
If you’d rather let Windows do the moving for you, right-click on any empty area of the taskbar and click on Taskbar settings from the pop-up menu.
Scroll down the Taskbar settings screen to the entry for “Taskbar location on screen.” Click the drop-down box and set the location for left, top, right, or bottom.
Where do I find the taskbar on my computer?
The taskbar is an element of an operating system located at the bottom of the screen. It allows you to locate and launch programs through the Start button or view any program that is currently open. The taskbar first introduced with Microsoft Windows 95 and can be found in all subsequent versions of Windows.
How do you open the taskbar on Windows 10?
Open Taskbar and Start Menu Properties in Windows 10
- Video guide on how to open Taskbar and Start Menu Properties in Windows 10:
- Way 1: Open it via the taskbar.
- Way 2: Open it in Control Panel.
- Step 1: Open Control Panel.
- Step 2: Type taskbar in the top-right search box, and tap Taskbar and Navigation.
How do I restore taskbar to bottom of screen?
Summary
- Right-click in an unused area of the taskbar.
- Make sure that “Lock the taskbar” is unchecked.
- Left-click and hold in that unused area of the taskbar.
- Drag the taskbar to the side of your screen on which you want it.
- Release the mouse.
- Now right-click, and this time, ensure that “Lock the taskbar” is checked.
How do I enable the taskbar?
Start with right-clicking on a free area of taskbar and then selecting Properties. Then click on the “Notifications Area” tab. 2. Then, tick the “Clock” option in Taskbar and Start Menu Properties and click OK.
How do I flip the taskbar in Windows 10?
To move the taskbar from its default position along the bottom edge of the screen to any of the other three edges of the screen:
- Click a blank portion of the taskbar.
- Hold down the primary mouse button, and then drag the mouse pointer to the place on the screen where you want the taskbar.
How do I make the taskbar disappear Windows 10?
Just follow these simple steps:
- Right-click on an empty area of the taskbar. (If you’re in tablet mode, hold a finger on the taskbar.)
- Click taskbar settings.
- Toggle Automatically hide the taskbar in desktop mode to on. (You can also do the same for tablet mode.)
How do I center my taskbar icons Windows 10?
How to Center the Taskbar Icons in Windows 10
- Step 1: Right-click on the taskbar and uncheck “lock the taskbar”.
- Step 2: Right-click anywhere on the taskbar, and then choose Toolbar–>New Toolbar.
- Step 3: Create a folder with any name you like, select the new folder and click the open button, you will notice that the taskbar has been created.
Why can’t I see my taskbar on Windows 10?
Right-Click on the taskbar and select Properties. Toggle the ‘Auto-Hide the taskbar’ checkbox and click Apply. If it is now checked, move the cursor to the bottom, right, left, or top of the screen and the taskbar should re-appear.
How do I get the time to show on my taskbar Windows 10?
The first option is to right-click on an empty section of your taskbar and select Properties. In the Taskbar and Start Menu Properties window that appears, make sure you’re on the Taskbar tab, find the option labeled “Notification area” and click Customize.
How do I add the time to the taskbar in Windows 10?
- Right-click the clock in the taskbar.
- Click Adjust Date/Time.
- Click Add Clocks For Different Time Zones (Windows 10) or the Additional Clocks tab (Windows 7)
- Select Show This Clock, pick a time zone, and then add a descriptive label for the custom clock.
- Click Ok.
Here’s another way to set how icons fit on the taskbar. Scroll down the Taskbar settings screen until you see the section for “Combine taskbar buttons.” Click on the drop-down box beneath, and you’ll see three options: “Always, hide labels,” “When taskbar is full,” and “Never.”
How do I make my taskbar always on top Windows 10?
Or you can also open the “Taskbar settings” through: Start menu > Settings > Personalization, and select “Taskbar” in the left menu. Step 2. Toggle off “Automatically hide the taskbar in desktop mode”. By turning off this feature, as long as your computer is in desktop mode, the taskbar will always on top.
How do I hide the taskbar not activated Windows 10?
To Show Taskbar when Hidden:
- Hover pointer on border of taskbar location.
- Press the Win+T keys.
- On a touchscreen, swipe inwards from the border where the taskbar is located.
- Starting with Windows 10 build 14328, you can choose to only auto-hide the taskbar in tablet mode.
How do I fix the taskbar in Windows 10?
How to Fix Problems with Taskbar not Hiding on Windows 10
- On your keyboard, press Ctrl+Shift+Esc. This will bring up the Windows Task Manager.
- Click More Details.
- Right-click Windows Explorer, then choose Restart.
How do I make the taskbar disappear?
Solutions
- Right-Click on the taskbar and select Properties.
- Toggle the ‘Auto-Hide the taskbar’ checkbox and click Apply.
- If it is now checked, move the cursor to the bottom, right, left, or top of the screen and the taskbar should re-appear.
- Repeat step three to return to your original setting.
Press the “F10” key if the command bar is hidden. This will restore access to the “View” command, which gives you the ability to unhide any third-party toolbars. Click “View” and then click “Toolbars.” Click to place a checkmark next to the toolbar you want to unhide.
How do I add the time to my taskbar?
To setup up to two additional clocks, all you have to do is right click on the time and/or date in the taskbar and select Adjust date/time from the menu. From here you will be taken to the settings screen to adjust your taskbar time and date. In this screen, select Add clocks for different time zones.
How do I remove the date from the taskbar in Windows 10?
I would like to hide or completely remove the Date from the Windows 10 taskbar. To hide the clock in Windows 10, open Settings > Systems > Notifications and actions > Turn system icons on or off > Toggle switch for Clock to Off position.
How do I show the time on my taskbar?
2 Answers
- Right-click an empty space on the taskbar and then click Properties.
- Click the Customize button in the Notification area section of the Taskbar and Start Menu Properties window.
- Click Turn system icons on or off at the bottom left of the Notification Area Icons window.
How do I show two clocks on my taskbar?
Right-click on the taskbar clock and choose Adjust date/time. Once the Date and Time window launches, select the Additional Clocks tab. Here, you can configure one or two additional clocks to display in your desktop taskbar.
Why is my taskbar not working?
Restart Windows Explorer. A quick first step when you have any Taskbar issue is to restart the explorer.exe process. This controls the Windows shell, which includes the File Explorer app as well as the Taskbar and Start Menu. To restart this process, press Ctrl + Shift + Esc to launch the Task Manager.
How do I show the calendar on my desktop Windows 10?
How to add a calendar in the Calendar app on Windows 10
- Click on the Start menu button.
- Click on the Calendar app.
- Click on the Settings button.
- Click on Manage Accounts.
- Click on the type of account you want to add.
- Enter your account information.
- Click on the Sign in button.
- Click on the Done button.
Photo in the article by “Flickr” https://www.flickr.com/photos/joergermeister/6970687067
On Windows 8.x and lower versions of Windows, you’re able to apply customizations to the Start Menu under the Taskbar and Start Menu Properties which can be found when you right-click on the taskbar. On Windows 10, this setting is not available when you select the Taskbar and Start Menu Properties on the taskbar and in the most recent version of Windows 10, you won’t see the properties at all.
The Start Menu settings in the taskbar properties have been removed in Windows 10, therefore, you can’t find the Start Menu or Taskbar settings as you would on earlier versions of Windows. This Start Menu customization setting has been moved to Settings > Personalization > Start whereas the Taskbar settings have been moved to Settings > Personalization > Taskbar. The steps below further illustrate how to access this setting on Windows 10.
- Right-click the Task Bar and choose Settings
- On the left pane (Personalization), you will see two further settings “Start and Taskbar” which is where the missing stuff from Windows 7 has been laid to in Windows 10.

Kevin Arrows
Kevin is a dynamic and self-motivated information technology professional, with a Thorough knowledge of all facets pertaining to network infrastructure design, implementation and administration. Superior record of delivering simultaneous large-scale mission critical projects on time and under budget.
Back to top button
Are you wondering how the new Start menu behaves in Windows 10 Technical Preview? Read this article to learn all the details.
Contents
- Windows 10 default behavior
- Where did the Start screen go?
- Clicking around in the new Start menu
- Customizing the new Start menu
- What about the upgrade use case?
- Conclusion: Answering Michael
Microsoft released the first public preview build of Windows 10 on October 1, 2014. Many Windows power users, myself certainly included, were curious to observe the changes that Microsoft made to the Start screen/Start menu system.
Well, prepare for the full run-down, my friend. I have Build 9841 installed as a VMware Workstation virtual machine, and I’ve thoroughly tested the new and changed functionality. Let’s get this done!
Windows 10 default behavior
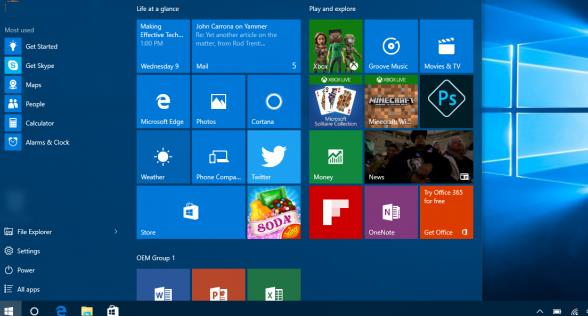
On a freshly installed copy of Windows 10 Technical Preview, the operating system boots directly to the “classic” Windows desktop. At first glance, the appearance of the Windows flag icon in the lower-left corner of the screen may lead you to believe that the Start screen is just around the corner—not so.
As you can see in the following screenshot, clicking the Flag button reveals the “new” Start menu. I’ve annotated the screenshot, so let me describe each part for you.

This is the “new” Start menu in Windows 10 Technical Preview.
- The search “omnibox” that has been with us since Windows Vista is still around, although I much prefer to hit Win+R to invoke the Run box.
- The All Programs menu has become All Apps. You’ll see Windows 8/Store apps in here in addition to classic Windows applications.
- Yes, we still have the PC Settings Windows 8 app, but you’ll be pleased to observe that all the “Metro” apps now run windowed instead of full-screen by default.
- The User menu and Power button do some cool things that I discuss separately later on in this article.
- Obviously, this is the show-stopper. A mini Start screen with live tiles!
As I said, you can still invoke the Run box by pressing Win+R, the Search tool by pressing Win+F, File Explorer by pressing Win+E, and so forth. Tapping the Windows key alone simply opens the new Start menu, as expected.
Where did the Start screen go?
At first blush, the Start screen appears to be completely removed from Windows 10 Technical Preview. Scouring every item in the Start menu, I was unable to find any references to it.
Then I opened the Taskbar and Start Menu Properties Control Panel item by right-clicking an empty area of the taskbar and selecting Properties from the shortcut menu. On the Start Menu tab, we have an option called Use the Start menu instead of the Start screen, as shown below.

You can control and customize the Start menu and Start screen with the Control Panel.
Unchecking that box tells Windows that you prefer to use the Start screen instead of the revamped Start menu. This event requires that you sign out and sign back in, though. Here’s the dialog you’ll see before that happens:

You are required to sign out if you switch between the Start menu and the Start screen.
After you sign back in, press the Windows key or click the flag button. Start screen ahoy!

Microsoft made some nice tweaks to the Start screen.
Take a closer look at the previous screenshot. Do you see anything different? In my opinion, Microsoft made excellent use of customer feedback. Notice that we have access to the taskbar even when we’re in the Start screen environment! Check out Michael’s post if you want to switch back and forth between the Start menu and the Start screen.
Now don’t get too excited—the taskbar disappears once you move your mouse away from it. For all I know, this is a programming bug that won’t appear in the final product. Starting Windows Store app from the Start Screen still results in a windowed experience and a cool app menu, which I’ve opened for you in the next screenshot:

In Windows 10 Tech Preview, Windows Store apps all run in windowed mode.
Clicking around in the new Start menu
Let’s reset the setting in the Taskbar and Start Menu Properties Control Panel item to bring back the Start menu and spend some time clicking around it to discover what’s new.
One big complaint that customers had concerning Windows 8 was difficulty in finding the Log Off, Restart, and Shut Down commands. While it will still not be entirely obvious to many customers that we can click the User icon in the Start menu, doing so gives you the ability to swap out your account picture, lock the computer, or sign out.

You can click or right-click just about everything in the new Start menu.
Clicking the Power button gives us easy access to the Sleep, Shut Down, and Restart commands.

We can easily manage system sleeps, shutdowns, and reboots through the Start menu.
Finally, right-clicking a live tile allows you to unpin, pin to taskbar, uninstall, or resize the app. By the way, you can pin apps from the All Apps folder to the Start menu by using the same right-click process.

We have limited control over live tiles in the new Start menu.
Customizing the new Start menu
My impressions are that Microsoft hasn’t given us too much customization capability in Windows 10 Technical Preview. Perhaps it’s a work in progress? For one thing, the Control Panel is called Taskbar and Start Menu Properties once it’s open, but Taskbar and Navigation in the Control Panel list.
Anyway, open that Control Panel, switch to the Start Menu tab, and note that we can improve our privacy with one click by selecting the option Clear personal info from my tiles. Next, click Customize to invoke the Customize Start Menu dialog.

Customize the Start menu by using the Control Panel.
I may be missing something, or it may just be incomplete functionality, but somehow I expected more to choose from here. At the moment, I don’t feel I have as much control over the live tiles in the Start menu as I’d like. What do you think?
One thing you can do is change the Start menu color scheme. Right-click an empty area of the desktop and select Personalize from the shortcut menu. In the Personalization Control Panel item, click Color. You can tweak the Start menu color theme by adjusting values in the Color and Appearance panel, as shown in the following screenshot.

Microsoft lets us change the color theme used in the Start menu.
What about the upgrade use case?
I’d like to run an experiment for you. I have two Windows 8.1 machines, each installed with a different Start menu replacement:
- Classic Shell
- Start8
What do you think will happen if we perform an in-place upgrade to Windows 10 Technical Preview on these boxes?
Uh…the Start menu replacements are removed. In fact, you actually get a “wipe and load” scenario instead of an in-place upgrade. When you open the Programs and Features Control Panel item, you don’t see the Start menu replacement software I installed—you see nothing!

Do not perform an in-place upgrade with preview software.
I’m pretty sure that Microsoft will give users the ability to perform an in-place upgrade to Windows 10 from Windows 8.1 and keep all their software—not just their Start menu replacement product.
In the meantime, I want to stress in the strongest possible terms not to perform an “upgrade” to Windows 10 Technical Preview on any production system!
Conclusion: Answering Michael
In a recent 4sysops article Michael argued that the Start menu doesn’t have any advantages over the Start screen.
Here is my opinion on this matter, from the perspective of a long-time Windows power user who has no real insight into the inner workings at Microsoft:
Microsoft got overzealous with the notion of writing a single operating system that looked and acted identically on all possible hardware platforms. What they discovered was that sometimes a square peg truly doesn’t fit into a round hole; touch-centric UI features are simply not a great match on desktop computers, generally speaking, and vice-versa.
Personally, I am overjoyed at the return of the new Start menu. I’m a keyboard-centric person, and speed is one of my highest priorities when evaluating an operating system. I found the sluggish behavior of the Start screen unbearable, not to mention the endless hunt for app icons in a colorful wash of color and kludginess.
At the moment, I’ll keep my Start menu replacements firmly in place on my Windows 8.1 and Windows Server 2012 R2 machines. Perhaps Microsoft will reinstate the Start menu for these operating systems in a future service pack? One can only hope.
Настройка макета меню Пуск и панели задач в Windows 10 через групповые политики
В домене Active Directory вы можете централизованно управлять макетом начального экрана (Start Layout) меню Пуск и панели задач на компьютерах пользователей Windows 10 с помощью групповых политик. Это позволяет назначить одинаковые настройки, вид и местоположение значков и ярлыков в меню Пуск и панели задач пользователям различных подразделений компании в зависимости от используемых програм и убедиться, что все рабочие места настроены одинаково.
Экспорт/импорт макета меню Пуск в Windows 10 с помощью PowerShell
Самый простой способ получить макет стартового меню Пуск в Windows 10 — вручную настроить внешний вид и элементы рабочего стола на эталонном ПК. Создайте ярлыки (плитки) для необходимых приложений, закрепите и сгруппируйте их, удалите ненужные элементы. Затем вы можете экспортировать текущее описание элементов стартового меню в xml файл.
Экспортировать текущие настройки можно с помощью PowerShell командлета Export-StartLayout:
Export-StartLayout –path c:psStartLayoutW10.xml 
Вы можете вручную импортировать данный шаблон стартового меню на другом компьютере Windows 10 с помощью командлета Import-StartLayout:
Import-StartLayout –LayoutPath c:psStartLayoutW10.xml –MountPath c:
Основной недостаток командлета Import—StartLayout – он импортирует макет начального экрана не к профилю текущего пользователя, а к профилю пользователя по умолчанию (в каталоге C:UsersDefaultAppDataLocalMicrosoftWindowsShell появляется файл Layoutmodification.xml). Данный XML макет начального экрана применится только к новым пользователя при первом входе в систему
Распространение макета начального экрана пользователям с помощью GPO
Чтобы распространить файл с макетом меню Пуск на компьютеры домена с помощью групповых политик (GPO), нужно скопировать полученный XML файл в каталог Netlogon на котроллере домена. Затем откройте консоль управления доменными групповыми политиками Group Policy Management Console (GPMC.msc) и создайте новую или отредактируйте существующую политику и назначьте ее на OU с пользователями.
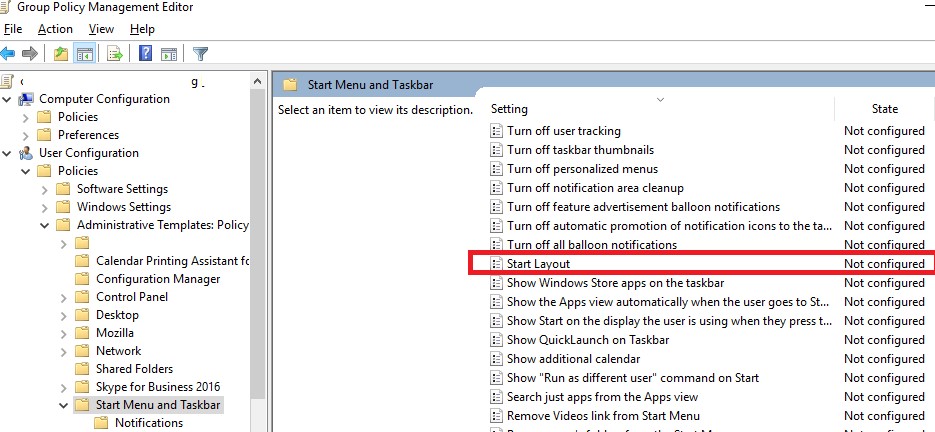
В редакторе GPO найдите политику с именем Start Layout (Макет начального экрана) в секции User Configuration -> Policies -> Administrative Templates -> Start Menu and Taskbar (также вы можете привязать макет меню Пуск к компьютеру, для этого нужно настроить политику в секции Computer Configuration).
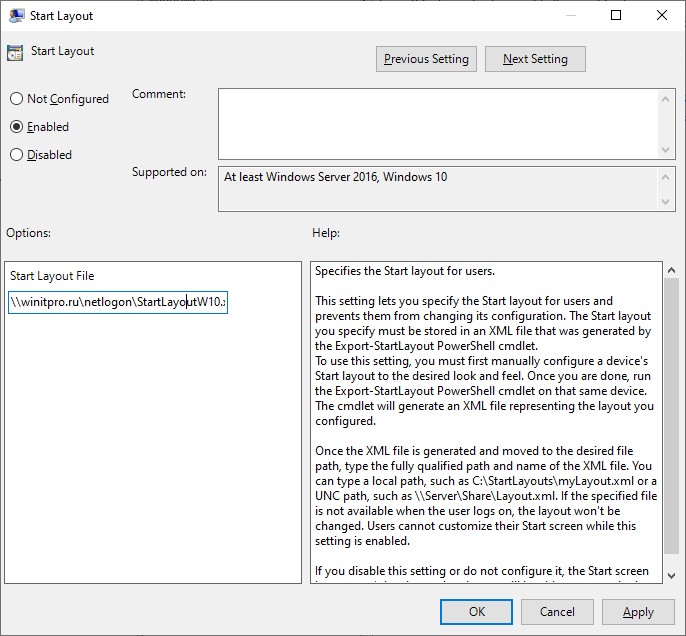
Откройте политику, включите ее (Enabled) и в поле Start layout file укажите UNC путь к xml файлу, содержащему макет стартового экрана Windows 10 на контроллере домена (например, \domain.runetlogonStartLayoutW10.xml).
Если вы хотите применить политику Start Layout, только к определенным группам пользователям или компьютерам, вы можете использовать Security Filtering или WMI фильтры GPO.
Partial Lockdown – частичная блокировка макета начального экрана Windows
Режим Partial Lockdown, появился в Windows 10 версии 1511, и позволяет указать группы плиток стартового меню, которые пользователи не могут изменить. Т.е. вы можете разрешить пользователяи изменять любые ярлыки, значки и плитки кроме определенной группы ярлыков корпоративных приложений.
Чтобы указать заблокированные группы начального экрана, нужно отредактировать XML файл с макетом с помощью любого текстового редактора (для редактирования XML файла удобно использовать Notepad++).
Откройте ваш файл StartLayoutW10.xml и найдите в нем секцию . Чтобы заблокировать определенную группу ярлыков, нужно в атрибуты данной секции изменить на .
Сохраните изменения в xml файле и распространите его на пользователей. Таким образом, будут заблокированы для редактирования пользователями только группы плиток (ярлыков), указанные в XML файле.
Partial Lockdown работает как в Windows 10 Enterprise так и в Pro (начиная с 1703).
В Windows 10 есть небольшой глюк, когда назначенный ярлык Internet Explorer не появляется после применения XML файла макета через GPO.
Для решения проблемы нужно отредактировать XML файл и исправить строку для ярлыка IE следующим образом:
И затем через GPO нужно скопировать ярлык “Internet Explorer.lnk” в каталог %ALLUSERSPROFILE%MicrosoftWindowsStart MenuPrograms.
Управление закрепленными ярлыкам в панели задач с помощью GPO
Начиная с Windows 10 1607 вы можете управлять закрепленными ярлыками в панели задач через тот же самый XML файл с макетом начального экрана. Чтобы добавить собственные закрепленные ярлыки в XML макет, который распространяется через GPO, отредактируйте XML файл. После тега нужно добавить следующий код:
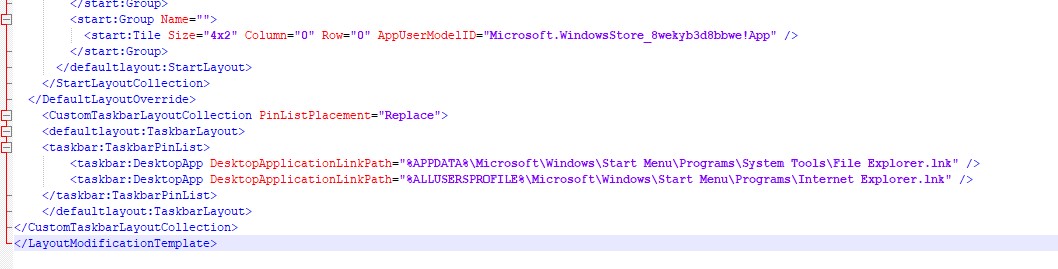
В данном примере мы добавим в панель задач два ярлыка: File Explorer и Internet Explorer. После применения политики на компьютере пользователя, в таскбаре появятся два закрепленных ярлыка.

В старых версия Windows 10 (до 1607) ярлыки приложений в панели задач настраивается по другому. Попробуем разобраться как.
Список закрепленных в панели задач ярлыков хранится в Windows 10 в каталоге %APPDATA%MicrosoftInternet ExplorerQuick LaunchUser PinnedTaskBar.
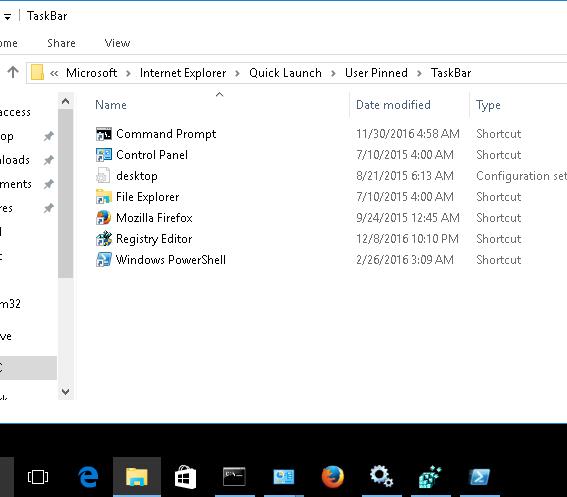
При этом параметры закрепленных в панели задач приложений хранятся в закодированном виде в ветке реестра HKEY_CURRENT_USERSoftwareMicrosoftWindowsCurrentVersionExplorerTaskband.
Для распространения настроек таскбара на компьютеры компании, нужно экспортировать содержимое данной ветки в reg файл:
reg export HKCUSoftwareMicrosoftWindowsCurrentVersionExplorerTaskband c:psPinnedItem.reg
Этот reg файл и каталог с ярлыками (%APPDATA%MicrosoftInternet ExplorerQuick LaunchUser PinnedTaskBar) нужно скопировать в общедоступную сетевую папку (например в Netlogon). И в редакторе доменной групповой политики (User Configuration- > Policies -> Windows Settings -> Scripts (Logon/Logoff) -> Logon) добавить логон скрипт с кодом:
@echo off
set Logfile=%AppData%pinned.log
if not exist «%Logfile% (
IF EXIST «%APPDATA%MicrosoftInternet ExplorerQuick LaunchUser PinnedTaskBar» GOTO NOTASKDIR
del «%APPDATA%MicrosoftInternet ExplorerQuick LaunchUser PinnedTaskBar*» /S /Q
:NOTASKDIR
xcopy /E /Y «\domain.runetlogonPinnedItem » «%APPDATA%MicrosoftInternet ExplorerQuick LaunchUser Pinned»
regedit.exe /s «\domain.runetlogonPinnedItem.reg «
echo PinnedItemImported on %date% at %time% >> %LogFile%
taskkill /IM explorer.exe /f
start explorer.exe
>
Теперь при входе пользователя в систему ему будет применен “корпоративный” набор закрепленных иконок приложений в панели задач.
Источник
Как настроить меню Пуск по умолчанию в Windows 10 для всех пользователей
Это задача часто встает перед сисадминами средних и крупных компаний, когда в Windows 10 в меню Пуск (Start) необходимо поместить определенные ярлыки программ для всех пользователей. Так при первом входе пользователи сразу увидят плитки с чаще всего используемыми в компании приложениями.
Это задача относительно простая, но имеет свои тонкости и подводные камни. Реализовать требуемое можно или через локальную постройку или через групповые политики (GPO). В обоих случаях необходимо использовать xml файл с необходимой конфигурацией расположения плиток в меню. Через ссылки на приложения, как ранее в Windows 7, плитки в меню настроить нельзя!
Подготовка
- На эталонном компьютере настройке меню Пуск как вам удобно. Вы можете перетаскивать плитки, изменять их размер, добавлять и удалять.
- Экспортируйте получившуюся раскладку (layout) в xml файл с помощью Powershell команды, указав место сохранения файла:
Export-StartLayout –path .xml
Применение настроек пользователя
Теперь вы можете применить получившееся меню в настройки пользователя по умолчанию (default). На целевой машине, где вы хотите изменить меню, запустите Powershell и выполните команду:
Import-StartLayout –LayoutPath .xml –MountPath %systemdrive%
Эта команда импортирует xml файл, но указанные там настройки применяться только при первом входе пользователя, который залогинится на эту машину после. К текущим профилям пользователей эта настройка не применима.
Также учтите, что даже после импорта раскладки меню новые пользователи смогут его кастомизировать под себя, удаляя и добавляя нужные плитки.
Применение настроек через политики
Чтобы заставить пользователей использовать только вами предопредленную раскладку меню, необходимо включить соответствующую политику. Файл xml должен располагаться или локально на диске или в сетевой папке и должен быть доступен для чтения всеми пользователями.
- Вы можете использовать как доменную политику (для её редактирования запустите gpmc.msc с соответствующими доменными правами) или локальную политику (запустите локально gpedit.msc).
- В редакторе политик найдите: Computer Configuration > Policies > Administrative Templates >Start Menu and Taskbar.
- Откройте настройку Start Layout и выберите значение Enabled.
- Укажите путь в файлу xml (UNC путь \ или локальный)
- Сохраните политику или перелогиньтесь.

После перелогина ко всем пользователям должна применяться настройка.
Того же эффекта можно достичь реестровыми ключами:
Включение (значение 1) и выключение (0) политики:
| Registry Hive | HKEY_LOCAL_MACHINE (для всех пользователей) HKEY_CURRENT_USER (для текущего) |
| Registry Path | SoftwarePoliciesMicrosoftWindowsExplorer |
| Value Name | LockedStartLayout |
| Value Type | REG_DWORD |
| Enabled Value | 1 |
| Disabled Value | 0 |
| Registry Hive | HKEY_LOCAL_MACHINE (для всех пользователей) HKEY_CURRENT_USER (для текущего) |
| Registry Path | SoftwarePoliciesMicrosoftWindowsExplorer |
| Value Name | StartLayoutFile |
| Value Type | REG_EXPAND_SZ |
Обратите внимание, что пользователь не сможет редактировать меню самостоятельно. Если вы все-таки хотите предоставить эту возможность, то вы можете отредактировать xml файл, добавив третьей строкой:
Источник
Возврат классического меню пуск в Windows 10.
Многим пользователям, перешедшим с предыдущих версий операционной системы Windows на Windows 10, не очень нравится новое оформление меню пуск – хотелось бы, к примеру, убрать плитки и вернуть такое привычное классическое меню пуск, каким оно было в «семерке».
Для того, чтобы сделать меню пуск более привычным и похожим на классическое, можно убрать плитки: щелкнуть по плитке правой клавишей мыши и выбрать «Открепить от начального экрана», затем уменьшить размер меню, наводя курсор на края и стягивая, с зажатой левой кнопкой мыши. Не стоит забывать, что доступ ко многим функциям открывается путем нажатия правой кнопки мыши по меню пуск.
Эти действия делают меню пуск близким по виду к классическому, но все же не возвращают его настоящий облик. Для этого можно воспользоваться сторонними программами: как платными, так и бесплатными (StartIsBack + +, Start 10, Classic Shell и другие).
В этой статье кратко рассмотрим возможности Classic Shell, потому что именно эта программа (по скромному мнению автора статьи) является самой качественной, на русском языке, к тому же абсолютно бесплатной. Скачать Classic Shell можно на официальном сайте http://www.classicshell.net/downloads/ .
Программа устанавливает несколько модулей для настроек:
- Classic Start Menu – для настроек классического меню пуск.
- Classic Explorer – настройка проводника: изменения отображения элементов, добавление элементов из разных предыдущих версий Windows и так далее.
- Classic IE – настройки для браузера Internet Explorer.
Если какие-то модули вам не нужны (например, мало кто пользуется классическим браузером Internet Explorer), то при установке программы можно раскрыть меню на ненужном модуле и выбрать вариант «Компонент будет полностью недоступен».
Когда вы первый раз, после установки программы, нажмете на кнопку «Пуск» – откроется окно с настройками меню пуск. Включить настройки в следующий раз вы сможете нажав правой кнопкой мыши по кнопке «Пуск» и выбрав соответствующий пункт меню.
Либо два раза кликнув по файлу «Start Menu Settings» в папке с установленной программой Classic Shell.
Для доступа ко всем параметрам, сверху в окне можно пометить галочкой пункт «Показать все параметры».
С помощью этих настроек у вас появиться возможность поменять образ меню пуск так как вам нравиться: установить меню пуск, таким, как оно было в Windows 7, 8, Vista, XP; изменить иконку кнопки на классическую (с надписью «Пуск» или «Start», причем надпись можно поменять на какую угодно) или вставить какую-то свою иконку; выбрать стиль меню, обложку, настроить прозрачность и много, много чего еще. Настроек очень много, как и возможностей тонкой настройки «под себя».
Для возврата к родному меню в Windows 10, вы можете нажать правой кнопкой мыши по значку «Пуск» и выбрать пункт меню «Выход».
Источник
The taskbar is one of the most frequently accessed areas of Windows operating system. With Windows 10, Microsoft has made subtle changes to the taskbar to add the universal search box and task view icons.
While there is nothing wrong with the default look of the taskbar, like other areas of Windows operating system, Windows 10’s taskbar can be customized in a number of ways without the help of third-party tools. And if you don’t mind using free, third-party tools, you get new possibilities to tweak and customize the taskbar in Windows 10.
If you love customizing Windows, here are the best ways to customize the taskbar in Windows 10.
1. Change the color of taskbar
Black is the default color of the taskbar in Windows 10. Unlike previous Windows versions, Windows 10 doesn’t automatically change the taskbar color to match the window border color.
If you’re bored with the default black color of the taskbar, open Settings app, click Personalization, click Colors and then turn on the option titled Show color on Start, taskbar, and action center.
On the same page, you can click on one of the tiles to choose an accent color and use it as taskbar color.
NOTE: With default settings, taskbar, Start menu, window borders, and some other areas of the operating system share the same (accent) color. If you would like to set a different color for the taskbar, follow our how to set a different color for taskbar in Windows 10 guide.
2. Enable or disable transparency
Unlike previous Windows versions, Windows 10 allows you enable or disable transparency for the taskbar without the help of third-party tools. To turn on or off the transparency, open Settings, click Personalization, click Colors and then turn on or off the option titled Make Start, taskbar, and action center transparent.
3. Add or remove the search box
The search box on the taskbar is quite useful to quickly search your PC as well as the web, but it takes considerable amount of space on the taskbar and might not be perfect on smaller screens.
If you feel that the search box is taking up good amount of space and you have little space for other icons, you can place a small search icon instead of search box by right-clicking on the taskbar, clicking Search and then clicking Show search icon. Here you can also select Hidden if you would like to use the search without the search box or icon.
If you didn’t know, one can use the Start menu search without the search box or icon. All you need to do is, open the Start menu and start typing. Go through our use the Start menu search without search box or icon guide for detailed information on this.
4. Move taskbar to the top, right or left of the screen
The bottom edge of the screen is the default location of the taskbar in Windows 10. However, if you’re on a tablet or netbook with small screen, you could move it the left or right to get more vertical space for applications.
To change the default position:
Step 1: Right-click on the empty area of the taskbar and click Properties.
Step 2: Under Taskbar tab, next to Taskbar location on screen, select Top, Left or Right, and then click Apply.
5. Auto-hide the taskbar
If you would like to have more screen real estate, configure the taskbar to auto-hide when not in use. The hidden taskbar can be revealed by moving the mouse cursor to the bottom edge (or where taskbar is positioned on screen) or by pressing Windows logo key.
To auto-hide the taskbar:
Step 1: Open Taskbar and Start Menu Properties by right-clicking on taskbar and then clicking Properties.
Step 2: Here, under the Taskbar tab, check the option titled Auto-hide the taskbar, and then click Apply button.
6. Use small icons to accommodate more icons
Are you running Windows 10 a tablet or netbook and don’t have enough space on the taskbar? Configure Windows 10 to show small buttons or icons on the taskbar, so that you can have more icons.
To use small icons:
Step 1: Open up the Taskbar and Start Menu Properties.
Step 2: Select Use small taskbar buttons and click Apply.
If you need larger icons/buttons, follow our how to make Windows 10 taskbar icons bigger guide.
7. Add or remove icons from the taskbar
Long time PC users who have used Windows 7 or Windows 8 before jumping to Windows 10 likely know that one can pin programs to the taskbar for quick access (right-click on the program in Start menu and click Pin to taskbar). Likewise, an icon pinned to the taskbar can be removed by right-clicking on it and clicking Unpin this program from taskbar option.
What if you want to remove icons from the system tray area of taskbar like this?
If you want to remove default icons like Action Center, Network and power icons from the taskbar, here is how to do that:
Step 1: Open Settings app clicking its icon on the Start menu or using Windows + I hotkey.
Step 2: Click System (Display, notifications, apps, power).
Step 3: Click Notifications and actions.
Step 4: Click Which icons appear on the taskbar and turn on or off the icons that you want to see or don’t want to see on the taskbar.
Step 5: Go back to Notifications and action, click Turn system icons on or off, and then remove system icons like clock, power icon, network, action center and other things.
8. Resize the taskbar
If want to create additional space on the taskbar, you can do so by increasing the default height of the taskbar.
To increase the height, here is what you need to do:
Step 1: Right-click on the empty area of the taskbar and make sure that there is no check mart next to Lock taskbar. If there is a check mark, click on Lock taskbar option to remove it.
Step 2: Place the mouse pointer at the top edge of the taskbar until the pointer changes into a double headed arrow and then drag it towards the top of the screen to increase the height.
Step 3: Lock the taskbar again by right-clicking on the empty area of the taskbar and then clicking Lock the taskbar.
9. Pin folders to the taskbar
Although Windows 10 doesn’t allow you pin folders to the taskbar, there are workarounds to add folders to the taskbar. Please go through our how to 3 ways to pin folders to the taskbar guide to all the ways out there to pin folders to Windows 10 taskbar.
10. Show labels for taskbar icons
By default, the Windows doesn’t display labels for icons on the taskbar. Although this saves some space, you might find it difficult to recognize icons on the taskbar.
If you want to see labels for icons on the taskbar:
Step 1: Open Taskbar and Start Menu Properties by right-clicking on the empty area on the taskbar and then clicking Properties.
Step 2: Under Taskbar tab, next to Taskbar buttons, select Combine when taskbar is full option. Click Apply.
11. Add a toolbar to the taskbar
Want to quickly access all the files on the desktop or in a folder? You can use the Toolbars feature to create a new toolbar on the taskbar to quickly access a folder located anywhere on the PC.
To create new toolbar:
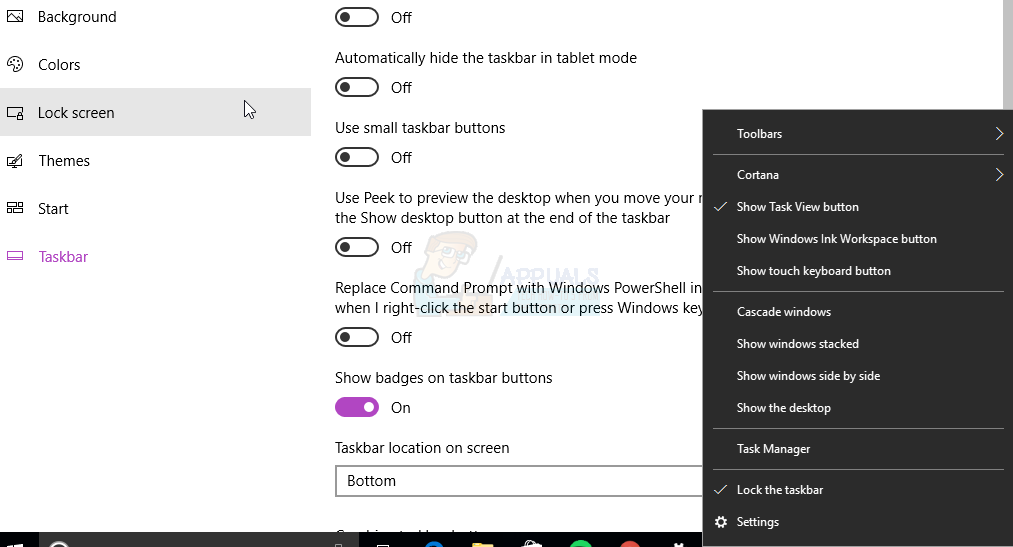
Step 1: Right-click on the empty area, click Toolbars and then click New toolbar.
Step 2: Browse to the location where the folder is saved and then click Select Folder button to the add the toolbar.
The toolbar can be removed by right-clicking on the empty area of the taskbar, clicking Toolbars and then clicking toolbar’s name. When the toolbar is inactive, the check mark will not appear next to it.
12. Hide the Start button on the taskbar
The extreme left of the taskbar is reserved for the Start button. The purpose of the Start button is to help uses open the Start menu, but that can be done by pressing Windows logo key. If you’re one of those users who use Windows logo key to access the Start menu, you can hide the Start button by using a free tool called 7+ Taskbar Tweaker for Windows 10.
After downloading and running the tool, check the option titled Hide the Start button.
13. Hide the Peek button
The Peek or desktop Peek feature was introduced back with Windows 7 to let users quickly peek through all open applications to view the desktop but most users are not aware of this handy feature.
If you’re not using this feature, you can remove the Peek button that appears at the right edge of the taskbar. Before hiding the button, it’s a good idea to turn off the feature first. To turn off the Peek feature:
Step 1: Open Taskbar and Start Menu Properties.
Step 2: Under Taskbar tab, uncheck the option titled “Use peek to preview the desktop when you move your mouse to the Show desktop button at the end of the taskbar”.
To remove the peek button from the taskbar:
Step 1: Download, install and run 7+ Taskbar Tweaker for Windows 10.
Step 2: Check the box next to Hide the show desktop button to remove the same. That’s it!
14. Pin custom folder to the taskbar
While Windows 10 doesn’t support pinning folders to the taskbar, you can pin folders with a small workaround. Please refer to our how to pin folders to Windows 10 taskbar for step-by-step instructions.
15. Center icons on the taskbar
By default, icons on the taskbar are aligned to the left. If you would like to center taskbar icons, you can do so by referring our how to center taskbar icons in Windows 10 article.
Enjoy Windows 10!