В Windows 10, существует функция с именем — TCP/IP Receive Window Auto-Tuning (Уровень автонастройки окна получения), которая включена в системе по умолчанию. Эта функция предназначена для повышения производительности приложений, которые получают TCP-пакеты по сети. При определенных условиях эта функция может снизить скорость Интернета. Вот как проверить, если вы заметили понижение скорости интернета и исправить проблему в случае необходимости.
Функция Receive Window Auto-Tuning была введена еще в Windows Vista. Но, она не была включена по умолчанию. В Windows 10, она включена из коробки для управления передачи данных по сети. В принципе для большинства пользователей это хорошо, но в некоторых случаях она может снизить производительность сети.
Для того, чтобы проверить состояние Receive Window Auto-Tuning, вы можете сделать следующее.
- Откройте командную строку или PowerShell от имени администратора.
- Введите или вставьте следующую команду:
netsh interface tcp show global
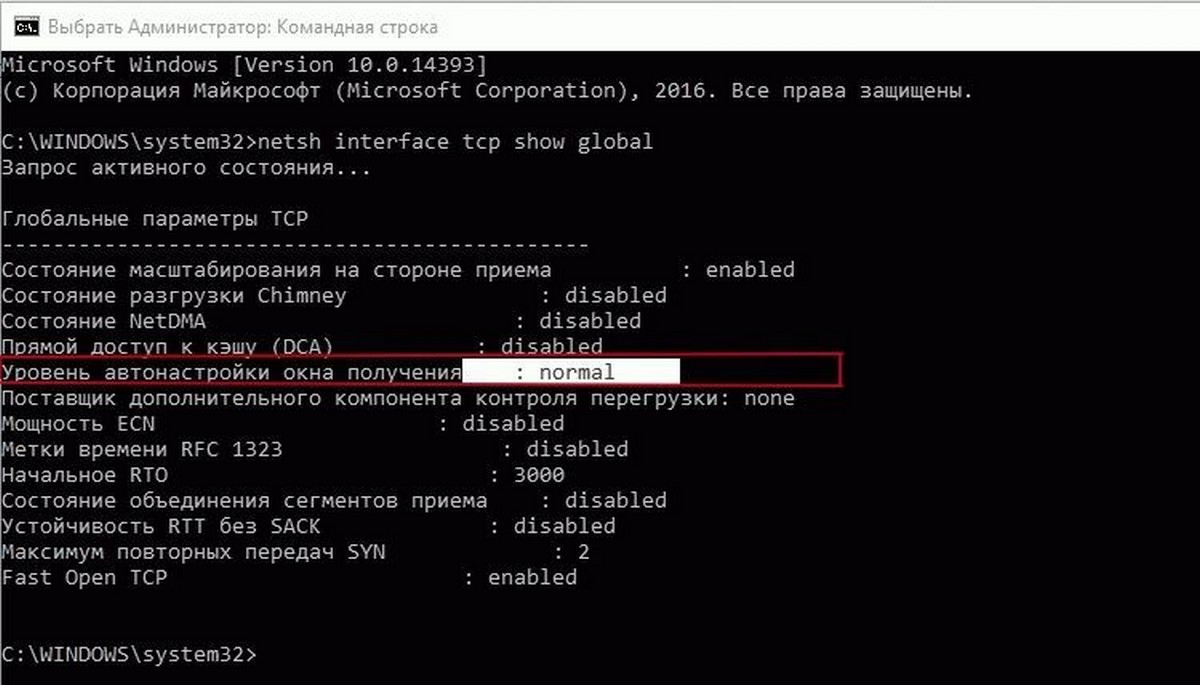
В результатах вывода команды, обратите внимание на строку «Уровень автонастройки окна получения». Если его значение : «normal», это означает, что функция включена. Если ваша скорость Интернета особенно медленна, то вы можете попробовать отключить «Уровень автонастройки окна…».
- Для того, чтобы отключить «Уровень автонастройки окна», введите следующую команду:
netsh int tcp set global autotuninglevel=disabled

После этого, проверьте скорость Интернета. Если функция работала неправильно, вы должны получить повышенную производительность сети интернет.
Если производительность сети не изменится или станет хуже, вы можете повторно включить Уровень автонастройки окна получения.
- Для включения, введите следующую команду:
netsh int tcp set global autotuninglevel=normal
Вот и все.
Вам может быть интересно: Как Исправить подключение к интернет в Windows 10
С выходом Vista в операционной системе Windows появилась функция под названием TCP/IP Receive Window Auto-Tuning, предназначенная для повышения производительности приложений, участвующих в обмене TCP-пакетами по сети. Имеется она и в Windows 10 Anniversary Update, но в отличие от более ранних версий системы, в «десятке» она включена по умолчанию.
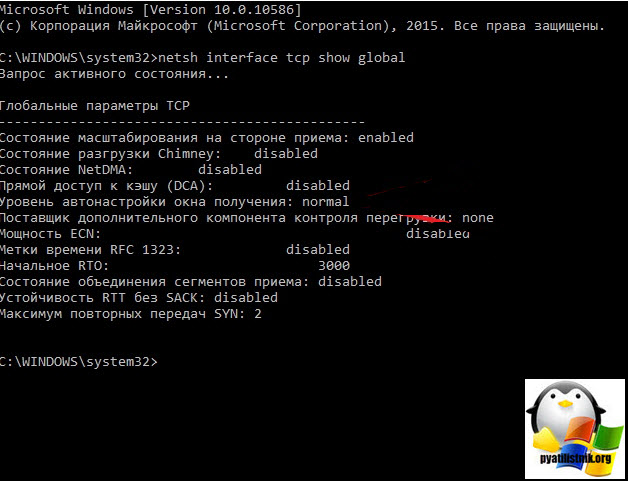
Как уже было сказано, главной ее задачей является оптимизация работы сетевых приложений, однако при определенных условиях TCP/IP Receive Window Auto-Tuning может снижать скорость интернет-подключения. Проверить, не вызывает ли она снижение производительности сети, вместо того чтобы ее повышать, очень просто. Откройте от имени администратора командную строку и выполните в ней следующую команду:
netsh interface tcp show global
В результате выполнения команды вы получите список глобальных параметров TCP. Найдите в нем запись «Уровень автонастройки окна получения» и для начала убедитесь, что он имеет значение normal.

Это будет означать, что функция включена. Теперь протестируйте с помощью любых удобных для вас средств скорость интернет-подключения, запишите данные, а затем отключите TCP/IP Receive Window Auto-Tuning командой netsh int tcp set global autotuninglevel=disabled.
После этого еще раз протестируйте скорость интернета и сравните полученные данные. Если функция работала некорректно, скорость соединения должна будет увеличиться. В этом случае функцию автотюнинга можно оставить отключенной. Если же ничего не изменилось, либо напротив, скорость подключения снизилась, сетевой автотюнинг следует включить заново, выполнив в консоли CMD команду netsh int tcp set global autotuninglevel=normal.
Отличного Вам дня!
Несколько лет назад, работая в IT отделе одной компании, столкнулся я с одной проблемой. Заключалась она в невозможности копирования по сети файлов большого размера. При попытке скопироватьперенести файл размером больше 100 МБ процесс намертво вставал, иногда вешая всю систему. Причем, что самое неприятное, проблема проявлялась периодически на разных компьютерах и локализовать ее не удавалось.
В тот раз решить проблему так и не удалось. Через некоторое время она ушла сама, так же неожиданно, как и появилась, и о ней благополучно забыли. И вот, по прошествии некоторого количества лет (и смены нескольких мест работы) я снова увидел знакомые симптомы. Но на сей раз все же удалось раскопать причину подобного поведения.
Дело в том, что в новой версии набора протоколов TCP/IP для Windows 7Server 2008 была реализована функция TCP Receive Window Auto-Tuning — автоматическая настройка окна приема TCP. Теоретически эта функция предназначена для оптимизации пропускной способности и улучшения работы сети, а практически является причиной множества проблем.
Теория
Окно приема TCP используется для ограничения потока данных и для обеспечения возможности контроля потока на принимающей стороне. Окно TCP представляет собой объем данных, который получатель разрешает отправлять за один прием. То есть, чем больше окно, тем лучше работа в сетях с высокой пропускной способностью.
Для TCP/IP в Windows XPServer 2003 максимальный размер окна приема фиксирован и по умолчению составляет 64КБ. В Windows 7Server 2008 оптимальный размер окна приема определяется динамически. Для этого измеряется пропускная способности канала и скорость извлечения приложением данных из окна приема, после чего размер окна адаптируется в соответствии с этими параметрами. Автотюнинг использует масштабирование окна TCP, благодаря чему максимальный размер окна приема составляет 16 МБ.
В идеале при включении автотюнинга передача данных по сети должна стать более эффективной. Однако не всё так просто. Например, приложение не успевает извлекать данные, текущее окно приема заполняется и принимающий узел начинает уменьшать его размер. При заполнении максимального окна приема размер текущего окна уменьшается до 0 байт, после чего передача данных прекратится.
Практика
Как я уже говорил, проблему с автотюнингом очень сложно локализовать. Поэтому, при наличии неопределенных проблем с сетевыми подключениями в первую очередь смотрим настройки TCP. Сделать это можно из командной строки (с повышенными привилегиями) командой:
netsh interface tcp show global
Здесь нас интересует параметр ″Уровень автонастройки окна получения″ (англ. Receive Window Auto-Tuning Level). Он может принимать значения:
• disabled — автотюнинг выключен, используется фиксированное значение размера приемного окна TCP — 64KB;
• higlyrestricted — позволяет размеру приемного окна выходить за пределы значения по умолчанию, очень ограниченно превышая его;
• restricted — допускает более существенный рост размера окна относительно значения по умолчанию;
• normal — по умолчанию. Позволяет менять размер окна в зависимости от различных условий работы;
• experimental — позволяет увеличивать размер окна до очень больших значений. Следует применять очень осторожно.
Можно попробовать подобрать нужный уровень, например попробовать higlyrestricted, а если не помогает, то отключить:
netsh interface tcp set global autotuninglevel=disabled
После изменения настройки компьютер следует перезагрузить.

Проблема с автотюнингом присутствует в операционных системах Windows Vista, Windows 7, Windows Server 2008 и 2008 R2. По Windows 8 и Server 2012 пока данных нет, хотя автотюнинг в них есть и используется. Возможно всплывет позже 🙂
Обновлено 04.12.2020

Добрый день уважаемые подписчики и читатели, недавно я вам рассказывал о глобальном обновлении от компании Microsoft Windows 10 Anniversary Update 1607, которое вышло второго августа текущего года, скачать его можно по ссылке слева. Данный релиз под кодовым названием redstone принес много нового, полезного, но и для кого то не очень, и причиной этому медленный интернет на windows 10 Redstone, стал он таковым после данного обновления, смотрим как это решить.
Почему в windows 10 стал медленнее интернет
Давайте смотреть из за чего стал медленный интернет на windows 10 Redstone. Всему причиной стала функция Window Auto-Tuning, существующая еще с времен Windows Vista. Window Auto-Tuning — это функция Автонастройки принимающего окна , что улучшает производительность программ, получение данных TCP в сети.Тем не менее эта функция отключена по умолчанию для программ, использующих интерфейс Служб Windows HTTP (WinHTTP) . Некоторые программы, которые используют WinHTTP примеры автоматического обновления, центра обновления Windows, подключение к удаленному рабочему столу, проводника Windows (копирование файлов в сети) и Sharepoint (WebDAV).
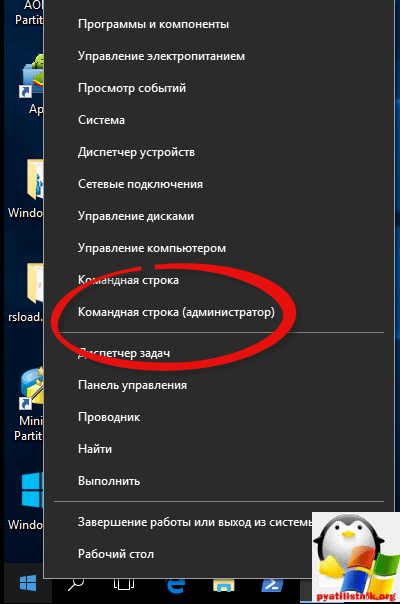
Логично, что если проблема в нем, то его следует отключить. Чтобы выключить Window Auto-Tuning, вам необходимо открыть командную строку от имени администратора, для этого щелкните правым кликом по значку пуск и выберите соответствующий пункт.
Первое, что необходимо сделать это посмотреть в каком состоянии находится функция Window Auto-Tuning, и проверить из за нее в windows 10 стал медленнее интернет.
netsh interface tcp show global
Если значение этого параметра normal, можно отключить его командой
netsh int tcp set global autotuninglevel=disabled
Далее делаете замер скорости, как это сделать я рассказывал в статье, ссылка слева. Если это не дало эффект, то заново включаем службу.
netsh int tcp set global autotuninglevel=normal
Еще возможные причины могут быть:
- Физический кабель, перебилась какая то жила или несколько
- Возможно тупит ваш роутер, попробуйте перезагрузить его
- Брандмауэр или антивирус, так же могут резать скорость.
- Посмотрите нет ли у вас ограничений скорости в системе с помощью Powershell
- Произведите обновление драйверов Windows на процессор и сетевую карту.
Надеюсь данные инструкции помогли вам исправить ситуацию, что в в windows 10 стал медленнее интернет, всем удачного серфинга.

Shortcuts
Tweaking Windows 7 / Vista TCP/IP settings for broadband internet connections
2008-04-24 (updated: 2016-09-05) by
Tags: patch, Nagle, QoS, SynAttackProtect, DNS, DefaultTTL, NetDMA, TCP 1323 Options, MTU, auto-tuning, Compound TCP, Chimney Offload, CTCP, TCP Window, Registry, TCP/IP, tweak, Vista, Windows 7

Windows Vista introduces a number of new features to the TCP/IP stack, including CTCP, and TCP Window Auto-Tuning. This new implementation works much better by default than previous Windows versions with broadband internet connections, and is able to adjust the RWIN value on the fly, depending on the BDP (bandwidth-delay product). This, however, introduces some problems with older routers and restricts the user from tweaking some of the TCP/IP parameters. Still, there is always some room for improvement, and this article explains the known tweakable TCP/IP parameters.
To enter some of the commands below, you will need to run «elevated» command prompt. To do so, click the Start icon > Run > type: cmd , then click CTRL+SHIFT+ENTER. Alternatively, you can navigate to Start > All Programs > Accessories > right-click Command Prompt and choose «Run as Administrator».
Check the TCP/IP state
To check the current status of the Vista TCP/IP tweakable parameters, in elevated command prompt type the following command:
netsh int tcp show global
You will be presented with something like the following:

The settings, as well as their default and recommended state are explained below. The two most important tweakable parameters are «Auto-Tuning Level» and «Congestion Control Provider».
When checking the TCP state with the «netsh int tcp show global» command, it is also possible to see the following message below all those parameters:
** The above autotuninglevel setting is the result of Windows Scaling heuristics overriding any local/policy configuration on at least one profile.
It is displayed when the «Receive Window Auto-Tuning Level» is not explicitly set, or if the system deemed it necessary to make a change because of user prompted «repairing» of your network connection, for example.
Disable Windows Scaling heuristics
Windows Vista/7 has the ability to automatically change its own TCP Window auto-tuning behavior to a more conservative state regardless of any user settings. It is possible for Windows to override the autotuninlevel even after an user sets their custom TCP auto-tuning level. When that behavior occurs, it can have a very noticeable negative impact on throughput, and it does not automatically correct itself. If auto-tuning gets limited, the «netsh int tcp show global» command displays the following message:
** The above autotuninglevel setting is the result of Windows Scaling heuristics
overriding any local/policy configuration on at least one profile.
To prevent that behavior and enforce any user-set TCP Window auto-tuning level, you should execute the following command:
netsh int tcp set heuristics disabled
possible settings are: disabled,enabled,default (sets to the Windows default state)
recommended: disabled (to retain user-set auto-tuning level)
Note this should be executed in elevated command prompt (with admin priviledges) before setting the autotuninlevel in next section. If the command is accepted by the OS you will see an «Ok.» on a new line.
The corresponding Registry value (not necessary to edit if setting via netsh) is located in:
HKEY_LOCAL_MACHINESYSTEMCurrentControlSetservicesTcpipParameters
EnableWsd=0 (default: 1, recommended: 0)
Note: This automatic limitation of the TCP Window usually occurs in the presence of some packet loss, which can be common in longer transfers and server applications.
TCP Auto-Tuning
To turn off the default RWIN auto tuning behavior, (in elevated command prompt) type:
netsh int tcp set global autotuninglevel=disabled
The default auto-tuning level is «normal», and the possible settings for the above command are:
disabled: uses a fixed value for the tcp receive window. Limits it to 64KB (limited at 65535).
highlyrestricted: allows the receive window to grow beyond its default value, very conservatively
restricted: somewhat restricted growth of the tcp receive window beyond its default value
normal: default value, allows the receive window to grow to accommodate most conditions
experimental: allows the receive window to grow to accommodate extreme scenarios (not recommended, it can degrade performance in common scenarios, only intended for research purposes. It enables RWIN values of over 16 MB)
Our recommendation: normal (unless you’re experiencing problems).
If you’re experiencing problems with your NAT router or SPI firewall, try the «restricted», «highlyrestricted», or even «disabled» state.
Notes:
— Reportedly, some older residential NAT routers with a SPI firewall may have problems with enabled tcp auto-tuning in it’s «normal» state, resulting in slow speeds, packet loss, reduced network performance in general.
— auto-tuning also causes problems with really old routers that do not support TCP Windows scaling. See MSKB 935400
— netsh set commands take effect immediately after executing, there is no need to reboot.
— sometimes when using «normal» mode and long lasting connections (p2p software / torrents), tcp windows can get very large and consume too much resources, if you’re experiencing problems try a more conservative (restricted) setting.
If you’re experiencing problems with Auto-Tuning, see also:
MSKB 835400 — email issues
MSKB 934430 — network connectivity behind firewall problems
MSKB 940646 — 3G WWAN throughput issues
MSKB 929868 — web browsing issues
MSKB 932170 — slow network file transfer
Compound TCP — Improve throughput
Add-On Congestion Control Provider
The traditional slow-start and congestion avoidance algorithms in TCP help avoid network congestion by gradually increasing the TCP window at the beginning of transfers until the TCP Receive Window boundary is reached, or packet loss occurs. For broadband internet connections that combine high TCP Window with higher latency (high BDP), these algorithms do not increase the TCP windows fast enough to fully utilize the bandwidth of the connection.
Compound TCP (CTCP) is a newer method, available in Vista and Server 2008 (there is also a hotfix available for XP x64 and 2003 Server — MSKB 949316). CTCP increases the TCP send window more aggressively for broadband connections (with large RWIN and BDP). CTCP attempts to maximize throughput by monitoring delay variations and packet loss. It also ensures that its behavior does not impact other TCP connections negatively.
By default, Vista and Windows 7 have CTCP turned off, it is only on by default under Server 2008. Turning this option on can significantly increase throughput and packet loss recovery.
To enable CTCP, in elevated command prompt type:
netsh int tcp set global congestionprovider=ctcp
To disable CTCP:
netsh int tcp set global congestionprovider=none
Possible options are: ctcp, none, default (restores the system default value).
Recommended setting: ctcp
It is better to use this newer generation CTCP congestion control algorithm for most broadband connections, we highly recommend it being turned on.
ECN Capability
ECN (Explicit Congestion Notification, RFC 3168) is a mechanism that provides routers with an alternate method of communicating network congestion. It is aimed to decrease retransmissions. In essence, ECN assumes that the cause of any packet loss is router congestion. It allows routers experiencing congestion to mark packets and allow clients to automatically lower their transfer rate to prevent further packet loss. Traditionally, TCP/IP networks signal congestion by dropping packets. When ECN is successfully negotiated, an ECN-aware router may set a bit in the IP header (in the DiffServ field) instead of dropping a packet in order to signal congestion. The receiver echoes the congestion indication to the sender, which must react as though a packet drop were detected.
ECN is disabled by default in Vista and other modern TCP/IP implementations, as it is possible that it may cause problems with some outdated routers that drop packets with the ECN bit set, rather than ignoring the bit. To check whether your router supports ECN, you can use the Microsoft Internet Connectivity Evaluation Tool. The results will be displayed under «Traffic Congestion Test».
To change ECN, in elevated command prompt type:
netsh int tcp set global ecncapability=default
Possible settings are: enabled, disabled, default (restores the state to the system default).
The default state is: disabled
Recommendation: enabled (only for short-lived, interactive connections and HTTP requests with routers that support it, in the presense of congestion/packet loss), disabled otherwise (for pure bulk throughput with large TCP Window, no regular congestion/packet loss, or outdated routers without ECN support).
Notes: ECN is only effective in combination with AQM (Active Queue Management) router policy. It has more noticeable effect on performance with interactive connections and HTTP requests, in the presence of router congestion/packet loss. Its effect on bulk throughput with large TCP Window are less clear.
Currently, we do not recommend enabling this setting, as reportedly it has negative impact on throughput with some residential US ISPs. EA multiplayer games that require a profile logon do not support ECN as well (you will not be able to logon). However, it can also reduce latency in some games with ECN-capable routers in the presence of packet loss (dropped packets).
More information on ECN: Explicit Congestion Notification (ECN) for TCP/IP
RSS — Receive-side Scaling
The receive-side scaling setting enables parallelized processing of received packets on multiple processors, while avoiding packet reordering. It avoids packet reordering y separating packets into «flows», and using a single processor for processing all the packets for a given flow. Packets are separated into flows by computing a hash value based on specific fields in each packet, and the resulting hash values are used to select a processor for processing the flow. This approach ensures that all packets belonging to a given TCP connection will be queued to the same processor, in the same order that they were received by the network adapter.
To set RSS:
netsh int tcp set global rss=enabled
Possible rss settings are: disabled, enabled, default (restores rss state to the system default).
Default state is: enabled
Recommended: enabled (if you have 2 or more processor cores and a NIC that can handle RSS)
In Windows Server 2008, the system default is for RSS to be enabled and to use a maximum of four CPUs. While this is usually enough, administrators can adjust the maximum number of RSS processors by setting the MaxNumRssCpus registry value in HKLMSystemCurrentControlSetServicesNDISParameters. The value type is DWORD, and if not present, the default value of four processors is assumed (do not use value greater than 32).
See also: Receive-Side Scaling Enhancements in Windows Seerver 2008
TCP Chimney Offload
TCP chimney offload enables Windows to offload all TCP processing for a connection to a network adapter. Offloads are initiated on a per-connection basis. Compared to task offload, TCP chimney offload further reduces networking-related CPU overhead, enabling better overall system performance by freeing up CPU time for other tasks.
To set TCP Chimney Offload:
netsh int tcp set global chimney=enabled
Default state: disabled (under Vista), automatic (under Windows 7 and 2008 Server)
Recommended: enabled
The possible states are disabled, enabled, default (Vista), automatic (only Windows 7 and 2008 Server) as follows:
automatic — This default setting is only available under Windows 7 and 2008 Server, it is not available udner Vista. It offloads if the connection is 10 GbE, has a RTT
default — this setting restores chimney offload to the system default. Setting this «default» state under Windows 7 and 2008 Server is possible, but it sets the system to the «automatic» mode described above.
disabled — this setting is maually configured as disabled.
enabled — this setting is manually configured as enabled.
Notes:
Under Windows 7 and Server 2008 the «default» and the additional «automatic» parameter set the system to the same «automatic» state.
For Chimney Offload to work, it needs to be enabled in both the OS and NIC. To enable the «TCP Offloading» setting in your NIC, navigate to the Device Manager, under Network Adapters, in the Advanced tab, and check «Enabled» in the box next to the TCP offload entry.
Direct Cache Access (DCA)
Windows 7 and 2008 Server (but not Vista) add NETDMA 2.0 Direct cache access support. Direct Cache Access (DCA) allows a capable I/O device, such as a network controller, to deliver data directly into a CPU cache. The objective of DCA is to reduce memory latency and the memory bandwidth requirement in high bandwidth (Gigabit) environments. DCA requires support from the I/O device, system chipset, and CPUs.
To enable DCA:
netsh int tcp set global dca=enabled
Available states are: enabled, disabled.
Default state: disabled
Recommended: enabled (provided the CPU/Chipset/NIC support it)
It is also possible to enable this setting by editing the Windows Registry instead of using netsh as follows:
HKEY_LOCAL_MACHINESYSTEMCurrentControlSetServicesTcpipParameters
EnableDCA=1(DWORD, entry does not exist by default. Set to 1 to enable, 0 to disable)
Setting MTU
It is sometimes useful to view and set the MTU value for a specific network interface manually. To view a list of active network interfaces and their MTU values in Vista using netsh, open command prompt as administrator and execute the following command:
netsh interface ipv4 show subinterface
You will be presented with a list of interfaces, and their respective MTU values as follows:

To change the MTU value of a specific network card, type the following in command prompt:
netsh interface ipv4 set subinterface «network interface name» mtu=#### store=persistent
Where «network interface name» is your specific network adapter name as obtained above (or viewable under Network adapters), and mtu=#### is the desired MTU value.
For example, if the name of your network card is «Wireless Network Connection» and you’d like to set its MTU to 1500, you’d have to type:
netsh interface ipv4 set subinterface «Wireless Network Connection» mtu=1500 store=persistent
Note: The maximum MTU value is usually 1500, and up to 1492 for PPPoE connections.
Manually tuning Registry Parameters
Many of the registry keys tuning TCP/IP parameters from previous Windows versions no longer work in Vista and Server 2008. Below is a list of the few we’ve confirmed to still work, as well as some new additions. Note that for changes to these settings to take effect the computer needs to be rebooted. As always, a registry backup is recommended if making any changes, and some proficiency in using regedit is required.
In regedit (Start icon > Run > type: regedit while logged in as administrator), you can navigate and edit the following keys.
MTU (Maximum Transmission Unit) — the maximum packet size.
HKEY_LOCAL_MACHINESYSTEMCurrentControlSetServicesTcpipParametersInterfaces{…}
MTU=1500 (DWORD, entry does not exist by default)
The {….} part of the above path is the unique identifier of your network adapter. You can recognize the correct adapter by looking at it’s IP address, if obtaining IP automatically labeled by: DhcpIPAddress=192.168.x.x text value, for example.
We recommend leaving this at default, unless you want to lower it. Vista uses the largest possible packet size for the underlying network by default.
Note: In some test environments, the correct MTU entry may be offset by 8. The 8 offset seems to coincide with the size of the PPPoE overhead. Check the result with the TCP Analyzer.
SMB Large MTU (SMB 2, CIFS network shares)
SMB 2 implementation in Windows 7 and Windows Server 2008 R2 allows for using a large MTU value for very high speed/low latency Gigabit networks by enabling a new registry parameter, as follows:
HKEY_LOCAL_MACHINESYSTEMCurrentControlSetServicesTcpipParameters
DisableLargeMtu=0 (DWORD, default: 1, to enable Large MTUs: 0)
Note that client workstations may have to enable lare SMB MTU in this hive instead:
HKEY_LOCAL_MACHINESYSTEMCurrentControlSetServicesLanmanWorkstationParameters
DisableLargeMtu=0
Note: This setting should only be applicable to SMB2 shares
TCP 1323 Options
HKEY_LOCAL_MACHINESYSTEMCurrentControlSetServicesTcpipParameters
Tcp1323Opts=1 (DWORD, entry created automatically by Windows when you run the «netsh int tcp set global autotuninglvl=…» command, set to 0 by default).
Setting this seems to have no effect, since auto-tuning uses the TCP 1323 scale factor and changes it on the fly, disregarding this setting. Additional testing may be required to determine it’s effect if auto-tuning is turned off. Setting it to 1 is best for broadband connections.
NetDMA (TCPA)
NetDMA enables support for advanced direct memory access. In essence, it provides the ability to more efficiently move network data by minimizing CPU usage. NetDMA frees the CPU from handling memory data transfers between network card data buffers and application buffers by using a DMA engine.
Under Windows 7, NetDMA can be set directly using the netsh interface (not available under Vista):
netsh int tcp set global netdma=enabled
Under Vista/2008/7, you can set NetDMA/TCPA using the following Registry parameter:
HKEY_LOCAL_MACHINESYSTEMCurrentControlSetServicesTcpipParameters
EnableTCPA=1 (DWORD, not in registry by default. Set to 1 to enable, 0 to disable NetDMA)
Recommended setting is 1 (if not using Chimney Offload), zero otherwise. A new DWORD value may need to be created if not already present in the registry.
For NetDMA to work, it must be enabled in BIOS, your CPU must support Intel I/O Acceleration Technology (I/OAT), and it does not work together with Chimney Offload. More info available -here-
Checksum Offloading (DisableTaskOffload)
This NDIS 5 setting allows for reducing CPU load by offloading some tasks required to maintain the TCP/IP stack to the network card. Theoretically, Widnows should automatically detect capable network hardware.
The tasks offloaded are as follows:
— TCP/IP checksum calculation — each packet sent includes a verification checksum.
— TCP/IP segmentation — also known as «TCP Large Send» where Windows sends a large amount of data to the network card, and the NIC is then responsible for dividing it according to the network MTU. Experimental feature, not enabled by default
— IPSec Encryption cyphers and message digests — provides encryption of packets at the hardware level.
To change the checksum offloading setting in the Windows Registry:
HKEY_LOCAL_MACHINESYSTEMCurrentControlSetServicesTcpipParameters
DisableTaskOffload=0 (DWORD value, default: not set, recommended: 0=enable offload, 1=disable offload)
Also see: MS KB888750, MS KB904946, MS KB936702, MS KB942861
EnableRSS
It is possible to edit receive-side scaling (RSS) in the Windows Registry, however, we recommend using the netsh command instead.
HKEY_LOCAL_MACHINESYSTEMCurrentControlSetServicesTcpipParameters
EnableRSS (DWORD, default: not in registry, recommended: edit using netsh)
HKEY_LOCAL_MACHINESYSTEMCurrentControlSetServicesNDISParameters
MaxNumRssCpus (DWORD, default: not present in registry, assuming 4 CPUs, recommended: don’t edit, possible values: 1-32)
DefaultTTL
TTL can be safely left alone in many cases. It is a limit to the time and number of hops/routers a packet will travel before being discarded. A number that’s too small risks packets being discarded before reaching their destination. A number that’s too large (over 128) will cause delay in when lost IP packets are discarded.
HKEY_LOCAL_MACHINESYSTEMCurrentControlSetServicesTcpipParameters
DefaultTTL=64 (DWORD, set to a decimal value between 32 and 128. Recommended: 64)
TcpMaxDataRetransmissions
Determines how many times unacknowledged data (non-connect segment) is retransmitted before TCP aborts the connection. The retransmission timeout is doubled with each successive retransmission on a connection. It is reset when responses resume.
HKEY_LOCAL_MACHINESYSTEMCurrentControlSetServicesTcpipParameters
TCPMaxDataRetransmissions=5 (DWORD, recommended: between 3 and 10, not present in registry by default)
Note: When not present in the registry, the default behavior is 255 retransmissions (5 in documentation).
SynAttackProtect
This undocumented for Windows 7 setting provides protection against SYN denial of service (DoS) attacks. When enabled, connections timeout sooner if SYN attack is detected. When set at 1, TCPMaxDataRetransmissions can be lowered further.
HKEY_LOCAL_MACHINESYSTEMCurrentControlSetServicesTcpipParameters
SynAttackProtect=1 (DWORD, recommended: 1, not present in registry by default)
Note: MSDN suggests a value of 2 for Windows 2k — http://msdn.microsoft.com/en-us/library/aa302363.aspx
EnableConnectionRateLimiting
This parameter sets (or disables) the half-open TCP connection limit in Windows 7, Vista (SP2), Server 2008, or later. Some Microsoft OSes, such as, Vista before SP2, and 2008 Server before SP2, may limit the number of half-open TCP connections to 10. Limiting the half-open (incomplete) TCP connections per second may lead to log errors which read as follows: «Event ID 4226: TCP/IP has reached the security limit imposed on the number of concurrent TCP connect attempts». It may cause P2P and other programs that open a large number of connections to be somewhat limited in ramping up their transfers. It is recommended to remove this limitation. Just check the below key and make sure it is either not present, or set to zero. Windows 7, and Windows Server 2008 SP2 or later should not have to make any changes.
HKEY_LOCAL_MACHINESYSTEMCurrentControlSetServicesTcpipParameters
EnableConnectionRateLimiting=0 (DWORD, recommended: 0, or delete key)
Network Throttling Index (Gaming)
By default, Windows Vista/7 implements a network throttling mechanism to restrict the processing of non-multimedia network traffic to 10 packets per millisecond (a bit over 100 Mbits/second). The idea behind such throttling is that processing of network packets can be a resource-intensive task, and it may need to be throttled to give prioritized CPU access to multimedia programs. In some cases, such as Gigabit networks and some online games, for example, it may be benefitial to turn off such throttling all together.
HKEY_LOCAL_MACHINESOFTWAREMicrosoftWindows NTCurrentVersionMultimediaSystemProfile
NetworkThrottlingIndex=ffffffff (DWORD, default: 10, recommended: 10 for media sharing, ffffffff for gaming and max throughput, valid range: 1 through 70 decimal or ffffffff to completely disable throttling)
It is only recommended to change this setting in saturated Gigabit LAN environments, where you do not want to give priority to multimedia playback. Reportedly, disabling throttling by using ffffffff can also help reduce ping spikes in some online games.
Notes: Setting is available in Windows 7, Vista (SP1), 2008 Server. Default value is 10 under Windows 7, similar behavior if the setting is not present in the Registry.
Games that may be affected by this throttling: Source Engine games (TF2, Left 4 Dead, CS:S), HoN, CoD, Overlord series.
Reference: MSKB 948066
SystemResponsiveness (Gaming and Multimedia playback)
In Windows 7, multimedia applications use the «Multimedia Class Scheduler service» (MMCSS) to ensure priritized access to CPU resources, without denying CPU resources to lower-priority background applications. However, this also reserves 20% of CPU by default for background processes, your multimedia streaming and some games can only utilize up to 80% of the CPU. This setting, in combination with the above «NetworkThrottlingIndex» can help some games and video streaming. We recommend reducing the reserved CPU for background processes from the default.
Navigate to:
HKEY_LOCAL_MACHINESOFTWAREMicrosoftWindows NTCurrentVersionMultimediaSystemProfile
SystemResponsiveness=0 (DWORD, default is 20 denoting 20% of CPU reserved, recommended: decimal 10, or 0 for pure multimedia/gaming performance)
Notes: The number in this key is rounded by the MMCSS to the nearest 10. Under Windows 2008/2012 Server, SystemResponsiveness is set to 100 by default, denoting that background processes take priority over multimedia applications.
See also: MSDN ms684247
Set DNS and Hosts Priority
As with previous versions of Windows, one can improve DNS and hostname resolution by increasing the priority of of related services, while keeping their order. This is explained in more defail in our Host Resolution article. Lower numbers mean higher process priority. The corresponding registry settings in Vista are as follows:
HKEY_LOCAL_MACHINESYSTEMCurrentControlSetServicesTcpipServiceProvider
LocalPriority=4 (DWORD, recommended: 4, default: 499) — local names cache
HostsPriority=5 (DWORD, recommended: 5, default: 500) — the HOSTS file
DnsPriority=6 (DWORD, recommended: 6, default: 2000) — DNS
NetbtPriority=7 (DWORD, recommended: 7, default: 2001) — NetBT name resolution, including WINS
TcpTimedWaitDelay (port allocation)
Short lived (ephemeral) TCP/IP ports above 1024 are allocated as needed by the OS. The default Vista values have improved from previous Windows versions, and are usually sufficient under normal load. However, in some instances under heavy load it it may be necessary to adjust the settings below to tweak the availability of user ports requested by an application.
If the default limits are exceeded under heavy loads, the following error may be observed: «address in use: connect exception». By default under Vista (when the values are not presend in the registry), the OS can allocate up to 16384 ephemeral ports above port 1024, and the OS waits for 120 seconds before reclaiming ports after an application closes the TCP connection. This is a considerable improvement over older Windows versions. However, if necessary, the following registry values can be added/edited:
HKEY_LOCAL_MACHINESYSTEMCurrentControlSetServicesTcpipParameters
MaxUserPort=65534 (DWORD, not in the registry by default. Recommended: leave at default, or use a number above 16384 up to 65534 decimal as necessary) — maximum number of ports to use. 1024 is automatically subtracted from entered value to allow for reserved ports under 1024.
TcpTimedWaitDelay=30 (DWORD, not present or 0xffffffff in registry by default. Recommended: 30 decimal, denoting 30 seconds) — time to wait before reclaiming ports, in seconds. Default time before reclaiming ports, if value is at 0xffffffff or not present in the registry is 120 seconds. Just reducing the delay is often sufficient without changing MaxUserPort, as it allows for reusing ports more efficiently.
Ephemeral ports can be checked and changed using netsh as well.
To query the current values, in command prompt, type:
netsh int ipv4 show dynamicportrange tcp (for UDP, use the same command, replacing only «tcp» with «udp» at the end)
To set both the starting, and max user port using netsh, in elevated command prompt run:
netsh int ipv4 set dynamicportrange protocol=tcp start=1025 num=64511 (start=NNN denoting the starting port, and num=NNN denoting the number of ports)
Notes:
By default, dynamic ports are allocated between ports 49152 and 65535 (for a total of 16384 ephemeral ports).
Using netsh allows to set both the starting port and port range. Editing the Registry allows for setting the port range, and the starting port is fixed at 1025. Deleting the MaxUserPort registry entry (or setting it to a value outside the allowed range) causes the OS to revert to using the default values.
Some system processes can install port filters to block certain port ranges. If ephemeral ports run into these filtered port ranges, TCP/IP applications will be unable to bind to any ports.
See also: TechNet article, MSKB 328476, MSKB 319502
MaxFreeTcbs and MaxHashTableSize
MaxFreeTcbs determines the number of TCP Control Blocks (TCBs) the system creates to support active connections. Each connection requires such control block, so this value determines how many active connections TCP can support simultaneously. Normally, TCP does not release a connection or reuse its resources until the connection has remained closed for a period of time (specified by the value of the TcpTimedWaitDelay entry). This interval is known as the TIME_WAIT state. The default value for this entry is determined both by the amount of physical memory on the computer when TCP/IP starts and by the Windows version. We recommend increasing it from the default if using network intensive applications that open many simultaneous connections, such as P2P.
HKEY_LOCAL_MACHINESYSTEMCurrentControlSetServicesTcpipParameters
MaxFreeTcbs=65535 (dword, not present in registry by default, recommended 65535 decimal)
MaxHashTableSize specifies the size of the hash table in which TCP Control Blocks (TCBs) are stored. TCP stores control blocks in a hash table so it can find them very quickly. If you adjust the number of TCBs the system creates (as specified by the value of MaxFreeTcbs), you should also adjust the value of the hash table proportionally.
HKEY_LOCAL_MACHINESYSTEMCurrentControlSetServicesTcpipParameters
MaxHashTableSize=65535 (dword, not present in registry by default, recommended 65535 decimal)
Note: The need for larger MaxFreeTcbs and MaxHashTableSize values is directly related to the value of TcpTimedWaitDelay because a large TcpTimedWaitDelay increases the number of ports that remain in WAIT states before being released.
QoS Reserved Bandwidth
As with Windows XP, nework adapters have a «QoS Packet Scheduler» enabled by default, which reserves 20% of bandwidth by default for QoS applications that request priority traffic. Note this only has effect in the presence of running QoS applications that request priority traffic. Registry value is undocumented for the Vista version of Windows. To customize this setting, in the Windows Registry:
HKEY_LOCAL_MACHINESOFTWAREPoliciesMicrosoftWindowsPsched
NonBestEffortLimit=0 (DWORD, not present in the registry by default. Recommended: 0 , possible values between 0 and 100) — indicates the percentage value of reserved bandwidth for QoS applications. Set to 0 to disable.
Notes: This tweak applies only to Windows versions that have Qos Packet Scheduler enabled. It will ONLY have effect in the presense of running QoS applications.
QoS Policy
QoS Policy settings under Windows 7 can be edited using the Group Policy Editor (gpedit.msc): Computer Configuration -> Windows Settings -> Policy-based QoS
In order to define DiffServ (DSCP) values, according to Microsoft the machine needs to have joined a domain, and interfaces have to see the domain controller. To overcome this limitation, so that you can tag DSCP values even for adapters that do not have access to a domain, use the following hidden registry key:
HKEY_LOCAL_MACHINESystemCurrentControlSetServicesTcpipQoS (you may have to create the QoS key)
«Do not use NLA»=»1» (REG_SZ string value, not DWORD, not present by default, recommended: 1 if you plan to edit Diffserv values via gpedit.msc)
Notes:
gpedit.msc is only provided with the Professional/Ultimate and Server Windows variants, it is not included in Starter/Home editions.
This registry key may also be needed in systems with multiple network adapters present.
Network Memory Allocation (Event ID 2017 error)
When using Windows Vista/7 to serve many/large files over the local network, it is possible to sometimes run into memory allocation errors related to the Windows share. This can happen with Linux, Mac, or Windows XP clients. When this happens, you can usually see the following error in the Event Viewer System log:
Source: srv
Event ID: 2017
Level: Error
The server was unable to allocate from the system nonpaged pool because the server reached the configured limit for nonpaged pool allocations.
It is also possible to get an error indicating that: «Not enough server storage is available to process this command». To avoid those errors, you need to change the way Windows allocates memory for network services and file sharing. The below settings optimze the machine as a file server so it would allocate resources accordingly. There are two related registry settings:
HKLMSYSTEMCurrentControlSetControlSession ManagerMemory Management
LargeSystemCache=1 (DWORD, default value: 0, recommended value: 1)
A value of zero above establishes a cache of ~8 MB, a value of 1 allows the cache to expand to physical memory minus 4 MB, if needed.
HKLMSYSTEMCurrentControlSetServicesLanmanServerParameters
Size=3 (DWORD, default value: 1, recommended value: 3)
Size=1 minimizes used memory
Size=2 balance used memory
Size=3 optimal setting for file sharing and network applications
Note: Even though this tweak is from older Windows server OSes, it works on workstation versions, as well as Windows Vista and 7 (32 and 64 bit).
Gaming Tweak — Disable Nagle’s algorithm
The tweak below allows for tweaking or disabling Nagle’s alogrithm. Disabling «nagling» allows for very small packets to be transferred immediately without delay. Note that disabling Nagle’s algorithm is only recommended for some games, and it may have negative impact on file transfers/throughput. The dafault state (Nagling enabled) improves performance by allowing several small packets to be combined together into a single, larger packet for more efficient transmission. While this improves overall performance and reduces TCP/IP overhead, it may briefly delay transmission of smaller packets. Keep in mind that disabling Nagle’s algorithm may have some negative effect on file transfers, and can only help reduce delay in some games. To implement this tweak, in the registry editor (Start>Run>regedit) find:
This setting configures the maximum number of outstanding ACKs in Windows XP/2003/Vista/2008:
HKEY_LOCAL_MACHINESYSTEMCurrentControlSetServicesTcpipParametersInterfaces{NIC-id}
There will be multiple NIC interfaces listed there, for example: {1660430C-B14A-4AC2-8F83-B653E83E8297}. Find the correct one with your IP address listed. Under this {NIC-id} key, create a new DWORD value:
TcpAckFrequency=1 (DWORD value, 1=disable, 2=default, 2-n=send ACKs if outstanding ACKs before timed interval. Setting not present by default).
For gaming performance, recommended is 1 (disable). For pure throughput and data streaming, you can experiment with values over 2. If you try larger values, just make sure TcpAckFrequency*MTU is less than RWIN, since the sender may stop sending data if RWIN fills witout acknowledgement. Wifi performance may see a slight improvement with disabled TcpAckFrequency as well.
In the same location, add:
TCPNoDelay=1 (DWORD, not present by default, 0 to enable Nagle’s algorithm, 1 to disable)
For Server Operating Systems that have Microsoft Message Queuing (MSMQ) installed, or if you have the MSMQ registry hive present, also add TCPNoDelay to:
HKEY_LOCAL_MACHINESOFTWAREMicrosoftMSMQParameters
TCPNoDelay=1 (DWORD, not present by default, 0 to enable Nagle’s algorithm, 1 to disable)
To configure the ACK interval timeout (only has effect if nagling is enabled), find the following key:
HKEY_LOCAL_MACHINESYSTEMCurrentControlSetServicesTcpipParametersInterfaces{NIC-id}
TcpDelAckTicks=0 (DWORD value, not present by default interpreted as 2, 0=disable nagling, 1-6=100-600 ms). Note you can also set this to 1 to reduce the nagle effect from the default of 200ms without disabling it.
Notes:
Reportedly, the above gaming tweak (disabling nagle’s algorithm) can reduce many MMOs like Diablo and WoW (World of Warcraft) latency by almost half!
XP/2003 needs hotfix or SP2 for it to work (MS KB 815230)
Vista needs hotfix or SP1 for it to work (MS KB 935458)
See also: NetworkThrottlingIndex setting above
SG TCP Optimizer (version 3.x)
The TCP Optimizer version 3.x allows for easy application of the above settings under all current Windows versions. This free software provides an intuitive interface for tuning your internet connection, backing up/restoring to the Windows defaults, etc. There is no installation required, you can just save it to the desktop, right-click > run as administrator and choose your settings. More detailed information about all available options is provided in the online documentation, answers to frequently asked questions are available in the Optimizer FAQ, and personalized help is available through our broadband tweaking forum.
SG TCP Optimizer download
For user convenience, we also provide a quick way to apply all optimal values as recommended above using our SG Vista TCP/IP Patch. It allows for tweaking all the above netsh settings and registry values in one simple step (with the exception of the «gaming tweak» section). The patch also provides for easily reverting the settings to their Windows default values. To apply, save to your desktop and run as administrator (right-click -> run as administrator). Click Y when prompted to apply settings.
Note: If for some reason Windows renames the file and adds .txt extension to it, you may have to manually rename it back to have a .cmd (or .bat) extension before running it as administrator.
See Also
Windows Vista tcpip.sys connection limit patch for Event ID 4226 — removing the limit on half-open TCP connections.
Windows 8, 10, 2012 Server TCP/IP Tweaks — updated tweaks for Windows 8, 8.1, 10, Server 2012 and 2012 R2.
Wireless Network Speed Tweaks and Network Adapter Optimization.
References
Windows Server 2008 Network Shell (Netsh) Technical Reference
Microsoft KB951037
RFC 2581
Wikipedia: Nagle’s algorithm
Technet: TCPNoDelay
Technet: LargeSystemCache
MS KB 311833
MS KB 328890
MS KB 321098
MS KB 321169
MS KB 951037 — TCP Chimney Offload, Receive Side Scaling, and Network DMA in Windows Server 2008
Download PC Repair Tool to quickly find & fix Windows errors automatically
Window Auto-Tuning feature is said to improve the performance for programs that receive TCP data over a network. It is nothing new. It was introduced in Windows Vista and is present in Windows 11/10 too. In today’s Internet, the range of latencies & throughput speeds is just too large to manage statically. It needs to be adjusted dynamically. Windows 11/10 will dynamically adjust the receive buffer size to the throughput and latency of the link, using this feature.
Programs like Automatic Updates, Windows Update, Remote Desktop Connection, Windows Explorer for network file copy, etc, use WinHTTP or Windows HTTP Services.
Window Auto-Tuning feature is enabled by default in Windows 11/10 and makes data transfers over networks more efficient. But if your network uses an old router or your firewall software does not support this feature, then you may experience slow data transfers or even loss of connectivity.
Says Microsoft,
When the Receive Window Auto-Tuning feature is enabled for HTTP traffic, older routers, older firewalls, and older operating systems that are incompatible with the Receive Window Auto-Tuning feature may sometimes cause slow data transfer or a loss of connectivity. When this occurs, users may experience slow performance.

To check the status of Auto-Tuning feature on your system, in an elevated command prompt window, type the following and hit Enter:
netsh interface tcp show global
If you see ‘normal’ written against Receive Window Auto-Tuning Level, it means that the feature is enabled and it is working fine.
To disable Windows AutoTuning, run the following command:
netsh int tcp set global autotuninglevel=disabled
To enable Windows AutoTuning, run the following command:
netsh int tcp set global autotuninglevel=normal
Let the default settings of Window Auto-Tuning feature be enabled
Let the default settings of Window Auto-Tuning feature be enabled. If your network uses an old router or your firewall software does not support this feature, and you are experiencing poor or no connectivity issues, only then may you disable this feature and see if it works in your favor.
BONUS TIP:
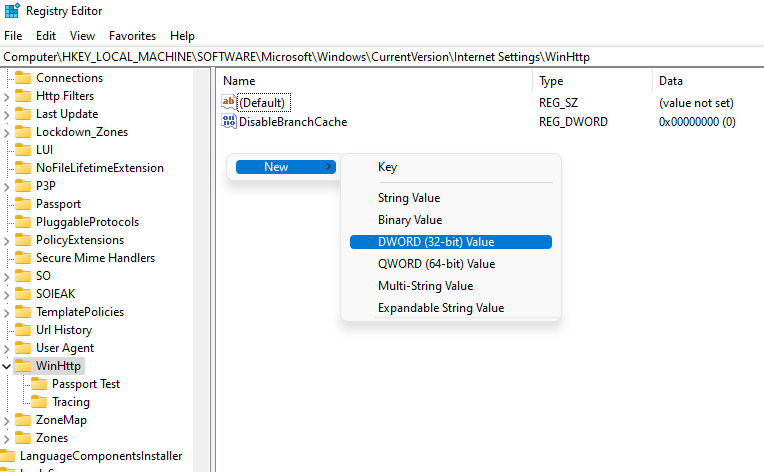
To enable the Receive Window Auto-Tuning feature for HTTP traffic, you can run regedit and navigate to the following registry subkey, says KB947239:
HKEY_LOCAL_MACHINESoftwareMicrosoftWindowsCurrentVersionInternet SettingsWinHttp
Right-click on it > New > DWORD Value. Type TcpAutotuning and give it a vale of 1.
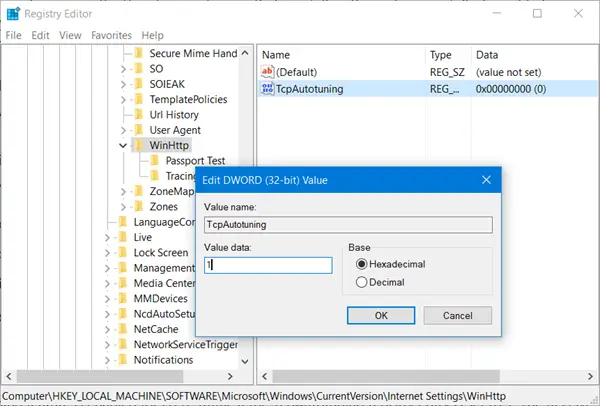
Click OK and exit.
To disable Receive Window Auto-Tuning feature for HTTP traffic, give it a value of 0 or delete the created TcpAutotuning DWORD.
The Receive Window Auto-Tuning feature lets the operating system continually monitor routing conditions such as bandwidth, network delay, and application delay. Therefore, the operating system can configure connections by scaling the TCP receive window to maximize the network performance. To determine the optimal receive window size, the Receive Window Auto-Tuning feature measures the products that delay bandwidth and the application retrieve rates. Then, the Receive Window Auto-Tuning feature adapts the receive window size of the ongoing transmission to take advantage of any unused bandwidth.
TIP: You can Analyze and Optimize TCP/IP with TCP Optimizer
Hope this solves the confusion about whether to enable or disable the Window Auto-Tuning feature.
See this post if you are facing Network & Internet connection problems.

Anand Khanse is the Admin of TheWindowsClub.com, a 10-year Microsoft MVP (2006-16) & a Windows Insider MVP (2016-2022). Please read the entire post & the comments first, create a System Restore Point before making any changes to your system & be careful about any 3rd-party offers while installing freeware.
You can optimize TCP/IP settings in Windows 10 either manually or using a third-party app. Optimizing it can potentially improve your internet connection speed. If you’re wondering whether it’s necessary, what settings you need to change, and how, we’ll walk you through the process. But before that, let’s get some basics out of the way.
What Is TCP/IP?
TCP/IP, short for Transmission Control Protocol/Internet Protocol, is a group of communication protocols that allow network devices to communicate when they’re connected. TCP/IP is a set of rules and procedures that dictate the way data is transmitted and received over the internet.

Your computer system interacts with countless other systems on a network, but at any given point in time, only two systems can communicate with each other. For this communication to work effectively, computers need protocols.
A protocol is a set of rules that computers use for interacting with each other. TCP/IP is a standard communication protocol that allows all computers to interact, regardless of the vendor. IP (Internet Protocol) is like an address where the data is to be sent, while TCP is the method of delivering the data to that address.
TCP and IP are different things, but they’re mostly used together because they rely on each other. Think of a text message for example. An IP address is similar to your phone number; it helps determine where the data is sent. TCP is the technology that transmits the message, plays the notification tone, and allows you to read the text message.
Do You Need to Optimize TCP/IP Settings on Windows 10?
In most cases, there’s no need to optimize TCP/IP settings unless you know a setting that you want to change for a specific purpose.
However, Windows Vista introduced a new feature called Receive Window Auto-Tuning, which monitors several parameters of the TCP including bandwidth and network delay in real-time. It determines the optimal receive window size by measuring products that delay application retrieve rates and bandwidth. Next, it tries to capitalize on the surplus bandwidth by adjusting the receive window size.

This is how the feature scales the TCP receive window to maximize network performance and throughput. Essentially, Windows added a feature to optimize TCP such that it maximizes your network speed.
That said, there are still a few cases where manual optimization may be warranted. For instance, if you’re using Windows XP or an older version of Windows, an old router or modem that doesn’t support the Auto-Tuning feature, or you want to change a specific TCP/IP setting, you’ll need to optimize TCP/IP settings manually.
How to Disable the Auto-Tuning Feature in Windows?
If you have an older version of Windows than Windows Vista or have a router that doesn’t support Auto Tuning, you can easily disable it.
Most third-party TCP optimization tools allow disabling Auto-Tuning from within their interface. However, if yours doesn’t, you can run a few commands to disable Auto-Tuning.
Start by launching the Command Prompt, and run the following commands:
- Check if Auto-Tuning is enabled:
netsh interface tcp show global

If Receive Window Auto-Tuning Level appears as normal, Auto-Tuning is enabled.
- Disable Auto-Tuning:
netsh int tcp set global autotuninglevel=disabled
At this point, you’ll have disabled Auto-Tuning. If you want to re-enable it, run the following command:
netsh int tcp set global autotuninglevel=normal
You can also disable Auto-Tuning from the Registry Editor. Press Win + R, type regedit, and press Enter. Paste the following address in the navigation bar:
HKEY_LOCAL_MACHINESoftwareMicrosoftWindowsCurrentVersionInternet SettingsWinHttp
You’ll need to create a new value in the WinHttp subkey. Right-click in the whitespace and select New > DWORD (32-bit) Value.
Name the value TcpAutotuning. Double-click on the DWORD, insert 1 in the Value data field and select OK.
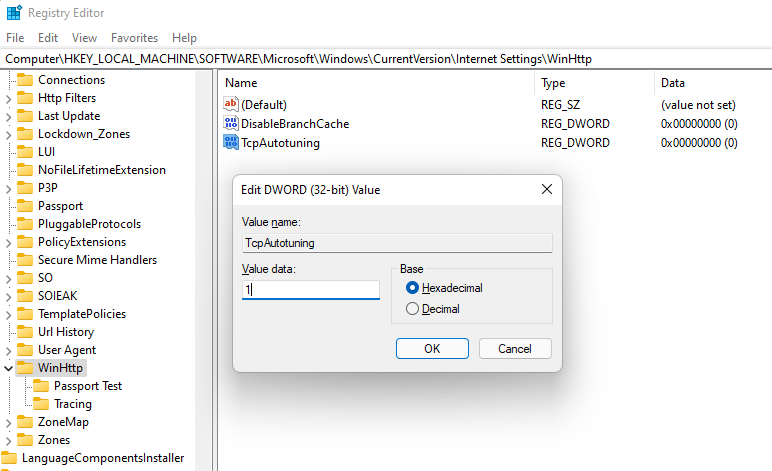
To re-enable, delete the value or set Value data to 0.
The Auto-Tuning feature and TCP/IP settings are pre-configured on Windows 10, which means they’re the same for everyone who uses Microsoft Windows unless they have changed them manually. But even people with the same operating systems can, of course, have different types of internet connections or old routers.
Internet connections may be broadband or fiber, offer different bandwidths, or have different latency. You can tweak your TCP/IP settings such that they work best for the specific characteristics of your internet connection.
If you’re tech-savvy, you can optimize TCP/IP on Windows 10 by changing Windows registry settings, or by running a combination of commands in the Command Prompt. But the process is much simpler with a third-party tool because you’ll be able to do everything using an interface and from one place.
Download TCP Optimizer
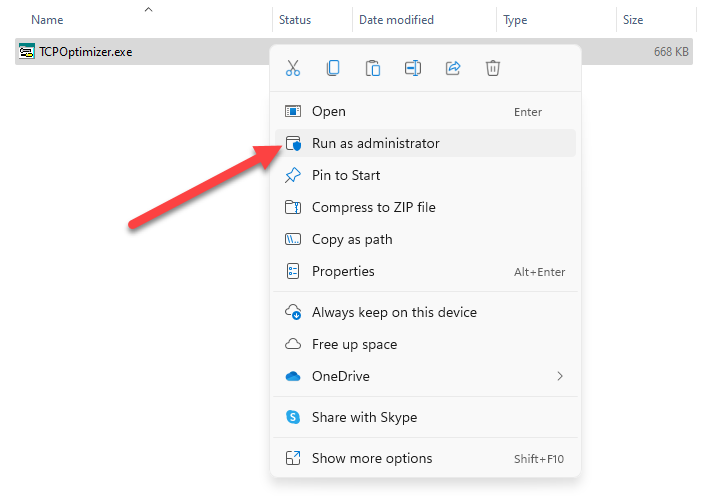
Before you can start optimizing your TCP/IP settings, you’ll need to download a third-party tool like TCP Optimizer.
Download it, right-click on the downloaded file, and select Run as administrator.
You’ll see the interface on your screen now.
Optimize TCP/IP
To start, you’ll need to only insert your internet speed into the TCP Optimizer and it will optimize all settings accordingly. Set the speed to the maximum speed that your internet connection offers. This is the maximum bandwidth available, not your LAN speed. For instance, if your bandwidth is 50Mbps connection, set the speed to 50 Mbps.
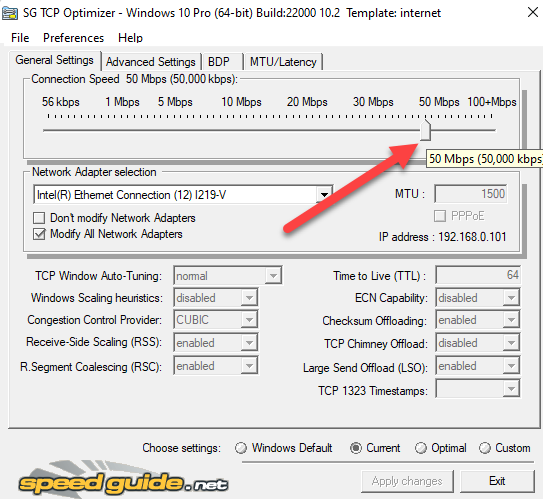
Then, select Optimal from the Choose settings section at the bottom and select Apply changes.
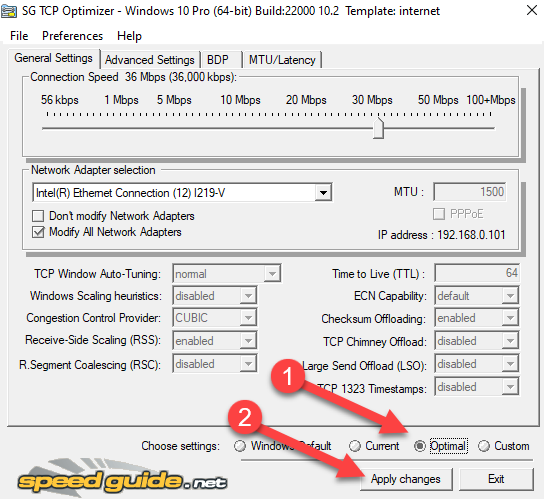
On the window that pops up, check both boxes next to Backup and Create Log at the bottom right, and select OK.
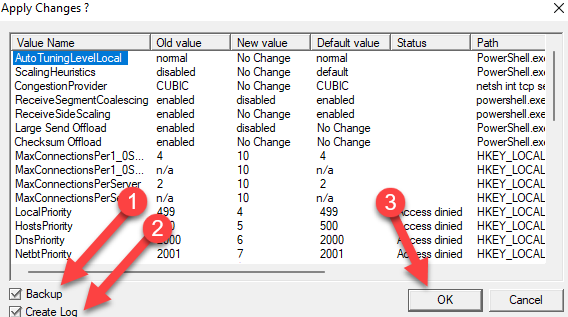
You’ll be prompted for a reboot, click Yes. Click No if you want to reboot later. Changes are applied only after the reboot, though.
That’s it, you’re done.
If something goes wrong, you can always revert to the default settings because TCP Optimizer automatically creates a backup of your settings before applying any changes.
If you know your way around networking and you want to change individual settings, start by selecting Custom in the Choose settings section at the bottom. Once you do this, you’ll see that all settings that were grayed out before can now be tweaked.
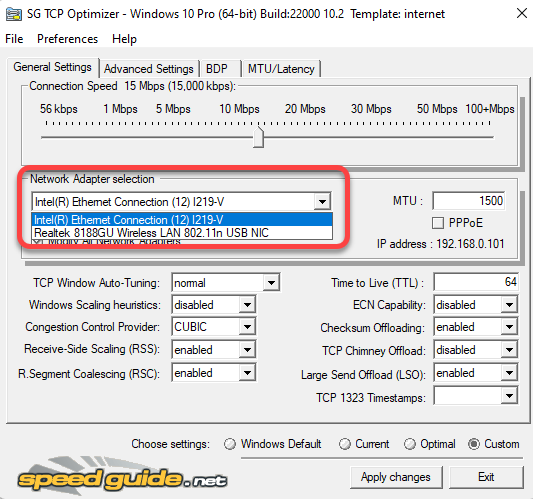
Before you change any settings, make sure that you’ve selected the correct network adapter in the Network Adapter selection section.
You can then change the MTU, Congestion Control Provider, and even advanced TCP/IP parameters like QoS. But these are typically helpful when you have an exact problem you’re trying to solve and know how to solve it using these settings.
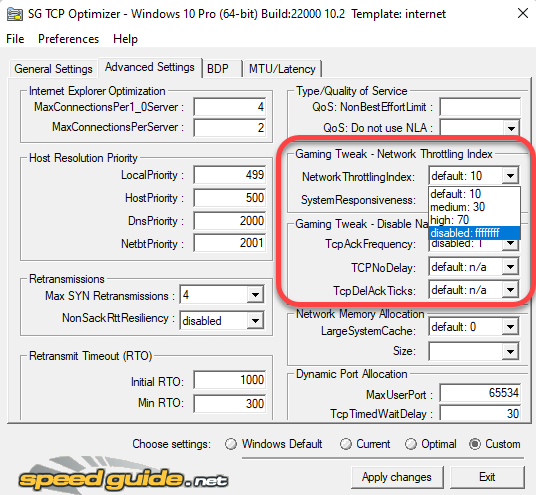
For instance, if you’re a gamer trying to optimize your internet speed, you can switch over to the Advanced Settings tab and disable the Network Throttling Index and Nagle’s algorithm.
TCP Optimizer comes with a lot of advanced functionality, but it’s best not to tinker with those unless you know what you’re doing. Plus, applying the optimal settings using TCP Optimizer, in most cases, is more than enough to optimize your TCP/IP settings on Windows 10.
If you do mess something up, you can always apply the default Windows settings and reset TCP/IP and WINSOCK from the File menu at the top.

TCP Settings, Optimized
Optimizing TCP can be very helpful when you want to ensure high performance from your network connections. If the current settings aren’t allowing you to leverage your internet plan’s full potential, you may try optimizing TCP settings.
Of course, it’s best to ensure that optimization is in fact warranted. For instance, it’s possible that all you need to do is improve your WiFi signal to get better internet speeds. Note that there are several other ways of improving your upload and download speeds too.