In most cases, we do not need to install TFTP Client on a Windows computer. This is because the TFTP (Trivial File Transfer Protocol) is a very simple file transfer protocol that has less security (or no security). This makes it unsafe for day-to use except for certain special situations.
TFTP is mostly used to move the backup/restore configurations and transfer the OS/boot images to network devices where the internet or USB drive access is not available. For example, upgrading the OS of CISCO or Fortigate devices can be done only via Telnet or SSH (no web access) by using TFTP.
Though we rarely use it on Windows client OS, installing a TFTP client on Windows 10 or Windows 11 will be helpful to test and confirm that the TFTP server is working well and ready to transfer data over the network.
In this guide, we will install/enable the built-in Windows TFTP client and test whether it can send and receive data through this protocol.

Installing a TFTP client on a Windows 11 computer is almost identical to Windows 10. The below screenshots are suitable for all Windows clients and Server Operating Systems.
1) Make sure that you have administrative access to enable the feature.
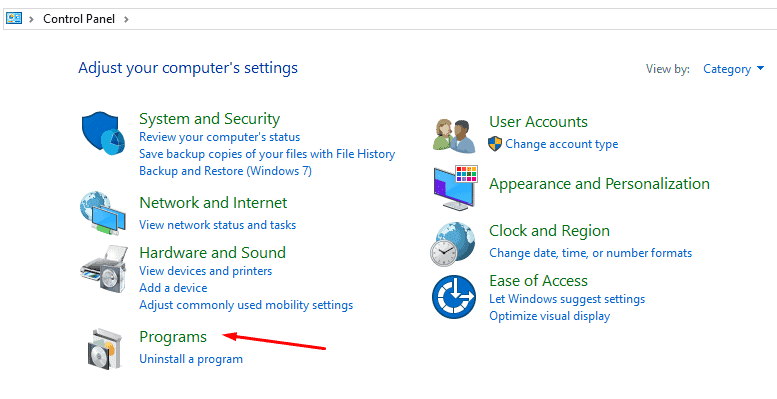
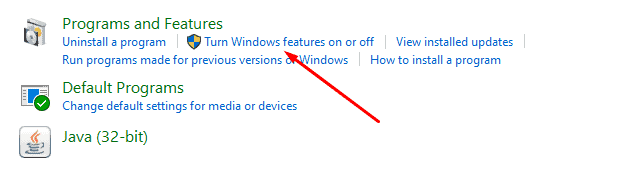
2) Go to the Control panel and click on ‘Programs & Features’.
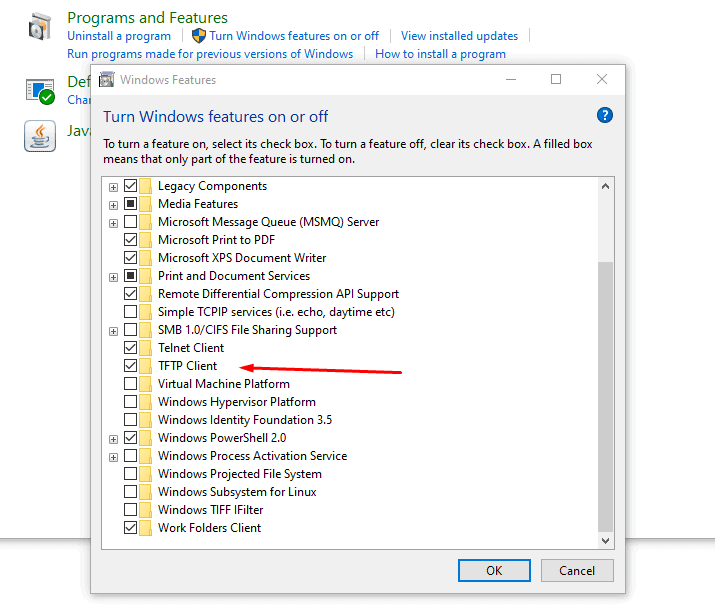
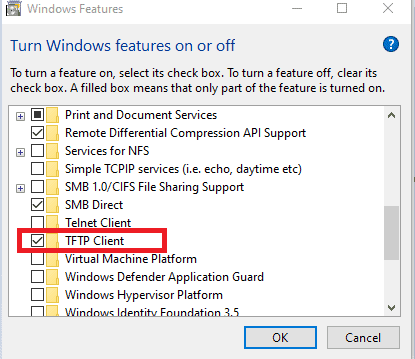
3) Click on ‘Turn Windows features on or off’ then tick the ‘TFTP Client’ as shown below.
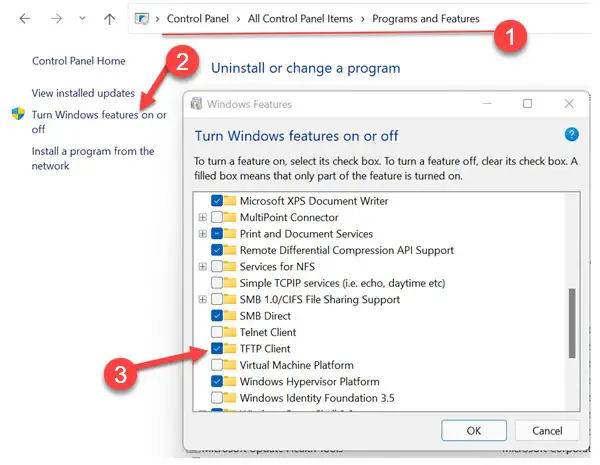
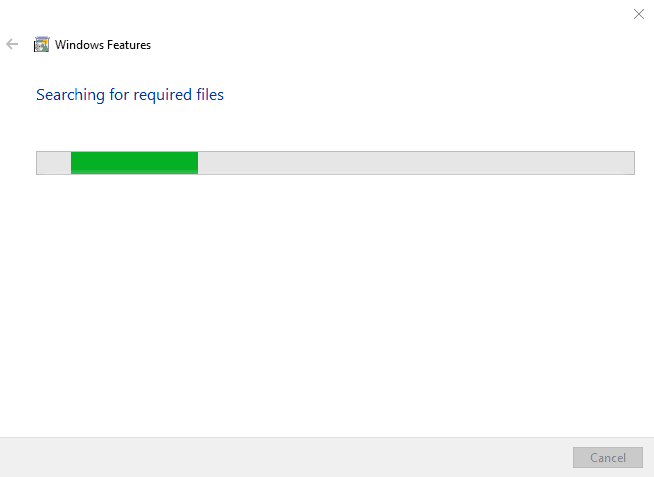
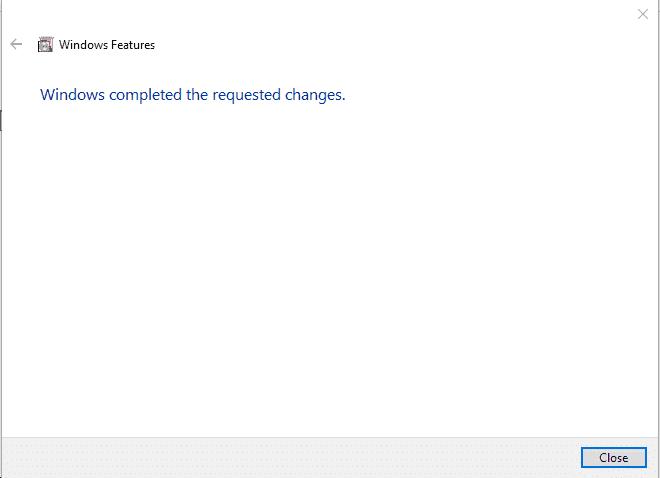
4) Press OK and wait for the installation to complete.
How to Verify that Windows TFTP Client Installed Successfully?
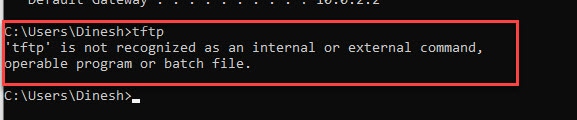
It is like a telnet client, when the feature has not been installed on a computer, the relevant commands will return an unknown command error.
For example, before installing the TFTP client, if you open a command prompt and type ‘tftp’, it will return the below message.
When it is installed, the same command will give the below output.
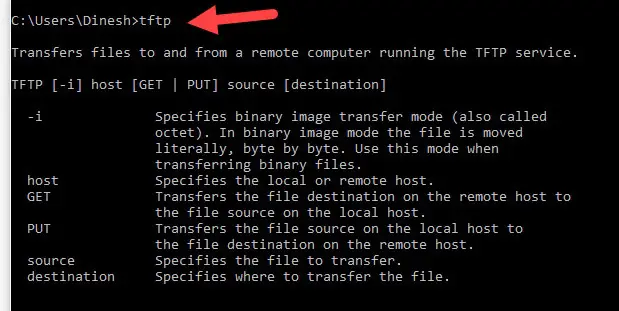
That was a clear indication that the Windows TFTP client is installed on your computer correctly.
How to Check a TFTP Server from Windows 10/11 Client
Let’s assume that the TFTP server setup is done correctly and the network security firewall is accepting incoming and outgoing traffic in the server.
Once we installed the client on Windows PC, we need to allow TFTP traffic in the Windows firewall or third-party firewall/anti-virus solution.
- You can altogether disable the Windows firewall to test it.
- Allow the TFTP program or port number in the firewall.
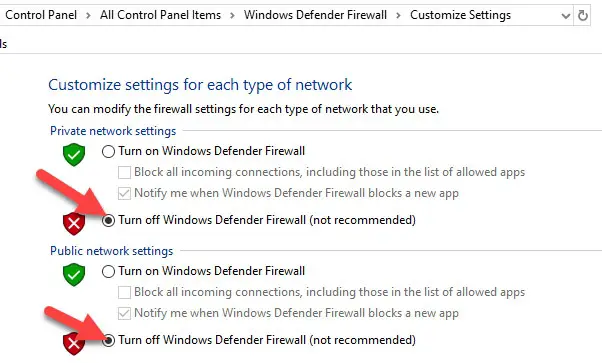
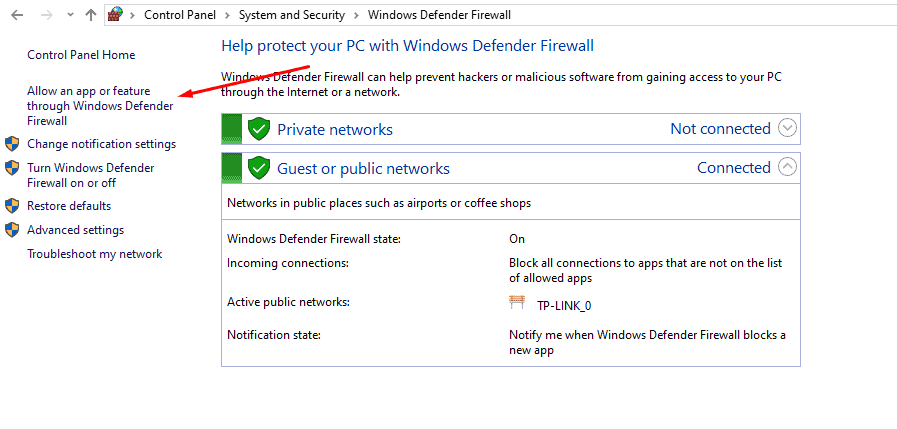
How to Completely switch off the Windows Defender Firewall to allow TFTP
5) Visit the control panel, and enable the ‘Large Icons’ view. This will show the all Control panel icons.
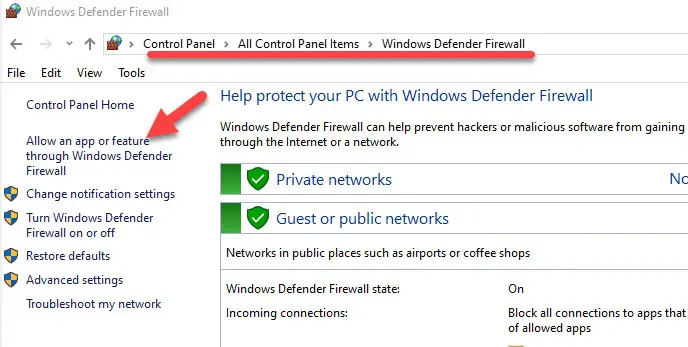
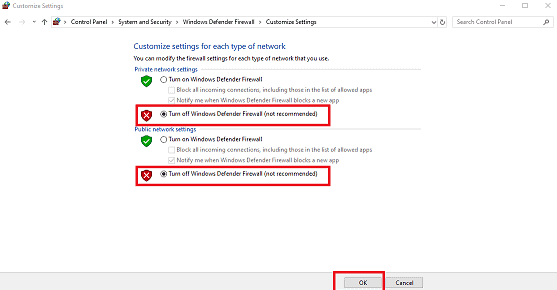
6) Click on ‘Windows Defender Firewall’ and open ‘Turn Windows Defender Firewall on or off.’
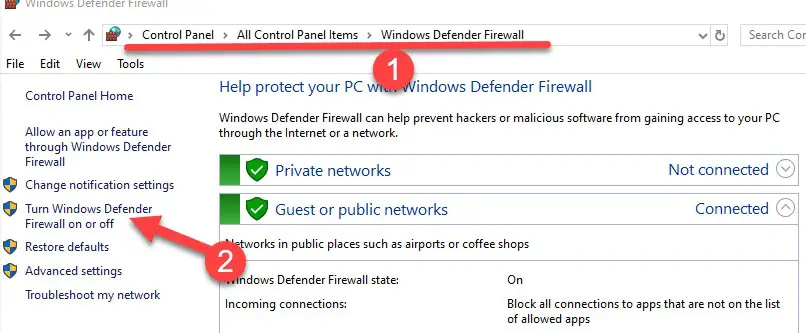
7) Depending on the connectivity type, you can turn off the Windows firewall. If you are not sure about it, then turn off both (Private and Public network settings). This will entirely turn off the network protection. It is highly recommended to put back the settings once the TFTP test is completed.
If you are not convinced about switching off the full Windows firewall, then follow the below step to allow particular TFTP traffic only.
How to Enable only TFTP Traffic in Windows Firewall
It can be done in two ways.
- Allow the TFTP application
- Allow the TFTP protocol.
Enable TFTP Application.
This method depends on which program you are using to connect the TFTP server. In our case, we are using the built-in Windows TFTP client. So, we need to allow the appropriate .exe file through the Windows firewall. If you are using any other third-party tools, you need to call those .exe files as shown below.
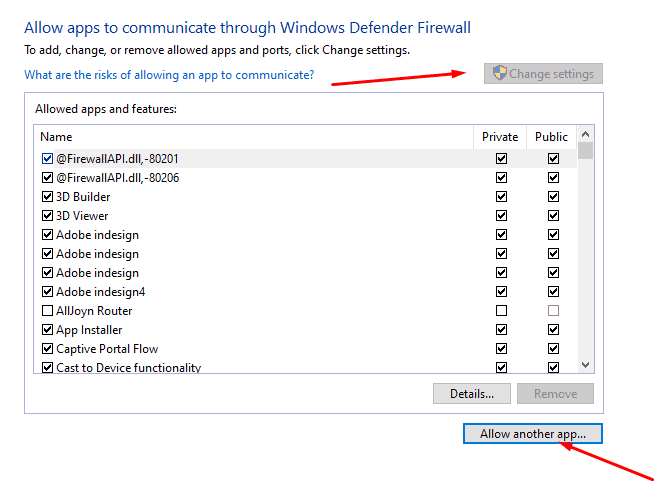
 Go to the same Windows defender firewall settings in Windows 10 or Windows 11. Click on ‘Allow an app or feature….’ Option.
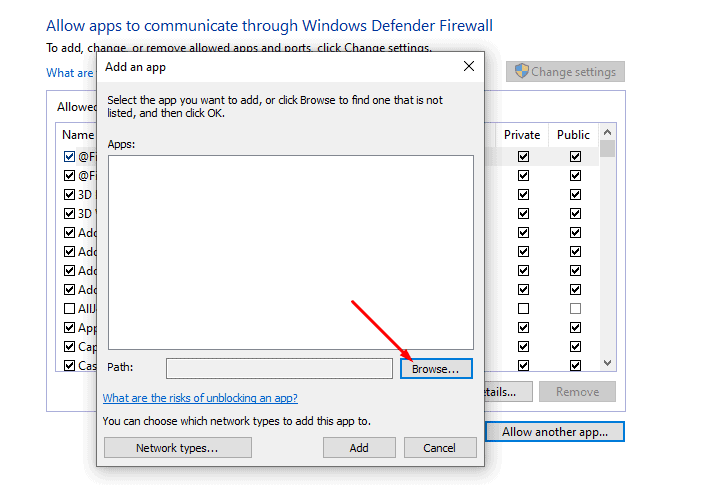
9) Mostly you will not find the TFTP app on this list. Click on the ‘Change Settings’ button at the top right, ‘Allow another app.’
10) Browse the TFTP.exe, which is located under the system32 folder. If you are using any third-party TFTP clients; you need to browse the particular exe file from its location.
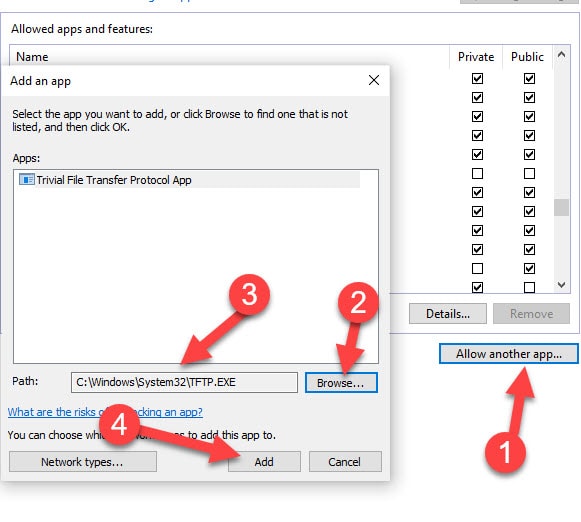
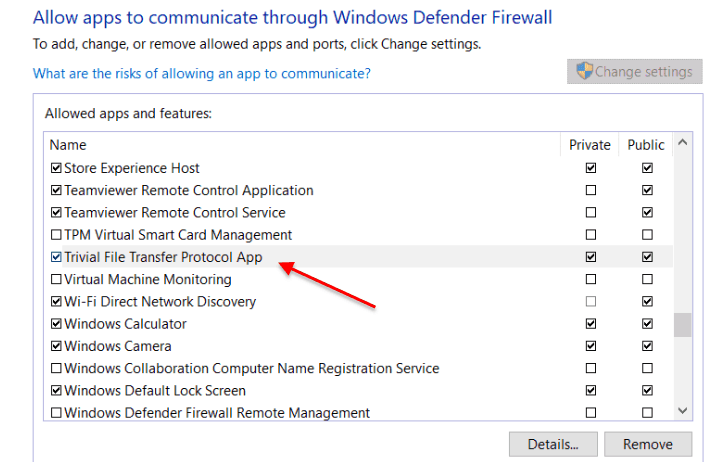
11) Click add to give the exception in the Windows. In this way, the Windows defender firewall will allow incoming and outgoing traffic of the TFTP.exe program without any restriction.
Allow TFTP Protocol in Windows 10/11 Firewall
Let’s assume you use multiple tools and programs which use the TFTP protocol. It is not advisable to follow the earlier step and add each program to the firewall. Instead of that, we can add the common TFTP protocol.
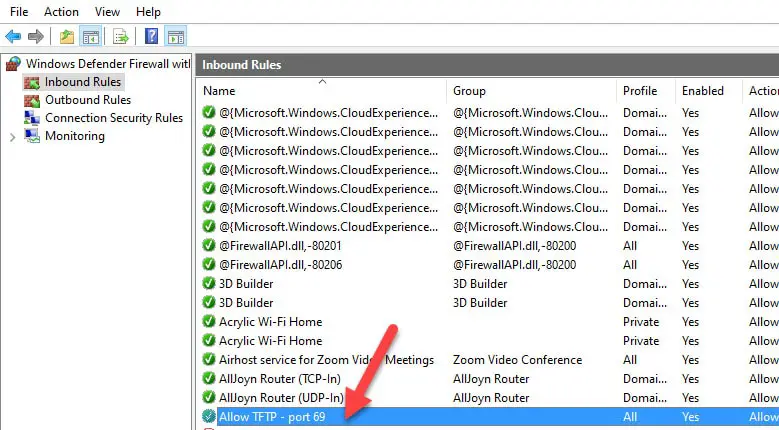
TFTP uses TCP port 69. We will simply enable this port for incoming and outgoing traffic.
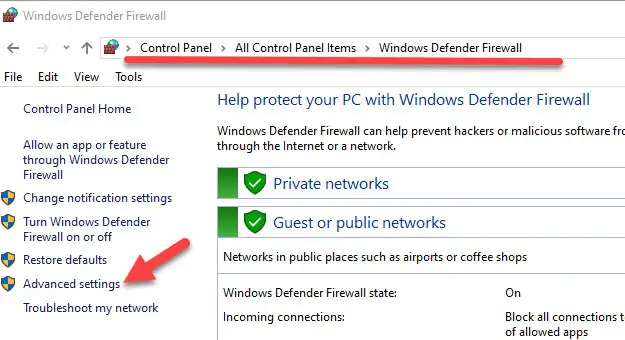
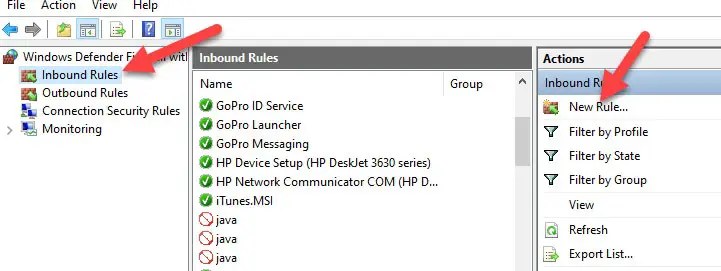
12) In the usual Windows defender firewall settings page, click on ‘Advanced Settings.’
13) In the ‘Inbound Rules’ create a new rule.
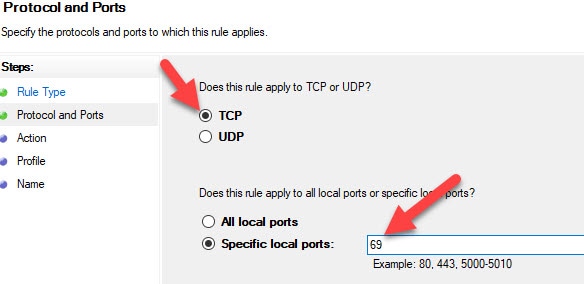
14) Select ‘Port’ and enter 69 as TCP port.
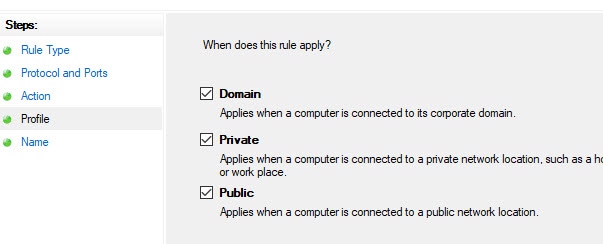
15) Make sure that ‘Allow the connection‘ is selected on the next screen. Also, select all 3 network types.
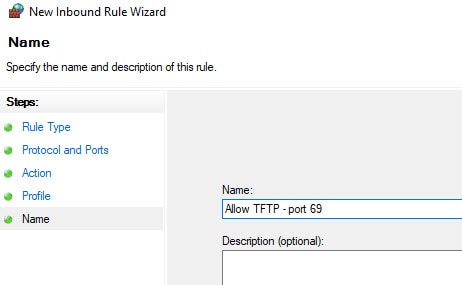
16) Give a name to the rule and press OK.
17) Make sure it is enabled and listed in ‘Inbound Rules’.
18) Repeat the same steps in ‘Outbound Rules’
With these above steps, your Windows 10/11 PC is ready to use the TFTP client.
Test Windows TFTP Client on Windows 10/11
Let’s assume that the TFTP server setup is done and files are available at the correct location. Before you download a file from the TFTP server, you must know the right file name with the extension.
In this example, I’m going to download a file called ‘tftp.zip’ from server 192.168.1.244. We use the GET command to download a file.
Type the below command in the command prompt (you must have a working network communication with the server, the ping command is handy to confirm the connectivity)
Tftp -i [server IP address] GET [file name with the expension]
The below message indicates that the file transfer is successful. The file will be downloaded at the location where you execute the command. In this case, it is C:UsersDinesh folder.

To upload a file using the TFTP client, use the following command. We use the PUT command to upload a file.
Tftp -i [server IP address] PUT [path of the file with the expension]
The below command output shows the successful file upload to the server by the Windows TFTP client. The file will be uploaded to the root of the TFTP server. We do not have any option to change the upload location.

As I’m using the Solarwind TFTP server in this example, the above command uploaded the file to this root location.
There you go, we learned how to install the built-in TFTP client on Windows 10/11 and how to ensure it works fine by modifying the firewall settings. Also, we showed the simple steps to upload and download a file using the TFTP client.
Network admins use TFTP Servers every day to transfer images, configuration files, firmware, etc. to their networking devices.
TFTP is simple on its own and does not need any sophisticated messaging to work.
Of course, having no overhead is terrific, but there is a downside; it does not provide any encryption and authentication mechanisms.
Although TFTP has no built-in security, network admins use it for simple and fast file transfers within LANs.

And best of all, it can be used for remote connections by hardening its security with the right server/client software.
In this step-by-step tutorial, you’ll learn how to set up and configure TFTP on Windows 10.
We’ll learn how TFTP works, and how to set it up on the client and server.
Let’s get started!
What is TFTP?
TFTP (Trivial File Transfer Protocol) is a simple file transferring mechanism developed as a “lighter” version of FTP.
It attempts to over-simplify and downsize the functionality of FTP.
Instead of using the full TCP implementation, TFTP relies on the connectionless and simple UDP transport over port 69.
TFTP only allows unidirectional file transferring.
It provides zero control and has low overhead.
The original idea of creating TFTP was to provide booting for disk-less computers or workstations that didn’t have enough memory or disk.
These disk-less workstations usually do not have access to the full TCP/IP stack, so they need to obtain configuration information such as DHCP or BOOTP from another server.
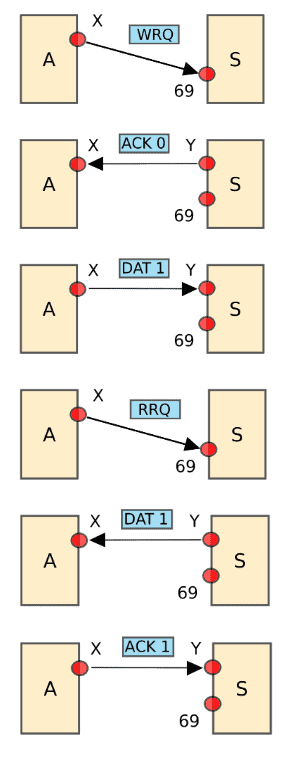
TFTP uses a client/server communication model.
As as you can see from the message exchange below, the TFTP server sends a block of data and waits for the acknowledgment before sending the next one.
A host sends a Request to Write (WRQ), the server responds with an Acknowledgement (ACK), so the host sends data.
The host can also send a Request to Read (RRQ) then the server sends the data and waits for an acknowledgment.
Today TFTP is commonly used for transferring configuration files and firmware images from and to networking devices.
It is also used for network booting by diskless nodes that need booting from the LAN.
TFTP is very easy to implement and use.
But it is not a secured transfer method.
It does not provide a login or access control mechanism, so it is more common in LANs.
Preparing your TFTP Environment
A TFTP server is a must-have piece of software in every network admin’s toolkit.
Cisco, Huawei, Netgear, and many more network appliances use TFTP for upgrading, backing-up, and saving configuration files and firmware.
Fortunately, you can set up and configure a TFTP server on your Windows 10 machine. You’ll need the following post if you’re looking for a TFTP client for Windows 7
SolarWinds Free TFTP Server is lightweight and compatible with Windows 10.
It is a standalone free tool use for fast and easy network file transfers.
Download TFTP Server Free!
Prerequisites Before We Start
When setting up your TFTP server for the first time, consider the following requirements:
- Download the Free TFTP Server To start, you’ll need to get the software. Download SolarWinds Free TFTP Server from its official site. The software is 100% free.
- Have Admin Rights Setting a TFTP server requires an administrator account.
- Have a Root Folder Ready In the end, the idea of using TFTP is to transfer files. Since you are configuring a TFTP server, you’ll need to have a folder storing all transferable files, such as OS firmware, configuration files, DCHP, etc.
- Port forwarding TFTP clients might be able to access the server within the local network area without any issues, so if you don’t need remote file transfers, skip the port forwarding. But if TFTP clients are located across the WAN, they need their traffic to be forwarded to the correct destination. Port Forwarding is a setting in the local router that redirects requests from IP address and port number from WAN to another service on the LAN. To allow TFTP requests from remote TFTP clients into your LAN, you will need to log into the router and forward the UDP port 69 to the IP address of your server.
- Configuring Port Forwarding This varies from router to router. Generally, most routers have it under Advanced Setup > NAT > Port Forward. Make a new entry on the list as Port (69) > UDP > IP Address (your IP)
- Allow local firewall rules The local firewall might block TFTP file transfers. To allow the TFTP client to successfully request data to the TFTP server, avoid any firewall that might be blocking the connection. If possible, configure the firewall inbound/outbound rules to allow TFTP traffic. In the same way, make sure that there are no local firewalls or routers with ACLs blocking the TFTP connection.
Setting up a TFTP Server on Windows 10
So, now you have the TFTP environment ready.
You downloaded the TFTP server software, have admin rights on the server, have the root folder with all files, made the right configurations on the local router, and you are sure that nothing is blocking your TFTP connection.
Let’s go ahead and install the TFTP server:
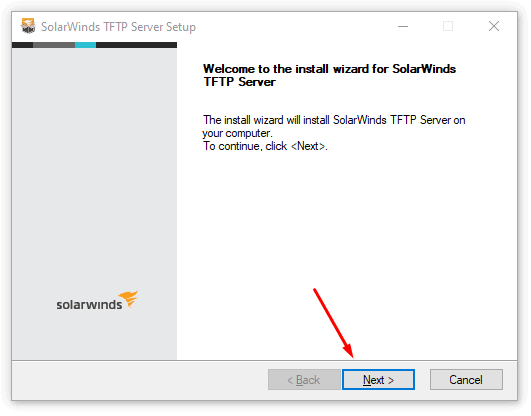
- Unpack the zip drive downloaded from the SolarWinds TFTP server and open the executable file. The SolarWinds TFTP Wizard will open, click on “Next”.
Download Free!

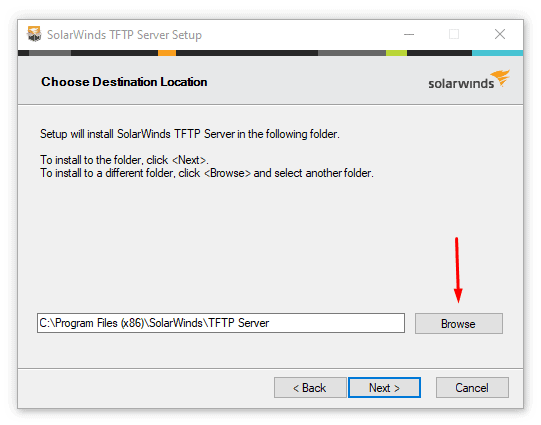
- Click “Browse” to choose a destination location.

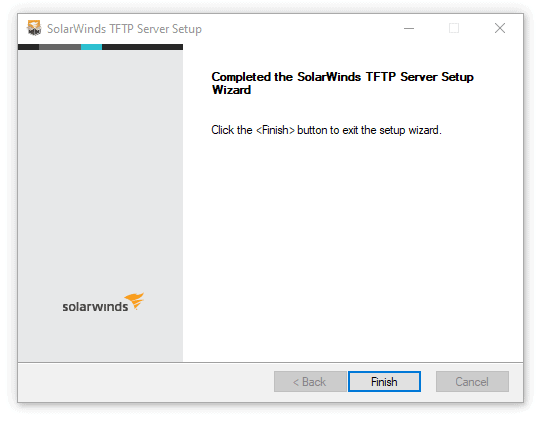
- Once the SolarWinds TFTP Server Setup finishes, click “Finish”.

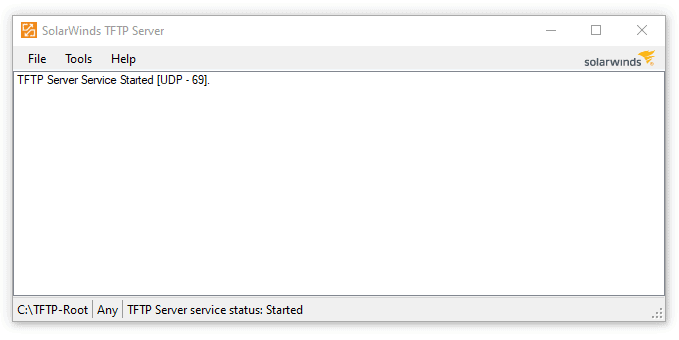
- Open the SolarWinds TFTP Server. The console should look something like this…

Configuring Security
TFTP is known for its lack of security. It does not have any encryption mechanism and does not support any client/server authentication methods.
Without encryption and authentication, a hacker could easily spoof the TFTP server and compromise the authenticity of critical files such as routing configuration and DCHP.
But despite that lack of security, TFTP is still the preferred method for quick and easy file sharing on networking devices.
Having no encryption and authentication makes TFTP fast and without much overhead.
Still, some TFTP server software can provide some features that guarantee a certain level of security.
For example:
- Restrict the use of the server to a certain range or single IP addresses.
- Permit or restrict certain types of file transfers. For example, only send, receive, or both.
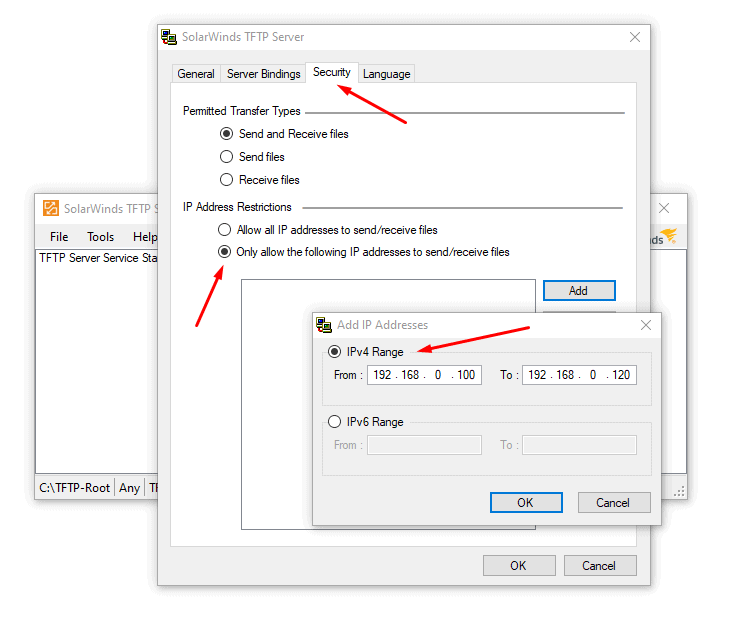
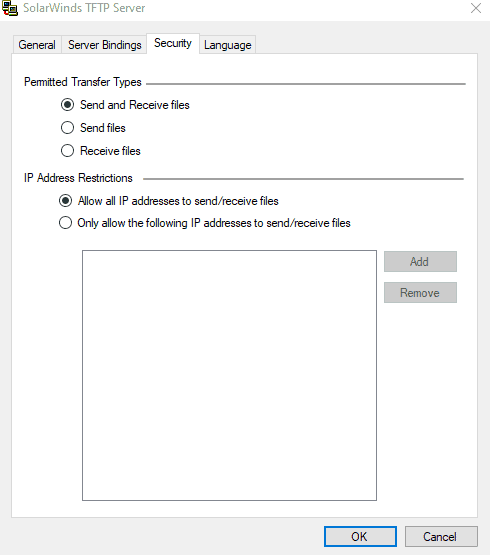
To configure IP address restriction and file transfer types in the Solarwinds TFTP server
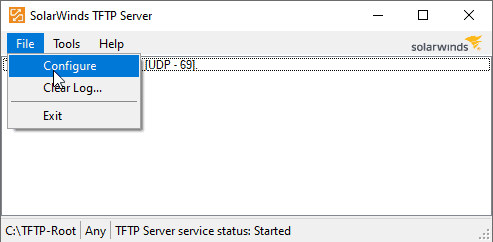
- Go to File > Configure.
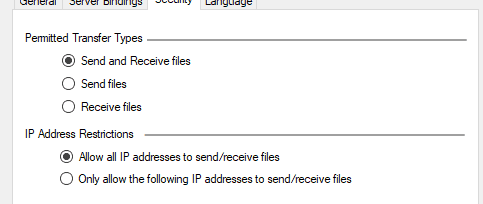
- Go to the Security tab.

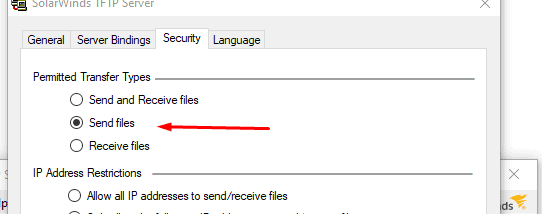
- By default, SolarWinds TFTP Server will allow all IP addresses to send/receive files. But you may also want to restrict the access to the TFTP server to specific IP addresses. If you want to restrict the server to a few networking devices, go ahead and click on “Only allow the following IP addresses to send/receive files,” then click on “Add”.
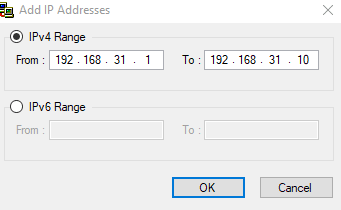
- In the following screen, you can define the IP address or range of addresses. For example, we are restricting access to sending/receiving files to the devices with IP from 192.68.0.100 to 192.168.0.120.

- In the same Security tab, you can also restrict transfer types. When you restrict IP addresses and transfer types, your security can be dramatically improved. For example, you may only want to allow sending files to a specific router.

- Click Ok.

Binding the Server to Specific IP addresses, Subnet, or interfaces
The tool we’re using also comes with “Server Bindings,” which is another fantastic feature that can improve security.
Server Bindings is similar to restricting IP addresses, except that you can customize this restriction based on your local TFTP server network interfaces.
If your server has more than one interface, you can customize its connectivity based on “source IP” or “subnet.” In other words, you can limit the number of available interfaces that the TFTP server is listening to.
By default, the TFTP server will process the requests from clients received from any network interface
- If you want to customize the server’s bindings, for example, allow an entire subnet (from an interface) and allow a single IP on another, go to File > Configure > Server Bindings, and click on “Use custom server binding.”
- You also have the option to bind to all addresses in
 the list that you provided or go through the list in descending order. Once, you finished, click “OK
 the list that you provided or go through the list in descending order. Once, you finished, click “OK
Configuring the TFTP Server
First, let’s make sure that the service has started.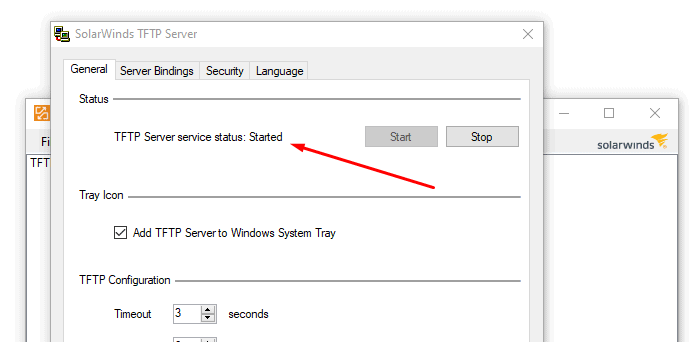
If you find the following message: “TFP Server service status: stopped,” try clicking the “Start” button to start the TFTP service in the server application and wait a couple of seconds.
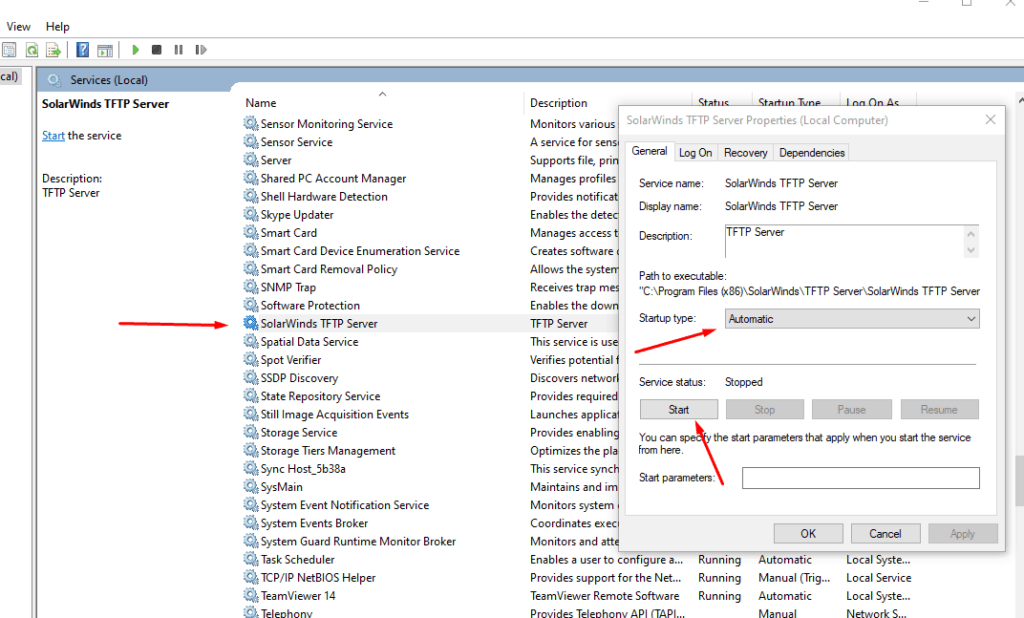
If it goes “stopped” again, try the following.
- Go to Windows services. Open Windows search bar and type “services”. Or type the Win+R keys to open the Run application and type “services.msc”. Make sure to run “services.msc” as an administrator.
- Find the service “SolarWinds TFTP Server” and double-click it. Make sure that its Startup Type is “Automatic” and if you see the Service status: Stopped, click the “Start” button.

- If you still see the service “Stopped,” disable any Antivirus or Firewall and test again. One of these applications might be blocking communication through port 69.
Configuring Other Parameters
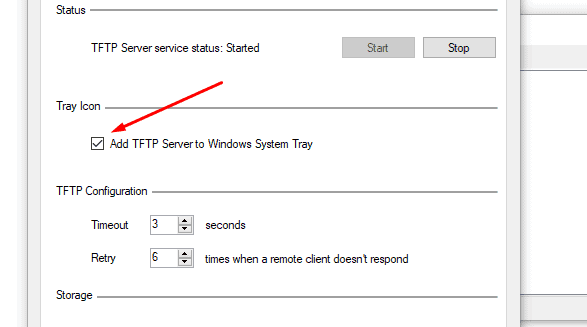
- A useful setting for easier access to the application is to enable “Add TFTP Server to Windows System Tray”.

- You can leave Timeout and Retry options, with their default settings unless you are testing the TFTP environment
- TFTP timeout: This is the TFTP session timeout in seconds.
- Retry: The number of times, the server will retry to transmit a packet when the TFTP client doesn’t respond.
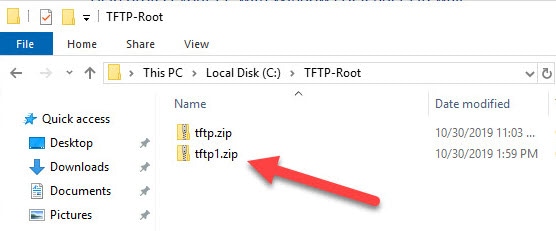
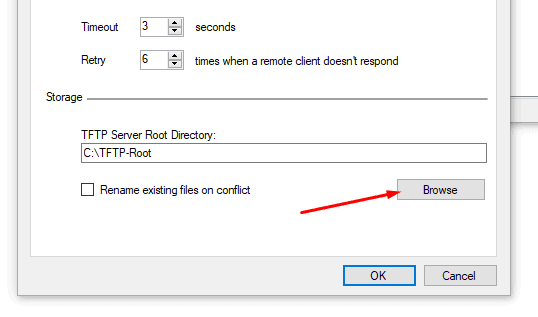
- Finally, let’s set up the “TFTP Server Root Directory”. This is the folder where all your files received from other devices will be stored, or where you will store the files that will be sent to other devices.
- Go to “Storage” > “Browse”. Choose a new folder or leave the “C:TFTP-Root” folder created by default.
- Click on “Ok”.

Setting up the TFTP Client
The TFTP Client depends on the successful installation and configuration of the TFTP server. The client is probably the one that you will be using the most.
The only task you might need to do with the server is to update the shared files and input/remove some IPs.
When using the TFTP server, don’t forget about the following settings (already mentioned).
- The TFTP server service has to be up and the application is running.
- Configure the right TFTP folder.
- Make sure no Firewall and Antivirus is blocking the application and connection.
- If you are file sharing to a remote location, don’t forget about port forwarding.
- Make sure all your TFTP clients can reach your TFTP server.
From the TFTP client
Most networking devices already have TFTP enabled. For example, to transfer a Cisco Switch image from the server to the device, you would have to specify the IP address of the TFTP server on the client (Cisco Switch).
As you can see from the screenshot below, this switch does not have any configuration or image filename.
It does have a default address and a TFTP address. So to receive these missing files, you can use the IOS command “copy tftp startup-config [ip address of the TFTP server]”.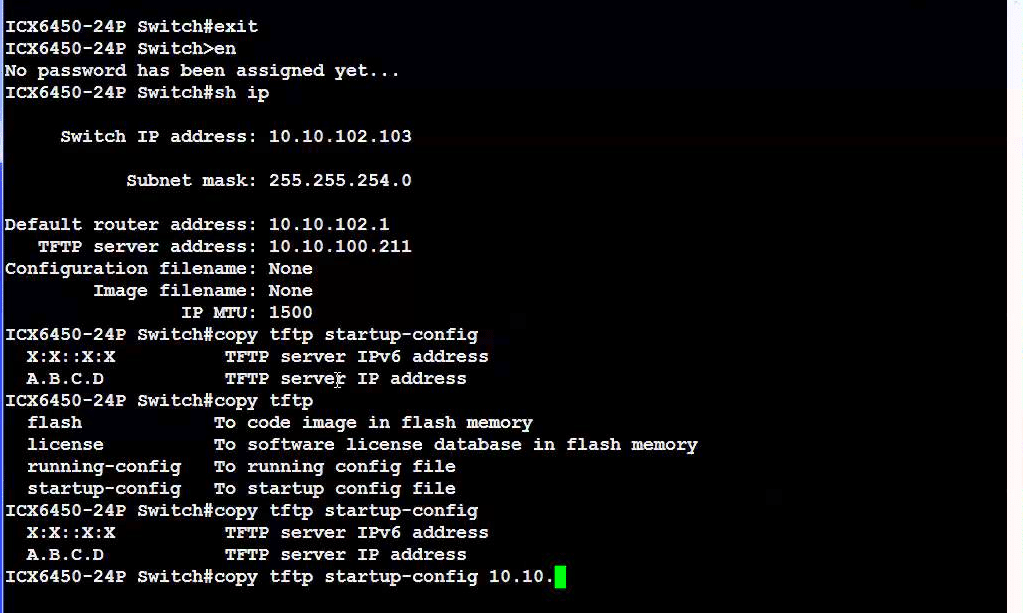
Another example, from a Huawei Switch (screenshot below).
The first line (TFTP get) downloads the files from the TFTP Server (192.168.0.2) to the switch.
The second line (TFTP put) uploads the files from the switch device to the TFTP server.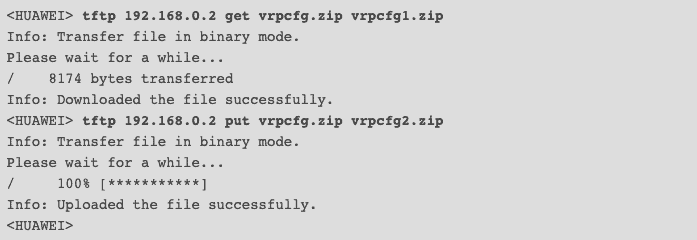
But networking devices are not the only ones that can run TFTP clients. You can also run the client on a Windows system.
Install TFTP Client on Windows 10
Fortunately, most Windows versions (servers and workstations) come with the TFTP client feature built-in, you only have to enable it.
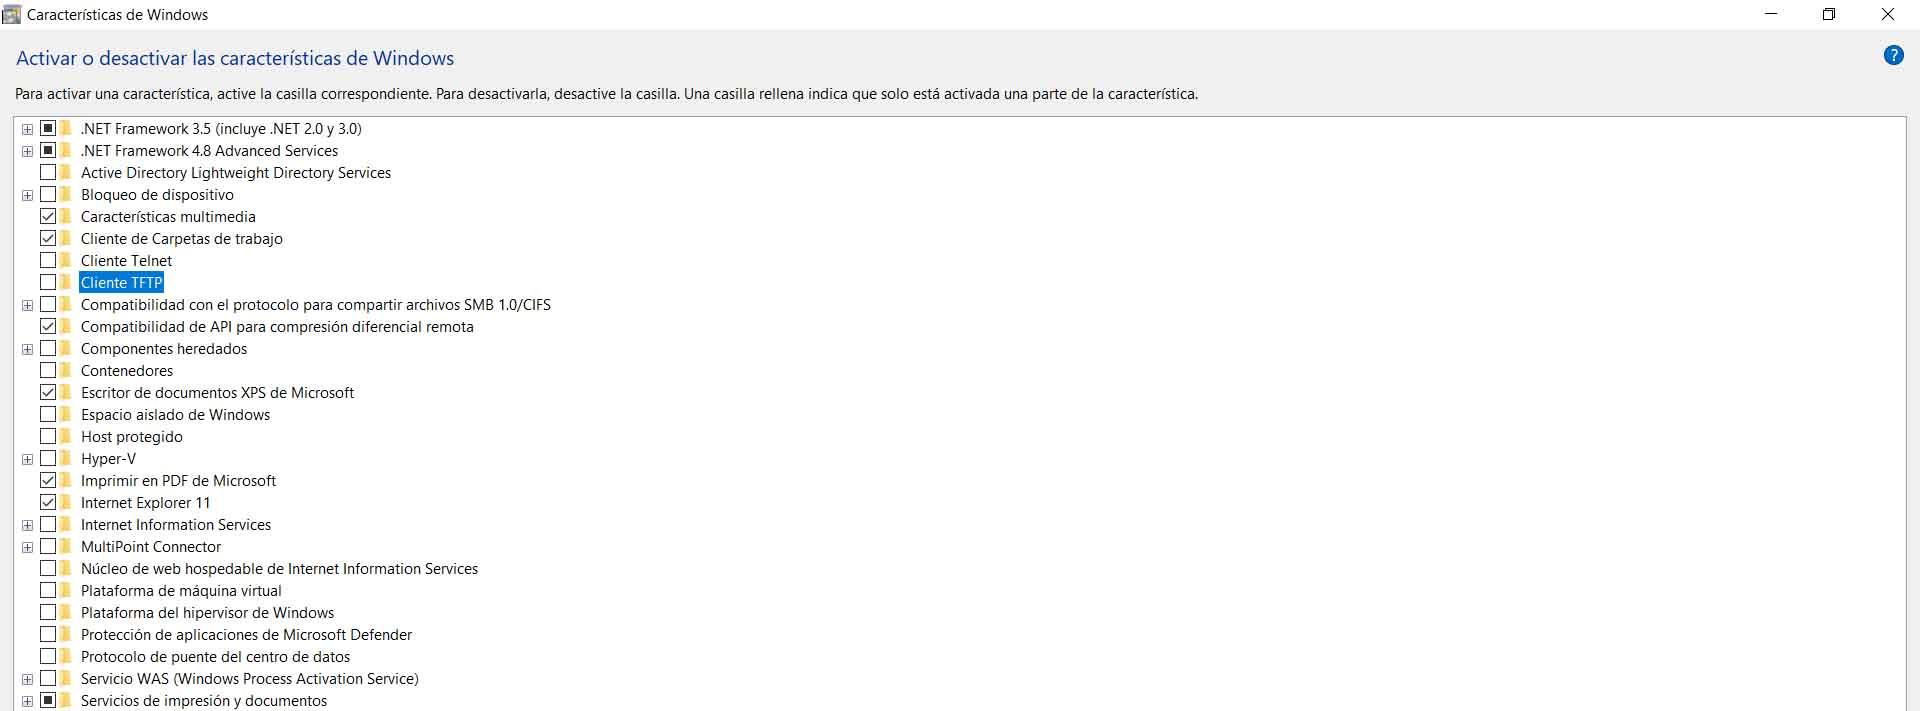
- Go to Windows Start and search for “Control Panel” then click on “Programs”

- Open Turn Windows features on or off.

- From the Windows Features list, find the TFTP Client feature and turn it on. Wait for the installation to complete and click “Ok”.

TFTP is considered an unsafe protocol, so Windows does not allow it by default. You will have to either turn off the Windows firewall (which is not recommended) or add an exception on the Firewall for the TFTP Client.
Let’s open the Windows Firewall and configure the rules and exceptions to allow TFTP.
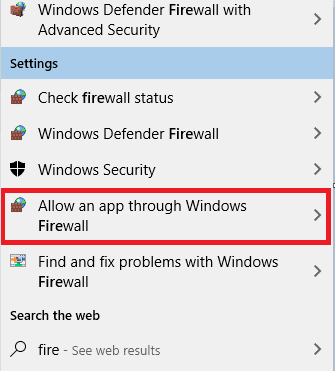
- Open the Windows Start menu and type “Firewall” > open the “Windows Defender Firewall with Advanced Security,” and run it as an Administrator.
- Make sure that the firewall is enabled, and click on “Allow an app or feature through Windows Defender Firewall”.

- Click on “Change Settings,” then “Allow another app”.

- Click on “Browse” and find the TFTP.exe from the System32 folder and click on Open. Then click on “Add”.

- You can now, find the application on the Windows Defender Firewall, enable both Private and Public.

Transferring Files with TFTP
Now that you enabled the native TFTP client in Windows, you can use it to transfer files between the TFTP server.
As mentioned before, make sure that the files are present in the root folder and that the client and server can reach each other.
The TFTP client runs through the command line interface. The command sytax is:
tftp [-i] [<Host>] [{get | put}] <Source> [<Destination>]
Where:
- s
- – i : Transfer in binary mode [also called octect]. If you don’t specify this parameter, the transfer goes in ASCII mode, which is a regular text file transfer.
- Host: Specifies the local/remote computer (server).
- Put: transfers the source file [on the local computer] to the file on the destination [remote computer]. Use this command to send a file.
- Get: Downloads [transfers] the file from the destination remote computer to the local computer. Use this command to receive a file.
- Source: Specifies the source file [with the path] to transfer.
- Destination: specifies the destination file [with the path] to get.
An example of using the TFTP command on Windows 10:
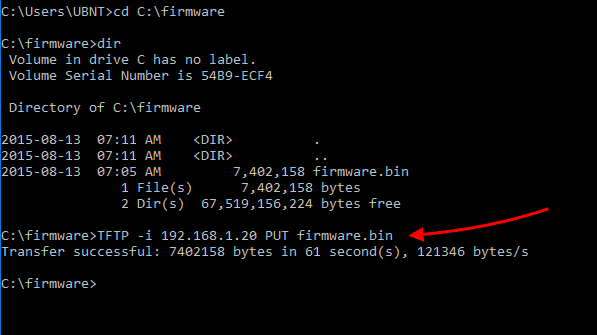
In this example, we will upload a firmware image file [.bin] to the TFTP server [192.168.1.20]. We will use the TFTP client in Windows and transfer the file using binary mode.
- Let’s open the Windows command prompt. Open the Windows search and type “cmd,” or press the Win + R > Open the Run and type “cmd”.
- Go to the directory where the firmware is stored (or specify the entire path).
- Type the command TFTP -i 192.168.1.20 PUT firmware.bin

Final Words
TFTP is a terrific and often misunderstood transferring method.
Although it has a bad reputation for its lack of security, it doesn’t have much overhead, making it a reliable, quick, and easy transferring mechanism.
You can use it in enclosed LANs or WANs, where speed reigns over security.
Setting up a TFTP server on Windows 10 is straightforward. Just download the SolarWinds Free TFTP Server and configure it, as shown in this tutorial.
If your TFTP client is a networking device, it will likely have the TFTP service already enabled. But if you want to transfer files to a Windows 10 workstation, you can enable the TFTP built-in feature.
We hope that this tutorial was informative.
Please comment if you have any questions about the setup and configuration of the TFTP on your Windows 10.
Setup & Configure TFTP On Windows 10 FAQs
What is TFTP?
TFTP stands for Trivial File Transfer Protocol. It is a simple file transfer protocol used for transferring files between devices on a network. It is commonly used in network devices such as routers, switches, and servers.
How do I use TFTP in Windows 10?
To use TFTP in Windows 10, you can use a TFTP client such as SolarWinds TFTP Server or TFTPD32. These programs will allow you to transfer files to and from a device using the TFTP protocol. You can also use the built-in «tftp» command in Command Prompt to transfer files.
Can I use TFTP to transfer files between two Windows 10 computers?
Yes, you can use TFTP to transfer files between two Windows 10 computers by using a TFTP client on both computers. You will need to configure the IP address and directory settings on the TFTP client to ensure that the files are transferred properly.
Is TFTP a secure protocol?
No, TFTP is not a secure protocol as it does not provide any encryption or authentication. It is recommended to use more secure protocols such as SFTP or SCP for transferring sensitive files.
How do I troubleshoot TFTP errors in Windows 10?
To troubleshoot TFTP errors in Windows 10, you can check the TFTP client settings to ensure they are correct. You can also check the firewall settings on the computer to ensure that TFTP traffic is not being blocked. Additionally, you can check the event logs on both computers for any error messages that may indicate the source of the problem.
Are there any alternatives to TFTP for file transfer?
Yes, alternatives to TFTP include FTP (File Transfer Protocol), SFTP (Secure File Transfer Protocol), and SCP (Secure Copy Protocol). These protocols provide more security and advanced features than TFTP.
Обновлено 12.06.2017
Все добрый день, сегодня я вам хочу рассказать, как включить tftp windows 10 redstone. Мы поговорим, зачем вообще нужен этот tftp клиент и где его можно применить. Данная статья будет полезна начинающим сетевым инженерам и системным администраторам, которые по каким-то причинам еще не успели познакомиться с данной сетевой технологией и не используют ее в своей практике, потратьте 5 минут на ее изучение и вы поймете, что она вам сэкономит потом часы.
Tftp в windows 10 redstone
И так, tftp это простейший протокол обмена данных, чаще всего используется для обновления прошивок на сетевых устройствах Juniper или Cisco, это как пример. Прошивка кладется на некую шару работающую по протоколу tftp и вы с помощью клиента забираете ее. Вот как это выглядит схематично.

Установка telnet windows 10 redstone
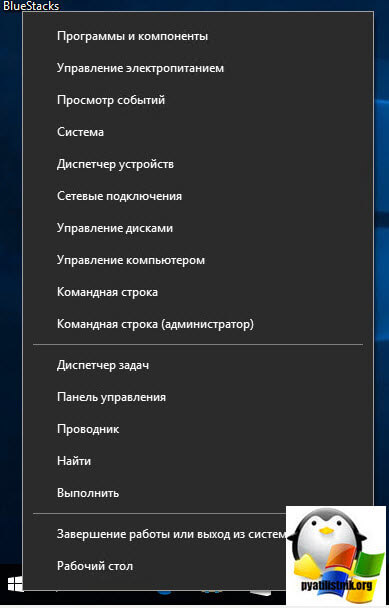
И так продолжаем наше изучение десятки, в прошлый раз я вам рассказывал, как раздать вай фай с ноутбука виндовс 10, двигаемся дальше. Для того, чтобы установить tftp клиент в данной операционной системе, есть три способа.
- Графический метод
Щелкаем правым кликом по кнопки пуск и из контекстного меню выбираем пункт панель управления.
Теперь в пункте просмотр вы выставляете крупные значки и переходите в пункт «Программы и компоненты».
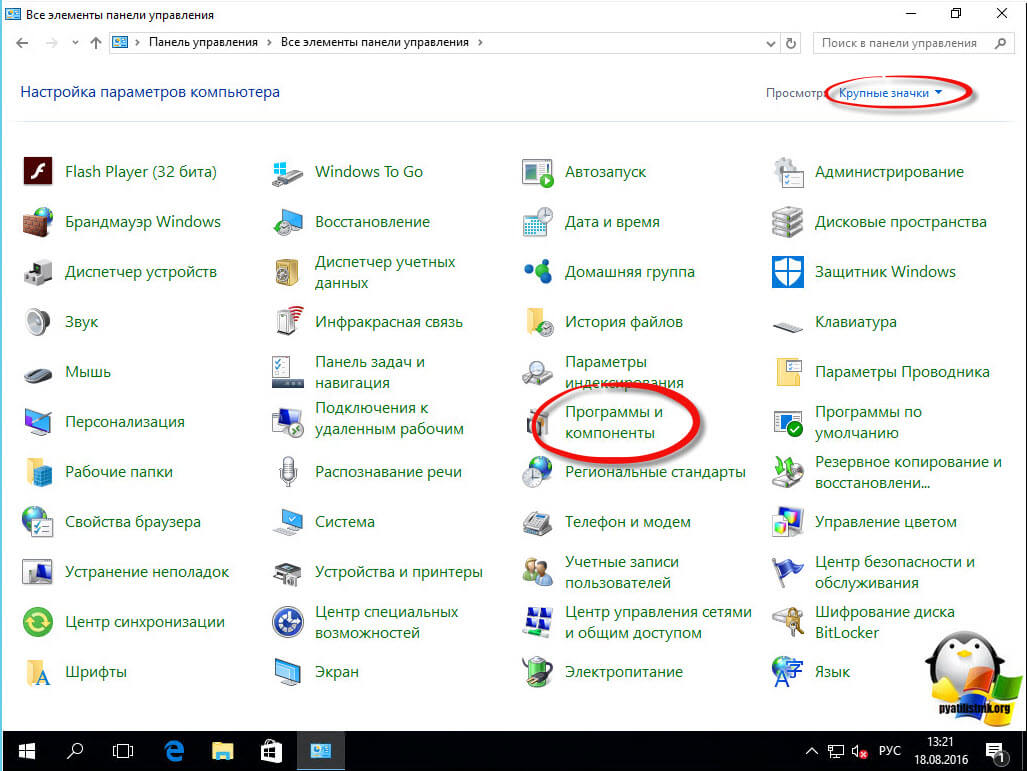
Далее переходим в пункт «Включить или отключить компоненты Windows» именно тут мы с вами произведем установку tftp для windows 10 redstone.
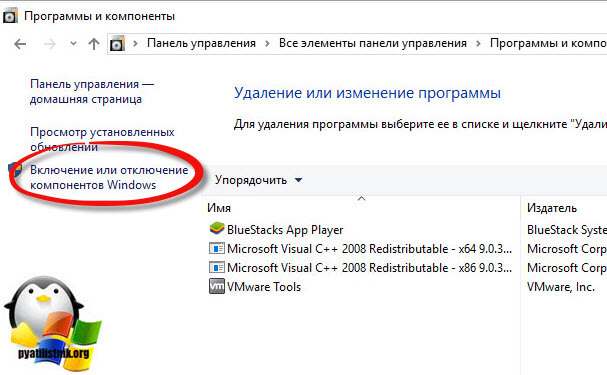
В открывшемся окне вы видите какие компоненты можно включить и тем самым доставить в систему, выбираем «Клиент TFTP».
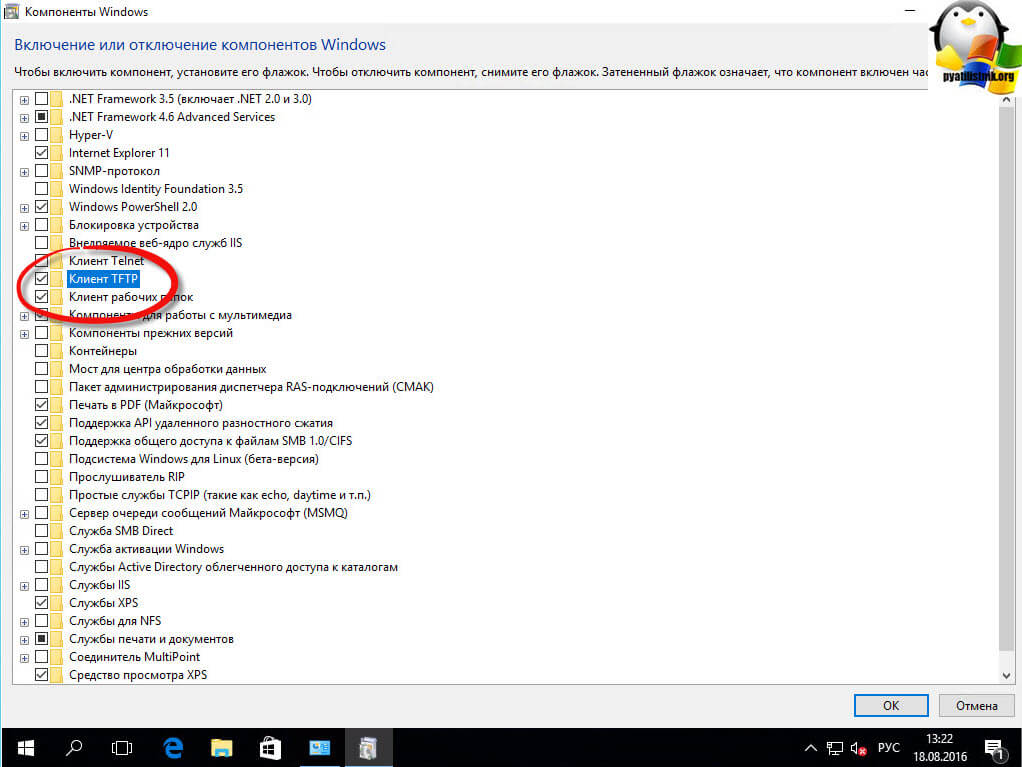
Начнется установка tftp в windows 10 redstone.
Через пару секунд вы увидите, что компонент установлен в операционную систему.
- С помощью утилиты DISM
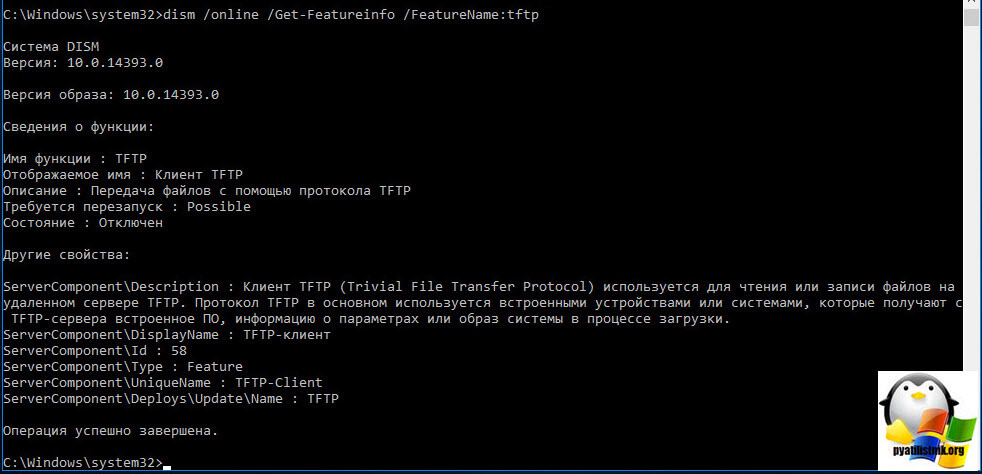
Да старая и добрая утилита DISM так же может помочь в нашей задаче, открываете командную строку от имени администратора и пишите вот такую команду
Dism /online /Get-FeatureInfo /FeatureName:TFTP
Вы увидите текущий статус данного компонента.
Ну и вводим команду для установки tftp клиента в десятке
Dism /online /enable-feature /FeatureName:TFTP /all
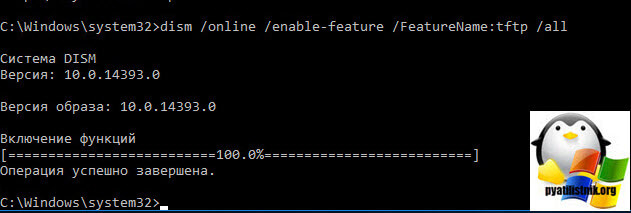
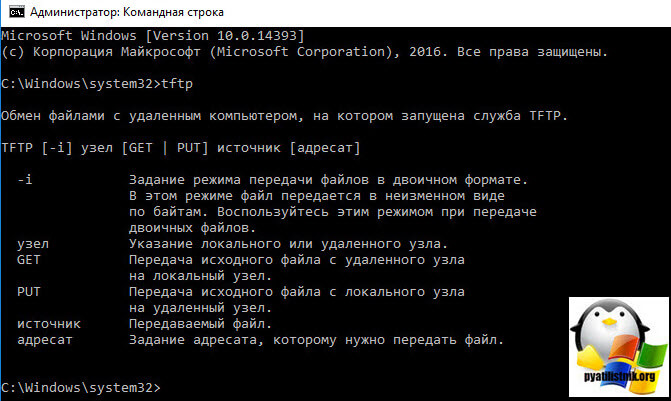
В итоге, теперь если ввести в командной строке tftp, то вы получите справку по данной команде.
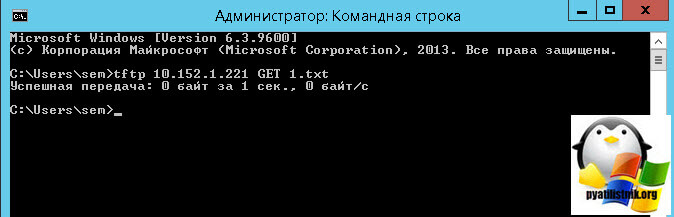
Давайте теперь установим TFTP сервер. для проверки. Я вам уже рассказывал про tftpd64 service edition. Я положил на свой сервер файл 1.txt и его я хочу передать по tftp. Открываем командную строку в Windows 10 redstone и вводим команду.
tftp 10.152.1.221 GET 1.txt
10.152.1.221 это ip адрес сервера.
В итоге вы увидите, что файл скачался. Скачивается он по умолчанию в тут директорию из которой запускается команда tftp. В данном случае C:userssem.
Можно посмотреть логи на сервере tftpd64 service edition.

Содержание
- Что такое протокол TFTP?
- Для чего используется TFTP?
- Чтение и запись файлов
- Устройства без жесткого диска
- Создавать резервные копии
- Проверка вирусов
- Оборудование с небольшой мощностью
- Безопасность, проблема для протокола TFTP
- Как включить TFTP в Windows 10

Это появилось в ранние 1980s , так что это не совсем недавний протокол. Он используется для регулирования передачи файлов между клиентом и сервером. Он работает легко и позволяет отправлять небольшие файлы.
Его название неизбежно приведет нас к тому, что мы сделаем сходство с FTP, который является гораздо более известным и используемым протоколом. Однако есть явная разница, и это то, что TFTP намного проще использовать. Это, по логике, также делает его более ограниченным. Это полезно, например, когда аутентификация пользователя не требуется.
Это, что мы комментируем, также приводит к ограничениям с точки зрения безопасности. К передача файлов и отсутствие необходимости аутентификации приводит к появлению рисков.
Как правило, использует UDP-порт 69 для передачи файлов, хотя это может быть изменено отправителем и получателем. Это важное отличие от FTP, который использует TCP для передачи файлов, и в этом случае он безопасен.
Для чего используется TFTP?
Протокол TFTP был в основном разработан для удаленного чтения и записи файлов через сервер. Но, как мы увидим, у него гораздо больше применений, чем мы упомянули.
Чтение и запись файлов
Основное использование — читать или отправлять небольшие файлы . Например почта или системная папка. Обычно он используется для передачи файлов, используемых для запуска компьютера, или для настройки системы между различными устройствами, которые подключены друг к другу.
Обычно это используется, когда эти устройства подключены к одной сети. Мы видели, что аутентификация не требуется, поэтому за пределами этой сети это может быть серьезной проблемой безопасности.
Устройства без жесткого диска
Он также используется в устройствах, которые нет жесткого диска для хранения файлов. Это позволяет TFTP использовать небольшую часть памяти и, например, иметь возможность загружать сеть или систему.
Это позволяет отказаться от этой памяти, такой как жесткий диск, которая может потребоваться в случае использования других аналогичных протоколов передачи файлов. Это позволит нам запускать компьютер удаленно без жесткого диска.
Создавать резервные копии
Важный момент, который следует выделить и который позволяет выполнять протокол TFTP, — это создать резервные копии . Мы можем сделать это с помощью сетевой конфигурации компьютера. Мы говорим о небольших файлах, которые мы можем легко передать и которые не нужно будет аутентифицировать.
Эти резервные копии также могут быть созданы из конфигурации маршрутизатора. Это позволит нам иметь эти файлы на случай, если возникнет проблема и мы захотим вернуться в предыдущее состояние.

Проверка вирусов
Хотя сегодня это гораздо менее используемый и популярный протокол, чем несколько десятилетий назад, правда в том, что TFTP по-прежнему полезен, когда дело доходит до анализа компьютера для обнаружить возможные угрозы в виде вредоносного ПО.
Он может действовать таким образом, чтобы снизить нагрузку на систему и позволить нам анализировать файлы простым способом. Лица, ответственные за безопасность в определенных случаях, полагаются на этот протокол.
Оборудование с небольшой мощностью
Несмотря на то, что это простой протокол и что сегодня мы можем сказать, что он устарел, если сравнивать его с другими, более новыми протоколами, правда в том, что он все еще используется. Одна из причин — воспользоваться преимуществами его простоты на компьютерах, которые не имеют большой емкости и которым не нужно использовать много ресурсов для передачи файлов или настройки чего-либо.
Обычно он используется в таких устройствах, как маршрутизатор, центральная станция VoIP и т.п. Например, это позволяет обновить прошивку без жесткого диска или возможности что-либо настроить.
Безопасность, проблема для протокола TFTP
Мы видели, что это очень старый протокол и он используется только для основных и конкретных вещей. тем не мение безопасность это проблема, которая присутствует. С одной стороны, передача файлов небезопасна, поскольку не требует аутентификации, но также может служить средством атаки.
Были случаи уязвимости в протоколе TFTP, которые влияют на его собственную работу и заставляют любой компьютер, на котором он включен, быть затронутым. Мы говорим о DrDoS атаки , который, по сути, является DDoS-атакой. Этот тип атаки ищет пакеты запроса на обслуживание или доступа и генерирует большое количество.
Чтобы избежать проблем с безопасностью протокола TFTP, можно отключить его, если мы его не используем. Тем не менее, это то, что команды, которые включили это сегодня, потому что это может быть необходимо.
По возможности лучше всего использовать другие протоколы передачи файлов, такие как SCP или SFTP. Например, Windows 10 этот протокол отключен по умолчанию, хотя его можно включить, если нам это нужно.
Как включить TFTP в Windows 10
к включить TFTP в Windows 10 нам нужно зайти в Панель управления, войти в «Программы» и щелкнуть «Программы и компоненты». Слева мы увидим раздел «Активировать или деактивировать функции Windows». Там мы увидим разные характеристики, которые мы можем добавить, если они нас заинтересуют.
Чтобы включить TFTP, нам просто нужно установить флажок и нажать OK. Процесс займет некоторое время, и он уже будет включен в операционной системе, и мы сможем его использовать. Однако, как мы видели сегодня, он несколько устарел и имеет определенные риски безопасности. Если нам не нужно его использовать, лучше оставить его отключенным.
Короче говоря, TFTP — это простой протокол передачи файлов, который позволяет нам читать или записывать небольшие файлы и обмениваться ими между устройствами. Хотя это старый протокол, сегодня он все еще используется при определенных обстоятельствах.
В данной статье показаны действия, с помощью которых можно включить компонент TFTP Client в операционной системе Windows 10, Windows 8.1 и Windows 7
TFTP (Trivial File Transfer Protocol — простой протокол передачи файлов) используется главным образом для первоначальной загрузки по сети операционных систем бездисковых рабочих станций, для обмена файлами с удаленным компьютером, на котором запущена служба TFTP, а так же для загрузки обновлений и конфигураций сетевых устройств (модемов, маршрутизаторов, систем хранения данных и т.п.). TFTP, в отличие от FTP, не содержит возможностей аутентификации (хотя возможна фильтрация по IP-адресу) и основан на транспортном протоколе UDP.
По умолчанию компонент TFTP Client в операционных системах Windows 10, Windows 8.1 и Windows 7 отключён, но при необходимости можно легко включить его используя любой из способов, которые представлены далее в этой инструкции.
Содержание
- Как включить TFTP Client в окне «Компоненты Windows»
- Включение TFTP Client в командной строке
- Всключение через Windows PowerShell
Как включить TFTP Client в окне «Компоненты Windows»
Чтобы включить компонент TFTP Client, нажмите сочетание клавиш ![]() + R, в открывшемся окне Выполнить введите (скопируйте и вставьте) OptionalFeatures и нажмите клавишу Enter↵.
+ R, в открывшемся окне Выполнить введите (скопируйте и вставьте) OptionalFeatures и нажмите клавишу Enter↵.

В открывшемся окне «Компоненты Windows» установите флажок компонента TFTP Client и нажмите OK.

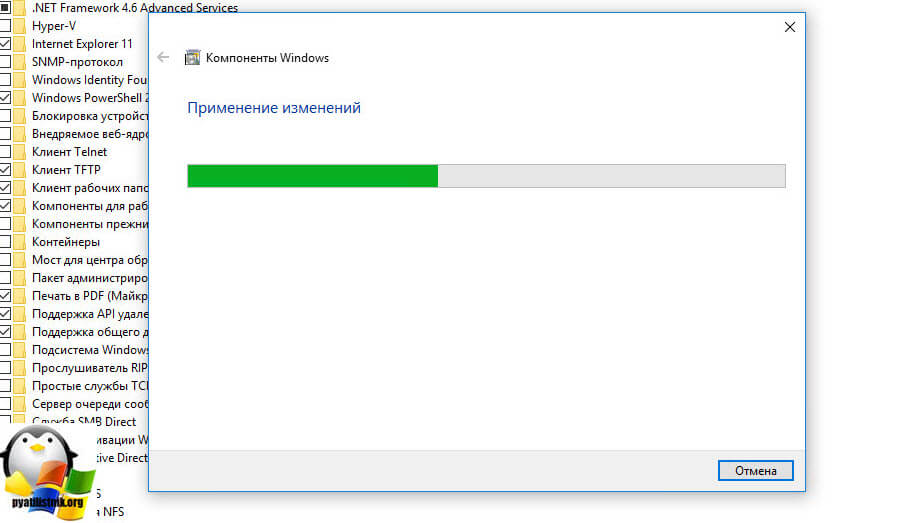
Через непродолжительное время Windows применит требуемые изменения и компонент TFTP Client будет включен.

Включение TFTP Client в командной строке
Вы можете включить или отключить компонент TFTP Client в командной строке используя DISM.
Чтобы включить компонент TFTP Client, запустите командную строку от имени администратора и выполните следующую команду:
Dism /online /Enable-Feature /FeatureName:TFTP

Чтобы отключить компонент TFTP Client, запустите командную строку от имени администратора и выполните следующую команду:
Dism /online /Disable-Feature /FeatureName:TFTP

Всключение через Windows PowerShell
Также включить или отключить компонент TFTP Client можно в консоли PowerShell.
Чтобы включить компонент TFTP Client, откройте консоль Windows PowerShell от имени администратора и выполните следующую команду:
Enable-WindowsOptionalFeature –FeatureName «TFTP» -Online

Чтобы отключить компонент TFTP Client, откройте консоль Windows PowerShell от имени администратора и выполните следующую команду:
Disable-WindowsOptionalFeature –FeatureName «TFTP» -Online

После включения компонента TFTP Client можно использовать утилиту tftp.exe для выполнения необходимых задач.

Если компонент TFTP Client отключен, то при вводе команды tftp в консоли командной строки вы увидите сообщение о том что:
«tftp» не является внутренней или внешней
командой, исполняемой программой или пакетным файлом.

Используя рассмотренные выше действия, можно включить или отключить компонент TFTP Client в операционной системе Windows 10, Windows 8.1 и Windows 7
На чтение 2 мин Просмотров 1.3к. Опубликовано 07.03.2021
Обновлено 12.03.2021
Ищите лучшую программу для работы по протоколу TFTP? Тогда эта небольшая подборка вам поможет. Рассмотрим пару tftp серверов для Windows
Немного теории 😉
Для справки: tftp – это протокол передачи данных, который работает на транспортном протоколе UDP на порту 69. Особой безопасности не предоставляет. Используется для загрузки бездисковых систем (нужен для загрузки первоначального загрузчика) и для обновления прошивок аппаратных sip-телефонов Cisco.
Для себя выявил несколько удобных программ для работы по TFTP.
Содержание
- Программа tftfp32, tftp64.
- Установка tftp64 на Windows 10.
- Pumpkin
Программа tftfp32, tftp64.
 tftpd32 — для 32-битной системы windows;
tftpd64 — для 32-битной системы соответственно.
Данный tftp-сервер можно установить как для старой Windows XP, так и для современной Windows 10. На серверные ОС (Windows 2012 r2, Windows 2016 и др.), tftpd64 и tftpd32 встают тоже без каких либо проблем.
Если выше подключение идёт через роутер то не забывайте пробросить порт 69/UDP.
Установка tftp64 на Windows 10.
- Скачиваем нужный вам tftp сервер windows отсюда.
- Устанавливаем загруженный дистрибутив, не меняя никаких параметров.
- Наслаждаемся работой сервера. Дальнейшая настройка не требуется.

Pumpkin
![]() PumpKIN — это полностью функциональный бесплатный сервер TFTP и клиент TFTP с открытым исходным кодом, который реализует TFTP в соответствии с RFC1350. Он также реализует параметр размера блока, который позволяет передавать файлы размером более 32 МБ, а также параметры размера передачи и тайм-аута передачи, описанные в RFC2348 и RFC2349.
PumpKIN — это полностью функциональный бесплатный сервер TFTP и клиент TFTP с открытым исходным кодом, который реализует TFTP в соответствии с RFC1350. Он также реализует параметр размера блока, который позволяет передавать файлы размером более 32 МБ, а также параметры размера передачи и тайм-аута передачи, описанные в RFC2348 и RFC2349.
Основное использование PumpKIN — обслуживание сетевого оборудования (например, обновление прошивки маршрутизатора).
Скачать данную программу можно с официального сайта

Надеюсь данная статья была вам полезна и вы узнали что то новое для себя. На мой взгляд данные tftp серверы windows являются наиболее удобные для работы.

Тривиальный протокол передачи файлов
На чтение 3 мин. Просмотров 135 Опубликовано 04.07.2019
Trivial File Transfer Protocol – это технология для передачи файлов между сетевыми устройствами и упрощенная версия более надежного протокола передачи файлов.
Протокол TFTP был разработан в 1970-х годах для компьютеров, которым не хватало памяти или дискового пространства для полной поддержки FTP. Сегодня протокол TFTP также используется как на потребительских широкополосных маршрутизаторах, так и на коммерческих сетевых маршрутизаторах.
Администраторы домашней сети иногда используют TFTP для обновления встроенного программного обеспечения маршрутизатора, в то время как профессиональные администраторы могут также использовать TFTP для распространения программного обеспечения по корпоративным сетям.
Содержание
- Как работает TFTP
- Клиентское и серверное программное обеспечение TFTP
- Как использовать клиент TFTP в Windows
- TFTP против FTP
Как работает TFTP
Как и FTP, TFTP использует клиентское и серверное программное обеспечение для установления соединения между двумя устройствами. С клиента TFTP отдельные файлы могут быть скопированы (загружены) или загружены с сервера. Другими словами, сервер размещает файлы, пока клиент запрашивает или отправляет их.
TFTP также можно использовать для удаленного запуска компьютера и резервного копирования файлов конфигурации сети или маршрутизатора.
TFTP использует UDP для передачи данных.
Клиентское и серверное программное обеспечение TFTP

TFTP-клиенты из командной строки включены в текущие версии Microsoft Windows, Linux и macOS.
Некоторые клиенты TFTP с графическими интерфейсами также доступны как бесплатные, например TFTPD32, который включает в себя сервер TFTP. Утилита Windows TFTP – еще один пример клиента и сервера графического интерфейса для TFTP, но есть и несколько других бесплатных FTP-клиентов, которые вы также можете использовать.
Microsoft Windows не поставляется с TFTP-сервером, но для загрузки доступно несколько бесплатных TFTP-серверов Windows. Системы Linux и macOS обычно используют TFTP-сервер tftpd, хотя он может быть отключен по умолчанию.
Сетевые эксперты рекомендуют тщательно настраивать TFTP-серверы, чтобы избежать потенциальных проблем с безопасностью.
Как использовать клиент TFTP в Windows
Клиент TFTP в Windows не включен по умолчанию. Включите его через апплет Программы и компоненты панели управления:
-
Откройте панель управления, затем откройте Программы и компоненты .
-
Выберите Включить или выключить функции Windows в левой части панели управления, чтобы открыть Функции Windows . Либо выполните команду факультативные в командной строке или диалоговом окне «Выполнить».
-
Прокрутите вниз в окне «Функции Windows» и установите флажок рядом с TFTP-клиентом .

-
Вам может потребоваться перезагрузка, чтобы изменения вступили в силу.

После установки вы можете получить доступ к TFTP через командную строку с помощью команды tftp . Используйте команду help или посмотрите страницу справки по командной строке tftp на веб-сайте Microsoft.
TFTP против FTP
Тривиальный протокол передачи файлов отличается от FTP в следующих ключевых аспектах:
- Оригинальные версии TFTP допускали передачу файлов размером до 32 МБ. Некоторые новые TFTP-серверы снимают это ограничение или могут ограничивать его до 4 ГБ.
- В отличие от FTP, TFTP не имеет функции входа в систему, поэтому он не запрашивает имя пользователя и пароль. Избегайте использования TFTP для обмена конфиденциальными файлами – вы не можете защитить их или проверить их доступ.
- Перечисление, переименование и удаление файлов по TFTP обычно запрещено.
- TFTP использует UDP-порт 69 для установления сетевых подключений, тогда как FTP использует TCP-порты 20 и 21.
Поскольку TFTP реализован с использованием UDP, он обычно работает только в локальных сетях.
Установить клиент TFTP
- Щелкните меню «Пуск» и выберите «Панель управления».
- Щелкните «Программы и компоненты» => «Включение или отключение компонентов Windows». …
- Прокрутите вниз, пока не увидите флажок TFTP Client, и ПРОВЕРЬТЕ его, как показано ниже:
- Нажмите кнопку ОК, чтобы начать процесс установки клиента TFTP.
Как включить TFTP в брандмауэре Windows 10?
Разрешить TFTP с изменением конфигурации брандмауэра
- Щелкните меню «Пуск» и введите «Панель управления», затем щелкните значок, когда он появится.
- Щелкните Брандмауэр Защитника Windows.
- Затем нажмите Включить или выключить Защитник Windows.
- Установите флажки, как показано ниже, и нажмите ОК.
- Вы отключили брандмауэр.
Как включить TFTP на моем компьютере?
Установка клиента TFTP
- Перейдите в меню «Пуск» и откройте панель управления.
- Перейдите в раздел «Программы и компоненты», а затем слева нажмите «Включение или отключение компонентов Windows».
- Прокрутите вниз и найдите TFTP Client. Установите флажок. Установка клиента TFTP.
- Щелкните OK, чтобы установить клиент.
- Подождите, пока он завершится.
Как мне подключиться к TFTP-серверу?
Подключение к серверу осуществляется команда меню Сервер-> Подключить. После выполнения этой команды отображается диалоговое окно (Рисунок 2). В окне подключения необходимо выбрать тип подключения (локальный или удаленный сервер) и задать параметры аутентификации.
В чем разница между TFTP и FTP?
TFTP означает простой протокол передачи файлов. TFTP используется для передачи файла из клиент на сервер или от сервера к клиенту без использования функции FTP.
…
TFTP:
| S.NO | Ftp | TFTP |
|---|---|---|
| 2. | Программное обеспечение FTP больше, чем TFTP. | В то время как программное обеспечение TFTP меньше FTP. |
Как проверить, открыт ли порт TFTP в окнах?
Как я могу найти существующий tftp-сервер в нашей сети?
- netstat -an | подробнее. для linux.
- netstat -an | grep 69. В любом случае вы должны увидеть что-то вроде:
- UDP 0 0 0.0. 0.0: 69… Если в вашей системе работает текущий TFTP-сервер.
TFTP UDP или TCP?
TFTP использует UDP в качестве транспортного протокола.
Как узнать, работает ли TFTP-сервер?
Простой способ определить, работает ли служба MTFTP, а также подтвердить IP-адрес, который она прослушивает, — это использовать команда netstat –An на сервере PXE из командной строки и найдите UDP 10.37. 159.245: 69 в обратном направлении. Замените IP-адрес IP-адресом тестируемого сервера.
Как использовать tftpd32 в качестве сервера TFTP?
Как установить и настроить TFTP-сервер в Windows
- Загрузите и установите Tfptd32 / Tftpd64 на ПК с Windows. …
- Откройте программу Tftpd64, нажмите кнопку «Настройки».
- Откроется окно настроек, как показано ниже. …
- Затем выберите вкладку TFTP. …
- В разделе «Безопасность TFTP» выберите вариант «Нет».
Как передать файлы на сервер TFTP?
Скопируйте файл текущей конфигурации с маршрутизатора на сервер TFTP
- Создайте новый файл router-config в каталоге / tftpboot сервера TFTP. …
- Измените права доступа к файлу на 777 с синтаксисом: chmod .
Что такое TFTP-сервер и как он работает?
Trivial File Transfer Protocol (TFTP) — это простой протокол для обмена файлами между двумя машинами TCP / IP. Серверы TFTP позволяют подключаться к TFTP-клиенту для отправки и получения файлов. … TFTP-сервер также может использоваться для загрузки HTML-страниц на HTTP-сервер или для загрузки файлов журнала на удаленный компьютер.
Как мне получить доступ к файлу TFTP?
Находясь в командном интерфейсе, к которому может получить доступ введите «cmd» в строку поиска в Windows, вы можете либо «положить», либо «получить» файл. При получении файл загружается с сервера TFTP, а при установке файл отправляется. Структура команды выглядит так: tftp [put / get] [имя файла] [адрес назначения] ».
Есть ли в Windows 10 встроенный TFTP-сервер?
Установите TFTP-клиент в Windows 10
К счастью, большинство версий Windows (серверы и рабочие станции) поставляются с Встроенная функция клиента TFTP, вам нужно только включить его. … В списке «Компоненты Windows» найдите функцию «Клиент TFTP» и включите ее. Дождитесь завершения установки и нажмите «ОК».
Что такое IP-адрес TFTP-сервера?
Сервер TFTP привязан к локальному IP-адресу (192.168 3. x), и, конечно же, внешний IP-адрес — это другой диапазон IP-сети.
When transferring files across a network then TFTP is a good solution due to its ease of use and easy configuration.
TFTP, or Trivial File Transport Protocol, is a way of sending and receiving files over the internet. It is especially useful in situations where the remote computer that is receiving the file is unmanned.
This makes sending files very easy and does not require human intervention on the other end if configured correctly. The downside is that the protocol is not secure. (If security is a concern then you should look at transfer methods that use encryption.)
If you do a lot of file transfers over your home or business network, then TFTP is a good way to go.
In order to demonstrate this method of file copying and transferring, we will be using a free TFTP tool provided by SolarWinds TFTP. It is a quick and easy way to get the job done, so we will be downloading it from here.
Best of all is that this app is free, so using it will certainly not break the bank. Let’s get started.
![]()
After you download, install the package on your PC and lets get started with the configure.
Before We Begin:
There are a couple of things that we need to do before we can get started. This is all very easy to do so don’t let these steps scare you off. The whole process should only take a few minutes and is very simple to get done. You will therefore need:
- Access to the Administrator account:
This is easy to do. If you are the only person using your computer then the chances that you are the administrator of your account is pretty high. - Download and Install SolarWinds TFTP Server:
In order to use the SolarWinds TFTP Server we will obviously need to download and install it to the computer. The download link can be found above in the intro section. - You will need Port Forwarding for External Connections:
If you are planning on using remote connections with your TFTP server then you will need to use port forwarding. UDP Port 69 is the port type and port number that you will need to use. It will need to point to the IP address of your server on your network from your router in order to allow users from outside of the network. If you only need internal connections, then don’t worry about this step as it is not needed.
Now we can get started with the rest of the setup!
What Kind of Connection Do You Need to Configure?
For external connections you will need to ensure that you configure the security settings appropriately in the application. You can select which IP addresses can send and receive files to help specify which valid hosts can transfer and receive.
Basic TFTP Server Setup
These steps will guide you through the setup process of SolarWinds TFTP Server. This will help you get the ball rolling and allow you to eventually make transfers across multiple networks possible.
- Open the SolarWinds TFTP application
- Next, click file -> configure.
- Choose the correct settings as highlighted in the following screen capture labelled 1, 2 and 3.
- 1 Shows the status of the TFTP service, 2 allows you to set the icon to appear in the taskbar and 3 is where the files will be stored by default. You can choose a different location if you want. We will be leaving ours as the default location but feel free to make any changes if you need to. A popular choice for example is the Downloads folder.

- The next step is locking down some security items. To do that, we need to go to the, you guessed it, security tab within the SolarWinds TFTP Server.
- This part is pretty self explanatory, but definitely worth looking into. We need to set the actions that we want this computer to be able to complete. If you are setting up permissions for a file server, then you might not want everyone to have access to send files to it, and instead you might only want it to server files and have them downloadable. If that is the case then you will want to choose send files. If you want to do both then select Send and Receive files.
- You can further lock down the security of your TFTP server by specifying which IP addresses are allowed to transfer files. You can do this by selecting a range of both IPv4 and IPv6 IP addresses. Our example uses IPv4 and allows 10 IP addresses to send and receive files across the network.
- We enter the range and then set the changes by clicking the OK button. Easy.
We have now configured our TFTP server in just a few simple clicks.
The Fun Part: Actually Utilizing Our New TFTP Server
The setup was pretty straight forward, and using the application is just as easy. Let’s go through the steps to make using our TFTP server a reality.
Port Forwarding Steps
This part is optional because you might not want to access your files from outside the network. This is understandable, especially because TFTP is not designed to be a secure protocol, just a convenient one. However, you can add mappings to port 69 in your router by either finding the NAT or Port Forwarding sections of your router. Each manufacturer is different, so be sure to consult your user manual when attempting to make changes to your router. If in doubt then contact your manufacturer’s support and see if they can assist you with the changes.
For everyone else, lets carry on with our tutorial!
Installing a suitable TFTP Client for Windows
The easiest way to continue is to use the default Windows TFTP that comes with the Operating System. To access it and install it onto our computer we need to do the following:
- Open the start menu and search for the control panel.
- Find Programs and Features and then click on Turn Windows features on or off.
- Find the TFTP client and click on the tick box so that the tick is visible.

- Next, Click on OK to install the client.

- Once finished, you have installed the client.

Important to note that this is the computer without the TFTP server application running, also known as the client PC.
Allow TFTP with a Firewall Configuration Change
There are 2 approaches to getting this right. The first and easiest way is to disable your Windows Firewall. This might be OK in a home setup where you trust all of your devices on the network, or in a corporate environment where management is conducted by the IT department. If you are not willing to do this, then we can create specific rules in our Windows firewall to allow traffic through.
- Click on the start menu and type in Control Panel, then click on that icon when it appears.
- Click on Windows Defender Firewall.
- Next, click on Turn Windows Defender on or off.
- Tick the boxes as seen below and then click ok

- You have now turned off you firewall.
- If you don’t feel comfortable turning off Windows Firewall we create an exception instead. To do this, we must click on Allow an app or feature through Windows Defender Firewall’ in the Windows Firewall settings.

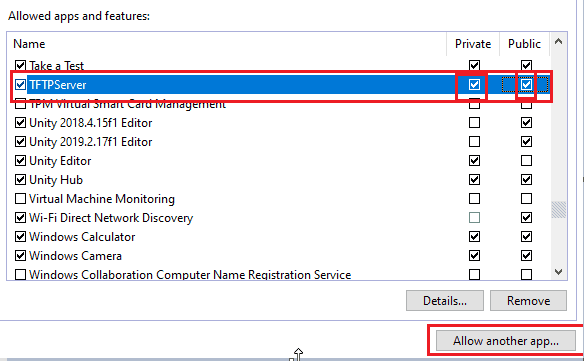
- Click on the Change settings button to add a program.
- Next you must click on Allow another appand then hit Browse.
- Select exein the Windows system32 directory and also TFTPServer in the SolarWinds folder inside Program Files x86.
- Click open and it has been added.
- Tick the boxes called Privateand To finish, click ok.

Transferring Files using TFTP
Let us now do some local tests with the following commands.
- Press the windows key or click on the start menu
- Type cmd and press enter
- You will see a black cmd terminal in front of you. This is where we will type in our commands.
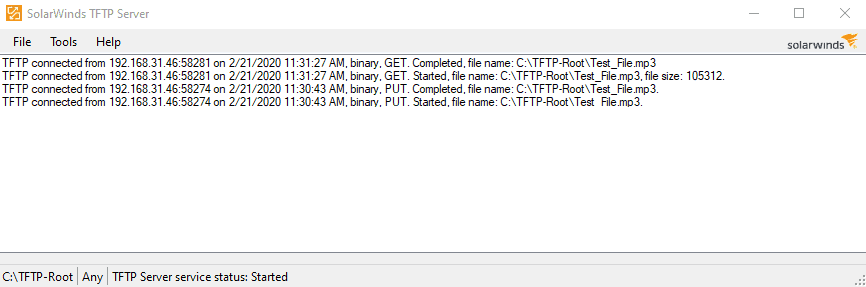
- Change directories to the path where your files are stored for sending and receiving. Let us now send a file. To do this, we use the ‘put’ command.
tftp -i 192.168.31.46 put “Test_File”.mp3
![]()
- If you want to receive a file, then the command we will use is called ‘get’.
tftp -i 192.168.31.46 get “Test_File”.mp3
![]()
We can look at our TFTP Server logs that display when we open our server app and we are greeted with the following records:
Conclusion
Transferring files by using TFTP is easy, fun and free. By leveraging the free TFTP server from SolarWinds, we can turn any ordinary PC into a file server with remote access capabilities.
This is useful for many reasons, and we hope that the tutorial will help you to get the correct access levels set for your own specific needs. Be sure to download the app from above so that you can follow along with this tutorial.
Better yet, check out SolarWinds and look at the multitude of monitoring, troubleshooting and control software that they have on offer. You are bound to find the right tool for the job, regardless of what you are trying to achieve!
Happy file transferring, and we’ll see you next time.
TFTP Server FAQs
What is difference between FTP and TFTP?
FTP is the File Transfer Protocol – the original file transfer system for the internet. TFTP is the Trivial File Transfer Protocol. This is a lightweight service that is usually used on private networks for moving small files to devices. Both systems can be used to either send or fetch a file and neither system includes security features, such as data encryption. As such, neither of these systems should be used to send files to remote devices outside a private network – user SFTP or FTPS instead.
Why do we use TFTP?
The Trivial File Transfer Protocol (TFTP) is fast and feature-free. It does not include authentication procedures, which means it can be integrated into task automation scripts without the need to store passwords but that also means that it shouldn’t e used to move sensitive data. The access security of private networks provides sufficient protection to make TFTP safe to use. However, even in this location, the protocol isn’t a good option for data movements. TFTP is good for moving configuration files to devices and for gathering log files from endpoints on a network to a central location.
Does TFTP use UDP or TCP?
The Trivial File Transfer Protocol (TFTP) is a lightweight file transfer system and as such, can be considered to be a stripped-down version of the File Transfer Protocol (FTP). The lack of features in TFTP makes it quick and also easy to deploy from a script. TFTP lacks authentication and session features, which are hallmarks of UDP. TFTP connections are initially made to port 69. However, continued communication for a transfer is switched to a random ephemeral port – some TFTP implementations choose to use the same ephemeral port number for all of their transactions.