Служба аудио не запущена — что делать?

В этой инструкции подробно о том, что делать в такой ситуации, чтобы исправить проблему и некоторых дополнительных нюансах, которые могут оказаться полезными, если простые методы не помогают. Также может быть полезно: Пропал звук Windows 10.
Простой способ запустить службу аудио
При возникновении проблемы «Служба аудио не запущена» для начала рекомендую использовать простые методы:
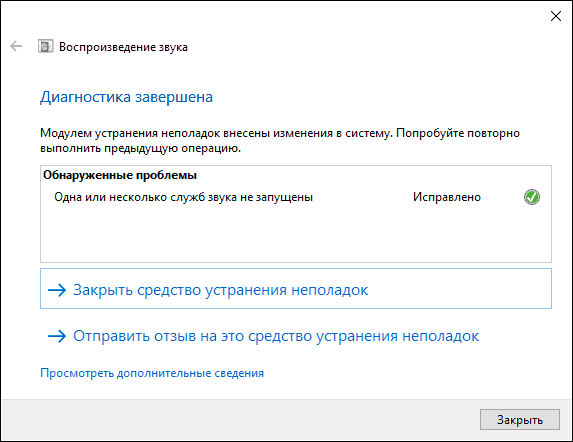
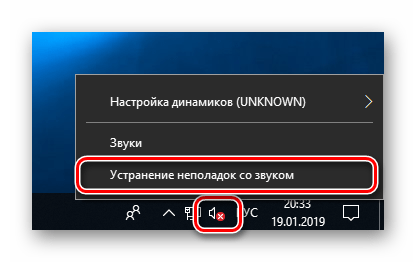
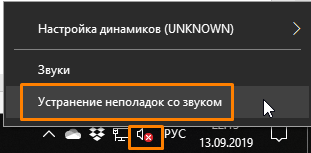
- Автоматическое устранение неполадок работы звука Windows (можно запустить двойным кликом по значку звука в области уведомлений после появления ошибки или через контекстное меню этого значка — пункт «Устранение неполадок со звуком»). Часто в этой ситуации (если только вы не отключили значительное число служб) автоматическое исправление исправно работает. Есть и другие способы запуска, см. Устранение неполадок Windows 10.
- Ручное включение службы аудио, о чем далее подробнее.
Под службой аудио понимается системная служба Windows Audio, присутствующая в Windows 10 и предыдущих версиях ОС. По умолчанию она включена и запускается автоматически при входе в Windows. Если же этого не происходит, можно попробовать выполнить следующие шаги
- Нажмите клавиши Win+R на клавиатуре, введите services.msc и нажмите Enter.
- В открывшемся списке служб найдите службу Windows Audio, дважды нажмите по ней.
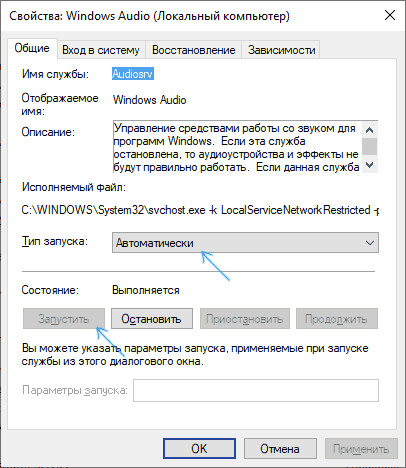
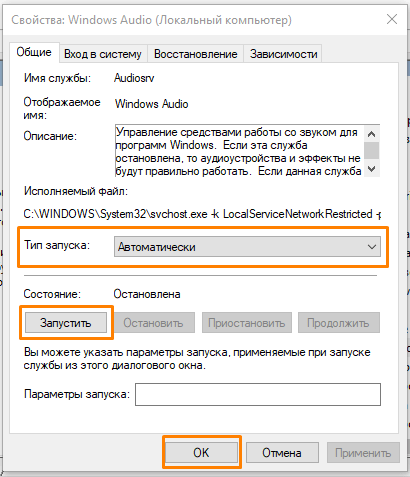
- Установите тип запуска в «Автоматически», нажмите «Применить» (чтобы сохранить параметры на будущее), а затем — «Запустить».
Если после этих действий запуск все равно не происходит, возможно, у вас отключены какие-то дополнительные службы, от которых зависит запуск службы аудио.
Что делать, если служба аудио (Windows Audio) не запускается
Если простой запуск службы Windows Audio не срабатывает, там же, в services.msc проверьте параметры работы следующих служб (для всех служб тип запуска по умолчанию — Автоматически):
- Удаленный вызов процедур RPC
- Средство построения конечных точек Windows Audio
- Планировщик классов мультимедиа (при наличии такой службы в списке)
После применения всех настроек рекомендую также выполнить перезагрузку компьютера. Если же ни один из описанных методов не помог в вашей ситуации, но сохранились точки восстановления на дату, предшествующую появлению проблемы, используйте их, например, как описано в инструкции Точки восстановления Windows 10 (будет работать и для предыдущих версий).
Содержание
- Устранение неполадок службы аудио
- Способ 1: Автоматическое исправление
- Способ 2: Ручной запуск
- Способ 3: «Командная строка»
- Способ 4: Восстановление ОС
- Способ 5: Проверка на вирусы
- Заключение
- Вопросы и ответы
Проблемы со звуком на операционных системах семейства Windows наблюдаются довольно часто, и не всегда их можно легко решить. Обусловлено это тем, что некоторые причины возникновения подобных неполадок не лежат на поверхности, и приходится попотеть, чтобы их выявить. Сегодня мы разберемся, почему после очередной загрузки ПК в области уведомлений «красуется» значок динамика с ошибкой и подсказкой вида «Служба аудио не запущена».
Устранение неполадок службы аудио
В большинстве случаев данная проблема не имеет под собой каких-то серьезных причин и решается парой простых манипуляций или обычной перезагрузкой ПК. Впрочем, иногда служба не реагирует на попытки ее запуска и приходится искать решение немного глубже.
Читайте также: Решение проблем со звуком в Windows 10
Способ 1: Автоматическое исправление
В Виндовс 10 присутствует встроенное средство диагностики и автоматического устранения неполадок. Вызывается оно из области уведомлений кликом ПКМ по динамику и выбором соответствующего пункта контекстного меню.
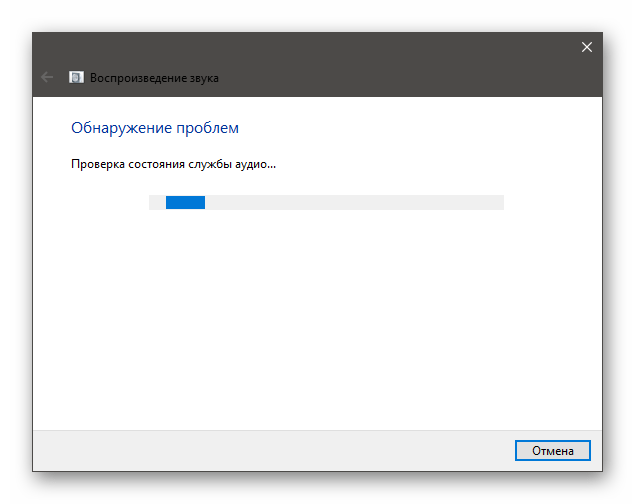
Система запустит утилиту и выполнит сканирование.
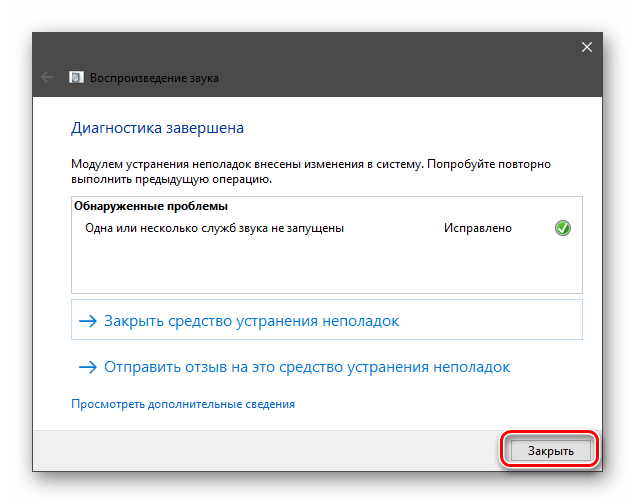
Если ошибка произошла из-за банального сбоя или воздействия извне, например, при очередном обновлении, установке или удалении драйверов и программ или восстановления ОС, результат будет положительным.
Читайте также: Ошибка «Выходное аудиоустройство не установлено» в Windows 10
Способ 2: Ручной запуск
Автоматическое исправление инструмент, конечно, хороший, но не всегда его применение бывает эффективным. Обусловлено это тем, то служба может не запуститься по разным причинам. Если такое произошло, необходимо попытаться сделать это вручную.
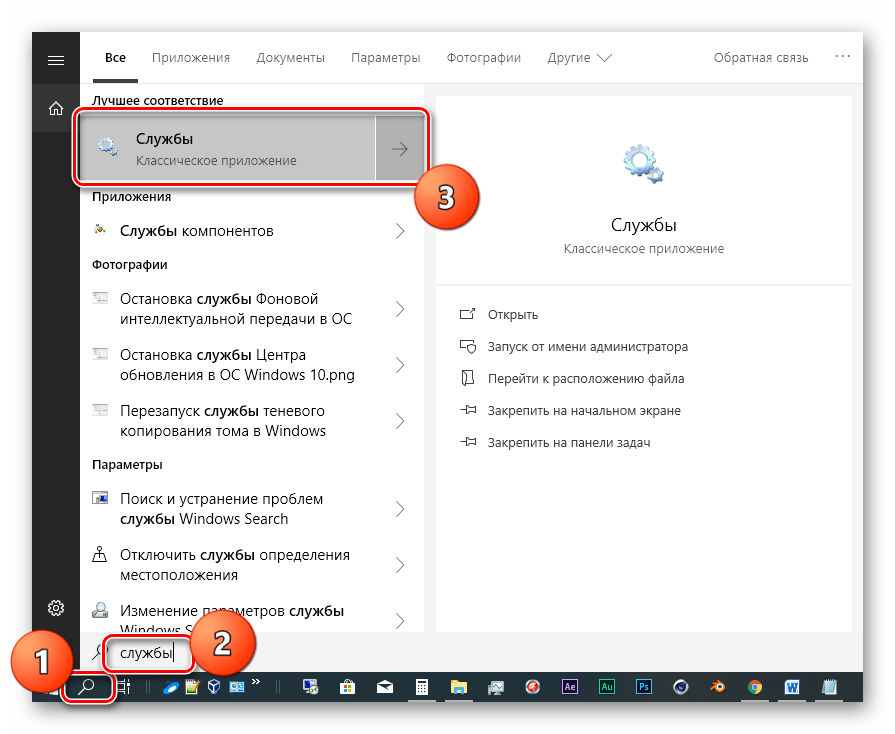
- Открываем системный поисковик и вводим «Службы». Запускаем приложение.
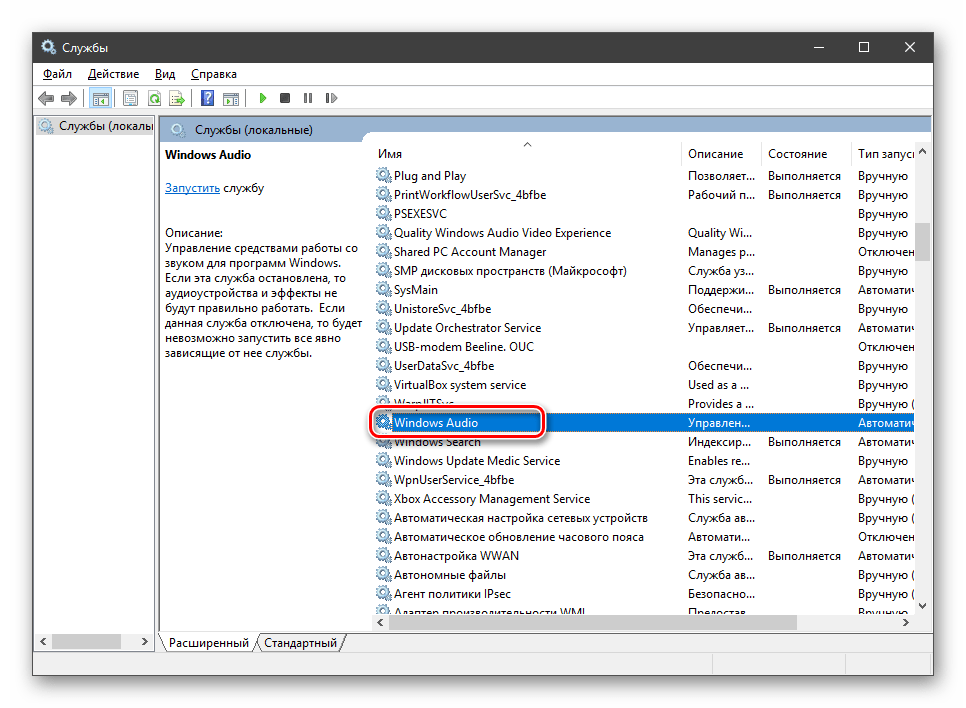
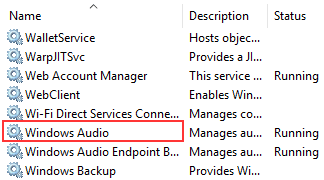
- Ищем в списке «Windows Audio» и кликаем по ней дважды, после чего откроется окно свойств.
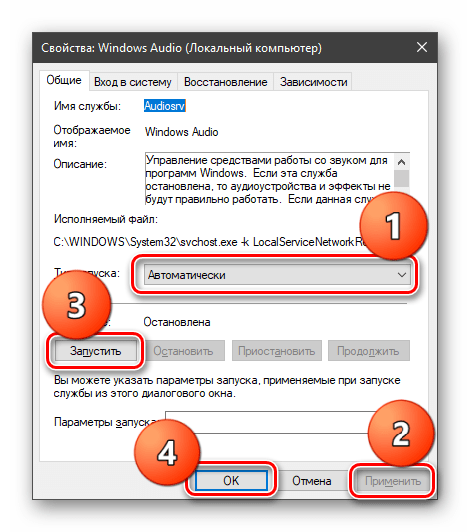
- Здесь выставляем для типа запуска сервиса значение «Автоматически», нажимаем «Применить», затем «Запустить» и ОК.
Возможные проблемы:
- Служба не запустилась с каким-либо предупреждением или ошибкой.
- После запуска звук не появился.
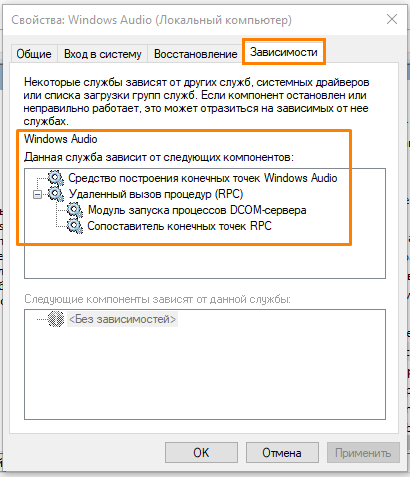
В такой ситуации проверяем зависимости в окне свойств (двойной клик по названию в списке). На вкладке с соответствующим названием раскрываем все ветки, нажав на плюсики, и смотрим, от каких сервисов зависит наша служба и какие зависят от нее. Для всех этих позиций следует произвести все действия, описанные выше.
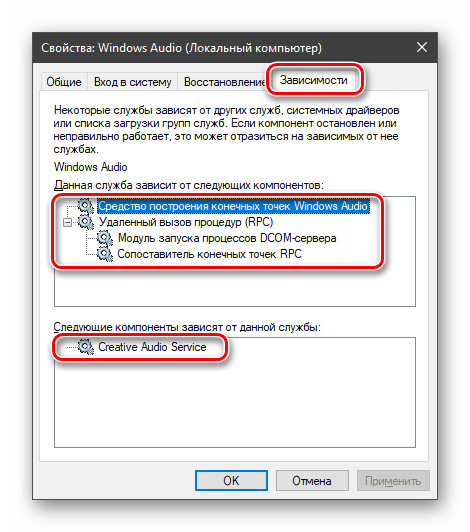
Обратите внимание, что запускать зависимые службы (в верхнем списке) следует снизу вверх, то есть, сначала «Сопоставитель конечных точек RPC», а затем остальные по порядку.
После того как настройка будет выполнена, возможно, потребуется перезагрузка.
Способ 3: «Командная строка»
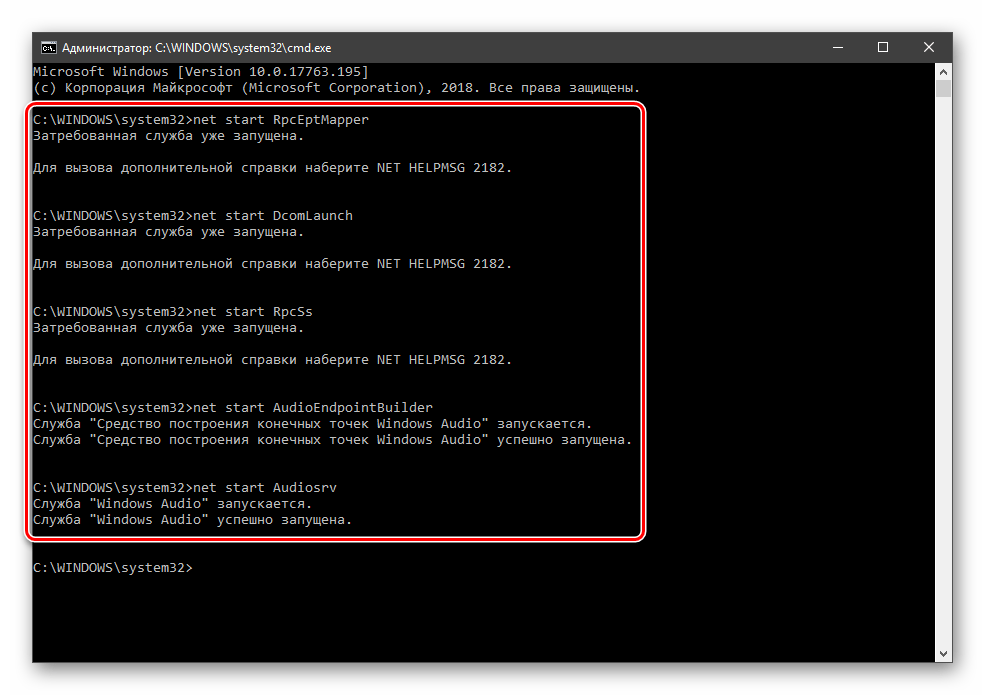
«Командная строка», работающая от имени администратора, способна решить многие системные проблемы. Ее нужно запустить и выполнить несколько строк кода.
Подробнее: Как открыть «Командную строку» в Windows 10
Команды следует применять в том порядке, в котором они приведены ниже. Делается это просто: вводим и нажимаем ENTER. Регистр не важен.
net start RpcEptMapper

net start DcomLaunch

net start RpcSs

net start AudioEndpointBuilder

net start Audiosrv
Если требуется (звук не включился), перезагружаемся.
Способ 4: Восстановление ОС
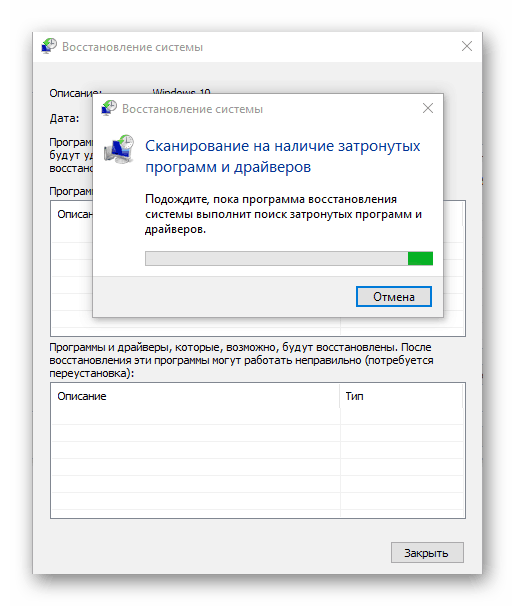
Если попытки запуска служб не принесли требуемого результата, нужно подумать о том, чтобы восстановить систему до даты, когда все работало нормально. Сделать это можно с помощью специальной встроенной утилиты. Она работает как непосредственно в запущенной «винде», так и в среде восстановления.
Подробнее: Как откатить Windows 10 до точки восстановления
Способ 5: Проверка на вирусы
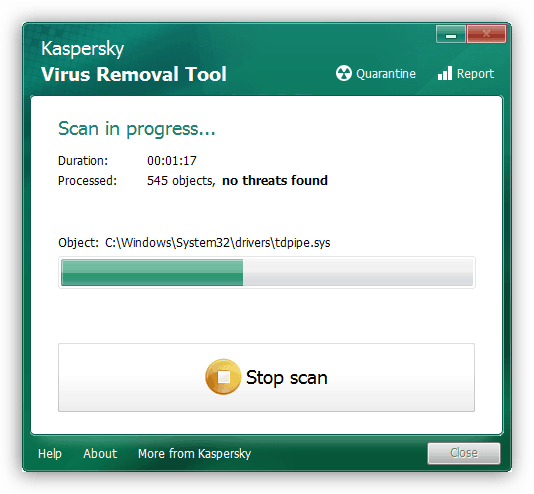
При проникновении на ПК вирусов последние «поселяются» в таких местах в системе, откуда их не получится «выгнать» с помощью восстановления. Признаки заражения и способы «лечения» приведены в статье, доступной по ссылке ниже. Внимательно изучите данный материал, это поможет избавиться от множества подобных проблем.
Подробнее: Борьба с компьютерными вирусами
Заключение
Службу аудио нельзя назвать важным системным компонентом, но ее некорректная работа лишает нас возможности полноценно пользоваться компьютером. Регулярные ее сбои должны натолкнуть на мысль, что с ПК не все в порядке. В первую очередь стоит провести антивирусные мероприятия, а затем проверить другие узлы – драйвера, сами устройства и так далее (первая ссылка в начале статьи).
В нормальном режиме служба аудио в Windows 10 запускается автоматически при включении компьютера, но в результате сбоев, произошедших, например, во время обновления ОС либо установки или удалении каких-либо программ или драйверов, ее автозапуск может отключиться. В этом случае рядом со значком громкости с изображением динамика в системном трее вы увидите красный крестик, а при наведении на него появится сообщение о том, что служба аудио не запущена. Также операционная система может выдать сообщение об ошибке 1068. Есть несколько способов решения этой проблемы. Давайте разберемся, как вернуть в строй службу аудио в Windows 10.
Запускаем службу аудио с помощью средства устранения неполадок
- Кликаем на значок громкости в панели задач правой кнопкой мыши и выбираем команду «Устранение неполадок со звуком».
Выбираем команду «Устранение неполадок со звуком» в контекстном меню значка громкости
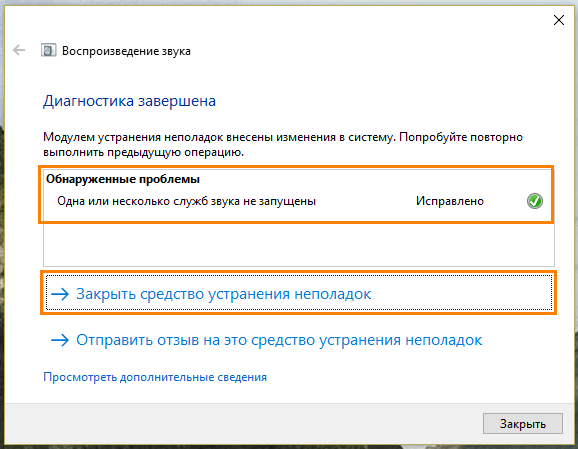
- Запустится средство диагностики и устранения неполадок, которое проверит состояние службы аудио и включит ее, после чего средство устранения неполадок можно закрыть.
Проблема воспроизведения звука обнаружена и исправлена
Загрузка …
Запускаем службу аудио вручную
Если предыдущий способ не помог, придется запустить службу аудио в Windows 10 вручную.
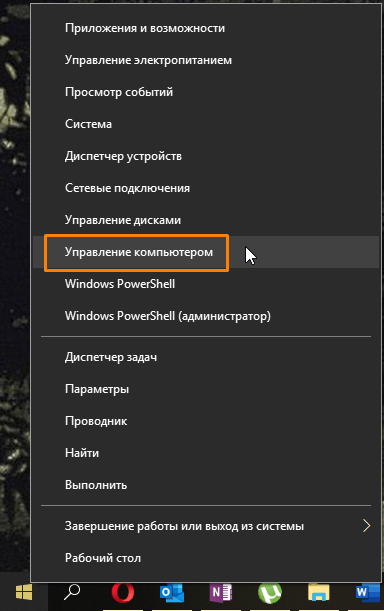
- Жмем на кнопку «Пуск» правой клавишей мыши и в контекстном меню выбираем пункт «Управление компьютером».
Выбираем команду «Управление компьютером» в контекстном меню кнопки «Пуск»
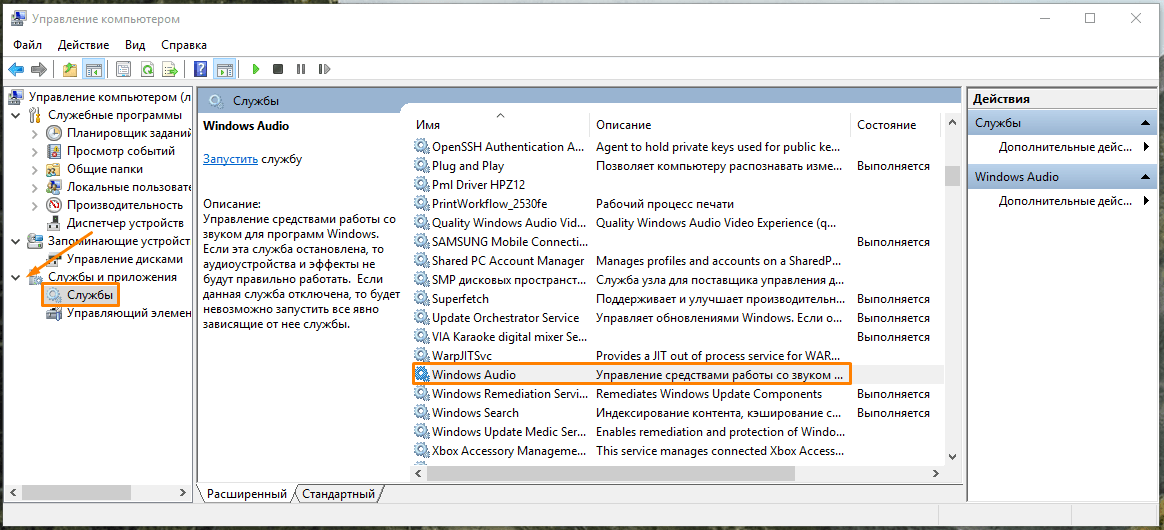
- В появившемся окне в списке слева раскрываем раздел «Службы и приложения» и кликаем на пункте «Службы». Затем в правой части окна находим службу «Windows Audio» и двойным щелчком по ней открываем ее свойства.
Дважды кликаем службу «Windows Audio»
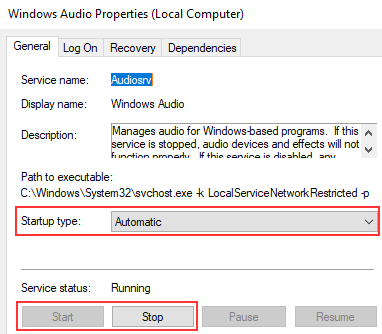
- В окне «Свойства: Windows Audio» на вкладке «Общие», которая откроется по умолчанию, в раскрывающемся списке «Тип запуска» выбираем «Автоматически» и нажимаем кнопку «Запустить», а затем «ОК».
Запускаем службу «Windows Audio»
- Если звук появился, окно «Управление компьютером» можно закрыть. Если же нет, придется проверить, запущены ли другие службы, также влияющие на воспроизведение звука. Для этого снова откроем окно свойств службы «Windows Audio» и перейдем на вкладку «Зависимости». Здесь показаны службы, от работы которых зависит служба «Windows Audio».
Смотрим список зависимых служб
- Для каждой из этих служб необходимо проделать те же действия, что для службы «Windows Audio»: найти службу в списке, двойным щелчком открыть ее свойства, установить автоматический тип запуска и запустить службу. Порядок запуска должен быть следующим:
-
- «Сопоставитель конечных точек RPC»;
- «Модуль запуска процессов DCOM-сервера»;
- «Удаленный вызов процедур (RPC)»;
- «Средство построения конечных точек Windows Audio».
-
- После внесения всех изменений перезагрузите компьютер.
Загрузка …
Запускаем службу аудио из командной строки
Еще один способ запустить службу аудио — ввести несколько команд в командную строку.
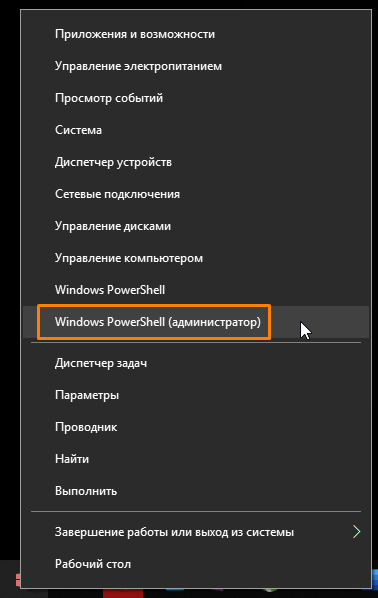
- Запускаем утилиту «PowerShell» от имени администратора, выбрав соответствующую команду в контекстном меню кнопки «Пуск».
Запускаем утилиту «PowerShell» от имени администратора
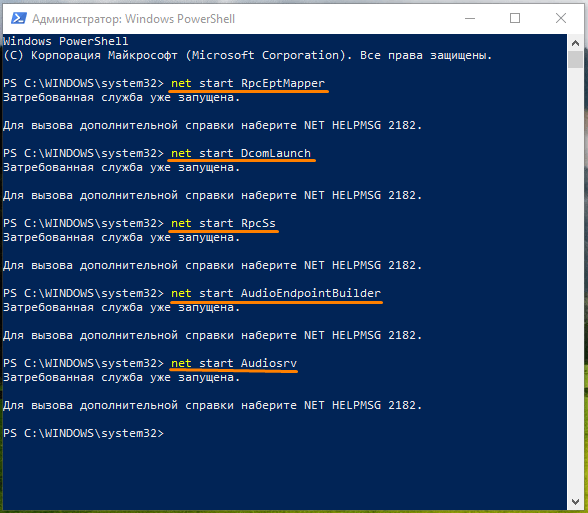
- Последовательно вводим пять команд, подтверждая каждую нажатием клавиши «Enter».
net start RpcEptMapper
net start DcomLaunch
net start RpcSs
net start AudioEndpointBuilder
net start Audiosrv
Вводим приведенные выше команды по порядку
- Если после выполнения этих команд звук не появится сразу, перезагрузите компьютер.
Один из трех описанных способов должен помочь вам исправить ошибку «Служба аудио не запущена» в Windows 10. В крайнем случае вы можете прибегнуть к процедуре восстановления системы, воспользовавшись одной из автоматически или вручную созданных ранее точек восстановления, чтобы откатить Windows до даты, когда всё работало стабильно.
Также есть вероятность, что данная ошибка могла быть вызвана повреждением системных файлов в результате заражения компьютера вирусами. Поэтому имеет смысл просканировать ПК на наличие вредоносных программ установленным на вашем компьютере антивирусом или скачать для этого бесплатную утилиту «Kaspersky Virus Removal Tool» с официального сайта Лаборатории Касперского.
Загрузка …
Видео
Загрузка …
Post Views: 15 580
Всем привет! Сегодня мы разберем сразу несколько одинаковых ошибок – «Служба звука не отвечает», «Служба аудио не запущена» или «Одна или несколько служб звука не запущены» (текст может быть разным). Проблема часто возникает на операционной системе Windows (10, 11, 8 и 7). Чаще всего ошибка решается достаточно быстро, так как под своим основанием не имеет каких-то серьезных причин. В любом случае я постарался описать все возможные решения, которые вам точно помогут. Поехали!
Содержание
- Способ 1: Функция поиска и устранения неисправностей
- Способ 2: Запуск службы вручную
- Способ 3: Консоль
- Способ 4: Комплексные меры
- Задать вопрос автору статьи
Способ 1: Функция поиска и устранения неисправностей
В Виндовс любой версии есть специальная функция, которая сама ищет неисправность и пытается её исправить. Из текста ошибки мы можем понять, что у нас есть проблема со службой – скорее всего она просто зависла или выключена. Дабы не лезть в раздел службы и не включать её вручную, можно проделать более простые шаги.
- Кликните правой кнопкой по значку динамика в правом нижнем углу в трее.
- Далее из выпадающего меню выбираем команду «Устранение неполадок со звуком».
- Система сама попытается найти неисправность и исправить её.
- В окне вы увидите сообщение, что теперь служба запущена и готова к работе. Можете просто закрыть это окошко.
Способ 2: Запуск службы вручную
Давайте представим себе ситуацию, что прошлый способ не дал никакого результата. Скорее всего есть какой-то сбой в системе. В любом случае мы можем запустить в Windows службу «Windows Audio» в ручном режиме. Также мы проверим, чтобы она запускалась при запуске компьютера.
- Чтобы попасть в раздел «Службы», на клавиатуре одновременно зажимаем горячие клавиши:
+ R
- Далее вводим команду и нажимаем «ОК»:
services.msc
- В списке найдите нужную нам службу и откройте её свойства, нажав два раза левой кнопкой мыши.
- В первую очередь запустите саму службу, нажав по соответствующей кнопке. Далее установите «Тип Запуска» в «Автоматическом» режиме. Нажимаем «Применить» и «ОК».
- После этого проверяем звук. Если ошибка осталась, или звук не появился в той же самой службе «Windows Audio», в свойствах перейдите во вкладку «Зависимости». Ниже в дополнительных окошках нажмите на все плюсики (+), чтобы раскрыть описание. Все эти службы напрямую связаны с «Windows Audio» – вам нужно найти их в списке и проделать все те же самые шаги (1-4) из этой главы. После этого перезагрузите компьютер и проверьте работоспособность аудио.
Способ 3: Консоль
Если стандартный интерфейс не дает результаты, мы можем воспользоваться функционалом командной строки. Самое главное, запустить консоль с правами администратора, иначе команды, которые мы будем применять, не будут работать. Проще всего запустить консоль через поиск Виндовс.
Как только командная строка откроется, вам нужно поочередно ввести несколько команд. Чтобы запустить команду после ввода, нужно использовать клавишу Enter. Прежде чем вводить следующую команду, дождитесь пока закончится работа предыдущей.
net start RpcEptMapper
net start DcomLaunch
net start RpcSs
net start AudioEndpointBuilder
net start Audiosrv
Что мы вообще сделали? – мы запустили все службы, которые хоть каким-то образом связаны со звуком. После этого проверьте – работает ли аудио. Если проблема не решилась, еще раз перезагрузите операционную систему.
Способ 4: Комплексные меры
Смотрите, все предыдущие способы мы просто вручную (или нет) пытаемся запустить обычную службу. Служба – это небольшой модуль в Windows, которые помогает работать с программами и железом. По идее у вас не должно было возникнуть проблем с запуском службы. Но если вы читаете эти строки, значит эта проблема все же возникла. Значит у нас сама ошибка и проблема уже стоит не на уровне служб, а на уровне операционной системы – с ней что-то не то.
Скорее всего произошла какая-то серьезная поломка. А теперь ряд решений, которые вам должны помочь:
- Есть такое неглавное правило: есть какие-то проблемы с ОС, и не знаешь, что делать – делай откат системы. Ваша задача просто откатиться до нужной точки – подробно об этом написано тут.
- Вспомните, может вы что-то устанавливали до этого? Возможно, какие-то программы, работающие с аудио? Например, есть ПО, которое устанавливает дополнительные виртуальные аудио-интерфейсы и драйвера. Если у вас есть на что-то подозрение – удалите эту программу.
- Если ничего из вышеперечисленного не помогло, значит, возможно, есть проблемы с драйвером. У меня подобное наблюдалось на моей старой звуковой карте Sound B. Скорее всего вы не сами устанавливали драйвера, а все сделала сама система через «Диспетчер устройств». Проблема в том, что «Диспетчер устройств» не всегда скачивает правильные драйвера. Поэтому нам нужно установить их вручную, скачав с официального сайта производителя. Если у вас встроенная звуковая карта, которая вшита в материнскую плату – скачиваем и устанавливает весь пак драйверов для материнки. Если же она внешняя, то ищем драйвера на сайте производителя. Про то, как правильно устанавливать и где скачивать драйвера – читаем тут (ссылка).
Все три шага мы пытались работать более точечно и попасть в раздел аудио в системе. Если же вам это не помогло, вот еще ряд советов:
- Если вы используете внешнюю звуковую карту – попробуйте её выключить и включить. Также проверьте, чтобы USB кабель был подключен. Можно даже попробовать другой USB порт на компьютере, возможно, он просто не работает или сгорел.
- Проверьте компьютер антивирусной программой.
- Очистите компьютер от всего лишнего – кеша, временных файлов и т.д.
- Посмотрите инструкции – настройка звука в Windows. Возможно, вы упустили какие-то шаги, или сделали что-то неправильно.
Напомню, что вы всегда можете обратиться ко мне или кому-то из нашей команды портала WiFiGiD.RU – мы стараемся помогать всем. Только старайтесь писать как можно подробнее. Всем добра!
Содержание
- Решено: служба аудио не работает под управлением Windows 10
- 2 исправления для сообщения «Аудиослужба не запущена»:
- Исправление 1. Измените настройки служб, связанных со звуком.
- Исправление 2: обновите аудиодрайвер
- Solved: The Audio Service is not running Windows 10
- 2 fixes for ‘The Audio Service is not running’:
- Fix 1: Modify the audio related services settings
- Fix 2: Update your audio driver
- Fix: The Audio Service is not running in Windows 10 (6 solutions)
- Run the Windows “Playing Audio Troubleshooter”
- Check Windows Audio services
- Roll back sound device driver
- Make the “Windows Audio” service log on as Local System account
- Uninstall and reinstall sound device driver
- Uninstall NVIDIA sound device driver
- The Audio Service is not running on Windows 11/10
- The Audio Service is not running in Windows
- 1] Check the status of Windows Services
- 2] Run Playing Audio Troubleshooter
- 3] Troubleshoot in Clean Boot State
- [Fix] The Audio Service is Not Running on Windows 10, 8, 7
- How to Fix The Audio Service is not running
- Adjust Volume on Windows 10, 8, 7
- Restart Audio Services
- Update Audio Drivers
Решено: служба аудио не работает под управлением Windows 10
Solved Audio Service Is Not Running Windows 10
Вот два решения, которыми вы можете попытаться решить эту проблему: Аудиослужба не запущена в вашей Windows 10. Нажмите, чтобы прочитать.
2 исправления для сообщения «Аудиослужба не запущена»:
Исправление 1. Измените настройки служб, связанных со звуком.
Эта проблема, вероятно, связана с неправильным статусом звуковой службы Windows и любых других ее зависимостей. Исправление статуса может решить вашу проблему.
Чтобы изменить настройки служб, связанных со звуком:
Конструктор конечных точек Windows Audio
Планировщик мультимедийных классов
Если да, поздравляем! Но если это не так, не расстраивайтесь, следуйте Решению 2.
Исправление 2: обновите аудиодрайвер
Driver Easy автоматически распознает вашу систему и найдет для нее подходящие драйверы. Вам не нужно точно знать, на какой системе работает ваш компьютер, вам не нужно рисковать, загружая и устанавливая неправильный драйвер, и вам не нужно беспокоиться о том, чтобы сделать ошибку при установке.
Вы можете автоматически обновлять драйверы с помощью СВОБОДНЫЙ или За версия Driver Easy. Но с версией Pro требуется всего 2 клика (и вы получаете полную поддержку и 30-дневную гарантию возврата денег):
Надеюсь, вы устранили проблему. Не стесняйтесь комментировать ниже любые вопросы.
Источник
Solved: The Audio Service is not running Windows 10
Last Updated: 7 months ago
If you’re on Windows 10, and you’re seeing this error saying The Audio Service is not running, you’re not alone. Many Windows users are reporting it. But the good news is you can fix it.
2 fixes for ‘The Audio Service is not running’:
This problem is probably the improper status of the Windows audio service and any other of its dependencies. Correcting the status can solve your problem.
To modify the audio related services settings:
Windows Audio Endpoint Builder
Multimedia Class Scheduler
If it does, congratulations! But if it doesn’t, don’t be frustrated, go on to follow the Solution 2.
Fix 2: Update your audio driver
Driver Easy will automatically recognize your system and find the correct drivers for it. You don’t need to know exactly what system your computer is running, you don’t need to risk downloading and installing the wrong driver, and you don’t need to worry about making a mistake when installing.
You can update your drivers automatically with either the FREE or the Pro version of Driver Easy. But with the Pro version it takes just 2 clicks (and you get full support and a 30-day money back guarantee):
Or click Update All to automatically download and install the correct version of all the drivers that are missing or out of date on your system (this requires the Pro version – you’ll be prompted to upgrade when you click Update All).
Hopefully you’ve fixed the problem. Feel free to comment below for any questions.
Источник
Fix: The Audio Service is not running in Windows 10 (6 solutions)
This tutorial will show you step by step how to fix the “The Audio Service is not running” problem in Microsoft Windows 10.
Run the Windows “Playing Audio Troubleshooter”
Windows 10 has a built-in tool called Playing Audio Troubleshooter.
You can use this tool to try and fix all kinds of sound problems.
You can run this tool and see if it can fix your problem.
Two ways to open this tool:
Check Windows Audio services
1. Open Windows “Services”.
Four ways to open “Services”:
The “Services” window appears.
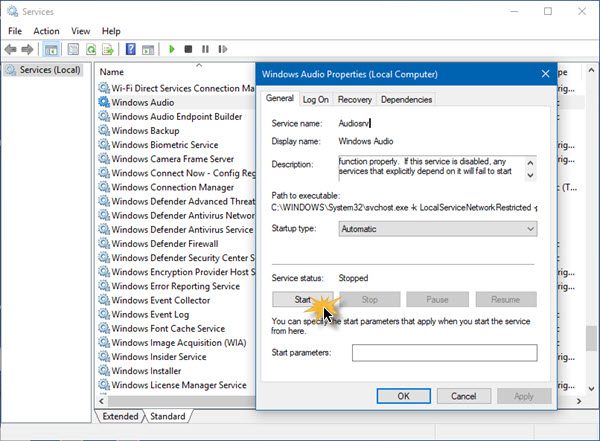
2. Scroll down to the Windows Audio service.
3. Double-click on Windows Audio service to open its Properties.
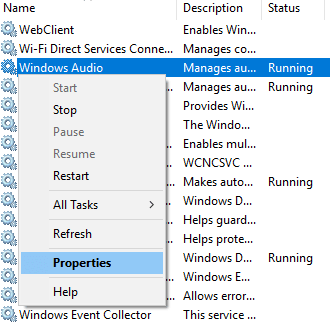
Or right-click on the Windows Audio service and then click on Properties.
4. Make sure that the Startup type is set to Automatic.
5. Click on the Start button. If it’s already started, then click on the Stop button and then click on the Start button.
6. Click on the Apply button.
7. Click on the OK button.
8. Repeat step 3 to 7 for the following Windows services:
If the Multimedia Class Scheduler service is present on your system, then you should repeat step 3 to 7 also for this service.
9. Close the “Services” window.
Roll back sound device driver
1. Open Windows “Device Manager”.
Four ways to open Device Manager:
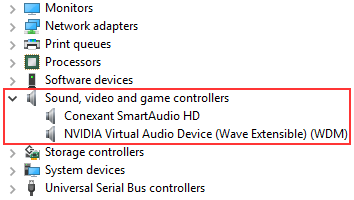
2. Expand Sound, video and game controllers.
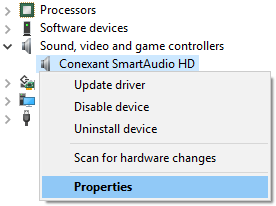
3. Right-click on the sound device and then click on Properties.
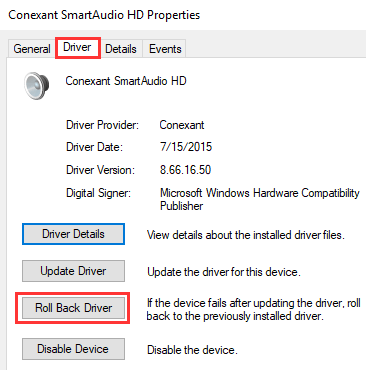
4. Click on the Driver tab.
5. If there’s a Roll Back Driver option then click on it.
6. After the process is completed, you restart your PC.
Make the “Windows Audio” service log on as Local System account
1. Open Windows “Services”.
Three ways to open “Services”:
The “Services” window appears.
2. Right-click on the Windows Audio service and then click on Properties.
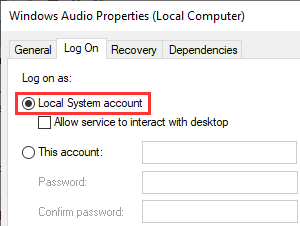
3. Click on the Log On tab.
4. Select (check) the Local System account option.
5. Click on Apply at the bottom of the window.
Uninstall and reinstall sound device driver
1. Open Windows “Device Manager”.
Four ways to open Device Manager:
2. Expand Sound, video and game controllers.
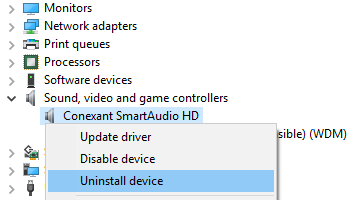
3. Right-click on the sound device and then click on Uninstall device.
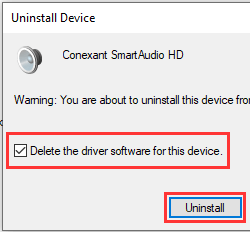
On my PC, the sound device is Conexant SmartAudio HD but it might be different on your PC.
A “Uninstall Device” window appears.
4. Select (check) the Delete the driver software for this device option if available.
5. Click on Uninstall.
6. Restart your computer after the process is completed.
Uninstall NVIDIA sound device driver
I had the “The Audio Service is not running” problem also in Windows 10 but I did have sound.
For me, the problem started after I updated the “NVIDIA GEFORCE” driver.
The driver added a sound device (driver) and after removing it my problem was solved.
The following step will show you how to uninstall the NVIDIA sound device (driver).
1. Open Windows “Device Manager”.
Four ways to open Device Manager:
2. Expand Sound, video and game controllers.
3. Right-click on the NVIDIA sound device and then click on Uninstall device.
A “Uninstall Device” window appears.
4. Select (check) the Delete the driver software for this device option if available.
5. Click on Uninstall.
6. Restart your PC after the process is completed.
Источник
The Audio Service is not running on Windows 11/10
If you see a red X mark on the Speaker icon in the Notification Area, and when you hover over the icon, you see a message The Audio Service is not running on your Windows 10/8/7 PC then here are a few things you need to take a look at.
The Audio Service is not running in Windows
1] Check the status of Windows Services
Set the Startup Type to Automatic and click on the Start button. If it already started, Stop it and then start it again.
If the Multimedia Class Scheduler Service is present on your system, that too should be Started and set on Automatic.
Multimedia Class Scheduler Service (MMCSS) is a Windows service that allows multimedia applications to get prioritized access to CPU for time-sensitive processing (such as multimedia applications) as well as prioritized disc access to ensure that the process is not starved of data to process.
2] Run Playing Audio Troubleshooter
Windows 10 includes the Playing Audio Troubleshooter, which you can easily invoke via the Control Panel, the Taskbar Search or the Troubleshooters tab of our freeware FixWin 10. You can also access it from the Troubleshooters Page in Windows 10.
Run it and see if it can fix your problem.
3] Troubleshoot in Clean Boot State
A Clean Boot is used to diagnose and later troubleshoot issues with your system. During a Clean Boot, we start the system with a minimal number of drivers and startup programs which helps isolate the cause with interfering software.
Once you have booted in the Clean Boot State, enable one process after another and see which process makes the problem appear. Thus you can find the offender.
Источник
[Fix] The Audio Service is Not Running on Windows 10, 8, 7
If you are encountering The Audio Service is not running on Windows 10 or Windows 7 or Windows 8, you’re one of many others having the same error. The good news is we can easily fix the Audio service is not running error in a few steps.
How to Fix The Audio Service is not running
We can fix the Windows 10 Audio service error in three ways. In most cases, the first solution will fix the issue, and this solution is so easy that even a child can perform. Let us check out the fixes.
Adjust Volume on Windows 10, 8, 7
You might think that it is a silly solution, but trust me when I say most of the users affected by “The Audio Service is not running” were able to fix it just by adjusting the volume level.
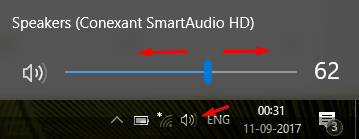
Just look for the “Volume” icon which is on the right bottom of your display. Click it and then adjust volume levels a little (increase or decrease).
Now check if you still see the error. Most probably the error is now gone. If you can still see it, then I assume there is something messed up with Audio related services. Let’s check out the next solution.
Restart Audio Services
You can restart audio services even if you have just basic knowledge of Windows PC. Follow the steps below and get rid of “The Audio Service is not running” once and for all.
Step 1: Open “Run.” Press Window Key + R or just search “Run” in the Windows search bar.
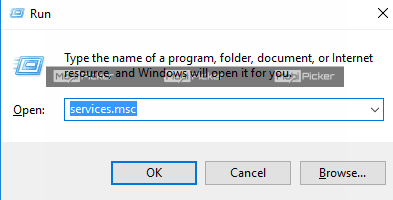
Step 2: Now that you have opened “Run,” type “services.msc” command and press Enter or click OK to open “Services” window.
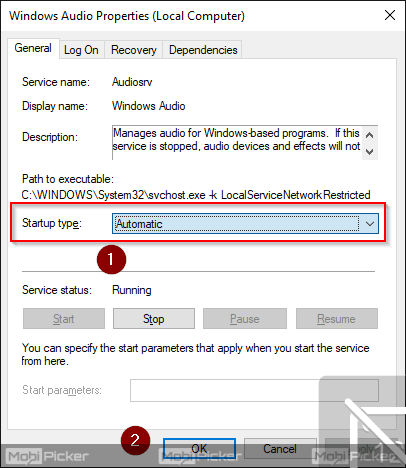
Step 3: In the Services window, press ‘W’ and locate “Windows Audio.” Double click it and select Startup type as “Automatic.” Click OK.
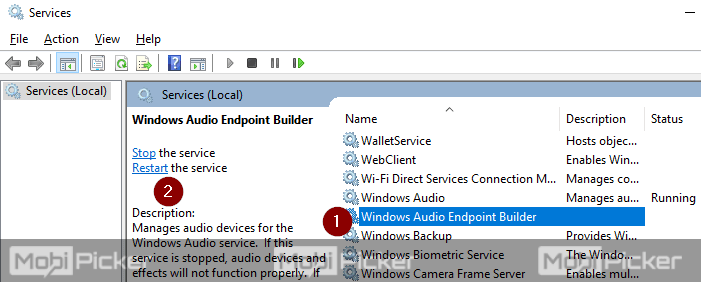
Step 4: Now select the “Windows Audio” and click “Restart the service” as shown in the image below.
Step 5: Now perform the 3rd and 4th steps for “Windows Audio Endpoint Builder” which is next to “Windows Audio.”
Step 6: If “Multimedia Class Scheduler” is also available in the Services window, then perform the 3rd and 4th steps for it. If it is not available, you can skip this part.
We assume that the Audio service is not running error is now fixed for you. It is a minor error and should not trouble you much, but in any case, if you still see the Audio service is not running, proceed to next solution.
Update Audio Drivers
Updating Audio drivers should not leave any loopholes. If the above two solutions did not fix the Windows 10 Audio problem, just update the drivers (if update available).
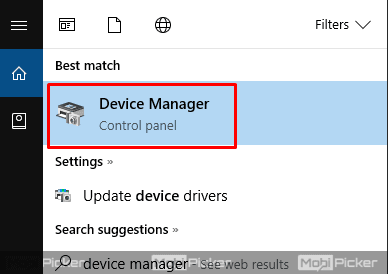
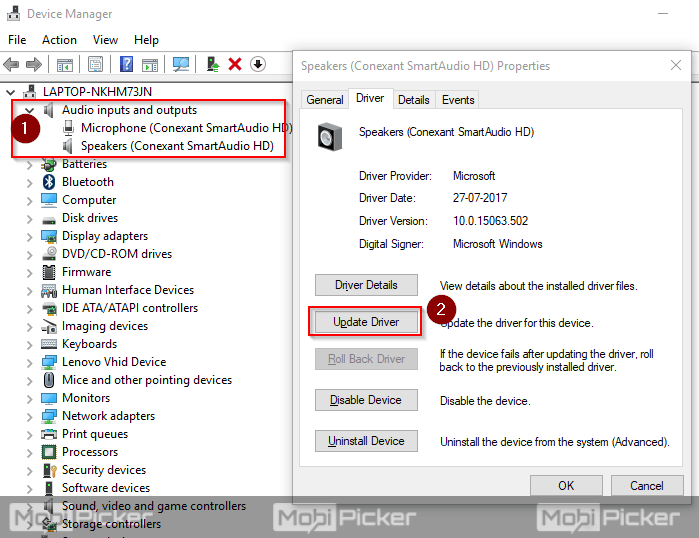
Step 1: Go to “Device Manager” by searching it in the Windows 10 search bar.
Step 2: Find the Audio Drivers and expand it.
Step 3: Double click on the driver, and it will open a new window with driver details. Click “Driver” tab and then click “Update Driver.”
Step 4: Follow onscreen instructions and restart your PC after updating the Audio drivers.
After performing all the solutions above, there should be any chance for the error ‘The Audio Service is not running‘. Let us know how was your experience with this tutorial. Oh, wait! If you still could not fix the Audio service is not running, just comment below with the complete details, and we will assist you. Stay tuned.
Источник
When we boot up our Windows 10 computer, whether it is a laptop or desktop, one of the first things we expect is to hear sound. Unfortunately, a lot of Windows users are running into an error that causes Windows audio services to fail. Most users will report having a little red “x” on their sound icon located in their taskbar and when hovered over, will see the “audio service is not running” error message. This simply means that your sound device is not responsive and needs to be fixed.
What is the Root Problem Behind the Audio Error?
In the majority of cases, the root problem is that one of the dependencies that the Windows audio service relies on has become disabled or has failed to start automatically during the boot up process. A temporary fix is to restart your computer, but this can get tedious very fast. Instead, use the methods below to permanently get your audio back.
7 Ways to Fix the Error & Get Audio Back.
1. Change Your Computer’s Volume.
Yes, it sounds a bit silly but simply increasing or decreasing your computer’s volume may be enough to fix the issue. The reason for this is that if the audio isn’t running or working as it should, increasing or decreasing the volume will kick start the audio service into running

- If your sound icon in your taskbar has a red “x” on it, your audio service is not running. Click on the sound icon to get a volume slider to pop up.
- Use the volume slider to either decrease or increase your sound. Doesn’t have to be by a lot, but a few decibels will do.
- If the red “x” on the sound icon has disappeared, you should no longer get the “audio service is not running” error when you hover your mouse over the “x” as it will have disappeared.
Test your sound out now. It should be working as intended.
2. Restart Your Windows Audio Service & All Dependencies.
Sometimes stopping and restarting a program is an easy solution as it allows you to ensure that all components of the program are working in the order that they should be. If a dependency that the Windows audio service relies on, stops working, then restarting will help fix this.

- Open up your “run dialogue” box. You can either search up “run”, right-click your start menu and open from there or hit the Windows key on your keyboard and press “R”.
- Type in services.msc and hit the okay button.
- In the Services configuration window that pops up, find:
- the Windows audio service,
- the Windows audio endpoint builder service,
- and the multimedia class scheduler service, if it is available.
- Right-click on each of these, choose properties, and make sure that the startup is set to automatic.
- Once all are set to automatic on startup, you want to either click on each of them in the configuration window and hit restart or right-click them and hit restart.
From here, you can exit out of the window you are in and you should no longer see the “audio service is not running” error and the little red “x” should be removed from your sound icon in your taskbar.
3. Reinstall Drivers or Choose to Rollback or Update Them.
If you’ve recently updated your audio drivers, it is safe to reason that the problem could be from an incorrect installation or incompatible audio drivers. Any of these issues can prevent the driver from communicating with your hardware, causing there to be no sound. To reinstall, rollback, or update your drivers, you will need to use the device manager.
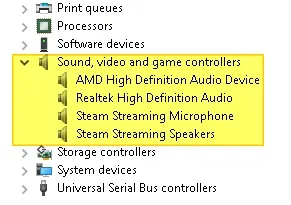
- In your Windows search bar (beside your start menu), search “device manager” and click on the application that comes up. You can also open the device manager by using the “run dialogue” box and typing in devmgmt.msc.
- In the device manager window, find the “Sound, video, and game controllers” option in the list and hit the arrow to expand it.
- Select the audio driver that you are using and right-click it. Hit the uninstall option.
- Once uninstalled, right-click again and choose the “scan for hardware changes” as this will prompt the re-installation of the audio driver.
- If the re-installation does not fix the issue, roll the driver back by right-clicking on it, hitting properties, and choosing the “rollback driver” from the driver details tab.
- If rolling back the driver does not work and reinstalling it does not work, right-click on the audio drive one last time and try updating it.
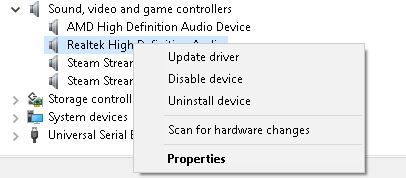
If updating the driver does not work, move onto another fix in this list.
4. Use the Troubleshoot Option in Your Windows Settings.
If you’ve put your computer through any manual or automatic hardware or software changes recently, the configuration setups from these could be causing the “audio service is not running” error. To find out if this is the case, use the “troubleshoot” option in your Windows settings.

- Either search for “settings” using your Windows search bar or hit the Windows key on your keyboard with “I” to bring the settings window up.
- Find the “update and security” option in the list and click it.
- Find the troubleshoot option from the left-hand menu pane and click it.
- Under the “get up and running” section, find the “playing audio” option and click it. Then hit the “run troubleshooter” for it.
Once the troubleshooter has finished, see if the issue persists.
5. Use the Command Prompt to Fix Local Account Configurations.
If you think that you’ve messed up local account configurations, you can use the command prompt tool to fix them and to automatically start the audio service.

- Search up the command prompt in your search menu and right-click it to run it “as an administrator”.
- Type in the following commands into the command prompt tool, hitting Enter after each one.
- net localgroup Administrators /add networkservice
- net localgroup Administrators /add localservice
- SC config Audiosrv start= auto
- REG ADD “HKLMSYSTEMCurrentControlSetServicesAudiosr” /V start /T REG_DWord /D 2 /F secedit /configure /cfg %windir%infdefltbase.inf /db defltbase.sdb /verbose
See if the problem still persists.
6. Try Modifying Your Computer’s Registry [Advanced].
You can always see if the problem is in your registry. If it is, you can modify the registry to solve the issue. Please note that this should only be undertaken by users with the understanding that editing the registry can cause serious problems if done wrong. Here are the exact steps:
- Open up your “run dialogue” program again and type in regedit to open up your registry editor.
- Find the HKEY that is for your local system. It should read: HKEY_Local_MachineSystemCurrentControlSetServicesAudioEndPointBuilderParameter.
- Find the ServiceDll. Look at the data column and if it reads %SystemRoot%System32Audiosrv.dll then this is what is causing the “audio service is not running” error.
- Replace the above value with %SystemRoot%System32AudioEndPointBuilder.dll
- Apply changes, close the registry editor, and restart your computer.

7. If You Are Using a Different User Account – Change the Log-on Settings.
While it would make sense for the audio configurations to be the same across all user accounts on a local computer, sometimes that’s not the case. To check to make sure that the audio is configured for the user account you are on, you will need to look at the log-on settings.

- Open up the “run dialogue” box and type in the services.msc command.
- Hit enter and in the new window that opens up, find the “Windows audio” service option. Right-click on it and hit properties.
- Find the “log-on” tab at the top and check mark the “local system account” option.
- Exit out and see if you still get the “audio service is not running” error. If you do, re-open the log-on settings using the above steps and instead, check the “account” option and type in “local service” in the box underneath it.
- Create a password for this and confirm it.
- Apply the changes.
- See if the problem still persists.
If you have exhausted this list of solutions and the problem still persists, you may need to see if there is a problem with your hardware. It could be the WIFI chipset in your motherboard giving you problems or an issue with an Ethernet port or WIFI LAN Card. To double check this, boot your computer into safe mode to rule out any third-party problems and if the problem still persists, have your hardware looked at by a specialist.
Главная » Уроки и статьи » Windows
Иногда пользователи сталкиваются с таким сообщением, как «служба аудио не запущена» в Windows 10. При этом прекращается воспроизведение звука, что критично для многих людей. К счастью, в большинстве случаев проблема решается очень просто и не требует от владельца компьютера особых усилий.
Легкий метод
Итак, для начала можно попробовать использовать встроенную утилиту «Устранение неполадок». В данном случае она обычно весьма эффективна. Кроме того, подобный способ решения позволяет значительно сэкономить время и силы.
Чтобы открыть программу, нужно зайти в «Параметры». Там можно просто вбить в поиск следующий запрос:
Сразу после этого появится окно утилиты. Выглядит оно следующим образом:
Необходимо лишь следовать инструкциям в самой программе: она самостоятельно найдет и устранит проблему.
Важно отметить, что, несмотря на не слишком хорошую славу этого встроенного приложения, оно действительно помогает исправить подобные ошибки. Если же этого не произошло, то можно включить службу вручную.
Включение вручную
Служба, отвечающая за воспроизведение звука, в норме автоматически запускается вместе с системой. Однако она может быть отключена: сделать это мог как неопытный пользователь, так и вредоносная программа. Для исправления ситуации рекомендуется придерживаться следующей инструкции:
- Нужно запустить программу, которая позволяет настраивать работу служб. Она так и называется «Службы». Ее можно найти с помощью поиска на панели задач.
- Далее следует найти службу звука в списке. Как она называется и где приблизительно располагается, можно увидеть на скриншоте ниже.
- Необходимо открыть настройки, дважды кликнув по пункту ЛКМ.
- В первой вкладке в типе запуска следует поставить «Автоматически». После этого нужно не забыть применить новые настройки, чтобы они сохранились.
- Кликнуть по кнопке «Запустить» (находится в нижней части окна).
По окончанию процедуры звук должен заработать. Если этого не происходит, значит возникла проблема посерьезнее – отключены какие-либо дополнительные службы, связанные с аудио. Вот, например, одна из подобных служб:
Нужно все их проверить и, при необходимости, повторить инструкцию, т. е. запустить службу и установить автоматический тип. Кроме того пункта, что указан на изображении выше, также следует обратить внимание на:
В некоторых версиях ОС также присутствует служба «Планировщик классов мультимедиа».
Таким образом, если нет звука в Windows 10, а служба аудио не работает, то можно просто использовать «Устранение неполадок». Чаще всего этого оказывается достаточно. Если такой вариант не подходит, то можно сделать все своими руками.
Понравилось? Поделись с друзьями!
Дата: 13.10.2021
Автор/Переводчик: Wolf
The Audio Service is Not Running is an error message that a Windows system displays when the service required to deliver sound does not work correctly. And, as a result, there’s no sound on the system. This is a common issue for all versions of Windows OS and the fixes too are equally relevant to all the versions.
This issue may also affect the sound icon. It puts a red cross (X) on the sound icon but you can actually use the headphones, speakers for the sound output.
The reasons for this problem can be found in the faulty audio drivers which may be outdated or damaged.
Whatever the cause is, luckily, there are several ways with which you can fix this problem.
The volume button might relieve you of this issue right away.
Though a red cross (X) can be seen on top of the volume icon, you can still try sliding the volume up and down.
- Click the speaker icon on the taskbar
- Slide the volume icon up and down to adjust the volume of the computer. You might get rid of the problem.
Audio Service Not Running: Fixes to Try
If the audio services are not running correctly on your Windows PC, you can try some easy fixes as mentioned below. The solutions to this issue are quite easy and straightforward and you can try them to fix it quickly on your Windows computer.
Procedure 1: Start Windows Audio Services
Steps to start Windows audio services:
- Press Windows key + R to open the Run box.
- Type services.msc.
- Press Enter to get into the Windows service list.
Try to Locate the following services:
- Windows audio
- Windows audio endpoint builder
- Plug and play
- Set the Startup type to Automatic and make sure these services are running. Even if they already are running, restart the services.
- Double click on the services and in the Properties window, set the Startup type to Automatic.
- Open Run, type in msconfig.exe and hit Enter. In the System Configuration window, go to the Services tab and make sure that the above services are checked there.
- Restart the computer to apply the changes.
Procedure 2: Start Windows Audio Components
Follow the steps below to start Windows audio components. This might resolve the issue with the audio service not running on Windows.
- Press Windows key + R, type services.msc and hit Enter.
- Locate Windows Audio service, double click to open Properties.
- Select the Dependencies tab and enlarge the components listed in “The service depends on the following system components”
- Make sure all the components listed above are started and running in the services.msc.
- Restart the Windows audio service.
- Reboot to apply the changes.
Procedure 3: Uninstall and Reinstall the Sound Drivers
Sometimes, the audio drivers might be corrupted or damaged and as a result, the audio services may stop running. If such is the case, proceed with these steps to uninstall and reinstall the sound drivers.
- Press Windows key + R then type devmgmt.msc and click Enter to open the Device Manager.
- Expand Sound, video and game controllers and click on the sound device then select uninstall.
- Click ok to uninstall
- Go to the Action tab.
- Click on Scan for hardware changes.
- Restart the computer to apply the changes.
Procedure 4: Reorient Registry key
- Press Windows key + R, type regedit and hit enter to open the registry editor.
- Begin with the following key, HKEY-LOCAL-MACHINESYSTEMCurrentControlSetServicesAudioEndPointBuilderParameter
- Locate Servicdll and if the value is %SystemRoot%System32Audiosrv.dll, this is the cause of the problem.
- Replace the above value with %SystemRoot%System32AudioEndPointBuilder.dll.
- Recommence your PC to apply changes.
Procedure 6: Updating the audio drivers
- Locate the particular driver in the device manager.
- Select update. This method might fix the problem.
For Windows XP:
- Click start > control panel > double click “system”.
- System > hardware > sound, video, game controller.
- Double Click “sound card” > driver tab > update driver
Check the sound system after the update is complete.
For accessing the sound card in a different way:
- Click on start icon > move to control panel > click Hardware and Sound.
- Find Device and Printer(in the device and printer section) > click Device Manager(under Device and Printer).
- Open Sound, Video, and Game controller > Sound card > right click on sound driver and select Update Driver Software.
For Auto-update:
- You can download a program from the internet that will update your audio drivers automatically and keep it up to date. So to the search engine and type update drivers and click search. Choose the software and scan it.
- A driver update may require these steps: click on free scan > download the software > click on scan now > let the scan finish.
- After the scan is completed, you will receive data on all your drivers > move to the sound, video, and game controllers > see if the sound card needs any update, if it shows “update now “ click on it till the update finishes.
In Conclusion
One of the simplest ways to fix this issue of the audio driver not working is to touch the audio icon and you can resolve the problem but when this method does not work you need to try out these methods to resolve the issue.
Hoping that we have solved your issue by now. If we missed any important step you can add that by commenting on the comment section.


