На днях на одном из компов с предустановленной так называемой инсайдерской сборкой Windows 10 вдруг появилось уведомление, что «Срок действия сборки Windows скоро истекает».
Сначала, конечно же, был сделан вывод, что эту самую сборку действительно забыли вовремя проапдейтить. Но, как выяснилось («Параметры» -> «Обновление и безопасность»), вовсе не забыли, и версия сборки на ПК стоит вроде как последняя.
Полезли в Softpedia.
А там по этому поводу сказано, что новая сборка таки уже есть, и подобные «предъявы» Microsoft как раз сейчас выставляет в предыдущих, притом крайним сроком указывается 14 декабря (кстати, чтобы быстро перепроверить номер сборки Windows, кликаем «Пуск«, в строке поиска системы пишем winver и жмем Enter).
Не пропустите: ОКОННЫЙ РЕЖИМ С ОПТИМИЗАЦИЕЙ: КАК ВКЛЮЧИТЬ ЕЁ В ИГРЕ НА КОМПЕ С WINDOWS 11
Стало понятным, что обнова где-то застряла. Но возиться с загрузкой ISO-образа и потом вручную ставить новую сборку как-то не очень хотелось, потому изыскания были продолжены, и не зря.
Поскольку проблемка решилась гораздо быстрее и проще.
«Срок действия сборки Windows скоро истекает»: почему не обновляется сборка?
Сначала мы зашли в раздел «Программа предварительной оценки Windows» («Параметры» -> «Обновление и безопасность» -> «Программа предварительной оценки Windows») и обнаружили, что, во-первых, все тамошние опции не активны (серые), при этом в подразделе «Какой тип содержимого…» по-прежнему указано «Активная разработка для Windows«, а в «Как часто вы хотите получать…» — «Поздний доступ«.
А во-вторых, что самое главное, соответствующая учетная запись пользователя нигде не значилась, что было странновато, так как прописывалась она еще на этапе регистрации в Windows Insider Programm и настройки получения сборок на данном конкретном ПК.
Не пропустите: ЕСЛИ WINDOWS 10 НЕ ВОССТАНАВЛИВАЕТСЯ ПОСЛЕ УСТАНОВКИ ОБНОВЛЕНИЯ (0XC000021A)
Посему решено было ту же учетку добавить заново. Но тут же оказалось, что она уже есть в списке, и достаточно было её только выбрать, даже логин и пароль не нужно было вводить.
После этого, как говорится, всё заработало. В разделе «Программа предварительной оценки Windows» все опции разблокировались (в том числе и «Ранний доступ» в разделе «Как часто вы хотите получать предварительные сборки«) и тут же заработал поиск обновлений.
В общем, если комп выдал сообщение «Срок действия сборки Windows скоро истекает«, а обнова обычным способом не скачивается, то просто проверьте привязку учетной записи к «Программе предварительной оценки Windows».
I get this warning each time I login to Windows 10:
This build of Windows will expire soon
Your build of Windows will expire on 31/07/2020. You should move to a new build as soon as possible. Go online for more information.
Build 20152 was released on June 24th 2020 the current build for the Dev channel was released on July 22nd 2020. There were 2 additional builds released between June 22nd 2020 and July 22nd 2020.
Based on my research it does not appear that the Beta channel has received what potentially will become the 21H1 release at this time. Build 20152 at this time is one of those builds. This means that until 20H2 is release the Beta channel WILL NOT have any builds that will potentially become 21H1 at this time.
I’m in the Windows Insider Program (to use WSL 2), and have recently switched from the Dev channel to the Beta channel, because the Dev channel is not needed anymore for WSL 2 support. It is my guess that switching WIP channels lead to this ‘Windows will expire soon’ warning.
At this time you will have to switch back to the Dev channel in order to receive new builds of Windows 10. You will have to stay on this channel until after 20H2 is released. You must make the switch from the Dev channel to the Beta channel before development of 22H1 is started.
My priorities are a) have a working operating system on July 31th, and b) move from the WIP Dev channel to the Beta channel (or maybe RC or turn of WIP entirely, depending on WSL 2 support). What are my options?
Once a build expires you will be unable to boot into Windows. This means you must install the current Dev channel build before July 31st 2020. In order to receive that build you must do the following actions as an Administrator.
1. Open the Start Menu.
2. In the search box, type CMD.exe.
3. On the right menu under Command Prompt, select Run as administrator.
4. If prompted by UAC, choose Yes.
5. From the elevated prompt, enter this command, then hit enter: `net stop wuauserv`
6. Enter this command, then hit enter: `rmdir /s /q C:WindowsSoftwareDistributionSLS`
7. Finally, enter this command, then hit enter: `net start wuauserv`
8. Close the Command Prompt window.
9. Open Settings > Update & Security > Windows Update and check for updates.
Once you have completed all the actions required to solve this problem you should be offered the current Dev channel build. Windows 10 does not allow you to go backwards to a past build. This means it’s not possible, at this current time, to install a Beta channel build.
I’ll repeat this procedure each time I’m close to the expiration date. Hopefully this will get me to a Beta build at some point. But I’m a bit afraid that Dev will have moved some versions by the time an earlier build has been deemed stable enough for Beta. Then I might never get out of Dev… E.g. Beta 19042.421 was released 2 days after Dev 20175. So seems I’m stuck.
You encountered an issue that impacted Intel and AMD machines on earlier builds. Due to the changes to the Insider Preview channels, until there is an overlap between the Dev channel and Beta channel you won’t be able to switch channels, the earliest this would happen is after 20H2 is released. You will have to postpone updates before the Dev channel build is higher than the expected build for 21H1.
I use this website to determine what release a build belongs to exactly.
switching from Dev to Beta is exactly what got me into this situation.
It was actually an issue, that was fixed back on July 22nd 2020, but prevented your machine from being offered a more recent build. Switching the Insider Preview channels didn’t have anything to do with your problem.
Maybe this is one of the few times that ‘typically’ does not apply, and for some reason they expired Dev releases before there is a suitable Beta release to upgrade to.
The Beta channel is actually targeting the next feature update 20H2. The build you had installed was a preview build for 21H1.
Source:
- Announcing Windows 10 Insider Preview Build 20175
- IMPORTANT!! Please read if you are not seeing build 20175!
The Windows Insider Preview program lets you run early versions of the upcoming Windows 10 builds. You can test new features, provide development feedback, and help shape the development of Windows 10.
However, at times, your Windows 10 Insider Preview build might expire. That is, Microsoft no longer supports the preview version of Windows you are using and then the «This build of Windows 10 will expire soon» error starts to appear.
So, how do you fix the error?
What Is the «This Build of Windows Will Expire Soon» Error?
The Windows Insider Preview program allows you to use new Windows 10 versions before general release. The user feedback and bug reporting help to shape Windows 10. As the development of Windows 10 is a constant stream of updates and tweaks, no Insider Preview build remains in circulation for long.

When an Insider Preview build is no longer supported, you’ll receive the «This build of Windows will expire soon» error message.
Your Windows Insider Preview version might expire for a few reasons:
- You opted out of Insider Preview builds
- You switched from the Dev Channel to the Beta Channel
- Your device was switched off for a long time
How to Fix the «This Build of Windows Will Expire Soon» Error
There are three methods you can use to fix the Insider Build expiring issue:
- Change your Insider Preview path settings
- Reinstall Windows with an Insider Preview Beta Channel ISO
- Switch to a clean installation of regular Windows 10
1. Change Your Insider Preview Path Settings
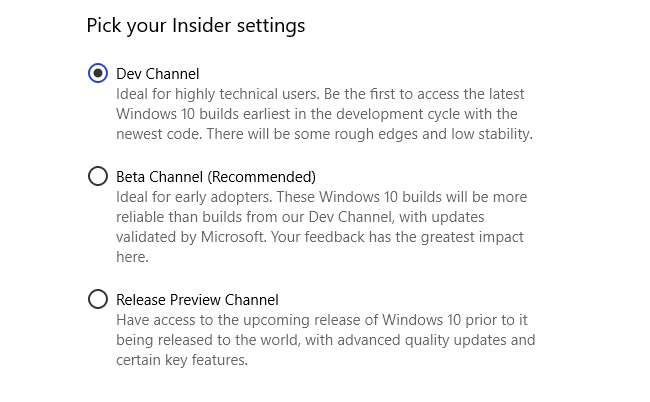
The easiest way to shift the expiring Insider Preview build is to switch your Insider Preview path. Windows 10 Insider Preview has three paths available for users:
- Dev Channel: Access the very latest Windows 10 builds, from the early stages of the development process
- Beta Channel: Recommended for early adopters, the Beta Channel provides more reliable builds than the Dev Channel
- Release Preview Channel: Early access for the upcoming Windows 10 release, including certain key features and minimal bugs
This fix is primarily for those stuck on the Beta Channel.
Press Windows Key + I to open the Settings window, select Update & Security, then Windows Insider Program. Here you will see your current Insider Preview options.
Select the box underneath Pick your insider settings to change your Insider Preview path. Switch from the Beta Channel to the Dev Channel.

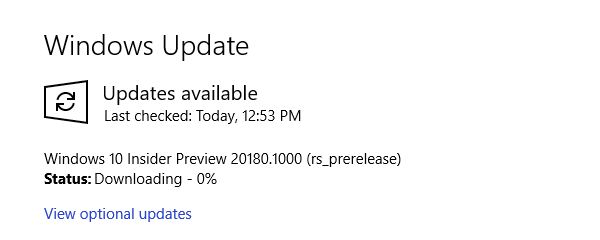
Now, head back to the Settings window and select Windows Update from the sidebar. Press Check for updates and wait for the latest Dev Channel Insider Preview build to download. After it downloads, install the new build, then restart your system.

You don’t have to stay on the Dev Channel. Once you install the latest Dev Channel Insider Preview build, you can switch your path back to the Beta Channel and wait for the latest build. It is time-consuming, but it does stop the «This build of Windows will expire soon» error messages.
2. Reinstall Windows with an Insider Preview Beta Channel ISO
If you don’t want to switch Insider Preview paths, you can download and install the latest Insider Preview Beta Channel build. This method ensures you remain on the Beta Channel.
Plus, you can use the in-place upgrade option, which means you don’t have to wipe your system in the process. The result is a much faster upgrade with minimal data loss.
However, it is always a good idea to take a backup before making any major changes to your system. Before commencing with the reinstallation, you must backup your data.
That means important files, photos, music, games—anything you do not want to lose during the reinstallation. Wondering how to do it? Check out our ultimate Windows 10 data backup guide.
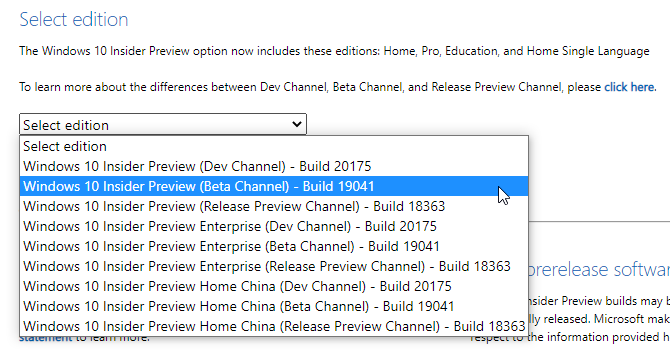
After backing up your data, head to the Windows Insider Preview Downloads page. Scroll down to the bottom of the page and select the latest Beta Channel or Release Preview Channel edition, followed by the language (make sure the language matches your existing installation, or the setup will run into trouble later).
You’ll then have to select between a 32- or 64-bit version of Windows. If you’re unsure, here’s how you find out if you have 32-bit or 64-bit Windows.

After the download completes, double-click the installation file to begin the process. Windows 10 will mount the ISO file automatically. Then, select Setup and follow the instructions.
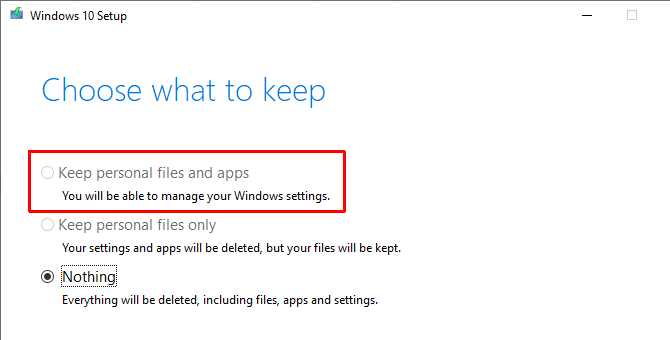
On the Choose what to keep page, select Keep personal files and apps. On the Ready to install page, make sure that Keep personal files and apps appears.

When ready, select Install. The installation process will take a few minutes to complete, and your computer will restart several times during the process. Once complete, you can log into Windows as normal.
3. Switch to a Clean Installation of Windows 10
The final option is to leave the Windows 10 Insider Preview scheme and head back to regular Windows 10. Like the fresh installation of the Insider Preview, you can use the in-place upgrade option to move back to the standard Windows 10 installation or complete a full clean installation if you desire.
Remember, a clean installation will wipe all your files, apps, and data. If you want a clean installation, you must backup your data or face losing it permanently.
First up, you need to create installation media for the latest version of Windows 10.
Download: Windows 10 Media Creation Tool for Windows (Free)
Open the Windows 10 Media Creation tool, accept the license terms, and select Upgrade this PC now. You’ll have to wait for the Windows 10 Setup to download and prepare Windows 10, which can take a while.
After the download completes, select Change what to keep. If you want to keep your files, select Keep personal files and apps. If you want a completely clean installation, select Nothing. Wait for the Windows 10 installation to complete, after which you can set up your clean installation.
A clean installation of Windows 10 is a wonderful thing. Check out the most important things you must do after installing Windows 10, such as running Windows Update, updating your drivers, and more.
How to Leave Windows 10 Insider Preview Builds
These are the fixes for the «This build of Windows will expire soon» error. But the final option is one way you can leave the Windows 10 Insider Preview scheme for good, too. You can leave the Windows 10 Insider Preview program whenever you want, safe in the knowledge that you don’t have to wipe your data.
Once you have a clean installation ready to go, you can adjust your Windows 10 privacy settings from the get-go. Here’s our complete guide to Windows 10 privacy settings to help you get set up.
If you love checking out new features and updates to Microsoft’s latest OS : Windows 10, I’m sure you’re using one of the Insider Preview builds. This also means that your enjoyment is for limited time and the build will expire after certain date at which point, Windows will keep restarting for every hour or so if you don’t update the build. Windows will keep reminding of this fact as the expiration date nears with with dialog saying –
This build of Windows will expire soon.
Well, it’s good to know once and be reminded rarely. But, it becomes an annoyance when it obstructs your work. Unfortunately, Windows 10 doesn’t provide you an option to change the frequency of reminder, let alone disable it. So, here a little trick to do the job and get rid of this annoying reminder –
Just change your system’s date few months back. That should do it. But, if you don’t want to do that here’s one more way :
- Head to C:WindowsSystem32 in File explorer.
- Look for a file named LicensingUI.exe
- Take the ownership of the file. ( Right click > Properties > Advanced > Owner ). Make sure you have all the necessary permissions to modify the file.
- Now, simply rename the file to anything you want.
That’s all! It’s as simple as that. You’ll not get reminder anymore because that is the programme responsible for the reminder and now since you’ve changed its name, Windows will not be able to launch it.
Hope this helped you.
Keep coming back for more trick and tips.
Also like and share our Facebook page for latest updates.

