Download PC Repair Tool to quickly find & fix Windows errors automatically
If when performing an upgrade to a new version of Windows, and you encounter the error message The computer started using the Windows installation media, then this post is intended to help you. In this post, we will offer the most suitable solutions to this issue.

When you encounter this issue, you’ll receive the following full error message
The computer started using Windows installation media. Remove the installation media and restart your computer so that Windows start normally. Then, insert the installation media and restart the upgrade. [Do not select Custom (advanced) to perform an upgrade. Custom (advanced) installs a new copy of Windows and deletes your programs and settings.]
If you’re faced with this issue, you can try our recommended solutions below in no particular order and see if that helps to resolve the issue.
- Modify the Registry
- Upgrade using Windows 11/10 ISO file
- Clean install Windows 11/10
Let’s take a look at the description of the process involved concerning each of the listed solutions.
1] Modify the Registry
Since this is a registry operation, it is recommended that you back up the registry or create a system restore point as necessary precautionary measures. Once done, you can proceed as follows:
- Press Windows key + R to invoke the Run dialog.
- In the Run dialog box, type regedit and hit Enter to open Registry Editor.
- Navigate or jump to the registry key path below:
HKEY_LOCAL_MACHINESYSTEMCurrentControlSetControl
- At the location, at the left navigation pane, under the Control key, scroll down until you get to the key named MiniNT.
Note: If you do not see this key, skip to the next solution.
- Next, take Ownership of the MiniNT registry key.
- After you have taken Ownership of the key, right-click the key and select Delete.
- Restart computer.
On boot, try the Windows 10 upgrade again and see if the error The computer started using the Windows installation media is resolved. Otherwise, try the next solution.
2] Upgrade using Windows 10 ISO file
Since you’re encountering this Windows 10 upgrade install error using the Media Creation tool aka Windows Update Assistant, this solution requires you to directly download the Windows 10 ISO image file from the Microsoft website. Once you have downloaded the ISO to a location (preferably the desktop) on your device, double-click the ISO image to mount it as a virtual drive then double-click the setup.exe file to start the in-place upgrade process with the ISO file.
3] Clean install Windows 10
If none of the above solutions worked, back up your data, create a fresh installation media with the latest version of Windows 10 and then perform a clean install on your device.
Hope this helps!

Obinna Onwusobalu has studied Information & Communication Technology and is a keen follower of the Windows ecosystem. He has been a Windows Insider MVP (2020). He runs a computer software clinic.
Содержание
- Fix: The Computer Started using the Windows Installation Media
- Solution 1: Run the Process from a Different Place
- Solution 2: Re-Insert Your Laptop’s Battery
- Solution 3: Delete a Certain Registry Key
- Solution 4: Boot in Normal Startup Before Running the Windows Setup
- Solution 5: Format the Drive You Want to Install Windows on
- The computer started using the Windows installation media
- The computer started using the Windows installation media
- 1] Modify the Registry
- 2] Upgrade using Windows 10 ISO file
- 3] Clean install Windows 10
- Compatibility report: The computer started using the windows installation media.
- Bat123Man
- How to troubleshoot Windows Installer errors
- Symptoms
- Error message 1
- Error message 2
- Error message 3
- Resolution
- To determine whether you’re using an account that has administrator rights
- Windows 10 Setup thinks it’s booted from installation media
- 2 Answers 2
Fix: The Computer Started using the Windows Installation Media
This scenario can be traced down to a single process on your computer: performing an upgrade to a new version of the Windows operating system or installing it from the scratch and it has been bugging users for quite a long time now.

Either there is a complete confusion which can be fixed quite easily and which will be explained the first solution or you will have to perform some serious troubleshooting which is, of course, the longer and more complicated path. However, the problem should be resolved quickly if you follow the methods below carefully!
Solution 1: Run the Process from a Different Place
If you want to perform an upgrade on a PC which already has an operating system installed which can be booted into, you might have made a mistake if you booted from your recovery media (Windows installation DVD or USB) and tried to initiate the upgrading process from there.
That is the usual scenario and the error message is not in vain. Instead, you need to boot into your operating system and start the process from there.


Solution 2: Re-Insert Your Laptop’s Battery
This solution definitely sounds too good to be true and we were also skeptical about it but several users confirmed that it actually works and we had to place it in our article. Nonetheless, the process takes about a minute and it won’t cost you anything, especially if it actually solved the problem.


Solution 3: Delete a Certain Registry Key
There are certain actions you may have tried out on your computer which could have led to a certain registry key being created. This registry key actually causes this problem and deleting it can solve it in no time. If you are trying to install Windows regularly and you are receiving this error, try following the steps below in order to solve the problem.


Solution 4: Boot in Normal Startup Before Running the Windows Setup
Changing the way you boot into your computer is something you choose for yourself but everyone will recommend that you switch to the normal startup mode before you try to start a Windows Setup for any purpose. It has worked for several people and we hope it will work for you as well.

Solution 5: Format the Drive You Want to Install Windows on
If you want to perform a clean install of Windows on your computer, you will definitely have to format the old drive which will include erasing all of your files. Since you have decided to perform a clean install, you should have already taken care of important files so we will skip that. You shouldn’t skip the formatting of all partitions which have the old system files on it.
The process will differ greatly depending on which installation media you are using (Windows 7, Windows 8, and Windows 10). However, the process is quite similar so we will cover the steps for Windows 10 since most people are installing this OS nowadays.

Источник
The computer started using the Windows installation media
If when performing an upgrade to a new version of Windows, and you encounter the error message The computer started using the Windows installation media, then this post is intended to help you. In this post, we will offer the most suitable solutions to this issue.

When you encounter this issue, you’ll receive the following full error message
The computer started using Windows installation media. Remove the installation media and restart your computer so that Windows start normally. Then, insert the installation media and restart the upgrade. [Do not select Custom (advanced) to perform an upgrade. Custom (advanced) installs a new copy of Windows and deletes your programs and settings.]
The computer started using the Windows installation media
Let’s take a look at the description of the process involved concerning each of the listed solutions.
1] Modify the Registry
Since this is a registry operation, it is recommended that you back up the registry or create a system restore point as necessary precautionary measures. Once done, you can proceed as follows:
On boot, try the Windows 10 upgrade again and see if the error The computer started using the Windows installation media is resolved. Otherwise, try the next solution.
2] Upgrade using Windows 10 ISO file
Since you’re encountering this Windows 10 upgrade install error using the Media Creation tool aka Windows Update Assistant, this solution requires you to directly download the Windows 10 ISO image file from the Microsoft website. Once you have downloaded the ISO to a location (preferably the desktop) on your device, double-click the ISO image to mount it as a virtual drive then double-click the setup.exe file to start the in-place upgrade process with the ISO file.
3] Clean install Windows 10
If none of the above solutions worked, back up your data, create a fresh installation media with the latest version of Windows 10 and then perform a clean install on your device.
Источник
Compatibility report: The computer started using the windows installation media.
Bat123Man
Member
I started off downloading the Microsoft 64-bit upgrade tool, and selecting «Upgrade this PC». As many users have reported, the tool came back with «Something Happened». So instead, I selected the other option and downloaded the 64-bit Pro version of Win10 to upgrade my 64-bit 8.1 Pro. I selected the option to have the files end up on a flash drive (Sony 32 GB stick). All of that went smoothly. Then I ran CCleaner to make sure I had a relatively clean system (removes temp files, etc.), and launched SETUP from the stick.
After it asked me to Confirm that it was going to zap Media Center which is no longer available for Win10, it checked for Upgrades. When that was complete, it rebooted and came up with a big «Install Now» button. I clicked it, and it asked what type of install I wanted to do; Upgrade or Custom. It heavily suggested I do an Upgrade as it implied that I would have a brand new system with no previous apps selecting Custom. I selected Upgrade, whereupon it returned an error message :
«Compatibility report: The computer started using the windows installation media. Remove the installation media and restart your computer so that windows starts normally. Then, insert the installation media and restart the upgrade. (Do not select Icustom [advanced] to perform an upgrade Icustom [advanced] installs a new copy of windows and deletes your programs and settings.)»
I pulled the stick, and tried to continue, and it told me that it could not find the media. I put the stick back in, but then it said it couldn’t find the driver. The dialog box looked like it came from Win95. I tried a bunch of things, and then managed to get back to the original «Install Now» button, and with no stick in the USB drive, tried to continue. No dice. Stick back in, no dice. Finally with the stick out, I clicked on the X to close the Window, and it said it might reboot the computer (it actually said «might»). I figured I was pooched at this point, but clicked OK. Computer restarted, I had my fingers crossed that it would boot back into 8.1. It didn’t, instead it said, «Upgrading Windows», and successfully upgraded my computer to Win10.
Thought I would post this in case someone else was getting grey hairs.
Источник
How to troubleshoot Windows Installer errors
Symptoms
When you install, uninstall, or update a program on a Windows-based computer, you may receive one of the following error messages.
Error message 1
The Windows Installer Service could not be accessed.
Error message 2
Windows Installer Service couldn’t be started.
Error message 3
Could not start the Windows Installer service on Local Computer. Error 5: Access is denied.
Resolution
To fix this problem automatically, run the «Fix problems that programs cannot be installed or uninstalled» troubleshooter to repair issues that block program installation or removal because of corrupted registry keys.
Important To perform many of the methods and steps in this article, you must be logged on to your computer as an administrator.
To determine whether you’re using an account that has administrator rights
To determine whether you’re using an account that has administrator rights, use one of the following methods, as appropriate for the operating system that you’re running.
Windows 7 and Windows Vista
Open the Date and Time dialog box.
Type the following command in the Start Search or Search programs and files box, and then press Enter:
timedate.cpl
The Date and Time dialog box appears.

Click Change date and time. When the User Account Control dialog box appears, click Continue.

Do one of the following, depending on what happens when you click Continue:
If your computer does not prompt you for a password, you are already logged on with an administrator account. Click Cancel two times to close the Date and Time dialog box. You are ready to fix the Windows Installer issues.
If your computer prompts you for a password, you are not logged on with an administrator account.
Windows XP and Windows Server 2003
Open the Date and Time dialog box.
Click Start, and then click Run.
Type the following command in the Run dialog box, and then press OK:
timedate.cpl

Do one of the following, depending on the result:
If the Date and Time Properties dialog box appears, you are already logged on as an administrator. Click Cancel to close the dialog box.

If you receive the following message, you are not logged on as an administrator:

After you’ve verified that you’re logged on to your computer as an administrator, you can start troubleshooting Windows Installer issues.
If the Windows Installer engine is corrupted, disabled, or installed incorrectly, this may cause program installation issues.
Use the following methods to identify any Windows Installer issues that may be causing problems when you install, uninstall, or update programs.
Method 1: Determine whether the Windows Installer engine is working
Click Start  , type cmd in the Search box or click Run then type cmd in the dialog (Windows XP or Windows Server 2003), and then press Enter to open a Command Prompt window.
At the command prompt, type MSIExec, and then press Enter.
If the MSI engine is working, you should not receive any error messages. If you receive an error message, enter the error message text into a search engine such as Bing or Google to locate troubleshooting information about the issue.
Try to install or uninstall again.
Method 2: Make sure that the Windows Installer service is not set to Disabled
Click Start , type services.msc in the Search box or click Run then type services.msc in the dialog (Windows XP or Windows Server 2003), and then press Enter to open Services.
Right-click Windows Installer, and then click Properties.
If the Startup type box is set to Disabled, change it to Manual.
Click OK to close the Properties window.
Right-click the Windows Installer service, and then click Start. The service should start without errors.
Try to install or to uninstall again.
Method 3: Check your version of Windows Installer, and upgrade to the latest version if necessaryImportant This method applies to Windows XP, Windows Vista, Windows Server 2003, Windows Server 2003 R2, and Windows Server 2008 only.
Click Start , type cmd in the Search box or click Run then type services.msc in the dialog (Windows XP or Windows Server 2003), and then press Enter to open a Command Prompt window.
At the command prompt, type MSIExec, and then press Enter. If the MSI engine is working, you should not receive any error messages, and a separate dialog box should open. This shows the MSI version.
If the installer is not version 4.5, download and install Windows Installer 4.5.
Try to install or to uninstall again.
Method 4: Reregister the installer engineImportant This method applies to Windows XP and to Windows Server 2000 only.
Click Start, click Run, type cmd, and then click Command Prompt.
At the command prompt, type the following, and then press Enter after each line:
Try to install or to uninstall again.
The installation or update method doesn’t run to completion
There are several methods that can be used to install, to uninstall, or to update a program. Additionally, the method or methods that are used may not have started or completed successfully. In this situation, try some other method to install, or to update the program.
The following are common methods that are used to install software:
Insert the CD or DVD media, and then let the installation auto-start.
Browse to the CD, DVD, removable media, or other location where the programs installation files are stored, and then double-click the Setup program. The setup file is typically one of the following:
Autorun or Autorun.exe
Install or Install.exe
Click Run when you download the program from a website.
The installation media is unreadable
Installation media such as CD and DVD media may be dirty or scratched and therefore be unreadable by the CD or DVD reader. To resolve this issue, follow these methods:
Method 1: Clean the CD or DVDTo do this, use a CD or DVD disc-cleaning kit. Or, use a soft, lint-free cotton cloth to gently wipe the silver side of the disc. Do not use paper cloth, as this can scratch the plastic or leave streaks. When you clean the disc, wipe from the center of the disc outward. Do not use a circular motion. If the problem continues to occur, clean the disc by using a damp cloth or a commercial CD or DVD disc-cleaning solution. Dry the disc thoroughly before you insert it into the drive.
Note If multiple CDs or DVDs are required, we recommend that you copy all the disks to the same folder, in reverse order (higher disk numbers first). Be prepared to approve the overwriting of existing files if you are prompted, and then install from that location.
Method 3: Obtain a fresh version of the installation packageIf you tried to install from a CD or DVD, do the following:
Check the software manufacturer’s website for a more recent version of the software package. Download and install the new version.
If you already have the latest version, download the program from the manufacturer’s website, and then run the installation.
Downloaded or copied installation files are corrupted
If you are installing a program from the Internet, redownload the file (select Save instead of Run in the download dialog box), save the file to a folder on a local hard disk on your computer or to other removable media. Then, run the installation from that location.
If your installation files are on a network (for example, a commercial or corporate environment), copy all the files to a folder on a local hard disk on your computer, and then run the installation from that location.
Method 2: Obtain a fresh version of the installation packageIf some time has elapsed between when you downloaded the package and when you tried to install it, do the following:
Check the software manufacturer’s website for a more recent version of the software package. Download and install the new version.
If you already have the latest version, download the program again, and then run the installation.
Programs that are currently running on your computer are interfering with the installation process
Disable programs that might be interfering with the installation process. To do this, follow these steps:
Click Start , type msconfig in the Search box, and then click msconfig.exe.
 If you are prompted for an administrator password or confirmation, type the password, or provide confirmation.
On the General tab, click Selective startup, and then clear the Load startup items check box.
Click Services, click Hide all Microsoft services, and then click Disable all.
Click OK, and then click Restart.
Try running your software program installation.
When you are finished troubleshooting the problem, restart the computer in Normal Startup mode. To do this, follow these steps:
Click Start , type msconfig in the Search box, and then click msconfig.exe.
If you are prompted for an administrator password or confirmation, type the password, or provide confirmation.
On the General tab, click Normal startup, click OK, and then click Restart.
There are typically several ways to remove any program. In this situation, try some other method to remove the program.
The following are common methods that are used to install software:
Method 1: Use the uninstall option (if available)
Click Start , and then click All Programs.
Select the folder for the program that you are trying to uninstall, and then open the folder.
If there is an uninstall option, try using it.
Method 2: Use Control Panel options
Click Start , click Control Panel, click Add and Remove Programs or Programs and Features, and then click Uninstall a program.
Select the program, and then click Uninstall. Follow the instructions.
Note The following steps are appropriate for advanced users only.
Make sure that you don’t have any file or folder names that are longer than 260 characters.
For more about the maximum path length limitation, see Naming files, paths, and namespaces.
Most programs create an installation log. If you can’t locate such a log, you can enable verbose MSI logging. For more information, see How to enable Windows Installer logging.
Msiexec path your_msi.msi /L*v path your_msi_log.txt For a list of msiexec command-line parameters, see Command-line options.
A failed installation typically logs «Return Value 3» where the problem occurred and where the installation rollback began. The description of the failure appears immediately before the Return Value 3 log entry.
You can use the Wilogutl.exe tool to analyze log files from a Windows Installer installation. This tool may suggest solutions to errors that are found in a log file. It is available in the latest Windows Software Development Kit.
The following is an example of how to use the Wilogutl.exe tool at a command line:
wilogutl /q /l c:mymsilog.log /o coutputdir
You may be able to manually uninstall some parts of the program through the Windows interface. For example, you may be able to delete program files and folders. Because the steps to do this may differ widely, depending on the version of Windows that you’re running and on the program that you’re trying to uninstall, no prescriptive steps are provided here. If you’re not sufficiently familiar with the program that you’re trying to uninstall to positively identify the files and folders for that program, we do not recommend that you try this method. Generally, when you begin to delete program files and folders, you run the risk of damaging your operating system. Use this method at your own risk.
If you are considering uninstalling the program manually, be aware of the following:
Before you use this method, make sure that you create a system restore point.
Before you get started, move any personal data or documents that may have ended up in the installation folder of the program that you’re uninstalling. For example, move this material into the Documents folder.
If you cannot manually delete a program file, this may mean that the file is being used or that some other program is accessing the file and preventing you from deleting it. For example, antivirus software may be accessing the file. When antivirus software is accessing a program file and making it impossible to delete it, it’s likely that this same antivirus software was preventing you from uninstalling the program by more traditional means.
For general information about how to install or to uninstall a program, see the following:
Источник
Windows 10 Setup thinks it’s booted from installation media
This has been happening for all Windows 10 Setup builds. Windows Setup will not let me upgrade or downgrade my build (currently 11082) without losing my apps. I always get this message right after I click «Upgrade«:
The computer started using the Windows installation media. Remove the installation media and restart your computer so that Windows starts normally. Then, insert the installation media and restart the upgrade. (Do not select «Custom (advanced)» to perform an upgrade. «Custom (advanced)» installs a new copy of Windows and deletes your programs and settings.)
I have tried opening setup from flash drives, tried in C:, you name it I tried it, but every time I open setup (I even tried the setup.exe found in the sources folder), it refuses to upgrade due to it thinking » the computer started using the Windows installation media «.
Note: The same installation files from the same flash drive worked to upgrade my laptop’s Windows 10 build (which was also at build 11082), so I know the files in the installation folder are legit.
Here are some screenshots:
I get this when I open setup.exe only on my PC:

It then asks me for a key:

Then after agreeing to the Windows license policy and clicking on «Upgrade«, I get the error which I wrote above.

I have fixed the partitioning to match the Microsoft recommended specification, and I have even tried booting the installation from another PC, but to no avail.
Any thoughts before I entirely give up upgrading once and for all?
2 Answers 2
I had the same weird behavior when trying a Windows 10 upgrade. Ultimately, my decision was to install from scratch. Definitely the right call. My main issue was that I didn’t have a partition structure that Windows liked. STRONGLY recommend a fresh install on a physical drive (SSD of course) with only the Windows partitions: System, MSR, Windows, and Recovery. Yes, 4 partitions on Drive 0. I was able to use the guidance from MSDN about UEFI/GPT-based hard drive partitions.
I didn’t have to use Windows PE as specified in the article because you can run the CreatePartitions batch from any Windows machine. Using the GPT version (not the MBR version) is highly advisable for 2TB and high drives (I had a 256G SSD, several 3TB drives, and a 5TB drive). Just save this to a CMD file and CHANGE THE DRIVE NUMBER to your physical drive. Run DISKPART LIST DISK to verify the disk number.
The first time I did it, I ran all of the commands manually from CMD. Much easier to see what’s going on that way. Also, if you have Windows «Disk Management» (run diskmgmt.msc) running, you’ll see the results in near real time.
Hope this helps. It saved me, and my Windows install has never been happier.
Pro tip: don’t enter your serial number when installing. make sure you have a good install and just enter it later. Click «I don’t have a product key» instead.
Источник
This scenario can be traced down to a single process on your computer: performing an upgrade to a new version of the Windows operating system or installing it from the scratch and it has been bugging users for quite a long time now.
Either there is a complete confusion which can be fixed quite easily and which will be explained the first solution or you will have to perform some serious troubleshooting which is, of course, the longer and more complicated path. However, the problem should be resolved quickly if you follow the methods below carefully!
Solution 1: Run the Process from a Different Place
If you want to perform an upgrade on a PC which already has an operating system installed which can be booted into, you might have made a mistake if you booted from your recovery media (Windows installation DVD or USB) and tried to initiate the upgrading process from there.
That is the usual scenario and the error message is not in vain. Instead, you need to boot into your operating system and start the process from there.
- First of all, remove the installation DVD or USB from your computer completely when it has shut down completely and boot normally into your Windows operating system.
- After that, insert the storage device you want to use to perform and update and wait for it to load on your computer. Open This PC or My Computer on older versions of Windows by looking for it in Windows Explorer and locate the drive. If it’s a USB it should appear as a Removable Storage Device and a DVD would appear as such with the disc icon.
- Double-click on it in order to open and you should see a file named setup.exe. Run it and you should see a set of steps. If it is Windows 10 you are trying to update to from an older version of Windows follow the steps below.
- On the “What do you want to do?” screen choose the “Upgrade this PC now” option and click on Next. It will take a while to download the necessary files so stay patient.
- Read the License terms on the window which will appear and click on Accept afterwards. After that, you will see the Ready to install window and an Install button at the lower right part so click on it and wait for the process to finish. After that, you will only need to setup certain settings which we will leave for you. The problem should be solved now.
Solution 2: Re-Insert Your Laptop’s Battery
This solution definitely sounds too good to be true and we were also skeptical about it but several users confirmed that it actually works and we had to place it in our article. Nonetheless, the process takes about a minute and it won’t cost you anything, especially if it actually solved the problem.
- Turn off your laptop and disconnect the AC adapter to make sure there is no current running. Release the latch or other attachment devices that hold your battery in its regular spot.
- Slide the battery out of its compartment or storage bay easily. Press the release button if there is one and carefully lift the battery out of its place. Avoid touching the contacts on the battery itself or inside the bay; the moisture on your fingertips could reduce the conductivity of the battery.
- Make sure to hold your laptop’s power button for at least 20 seconds in order to drain it from any current which may have remained. You should only do this with the both battery and AC adapter disconnected and your laptop being shut down.
- Slide the battery back into the notch or bay and close the safety latch to lock it into place. Reconnect the AC adapter and boot your computer to try the installing process again.
Solution 3: Delete a Certain Registry Key
There are certain actions you may have tried out on your computer which could have led to a certain registry key being created. This registry key actually causes this problem and deleting it can solve it in no time. If you are trying to install Windows regularly and you are receiving this error, try following the steps below in order to solve the problem.
- Open the Registry Editor interface by typing “regedit” in either the search bar or the Run dialog box. Navigate to the following key in Registry Editor by navigating in the left pane:
HKEY_LOCAL_MACHINESYSTEMCurrentControlSetControl
- Under the Control key, you should be able to see a key named MiniNT so make sure you right-click on it and click on Permissions.
- Under the Group or user names section, try to locate your username on the list. If you fail to do so, click on Add >> Advanced >> Find Now. You should be able to see your user account under the Search results section so select it and click OK twice until you back in the Permissions folder.
- Select you account in the Group or user names section and check the Full Control checkbox under Permissions for… and apply the changes you have made.
- After that, you can right-click the MiniNT key and click on Delete. Confirm the dialog box which will appear and restart your computer to Apply the changes. Try installing Windows again.
Solution 4: Boot in Normal Startup Before Running the Windows Setup
Changing the way you boot into your computer is something you choose for yourself but everyone will recommend that you switch to the normal startup mode before you try to start a Windows Setup for any purpose. It has worked for several people and we hope it will work for you as well.
- Use the Windows + R key combination on your keyboard in order to open the Run dialog box and type in “msconfig” before clicking OK. If you are using Windows 10, you can also search for “msconfig” in the Start menu or the search bar next to it. The first result should be System configuration so make sure you click on it.
- Stay in the General tab and change the radio button under Startup selection from the previous setting to Normal startup and Apply the changes before exiting. Restart your computer and check to see if the problem is gone.
Solution 5: Format the Drive You Want to Install Windows on
If you want to perform a clean install of Windows on your computer, you will definitely have to format the old drive which will include erasing all of your files. Since you have decided to perform a clean install, you should have already taken care of important files so we will skip that. You shouldn’t skip the formatting of all partitions which have the old system files on it.
The process will differ greatly depending on which installation media you are using (Windows 7, Windows 8, and Windows 10). However, the process is quite similar so we will cover the steps for Windows 10 since most people are installing this OS nowadays.
- Insert the installation media and boot the computer. Setup the languate, time and date settings, etc.
- If you’ve never installed Windows 10 on this computer before, you’ll see the Windows activation screen. Enter your Windows 10 key here. If you don’t have one, but you have a valid 7, 8, or 8.1 key, enter it here instead. You can also skip this part and enter the key after the installation is complete.
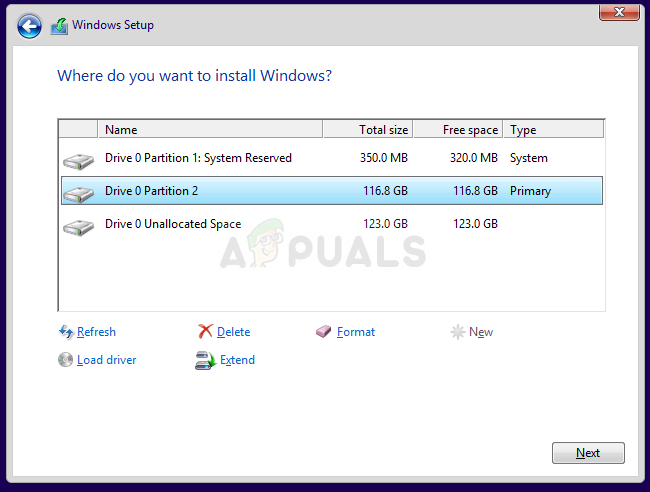
- Go through the setup process normally until you see the “Which type of installation do you want?” screen. Select the “Custom” option to ensure you’re performing a clean install and not an upgrade install which was covered in the first solution.
- You will now see the “Where do you want to install Windows?” screen with the partitions you have active. Choose each one with current OS’ system files on it and click on Delete. Choose the one where you want to install Windows and follow through with the process. The error shouldn’t appear now.

Kevin Arrows
Kevin is a dynamic and self-motivated information technology professional, with a Thorough knowledge of all facets pertaining to network infrastructure design, implementation and administration. Superior record of delivering simultaneous large-scale mission critical projects on time and under budget.
- Remove From My Forums
-
Вопрос
-
The computer started using Windows installation media. Remove the installation media and restart your computer so that Windows starts normally. The, insert the installation media and restart the upgrade. (Do not select |custom[advanced]| to perform
an upgrade. |custom[advanced]| installs a new copy of Windows and deletes your programs and settings.)That is the Compatibility report that I’m getting when trying to install onto parallels 10 Version 10.2.0 (28956) on my mid 2009 Macbook 13. This happens just after I click ‘Install now‘ and accept the T&Cs. I am selecting ‘Upgrade:
Install Windows and keep files, setting and applications’.I am upgrading from the Windows Technical Preview Evaluation Copy. Build 9879.
I have updated my EFI and tried a few restarts and am booting from a CD. No luck yet.
Any help would be muchos appreciated.
-
Изменено
5 мая 2015 г. 22:08
Modified post to remove large text and replace with quote box.
-
Изменено
Ответы
-
Hi bitofagiggle,
I am not familiar with mac machines, based on what I know, there should be more settigns that need to be configured before the installation of Windows, I suggest you contact the manufacturer for further help regarding how to make Windows to upgrade smoothly.
The below is some articles for reference:
Install
Windows 8.1 on a MacYour Manufacturer website:
How to install Windows using Boot Camp
Please note: Since this website is not hosted by Microsoft, the information may change without notice. Microsoft does not guarantee the accuracy of this information.
Best regards
Please remember to mark the replies as answers if they help, and unmark the answers if they provide no help. If you have feedback for TechNet Support, contact tnmff@microsoft.com.
-
Предложено в качестве ответа
Michael_LSModerator
6 мая 2015 г. 1:23 -
Помечено в качестве ответа
Karen HuModerator
6 мая 2015 г. 9:21
-
Предложено в качестве ответа
-
What you have reported is the expected behavior when you select Upgrade after booting from the installation media. You can either perform a clean installation from the installation media or detach the installation media, reboot into the
previous version of Windows, and reattach the installation media. Follow the prompts that appear to perform an upgrade installation.Brandon
Windows Outreach Team- IT Pro
Windows for IT Pros on TechNet-
Предложено в качестве ответа
Michael_LSModerator
6 мая 2015 г. 1:23 -
Помечено в качестве ответа
Karen HuModerator
6 мая 2015 г. 9:21
-
Предложено в качестве ответа
Compatibility report: The computer started using the windows installation media.
-
Thread starterBat123Man
-
Start dateJul 30, 2015
-
#1
After it asked me to Confirm that it was going to zap Media Center which is no longer available for Win10, it checked for Upgrades. When that was complete, it rebooted and came up with a big «Install Now» button. I clicked it, and it asked what type of install I wanted to do; Upgrade or Custom. It heavily suggested I do an Upgrade as it implied that I would have a brand new system with no previous apps selecting Custom. I selected Upgrade, whereupon it returned an error message :
«Compatibility report: The computer started using the windows installation media. Remove the installation media and restart your computer so that windows starts normally. Then, insert the installation media and restart the upgrade. (Do not select Icustom [advanced] to perform an upgrade Icustom [advanced] installs a new copy of windows and deletes your programs and settings.)»
I pulled the stick, and tried to continue, and it told me that it could not find the media. I put the stick back in, but then it said it couldn’t find the driver. The dialog box looked like it came from Win95. I tried a bunch of things, and then managed to get back to the original «Install Now» button, and with no stick in the USB drive, tried to continue. No dice. Stick back in, no dice. Finally with the stick out, I clicked on the X to close the Window, and it said it might reboot the computer (it actually said «might»). I figured I was pooched at this point, but clicked OK. Computer restarted, I had my fingers crossed that it would boot back into 8.1. It didn’t, instead it said, «Upgrading Windows», and successfully upgraded my computer to Win10.
When Win10 started up, it looked like it was from the 90’s. 1024*768 on my 27-inch LCD. I waited for about 10 mins because I could see Win10 was still updating drivers. When it was done, I still had the «Microsoft Basic Video Driver» with no option in the Display panel to change it. I went into Device Manager, and saw that my Nvidia 570 had a yellow ! beside it. I right-clicked, and selected «Update Driver». Win10 responded that the best driver was already there, but then said I needed to reboot. Upon restart, back to glorious 1920*1080. Upgrade complete.
Thought I would post this in case someone else was getting grey hairs.
Last edited: Jul 30, 2015

-
#2
Upon restart, back to glorious 1920*1080. Upgrade complete.Thought I would post this in case someone else was getting grey hairs.
I’ve posted about this a few times. The default nvidia driver is awful…and requires a reboot.

-
#3
I pulled the stick, and tried to continue, and it told me that it could not find the media. I put the stick back in, but then it said it couldn’t find the driver. The dialog box looked like it came from Win95. I tried a bunch of things, and then managed to get back to the original «Install Now» button, and with no stick in the USB drive, tried to continue. No dice. Stick back in, no dice. Finally with the stick out, I clicked on the X to close the Window, and it said it might reboot the computer (it actually said «might»). I figured I was pooched at this point, but clicked OK. Computer restarted, I had my fingers crossed that it would boot back into 8.1. It didn’t, instead it said, «Upgrading Windows», and successfully upgraded my computer to Win10.
When you say «tried to continue,» what exactly did you do? I pull the stick but the only option on that screen is «close». After that, I try closing out the whole installer and see the message you mention that says it «might» reboot, but when it does it just goes into Windows 7 again.
Do I need to have the BIOS set to boot to USB first again?

-
- Jul 13, 2005
-
- 33,956
-
- 3,295
-
- 126
-
#4
-
#5
When you say «tried to continue,» what exactly did you do? I pull the stick but the only option on that screen is «close». After that, I try closing out the whole installer and see the message you mention that says it «might» reboot, but when it does it just goes into Windows 7 again.Do I need to have the BIOS set to boot to USB first again?
Never mind. I was expecting something different than reality. Trying off USB now.
-
#6
When you say «tried to continue,» what exactly did you do? I pull the stick but the only option on that screen is «close». After that, I try closing out the whole installer and see the message you mention that says it «might» reboot, but when it does it just goes into Windows 7 again.Do I need to have the BIOS set to boot to USB first again?
What was blocking me was that my computer automatically booted off the USB stick after it had transferred the setup files. So even though the error message was long and overly complex, the basic message was, «pull your stick, and reboot».
When I was trying to continue, I was clicking anything it would let me click, pulling and replacing the USB stick, basically trying to avoid rebooting. What I should have done was just pulled the stick and clicked the X to close the window. As far as I can tell, you do need to boot from the USB stick initially, so if you haven’t done so, you do need to modify your BIOS to boot from the stick. The setup uses the first reboot to transfer the files to your HD. After that, it reboots and expects to boot from those files to complete the setup, so once you get that mesage, pull the stick, reboot, and you should be good to go.
The easiest way around this for you is probably to either create an ISO you can mount, or else create a DVD instead of using the USB stick. Then you will always have a bootable DVD, which is certainly not a bad idea. And I do remember the last time I installed Windows via DVD, the installation was smart enough to tell me «OK, remove your DVD and the computer will reboot» so that I did not encounter the stick problem.
-
#7
so when all was said and done— common sense prevailed!
In a nutshell, yes. However, based on my experience, I know my phone will be ringing when other family members attempt this update.
- Advertising
- Cookies Policies
- Privacy
- Term & Conditions
- About us
-
This site uses cookies to help personalise content, tailor your experience and to keep you logged in if you register.
By continuing to use this site, you are consenting to our use of cookies.
I had the same weird behavior when trying a Windows 10 upgrade. Ultimately, my decision was to install from scratch. Definitely the right call. My main issue was that I didn’t have a partition structure that Windows liked. STRONGLY recommend a fresh install on a physical drive (SSD of course) with only the Windows partitions: System, MSR, Windows, and Recovery. Yes, 4 partitions on Drive 0. I was able to use the guidance from MSDN about UEFI/GPT-based hard drive partitions.
I didn’t have to use Windows PE as specified in the article because you can run the CreatePartitions batch from any Windows machine. Using the GPT version (not the MBR version) is highly advisable for 2TB and high drives (I had a 256G SSD, several 3TB drives, and a 5TB drive). Just save this to a CMD file and CHANGE THE DRIVE NUMBER to your physical drive. Run DISKPART LIST DISK to verify the disk number.
rem    Create four partitions for a UEFI/GPT-based Windows PC.
rem    Adjust the partition sizes to fill the drive as necessary.

select disk <NUMBER>
clean
convert gpt

rem == 1. System partition =========================
create partition efi size=100
format quick fs=fat32 label="System"
assign letter="S"

rem == 2. Microsoft Reserved (MSR) partition =======
create partition msr size=16

rem == 3. Windows partition ========================
rem ==    a. Create the Windows partition ==========
create partition primary
rem ==    b. Create space for the recovery tools ===
shrink minimum=500
rem ==    c. Prepare the Windows partition =========
format quick fs=ntfs label="Windows"
assign letter="W"

rem === 4. Recovery tools partition ================
create partition primary
format quick fs=ntfs label="Recovery tools"
assign letter="R"
set id="de94bba4-06d1-4d40-a16a-bfd50179d6ac"
gpt attributes=0x8000000000000001
list volume
exit
The first time I did it, I ran all of the commands manually from CMD. Much easier to see what’s going on that way. Also, if you have Windows «Disk Management» (run diskmgmt.msc) running, you’ll see the results in near real time.
Hope this helps. It saved me, and my Windows install has never been happier.
Pro tip: don’t enter your serial number when installing… make sure you have a good install and just enter it later. Click «I don’t have a product key» instead.