From Wikipedia, the free encyclopedia
This article is about the GUI element. For the keyboard button that summons the Start menu, see Windows key.
The Start menu is a graphical user interface element used in Microsoft Windows since Windows 95 and in other operating systems. It provides a central launching point for computer programs and performing other tasks in the Windows shell. It is named Start screen in Windows 8.
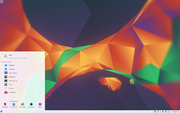
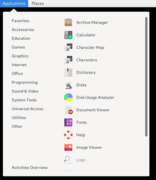
It has been co-opted by some operating systems (like ReactOS) and Linux desktop environments for providing a more Windows-like experience, and as such is for example present in KDE, with the name of Kickoff Application Launcher, and on Xfce with the name of Whisker Menu.
Traditionally, the Start menu provided a customizable nested list of programs for the user to launch, as well as a list of most recently opened documents, a way to find files and obtain assistance, and access to the system settings. Later enhancements via Windows Desktop Update included access to special folders such as «My Documents» and «Favorites» (browser bookmarks). Windows XP’s Start menu was expanded to encompass various My Documents folders (including My Music and My Pictures), and transplanted other items like My Computer and My Network Places from the Windows desktop. Until Windows Vista, the Start menu was constantly expanded across the screen as the user navigated through its cascading sub-menus.
Microsoft Windows[edit]
In Microsoft Windows, the Start menu in some form appears in Windows 9x, Windows NT 4.0 and all subsequent versions in the Windows NT family, as well as Windows CE, Windows Mobile and Windows Phone.
Windows 95–ME[edit]

The Start menu was introduced in Windows 95 and Windows NT 4.0, but had been worked on at Microsoft since 1992, originally being labelled as «System» to testers of the time. It was made to overcome the shortcomings of Program Manager in previous operating systems.[1] Program Manager consisted of a simple multiple document interface (MDI) which allowed users to open separate «program groups» and then execute the shortcuts to programs contained within. It lacked the ability to nest groups within other groups.
Windows 95 and Windows NT 4.0 replaced Program Manager with desktop and Start menu. The latter was comparable in some respects with the Apple menu in Mac OS operating systems and did not have the mentioned limitations of Program Manager: Being a menu, it allowed nested grouping while keeping only one group open at the time. The menu also offered the ability to shut down and log off from their computer.
Later developments in Internet Explorer and subsequent Windows releases make it possible to customize the Start menu and to access and expand Internet Explorer Favorites, My Documents and Administrative Tools (Windows 2000 and later) from the Start menu. Items could also be simply added to the Start menu by dragging and dropping them.
Although Windows XP and Windows Server 2003 introduced a new version of Start menu, they offered the ability to switch back to this version of Start menu. This version of the Start menu is also available in Windows Vista and Windows Server 2008. However, it is absent in Windows 7, Windows Server 2008 R2 and other later Windows releases.
Windows XP[edit]

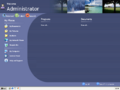
The first major overhaul to the Start menu was introduced in Windows XP and was later included in Windows Server 2003. The Start menu was expanded to two columns: the left-hand column focuses on installed programs, while the right-hand column provides access to My Documents, My Pictures, My Music and other special folders.[2] This column also includes shortcuts for Computer and Network (Network Neighborhood in Windows 95 and 98), which were placed on the Desktop in prior versions of Windows.[2] The contents of this column can be customized. Commonly used programs are automatically displayed in the left-hand menu. Users may opt to «pin» programs to this side of the Start menu so that they are always accessible. A sub-menu item at the bottom of this column grants access to all items of Start menu. When this menu item is selected, a scrolling list of Start menu programs replaces the user/recent list.
Windows Vista-7[edit]


Windows Vista and its successors added minor changes to the menu. Prior to Windows Vista and Windows Server 2008, the Start menu consisted of a group of menus and sub-menus that cascaded and expanded, obscuring the initially visible portions of the screen beneath them. In Windows Vista, however, cascading menus were replaced by a sliding window in the left pane of the Start menu. Whenever the All Programs item is clicked, the contents of the left pane slide off the left edge of the Start menu, and the All Programs menu slides in from the right edge of the left column. This menu presents a tree view of its hierarchy that expands towards the bottom, with a vertical scrollbar whenever needed. Also added in Windows Vista is a Search box that allows users to search for the Start menu shortcuts or other files and folders. The search box features incremental search: If indexing is not turned off, the search box returns results on-the-fly as users type into it. Since the found items can be immediately opened, the Start menu search box partially replaces the function of the Run command from previous versions of Windows. The Run command can also be added separately to the right column in the Start menu. In Windows 7 and Windows Server 2008 R2, the search results pane covers both columns of the Start menu. The search box is extended to support searching Control Panel items. The right column in Windows 7 links to Libraries instead of ordinary folders. Most importantly, however, items on the Start menu support Jump lists through cascade buttons on their right. Unlike prior versions, the ability to revert to the «Classic» Start menu design is no longer available.
Windows 8[edit]

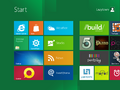
On Windows 8 and Windows Server 2012, an update to the Start menu known as the «Start screen» was introduced. It covers the entire screen and no longer features the right column. It shows much larger tiles for programs and, whenever possible, displays dynamic content supplied by the program directly on the tile itself (known as a «live tile»), behaving similarly to a widget.[3] For instance, the live tile for an email client may display the number of unread emails. The Start screen allows users to uninstall their programs by right-clicking on them and selecting «Uninstall». Pinned apps can be placed in groups. The search box is initially hidden but can be viewed by clicking the search button on the charms bar and can also be brought up as it receives keyboard input. True to its name, the Start screen is the first screen that a user sees upon login.
The idea of a full-screen Start can be traced back to Windows Neptune, when Microsoft originally considered a «Start page» that integrated with Windows desktop through Active Desktop.[4] This menu has its roots in Windows Mobile and Windows Phone: In Windows Mobile Standard, which runs on smartphones, the Start menu produces a separate screen of icons. Windows Phone was the original host of the design principles of the third generation Start menu.
The Start screen no longer supports several previously available features. A list of recently launched programs or shortcuts to special folders no longer appears on the Start screen. It no longer supports more than one level of nesting for groups in the All Programs view. Drag and drop support for adding new items to the menu as well as reorganizing the contents of the All Programs view is no longer available. In addition, for the first time in the history of Windows, the Start menu in a stock installation of Windows 8, Windows Server 2012, Windows 8.1 or Windows Server 2012 R2 does not provide any facility for shutting down, restarting or activating sleep mode or hibernation, forcing users to use the settings button in the charms bar to perform these actions. An April 2014 update for Windows 8.1 and Windows Server 2012 R2 restores the latter.
Windows 10[edit]

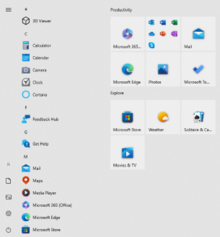
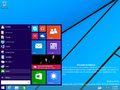
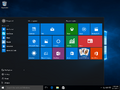
Windows 10 re-introduced the Start menu in a revised form. It uses a two column design similar to Windows 7’s version, except that the right side is populated by tiles, similarly to Windows 8’s Start screen. Applications can be pinned to the right half, and their respective tiles can be resized and grouped into user-specified categories. The left column displays a vertical list, containing frequently-used applications, and links to the «All apps» menu, File Explorer, Settings, and power options. Some of these links, and additional links to folders such as Downloads, Pictures, and Music, can be added through Settings’ «Choose which folders appear on Start» page. The Start menu can be resized, or be placed in a full-screen display resembling the Windows 8/8.1 Start screen (although scrolling vertically instead of horizontally).[5][6] The Start menu also enters this state when «Tablet mode» is enabled.[7][8][9][10]
As of build 10586, the left panel of the Start menu advertises «suggested» Windows Store apps; users can opt out of these suggestions.[11]
Windows RT 8.1 update KB3033055[12] adds a variant of the Windows 10 Start menu that is visually closer to the design used in early preview builds of Windows 10. It allows applications to be pinned to the top of the left column, with recently used apps listed below (much like 7), and as with 10, allows tiles to be pinned to the right column.[12][13][14][15]
Windows 11[edit]
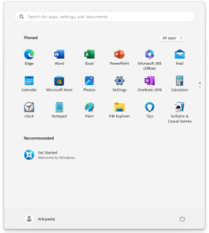
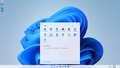
Windows 11 introduces another major redesign to the start menu; a search box was reinstated at the top of the menu, and tiles have been replaced by an area for pinned application shortcuts displayed in a grid, accompanied by a section for «recommended» applications and files. An «All apps» button is displayed next to the heading for pinned applications. Windows 11 does not use live tiles, with their functionality being moved to the separate «Widgets» area on the taskbar.[16][17]
Start button[edit]
«Start button» redirects here. For the power control, see on button. For the button used to start playing media, see media controls.
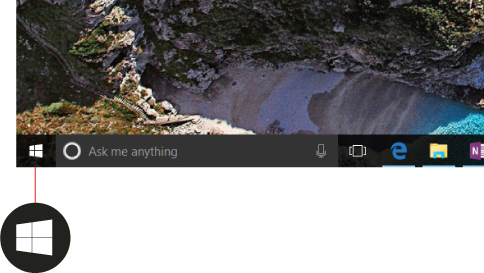
The Start menu may be launched either by pressing ⊞ Win (the Windows key) on a keyboard or its equivalent on a tablet device, pressing Ctrl+Esc on a keyboard, or by clicking on the visual Start button. With the exception of Windows 8 and Windows Server 2012, the Start button can be found on the taskbar. The Start button on Windows Server 2012 and Windows 8 is initially moved from the traditional taskbar to «charms», a hidden secondary taskbar located to the right of the screen (accessed by swiping in from the right on multitouch devices, or positioning the mouse in one of the right corners of the screen and sliding up or down). The Start screen is accessed either by that button or by clicking the lower left corner of the screen. Windows 8.1 and Windows Server 2012 R2 restore the button back to its original place without removing the new button in the charms.[18][19] On most versions of Windows, the Start button is located on the lower left corner of the screen, while the start button on Windows 11 is located in the center (but can be moved back to the lower left corner).
On a Mac keyboard or on a Mac running Windows through Boot Camp (software), the ⌘ Command key is used as the Windows logo key to activate the Start menu.
Right-clicking on the Start button invokes a context menu. This menu in Windows 8 and Windows Server 2012 is called the Quick Link menu[20] and grants access to several frequently used features of Windows, such as accessing desktop or File Explorer.[21]
Location on disk[edit]
Users may add Start menu entries by creating folders and shortcuts in the associated «Start Menu» folder, located on the operating system operating media. These appear in a separated section at the top of the Start menu, or, if placed in the Programs sub-folder, in the Programs menu. The location of this folder however, depends on the operating system installed:
- In Windows 9x, this folder is located either in «
%windir%Start Menu» or, if there are multiple users, in «%windir%Profiles[username]Start Menu» path, where [username] is the account name of the user. - In Windows NT 4.0, the folder is located in «
%systemroot%Profiles%username%Start Menu» for individual users, or «%systemroot%ProfilesAll UsersStart Menu» for shared shortcuts. One distinguishing feature in Windows NT 4.0 is that the Start menu separated the per-user shortcuts from the shared shortcuts and by a separator line and used different icons for the program folders in per-user and shared menus.[22][23] - In Windows 2000, Windows XP and Windows Server 2003, the folder is located in «
%userprofile%Start Menu» for individual users, or «%allusersprofile%Start Menu» for shared shortcuts. - In Windows Vista, Windows Server 2008, Windows 7, Windows Server 2008 R2, Windows Server 2012, Windows 8, Windows 10, and Windows 11, the folder is located in «
%appdata%MicrosoftWindowsStart Menu» for individual users, or «%programdata%MicrosoftWindowsStart Menu» for the shared portion of the menu.
In Windows Server 2003 and earlier, the folder name «Start Menu» changes depending on the localization; for example, on German versions of Windows XP it is «Startmenü«. Windows installers generally use the Windows API to find out the real names and locations of the Start menu and Desktop folders. Since Windows Vista, all folders used by the system use the same name as in the English version and only display different names in Windows Explorer.
Tweaks[edit]
TweakUI, an unsupported utility program from Microsoft, offers additional customizations, including speeding up the response time of the Start menu, window animation, and other hacks.[24][25] On Windows XP and Windows Vista, it is possible to prevent specific programs from appearing in the recent programs list (the left pane of the Start menu) by modifying the Windows registry.[26]
Open-source operating systems[edit]
Many desktop environments for open source operating systems provide a menu similar to the Start menu:
- Cinnamon
- FVWM95
- GNOME
- IceWM
- JWM
- KDE Plasma
- Lumina[27]
- LXDE
- MATE
- Qvwm
- ReactOS
- Unity
- Xfce
-

-

Kickoff Application Launcher in KDE SC 4
-

-

-

-


See also[edit]
- Desktop environment
- Comparison of Start menu replacements for Windows 8
- Apple menu
References[edit]
- ^ Fitzpatrick, Jason (6 August 2015). «The Start Menu Should Be Sacred (But It’s Still a Disaster in Windows 10)». How-To Geek. Retrieved 30 July 2016.
- ^ a b Fitzpatrick, Jason (6 August 2015). «The Start Menu Should Be Sacred (But It’s Still a Disaster in Windows 10)». How-To Geek. Retrieved 30 July 2016.
- ^ «Designing the Start screen». Building Windows 8. Microsoft. 2011-10-04. Retrieved 2012-12-06.
- ^ Thurrott, Paul (7 August 2013). «SuperSite Flashback: Neptune». SuperSite for Windows. Penton Media. Retrieved 7 August 2013.
- ^ Mediati, Nick (August 8, 2015). «How to customize Windows 10’s Start Menu». PC World. IDG. Archived from the original on August 8, 2015. Retrieved 20 September 2015.
- ^ Paul, Ian (August 11, 2015). «How to customize the left side of the Windows 10 Start menu». PC World. IDG. Retrieved 20 September 2015.
- ^ Seifert, Dan (September 30, 2014). «Watch how Windows 10 works with touch interfaces». The Verge. Vox Media. Retrieved 30 September 2014.
- ^ Thurrott, Paul (April 23, 2015). «Windows 10 Technical Preview 2: Configure Tablet Mode». Thurrott.com. Retrieved 16 July 2015.
- ^ Thurrott, Paul (March 23, 2015). «Windows 10 Technical Preview 2: Continuum and Tablet Mode». Thurrott.com. Retrieved 16 July 2015.
- ^ Bowden, Zack (July 3, 2015). «Windows 10: The tablet experience is better than ever (with video)». WinBeta. Archived from the original on July 5, 2015. Retrieved 16 July 2015.
- ^ Wilson, Mark (October 15, 2015). «Microsoft now uses Windows 10’s Start menu to display ads». BetaNews. Retrieved 15 October 2015.
- ^ a b «Update for Windows RT 8.1 feature improvement». Support. Microsoft. September 30, 2015. Retrieved 20 September 2015.
- ^ Bright, Peter (September 16, 2015). «Windows RT gets a Start menu of its own in Windows RT 8.1 Update 3». Ars Technica. Conde Nast. Retrieved 16 September 2015.
- ^ Newman, Jared (July 20, 2015). «Windows RT users shouldn’t expect much from Update 3, report claims». PC World. IDG. Retrieved 20 July 2015.
- ^ «Upcoming Windows RT update will include new Start menu and lock screen». The Verge. Vox Media. 9 August 2015. Retrieved 20 August 2015.
- ^ Warren, Tom (June 24, 2021). «Microsoft announces Windows 11, with a new design, Start menu, and more». The Verge. Archived from the original on June 24, 2021. Retrieved June 24, 2021.
- ^ Salter, Jim (June 24, 2021). «Windows 11 is much more than a new theme slapped onto Windows 10». Ars Technica. Archived from the original on June 25, 2021. Retrieved June 25, 2021.
- ^ Thurrott, Paul (May 29, 2013). «Coming in Blue: Boot to Desktop, Start Button, and More!». Supersite for Windows. Penton. Retrieved May 29, 2013.
- ^ Thurrott, Paul (May 29, 2013). «In Blue: Start Experience Changes». Supersite for Windows. Penton. Retrieved May 29, 2013.
- ^ «Keyboard shortcuts — Windows 8, Windows RT». Windows. Microsoft. Archived from the original on October 25, 2012. Retrieved 3 September 2013.
- ^ Thurrot, Paul (June 26, 2013). «Hands-On with Windows 8.1: Power User Menu». SuperSite for Windows. Penton Media. Retrieved August 7, 2013.
- ^ «Image». Archived from the original on May 18, 2013.
- ^ Thurrott, Paul (May 18, 2000). «Teach Yourself Windows 2000 Server: Using Windows 2000 Server». Supersite for Windows. Penton.
- ^ «Download page for Microsoft Windows Tweak UI Power Toy». Windows. Microsoft. Archived from the original on October 6, 1999.
- ^ «O’Reilly Annoyances.org Tweak UI page». Annoyances. Archived from the original on December 12, 2001.
- ^ «How To Prevent a Program from Being Displayed in the Most Frequently Used Programs List in Windows XP». Support. Microsoft. July 15, 2004. Archived from the original on February 11, 2005.
- ^ Watson, J.A. (18 August 2016). «Hands-on: Lumina Desktop 1.0.0». ZDNet. CBS Interactive. Retrieved 23 November 2016.
Further reading[edit]
- Sullivan, Kent. «The Windows 95 User Interface: A Case Study in Usability Engineering». 1996 for Association for Computing Machinery, Inc. An article written by a developer on the Windows 95 UI team, detailing the usability studies and development processes that led to the creation of the Windows 95 interface.
- Patent #5920316 – «Taskbar with Start menu»
Updated: 10/18/2022 by
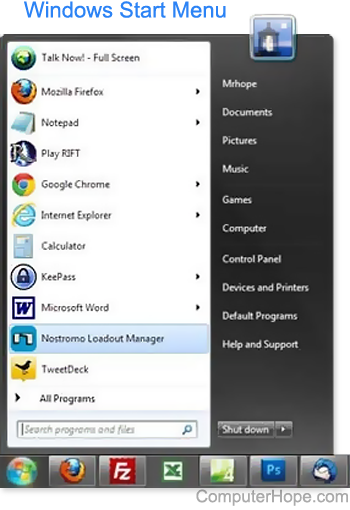
The Microsoft Windows Start menu is the primary location in Windows to locate your installed programs and find any files or folders. By default, the Start menu is accessed by clicking Start in the bottom-left corner of the Windows desktop screen. The picture shows an example of the Windows 7 Start menu.
Note
In Windows 8 and Windows 8.1, the Start menu was replaced by the Start Screen. The Start menu returned in Windows 10 and is discussed later on this page.
Tip
If you’re more familiar with Apple computers, you can think of the Start menu as the Apple menu.
Where is the Start menu?
For versions of Microsoft Windows supporting the Start menu, it’s found by click Start and is shown in the bottom left portion of the screen by default. Its position can change if the Taskbar position is changed from the bottom of the screen.
Note
Computer’s that are not running Microsoft Windows (e.g., Linux computers and Apple computers) do not have a Start menu. Also, there are no smartphones or tablets with a Windows Start menu.
What versions of Windows have the Start menu?
The Microsoft Windows Start menu was first introduced with Microsoft Windows 95, and since it’s release, all versions of Windows except Windows 8 have a Start menu. Before the release of Windows 95, earlier versions of Windows (e.g., Windows 3.11) also did not have a Start menu.
- Microsoft Windows versions.
Below is an overview of the Windows Start menu found in Microsoft Windows XP and Windows 7. If you have Windows 10 Skip down to the Windows 10 Start menu section.
Left pane
The left pane shows recently started programs or any pinned program shortcuts. In the above example, there is one pinned program separated by a line and then the recently ran programs.
All programs
At the bottom of the left pane is the All Programs option that displays all programs installed on the computer.
Search
Directly below the All Programs option is the «Search» bar. This useful feature lets you type in the name of the program or file you’re looking for and have the results displayed above.
Right pane
The right pane shows each of the more commonly accessed sections of the computer, such as your Computer, Control Panel, Documents, Music, and Pictures.
Tip
You can find the version of Windows on your computer if you right-click Computer and select Properties. In the System window, you can view basic system properties, including the Windows version and access the Device Manager.
Shut down
At the bottom of the right pane is the Shut down button, which lets you turn the computer off. You can also click the arrow next to the Shut down button to switch users, log off, restart, sleep, or hibernate the computer.
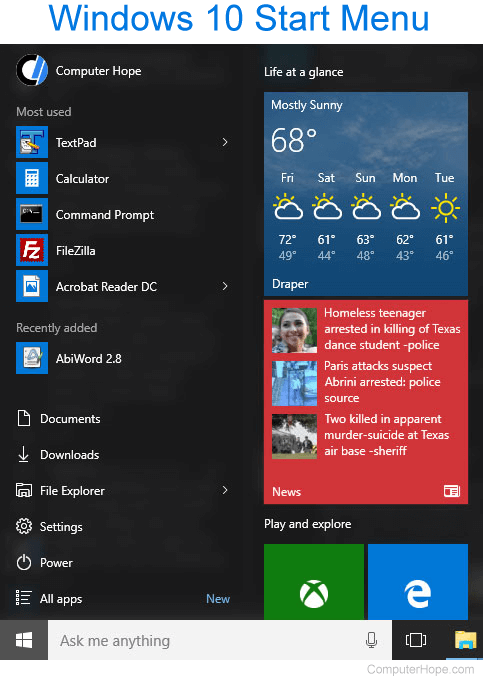
Windows 10 Start menu
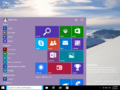
The Windows 10 Start menu made some drastic changes to the Start menu available in previous versions of Windows, as is immediately apparent in the picture below. One of the most noticeable changes is the integration of tiles (from the Windows 8 start screen) into the Start menu. From this Start menu, you can access all your programs through the «All apps» option and in the left pane.
How to get out of the Start menu
Moving the mouse pointer anywhere outside of the Start menu and clicking closes the Start menu. If you want to use your keyboard, press the Esc.
How to navigate the Start menu with the keyboard
Once the Start menu is open (using the Windows key), use the Tab to navigate between each of the ares of the Start menu. Once in the area you want, use the arrow keys to navigate between each of the icons in the Start menu. Once what you want to open is selected press Enter.
If you’ve decided you don’t want the Start menu open, press Esc.
Tip
With recent versions of Windows it’s faster to press the Windows key, type what you’re looking for (for example type «calc» to find calculator), and when what you want is highlighted, press Enter.
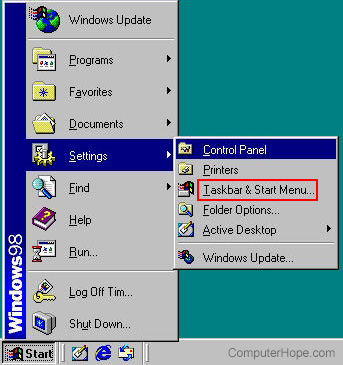
Should I capitalize «menu» in Windows Start menu?
In early versions of Microsoft Windows, such as Windows 95 and Windows 98, Menu was capitalized as shown in the following picture of the Windows 98 Start Menu. With all modern versions of Microsoft Windows such as Windows 7 and Windows 10, the «m» in menu should be written in lowercase. So, when referring to the Microsoft Windows Start menu today, it should be written as Start menu.
Operating system terms, Start
![]()
Download Article
![]()
Download Article
The Windows 10 Start menu is a hybrid of the Windows 7 Start menu and the Windows 8 Start screen, as Windows 8 introduced tiles. The Start menu allows you to open and uninstall apps, access device power options, sign out of Windows, get instant info from live tiles, and do much more.al functions and customization options available at your fingertips from the Start Menu.
-

1
Open the Start Menu. There are two ways to access the Start Menu: from the desktop or from the keyboard.
- Click the Start
button at the bottom-left corner of your screen. It’s a white Windows icon. When you hover over it, its color changes to your set accent color.
- Press the ⊞ Win (Windows logo) keyboard key. It’s usually located on the bottom row of your keyboard.
- When you click/tap the Start button or hit the Windows key, the Start Menu pops up. You will see two panes. The left pane contains the menu-based list of folders, applications shortcuts, settings, and functions familiar to Windows 7 users. The right pane contains the finger-friendly screen full of tiles (similar to the Start Screen in Windows where you can access Windows apps.
- Click the Start
-
2
Work with the menu column on left pane of the Start Menu. The left pane is divided into three general areas.
- On the top is the User Account section where you can find the active user account name and picture. Click/tap on this and you can lock the screen, sign out from the account, or change the account settings.
- Below the User Account section is a list of shortcuts to folders, programs, or apps that you configured to be placed on the Start Menu and those that you frequently use or have recently used. Clicking/tapping on the shortcut will open the folder or launch the application.
- Below this is the shortcut to “File Explorer.” Clicking/tapping on this will open the File Explorer window.
- Next is the “Settings” shortcut. Clicking/tapping on this will open the Settings menu in a different window. From the Settings menu, you can personalize your desktop, manage wired and wireless devices, set time and language, set privacy options, update Windows, among others.
- Below “Settings” is the “Power” button where you can shut down, restart, or hibernate your device.
- At the bottom is the “All Apps” button. Clicking/tapping on “All Apps” will expand the directory tree. All programs and apps installed in your computer will be listed in alphabetical order, and you can launch the app or program by clicking/tapping on it.
Advertisement
-
3
Work with the tiles on the right pane of the Start Menu. On the right pane are “tiles” (tablet-style icons) that are shortcuts to folders or apps (usually Windows Store apps or built-in Windows apps). Clicking/tapping on a tile launches the app. Some of these tiles are “live” tiles, some are “static” tiles. Live tiles continuously display updated information from the app (weather updates, latest news, stock market movement, etc.). Static tiles are just app shortcuts.


 where you can access Windows apps.

Advertisement
-
1
Resize the Start Menu. You can resize the Start Menu vertically by placing the mouse cursor on the top edge of the Start Menu until the cursor changes to a bi-directional vertical arrow then dragging it up or down. Similarly, you can change the width of the Start Menu by placing the cursor at the right edge of the Start Menu until it changes into a bi-directional horizontal arrow and dragging it left or right. Widening the Start Menu will extend the area for the tiles. At its narrowest, the Start Menu can fit three “medium” columns of the smaller tiles, but at its widest, six tiles can be fitted into the area.
-
2
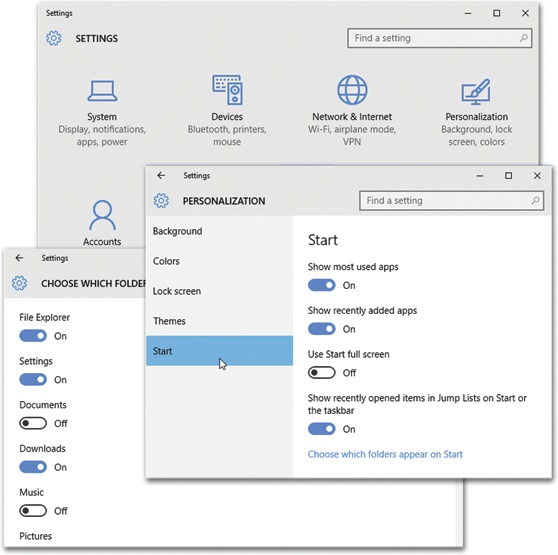
Personalize the Start Menu. You can determine what is contained in the Start Menu.
- Click/tap the Start button and click/tap “Settings” to open the Settings menu.
- At the Settings window, click/tap “Personalization.”
- At the left pane of the “Personalization” window, click “Start.” The personalization options for the Start Menu appears in the right pane.
- On the right side, you can find toggle switches that you can turn on or off by clicking or tapping on it. You can choose to show or not to show the most used or recently added apps and recently opened items by clicking/tapping the toggle switch on or off.
- The third toggle switch is labelled “Use Start full screen.” If turned on, the Windows 8-style Start Screen will appear when you click/tap the Start button.
- At the bottom of the right pane is a link entitled “Choose which folders appear on Start.” Clicking/tapping on the link takes you to a list of folders which you can toggle on or off to determine, which are shown in the Start Menu.
-
3
Configure the tiles. By default, the tile area is divided into two sub-sections: “Life at a glance” and “Play and explore,” each of which contains tiles.
- To resize the tiles, right-click (tap and hold) the tile and place the mouse on “Resize” in the context menu. Four size options will be presented to you: small, medium, wide and large. Select the one you prefer.
- To move the tiles, click the tile and drag it wherever you like within the tile area.
- To turn live tile on or off, right-click (tap and hold) the tile and click/tap “Turn live tile on (or off).”
- To remove a tile from the Start Menu, right-click (tap and hold) the tile and click/tap “Unpin from Start.”


Advertisement
Ask a Question
200 characters left
Include your email address to get a message when this question is answered.
Submit
Advertisement
Thanks for submitting a tip for review!
About This Article
Thanks to all authors for creating a page that has been read 35,325 times.
Is this article up to date?
To open the Start menu—which contains all your apps, settings, and files—you can do any of the following:
-
On the center or left end of the taskbar, select the Start icon.
Note: Your taskbar settings determine where the taskbar is located.
-
Press the Windows logo key on your keyboard.
-
Swipe up from the bottom center or left of your screen.
Note: When using display languages that read right-to-left (RTL), you can swipe up from the bottom center or right of your screen.
To open the Start menu—which contains all your apps, settings, and files—do either of the following:
-
On the left end of the taskbar, select the Start icon.
-
Press the Windows logo key on your keyboard.
| Component of Microsoft Windows | |

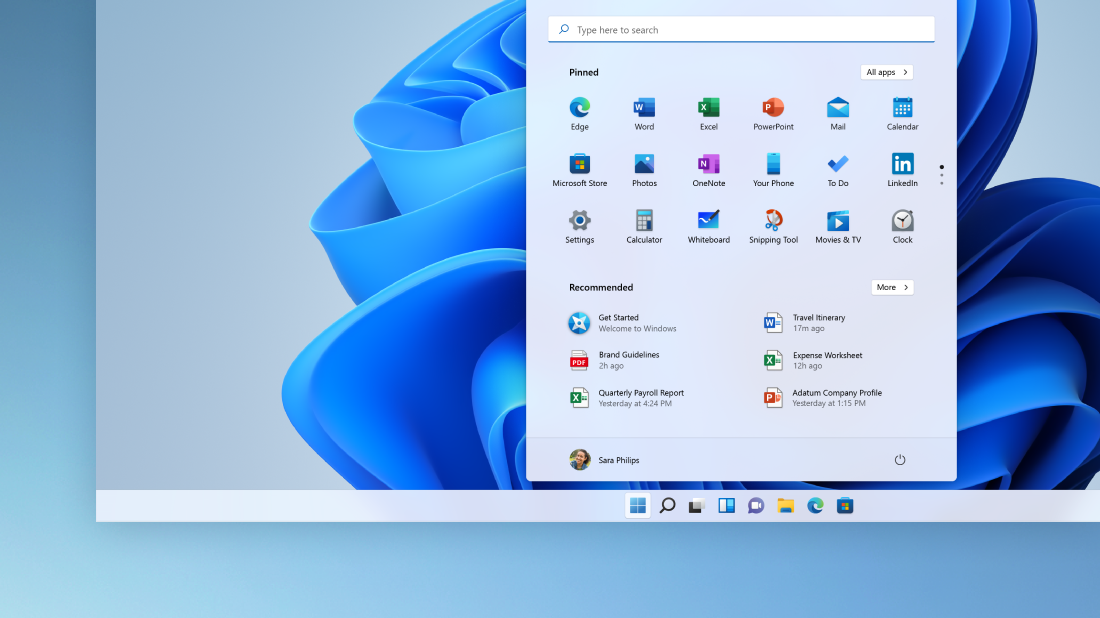
Start menu in Windows 11 (original release) |
|
| Other names | Start screen |
|---|---|
| Introduced in | Windows 95 |
| Replaces | Program Manager |
The Start menu is a user interface element used in Microsoft Windows and other operating systems that provides a central point for accessing basic operating system functions such as power options and settings, as well as launching programs and viewing recently open files.
History[edit | edit source]
Prior to the introduction of the Start menu, Program Manager offered similar functionality using an MDI window. The peculiarities of Windows 3.1 window management meant that the program manager window would often get lost behind other windows, requiring the user to minimize multiple windows in order to launch an application. The program itself also suffered from its rather complex interface, with some common tasks such as exiting Windows being hidden in confusingly named menus.
Microsoft aimed to fix this problem with a new desktop metaphor user interface originally planned for Cairo and later ported to Chicago. An initial design tested in 1993 included a tray with the System, Find and Help buttons; each exposing a part of the base operating system functionality in a menu. Applications could be launched by browsing the «Programs» directory on the desktop, which was similar to the Windows 3.1 experience. The design further evolved in the following months, resulting in a single menu that combined the three menus and the Programs folder into a single interface, which was available by using the Start button on the taskbar.
[edit | edit source]
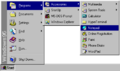
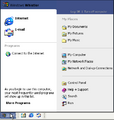
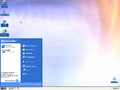
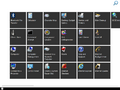
The classic Start menu introduced with Windows 95 is a single column menu that containes power options, as well as shortcuts to help, settings, documents, and installed applications. It is also possible to add custom items on top of the menu by creating shortcuts in the Start Menu directory. By default, the main menu uses 32×32 icons and displays an operating system branding banner on the left side. However, it can also be switched to small mode, which uses 16×16 icons and doesn’t show any banner.
Although a new Start menu design was introduced in Windows XP, the classic Start menu was still retained as an option up to Windows Vista.
Start panel[edit | edit source]
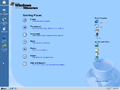
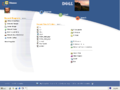
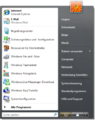
The Start menu was redesigned with Windows XP to feature a two-column design, originally called the Start panel. The left pane includes links to the user’s frequently used and pinned programs, as well as shortcuts to the machine’s default internet and email program. Other programs could be accessed via the «All Programs» option in the bottom of the menu. The right pane features quick links to user folders, recent documents, as well as network places and settings. The menu also includes a link to account settings and power options.
The Windows XP menu is based on an earlier design called the Start page, which is shown in full screen and features more columns, although it is still very similar in principle to the smaller panel introduced later. The page originated during the development of Neptune and Millennium, where it was implemented as an HTML application that would have fit in with the Activity Centers user experience. However, the feature was still in development after the cancelation of both Neptune and Activity Centers, with build 2250 including an incomplete version of it and build 2410 featuring a newer implementation that was rewritten using DirectUI.
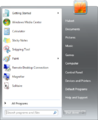
The menu was redesigned with Windows Vista to fit the Aero user experience. Notably, the All Programs option is now an inline scrollable menu that replaces the left pane, as opposed to it being a regular dropdown menu. A search box was also added to the bottom of the menu, allowing the user to open the Start menu and instantly search for programs, as well as files and system options. The menu was again updated in Windows 7 with the introduction of Jump Lists, which can be accessed by a rightward pointing arrow shown for programs featured on the initial page.
Start screen[edit | edit source]
Windows 8 relocated the traditional Start button to the Charms bar and introduced the DirectUI-based Start screen, which used a Live Tile interface similar to Windows Phone. It completely removed the links to common folders, as well as the user’s recent documents and frequent applications. The background and accent color for the Start screen could now be customized, and tiles could be organized into groups which could be named. Windows 8.1 Update 1 later improved the Start screen by adding Search and Power buttons to the top-right corner and added a context menu when right-clicking on tiles.
Because of Redpill, early builds of Windows 8 had their Metro components disabled by default, including the Start screen. The only known Windows 8 build to be distributed with the Start screen enabled out-of-the-box is the Windows 8 Developer Preview, which comes with Redpill pre-enabled. Windows 8 build 8128 is the first known build to integrate Redpill to the OS and thus remove the ability to disable the Start screen.
[edit | edit source]
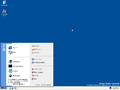
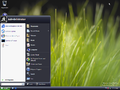
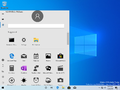
Windows 10 re-introduced the Start menu as an XAML-based taskbar flyout. Build 9780 had a start menu which has parts from the Windows 8.1 start screen and the Windows 7 Start menu. Build 9900 introduced a different start menu. The left side of this new menu included links to frequently-used applications, as well as user folders. The right side featured a similar tile design to the Start screen, however the menu could be put into full-screen mode, resulting in an experience similar to the previous Start screen. In Windows 10 Anniversary Update, the left column was updated to now include a list of all apps, as well as a list of user folders in a hamburger menu. Windows 10 build 17004 slightly updated the apps section of the menu to use Fluent Design hover effects. Windows 10 build 20161 updated the tiles and app icons so that they no longer have an accent color behind them.
Windows 10X and Windows 11[edit | edit source]
Windows 10X introduced a centered Start menu design that removed the Live Tile functionality whilst also introducing a search bar and a recent items list, in addition to overhauling the installed applications list.
After the cancellation of Windows 10X, much of its functionality was moved over to Windows 11, including a start menu similar to the one seen in 10X build 19563 and above, albeit with a missing search bar. The search bar was later re-added in build 22000.65 (22000.51 also has it, but it is disabled by default).
Build 22509 provided the ability to modify the Start menu layout with more pinned items or recommendations by increasing the size of each area of the Start menu. This was expanded upon in build 22610, which added a group policy to completely disable the recommended section.
Build 22557 added the ability to create app folders in the pinned apps area by dragging an app on top of another. The renaming feature for app folders was later implemented in build 22579.
Gallery[edit | edit source]
[edit | edit source]
Start Page[edit | edit source]
Start Panel[edit | edit source]
Start Screen[edit | edit source]
Windows 10[edit | edit source]
Windows 10X and Windows 11[edit | edit source]
-

-

-
Start menu in Windows 11 build 22509 with More Recommendations layout

Chapter 1. Desktop & Start Menu
These days, the graphic user interface (the colorful world of icons, windows, and menus) is standard. Mac, Windows, Chrome OS, Linux—every operating system is fundamentally the same, which is to say a very long way from the lines of typed commands that defined the earliest computers.
Windows 10 restores the desktop to its traditional importance, following a weird three-year detour into “what the heck” land known as Windows 8. The desktop is once again your only home base, your single starting point. It’s the view that greets you when the computer turns on, and it offers all the tools you need to manage and organize your files.
Herewith: a grand tour of the state of the art in computer desktops—the one in Windows 10.
The Lock Screen
When you turn on a Windows 10 machine, you know right away that you’re not in Kansas anymore. The first thing you see is a colorful curtain that’s been drawn over the computer’s world. It’s the Lock screen (Figure 1-1).
The Lock screen serves the same purpose it does on a phone: It gives a quick glance at the time, the date, your WiFi signal strength, the weather, and (on laptops and tablets) your battery charge. As you download and install new apps, they can add informational tidbits to this Lock screen, too.
The point is that sometimes you don’t really need to wake the machine up. You just want to know what time it is.
The Lock screen can also give you instant access to your Camera and Skype apps (Camera and Skype). You might want to take a picture or answer a call without having to go through the red tape of fully logging in.
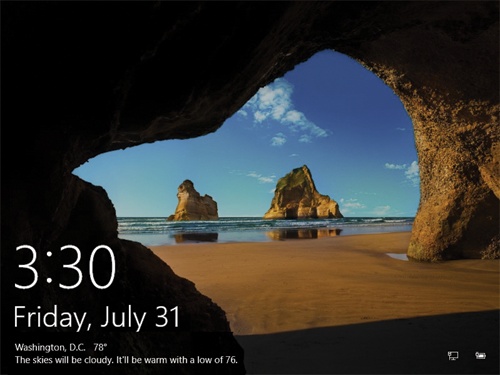
Figure 1-1. You can control which apps are allowed to add information to the Lock screen in Settings (like the weather report shown here). You’re not stuck with the Lock screen photo as Mother Microsoft has installed it, either. You can change the picture, if you like, or you can eliminate it altogether. Chapter 4 has the details.
When you do want to go past the Lock screen to log in, there’s nothing to it. Almost anything you do that says, “I’m here!” works:
-
Touchscreen: Swipe a finger upward. (Swipe downward to jump into Camera mode.)
-
Mouse: Click anywhere. Or turn the mouse wheel.
-
Keyboard: Press any key.
The Lock screen slides up and out of the way, revealing the Login screen (Figure 1-2, top).
Tip
You can change the photo background of the Lock screen, make it a slideshow, or fiddle with which information appears here; see Customizing the Lock Screen. You can even eliminate the Lock screen altogether—after all, it’s an extra click every time you log in. For step-by-step instructions, see “Eliminating the Windows 10 Lock Screen,” a free downloadable PDF appendix on this book’s “Missing CD” page at www.missingmanuals.com.
The Login Screen
As in any modern operating system, you have your own account in Windows. It’s your world of files, settings, and preferences. So the second thing you encounter in Windows 10 is the Login screen. Here, at lower left, you see the name and photo for each person who has an account on this machine (Figure 1-2). Choose yours.
This is also where you’re supposed to log in—to prove that you’re you. But logging in no longer has to mean typing a password. One of Windows 10’s primary goals is to embrace touchscreens, and typing is a pain on tablets.
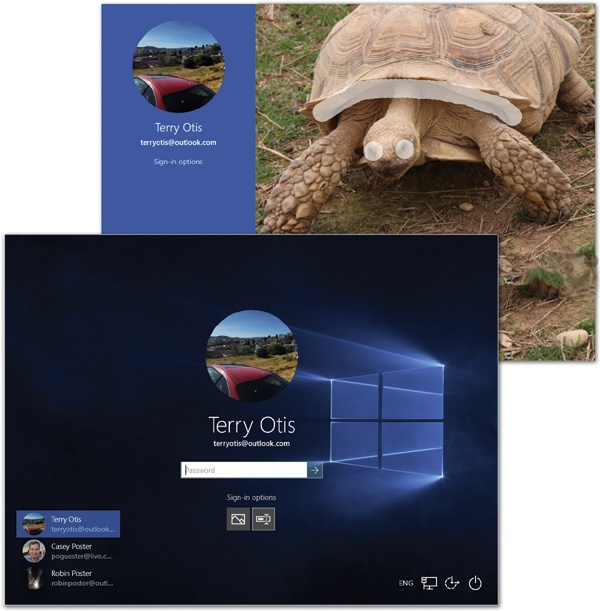
Figure 1-2. Lower left: If your machine has more than one account set up, tap or click your icon to sign in. Top right: Typing is so 2009! In Windows 10, you can log into your account using any of several more touchscreen-friendly methods, like drawing three predetermined lines on a photograph.
Therefore, you can log in using any of these techniques:
-
Just look at your screen. On laptops or tablets with Intel’s RealSense infrared cameras, facial recognition logs you in.
-
Swipe your finger across the fingerprint reader, if your computer has one.
-
Put your eye up to the iris reader, if your machine is so equipped.
-
Draw three lines, taps, or circles on a photo you’ve selected (Figure 1-2, top).
-
Type in a PIN you’ve memorized.
-
Type a traditional password.
-
Skip the security altogether. Jump directly to the desktop when you turn on the machine.
See Chapter 19 for instructions on setting each of these up.
The Desktop
Once you’ve gotten past the security barrier, you finally wind up at the home base of Windows: the desktop. See Figure 1-3 for a refresher course.
You can, and should, make the desktop look like whatever you want. You can change its background picture or color scheme; you can make the text larger; you can clutter up the whole thing with icons you use a lot. Chapter 4 is a crash course in desktop interior decoration.
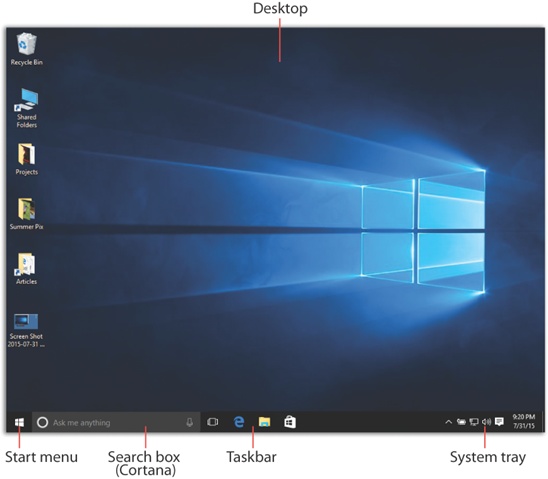
Figure 1-3. The desktop returns in Windows 10 as everybody’s starting place. It’s once again the first thing you see after you log in. It has a shiny, clean, new look, but the time-honored landmarks—Start menu, taskbar, system tray—are just where they’ve always been.
Meet the Start Menu
Windows is composed of 50 million lines of computer code, scattered across your hard drive in thousands of files. The vast majority of them are not for you; they’re support files, there for behind-the-scenes use by Windows and your applications. They may as well bear a sticker reading, “No user-serviceable parts inside.”
That’s why the Start menu is so important (Figure 1-4). It lists every useful piece of software on your computer, including commands, programs, and files. Just about everything you do on your PC begins—or can begin—with your Start menu.
In Windows 10, as you’ve probably noticed, the word “Start” doesn’t actually appear on the Start menu, as it did for years; now the Start menu is just a square button in the lower-left corner of your screen, bearing the Windows logo (![]() ). But it’s still called the Start menu, and it’s still the gateway to everything on the PC.
). But it’s still called the Start menu, and it’s still the gateway to everything on the PC.
If you’re the type who bills by the hour, you can open the Start menu (Figure 1-3, lower left) by clicking it with the mouse. If you feel that life’s too short, however, tap the ![]() key on the keyboard instead, or the
key on the keyboard instead, or the ![]() button if it’s a tablet.
button if it’s a tablet.
Really, truly: Learn this. Tap ![]() to open the Start menu (or to close it!).
to open the Start menu (or to close it!).
The Start menu (Figure 1-4) is split into two columns. For convenience, let’s call them the left side and the right side.
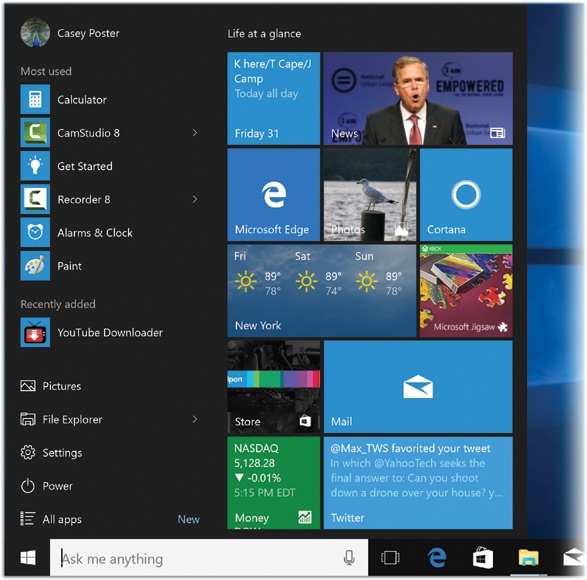
Figure 1-4. Here it is, the single biggest change in Windows 10: the new, hybrid Start menu. The left side gives you direct access to apps you use frequently, or that you’ve installed recently, as well as important commands and places like Power and “All apps.” The right side is yours to customize.
Note
If your computer is a tablet, and it has no physical keyboard at all, then it may start up in Windows 10’s new Tablet mode. In this mode, the right side of the Start menu fills the entire screen, and the left side doesn’t appear unless you tap the ![]() in the top-left corner. For details on Tablet mode, see Chapter 13.
in the top-left corner. For details on Tablet mode, see Chapter 13.
Start Menu: The Left Side
The most amazing thing about the Windows 10 Start menu is that Windows 10 has a Start menu—something that’s been missing since Windows 7. The left side, or something like it, has been with Windows from the beginning. The right side is a pared-back version of the Start screen that distinguished Windows 8.
The left side may look like the Start menu that’s been in Windows from the beginning (except during that one unfortunate three-year Windows 8 phase). But there’s a big difference: In Windows 10, you can’t use it to list your own favorite programs, folders, and files. (That’s what the right side is for.) The left side is meant to be managed and run entirely by Windows itself.
The left side has five sections, described here from top to bottom:
[Your name]
See your account name and picture in the upper-left corner of the Start menu (Figure 1-5)?
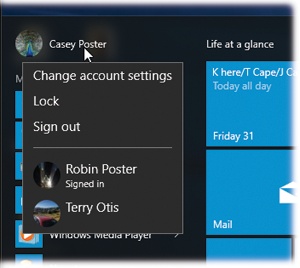
Figure 1-5. Your account icon isn’t just an icon; it’s also a pop-up menu. Click it to see the “Sign out” and “Lock” commands, as well as a shortcut to your account settings.
That’s not just helpful information. The picture is also a pop-up menu. And its commands all have to do with switching from one account to another. (In Windows’ accounts feature, each person who uses this PC gets to see her own desktop picture, email account, files, and so on. See Chapter 19.) Here’s what they do.
Tip
Some keystrokes from previous Windows versions are still around. For example, you can still press Ctrl+Alt+Delete to summon the three commands described here: “Lock,” “Switch user,” and “Sign out”—plus a bonus link for the Task Manager (Exiting Programs).
-
Change account settings takes you directly to the Settings→Account screen, where you can change your account picture, password, login method, and other details of your account—and you can create accounts for other family members.
-
Lock. This command takes you back to the Lock screen described at the beginning of this chapter. In essence, it throws a sheet of inch-thick steel over everything you were doing, hiding your screen from view. This is an ideal way to protect your PC from nosy people who happen to wander by your desk while you’re away getting coffee or lunch.
Whatever you had running remains open behind the scenes. When you log in again, you’ll find all your open programs and documents exactly as you left them.
-
Sign out. When you choose “Sign out,” Windows closes all your open programs and documents (giving you an opportunity to save any unsaved documents first). It then presents a new Login screen so that somebody else can log in.
Most Used
Beneath your name icon, you get a list of the programs that Windows sees you using a lot. Windows computes this list automatically and continuously. It’s a really great feature, because, well, if you’ve been using something a lot recently, you’ll probably use it a lot more still, and now you don’t have to burrow around looking for it.
On the other hand, if you’d rather not have Windows track what you’re doing, you can get rid of this list, or just certain items on it; see the box below.
If you see a submenu arrow (>) next to a program’s name in the Start menu, congrats. You’ve just found a jump list, a feature that gives you quick access to documents you’ve opened recently. See Jump Lists in the Taskbar for details on creating, deleting, and working with jump lists.
Tip
So how does Windows decide what to put into the “Most used” list? It’s an algorithm, Microsoft says, one that it intends to keep refining to make the list more useful. One thing is for sure, though: Any app you’ve put onto the right side of the Start menu doesn’t appear in the “Most used” list. Microsoft figures you don’t need to see its name twice.
Recently Added
The middle section of the left side shows one item: whatever app you’ve most recently downloaded or installed. It’s surprisingly handy, especially for novices, who often download something from the Internet and then can’t find where it landed.
If you’ve installed more than one new app recently, open the “All apps” list described below; the little “New” indicators show you which are the recent arrivals.
Tip
It probably goes without saying, but you can hide the “Recently added” section if you like. Open the Start menu; choose Settings→Personalization→Start; turn off “Show recently added apps.” Close Settings.
Important Places
In general, the bottom of the left side is devoted to listing important places on the computer. On a shiny new PC, the list includes these:
-
File Explorer. This “app” is the standard desktop window, showing the contents of your drives and folders (Chapter 2).
-
Settings. Yes, adjusting the settings and preferences of your PC is about six steps quicker now, since Settings is listed right here in the Start menu. Chapter 7 covers Settings in absurd detail.
-
Power. Hard though it may be to believe, there may come a day when you want to shut down or restart your computer. See Change the color.
-
All apps opens the complete master list of all your programs, as described below.
What’s great, though, is that you can add other important folders to this list, following the steps shown in Figure 1-6. These are some of your options:
-
Documents: This command opens up your Documents folder, a very important folder indeed. It’s designed to store just about all the work you do on your PC—everything except music, pictures, and videos, which get folders of their own.
Of course, you’re welcome to file your documents anywhere on the hard drive, but most programs propose depositing newly created documents into the Documents folder. That principle makes navigation easy. You never have to wonder where you filed something, since all your stuff is sitting right there in Documents.
Note
The Documents folder actually sits in the This PC
 Local Disk (C:) Users [Your Name] folder.
If you study that path carefully, it should become clear that what’s in Documents when you log in isn’t the same thing other people will see when they log in. That is, each account holder (Chapter 19) has a different Documents folder, whose contents switch according to who’s logged in.
-
Downloads. For decades, computer novices have been baffled: They download something from the web but then can’t find where it went. Now you’ll know. Out of the box, Windows puts your downloaded files into this Downloads folder (which is inside your Personal folder). It makes perfect sense to add this item to your Start menu so you have quick access to it.

Figure 1-6. You can add other important folders to your Start menu. Choose
 →Settings. In the Settings window (top right), choose Personalization. On the next screen, click Start. Finally, click “Choose which folders appear on Start” (middle). Up pops a list of items like File Explorer, Settings, Documents, Downloads, Music, Pictures, Videos, HomeGroup, and Network, so that you can turn on or off the ones you like (bottom).
 -
Music, Pictures, Videos. Microsoft assumes (correctly) that most people these days use their home computers for managing digital music, photos, and video collections. As you can probably guess, the Music, Pictures, and Videos folders are intended to house them—and these Start menu commands are quick ways to open them.
In fact, whatever software came with your phone, digital camera, or MP3 player probably dumps your photos into, and sucks your music files out of, these folders automatically. You’ll find much more on photos and music in Chapter 8.
-
HomeGroup is Microsoft’s name for an easy file-sharing system. It lets you see what’s on other computers on your home network, so that you can shove folders and files back and forth without running all over the house with a flash drive. This command opens the HomeGroup window (HomeGroups).
-
Network opens (what else?) the Network folder, where you can see a map of your home or office network and make changes to the settings. See Chapter 20.
-
Personal folder. As the box below makes clear, Windows keeps all your stuff—your files, folders, email, pictures, music, bookmarks, even settings and preferences—in one handy, central location: your Personal folder. This folder bears your name, or whatever account name you typed when you installed Windows.
Everyone with an account on your PC has a Personal folder.
Technically, your Personal folder lurks inside the C:→Users folder. But that’s a lot of burrowing when you just want a view of your empire. That’s why your Personal folder can also be installed here.
All Apps
When you click “All apps” at the bottom of the Start menu, you’re shown an important list indeed: the master catalog of every program on your computer (Figure 1-7). You can jump directly to your word processor, calendar, or favorite game, for example, just by choosing its name in this scrolling list. As a handy bonus, the word “New” appears beneath the name of any new programs—ones you’ve installed but haven’t yet used.
You can restore the original left-side column by clicking Back (at the bottom of the list).
Tip
You can also open the “All apps” menu with a quick swipe upward anywhere on the left side of the Start menu—either with the mouse, trackpad, or your finger on a touchscreen. Try it!
There are even more ways to open “All apps” if the Start menu is already open. Click the phrase “All apps,” or point to it and keep the mouse still for a moment, or press the ![]() , key (to highlight “All apps”). Then tap the Enter key, the
, key (to highlight “All apps”). Then tap the Enter key, the ![]() key, or the space bar. Just for keyboard fanatics: Once the “All apps” list is open, you can also choose anything in it without involving the mouse. Just press the
key, or the space bar. Just for keyboard fanatics: Once the “All apps” list is open, you can also choose anything in it without involving the mouse. Just press the ![]() and
and ![]() keys to highlight the item you want (or type a few letters of its name). Then press Enter to seal the deal.
keys to highlight the item you want (or type a few letters of its name). Then press Enter to seal the deal.
The “All apps” list used to be called All Programs, of course, but Microsoft had to go with the lingo of those crazy kids today. But there is one handy trick in Windows 10 that never existed before: You can now jump around in the list using an alphabetic index, shown at right in Figure 1-7.
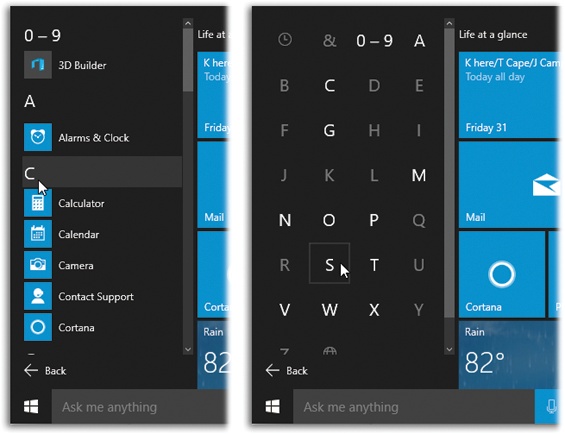
Figure 1-7. Left: When the “All apps” list is visible, your apps are grouped alphabetically. Turns out that those letter headings (A, B, C…) are also buttons. When you click one, Windows offers you a grid of the entire alphabet (right). Click a letter to jump directly to that section of the “All apps” list. If you have a lot of programs, this trick can save you a lot of scrolling.
Folders
As you’ll quickly discover, the “All apps” list doesn’t list just programs. It also houses a number of folders. See Figure 1-8.
Tip
Submenus, also known as cascading menus, largely have been eliminated from the Start menu. Instead, when you open something that contains other things—like a folder listed in the Start menu—you see its contents listed beneath, indented slightly, as shown at right in Figure 1-8. Click the folder name again to collapse the sublisting.
Keyboard freaks should note that you can also open a highlighted folder in the list by pressing the Enter key (or the ![]() key). Close the folder by pressing Enter again (or the
key). Close the folder by pressing Enter again (or the ![]() key).
key).
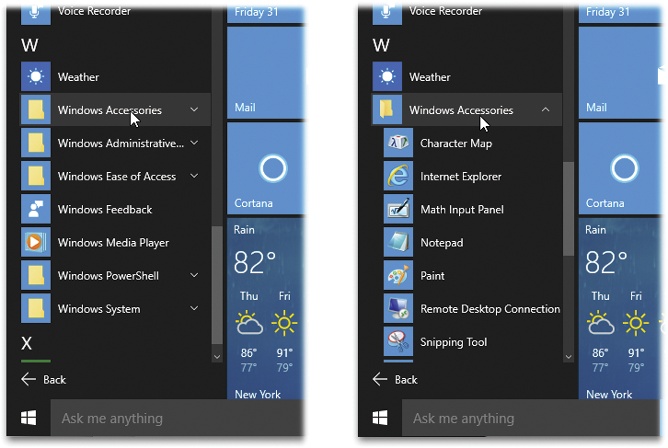
Figure 1-8. You know when you’re looking at a folder in the “All apps” list because a ![]() appears to the right of its name (left). Click the folder’s name to expand the listing—to see what’s hiding inside. (You don’t have to click right on the
appears to the right of its name (left). Click the folder’s name to expand the listing—to see what’s hiding inside. (You don’t have to click right on the ![]() .) When the folder is expanded, the symbol changes to
.) When the folder is expanded, the symbol changes to ![]() , just in case you didn’t get the point.
, just in case you didn’t get the point.
-
Software-company folders. Some of these folders bear the names of software you’ve installed; you might see a folder called, for example, PowerSoft or Logitech. These generally contain programs, uninstallers, instruction manuals, and other related junk.
-
Program-group folders. Another set of folders is designed to trim down the Programs menu by consolidating related programs, like Games, Accessories (little single-purpose programs), and Maintenance. Everything in these folders is described in Chapter 8.
How to Customize the Left Side
You can’t add anything to the left side yourself, which is a big change from Windows 7. Nor can you change the order of anything here.
You do, however, have three opportunities to redesign the left side:
-
Eliminate the “Most used” list (or certain items in it). See the box on Getting Rid of the “Most Used” List.
-
Move something to Start or the taskbar. Suppose there’s some app—say, Calculator—that’s listed in “Most used” or the “All apps” list. And you think you’d rather have it installed on your taskbar, visible at all times. Or you think it’d work best as a tile on the right side.
Turns out you can right-click its name on the left side. From the shortcut menu, choose “Pin to taskbar” or “Pin to Start.” It disappears from the “Most used” list (if that’s where it was) and goes where you sent it.
Tip
If you have a touchscreen, you can “right-click” something by holding your finger down on it for one second.
-
Add certain Windows folders to the Important Places list. You do that in Settings, as described on Recently Added.
Tip
How cool is this? You can uninstall a program right from the “All apps” list. Just right-click it (or hold your finger down on it); from the shortcut menu, choose Uninstall. Confirm in the dialog box that appears. (You can’t uninstall apps that came with Windows 10 this way—only stuff you’ve added.
Start Menu: The Right Side
The right side of the Start menu is all that remains of the Great Touchscreen Experiment of 2012, during which Microsoft expected every PC on earth to come with a touchscreen. Instead of a Start menu, you got a Start screen, stretching from edge to edge of your monitor, displaying your files, folders, and programs as big rectangular tiles.
Unfortunately, the Start screen covered up your entire screen, blocking whatever you were working on. It was horribly space-inefficient—finding a new program you’d downloaded often meant scrolling several screens to the right. And it just felt detached from the rest of the Windows world.
Turns out most people preferred the Start menu.
There were some nice aspects of the Start-screen idea, though. For one thing, it’s more than just a launcher. It’s also a dashboard. Each tile isn’t just a button that opens the corresponding program; it’s also a little display—a live tile, as Microsoft calls it—that can show you real-time information from that program. The Calendar tile shows you your next appointment. Your Mail tile shows the latest incoming subject line. The People tile shows Twitter and Facebook posts as they pour in.
Tip
Not all Start menu tiles display their own names. Some apps, like the ones for Calendar, People, and Mail, are meant to be visual dashboards. To find out such an app’s name, point to it with your cursor without clicking. A tinted, rectangular tooltip bar appears, identifying the name.
So in Windows 10, Microsoft decided to retain those colorful live tiles—on the right side of the Start menu (Figure 1-9).
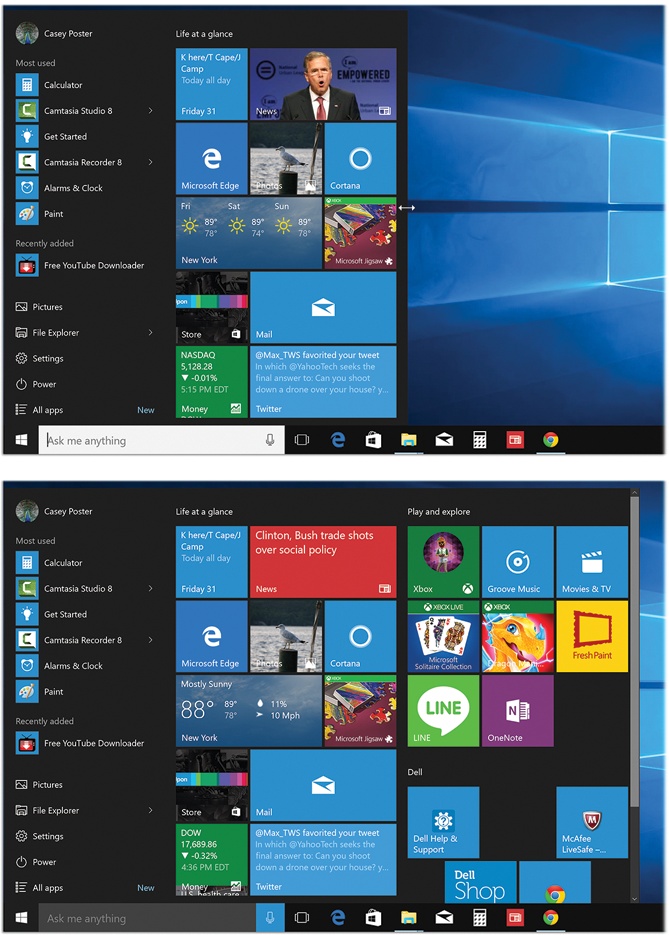
Figure 1-9. As you drag the top or right edge of the Right Side of the Start menu, you see it snap to a larger size once you’ve moved your cursor far enough. You don’t have an infinite degree of freedom here; you can only double the width or, if you have one of those rare Samsung Billboard Monitors, maybe triple it. You can also adjust the height of the Start menu—by dragging the top edge. You can goose it all the way to the top of your screen, or you can squish it down to mushroom height.
You can make this scrolling “column” bigger; you can even make it fill the screen, as it did in Windows 8; or you can hide it completely. But the point is that this time, it’s up to you. The “Start screen” takes over your world only as much as you want it to.
Tip
If you’re keyboard oriented, you can use the arrow keys to highlight the icon you want and then press the Enter key to open it.
How to Customize the Right Side
The left side is really Windows’ playground; you can’t do much to change it.
The right side, however, is your playground. You can customize it in lots of different ways. If your current job doesn’t work out, you could become a full-time right-side customizer.
Make the right side bigger or smaller
If you have a mouse or a trackpad, you can make the right side of the Start menu either wider or taller; just grab the right edge or the top edge and drag. (In the initial release of Windows 10, you can’t enlarge the Start menu with your finger on a touchscreen.)
Make the right side fill the screen
Maybe you were one of the 11 people who actually liked Windows 8, including the way it had a Start screen instead of a Start menu. Well, that look is still available.
Right-click anywhere on the desktop. (Touchscreen: Hold your finger down on the desktop.) From the shortcut menu, choose Personalize. On the Settings screen, click Start, and then click turn on “Use Start full screen.”
In this mode, the left side of the Start menu is gone. The live tiles fill your entire desktop (which is handy for touchscreens).
Note
If your goal is to use Windows 10 on a tablet, you don’t need to do all this. Just turn on Tablet mode (Chapter 13). In Tablet mode, the Start screen is standard and automatic.
Move a tile
You can, of course, drag the right side’s tiles into a new order, putting the personal back into personal computer.
With the Start menu open, just drag the tile to a new spot. The other tiles scoot out of the way to make room.
That works fine if you have a mouse or a trackpad. But if you’re using a touchscreen, that instruction leaves out a key fact: Dragging scrolls the right side! Instead, hold your finger down on the tile for half a second before dragging it.
Resize a tile
Tiles come in four sizes: three square sizes and one rectangle. As part of your Start menu interior decoration binge, you may want to make some of them bigger and some of them smaller. Maybe you want to make the important ones rectangular so you can read more information on them. Maybe you want to make the rarely used ones smaller so that more of them fit into a compact space.
Right-click the tile. (Touchscreen: Hold your finger down on the tile; tap the … button that appears.) From the shortcut menu, choose Resize. All icons give you a choice of Small and Medium; some apps offer Wide or Large options, too. See Figure 1-10.
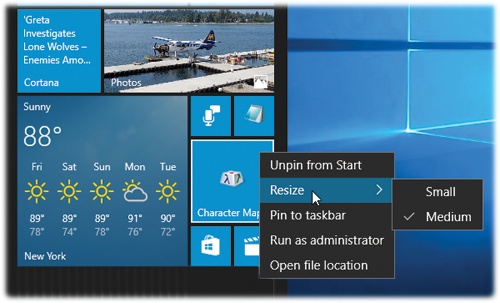
Figure 1-10. Tiles on the right side come in four sizes: Small (tiny square, no label); Medium (4x the times of Small—room for a name); Wide (twice the width of Medium); and Large (4x the size of Medium). Wide and Large options appear only for apps whose live tiles can display useful information. Drag them around into a mosaic that satisfies your inner Mondrian.
Add new tiles
You can add tiles to the right side. They can be apps, folders, or disks (but not individual files). You can use either of two techniques: dragging or right-clicking.
-
The drag method. Drag the icon directly into the open Start menu—from the desktop, an open window, the “All apps” list, or the left side of the Start menu.
-
The right-click method. Right-click an icon wherever fine icons are found: in a window, on the desktop, in the “All apps” list, or on the left side. (Touchscreen: Hold your finger down on the icon for a second.) From the shortcut menu, choose Pin to Start.
Tip
In the Edge browser, you can also add a web page to the right side. With the page open, click the … button at top right; choose Pin to Start.
In each case, the newly installed tile appears at the bottom of the right side. (You might have to scroll to see it.)
Make a tile stop blinking
Some of your right side tiles are live tiles—tiny dashboards that display real-time incoming information. There, on the Mail tile, you see the subject lines of the last few incoming messages; there, on the Calendar tile, is your next appointment; and so on.
It has to be said, though: Altogether, a Start menu filled with blinky, scrolling icons can look a little like Times Square at midnight.
If you’re feeling quite caffeinated enough already, you might not want live tiles so much as, well, dead ones.
If you’d rather silence the animation of a live tile, right-click it. (Touchscreen: Hold your finger down on it, and then tap ![]() .) From the shortcut menu, choose “Turn live tile off.” The tile’s current information disappears, and the live updating stops.
.) From the shortcut menu, choose “Turn live tile off.” The tile’s current information disappears, and the live updating stops.
To reverse the procedure, “right-click” an unmoving tile; from the shortcut menu, choose “Turn live tile on” instead.
Remove a tile
Open the Start menu. Right-click the tile you want to eliminate. (Touchscreen: Hold your finger down on it, and then tap the … button.) From the shortcut menu, choose Unpin from Start. (You’re not actually discarding that item—just getting its tile off the Start menu.)
Group your tiles
The right side’s tiles aren’t scattered pell-mell; they present an attractive, orderly mosaic. Not only are they mathematically nestled among one another, but they’re actually grouped. Each cluster of related tiles can bear a name, like “Life at a glance” (Calendar, Mail, Weather…) or “Play and explore” (games, music, TV…).
But you can change those headings, or those groupings, and come up with new ones of your own.
The technique isn’t quite obvious, but you’ll get the hang of it (see Figure 1-11). It works like this:
-
Drag a tile to the very bottom of the existing ones. (Touchscreen: Hold your finger still for a second before dragging.)
When you drag far enough—the right side might scroll, but keep your finger down—a horizontal bar appears, as shown in Figure 1-11. That’s Windows telling you, “I get it. You want to create a new group right here.”
-
Drag the tile below the bar and release it.
Release the tile you’re dragging; it’s now happily setting up the homestead. Go get some other tiles to drag over into the new group to join it, if you like. Build up the group’s population.
-
Click or tap just above your newly grouped tiles.
The words “Name group” appear.
-
Type a name for this group, and then press Enter.
Your group name is now immortalized.
By the way: Whenever you point to (or tap) the heading of any group, you may notice a little “grip strip” at the right side. If you like, you can drag that strip up or down to move the entire group to a new spot among your existing groups. (Or horizontally, if you have a multicolumn right side.)
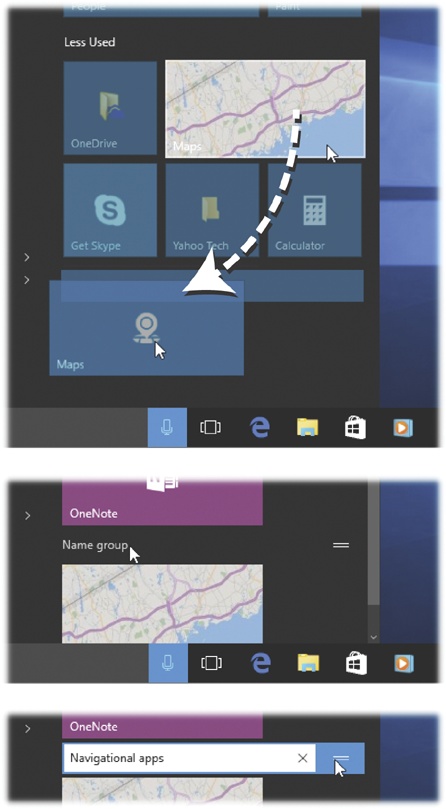
Figure 1-11. Top: To create a new tile group, start by dragging one lonely tile below all other tiles. This is your colonist. A fat horizontal divider bar appears when you’ve gone far enough. Let go. Middle: Point to the starter name (“Name group”) and click. Bottom: Type a name for the group. Use the grip strip to drag the group into a new spot, if you like.
At any point, you can rename a group (click or tap its name; type). To eliminate a group, just drag all of its tiles into other groups, one at a time. When the group is empty, its name vanishes into wherever withered, obsolete tile groups go.
Eliminate all tiles
Yes, it’s possible to eliminate the entire right side. If you like your Start menu to look like it did in the good old days, with only the left side showing, you can do that, as shown in Figure 1-12.
Of course, once you’ve done that, you’ve just eliminated one of the most useful ways of opening things on your PC. Now you can open apps only from the left side or the taskbar.
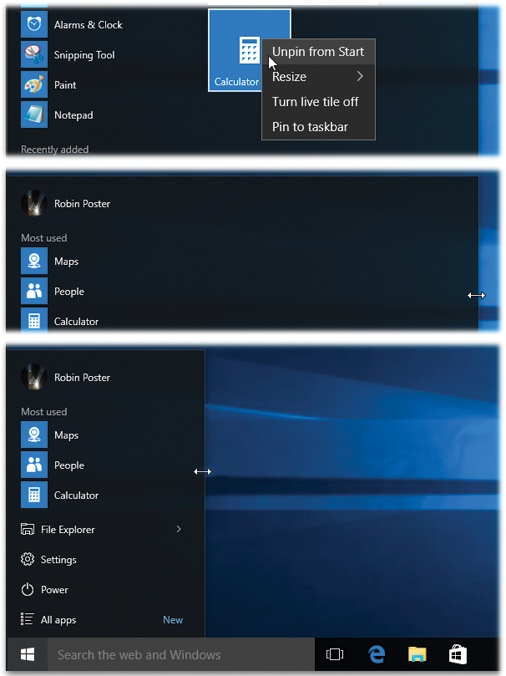
Figure 1-12. Top: To remove all the tiles from the right side, right-click it and choose Unpin from Start. (Touchscreen: Hold your finger down on the tile, and then tap the … button to see Unpin from Start.) Repeat until you’ve eliminated all the tiles. Middle: Now only the left column remains, just as it was in Windows 7. Bottom: Drag the right edge of the menu inward, closing up the empty space where the right side used to be.
Change the color
You can also change colors of the various Start menu elements (and the taskbar, and the Action Center). See Chapter 4 for the step-by-steps.
Turn off ads
From time to time, you may spot a Start-menu tile that you didn’t put there. It’s a suggestion of an app that Microsoft thinks you might like—in other words, an ad.
If you’d prefer Microsoft and its ad partners to keep their darned apps to themselves, open Settings→Personalization→Start, and turn off “Occasionally show suggestions in Start.”
Shutting Down
What should you do when you’re finished using your computer for the moment?
Millions of people shut their PCs off, but they shouldn’t; it’s a colossal waste of time. When you shut down, you have to wait for all your programs to close—and then the next morning, you have to reopen everything, reposition your windows, and get everything back the way you had it.
You shouldn’t just leave your computer on all the time, either. That’s a waste of electricity, a security risk, and a black mark for the environment.
What you should do is put your machine to sleep. If it’s a laptop, just close the lid. If it’s a tablet, just press the Sleep switch. If it’s a desktop PC, it’s usually a matter of pressing the physical power button.
The Sleep/Shut Down/Restart Commands
If you really want to do the sleeping or shutting down thing using the onscreen commands, you’ll be happy to know that in Windows 10, you no longer need 20 minutes and a tour guide to find them. They’re right there in the Start menu, near the bottom. Choose Power to see them.
As shown in Figure 1-13, shutting down is only one of the options for finishing your work session. What follows are your others.
Sleep
Sleep is great. When the flight attendant hands over your pretzels and cranberry cocktail, you can take a break without closing all your programs or shutting down the computer.
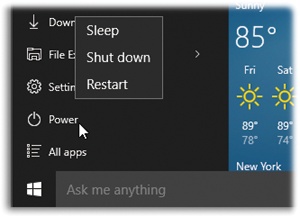
Figure 1-13. Shutting down your computer requires only two steps now, rather than 417 (as in Windows 8). Open the Start menu. Choose Power, and then “Shut down”.
The instant you put the computer to sleep, Windows quietly transfers a copy of everything in memory into an invisible file on the hard drive. But it still keeps everything alive in memory—the battery provides a tiny trickle of power—for when you return and want to dive back into work.
If you do return soon, the next startup is lightning-fast. Everything reappears on the screen faster than you can say, “Redmond, Washington.”
If you don’t return shortly, then Windows eventually cuts power, abandoning what it had memorized in RAM. Now your computer is using no power at all; it’s in hibernate mode.
Fortunately, Windows still has the hard drive copy of your work environment. So now when you tap a key to wake the computer, you may have to wait 30 seconds or so—not as fast as 2 seconds, but certainly better than the 5 minutes it would take to start up, reopen all your programs, reposition your document windows, and so on.
The bottom line: When you’re done working for the moment—or for the day—put your computer to sleep instead of shutting it down. You save power, you save time, and you don’t risk any data loss.
You can send a laptop to sleep just by closing the lid. On any kind of computer, you can trigger Sleep by choosing it from the ![]() →Power command, or by pushing the PC’s power button, if you’ve set it up that way, as described below.
→Power command, or by pushing the PC’s power button, if you’ve set it up that way, as described below.
Restart
This command quits all open programs and then quits and restarts Windows again automatically. The computer doesn’t actually turn off. You might do this to “refresh” your computer when you notice that it’s responding sluggishly, for example.
Shut down
This is what most people would call “really, really off.” When you shut down your PC, Windows quits all open programs, offers you the opportunity to save any unsaved documents, exits Windows, and turns off the computer.
There’s almost no reason to shut down your PC anymore, though. Sleep is almost always better all the way around.
The only exceptions have to do with hardware installation. Anytime you have to open up the PC to make a change (installing memory, hard drives, or sound or video cards), you should shut the thing down first.
Tip
If you’re a keyboardy sort of person, you might prefer this faster route to shut down: Press Ctrl+Alt+Delete to summon the Lock/Switch User screen, and then Tab your way over to the ![]() button in the lower right. Press Enter, and arrow-key your way to Shut down. Press Enter again.
button in the lower right. Press Enter, and arrow-key your way to Shut down. Press Enter again.
Three Triggers for Sleep/Shut Down—and How to Change Them
You now know how to trigger the Shut down command using the Start menu→Power button. But there are even faster ways.
If you have a laptop, just close the lid. If it’s a tablet, tap its Sleep switch. If you have a desktop PC, press its power button (![]() ).
).
In each of these cases, though—menu, lid, switch, or button—you can decide whether the computer shuts down, goes to sleep, hibernates, or just ignores you.
To find the factory setting that controls what happens when you close the lid or hit the power button, click in the “Ask me anything” search box and type lid.
In the search results, the top hit is “Change what closing the lid does.” Press Enter to select it.
Now you arrive at the “Define power buttons” screen. Here, for each option (pressing the power button; pressing the Sleep button, if you have one; closing the lid), you can choose “Sleep,” “Do nothing,” “Hibernate,” “Shut down,” or “Turn off the display.”
And you can set up different behaviors for when the machine is plugged in and when it’s running on battery power.
Navigating the Start Menu by Keyboard
If your computer has a physical keyboard—you old-timer, you!—you can navigate and control the Start menu in either of two ways:
Use the Arrow Keys
Once the Start menu is open, you can use the arrow keys to “walk” up and down the menu. For example, press ![]() to enter the left-side column from the bottom. Or press
to enter the left-side column from the bottom. Or press ![]() and then
and then ![]() to enter the right side.
to enter the right side.
Either way, once you’ve highlighted something in either column, you can press the ![]() or
or ![]() keys to hop to the opposite side of the menu, or press the
keys to hop to the opposite side of the menu, or press the ![]() or
or ![]() keys to highlight other commands in the column (even the Power command or “All apps”). (You can no longer type the first initial of something to select it.)
keys to highlight other commands in the column (even the Power command or “All apps”). (You can no longer type the first initial of something to select it.)
Once you’ve highlighted something, you can press Enter to “click” it (open it), or tap the ![]() key or Esc to close the Start menu and forget the whole thing.
key or Esc to close the Start menu and forget the whole thing.
Use the Search Box
This thing is awesome. The instant you press the ![]() key, your insertion point blinks in the new “Ask me anything” search box below the Start menu (Figure 1-13).
key, your insertion point blinks in the new “Ask me anything” search box below the Start menu (Figure 1-13).
Note
If you click in the “Ask me anything” search box instead of pressing ![]() , you get a panel full of news, weather, and other details Windows thinks might be relevant to your life. That’s all part of Cortana, the voice assistant described in Chapter 5.
, you get a panel full of news, weather, and other details Windows thinks might be relevant to your life. That’s all part of Cortana, the voice assistant described in Chapter 5.
That’s your cue that you can now begin typing the name of whatever you want to open.
Note
The search box used to be part of the Start menu. Now it’s actually part of the taskbar. It still takes you one click, tap, or keystroke to highlight it for typing—but because it’s always visible, it seems more present and useful. You know?
The instant you start to type, you trigger Windows’ very fast, whole-computer search function. This search can find files, folders, programs, email messages, address book entries, calendar appointments, pictures, movies, PDF documents, music files, web bookmarks, and Microsoft Office documents, among other things.
It also finds anything in the Start menu, making it a very quick way to pull up something without having to click through a bunch of submenus.
You can read the meaty details about search in Chapter 3.
Jump Lists in the Start Menu
Jump lists are submenus that list frequently used commands and files in each of your programs for quick access.
For example, the jump list for a web browser might offer commands like “New window” and “Close window”; the jump list for a Microsoft Office program (like Word) might list documents you’ve edited lately.
In other words, jump lists can save you time when you want to resume work on something you had open recently. They save you burrowing through folders.
Now, jump lists can appear either in the Start menu (in the “Most used” section) or on your taskbar. Jump Lists in the Taskbar describes the taskbar versions, but here’s a quick rundown on the Start menu versions.
Recently Opened Documents
The left side of the Start menu—the “Most used” section—keeps track of recently used documents automatically, as shown in Figure 1-14. This list of Recent documents changes as your workflow does; documents drop off the list if you don’t open them much anymore.
You can, however, pin a document to its jump list, meaning that it won’t disappear even if you never open it. Figure 1-14 shows the technique.
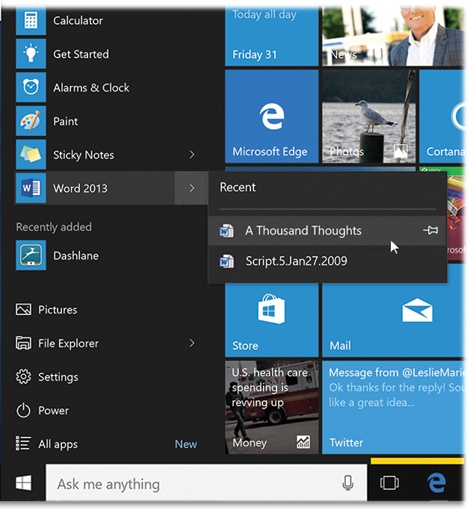
Figure 1-14. Jump lists display the most recently opened documents in each program. Click the > button to see them. To pin one of these document s so that it won’t disappear on you, point to it without clicking, as shown here, and then click the pushpin icon. Now there’s a new section in the jump list called Pinned, where that document will remain undisturbed until you unpin it (by clicking the pushpin again).
The Secret Start Menu
Windows 10’s new (old) Start button harbors a secret: It can sprout a tiny utility menu, as shown in Figure 1-15.
To see it, right-click the ![]() button, or (on a touchscreen) hold your finger down on it.
button, or (on a touchscreen) hold your finger down on it.
Tip
Or press ![]() +X to make the secret Start menu appear (if you have a keyboard, of course).
+X to make the secret Start menu appear (if you have a keyboard, of course).
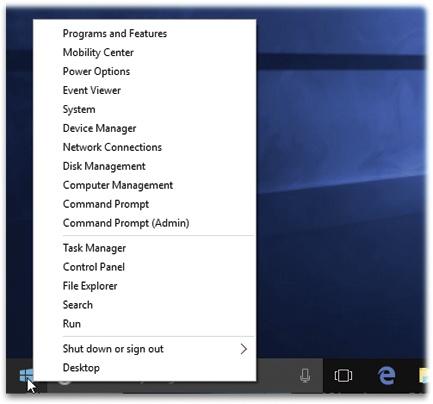
Figure 1-15. This secret little menu of options appears when you right-click the ![]() button. It’s a shortcut to the Task Manager and the Control Panel, among other things.
button. It’s a shortcut to the Task Manager and the Control Panel, among other things.
There, in all its majesty, is the secret Start menu. It’s seething with shortcuts to toys for the technically inclined.
All the items in it are described elsewhere in this book, but some are especially useful to have at your mousetip:
-
System opens a window that provides every possible detail about your machine.
-
Control Panel is the quickest known method to get to the desktop Control Panel, described in Chapter 7.
-
Task Manager. Huge. This special screen (Exiting Programs) is your lifeline when a program seems to be locked up. Thanks to the Task Manager, you can quit that app and get on with your life.
Get Windows 10: The Missing Manual now with the O’Reilly learning platform.
O’Reilly members experience live online training, plus books, videos, and digital content from nearly 200 publishers.
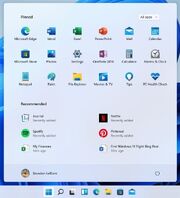
Default Start menu for Windows 11
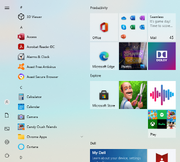
Default Start menu for Windows 10 20H2
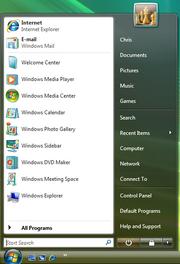
Default Start menu for Windows Vista
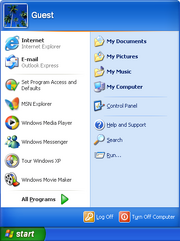
Default Start menu for Windows XP
The Start menu is a graphical user interface element used in the Microsoft Windows product line since Windows 95. It serves as the central launching point for computer programs and performing other tasks in the Windows shell. In Windows 8 it is named Start screen.
Traditionally, the Start menu provided a customizable nested list of programs for the user to launch, as well as a list of most recently opened documents, a way to find files and obtain assistance, and access system settings. Later enhancements via Windows Desktop Update included access to special folders such as «My Documents» and «Favorites» (browser bookmarks). Windows XP’s Start menu was expanded to encompass various My Documents folders (including My Music and My Pictures), and transplanted other items like My Computer and My Network Places from the Windows desktop. Until Windows Vista, the Start menu was constantly expanded across the screen as the user navigated through its cascading sub-menus.
History
The Start menu was introduced in Windows 95 and Windows NT 4.0, but had
In the earliest versions of Windows, a program called MS-DOS Executive provided basic file management and program menu capability. This was replaced by the programs File Manager and Program Manager in Windows 3.0, with the Program Manager taking on the role of the program menu.
The Program Manager was a full windowed application, which required the whole screen to be used effectively. It consisted of a simple multiple document interface which allowed users to open «program groups» and then execute the shortcuts to programs contained within.
Windows 95 was the version in which the Program Manager was superseded by the Start menu, which condensed the Program Manager into a popup menu that could be accessed at any time. It also boasted several advantages over the Program Manager, such as the ability to nest groups within other groups, and the ability to add to the Start menu by dropping objects (program files, document files) onto the Start button.
Later developments in Internet Explorer and subsequent Windows releases allowed users to customise the Start menu and access and expand Favorites, My Documents and Administrative Tools (Windows 2000) from the Start menu.
The first significant revision to the Start menu since its inception came in Windows XP. To help the user access a wider range of common destinations more easily, and to promote a greater sense of «personality», the Start menu was expanded to two columns; the left-hand column focuses on the user’s installed applications, while the right-hand column provides access to the user’s documents, and system functionality. Links to My Documents, My Pictures and other special folders are brought to the fore. The My Computer and My Network Places (Network Neighborhood in Windows 95 and 98) icons were also moved off the Desktop and into the Start menu, making it easier to access these icons while a number of applications are open (they could be restored optionally in the Display Properties control panel «Desktop» settings). Commonly used programs are automatically displayed in the left-hand menu, and the user may opt to «pin» programs to the Start menu so that they are always accessible without having to navigate through the All Programs folder.
The other significant change came in Windows Vista, where the interface of the Start menu changed. Instead of flying out, All Programs expanded inside the left column. A search bar was added to the Start menu, allowing the user to type to find programs as well as files. The Start menu color also could be customized, without needing to change the theme. Windows 7 retained this layout of the Start menu.
Button
The Start button of the Start menu/screen has also changed throughout the operating systems.
Windows 95
When it first came out, the Start menu featured a grey button with the Windows logo on the side with the words ‘Start’ in black to the right of the logo. The button was rectangular and it became lighter as one mouses over or clicks on it.
Windows XP
In Windows XP, the button changed to a green color with a white font. The button had the effect of being pressed down when moused over. When clicked, the Start button changed into a darker color.
Windows Vista
The biggest change for the Start button came with Windows Vista, when the rectangular shape was replaced with a blue sphere with the Windows logo on it. The word ‘Start’ was omitted entirely and it basically had the same mouseover effects as Windows XP. The Windows 7 Start button is similar except the button glows when moused over and clicked.
Windows 8
In Windows 8, the Start button was included in the Developer Preview, but was omitted from the Consumer Preview and public release.
Windows 8.1
In Windows 8.1, the Start button was restored, but the design was simplified with no sphere and did not glow when moused over, The background was the color of the Taskbar.
Windows 10
In Windows 10, there weren’t too many drastic changes to the button. The only minor changes were that the Windows logo became a bit smaller and there is no shine when hovering on the button. The first change only occurs in desktop mode, but in tablet mode, the logo has the same size as the one in Windows 8.
Windows 11
In Windows 11, the Start button received few changes in appearance, but it is notably located in the center of the Taskbar (but can be moved back to the lower left corner).
Technical details
Users may add Start menu entries that creating folders and shortcuts in the associated «Start Menu» folder, located on the operating system operating media. These appear in a separated section at the top of the Start menu, or, if placed in the Programs sub-folder, in the Programs menu. The location of this folder however, depends on the operating system installed:
- In Windows 9x, this folder is located either in «
%windir%Start Menu» or, if there are multiple users, in «%windir%Profiles[username]Start Menu«, where [username] is the account name of the user. - In Windows NT 4.0, this folder is located in «
%systemroot%Profiles%username%Start Menu» for individual users, or «%systemroot%ProfilesAll UsersStart Menu» for shared shortcuts. One distinguishing feature in Windows NT 4.0 is that the Start menu separated the per-user shortcuts from the shared shortcuts and by a separator line and used different icons for the program folders in per-user and shared menus. - In Windows 2000, Windows XP, and Windows Server 2003, the folder is located in «
%userprofile%Start Menu» for individual users, or «%allusersprofile%Start Menu» for shared shortcuts. - In Windows Vista, Windows Server 2008, Windows 7, Windows Server 2008 R2, Windows Server 2012, Windows 8, and Windows 10, the folder is located in «
%appdata%MicrosoftWindowsStart Menu» for individual users, or «%programdata%MicrosoftWindowsStart Menu» for the shared portion of the menu.
Symbolism
The Start button and its menu were lauded as a leap forward in user friendliness and interface design when they were first introduced in Windows 95. The symbol of the Start button was, and still is, used to advertise the product. Furthermore, Microsoft has embraced the word «start» as their «catchword», and it is frequently used in their advertising even today.
Design
The Start menu in Windows 95.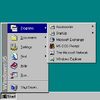
Windows 95/98/2000/Me
The Start menu was introduced in Windows 95 and Windows NT 4.0, and remains mostly unchanged through Windows 2000 and Me.
The Start menu in Windows XP.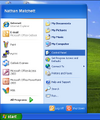
Windows XP
The Start menu was redesigned in Windows XP by changing the design template and layout options. However, you are able to enable the classic Start menu in Properties.
The Start menu in Windows Vista.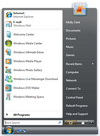
Windows Vista
In Windows Vista, the Start menu changed more, and this time the word «Start» was dropped from the button, now it’s the Windows logo and this was used in Windows 7 later. This new menu allowed for better organization, and a built-in Search function. In addition, the Log off and Shut down menus were grouped, and the user photo was moved over to the right. Windows Vista also dropped the option to switch back to the classic Start menu, however, several programs developed by third-party developers allow to switch back by editing System.ini files.
The Start menu in Windows 7.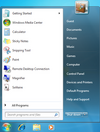
Windows 7
In Windows 7, the Start menu was slightly changed. The power options section now say ‘Shut Down’ instead of the icons used in Windows Vista.
The Start screen in Windows 8. The Start screen in Windows 8.1.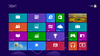
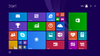
Windows 8/8.1
In Windows 8, the Start button was completely dropped, and now the system auto-launched into the Start screen with the Metro appearance at boot. When switching to desktop, you can go back to the start screen by highlighting your mouse to the bottom-left of the screen or by clicking the Windows button on your Windows-button-enabled keyboard. The start screen groups things differently as well, and things can be dragged and dropped. The old Start menu could be restored in Windows 8 by programs developed by third-parties like Startisback. The Start button was restored in Windows 8.1 to launch the Start screen.
The Start menu in Windows 10.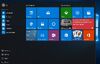
Windows 10
In Windows 10, the Start menu was restored with an interface more reminiscent of Windows 7, but with the second column consisting of live tiles retaining the Metro appearance, or Modern UI. The 20H2 update evolved that appearance with a lighter design.
Start menu in Windows 10X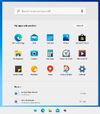
Windows 10X/11
Windows 10X introduced a revised Start menu in the Fluent Design System that would be largely carried over into Windows 11.
Trivia
- Like most facets of the Windows operating system, there are undocumented features of the Start menu, and opportunities for customization. For instance, in Classic Start menu mode, dragging a file or program onto the Start button creates a top-level Start menu item. Shortcuts on the Start menu folder with keyboard shortcut key(s) assigned respond throughout the Windows environment. The Windows Power Toy TweakUI offers many other customizations, including speeding up the response time of the Start menu, window animation, and other «power user» hacks. Many more tips and tricks are documented on the Web.
- In 1995, Microsoft licensed the Rolling Stones’ song «Start Me Up» for the Windows 95 marketing campaign.
- In Windows 95, it was possible to hide the Start button by clicking it, then pressing Esc, and then «Alt» together with the minus key. A little context menu appeared, which offered the possibility to move the button or close it completely, causing it to disappear. It reappeared after rebooting the operating system.
External links
- Open the Start menu — Windows 11 / Windows 10 at Microsoft Support
- Start menu at Wikipedia
|
|
Wikipedia This page uses Creative Commons Licensed content from Wikipedia (view authors). |
|---|

Use the following tips to get the Start menu on Windows 10 working quickly for you again.
Have you ever clicked on the Windows 10 Start menu and nothing happens? The Windows 10 Start menu, not opening is a common occurrence for many users.
Most people just tolerate this annoyance, since eventually, the Start menu will begin working again. However, you don’t have to tolerate it any longer. Use the following tips to get the Start menu working quickly for you again.
Windows 10 Start Menu Not Opening: Why It Happens
There are two main behaviors that can start happening with the Windows 10 Start menu. It either won’t open at all, or it takes more than 5 seconds to finally open. It’s the second behavior that’s the most common, and it’s especially annoying because past versions of Windows always had instantaneous Start menus.
Why does this even happen? There are numerous causes, including:
- Temporary data files that the Start menu uses are corrupt or out of date
- Cortana temporary files are corrupt or out of date
- A known glitch in Windows 10 that causes the Start menu to freeze
- The Start menu under your specific Windows account is crashing or missing
- Windows Explorer on your system is out of date or includes corrupted files
Now to get to the fixes and tweaks that will resolve this issue. We’ll work down this list from the easiest quick fixes to the more complex and involved ones.
1. Sign Out of Your Microsoft Account
As each user signs in to their Microsoft account on a Windows 10 computer, many of the apps and other things listed on the Start menu get cached. If you stay logged in for long periods of time (as is usually the case with a computer that only has one user), this cache can eventually get very large or corrupted.
When you log out and then back into your account, many of these things are cleared and refreshed. So a great quick fix for Windows 10 Start menu issues is simply logging out and back in.
To log out, click on your Desktop (not on an app) and press the keyboard shortcut ALT+F4. The Windows 10 Shut down menu will appear and you can choose to either Sign out or do a full Restart.
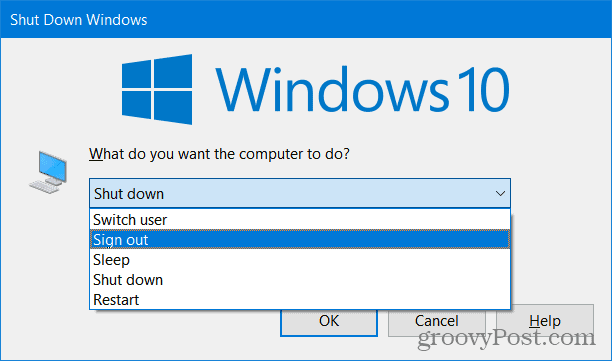
We mention a full Restart because, for many of us, we don’t restart our computers very often. By restarting the system, everything will get closed out, memory and cache flushed, etc. It’s good to do this from time to time to keep your system running at peak performance.
Once you log back into your, test the Start menu to see if the lag is gone.
2. Restart Windows Explorer
Another issue that happens when you use a Windows 10 computer for a long time is that Windows Explorer can get glitchy. This is also the software that serves the Start menu, so restarting it can resolve a lot of Start menu issues.
To restart Windows Explorer, press Ctrl + Shift + Esc to open the Task Manager. Select the Name field to sort apps and processes by name. Then scroll down to Windows Explorer under the Windows Processes section. Right-click Windows Explorer and select End task.
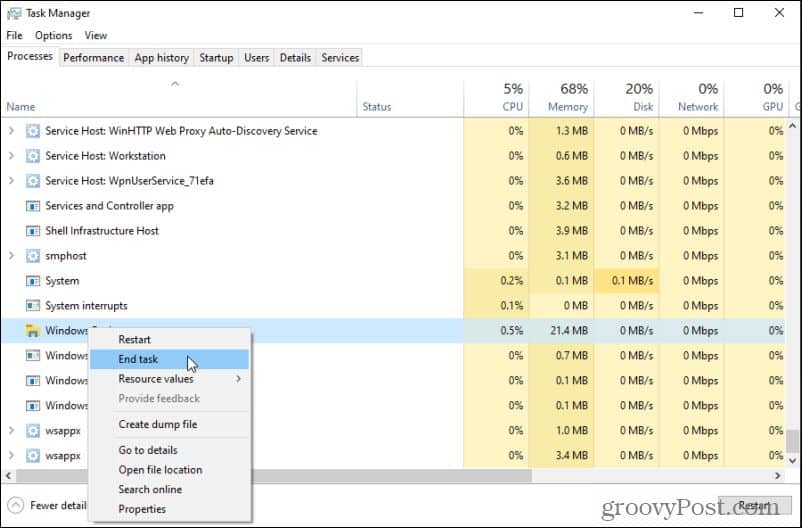
You will see your desktop blink a few times, and the taskbar may actually disappear. Give the computer a few moments to automatically restart the Windows Explorer process. After this, select the Windows 10 Start menu and see if the issues you were having are now resolved.
3. Check for Windows Updates
If the problem is still happening, it’s very possible your version of Windows 10 is out of date and buggy. A good quick-fix for this is just to make sure you have all of the latest critical Windows updates.
Select the Start menu and select the Settings icon. If your Start menu isn’t working, use Windows Key + I to open Settings. Select Update & Security.
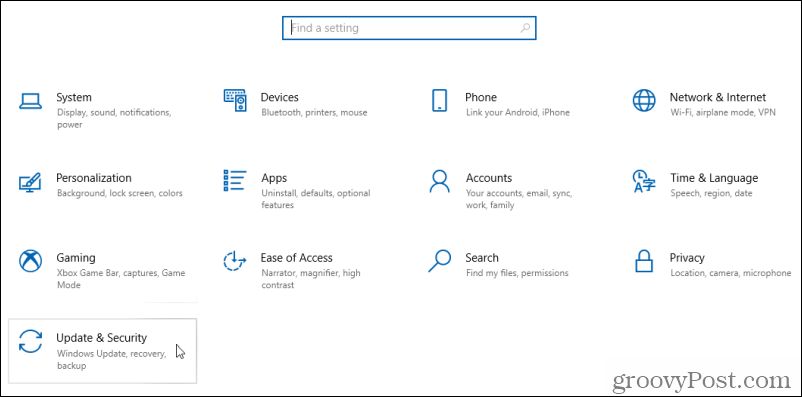
In the Windows Update window, check for and install all critical Windows updates. Under any optional Windows 10 updates, it wouldn’t hurt to select Download and install for any related to Security or Quality.
Once all of the latest updates are installed, restart your computer and test the Windows Start menu again.
4. Scan for Corrupt System Files
One of the most common causes for a misbehaving Start menu is corrupted or damaged system files. You can do your Windows 10 system a lot of good by running a system file scan and repairing all of those system files.
To do this, press Windows Key + R, type “cmd” and press Ctrl + Shift + Enter to open the command prompt as administrator.
There are two commands you should use in sequence to fully scan and repair your system: DISM and SFC.
In the command prompt window, type the following command and press Enter.
DISM.exe /Online /Cleanup-image /Restorehealth
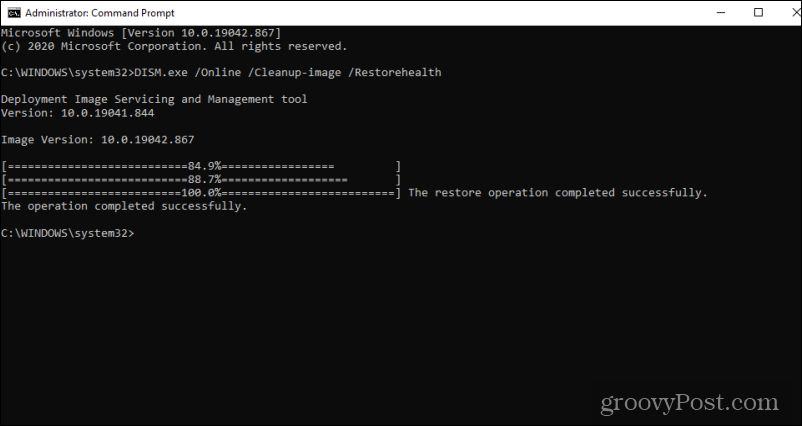
This can take up to 30 minutes, so be patient. When this is finished and you see the message that it’s completed successfully, type the following command and press Enter.
sfc /scannow
When this is finished you’ll see the message “Verification 100% complete”. Type exit to close the Command Prompt.
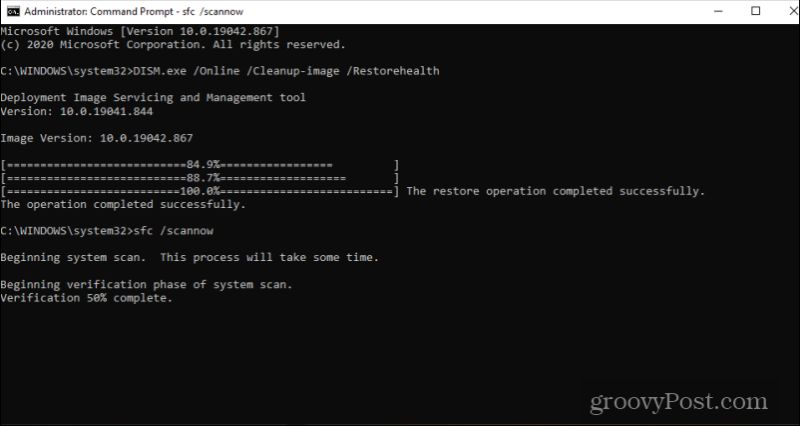
Restart your computer and test the Start menu again to see if the problems are now gone.
5. Clear Cortana Temporary Files
Many people don’t realize that Cortana is well integrated into the Windows Start menu. Issues with Cortana can actually affect the performance of the Start menu itself.
The most common Cortana issue is temporary Cortana files getting corrupted and causing lag every time you select the Start menu. Clear these temporary files and you could quickly resolve the lag issue.
To clear Cortana temporary files, press Windows Key + R, type “cmd” and press Ctrl + Shift + Enter to open the command prompt as administrator. Type the following commands in order, and press Enter after each.
Note: These commands must be run in this order. They will switch to the Cortana directory, kill the Cortana process, and remove the Cortana directory. Once Cortana restarts, this directory will be recreated and rebuilt fresh.
CD /d "%LOCALAPPDATA%PackagesMicrosoft.Windows.Cortana_cw5n1h2txyewy"
Taskkill /F /IM SearchUI.exe
RD /S /Q Settings
You don’t have to restart the Cortana task manually because Windows will do it automatically. It wouldn’t hurt to restart your computer after running these commands as well.
Test the Start menu again to see if the issues you were experiencing are resolved.
6. Uninstall or Fix Dropbox
There is a known issue with the Windows 10 Dropbox application that causes conflicts and unusual behaviors with the Windows Start menu. If you don’t use the Dropbox app, then uninstall it from your system and you should see the issues disappear.
However, if you want to keep Dropbox, you’ll need to make a tweak to the Windows Registry to fix these conflicts.
To do this, press Windows + R, type regedit and select OK. This will open the registry editor.
Navigate to:
HKEY_LOCAL_MACHINESYSTEMCurrentControlSetServicesWpnUserService
Double-click the Start Dword in the right pane. The default setting here is 2. Update this to 4 and select OK.
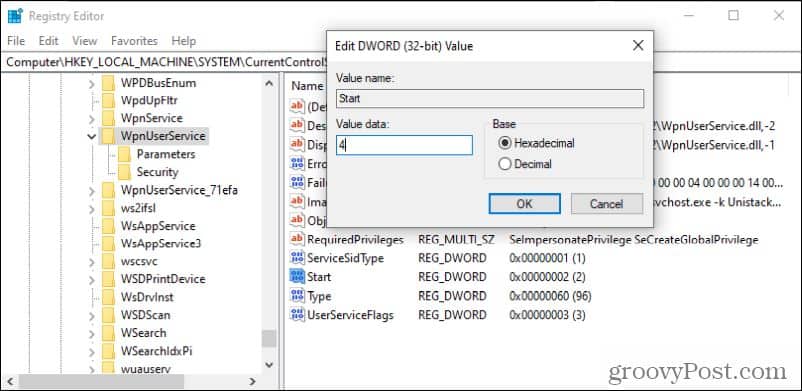
You should restart your computer for the new registry settings to take effect.
For Dropbox users, this is a very common complaint and most users report that this fix nearly always resolves the problems their seeing with their Start menu.
7. Xaml Start Menu Registry Entry
When Microsoft switched to the new Windows 10 Start menu, it included launching the Xaml process that ran it. There are known conflicts that arise when you disable User Access Control (UAC) that cause the new Windows Start menu to not work properly.
Ensure the Xaml Start Menu is enabled to creating and setting the EnableXamlStartMenu in the Windows registry. Press Windows + R, type regedit and select OK to open the registry editor.
Navigate to:
HKEY_CURRENT_USERSoftwareMicrosoftWindowsCurrentVersionExplorerAdvanced
Right-click on the empty space in the right pane, choose New > DWORD (32-bit).
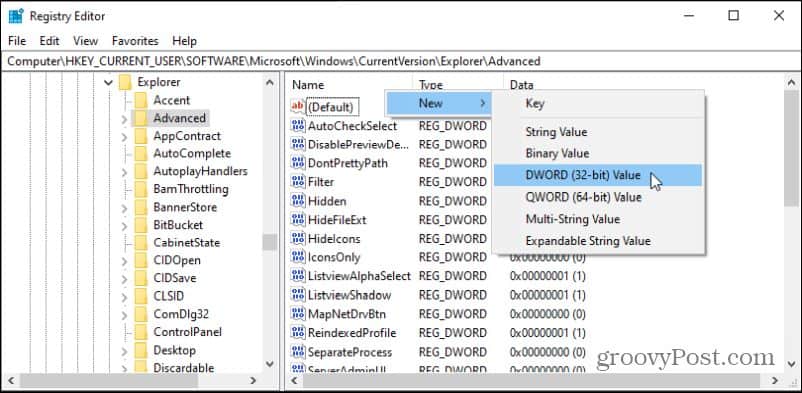
Name this new entry EnableXamlStartMenu and leave the value set to 0.
Now, reset the computer and test the Start menu again.
Windows 10 Start Menu Problems
Problems using the Windows 10 Start menu can be especially annoying because everything you want to use – apps, settings, and more – are all found there. Hopefully one of the solutions above resolved your issue and this annoying problem won’t plague you anymore.
![]()