The requested system device cannot be found issue often happens when Windows cannot boot successfully and user try to rebuild MBR in Command Prompt with a Windows installation media bootable USB drive. This article analyzes the possible reasons for the error «rebuildbcd the requested system device cannot be found» and illustrates 3 solutions to resolve this issue.
When your windows system cannot boot successfully, it is likely due to the damage or corruption of the BCD file on your Windows system. For example, when you boot your computer, but the computer screen might show «Recovery your PC needs to be repaired». This means Windows can not be able to boot the system due to the missing or corruption of system files used for booting.
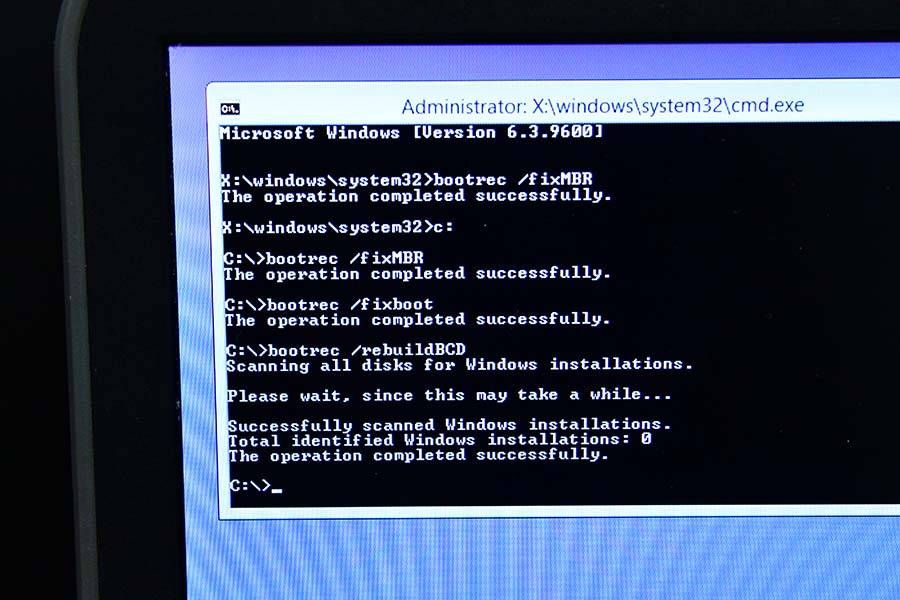
At this time, you would turn to Windows Recovery Media, Windows Repair Disc or other types of USB installation media to fix it when Windows is unbootable. To fix the BCD file, most people will choose to fix the MBR by using the following commands in Command Prompt:
bootrec /Rebuildbcd
bootrec /Fixmbr
bootrec /Fixboot
However, when people try to use the above command to fix MBR, it may result in «rebuildbcd the requested system device cannot be found» error.
Successfully scanned Windows installations: 1
[1] C:Windows
Add installation to boot list? Yes(Y)/No(N)/All(A):Y
The requested system device cannot be found.
Some users also come across the «bcdedit import the requested system device cannot be found» issue. When they perform bcdedit /enum, they receive the following message:
The boot configuration data store cannot be opened.
The requested system device cannot be found.
Why would «the requested system device cannot be found» occur? What should we do when this issue occurs? Don’t be panic. In the following contents, I will show you 4 solutions to help you get out of the trouble.
Why Would «the requested system device cannot be found» Error Occur?
1. You plug the USB into a wrong USB slot, which is not support for WinRE environment.
If you are booting from a USB drive, and your BIOS supports a given USB slot, but the Windows Repair Environment does not, the requested system device cannot be found Windows 10 issue would occur.
For example, some users boot with the advanced USB 3.0 interface. However, the USB 3.0 interface cannot be detected by Windows Repair Environment. In this case, you may try a different USB slot and check if this issue still exists.
2. The requested system device cannot be found issue occurred after converting system disk to GPT.
When you convert MBR disk to GPT but your boot option is BIOS/MBR not UEFI, the requested system device cannot be found Windows 10 issue could occur, and Windows also reported the installed version was not a compatible windows version. After converting the system disk to GPT, you need to select UEFI boot instead of BIOS and start PC again.
3. Windows didn’t find the correct partition.
If you boot from a UEFI Windows 10 recovery disk (CD/DVD/USB), the automated recovery process may not find the correct system partition. If you use a Window 10 installation media USB drive to boot, it may not find the correct system partition on the hard drive, leading to the bootrec /rebuildbcd device cannot be found Windows 10 issue.
4. EFI partition is missing or corrupted.
On GPT disk, system is looking for the EFI partition. If the partition is missing or corrupted, you’ll encounter the requested system device cannot be found Windows 10 error as well. If you are using an MBR system disk, you need to make sure the partition that stored BCD registry file is set active.
5. Windows installation and USB drive boot mode do not match.
For example, if your Windows was installed by using legacy BIOS, you should create a proper legacy BIOS bootable USB drive. If not, the bootrec /rebuildbcd device cannot be found Windows 10 issue could occur.
Note: If you have important files and data stored on the unbootable computer, you may recover important files from the computer by using a professional data recovery software.
Solution 1. Repair Windows 10 with Windows Repair DVD/CD
If Windows PE cannot recognize USB drive or USB 3.0 cannot be detected by Windows, you can try to create a Windows installation media by using a DVD/CD.
Step 1. Create a Windows 10 installation media DVD/CD disc by using Microsoft’s Media Creation tool.
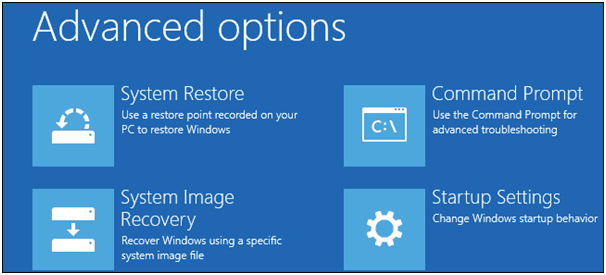
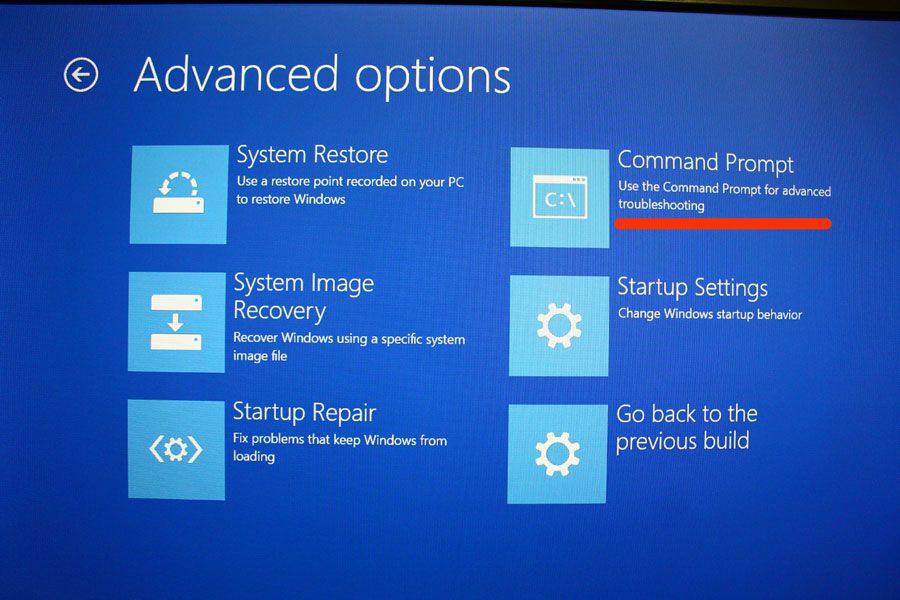
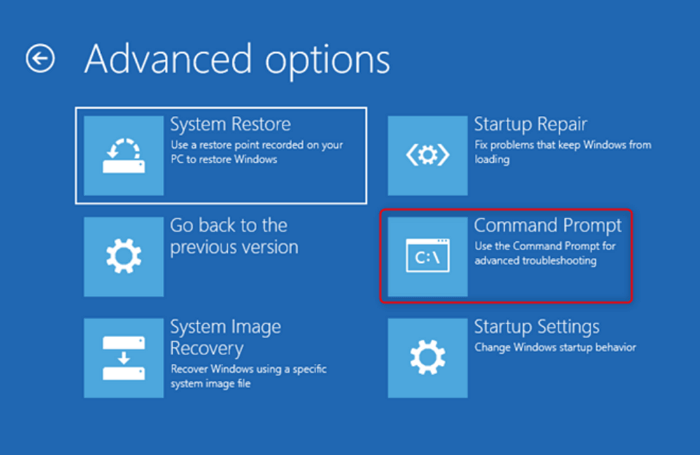
Step 2. Boot from the Windows DVD/CD disc, and in Advanced options page, choose Command Prompt.
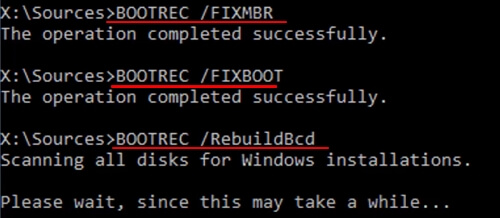
Step 3. Type these commands and press Enter after each command.
bootrec /fixmbr
bootrec /fixboot
bootrec /rebuildbcd
Step 4. Restart your PC to see if that works.
Solution 2. Set the Correct Partition in Command Prompt
If the error «the requested system device cannot be found» occurs when you try to perform Bootrec operations using a USB installation media, it may not find the correct system partition, which causes bootrec /rebuildbcd device cannot be found Windows 10 issue. You may try this method to set the correct partition.
Step 1. Boot from a UEFI Windows 10 installation (CD/DVD/USB) disk, and in Advanced optionspage, choose Command Prompt.
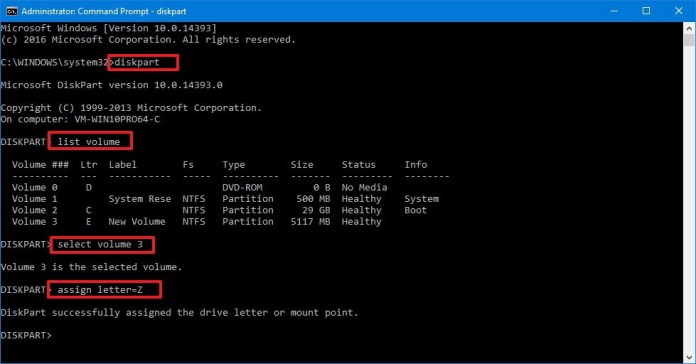
Step 2. Input diskpart and press Enter to list all partitions and for you to identify EFI partition. Please note that EFI partition is formatted as FAT32 type (if the EFI partition is missing, click here to follow the instruction to create one).
Step 3. Input select volume 3 and press Enter (here volume 3 is the volume number of the EFI partition).
Step 4. Input assign letter=m to assign a letter to the EFI partition and press Enter. You may replace m with a letter of your choice.
Step 5. Input exit and press Enter to exit diskpart
Step 6. Then type the following commands in Command Prompt and press Enter after every command.
cd /d m:EFIMicrosoftBoot
bootrec /fixboot
Step 7. Input ren BCD BCD.bak and press Enter to change the name of BDC file from BCD to BCD.bak file.
Step 8. Input bcdboot c:Windows /l en-us /s m: /f ALL and press Enter to recreate BCD. If the letter you’ve assigned for the EFI partition earlier is not m, then change it in this command accordingly.
Step 9. Input exit to close Command Prompt and restart your computer.
This solution has helped many people resolve the error the requested system device cannot be found Windows 10 and rebuild BCD, especially for people who use a USB installation media to rebuild MBR.
Solution 3: Reinstall system
If all of the above methods do not work for your computer, then you have no choice but to reinstall Windows 10 as the last resolution. Although reinstalling Windows can be troublesome, it does help.
However, if you reinstall your operating system, the files on your system drive can be deleted and all your applications need to be reinstalled. So we recommend backing up your files before you reinstall your system.
MiniTool Partition Wizard is professional partition magic that helps manage partition and disk issues in just a few clicks. If you want to save all files and data on the disk, you may choose its Copy Disk feature in MiniTool Partition Wizard Bootable Edition.
Note: If you just want to copy specific partitions on your disks, you might as well choose the Copy Partition feature. The steps are the same as Copy Disk.
Step 1. Prepare a USB flash drive (or CD/DVD disc) and connect it to a normal computer.
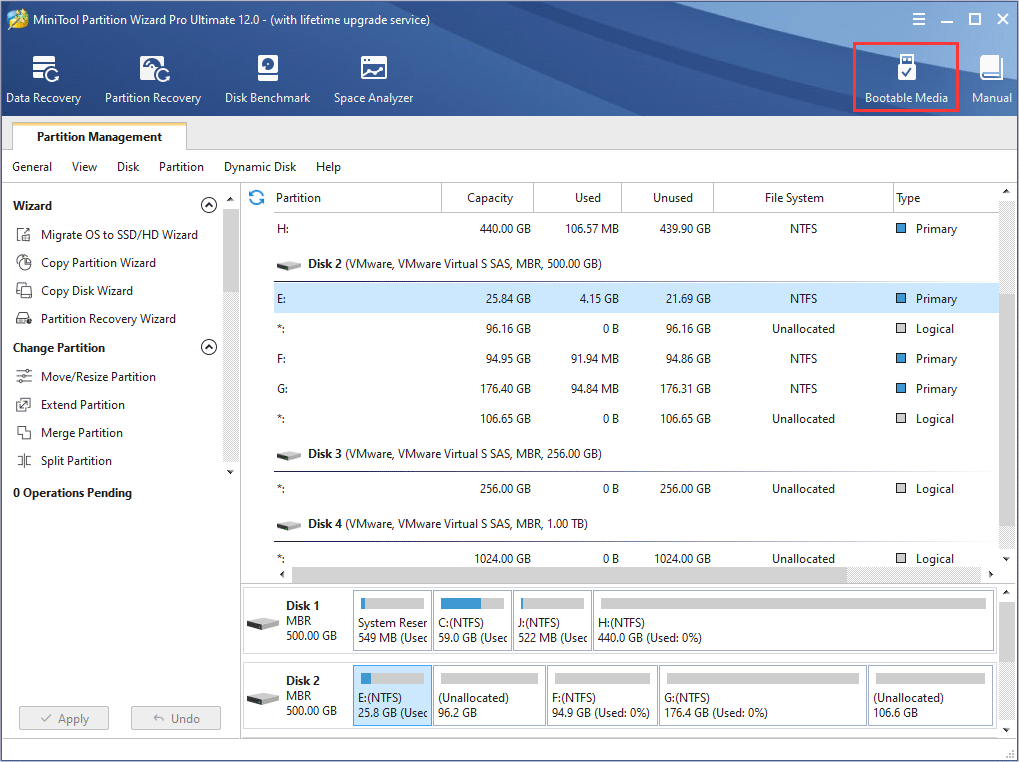
Step 2. Get MiniTool Partition Wizard Pro Edition by clicking the following button and launch Bootable Media Builder (you may see this feature by clicking the More Tools icon) from MiniTool software to the main interface.
Buy Now
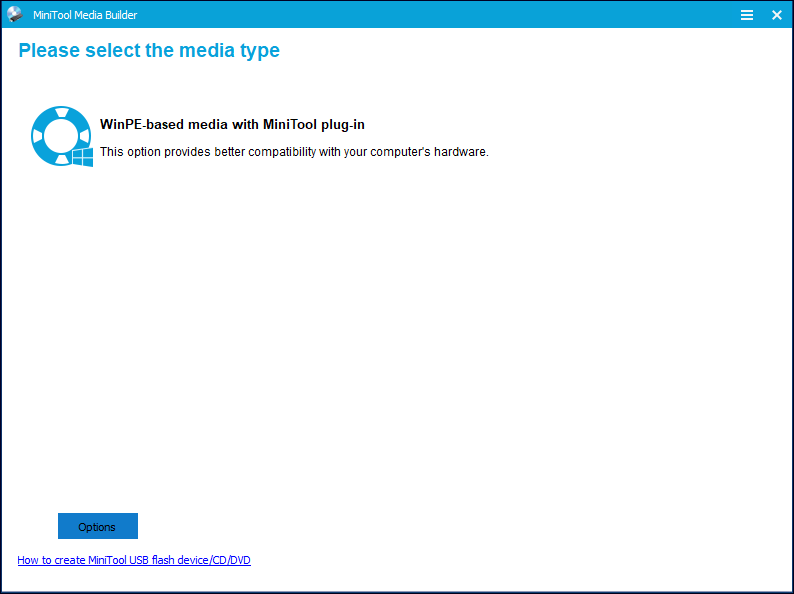
Step 3. Select WinPE-based media with MiniTool plug-in to continue.
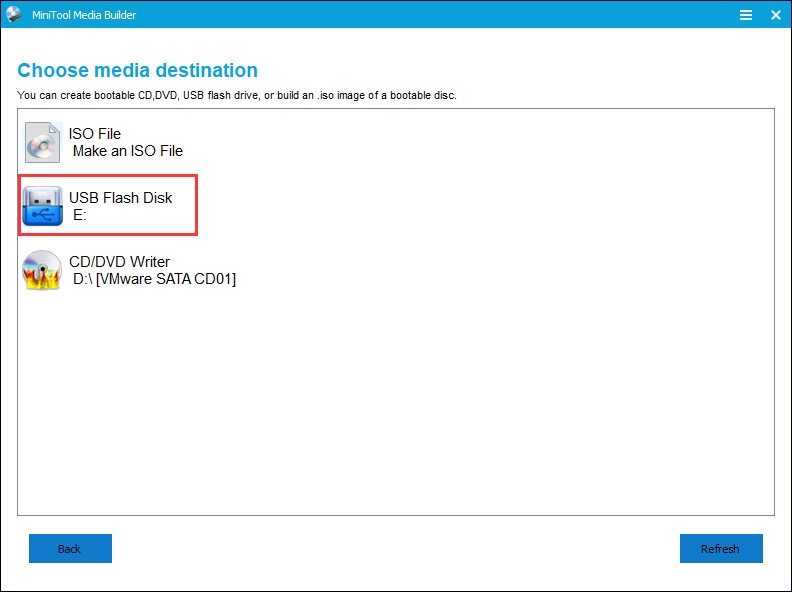
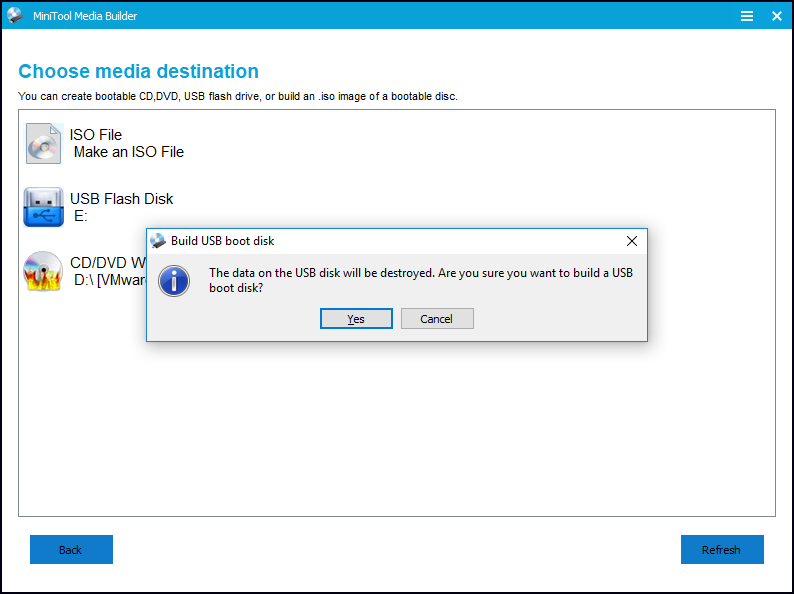
Step 4. Select USB Flash Drive option and choose the correct USB flash drive. Then click Yes to confirm that you want to burn the boot flash drive.
Step 5. When you select the USB Flash Disk, please make sure the USB does not contain any important files and data as MiniTool Partition Wizard will format the drive firstly. Then click Yes to go on.
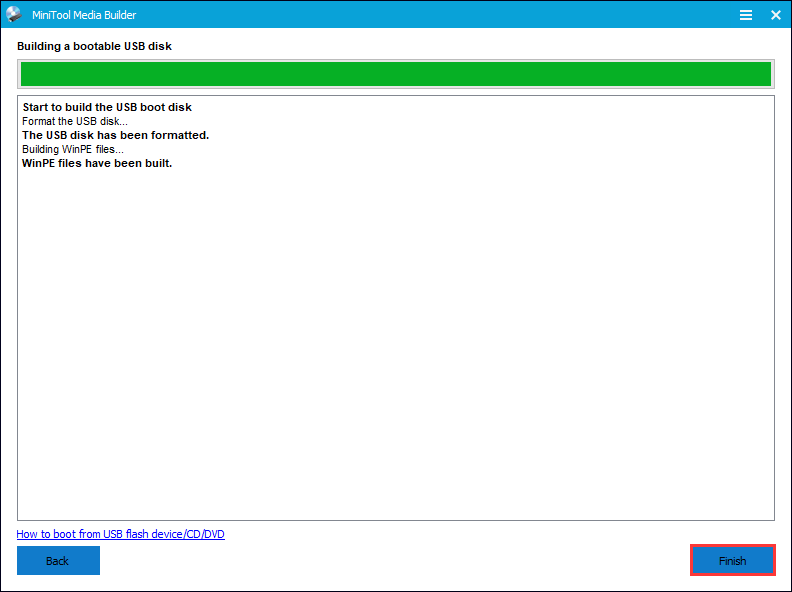
Step 6. Click Finish after successful burning.
Step 7. Connect the MiniTool bootable media on the problematic computer. Then enter the BIOS to change the boot order, giving the USB device boot sequence priority over the hard drive. If you are using a DVD/CD disc, change the boot sequence priority accordingly.
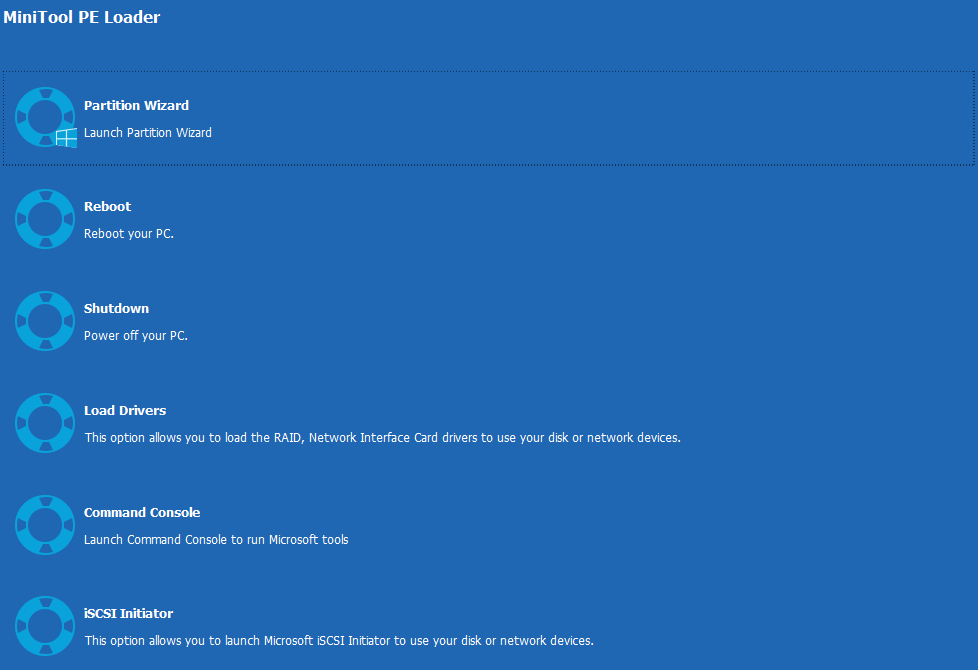
Step 8. When you boot from the USB drive, you will get the interface of MiniTool PE loader, then click MiniTool Partition Wizard to get the main interface of MiniTool Partition Wizard Bootable Edition.
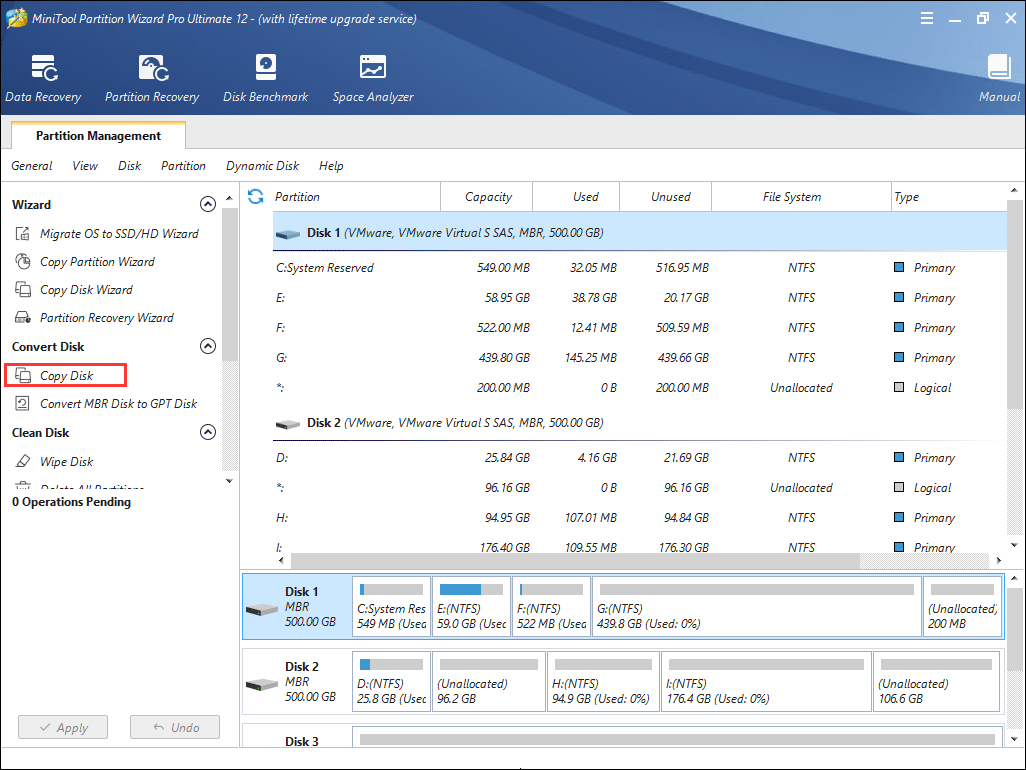
Step 9. When you get the main interface of Partition Wizard, select the disk that you want to copy and click on Copy Disk.
Step 10. Follow the instructions of Partition Wizard and at last, don’t forget to click Apply on the upper left corner.
After you successful backup necessary partitions or disks, now follow the steps on how to install Windows 10. You may refer to this post if you don’t know how to install Windows 10: How to Install Windows 10 on a New Hard Drive (with Pictures)
Step 1. Insert the Windows10 installation media USB drive or DVD/CD disc to your computer and boot from it.
Step 2. Select your language preferences, and click on Next button to continue.
Step 3. Click on Install now.
Step 4. Follow the on-screen instructions to complete the setup configurations and the reinstallation of your system.
Mostly, the installation is automatic, but keep an eye on it and answer any questions you’re asked. Once the installation is done, Windows 10 will boot successfully, and you just need to sign in with your Microsoft account, and get everything ready.
«By following the methods in this post, I successfully fixed ‘the requested system device cannot be found’ issue and now my Windows 10 can boot normally. Hope this post helps more friends who are suffering from the same issue.»Click to Tweet
Bottom Line
In this post, I have introduced you 3 ways to resolve «the requested system device cannot be found» issue. Now, you may try the above 3 methods to fix it and reboot your computer. If you choose to reinstall Windows 10, remember to backup important files and data on your computer by using MiniTool Partition Wizard Bootable Edition. Hope this post can help you.
If you have any other good solutions about «the requested system device cannot be found» issue or if you’ve come across other hard drive issues, you can leave a message on the following comment zone and we will response as soon as possible. If you need any help when using MiniTool software, you can contact us via [email protected].
Fix: bootrec /rebuildbcd fails the requested system device cannot be found Windows 10, 8, 7
Hello every readers! Thank you for visiting our blog! Just before we uploaded this bootrec /rebuildbcd post, we had a laptop that is displaying a blue screen error of :BCD ERROR 0XC0000098. It has Windows 10. As we tried to resolve the problem, we tried to use these bootrec commands in Windows Command Prompt. The bootrec /fixMBR, and bootrect /fixboot commands were successful, but for some reason, when we tried the bootrec /rebuildbcd command, it was unsuccessful. It keep failed with an error message of the requested system device cannot be found. This is probably what you are having right now. Thankfully, we did Google search and found out the solution on other website. Here is the solution for it. Let’s fix the computer!
How to fix bootrec /rebuildbcd fails the requested system device cannot be found Windows 10, 8, 7
First of all, you need to be in Advanced option to open Windows Command Prompt. If you need Windows 10 & 8 installation disk, here is how to create Windows installation disk on a DVD or USB: https://www.pntbrother.com/how-to-download-windows-10-8-iso-from-microsoft-for-free/ After creating an installation disk, boot from the installation disk, and by clicking repair you computer button during the installation process, you will be able to access the advanced option. After opening CMD, type the following command
diskpart
Enter diskpart to use the disk utility to see the existing hard drive partitions and to find out the current EFI partition. It is important that your EFI partition is formatted as FAT32 type. Type list vol to list all the partitions and volumes like the example below:
DISKPART> list vol
Volume ###  Ltr  Label        Fs     Type        Size     Status     Info
----------  ---  -----------  -----  ----------  -------  ---------  --------
Volume 0     E                       DVD-ROM         0 B  No Media
Volume 1     C                NTFS   Partition    195 GB  Healthy    Boot
Volume 2         WINRE        NTFS   Partition    400 MB  Healthy    Hidden
Volume 3                      FAT32  Partition    260 MB  Healthy    System
It is time to assign a drive letter for EFI partition. In this case, it is the Volume 3 which is formatted in FAT32 type. Type the following command to assign a letter to it. In this example, we are assigning a letter B. you can assign any letters. It is totally up to you. 😀
DISKPART> sel vol 3
Volume 3 is the selected volume.
DISKPART> assign letter=b:
DiskPart successfully assigned the drive letter or mount point.
Type exit to quit disk utility and type the following commands.
cd /d b:EFIMicrosoftBoot
bootrec /fixboot
Now, you can delete BDC file or change the name of it like below. The command below is showing how to change it from BCD to BCD.bak file.
ren BCD BCD.bak
Time to recreate BCD. Type the following command:
bcdboot c:Windows /l en-us /s b: /f ALL
After it, try to restart the computer, and see if it works. We hope your computer is back to life! Thank you for the great solution (original link: http://www.screwloose.com.au/windows-10-bootrec-the-requested-system-device-cannot-be-found) Thank you everyone! Have a great day!! 😀 😀 😀
Содержание
- 1 Исправлено: bootrec / rebuildbcd не удается, запрошенное системное устройство не может быть найдено Windows 10, 8, 7
- 2 Как исправить bootrec / rebuildbcd не удалось запрошенное системное устройство не может быть найдено Windows 10, 8, 7
Исправлено: bootrec / rebuildbcd не удается, запрошенное системное устройство не может быть найдено Windows 10, 8, 7
Привет всем читателям! Благодарим Вас за посещение нашего блога! Непосредственно перед загрузкой этого сообщения bootrec / rebuildbcd у нас был ноутбук, на котором синий экран отображал ошибку: BCD ERROR 0XC0000098. У него Windows 10. Когда мы пытались решить проблему, мы пытались использовать эти команды bootrec в командной строке Windows. Команды bootrec / fixMBR и bootrect / fixboot были успешными, но по какой-то причине, когда мы попробовали команду bootrec / rebuildbcd, она оказалась неудачной. Не удалось сохранить сообщение с сообщением об ошибке запрошенного системного устройства. Это, вероятно, то, что вы сейчас имеете. К счастью, мы провели поиск в Google и нашли решение на другом сайте. Вот решение для этого. Давайте починить компьютер!
Как исправить bootrec / rebuildbcd не удалось запрошенное системное устройство не может быть найдено Windows 10, 8, 7
Прежде всего, вы должны быть в расширенной опции, чтобы открыть командную строку Windows. Если вам нужна Windows 10 8 Установочный диск, вот как создать установочный диск Windows на DVD или USB: https://www.pntbrother.com/how-to-download-windows-10-8-iso-from-microsoft-for-free/ После создания установочного диска загрузитесь с установочного диска и, нажав кнопку восстановить компьютер во время процесса установки, вы сможете получить доступ к расширенному параметру. После открытия CMD введите следующую команду
DiskPart
Введите diskpart, чтобы использовать утилиту диска, чтобы просмотреть существующие разделы жесткого диска и узнать текущий раздел EFI. Важно, чтобы ваш раздел EFI был отформатирован как тип FAT32. Введите list vol, чтобы получить список всех разделов и томов, как в примере ниже:
DISKPART> список том
Том ### Ltr Метка Fs Тип Размер Информация о статусе
---------- --- ----------- ----- ---------- ------- ---- ----- --------
Том 0 E DVD-ROM 0 B Нет носителя
Том 1 C NTFS Раздел 195 ГБ Здоровая загрузка
Том 2 WINRE NTFS, раздел 400 Мб, Hidden Hidden
Том 3 Раздел FAT32 260 МБ Здоровая система
Настало время назначить букву диска для раздела EFI. В данном случае это том 3, отформатированный в формате FAT32. Введите следующую команду, чтобы назначить ей букву. В этом примере мы присваиваем букву B. Вы можете назначить любые буквы. Это полностью зависит от вас. ��
DISKPART> sel vol 3
Том 3 - это выбранный том.
DISKPART> назначить букву = b:
DiskPart успешно назначил букву диска или точку монтирования.
Введите команду exit для выхода из утилиты диска и введите следующие команды.
cd / d b:  EFI  Microsoft  Boot
bootrec / fixboot
Теперь вы можете удалить файл BDC или изменить его имя, как показано ниже. Команда ниже показывает, как изменить его из файла BCD в файл BCD.bak.
ren BCD BCD.bak
Время воссоздать BCD. Введите следующую команду:
bcdboot c: Windows / l en-us / s b: / f ALL
После этого попробуйте перезагрузить компьютер и посмотреть, работает ли он. Мы надеемся, что ваш компьютер вернулся к жизни! Спасибо за отличное решение (оригинальная ссылка: http://www.screwloose.com.au/windows-10-bootrec-the-requested-system-device-cannot-be-found) Всем спасибо! Хорошего дня!! �� �� ��
When the BCD file system on your system is corrupted, you will not be able to access the operating system. You may try to fix the boot failure by using the following command:
bootrec /rebuildbcd
bootrec /fixmbr
bootrec /fixboot
bcdedit /enum
You may receive some error messages when you execute these commands, such as:
- rebuildbcd the requested system device cannot be found
- bcdedit import the requested system device cannot be found
Why does the «the requested system device cannot be found» error occur? How can we fix this error? Don’t worry. This troubleshooting guide will help you cover all aspects of the error and provide you with an effective solution to resolve it.
Why Does the Requested System Device Cannot Be Found Occur
When using USB installation media to fix Windows unbootable problems, many reasons cause the requested system device cannot be found error. Here are some of the main reasons:
1. USB drive interface error
Even if the BIOS supports the given USB slot, you need to check the USB interface. The Windows repair environment cannot detect the USB 3.0 interface. You can try to replace the USB with a 2.0 interface.
2. BIOS partition type not updated
The boot options for MBR and GPT are different. When you convert MBR to GPT, you need to select UEFI to reboot the PC. To fix the error, you can enable/disable UEFI mode to fit the MBR/GPT format.
3. EFI partition is missing or corrupted
On GPT disks, the system requires an EFI partition. If it is lost, you need to recreate EFI partition. While on MBR disks, you need to set the partition where the BCD registry files are stored as the active partition.
4. Windows did not find the correct partition
Windows will access the installation path on the local disk by default. If you boot from the installation media USB drive, there is a chance that the correct system partition will not be found.
5. Windows installation and USB boot mode are incompatibilities
The bootable USB should also fit the older BIOS if Windows is installed using an older BIOS.
After understanding these possible causes of the requested system device cannot be found, you can find a solution based on the specifics of your problem. Let’s take a look at the next section.
How to Fix the Requested System Device Cannot Be Found Error
In response to the problems that emerged in the previous section, this article summarizes the solutions in the following ways:
Fix 1. Repair MBR through EaseUS Partition Master
Fix 2. Repair Windows with Windows Repair DVD/CD
Fix 3. Set the Correct Partition in Command Prompt
Of these methods, fixing one is the quickest and easiest. Next, we will start with the most effective ways one by one.
Fix 1. Repair MBR through EaseUS Partition Master
EaseUS Partition Master is a third-party tool to repair the corrupted MBR. It can rebuild the MBR without losing data.
Because Windows cannot boot successfully, you need to connect the drive to another computer to repair it or use the tool to create a WinPE bootable disk to access the inaccessible operating system.
Step 1. Create a WinPE bootable disk
- Launch EaseUS Partition Master, and click «Bootable Media» on the toolbar. Select «Create bootable media».
- Click «Next» to finish the process.
Step 2. Boot EaseUS Partition Master Bootable USB
- Connect the bootable USB or CD/DVD to your PC.
- Press F2 or Del when you restart the computer to enter the BIOS screen. Set and boot your computer from «Removable Devices» or «CD-ROM Drive». And then EaseUS Partition Master will run automatically.
Step 3. Rebuild MBR
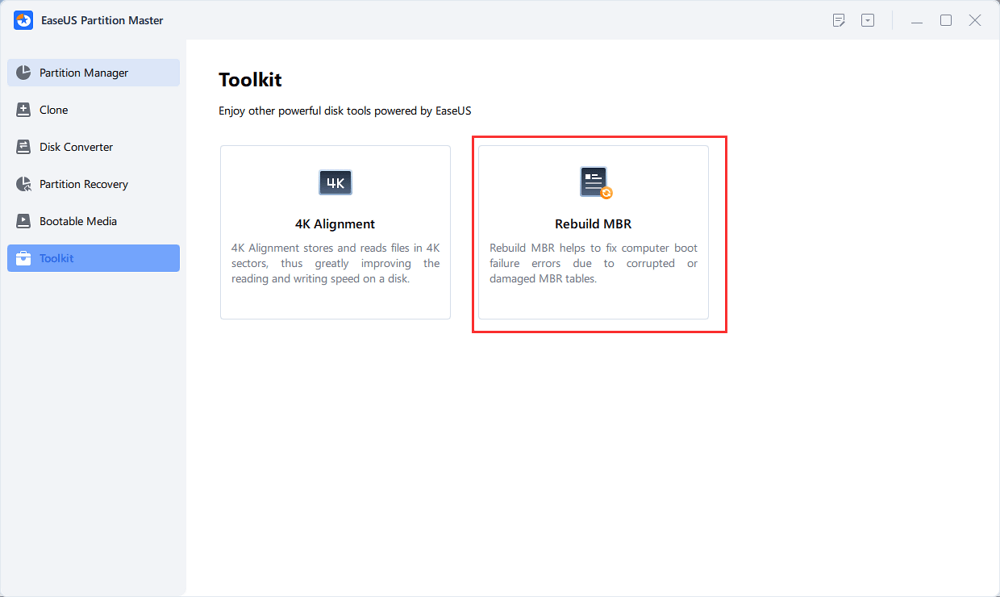
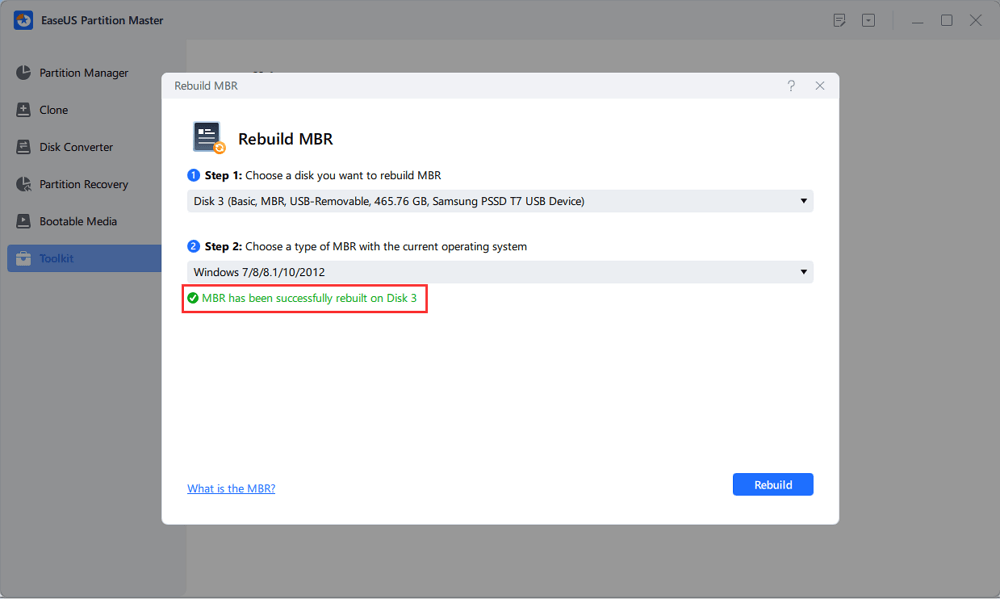
- Click «Toolkit» and choose «Rebuild MBR».
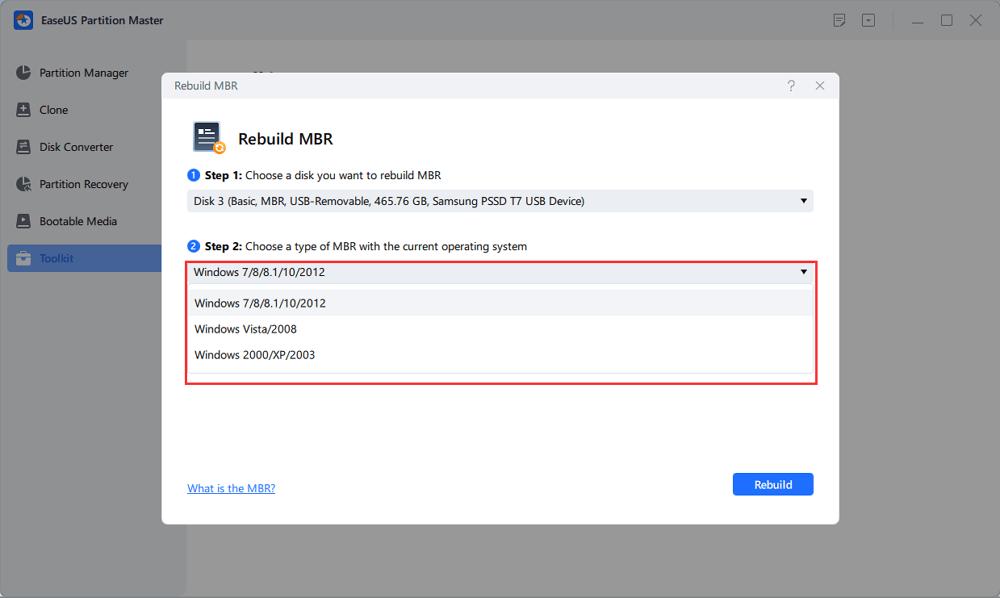
- Select the disk and the type of MBR. Then, click «Rebuild».
- After that, you can see «MBR has been successfully rebuilt on Disk X».
EaseUS Partition Master simplifies the process of MBR repair using the Diskpart command. In addition, it helps you to check bad sectors on your hard disk and repair file system errors.
Fix 2. Repair Windows with Windows Repair DVD/CD
You can try to make a Windows installation media using a DVD/CD if Windows PE or Windows cannot detect USB 3.0 or USB 3.0 drives. Follow the steps below to repair Windows with Windows repair DVD/CD:
Step 1. Choose Command Prompt on the Advanced settings screen starting Windows from the DVD or CD.
Step 2. Input the following command and hit Enter after each command:
bootrec /fixmbr
bootrec /fixboot
bootrec /rebuildbcd
To test whether this works, restart your computer. As an alternative, you can resolve the problem by typing bcdboot.exeC:Windows /s C: directly at the prompt under Windows Recovery Environment.
Fix 3. Set the Correct Partition in Command Prompt
When trying to perform Bootrec operations with a USB installation media, you may fail to find the system partition. You need to select the correct partition in the command prompt. And follow the steps below to fix the requested system device cannot be found issue.
Step 1. Launch Windows 10 using a UEFI installation disk (CD, DVD, or USB), and select Command Prompt from the Advanced settings screen.
Step 2. Type the following command and hit Enter. Please be aware that the EFI partition should be in FAT32 format.
diskpart
list volume
select volume 3
assign letter=Z
exit
Step 3. After leaving the diskpart, type the following command:
cd /dm:EFIMicrosoftBoot
bootrec /fixboot
Step 4. To rename the BDC file from BCD to BCD.bak, type ren BCD BCD.bak and hit Enter.
Step 5. To regenerate BCD, type bcdboot c:Windows /l en-us /s z: /f ALL and press Enter.
Step 6. Exit the command prompt and restart the computer.
Conclusion
When you meet the requested system device cannot be found issue, don’t panic. In this guide, you can know why you meet this issue and find the responding solution to fix it. This guide provides three ways for you. At the same time, the easiest way is to try EaseUS Partition Master to rebuild or repair MBR. It is a powerful tool related to a disk partition. If you have any problem, you can try it.
FAQs About the Requested System Device Cannot Be Found
This part will provide frequently asked questions and answers about the requested system device cannot be found. If you are interested, keep reading.
1. Why is Fixboot access denied?
It frequently has to do with the Master Boot Record, or MBR, a crucial component of every hard drive partition. Your machine won’t be able to boot into Windows if the MBR on your primary hard disk fails.
2. Can I repair MBR?
Of course, you can repair MBR. Corrupted MBR will make you unable to boot Windows. You can use the command prompt or a third-party tool to repair it, such as EaseUS Partition Master. It will help you create bootable media and integrate BIOS to rebuild MBR.
3. What causes corrupted MBR?
Unexpected system shutdowns, virus attacks, or other malware attacks can cause the Master Boot Record to become corrupt, which can completely impair the operation of the operating system by changing its programs.
With GPT disks and UEFI all the rage now, it’s not uncommon to encounter a scenario where boot parameters need to be repaired in order to reach the operating system. Generally speaking, it’s often easy enough to accomplish this by executing the command bcdboot X:windows (where X is the system drive letter) from a recovery environment.
However, other times, even in spite of this command properly completing, the system still will not boot. In many cases the failure is evident when attempting to perform bcdedit /enum and receiving a message such as this one:
The boot configuration data store can not be opened.
The requested system device cannot be found.
Performing bootrec /fixboot also provokes the following error:
Element not found
This is bad news on a GPT disk using UEFI rather than BIOS. Essentially, the system is looking for the EFI partition, which in this case is either missing or corrupt.
If it’s corrupt but still exists, you can simply enter diskpart, select the system partition (usually around 500 MB in size and with an ID of “EFI”) and assign it a letter, exit diskpart, and then perform a chkdsk command on the new partition assignment. This sometimes will correct it. Other times, forcibly removing the EFI and boot folders from the EFI partition and then executing the bcdboot command with a specific system partition parameter (e.g.: bcdboot X:windows /s E:, where X: is the Windows partition and E: is the EFI paritition) works.
But let’s say the partition is missing altogether. This is most often the case following a drive image using imaging tools to a new SSD for example. Sometimes the tools (especially if executed externally on another system rather than live within the target OS) will remove the EFI partition and only image the Windows partition.
If this happens, most people will tell you that you will need to reinstall Windows from scratch. However, all is not yet lost! It’s fixable — but in order to accomplish it, you must recreate the EFI partition manually and then reload the boot parameters from there.
Here’s how it’s done at a command prompt from a recovery environment. I’ve bolded the commands I typed to make it easier to read — hold on tight:
X:windowssystem32>diskpart
Microsoft DiskPart version 10.0.10240
Copyright (C) 1999-2013 Microsoft Corporation.
On computer: MININT-3A416N9
DISKPART> list disk
Disk ### Status Size Free Dyn Gpt
——– ————- ——- ——- — —
Disk 0 Online 489 GB 0 B *
DISKPART> sel disk 0
Disk 0 is now the selected disk.
DISKPART> list part
Partition ### Type Size Offset
————- —————- ——- ——-
Partition 1 Primary 489 GB 1024 KB
DISKPART> sel part 1
Partition 1 is now the selected partition.
DISKPART> shrink desired=1024
DiskPart successfully shrunk the volume by: 1024 MB
DISKPART> create partition efi size=260
DiskPart succeeded in creating the specified partition.
DISKPART> format quick fs=fat32
100 percent completed
DiskPart successfully formatted the volume.
DISKPART> exit
Leaving DiskPart…
X:windowssystem32>bcdboot c:windows
Boot files successfully created.
Following these steps, the machine should now be bootable. If it’s not, it’s probably time to call a professional!
Good luck!
Donate to say «Thanks» if this post has helped save you time and money! 🙂

