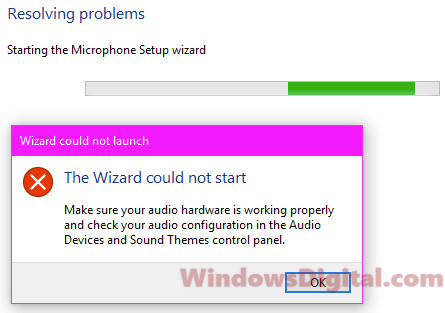
When you try to set up your mic through ease of access or Speech recognition from Windows 11 or Windows 10 control panel, suddenly, it shows Wizard could not start microphone in Windows 10/11 with a description that reads “Make sure your audio hardware is working properly and check your audio configuration in the Audio Devices and Sound Themes control panel”.
This issue can sometimes happen after a major Windows update where there is a high chance that the drivers of hardware in your computer got messed up by the update or new features that were introduced cause a conflict between these devices.
I’ve listed several solutions below, including the one that have fixed mine, to help you troubleshoot your microphone problem, particularly the Wizard could not start microphone in Windows 11/10 error.
Fix: The Wizard could not start microphone Windows 10/11
Check the privacy for Microphone
In most cases when this error shows up, it’s because the Microphone was disabled in the Windows privacy settings. Here’s how to check if you’ve the setting enabled.
In Windows 10, press Win+i key to open Settings app. Select Privacy. From the left pane, select Microphone. On the right pane under Allow apps to access your Microphone, make sure it’s toggled On and set to be enabled. Retry the speech set up again and see if the wizard could not start microphone error would still appear.

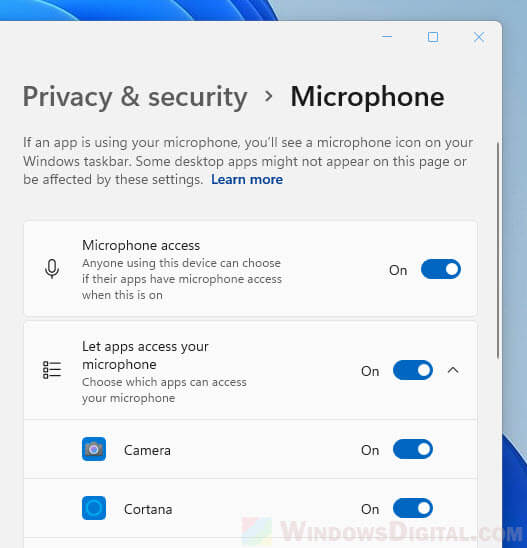
In Windows 11, open Settings app and navigate to Privacy & Security > Microphone. Make sure both the “Microphone access” and “Let apps access your microphone” options are turned On. Tip: From here you can configure which apps can access your microphone using the toggles.
Update or reinstall the microphone’s driver
When there is a new Windows update, devices such as microphone could become incompatible with the latest update and, thus, need a driver update. If you know how to search for or where to download the microphone’s driver, download and install it and see if it fixes the problem.
If you don’t know if your microphone’s driver is updated or even working, try to uninstall it and run Windows Update again to let Windows install the latest driver for you. Here’s how to do it.
- Go to start menu / Windows Search.
- Search for Device Manager and open it.
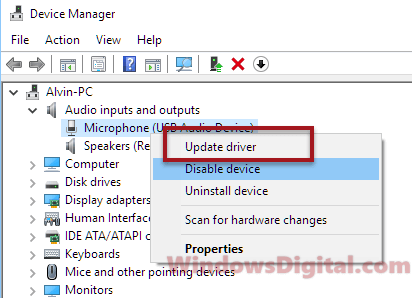
- In Device Manager, expand Audio inputs and outputs.
- Right-click your microphone. We’ll try letting it to update the driver first. Click on update driver.

- If there is an update installed, try setting up your microphone again and see if it works.
- If no update was installed, right-click it again and select uninstall device.
- Restart your PC. Windows should automatically find the best driver from Microsoft’s drivers repository and install it for your microphone.
Update your sound card driver
This is the workaround that actually solved my issue with The Wizard could not start microphone Windows 11/10 problem. Whether you are using a specific sound card or the built-in sound controllers on your motherboard, you will need to make sure they are updated and working as intended. A sound card is a device that allows communication between your microphone and your computer. If it stops working, neither your speaker or your microphone would work.
To update the sound driver, go to Device Manager as shown in the steps above. Expand Sound, video and game controllers. Right-click the sound driver you are currently using, then select Update driver. Then select Search automatically for updated driver software. Windows will then automatically search for and download the latest compatible sound driver that best matches your device for your PC.
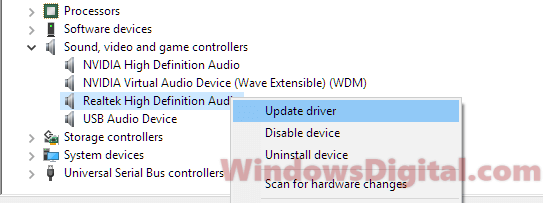
In most cases, we use Realtek High Definition Audio. For some people who use specific sound cards, it will be otherwise such as Nvidia High Definition Audio or USB Audio Device. If you are not sure which driver you are using, just right-click each one of them and update all of them.
If updating or reinstalling the driver doesn’t work, or if you don’t see your microphone or your sound card driver from the list in device manager, try the next solution.
Move the microphone plug from front jack to rear jack or vice versa
Try to reinsert the microphone jack first to make sure it’s not because of a loose connection of the jack. If it doesn’t work, try to move the microphone plug from front to rear jack, or vice versa if your microphone was using rear jack. Then, try to set up the microphone again.
Check if your preferred Microphone is enabled and set as default
Windows update will sometimes cause conflicts between hardware, especially when you have multiple devices of the same type. For example, if you have more than 1 microphone (often happen in laptop since most of them have a built-in microphone), Windows will sometimes be unable to identify which one to use.
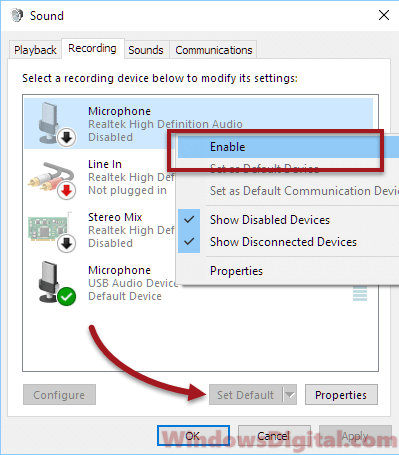
To check if your microphone is selected, enabled and set as default, go to start menu. Search for Sound. Go to Recording tab. Right-click on your preferred microphone and select Enabled. While it’s selected, at the bottom, click Set as default. Then, go ahead to set up your microphone again.
by Matthew Adams
Matthew is a freelancer who has produced a variety of articles on various topics related to technology. His main focus is the Windows OS and all the things… read more
Updated on March 25, 2021
- Windows 10 is highly optimized to support all peripherals and built-in devices, including the microphone.
- If you have issues with your microphone, follow the troubleshooting steps written below.
- More guides like this one can also be found in our dedicated Microphone Issues Hub.
- Even more fix guides are available on our Windows 10 Fix page.

XINSTALL BY CLICKING THE DOWNLOAD FILE
This software will repair common computer errors, protect you from file loss, malware, hardware failure and optimize your PC for maximum performance. Fix PC issues and remove viruses now in 3 easy steps:
- Download Restoro PC Repair Tool that comes with Patented Technologies (patent available here).
- Click Start Scan to find Windows issues that could be causing PC problems.
- Click Repair All to fix issues affecting your computer’s security and performance
- Restoro has been downloaded by 0 readers this month.
Some users have discussed a Wizard could not start a microphone error on Microsoft’s support forum. When some users click Set up microphone in Windows, a The Wizard could not start microphone error message pops up.
Consequently, users can’t utilize the Microphone Setup Wizard when that issue arises.
How can I fix the Wizard could not start microphone error?
1. Reinstall the microphone driver
Alternatively, you could try reinstalling the microphone driver.
- To do so, launch Run with the Windows key + R hotkey.
- Type devmgmt.msc in the Open box and click OK to open Device Manager.

- Double-click Audio inputs and outputs to expand devices for that category.
- Right-click the microphone listed there and select Uninstall device.
- Restart Windows after uninstalling the driver for the microphone.
- After restarting, Windows will initiate an installation service to reinstall a microphone driver.

Alternatively, you could use a dedicated driver updater and fixer like DriverFix, as this method is much faster, much more reliable, and requires less input on your behalf.

SImple download and install it, let it run, and it will scan your hardware for old, broken, or missing drivers all by itself.
It will then install them for you, and all you need to do is finish up by restarting the PC.

DriverFix
Old, broken or missing microphone drivers are the root of most device-related issues. Fix them today with DriverFix!
2. Run the Recording Audio troubleshooter
- Press Start
- Type troubleshoot in the Type here to search box.
- Click Troubleshoot settings in the search utility to open Settings as in the snapshot directly below.

- Select the Recording Audio troubleshooter in Settings, and click the Run the troubleshooter button.
- Then select the Microphone option.

- Click the Next button.
- Click Apply Fix if the troubleshooter provides resolution.


3. Turn on Allow apps to access your microphone
- To do that, open Windows’ search box.
- Type in microphone as the search keyword.
- Click Microphone privacy settings to open the window in the snapshot directly below.
- Toggle the Allow apps to access your microphone option on if it’s off.
- Thereafter, restart Windows.

Turning on the Allow apps to access your microphone setting is among the most widely confirmed fixes for the Wizard could not start microphone error.
4. Check if the microphone is enabled
- To do that, right-click the Speakers icon and select Open sound settings.
- Scroll down to Related Settings.
- Click Sound Control Panel to open the Sound window.
- Select the Recording tab shown directly below.

- Right-click the microphone you need enabled and select Enable.
- Press the Set as default button to change the selected microphone to be the default one.
- Click the Apply option.
- Click OK to exit the Sound window.

A lot of users have confirmed those resolutions to fix the Wizard could not start microphone error. With the error fixed, you can configure your microphone with Microphone Setup Wizard.
- Does my PC have a built-in microphone?
If your computer has an external or internal microphone, it is listed in the Recording tab of your Control Panel.
![]()
Newsletter
Содержание
- Исправить ошибку «Мастер не может запустить микрофон» в Windows 10
- Метод 1. Запустив средство устранения неполадок
- Метод 2: разрешив приложениям получать доступ к настройкам вашего микрофона
- Метод 3: проверив, включен ли микрофон
- Fix: The Wizard could not start microphone in Windows 10
- How can I fix the Wizard could not start microphone error?
- 1. Reinstall the microphone driver
- DriverFix
- 2. Run the Recording Audio troubleshooter
- 3. Turn on Allow apps to access your microphone
- 4. Check if the microphone is enabled
- Frequently Asked Questions
- The Wizard Could Not Start Microphone in Windows 10 (Solved)
- Fix: The Wizard could not start microphone Windows 10
- Check the privacy for Microphone
- Update or reinstall the microphone’s driver
- Update your sound card driver
- Move the microphone plug from front jack to rear jack or vice versa
- Check if your preferred Microphone is enabled and set as default
- The Wizard Could Not Start Microphone on Windows 10: Fix it [MiniTool News]
- Summary :
- How to Fix Set up Microphone Wizard Could Not Start?
- Fix 1: Update the Microphone Driver
- Fix 2: Reinstall the Microphone Driver
- Fix 3: Run the Recording Audio Troubleshooter
- Fix 4: Turn on Allow Apps to Access Your Microphone
- Fix 5: Make Sure Microphone Is Enabled
- ABOUT THE AUTHOR
- Мастеру не удалось запустить микрофон в Windows 10: исправить [Новости MiniTool]
- Резюме :
- Как исправить не удается запустить мастер настройки микрофона?
- Исправление 1. Обновите драйвер микрофона.
- Исправление 2: переустановите драйвер микрофона
- Исправление 3: Запустите средство устранения неполадок при записи звука
- Исправление 4. Включите Разрешить приложениям доступ к вашему микрофону.
- Исправление 5: убедитесь, что микрофон включен
Исправить ошибку «Мастер не может запустить микрофон» в Windows 10
Всякий раз, когда вы пытаетесь получить доступ к настройке микрофона в Windows 10, вы видите это сообщение об ошибке « Мастеру не удалось запустить микрофон ». Это распространенная ошибка, особенно когда вы пытаетесь настроить микрофон Windows, и она мешает вам сделать это.
К счастью, есть несколько решений для этой ошибки «Мастеру не удалось запустить микрофон» в Windows 10. Давайте посмотрим, как решить эту проблему.
Метод 1. Запустив средство устранения неполадок


Затем нажмите кнопку « Запустить средство устранения неполадок» под ним.


Теперь подождите, пока средство устранения неполадок предоставит решение. Нажмите Применить исправление, чтобы решить проблему.
Это должно устранить ошибку, и она больше не должна появляться, но если она все еще появляется, попробуйте второй метод.
Метод 2: разрешив приложениям получать доступ к настройкам вашего микрофона


Шаг 3. В правой части панели прокрутите вниз до раздела Разрешить приложениям доступ к вашему микрофону и переместите ползунок, чтобы включить его.

Теперь перезагрузите компьютер, и ошибка должна исчезнуть. Но если проблема не исчезнет, попробуйте третий способ.
Метод 3: проверив, включен ли микрофон

Шаг 2: в диалоговом окне « Звук» выберите вкладку « Запись », выберите микрофон и щелкните его правой кнопкой мыши. Щелкните Включить в контекстном меню.

Шаг 3: Теперь нажмите кнопку « Установить по умолчанию» ниже, чтобы изменить текущий микрофон на микрофон по умолчанию. Нажмите Применить, а затем ОК, чтобы сохранить изменения и выйти.
Вот и все. Теперь вы можете без проблем получить доступ к настройке микрофона на своем ПК с Windows 10 без каких-либо ошибок.
Источник
Fix: The Wizard could not start microphone in Windows 10

Some users have discussed a Wizard could not start a microphone error on Microsoft’s support forum. When some users click Set up microphone in Windows, a The Wizard could not start microphone error message pops up.
Consequently, users can’t utilize the Microphone Setup Wizard when that issue arises.
How can I fix the Wizard could not start microphone error?
1. Reinstall the microphone driver
Alternatively, you could try reinstalling the microphone driver.
Alternatively, you could use a dedicated driver updater and fixer like DriverFix, as this method is much faster, much more reliable, and requires less input on your behalf.
SImple download and install it, let it run, and it will scan your hardware for old, broken, or missing drivers all by itself.
It will then install them for you, and all you need to do is finish up by restarting the PC.
DriverFix
Old, broken or missing microphone drivers are the root of most device-related issues. Fix them today with DriverFix!
2. Run the Recording Audio troubleshooter
3. Turn on Allow apps to access your microphone
Turning on the Allow apps to access your microphone setting is among the most widely confirmed fixes for the Wizard could not start microphone error.
4. Check if the microphone is enabled
A lot of users have confirmed those resolutions to fix the Wizard could not start microphone error. With the error fixed, you can configure your microphone with Microphone Setup Wizard.
If your computer has an external or internal microphone, it is listed in the Recording tab of your Control Panel.
Restoro has been downloaded by 0 readers this month.
Frequently Asked Questions
Yes, as long as your device has a microphone, then Windows 10 will also have the necessary driver for it. However, a built-in microphone can’t be compared to professional microphones in terms of quality.
If your computer has an external or internal microphone, it is listed in the Recording tab of your Control Panel.
Yes, many VoIP apps that have web clients will only work if you allow your browser to access your microphone.
Источник
The Wizard Could Not Start Microphone in Windows 10 (Solved)
When you try to set up your mic through ease of access or Speech recognition from Windows 10 control panel, suddenly, it shows Wizard could not start microphone in Windows 10 with a description that reads “Make sure your audio hardware is working properly and check your audio configuration in the Audio Devices and Sound Themes control panel”.
The issue can sometimes happen after a major Windows 10 update where there is a high chance that the drivers of hardware in your computer got messed up by the update or new features that were introduced cause a conflict between these devices.
I’ve listed several solutions below, including the one that fixed mine, to help you troubleshoot your microphone problem, particularly the Wizard could not start microphone in Windows 10 error.
Fix: The Wizard could not start microphone Windows 10
Check the privacy for Microphone
In most cases when this error shows up, it’s because the Microphone was disabled in the Windows 10 privacy settings. Here’s how to check if you’ve the setting enabled.
In Windows 10, press Win+i key to open Settings app. Select Privacy. From the left pane, select Microphone. On the right pane under Allow apps to access your Microphone, make sure it’s toggled On and set to be enabled. Retry the speech set up again and see if the wizard could not start microphone Windows 10 error would still appear.
Update or reinstall the microphone’s driver
When there is a new Windows update, devices such as microphone could become incompatible with the latest update and, thus, need a driver update. If you know how to search for or where to download the microphone’s driver, download and install it and see if it fixes the problem.
If you don’t know if your microphone’s driver is updated or even working, try to uninstall it and run Windows Update again to let Windows install the latest driver for you. Here’s how to do it.
Update your sound card driver
This is the workaround that actually solved my issue with The Wizard could not start microphone Windows 10 problem. Whether you are using a specific sound card or the built-in sound controllers on your motherboard, you will need to make sure they are updated and working as intended. A sound card is a device that allows communication between your microphone and your computer. If it stops working, neither your speaker or your microphone would work.
To update the sound driver, go to Device Manager as shown in the steps above. Expand Sound, video and game controllers. Right-click the sound driver you are currently using, then select Update driver. Then select Search automatically for updated driver software. Windows will then automatically search for and download the latest compatible sound driver that best matches your device for your PC.
In most cases, we use Realtek High Definition Audio. For some people who use specific sound cards, it will be otherwise such as Nvidia High Definition Audio or USB Audio Device. If you are not sure which driver you are using, just right-click each one of them and update all of them.
If updating or reinstalling the driver doesn’t work, or if you don’t see your microphone or your sound card driver from the list in device manager, try the next solution.
Move the microphone plug from front jack to rear jack or vice versa
Try to reinsert the microphone jack first to make sure it’s not because of a loose connection of the jack. If it doesn’t work, try to move the microphone plug from front to rear jack, or vice versa if your microphone was using rear jack. Then, try to set up the microphone again.
Check if your preferred Microphone is enabled and set as default
Windows update will sometimes cause conflicts between hardware, especially when you have multiple devices of the same type. For example, if you have more than 1 microphone (often happen in laptop since most of them have a built-in microphone), Windows will sometimes be unable to identify which one to use.
To check if your microphone is selected, enabled and set as default, go to start menu. Search for Sound. Go to Recording tab. Right-click on your preferred microphone and select Enabled. While it’s selected, at the bottom, click Set as default. Then, go ahead to set up your microphone again.
You’ll also like:
Description for sharing: When you set up your microphone, it shows Wizard could not start microphone in Windows 10 with a description that reads «make sure your audio hardware is working properly and check your audio configuration in the Audio Devices and Sound Themes control panel».
Источник
The Wizard Could Not Start Microphone on Windows 10: Fix it [MiniTool News]
By Stella | Follow | Last Updated November 23, 2020
Summary :

The wizard could not start microphone Windows 10 error will stop you from successfully setting up your microphone on your computer. MiniTool Software will show you some solutions that are proved to be effective to fix this issue in this post. You can try them to help you out.

This is a typical microphone setup wizard not working issue. You need to take some measures to fix it. This post will show you some effective solutions.
How to Fix Set up Microphone Wizard Could Not Start?
Fix 1: Update the Microphone Driver
When the wizard could not start microphone Windows 10 issue happens on your computer, the first thing you need to consider is to reinstall the driver for the microphone. Here is a guide:
1. Use Windows Search to search for device manager and select the first result to open Device Manager.
2. Expand Audio inputs and outputs.
3. Right-click on the target Microphone and then select Update driver.

4. Select Search automatically for updated driver software and follow the rest wizards to complete the update process.
After updating the driver for the microphone, you can go to check whether you can set up the device successfully. If not, you can reinstall the driver to have a try.
Fix 2: Reinstall the Microphone Driver
Fix 3: Run the Recording Audio Troubleshooter
1. Click Start.
2. Go to Setting > Update & Security > Troubleshoot.
3. Scroll down to find the Recording Audio option and click it. Next, click Run the troubleshooter to continue.

4. On the pop-up window, select the microphone you want to fix and click Next to follow the wizard to fix the found issues.
Fix 4: Turn on Allow Apps to Access Your Microphone
If you want to use the microphone along with some apps on your computer, you need to turn on the Allow apps to access your microphone feature.

Fix 5: Make Sure Microphone Is Enabled
If you want to use a microphone on your computer, you should enable it of course. So, if set up microphone wizard could not start, you need to check whether the microphone is enabled on your PC.
1. Right-click the speaker icon from the Windows system tray or the taskbar, and select Open Sound settings.

2. Click Sound Control Panel under Related Settings.

3. Right-click on the microphone you want to enable and select Enable.
4. Click the Set Default button to make the selected microphone the default one.
5. Click Apply.
6. Click OK.
We hope these 5 methods can effectively get rid of the wizard could not start microphone Windows 10. Should you have any related problems, you can let us know in the comment.

Position: Columnist
Stella has been working in MiniTool Software as an English Editor for more than 4 years. Her articles mainly cover the fields of data recovery including storage media data recovery and phone data recovery, YouTube videos download, partition management, and video conversions.
Источник
Мастеру не удалось запустить микрофон в Windows 10: исправить [Новости MiniTool]
Wizard Could Not Start Microphone Windows 10
Резюме :

Мастеру не удалось запустить микрофон. Ошибка Windows 10 помешает вам успешно настроить микрофон на вашем компьютере. Программное обеспечение MiniTool покажет вам некоторые решения, которые доказали свою эффективность для устранения этой проблемы в этом посте. Вы можете попробовать их в помощи.

Это типичная проблема с неработающим мастером настройки микрофона. Вам нужно принять некоторые меры, чтобы это исправить. Этот пост покажет вам несколько эффективных решений.
Как исправить не удается запустить мастер настройки микрофона?
Исправление 1. Обновите драйвер микрофона.

4. Выбрать Автоматический поиск обновленного программного обеспечения драйвера и следуйте остальным мастерам, чтобы завершить процесс обновления.
После обновления драйвера для микрофона вы можете проверить, удастся ли вам настроить устройство. Если нет, вы можете переустановить драйвер, чтобы попробовать.
Исправление 2: переустановите драйвер микрофона
Исправление 3: Запустите средство устранения неполадок при записи звука
3. Прокрутите вниз, чтобы найти Запись аудио вариант и щелкните его. Далее нажмите Запустите средство устранения неполадок продолжать.

4. Во всплывающем окне выберите микрофон, который нужно исправить, и нажмите следующий чтобы следовать указаниям мастера, чтобы исправить найденные проблемы.
Исправление 4. Включите Разрешить приложениям доступ к вашему микрофону.
Если вы хотите использовать микрофон вместе с некоторыми приложениями на вашем компьютере, вам необходимо включить Разрешить приложениям доступ к вашему микрофону характерная черта.

Исправление 5: убедитесь, что микрофон включен
Если вы хотите использовать микрофон на своем компьютере, вы, конечно, должны его включить. Итак, если мастер настройки микрофона не может запуститься, вам необходимо проверить, включен ли микрофон на вашем ПК.


Мы надеемся, что эти 5 методов могут эффективно избавиться от мастера, который не смог запустить микрофон Windows 10. Если у вас возникнут какие-либо проблемы, вы можете сообщить нам об этом в комментарии.
Источник
-
MiniTool
-
MiniTool News Center
- The Wizard Could Not Start Microphone on Windows 10: Fix it
By Stella | Follow |
Last Updated November 23, 2020
![]()
The wizard could not start microphone Windows 10 error will stop you from successfully setting up your microphone on your computer. MiniTool Software will show you some solutions that are proved to be effective to fix this issue in this post. You can try them to help you out.
When you set up your microphone on your Windows 10 computer, you may get a Wizard could not launch error saying The Wizard could not start after clicking Set up microphone. The detail prompt is Make sure your audio hardware is working properly and check your audio configuration in the Audio Devices and Sound Themes control panel.
This is a typical microphone setup wizard not working issue. You need to take some measures to fix it. This post will show you some effective solutions.
How to Fix Set up Microphone Wizard Could Not Start?
- Update the Microphone Driver
- Reinstall the Microphone Driver
- Run the Recording Audio Troubleshooter
- Turn on Allow apps to access your microphone
- Make Sure Microphone Is Enabled
Fix 1: Update the Microphone Driver
When the wizard could not start microphone Windows 10 issue happens on your computer, the first thing you need to consider is to reinstall the driver for the microphone. Here is a guide:
1. Use Windows Search to search for device manager and select the first result to open Device Manager.
2. Expand Audio inputs and outputs.
3. Right-click on the target Microphone and then select Update driver.
4. Select Search automatically for updated driver software and follow the rest wizards to complete the update process.
After updating the driver for the microphone, you can go to check whether you can set up the device successfully. If not, you can reinstall the driver to have a try.
Fix 2: Reinstall the Microphone Driver
- Open Device Manager.
- Expand Audio inputs and outputs.
- Right-click on the target Microphone and then select Uninstall device.
- Restart your computer and Windows will automatically reinstall the driver to your computer.
Fix 3: Run the Recording Audio Troubleshooter
1. Click Start.
2. Go to Setting > Update & Security > Troubleshoot.
3. Scroll down to find the Recording Audio option and click it. Next, click Run the troubleshooter to continue.
4. On the pop-up window, select the microphone you want to fix and click Next to follow the wizard to fix the found issues.
Fix 4: Turn on Allow Apps to Access Your Microphone
If you want to use the microphone along with some apps on your computer, you need to turn on the Allow apps to access your microphone feature.
- Use Windows Search to search for microphone privacy settings and select the first result.
- Turn on the button for Allow apps to access your microphone.
- Reboot your computer.
Fix 5: Make Sure Microphone Is Enabled
If you want to use a microphone on your computer, you should enable it of course. So, if set up microphone wizard could not start, you need to check whether the microphone is enabled on your PC.
1. Right-click the speaker icon from the Windows system tray or the taskbar, and select Open Sound settings.
2. Click Sound Control Panel under Related Settings.
3. Right-click on the microphone you want to enable and select Enable.
4. Click the Set Default button to make the selected microphone the default one.
5. Click Apply.
6. Click OK.
We hope these 5 methods can effectively get rid of the wizard could not start microphone Windows 10. Should you have any related problems, you can let us know in the comment.
About The Author
Position: Columnist
Stella has been working in MiniTool Software as an English Editor for more than 4 years. Her articles mainly cover the fields of data recovery including storage media data recovery and phone data recovery, YouTube videos download, partition management, and video conversions.
Не работает микрофон в Windows 10 [решение]

Пару дней назад моя Windows 10 самостоятельно обновилась (сердце чувствовало, что ненужно было, но меня не спросили. ). Теперь у меня не работает микрофон — при разговорах никто меня не слышит. Можно ли что-то сделать? Уже подумываю сносить ее и поставить Windows 7 (но у меня на ноутбуке на HDD были записаны драйвера только для Windows 10 — тоже засада. )
Да, к сожалению, Windows 10 иногда обновляется без разрешения пользователя (но, судя по последним новостям, эту политику хотят «смягчить». ). Что касается микрофона: в подавляющем большинстве случаев он перестает работать из-за настроек конфиденциальности (смешно . Вводят такие «жесткие» настройки приватности, и в тоже время сама Windows 10 «следит» за пользователем. ).
И так, теперь ближе к теме.

Что делать, если не работает микрофон
Проверьте настройки конфиденциальности
Это первое с чего следует начать. Необходимо открыть параметры Windows (не путайте с панелью управления), раздел «Конфиденциальность» (см. скрин ниже).
Примечание : чтобы открыть параметры Windows, нажмите сочетания кнопок Win+i, либо воспользуйтесь меню ПУСК.
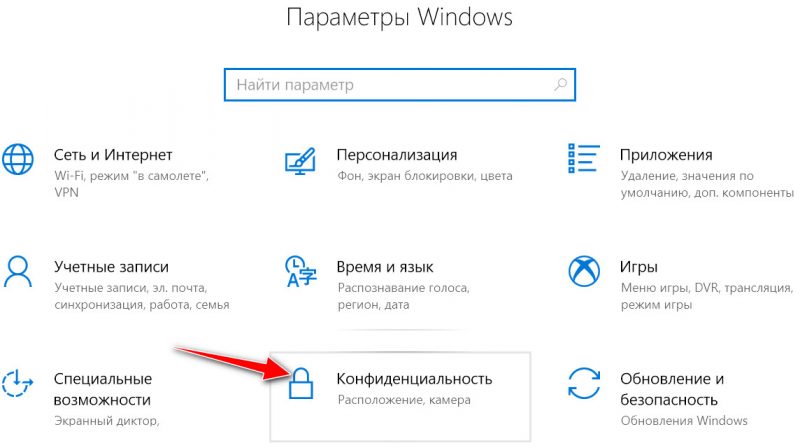
Параметры Windows / Кликабельно
Далее во вкладке «Микрофон» сделайте следующее:
- разрешите доступ к микрофону приложениям (цифра-3 на скрине ниже);
- разрешите доступ к микрофону для «Win32WebViewHost» (цифра-4 на скрине ниже);
- проверьте также чтобы в списке разрешенных приложений было и то приложение, в котором у вас не работает микрофон.
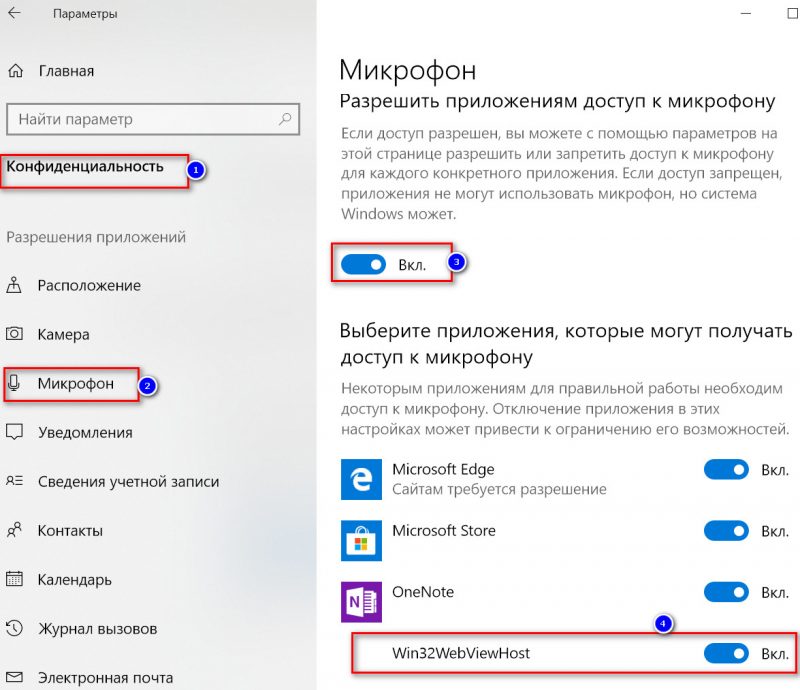
Параметры конфиденциальности в Windows 10 | Кликабельно
После внесения изменений в раздел конфиденциальности, перезапустите ОС Windows, попробуйте заново открыть приложение и проверить микрофон. В большинстве случаев, подобные «манипуляции» возвращают работу микрофона.
Настройка устройств звукозаписи
Пожалуй, это второе, на что нужно обратить внимание. Дело тут в том, что при определенных настройках, звук с микрофона может стать практически не слышимым (т.е. он вроде и есть, но едва различимый).
Для проверки подобных настроек, рекомендую открыть панель управления Windows, раздел «Оборудование и звук/Звук» (см. пример на скрине ниже).
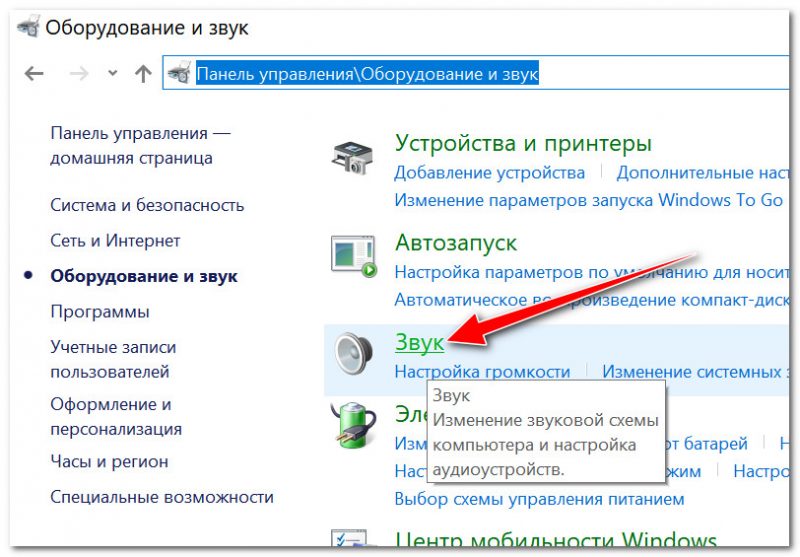
Панель управления — звук
Далее перейдите во вкладку «Запись» и откройте свойства текущего микрофона.
Обратите внимание, кстати, если у вас два и более микрофонов — тот ли микрофон выбран по умолчанию для записи? Просто, возможно у вас не работает микрофон из-за того, что Windows «выбирает» по умолчанию не то устройство.
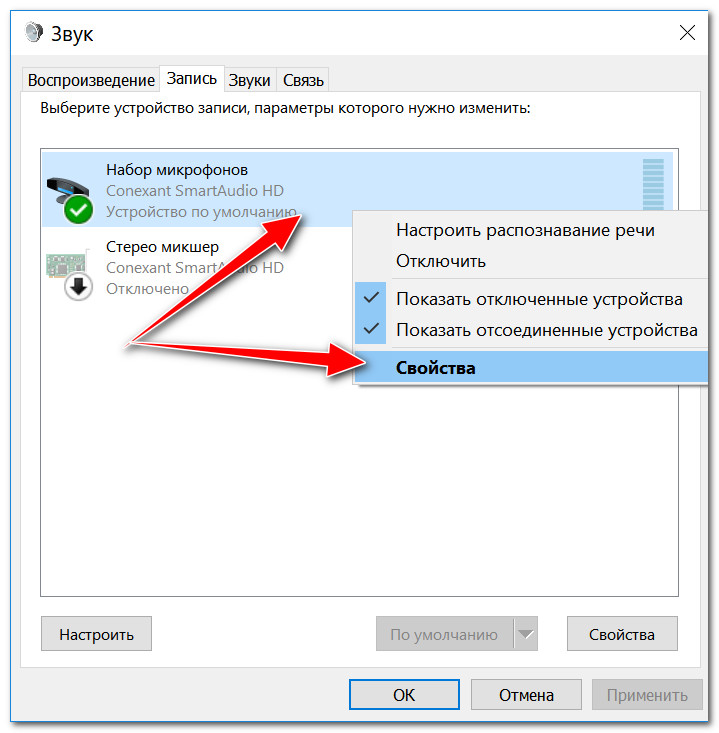
Свойства текущего микрофона
Во вкладке «Общие» проверьте, чтобы напротив устройство горел статус «Использовать это устройство (Включено)».
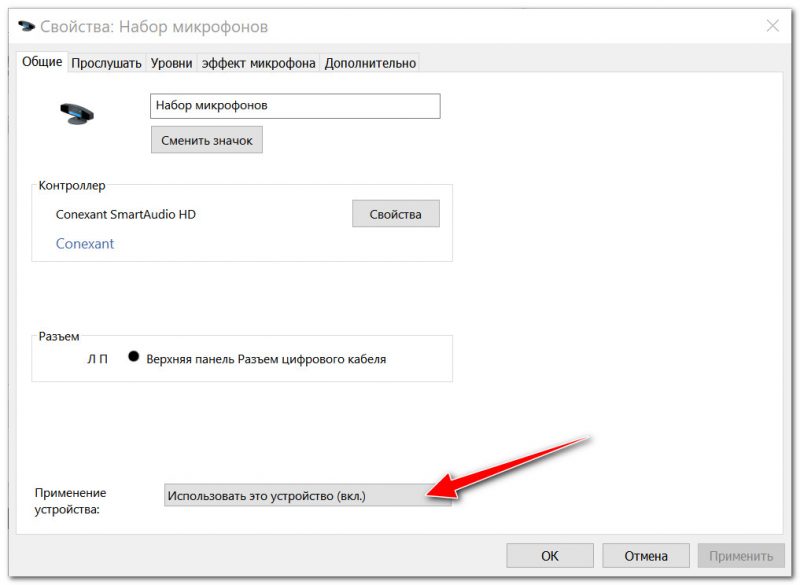
Включено ли устройство
Во вкладке «Прослушать» проверьте, чтобы стояла галочка напротив пункта «Продолжать работу при переходе на питание от аккумулятора» (иначе, в некоторых случаях, для экономии заряда батареи микрофон может выключаться) .
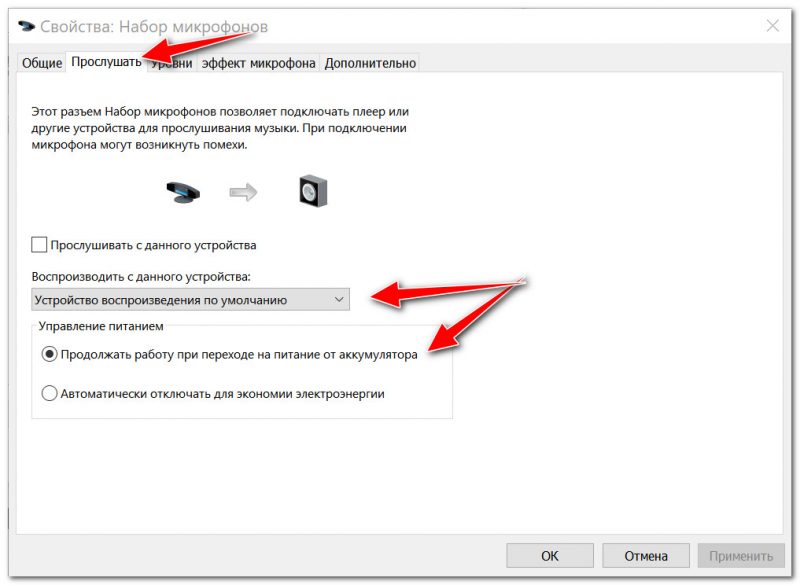
Продолжать работу при переходе на питание от аккумулятора
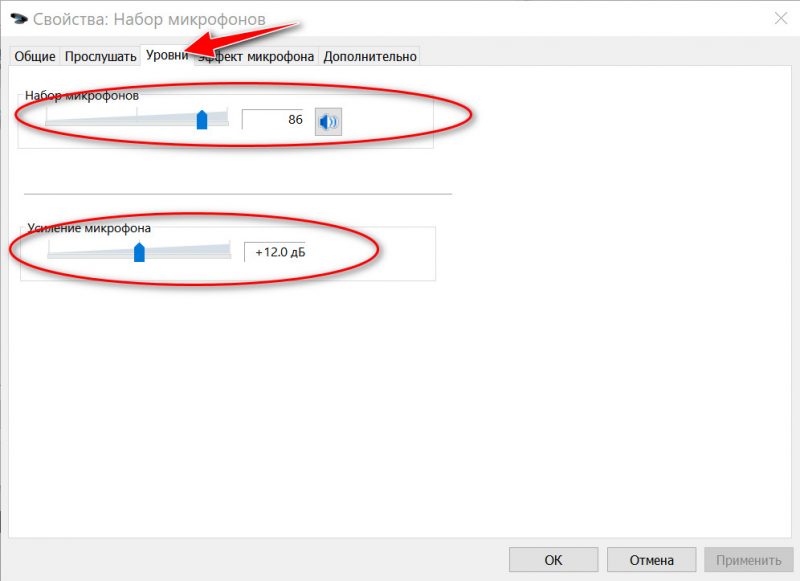
Во вкладке «Уровни» проверьте:
- набор микрофонов: установите ползунок в район 80-90;
- усиление микрофона: попробуйте передвинуть ползунок в сторону усиления (например, в моем случае микрофон хорошо себя ведет при +12 дБ).
Во вкладке «Эффект микрофона» я порекомендую для начала вообще отключить все эффекты (при определенных условиях, тоже подавление шума может подавлять и ваш голос в том числе. ) .
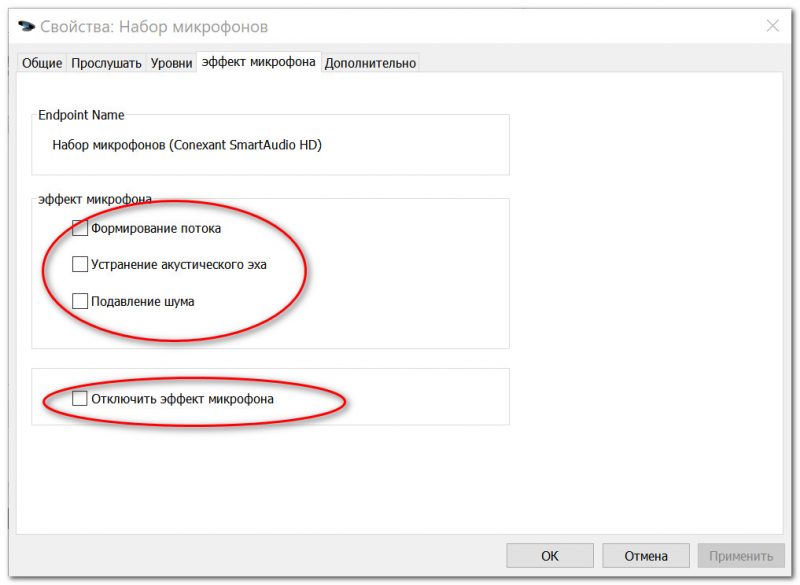
Отключаем эффекты микрофона
Ну и в последней вкладке «Дополнительно» попробуйте поменять разрядность и частоту дискретизации: установите в режим, например, 24 бит, 48000 Гц (студийная запись).
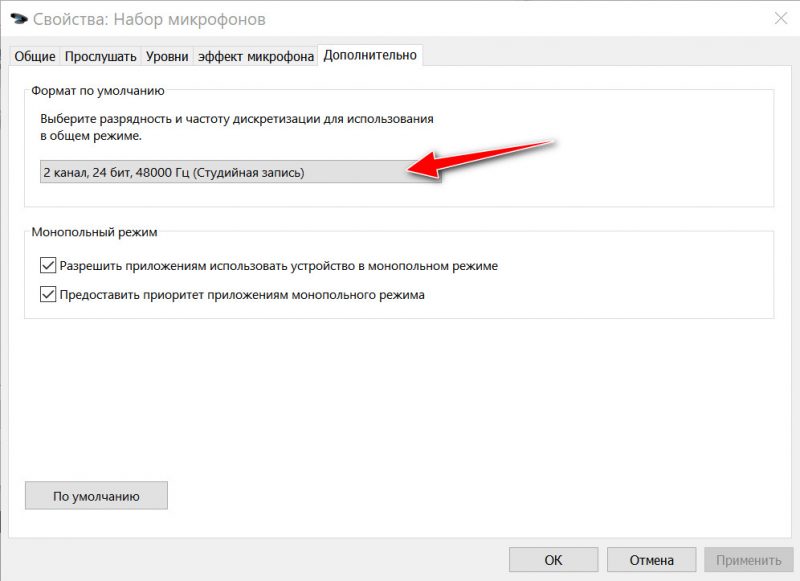
Формат по умолчанию
Сохранение измененные настройки и проверьте заново работу микрофона.
Установлены ли «родные» драйвера. Настройки драйверов
При установке (обновлении*) Windows 10 инсталлирует в систему «универсальный» драйвер микрофона, который далеко не всегда корректно работает. Поэтому, после установки системы, я всегда рекомендую обновлять драйвер, загрузив его с официального сайта вашего оборудования.
Для проверки наличия драйвера, достаточно войти в диспетчер устройств и посмотреть, нет ли устройств в желтыми воскл. знаками, определена ли модель устройства. См. скрин ниже -драйвер установлен. Кстати, там же вы можете запустить автоматическое обновление драйвера (достаточно кликнуть по устройству правой кнопкой мышки).
Примечание! Чтобы войти в диспетчер устройств — нажмите сочетание кнопок Win+R, в появившееся окно «Выполнить» введите команду devmgmt.msc .
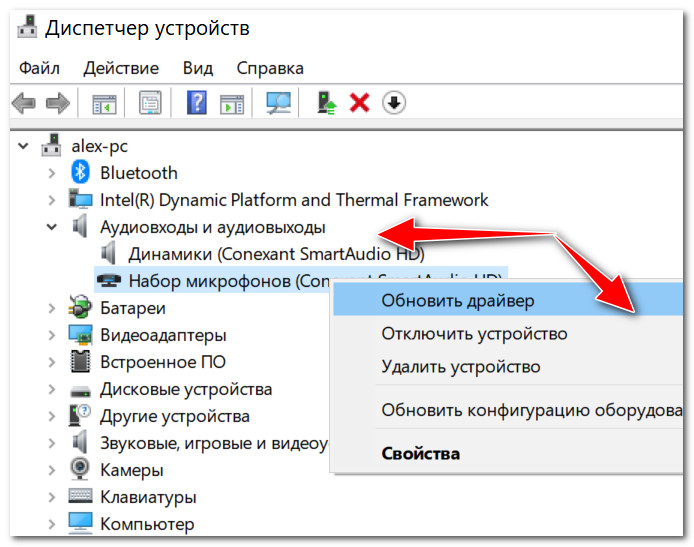
Микрофон — обновить драйвер (диспетчер устройств)
Кстати, для сравнения приведу ниже еще один скриншот: обратите внимание, что во вкладке звуковых устройств микрофона нет, но во вкладке «Других устройств» — есть одно неизвестное. Это означает, что для микрофона просто нет драйвера в системе.
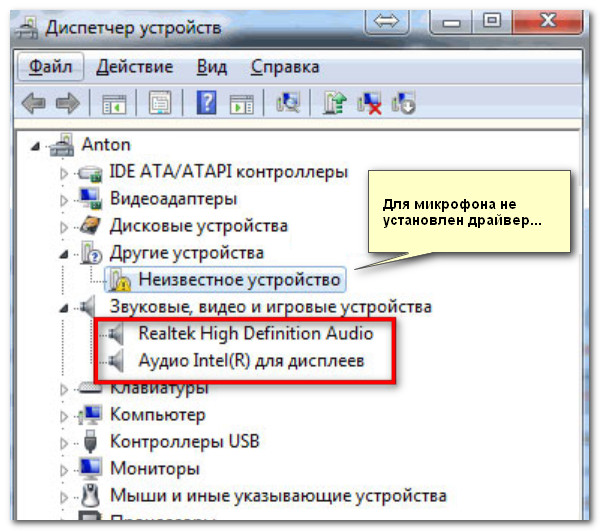
Диспетчер устройств — для микрофона нет драйвера
Как можно обновить драйвер микрофона:
- если у вас есть диск, шедший в комплекте к вашему микрофону, воспользуйтесь им (правда, если микрофон был куплен пару лет назад, на нем может не оказаться драйвера под современную ОС Windows 10);
- посмотреть точную модель микрофона с помощью спец. утилит, и загрузить нужный драйвер с официального сайта производителя;
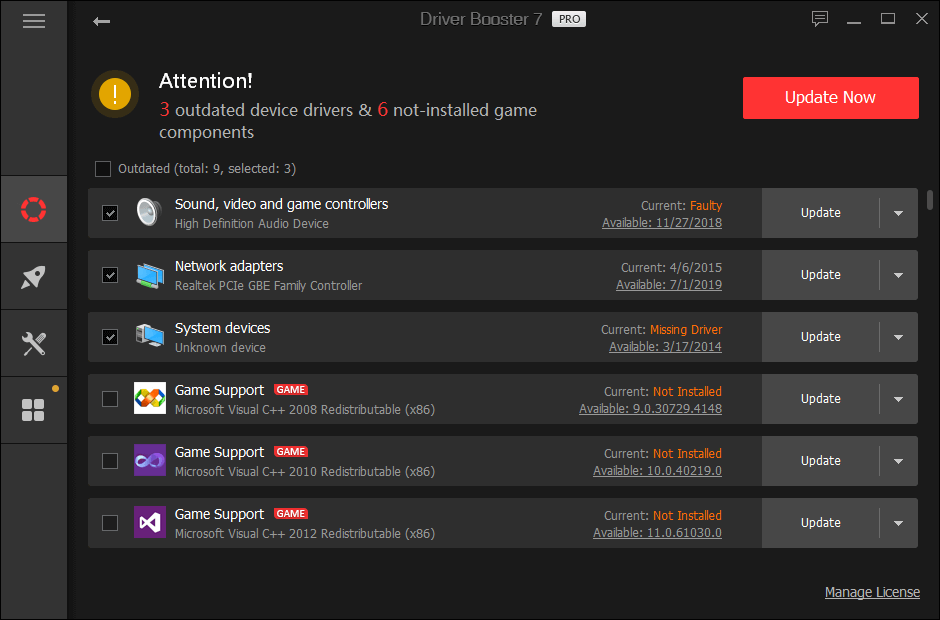
- воспользоваться спец. утилитами для авто-обновления драйверов. Они все сделают за вас: определят модель устройства, проверят, нет ли более нового драйвера для него, и загрузят его (в случае необходимости).
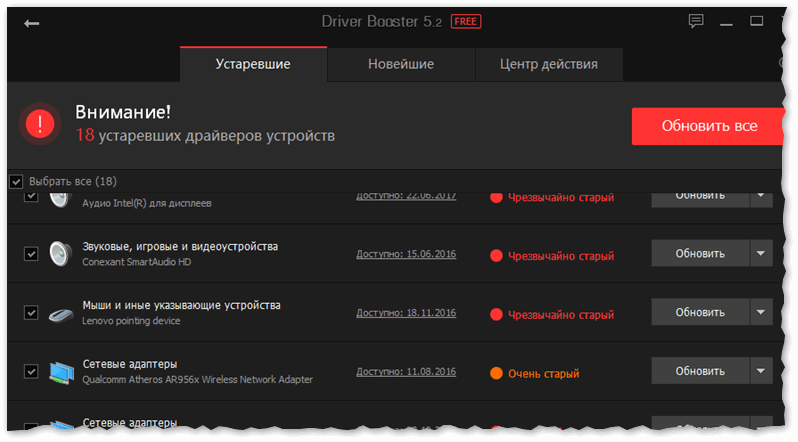
Driver Booster — найдено 18 устаревших драйверов, в т.ч. и для аудио-устройств // пример работы программы
Рекомендация! Перед установкой нового драйвера (при ручном обновлении) удалите старый драйвер. О том, как это сделать — см. здесь: https://ocomp.info/kak-udalit-drayvera.html
PS: если ваш микрофон достаточно старый, возможно, что для него просто нет драйвера для Windows 10. В этом случае можно либо установить на ПК более старую ОС, либо купить более современный микрофон.

Купить микрофон можно по бросовым ценам в китайских-интернет магазинах (если поймать акцию + воспользоваться сервисом кэшбек). Об этом можете узнать здесь — https://ocomp.info/kitayskie-internet-magazinyi.html
Кстати, после обновления и установки драйверов, не забудьте зайти в их настройки и проверить уровни громкости, эффекты и пр. параметры. Как правило, они имеют более приоритетное значение, чем настройки звука в Windows.
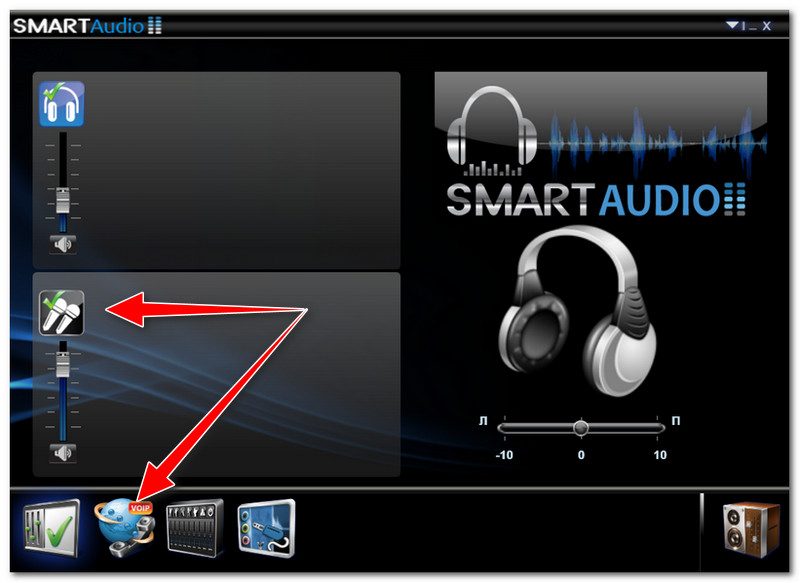
Настройка звука, микрофона
По поводу Skype, Steam и др. приложений для разговоров
Во всех этих приложениях есть свои собственные настройки звука. После обновления ОС Windows, могло так стать, что в этих настройках сейчас выбрано неправильное устройство (то бишь вместо реального вашего микрофона — указано получать звук с др. устройства, которое в данный момент вообще может быть не подключено!).
Также, если касаться того же Skype, обратите внимание на галочку «Разрешить автоматическую настройку микрофона». Не всегда эта «фишка» работает правильно. Рекомендую попробовать ее снять и настроить звук вручную.
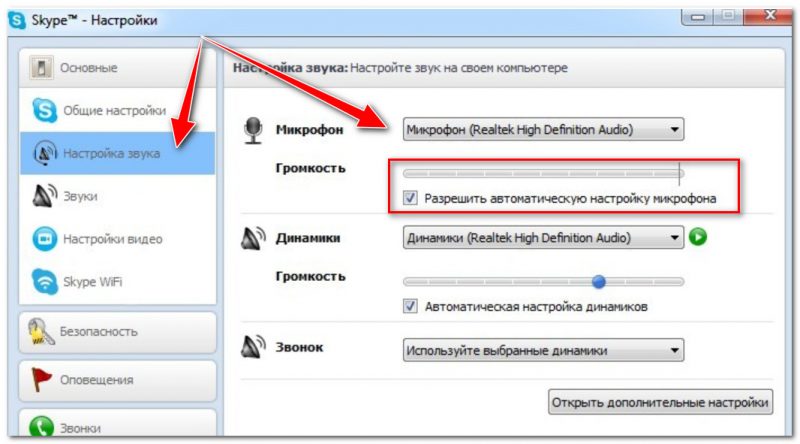
Skype — настройка микрофона и динамиков
В Steam, на мой взгляд, настроек для микрофона еще больше (раздел «Голос»). Можно настроить громкость (в т.ч. выходную), проверить его работу, можно задать определенную клавишу для передачи звука, указать вручную микрофон (актуально, если у вас их несколько).
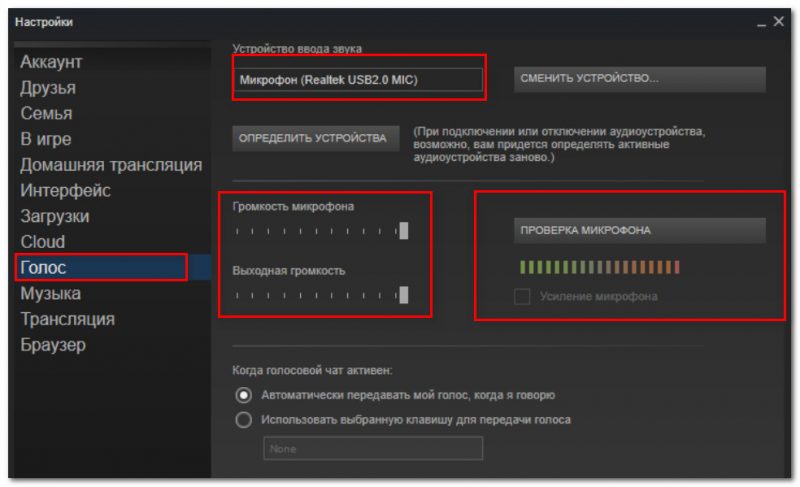
Steam — настройка микрофона (вкладка «Голос»)
На что еще обратить внимание
1) 1 вход для наушников
Если у вас на ноутбуке гарнитурный разъем (т.е. у вас 1 разъем для одновременного подключения микрофона и наушников), то подключив к такому порту «обычный» классический микрофон — шансов, что он будет работать, не много.
Вообще, у меня на блоге этой проблеме посвящена целая статья. Рекомендую ознакомиться. «Один вход для наушников и микрофона в ноутбуке — как их подключить»: https://ocomp.info/odin-vhod-dlya-mikrofona-i-naushnikov.html
2) Попробуйте запустить средство отладки и поиска неисправностей
За что следует поблагодарить разработчиков Windows 10 — так это за появление все большого числа мастеров устранения неполадок. Суть этого мастера в том, что ОС Windows в автоматическом режиме попытается найти и устранить причину неисправности. Во многих случаях помогает решить проблему.
Чтобы запустить средство отладки : откройте параметры Windows (сочетание кнопок Win+i), далее откройте раздел «Обновление и безопасность/устранение неполадок», инструмент «Запись звука» (см. скрин ниже).
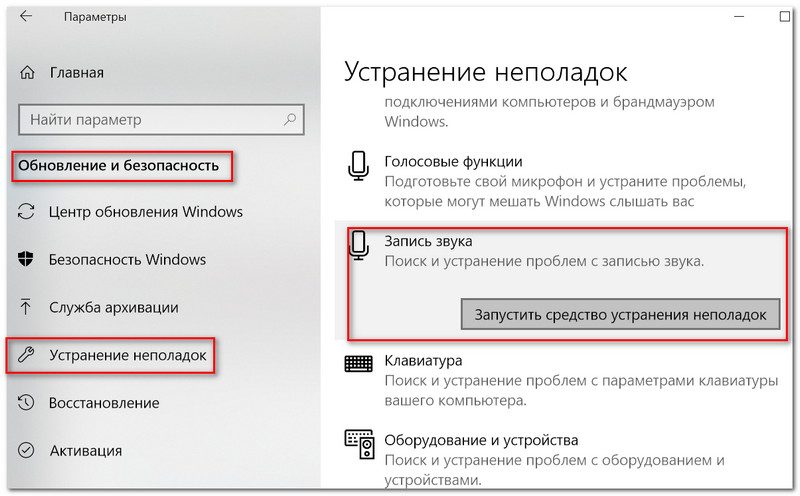
Обновление и безопасность — устранение неполадок
В течении минуты-другой Windows «задумается», а потом предложит варианты решений (в качестве примера см. скрин ниже).
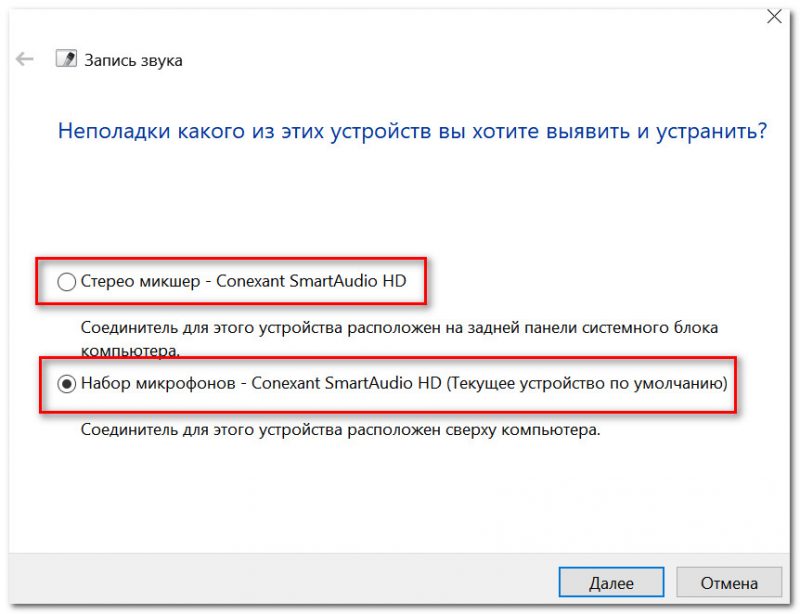
Набор микрофонов (или стерео-микшер)
3) Проверьте состояние гнезд, кабеля
Если микрофон вообще не подает признаков «жизни» — обратите внимание на штекер, гнезда и сам кабель. Нередко, на вид с кабелем может быть все в порядке, но из-за частых перегибов — внутри медные жилки могут быть перебиты. Неплохо было бы проверить микрофон на другом устройстве.
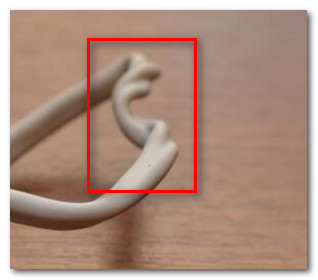
Кабель перегнут (скручен)
4) Обратите внимание на телефон (может создавать шум/помехи)
Если ваш мобильный телефон находится рядом с микрофоном — он может сказываться на качестве звука (фонить). Из-за этого будет слышен треск, шум, шипение и т.д. (может так стать, что из-за этих помех, вы не будете слышать себя. ).
Отмечу, что подобное может происходить и из-за радио-телефонов, раций, различных гаджетов и приставок. Можно, конечно, попробовать экранировать устройства, но лучше просто разместить в разные стороны стола.
Дополнения к решению вопроса — приветствуются.
Источник
Fix: The Wizard could not start microphone in Windows 10

- Windows 10 is highly optimized to support all peripherals and built-in devices, including the microphone.
- If you have issues with your microphone, follow the troubleshooting steps written below.
- More guides like this one can also be found in our dedicated Hub for Troubleshooting Microphone Issues.
- Even more fix guides are available on our Windows 10 Fix page.
Some users have discussed a Wizard could not start a microphone error on Microsoft’s support forum. When some users click Set up microphone in Windows, a The Wizard could not start microphone error message pops up.
Consequently, users can’t utilize the Microphone Setup Wizard when that issue arises.
This is how you can fix the Wizard could not start microphone error
1. Run the Recording Audio troubleshooter
First, check out the Recording Audio troubleshooter.
- Click the Type here to search taskbar button to open Windows 10’s search box.
- Type troubleshoot in the Type here to search box.
- Click Troubleshoot settings in the search utility to open Settings as in the snapshot directly below.

- Select the Recording Audio troubleshooter in Settings, and click the Run the troubleshooter button.
- Then select the Microphone option.
- Click the Next button.
- Click Apply Fix if the troubleshooter provides resolution.
2. Turn on the Allow apps to access your microphone setting
Turning on the Allow apps to access your microphone setting is among the most widely confirmed fixes for the Wizard could not start microphone error.
- To do that, open Windows’ search box.
- Type in microphone as the search keyword.
- Click Microphone privacy settings to open the window in the snapshot directly below.
- Toggle the Allow apps to access your microphone option on if it’s off.
- Thereafter, restart Windows.
3. Update the sound card driver
The Wizard could not start microphone error can also be due to incompatible or antiquated sound or microphone drivers.
- To scan drivers, add Driver Booster to Windows by clicking Free Download on the software’s homepage.
- Install Driver Booster 7 with the downloaded setup wizard.
- Then open Driver Booster 7, which will start scanning when launched.
- Select microphone and sound card devices listed by the scan.
- Click Update Now to update drivers for selected devices.
4. Reinstall the microphone driver
Alternatively, you could try reinstalling the microphone driver.
- To do so, launch Run with the Windows key + R hotkey.
- Type devmgmt.msc in the Open box and click OK to open Device Manager.
- Double-click Audio inputs and outputs to expand devices for that category.
- Right-click the microphone listed there and select Uninstall device.
- Restart Windows after uninstalling the driver for microphone.
- After restarting, Windows will initiate an installation service to reinstall a microphone driver.
5. Check if the microphone is enabled
Some users might need to enable their microphones.
- To do that, right-click the Speakers icon and select Open sound settings.
- Scroll down to Related Settings.
- Click Sound Control Panel to open the Sound window.
- Select the Recording tab shown directly below.
- Right-click the microphone you need enabled and select Enable.
- Press the Set as default button to change the selected microphone to be the default one.
- Click the Apply option.
- Click OK to exit the Sound window.
A lot of users have confirmed those resolutions to fix the Wizard could not start microphone error. With the error fixed, you can configure your microphone with Microphone Setup Wizard.
FAQ: Learn more about Windows 10 microphones
Yes, as long as your device has a microphone, then Windows 10 will also have the necessary driver for it. However, a built-in microphone can’t be compared to professional microphones in terms of quality.
- Can my browser access my microphone?
Yes, many VoIP apps that have web clients will only work if you allow your browser to access your microphone.
If your computer has an external or internal microphone, it is listed in the Recording tab of your Control Panel.
Источник
Download PC Repair Tool to quickly find & fix Windows errors automatically
Some users have complained that they encounter the error The Wizard could not start when trying to set up a new media device or microphone in Windows 10. This app stops any microphone input. If you encounter the issue in discussion, then read through this article for the resolution.

The main cause of the issue is that when an app needs to use the microphone and the system denies permission, its wizard is unable to invoke the microphone and thus the error in discussion occurs. Another reason could be obsolete drivers. If you encounter the error The Wizard could not start microphone in Windows 10, then try the following solutions sequentially:
- Allow the problematic app to access the microphone
- Run the Audio troubleshooter
- Update the audio drivers
1] Allow the problematic app to access the microphone

Most users have confirmed that the issue was resolved upon allowing the problematic app to access the microphone. The procedure to do so is as follows:
- Click on the Start button and go to Settings > Privacy > Microphone.
- Now, turn OFF the switch associated with Allow apps to access your microphone.
- Then try using the application in discussion and if it doesn’t work, use it after rebooting the system.
2] Run the Audio troubleshooter
The Audio troubleshooter is an excellent tool to judge issues related to audio devices connected to the system. Try running the troubleshooter to fix the issue in discussion as follows:
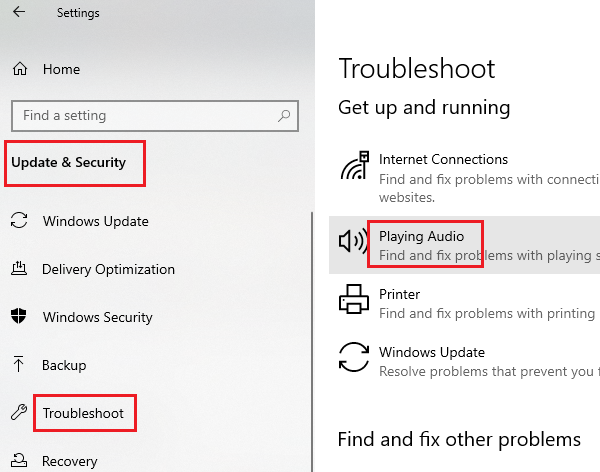
Click on the Start button and go to Settings >> Updates & Security >> Troubleshoot.
Now, select Additional troubleshooters.
In the list of troubleshooters, select the Playing audio troubleshooter and click on Run the troubleshooter to run it.
Reboot the system and check whether it resolves the problem.
3] Update the audio drivers
The issue is discussion could be caused if the audio drivers are corrupt or obsolete. In such a case, you can download the latest audio drivers from Intel.com.
Once downloaded, extract the ZIP folder and locate the Setup file. Double-click on it to run it.
Hope something helps.
Read next: Microphone not working on Windows 10.

Karan Khanna is a passionate Windows user who loves troubleshooting Windows 11/10 problems in specific and writing about Microsoft technologies in general.