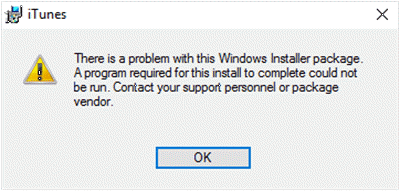
Most of the time, Windows applications install smoothly onto your device. This is why many users panic when seeing the “There is a problem with this Windows installer package” error during the installation process of popular apps such as iTunes, Unreal Engine, and even Adobe Acrobat Reader.
There’s nothing to worry about — in this guide, you will learn how to fix this error even if you’re not tech-savvy.
Causes of the “There is a problem with this Windows installer package” error
Even though there’s no single sure cause of this error, most users have reported the following as the leading cause of installer package error:
- You have an outdated or damaged installer file. You might be trying to install an application with an old or corrupted installer file. This doesn’t allow the app to install properly, causing the error.
- You downloaded the wrong package. Some systems are 32-bit, while others are 64-bit. You need to make sure to download the right bit version of the installer package in order to match your system’s bit version.
- Your computer doesn’t meet the minimum requirements. Some applications may return the “There is a problem with this Windows installer package” error if your computer doesn’t meet the minimum system requirements to run the app.
- Your Windows is not updated. Many issues can arise from an outdated system. Some users reported that updating Windows fixed this error.
- You don’t have full access to the installation folder. Permissions are very important when operating a PC. It’s possible that you chose an installation directory that you don’t have full access to, meaning that the installer can’t create necessary files to finish the install process.
Fixed “There is a problem with this Windows installer package”
After identifying the possible causes, you can begin troubleshooting. There are various methods you can try.
Method 1: Make sure you have administrative permissions
If you lack the appropriate permissions to install applications, you can easily run into the error of this article. If you’re using a public or work computer, this is normal — you’re most likely not an administrator. Make sure to contact the administrator and ask them for help.
However, if this issue occurs on your personal device, here’s what you can do to give yourself administrator permissions.
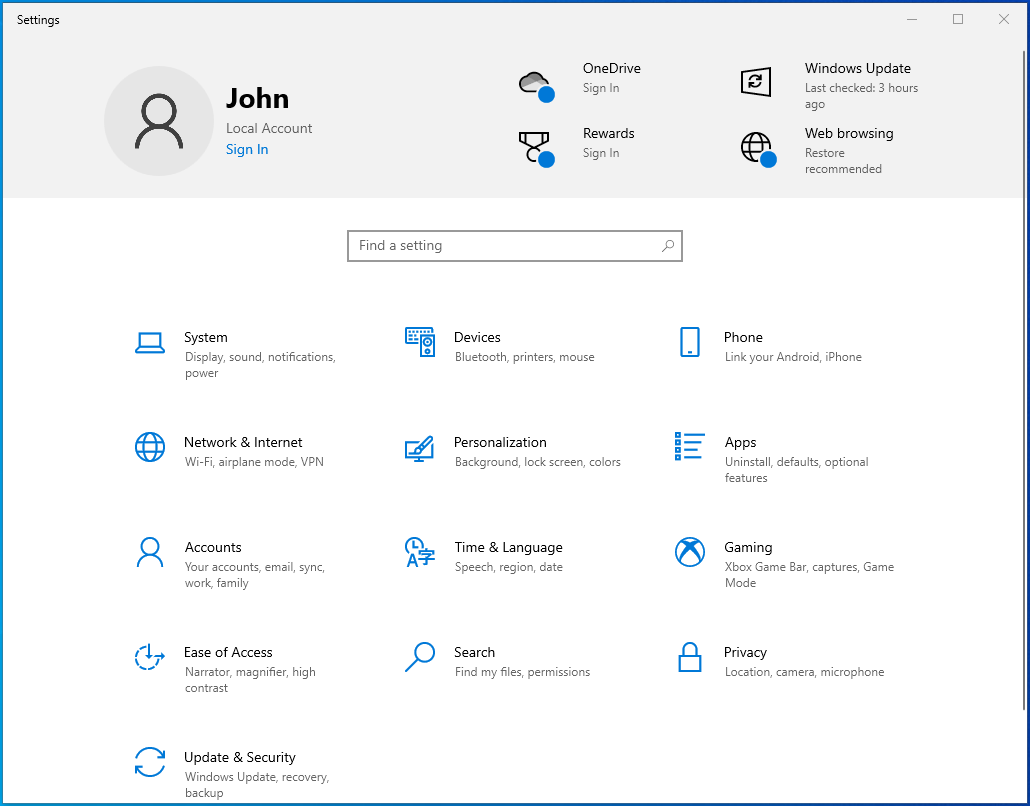
- Click on the Windows icon in your taskbar and select Settings.

- Click on Accounts.

- Choose Family & other users from the menu on the left.

- Select your account, then click on Change account type.

- Choose the Administrator option from the drop-down menu and click OK.

- Locate the installer file then right-click on it and choose Run as administrator.


Method 2: Use the Program Install and Uninstall troubleshooter
Microsoft has a free to download troubleshooter that aims to help with installation issues. Here’s how you can get it.
- Navigate to this Microsoft website and click on the Download button.

- Launch the file you just downloaded.

- Click Next, then choose Installing.
- Select the application you want to install or choose Not listed and browse your computer manually to locate the installer file.
- Wait for the troubleshooter to identify issues and help you install the application.


Please note that the Program Install and Uninstall troubleshooter isn’t perfect and might not be able to identify an issue. In this case, we recommend you attempt our other methods listed on this page to get rid of the error.
Method 3: Repair the software
There’s a possibility that the application you’re trying to update can’t install because it’s corrupted. When this happens, simply repair the app using these steps.
- Click on the Windows icon in your taskbar and select Settings.
- Click on Apps and wait for your system to load your installed applications.

- Select the problematic application and click on Modify.

- Choose the Repair option and follow the on-screen instructions to repair the application.

- Try installing now to see if the error still appears.


Method 4: Re-register Windows Installer
The Windows Installer is a key component for installing applications on your device. While you can’t simply repair or uninstall it like other apps, you can use the command prompt to re-register it and possibly fix related issues.
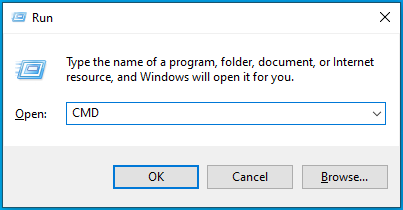
- Press the Windows + R keys on your computer at the same time to open Run.
- Type in “cmd” and hit the Ctrl + Shift + Enter keys at the same time. This will launch the Command Prompt with Administrator permissions.

- Input the following commands, pressing Enter after each line:
- msiexec.exe /unregister
- msiexec.exe /regserver
- Close the Command Prompt and check if the installer runs properly.

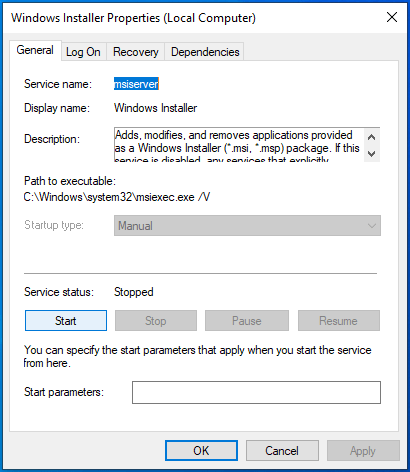
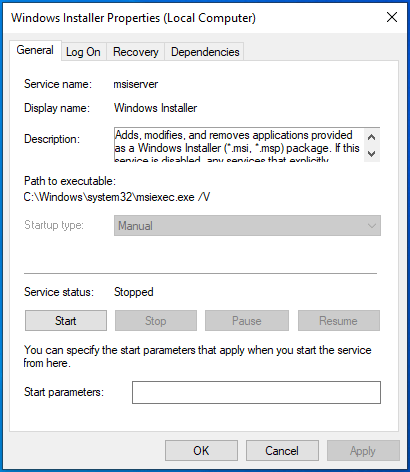
Method 5: Restart the Windows Installer service
If re-registering Windows Installer didn’t work, try restarting the service. This will give your computer a chance to properly restart the service. To do that, follow the next steps.
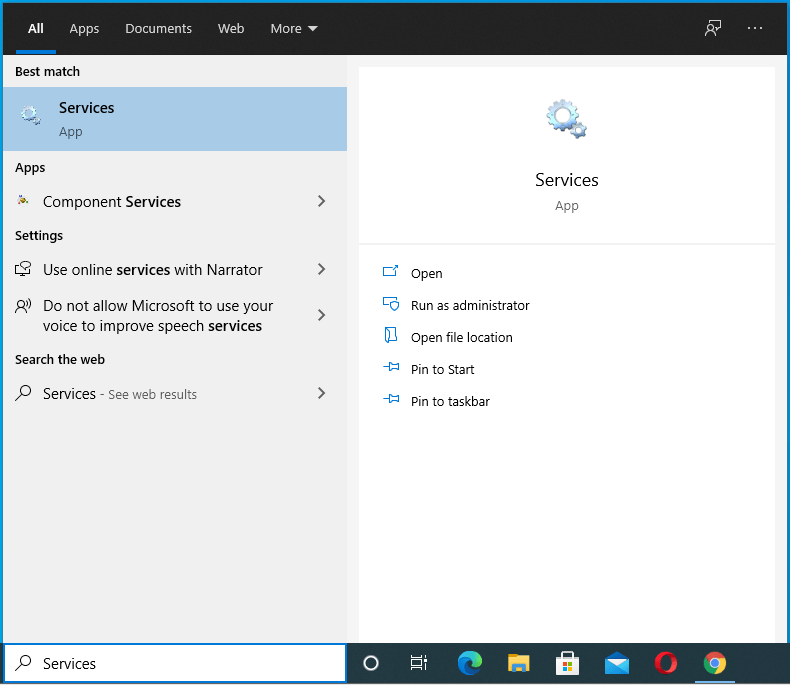
- Press the Windows + R keys on your computer at the same time to open Run.
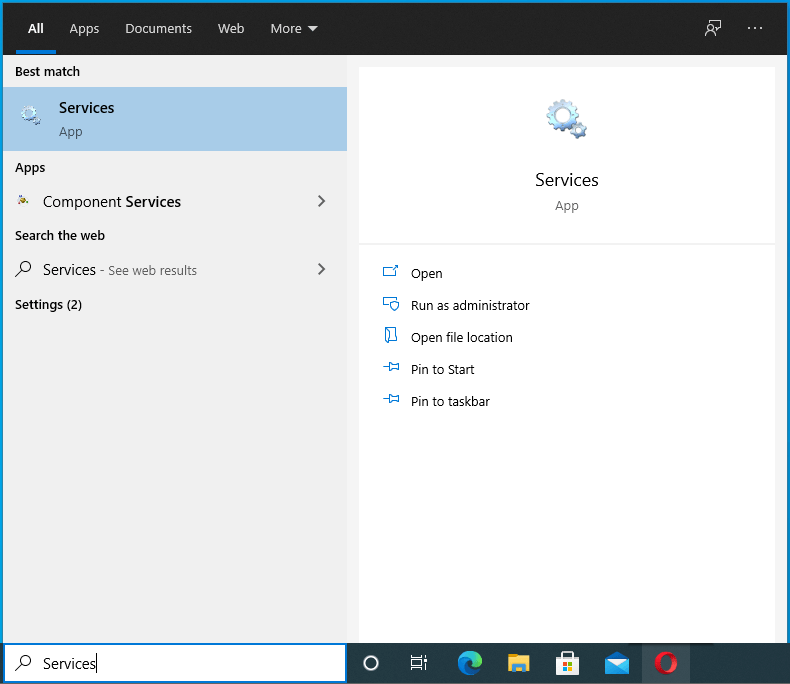
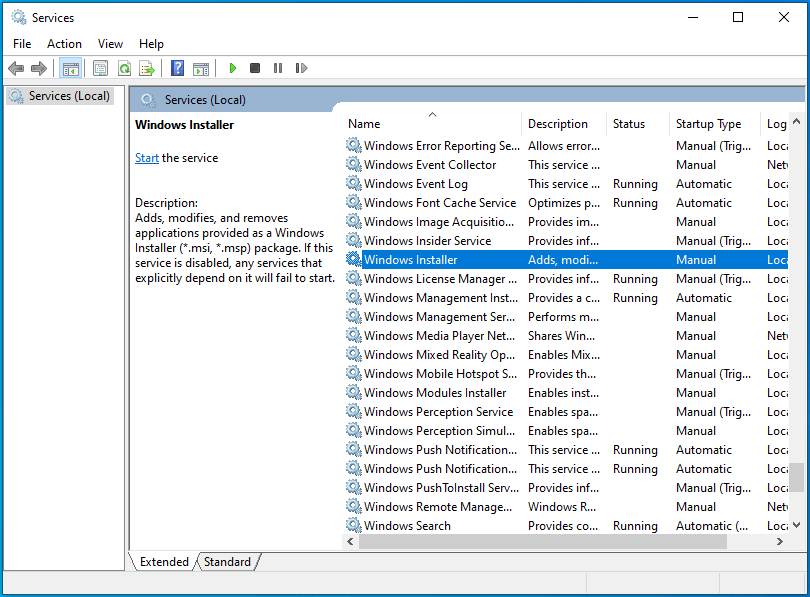
- Type in “services.msc” and click on the OK button. This is going to launch Services, which should display every available service on your computer.
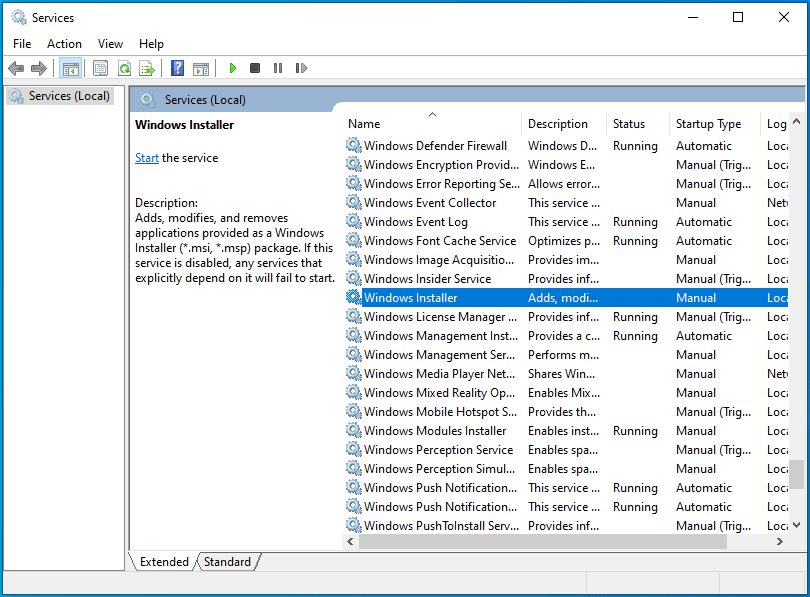
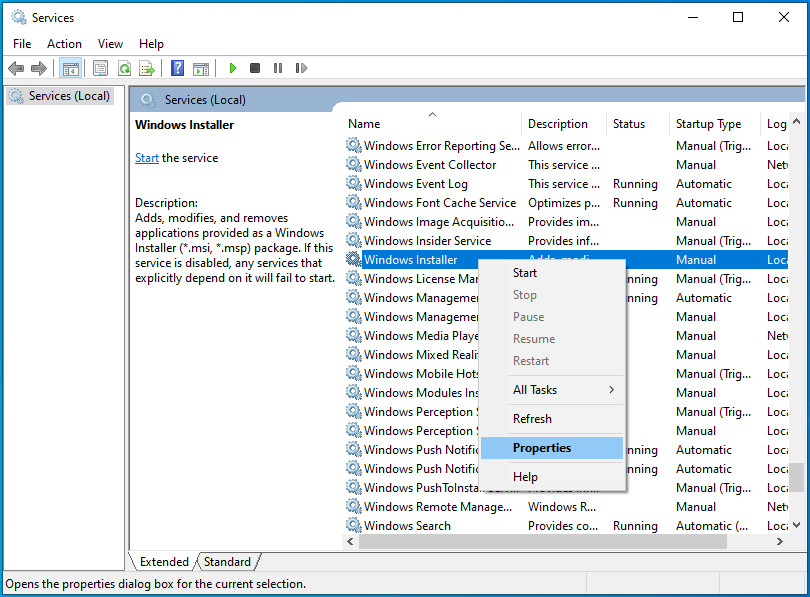
- Locate the Windows Installer service, then right-click on it and choose Stop.

- Wait a minute, then right-click Windows Installer and choose Start.

- Restart your computer and attempt the installation again.


Hopefully, one of our methods was able to get rid of the “There is a problem with this Windows installer package” issue on your computer. Enjoy installing your apps smoothly.
Ошибка 1723. Произошла ошибка пакета установщика Windows. Библиотеки DLL необходимые для завершения этой процедуры не может быть запущен.
Error 1723. There is a problem with this Windows Installer package. A DLL required for this install to complete could not run. Contact your support personnel or package vendor.
Решение довольно простое:
Обычно причиной ошибки 1723 является отсутствие прав локального пользователя на папку временных файлов Temp. Такое случается, если папка переносилась на новое место или по другим причинам.
1. Отыскиваем её. В профиле пользователя (если это Win7,8,10 или Win 2008,2012), например c:UsersSlavaAppDataLocalTemp или другой путь, если вы его назначили в свойствах системы >> дополнительных параметрах системы >> переменные среды.
2. Удаляем всё лишнее, что удаляется. Не бойтесь, ничего важного в ней не хранится.
3. Переходим в свойства этой папки, далее вкладка Безопасность и назначаем локальному пользователю (в моём примере Slava) полные права.

Содержание
- Siava.Su
- черновик сисадмина
- Ошибка 1723 — как исправить
- 3 комментария
- 7 способов исправить ошибку 1722 (ошибка пакета установщика Windows) в Windows 10
- diflyon
- Журнал айтишника
- There is a problem with this Windows installer package Fix
- Fix 1: Tweak the Registry Settings
- Fix 2 – Change Temp folder permissions
- Fix 3: Run as an administrator
- Fix 4: Use Microsoft Program Install and Uninstall
- Fix 5: Restart the Windows Installer service
- Fix 6: Repair the Application
- Fix 7: Re-register Windows Installer
- Fix 8: Disable the apps at Startup and try Installing
- Fix 10: Installing Latest Updates
- Fix 11: Scan the system for Malware or Virus
- Fix 12: Run Program Compatibility Troubleshooter
Siava.Su
черновик сисадмина

Ошибка 1723 — как исправить
Ошибка 1723. Произошла ошибка пакета установщика Windows. Библиотеки DLL необходимые для завершения этой процедуры не может быть запущен.
Error 1723. There is a problem with this Windows Installer package. A DLL required for this install to complete could not run. Contact your support personnel or package vendor.
Решение довольно простое:
Обычно причиной ошибки 1723 является отсутствие прав локального пользователя на папку временных файлов Temp. Такое случается, если папка переносилась на новое место или по другим причинам.
1. Отыскиваем её. В профиле пользователя (если это Win7,8,10 или Win 2008,2012), например c:UsersSlavaAppDataLocalTemp или другой путь, если вы его назначили в свойствах системы >> дополнительных параметрах системы >> переменные среды.
2. Удаляем всё лишнее, что удаляется. Не бойтесь, ничего важного в ней не хранится.
3. Переходим в свойства этой папки, далее вкладка Безопасность и назначаем локальному пользователю (в моём примере Slava) полные права.

3 комментария
Благодарен, плюс вам в карму!
Огромное спасибо, не мог установить налогоплательщик юл, пока не назначил всем все права
Источник
7 способов исправить ошибку 1722 (ошибка пакета установщика Windows) в Windows 10
Windows 10 использует встроенный установщик Windows для установки, обслуживания и удаления программного обеспечения на вашем ПК. Когда установщик неисправен, вы столкнетесь с несколькими проблемами при попытке установить или удалить программное обеспечение. Появится всплывающее окно с кодом ошибки InstallShield 1722. Ошибка также может появиться из-за других различных системных проблем.
Читайте дальше, чтобы узнать все возможные причины и способы устранения ошибки InstallShield 1722.
Что вызывает ошибку 1722 (ошибка пакета установщика Windows)?
Вот некоторые возможные причины этой ошибки:
Установщик Windows отключен в настройках системы.
На вашем компьютере отсутствуют или повреждены некоторые системные файлы.
Неверные или поврежденные записи реестра конфликтуют с установщиком Windows.
Некоторые программы повреждены.
1. Быстрые исправления
Прежде чем продолжить подробные решения, вот несколько быстрых исправлений, которые вы можете попробовать.
При возникновении ошибки немедленно перезагрузите компьютер.
Обновите свои приложения. Помимо добавления новых функций, обновление приложений помогает исправить или удалить системные ошибки.
Запустите средство устранения неполадок Windows. Перейдите в меню «Пуск» Windows> Параметры ПК> Обновление и безопасность> Устранение неполадок. Запустите как средство устранения неполадок совместимости программ, так и средство устранения неполадок приложений Магазина Windows.
Очистите свой компьютер. Простая очистка диска помогает освободить дисковое пространство и позволяет приложениям работать эффективно. Это может помочь решить проблемы с установщиком Windows и другими программами.
2. Включите установщик Windows.
Если установщик Windows отключен, вам будет сложно устанавливать или удалять программы. Вот что вам нужно сделать, чтобы включить установщик.
Нажмите клавиши Windows + R, чтобы открыть диалоговое окно «Выполнить команду».
Введите services.msc и нажмите Enter.
На следующем экране прокрутите вниз и дважды щелкните параметр Windows Installer.

На следующем экране установите для параметра Тип запуска установщика Windows значение Вручную. Нажмите кнопку «Пуск», чтобы включить службу. Выберите Применить, а затем ОК, чтобы сохранить эти изменения.

3. Запустите средство устранения неполадок установки и удаления программы Microsoft.
Если вы подозреваете, что проблема вызвана поврежденными ключами реестра, вам может помочь средство устранения неполадок при установке и удалении программ Microsoft.
Когда дело доходит до исправления поврежденных ключей реестра, вам не следует использовать средство очистки реестра. Запуск этих программ может нанести вред вашему компьютеру. Если вы удалите, переместите или повредите ключи реестра, критические системные функции могут выйти из строя. Это могло вызвать проблемы с установкой, запуском или удалением приложений.
Средство устранения неполадок при установке и удалении программы не только поможет сканировать и исправить поврежденные ключи реестра, но также исправит другие системные файлы.
Запустите средство устранения неполадок, дважды щелкнув его.
Щелкните Далее, чтобы начать процесс устранения неполадок.
Из появившихся опций выберите вариант «Установка» или «Удаление».

В следующем окне выберите программу, с которой вы столкнулись с проблемами, и нажмите Далее. Если вы не можете найти программу в списке, выберите вариант Нет в списке и найдите программу. Отсюда следуйте инструкциям на экране, чтобы завершить процесс устранения неполадок.
4. Отмените регистрацию и повторно зарегистрируйте установщик Windows.
Нажмите клавиши Windows + R, чтобы открыть диалоговое окно «Выполнить команду».
Введите CMD и нажмите Ctrl + Shift + Enter, чтобы открыть командную строку с повышенными привилегиями.
Чтобы временно отменить регистрацию установщика Windows, введите следующую команду и нажмите Enter:
По завершении этого процесса вы можете повторно зарегистрировать установщик Windows. Для этого введите следующую команду и нажмите Enter:
Перезагрузите компьютер, чтобы сохранить эти изменения.
5. Используйте инструменты SFC и DISM.
Поскольку эта ошибка может возникнуть из-за поврежденных системных файлов, вы можете устранить ее с помощью инструментов SFC и DISM. SFC просканирует ваш компьютер на предмет отсутствующих или поврежденных системных файлов, а DISM просканирует образ системы, используемый для внесения этих исправлений. В этом случае вы должны сначала запустить DISM, чтобы убедиться, что SFC работает правильно.
Чтобы начать, нажмите клавиши Windows + R и введите CMD.
Нажмите Ctrl + Shift + Enter, чтобы открыть командную строку с повышенными привилегиями.
Введите следующую команду и нажмите Enter:
DISM / Онлайн / Очистка-Образ / ScanHealth
Когда сканирование будет завершено, введите следующую команду и нажмите Enter:
DISM / Онлайн / Очистка-Образ / RestoreHealth
Дождитесь завершения сканирования, а затем перезагрузите компьютер.
Откройте командную строку, как описано выше. Введите следующую команду и нажмите Enter:
Дождитесь завершения сканирования. Отсюда закройте командную строку и перезагрузите компьютер.
6. Устанавливайте программы в безопасном режиме.
Вы можете решить эту проблему, установив программное обеспечение в безопасном режиме. Это поможет вам определить, вызвана ли проблема установленным программным обеспечением или поврежденными аппаратными компонентами вашего ПК.
Если вы больше не сталкиваетесь с ошибкой, как только вы загружаетесь в безопасном режиме, можно с уверенностью сказать, что проблема возникает из-за драйвера или программного обеспечения.
Чтобы начать работу, перейдите в меню «Пуск» Windows> Параметры ПК> Обновление и безопасность.
Выберите вариант восстановления.
В разделе «Расширенный запуск» нажмите кнопку «Перезагрузить сейчас».

Это перезагрузит ваш компьютер в среде восстановления.
На появившемся экране выберите «Дополнительные параметры»> «Параметры запуска» и нажмите кнопку «Перезагрузить». Наконец, нажмите клавишу F4, чтобы ваш компьютер загрузился в безопасном режиме.
7. Выполните чистую загрузку и используйте сторонний деинсталлятор.
Вы можете выполнить чистую загрузку, чтобы изолировать другие программы, которые могут вызывать эту ошибку. Этот процесс просто загружает ваш компьютер с отключенными всеми сторонними приложениями. Он также запускает ваш компьютер с минимально необходимыми драйверами и программами. Это помогает устранить любые конфликты, возникающие при установке или удалении программного обеспечения.
После того, как вы определили проблемную программу, вы можете удалить ее с помощью стороннего деинсталлятора. Это поможет убедиться, что не осталось остаточных файлов, которые могут вызвать дальнейшие проблемы на вашем компьютере.
Если ничего не помогает, вам следует подумать об обновлении Windows. Это должно помочь решить эту проблему и другие важные системные проблемы.
Простая установка и удаление программ в Windows 10
Ошибка пакета установщика Windows 1722 может сильно раздражать, но теперь вы сможете легко ее решить. Это сообщение об ошибке или любое другое подобное сообщение не должно мешать вам легко устанавливать или удалять приложения.
Источник
 diflyon
 diflyon
 Журнал айтишника
Ошибка
«Error 1723. There is a problem with this Windows Installer package. A DLL required for this install to complete could not be run. Contact your support personnel or package vendor».
Описание
При установке программы может вылезти данное сообщение об ошибке:

Причина
Эта ошибка возникает по одной или нескольким причинам:
Решения
Для решения данной проблемы выполните следующие действия по порядку. После каждого действия перезагрузите копьютер и повторите установку программы. Переходите к следующему действию, если ошибка не устранилась.
1. Update Windows Installer:
2. Change the permissions to full access to:
1. Open Windows Explorer are locate the mentioned folder above.
2. Right click on the folder, the Local Properties pop up window will appear.
3. Select the tab Security.
4. Click Edit, the Permissions for Local pop up window will appear.
5. On Group or user names, select the desired user.
6. Ensure that the Allow check box for Full control is activated, else activate it.
7. On the Permissions for Local pop up window, click OK (if no changes were made) or Apply (if changes were made).
8. On the Local Properties pop up window, click OK (if no changes were made) or Apply (if changes were made).
Источник
There is a problem with this Windows installer package Fix
September 24, 2022 By Anusha Pai
As we all know Windows Installer is used to install, uninstall programs in the system. Usually, this package runs to completion well without any errors. However, at times the users have reported seeing the following error:
There is a problem with this Windows installer package
At times, the error is seen along with 1720,1721,17213112 error numbers. This error is noticed while installing popular apps like iTunes, Adobe Acrobat Reader, Unreal Engine, Datasmith exporter for 3dmax, SQLite, etc.
Possible causes for this problem are :
In case you have encountered this issue, there is nothing to worry about. In this article, we will be discussing different ways to fix the error with the Windows Installer package.
Note: –
1.Try downloading and installing again after disabling third party Antivirus software. It fixed the issue for most of the users.
2. Check the downloaded file size again. May be this error is being show due to incomplete download of the software package.
Fix 1: Tweak the Registry Settings
NOTE: You must be logged in as an Administrator to do this change.
Step 1: Open run window holding Windows+r keys
Step 2: Enter regedit and press Enter

Step 3: If you see the UAC window popping up, click on the Yes button
NOTE: Registry editing can have an adverse effect on the system even with the slightest mistake. So please be very careful.Also, It is advised to take the backup of the registry before proceeding. To take a backup, In the Registry Editor–> Go to File –> Export –> Save your Backup file.
Step 4: In the top bar, copy-paste the following location and hit Enter as shown below
HKEY_CLASSES_ROOTMsi.Packageshell

Step 5: Right-click on the shell key. Choose New and then select Key

Step 6: Name this newly created key as runas and hit Enter
Step 7: Click on runas and then double click on the (Default) key on the right-hand side

Step 8: In the Edit String window, under the Value data, enter the below text and hit Enter

Step 9: Right-click on the runas key that we created. Choose New–> Key.

Step 10: Name the newly created key as command and hit Enter
Step 11: Click on the command key. On the right-hand side, double click on (Default) key

Step 12: In the Edit String window, under the Value data, enter the below text and hit Enter

Step 13: Restart the System
Step 14: Now try installing the application again.
Fix 2 – Change Temp folder permissions
1. Open file explorer.
2. Go to the address given below
3. Now, Right click on Temp folder and choose properties

3. Now, click Security Tab
4. Click on Edit

5.Click on Add.
6. Write Everyone in the text field.
7. Now, click on check names.
8. An underline will appear below everyone. Now, click OK.

9. Now, select all permissions, including full control etc. for everyone.
10. Click on OK and Apply.

In case this doesn’t help check the general fixes listed below.
Fix 3: Run as an administrator
In case you do not have the Administrator rights, then contact your administrator
Step 1: Locate the Installer file in the system and right-click on it
Step 2: From the context menu, select Run as administrator

For some applications, you can see that Run as administrator doesn’t show up in the context menu. For such applications, follow the below steps
Step 1: Hold the Win Key and then press R
Step 2: Type cmd and hit Ctrl+Shift+Enter
This opens the command prompt in Admin mode

Step 3: In the User Access Control window, simply click on Yes.
Check if this helps, if not try the next fix.
Fix 4: Use Microsoft Program Install and Uninstall
Step 1: Download the Microsoft Program Install and Uninstall from this link
Step 2: Click on the Download troubleshooter button on the page

Step 3: Right-click on the downloaded troubleshooter and click on Open

Step 4: Select Next and then choose Installing
Step 5: From the given list of options, select the application you want to install. In case the required application is not listed, then select Not listed. In this case, you have manually browse to the location of the installer file
Step 6: The troubleshooter will start running wait for some time for it to identify the problems
Step 7: Once the issues are identified, follow the instructions on the screen to fix them
Check if this helps, if not try the next fix listed
Fix 5: Restart the Windows Installer service
Step 1: Open Run Dialog (Windows+r)
Step 2: Type services.msc and hit OK

Step 3: In the Services window, scroll down to find the Windows Installer service
Step 4: Right-click on the service and select stop as shown below

Step 5: Again, right-click on the Windows Installer service and choose Start

Step 6: Restart your system and try again.
If this does not fix the error, try the next one
Fix 6: Repair the Application
Note that not all applications will have this option. Just as an example, iTunes has the option to repair. However, if you check Adobe Acrobat Reader, it doesn’t.
For demonstrating, we are using iTunes App i.e Apple Mobile Device Support. However, the steps should be similar for any other application
Step 1: Open the Run dialog with Windows+R shortcut
Step 2: Type the command ms-settings:apps and press OK

Step 3: In the Settings window that appears, scroll down on the right-hand side to locate the required application. For example, Apple Mobile Device Support. Click on the Modify button

Step 4: In the App Support window that opens, Tick on Repair and then press on the Next button

Step 5: This would take some time and the application would be repaired.
Step 6: Now try installing again and check if the error exists.
If you are still noticing the error while installing, try the next fix.
Fix 7: Re-register Windows Installer
Step 1: Open Run Dialog holding Win Key+R combination
Step 2: Enter cmd and hit Ctrl+Shift+Enter to open a Command prompt with Admin privileges.

Step 3: In the UAC window that opens asking for permissions, click on Yes
Step 4: In the command prompt window that opens, type the below command and hit Enter

Step 5: When everything is working as expected you will see the Details window as shown below. If not, an error report will be displayed.

Step 6: If the error report is displayed, one should consider re-registering the Windows Installer.
Step 7: In the command prompt type the below commands one after the other. Make sure to press Enter key after every command
These commands will re-register the Windows Installer in the system. Now try installing the application again and check if everything is working as expected.
Fix 8: Disable the apps at Startup and try Installing
Step 1: Open the Run window(Windows+r)
Step 2: Type msconfig and press OK

Step 3: In the System Configuration window that opens, under the Services tab, Tick the Hide All Microsoft services
Step 4: Click on the Disable all button

Step 5: In the same window, Open the Startup tab, click on Open Task Manager

Step 6: In the Task Manager Window that opens, Disable all the programs that are enabled at the start-up.

Step 7: In the System Configuration Window, Click on Apply and then Press OK

Step 8: Restart the PC.
Step 9: Now that there will be no interference from any other application, try installing. If it does not help, checkout the fixes listed in the next section
Fix 10: Installing Latest Updates
Step 1: Open the Run window(Windows+r) and type ms-settings:windowsupdate-action and press OK

Step 2: In the Settings –> Update & Security –>Windows Update window that opens, click on Check for Updates. Once the updates are installed, restart the PC.

Now that the system is up to date, check if the issue still exists.
Fix 11: Scan the system for Malware or Virus
Sometimes, the viruses and malware in the system can affect the working of the Windows Installer.
Step 1: Hold the keys Windows+r and open the Run Window
Step 2: Type ms-settings:windowsdefender and press OK

Step 3: In the settings window, choose Virus & Threat Protection

Step 4: In the window that opens, click on Scan Options

Step 5: Choose Full scan and press on Scan now button

Once the scan finishes, it notifies about any viruses and malware in the system. Take necessary steps to mitigate them.
In case you are still seeing the same error, then try the next fix.
Fix 12: Run Program Compatibility Troubleshooter
Step 1: Locate the application file(.exe file) in the system
Step 2: Right-click on the Application file(.exe) and Choose Troubleshoot Compatibility

Step 6: In the Program Troubleshoot Compatibility window, click on Try recommended settings.

Step 7: In the window, the problems are detected and fixed.
Now try Installing again and see if this fixes the issue.
We hope this has been informative. Kindly comment and let us know in case you run into issues. We will be glad to assist.
Also, please comment and let us know if you were able to fix the issue with the above fixes.
Thank you for Reading.

Anusha Pai is a Software Engineer having a long experience in IT industry and having a passion to write.
Источник
I had a similar problem on my Windows 7 box where I was trying to uninstall Java and do a clean install of a newer version. Something got messed up and I would get the 1723 error message during the uninstall and attempted reinstall. Here’s information about how I was able to fix the problem, and maybe this will help you:
Look at the log files for the uninstall/reinstall. On Windows 7 they can be found at c:usersusernameAppDataLocalTemp
The java_install.logdidn’t show any extra information, but I had several MSI##### log files that contained error messages about the failed uninstall. The message was: Error 1723.There is a problem with this Windows Installer package. A DLL required for this install to complete could not be run. Contact your support personnel or package vendor. Action UninstallJRE, entry: MSIUninstallJRE, library: C:Program FilesJavajre6binregutils.dll
There was indeed no regutils.dll file, and not even the bindirectory was there. So I copied over a regutils.dll file from another computer, ran the uninstaller, and it worked. Then the new clean install of Java also worked.
So take a look at your logfiles and hopefully that will give you more detailed information about the 1723 error.
 Довольно распространённая проблема среди пользователей операционной системы Windows любых версий – ошибка msi при установке программ из файла с расширением .msi. В этой статье я опишу часто встречаемые проблемы с установщиком Windows 7/10/XP и варианты их решения, а также сделаю видео по текущему вопросу.
Файлы с расширением .msi это обычные пакеты установки (дистрибутивы) из которых ставится программа. В отличии от обычных «setup.exe», для запуска файла msi система использует службу Windows Installer (процесс msiexec.exe). Говоря простыми словами, установщик Windows разархивирует и запускает файлы из дистрибутива. Когда Windows Installer не работает, то появляются различные ошибки.
Вообще, меня это жутко бесит, т.к. после глупого сообщения об ошибке совсем непонятно что делать дальше. Microsoft специально разработали установщик Windows Installer для расширения возможностей установки программ (в основном это касается системных администраторов), но не позаботились должным образом о безглючной работе этой службы или хотя бы об адекватных сообщениях о проблемах. А нам теперь это разгребать 🙂
Неполадки могут быть с работой самой службы или могут возникать в процессе установки программ, когда всё настроено, в принципе, правильно. В первом случае нужно ковырять службу установщика, а во втором решать проблему с конкретным файлом. Рассмотрим оба варианта, но сначала второй.
Ошибки msi файлов
Очень часто ошибки появляются из-за недостаточных прав системы на файлы или папки. Нельзя сказать, что Windows Installer не работает, в этом случае достаточно просто добавить нужные права и всё заработает. Буквально вчера я столкнулся с тем, что скаченный дистрибутив .msi не захотел устанавливаться, при этом успешно запускается мастер установки, выбираются параметры, но затем система думает несколько секунд и выдаёт ошибку:
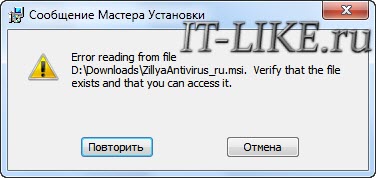
«Error reading from file «имя файла» verify that the file exists and that you can access it» (Error 1305). Переводится «Ошибка чтения из файла … проверьте существует ли файл и имеете ли вы к нему доступ». Ну не тупняк ли? Естественно, что кнопка «Повторить» не помогает, а отмена прекращает всю установку. Сообщение особой смысловой нагрузки также не несёт, т.к. файл точно существует и я имею к нему доступ, иначе бы просто не смог его запустить и получить это сообщение, к тому же почему-то на английском языке 🙂
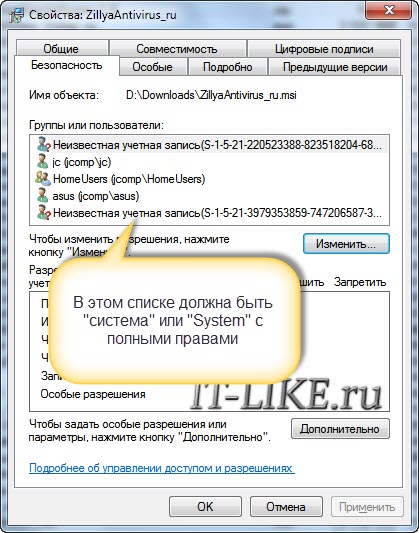
А ошибка в том, что не Я должен иметь доступ к файлу, а установщик Windows, точнее сама Система. Решается очень просто:
- Кликаем правой кнопкой по файлу с расширением .msi, выбираем «Свойства»
- На вкладке «Безопасность» смотрим, есть ли в списке пользователь с именем «система» или «System»

- Скорее всего вы такого не увидите. Поэтому будем добавлять вручную. Нажимаем кнопку «Изменить…», затем «Добавить…»
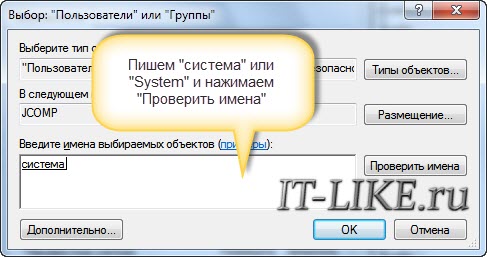
- В поле пишем «система» или «System» (если у вас английская Windows) и нажимаем «Проверить имена». При этом слово должно стать подчёркнутым как на картинке.

- Нажимаем «ОК», ставим галочку «Полный доступ», «ОК»
- Кнопка «Дополнительно» -> «Изменить разрешения…» ставим «Добавить разрешения, наследуемые от родительских объектов», «ОК» три раза.
Теперь ошибка установщика не появится! Можно добавить доступ на всю папку, из которой вы обычно инсталлируете программы, например на папку «Downloads», как у меня. Смотрим видео по решению проблем с правами доступа:
В Windows XP вкладки «Безопасность» не будет, если включён простой общий доступ к файлам. Чтобы его выключить, нужно зайти в и выключить опцию «Использовать простой общий доступ к файлам». В урезанных версиях Windows 7/10 и XP вкладки «Безопасность» нет в принципе. Чтобы её увидеть, нужно загрузить Windows в безопасном режиме и зайти в неё под администратором.
Ещё способы решить проблему
- Запускайте установку, войдя в систему под администраторским аккаунтом
- Правой кнопкой по пакету «.msi» и выбираем «Запуск от имени Администратора»
- Выключите антивирус на время
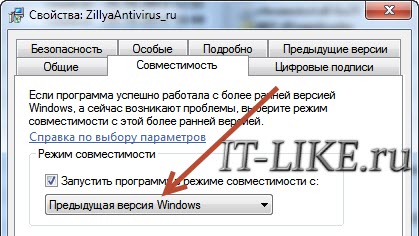
- Включить режим совместимости с предыдущими операционными системами. Для этого зайдите в свойства файла msi и на вкладке «Совместимость» поставьте галочку «Запустить программу в режиме совместимости»

- Если файл на флешке, то попробуйте скопировать его куда-нибудь на жёсткий диск и запустить оттуда (бывает, что запрещена установка программ со съёмных накопителей)
- Попробуйте просто создать новую папку с любым именем в корне диска, перекинуть туда дистрибутив и запустить его оттуда
Описанный метод поможет при разных сообщениях, с разными номерами. Например, вы можете видеть такие ошибки файлов msi:
- Error 1723
- Internal Error 2203
- Системная ошибка 2147287035
- Ошибка «Невозможно открыть этот установочный пакет»
- Ошибка 1603: Во время установки произошла неустранимая ошибка
Во всех этих случаях должна помочь установка прав на файл и/или на некоторые системные папки. Проверьте, имеет ли доступ «система» к папке временных файлов (вы можете получать ошибку «Системе не удается открыть указанное устройство или файл»). Для этого:
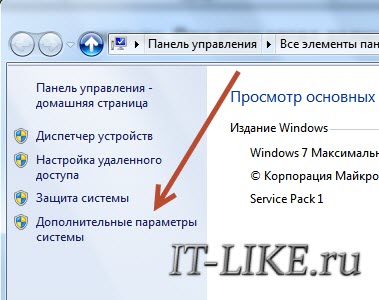
- Сначала узнаем нужные пути. Нажмите «Win + Pause» и зайдите в

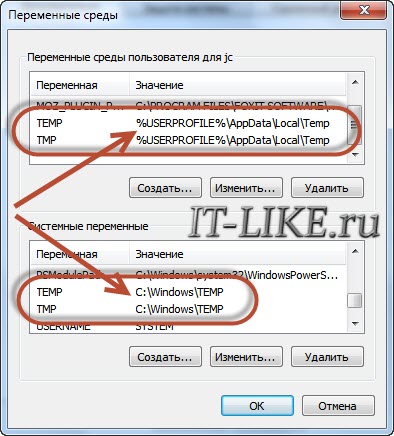
- В списках ищем переменные с названиями «TEMP» и «TMP» (значения обычно совпадают), в них записаны пути к временным папкам, которые использует установщик Windows

- Теперь идём к этим папкам и смотрим в их свойствах, имеет ли к ним доступ «система». Чтобы быстро получить путь к временной папке пользователя, кликните два раза по переменной, скопируйте путь и вставьте его в адресной строке «Проводника» Windows
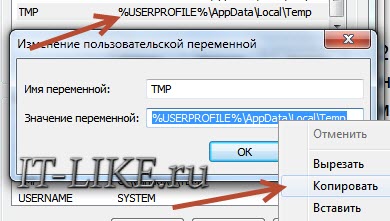

После нажатия «Enter» путь преобразится на «нормальный» и вы переместитесь в реальную временную папку. Права на неё и надо проверять. Также рекомендую очистить временные папки от всего что там скопилось или даже лучше удалить их и создать новые с такими же названиями. Если не получается удалить папку, почитайте как удалить неудаляемое, но это не обязательно.
Если служба Windows Installer всё равно не хочет работать, то проверьте права на папку «C:Config.Msi», сюда «система» также должна иметь полный доступ. В этом случае вы могли наблюдать ошибку «Error 1310». На всякий случай убедитесь, что к папке КУДА вы инсталлируете софт также есть все права.
Если вы используете шифрование папок, то отключите его для указанных мной папок. Дело в том, что хотя мы сами имеем к ним доступ, служба Microsoft Installer не может до них достучаться пока они зашифрованы.
Ещё ошибка может быть связана с битым файлом. Может быть он не полностью скачался или оказался битым уже на сервере. Попробуйте скачать его ещё раз оттуда же или лучше с другого места.
Ошибка установщика Windows
В случае общих проблем не будут устанавливаться никакие msi файлы, процесс установки, скорее всего, даже не начнётся. При этом могут появляться ошибки вида:
- Нет доступа к службе установщика Windows
- Не удалось получить доступ к службе установщика Windows
- Ошибка пакета установщика Windows (1719)
или ещё нечто подобное со словами «ошибка msi», «Windows Installer Error». Всё это означает, что система дала сбой и теперь её надо лечить. Может вы ставили какой-то софт, который испортил системные файлы и реестр, или подхватили вирус. Конечно, никогда не будет лишним удалить вирусы, или убедиться что их нет. Но оставьте этот вариант на потом, т.к. обычно проблема кроется в другом.
Сначала давайте проверим работает ли служба Windows Installer:
- Нажмите «Win + R» и введите services.msc
- Найдите в конце списка службу «Установщик Windows» или «Windows Installer»

- Тип запуска должен быть «Вручную». Если она «Отключена», то зайдите в «Свойства» и выберите «Вручную»
- Затем кликните по ней правой кнопкой и выберите «Запустить» или «Перезапустить». Если ошибок нет и состояние переходит в режим «Работает», то здесь всё нормально.
- Нажмите «Win + R» и введите msiexec. Если модуль MSI работает нормально, то должно появиться окно с версией установщика и параметрами запуска, а не ошибка.

Следующее что я посоветую сделать – это выполнить команду сканирования системы на повреждённые и изменённые системные файлы. Нажмите «Win + R» и введите
Sfc /scannow
Произойдёт поиск и замена испорченных файлов на оригинальные, при этом может потребоваться вставить установочный диск с Windows XP-7-10. После окончания процесса перегрузитесь и посмотрите, решена ли проблема.
Microsoft сам предлагает утилиту, призванную решить нашу проблему. Запустите программу Easy Fix и следуйте мастеру.
Скачать Easy Fix
Параметры реестра и службы
Следующий способ устранения ошибки – восстановление рабочих параметров в реестре установщика Windows Installer.
Скачать msiserver.reg
Для этого скачайте архив и запустите оттуда два reg-файла, соответственно своей версии Windows. Согласитесь с импортом настроек.
Важно! Перед последним действием желательно создать точку восстановления системы! Если способ не поможет или станет хуже, вы сможете восстановиться до прежнего состояния.
В Windows XP или Windows Server 2000 установите последнюю версию установщика 4.5.
Скачать Windows Installer 4.5
Если не помогло, то проделайте ещё перерегистрацию компонентов:
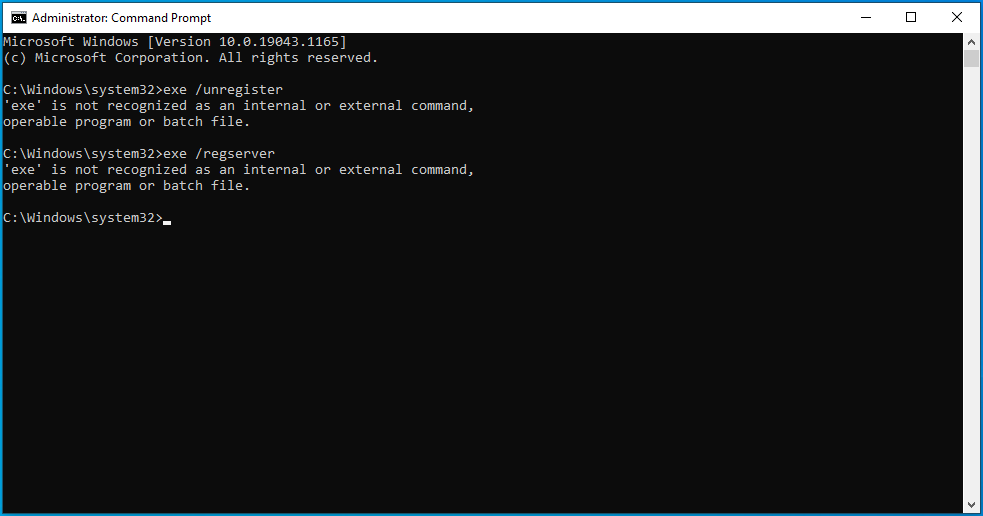
- Нажмите «Win + R» и введите «cmd». Затем в чёрном окне введите последовательно команды:
MSIExec /unregister
MSIExec /regserver - В ответ должна быть пустота, никаких ошибок. Если проблема не решена, введите ещё команду
regsvr32 msi.dll - Закройте чёрное окно
Если пишет, что не хватает прав, то нужно запускать командную строку от имени Администратора.
Если команды выполнились, но не помогло, то скачайте файл и запустите msi_error.bat из архива, проверьте результат.
Последний вариант — скачайте программу Kerish Doctor, почитайте мою статью, там есть функция исправления работы службы установщика и многих других частых проблем Windows.
Также, многие программы используют .NET Framework, поэтому не будет лишним установить последнюю версию этого пакета. И, напоследок, ещё один совет: если в пути к файлу-дистрибутиву есть хоть одна папка с пробелом в начале названия, то удалите пробел. Такой простой приём решит вашу проблему 🙂
Подведение итогов
Ошибки с установщиком Windows очень неприятные, их много и сразу непонятно куда копать. Одно ясно – система дала сбой и нужно восстанавливать её до рабочего состояния. Иногда ничего не помогает и приходится переустанавливать Windows. Однако не торопитесь это делать, попробуйте попросить помощи на этом форуме. В точности опишите вашу проблему, расскажите что вы уже делали, какие сообщения получили, и, возможно, вам помогут! Ведь мир не без добрых людей 🙂
Contents
- What Is the Error 1720 on Windows 10?
- How to Fix ‘There Is a Problem with this Windows Installer Package’ on Windows 10
- Solution 1: Be Sure to Run the Installer with Administrative Permissions
- Solution 2: Re-Download the Installer and Setup Files
- Solution 3: Run the Troubleshooter
- Solution 4: Install Pending Windows Updates
- Solution 5: Check Windows Installer for Errors
- Solution 6: Re-Register Windows Installer
- Solution 7: Restart the Windows Installer Service
- Solution 8: Re-Register the Scrrun.dll File
- Here are the steps:
- Scan Your Registry for Issues
![[FIXED] Error 1720 There is a problem with this Windows Installer package](https://www.auslogics.com/en/articles/wp-content/uploads/2021/07/fix-error-1720-there-is-a-problem-with-this-windows-installer-package.jpg)
Are you looking for solutions on how to get rid of the Error 1720 in Windows 10 Installer? Well, you’ve come to the right page. Windows users have been complaining about encountering this error on several occasions on their computers. The Windows Installer performs some of the most critical tasks on the operating system, such as program installation, software removal, and maintenance.
The installer is packed with registry keys, shortcuts, and other metadata and usually carries out its functions without issues. The thing is, errors can occur randomly. You may receive the following message:
“There is a problem with this Windows Installer package. A script required for this install to complete could not be run.”
What Is the Error 1720 on Windows 10?
The “Error 1720: There is a problem with this Windows Installer package” can be triggered by registry issues. The error appears to affect Windows 7, Windows 8, and Windows 10 machines and pops up when a software update/upgrade or installation fails. It also appears when users try to uninstall programs.
The most annoying thing is that the error can be quite resilient and can interfere with your daily tasks. Fortunately, the error is temporary and can easily be fixed by the workarounds in this post.
How to Fix ‘There Is a Problem with this Windows Installer Package’ on Windows 10
Solution 1: Be Sure to Run the Installer with Administrative Permissions
Installing any third-party application requires administrative permissions for the process to succeed. This is a standard requirement on all Windows machines that gives you more control over what gets installed on your device. It’s a preventive measure that helps to keep applications from installing in the background. It also helps prevent the installation of malware.
Now, you might not have the proper permissions to install the program that triggered the Error 1720. Well, you can resolve it by running the installer as an administrator. Here’s how:
- Open the location in File Explorer containing the application you want to install.
- Right-click the installer and select Run as Administrator.
That’s it. If the issue was caused by a lack of administrator rights, this should fix it. If not, try the next troubleshooting step below.
Solution 2: Re-Download the Installer and Setup Files
An application package comprises several installation setup files or a single .exe file, accompanied by numerous DLL files. If the download was incomplete, or for some reason one of the files got corrupted, the installation will fail and may trigger the Error 1720.
Besides, the file could have been corrupted by the presence of a virus in your computer. Your antivirus can also block the .exe file, deeming it malicious. For that case, you should run a malware scan to eliminate any kinds of threats. Additionally, try re-downloading the file once again to check if this works.
You can also temporarily disable your antivirus software and try to run the installer. However, this is a risky move unless you are 100 percent certain that the application is trustworthy. One more thing. Be sure your system meets the minimum requirements to run the program. Otherwise, the entire process will fail again.
Solution 3: Run the Troubleshooter
Windows 10 comes with troubleshooting tools to help find and fix common computer problems. Usually, you’ll find the Troubleshoot option in the Settings app under this path:
Update & Security > Troubleshoot > Additional troubleshooters.
Alternatively, you can open Control Panel and type “Troubleshoot” (no quotes) in the Search Control Panel input box.
However, the Program Install and Uninstall troubleshooter is not listed here, and you’ll have to download it to proceed with this process. Here are the steps:
- Go to Microsoft’s download page and click on the blue Download Troubleshooter button.
- Choose your preferred location to save the file and download it. Once downloaded, select Run or Open.
- Follow the instructions provided to complete the process. Once done, try to install or uninstall the problematic program to see if it goes through this time.
Solution 4: Install Pending Windows Updates
The Error 1720 could be caused by a buggy Windows Installer. Typically, Windows releases updates periodically to address buggy updates and improve system performance. That’s why you’re always encouraged to keep your system up to date.
To check if there are pending Windows updates for your system, follow the guide below:
- Press the Windows Key + I to launch the Settings app.

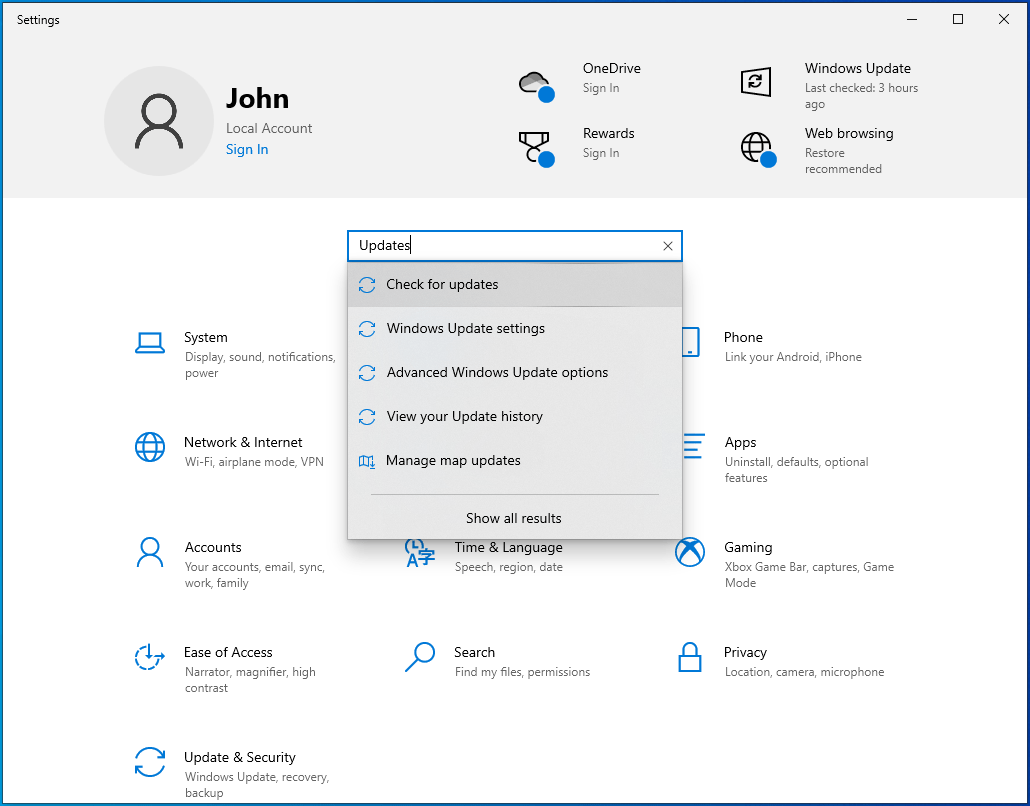
- Type “Updates” (no quotes) in the Find a Setting input box and select Check for Updates.
- On the page that opens next, check if pending updates are waiting to be installed and install them. If no updates are displayed, click on the Check for Updates button and wait for Windows to search online for available updates. If updates are available, Windows will automatically download and install them on your machine.
Restart your Windows PC and try running the installer again. If you’re still getting the error, proceed to the next fix.
Solution 5: Check Windows Installer for Errors
If Windows Installer is corrupted or disabled by mistake, you won’t be able to install anything on your machine. You need to make sure that it’s working accordingly. To do that:
- Press the Win + R keyboard shortcut.

- Type “CMD” (no quotes) into the Run text box. Press the Ctrl + Shift + Enter key combination to launch Command Prompt with elevated rights.
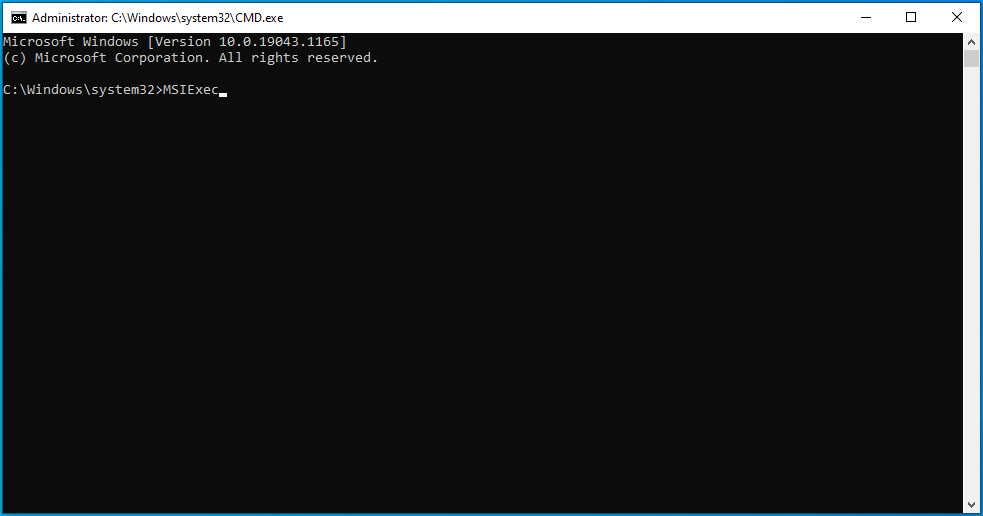
- Type the command “MSIExec” (no quotes) and press Enter. If everything checks out, a pop-up window with Windows Installer details will appear. If an error report is displayed instead, you’ll need to re-register Windows Installer.

Solution 6: Re-Register Windows Installer
If the previous step shows a Windows Installer error report, you must re-register it to get rid of those errors, and hence the Error 1720. Follow these instructions for guidance:
- Open the Quick User Menu using the Win + X shortcut and select Command Prompt (Admin). If the option is not available here, repeat Step 1 from Solution 5 above.
- In the Command Prompt window, execute the commands:
- After the commands run successfully, exit Command Prompt and repeat the action that triggered the error in question to see if it has been resolved.
Solution 7: Restart the Windows Installer Service
Like we noted above, you or someone else may have disabled Windows Installer unintentionally. To check this fact and restart it, follow these steps:
- Press the Windows logo on your keyboard, type “Services” (without quotes), and press Enter.

- In the Services window, locate Windows Installer and double-click on it to open its Properties.

- Under Service Status check if it says Running. If it does, click on Stop and then click on Start to run it again. If it says Stopped, click on Start to run it.

- Change the Startup Type to Automatic.
- Click on Apply > OK.
- Restart your computer to effect the changes and check if this fixes the “Error 1720: There is a problem with this Windows Installer package” issue.
Solution 8: Re-Register the Scrrun.dll File
Scrrun.dll is the Scripting Runtime DLL (Dynamic Link Library) file responsible for reading and writing scripts and text files. It’s essential for your Windows machine to run properly and enables the installer to function accordingly. If it stops working, Windows Installer ceases to run correctly. We’ll attempt to fix Windows Installer by re-registering the scrrun.dll file.
Here are the steps:
- Press the Windows Key, type “Services” (without quotes) into the Windows Search box, and hit Enter to launch the Services window.

- Navigate to the Windows Installer service, which should be toward the bottom of the page.
- Right-click on it and open its Properties.
- Select Manual under Startup Type.
- Click on Apply > OK and restart your PC.
- Next, open Command Prompt with administrator rights. To do that, press the Win + R key combination, type “CMD” (no quotes), and hit the Ctrl + Shift + Enter keys at the same time.
- On the elevated command prompt window, type or paste the commands below, one after the other, and then press Enter after each one:
- For Windows (32-bit): cd C:\Windows\System32
- For Windows (64-bit): cd C:\Windows\SysWow64
- Next, still on the Command Prompt window, type “regsvr32 scrrun.dll” (no quotes) to re-register the DLL file.
- Once done, reboot Windows and check if the error has disappeared.
Scan Your Registry for Issues
If none of these solutions gets rid of the Error 1720 in Windows 10 Installer, we recommend scanning the registry for corruption and other issues. We mentioned at the beginning of this article that registry problems are mainly to blame for Windows Installer errors. We understand trying to identify corrupt keys or broken entries in such a vast database is nearly impossible.
That’s why we suggest an automatic repair tool like Auslogics BoostSpeed Registry Cleaner.
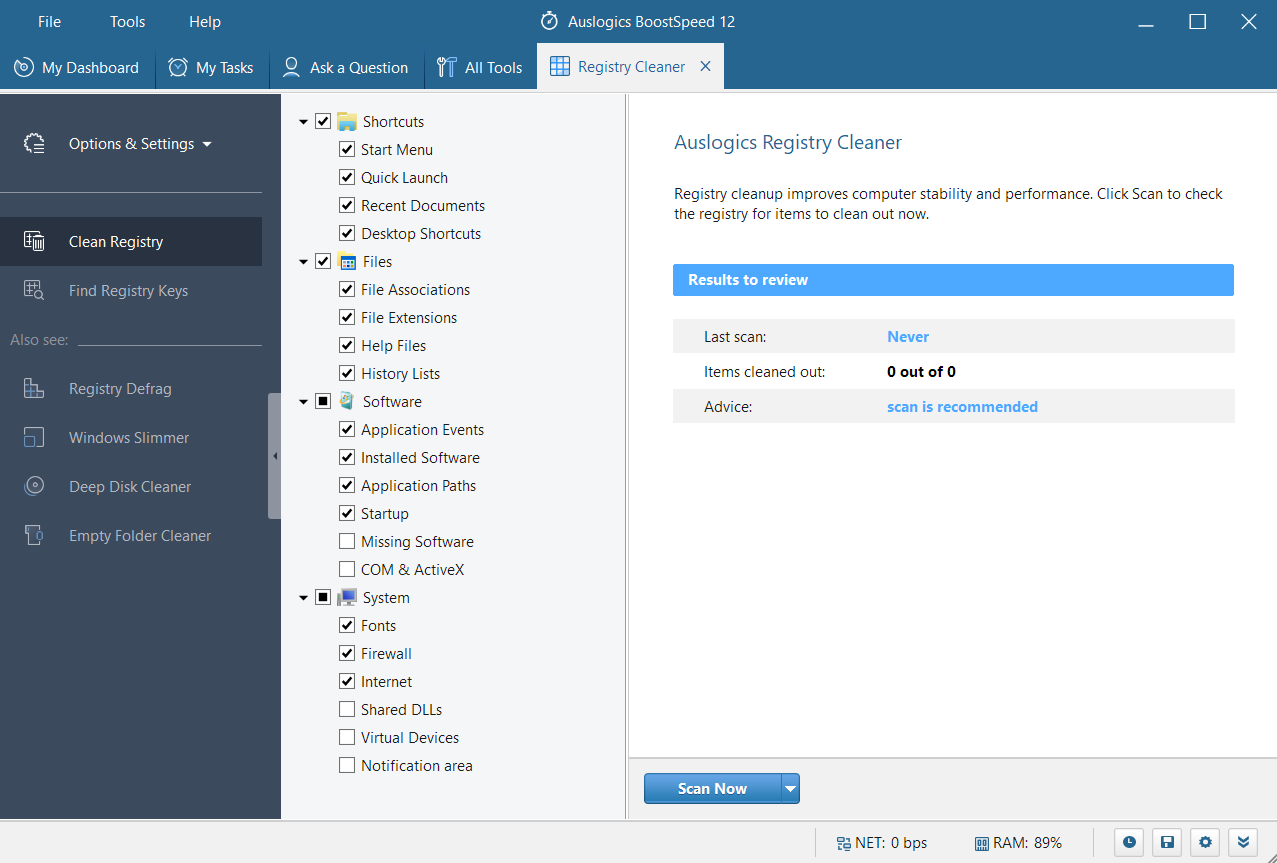
This application detects and fixes registry issues, stabilizing your PC. It’s safe, fast, and reliable. You don’t have to worry about the wrong keys or entries being deleted since the tool is designed to work with precision.
Cleaning the registry is recommended every once in a while to remove keys that may have been left behind after the uninstallation of programs. You don’t want them to accumulate since they’ll start causing issues. Registry Cleaner is just one of the many tools that come with Auslogics BoostSpeed. You can also clean PC junk, defrag the registry and your hard disks, remove file duplicates, and so on. What’s more, you can schedule automatic scans to ensure that your system runs at optimal levels every time you use it.