“The driver can’t release to failure” – это сообщение об ошибке, которое проявляется у пользователей материнских плат от Gigabyte. Сообщение само по себе не говорит с каким драйвером произошли проблемы, но оно тесно связано с материнками от Gigabyte, особенно с теми у которых нет беспроводных возможностей.
Проблема проявляется при использовании вами программного обеспечения Gigabyte. Наиболее проблемной утилитой является “Cloud Station Server” и так как она полагается на возможность использования WiFi, то на ПК без этих технологий и возникает ошибка.

Метод №1 Отключение Home Cloud, GIGABYTE Remote и Remote OC в App Center
- Для начала откройте App Center.
- Затем откройте Cloud Station Server.
- Вы увидите окошко с пятью вкладками находящиеся внизу. Первые три(Home Cloud, GIGABYTE Remote и Remote) как раз и являются функциями из-за которых возникает проблема. На всех них стоит отметка “Всегда запускать при следующей загрузке”.
- Выключите эту опцию для всей тройки и перезапустите свой компьютер.
После этого ошибка “The driver can’t release to failure” должна исчезнуть.
Метод №2 Полная переустановка ПО
Процесс Cloud Station Server который работает на заднем фоне во время появления ошибки называется ubssrv. Переустановка ПО предотвратит работу этого процесса, что и решает проблему с ошибкой “The driver can’t release to failure”.
- Зайдите в “Панель управления”. Для этого нажмите правой кнопкой мыши на “Пуск” и выберите соответствующий пункт
- Далее пройдите в “Программы и компоненты”.
- В списке утилит найдите Gigabyte. У вас есть выбор перед удалением только Cloud Station Server или всего App Center.
- Выберите нужное ПО, нажмите на него правой кнопкой мыши и кликните “Удалить”.
- Далее следуйте инструкциям мастера установки. После этого процесса, перезагрузите ваш компьютер.
Не совсем понятно почему Gigabyte еще не исправили эту проблему, так как ошибка “The driver can’t release to failure” возникает у достаточно большого количества пользователей с различным набором их материнок и операционных систем.
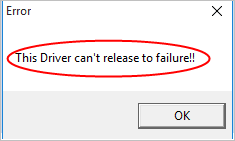
Каждый раз, когда вы запускаете Windows 10, вы видите сообщение об ошибке Этот драйвер не может быть доведен до отказа не волнуйся. Вы можете исправить это с помощью одного из 3 решений, описанных в этой статье. Возможно, вам не придется пробовать их все. Просто двигайтесь вниз, пока не найдете тот, который вам подходит.
Причина проблемы — утилита GIGABYTE (APP Center), поставляемая вместе сGIGABYTEматеринские платы. Чтобы решить эту проблему, попробуйте эти 3 решения:
Решение 1. Загрузите последнюю версию GIGABYTE APP Center
Ваш текущий GIGABYTE APP Center может быть несовместим с Windows 10. Перейдите на Официальная страница загрузки GIGABYTE чтобы проверить и загрузить последнюю версию центра приложений, а затем установить ее на свой компьютер.
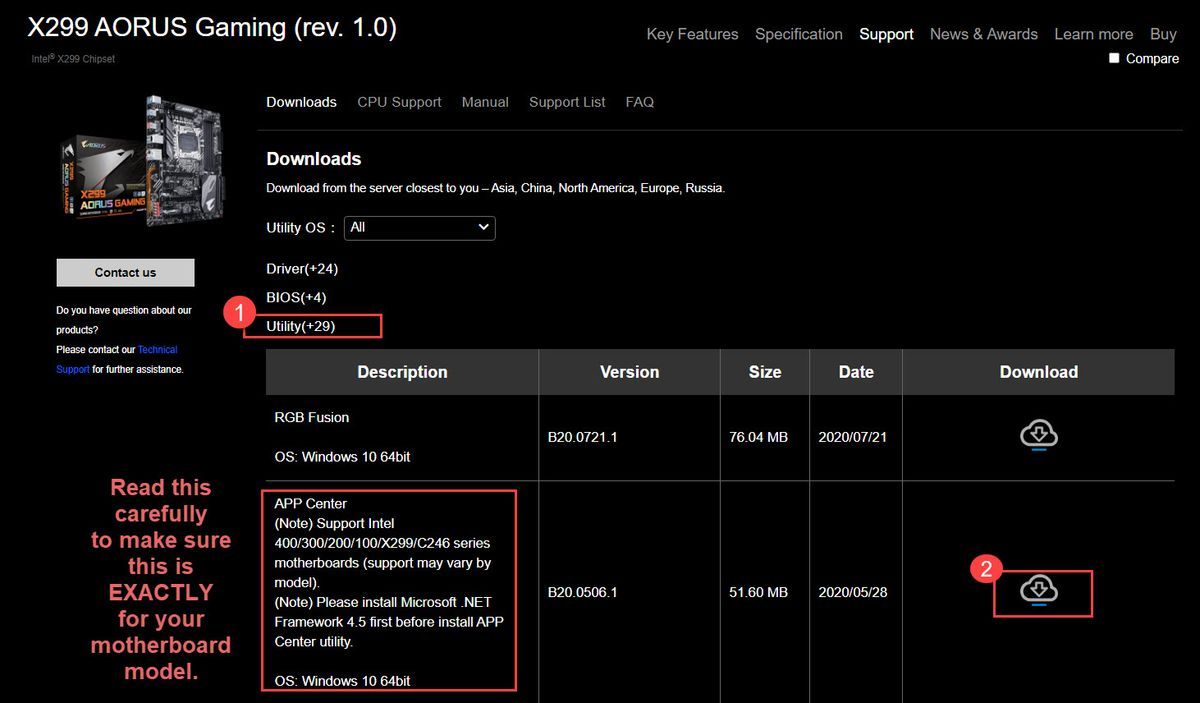
ВАЖНЫЙ: Установите GIGABYTE App Center, загрузив его только с Официальный сайт GIGABYTE . Устанавливайте только ту версию, которая отображается в списке загрузок для вашего точное соответствие конкретной модели материнской платы .
1. Перейдите в Загрузка утилиты GIGABYTE страница.
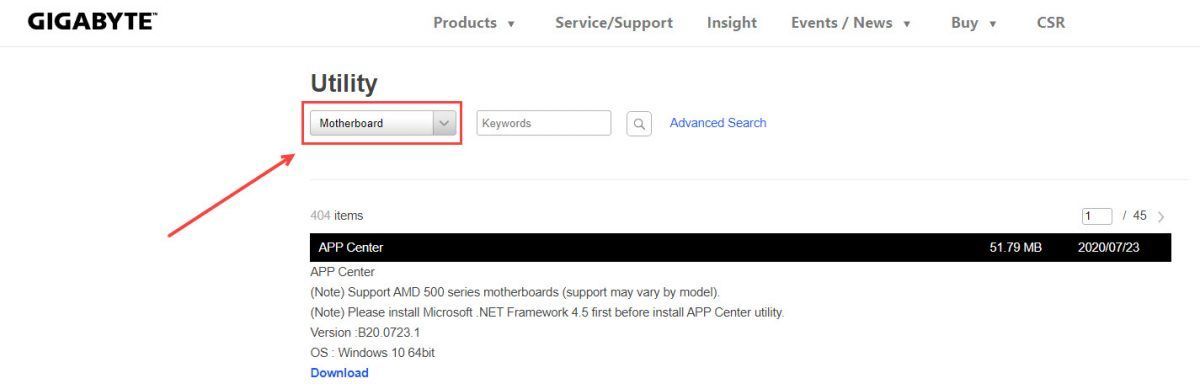
2. Найдите Центр приложений по Материнская плата .
3. Введите Ключевые слова в поле поиска и начните поиск.
В качестве альтернативы вы можете выбрать Расширенный поиск (выполните поиск по сокету, набору микросхем и модели), чтобы найти соответствующий Центр приложений.
4. Щелкните Скачать рядом с центром приложений именно для вашей материнской платы.

5. Запустите установочный файл и следуйте инструкциям на экране для установки.
Заметка: Вы можете либо перейти на его Материнская плата для доступа к Центру приложений. Затем перейдите в раздел «Утилиты», чтобы загрузить точную версию Центра приложений для вашего компьютера.
Надеюсь, это решит вашу Этот драйвер не может быть доведен до отказа вопрос. Если, к сожалению, это решение не поможет, не волнуйтесь. Ознакомьтесь с нашим следующим решением ниже.
Решение 2. Удалите GIGABYTE APP Center.
Идти к Программы и особенности чтобы удалить весь GIGABYTE APP Center. После этого проблема должна разрешиться.
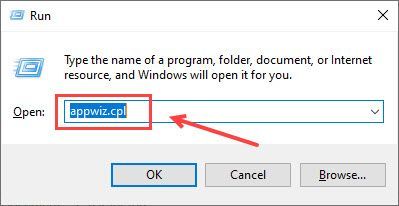
1) Нажмите клавиши Win + R, чтобы открыть окно «Выполнить».
2) Скопируйте и вставьте appwiz.cpl в поле и нажмите ввод
3) Щелкните правой кнопкой мыши Центр приложений GIGABYTE и выберите Удалить .
Решение 3. Обновите драйверы GIGABYTE
В некоторых случаях виноваты проблемные драйверы GIGABYTE. Приведенные выше шаги могут решить эту проблему, но если это не так, попробуйте обновить драйверы. Если вы не уверены, что играете с драйверами вручную,вы можете сделать это автоматически с Водитель Easy .
Driver Easy автоматически распознает вашу систему и найдет для нее подходящие драйверы. Вам не нужно точно знать, в какой системе работает ваш компьютер, вам не нужно рисковать, загружая и устанавливая неправильный драйвер, и вам не нужно беспокоиться о том, что вы ошиблись при установке.
Вы можете автоматически обновлять драйверы с помощью БЕСПЛАТНОЙ или Pro версии Driver Easy. Но с версией Pro требуется всего 2 клика (и вы получаете полную поддержку и 30-дневную гарантию возврата денег):
1) Скачать и установите Driver Easy.
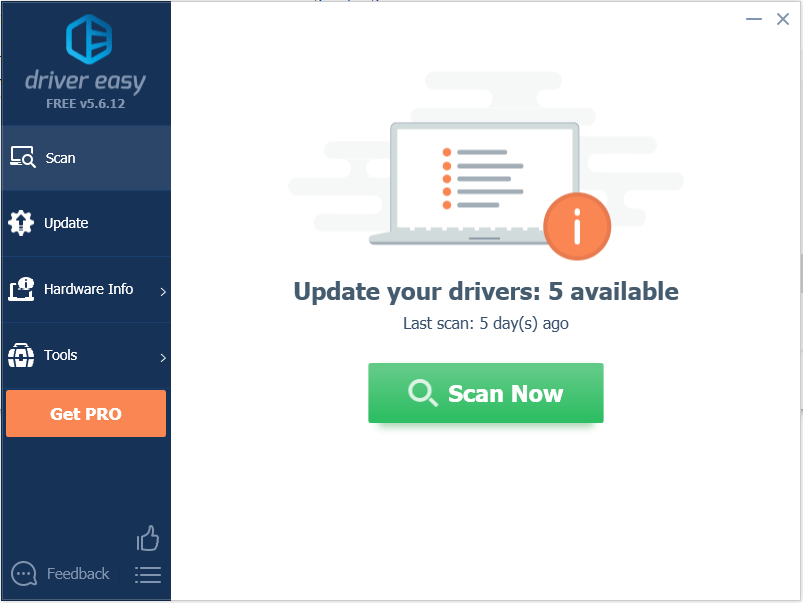
2) Запустите Driver Easy и нажмите Сканировать сейчас кнопка. Затем Driver Easy просканирует ваш компьютер и обнаружит проблемы с драйверами.
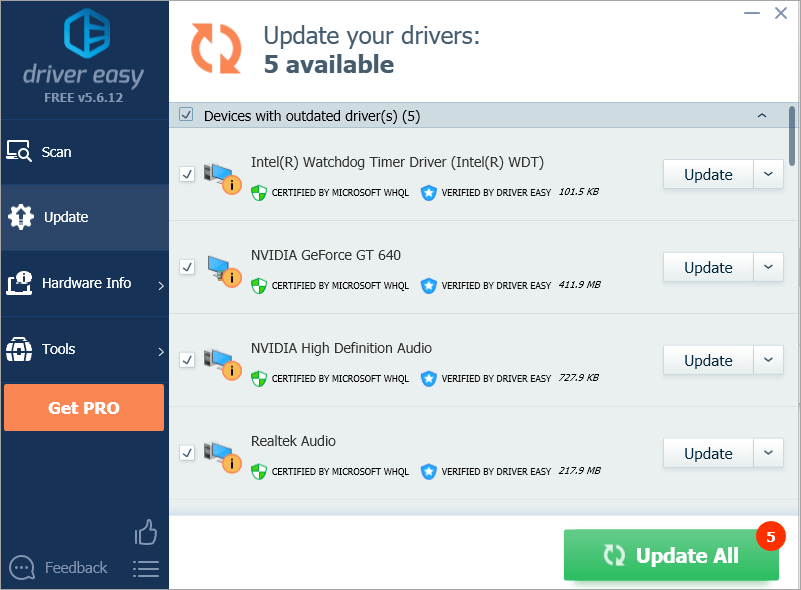
3) Щелкните значок Обновить нажмите кнопку, чтобы загрузить и установить драйверы по одному (это можно сделать в БЕСПЛАТНОЙ версии). Или нажмите Обновить все для автоматической загрузки и установки правильной версии все драйверы, которые отсутствуют или устарели в вашей системе (для этого требуется Pro версия — вам будет предложено выполнить обновление, когда вы нажмете «Обновить все»).
Надеюсь, эта статья окажется для вас полезной. Если у вас есть какие-либо вопросы, идеи или предложения, не стесняйтесь оставлять комментарии ниже.
Содержание
- This Driver can’t release to failure in Windows 10 [SOLVED]
- Solution 1: Download the Latest version of GIGABYTE APP Center
- Solution 2: Uninstall GIGABYTE APP Center
- Solution 3: Update GIGABYTE drivers
- This driver can t release to failure windows 10 как исправить
- реклама
- Этот драйвер не может быть выпущен до отказа в Windows 10 (решено)
- Решение 1. Загрузите последнюю версию GIGABYTE APP Center
- Решение 2. Удалите GIGABYTE APP Center.
- Решение 3. Обновите драйверы GIGABYTE
- Как исправить ошибку “The driver can’t release to failure” в Windows 7, 8 и 10?
- Метод №1 Отключение Home Cloud, GIGABYTE Remote и Remote OC в App Center
- Метод №2 Полная переустановка ПО
- FIX: This driver can’t release to failure
- How do I fix the This driver can’t release to failure error?
- 1. Update the Motherboard Drivers
- DriverFix
- 2. Switch off the Always run on next reboot setting
- 3. Reinstall Gigabyte Services via Command Prompt
- 4. Update the App Center
- 5. Uninstall the App Center
This Driver can’t release to failure in Windows 10 [SOLVED]
Last Updated: 1 year ago

Every time when you start Windows 10, if you see error message saying This Driver can’t release to failure, don’t worry. You can fix it with one of the 3 solutions in this article. You may not have to try them all. Just work your way down until you find the one that works for you.
The cause of the problem is GIGABYTE utility (APP Center) that came along with GIGABYTE motherboards. To fix the problem, just try these 3 solutions:
Solution 1: Download the Latest version of GIGABYTE APP Center
Your current GIGABYTE APP Center might not be compatible with Windows 10. So go to GIGABYTE official download page to check and download the latest APP center, then install it on your computer.
2. Search for the App Center by Motherboard.

3. Enter Keywords in the search box and start searching.
Alternatively, you can choose Advanced Search (search by Socket, Chipset and Model) to find the matching App Center.
4. Click Download next to the App Center exactly for your motherboard.

5. Run the installation file and follow the on-screen instructions to install.
Hope this solves your This Driver can’t release to failure issue. If unfortunately this solution doesn’t do the trick for you, don’t worry. Check out our next solution below.
Solution 2: Uninstall GIGABYTE APP Center
Go to Programs and Features to uninstall the whole GIGABYTE APP Center. After that, the problem should resolve.
1) Press the Win key + R to invoke the Run box.
2) Copy & paste appwiz.cpl into the box and press enter

3) Right click the GIGABYTE APP Center and select Uninstall.
Solution 3: Update GIGABYTE drivers
In some cases, problematic GIGABYTE drivers can be the culprit. The steps above may resolve it, but if they don’t, try to update the drivers. If you’re not confident playing around with drivers manually, you can do it automatically with Driver Easy.
Driver Easy will automatically recognize your system and find the correct drivers for it. You don’t need to know exactly what system your computer is running, you don’t need to risk downloading and installing the wrong driver, and you don’t need to worry about making a mistake when installing.
You can update your drivers automatically with either the FREE or the Pro version of Driver Easy. But with the Pro version it takes just 2 clicks (and you get full support and a 30-day money back guarantee):
1) Download and install Driver Easy.
2) Run Driver Easy and click Scan Now button. Driver Easy will then scan your computer and detect any problem drivers.

3) Click the Update button to download and install the drivers one by one (you can do this with the FREE version). Or click Update All to automatically download and install the correct version of all the drivers that are missing or out of date on your system (this requires the Pro version – you’ll be prompted to upgrade when you click Update All).

Hopefully you find this article helpful. If you have any questions, ideas or suggestions, feel free to leave a comment below.
Источник
This driver can t release to failure windows 10 как исправить
Обновления Windows 10 зачастую вызывали много проблем у многих пользователей и с каждым новым накопительным обновлением их становится всё больше и больше. Например, могут возникнуть проблемы с драйверами, которые ранее никак себя не проявляли, а устройства, для которых эти драйверы предназначены, работали вполне себе штатно.
реклама
Если на Вашем устройстве с операционной системой Windows 10 возникает ошибка «драйвер не может быть загружен на этом устройстве», Microsoft утверждает, что это означает следующее: настройка целостности памяти в Windows Security предотвращает загрузку драйвера на вашем устройстве.
Корпорация Майкрософт обновила документ поддержки, предупреждая пользователей о том, что «если Вы решите продолжить использование устройства без решения проблемы драйвера, Вы можете обнаружить, что функциональность, которую поддерживает драйвер, больше не работает, что может иметь последствия от незначительных до серьезных».
Как быть в данной ситуации? Как решить проблему с драйверами в Windows 10?
Первое, что Вы должны сделать, это проверить, доступен ли новый или обновленный драйвер через Центр обновления Windows или через производителя этого драйвера. Если Вы не можете найти совместимый драйвер для решения этой проблемы, Вы можете отключить параметр целостности памяти в системе безопасности Windows, чтобы обойти сообщение об ошибке «драйвер не может загрузиться на это устройство».
1) Перейдите в меню Пуск > Настройки > Обновление и безопасность
2) Затем выберите Безопасность Windows > Безопасность устройства
3) В разделе «Изоляция ядра» выберите «Сведения об изоляции ядра»
4) Отключите настройку целостности памяти, если она еще не включена
5) Перезагрузите компьютер для вступления измененных параметров в силу
Несовместимые драйверы оказались своего рода проклятием для Windows 10, но похоже что компания, по крайней мере, наконец-то начала признавать эти проблемы и предлагать обходные пути вместо того, чтобы оставлять пользователей в поисках решений.
Источник
Этот драйвер не может быть выпущен до отказа в Windows 10 (решено)
This Driver Can T Release Failure Windows 10
Если каждый раз, когда вы запускаете Windows 10, вы получаете сообщение об ошибке, в котором говорится, что этот драйвер не может работать до отказа, используйте здесь решения, чтобы решить проблему.
Каждый раз, когда вы запускаете Windows 10, вы видите сообщение об ошибке Этот драйвер не может быть доведен до отказа не волнуйся. Вы можете исправить это с помощью одного из 3 решений, описанных в этой статье. Возможно, вам не придется пробовать их все. Просто двигайтесь вниз, пока не найдете тот, который вам подходит.
Решение 1. Загрузите последнюю версию GIGABYTE APP Center
Ваш текущий GIGABYTE APP Center может быть несовместим с Windows 10. Перейдите на Официальная страница загрузки GIGABYTE чтобы проверить и загрузить последнюю версию центра приложений, а затем установить ее на свой компьютер.
3. Введите Ключевые слова в поле поиска и начните поиск.
В качестве альтернативы вы можете выбрать Расширенный поиск (выполните поиск по сокету, набору микросхем и модели), чтобы найти соответствующий Центр приложений.
4. Щелкните Скачать рядом с центром приложений именно для вашей материнской платы.
5. Запустите установочный файл и следуйте инструкциям на экране для установки.
Заметка: Вы можете либо перейти на его Материнская плата для доступа к Центру приложений. Затем перейдите в раздел «Утилиты», чтобы загрузить точную версию Центра приложений для вашего компьютера.
Надеюсь, это решит вашу Этот драйвер не может быть доведен до отказа вопрос. Если, к сожалению, это решение не поможет, не волнуйтесь. Ознакомьтесь с нашим следующим решением ниже.
Решение 2. Удалите GIGABYTE APP Center.
Идти к Программы и особенности чтобы удалить весь GIGABYTE APP Center. После этого проблема должна разрешиться.
1) Нажмите клавиши Win + R, чтобы открыть окно «Выполнить».
2) Скопируйте и вставьте appwiz.cpl в поле и нажмите ввод
Решение 3. Обновите драйверы GIGABYTE
Driver Easy автоматически распознает вашу систему и найдет для нее подходящие драйверы. Вам не нужно точно знать, в какой системе работает ваш компьютер, вам не нужно рисковать, загружая и устанавливая неправильный драйвер, и вам не нужно беспокоиться о том, что вы ошиблись при установке.
Вы можете автоматически обновлять драйверы с помощью БЕСПЛАТНОЙ или Pro версии Driver Easy. Но с версией Pro требуется всего 2 клика (и вы получаете полную поддержку и 30-дневную гарантию возврата денег):
1) Скачать и установите Driver Easy.
2) Запустите Driver Easy и нажмите Сканировать сейчас кнопка. Затем Driver Easy просканирует ваш компьютер и обнаружит проблемы с драйверами.
Надеюсь, эта статья окажется для вас полезной. Если у вас есть какие-либо вопросы, идеи или предложения, не стесняйтесь оставлять комментарии ниже.
Источник
Как исправить ошибку “The driver can’t release to failure” в Windows 7, 8 и 10?
“The driver can’t release to failure” – это сообщение об ошибке, которое проявляется у пользователей материнских плат от Gigabyte. Сообщение само по себе не говорит с каким драйвером произошли проблемы, но оно тесно связано с материнками от Gigabyte, особенно с теми у которых нет беспроводных возможностей.
Проблема проявляется при использовании вами программного обеспечения Gigabyte. Наиболее проблемной утилитой является “Cloud Station Server” и так как она полагается на возможность использования WiFi, то на ПК без этих технологий и возникает ошибка.

Метод №1 Отключение Home Cloud, GIGABYTE Remote и Remote OC в App Center
После этого ошибка “The driver can’t release to failure” должна исчезнуть.
Метод №2 Полная переустановка ПО
Процесс Cloud Station Server который работает на заднем фоне во время появления ошибки называется ubssrv. Переустановка ПО предотвратит работу этого процесса, что и решает проблему с ошибкой “The driver can’t release to failure”.
Не совсем понятно почему Gigabyte еще не исправили эту проблему, так как ошибка “The driver can’t release to failure” возникает у достаточно большого количества пользователей с различным набором их материнок и операционных систем.
Источник
FIX: This driver can’t release to failure


The This driver can’t release to failure error message is one that more specifically pertains to Gigabyte motherboards.
Some users have stated that the error message pops up after upgrading to Windows 10. The error message is usually due to a motherboard‘s lack of built-in Wi-Fi, which is something required for the Gigabyte App Center’s Cloud Station Server.
Here are a few resolutions that can fix this Gigabyte motherboard error in Windows 10.
How do I fix the This driver can’t release to failure error?
1. Update the Motherboard Drivers
You might need to update your Gigabyte motherboard drivers to fix the driver can’t release error message. However, the motherboard has various drivers.
As such, it’s probably better to utilize driver-updating software to ensure the motherboard drivers are updated. This includes updating old ones, fixing broken ones, and replacing missing ones.
Most of the time, the generic drivers for your PC’s hardware and peripherals are not properly updated by the system. There are key differences between a generic driver and a manufacturer’s driver.Searching for the right driver version for each of your hardware components can become tedious. That’s why an automated assistant can help you find and update your system with the correct drivers every time, and we strongly recommend DriverFix. Here’s how to do it:
DriverFix
Keep your PC components drivers working perfectly without putting your PC at risk.
Disclaimer: this program needs to be upgraded from the free version in order to perform some specific actions.
2. Switch off the Always run on next reboot setting
As mentioned, the Cloud Station Server is one component of the Gigabyte App Center that requires onboard Wi-Fi. The Remote OC and Gigabyte Remote are two are components that also need onboard Wi-Fi.
Thus, switching those components off can fix the issue.
3. Reinstall Gigabyte Services via Command Prompt
‘sc create gdrv binPath= «C:Windowsgdrv.sys» type= «kernel» DisplayName= «gdrv»‘ and Return to reinstall the services.

Alternatively, reinstalling Gigabyte services might also resolve the issue.
4. Update the App Center

If you’ve recently upgraded to Windows 10, update the App Center to ensure that its compatible with the latest platform.
You can do that by pressing the GIGABYTE App Center Utility Download button on this page.
Then open the installer for the app to add the latest App Center version to Windows.
5. Uninstall the App Center
Some users have resolved the Gigabyte motherboard error message by removing the App Center from Windows.
One, or more, of those resolutions, will probably fix the driver can’t release” error in Windows 10. If you have any further suggestions for fixing the Gigabyte motherboard error, feel free to share them below.
Restoro has been downloaded by 0 readers this month.
Источник

Whenever you start your Windows 10, you get an error message saying “This Driver can’t release to failure” is because of the GIGABYTE App Center Utility. This problem is particular in all the PCs with a GIGABYTE motherboard because this utility comes pre-installed on it.
Now the main cause of this error is the components of APP center that requires access to onboard WiFi, and if no onboard Wifi is present, then the component fails. The components which we are talking about are Cloud Server Station, GIGABYTE Remote, and Remote OC. Now we know the main cause of this error, so without wasting any time, let’s see how to fix this error.
Contents
- [SOLVED] The driver can’t release to failure error
- Method 1: Disable Cloud Server Station, GIGABYTE Remote, and Remote OC
- Method 2: Install the latest version of APP center
- Method 3: Uninstall GIGABYTE services from the command prompt
- Method 4: Uninstall GIGABYTE APP Center
It’s recommended to create a restore point just in case something goes wrong.
Method 1: Disable Cloud Server Station, GIGABYTE Remote, and Remote OC
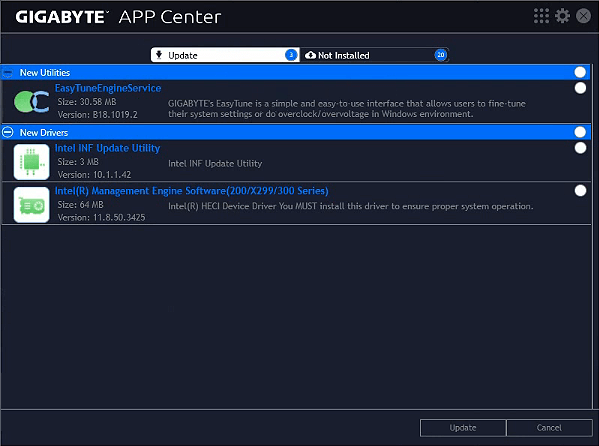
1. Open the GIGABYTE App Center from the System Tray.
2. Click on the tabs of Cloud Server Station, GIGABYTE Remote, and Remote OC.

3. Turn off ‘Always run on next reboot‘ switch on the above three components.
4. Restart your PC to save changes.
Method 2: Install the latest version of APP center
If you require certain components of APP center, then install the latest version of APP center (or only those components which you require) from the GIGABYTE download page.
Method 3: Uninstall GIGABYTE services from the command prompt
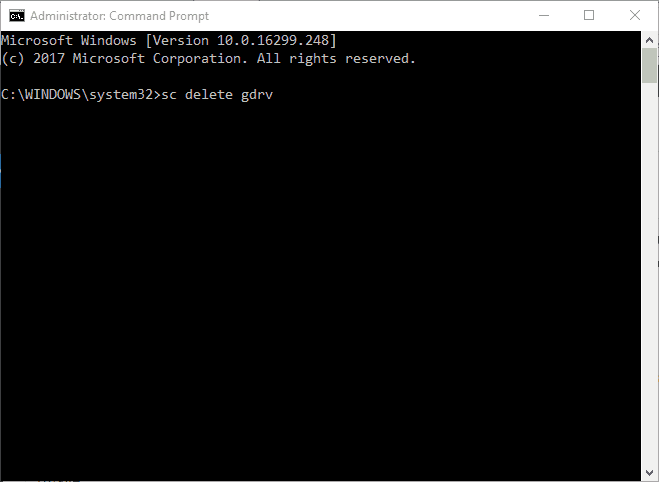
1. Press Windows Key + X then select Command Prompt (Admin).

2. Now type the following command exactly as shown below and hit enter after each one:
sc delete gdrv
sc create gdrv binPath= "C:Windowsgdrv.sys" type= "kernel" DisplayName= "gdrv"

3. The first command above uninstall the GIGABYTE services and the second command reinstall the same services.
4. Restart your PC to save changes and check if you’re able to Fix The driver can’t release to failure error.
Method 4: Uninstall GIGABYTE APP Center
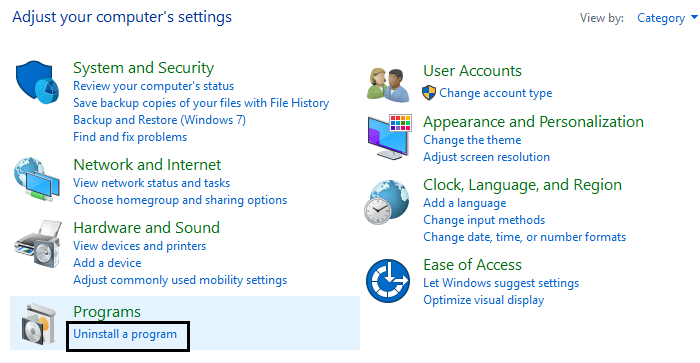
1. Press Windows Key + X then select Control Panel.

2. Click on Uninstall a program under Programs.
3. Find the GIGABYTE App center and right-click then select uninstall.
4. Make sure to remove any other services associated with GIGABYTE.
5. Reboot to save changes.
That’s it you have successfully Fix The driver can’t release to failure error but if you still have any questions regarding this post feel free to ask them in the comment section.
by Matthew Adams
Matthew is a freelancer who has produced a variety of articles on various topics related to technology. His main focus is the Windows OS and all the things… read more
Updated on March 10, 2022
- Gigabyte Motherboards are some of the most popular in the world, and keeping them constantly update d is important.
- Sometimes the lack of updates or certain software issues can lead to error messages in Gigabyte motherboards.
- The article below is just one of many included in our hub dedicated to fixing System Errors.
- Take a look at our dedicated Fix page for more step-by-step troubleshooting guides.
XINSTALL BY CLICKING THE DOWNLOAD FILE
This software will keep your drivers up and running, thus keeping you safe from common computer errors and hardware failure. Check all your drivers now in 3 easy steps:
- Download DriverFix (verified download file).
- Click Start Scan to find all problematic drivers.
- Click Update Drivers to get new versions and avoid system malfunctionings.
- DriverFix has been downloaded by 0 readers this month.
This driver can’t release to failure is an error message that more specifically pertains to Gigabyte motherboards.
Some users have stated that the error message pops up after upgrading to Windows 10.
The error message is usually due to a motherboard’s lack of built-in Wi-Fi, which is something required for the Gigabyte App Center’s Cloud Station Server.
Here are a few resolutions that can fix this Gigabyte motherboard error in Windows 10.
How do I fix the This driver can’t release to failure error?
- Update the Motherboard Drivers
- Switch off the Always run on next reboot setting
- Reinstall Gigabyte Services via Command Prompt
- Update the App Center
- Uninstall the App Center
1. Update the Motherboard Drivers
You might need to update your Gigabyte motherboard drivers to fix the driver can’t release error message. However, the motherboard has various drivers.
As such, it’s probably better to utilize driver-updating software to ensure the motherboard drivers are updated. This includes updating old ones, fixing broken ones, and replacing missing ones.
Most of the time, the generic drivers for your PC’s hardware and peripherals are not properly updated by the system. There are key differences between a generic driver and a manufacturer’s driver.Searching for the right driver version for each of your hardware components can become tedious. That’s why an automated assistant can help you find and update your system with the correct drivers every time, and we strongly recommend DriverFix. Here’s how to do it:
- Download and install DriverFix.
- Launch the software.
- Wait for the detection of all your faulty drivers.
- DriverFix will now show you all the drivers that have issues, and you just need to select the ones you’d liked fixed.
- Wait for the app to download and install the newest drivers.
- Restart your PC for the changes to take effect.

DriverFix
Keep your PC components drivers working perfectly without putting your PC at risk.
Disclaimer: this program needs to be upgraded from the free version in order to perform some specific actions.
2. Switch off the Always run on next reboot setting
- First, open the Gigabyte App Center via the Windows system tray.

- Then click the Cloud Station Server tab at the bottom of the app.
- Switch off the Always run on next reboot setting for the Cloud Station Server.
- Select the OC tab for Remote OC, and switch the Always run on next reboot option off.
- Then select the Gigabyte Remote tab, and turn off the Always run on next reboot option.
- Restart your desktop or laptop.
As mentioned, the Cloud Station Server is one component of the Gigabyte App Center that requires onboard Wi-Fi. The Remote OC and Gigabyte Remote are two are components that also need onboard Wi-Fi.
Thus, switching those components off can fix the issue.
3. Reinstall Gigabyte Services via Command Prompt
- Press the Win key + X hotkey.
- Then select Command Prompt (Admin) to open the Prompt.
- Input sc delete gdrv in the Prompt, and press the Return key.

- Enter the following line, and press Enter:
Some PC issues are hard to tackle, especially when it comes to corrupted repositories or missing Windows files. If you are having troubles fixing an error, your system may be partially broken.
We recommend installing Restoro, a tool that will scan your machine and identify what the fault is.
Click here to download and start repairing.
'sc create gdrv binPath= "C:Windowsgdrv.sys" type= "kernel" DisplayName= "gdrv"' and Return to reinstall the services.
Alternatively, reinstalling Gigabyte services might also resolve the issue.
- Fix DRIVER VERIFIER DMA VIOLATION error in Windows 10/11
- NVIDIA driver update failed / BSoD error [Complete Fix]
- Windows cannot download drivers? Fix it now
- How to update drivers in Windows 10 [Full Guide]
- PC automatically goes to BIOS on startup
4. Update the App Center
If you’ve recently upgraded to Windows 10, update the App Center to ensure that its compatible with the latest platform.
You can do that by pressing the GIGABYTE App Center Utility Download button on this page.
Then open the installer for the app to add the latest App Center version to Windows.
5. Uninstall the App Center
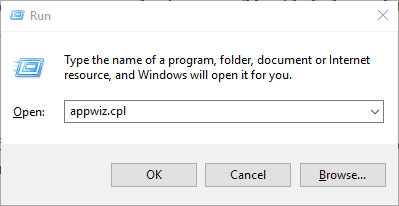
- Press the Windows key + R to open Run.

- Enter appwiz.cpl in Run and click OK to open the uninstaller window in the snapshot directly below.

- Now select the Gigabyte App Center software, and press its Uninstall button.
- Press the Yes button for further confirmation.
- Then restart Windows after removing the App Center.

Some users have resolved the Gigabyte motherboard error message by removing the App Center from Windows. But there are also a few users who struggle with this. If that’s also your case, read on.
Can’t uninstall the Gigabyte app center
Using the Control Panel to remove a no longer wanted program (as shown above) is quick and easy, but it seems that not everyone can successfully use this option.
For some, the Gigabyte app center won’t uninstall no matter what they do. So, here’s what we suggest:
- Clean boot your computer and manually delete the entire folder from
C:Program Files (x86)GigabyteAppCenter directory - Use a good registry cleaner tool to remove any hanging, broken, or superfluous keys that might linger on.
- Finally, use a professional uninstaller tool that takes care of all the leftovers for you.
One, or more, of those resolutions, will probably fix the driver can’t release error in Windows 10. If you have any further suggestions for fixing the Gigabyte motherboard error, feel free to share them below.
![]()
Newsletter
by Matthew Adams
Matthew is a freelancer who has produced a variety of articles on various topics related to technology. His main focus is the Windows OS and all the things… read more
Updated on March 10, 2022
- Gigabyte Motherboards are some of the most popular in the world, and keeping them constantly update d is important.
- Sometimes the lack of updates or certain software issues can lead to error messages in Gigabyte motherboards.
- The article below is just one of many included in our hub dedicated to fixing System Errors.
- Take a look at our dedicated Fix page for more step-by-step troubleshooting guides.
XINSTALL BY CLICKING THE DOWNLOAD FILE
This software will keep your drivers up and running, thus keeping you safe from common computer errors and hardware failure. Check all your drivers now in 3 easy steps:
- Download DriverFix (verified download file).
- Click Start Scan to find all problematic drivers.
- Click Update Drivers to get new versions and avoid system malfunctionings.
- DriverFix has been downloaded by 0 readers this month.
This driver can’t release to failure is an error message that more specifically pertains to Gigabyte motherboards.
Some users have stated that the error message pops up after upgrading to Windows 10.
The error message is usually due to a motherboard’s lack of built-in Wi-Fi, which is something required for the Gigabyte App Center’s Cloud Station Server.
Here are a few resolutions that can fix this Gigabyte motherboard error in Windows 10.
How do I fix the This driver can’t release to failure error?
- Update the Motherboard Drivers
- Switch off the Always run on next reboot setting
- Reinstall Gigabyte Services via Command Prompt
- Update the App Center
- Uninstall the App Center
1. Update the Motherboard Drivers
You might need to update your Gigabyte motherboard drivers to fix the driver can’t release error message. However, the motherboard has various drivers.
As such, it’s probably better to utilize driver-updating software to ensure the motherboard drivers are updated. This includes updating old ones, fixing broken ones, and replacing missing ones.
Most of the time, the generic drivers for your PC’s hardware and peripherals are not properly updated by the system. There are key differences between a generic driver and a manufacturer’s driver.Searching for the right driver version for each of your hardware components can become tedious. That’s why an automated assistant can help you find and update your system with the correct drivers every time, and we strongly recommend DriverFix. Here’s how to do it:
- Download and install DriverFix.
- Launch the software.
- Wait for the detection of all your faulty drivers.
- DriverFix will now show you all the drivers that have issues, and you just need to select the ones you’d liked fixed.
- Wait for the app to download and install the newest drivers.
- Restart your PC for the changes to take effect.
DriverFix
Keep your PC components drivers working perfectly without putting your PC at risk.
Disclaimer: this program needs to be upgraded from the free version in order to perform some specific actions.
2. Switch off the Always run on next reboot setting
- First, open the Gigabyte App Center via the Windows system tray.
- Then click the Cloud Station Server tab at the bottom of the app.
- Switch off the Always run on next reboot setting for the Cloud Station Server.
- Select the OC tab for Remote OC, and switch the Always run on next reboot option off.
- Then select the Gigabyte Remote tab, and turn off the Always run on next reboot option.
- Restart your desktop or laptop.
As mentioned, the Cloud Station Server is one component of the Gigabyte App Center that requires onboard Wi-Fi. The Remote OC and Gigabyte Remote are two are components that also need onboard Wi-Fi.
Thus, switching those components off can fix the issue.
3. Reinstall Gigabyte Services via Command Prompt
- Press the Win key + X hotkey.
- Then select Command Prompt (Admin) to open the Prompt.
- Input sc delete gdrv in the Prompt, and press the Return key.
- Enter the following line, and press Enter:
Some PC issues are hard to tackle, especially when it comes to corrupted repositories or missing Windows files. If you are having troubles fixing an error, your system may be partially broken.
We recommend installing Restoro, a tool that will scan your machine and identify what the fault is.
Click here to download and start repairing.
'sc create gdrv binPath= "C:Windowsgdrv.sys" type= "kernel" DisplayName= "gdrv"' and Return to reinstall the services.
Alternatively, reinstalling Gigabyte services might also resolve the issue.
- Fix DRIVER VERIFIER DMA VIOLATION error in Windows 10/11
- NVIDIA driver update failed / BSoD error [Complete Fix]
- Windows cannot download drivers? Fix it now
- How to update drivers in Windows 10 [Full Guide]
- PC automatically goes to BIOS on startup
4. Update the App Center
If you’ve recently upgraded to Windows 10, update the App Center to ensure that its compatible with the latest platform.
You can do that by pressing the GIGABYTE App Center Utility Download button on this page.
Then open the installer for the app to add the latest App Center version to Windows.
5. Uninstall the App Center
- Press the Windows key + R to open Run.
- Enter appwiz.cpl in Run and click OK to open the uninstaller window in the snapshot directly below.
- Now select the Gigabyte App Center software, and press its Uninstall button.
- Press the Yes button for further confirmation.
- Then restart Windows after removing the App Center.
Some users have resolved the Gigabyte motherboard error message by removing the App Center from Windows. But there are also a few users who struggle with this. If that’s also your case, read on.
Can’t uninstall the Gigabyte app center
Using the Control Panel to remove a no longer wanted program (as shown above) is quick and easy, but it seems that not everyone can successfully use this option.
For some, the Gigabyte app center won’t uninstall no matter what they do. So, here’s what we suggest:
- Clean boot your computer and manually delete the entire folder from
C:Program Files (x86)GigabyteAppCenter directory - Use a good registry cleaner tool to remove any hanging, broken, or superfluous keys that might linger on.
- Finally, use a professional uninstaller tool that takes care of all the leftovers for you.
One, or more, of those resolutions, will probably fix the driver can’t release error in Windows 10. If you have any further suggestions for fixing the Gigabyte motherboard error, feel free to share them below.
![]()
Newsletter
Содержание
- This Driver can’t release to failure in Windows 10 [SOLVED]
- Solution 1: Download the Latest version of GIGABYTE APP Center
- Solution 2: Uninstall GIGABYTE APP Center
- Solution 3: Update GIGABYTE drivers
- This driver can t release to failure windows 10 как исправить
- реклама
- Этот драйвер не может быть выпущен до отказа в Windows 10 (решено)
- Решение 1. Загрузите последнюю версию GIGABYTE APP Center
- Решение 2. Удалите GIGABYTE APP Center.
- Решение 3. Обновите драйверы GIGABYTE
- Как исправить ошибку “The driver can’t release to failure” в Windows 7, 8 и 10?
- Метод №1 Отключение Home Cloud, GIGABYTE Remote и Remote OC в App Center
- Метод №2 Полная переустановка ПО
- FIX: This driver can’t release to failure
- How do I fix the This driver can’t release to failure error?
- 1. Update the Motherboard Drivers
- DriverFix
- 2. Switch off the Always run on next reboot setting
- 3. Reinstall Gigabyte Services via Command Prompt
- 4. Update the App Center
- 5. Uninstall the App Center
This Driver can’t release to failure in Windows 10 [SOLVED]
Last Updated: 1 year ago
Every time when you start Windows 10, if you see error message saying This Driver can’t release to failure, don’t worry. You can fix it with one of the 3 solutions in this article. You may not have to try them all. Just work your way down until you find the one that works for you.
The cause of the problem is GIGABYTE utility (APP Center) that came along with GIGABYTE motherboards. To fix the problem, just try these 3 solutions:
Solution 1: Download the Latest version of GIGABYTE APP Center
Your current GIGABYTE APP Center might not be compatible with Windows 10. So go to GIGABYTE official download page to check and download the latest APP center, then install it on your computer.
2. Search for the App Center by Motherboard.
3. Enter Keywords in the search box and start searching.
Alternatively, you can choose Advanced Search (search by Socket, Chipset and Model) to find the matching App Center.
4. Click Download next to the App Center exactly for your motherboard.
5. Run the installation file and follow the on-screen instructions to install.
Hope this solves your This Driver can’t release to failure issue. If unfortunately this solution doesn’t do the trick for you, don’t worry. Check out our next solution below.
Solution 2: Uninstall GIGABYTE APP Center
Go to Programs and Features to uninstall the whole GIGABYTE APP Center. After that, the problem should resolve.
1) Press the Win key + R to invoke the Run box.
2) Copy & paste appwiz.cpl into the box and press enter
3) Right click the GIGABYTE APP Center and select Uninstall.
Solution 3: Update GIGABYTE drivers
In some cases, problematic GIGABYTE drivers can be the culprit. The steps above may resolve it, but if they don’t, try to update the drivers. If you’re not confident playing around with drivers manually, you can do it automatically with Driver Easy.
Driver Easy will automatically recognize your system and find the correct drivers for it. You don’t need to know exactly what system your computer is running, you don’t need to risk downloading and installing the wrong driver, and you don’t need to worry about making a mistake when installing.
You can update your drivers automatically with either the FREE or the Pro version of Driver Easy. But with the Pro version it takes just 2 clicks (and you get full support and a 30-day money back guarantee):
1) Download and install Driver Easy.
2) Run Driver Easy and click Scan Now button. Driver Easy will then scan your computer and detect any problem drivers.
3) Click the Update button to download and install the drivers one by one (you can do this with the FREE version). Or click Update All to automatically download and install the correct version of all the drivers that are missing or out of date on your system (this requires the Pro version – you’ll be prompted to upgrade when you click Update All).
Hopefully you find this article helpful. If you have any questions, ideas or suggestions, feel free to leave a comment below.
Источник
This driver can t release to failure windows 10 как исправить
Обновления Windows 10 зачастую вызывали много проблем у многих пользователей и с каждым новым накопительным обновлением их становится всё больше и больше. Например, могут возникнуть проблемы с драйверами, которые ранее никак себя не проявляли, а устройства, для которых эти драйверы предназначены, работали вполне себе штатно.
реклама
Если на Вашем устройстве с операционной системой Windows 10 возникает ошибка «драйвер не может быть загружен на этом устройстве», Microsoft утверждает, что это означает следующее: настройка целостности памяти в Windows Security предотвращает загрузку драйвера на вашем устройстве.
Корпорация Майкрософт обновила документ поддержки, предупреждая пользователей о том, что «если Вы решите продолжить использование устройства без решения проблемы драйвера, Вы можете обнаружить, что функциональность, которую поддерживает драйвер, больше не работает, что может иметь последствия от незначительных до серьезных».
Как быть в данной ситуации? Как решить проблему с драйверами в Windows 10?
Первое, что Вы должны сделать, это проверить, доступен ли новый или обновленный драйвер через Центр обновления Windows или через производителя этого драйвера. Если Вы не можете найти совместимый драйвер для решения этой проблемы, Вы можете отключить параметр целостности памяти в системе безопасности Windows, чтобы обойти сообщение об ошибке «драйвер не может загрузиться на это устройство».
1) Перейдите в меню Пуск > Настройки > Обновление и безопасность
2) Затем выберите Безопасность Windows > Безопасность устройства
3) В разделе «Изоляция ядра» выберите «Сведения об изоляции ядра»
4) Отключите настройку целостности памяти, если она еще не включена
5) Перезагрузите компьютер для вступления измененных параметров в силу
Несовместимые драйверы оказались своего рода проклятием для Windows 10, но похоже что компания, по крайней мере, наконец-то начала признавать эти проблемы и предлагать обходные пути вместо того, чтобы оставлять пользователей в поисках решений.
Источник
Этот драйвер не может быть выпущен до отказа в Windows 10 (решено)
This Driver Can T Release Failure Windows 10
Если каждый раз, когда вы запускаете Windows 10, вы получаете сообщение об ошибке, в котором говорится, что этот драйвер не может работать до отказа, используйте здесь решения, чтобы решить проблему.
Каждый раз, когда вы запускаете Windows 10, вы видите сообщение об ошибке Этот драйвер не может быть доведен до отказа не волнуйся. Вы можете исправить это с помощью одного из 3 решений, описанных в этой статье. Возможно, вам не придется пробовать их все. Просто двигайтесь вниз, пока не найдете тот, который вам подходит.
Решение 1. Загрузите последнюю версию GIGABYTE APP Center
Ваш текущий GIGABYTE APP Center может быть несовместим с Windows 10. Перейдите на Официальная страница загрузки GIGABYTE чтобы проверить и загрузить последнюю версию центра приложений, а затем установить ее на свой компьютер.
3. Введите Ключевые слова в поле поиска и начните поиск.
В качестве альтернативы вы можете выбрать Расширенный поиск (выполните поиск по сокету, набору микросхем и модели), чтобы найти соответствующий Центр приложений.
4. Щелкните Скачать рядом с центром приложений именно для вашей материнской платы.
5. Запустите установочный файл и следуйте инструкциям на экране для установки.
Заметка: Вы можете либо перейти на его Материнская плата для доступа к Центру приложений. Затем перейдите в раздел «Утилиты», чтобы загрузить точную версию Центра приложений для вашего компьютера.
Надеюсь, это решит вашу Этот драйвер не может быть доведен до отказа вопрос. Если, к сожалению, это решение не поможет, не волнуйтесь. Ознакомьтесь с нашим следующим решением ниже.
Решение 2. Удалите GIGABYTE APP Center.
Идти к Программы и особенности чтобы удалить весь GIGABYTE APP Center. После этого проблема должна разрешиться.
1) Нажмите клавиши Win + R, чтобы открыть окно «Выполнить».
2) Скопируйте и вставьте appwiz.cpl в поле и нажмите ввод
Решение 3. Обновите драйверы GIGABYTE
Driver Easy автоматически распознает вашу систему и найдет для нее подходящие драйверы. Вам не нужно точно знать, в какой системе работает ваш компьютер, вам не нужно рисковать, загружая и устанавливая неправильный драйвер, и вам не нужно беспокоиться о том, что вы ошиблись при установке.
Вы можете автоматически обновлять драйверы с помощью БЕСПЛАТНОЙ или Pro версии Driver Easy. Но с версией Pro требуется всего 2 клика (и вы получаете полную поддержку и 30-дневную гарантию возврата денег):
1) Скачать и установите Driver Easy.
2) Запустите Driver Easy и нажмите Сканировать сейчас кнопка. Затем Driver Easy просканирует ваш компьютер и обнаружит проблемы с драйверами.
Надеюсь, эта статья окажется для вас полезной. Если у вас есть какие-либо вопросы, идеи или предложения, не стесняйтесь оставлять комментарии ниже.
Источник
Как исправить ошибку “The driver can’t release to failure” в Windows 7, 8 и 10?
“The driver can’t release to failure” – это сообщение об ошибке, которое проявляется у пользователей материнских плат от Gigabyte. Сообщение само по себе не говорит с каким драйвером произошли проблемы, но оно тесно связано с материнками от Gigabyte, особенно с теми у которых нет беспроводных возможностей.
Проблема проявляется при использовании вами программного обеспечения Gigabyte. Наиболее проблемной утилитой является “Cloud Station Server” и так как она полагается на возможность использования WiFi, то на ПК без этих технологий и возникает ошибка.
Метод №1 Отключение Home Cloud, GIGABYTE Remote и Remote OC в App Center
После этого ошибка “The driver can’t release to failure” должна исчезнуть.
Метод №2 Полная переустановка ПО
Процесс Cloud Station Server который работает на заднем фоне во время появления ошибки называется ubssrv. Переустановка ПО предотвратит работу этого процесса, что и решает проблему с ошибкой “The driver can’t release to failure”.
Не совсем понятно почему Gigabyte еще не исправили эту проблему, так как ошибка “The driver can’t release to failure” возникает у достаточно большого количества пользователей с различным набором их материнок и операционных систем.
Источник
FIX: This driver can’t release to failure
The This driver can’t release to failure error message is one that more specifically pertains to Gigabyte motherboards.
Some users have stated that the error message pops up after upgrading to Windows 10. The error message is usually due to a motherboard‘s lack of built-in Wi-Fi, which is something required for the Gigabyte App Center’s Cloud Station Server.
Here are a few resolutions that can fix this Gigabyte motherboard error in Windows 10.
How do I fix the This driver can’t release to failure error?
1. Update the Motherboard Drivers
You might need to update your Gigabyte motherboard drivers to fix the driver can’t release error message. However, the motherboard has various drivers.
As such, it’s probably better to utilize driver-updating software to ensure the motherboard drivers are updated. This includes updating old ones, fixing broken ones, and replacing missing ones.
Most of the time, the generic drivers for your PC’s hardware and peripherals are not properly updated by the system. There are key differences between a generic driver and a manufacturer’s driver.Searching for the right driver version for each of your hardware components can become tedious. That’s why an automated assistant can help you find and update your system with the correct drivers every time, and we strongly recommend DriverFix. Here’s how to do it:
DriverFix
Keep your PC components drivers working perfectly without putting your PC at risk.
Disclaimer: this program needs to be upgraded from the free version in order to perform some specific actions.
2. Switch off the Always run on next reboot setting
As mentioned, the Cloud Station Server is one component of the Gigabyte App Center that requires onboard Wi-Fi. The Remote OC and Gigabyte Remote are two are components that also need onboard Wi-Fi.
Thus, switching those components off can fix the issue.
3. Reinstall Gigabyte Services via Command Prompt
‘sc create gdrv binPath= «C:Windowsgdrv.sys» type= «kernel» DisplayName= «gdrv»‘ and Return to reinstall the services.
Alternatively, reinstalling Gigabyte services might also resolve the issue.
4. Update the App Center
If you’ve recently upgraded to Windows 10, update the App Center to ensure that its compatible with the latest platform.
You can do that by pressing the GIGABYTE App Center Utility Download button on this page.
Then open the installer for the app to add the latest App Center version to Windows.
5. Uninstall the App Center
Some users have resolved the Gigabyte motherboard error message by removing the App Center from Windows.
One, or more, of those resolutions, will probably fix the driver can’t release” error in Windows 10. If you have any further suggestions for fixing the Gigabyte motherboard error, feel free to share them below.
Restoro has been downloaded by 0 readers this month.
Источник