Перейти к содержанию
На чтение 4 мин Опубликовано 21.06.2021
В процессе установки Windows 11 многие пользователи сталкиваются с ошибкой «This PC can’t run Windows 11». Под всплывающим предупреждением могут быть указаны несколько различных причин: «The PC must support TPM 2.0», «The PC must support Secure Boot» или «This PC doesn’t meet the minimum system requirements». В статье мы расскажем о причинах ошибки и распишем методы их исправления.
Содержание
- Что ошибка означает
- Решение ошибки «This PC can’t run Windows 11» через BIOS
- Исправляем ошибку через замену файлов
- Заключение
Что ошибка означает
«This PC can’t run Windows 11» — это системное предупреждение, которое уведомляет пользователя о том, что компьютер не может работать под управлением Windows 11. Основные причины сбоя: несоответствие системных требований и отсутствие крипточипа TPM 2.0.
В зависимости от типа установки (прямой переход с Windows 7/8/10, запуск с нуля или загрузки в Virtual box), пользователь может получить различные пояснения к ошибке:
- отсутствие поддержки платформенного модуля TPM 2.0 (компонента системы шифрования, которая обеспечивает средства для безопасного создания ключей шифрования);
- на компьютере не поддерживается или отключен режим Secure Boot («безопасная загрузка», необходимая для проверки электронной цифровой подписи в выполняемых EFI-приложений);

Ошибка «This PC can’t run Windows 11» из-за отсутствия модуля TPM 2.0 и режима безопасной загрузки - компьютер не соответствует минимальным системным требованиям, необходимым для установки и запуска операционной системы.

Компьютер не соответствует системным требованиям Windows 11


Несмотря на различные описания проблемы, принцип её решения будет общим и заключается он в дополнительной настройке через BIOS или замене файлов установщика. Важное дополнение: нижеизложенные инструкции созданы по материалам, которые получили положительные отзывы у пользователей и помогли им, но все действия вы выполняете на свой страх и риск.
Решение ошибки «This PC can’t run Windows 11» через BIOS
Для начала проверьте и включите в BIOS запрашиваемые новой системой параметры: «Secure Boot» и «TPM». В зависимости от модели материнской платы, настройки могут располагаться в различных меню.
- Для MSI: заходим в BIOS → Settings → Security → Trusted computing → Security Device Support → вместо параметра Disable выставляем Enable. Сохраняемся и выходим.
- Для Gigabyte: заходим в BIOS → Peripherals → Trusted computing → Security Device Support → выставляем Enable.
- Для ASUS: заходим в BIOS → Advanced → AMD fTPM configuration → выставляем Enable.

Включение поддержки модуля TPM в материнских платах ASUS

После такой настройки пробуйте снова запустить установку Windows 11 — проблема должна решится. Если уведомление не исчезает, проверьте настройку «Secure Boot» в БИОС и при необходимости её включите. Обычно этот параметр располагается во вкладках «Boot», «Boot Security», «System Configuration».
Второе решение проблемы связано с заменой файлов в папке «Sources» из установочного образа Windows 11 на файлы из установочного образа Windows 10. Делается это следующим образом:
- Подключите к компьютеру USB с установочным образом Windows 11. Кстати, пользователи рекомендуют создавать установочную флешку через программу Rufus. При создании установочной флешки не забывайте учитывать поддержку компьютером разделов GPT или MBR.
- Загрузите на свой компьютер установочный ISO файл Windows 10 (x64 en-US). С помощью проводника или сторонних программ смонтируйте скачанный образ. Для ленивых: в сети можно найти ссылки на скачивание отдельной папки «Sources» от Windows 10.
- Через проводник откройте образ Windows 10 и перейдите в папку «Sources» → в ней выделите все файлы кроме «install.wim» или «install.esd» → нажмите «Копировать».

Выделите и скопируйте все файлы кроме install.wim - Через проводник откройте образ Windows 11 и перейдите в аналогичную папку «Sources» → нажмите «Вставить» → подтвердите выбор «Копировать с заменой» → ниже установите галочку на «Сделать это для следующих 170 конфликтов».

Выполните копирование с заменой в папку Sources Windows 11


После окончания копирования пробуйте снова установить Windows 11 с замененными файлами. Большинству пользователей такая замена помогает решить ошибку «This PC can’t run Windows 11».
Заключение
Ошибка установки «This PC can’t run Windows 11» в большинстве случаев связана с отсутствующей или отключенной поддержкой TPM 2.0 и решается путем включения этого модуля в BIOS. Если первое решение не поможет — пробуйте сменить файлы в установочной папке «Sources». Если у вас имеются свои варианты или есть вопросы по описанным решениям — пишите их в комментариях ниже.
 Доброго времени!
Многие пользователи, кто захотел попробовать новую ОС Windows 11, — столкнулись с ошибкой «This PC can’t run Windows 11» (запуск на этом ПК невозможен…). Возникать она могла как на этапе проверки компьютера на совместимость, так и при непосредственной установке (после загрузки с подгот. флешки). 👀
Сразу скажу, если вы столкнулись с подобной ошибкой — это совсем не означает, что на ваш компьютер нельзя установить новую ОС. Вполне вероятно, у вас не заданы некоторые настройки BIOS (да впрочем, даже и без них можно попробовать установить 11-ю!).
О том, с чего начать (при появл. подобной проблемы) и на что обратить внимание и будет сегодняшняя заметка.
Примечание: в заметке исхожу из того, что у вас на ПК установлена какая-нибудь версия Windows, и она загружается.
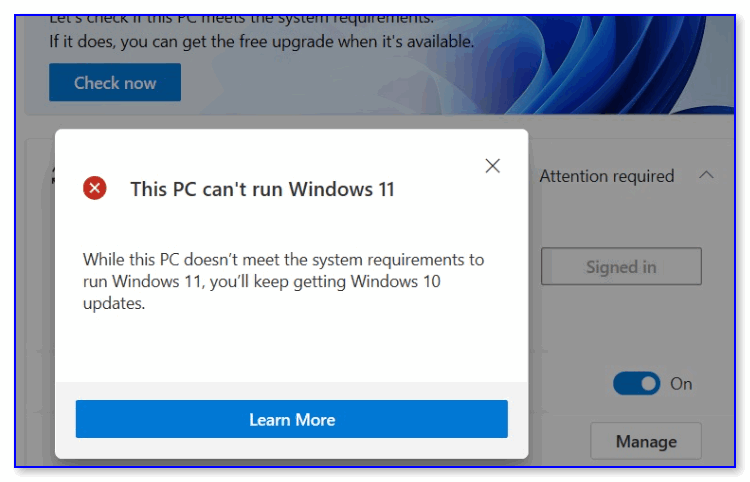
This PC can’t run Windows 11 // пример ошибки
*
Содержание статьи
- 1 Что делать, если появилась ошибка
- 1.1 ШАГ 1: уточнение причины
- 1.2 ШАГ 2: вкл. TPM и Secure Boot в BIOS (опционально)
- 1.3 ШАГ 3: варианты установки Windows 11 без TPM 2.0
- 1.3.1 Вариант 1
- 1.3.2 Вариант 2
- 1.3.3 Вариант 3

→ Задать вопрос | дополнить
Что делать, если появилась ошибка
ШАГ 1: уточнение причины
Итак…
Для начала я бы посоветовал воспользоваться 👉 утилитой WhyNotWin11 и узнать по какому компоненту не проходит ПК/ноутбук (см. скрин ниже, как выглядит окно утилиты). Как правило, чаще всего проблема связана с ЦП и модулем TPM 2.0.
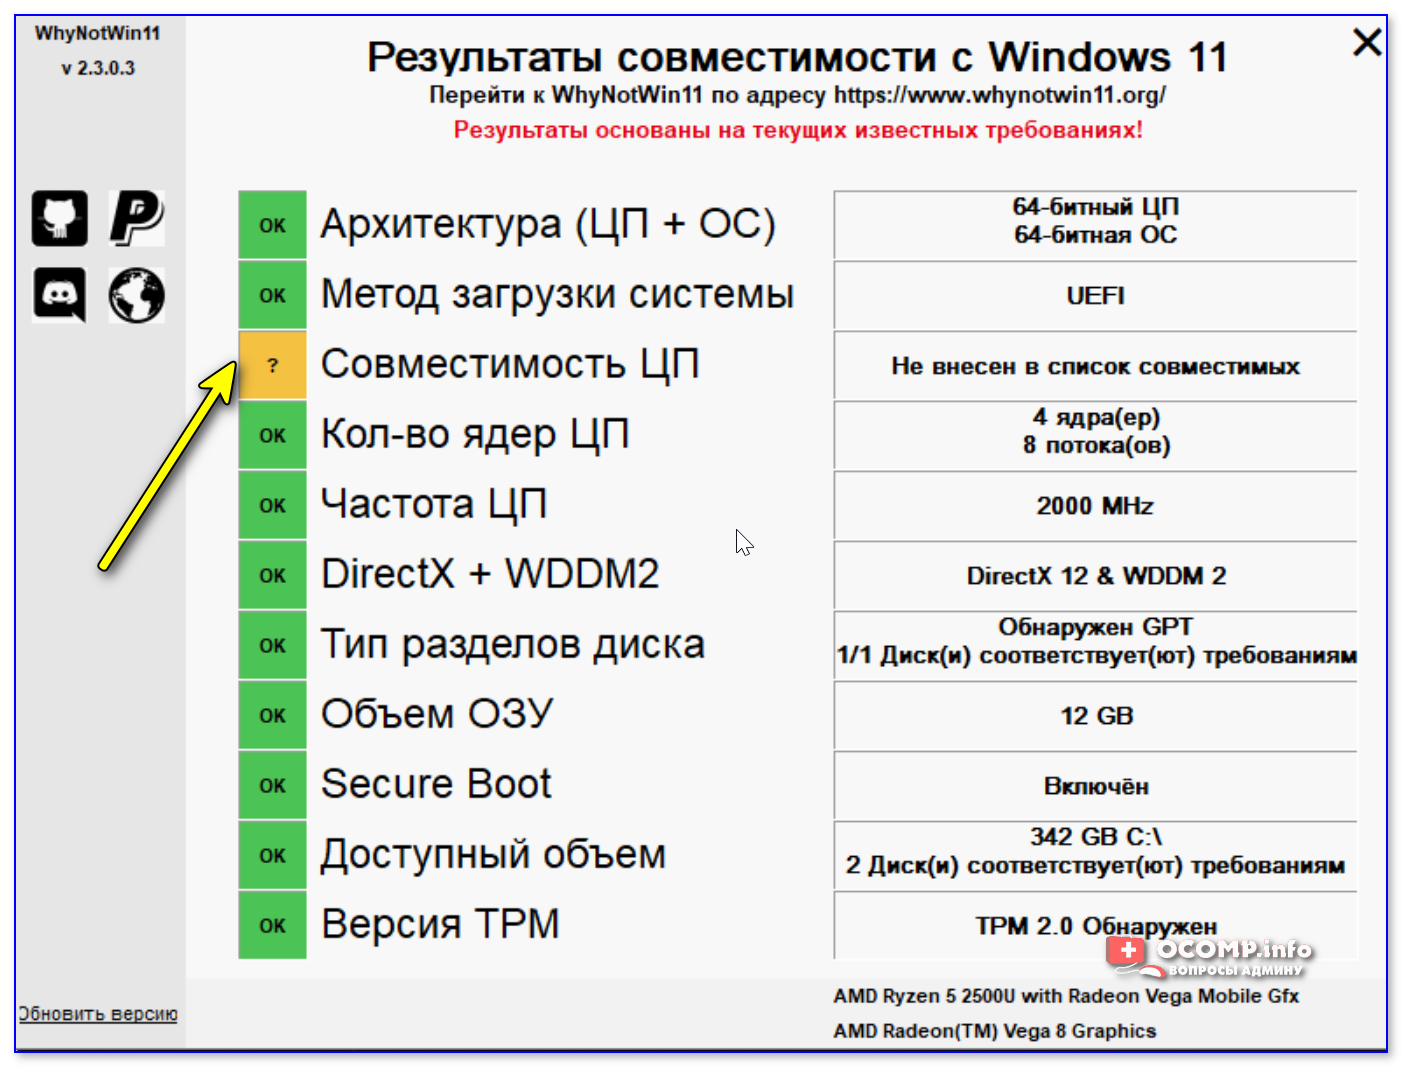
Не внесен в список совместимых — проверка на то, можно ли на ПК установить Windows 11
Кстати, если у вас проблема связана с TPM — то я бы также посоветовал запустить Windows PowerShell (правый клик по меню ПУСК в Windows 10) и ввести команду get-tpm, нажать Enter.
Далее внимательно посмотреть результаты:
- TpmPresent и TpmReady со значением true — значит TPM есть; 👇
- TpmPresent присвоено True, а TpmReady: False — то в BIOS нужно включить TPM;
- TpmPresent показывает False — мат. плата без модуля TPM.
👉 В помощь!
Как узнать, есть ли TPM и какой версии, спецификации (прим.: нужен для установки Windows 11)
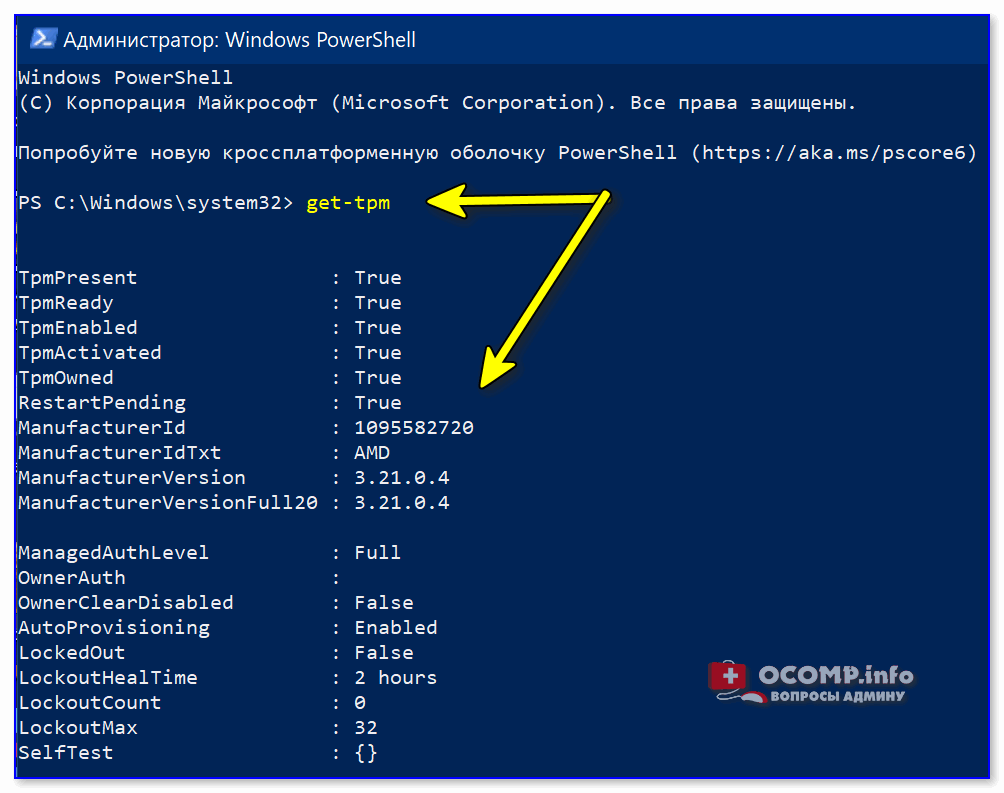
get-tpm
Это я к тому, что возможно на вашем компьютере есть модуль TPM, но он не активирован в BIOS (а это достаточно легко исправить, см. чуть ниже 👇).
*
ШАГ 2: вкл. TPM и Secure Boot в BIOS (опционально)
Если у вас относительно новый ПК/ноутбук (2019-2021г. выпуска*) — то очень вероятно у вас должен быть модуль TPM (просто он не всегда бывает включен, и из-за этого может «ругаться» новая ОС Windows 11).
*
Чтобы включить TPM — необходимо 👉 открыть настройки BIOS и перейти в настройки безопасности (чаще всего вкладка «Security» // «Trusted…»).
Дальше многое будет зависеть от версии вашей прошивки и железа. Например, на ноутбуках Lenovo (ThinkPad) — нужный параметр так и называется «Security Chip Type — TPM 2.0». См. пример ниже 👇 (разумеется, он должен быть переведен в режим «Enabled» — т.е. включено!).
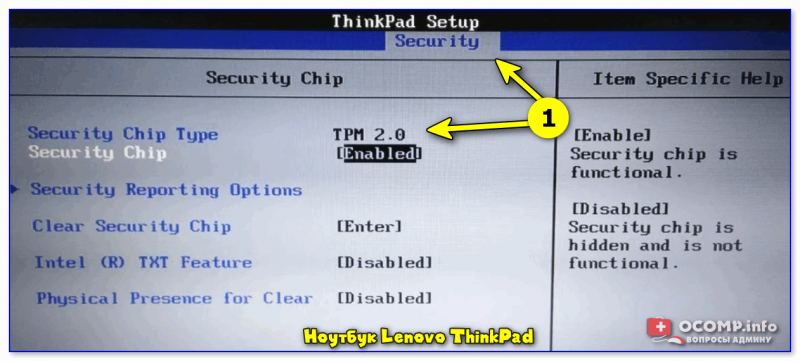
Ноутбук Lenovo ThinkPad
На мат. платах от ASUS параметр «спрятан» немного необычно — раздел «Advanced / Trusted Computing / TPM…». См. пример ниже. 👇
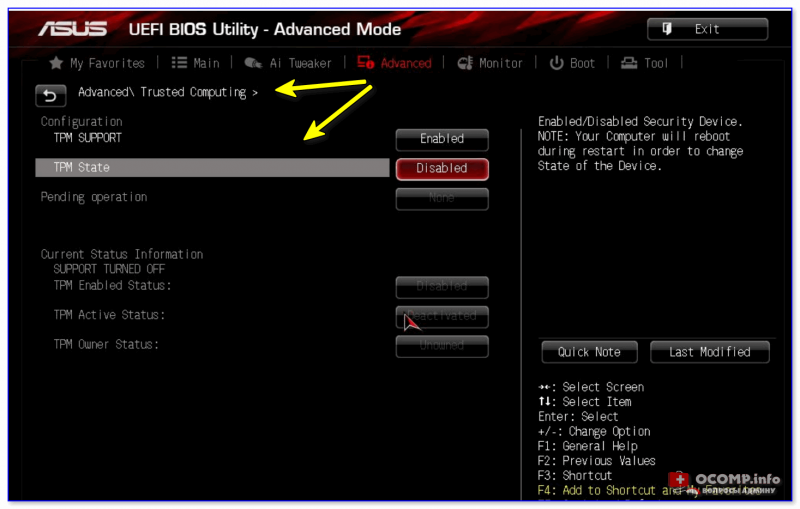
ASUS UEFI BIOS Utility
Также иногда TPM «прячется» в разделе: «Advanced menu —> PCH-FW Configuration».
*
👉 Рекомендация!
Т.к. привести скрины и варианты настроек ко всем версия BIOS в одной заметке нельзя — узнайте свою модель ноутбука (если у вас ПК — то мат. платы) и найдите спецификацию к ним.
По ней можно будет определить, как включить TPM (и можно ли это сделать в принципе…).
*
Кстати, в BIOS (помимо модуля TPM) необходимо еще включить режим защищенной загрузки — Secure Boot (защищенная загрузка). Данная опция, обычно, находится в разделе «BOOT».
Как правило, после задания подобных настроек — установка Windows 11 проходит в штатном режиме без каких-либо проблем… 👌
*
👉 Важно!
После изменения настроек BIOS — не забудьте их сохранить, нажав на клавишу F10 (в 99% обычно она отвечает за сохранение параметров).
*
ШАГ 3: варианты установки Windows 11 без TPM 2.0
Если всё же в BIOS не оказалось нужных параметров (насчет TPM) — то установку Windows 11 (пока что) можно выполнить и без них. Достаточно лишь правильно подготовить установочную флешку… 👌
*
Вариант 1
Перед записью ISO образа с Windows 11 на флешку — необходимо в него добавить (с заменой) файл appraiserres.dll из образа ISO с Windows 10 (т.е. вам предварительно понадобиться загрузить и образ с Windows 10, и образ с Windows 11). Сделать это можно с помощью утилиты 👉 UltraISO. Пару ссылок ниже в помощь.
👉 В помощь!
1) Как создать загрузочную флешку с Windows 11.
2) Загрузка ISO-образа с Windows 10.
*
Вариант 2
В сети можно найти образы ISO c Windows 11 с уже отключенной проверкой модуля TPM. Если не знаете как искать — вот статейка в помощь по поиску…
*
Вариант 3
Чтобы не редактировать образы — можно попробовать «выправить» невозможность установки с помощью реестра…
Для этого на этапе выбора версии (во время «чистой установки»):
- нажмите сочетание Shift+F10 и введите regedit;
- должен открыться редактор реестра (как у меня на скриншоте ниже); 👇
- далее нужно найти и открыть ветку: [HKEY_LOCAL_MACHINESYSTEMSetupLabConfig]
- внести изменения (создать параметры: имя/тип/значение):
«BypassTPMCheck»=dword32:00000001
«BypassSecureBootCheck»=dword32:00000001 - закрыть окно редактора реестра и продолжить установку…
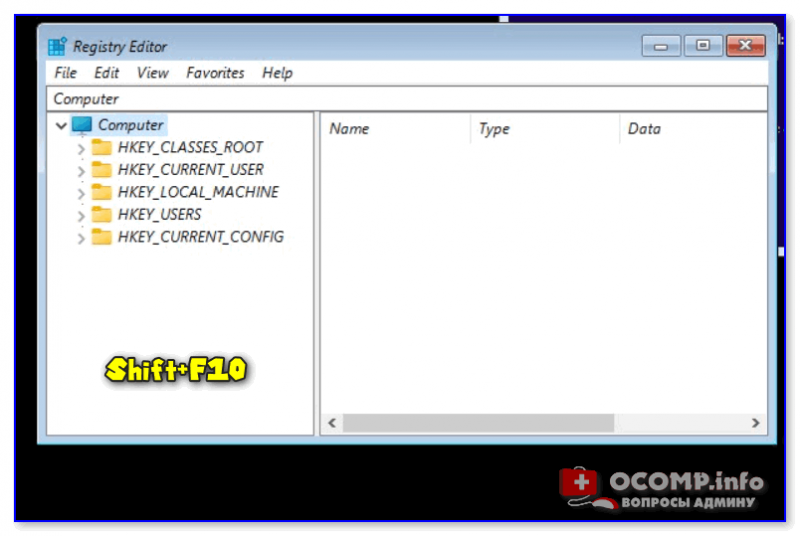
Shift+F10 (на этапе установки Windows 10)
*
Дополнения по теме — приветствуются!
Успехов!
👋


Полезный софт:
-

- Видео-Монтаж

Отличное ПО для создания своих первых видеороликов (все действия идут по шагам!).
Видео сделает даже новичок!
-
- Ускоритель компьютера

Программа для очистки Windows от «мусора» (удаляет временные файлы, ускоряет систему, оптимизирует реестр).
Windows 11 was officially announced on June 24th and Microsoft provides PC Health Check for Windows 10 users to check if their computer is compatible with the new operating system. The PC Health Check will show two different results:
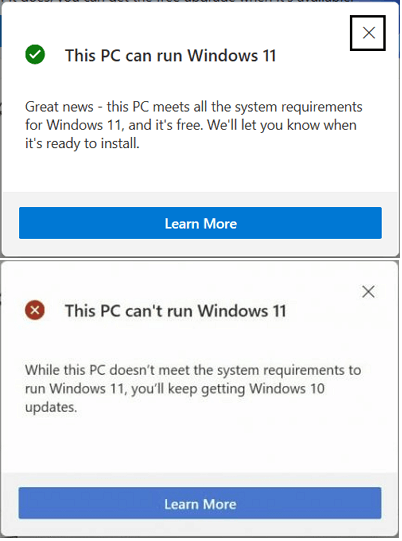
1. This PC can run Windows 11. Great news — this PC meets all the system requirements for Windows 11.
2. This PC can’t run Windows 11. While This PC doesn’t meet system requirements on Windows 11.
If you received the first message, congratulation. You can directly update to Windows 11 and it will run smoothly without any issue on your computer. However, if you get the second error message, it means that your current computer is not compatible with Windows 11 and you can’t directly install it on your computer. Follow this guide, we’ll show you how to fix your PC can’t run Windows 11 error.
Error: This PC can’t run Windows 11
What is the «This PC can’t run Windows 11» error? It’s an error message popped up by the PC Health Check application which is a tool for checking Windows 11 compatibility. When your computer doesn’t reach the Windows 11 minimum system requirement as shown below, you’ll receive the error message telling «This PC can’t run Windows 11»:
| Processor: 1 gigahertz (GHz) or faster with 2 or more cores on a compatible 64-bit processor or System on a Chip (SoC) | Internet connection: Microsoft account and internet connectivity required for setup for Windows 11 Home |
| TPM: Trusted Platform Module (TPM) version 2.0 | Graphics card: DirectX 12 compatible graphics / WDDM 2.x |
| Storage: 64 GB or larger storage device | Display: >9” with HD Resolution (720p) |
| System firmware: UEFI, Secure Boot capable | Memory: 4 GB RAM |
As the different support for Windows 11 in computer hardware, the descriptions of the «This PC can’t run Windows 11» error may be different. Here is a list of all error messages that popped up by PC Health Check, and if you are one of them, follow the respective solution to fix it on your computer now:
- This PC can’t run Windows 11. The PC must support Secure Boot.
- This PC can’t run Windows 11. The system disk needs to be 64GB or larger.
- This PC can’t run Windows 11. The processor isn’t supported for Windows 11.
- This PC can’t run Windows 11. TPM 2.0 is a requirement for running Windows 11.
- Other more…
So how to fix these issues and it works for your computer to get Windows 11 update? Follow the respective fix for each issue and make it possible to update or install Windows 11 on your computer now.
Guide 1: How to Fix «This PC can’t run Windows 11. The PC must support Secure Boot» Error
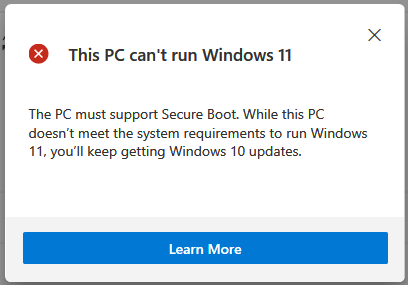
Detailed Error Message: «This PC can’t run Windows 11. The PC must support secure boot. While this PC doesn’t meet the system requirements to run Windows 11, you’ll keep getting Windows 10 updates.»
Most modern PCs in Windows 10/8 are shipped with the Secure Boot mode. It keeps your computer safe. And it requires the Secure Boot mode to be enabled for updating or installing Windows 11.
How to Fix Guide:
1. Check if your system supports Secure Boot
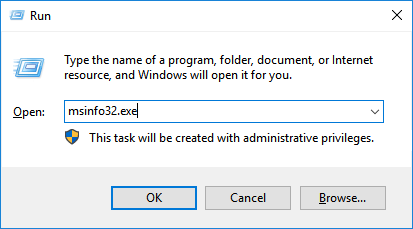
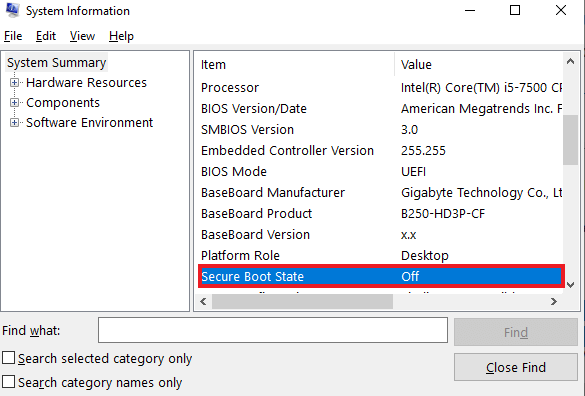
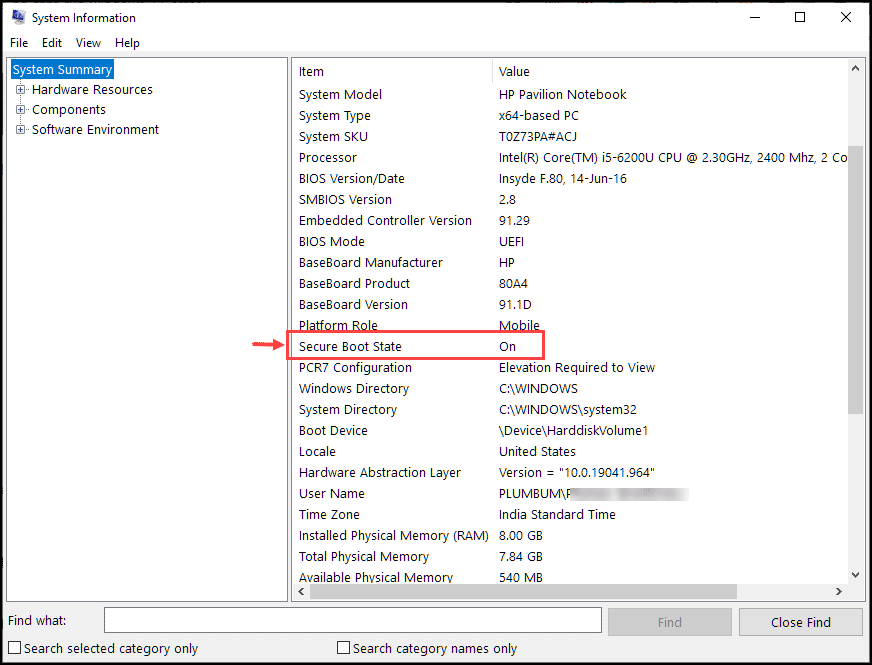
Step 1. Press Windows + R keys, type msinfo32.exe, and hit Enter.
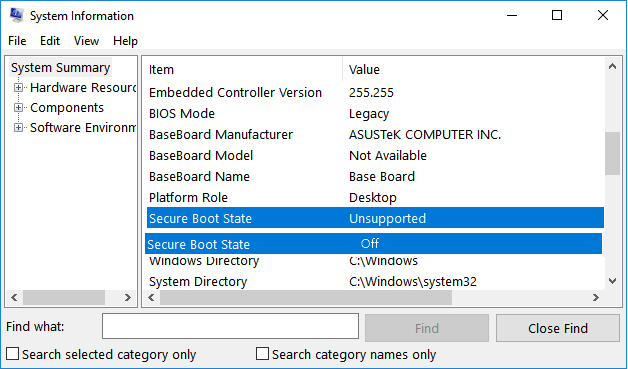
Step 2. On the System Information window, select System Summary.
Step 3. Scroll down to see if you find a section named Secure Boot State (as shown below).
If the Secure Boot State shows as «Off», it means that your computer support Secure Boot and you can jump to the third part to enable it.
If the Secure Boot State shows as «Unsupported», it indicates that your computer hardware doesn’t support secure boot. To fix it, move to the next part to check if your computer supports UEFI mode first.
2. Check if your computer supports UEFI mode
Step 1. Restart PC and press F2/F10/Del to enter BIOS.
Step 2. Go to the Boot Menu, find the boot mode section, click to see if your computer supports UEFI mode.
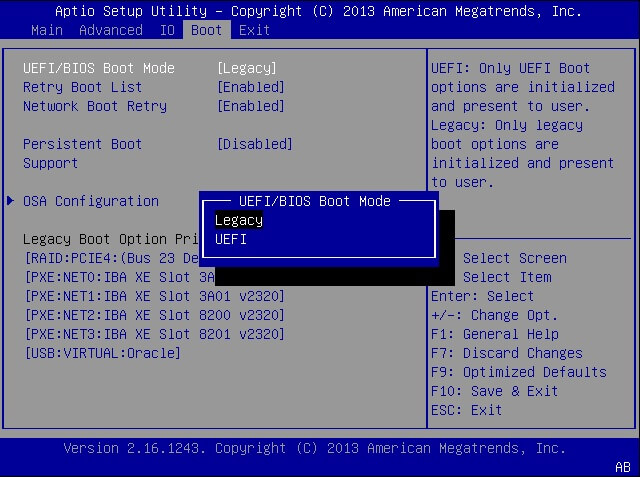
If you see a UEFI mode, it means your computer supports this boot mode. And if it’s currently disabled, move to the next guide to enable UEFI and Secure Mode.
Note that, if your computer doesn’t support UEFI mode, you can’t enable Secure Boot and upgrade to Windows 11.
3. Enable UEFI Mode and Secure Boot
Enable UEFI Mode:
Step 1. Open Disk Management and check if the system disk is with GPT type.
If not, convert the OS disk to GPT disk first as UEFI and Secure Boot requires GPT disk type.
Here we suggest you applying EaseUS Partition Master with its disk conversion feature for help. It converts the disk to MBR or GPT without removing any data or partitions.
Step 2. After disk conversion, restart PC and enter BIOS, go to the Boot Menu, click Boot Mode and select «UEFI».
Step 3. Save the changes and restart the PC.

Enable Secure Boot:
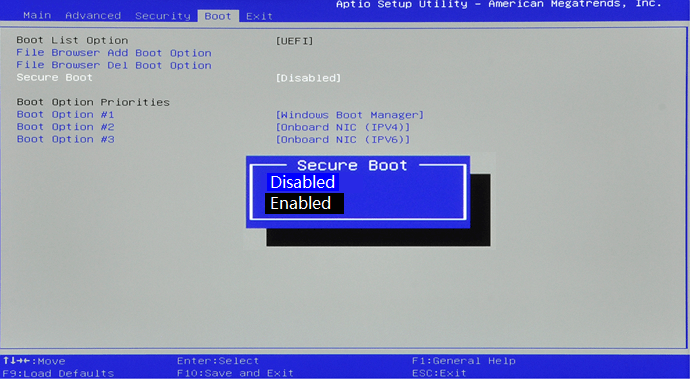
Step 1. Restart PC and re-enter BIOS settings.
Step 2. Go to the Boot Menu, select the Secure Boot settings and set it to «Enabled».
When you complete the process, you can continue installing the Windows 11 update on your computer now.
Guide 2. How to Fix «This PC can’t run Windows 11. The system disk needs to be 64GB or larger.» Error
Detailed Error Message: «This PC can’t run Windows 11. The System disk needs to be 64GB or larger. While this PC doesn’t meet the system requirements to run Windows 11, you’ll keep getting Windows 10 updates.
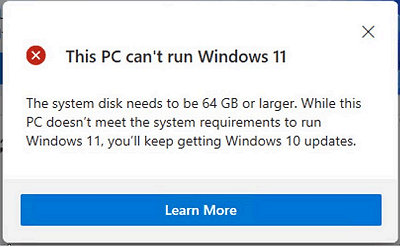
This error message indicates that your system disk space is too small, which mostly happens on old computers. Here are two tips for you:
1. If your computer is too old, bought before the year of 2015, we suggest that you stay with Windows 10.
2. If your computer is new but the OS disk is too small, you can upgrade your system disk to fix this issue.
How to Fix Guide: (Upgrade OS disk to a larger one)
1. Purchase and Prepare a New Disk — SSD (Preferred)
- New disk capacity must be bigger than 64GB.
- SSD is more recommended for replacing OS disk.
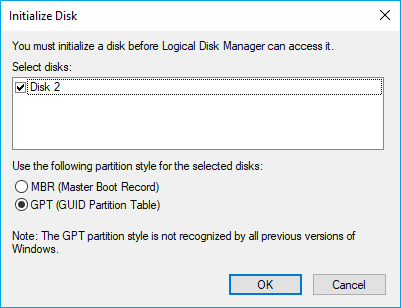
- Initialize disk in Disk Management: Right-click SSD > Initialize > Select «GPT».
2. Transfer OS to New Disk
It’s recommended that you transfer OS to the new disk and keep data on the old drive, which is the best way of optimizing the computer performance.
EaseUS Partition Master with its Migrate OS to HDD/SSD feature enables you to fully transfer OS and installed applications to the new disk in a few simple clicks.
Note: The operation of migrating OS to SSD or HDD will delete and remove existing partitions and data on your target disk when there is not enough unallocated space on the target disk. If you saved important data there, back up them to an external hard drive in advance.
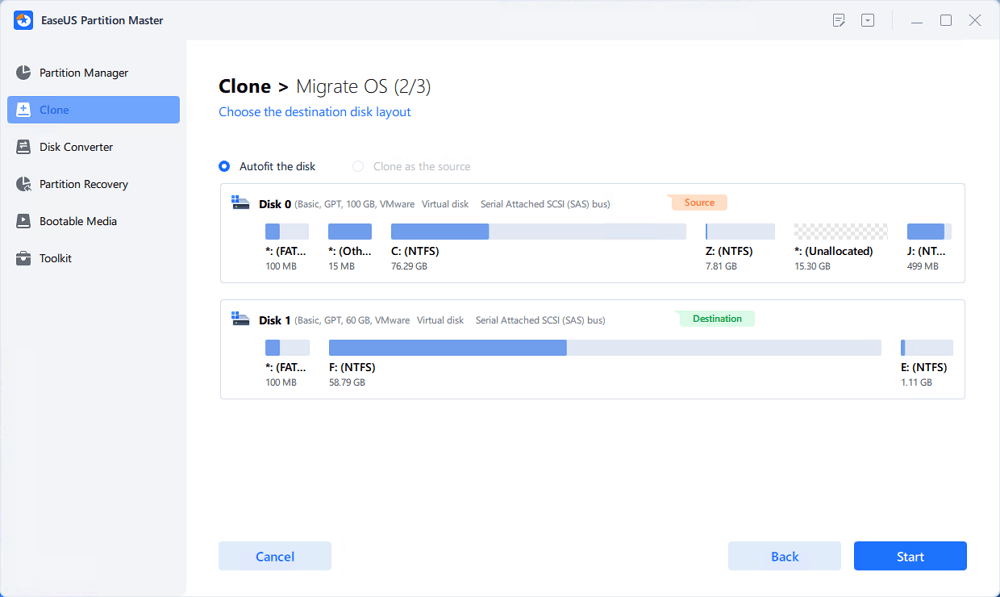
Step 1. Select «Clone» from the left menu. Select the «Migrate OS» and click «Next» to continue..
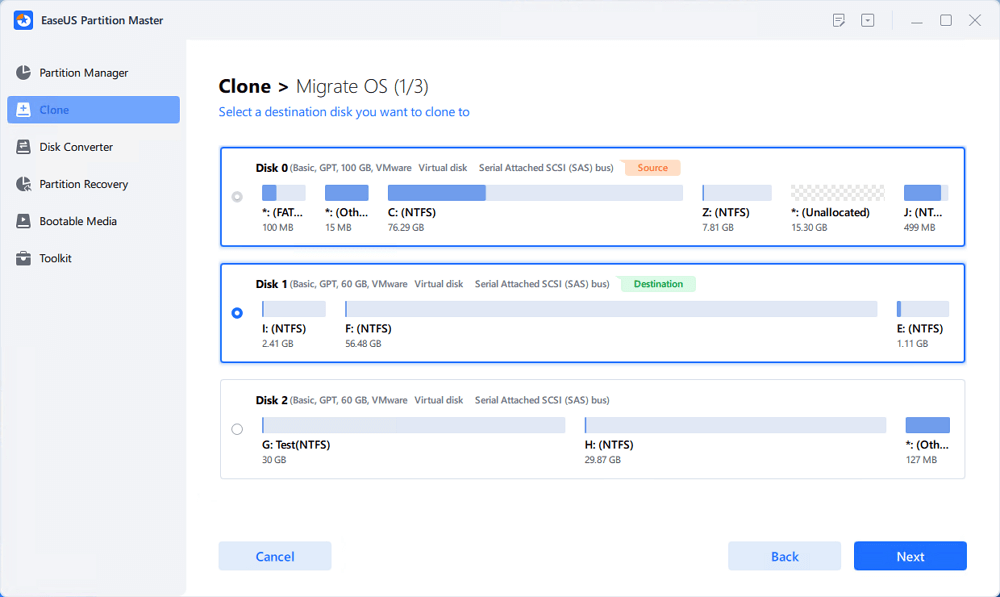
Step 2. Select the target disk you want to clone. Click «Next».
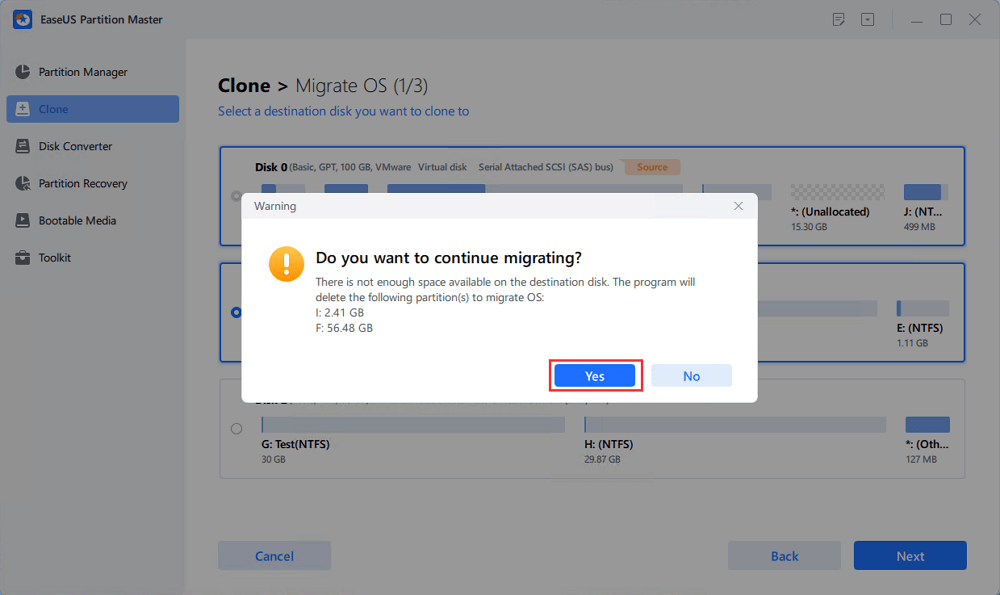
Step 3. Click «Yes» after checking the warning message. The data and partitions on the target disk will be deleted. Make sure that you’ve backed up important data in advance. If not, do it now.
Step 4. Preview the layout of your target disk. You can also click the disk layout options to customize the layout of your target disk as you want. Then click «Start» to start migrating your OS to a new disk
When you are done with this, restart the computer as requested. If necessary, go and enter BIOS to set the new SSD as boot drive:
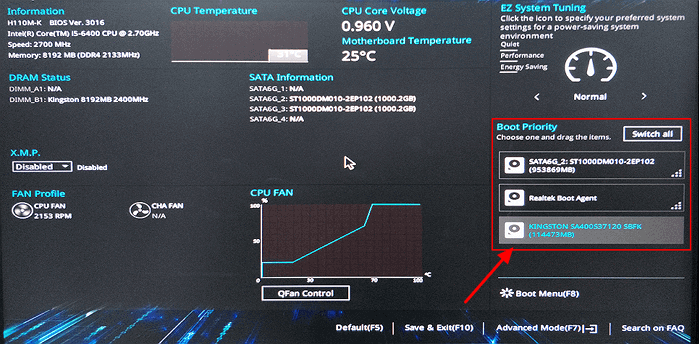
When the computer boots up, you can continue with the Windows 11 update process now.
Guide 3: How to Fix «This PC can’t run Windows 11. The processor isn’t supported for Windows 11.» Error
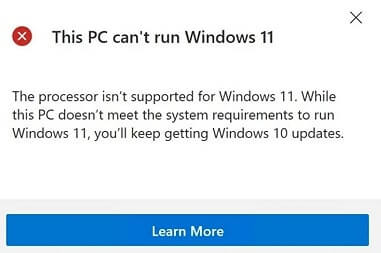
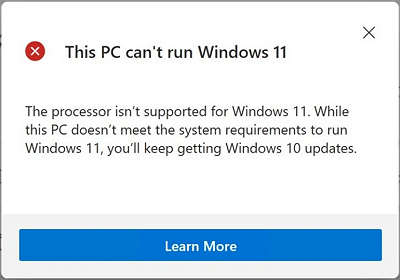 Detailed Error Message: This PC can’t run Windows 11. The processor isn’t supported for Windows 11. While this PC doesn’t meet the system requirements to run Windows 11, you’ll keep getting Windows 10 updates.
This error message means that your computer processor is not included in the supported processor list.
How to Fix:
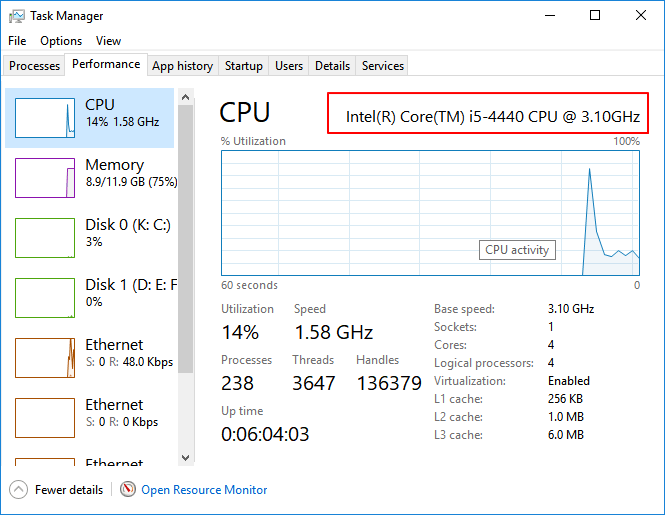
1. Check your processor
- Press Ctrl+Alt+Del to bring up Task Manager, select to open it.
- Go to the performance section and check the CPU generation. (CPU is sometimes called as the processor.)
2. Check if your processor is supported for Windows 11
Go to Windows 11 Supported Intel Processors page and find if your processor is on the list.
https://docs.microsoft.com/en-us/windows-hardware/design/minimum/supported/windows-11-supported-intel-processors
3. 3 options to fix unsupported processor
- Option 1. Stay with Windows 10
- Option 2. Replace processor in a local computer repair center.
- Option 3. Change processor on your own. (Risky) See how to upgrade CPU processor.
Editor’s Suggestion: To keep your computer safe, it’s a wise choice of staying with your current operating system.
Guide 4: How to Fix «This PC can’t run Windows 11. TPM 2.0 is a requirement for running Windows 11.» Error
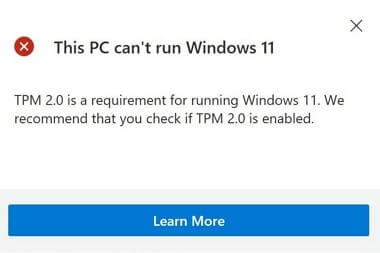
Detailed Error Message: This PC can’t run Windows 11. TPM 2.0 is a requirement for running Windows 11. We recommend that you check if TMP 2.0 is enabled.
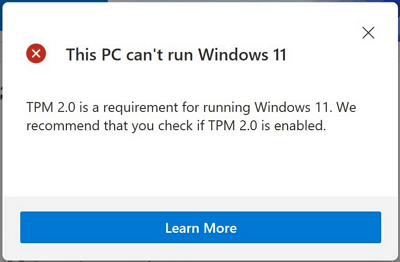
The error message contains two meanings: 1. Your computer contains a TPM chip but its not enabled; 2. Your computer doesn’t contain a TPM 2.0 chip and you can’t update the computer to Windows 11. So how to fix this issue? Check the fixes below.
How to Fix:
1. Check if your computer supports Trusted Platform Module
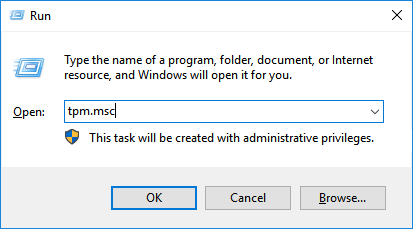
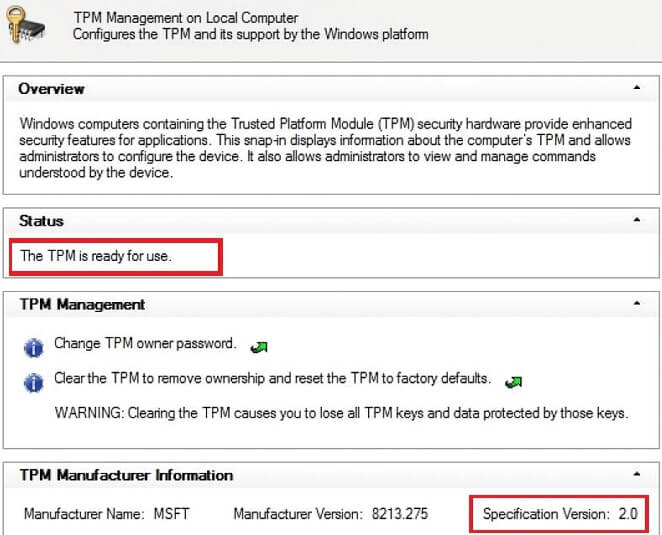
Step 1. Press Windows + R keys, type tpm.msc in the Run dialog, and hit Enter.
Step 2. When the Trusted Platform Module (TPM) utility pops up, check if the TPM is in use.
If yes, you’ll see it under the Status section, marked as The TPM is ready for use.
Step 3. Under the TPM Manufacturer Information section, you’ll be able to check the TPM version.
If it’s TPM 2.0, your computer is good to install and run Windows 11. Move to the next guide to enable it.

But if it’s not TPM 2.0, or its version is lower, it means that you can’t update to Windows 11.
Editors Suggestions: When your computer warns «Compatible TPM cannot be found» or the TPM module version is lower than 2.0, staying with your current computer operating system will be a wise decision.
2. Enable TPM 2.0 chip for Windows 11
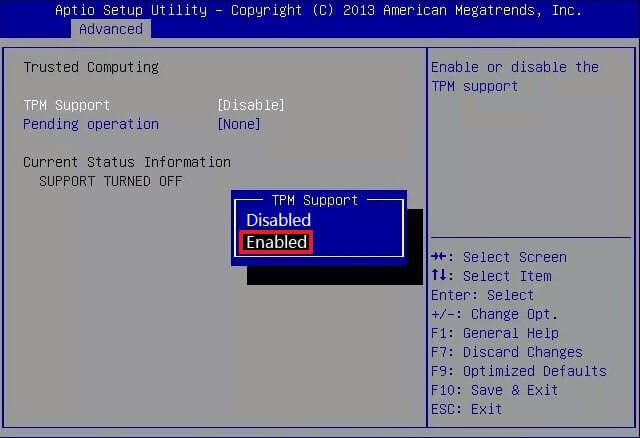
Step 1. Restart PC and press F2/F10/Del key to enter BIOS.
Step 2. Use the left key and go to the Security section.

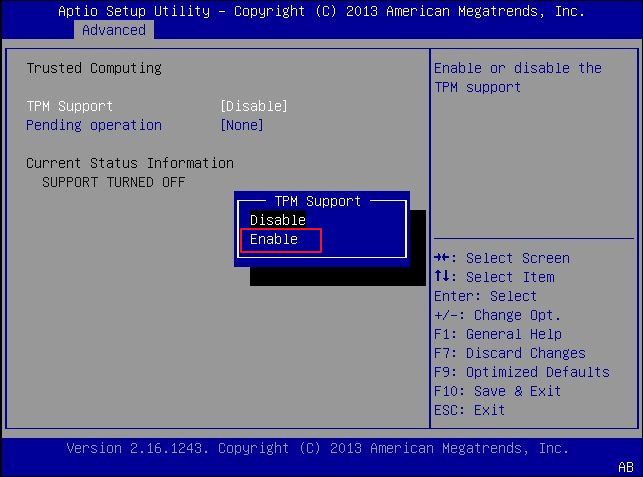
Step 3. Check the TPM State and if it’s Disabled, change it to Enabled.
Step 4. Save the changes and exit BIOS.
Now you can restart the computer and get Windows 11 update on your computer successfully.
This PC can’t run Windows 11 Is Not The End of The Day, Fix It and Get Windows 11 on Your PC Now
On this page, we explained that This PC can’t run Windows 11 error mainly occurs when you use Microsoft PC Health Check to check if your computer is compatible with Windows 11.
And when the PC has a compatibility issue, you’ll get this error. Fortunately, you can do something to fix the error and make yourself ready for this new OS update. We collected 4 major error messages with respective solutions for you.
If you are with one of the errors, go and follow to fix it, then make your computer ready for Windows 11 update now.
FAQs About This PC can’t run Windows 11
We listed 4 major errors related to This PC can’t run Windows 11 that happened to Windows 11 users while using PC Health Check. According to some Windows users, it seemed that when they install Windows 11 via the Insider program, they also came across some similar issues.
If you are encountering one of them, follow the quick guide to fix it:
1. How to fix «This pc can’t run Windows 11. The PC must support TPM 2.0. The PC must support Secure Boot.»?
To fix this issue, you’ll need to revert to Guide 1 and Guide 2 for help. Or, do the listed work here:
- First, confirm if your computer supports Secure Boot and TPM 2.0.
- If not, stay with Windows 10 or your current operating system.
- If yes, go to BIOS to enable UEFI mode and turn on Secure Boot. And enable TPM mode.
2. How to fix «This PC can’t run Windows 11. There must be at least 4GB of system memory.»?
This issue happens when the system memory storage is too low. If your processor matches with Windows 11, you can fix this issue by adding a new memory stick to your computer.
- Mostly, the new memory stick should be the same brand as your current one.
- Also, if your current computer doesn’t have an extra memory stick slot, replace the old memory stick with a bigger one.
3. What caused the «PC can’t run Windows 11» issue?
First, let’s make it clear that the «This PC can’t run Windows 11» error is not caused by the Windows 11 compatibility check tool, either it’s PC Health Check or WhyNotWindows11, etc., tools.
The basic reason why PC not compatible with Windows 11 is that Windows 11 has some basic system requirements on your computer.
And when the hardware or software on your computer doesn’t match with the new OS requests, the compatibility issue comes up. Again, let’s see all the basic requirements of Windows 11:
- UEFI and Secure Boot must be enabled.
- TPM 2.0 chip must be enabled.
- OS disk storage must be 64GB or bigger.
- Processor must be Intel Core processor produced from 2017 or AMD Zen 2 processors from 2019.
- Memory at least needs to be 4GB or even bigger.
- Graphics card must be DirectX12 or later with a WDDM 2.0 driver.
- Display must be at least 720P or higher.
![Cover image for [Solved] This PC can't run Windows 11](https://www.windows11.dev/images/AZlbFLb9qE4ssrFjgc9IjArx67_2RTgEeNimkWK63Ps/s:1000:420/mb:500000/ar:1/aHR0cHM6Ly9zMy51/cy13ZXN0LTEuYW1h/em9uYXdzLmNvbS9h/bnN3ci50by91cGxv/YWRzL2FydGljbGVz/L3U4YW51YndncXR0/emh5em9sODI2Lmpw/Zw)
![]()
Introduction
If you’ve encountered the error «This PC can’t run Windows 11» and faced the message like below when running Windows PC Health Check although your PC meets all system requirements for Windows 11, you can fix it by following the solution steps in this tutorial.
While this PC doesn't meet the system requirements to run Windows 11, you'll keep getting Windows 10 updates.
Enter fullscreen mode
Exit fullscreen mode
System Requirements
To ensure that your PC can run Windows 11, you need to have some hardware configurations. Otherwise, there is no way to run Windows 11 for now.
- 1 GHz 64-Bit dual-core CPU (Your CPU also need to be the one listed below)
- 4 GB RAM
- 64 GB storage
- 9 inch screen with 1366×768 resolution
- UEFI, Secure Boot and TPM 2.0 standards
- DirectX 12 compatible graphics, WWDM 2.x
Supported Intel CPUs
- Intel 8th GEN (Coffee Lake)
- Intel 9th GEN (Coffee Lake Refresh)
- Intel 10th GEN (Comet Lake)
- Intel 10th GEN (Ice Lake)
- Intel 11th GEN (Rocket Lake)
- Intel 11th GEN (Tiger Lake)
- Intel Xeon Skylake-SP
- Intel Xeon Cascade Lake-SP
- Intel Xeon Cooper Lake-SP
- Intel Xeon Ice Lake-SP
Supported AMD CPUs
- AMD Ryzen 2000
- AMD Ryzen 3000
- AMD Ryzen 4000
- AMD Ryzen 5000
- AMD Ryzen Threadripper 2000
- AMD Ryzen Threadripper 3000
- AMD Ryzen Threadripper Pro 3000
- AMD EPYC 2nd GEN
- AMD EPYC 3rd GEN
Good to Know about BIOS
If updating Windows couldn’t solve the error, you will need to change UEFI and TPM settings on BIOS. Thus, you need to know how to enter BIOS and how to use it.
-
In order to enter BIOS, restart your PC and press the BIOS entering key on your keyboard before Windows starts.
-
BIOS keys vary by computer. For example, I use Lenovo ThinkPad E595, and my BIOS key is
Enter, thenF2. I also have a Dell Inspiron laptop, and its BIOS key isF2. -
If you don’t know what your BIOS key is, you can find it by searching on Google with the keywod like «Lenovo ThinkPad E595 BIOS key«.
-
The BIOS interface is different from the Windows interface. Use the
RightandLeftarrow keys to move between tabs, andUpandDownarrow keys between the options in a current tab. To change a value of an option, you need to enter in it by pressingEnter. -
You might see the instructions of BIOS the bottom of your screen. Notice them.
Updating the Current Windows
-
Your current Windows need to be up-to-date to be able to run Windows 11. In order to ensure this, open Start Menu and type «Update«.
-
You’ll see Check for Updates option, then click on it.

-
Even if you see «Your Windows up-to-date» message, click on
Check for updatesbutton and wait for new available updates. -
Windows Update tool will find the available updates and install them. After the installation is finished, you’ll see a message like the image below. Click
Restart now.

-
If you see some additional updates like the image below,
Download and installthem by clicking that link, too.

-
If restart is required, restart your computer again.
-
Try again the PC Health Check tool for Windows 11.


Enabling TPM on BIOS
-
Before start, we can check whether TPM is enabled or not. To do this, press
Windows+Rkeys on your keyboard and open Windows Run window. Then, type «tpm.msc» without quotes, pressEnter.

-
If you see the message «The TPM is ready for use.» under the Status section, the problem is not related to TPM. You can skip to the next solution method. Otherwise, you need to enable it on BIOS.

-
Restart your PC and press the BIOS enter key on your keyboard before Windows starting.
-
After entering BIOS, go to the
Securitytab by usingRightandLeftarrow keys. -
Now, go to the TPM option by using
UpandDownarrow keys. -
Press
Enteron the TPM option and selectEnabled. -
Save the changes by pressing the save and exit key on your keyboard. Generally the save and exit key is
F10. -
Try again the PC Health Check tool.


Enabling UEFI and Secure Boot
-
Before start, we’ll check if our BIOS Mode is UEFI or not. To do this, open Start Menu and type
msinfodirectly. You’ll see System Information in the search results, click on it.

-
Check if the BIOS mode is UEFI or not. If it is, you don’t need to do anything related to UEFI. If not, follow the next steps and enable UEFI mode.

-
Restart your PC and enter BIOS by pressing the BIOS key of your PC as I explained the Good to Know about BIOS section above.
-
Go to
Boottab by usingLeftandRightarrow keys. Then, by using theDownarrow key go toUEFI/BIOS Boot Mode, pressEnter. Switch to UEFI from Legacy by usingUpandDownarrow keys, and pressEnter.

-
Press the
Save and Exitkey on your keyboard and exit from BIOS. For example,F10is theSave and Exitkey for my PC. Most BIOS versions useF10for the same purpose. -
Your PC will be restarted, press the BIOS key again and enter BIOS. Go to
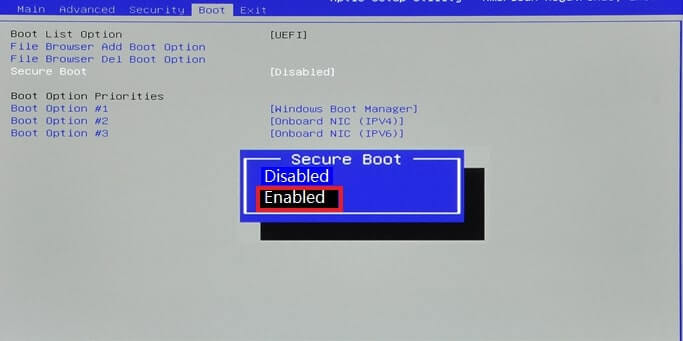
Boottab and enableSecure Boot. Some BIOS versions haveFast Bootoption meaning it is not secure boot. So, you need to disableFast Bootto be able to enableSecure Boot. -
Start your PC and try again the PC Health Check tool.


Final Words
I’ve shared you all available solutions in this tutorial. If you could solve the error by following the methods here, or any other methods; or you couldn’t solve it, please share your experience and PC model or hardware configuration with us the discussion form below. In this way, I can suggest new methods to you and develop this tutorial.
Совсем недавно компания Microsoft представила новую версию своей операционной системы под названием Windows 11. Однако многие пользователи столкнулись с ошибкой «Запуск Windows 11 на этом компьютере невозможен». В этой статье мы разберем причины появления этой ошибки, а также методы ее решения.

Содержание
- Причины ошибки «Запуск Windows 11 на этом компьютере невозможен»
- Как включить модуль TPM 2.0 в настройках BIOS или UEFI?
- Как включить Secure Boot в BIOS или UEFI?
- Как проверить наличие модуля TPM 2.0 в вашем компьютере?
- Могу ли я добавить чип TPM 2.0 в свой компьютер?
- Как установить Windows 11 на компьютер без ТРМ?
- Как установить Windows 11 на несовместимый компьютер через Центр Обновления Windows?
- Что делать если были утеряны важные данные?
Windows 11 принесла много нововведений для своих пользователей таких как новый дизайн (содержащий в себе много размытия и новые иконки), окна со скругленными краями, новое меню «Пуск», новый опыт работы с окнами (теперь при наведении на иконку развертывания окон справа вверху появляется дополнительная область, показывающая как можно разместить окно, чтобы более эффективно разделить рабочее пространство), новую панель задач (располагающуюся по центру), более удобную работу с рабочими дополнительными мониторами (система помнит позицию окон), поддержку Android приложений и многое другое.

Также представители компании Microsoft заявили, что внутри системы также было проделано немало изменений, благодаря чему система стала быстрее, а скорость загрузки игр стала быстрее до 20% благодаря внедрению технологии DirectStorage, которая позволяет загружать нужные данные прямо в видеокарту, минуя центральный процессор (эта же технология используется в XBOX).
Естественно, что количество желающих обновиться с уже надоевшей «Десятки» до новой Windows 11 сразу же возросло, однако многие столкнулись с ошибкой «Запуск Windows 11 на этом компьютере невозможен», не смотря на то, что их компьютер казалось бы полностью соответствует необходимым требованиям. Так в чем же тогда причина?
Причины ошибки «Запуск Windows 11 на этом компьютере невозможен»
Поскольку безопасность данных в современном мире стоит на первом месте – в новой Windows 11 уделили этому вопросу достаточно большое внимание. Компания устранила много уязвимостей, которые присутствовали в Windows 10, но самым большим нововведением стало требование наличия в компьютере модуля TPM 2.0 Что же это такое?
Модуль TPM (Trusted Platform Module) – являет собой чип на материнской плате компьютера, который занимается криптографическим шифрованием данных и защитой компьютера. Версия TPM 2.0 является последней актуальной версией на сегодняшний день.
В одной из статей мы говорили о том, как зашифровать свой жесткий диск при помощи встроенного инструмента под названием BitLocker (О том, как использовать BitLocker вы можете прочесть в статье: «Как зашифровать данные на жестком диске при помощи BitLocker?»). Так вот, если в компьютере присутствует микросхема TPM – выполнение шифрования данных происходит уже не в центральном процессоре, а при помощи чипа TPM. Тем самым снимается лишняя нагрузка с ЦП.
Помимо шифрования данных, чип TPM 2.0 может отвечать за проверку личности пользователя ПК, предотвращать изменения конфигурации операционной системы без ведома пользователя исключая возможность присутствия на компьютере вредоносных программ типа bootkit и rootkit (кто не знает – эти два вируса модифицируют загрузочную запись MBR или GPT), либо отвечать за идентификацию пользователя в сети или приложениях. Все дело в том, что каждый чип TPM имеет свой собственный идентификатор, который нельзя изменить. Соответственно если он правильно настроен – TPM модуль являет собой своеобразный «паспорт» компьютера, который невозможно подделать.

Чтобы проверить можно ли на вашем компьютере установить Windows 11 Microsoft предлагает использовать программу PC Health Check. Она анализирует все параметры вашего компьютера и показывает либо «На этом компьютере можно установить Windows 11»

… либо «Запуск Windows 11 на этом компьютере невозможен»

Но довольно часто PC Health Check сообщает о невозможности установить Windows 11 на вашем компьютере даже при полном соответствии всем требованиям и наличии модуля TPM 2.0.
Чаще всего причиной является отключенный чип «TPM 2.0» либо функция «Secure Boot» не активирована в настройках BIOS/UEFI. Дело в том, что обе эти функции должны использоваться, так как фактически на них построена вся безопасность данных в Windows 11.
Если вы столкнулись с ошибкой «Запуск Windows 11 на этом компьютере невозможен» воспользуйтесь инструкциями из следующих пунктов этой статьи.
Как включить модуль TPM 2.0 в настройках BIOS или UEFI?
Как уже упоминалось выше, наличие модуля TPM 2.0 является обязательным требованием для запуска Windows 11 на вашем компьютере. Однако многие пользователи не проверяют активирован ли этот модуль, и если от выключен – получают ошибку «Запуск Windows 11 на этом компьютере невозможен». Чтобы включить модуль TPM 2.0 следует:
Шаг 1: Войдите в настройки BIOS или UEFI. Для этого перезагрузите ваш компьютер и во время следующего включения используйте клавишу входа в BIOS. В зависимости от модели она может отличаться, но чаще сего это Del, F2, F1 или F12. Просто посмотрите подсказку на экране при включении компьютера.

Шаг 2: В настройках BIOS (UEFI) найдите вкладку «Security» и проверьте включен ли модуль TPM 2.0. Убедитесь, что возле надписи «Trusted Platform Module» написано «Enabled».

Шаг 3: После этого нужно сохранить изменения. Для этого вернитесь в главное меню BIOS/UEFI при помощи кнопки «ESC», перейдите во вкладку «Save & Exit», выберите «Save Changes and Reset» и нажмите «Enter», а затем «Yes» для подтверждения сохранения изменений.

В UEFI процесс включения модуля TPM 2.0 может немного отличаться, но суть остается той же – ищите пункт меню, отвечающий за безопасность, а в нем, включите чип TPM 2.0
Теперь снова попробуйте запустить утилиту PCHealthCheck для проверки возможности установки Windows 11 на вашем ПК. Если ошибка «Запуск Windows 11 на этом компьютере невозможен» повторилась снова – выполните инструкцию из следующего пункта этой статьи.
Как включить Secure Boot в BIOS или UEFI?
Опция Secure Boot занимается проверкой всех компонентов на наличие вредоносного ПО перед загрузкой операционной системы. То есть, еще до запуска Windows 11 каждый компонент компьютера должен доказать, что он не является вирусом. Для идентификации компонентов используется электронная цифровая подпись, которая уникальна для каждого устройства. Таким образом, риск заражения компьютера сводится к минимуму.
Чтобы включить Secure Boot выполните:
Шаг 1: Откройте меню «Пуск» и выберите «Параметры»

Шаг 2: В открывшемся окне выберите «Обновление и безопасность»

Шаг 3: Выберите вкладку «Восстановление», а затем в правой части окна, в поле «Особые варианты загрузки» нажмите кнопку «Перезагрузить сейчас»

Шаг 4: После перезагрузки перед вами откроются дополнительные варианты загрузки. Выберите «Параметры встроенного ПО UEFI»

Таким образом вы откроете параметры UEFI. Вид этого меню может отличатся от того, который представлен на скриншотах, однако логика включения Secure Boot примерно одинакова: вам нужно найти раздел, отвечающий за безопасность (обычно он называется «Security» или «Secure Boot») и включить функцию Secure Boot поставив галочку возле «Enabled». После этого нужно сохранить конфигурацию нажав кнопку «Apply» (или «Save», в зависимости от производителя вашего компьютера).

После проведения этих действий ваш компьютер снова перезагрузится в обычном режиме. Теперь вы сможете установить Windows 11 на вашем компьютере.
Как проверить наличие модуля TPM 2.0 в вашем компьютере?
Многие пользователи не знают установлен ли в их компьютере модель безопасности TPM 2.0, который необходим для установки Windows 11, либо не могут найти его настройки в BIOS/UEFI.
Пере тем, как приступать к проверке наличия модуля TPM следует отметить, что первая версия этого чипа появилась в 2003 году, а вторая (то есть TPM 2.0) – в ноябре 2019 года. Поэтому, если ваш компьютер представлен ранее – скорее всего он будет отсутствовать.
Если вы хотите проверить, есть ли в вашем компьютере микросхема TPM 2.0 – вам не обязательно вскрывать его. Это вполне можно проверить программными средствами. Для этого выполните:
Шаг 1: Откройте меню «Пуск» и нажмите «пробел» на клавиатуре. Перед вами откроется окно поиска (его также можно открыть нажав по иконке лупы, возле иконки «Пуск»).
В открывшемся окне, в поле поиска введите запрос «Безопасность Windows» и щелкните на соответствующем результате.

Шаг 2: В правой части открывшегося окна щелкните по «Безопасность устройства»

Перед вами откроется окно отвечающее за безопасность устройства. В поле «Спецификации» вы можете проверить версию TPM модуля, встроенного в ваше устройство. В нашем случае это версия TPM 2.0

Если вы увидели надпись «Стандартная безопасность оборудования не поддерживается» значит модуль TPM отсутствует, или он отключен в настройках BIOS.

Попробуйте его включить используя инструкцию из второго пункта этой статьи. Искать нужно пункты под названием TPM, PTT, Intel Platform Trust Technology, чип безопасности или fTPM (для устройств AMD).
Если вы не смогли найти ни одну из этих надписей – вероятнее всего он попросту отсутствует в вашем устройстве.
Могу ли я добавить чип TPM 2.0 в свой компьютер?
Часто пользователи, не обнаружившие в своем компьютере модуль TPM 2.0 задаются вопросом можно ли его установить самостоятельно или в сервисном центре? Тут все несколько неоднозначно и зависит от того, есть ли соответствующий разъем на материнской плате вашей машины.
Чаще всего возможность установки присутствует в стационарных компьютерах, в то время как ноутбуки в 99% лишены такой возможности. Причиной тому является их мобильность — практически все детали распаяны по материнской плате чтобы сделать компьютер тоньше, легче и т.д.
Однако, даже если в вашем компьютере есть возможность установки модуля безопасности — вам стоит иметь ввиду, что стоить такой апгрейд будет недешево, поскольку придется приобрести сам чип TPM, плюс оплатить услуги сервисного центра.
Несмотря на то, что часто в стационарных компьютерах есть слот TPM header key, LPC bus, который используется для подключения микросхемы TPM 2.0 — не рекомендуется устанавливать модуль безопасности самостоятельно, если у вас нет опыта в таких делах. Вы можете попросту повредить ваш компьютер.
Если вы хотите установить модуль TPM 2.0 только ради того, чтобы перейти на Windows 11 — вам стоит прочесть следующий пункт этой статьи, так как там детально описано, как можно установить Windows 11 на компьютерах без модуля безопасности.
Как установить Windows 11 на компьютер без ТРМ?
Почти сразу же после выхода бета версии Windows 11 и обнародования требований для установки оказалось, что очень большое количество людей использует не слишком новые компьютеры без чипа TPM 2.0. Соответственно практически сразу же множество энтузиастов стали придумывать как обойти требование наличия чипа безопасности. Через некоторое время это дало свой результат и сегодня любой желающий может установить Windows 11 на свой ПК или ноутбук.
Этот способ не является запрещенным, однако он накладывает ряд ограничений. К примеру, пользователи Windows 11, в чьих компьютерах отсутствует микросхема TPM 2.0 пока что не смогут получать обновления, однако, скорее все и это ограничение можно будет обойти путем редактирования реестра, либо удаления файлов, отвечающих за проверку наличия в компьютере чипа безопасности. Поэтому смысл использовать этот способ однозначно есть.
Этот способ отлично подходит если вы хотите получить чистую Windows 11 и не хотите заморачиваться с BIOS и т.д.
Стоит отметить, что этот метод также подходит если количество оперативной памяти вашего компьютера не отвечает минимальным требованиям, заявленным на сайте разработчика.
Итак, чтобы установить Windows 11 на компьютере без TPM модуля следует:
Шаг 1: Скачайте образ Windows 11 с сайта Microsoft (или другого источника, которому вы доверяете).
Шаг 2: Создайте загрузочную флэшку при помощи утилиты Rufus. О том, как это сделать, вы можете прочесть в статье «Как создать загрузочную флэшку Windows», все шаги аналогичны созданию флэшки с Windows 10.
Шаг 3: Загрузите ваш компьютер с флэшки (для этого в настройках BIOS/UEFI установите вашу флэшку в качестве загрузочного устройства). Перед вами появится стандартное окно установки Windows. Укажите нужный вам язык и другие параметры, но не нажимайте кнопку «Далее». Вместо этого воспользуйтесь комбинацией клавиш «Shift + F10»

Шаг 4: Пере вами откроется командная строка Windows. Введите команду «regedit» и нажмите «Enter» для ее выполнения.

Шаг 5: В открывшемся окне редактора реестра перейдите по пути: «HKEY_LOCAL_MACHINESYSTEMSetup», затем щелкните правой кнопкой мыши по папке «Setup» и выберите «Создать», а затем «Раздел». Назовите новый раздел «LabConfig»

У вас должно получится как на скриншоте ниже:

Шаг 6: Откройте папку LabConfig, затем щелкните правой кнопкой мыши на пустом пространстве в правой части окна и выберите «Создать», а затем кликните по «Параметр DWORD (32 бита)». Эту операцию нужно повторить три раза (то есть создать три ключа DWORD 32).

Шаг 7: Теперь нужно переименовать эти файлы. Для этого щелкните правой кнопкой мышки на параметре, для которого хотите изменить имя и выберите «Переименовать»

Только что созданные параметры следует назвать следующим образом:
- Первый параметр – BypassTPMCheck;
- Второй параметр – BypassSecureBootCheck;
- Третий параметр – BypassRAMCheck;
Внимательно вводите названия параметров, так как от этого зависит дальнейшая установка Windows 11.
У вас должно получиться как на скриншоте ниже:

Шаг 8: Теперь каждому параметру нужно присвоить значение «1». Для этого дважды кликните по нужному параметру, установите значение «1» и нажмите кнопку «ОК» для подтверждения. Повторите это действие для всех трех параметров.

После этого можно закрыть редактор реестра и командную строку, нажать кнопку «Далее» и продолжить установку как обычно.

Как установить Windows 11 на несовместимый компьютер через Центр Обновления Windows?
Несколько дней назад компания Microsoft официально представила способ установки Windows 11 на несовместимые компьютеры. Этот способ подойдет для пользователей Windows 10, в чьих компьютерах установлен более старый чип безопасности TPM 1.2. Также он подходит для установки Windows 11 на компьютерах с несовместимым процессором.
Стоит отметить, что компания настоятельно не рекомендует пользоваться этим способом, однако вынуждена идти на уступки, так как пользователей со сравнительно старыми ПК и ноутбуками оказалось очень много.
Итак, для того, чтобы установить Windows 11 на несовместимом компьютере следует:
Шаг 1: Нажмите комбинацию клавиш «Win + R» и в открывшемся окне введите команду «regedit», а затем нажмите кнопку «Enter» для ее выполнения.

Шаг 2: Перед вами откроется окно реестра Windows. Перейдите по адресу «HKEY_LOCAL_MACHINESYSTEMSetupMoSetup». В этой папке щелкните правой кнопкой мыши, выберите «Создать», а затем «Параметр DWORD (32-бита)»

Шаг 3: Назовите новый параметр «AllowUpgradesWithUnsupportedTPMOrCPU», затем дважды щелкните на нем, введите значение «1» и нажмите «OK» чтобы сохранить изменения.

Шаг 4: Перезагрузите ваш компьютер.
После этого вы сможете установить Windows 11 как с помощью образа, скачанного с официального сайта, так и при помощи центра обновлений Windows.
Что делать если были утеряны важные данные?
Каждый современный пользователь компьютера хранит на нем ценную информацию. У кого-то это финансовые отчеты, а у кого-то это фото со свадьбы. Тут все субъективно. Однако часто пользователи забывают перенести данные в безопасное место и форматируют диск C: при установке Windows 11.
Также нередко попытки установки Windows 11 могут закончится неудачно. Особенно если речь идет о пиратских модификациях.
Если вы обнаружили, что важные данные исчезли — немедленно воспользуйтесь профессиональной программой для восстановления данных RS Partition Recovery. В противном случае данные могут быть утеряны безвозвратно. Причиной является высокая вероятность перезаписи файлов другими.
Обычно, когда Windows форматирует накопитель или удаляет файл — она не удаляет его физически, а лишь отмечает его как удаленный и позволяет контроллеру перезаписать его другими данными в случае необходимости. То есть физически файл присутствует на диске, просто проводник его не отображает. Именно поэтому процесс удаления происходит в разы быстрее чем процесс записи данных на диск. Однако, определить момент, когда именно удаленный файл будет перезаписан другим нельзя спрогнозировать, поскольку контроллер распределяет данные на диске основываясь на тысячах разных факторов. Именно поэтому так важно не тянуть время и сразу же использовать RS Partition Recovery.
Программа обладает интуитивно понятным интерфейсом, благодаря чему вы сможете восстановить утерянные данные независимо от того, насколько хорошо вы владеете компьютером.
Кроме того, RS Partition Recovery поддерживает ВСЕ современные файловые системы — соответственно не имеет значения, в какой операционной системе использовался накопитель, а режим глубокого сканирования сможет восстановить даже те файлы, которые были утеряны несколько месяцев тому назад.
Просто подключите накопитель к рабочему компьютеру, либо установите новую копию Windows на вашем ПК и выполните ряд простых действий:
Шаг 1. Установите и запустите программу RS Partition Recovery.
Шаг 2. Выберите носитель или раздел диска, с которого необходимо восстановить данные.

Шаг 3. Выберите тип анализа.

Быстрый анализ стоит использовать, если файлы были удалены недавно. Программа проведет анализ и отобразит данные доступные для восстановления.
Полный анализ позволяет найти утерянные данные после форматирования, перераспределения диска или повреждения файловой структуры (RAW).
Шаг 4. Просмотр и выбор файлов для восстановления.

Шаг 5. Добавление файлов для сохранения в «Список Восстановления» или выбор всего раздела для восстановления.


Стоит отметить, что в качестве места для записи восстановленного файла лучше всего выбрать другой диск или раздел чтобы избежать перезаписи файла.
Часто задаваемые вопросы
Модуль TPM – это специальная микросхема, установлена на вашем компьютере, которая отвечает за безопасность данных. Каждый чип TPM обладает собственным ключом, который нельзя изменить и который используется во время шифрования данных, идентификации пользователя в сети и т.д.
Да. Можно. Существует несколько способов как это сделать. Более детально читайте на нашем сайте.
Да. RS Partition Recovery позволяет восстанавливать данные после случайного удаления, форматирования диска, повреждений файловой системы или логической структуры диска и т.д.
Скорее всего в вашем компьютере отсутствует модуль безопасности TPM 2.0 или же он выключен в настройках BIOS/UEFI. Также проверьте включена ли функция Secure Boot, так как это одно из требований для запуска Windows 11.
Чтобы проверить есть ли в вашем компьютере модуль TPM 2.0 войдите утилиту «Безопасность Windows» и посмотрите используется ли обработчик безопасности. Если нет – попробуйте войти в настройки BIOS/UEFI и во вкладке безопасности поищите TPM, PTT, Intel Platform Trust Technology, чип безопасности или fTPM. Больше информации вы можете найти на нашем сайте.
June 24th was the date that Windows 11 was announced. To ease the Windows 10 user’s life, Microsoft provided a tool called PC Health Check. With this tool, the users can check if their computer is compatible with the new operating system. A lot of people were surprised once they ran the software that they received the message “This PC Can’t Run Windows 11”.
If you were one of those users, that means that your current PC is not compatible with Windows 11 and you won’t be able to directly install it.
There are several workarounds and if you follow this guide, we will show you how to fix the “This PC Can’t Run Windows 11” error.
So why are you getting the “This PC Can’t Run Windows 11” error?
When you run PC Health Check and you get the error it is probably because your PC does not meet the minimum system requirements. Check the table below to see if you cover the requirements:
| Processor | 1 gigahertz (GHz) or faster with 2 or more cores on a compatible 64-bit processor or System on a Chip (SoC). |
|---|---|
| RAM | 4 gigabyte (GB). |
| Storage | 64 GB or larger storage device Note: See below under “More information on storage space to keep Windows 11 up-to-date” for more details. |
| System firmware | UEFI, Secure Boot capable. Check here for information on how your PC might be able to meet this requirement. |
| TPM | Trusted Platform Module (TPM) version 2.0. Check here for instructions on how your PC might be enabled to meet this requirement. |
| Graphics card | Compatible with DirectX 12 or later with WDDM 2.0 driver. |
| Display | High definition (720p) display that is greater than 9″ diagonally, 8 bits per colour channel. |
| Internet connection and Microsoft account | Windows 11 Home edition requires internet connectivity and a Microsoft account. |
The majority of requirements are not so different from the Windows 10 ones and most computers can meet them. The problems with the upgrade come from the requirements for UEFI, Secure Boot, and TPM 2.0.
Here is a list of all error messages that you can see when you run PC Health Check. If you encounter one of them, follow the solutions below to fix them:
- This PC can’t run Windows 11. TPM 2.0 is a requirement for running Windows 11,+
- This PC can’t run Windows 11. The PC must support Secure Boot.
- This PC can’t run Windows 11. The processor isn’t supported for Windows 11.
Guide 1: How to fix “This PC can’t run Windows 11. TPM 2.0 is a requirement for running Windows 11” error
In this case there are 2 issues:
- Your PC contains a TPM chip, but it is not enabled.
- Your PC does not have a TPM chip and you won’t be able to update to Windows 11.
How to fix the issue:
- Check if your PC supports TPM:
- Step1 – Press Win Key + R. Type tpm.msc in the dialog window, and hit Enter.
- Step 2 – When the TPM utility pops up, check if the chip is in use.
If yes, you’ll see it under the Status section, marked as The TPM is ready to use. - Step 3 – The TPM Manufacturer Information section will provide you with information about the TPM version.
If it is TPM 2.0, you will be able to install and run Windows 11.If the version of TPM is not 2.0 or if it is lower, that means that you won’t be able to update to Windows 11.
When your computer warns “Compatible TPM cannot be found” or the TPM module version is lower than 2.0, staying with your current computer operating system will be a wise decision.
- Enable TPM 2.0 chip for Windows 11
- Step 1 – Restart your PC and press the F2/F10/Del key to enter your BIOS
- Step 2 – Navigate with your keyboard to the Security section.
- Step 3 – Enable the TMP State
- Step 4 – Hit the F10 key and press Enter to exit the BIOS.Restart your PC and get the Windows 11 update successfully.
 If it is TPM 2.0, you will be able to install and run Windows 11.If the version of TPM is not 2.0 or if it is lower, that means that you won’t be able to update to Windows 11.
Guide 2 – How to fix “This PC can’t run Windows 11. The PC must support Secure Boot” error

Secure Boot mode is usually enabled for most modern computers. Its’ role is to keep your computer safe. In order to update to Windows 11 the Secure Boot mode needs to be enabled.
How to enable Secure Boot:
-
Check if your system supports Secure Boot
- Press Win Key + R. Type msinfo32.exe, and hit Enter.
- Select System Summary
- On the right-side pane scroll down and try to find a section named Secure Boot State (as shown in the screenshot)
If the Secure Boot State shows as “Off”, that means that your PC support Secure Boot and just follow this guide in order to enable it.If the Secure Boot State shows as “Unsupported”, that means that your computer hardware does not support Secure Boot. To fix this issue you need to check if your PC supports UEFI mode first.
-
Check if your PC supports UEFI mode
- Restart your PC and press the F2/F10/Del key to enter your BIOS
- Navigate to the Boot Menu. Locate the Boot Mode section and click to see if your computer supports UEFI mode.If you see a UEFI mode, that means that your PC supports this boot mode. If it is currently disabled follow the next steps to enable both UEFI and Secure Mode.Note that, if your computer doesn’t support UEFI mode, you can’t enable Secure Boot and upgrade to Windows 11.
-
Enable UEFI Mode and Secure Boot
Enable UEFI Mode:
-
- Restart your PC and press the F2/F10/Del key to enter your BIOS
- Navigate to the Boot Menu. Locate the Boot Mode section and click to see if your computer supports UEFI mode.
- Select UEFI boot mode and press F10 to Save and Exit your BIOS.
Enable Secure Boot:
-
- Restart your PC and re-enter your BIOS settings.
- Navigate to the Boot Menu, select Secure Boot settings and set it to “Enabled”
Once you enable the UEFI mode and Secure Boot you can continue installing the Windows 100 update on your computer.
-
 If the Secure Boot State shows as “Off”, that means that your PC support Secure Boot and just follow this guide in order to enable it.If the Secure Boot State shows as “Unsupported”, that means that your computer hardware does not support Secure Boot. To fix this issue you need to check if your PC supports UEFI mode first.
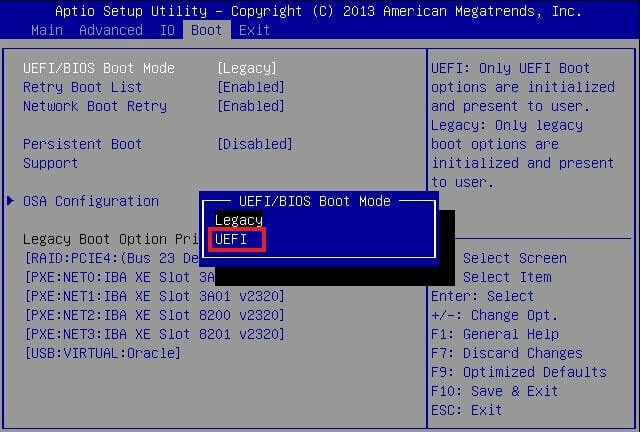
 Once you enable the UEFI mode and Secure Boot you can continue installing the Windows 100 update on your computer.
Guide 3 – How to fix “This PC can’t run Windows 11. The processor isn’t supported for Windows 11.” error
This error message means that your computer processor is not included in the supported processor list.
We’ve cover this error in a separate article that you can find here
Conclusion
As a new operating system, every user wants to try out its’ new features. However, because there are minimum system requirements, many users receive the “This PC can’t run Windows” error. The most common reason for the message is the lack of secure boot or TPM 2.0.
Post Views: 5,382
On June 24, 2021, Microsoft launched the all-new PC operating system – Windows 11. By the first look of Windows 11, it seems that it’s a refurbished version of Windows 10 with some added features like Android Apps compatibility and more.
Though there is still a long way to get the official Windows 11 OS, Microsoft has provided the way to check whether your device would be compatible with it or not using the Windows PC Health Check.
To fix various Windows 10 problems, we recommend Outbyte PC Repair:
This software will repair common computer errors, protect you from file loss, malware damage, hardware failure, and optimise your computer for peak performance. In three simple steps, you can resolve PC issues and remove virus damage:
- Download Outbyte PC Repair Software
- Click Start Scan to detect Windows 10 issues that may be causing PC issues.
- Click Repair All to fix issues with your computer’s security and performance.
This month, Outbyte has been downloaded by 26,078 readers.
While checking the compatibility for Windows 11, many users are getting the “This PC can’t run Windows 11” error, despite having the latest device with more than sufficient hardware and software requirements for Windows 11.
In this post, we would know how to check the Windows 11 compatibility and fix the “This PC can’t run Windows 11” error on the device that fulfills the minimum requirements.
What are the Minimum System Requirements for Windows 11?
If you want to install Windows 11 on your device, your PC must fulfill the minimum system requirements. As per Microsoft, the minimum system requirements for running Windows 11 on your PC are:
| Processor | 1 GHz or more with two or more cores on a compatible 64-bit processor Generation 8 or newer |
|---|---|
| RAM | 4 GB |
| Storage | 64 GB of free storage for installation (more for keeping it updated) |
| Graphics Card | Compatible with DirectX 12 or later with WDDM 2.0 driver |
| TPM | Trusted Platform Module version 2.0 |
| Firmware | UEFI, Secure Boot capable |
| Display | High Definition (720p) |
| Screen Size | Greater than 9″ Diagonally |
If your PC does not fulfill these minimum requirements, you can upgrade it and make it ready for Windows 11.
Other than these, if you want a free upgrade to Windows 11, your system must be already running on Windows 10. Also, you won’t be able to change the edition while upgrading to Windows 11. For example, if your device is currently running on Windows 10 Home, it cannot be upgraded to Windows 11 Pro.
With Microsoft announcing that Windows 11 would be free to upgrade for Windows 10 users, many users might be eager to know whether their Windows 10 device is compatible with it or not. To check whether your PC can run Windows 11 or not, you can use Microsoft’s PC Health Checkup application.
Here are the steps for that:
-
Download the PC Health Checkup Application
-
Begin installation after the download is completed.
-
Launch the application after its installation.
-
Click on the Check now button under the Introducing Windows 11 heading.
-
If your device is compatible with Windows 11, the app will display this popup:
-
If your device is incompatible with Windows 11, the app will show this popup:


How to fix “This PC can’t run Windows 11”?
If your device fulfills all the minimum requirements listed by Microsoft for Windows 11, but PC Health Checkup Application is showing the “This PC can’t run Windows 11” popup error, it might be because of the following reasons:
- Trusted Platform Module (TPM) is disabled on your system.
- Secure Boot is disabled.
- Incorrect report by the application.
To solve the error, try the following fixes:
Check if TPM is Enabled
To check whether your system has a compatible TPM and it is enabled, follow these steps:
- On the windows search box, type Windows PowerShell, right-click on it and select Run as Administrator.

- Once the PowerShell window opens, type the get-tpm command and hit the enter key.
- Check whether TPM is present and enabled or not.


To check the TPM version, follow these steps:
- Open the Run command box, type tpm.msc, and hit the enter key.

- On the TPM Management window, check the Specification version.

- If it is 2.0, then your computer is compatible with Windows 11.


If the TPM is disabled, you will have to turn the TPM state chip to ON directly from BIOS.
- Restart your system
- Press the F2 key (or fn+F2) during boot up to navigate to the BIOS menu.
- Using the arrow key, navigate to the Security tab.
- Find a listing for either TPM, Intel Platform Trust Technology (IPTT), or AMD CPU fTPM.
- Enable the TPM and press F10 to Save & Exit.


Check if Secure Boot is enabled
To check if secure boot is enabled on your system, follow these steps:
- Open the Run command box, type msinfo32, and hit the enter key.
- On the System Information window, look for Secure Boot State.

- Check whether it is ON or not.

If it is OFF, enable the Secure Boot from the BIOS.
- Restart your system
- Press the F2 key (or fn+F2) during boot up to navigate to the BIOS menu.
- Using the arrow key, navigate to the Security tab.
- Find the Secure Boot setting, and if it is disabled, set it to enabled. The Secure Boot setting can also be found under the Boot tab or the Authentication tab.


Summing Up
Every Windows user is excited about the release of the all-new Windows 11, as it is expected to overcome all the faults of Windows 10. Though the current Windows 10 devices are not expected to get Windows 11 until the first half of 2022, users can prepare or upgrade their devices if they are incompatible with it. If the PC Health Checkup application displays the “This PC can’t run Windows 11” error, you can follow the solutions listed in this post or upgrade the device’s hardware if it is outdated.
Will I get Windows 11 for free?
If you are currently using the genuine version of Windows 10 and your system is compatible with the minimum system requirements of Windows 11, you are eligible for getting the free upgrade to Windows 11.
Is Windows 11 available to install?
Though Windows 11 was launched on June 24, 2021, it would still be unavailable to install until the first half of 2022.
Will Windows 11 be faster?
Windows 11 is a next-gen operating system, so it is expected to be quicker than the current Windows 10 OS.

Peter is an Electrical Engineer whose primary interest is tinkering with his computer. He is passionate about Windows 10 Platform and enjoys writing tips and tutorials about it.