Sometimes, due to a lack of Windows updates or some Windows Defender issues, you get an error message that reads: “This setting is managed by your administrator,” even though you were logged in as one. This might prevent you from disabling the SmartScreen, or in some cases, launching non-Microsoft apps.
Fortunately, you don’t have to be an installation specialist to solve this problem, although it involves a few minor technical edits. We will go through these fixes one by one, from the most obvious solutions to the registry editing steps.
Content
- What Is the «This Setting Is Managed by Your Administrator» Issue?
- 1. Check for Windows Updates
- 2. Disable Other Antivirus Software
- 3. Solve Using Registry Editor
- 4. Disable Any Windows Defender Configurations in Local Group Policy Editor
- Issue Resolved: «This Setting is Managed by Your Administrator»
- Frequently Asked Questions
Contrary to the way it sounds, “This setting is managed by your administrator” has nothing to do with whether or not you are logged in as an administrator. It has more to do with certain unpredictable errors which affect Windows Defender.
There are different indications of this error. For example, when you launch “Windows Security” settings from the search box menu and go to “Reputation-based protection,” some of the options will be grayed out.

Here, one of the settings, “Check apps and files,” has been disabled. This is a very important setting, as SmartScreen checks for unrecognized apps and files, and you can’t manage your PC without accessing this control.

On Windows 11 devices, when the toggle is off, the system will display a “Check apps and files is off. Your device may be vulnerable” message.

Windows 11 devices also have built-in “Exploit protection” for added security. If any of its settings are turned off by default, the system will immediately prompt you for a restart.

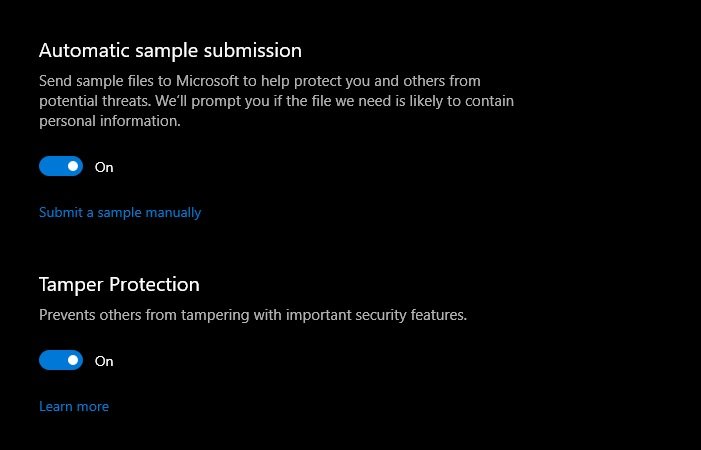
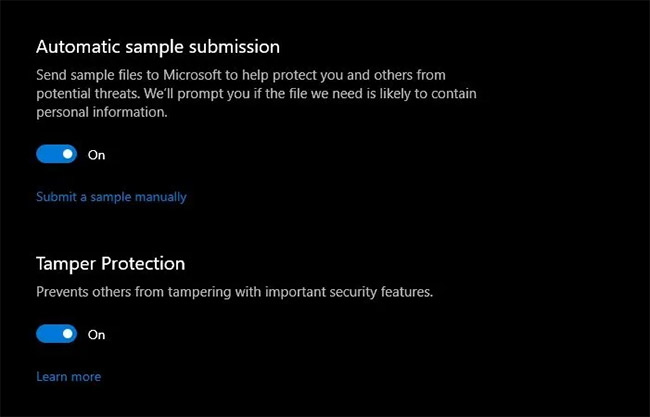
Similar settings may be disabled for “Real-time Protection” or “Automatic Sample Submission.” To solve these issues, we are exploring various troubleshooting steps.

1. Check for Windows Updates
The first thing to do is to check your system for any pending Windows updates. When many of these updates accumulate, there are chances that it may affect some of the programs – including Windows Defender. Go ahead and finish these updates, which will clear the system of any legacy errors. To see whether you have any new updates pending go to “Settings -> Windows Update.”

2. Disable Other Antivirus Software
If you have a third-party antivirus, it may be affecting Windows Defender, as the latter’s Real-time Protection feature will be turned off by default. You may need to disable or uninstall the antivirus temporarily to remove the error. You can reinstall it later. Consider that Windows Defender itself is a very reliable antivirus and compatible with existing Windows 10 and 11 systems.

3. Solve Using Registry Editor
If the first two steps do not solve the issue, then one of the best ways to solve “This setting is managed by your administrator,” is to tweak the registry for Windows Defender. We will be temporarily deleting the registry files for Windows Defender.
- Launch the Registry Editor app from the Windows 10/11 search box by typing “regedit.” It’s better to run it in Administrator mode. You may also open Registry Editor by typing Win + R and then entering “regedit.”

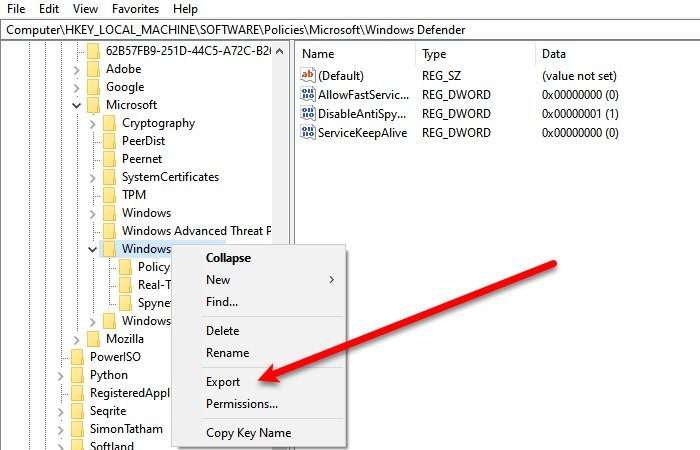
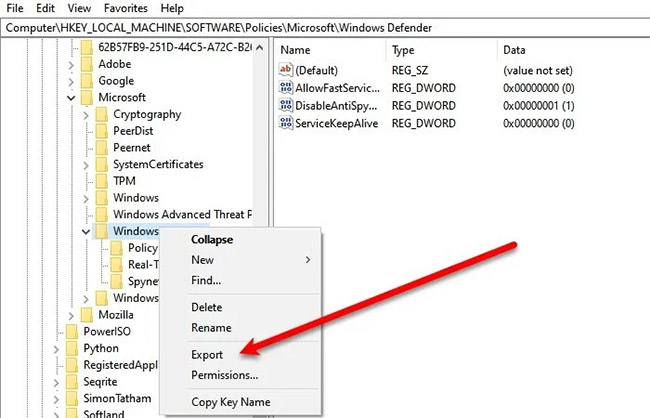
- Once the Registry Editor app is open, navigate to the path shown in the screen below: “ComputerHKEY_LOCAL_MACHINESOFTWAREPoliciesMicrosoftWindows Defender.”

- Right-click on the Windows Defender key and click “Export.”

- Create a new folder on your desktop or anywhere else on the system. In this example, the folder is “Regedit Check.”
- Export the registry file for the Windows Defender key in the recently created folder. It’s in .reg format.

- Repeat the procedure for all the sub-keys under “Windows Defender.” As shown here, we are exporting the Registry file for “Policy Manager.” Make sure the subkey name is exactly the same as in the Registry Editor.

- Depending on your Windows 10 or Windows 11 system, there may be more subkeys. Make the backup for each and every item.
- Once you have the backup, you have to delete the “Windows Defender” key. Don’t worry about losing files – it’s only temporary; that’s why we made a backup.

- You will get a warning message that asks, “Are you sure you want to permanently delete this key and all its subkeys?” Click “Yes” to proceed.

4. Disable Any Windows Defender Configurations in Local Group Policy Editor
The Local Group Policy Editor in Windows allows you to configure administrator settings that were accidentally turned on/off. Only Windows Professional (Pro) and higher edition users can access this tweak.
- Open the Local Group Policy Editor from the Run command menu by typing Win + R and then entering
gpedit.msc. - In the app, navigate to “Computer Configuration -> Administrative templates -> Windows components -> Microsoft Defender Antivirus -> Real-time Protection.”
- Ensure that no policy is configured by default here. If it is, you need to turn it off.

Issue Resolved: “This Setting is Managed by Your Administrator”
Restart your system and go back to the “Reputation-based protection” menu. You will see that you can now enable/disable the SmartScreen freely, as the “Check apps and files” screen is now active once again.

Also, under “Virus & Threat Protection Settings,” Real-time and Cloud protection are re-enabled.

“Memory integrity” in “Core isolation” should also appear enabled in Windows 11 and supported Windows 10 hardware. It may require a restart to achieve it.

We had deleted the registry files of Windows Defender to achieve the results. Now it’s time to restore them. For that, go back to the backup folder and double-click on the parent Windows Defender registry file first. You’ll get a warning screen asking whether you want to add files to the registry. Click “Yes” to continue, and the older registry files for Windows Defender will return.

Frequently Asked Questions
How to fix Windows Defender «Not connected» error in Administrator mode?
Sometimes, in very rare cases, Windows Defender is grayed out/disabled instead of showing a connected status. To solve it, update your Windows system first, which might clear the problem automatically. If it doesn’t, go back to the Windows Defender key in Registry Editor and check for a “Disable anti-spyware” parameter; it may not be present if your system is running properly. Right-click on it. You will get an option to “Modify,” which will take you to a screen where the “DWord” value is to be changed from “1” to “0.” Once you do this modification, you should be able to access Windows Defender once again.
How do I fix «Some settings are managed by your organization» in Windows?
“Some settings are managed by your organization” is an error status similar to “This setting is managed by your administrator.” It affects Windows Pro/Enterprise/Education users as a few policies are enforced bypassing their user privilege status. The only way to fix this status is to use the Local Group Policy Editor where the user needs to reset any misconfiguration in Windows Defender policies for their devices.
If you don’t have access to the Local Group Policy Editor app, contact a system administrator for help fixing the problem.
How do I fix other Windows administration problems?
The only way to fix any Windows administration issues is to ensure that you’ve indeed logged in as an administrator. This may require deleting any hidden local accounts from your User Account Control (UAC). All of them can be accessed from the Run command menu, by typing Win + R and then entering netplwiz.
Image credit: geralt via Pixabay All screenshots by Sayak Boral

Sayak Boral
Sayak Boral is a technology writer with over eleven years of experience working in different industries including semiconductors, IoT, enterprise IT, telecommunications OSS/BSS, and network security. He has been writing for MakeTechEasier on a wide range of technical topics including Windows, Android, Internet, Hardware Guides, Browsers, Software Tools, and Product Reviews.
Subscribe to our newsletter!
Our latest tutorials delivered straight to your inbox
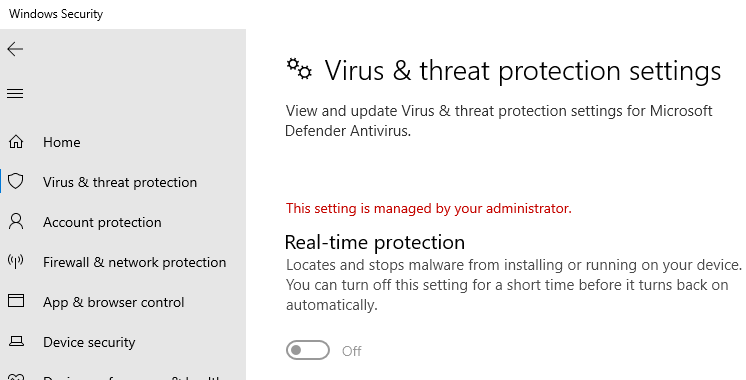
Some users see, “This setting is managed by your administrator” message in Microsoft Defender, and because of this, they are either unable to enable all three settings – Real-time protection, Cloud-delivered protection, and Automatic Sample submission, or one of them.

You may see this message This setting is managed by your administrator for the following functions in Windows Security:
- Real-time protection
- Cloud delivery protection
- Automatic Sample Submission.
Typically, this means that these settings have indeed been configured by your system administrator, and it would make sense to discuss this with him. But if you are the admin, then these are things you can do to fix the issues.
- Check if you are using any 3rd party tool
- Scan for virus and malware
- Delete Windows Defender Registry key
- Delete AntiSpyware
- Check Registry or Group Policy settings.
Let us talk about them in detail.
1] Check if you are using any 3rd party tool
If you are using a 3rd-party tweak tool to harden your Windows 10 security, then maybe it made these changes via the Registry or Group Policy.
You might want to identify it and uninstall it or use its Reset to Windows defaults button and see if that helps,
2] Scan for virus and malware
The first and foremost thing you need to do to fix the issue is to scan your computer for viruses and malware. To delete malware, we won’t recommend using any third-party anti-malware software as they can register themselves as the primary protection; therefore, we are going to use Microsoft Defender.
To do that, follow the prescribed steps:
- Launch Settings by Win + I
- Click Update & Security > Windows Security > Open Windows Security.
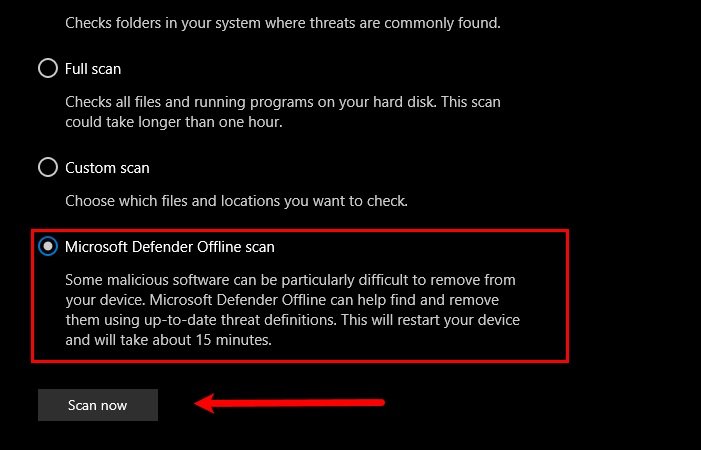
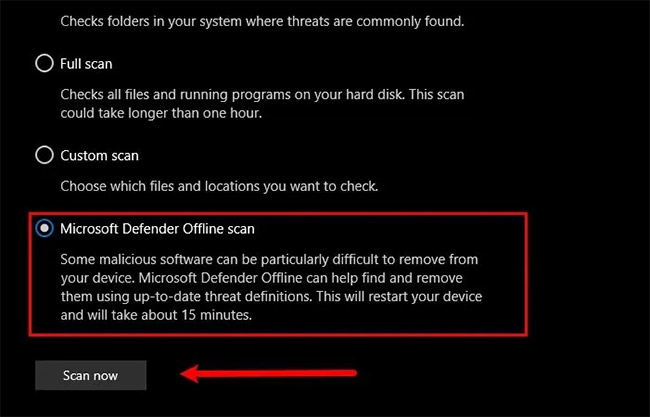
- Click Virus & threat protection > Scan options > Microsoft Defender Offline scan > Scan now.
Let it scan your computer and delete the virus.
Check if it fixes the problem. If this didn’t fix your issue, you could try the next solution.
Related: Some settings are managed by your organization.
3] Delete Windows Defender Registry key
Deleting Windows Defender Key in the Registry Editor has worked for me and will certainly work for you. So, to do that, launch Registry Editor from the Start Menu and navigate to the following location.
ComputerHKEY_LOCAL_MACHINESOFTWAREPoliciesMicrosoftWindows Defender
Right-click on Windows Defender, select Export, create a New Folder on your PC (preferably on the Desktop), open it, name the file “Windows Defender,” and click Save.
Now, do this for all the sub-keys and delete Windows Defender.
Finally, restart your PC, and the problem will be fixed.
Related: Your Virus & threat protection is managed by your organization.
4] Delete AntiSpyware key
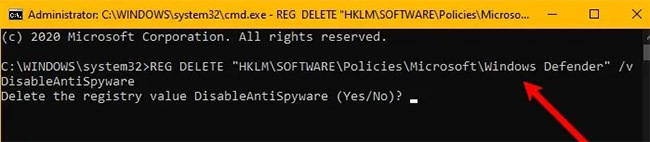
If the above solution didn’t work for you or you are not comfortable with Registry Editor, you can delete AntiSpyware to fix this issue. To do that, launch Command Prompt as an administrator by Win + R > type “cmd” > Ctrl + Shift + Enter, type the following command and hit Enter.
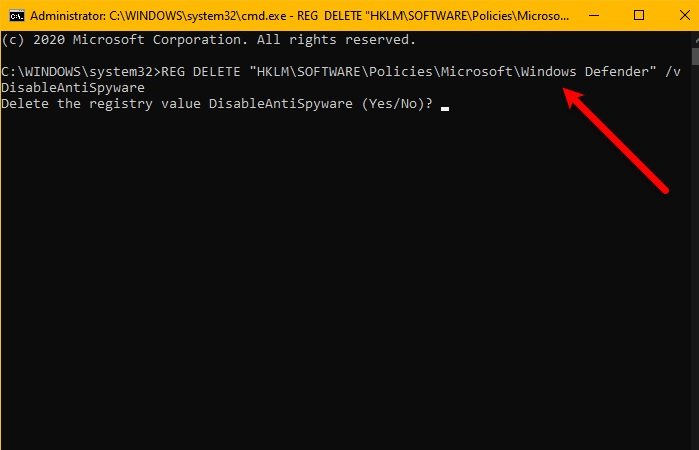
REG DELETE "HKLMSOFTWAREPoliciesMicrosoftWindows Defender" /v DisableAntiSpyware
It will ask you to confirm your action, so hit “Y” to do that.
Finally, restart your computer and see if the issue persists. Hopefully, your problem will be fixed.
These solutions will definitely work for you as they worked for me.
Read: Cloud-delivered protection is off, Your device may be vulnerable
5] Check Registry or Group Policy settings
Now you may need a bit of expertise to do this. You have to check the settings manually.
You can find the Defender settings in Registry under:
HKEY_LOCAL_MACHINESOFTWAREPoliciesMicrosoftWindows Advanced Threat Protection
And in Group Policy under:
Computer Configuration > Administrative Templates > Windows Components > Microsoft Defender Antivirus
You will have to check if any have been Configured. You need to make sure they’re Not configured.
Read Next: How to harden Windows Defender security.
 Некоторые пользователи Windows 10 и Windows 11, зайдя в окно «Безопасность Windows» с целью настроить какие-либо параметры Microsoft Defender (ранее — Защитник Windows) могут обнаружить, что некоторые параметры заблокированы и увидеть надпись «Этим параметром управляет ваш администратор».
Далее в инструкции подробно о том, почему появляется уведомление о том, что этим параметром управляет ваш администратор в параметрах безопасности Windows, как это исправить и нужно ли это делать.
Что значит «Этим параметром управляет ваш администратор» в Microsoft Defender

Как правило, непонимание по поводу рассматриваемого уведомления возникает у пользователей, которые сами являются единственным администратором текущего компьютера или ноутбука. Переживать не стоит — никто посторонний компьютером не управляет. За исключением варианта, когда речь идёт о компьютере организации и параметры действительно заданы администратором.
Причина такого уведомления — настройки политик Защитника Windows, которые были выполнены не через интерфейс его настроек в окне «Безопасность Windows», а одним из следующих способов:
- С помощью ручной настройки параметров Microsoft Defender в редакторе локальной групповой политики.
- Путем изменения параметров защиты от вирусов с помощью реестра.
- С помощью сторонних программ для отключения Защитника Windows, оптимизации параметров работы системы, отключения «слежки» Windows, которые также внесли изменения в реестр.
- В редких случаях изменение параметров защиты от вирусов и угроз бывает выполнено вредоносными программами.
Подводя итог, сообщение «Этим параметром управляет ваш администратор» в параметрах защиты и безопасности Windows говорит лишь о том, что некоторые из настроек были выполнены «в обход» интерфейса настроек, доступных в окне «Безопасность Windows».
Что делать и как убрать надпись «Этим параметром управляет ваш администратор»
Если ранее вы целенаправленно меняли настройки встроенного антивируса Windows 10 или Windows 11 с помощью редактора реестра, редактора локальной групповой политики или сторонних программ и результат вас устраивает, то какие-либо действия не требуются: на надпись об управлении параметром вашим администратором можно не обращать внимания.
Если же задача — разблокировать эти параметры, потребуется вернуть политики Microsoft Defender или Защитника Windows к значениям по умолчанию. Сделать это можно с помощью редактора локальной групповой политики или редактора реестра.
Если на вашем компьютере установлена Pro или Enterprise версия Windows, можно использовать редактор локальной групповой политики:
- Нажмите правой кнопкой мыши по кнопке «Пуск», выберите пункт «Выполнить», введите gpedit.msc и нажмите Enter.
- В редакторе локальной групповой политики перейдите к разделу Конфигурация компьютера — Административные шаблоны — Компоненты Windows — Антивирусная программа Microsoft Defender.
- Внутри этого раздела пройдите по всем вложенным подразделам, обращая внимание на значения разных политик в правой панели редактора. По умолчанию все значения равны «Не задана». Если вы встретили политики с отличающимся значением, дважды нажмите по таким пунктам, изменение значение на «Не задана» и примените настройки.

- Повторите те же действия для раздела Конфигурация компьютера — Административные шаблоны — Компоненты Windows — Антивирусная программа Безопасность Windows.

Процесс можно и ускорить, подробнее об этом: Как сбросить локальные групповые политики в Windows.
В Windows 11 и Windows 10 домашняя gpedit.msc отсутствует, но удалить настроенные политики можно с помощью редактора реестра:
- Нажмите клавиши Win+R на клавиатуре, введите regedit и нажмите Enter.
- Перейдите к разделу реестра
HKEY_LOCAL_MACHINESOFTWAREPoliciesMicrosoftWindows Defender
- По умолчанию в этом разделе в правой панели не должно быть никаких значений, кроме стокового значения «По умолчанию» (если есть другие — их можно удалить), а если раскрыть этот раздел, то в нем может присутствовать пустой подраздел «Policy Manager» без каких-либо значений и никаких других подразделов, иначе их можно удалить (правый клик — удалить).
- Если в реестре присутствует раздел
HKEY_LOCAL_MACHINESOFTWAREPoliciesMicrosoftWindows Defender Security Center
его можно удалить целиком вместе со всеми подразделами, по умолчанию в реестре этот раздел отсутствует, так как какие-либо политики центра безопасности Windows не настроены.


Как правило, сделанные изменения начинают действовать сразу, без перезагрузки компьютера, но окно «Безопасность Windows» потребуется закрыть и открыть снова.
В ситуации, когда политики работы защитника Windows появляются снова, можно предположить, что это результат работы какого-то стороннего ПО, не исключено, что вредоносного. Имеет смысл проверить компьютер на вирусы и использовать специальные средства удаления вредоносных программ с компьютера.
This Setting is Managed by Your Administrator in Windows is a common error many Windows users face.
This error states that the settings have been configured by your Windows system administrator. But sometimes users face this issue even after being the admin.

If you are facing this, don’t worry. This article provides you with 10 different solutions to fix this issue.
Solutions to Fix This Setting is Managed by Your Administrator in Windows Error
- Scan For Viruses and Malware
- Delete Windows Defender Registry Key
- Delete the Antispyware Key
- Check For 3rd Party Tool in your System
- Check For Windows Updates
- Remove Work or School Accounts
- Change Your Diagnostic and Usage Data
- Check the Hard Drive
- Check the Scheduled Tasks
- Change the Settings From the Group Policy Editor
Methods to Fix This Setting is Managed by Your Administrator in Windows Error
1. Scan For Viruses and Malware
This is the first and foremost step you should take when encountering this error. You can scan for viruses and malware using Microsoft Defender antivirus. Follow the steps below to scan for viruses and malware.
- Click on the search icon and search for the Settings app.

- Click on the Update and Security option.

- From the left menu, click on Windows Security.

- Click on the Open Windows Security button.

- Click on Virus & Threat Protection.

- Click on the Scan option.
- Click on Microsoft Defender Offline Scan and click on Scan Now.
- Check if the This Setting is Managed by Your Administrator in Windows issue is fixed or not.
It will start to scan the system. If any viruses or malware are found, it will delete them. After completing this method, restart your system and check if the error has been solved.
2. Delete Windows Defender Registry Key
This method has worked for many users and might also work for you. Follow the steps below to delete the Windows Defender registry key.
- Click on the search icon and search for Registry editor.

- You can also reach this by pressing Windows + R key on your keyboard and type regedit in the search box.

- Click on Ok.
- Navigate to the following location provided below for all Windows Defender registry editors.

ComputerHKEY_LOCAL_MACHINESOFTWAREPoliciesMicrosoftWindows Defender
- Click on File and click on Export.

- Create a new folder on your PC (desktop is preferred). Name it Windows Defender and Save.

- Now, create a folder for all the subkeys and delete the Windows Defender registry editor.
Now, restart the PC and check if the issue has been solved.
3. Delete the Antispyware Key
Follow the steps below to delete the antispyware key.
- Click on the search icon and search for the Command Prompt app.

- Type the following command and press Enter.

REG DELETE “HKLMSOFTWAREPoliciesMicrosoftWindows Defender” /v DisableAntiSpyware
- Press Y to confirm your action.
After that, restart your system and check if the issue has been solved.
4. Check For 3rd Party Tool in your System
If you use any third-party tool to tighten your Windows security, then it might make changes via the registry or group policy.
You have to either identify and uninstall it or use the Reset to Windows Default button to check if it helps.
5. Check For Windows Updates
If you last updated your system a while ago, it could cause this issue. Follow the steps below to check for Windows Updates.
- Click on the search icon and search for the Settings app.

- Click on the Update & Security option.

- Click on Check for Updates.

- It will start to check for updates.
- If any updates are found, it will update it.
- After updating, restart the system and check if the issue has been solved.
6. Remove Work or School Accounts
Sometimes when you connect work or school accounts to the device, this error could happen. Try to remove them and check if it works. Follow the steps below to remove work or school accounts.
- Click on the search icon and search for the Settings app.

- Click on the Accounts option.

- Click on Access Work or School.

- Check if any account is connected to it and remove that account.

- Now, restart your device and check if the issue has been solved.
But sometimes, you might need permission to remove these accounts. In that case, you must create a new user account with administrator privileges. Follow the steps below to enable a new administrator account with administrator privileges.
- Click on the search icon and search for the Settings app.

- Click on the Accounts option.

- Click on Family & Other Users.

- Click on Add Someone Else to this PC.

- Now, enter the Email or Phone number and follow the on-screen instructions provided.

- After creating the account, enable it to administrator mode and click on Ok.
7. Change Your Diagnostic and Usage Data
Follow the steps below to change the diagnostic and usage data.
- Click on the search icon and search for the Settings app.

- Click on the Privacy option.

- From the left menu, click on the Diagnostics & Feedback option.

- Choose the optional diagnostic data.

This is one of the most straightforward solutions where you have to change only one setting. Here you have to mention that this option regulates how much personal data is sent to Microsoft for analysis.
If you are uncomfortable sharing your personal data for analysis, use the enhanced option.
8. Check the Hard Drive
Hard drives can also cause this issue. Some users reported that the problem started because the hard drive was designed for data storage.
Replace your hard drive and check if it solves the issue. In addition to this, check the health of your hard drive.
9. Check the Scheduled Tasks
Follow the steps below to check the scheduled tasks.
- Click on the search icon and search for the Task Scheduler app.

- Expand the safer networking directory and select Spybot Anti-Beacon.
- From the right panel, select the available task.
- Right-click on the task and click on Delete.
Note: This method works only for those with safer networking and Spybot anti-beacon directories in their scheduler.
10. Change the Settings From the Group Policy Editor
Follow the steps below to change the group policy settings from the group policy editor.
- Press Windows + R key on your keyboard.
- Type gpedit.msc and click on Ok.

- It will start with the group policy editor. Navigate to the path given below:
User Configuration/ Administrative Templates /Start Menu and Taskbar/ Notifications
- Double-click on the Turn Off toast notifications setting.
- Enable it and disable it a couple of times. But remember to disable it before you save your settings.

You can see the message “This setting is managed by your administrator” for the following functions in Windows Security:
- Real-time protection
- Cloud delivery protection
- Automatic sample submission.
Usually that means these settings have actually been configured by the system administrator, and it would make sense for you to discuss this with that person. But if you’re the admin, here’s what you can do to fix the problem.
1. Check if you are using any 3rd party tools
If you are using a 3rd party tweaking tool to enhance your Windows 10 security, it may have made these changes through the Registry or Group Policy.
You may want to identify and uninstall this tool or use the . button Reset to Windows defaults and see if that helps,
2. Scan for viruses and malware
The first and most important thing you need to do to fix the problem is to scan your computer for viruses and malware. To remove malware, the article recommends against using any third-party anti-malware programs. Instead, use Microsoft Defender.
To do that, follow these steps:
B1: Launch Settings with Win + I.
B2: Click Update & Security > Windows Security > Open Windows Security.
B3: Click Virus & threat protection > Scan options > Microsoft Defender Offline scan > Scan now.
Let your computer be scanned and deleted for viruses.
Check if this fixes the problem. If this does not fix your problem, you can try the next solution.
3. Remove Windows Defender Key
Deleting the Windows Defender Key in the Registry Editor has worked for some users and will certainly work for you. So, to do that, launch Registry Editor from the Start menu and navigate to the following location.
ComputerHKEY_LOCAL_MACHINESOFTWAREPoliciesMicrosoftWindows DefenderRight click on Windows Defender, choose Export, create a new folder on PC (preferably on Desktop), open it, name the file “Windows Defender” and click Save.
Now do this for all subkeys and delete Windows Defender.
Finally, restart the PC and the problem should be fixed.
4. Remove AntiSpyware key key
If the above solution does not work for you or you are not satisfied with the Registry Editor, you can remove AntiSpyware to fix this problem. To do that, launch Command Prompt as admin with Win + CHEAP > enter “cmd” > Ctrl + Shift + Enter, enter the following command and press Enter.
REG DELETE "HKLMSOFTWAREPoliciesMicrosoftWindows Defender" /v DisableAntiSpywareYou will be asked to confirm your action, so press “Y” to do that.
Finally, restart the computer and see if the problem persists. Hopefully, your problem will be fixed.
5. Check Registry or Group Policy settings
Now you may need a bit of expertise to do this. You have to check the settings manually.
You can find the Defender settings in the Registry by following the path:
HKEY_LOCAL_MACHINESOFTWAREPoliciesMicrosoftWindows Advanced Threat ProtectionAnd in Group Policy go to:
Computer Configuration > Administrative Templates > Windows Components > Microsoft Defender AntivirusYou will have to check if any is in the state Configured (configured) or not. You need to make sure they are not Not configured (not yet configured).
Good luck with your troubleshooting!
Source link: How to fix “This Setting Is Managed by Your Administrator” error on Windows 10
– https://techtipsnreview.com/
Administrator, error, Fix, Managed, Setting, Windows
by Loredana Harsana
Loredana is a passionate writer with a keen interest in PC software and technology. She started off writing about mobile phones back when Samsung Galaxy S II was… read more
Updated on October 3, 2022
- Windows Security users get a similar message stating This setting is managed by your administrator.
- The setting is automatically configured via administrative policies, so check out our below tricks.
- If you happen to encounter similar errors, simply visit this Windows 10 Errors section for useful tips.
- To keep your PC safe from malware and other threats, bookmark our Security & Privacy Software Hub.

XINSTALL BY CLICKING THE DOWNLOAD FILE
This software will repair common computer errors, protect you from file loss, malware, hardware failure and optimize your PC for maximum performance. Fix PC issues and remove viruses now in 3 easy steps:
- Download Restoro PC Repair Tool that comes with Patented Technologies (patent available here).
- Click Start Scan to find Windows issues that could be causing PC problems.
- Click Repair All to fix issues affecting your computer’s security and performance
- Restoro has been downloaded by 0 readers this month.
Countless users describe a similar situation regarding using Windows Security. A message is shown stating This setting is managed by your administrator.
Things are rather strange since this happens precisely to administrators. Windows Security is a popular Windows 10 built-in app that comes with a simple interface.
It even includes the Microsoft Defender antivirus that’s meant to protect your PC against malware and other threats, so you need to address the issue as soon as possible.
People are worried and ask for solutions. Here’s what one of them said:
What is going on with my Windows Security? It says I’m not Admin although I am.
How to remove This setting is enforced by your administrator?
Even if you get a message that claims This setting is managed by your administrator, do note that it’s only indicating that the setting it’s being automatically configured via administrative policies.
The admin hasn’t been changed, therefore waste no more time and check the group policy editor. You should verify if any admin templates are still active.
Chances are you have edited the local policies to manage automatic updates or you’ve changed some registry values and that’s an immediate result of your previous actions.
A similar message that countless users report is the following one: Your IT Administrator has limited access. In case of encountering it too, follow the procedures described in this quick guide right away.
Moreover, do note that admin permissions are dangerous. It’s simple to break something for good if you don’t act carefully.
Still having issues? Fix them with this tool:
SPONSORED
If the advices above haven’t solved your issue, your PC may experience deeper Windows problems. We recommend downloading this PC Repair tool (rated Great on TrustPilot.com) to easily address them. After installation, simply click the Start Scan button and then press on Repair All.
![]()
Newsletter
Hi Guys, Today I am Going to tell you How to Fix “This setting is managed by your administrator” Can’t Turn On Memory Integrity Error in Windows 10 & 11?
Check Out This: How to Install & Run Google Playstore in Windows 11 Without Using any Emulators?
Are you Looking for the Commonly Searched Term “How to Fix “This setting is managed by your administrator” Can’t Turn On Memory Integrity Error?” (or) “How to Turn On (or) Off Core Isolation Memory Integrity in Windows 11? “.
You are at the Right Place to Get Your Answers & Solve the Issue/Error.
Let’s See About it.
Steps For How to Fix “This setting is managed by your administrator” Can’t Turn On Memory Integrity Error in Windows 10 & 11?
*Important Note – Make Sure that Virtualization is enabled in your BIOS. If Not Enabled, Just Enable it first and then try the solutions.
Solution 1: Using Registry Editor
Step 1: Go to Search and Search for Regedit (or) Registry Editor and Open it.
Step 2: Now Copy Paste the Below Address in the Registry Editor Address Bar
HKEY_LOCAL_MACHINESYSTEMCurrentControlSetControlDeviceGuardScenariosHypervisorEnforcedCodeIntegrity
HKEY_LOCAL_MACHINESYSTEMCurrentControlSetControlDeviceGuardScenariosHypervisorEnforcedCodeIntegrity
Step 3: Now If You want to Enable it, Change the DWORD Value to 1. If you want to Disable it, Change the DWORD Value to 0.
Restart Your PC.
Solution 2: Using a REG file (Windows Registry file)
For Turning On Memory Integrity
Step 1: Just Copy Paste the Below code in a notepad and save the file as filename.reg
[HKEY_LOCAL_MACHINESYSTEMCurrentControlSetControlDeviceGuardScenariosHypervisorEnforcedCodeIntegrity]
"Enabled"=dword:00000001
Step 2: Now Double Click (or) Run the Reg File and Press Yes to Turn on the Memory Integrity.
For Turning Off Memory Integrity
Step 1: – Just Copy Paste the Below code in a notepad and save it as filename.reg
[HKEY_LOCAL_MACHINESYSTEMCurrentControlSetControlDeviceGuardScenariosHypervisorEnforcedCodeIntegrity]
"Enabled"=dword:00000000
Step 2: Now Double Click (or) Run the Reg File and Press Yes to Turn Off the Memory Integrity.
Step 3: Restart Your PC.
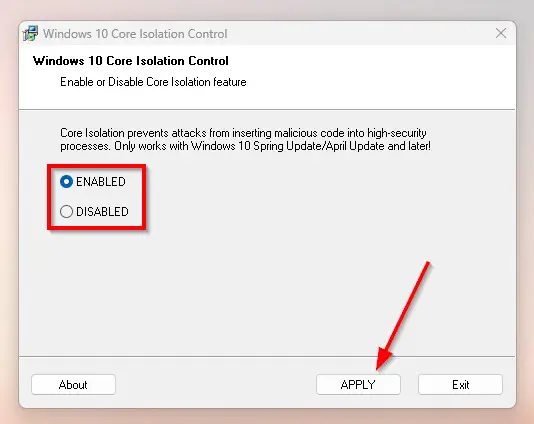
Solution 3: Using Rejzor Core Isolation Tool.
Step 1: Download the Rejzor Core Isolation Tool from the below given Official Website.
Link – https://rejzor.wordpress.com/2018/04/29/windows-10-core-isolation-control-1-0-released/
Step 2: After Downloading, Install the Rejzor Core Isolation Tool and Run it.
Step 3: Now Select the Option Enabled or Disabled as per your need and Press the Apply Button.
That’s It. You’re Done. Have a Nice Day.
@@@ Leave Comments @@@
In the aftermath of a malware attack, the Windows Defender Security settings page may show the message Some settings are managed by your organization or This setting is managed by your administrator. The real-time protection and cloud-based protection options may remain disabled or grayed out.
Here is what the Windows Defender Settings page might look like. The controls for real-time protection, cloud-based protection, and Automatic sample submission options may be disabled and locked down or grayed out.
If you’ve installed a 3rd party anti-virus, Windows Defender gets disabled automatically. It’s normal. In that case, you’ll see the message “You’re using other antivirus providers.” instead.
If Microsoft Defender group policies or registry-based policy settings are in effect, the following error appears when opening the Security at a glance page:
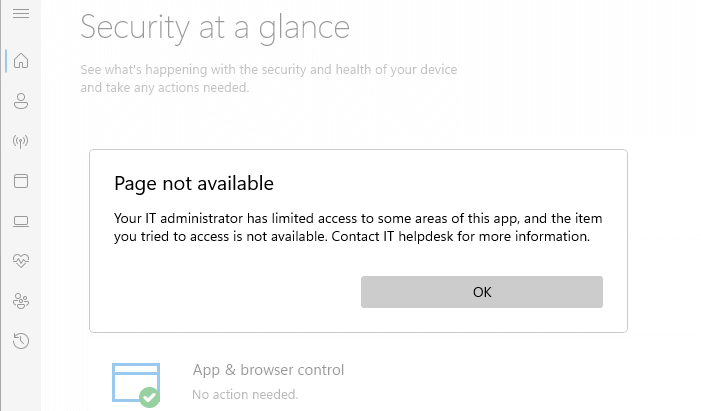
Page not available

Your IT administrator has limited access to some areas of this app, and the item you tried to access is not available. Contact IT helpdesk for more information.
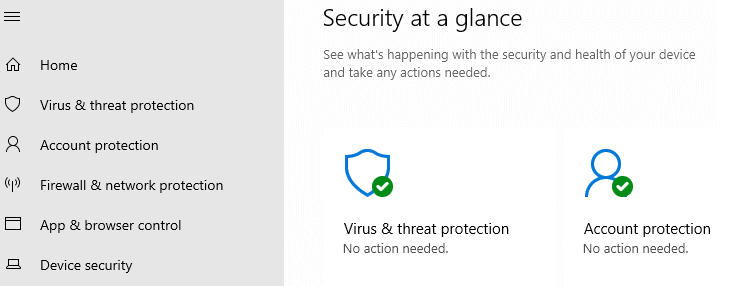
Virus & Threat Protection is Missing?
In some situations, the Virus & threat protection section may be missing. The Virus & threat protection section in the Windows Security user interface lets you configure every aspect of the Microsoft Defender Antivirus — such as real-time protection, tamper protection, ransomware protection, Controlled folder access, and other important settings.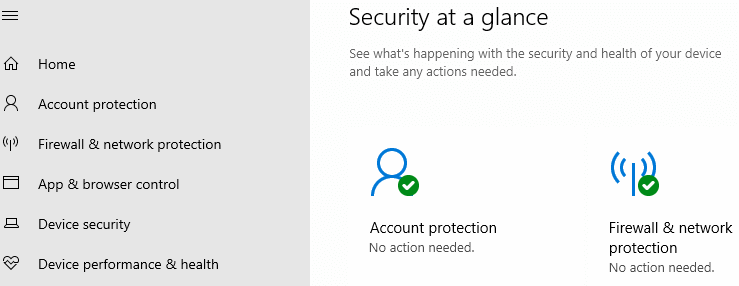
Malware and viruses may add registry entries that hide the Virus & threat protection section from the user interface. This is caused by some registry-based Policy settings. (Jump to this part.)
This post tells you how to activate Microsoft Defender real-time protection and other settings by removing the entire Microsoft Defender Antivirus registry-based policies previously added by malware, a 3rd party tweaker, or a privacy protection tool. The “Virus & Threat Protection” section should also be restored automatically after removing all the Policies.
Cause
Third-party privacy protection tools
If you have used third-party anti-spy tools such as O&O ShutUp, make sure you reset all “Windows Defender and Microsoft SpyNet” settings in that program.
Connected to Domain/Azure AD?
If you’ve connected your computer to a domain or work/school account, please contact your IT administrator or disconnect the system from the work/school account.
Or disconnect from your Work/School/Azure AD by opening Settings → Accounts → Access work or school and click on your Azure AD account, and click Disconnect.
Malware?
Malware can add registry entries that disable the real-time monitoring capabilities of Windows Defender, and also hide certain parts of the Windows Defender user interface from users.
First, make sure you eliminate malware with help from an expert or friend — given the complexity of the malware infestation, professional help may be suggested. You may also try Windows Defender Offline. in addition.
The malware removal procedure is complex and is beyond the scope of this article. After eradicating the malware, remove the registry-based policy settings added by malware.
Virus and Threat Protection missing?
If the Virus & threat protection section is missing in the Defender user interface, it may be caused by one of the following group policy settings:
Enable the headless UI modegroup policy setting (Registry value:UILockdown)Hide the virus and threat protection areagroup policy (Registry value:UILockdown)- A registry-based policy — value named
AllowUserUIAccess.
The following are the registry values that hide the Virus & threat protection category in the Windows Defender Security user interface.
[HKEY_LOCAL_MACHINESOFTWAREPoliciesMicrosoftWindows DefenderUX Configuration]
Value: UILockdown

[HKEY_LOCAL_MACHINESOFTWAREPoliciesMicrosoftWindows Defender Security CenterVirus and threat protection]
Value: UILockdown

[HKEY_LOCAL_MACHINESOFTWAREPoliciesMicrosoftWindows DefenderPolicy Manager]
Value: AllowUserUIAccess
Clearing the above policies especially should reinstate the Virus & threat protection option back. The “defender-policies-remove.reg” registry file below removes all the Microsoft Defender Policies and restores the Virus & threat protection section as well.
Remove All the Microsoft Defender Policies
Option 1: Remove Microsoft Defender Registry-based Policies
Note: The following procedure doesn’t apply or work if your system is connected to an AD/domain, where domain group policies apply. This article is for standalone systems where a virus or malware has completely disabled Windows Defender and locked down the settings. However, if you have previously enabled the Policies using the Local Group Policy Editor (gpedit.msc) on the local computer, you need to follow “Method 2” to remove the Policies.
Automate the following registry modifications using defender-policies-remove.reg (zipped). Unzip and run the enclosed REG file. After running it, you may want to open the Registry Editor to ensure the “Windows Defender” Policies key doesn’t exist. Once done, restart Windows for the changes to take effect. If you’re unable to apply the above registry file, launch Windows in Safe Mode and try merging the file again.
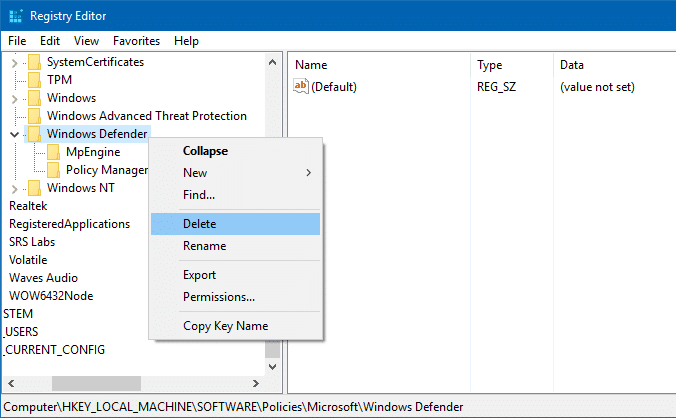
To manually remove Microsoft Defender Antivirus policies using Regedit:
- Start the Registry Editor (regedit.exe) and go to the following branch:
HKEY_LOCAL_MACHINESOFTWAREPoliciesMicrosoftWindows Defender
- Export the branch to a .reg file.
- Right-click “Windows Defender” and choose Delete.

Windows Defender Policy keys in the registry. - Similarly, backup the following branch (if exists) to a .reg file:
HKEY_LOCAL_MACHINESOFTWAREPoliciesMicrosoftWindows Advanced Threat Protection
- Delete the “Windows Advanced Threat Protection” key.
- Next, backup the following branch (if exists) to a .reg file:
HKEY_LOCAL_MACHINESOFTWAREPoliciesMicrosoftWindows Defender Security Center
- Delete the “Windows Defender Security Center” key.
- Exit the Registry Editor.
- Restart Windows.
Note that this completely clears the policy settings for Microsoft Defender Antivirus and Windows Security page. By default, in a clean installation of Windows, no policies are set for Defender.
After removing all the policies, you may want to enable PUA or adware protection in Windows Defender. If you had already enabled the setting before, you’d need to redo the procedure now.
Option 2: Remove Windows Defender Policies using Group Policy Editor
If you have previously enabled Defender Policies using gpedit.msc (Windows 10/11 Professional or higher editions), you’ll need to use the same tool to remove the policies. The relevant Microsoft Defender Antivirus Group Policies are available in the following branch of the Group Policy Editor (gpedit.msc).
Computer Configuration → Administrative Templates → Windows Components → Microsoft Defender Antivirus
Computer Configuration → Administrative Templates → Windows Components → Windows Security
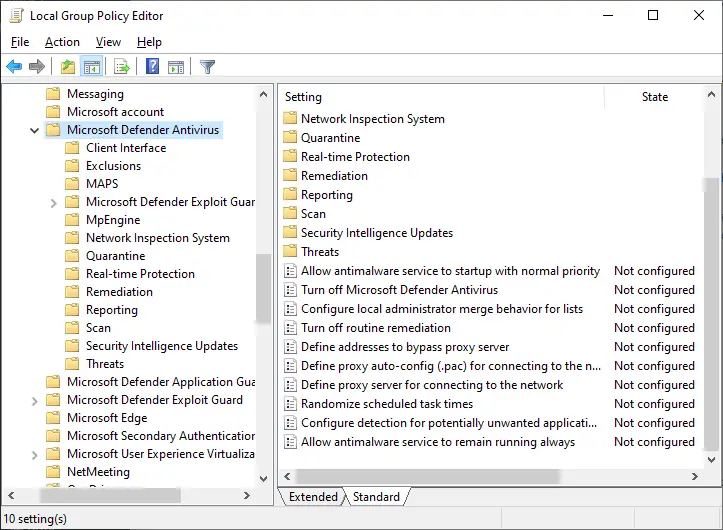
Note that in earlier versions of Windows 10, the policy settings would be located under “Windows Defender” instead of “Microsoft Defender Antivirus”.
There are 100+ policy settings in Windows 10/11, with the items in every sub-branch put together.
Running the Resultant Set of Policy utility (Rsop.msc) or gpresult /h <path>gpreport.html command shows you which policies are currently enabled.

You need to make sure they’re set to “Not configured.”
Microsoft Defender Antivirus
Allow antimalware service to startup with normal priority
Turn off Microsoft Defender Antivirus
Configure local administrator merge behavior for lists
Turn off routine remediation
Control whether or not exclusions are visible to Local Admins
Define addresses to bypass proxy server
Define proxy auto-config (.pac) for connecting to the network
Define proxy server for connecting to the network
Randomize scheduled task times
Configure detection for potentially unwanted applications
Allow antimalware service to remain running always
Also, check the following sub-branches in the above location, and set each policy setting to “Not configured.”
Microsoft Defender AntivirusClient Interface
Display additional text to clients when they need to perform an action
Suppress all notifications
Suppresses reboot notifications
Enable headless UI mode
Microsoft Defender AntivirusDevice Control
Define device control policy groups
Define device control policy rules
Microsoft Defender AntivirusExclusions
Turn off Auto Exclusions
Extension Exclusions
Path Exclusions
Process Exclusions
Microsoft Defender AntivirusMAPS
Configure the 'Block at First Sight' feature
Join Microsoft MAPS
Configure local setting override for reporting to Microsoft MAPS
Send file samples when further analysis is required
Microsoft Defender Exploit GuardAttack Surface Reduction
Exclude files and paths from Attack Surface Reduction Rules
Configure Attack Surface Reduction rules
Microsoft Defender Exploit GuardControlled Folder Access
Configure allowed applications
Configure Controlled folder access
Configure protected folders
Microsoft Defender Exploit GuardNetwork Protection
Prevent users and apps from accessing dangerous websites
Microsoft Defender AntivirusMpEngine
Enable file hash computation feature
Configure extended cloud check
Select cloud protection level
Microsoft Defender AntivirusNetwork Inspection System
Turn on definition retirement
Specify additional definition sets for network traffic inspection
Turn on protocol recognition
Microsoft Defender AntivirusQuarantine
Configure local setting override for the removal of items from Quarantine folder
Configure removal of items from Quarantine folder
Microsoft Defender AntivirusReal-time Protection
Turn off real-time protection
Turn on behavior monitoring
Scan all downloaded files and attachments
Monitor file and program activity on your computer
Turn on raw volume write notifications
Turn on process scanning whenever real-time protection is enabled
Define the maximum size of downloaded files and attachments to be scanned
Configure local setting override for turn on behavior monitoring
Configure local setting override for scanning all downloaded files and attachments
Configure local setting override for monitoring file and program activity on your computer
Configure local setting override to turn on real-time protection
Configure local setting override for monitoring for incoming and outgoing file activity
Configure monitoring for incoming and outgoing file and program activity
Microsoft Defender AntivirusRemediation
Configure local setting override for the time of day to run a scheduled full scan to complete remediation
Specify the day of the week to run a scheduled full scan to complete remediation
Specify the time of day to run a scheduled full scan to complete remediation
Microsoft Defender AntivirusReporting
Configure time out for detections requiring additional action
Configure time out for detections in critically failed state
Turn off enhanced notifications
Configure Watson events
Configure time out for detections in non-critical failed state
Configure time out for detections in recently remediated state
Configure Windows software trace preprocessor components
Configure WPP tracing level
Microsoft Defender AntivirusScan
Check for the latest virus and spyware security intellgence before running a scheduled scan
Allow users to pause scan
Specify the maximum depth to scan archive files
Specify the maximum size of archive files to be scanned
Specify the maximum percentage of CPU utilization during a scan
Scan archive files
Turn on catch-up full scan
Turn on catch-up quick scan
Turn on e-mail scanning
Turn on heuristics
Scan packed executables
Scan removable drives
Turn on reparse point scanning
Create a system restore point
Run full scan on mapped network drives
Scan network files
Configure local setting override for maximum percentage of CPU utilization
Configure local setting override for the scan type to use for a scheduled scan
Configure local setting override for schedule scan day
Configure local setting override for scheduled quick scan time
Configure local setting override for scheduled scan time
Configure low CPU priority for scheduled scans
Define the number of days after which a catch-up scan is forced
Turn on removal of items from scan history folder
Specify the interval to run quick scans per day
Start the scheduled scan only when computer is on but not in use
Specify the scan type to use for a scheduled scan
Specify the day of the week to run a scheduled scan
Specify the time for a daily quick scan
Specify the time of day to run a scheduled scan
Microsoft Defender AntivirusSecurity Intelligence Updates
Define the number of days before spyware security intelligence is considered out of date
Define the number of days before virus security intelligence is considered out of date
Define file shares for downloading security intelligence updates
Turn on scan after security intelligence update
Allow security intelligence updates when running on battery power
Initiate security intelligence update on startup
Define the order of sources for downloading security intelligence updates
Allow security intelligence updates from Microsoft Update
Allow real-time security intelligence updates based on reports to Microsoft MAPS
Specify the day of the week to check for security intelligence updates
Specify the time to check for security intelligence updates
Define security intelligence location for VDI clients
Allow notifications to disable security intelligence based reports to Microsoft MAPS
Define the number of days after which a catch-up security intelligence update is required
Specify the interval to check for security intelligence updates
Check for the latest virus and spyware security intelligence on startup
Microsoft Defender AntivirusThreats
Specify threats upon which default action should not be taken when detected
Specify threat alert levels at which default action should not be taken when detected
Windows ComponentsWindows SecurityAccount Protection
Hide the Account protection area
Windows ComponentsWindows SecurityApp and browser protection
Prevent users from modifying settings
Hide the App and browser protection area
Windows ComponentsWindows SecurityDevice performance and health
Hide the Device performance and health area
Windows ComponentsWindows SecurityDevice performance and health
Disable the Clear TPM button
Hide the TPM Firmware Update recommendation
Hide the Secure boot area
Hide the Security processor (TPM) troubleshooter page
Hide the Device security area
Windows ComponentsWindows SecurityEnterprise Customization
Specify contact company name
Specify contact email address or Email ID
Configure customized notifications
Configure customized contact information
Specify contact phone number or Skype ID
Specify contact website
Windows ComponentsWindows SecurityFamily options
Hide the Family options area
Windows ComponentsWindows SecurityFirewall and network protection
Hide the Firewall and network protection area
Windows ComponentsWindows SecurityNotifications
Hide non-critical notifications
Hide all notifications
Windows ComponentsWindows SecuritySystray
Hide Windows Security systray
Windows ComponentsWindows SecurityVirus and threat protection
Hide the Ransomware data recovery area
Hide the Virus and threat protection area
If some of them already read as “Not configured”, set it to “Enable, click Apply and set it back to “Not configured.” This is to clear the registry values successfully.
Last updated on 17-Aug-2022 for Windows 10 21H2.
One small request: If you liked this post, please share this?
One «tiny» share from you would seriously help a lot with the growth of this blog.
Some great suggestions:
- Pin it!
- Share it to your favorite blog + Facebook, Reddit
- Tweet it!
So thank you so much for your support. It won’t take more than 10 seconds of your time. The share buttons are right below. 
