 Довольно распространённая проблема среди пользователей операционной системы Windows любых версий – ошибка msi при установке программ из файла с расширением .msi. В этой статье я опишу часто встречаемые проблемы с установщиком Windows 7/10/XP и варианты их решения, а также сделаю видео по текущему вопросу.
Файлы с расширением .msi это обычные пакеты установки (дистрибутивы) из которых ставится программа. В отличии от обычных «setup.exe», для запуска файла msi система использует службу Windows Installer (процесс msiexec.exe). Говоря простыми словами, установщик Windows разархивирует и запускает файлы из дистрибутива. Когда Windows Installer не работает, то появляются различные ошибки.
Вообще, меня это жутко бесит, т.к. после глупого сообщения об ошибке совсем непонятно что делать дальше. Microsoft специально разработали установщик Windows Installer для расширения возможностей установки программ (в основном это касается системных администраторов), но не позаботились должным образом о безглючной работе этой службы или хотя бы об адекватных сообщениях о проблемах. А нам теперь это разгребать 🙂
Неполадки могут быть с работой самой службы или могут возникать в процессе установки программ, когда всё настроено, в принципе, правильно. В первом случае нужно ковырять службу установщика, а во втором решать проблему с конкретным файлом. Рассмотрим оба варианта, но сначала второй.
Ошибки msi файлов
Очень часто ошибки появляются из-за недостаточных прав системы на файлы или папки. Нельзя сказать, что Windows Installer не работает, в этом случае достаточно просто добавить нужные права и всё заработает. Буквально вчера я столкнулся с тем, что скаченный дистрибутив .msi не захотел устанавливаться, при этом успешно запускается мастер установки, выбираются параметры, но затем система думает несколько секунд и выдаёт ошибку:
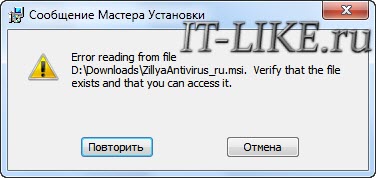
«Error reading from file «имя файла» verify that the file exists and that you can access it» (Error 1305). Переводится «Ошибка чтения из файла … проверьте существует ли файл и имеете ли вы к нему доступ». Ну не тупняк ли? Естественно, что кнопка «Повторить» не помогает, а отмена прекращает всю установку. Сообщение особой смысловой нагрузки также не несёт, т.к. файл точно существует и я имею к нему доступ, иначе бы просто не смог его запустить и получить это сообщение, к тому же почему-то на английском языке 🙂
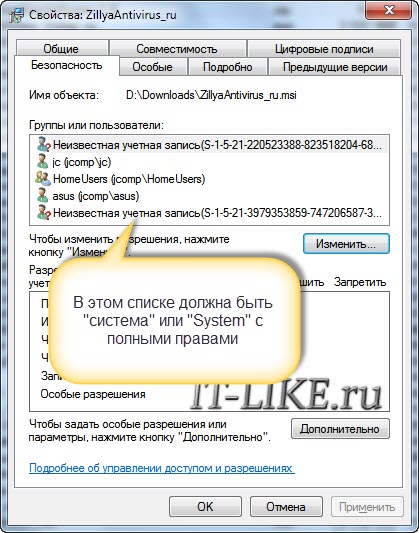
А ошибка в том, что не Я должен иметь доступ к файлу, а установщик Windows, точнее сама Система. Решается очень просто:
- Кликаем правой кнопкой по файлу с расширением .msi, выбираем «Свойства»
- На вкладке «Безопасность» смотрим, есть ли в списке пользователь с именем «система» или «System»

- Скорее всего вы такого не увидите. Поэтому будем добавлять вручную. Нажимаем кнопку «Изменить…», затем «Добавить…»
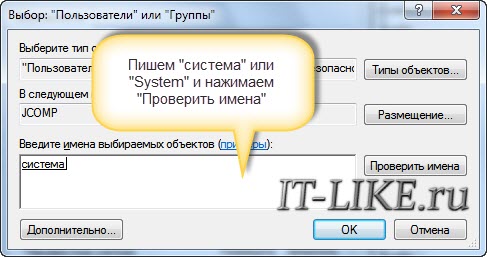
- В поле пишем «система» или «System» (если у вас английская Windows) и нажимаем «Проверить имена». При этом слово должно стать подчёркнутым как на картинке.

- Нажимаем «ОК», ставим галочку «Полный доступ», «ОК»
- Кнопка «Дополнительно» -> «Изменить разрешения…» ставим «Добавить разрешения, наследуемые от родительских объектов», «ОК» три раза.
Теперь ошибка установщика не появится! Можно добавить доступ на всю папку, из которой вы обычно инсталлируете программы, например на папку «Downloads», как у меня. Смотрим видео по решению проблем с правами доступа:
В Windows XP вкладки «Безопасность» не будет, если включён простой общий доступ к файлам. Чтобы его выключить, нужно зайти в и выключить опцию «Использовать простой общий доступ к файлам». В урезанных версиях Windows 7/10 и XP вкладки «Безопасность» нет в принципе. Чтобы её увидеть, нужно загрузить Windows в безопасном режиме и зайти в неё под администратором.
Ещё способы решить проблему
- Запускайте установку, войдя в систему под администраторским аккаунтом
- Правой кнопкой по пакету «.msi» и выбираем «Запуск от имени Администратора»
- Выключите антивирус на время
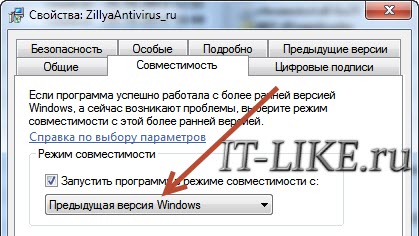
- Включить режим совместимости с предыдущими операционными системами. Для этого зайдите в свойства файла msi и на вкладке «Совместимость» поставьте галочку «Запустить программу в режиме совместимости»

- Если файл на флешке, то попробуйте скопировать его куда-нибудь на жёсткий диск и запустить оттуда (бывает, что запрещена установка программ со съёмных накопителей)
- Попробуйте просто создать новую папку с любым именем в корне диска, перекинуть туда дистрибутив и запустить его оттуда
Описанный метод поможет при разных сообщениях, с разными номерами. Например, вы можете видеть такие ошибки файлов msi:
- Error 1723
- Internal Error 2203
- Системная ошибка 2147287035
- Ошибка «Невозможно открыть этот установочный пакет»
- Ошибка 1603: Во время установки произошла неустранимая ошибка
Во всех этих случаях должна помочь установка прав на файл и/или на некоторые системные папки. Проверьте, имеет ли доступ «система» к папке временных файлов (вы можете получать ошибку «Системе не удается открыть указанное устройство или файл»). Для этого:
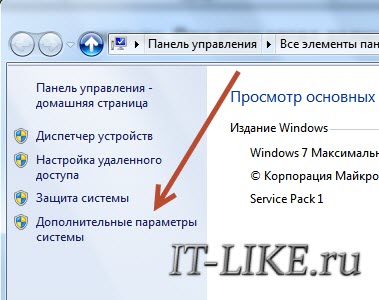
- Сначала узнаем нужные пути. Нажмите «Win + Pause» и зайдите в

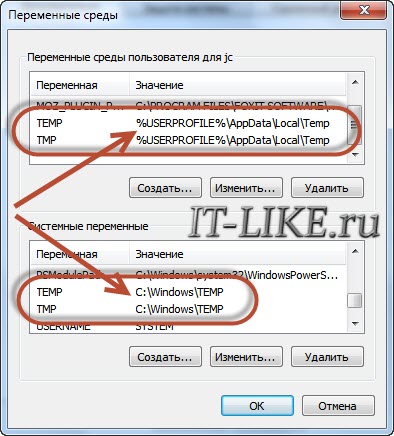
- В списках ищем переменные с названиями «TEMP» и «TMP» (значения обычно совпадают), в них записаны пути к временным папкам, которые использует установщик Windows

- Теперь идём к этим папкам и смотрим в их свойствах, имеет ли к ним доступ «система». Чтобы быстро получить путь к временной папке пользователя, кликните два раза по переменной, скопируйте путь и вставьте его в адресной строке «Проводника» Windows
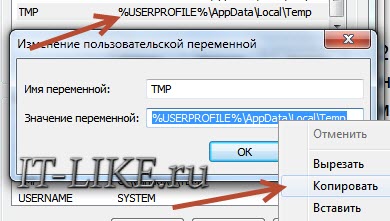

После нажатия «Enter» путь преобразится на «нормальный» и вы переместитесь в реальную временную папку. Права на неё и надо проверять. Также рекомендую очистить временные папки от всего что там скопилось или даже лучше удалить их и создать новые с такими же названиями. Если не получается удалить папку, почитайте как удалить неудаляемое, но это не обязательно.
Если служба Windows Installer всё равно не хочет работать, то проверьте права на папку «C:Config.Msi», сюда «система» также должна иметь полный доступ. В этом случае вы могли наблюдать ошибку «Error 1310». На всякий случай убедитесь, что к папке КУДА вы инсталлируете софт также есть все права.
Если вы используете шифрование папок, то отключите его для указанных мной папок. Дело в том, что хотя мы сами имеем к ним доступ, служба Microsoft Installer не может до них достучаться пока они зашифрованы.
Ещё ошибка может быть связана с битым файлом. Может быть он не полностью скачался или оказался битым уже на сервере. Попробуйте скачать его ещё раз оттуда же или лучше с другого места.
Ошибка установщика Windows
В случае общих проблем не будут устанавливаться никакие msi файлы, процесс установки, скорее всего, даже не начнётся. При этом могут появляться ошибки вида:
- Нет доступа к службе установщика Windows
- Не удалось получить доступ к службе установщика Windows
- Ошибка пакета установщика Windows (1719)
или ещё нечто подобное со словами «ошибка msi», «Windows Installer Error». Всё это означает, что система дала сбой и теперь её надо лечить. Может вы ставили какой-то софт, который испортил системные файлы и реестр, или подхватили вирус. Конечно, никогда не будет лишним удалить вирусы, или убедиться что их нет. Но оставьте этот вариант на потом, т.к. обычно проблема кроется в другом.
Сначала давайте проверим работает ли служба Windows Installer:
- Нажмите «Win + R» и введите services.msc
- Найдите в конце списка службу «Установщик Windows» или «Windows Installer»

- Тип запуска должен быть «Вручную». Если она «Отключена», то зайдите в «Свойства» и выберите «Вручную»
- Затем кликните по ней правой кнопкой и выберите «Запустить» или «Перезапустить». Если ошибок нет и состояние переходит в режим «Работает», то здесь всё нормально.
- Нажмите «Win + R» и введите msiexec. Если модуль MSI работает нормально, то должно появиться окно с версией установщика и параметрами запуска, а не ошибка.

Следующее что я посоветую сделать – это выполнить команду сканирования системы на повреждённые и изменённые системные файлы. Нажмите «Win + R» и введите
Sfc /scannow
Произойдёт поиск и замена испорченных файлов на оригинальные, при этом может потребоваться вставить установочный диск с Windows XP-7-10. После окончания процесса перегрузитесь и посмотрите, решена ли проблема.
Microsoft сам предлагает утилиту, призванную решить нашу проблему. Запустите программу Easy Fix и следуйте мастеру.
Скачать Easy Fix
Параметры реестра и службы
Следующий способ устранения ошибки – восстановление рабочих параметров в реестре установщика Windows Installer.
Скачать msiserver.reg
Для этого скачайте архив и запустите оттуда два reg-файла, соответственно своей версии Windows. Согласитесь с импортом настроек.
Важно! Перед последним действием желательно создать точку восстановления системы! Если способ не поможет или станет хуже, вы сможете восстановиться до прежнего состояния.
В Windows XP или Windows Server 2000 установите последнюю версию установщика 4.5.
Скачать Windows Installer 4.5
Если не помогло, то проделайте ещё перерегистрацию компонентов:
- Нажмите «Win + R» и введите «cmd». Затем в чёрном окне введите последовательно команды:
MSIExec /unregister
MSIExec /regserver - В ответ должна быть пустота, никаких ошибок. Если проблема не решена, введите ещё команду
regsvr32 msi.dll - Закройте чёрное окно
Если пишет, что не хватает прав, то нужно запускать командную строку от имени Администратора.
Если команды выполнились, но не помогло, то скачайте файл и запустите msi_error.bat из архива, проверьте результат.
Последний вариант — скачайте программу Kerish Doctor, почитайте мою статью, там есть функция исправления работы службы установщика и многих других частых проблем Windows.
Также, многие программы используют .NET Framework, поэтому не будет лишним установить последнюю версию этого пакета. И, напоследок, ещё один совет: если в пути к файлу-дистрибутиву есть хоть одна папка с пробелом в начале названия, то удалите пробел. Такой простой приём решит вашу проблему 🙂
Подведение итогов
Ошибки с установщиком Windows очень неприятные, их много и сразу непонятно куда копать. Одно ясно – система дала сбой и нужно восстанавливать её до рабочего состояния. Иногда ничего не помогает и приходится переустанавливать Windows. Однако не торопитесь это делать, попробуйте попросить помощи на этом форуме. В точности опишите вашу проблему, расскажите что вы уже делали, какие сообщения получили, и, возможно, вам помогут! Ведь мир не без добрых людей 🙂
Начиная с незначительных сторонних инструментов и заканчивая сложными играми и приложениями, одно можно сказать наверняка: вам необходимо установить программу, чтобы использовать ее. В Windows 10 существует множество ошибок установщика Windows, и ошибка «Существует проблема с пакетом установщика Windows» является одной из наиболее устойчивых.
Несмотря на то, что Microsoft хочет, чтобы приложения Windows Metro играли эту роль, стандартные сторонние программы по-прежнему остаются фаворитами. Тем не менее, случайные ошибки установщика Windows действительно сбивают с толку, и вам потребуется некоторое время и усилия для их устранения.
Поэтому, если вы застряли с этой ошибкой и не знаете, как с ней справиться, мы рекомендуем выполнить следующие шаги.
Решение 1. Убедитесь, что у вас есть права администратора
Как вы уже знаете, для установки любого приложения из стороннего источника вам потребуется разрешение администратора. На сегодняшний день это стандартная мера безопасности, присутствующая на всех платформах Windows, и она крайне важна для предотвращения установки сторонних программ в фоновом режиме. В основном, большой знак Стоп для вредоносных программ и вредоносных программ.
Таким образом, вам необходимо войти в систему с учетной записью администратора или иметь разрешение на внесение системных изменений в альтернативную учетную запись. Отсутствие надлежащего разрешения может привести к ошибкам при установке, в том числе той, о которой мы сегодня говорим. Также вы можете попробовать щелкнуть правой кнопкой мыши установщик и запустить его от имени администратора.

С другой стороны, если вы запустили установку от имени администратора и эта неприятная ошибка продолжает появляться, продолжайте устранение неполадок, следуя приведенным ниже инструкциям.
Решение 2. Проверьте установщик и установочные файлы
Существуют различные формы установки для различных приложений. Иногда установка происходит в виде одного сжатого EXE-файла, в то время как, с другой стороны, вы можете иметь множество доступных файлов (например, DLL), сопровождающих установщик. В любом случае, если хотя бы один вспомогательный файл поврежден или не завершен, установка завершится неудачно.
Следовательно, вам необходимо убедиться, что установочные файлы правильно загружены и не подвержены воздействию вируса (или антивируса в этом отношении). Лучший способ преодолеть это — повторно загрузить исходную настройку, отключить антивирус (или добавить исключение) и выполнить установку еще одного снимка. Имейте в виду, что это рискованно, и делайте это только в том случае, если вы уверены, что приложение на 100% надежное и чистое.
Кроме того, убедитесь, что установщик соответствует вашей системной архитектуре. Например, если вы используете Windows 10 с архитектурой x86 (32-разрядная версия), вы не сможете запустить установочный пакет x64 (64-разрядная версия).
Решение 3 — Запустите программу установки и удаления устранения неполадок
Большинство инструментов для устранения неполадок уже описаны в Windows 10. Тем не менее, даже несмотря на то, что существует целый ряд специальных средств для устранения неполадок с определенной целью, вам потребуется загружаемый инструмент для устранения проблем, связанных с установкой / удалением. После того, как вы запустите его, программа установки и удаления неполадок будет проверять и устранять ошибки, связанные с установкой. Стоит также упомянуть, что этот инструмент предоставляется Microsoft, поэтому вам не нужно рисковать с помощью подозрительных сторонних решений.
Следуйте приведенным ниже инструкциям, чтобы загрузить и использовать Устранение неполадок при установке и удалении программы:
- Загрузите специализированное средство устранения неполадок здесь.
- Запустите средство устранения неполадок.

- Следуйте инструкциям, пока специалист по устранению неполадок не решит проблему.
- Попробуйте установить проблемную программу еще раз и ищите изменения.

Решение 4. Проверьте установщик Windows на наличие ошибок
В такой сложной системе, как Windows, у вас есть различные сервисы, которые участвуют во всем, что вы делаете. MSI Engine Foundation отвечает за установку, обслуживание и удаление сторонних программ. Вам не нужно быть техническим энтузиастом, чтобы понять, куда это идет. Если движок MSI (установщик Windows) не работает, поврежден или отключен по ошибке, вам будет сложно установить что-либо.
Во-первых, давайте удостоверимся, что установщик Windows работает так, как задумано.
- Щелкните правой кнопкой мыши меню « Пуск» и в меню «Питание» выберите « Командная строка» («Администратор»).
- Введите следующую команду в командной строке и нажмите Enter:
- MSIExec
- Если все в порядке, вы увидите всплывающее окно с информацией об установщике Windows.
- Если вы видите сообщение об ошибке, вам необходимо перерегистрировать установщик Windows.

Решение 5 — Перерегистрировать установщик Windows
Как вы, возможно, знаете, невозможно переустановить встроенные функции Windows. Вы вряд ли сможете что-либо сделать в отношении расширенных функций и сервисов системы. Тем не менее, вы можете перезапустить большинство из них, используя несколько продвинутых решений. При неправильном использовании эти обходные пути могут привести к большим неприятностям, поэтому действуйте с осторожностью. Это, конечно, включает и установщик Windows. Итак, если вы столкнулись с ошибкой после предыдущего шага, обязательно внимательно следуйте этим инструкциям, и мы должны быть готовы
- Щелкните правой кнопкой мыши «Пуск» и выберите « Командная строка» («Администратор»).
- В командной строке введите следующие команды и нажмите Enter после каждого:
- msiexec.exe / отменить регистрацию
- msiexec.exe / regserver
- Закройте командную строку и найдите изменения. Если проблема все еще существует, перейдите к шагу 4.
- В поиске Windows введите Services.msc и нажмите Enter.
- Найдите установщик Windows. Это должно быть внизу списка.
- Щелкните правой кнопкой мыши службу установщика Windows и остановите ее.
- Снова щелкните правой кнопкой мыши и выберите «Пуск».
- Перезагрузите компьютер.

Этого должно быть достаточно, чтобы избавить вас от ошибки установки «Есть проблема с этим пакетом установщика Windows». Если у вас есть альтернативное решение или вопрос относительно представленных решений, обязательно сообщите нам об этом в разделе комментариев ниже.
Щелкните правой кнопкой мыши основной файл «.exe» программы. Выберите «Свойства» и щелкните вкладку «Совместимость». Нажмите «Запустить средство устранения неполадок совместимости» для Windows 10/8 и «Помогите мне выбрать настройки» для Windows 7.… Следуйте инструкциям на экране и повторяйте процесс, пока программа не заработает.
Используйте следующие шаги:
- 1) Щелкните правой кнопкой мыши программу.
- 2) Нажмите на Свойства.
- 3) Щелкните вкладку «Совместимость».
- 4) Выберите «Запустить эту программу в режиме совместимости» и выберите Windows Vista или любую другую операционную систему, в которой программа успешно работала.
12 центов 2010 г.
Как исправить несовместимые программы в Windows 10?
В поле поиска на панели задач введите название программы или приложения, для устранения неполадок. Выберите и удерживайте (или щелкните правой кнопкой мыши) его, а затем выберите Открыть расположение файла. Выберите и удерживайте (или щелкните правой кнопкой мыши) файл программы, выберите «Свойства», а затем перейдите на вкладку «Совместимость». Выберите Запустить средство устранения неполадок совместимости.
Как изменить режим совместимости с Windows?
Изменение режима совместимости
Щелкните правой кнопкой мыши исполняемый файл или файл ярлыка и выберите «Свойства» во всплывающем меню. В окне «Свойства» перейдите на вкладку «Совместимость». В разделе «Режим совместимости» установите флажок «Запускать эту программу в режиме совместимости для».
Какая версия Windows несовместима с запущенной?
Версия этого файла несовместима с используемой вами версией Windows. Проверьте системную информацию своего компьютера, чтобы узнать, нужна ли вам версия программы x86 (32-разрядная) или x64 (64-разрядная), а затем обратитесь к издателю программного обеспечения.
Как решить проблему с неподдерживаемым 16-битным приложением?
Для поддержки 16 бит потребуется включить функцию NTVDM. Для этого нажмите клавиши Windows + R, затем введите: optionalfeatures.exe и нажмите Enter. Разверните «Устаревшие компоненты», затем отметьте NTVDM и нажмите «ОК».
Могу ли я запускать старые программы в Windows 10?
Ожидается, что Windows 10, как и ее предшественники, будет иметь режим совместимости, позволяющий пользователям запускать старые программы, написанные еще в то время, когда предыдущие версии Windows были новейшей операционной системой. Эта опция становится доступной, если щелкнуть приложение правой кнопкой мыши и выбрать совместимость.
Как запустить старые программы в Windows 10?
Щелкните правой кнопкой мыши ярлык вашей программы или EXE-файл и выберите «Свойства». Когда появится экран «Свойства», выберите вкладку «Совместимость», затем выберите, какую версию Windows вы хотите использовать. Конечно, не забудьте нажать OK, чтобы он всегда открывался в установленном вами режиме.
Как исправить несовместимость этого устройства?
Чтобы исправить сообщение об ошибке «ваше устройство несовместимо с этой версией», попробуйте очистить кеш Google Play Store, а затем данные. Затем перезапустите Google Play Store и попробуйте снова установить приложение.
Как проверить, совместима ли программа с Windows 10?
Найдите логотип Windows (на нем написано «Установите Windows 10») на панели задач. Это приведет вас к приложению Get Windows 10, которое позволяет зарезервировать бесплатную копию обновления, указав свой адрес электронной почты. Чтобы проверить наличие проблем с совместимостью, в том же окне щелкните значок меню в левом верхнем углу, а затем ссылку «Проверьте свой компьютер».
Как отключить режим совместимости в Windows 10?
Если вы хотели отключить режим совместимости для программы, вы можете попробовать следующие шаги.
- Щелкните правой кнопкой мыши установочные файлы и выберите свойства.
- Перейдите на вкладку совместимость и снимите флажок Запускать эту программу в режиме совместимости для:
- Нажмите «Применить» и «ОК».
Есть ли в Windows 10 режим совместимости?
Как и в Windows 7, в Windows 10 есть параметры «режима совместимости», которые заставляют приложения думать, что они работают в более старых версиях Windows. Многие старые настольные программы Windows будут нормально работать при использовании этого режима, даже если бы они не работали иначе.
Как исправить проблемы совместимости в Windows 7?
Решение проблемы совместимости программ в Windows 7
- Щелкните значок Pearl, а затем щелкните Панель управления.
- Нажмите «Найти и исправить проблемы» в разделе «Система и безопасность».
- Щелкните Запускать программы, созданные для предыдущих версий Windows, в разделе «Программы».
- Выберите программу и нажмите Далее. …
- Щелкните Попробовать рекомендуемые настройки.
Как запустить 32-битную программу на 64-битной Windows 10?
Запуск 32-битных приложений в Windows 10 64-бит.
- WoW64. Ссылка. По-видимому, это должно позволить вам запускать 32-битную версию на 64-битной Windows. …
- Режим XP. Ссылка. …
- Виртуальная машина коробки. Ссылка. …
- Разделение диска на 32-битные и 64-битные версии По-видимому, вы можете использовать бесплатный инструмент EaseUS, чтобы разделить диск на два, а затем установить отдельные 32-битные и 64-битные версии.
Содержание
- Ошибки при установке программ из пакета Windows Installer «.msi»
- Ошибки msi файлов
- Ещё способы решить проблему
- Ошибка установщика Windows
- Параметры реестра и службы
- Подведение итогов
- Re-package a x86 installer for 64-bit Windows without access to an older Windows OS
- 1 Answer 1
- How to Fix the Error «This App Can’t Run On Your PC»?
- The core of the problem
- The error This app can’t run on your PC
- Use your account with administrator rights
- 32-bit or 64-bit application
- Disable SmartScreen in Windows 10
- Disable SmartScreen in Windows 10 with Windows Defender Security Center
- Disable SmartScreen in Windows 10 with the Registry Editor
- Disable SmartScreen in Windows 10 with the Local Group Policy Editor
- How to troubleshoot Windows Installer errors
- Symptoms
- Error message 1
- Error message 2
- Error message 3
- Resolution
- To determine whether you’re using an account that has administrator rights
Ошибки при установке программ из пакета Windows Installer «.msi»
Вообще, меня это жутко бесит, т.к. после глупого сообщения об ошибке совсем непонятно что делать дальше. Microsoft специально разработали установщик Windows Installer для расширения возможностей установки программ (в основном это касается системных администраторов), но не позаботились должным образом о безглючной работе этой службы или хотя бы об адекватных сообщениях о проблемах. А нам теперь это разгребать 🙂
Неполадки могут быть с работой самой службы или могут возникать в процессе установки программ, когда всё настроено, в принципе, правильно. В первом случае нужно ковырять службу установщика, а во втором решать проблему с конкретным файлом. Рассмотрим оба варианта, но сначала второй.
Ошибки msi файлов

«Error reading from file «имя файла» verify that the file exists and that you can access it» (Error 1305). Переводится «Ошибка чтения из файла … проверьте существует ли файл и имеете ли вы к нему доступ». Ну не тупняк ли? Естественно, что кнопка «Повторить» не помогает, а отмена прекращает всю установку. Сообщение особой смысловой нагрузки также не несёт, т.к. файл точно существует и я имею к нему доступ, иначе бы просто не смог его запустить и получить это сообщение, к тому же почему-то на английском языке 🙂
А ошибка в том, что не Я должен иметь доступ к файлу, а установщик Windows, точнее сама Система. Решается очень просто:
Теперь ошибка установщика не появится! Можно добавить доступ на всю папку, из которой вы обычно инсталлируете программы, например на папку «Downloads», как у меня. Смотрим видео по решению проблем с правами доступа:
Ещё способы решить проблему
Описанный метод поможет при разных сообщениях, с разными номерами. Например, вы можете видеть такие ошибки файлов msi:
Во всех этих случаях должна помочь установка прав на файл и/или на некоторые системные папки. Проверьте, имеет ли доступ «система» к папке временных файлов (вы можете получать ошибку «Системе не удается открыть указанное устройство или файл»). Для этого:
После нажатия «Enter» путь преобразится на «нормальный» и вы переместитесь в реальную временную папку. Права на неё и надо проверять. Также рекомендую очистить временные папки от всего что там скопилось или даже лучше удалить их и создать новые с такими же названиями. Если не получается удалить папку, почитайте как удалить неудаляемое, но это не обязательно.
Если служба Windows Installer всё равно не хочет работать, то проверьте права на папку «C:Config.Msi», сюда «система» также должна иметь полный доступ. В этом случае вы могли наблюдать ошибку «Error 1310». На всякий случай убедитесь, что к папке КУДА вы инсталлируете софт также есть все права.
Если вы используете шифрование папок, то отключите его для указанных мной папок. Дело в том, что хотя мы сами имеем к ним доступ, служба Microsoft Installer не может до них достучаться пока они зашифрованы.
Ещё ошибка может быть связана с битым файлом. Может быть он не полностью скачался или оказался битым уже на сервере. Попробуйте скачать его ещё раз оттуда же или лучше с другого места.
Ошибка установщика Windows
В случае общих проблем не будут устанавливаться никакие msi файлы, процесс установки, скорее всего, даже не начнётся. При этом могут появляться ошибки вида:
или ещё нечто подобное со словами «ошибка msi», «Windows Installer Error». Всё это означает, что система дала сбой и теперь её надо лечить. Может вы ставили какой-то софт, который испортил системные файлы и реестр, или подхватили вирус. Конечно, никогда не будет лишним удалить вирусы, или убедиться что их нет. Но оставьте этот вариант на потом, т.к. обычно проблема кроется в другом.
Сначала давайте проверим работает ли служба Windows Installer:
Следующее что я посоветую сделать – это выполнить команду сканирования системы на повреждённые и изменённые системные файлы. Нажмите «Win + R» и введите
Sfc /scannow
Произойдёт поиск и замена испорченных файлов на оригинальные, при этом может потребоваться вставить установочный диск с Windows XP-7-10. После окончания процесса перегрузитесь и посмотрите, решена ли проблема.
Microsoft сам предлагает утилиту, призванную решить нашу проблему. Запустите программу Easy Fix и следуйте мастеру.
Параметры реестра и службы
Следующий способ устранения ошибки – восстановление рабочих параметров в реестре установщика Windows Installer.
Для этого скачайте архив и запустите оттуда два reg-файла, соответственно своей версии Windows. Согласитесь с импортом настроек.
В Windows XP или Windows Server 2000 установите последнюю версию установщика 4.5.
Если не помогло, то проделайте ещё перерегистрацию компонентов:
Если пишет, что не хватает прав, то нужно запускать командную строку от имени Администратора.
Если команды выполнились, но не помогло, то скачайте файл и запустите msi_error.bat из архива, проверьте результат.
Последний вариант — скачайте программу Kerish Doctor, почитайте мою статью, там есть функция исправления работы службы установщика и многих других частых проблем Windows.
Подведение итогов
Ошибки с установщиком Windows очень неприятные, их много и сразу непонятно куда копать. Одно ясно – система дала сбой и нужно восстанавливать её до рабочего состояния. Иногда ничего не помогает и приходится переустанавливать Windows. Однако не торопитесь это делать, попробуйте попросить помощи на этом форуме. В точности опишите вашу проблему, расскажите что вы уже делали, какие сообщения получили, и, возможно, вам помогут! Ведь мир не без добрых людей 🙂
Источник
Re-package a x86 installer for 64-bit Windows without access to an older Windows OS
I have an older Windows 32 program that needs to be repackaged for Windows 8. All I have is the installer, which does not run in compatibility mode, although the program itself does run in compatibility mode once installed (this was tested by users, not me), so the app itself does not need to be remade, just the installer.
I currently don’t have access to a 32-bit Windows machine. Is there a way to unpack and repackage this installer from Windows 8? I am not sure which installer this is, even after studying it in a hex editor. If it helps, this is what the icon looks like.

1 Answer 1
Before you try to repackage it you should consult its docs to see if there are easier methods. For example some EXE installers can simply be extracted using 7-zip, others have a command line switch.
If not, you should try to run it on a 64-bit machine and see if you can get a log of the failed installation. Maybe that will give you hints on what is the problem and from there on you can think on a better solution. In some cases shims are helpful.
EDIT: From what I know a 32 bit application should always be able to run on a 64 bit Win OS, so I suspect the installer you have is just stopping you because it considers the app cannot run. You can trick it to tell it the OS is a 32 bit one using a shim, as I said above. Here are two articles about how to create shims:
Источник
How to Fix the Error «This App Can’t Run On Your PC»?
Read this article to learn how to fix the problem with running an application on PC, and we will find out why this error appears and how to solve the problem.

The core of the problem
On the Internet, there are lots of websites offering to install various applications and programs. At an early stage, Windows 10 operating system can detect and warn the user of possible issues, or even block a harmful application or program at once.
For this purpose, Microsoft has improved greatly the built-in defense component, SmartScreen. Its main task is to protect the user from apps provided by questionable developers. SmartScreen helps to reveal any previously detected malware, applications or websites created for malicious purposes, and takes informed decisions on blocking their access, download or use on your personal computer or another computing device.
At the first stage, SmartScreen analyzes all applications, programs and webpages for any suspicious activities. The next step will be to compare suspicious apps and webpages with the list of programs and websites recognized to be harmful. In case of a coincidence, SmartScreen will block download or installation for such a program, and display a corresponding notification for the user.
Obviously, SmartScreen is quite a useful feature in Windows 10 and using it seems absolutely justified. However, frequent error messages or warning notifications displayed while you are working with an application or website that you trust can become quite irritating. In that case, SmartScreen is easy to disable – if you know the app we are talking about is absolutely safe.
This security feature can display quite a number of various warnings and error messages, but most of these can be sorted out on your own. Mostly, these are issues related to providing additional permissions or signing in to an account with administrator’s rights.
Still, cases when you see a SmartScreen message saying This app can’t run on your PC are totally different. Such messages only suggest that you contact the program’s developer for advice – and that’s all. Also, you can face such messages when apps that used to run seamlessly on your computer, suddenly can’t start, for no evident reason. Yet don’t worry: even if you see the error This app can’t run on your PC in Windows 10, here’s what you can do.
The error This app can’t run on your PC
If you see such a message, it means there is a compatibility error. The application you are trying to install is incompatible with your operating system, Windows 10. You may also encounter this error if the application requires special permissions to run – and the current user account lacks them. This error only appears when you are trying to install an application, and never does when you start one. If an application is already installed to your computer, starting it will never trigger this error. There are two ways to fix it.

Use your account with administrator rights
When you see this error message, it might be due to your signing in to an account which doesn’t have administrator rights. To exclude this one out, check the account you are using now. If the current account is not the administrator’s one, switch to that account, and try installing the application again. If this method doesn’t work, try another one on the list.
32-bit or 64-bit application
If you’re using the 32-bit version of Windows 10 and trying to run a 64-bit version of the program, the error should have been expected. Similarly, if you’re trying to install a 32-bit program onto a 64-bit version of Windows 10, this error may also take place. If the problem comes from bitness, there’s only one solution – you’ve got to find the proper version of the necessary application and install it.
Disable SmartScreen in Windows 10
Sometimes, the error This app can’t run on your PC may be false. That’s why if the advice I have given you in this article didn’t help you and you still face this error, and you still need to run this app despite the warning, try disabling SmartScreen filter. In this tutorial, we will show you three ways to disable the security feature, as it is applied to the entire Windows 10 operating system, to applications received from Microsoft Store, and to the system’s featured browser, Microsoft Edge.
Disable SmartScreen in Windows 10 with Windows Defender Security Center
In this case, you should open Windows Defender Security Center. It can be done in a few ways.
Click on the Start button on the Taskbar, and open the main Windows menu, then click the gearwheel symbol. Alternatively, drag the scroll bar down until you find the line Settings.

In the application window, drag the slider down and select the section Update and Security.

On the left, select Windows Security, and on the right click on Open Windows Defender Security Center.

It opens the main window of Windows Defender Security Center.

In the side menu on the right, select App & browser control. You will be redirected to the page where you can configure SmartScreen for applications and browsers.

Here, you can disable Check apps & files, SmartScreen for Microsoft Edge and SmartScreen for Microsoft Store apps. Check the Off option in corresponding sections.
When the pop-up notification from Windows User Account Control asks Do you want to allow this app to make changes to your device? click Yes for the changes to take effect.
Disable SmartScreen in Windows 10 with the Registry Editor
Note: It is important to remember that anything you do to the registry is on your own responsibility. Any actions involving the registry may cause irreversible consequences. Windows 10 may begin working with errors, some apps or programs may not be able to start, the operating system can crash or have problems when booting. Before you start modifying the registry, we strongly recommend backing it up, just in case. To do it, open the Registry Editor, choose the File tab in the main menu, and select Export. The operating system will suggest you to give a name to the registry backup and select the directory where to save it. Choose a name that will help you to remember when exactly this backup was created. The best name would be the date of creation, for example, 02-04-2019. After that, click Save. Now you will have a registry backup file which you can use to restore it if necessary.
One more time, open the Run dialogue box in any of the ways described in this article (for example, by pressing the keyboard shortcut Windows + R for quick access to the Runwindow). In the command prompt field, type the command for opening the Registry Editor (regedit) and click ОК to perform the command.

When the pop-up notification from Windows User Account Control asks Do you want to allow this app to make changes to your device? click Yes and open the Registry Editor window.

In the left-side part of the window, follow the path:
You can also use a different method for accessing this particular section of the registry. Just copy and paste it into the address bar of the Registry Editor (it’s under the main menu). This way, you can avoid possible errors when selecting the registry section, as the left panel displays many similar directories, and this specific method helps you make sure you use the correct address.

Right-click on an empty area on the right, select New from the context menu that appears, and click on the nested menu option DWORD value (32 bit).

Give the new DWORD value the name EnableSmartScreen. Double-click on it, or right-click on it and select Modify from the menu.

In the window Edit DWORD value (32 bit) set the Value data to0 (this value data will be used by default). Click ОК or press Enter on your keyboard to save the changes to the value.

Now close the Registry Editor window and restart your computer. After that, SmartScreen will be disabled.
Disable SmartScreen in Windows 10 with the Local Group Policy Editor
If your computer is running Windows 10 Home Edition, you won’t be able to use the functionality of the Local Group Policy Editor, as this utility is not excluded into this particular version of the operating system. For other versions of Windows 10, do the following.
Open the Run dialogue box in any of the ways described in today’s article (for example, right-click on the Start button in the Taskbar, and select the Run dialogue box in the menu that opens). In the Command Prompt window, type the command gpedit.msc.

Click ОК or press Enter on your keyboard to confirm your action, and the Local Group Policy Editor window will appear.

In the left-side panel, follow this path:
Computer Configuration – Administrative Templates – Windows Components – Windows Defender SmartScreen.

There are two subsections, Explorer and Microsoft Edge. Each of them contains a policy setting Configure Windows SmartScreen that allows you to enable or disable the filter as you like. Double-click on it, or right-click on it and select Edit from the menu.

In the window that opens, check the option for Disabled, then click Apply and ОК to save the changes you have made.

Apply this algorithm to every subsection: Explorer and Microsoft Edge. In the first subsection, it disables checking files in Windows 10, and in the second subsection it turns off SmartScreen in Microsoft Edge. After saving the changes, close the Local Group Policy Editor, and the SmartScreen feature will be disabled.
There is also a way to disable SmartScreen in Microsoft Edge in the browser settings. Open Microsoft Edge and click on the three-dot button in the top right corner to open the main menu.


Then click View advanced settings.

Scroll down to find the line Help protect me from malicious sites and downloads with Windows Defender SmartScreen and set the slider to Off.

Finally, when the SmartScreen feature is disabled, make sure that your application starts and works correctly now. If you see the error again, the problem must be in the application itself, not in the security feature.
Then all you can do is to wait for another update to fix this issue, or find another program to replace the faulty app. If you disabled the SmartScreen feature, make sure you turn it on again after the necessary application is installed. It’s not a good idea to leave your system open to threats and without protection, so turn the feature on again and improve the security of your operating system.
See the full article with all additional video tutorials. If you still have any questions, please ask in a comments. Also visit our Youtube channel, there are over 400 video tutorials.
Источник
How to troubleshoot Windows Installer errors
Symptoms
When you install, uninstall, or update a program on a Windows-based computer, you may receive one of the following error messages.
Error message 1
The Windows Installer Service could not be accessed.
Error message 2
Windows Installer Service couldn’t be started.
Error message 3
Could not start the Windows Installer service on Local Computer. Error 5: Access is denied.
Resolution
To fix this problem automatically, run the «Fix problems that programs cannot be installed or uninstalled» troubleshooter to repair issues that block program installation or removal because of corrupted registry keys.
Important To perform many of the methods and steps in this article, you must be logged on to your computer as an administrator.
To determine whether you’re using an account that has administrator rights
To determine whether you’re using an account that has administrator rights, use one of the following methods, as appropriate for the operating system that you’re running.
Windows 7 and Windows Vista
Open the Date and Time dialog box.
Type the following command in the Start Search or Search programs and files box, and then press Enter:
timedate.cpl
The Date and Time dialog box appears.

Click Change date and time. When the User Account Control dialog box appears, click Continue.

Do one of the following, depending on what happens when you click Continue:
If your computer does not prompt you for a password, you are already logged on with an administrator account. Click Cancel two times to close the Date and Time dialog box. You are ready to fix the Windows Installer issues.
If your computer prompts you for a password, you are not logged on with an administrator account.
Windows XP and Windows Server 2003
Open the Date and Time dialog box.
Click Start, and then click Run.
Type the following command in the Run dialog box, and then press OK:
timedate.cpl

Do one of the following, depending on the result:
If the Date and Time Properties dialog box appears, you are already logged on as an administrator. Click Cancel to close the dialog box.

If you receive the following message, you are not logged on as an administrator:

After you’ve verified that you’re logged on to your computer as an administrator, you can start troubleshooting Windows Installer issues.
If the Windows Installer engine is corrupted, disabled, or installed incorrectly, this may cause program installation issues.
Use the following methods to identify any Windows Installer issues that may be causing problems when you install, uninstall, or update programs.
Method 1: Determine whether the Windows Installer engine is working
Click Start  , type cmd in the Search box or click Run then type cmd in the dialog (Windows XP or Windows Server 2003), and then press Enter to open a Command Prompt window.
At the command prompt, type MSIExec, and then press Enter.
If the MSI engine is working, you should not receive any error messages. If you receive an error message, enter the error message text into a search engine such as Bing or Google to locate troubleshooting information about the issue.
Try to install or uninstall again.
Method 2: Make sure that the Windows Installer service is not set to Disabled
Click Start , type services.msc in the Search box or click Run then type services.msc in the dialog (Windows XP or Windows Server 2003), and then press Enter to open Services.
Right-click Windows Installer, and then click Properties.
If the Startup type box is set to Disabled, change it to Manual.
Click OK to close the Properties window.
Right-click the Windows Installer service, and then click Start. The service should start without errors.
Try to install or to uninstall again.
Method 3: Check your version of Windows Installer, and upgrade to the latest version if necessaryImportant This method applies to Windows XP, Windows Vista, Windows Server 2003, Windows Server 2003 R2, and Windows Server 2008 only.
Click Start , type cmd in the Search box or click Run then type services.msc in the dialog (Windows XP or Windows Server 2003), and then press Enter to open a Command Prompt window.
At the command prompt, type MSIExec, and then press Enter. If the MSI engine is working, you should not receive any error messages, and a separate dialog box should open. This shows the MSI version.
If the installer is not version 4.5, download and install Windows Installer 4.5.
Try to install or to uninstall again.
Method 4: Reregister the installer engineImportant This method applies to Windows XP and to Windows Server 2000 only.
Click Start, click Run, type cmd, and then click Command Prompt.
At the command prompt, type the following, and then press Enter after each line:
Try to install or to uninstall again.
The installation or update method doesn’t run to completion
There are several methods that can be used to install, to uninstall, or to update a program. Additionally, the method or methods that are used may not have started or completed successfully. In this situation, try some other method to install, or to update the program.
The following are common methods that are used to install software:
Insert the CD or DVD media, and then let the installation auto-start.
Browse to the CD, DVD, removable media, or other location where the programs installation files are stored, and then double-click the Setup program. The setup file is typically one of the following:
Autorun or Autorun.exe
Install or Install.exe
Click Run when you download the program from a website.
The installation media is unreadable
Installation media such as CD and DVD media may be dirty or scratched and therefore be unreadable by the CD or DVD reader. To resolve this issue, follow these methods:
Method 1: Clean the CD or DVDTo do this, use a CD or DVD disc-cleaning kit. Or, use a soft, lint-free cotton cloth to gently wipe the silver side of the disc. Do not use paper cloth, as this can scratch the plastic or leave streaks. When you clean the disc, wipe from the center of the disc outward. Do not use a circular motion. If the problem continues to occur, clean the disc by using a damp cloth or a commercial CD or DVD disc-cleaning solution. Dry the disc thoroughly before you insert it into the drive.
Note If multiple CDs or DVDs are required, we recommend that you copy all the disks to the same folder, in reverse order (higher disk numbers first). Be prepared to approve the overwriting of existing files if you are prompted, and then install from that location.
Method 3: Obtain a fresh version of the installation packageIf you tried to install from a CD or DVD, do the following:
Check the software manufacturer’s website for a more recent version of the software package. Download and install the new version.
If you already have the latest version, download the program from the manufacturer’s website, and then run the installation.
Downloaded or copied installation files are corrupted
If you are installing a program from the Internet, redownload the file (select Save instead of Run in the download dialog box), save the file to a folder on a local hard disk on your computer or to other removable media. Then, run the installation from that location.
If your installation files are on a network (for example, a commercial or corporate environment), copy all the files to a folder on a local hard disk on your computer, and then run the installation from that location.
Method 2: Obtain a fresh version of the installation packageIf some time has elapsed between when you downloaded the package and when you tried to install it, do the following:
Check the software manufacturer’s website for a more recent version of the software package. Download and install the new version.
If you already have the latest version, download the program again, and then run the installation.
Programs that are currently running on your computer are interfering with the installation process
Disable programs that might be interfering with the installation process. To do this, follow these steps:
Click Start , type msconfig in the Search box, and then click msconfig.exe.
 If you are prompted for an administrator password or confirmation, type the password, or provide confirmation.
On the General tab, click Selective startup, and then clear the Load startup items check box.
Click Services, click Hide all Microsoft services, and then click Disable all.
Click OK, and then click Restart.
Try running your software program installation.
When you are finished troubleshooting the problem, restart the computer in Normal Startup mode. To do this, follow these steps:
Click Start , type msconfig in the Search box, and then click msconfig.exe.
If you are prompted for an administrator password or confirmation, type the password, or provide confirmation.
On the General tab, click Normal startup, click OK, and then click Restart.
There are typically several ways to remove any program. In this situation, try some other method to remove the program.
The following are common methods that are used to install software:
Method 1: Use the uninstall option (if available)
Click Start , and then click All Programs.
Select the folder for the program that you are trying to uninstall, and then open the folder.
If there is an uninstall option, try using it.
Method 2: Use Control Panel options
Click Start , click Control Panel, click Add and Remove Programs or Programs and Features, and then click Uninstall a program.
Select the program, and then click Uninstall. Follow the instructions.
Note The following steps are appropriate for advanced users only.
Make sure that you don’t have any file or folder names that are longer than 260 characters.
For more about the maximum path length limitation, see Naming files, paths, and namespaces.
Most programs create an installation log. If you can’t locate such a log, you can enable verbose MSI logging. For more information, see How to enable Windows Installer logging.
Msiexec path your_msi.msi /L*v path your_msi_log.txt For a list of msiexec command-line parameters, see Command-line options.
A failed installation typically logs «Return Value 3» where the problem occurred and where the installation rollback began. The description of the failure appears immediately before the Return Value 3 log entry.
You can use the Wilogutl.exe tool to analyze log files from a Windows Installer installation. This tool may suggest solutions to errors that are found in a log file. It is available in the latest Windows Software Development Kit.
The following is an example of how to use the Wilogutl.exe tool at a command line:
wilogutl /q /l c:mymsilog.log /o coutputdir
You may be able to manually uninstall some parts of the program through the Windows interface. For example, you may be able to delete program files and folders. Because the steps to do this may differ widely, depending on the version of Windows that you’re running and on the program that you’re trying to uninstall, no prescriptive steps are provided here. If you’re not sufficiently familiar with the program that you’re trying to uninstall to positively identify the files and folders for that program, we do not recommend that you try this method. Generally, when you begin to delete program files and folders, you run the risk of damaging your operating system. Use this method at your own risk.
If you are considering uninstalling the program manually, be aware of the following:
Before you use this method, make sure that you create a system restore point.
Before you get started, move any personal data or documents that may have ended up in the installation folder of the program that you’re uninstalling. For example, move this material into the Documents folder.
If you cannot manually delete a program file, this may mean that the file is being used or that some other program is accessing the file and preventing you from deleting it. For example, antivirus software may be accessing the file. When antivirus software is accessing a program file and making it impossible to delete it, it’s likely that this same antivirus software was preventing you from uninstalling the program by more traditional means.
For general information about how to install or to uninstall a program, see the following:
Источник
На чтение 3 мин Просмотров 317 Опубликовано 19.10.2021
В этой заметке я расскажу, как исправить ошибку ‘ Используйте другой установочный диск, на котором написано 64-bit ‘, с которой многие сталкиваются прямо сейчас. Решение не представляет собой ничего сложного и занимает совсем немного времени. Итак, давайте начнем!
Требования перед началом работы
Вот требования, которые вы должны выполнить, прежде чем двигаться дальше:
Что такое WinCDEmu?
WinCDEmu — это программа с открытым исходным кодом для монтирования файлов образов дисков. Она устанавливает драйвер устройства Windows, который позволяет пользователю создать виртуальный привод и получить доступ к образу CD или DVD, как если бы это был физический привод.
Является ли WinCDEmu бесплатной и безопасной?
WinCDEmu — бесплатная утилита с открытым исходным кодом. И она также безопасна для вас. Просто убедитесь, что вы скачиваете ее только с официального сайта, потому что это будет безопасный способ загрузки. Если вы скачаете ее с любого стороннего сайта, то нет никакой гарантии ее безопасности.
Вы можете скачать WinCDEmu отсюда. После загрузки дважды щелкните по установочному файлу и следуйте инструкциям для его установки на вашу систему. После успешной установки вы можете перейти к статье.
Скачайте ISO-файл Windows 7 / 8 /10
Вам нужен ISO-файл windows, который вы будете монтировать с помощью WinCDEmu. Поэтому, если вы еще не скачали его, вы можете скачатьISO-файл windows здесь. И вы готовы приступить к работе.
Это решение отлично работает на windows 7, 8 и 10 и протестировано как на x32, так и на x64 версии windows. Просто следуйте приведенным ниже инструкциям и избавьтесь от этой коварной ошибки.
Как решить ошибку ‘Use the other installation disc that says 64-bit’
Заключительные слова
Итак, это было простое решение для устранения ошибки ‘Используйте другой установочный диск, на котором написано 64-bit. Когда вы вставите его, Windows Setup перезапустится автоматически» . Надеюсь, это решит вашу ошибку и сэкономит вам оставшееся время. Задавайте любые интересующие вас вопросы и не забывайте делиться отзывами в комментариях ниже.
I’m helping someone set up their new 64-bit Acer Aspire One Netbook and have set everything up perfectly except the HP OfficeJet 4500 Wireless printer. The problem is I can’t get the setup.exe file to work:
- put install CD in, double-clicked on setup.exe, nothing happened
- copied CD contents to hard drive, double-clicked on setup.exe, nothing happened
- downloaded newest driver from HP website, double-clicked setup.exe, nothing happened
- did right-click, run as administrator, nothing happened
- (put CD in another computer (32-bit Windows XP), double-clicked on setup.exe, worked fine)
- (other setup.exe files work fine)
How can I get this setup.exe file to execute on this computer?
asked Jul 15, 2011 at 14:03
![]()
Edward TanguayEdward Tanguay
13.4k36 gold badges101 silver badges128 bronze badges
2
answered Jul 15, 2011 at 14:28
![]()
1
I would try to execute as compatibility mode.
Right click on setup.exe and select «Properties», then «Compatibility», mark «Execute this program in compatibility mode», then you could select for example «Windows XP SP1».
Take a try and post your results, if it dont works, try another compatibility, as Windows Vista for example, I hope one of them will going to works.
answered Jul 15, 2011 at 14:09
![]()
DiogoDiogo
29.9k65 gold badges148 silver badges221 bronze badges
32 bit installers often still contain a 16 bit launcher application for compatibility. On a 32 bit system this is no problem as it emulates the 16 bit system.
But on 64 bit systems like yours only 32 bit software can be run — 16 bit software does not work anymore.
I assume that you discovered an installer that still uses such a 16 bit launcher and hence this setup can not be run on your computer.
answered Sep 1, 2011 at 11:21
![]()
RobertRobert
7,4543 gold badges32 silver badges49 bronze badges
Windows 10: «The setup program requires an IA64 Platform. It cannot be installed on this platform.»
Discus and support «The setup program requires an IA64 Platform. It cannot be installed on this platform.» in Windows 10 Installation and Upgrade to solve the problem; So I’ve been trying to play Sonic Generations on Steam. Unfortunately, I’m unable to do so since I keep getting «MSVCP100.dll is missing from your…
Discussion in ‘Windows 10 Installation and Upgrade’ started by Tomas VF, Sep 5, 2021.
-
«The setup program requires an IA64 Platform. It cannot be installed on this platform.»
So I’ve been trying to play Sonic Generations on Steam. Unfortunately, I’m unable to do so since I keep getting «MSVCP100.dll is missing from your computer.» and I’ve seen recommendations to install the Redistributable of Visual C++ 2010 but I end up getting this imageI need some help here. Could someone point me to an IA64 Platform?
-
IA64 problems help please64-bit Windows 10? This setup program requires an IA64 platform. It cannot be installed on this platform.
Visual C++2010
first error.
The code execution cannot proceed because VCRUNTIME140.dll was not found
This setup program requires an IA64 platform. It cannot be installed on this platform.
Visual C++2010
64-bit Windows 10?
-
IA64 problems help please
so I’m trying to install a game that requires «Microsoft visual C+ + 2010 IA64 Redistributable setup» and every time I try to install it says that my computer doesn’t meet the requirements and sees please resolve the following » This setup program requires
an IA64 platform. It cannot be installed on this platform» I latterly bought a new alien ware laptop today with 16g ram 7th gen intel i7 core and I’m pretty sure it should be able to run most if not all games so why does it still say not compatible iv been
tryin to fix this for the past 5 hours any suggestions would e greatly appreciated. -
«The setup program requires an IA64 Platform. It cannot be installed on this platform.»
DBAgent.exe — System Error
♀️♀️ Message reads .. The setup program requires an IA64 platform, it cannot be installed on this platform

«The setup program requires an IA64 Platform. It cannot be installed on this platform.»
-
«The setup program requires an IA64 Platform. It cannot be installed on this platform.» — Similar Threads — setup program requires
-
Cannot enable Virtual Machine Platform
in Windows 10 Gaming
Cannot enable Virtual Machine Platform: I’m running Windows 10 Enterprise Version 10.0.19043.1826I was trying to install WSL2 but when I was trying to enable Virtual Machine Platform I got this error when restarting: «Failed to update services».I ran systeminfo.exe and checked to make sure virtualization is… -
Cannot enable Virtual Machine Platform
in Windows 10 Software and Apps
Cannot enable Virtual Machine Platform: I’m running Windows 10 Enterprise Version 10.0.19043.1826I was trying to install WSL2 but when I was trying to enable Virtual Machine Platform I got this error when restarting: «Failed to update services».I ran systeminfo.exe and checked to make sure virtualization is… -
Cannot enable Virtual Machine Platform
in Windows 10 Installation and Upgrade
Cannot enable Virtual Machine Platform: I’m running Windows 10 Enterprise Version 10.0.19043.1826I was trying to install WSL2 but when I was trying to enable Virtual Machine Platform I got this error when restarting: «Failed to update services».I ran systeminfo.exe and checked to make sure virtualization is… -
Virtual machine platform cannot be enabled.
in Windows 10 BSOD Crashes and Debugging
Virtual machine platform cannot be enabled.: I’m running Windows 10 Home 10.0.19043 build 19043 on FUJITSU FMVWKS2S77.I followed https://docs.microsoft.com/en-us/windows/wsl/install-win10 to install WSL2, but Step 3 resulted in an error. After rebooting, the update does not complete with the message «Failure configuring… -
Microsoft Platforms
in Microsoft Windows 10 Store
Microsoft Platforms: [ATTACH]Im on Pc and when I buy a game from the microsoft store that says it is available on xbox, can i still play on pchttps://answers.microsoft.com/en-us/windows/forum/all/microsoft-platforms/04301cf1-130e-406c-8a04-670f64327a88
-
Windows Hypervisor Platform and Virtual Machine Platform
in Windows 10 BSOD Crashes and Debugging
Windows Hypervisor Platform and Virtual Machine Platform: I have «ASUS TUF Gaming FX505DT” with “AMD Ryzen 5 3550H” with Radeon Vega Mobile Gfx, 2100 Mhz, 4 Cores, 8 Logical Processors and NVIDIA GeForce GTX 1650 running on “Windows 10 Home 2004”I wanted to run AVD in Android Studio for that:
I enabled “SVM” in BIOS BIOS…
-
Cross platform
in Windows 10 Gaming
Cross platform: It is not letting me play with a ps4 playerhttps://answers.microsoft.com/en-us/windows/forum/all/cross-platform/b3c075e5-13ad-41ae-80ef-a5e9f995a827
-
Hyper V Platform cannot be installed
in Windows 10 Customization
Hyper V Platform cannot be installed: Ok so the error is that hyper v cannot be installed because virtualization is disabled in the firmware. But I Do enable the virtualization in bios and yet no result! It still says that virtualization is not disabled. Any idea of what might be wrong?… -
Ironlake Platform
in Windows 10 Graphic Cards
Ironlake Platform: Hello guys. Recently from upgrading to Windows 10 and trying some builds I’m been having a hard time finding drivers for my laptop especially the Graphics Card. I’ve tried downgrading the version etc and i have a switchable graphics so my graphics sucks. So I’ve tried many…
Users found this page by searching for:
-
setup require IA64 platform
,
-
this setupbprogram requires IA64 platform problem solve
Hi all, I am not fluent in the inner workings of software. I’ve been trying to get my mother her favorite program back for years, and found it here. The Print Shop Deluxe 6.0 (https://winworldpc.com/product/the-print-shop/deluxe-60-win). I mounted the ISO and clicked install, I’m getting an error stating:
The program or feature «…..SETUPIS_SETUP.EXE» cannot start or run due to incompatibility with 64-bit versions of Windows. Please contact the software vendor to ask if a 64-bit Windows compatible version is available.
I checked the ‘Properties — Compatibility — Compatibility Mode’ and changed it to all of the different options, as well as ran the troubleshooter. Nothing. Assuming it was because it must be a 32-bit program, I looked up how to allow her computer to install it, though she is 64-bit. I got to the IIS Manager and «Enable 32-Bit Applications = True» and I’m still getting nothing.
She lost the discs years ago, she purchased newer software but struggled to use it. I haven’t been able to find it for years. Can anyone help me get this running?
Please and thank you!