Установочный диск Windows 7 является загрузочным, поэтому можно включить компьютер, и процесс установки начнется автоматически.
Если компьютер отказывается загружаться с установочного диска, необходимо выполнить следующее:
О Настройка BIOS
Войдите в BIOS, перейдите к разделу Boot и измените приоритеты загрузки (boot device priority) или последовательность загрузки (boot sequence) таким образом, чтобы DVD появился в очереди перед жестким диском. Сохраните сделанные изменения и выйдите из настройки BIOS.
О Меню загрузки
Некоторые компьютеры предлагают «меню загрузки», которое позволяет выбрать загрузочный диск. Поищите сообщение над или под экраном загрузки; как правило, достаточно нажать F12 (до звукового сигнала), выбрать CD/DVD-ROM и нажать Enter.
При обнаружении загрузочного диска на экране появляется на три-четыре секунды следующее сообщение:
Нажмите любую клавишу, чтобы запуститься с CD или DVD . . .
(Press any key to boot from CD or DVD . . .)
Нажмите любую кнопку, и через несколько мгновений начнется установка. (Если не удается воспользоваться установочным диском Windows, читайте раздел «Загрузка без загрузочного диска».)
В первом окне нажмите на кнопку Далее (Next), чтобы появилось окно Установка Windows (Install Windows), показанное на рис. 1.1. Чтобы продолжить, в появившемся окне нажмите Установить (Install now).
В следующем окне программа установки попросит вас ввести ключ продукта, который находится на коробке DVD или наклейке на корпусе компьютера. К счастью, Microsoft позволяет пропустить этот шаг — оставьте поле незаполненным и нажмите Далее (Next), после чего ответьте Нет (No) — чтобы не тратить время понапрасну, разыскивая наклейку, и мучительно вводить длинный (25 цифр) ключ (не надейтесь, что у вас получится это сделать без ошибок с первого раза). Такой прием значительно сэкономит время в случае временной установки для тестирования программы или восстановления данных.
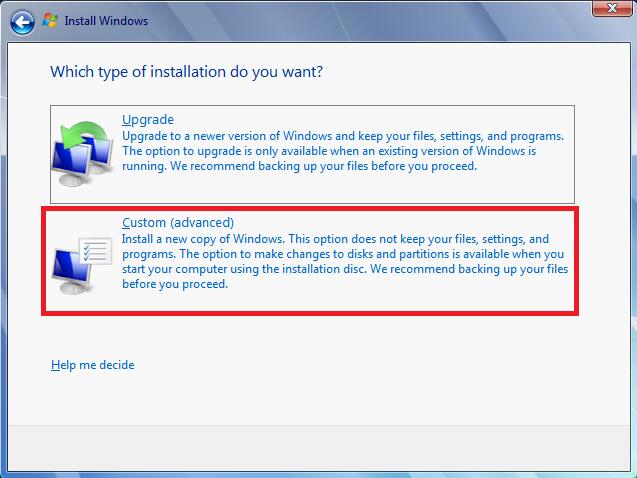
Через несколько окон у вас поинтересуются: Какой тип установки выбрать? (Which type of installation do you want?). На этом этапе выберите Обновление (Upgrade) или Полная установка (дополнительные параметры) (Custom (advanced)). Опция Обновление (Upgrade) предназначена для установки новой системы только поверх Windows Vista, если вы попробуете сделать это с более ранней версией, например ХР, программа установки выдаст ошибку и запустит процесс заново.
«^v I При установке без ввода ключа убедитесь, что вы выбрали версию Windows 7,
1 для К0Т0Р°й У вас есть к-™04- Ошибка на этом этапе заставит переустанавливать систему еще раз. После загрузки Windows, как правило, будет работать в полно* ч* функциональном «демонстрационном» режиме 30 дней. Если в течение этого времени вы не ввели ключ для выбранной версии, Windows перейдет в режим блокировки. (Как увеличить демонстрационный период, рассказано в подразделе «Чистая установка с лиска обновления»). Не следует откладывать ввод ключа продукта, иначе головная боль вам обеспечена.
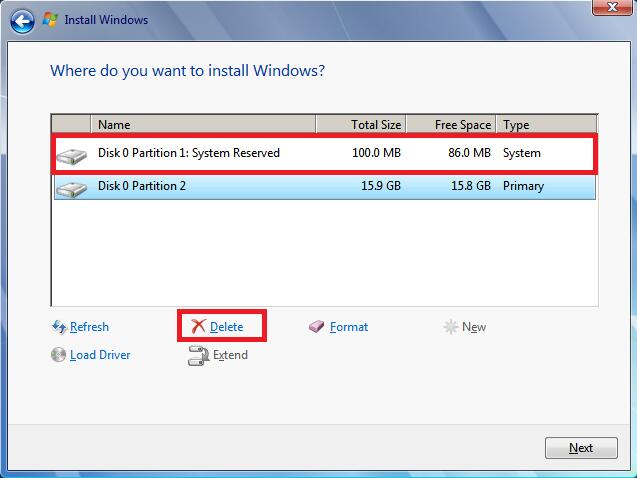
Выберите Полная установка (дополнительные параметры) (Custom (advanced)); появится окно Выберите раздел для установки Windows (Where do you want to install Windows?). Перейдите по ссылке Параметры диска (Drive options), чтобы вызвать Мастер разбивки, показанный на рис. 1.2.
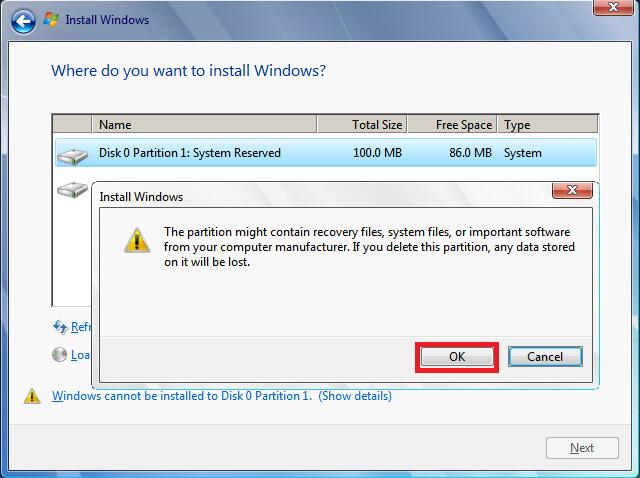
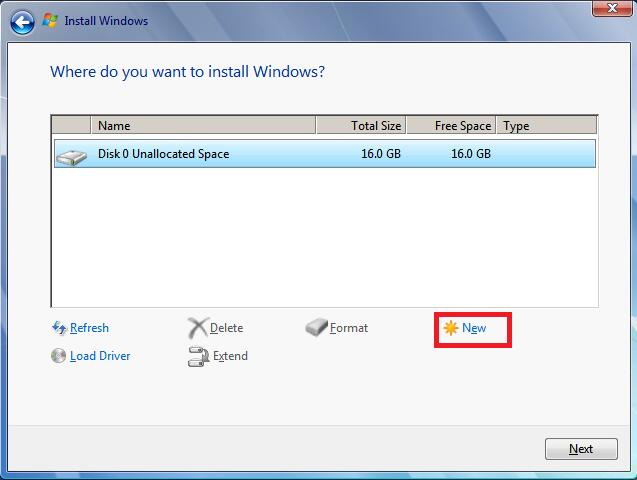
Если жесткий диск не содержит нужных вам данных и вы хотите использовать его для установки, просто нажмите Далее (Next). В противном случе воспользуйтесь кнопкой Удалить (Delete), чтобы стереть существующие разделы, а также данные, содержащиеся на них (удаленные данные вернуть невозможно), затем нажмите кнопку Новый (New), чтобы создать новый раздел диска.
При установке на пустом жесткий диск программа установки Windows 7 создаст Системный резерв (System Reserved) размером 100 Мбайт (версия Professional или выше). Как сделать пак, чтобы этого не происходило, и использовать все пространство жесткого диска для установки Windows, читайте в подразделе «Как предотвратить создание дополнительных разделов при установке Windows» на с. 26.
Следуйте указаниям для завершения установки. Если процесс будет приостановлен или Windows не будет запускаться после завершения установки, обратитесь к разделу «Устранение проблем при установке Windows».
Чистая установка с диска обновления
Итак, вы решили сэкономить деньги, купив версию «обновления» Windows, и попали впросак. Может быть, жесткий диск поврежден, нет полного резервного копирования, и придется полностью восстанавливать систему. Или вы решили не делать установку поверх Vista, чтобы избежать сохранения всего мусора, который накопился в течение пары лет ее использования. Как бы то ни было, вы уже обнаружили, что с диска невозможно установить обновление Windows, если у вас не та версия операционной системы, поверх которой можно это сделать.
В этом случае Microsoft предлагает вам установить Vista, а уже поверх нее — Windows 7. Вряд ли такое решение кого-то устроит. Вместо этого проделайте следующие шаги, чтобы провести новую установку Windows 7 с диска обновления:
1. Используйте диск с Windows 7 для загрузки ПК, как описано в разделе «Установка Windows на пустой жесткий диск».
2. При появлении окна программы установки выберите Установить (Install now) и продолжайте, следуя подсказкам программы.
3. Когда программа запросит ключ продукта, оставьте поле незаполненным и просто нажмите Далее (Next). Так как вы не ввели ключ, программа спросит, какую версию Windows 7 следует установить; убедитесь, что вы правильно указали вашу версию.
4. По завершении установки у вас будет 30 дней, но вы не сможете активировать Windows 7 без ключа.
Чтобы ввести ключ, откройте командную строку в режиме администратора, как
описано в разделе «Управление UAO и затем введите команду:
cscriptwindowssystem32slmgr.vbs -ipkxxxxx-xxxxx-xxxxx-xxxxx-xxxxx
где ххххх-ххххх-ххххх-ххххх-ххххх — ключ вашей версии Windows 7, взятый с обложки DVD-диска или с наклейки на корпусе ПК. Нажмите Enter, чтобы продолжить.
Vr-
Если это не сработает, то потребуется отключить контроль учетных записей пользователей (UAC), как описано в главе 7, и затем попытаться еще раз. После
{ ? завершения включите UAC (если вам, конечно, этого захочется).
1. Следующим шагом активируйте Windows:
cscript windowssystem32slmgr.vbs -ato и нажмите Enter. Чтобы проверить, прошла ли активация, введите команду: cscript windowssystem32slmgr.vbs -dlv
2. Введите exit или закройте окно командной строки.
Используя так функцию «перевооружения» (rearming), вы можете увеличить демонстрационный период в два или три раза, что составит 120 дней. Просто выполните сценарий slmgr.vbs с параметром -rearm. Понадобится 15-30 секунд на внесение изменений, после чего необходимо перезагрузить Windows.
Как предотвратить создание дополнительных разделов при установке Windows
При установке Windows 7 (версии Professional, Ultimate или Enterprise) на пустой жесткий диск программа установки создает дополнительный скрытый раздел объемом 100 Мбайт. Он используется для шифрования диска при помощи Bit Locker, хотя BitLocker прекрасно работает и без него. В этом разделе содержится копия Инструментов восстановления Windows (Windows Recovery Environment), необходимых для исправления Windows без установочного диска, как описано в разделе «Что делать, если Windows не запускается».
*2*
* . При установке на жесткий диск с уже имеющимися разделами и хранящимися
там данными версии Ноше Premium (или если вы не против создания еще одного { ? раздела, ведь 100 Мбайт не так уже много по сегодняшним меркам) можно нро-‘* пустить этот раздел.
Так как эти 100 Мбайт вы никогда не сможете использовать для хранения данных, можно избежать создания этого раздела, выполнив следующие шаги:
1. В окне Выберите раздел для установки Windows (Where do you want to install Windows?) (см. рис. 1.2) создания раздела программы установки Windows 7 нажмите Параметры диска (расширенные) (Drive options (advanced)). Удалите существующие разделы (если они есть) и создайте новый раздел диска.
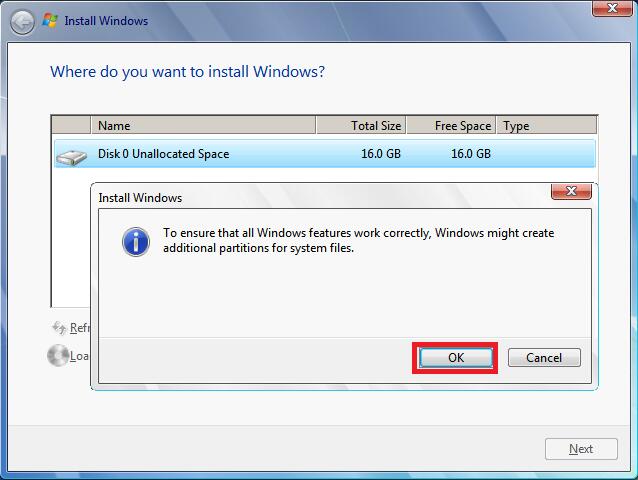
2. При появлении предупреждения Чтобы убедиться, что все функции Windows работают корректно, Windows может создать дополнительный раздел для системных файлов (То ensure that all Windows features work correctly, Windows might create additional partitions for system files) нажмите OK.
На этом этапе вы увидите два раздела:
• Диск 0 Раздел 1: Системный резерв (Система) (Disk 0 Partition 1: System Reserved (System));
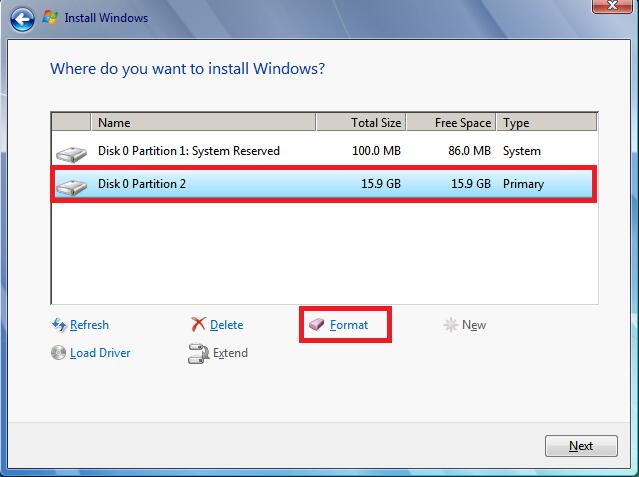
• Диск 0 Раздел 2: (Основной) (Disk 0 Partition 2: (Primary)).
3. Выберите раздел Основной (Primary) и нажмите Удалить (Delete).
4. Далее выберите раздел Системный резерв (System Reserved) и нажмите Расширить (Extend). Введите максимальный доступный размер и нажмите Применить (Apply).
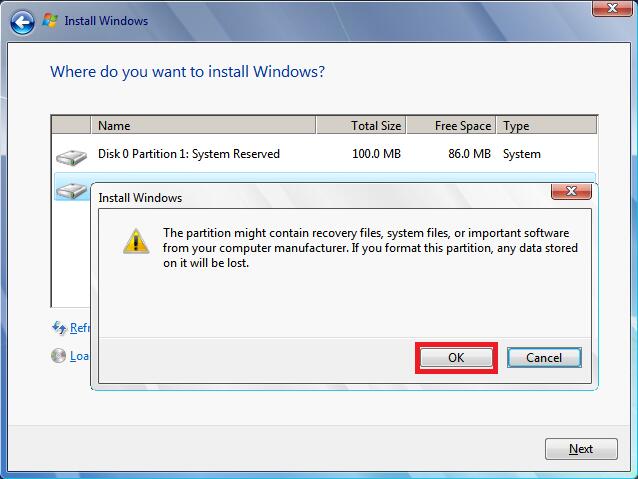
5. Снова выберите новый расширенный раздел Системный резерв (System Reserved) и нажмите Форматировать (Format).
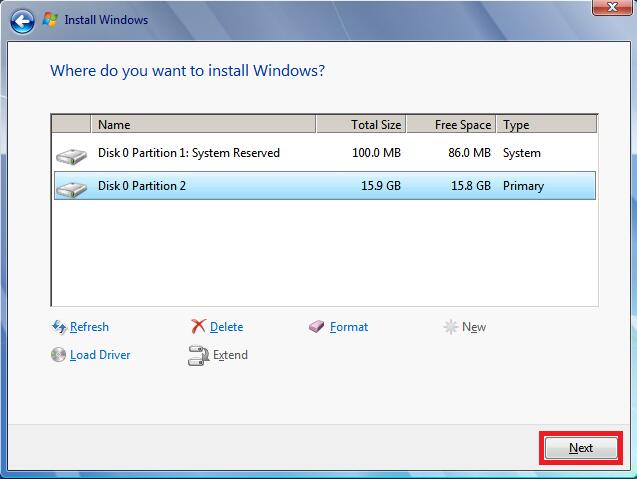
6. По окончании форматирования продолжайте установку Windows в этом разделе.
Используя так функцию «перевооружения» (rearming), вы можете увеличить демонстрационный период в два или три раза, что составит 120 дней. Просто выполните сценарий slmgr.vbs с параметром -rearm. Понадобится 15-30 секунд на внесение изменений, после чего необходимо перезагрузить Windows.
Как предотвратить создание дополнительных разделов при установке Windows
При установке Windows 7 (версии Professional, Ultimate или Enterprise) на пустой жесткий диск программа установки создает дополнительный скрытый раздел объемом 100 Мбайт. Он используется для шифрования диска при помощи Bit Locker, хотя BitLocker прекрасно работает и без него. В этом разделе содержится копия Инструментов восстановления Windows (Windows Recovery Environment), необходимых для исправления Windows без установочного диска, как описано в разделе «Что делать, если Windows не запускается».
*2*
* . При установке на жесткий диск с уже имеющимися разделами и хранящимися
там данными версии Ноше Premium (или если вы не против создания еще одного { £ раздела, ведь 100 Мбайт не так уже много по сегодняшним меркам) можно нро-‘* пустить этот раздел.
Так как эти 100 Мбайт вы никогда не сможете использовать для хранения данных, можно избежать создания этого раздела, выполнив следующие шаги:
1. В окне Выберите раздел для установки Windows (Where do you want to install Windows?) (см. рис. 1.2) создания раздела программы установки Windows 7 нажмите Параметры диска (расширенные) (Drive options (advanced)). Удалите существующие разделы (если они есть) и создайте новый раздел диска.
2. При появлении предупреждения Чтобы убедиться, что все функции Windows работают корректно, Windows может создать дополнительный раздел для системных файлов (То ensure that all Windows features work correctly, Windows might create additional partitions for system files) нажмите OK.
На этом этапе вы увидите два раздела:
• Диск 0 Раздел 1: Системный резерв (Система) (Disk 0 Partition 1: System Reserved (System));
• Диск 0 Раздел 2: (Основной) (Disk 0 Partition 2: (Primary)).
3. Выберите раздел Основной (Primary) и нажмите Удалить (Delete).
4. Далее выберите раздел Системный резерв (System Reserved) и нажмите Расширить (Extend). Введите максимальный доступный размер и нажмите Применить (Apply).
5. Снова выберите новый расширенный раздел Системный резерв (System Reserved) и нажмите Форматировать (Format).
6. По окончании форматирования продолжайте установку Windows в этом разделе.
Загрузка без загрузочного диска
У меня в кладовке все еще хранятся дискеты, большинство из которых являются загрузочными дисками для старых операционных систем (Windows Me, Windows 95, DOS 6.2, DOS 4.0, и т. д.). Ни на одном из моих компьютеров уже нет дисковода, но столько трудов стоило создать или получить каждый диск, что я не осмеливаюсь расстаться с ними: вдруг однажды кто-то постучится в мою дверь и попросит загрузочный диск для IBM XT двадцатипятилетней давности?
Достаточно сказать, что запустить ПК без операционной системы действительно сложно. Windows 7 продается на загрузочном DVD, но что, если у вас старый привод, не поддерживающий загрузку с DVD, или привод не работает, что делать тогда? Один из способов — снять жесткий диск и использовать другой компьютер для копирования файлов с установочного диска Windows во временную папку на диске. При этом остается одна проблема: как же запустить компьютер, чтобы извлечь эти файлы?
А если Windows уже установлена, но необходимо выполнить задачу, которую вы не можете сделать изиутри Windows, например обновление (прошивку) BIOS компьютера, видеокарты или жесткого диска?
Если вам не повезло связаться с одной из утилит по обновлению BIOS, ко* 0% торые настаивают на записи файлов на диск, то вы можете воспользоваться
i ^ бесплатным инструментом Виртуальный гибкий диск (Virtual Floppy Drive), скачав его с http://chitchat.atinfbseek.co.jp/vmware/vfd.html, и добавить фальшивую букву диска. Запустите программу, после чего используйте Проводник для извлечения файлов.
К счастью, существует несколько способов запуска ПК, если не получается запустить компьютер с жесткого диска: сетевая загрузка (РХЕ), загрузочный флэш-диск USB и загрузочный CD.
Сетевая загрузка (РХЕ)
Используя Предварительную загрузку (Preboot Execution Environment (РХЕ)), вы можете поместить загрузочные файлы в папку на другом компьютере сети, после чего загрузить ПК, используя эти файлы. Придется потрудиться, но это проще, чем загрузка с диска.
Для начала нужен рабочий компьютер с выходом в Интернет. Установите Пакет автоматической установки Windows (Windows Automated Installation Kit (WAIK)), который можно бесплатно скачать с http://go.microsoft.com/fwlink/?LinkId=136976. Из меню Пуск откройте Утилиты командной строки Windows РЕ (Windows РЕ Tools Command Prompt) и, если вы устанавливаете 32-битную версию Windows 7, наберите
На основании Вашего запроса эти примеры могут содержать грубую лексику.
На основании Вашего запроса эти примеры могут содержать разговорную лексику.
Перевод «чтобы обеспечить корректную работу» на английский
Теперь нам нужно подтвердить настройки брандмауэра, чтобы обеспечить корректную работу Hub Transport.
Появится предупреждающее сообщение: «Чтобы обеспечить корректную работу всех своих возможностей, Windows может создать дополнительные разделы для системных файлов».
Блокирование всплывающих окон: чтобы обеспечить корректную работу этого сайта, убедитесь, что
Мобильные приложения могут собирать анонимные данные о местоположении Пользователя, для того чтобы обеспечить более корректную работу с выбором способа платежа.
Mobile application may accumulate anonymous information concerning the Customer’s location to ensure that the form of payment is chosen correctly.
Результатов: 57967. Точных совпадений: 3. Затраченное время: 155 мс
Documents
Корпоративные решения
Спряжение
Синонимы
Корректор
Справка и о нас
Индекс слова: 1-300, 301-600, 601-900
Индекс выражения: 1-400, 401-800, 801-1200
Индекс фразы: 1-400, 401-800, 801-1200
Содержание
- To ensure that all windows features work correctly
- How to Partition Windows 10
- How to Partition in Windows 10 during Installation
- How to Partition in Windows 10 after Installation
- How to Partition in Windows 10 without Formatting
- GPT Disk Partitions Not in Recommended Order Windows 10
- Windows 10 Installation Error of Partitions Not in Recommended Order
- Fix Partitions on GPT Disk Are Not in Recommended Order
- Take more control of Windows 10 Disk Partitions
- Error 0x80070057: Windows Could Not Format a Partition on Disk 0 [Partition Magic]
- Summary :
- Quick Navigation :
- We Receive Error 0x80070057 When Trying to Reinstall Windows 7
- Solution 1: Format Partition under Startup Mode
- Solution 2: Format Partition in Command Prompt Window
- Solution 3. Format Partition during Windows 7 Installation Process.
- Solution 4: Reinstall RAM
- Solution 5: Reinstall Hard Disk Driver
- Solution 6: Replace the SATA Cable or SATA Port
- Solution 7: Modify User Permission
- Bottom Line
- ABOUT THE AUTHOR
To ensure that all windows features work correctly
При установке Windows 7 (версии Professional, Ultimate или Enterprise) на пустой жесткий диск программа установки создает дополнительный скрытый раздел объемом 100 Мбайт. Он используется для шифрования диска при помощи Bit Locker, хотя BitLocker прекрасно работает и без него. В этом разделе содержится копия Инструментов восстановления Windows (Windows Recovery Environment), необходимых для исправления Windows без установочного диска, как описано в разделе «Что делать, если Windows не запускается».
Так как эти 100 Мбайт вы никогда не сможете использовать для хранения данных, можно избежать создания этого раздела, выполнив следующие шаги:
1. В окне Выберите раздел для установки Windows (Where do you want to install Windows?) (см. рис. 1.2) создания раздела программы установки Windows 7 нажмите Параметры диска (расширенные) (Drive options (advanced)). Удалите существующие разделы (если они есть) и создайте новый раздел диска.
2. При появлении предупреждения Чтобы убедиться, что все функции Windows работают корректно, Windows может создать дополнительный раздел для системных файлов (То ensure that all Windows features work correctly, Windows might create additional partitions for system files) нажмите OK.
На этом этапе вы увидите два раздела:
• Диск 0 Раздел 1: Системный резерв (Система) (Disk 0 Partition 1: System Reserved (System));
• Диск 0 Раздел 2: (Основной) (Disk 0 Partition 2: (Primary)).
3. Выберите раздел Основной (Primary) и нажмите Удалить (Delete).
4. Далее выберите раздел Системный резерв (System Reserved) и нажмите Расширить (Extend). Введите максимальный доступный размер и нажмите Применить (Apply).
5. Снова выберите новый расширенный раздел Системный резерв (System Reserved) и нажмите Форматировать (Format).
6. По окончании форматирования продолжайте установку Windows в этом разделе.
Загрузка без загрузочного диска
У меня в кладовке все еще хранятся дискеты, большинство из которых являются загрузочными дисками для старых операционных систем (Windows Me, Windows 95, DOS 6.2, DOS 4.0, и т. д.). Ни на одном из моих компьютеров уже нет дисковода, но столько трудов стоило создать или получить каждый диск, что я не осмеливаюсь расстаться с ними: вдруг однажды кто-то постучится в мою дверь и попросит загрузочный диск для IBM XT двадцатипятилетней давности?
Достаточно сказать, что запустить ПК без операционной системы действительно сложно. Windows 7 продается на загрузочном DVD, но что, если у вас старый привод, не поддерживающий загрузку с DVD, или привод не работает, что делать тогда? Один из способов — снять жесткий диск и использовать другой компьютер для копирования файлов с установочного диска Windows во временную папку на диске. При этом остается одна проблема: как же запустить компьютер, чтобы извлечь эти файлы?
А если Windows уже установлена, но необходимо выполнить задачу, которую вы не можете сделать изиутри Windows, например обновление (прошивку) BIOS компьютера, видеокарты или жесткого диска?
Если вам не повезло связаться с одной из утилит по обновлению BIOS, ко* 0% торые настаивают на записи файлов на диск, то вы можете воспользоваться
i ^ бесплатным инструментом Виртуальный гибкий диск (Virtual Floppy Drive), скачав его с http://chitchat.atinfbseek.co.jp/vmware/vfd.html, и добавить фальшивую букву диска. Запустите программу, после чего используйте Проводник для извлечения файлов.
К счастью, существует несколько способов запуска ПК, если не получается запустить компьютер с жесткого диска: сетевая загрузка (РХЕ), загрузочный флэш-диск USB и загрузочный CD.
Используя Предварительную загрузку (Preboot Execution Environment (РХЕ)), вы можете поместить загрузочные файлы в папку на другом компьютере сети, после чего загрузить ПК, используя эти файлы. Придется потрудиться, но это проще, чем загрузка с диска.
Источник
How to Partition Windows 10
In this page, we’ll guide on how to partition in Windows 10, situations might be different, partition Windows 10 during installation, partition Windows 10 after installation, or just want to partition Windows 10 after upgraded from Windows 7 without formatting. Windows Disk Management and diskpart command line can be used in certain situations, while partition software can be used in others, the following passage will tell the differences, as all-in-one partition manager, Macrorit Partition Expert is able to do all disk tasks with ease, and it’s free.
How to Partition in Windows 10 during Installation
When you’re installing Windows 10 from CD or USB drive, you can partition disk in the «Where do you want to install Windows?» Window, steps to partition Windows 10 during installation are as followed:
That’s for new Windows installation, you can create just one partition and create more in disk management after installation if you can’t wait to experience new features of Windows 10;
How to Partition in Windows 10 after Installation
After Windows 10 installation, you can create more partitions in Windows Disk management or diskpart command line, both methods requires format partition before add new volume to Windows 10 disk.
Here’re the steps to create new partition in Windows 10 disk management:
Do the same operations to create more partitions, you can create four primary partition in MBR disk at most, «MBR» or «GPT» information will show in disk management, or three primary partition plus many logical partition; if you’re using GPT disk in Windows 10, don’t worry, just partition as many as you can, it’s not easy to reach the limitation of 128 partitions from Windows 10.
How to Partition in Windows 10 without Formatting
Format partition will cause data loss, although it’s not really gone, it’s not easy to recover them unless access to professional data recovery software. Windows disk management and command prompt will format partition when creating new simple volumes; can I partition Windows 10 without formatting?
Partition manager software Macrorit Partition Expert partitions Windows 10 without formatting, that’s to say, there’s no need to worry about data loss when using this partition program to create new partitions, steps are easy to follow:
Источник
GPT Disk Partitions Not in Recommended Order Windows 10
To help you completely fix the error «GPT Disk Partitions Not in Recommended Order Windows 10»
1. You’re doing a fresh install.
2. You selected the largest partition to install. Full steps
| Workable Solutions | Step-by-step Troubleshooting |
|---|---|
| Part 1. Why You Get This Error | |
| Part 2. Solutions to Not in Recommended Order | At the Windows 10 setup «Partition Screen», press Shift-F10 > type diskpart > type list disk. Full steps |
Windows 10 Installation Error of Partitions Not in Recommended Order
«When clean install Windows 10, I found ‘recommended order’ error report for a GPT disk, it says ‘the partitions on the disk selected for installation are not in the recommended order. For additional information about installing to GPT disk, go to the Microsoft website. do you want to proceed with installation?’ Now should I listen to the warning or just ignore it? How to properly deal with GPT disk partitions, not in recommended order in Windows 10? I need some real advice.»
When do you receive the partition error warning very likely?
Case 1. You are doing a fresh install, from a Windows 10 ISO image or are installing Windows to an existing hard disk that had an operating system previously installed.
Case 2. You have selected the largest available partition to install, likely the same partition Windows 7 or 8 was previously installed. Other partitions, such as an ESP partition, are ordered earlier in the list. В
Fix Partitions on GPT Disk Are Not in Recommended Order
For a bold attempt, many people would choose to ignore the warning and continue with the installation. Just select the partition that had Windows 7 or Windows 8 previously installed on. It turns out Windows 10 will install correctly, even with the error, not a single partition lost. However, it’s not recommended regarding the future partition error occurrence and the possibility to fix it. Deleting the partition and consolidate the disk can solve this error.
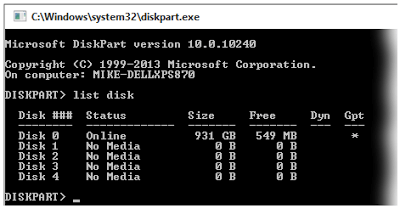
1. В At the Windows 10 Setup «Partition Screen», press»Shift-F10″. This opens a DOS prompt.
2. В Type this command: diskpart.
3. В Type List Disk.
Note which disk is your largest. This is likely the one where your existing operating system is installed. В If you have SD card slots, they will show on the list. В Ignore them. В For most people, DISK 0 is the disk you care about.
4. В Type Select Disk=0 to activate your disk.
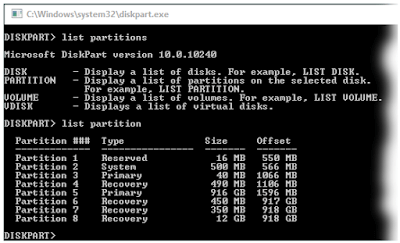
5. В Type List Partition
You could confirm this matches what the Windows Setup screen showed. В My disk looks like this illustration. В In this case, some of the partitions were from Windows 8. When Windows 10 upgraded, it adds its own new partitions rather than risk damaging the older ones. В The space occupied by these is negligible:
One command does it all. В There is no warning. В
7. В Type List Partitions
expected results: «There are no partitions on this disk to show»
8. В Type exit, closing DiskPart
9. В Type exit, closing the command window
Return to the already-in-progress Windows 10 setup, where the old partitions still show. В Continue with these steps:
10. В Click «Refresh» В В
Note drive 0 shows all unallocated space, all on one partition.
11. В Click «*new», В Apply, accepting the recommended disk size
12. В Click «OK» on «To ensure Windows features work correctly, Windows might create additional partitions.» В Allow it to do so.
Continue with your Windows install.
Take more control of Windows 10 Disk Partitions
When making Windows 10 clean installation, you may encounter embarrassments: low disk space available to install Windows 10 system and data, the partition needs to be formatted, etc. To correct the mentioned issues, you can apply EaseUS partition manager to increase a volume by shrinking its neighboring one with its resize/move partition feature, format a partition to a certain file system, convert file system between FAT and NTFS, convert MBR disk to GPT disk, wipe partition or clear junk files to optimize Windows 10 performance.
Источник
Error 0x80070057: Windows Could Not Format a Partition on Disk 0 [Partition Magic]
By Rodin | Follow | Last Updated November 28, 2020
Summary :
Trying to install Windows but receive an error message saying that Windows was unable to format a partition on disk 0? To go through the installation process smoothly, you can try on the 3 formatting solutions explained in this article as well as more suggestions that have been proved useful by some users.
Quick Navigation :
We Receive Error 0x80070057 When Trying to Reinstall Windows 7
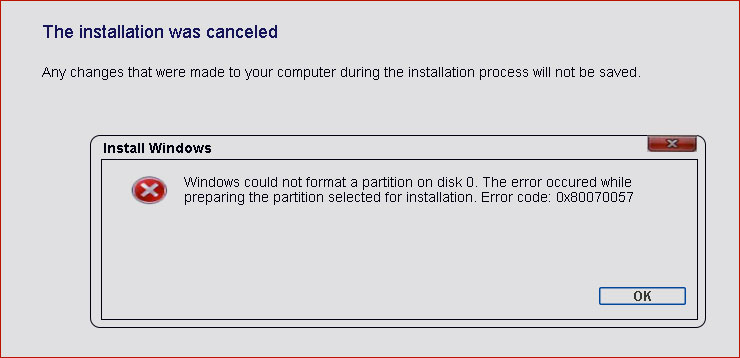
Sometimes we need to reinstall Windows 7. Then we should first of all prepare an installation media, back up important data on the local drive, and then reinstall Windows 7. If the process is successful then naturally we have solved the problem smoothly. Unfortunately, there are times we get stuck during the process. The following error message which reads: «Windows could not format a partition on disk 0. The error occurred while preparing the partition selected for installation. Error code: 0x80070057» may appear…
Another possible error code that can occur is:»
Failed to format the selected partition. Error: 0x80070057«.
In fact, this is a very common error that can occur to anyone of us. After searching the internet, we find this problem is all over the internet. Below is a typical example:
Have you ever encountered this problem? Are you troubled by this error code now? What caused this error? And what should we do to address this problem? Let’s see the details.
Solutions to «Windows Could Not Format a Partition on Disk 0»
Solution 1: Format Partition under Startup Mode
Since Windows could not format a partition on disk 0 and sends out error code 0x80070057, we have to find other reliable ways to do this job. For example, we can turn to MiniTool Partition Wizard Bootable Edition for help. The reason why we list it here as top recommendation is that this tool is rather user-friendly to use for Windows 7/8/10 users. Please note that this is a paid feature in Partition Wizard, and you need to buy a license if you do not have one to activate this feature.
Preparatory work:
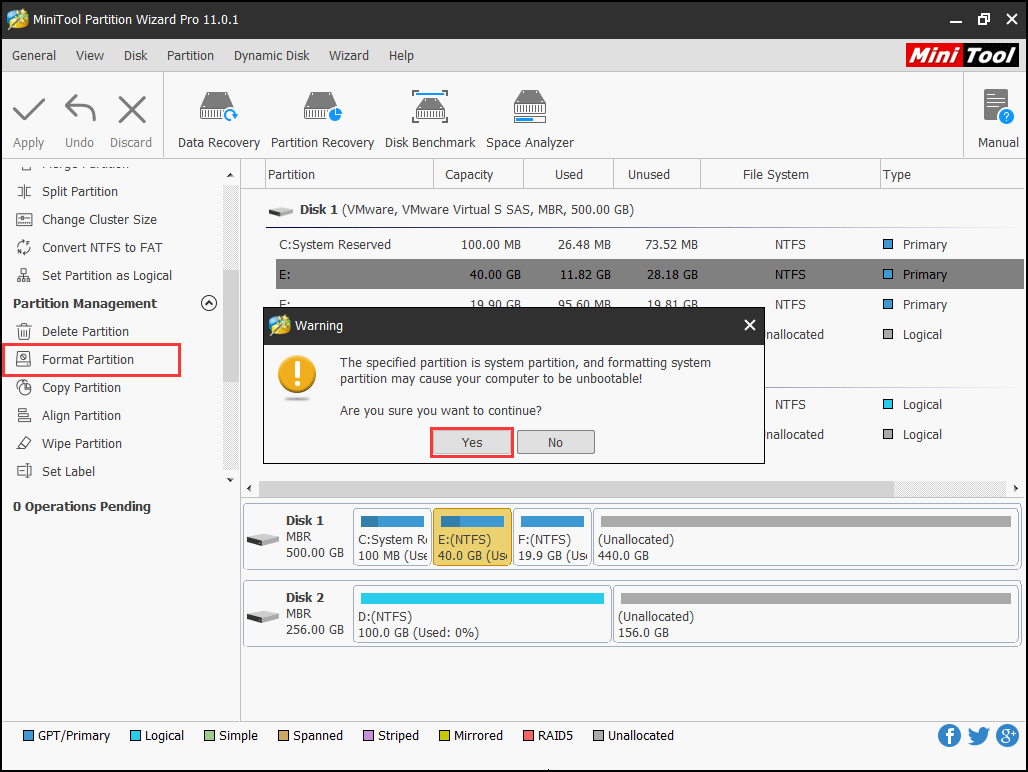
Step 1. On the main interface of MiniTool Partition Wizard, click the partition that you are installing Windows 7 to and select «Format Partition«.
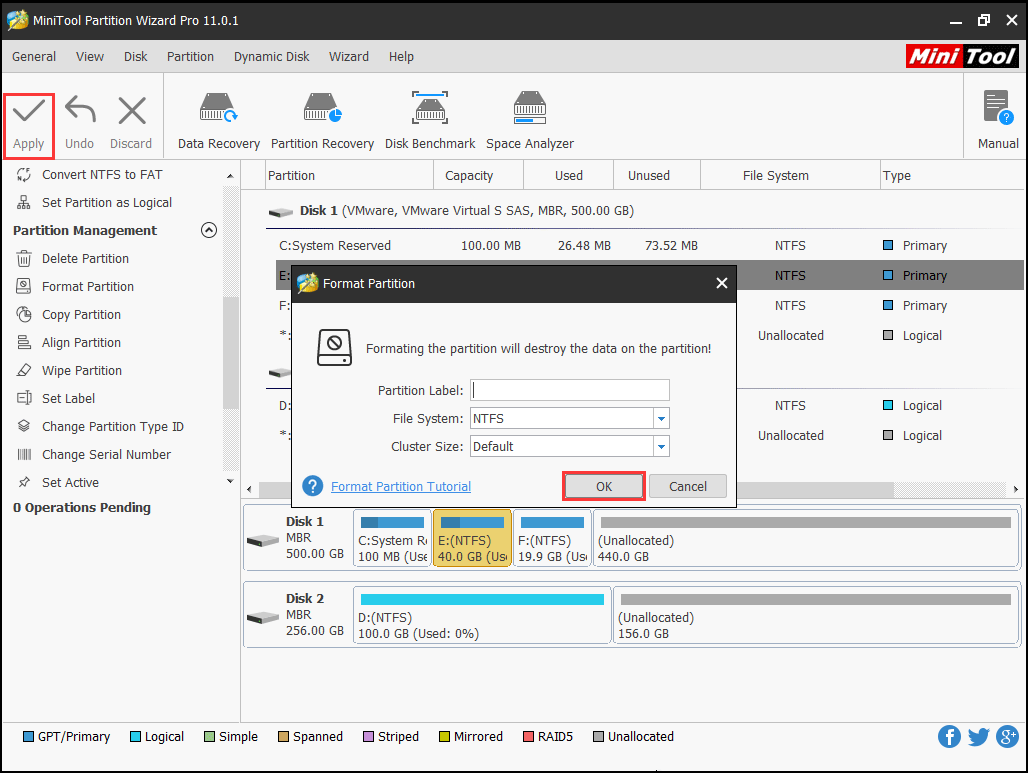
Step 2. Confirm that you want to continue and hit «Apply» on the toolbar.
Now you can exit MiniTool Partition Wizard, disconnect the bootable media of Partition Wizard, and then try to reinstall Windows 7 once again.
Solution 2: Format Partition in Command Prompt Window
Windows command prompt is a rather reliable method when you need to format a partition. But to format system partition, you will need the help of Windows installation disk. Here is how you can do this:
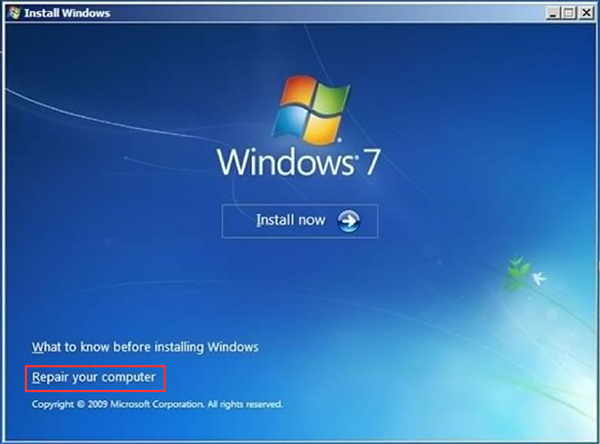
Step 1. Boot the computer with windows 7 installation DVD, then instead of selecting «Install Windows 7«, select «Repair Your Computer» and then select «Use Recovery Tools…«;
Step 2. In the next window select «Command Prompt«;
Step 3. Type «diskpart«. This may take some time for it to pop up and it will ask you for Administrative privileges. Go ahead and click «Yes«;
Step 4. Type «list disk«. It will show a list of disks;
Step 5. Type «select disk [n]» to select your disk out of the list above. For example: «select disk 3«;
Step 6. Type «clean» to clean the drive;
Step 7. Type «create partition primary«; Step 8. Type «select partition 1«;
Step 9. Type «active» to activate the partition on the disk;
Step 10. Type «format fs=ntfs» to do a full format into NTFS. Depending on the size of the disk, this will take some time to complete.
Step 11. Type «exit» when the format is finished. We need to type «exit» for two times. One to exit from diskpart, and the other one for command prompt.
Step 12. Repeat installing Windows 7.
Solution 3. Format Partition during Windows 7 Installation Process.
Accroding to Microsoft support, this error code will appear when the system reserved partition is damaged. (System reserved partition is an area reserved for the BitLocker encryption and the restoration of Windows.) Microsoft suggests that we need to delete the system reserved partition as well as the system partition at first, then create a new partition, and continue with the formatting during the installation process.
To do these, please follow the detailed steps here:
Step 1. Insert the Windows 7 installation DVD, set your preferences and click «Install now«.
Step 2. After reading the Microsoft license agreement, click «I accept the terms of license«, and then click «Next«.
Step 3. When you see the following window, click «Custom (advanced)«.
Step 4. Select «Disk 0 partition 1«, and click «Delete«. Then click «OK» to confirm the deletion on the pop-up window.
Step 5. Repeat Step 4 to delete Disk 0 partition 2. Then the whole disk becomes an unallocated space. Now you can click «New» to create a new partition.
Step 6. Define the size of the disk, and then click «Apply«. If you don’t make any change of the new partition size, then the default value is the maximum size of the disk.
Step 7. At this time Windows will prompt that «To ensure that all Windows feature work correctly, Windows might create additional partitions for system files.» Click «OK» when prompted.
Step 8. Then you can see two partitions are created again. Select Disk 0 partition 2, and then click «Format«. Click «OK» when prompted.
Step 9. Formatting should be completed correctly. Click «Next» to continue. you can now complete the installation without problems.
However, if these three solutions do not help, please try the following solutions to take your chance…
Solution 4: Reinstall RAM
Solution 5: Reinstall Hard Disk Driver
Another possible reason for error code 0x80070057 is that the System Has Lost Hard Disk Driver and Needs Installation. At this time, you can insert the Windows 7 installation DVD and follow the steps listed in Solution 3. When it comes to selecting where you want to install windows, you are expected to select «Disk 0 Partition 2«, and then click «Load Driver«. It will automatically install the disk driver.
Solution 6: Replace the SATA Cable or SATA Port
If you still get the same error code, you should consider SATA cable fault. Here is a specific example on answers.microsoft that gets to the point. Just have a try.
Solution 7: Modify User Permission
Sometimes, when we try to format a partition before installing Windows, Windows is unable to complete the format. This error might be caused by insufficient user permission, and what we are expected to do is to modify user permission. Follow the instructions below.
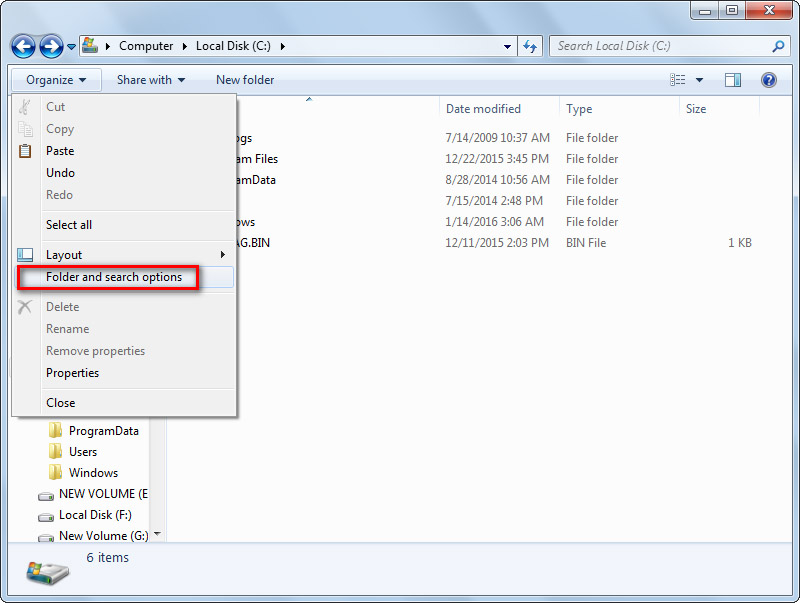
Step 1. Open Windows Explorer, drop down «Organize» and choose «Folder and search options«.
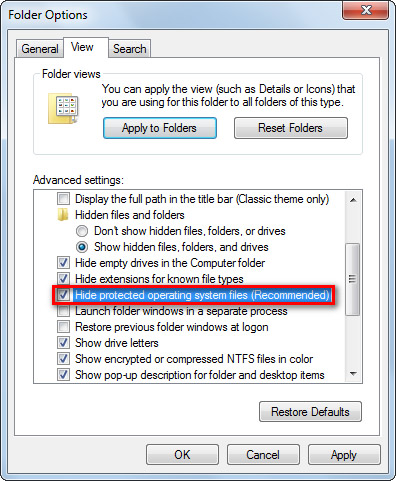
Step 2. Remove the tick before «Hide protected operating system files (Recommended)» under «View» board. Immediately you will receive a warning window saying «These files are required to start Windows. Deleting or editing them can make your computer inoperable. Are you sure you want to display these files?» You don’t need to worry about it and click «Yes«.
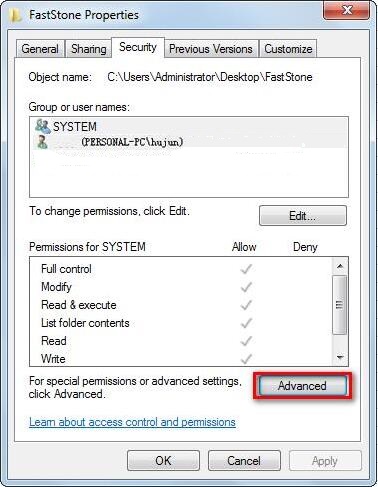
Step 3. After that, find the folder that cannot be deleted. Right click on it and select «Properties«. Switch the board to «Security» and press «Advanced«.
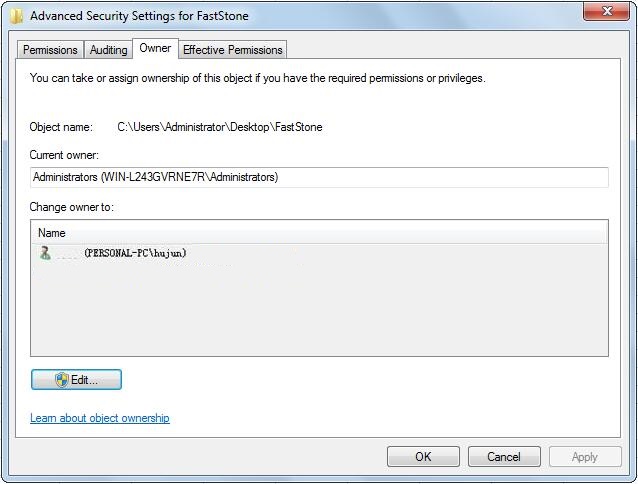
Step 4. Switch the board to «Owner» and press «Edit» button.
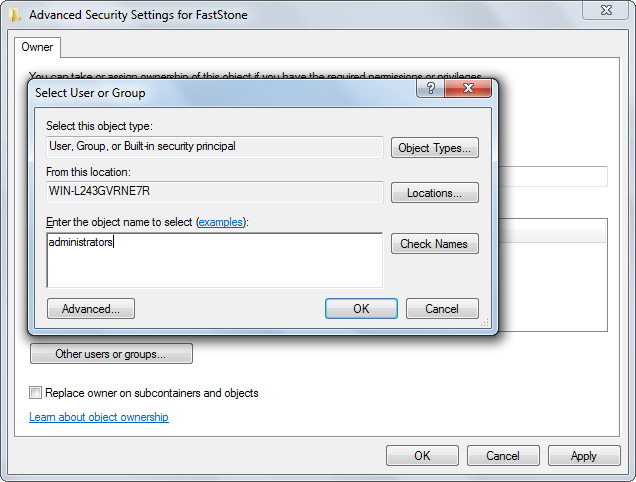
Step 5. Press «Other users or groups» to assign ownership to Administrators. Then you can format the hard drive without block.
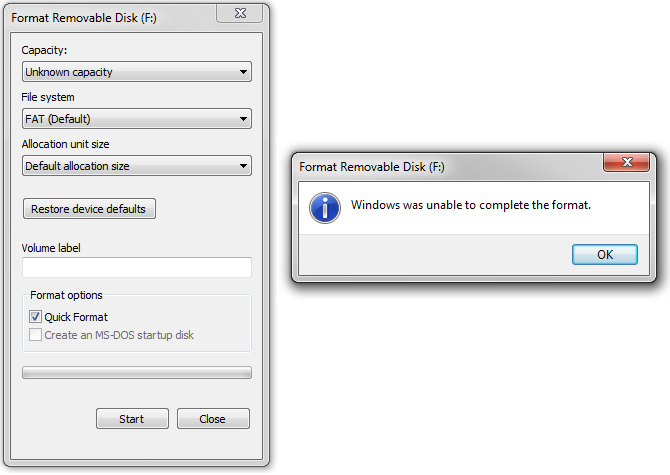
Disk formatting is quick and efficient in cleaning up disk partition files, and is usually adopted by us when we are asked to format before we can use it, or when we are creating a bootable USB flash drive or empting an external hard drive. However, sometimes Windows will give us a prompt saying «Windows was unable to complete the format«, just as shown in the figure below.
If you encounter such a situation when formatting a removable disk or USB flash drive, what should you do to overcome this? Do you know what caused this error and how to avoid this error message in the coming days?
To get detailed explanations, please refer to our previous post: How Do I Fix Windows Was Unable to Complete the Format, there you will find the possible reasons that lead to this issue as well as the best solutions.
Bottom Line
Here comes to the end of this post. In this article, we have talked so much about why Windows could not format a partition on disk 0 and explained the most feasible solutions for error code 0x80070057.
Position: Columnist
Rodin is an enthusiastic IT writer focusing on Windows trends, disk partition management and data recovery. She loves to write and share her idea about the useful tips and tricks on personal computers’ maintenance.
If you are looking for methods to improve your computer performance, manage hard drives and recover data from different devices, Rodin can provide reliable solutions for data management.
Источник
Содержание
- WSL 2 will be generally available in Windows 10, version 2004
- How will I notice this change?
- Automatic install and updates
- Temporary experience of manually installing the Linux kernel in Windows 10, version 2004 and Windows Insiders slow ring
- Future plans and where to learn more
- How to uninstall WSL2 on Windows 10
- Uninstall WSL2 on Windows 10
- Step one: Uninstall Linux distros from WSL2
- Step two: Uninstall Windows Subsystem for Linux update
- Step three: Uninstall WSL2 components
- A problem with your hardware caused Windows to stop working correctly.
- Replies (27)
WSL 2 will be generally available in Windows 10, version 2004
March 13th, 2020
WSL 2 will soon be officially available as part of Windows 10, version 2004! As we get ready for general availability, we want to share one additional change: updating how the Linux kernel inside of WSL 2 is installed and serviced on your machine. We’ve heard lots of community feedback that the install experience could be streamlined, and we’re taking the first step towards this by improving the servicing model of the Linux kernel. We’ve removed the Linux kernel from the Windows OS image and instead will be delivering it to your machine via Windows Update, the same way that 3rd party drivers (like graphics, or touchpad drivers) are installed and updated on your machine today. This change will give you more agility and flexibility over Linux kernel updates in WSL 2. Read on to learn more about how you’ll see this in the user experience.
How will I notice this change?
Our end goal is for this change to be seamless, where your Linux kernel is kept up to date without you needing to think about it. By default this will be handled entirely by Windows, just like regular updates on your machine. Inside of the initial release of Windows 10, version 2004, and in the latest Windows Insiders slow ring preview build you will temporarily need to manually install the Linux kernel, and will receive an update in a few months that will add automatic install and servicing capabilities. We made this change now and will have a patch later to ensure that all users in the initial general release of WSL 2 will be serviced via this dynamic model, and no one will be left in a middle state using the prior system.
Automatic install and updates
If you’ve ever gone to your Windows settings, and clicked ‘Check for Updates’ you might have seen some other items being updated like Windows Defender malware definitions, or a new touchpad driver, etc. The Linux kernel in WSL 2 will now be serviced in this same method, which means you’ll get the latest kernel version independently of consuming an update to your Windows image. You can manually check for new kernel updates by clicking the ‘Check for Updates’ button, or you can let Windows keep you up to date just like normal.
If you’re installing WSL for the first time, we’ll check for updates and install the Linux kernel for you during the WSL install process.
Temporary experience of manually installing the Linux kernel in Windows 10, version 2004 and Windows Insiders slow ring
After updating to Windows 10 build 19041.153, when you run any of the following commands:
- wsl (If a WSL 2 distro is your default distro)
- wsl —set-version 2 , – wsl —set-default-version 2
- wsl —import and wsl —export targeting WSL 2
You’ll see a one-time message instructing you to update your kernel. It will instruct you to go to the link: https://aka.ms/wsl2kernel.
Once there, follow the instructions to download the MSI package, run it to install your Linux kernel, and you’ll be finished and ready to use WSL 2. When automatic install and update of the Linux kernel is added you’ll start getting automatic updates to your kernel right away.
Future plans and where to learn more
We’re excited for the release of WSL2, and to keep working on the WSL install experience. If you’d like to learn more about WSL 2, check out our latest overview video WSL 2: Code faster on the Windows Subsystem for Linux. Please stay tuned for more updates from us soon!
As always you can reach members of the WSL team that are on Twitter, or me personally @craigaloewen on Twitter if you have any general questions. For technical issues please file an issue on the WSL Github Repo. We always love hearing your feedback, thank you for helping make WSL amazing, and we’ll see you with the next update soon!
Updates:
- 3/13/2020 – Thank you to our WSL distro partners: Canonical, Debian, openSUSE, Kali Linux, and Pengwin for adding a change to their distro launcher to help support this experience!
- 3/13/2020 – Added link to WSL 2 explanation video
- 6/22/2020 – Changed verbage to ‘WSL 2’
Craig Loewen
Program Manager, Windows Developer Platform
How to uninstall WSL2 on Windows 10
If WSL2 isn’t working correctly or not for you, it’s possible to uninstall it completely from Windows 10 – here’s how.
On Windows 10, you can uninstall the Windows Subsystem for Linux 2 (WSL2) when you no longer need to use the integration, and in this guide, you’ll learn how to complete the task. WSL2 is the second version of the integration that Microsoft has built to run Linux on Windows 10 using a lightweight virtual machine instead of a direct translation between Linux and Windows available with the first version.
As a result of this change, you now get a real Linux kernel with a solution that improves performance and app compatibility while maintaining the same experience as WSL1. (See also how to install WSL2.)
Although the ability to run Linux on Windows 10 is a useful feature for developers and users who need access to both operating systems, it might come the time when you no longer need the feature, or you may need to reset it if you’re having problems.
Whatever the reason, you can always remove WSL2 by uninstalling all the components, or you can reset distros individually if they’re causing issues.
In this guide, you will learn the steps to completely remove the WSL2 integration on Windows 10.
Uninstall WSL2 on Windows 10
The uninstall process of the Windows Subsystem for Linux 2 requires multiple steps, including removing the distro, kernel update, and other components.
Step one: Uninstall Linux distros from WSL2
To uninstall a distro of Linux, use these steps:
Open Settings on Windows 10.
Click on Apps.
Click on Apps & features.
Select the distribution of Linux and click the Uninstall button.

Click the Uninstall button again.
Once you complete the steps, you may need to repeat the steps to continue removing additional distros as needed.
Step two: Uninstall Windows Subsystem for Linux update
To uninstall the WSL 2 Linux kernel update, use these steps:
Open Settings.
Click on Apps.
Click on Apps & features.
Select the Windows Subsystem for Linux update item and click the Uninstall button.

Click the Uninstall button again.
After you complete the steps, you can proceed to remove the remaining components.
Step three: Uninstall WSL2 components
To disable the Windows Subsystem for Linux components, use these steps:
Open Settings.
Click on Apps.
Click on Apps & features.
Under the “Related settings” section, click the Programs and Features option from the right side.

Click the Turn Windows features on or off option.
Clear the Virtual Machine Platform option.
Clear the Windows Subsystem for Linux option.

Click the OK button.
Click the Restart now button.
Once you complete the steps, the Windows Subsystem for Linux will be completely uninstalled from your computer.
If you change your mind, you can always set up the environment again with these instructions. If you are running Windows 10 build 20246 and later, you can use the new method to set up WSL2.
We may earn commission for purchases using our links to help keep offering the free content. Privacy policy info.
All content on this site is provided with no warranties, express or implied. Use any information at your own risk. Always backup of your device and files before making any changes. Privacy policy info.
A problem with your hardware caused Windows to stop working correctly.
I am going quietly nuts over the following. I am not using the beta versions of Wiindows 10 available in Windows Insider. The problem has occurred several times since last week I installed the latest cumulative update for Windows 10 version 1607, build 14393.351
A problem with your hardware caused Windows to stop working correctly.
Problem signature
Problem Event Name: LiveKernelEvent
Code: ab
Parameter 1: 1
Parameter 2: 790
Parameter 3: 1680
Parameter 4: f0000000b
OS version: 10_0_14393
Service Pack: 0_0
Product: 256_1
OS Version: 10.0.14393.2.0.0.256.48
Locale ID: 3081
My computer is a Toshiba Laptop P50T. 16 BG RAM, Intel 7 processor, plenty of hard drive space! sfc /scannow and DISM scan health report no problems. No signs of viruses with 2 full scans (Windows Defender and MalwareBytes.)
I have had 2 kernel power system Event 41 critical errors during the last 7 days that this problem has occurred. The task category is 63. There are no problems shown in device manager.
Any help would be appreciated. Thanks in advance!
* Please try a lower page number.
* Please enter only numbers.
* Please try a lower page number.
* Please enter only numbers.
It appears that you have already run SFC and DISM scan to troubleshoot the issue.
In this case, you may refer to this link to troubleshoot it further. If still no luck, our next step would be to perform Hardware Diagnostics with your Original Equipment Manufacturer’s guidance as this matter is already best handled by their level of support and expertise.
1 person found this reply helpful
Was this reply helpful?
Sorry this didn’t help.
Great! Thanks for your feedback.
How satisfied are you with this reply?
Thanks for your feedback, it helps us improve the site.
How satisfied are you with this reply?
Thanks for your feedback.
My sincere thanks for your prompt reply. It is much appreciated.
This morning, I turned my computer on and I checked reliability and found the following. This was done when the desktop screen was seen and reliability was accessed through control panel.
A problem with your hardware caused Windows to stop working correctly.
Problem signature
Problem Event Name: LiveKernelEvent
Code: ab
Parameter 1: 1
Parameter 2: 790
Parameter 3: 1680
Parameter 4: f0000000b
OS version: 10_0_14393
Service Pack: 0_0
Product: 256_1
OS Version: 10.0.14393.2.0.0.256.48
Locale ID: 3081
Please notice the similarity in what I originally posted.
On checking Event Viewer no critical errors are reported for this morning. Therefore, it appears that the hardware error shown above is independent of Event 41.
I have run the Windows 10 hardware troubleshooter. It has nothing to report. The various Toshiba apps report nothing wrong. Not that they enable detailed testing.
I suspect that this problem occurred as a result of installing the latest Windows 10 cumulative update for version 1607. There are other reports in various news groups, but their authenticity is unknown.
Please note that Toshiba is no longer marketing computers here in Australia and their support has been downgraded.
My device manager shows a clean bill of health.
The Toshiba web site for my model lists a BIOS update but shows this for Windows 8.1. It only shows a wi-fi update for Windows 10 which is installed. Flashing a BIOS is not my favourite occupation but I will do it if I have to.
Was this reply helpful?
Sorry this didn’t help.
Great! Thanks for your feedback.
How satisfied are you with this reply?
Thanks for your feedback, it helps us improve the site.
How satisfied are you with this reply?
Thanks for your feedback.
I seem to have almost the same problem at startup & restart with my Toshiba Satellite Pro L70. 8 GB ram Intel core i7 processor.
A problem with your hardware caused Windows to stop working correctly.
Problem signature
Problem Event Name: LiveKernelEvent
Code: ab
Parameter 1: 1
Parameter 2: 440
Parameter 3: 970
Parameter 4: 900000007
OS version: 10_0_14393
Service Pack: 0_0
Product: 256_1
OS Version: 10.0.14393.2.0.0.256.48
Locale ID: 3081
This error started with the install of cumulative update KB3197954
Was this reply helpful?
Sorry this didn’t help.
Great! Thanks for your feedback.
How satisfied are you with this reply?
Thanks for your feedback, it helps us improve the site.
How satisfied are you with this reply?
Thanks for your feedback.
To better assist you with your concern, we would like to ask if you have already tried running our Hardware and devices troubleshooter? If not, you may click here to run the troubleshooter.
If you’ve already run the Windows 10 hardware troubleshooter, you might want to consider updating your BIOS to the latest version.
There’s also a possibility that your computer is overheating.
If you’re using a laptop, it could be a common problem. Having the computer on a soft surface blocks the air vents. Laptops should only be used on a hard surface.
If you’re using a desktop, start by removing the plugs, and holding the power button for 10 seconds. Once done, open the side panel, and blow out all the dust. You may have to remove the front panel as well to clean it out.
Let us know if you have any other questions.
1 person found this reply helpful
Was this reply helpful?
Sorry this didn’t help.
Great! Thanks for your feedback.
How satisfied are you with this reply?
Thanks for your feedback, it helps us improve the site.
How satisfied are you with this reply?
Thanks for your feedback.
Hi Ruizell & everyone
Thank you for your reply I ran the h ardware and devices troubleshooter.It said made some changes that should fix your problem.restart your PC for changes to take affect.(have try there in the past with no luck) There is no BIOS update for my Toshiba Satellite Pro laptop.My laptop is on a desk & always runs cool no problem there.All drivers are up to date & the device manager has no problems. Will let you all know if there are any changes.
Was this reply helpful?
Sorry this didn’t help.
Great! Thanks for your feedback.
How satisfied are you with this reply?
Thanks for your feedback, it helps us improve the site.
How satisfied are you with this reply?
Thanks for your feedback.
Thank you for your reply.
- Other users of Windows 10 version 1607 are reporting the same problem. Some use desktops, others are laptop users of various makes.
- The problem first appeared for me after the October cumulative update was installed.
- There is no entry in Event Viewer corresponding to this hardware error. Very strange! Is it a false positive?
- Device manager reports no problems. Nor does sfc /scannow or DISM online scan health. As well Chkdsk /f C: reports no problems
- I have found that the hardware error is most likely to appear after a number of updates for Windows /Office have been installed and the computer is restarted.
- My computer is well ventilated as it sits on a stand designed for cooling.
- I have run the Windows hardware troubleshooter. No problems detected. I have also run the Toshiba troubleshooters.
- Toshiba Service Station reports no available downloads. This does not agree with the Toshiba download pages for my model Toshiba. Getting info on what the updates are supposed to do has been difficult. I finally succeeded today! 3 different pages give different results!
- There is a BIOS update for my computer. With difficulty I found what it is supposed to correct, but nothing appears to be relevant to the problem. But if this hardware error continues I will install it with great care. Flashing a BIOS is not my favourite occupation!
|
This code will work correctly in 32-bit systems but might fail […] in a 64-bit program. viva64.com viva64.com |
Такой код будет корректно работать в 32-битных системах, но может […] привести к сбою в 64-битной программе. viva64.com viva64.com |
|
For this to work correctly, you must tell the OSD the capacity of your primary […] battery. eagletreesystems.com eagletreesystems.com |
Для того чтобы это работало правильно, вы должны указать OSD емкость Вашей основной […] батареи. eagletreesystems.com eagletreesystems.com |
|
Freak will not work correctly on any 4 decimal place platform. mql5.com mql5.com |
Freak не работает корректно на 4-значных котировках. mql5.com mql5.com |
|
The base-plates must be level if the machine is to work correctly. continental-industrie.com continental-industrie.com |
Шасси должны быть […] continental-industrie.com continental-industrie.com |
|
In most cases this will ensure […] that the device that […] into the installed system. debian.org debian.org |
В большинстве случаев это гарантирует, что […] устройство, которому […] компьютера в установленную систему. debian.org debian.org |
|
If the projector will not work correctly, turn off the […] projector, wait 30 seconds, and turn it back on. nec-display-solutions.com nec-display-solutions.com |
Если проектор работает неправильно, выключите […] его, подождите 30 секунд и включите его снова. nec-display-solutions.com nec-display-solutions.com |
|
Older browsers are slow, may put your security at risk and some features may not work correctly. mechanical-engi…europages.co.uk mechanical-engi…europages.co.uk |
Устаревшие версии браузеров не отвечают современным требованиям оптимизированной и безопасной навигации и не позволяют использовать отдельные функции в полном объеме. europages.com.ru europages.com.ru |
|
This code could always work correctly on the 32-bit platform because the program […] never allocated large-sized arrays. viva64.com viva64.com |
Такой код мог всегда корректно работать на 32-битной платформе, в силу того, […] что программа никогда не выделяла массивов […] больших размеров. viva64.com viva64.com |
|
If the battery charger does not work correctly or if it has been damaged, […] unplugged it immediately from the supply socket […] and from the battery socket and contact a retailer. aenergo-ekb.ru aenergo-ekb.ru |
Если […] его непосредственно из сети и от аккумуляторной батареи и […] свяжитесь с продавцом. aenergo-ekb.ru aenergo-ekb.ru |
|
The time must be set in order for the above features to work correctly. vertu.com vertu.com |
Чтобы упомянутые выше функции работали правильно, должно быть установлено время. vertu.com vertu.com |
|
If the System does not work correctly, disconnect the […] AC power cord from the wall outlet, wait for a while, and connect the cord again. jvc.ca jvc.ca |
Если система работает неправильно, отсоедините […] кабель питания переменного тока от розетки, подождите некоторое время и снова […] подсоедините кабель. jvc.ru jvc.ru |
|
Qualified engineering personnel shall apply in their decisions modern electrical products, advanced technology in the design and construction, which allows us to work correctly and in due time and to fulfill its warranty obligations for work performed. ua-region.com ua-region.com |
Квалифицированный инженерно-технический персонал, применяет в своих решениях современную электротехническую продукцию, передовые технологии в проектировании и монтаже, что позволяет фирме работать без ошибок и в установленные сроки и выполнять свои гарантийные обязательства на выполненные работы. ua-region.info ua-region.info |
|
Note, however, that if you reject the use of cookies you will still be able to […] shell.co.uk shell.co.uk |
Учтите, что если вы откажетесь от […] использования cookie-файлов, вы все равно сможете посещать […] shell.com.ru shell.com.ru |
|
They are now displayed correctly and they also work correctly. soccer.powerplaymanager.com soccer.powerplaymanager.com |
Теперь они отображаются и работают правильно. soccer.powerplaymanager.com soccer.powerplaymanager.com |
|
While it may seem that if it has a […] you need to look closely at the fine print. gigabyte.si gigabyte.si |
Многим может подуматься, […] что раз устройство имеет USB разъём, то его однозначно можно […] gigabyte.ru gigabyte.ru |
|
Allows the reiteration of REMI picking to work correctly (parameter SB). geoleader.ru geoleader.ru |
Позволяет […] geoleader.ru geoleader.ru |
|
This can cause the device to not work correctly if the drivers conflict or […] if the wrong driver is loaded first. debian.org debian.org |
Это может приводить к неправильной работе устройства при конфликте […] драйверов, или если сперва загружается неправильный драйвер. debian.org debian.org |
|
The NAP Agent has to be enabled in order for NAP processing to work correctly. redline-software.com redline-software.com |
Агент […] redline-software.com redline-software.com |
|
For the ignition glow plugs to work correctly, the thermocouples […] must always be clean. fosterspa.com fosterspa.com |
Чтобы обеспечить работу свечей зажигания и термопар, […] они должны быть хорошо очищены. fosterspa.com fosterspa.com |
|
At first in the ciphered minimalist drawing the artist tells to her son (To Sahka who is not with me) a sad lyric story of a little-devil who lives […] very far away at the meteo-station and […] by 1941 the book changes into a […] document, an accusation of the Stalin’s regime. slowar.tv slowar.tv |
Сначала в зашифрованном минималистичном рисунке художница начинает рассказывать сыну («Сашке, которого нет со мной») грустную […] лиричную историю о жизни «чертушки» в […] постепенно, к концу 1941 года эта история […] перерастает в документ – обвинение сталинскому режиму. slowar.tv slowar.tv |
|
To ensure that all system components work correctly, test your system regularly, […] and have it inspected according to local code or law. resource.boschsecurity.com resource.boschsecurity.com |
Чтобы убедиться в том, что все компоненты системы правильно функционируют, вам […] следует регулярно тестировать свою систему […] и проводить проверки в соответствии с местными нормами или законами. resource.boschsecurity.com resource.boschsecurity.com |
|
Be careful not to allow any oil or grease to get onto […] techdocs.shimano.com techdocs.shimano.com |
Не допускайте попадания масла или смазки на ротор и […] techdocs.shimano.com techdocs.shimano.com |
|
For the measurement of the grinding jar’s […] cover must be braced with the clamping […] ring, which is included in the scope of supply. retsch.sk retsch.sk |
Для корректного измерения внутреннего давления в размольном […] контейнере крышка размольного контейнера должна быть оснащена […] предусмотренным зажимным кольцом. retsch.sk retsch.sk |
|
Some of Rattletrap’s contraptions don’t quite work correctly, so detonating them proves useful as an offensive maneuver. dota2wiki.com dota2wiki.com |
Некоторые устройства Развалюхи не работают так, как надо, так что их подрыв неплох для нападения. dota2wiki.com dota2wiki.com |
|
Allows LIBRI UM to work correctly with XPS datasets when offset values are in decreasing order. geoleader.ru geoleader.ru |
Позволяет библиотеке LIBRI UM работать без сбоев с наборами данных XPS, когда значения удалений заданы в порядке уменьшения. geoleader.ru geoleader.ru |
|
Drivers for Windows 7 are sometimes defined by the operating system […] automatically, however similar […] Windows7, or the part of […] functions of the device can not work. drivervista.ru drivervista.ru |
Драйверы для Windows 7 иногда определяются операционной системой автоматически, […] однако подобные […] в среде Windows7, либо может […] не работать часть функций устройства. drivervista.ru drivervista.ru |
|
Some newer HP printers are […] mode, apparently due to some (not yet exactly understood) timing problem. az.48.org az.48.org |
Про некоторые новые принтеры HP […] взаимодействия на основе прерываний, вероятно, […] из-за некоторой (еще не вполне понятной) проблемы синхронизации. az.48.org az.48.org |
|
To extract data from the script the simplest way is to use the option available as a right click in the HTTP Data window when it is displaying Recorded Request Details […] (button with red dot and […] Details view (green triangle with yellow arrow). agileload.com agileload.com |
Для извлечения данных из сценария самый простой способ состоит в использовании опции доступны как правой кнопкой мыши в окне данных HTTP, когда он отображает […] записи запроса данных (кнопка с […] если в Replay Запрос о подробностях […] зрения (зеленый треугольник с желтой стрелкой). ru.agileload.com ru.agileload.com |
|
These cookies are essential […] our websites and use our features. unilever.lv unilever.lv |
Эти файлы необходимы, […] по нашему сайту и использовать […] его возможности. unilever.ru unilever.ru |
Перевод по словам
— work [noun]
verb: работать, трудиться, действовать, заниматься, потрудиться, стремиться, обрабатывать, отрабатывать, вести, разрабатывать
noun: работа, труд, произведение, дело, дела, сочинение, обработка, действие, занятие, вещь
- preliminary work — предварительная работа
- irrigation work — ирригационное сооружение
- creep feed work — глубинное шлифование
- work sheet — рабочий лист
- apps work — работа приложений
- work-to-rule strike — забастовка путем работы строго по правилам
- teller work station — банковский терминал
- meticulous work — кропотливая работа
- thesis work — диссертационная работа
- work function — рабочая функция
— correctly [adverb]
adverb: правильно, корректно, верно, грамотно, вежливо
- correctly folded sheet — правильно сфальцованный лист
- correctly formatted — правильно форматированный
- correctly sized — заданного размера
- act correctly — поступить правильно
- respond correctly — реагировать правильно
- behave correctly — вести себя корректно
- display correctly — отображаться неправильно
- use correctly — правильно применять
- understand correctly — понять правильно
- guess correctly — угадывать правильно
Предложения с «work correctly»
|
In the sample implementation of -application:openURL:sourceApplication:annotation: above, the call to FBSDKApplicationDelegate is required for deferred deep linking to work correctly . |
В примере — application:openURL:sourceApplication:annotation: выше вызов FBSDKApplicationDelegate необходим для корректной работы отсроченного диплинка. |
|
Include any additional domains or subdomains required for your service to work correctly in your submission |
Включите дополнительные домены или поддомены для своего сервиса, чтобы они работали корректно в вашей заявке. |
|
As it didn’t, I’ve added one to this sandbox version and it appears to work correctly with the test I added at the start of the testcases page. |
Поскольку этого не произошло, я добавил его в эту версию песочницы, и он, похоже, правильно работает с тестом, который я добавил в начале страницы testcases. |
|
Similarly the use of blank ammunition will typically cause the mechanism not to work correctly , unless a device is fitted to boost the recoil. |
Точно так же использование холостых патронов обычно приводит к тому, что механизм не работает правильно , если только не установлено устройство для усиления отдачи. |
|
It is a badly coded template that relies on Tidy to work correctly , but as shown above, it also creates problems and has the potential to fail if not used correctly . |
Это плохо закодированный шаблон, который полагается на Tidy, чтобы работать правильно , но, как показано выше, он также создает проблемы и может потерпеть неудачу, если не используется правильно . |
|
Certain blackletter characters don’t seem to work correctly , and I suspect this might somehow be the template’s fault. |
Некоторые символы blackletter, кажется, не работают правильно , и я подозреваю, что это может быть как — то ошибка шаблона. |
|
Since some software does not work correctly with RPC-1 drives, there is also the option of reflashing the drive with a so-called auto-reset firmware. |
Поскольку некоторые программы не работают корректно с RPC — 1 накопителями,существует также возможность перепрошивки накопителя с помощью так называемой прошивки с автоматическим сбросом. |
|
Their conclusion at the time was that the techniques Wiles used seemed to work correctly . |
В то время они пришли к выводу, что методы, которые использовал Уайлс, работали правильно . |
|
This template does not work correctly — parameters 2 and 3 do not appear to be optional. |
Этот шаблон работает неправильно — параметры 2 и 3 не являются необязательными. |
|
Note that most Internet protocols will not work correctly over one-way access, since they require a return channel. |
Обратите внимание, что большинство интернет — протоколов не будут корректно работать при одностороннем доступе, так как они требуют обратного канала. |
|
The mixture of FSII must be between 0.10% and 0.15% by volume for the additive to work correctly , and the FSII must be distributed evenly throughout the fuel. |
Смесь FSII должна составлять от 0,10% до 0,15% по объему, чтобы присадка работала правильно , и FSII должен быть равномерно распределен по всему топливу. |
|
I need this for {{cite video game}} to work correctly with the citation core. |
Мне это нужно для {{cite video game}}, чтобы правильно работать с ядром цитирования. |
|
In more extreme cases the PlayStation would only work correctly when turned onto its side or upside down. |
В более крайних случаях PlayStation будет работать правильно только тогда, когда ее перевернут на бок или вверх ногами. |
|
I’ve today the talkpage archived, hope MiszaBot will work correctly . |
Я сегодня на странице обсуждения заархивированы, надеюсь, MiszaBot будет работать правильно . |
|
but I made a start, and hope I have made all the redirects work correctly . |
но я уже начал и надеюсь, что все редиректы работают правильно . |
|
Unlike most web browsers, Lynx does not support JavaScript or Adobe Flash, which some websites require to work correctly . |
В отличие от большинства веб — браузеров, Lynx не поддерживает JavaScript или Adobe Flash, которые требуются для корректной работы некоторых веб — сайтов. |
|
Turns out Twinkle’s DI tab does not work correctly . |
Оказывается, вкладка DI Twinkle работает неправильно. |
|
Or, alternatively, is this due to Mac OS X’s limited support for OpenType font features where the same font on Windows would work correctly ? |
Или, наоборот, это связано с ограниченной поддержкой Mac OS X функций шрифта OpenType, где один и тот же шрифт в Windows будет работать правильно ? |
|
Therefore, paragraph 52 and the other adopted conclusions and recommendations correctly focus attention at this stage on the practical work of the task force. |
Поэтому пункт 52 и другие принятые выводы и рекомендации правильно заостряют внимание на данном этапе на практической работе целевой группы. |
|
You may need to work with your website developer to implement this pixel on your website and modify it correctly . |
Возможно, вам понадобится помощь разработчика вашего веб — сайта для установки правильно настроенного пикселя. |
|
Placed correctly , it will make short work of reinforced concrete. |
Установите ее правильно , и она быстро справится с железобетоном. |
|
Visconti said that the arrangements were collaborations with McCartney, and was surprised he was not correctly credited for his work until the 25th anniversary reissue. |
Висконти сказал, что эти договоренности были сотрудничеством с Маккартни, и был удивлен, что он не был правильно зачислен за свою работу до 25 — летия переиздания. |
|
The best way to ensure that an injured horse returns to full work is to rehabilitate the animal correctly . |
Лучший способ гарантировать, что раненая лошадь вернется к полноценной работе, — это правильно реабилитировать животное. |
|
To work properly, the ferrule must be oriented correctly—usually the ferrule is fitted such that the longest sloping face of the ferrule faces away from the nut. |
Для правильной работы наконечник должен быть правильно ориентирован—обычно наконечник устанавливается таким образом, чтобы самая длинная наклонная грань наконечника была обращена в сторону от гайки. |
|
Take care to check that all the fields are correctly populated, since the tool does not always work 100%. |
Убедитесь, что все поля заполнены правильно , так как инструмент не всегда работает на 100%. |
|
Seeing another correctly can depend on overcoming jealousy, and discoveries about the world involve inner work. |
Правильное видение другого может зависеть от преодоления ревности, а открытия о мире включают внутреннюю работу. |
|
Automatic rate filtering can work as long as set rate-thresholds have been set correctly . |
Автоматическая фильтрация скорости может работать до тех пор, пока заданные пороговые значения скорости установлены правильно . |
|
Am I understanding correctly that the caption attribute will not work in these cases? |
Правильно ли я понимаю, что атрибут caption не будет работать в этих случаях? |
|
In 1873, Charles Graux correctly interpreted these as measures of the length of each work. |
В 1873 году Шарль Грау правильно истолковал их как меры длины каждой работы. |
|
The image does not display correctly on my work computer. |
Изображение не отображается правильно на моем рабочем компьютере. |
|
I’ve been trying diligently to do things correctly , as the last thing I want to do is create more work for other people. |
Я старательно стараюсь делать все правильно , так как последнее, что я хочу делать, — это создавать больше работы для других людей. |
Trying to install Windows but receive an error message saying that Windows was unable to format a partition on disk 0? To go through the installation process smoothly, you can try on the 3 formatting solutions explained in this article as well as more suggestions that have been proved useful by some users.
We Receive Error 0x80070057 When Trying to Reinstall Windows 7
Sometimes we need to reinstall Windows 7. Then we should first of all prepare an installation media, back up important data on the local drive, and then reinstall Windows 7. If the process is successful then naturally we have solved the problem smoothly. Unfortunately, there are times we get stuck during the process. The following error message which reads: «Windows could not format a partition on disk 0. The error occurred while preparing the partition selected for installation. Error code: 0x80070057» may appear…
Another possible error code that can occur is:»
Failed to format the selected partition. Error: 0x80070057«.
In fact, this is a very common error that can occur to anyone of us. After searching the internet, we find this problem is all over the internet. Below is a typical example:
«Hey everybody, I am trying to do a clean install of windows 7 onto my laptop, and I keep getting the error, «windows could not format a partition on disk 0. The error occurred while preparing the partition selected for installation. Error code: 0x80070057″. I have reformatted the hard drive and tried clicking next from there. This is the 64-bit version of windows 7, any help would be grateful.»— from sevenforums
Have you ever encountered this problem? Are you troubled by this error code now? What caused this error? And what should we do to address this problem? Let’s see the details.
Solutions to «Windows Could Not Format a Partition on Disk 0»
Tip: This issue can appear when you try to clean install Windows 7/8/10. In this post, we take Windows 7 for example to explain.
Solution 1: Format Partition under Startup Mode
Since Windows could not format a partition on disk 0 and sends out error code 0x80070057, we have to find other reliable ways to do this job. For example, we can turn to MiniTool Partition Wizard Bootable Edition for help. The reason why we list it here as top recommendation is that this tool is rather user-friendly to use for Windows 7/8/10 users. Please note that this is a paid feature in Partition Wizard, and you need to buy a license if you do not have one to activate this feature.
Preparatory work:
- Build Boot CD/DVD Discs and Boot Flash Drive with Bootable Media Builder.
- Set computer to boot from the bootable media in BIOS.
- Boot computer to enter MiniTool Partition Wizard.
Step 1. On the main interface of MiniTool Partition Wizard, click the partition that you are installing Windows 7 to and select «Format Partition«.
Step 2. Confirm that you want to continue and hit «Apply» on the toolbar.
Tip: If «Format Partition» function fails to work, just delete partitions in MiniTool Partition Wizard.
Now you can exit MiniTool Partition Wizard, disconnect the bootable media of Partition Wizard, and then try to reinstall Windows 7 once again.
Solution 2: Format Partition in Command Prompt Window
Windows command prompt is a rather reliable method when you need to format a partition. But to format system partition, you will need the help of Windows installation disk. Here is how you can do this:
Step 1. Boot the computer with windows 7 installation DVD, then instead of selecting «Install Windows 7«, select «Repair Your Computer» and then select «Use Recovery Tools…«;
Step 2. In the next window select «Command Prompt«;
Step 3. Type «diskpart«. This may take some time for it to pop up and it will ask you for Administrative privileges. Go ahead and click «Yes«;
Step 4. Type «list disk«. It will show a list of disks;
Step 5. Type «select disk [n]» to select your disk out of the list above. For example: «select disk 3«;
Step 6. Type «clean» to clean the drive;
Step 7. Type «create partition primary«; Step 8. Type «select partition 1«;
Step 9. Type «active» to activate the partition on the disk;
Step 10. Type «format fs=ntfs» to do a full format into NTFS. Depending on the size of the disk, this will take some time to complete.
Step 11. Type «exit» when the format is finished. We need to type «exit» for two times. One to exit from diskpart, and the other one for command prompt.
Step 12. Repeat installing Windows 7.
Solution 3. Format Partition during Windows 7 Installation Process.
Accroding to Microsoft support, this error code will appear when the system reserved partition is damaged. (System reserved partition is an area reserved for the BitLocker encryption and the restoration of Windows.) Microsoft suggests that we need to delete the system reserved partition as well as the system partition at first, then create a new partition, and continue with the formatting during the installation process.
To do these, please follow the detailed steps here:
Step 1. Insert the Windows 7 installation DVD, set your preferences and click «Install now«.
Step 2. After reading the Microsoft license agreement, click «I accept the terms of license«, and then click «Next«.
Step 3. When you see the following window, click «Custom (advanced)«.
Step 4. Select «Disk 0 partition 1«, and click «Delete«. Then click «OK» to confirm the deletion on the pop-up window.
Maybe you are looking for: 10 Cases: External Hard Drive Not Showing up & Best Fixes.
Step 5. Repeat Step 4 to delete Disk 0 partition 2. Then the whole disk becomes an unallocated space. Now you can click «New» to create a new partition.
Step 6. Define the size of the disk, and then click «Apply«. If you don’t make any change of the new partition size, then the default value is the maximum size of the disk.
Step 7. At this time Windows will prompt that «To ensure that all Windows feature work correctly, Windows might create additional partitions for system files.» Click «OK» when prompted.
Step 8. Then you can see two partitions are created again. Select Disk 0 partition 2, and then click «Format«. Click «OK» when prompted.
Step 9. Formatting should be completed correctly. Click «Next» to continue. you can now complete the installation without problems.
«These solutions help me to cope with «Windows could not format a partition on disk 0, error code 0x80070057″, and I hope you can also benefit from these solutions to get out of this trouble…» Click to Tweet
However, if these three solutions do not help, please try the following solutions to take your chance…
Solution 4: Reinstall RAM
RAM is a form of computer data storage which stores frequently used program instructions to increase the general speed of a system. When error 0x80070057 appears, you can try removing the RAM and installing RAM again, for the RAM may get wrong. How to do this? Please refer to PCWorld guide — How to install new memory in your PC — to complete. After that, repeat the 3rd solution.
Solution 5: Reinstall Hard Disk Driver
Another possible reason for error code 0x80070057 is that the System Has Lost Hard Disk Driver and Needs Installation. At this time, you can insert the Windows 7 installation DVD and follow the steps listed in Solution 3. When it comes to selecting where you want to install windows, you are expected to select «Disk 0 Partition 2«, and then click «Load Driver«. It will automatically install the disk driver.
Solution 6: Replace the SATA Cable or SATA Port
If you still get the same error code, you should consider SATA cable fault. Here is a specific example on answers.microsoft that gets to the point. Just have a try.
I recently bought components to build a new Win 7 64bit PC. I’ve built many PC’s in the past so wasn’t expecting any problems I couldn’t deal with. I had this exact same error message and have been pulling my hair out for the last two weeks trying to solve it. I even bought a new motherboard, CPU, and HD and got the same error. Urgghh!
Well when I finally figured out what it was I was so relieved and so angry at the same time! IT WAS THE SATA CABLE! I’ve never had a problem with a SATA cable before so I never even thought about replacing it. The one that turned out to be faulty was one of the thin ones, but I’ve used many of these in the past without incident. This may or may not be the cause of your problem, but try it. Have a great Xmas and all the best for the new year!— from answers.microsoft
Solution 7: Modify User Permission
Sometimes, when we try to format a partition before installing Windows, Windows is unable to complete the format. This error might be caused by insufficient user permission, and what we are expected to do is to modify user permission. Follow the instructions below.
Step 1. Open Windows Explorer, drop down «Organize» and choose «Folder and search options«.
Step 2. Remove the tick before «Hide protected operating system files (Recommended)» under «View» board. Immediately you will receive a warning window saying «These files are required to start Windows. Deleting or editing them can make your computer inoperable. Are you sure you want to display these files?» You don’t need to worry about it and click «Yes«.
Step 3. After that, find the folder that cannot be deleted. Right click on it and select «Properties«. Switch the board to «Security» and press «Advanced«.
Step 4. Switch the board to «Owner» and press «Edit» button.
Step 5. Press «Other users or groups» to assign ownership to Administrators. Then you can format the hard drive without block.
Very Similar Issue — Windows Was Unable to Complete the Format
«Hello,
I’m new to these little things. How can I open my flash drive when it says «You need to format the disk before you can use it». But when I format it, a pop up message appears saying «Windows was unable to complete the format». How can I open it when I can’t format it? Hope you’ll help me.
Thanks.» — from CCM
Disk formatting is quick and efficient in cleaning up disk partition files, and is usually adopted by us when we are asked to format before we can use it, or when we are creating a bootable USB flash drive or empting an external hard drive. However, sometimes Windows will give us a prompt saying «Windows was unable to complete the format«, just as shown in the figure below.
If you encounter such a situation when formatting a removable disk or USB flash drive, what should you do to overcome this? Do you know what caused this error and how to avoid this error message in the coming days?
To get detailed explanations, please refer to our previous post: How Do I Fix Windows Was Unable to Complete the Format, there you will find the possible reasons that lead to this issue as well as the best solutions.
Bottom Line
Here comes to the end of this post. In this article, we have talked so much about why Windows could not format a partition on disk 0 and explained the most feasible solutions for error code 0x80070057.
In addition, we mentioned another very similar error — Windows was unable to complete the format, and also listed the solution immediately. If you are suffering from the same issue, try these methods to get out of the trouble. We expect your success.
For any questions or suggestions, please leave it in the comment zone or send email to [email protected], thanks in advance!

Introduction
We’ll learn how to install Windows 11 on a VMware virtual machine from scratch in this guide.
If you don’t already have VMware Workstation Pro or Player installed on your PC, follow this ultimate guide to install it first. After installing it, you can continue from here.
Before start, I promise you’ll have a running Windows 11 on a virtual machine without facing any errors if you follow all the steps carefully. Everything is clear, you don’t need to know anything other than what I’ve explained here. ✌
However, if you run into a problem, feel free to ask for help using the discussion form at the end of this tutorial. 😊
Pre-requisites
- VMware Workstation Pro or Player (Click here for installation guide)
- Windows 11 ISO file (Search for «21996.1.210529-1541.co_release_CLIENT_CONSUMER_x64FRE_en-us.iso» without quotes on Google to download it)
System Requirements
- 4 GB RAM minimum
- 1 GHz or faster 64-Bit dual-core CPU
- 64 GB or higher free disk space
Getting Started
The current installation file of Windows 11 is a leaked one. That’s why you shouldn’t install it on your main PC to avoid data loss. For this reason, I’ve shown you how to install Windows 11 on a virtual machine instead of a real one in this tutorial.
Creating a Virtual Machine with Windows 11 ISO
-
Open VMware Workstation Player
-
We need a virtual machine to be able to install Windows 11. To do this, click on the
Create a New Virtual Machinetext or hit theALT+Ncombination on your keyboard.
-
Choose the second option saying that «Installer disc image file (iso):» and click the
Browsebutton under this option to choose Windows 11 ISO file. VMware will not be able to detect Windows 11 in the disc image (ISO file) since Windows 11 hasn’t been published yet. There is no problem here. ClickNextto continue.
-
Choose Windows as the Guest operating system, and select Windows 10 x64 as the version. Click
Next.
-
You can specify a name what you want. I’ll name it «Windows 11» as a creative man:)
-
You can specify the Maximum disk size field depending on your using plans. Since I’m installing it for experimental purposes, I’ll specify it as 60.0 GB. Click on
Next.
-
If you have a well-configured PC, I strongly recommend
Customize Hardware. You don’t have to change anything else if your PC has poor hardware configuration. Then clickFinish.
-
If you’ll customize hardware, this step for you: Drag the bar to increase the memory, or enter a specific value in the text box.
-
If you’ll customize hardware, this step for you: Depending on how many cores your CPU has, increase the number of processor cores. I’ll specify it as 4. That’s enough. Click
Close, thenFinish.
-
We now have a virtual machine with a Windows 11 installation ISO file. To start the machine, right-click on its name and click
Power on, or after selecting the machine’s name, click the green-coloredPlaybutton on the top of the window.
-
If you would face a notice window, check the «Do not show this hint again» option then click
OK. -
You might face a recommendation for VMware tools like the one below, even though they are so helpful, we don’t need them now. So, click on
Remind Me Later.
-
If you see a blue-colored boot screen like the one below or the «Time out.» message on a black screen, it means you missed the «Press a key…» screen. By restarting the virtual machine, you can return to the previous screen. To be able to do that, you can follow two different ways.
-
Click on the blue screen and hit the
Downkey on your keyboard for 6 times and select «Reset the system» option, then pressEnter. -
Click on the arrow icon on the left side of the
Pauseicon, then click onRestart Guestoption.
-
-
When you see the notice below, click on the black screen to make it accessible, and press any key on your keyboard immidiately.
-
You’ll see the screen below. It means that the installation process has been started.
Installing Windows 11
-
In the first step, choose Windows 11’s language, time and currency format, and keyboard or input method, as shown below.
-
Click
Install Now.
-
Because the ISO file we use is the leaked one, we don’t have an available product key. So, click on the
_I don't have a product keylink.
-
Select the operating system you want to install from the list. I’ll install Windows 11 Pro.
-
Accept the Microsoft Software License Terms by checking the checkbox.
-
We won’t upgrade our current OS; we’ll do a clean installation. Thus, click on the second option,
Custom: Install Windows only (advanced).
-
To start the installation, we need a formatted partition. That’s why when
Drive 0is selected, click onNew.
-
If you want to have *C:* and *D:* drives on your virtual Windows 11 instance, you can reduce the size of the first drive (C:), but I think you won’t need another drive on a virtual machine. So, click
Applywithout change the size.
-
You’ll see a confirmation window. Then click
OK.
-
To ensure that all Windows features work correctly, Windows 11 will create multiple partitions. You should not change or delete the first and second partitions, since they are reserved by the system. Select the third partition marked as Primary then click
Next.
-
Installation will begin immediately. It might take more than 5 minutes; please wait.
-
Select your country or region then click
Yes.
-
Select your keyboard layout or input method, and click
Yes.
-
I’ll skip this step. You can add a second keyboard layout if you wish.
-
I’ll use the VM for personal use, so I’ve selected that option. You can choose the second option if you’re going to use your VM for work or school purposes.
-
Here, you can sign in using your Microsoft account, but it might be unsafe since the leaked ISO file might contain harmful content. For now, I don’t recommend using an online account. You can, of course, use it if you wish. I’ll continue with an offline account by clicking on
Sign-in options.
-
This step for offline account users: Click on
Offline account.
-
This step for offline account users: Click on
Limited experiencelink.
-
This step for offline account users: Type your username.
-
This step for offline account users: Enter your password, then confirm it by typing the same password again.
-
This step for offline account users: Sometimes, we forget our passwords. For similar cases, we need a clue to reset the our user password. We use security questions to reset our passwords when we forget them. In this step, we’ll specify three different questions and answers. I will only show you one of them since they are all the same. By clicking
Next, you need to specify the two of them.
-
Choose privacy settings for your device. If you wish, you can disable all of them, but I won’t change anything because this machine will be used for experimental purposes. Then click
Accept.
-
Your Windows 11 is being prepared.
-
The installation is about to be completed. It might take a few minutes. Please, wait.
-
Finally, Windows 11 has been installed successfuly 😊
Conclusion
Now, you have a Windows 11 Developer Edition virtually. However, don’t forget that this version hasn’t been completed yet. Windows 11 is shown here in its early stages, so I think the Beta version and the Final version will have many new offers.
I will update this content as soon as Windows 11 becomes available officially. That’s why I strongly suggest bookmarking this page on your browser and visiting periodically.

