Your graphics card does not support CUDA 9.0.
Since I’ve seen a lot of questions that refer to issues like this I’m writing a broad answer on how to check if your system is compatible with CUDA, specifically targeted at using PyTorch with CUDA support. Various circumstance-dependent options for resolving issues are described in the last section of this answer.
The system requirements to use PyTorch with CUDA are as follows:
- Your graphics card must support the required version of CUDA
- Your graphics card driver must support the required version of CUDA
- The PyTorch binaries must be built with support for the compute capability of your graphics card
Note: If you install pre-built binaries (using either pip or conda) then you do not need to install the CUDA toolkit or runtime on your system before installing PyTorch with CUDA support. This is because PyTorch, unless compiled from source, is always delivered with a copy of the CUDA library.
1. How to check if your GPU/graphics card supports a particular CUDA version
First, identify the model of your graphics card.
Before moving forward ensure that you’ve got an NVIDIA graphics card. AMD and Intel graphics cards do not support CUDA.
NVIDIA doesn’t do a great job of providing CUDA compatibility information in a single location. The best resource is probably this section on the CUDA Wikipedia page. To determine which versions of CUDA are supported
- Locate your graphics card model in the big table and take note of the compute capability version. For example, the GeForce 820M compute capability is 2.1.
- In the bullet list preceding the table check to see if the required CUDA version is supported by the compute capability of your graphics card. For example, CUDA 9.2 is not supported for compute compatibility 2.1.
If your card doesn’t support the required CUDA version then see the options in section 4 of this answer.
Note: Compute capability refers to the computational features supported by your graphics card. Newer versions of the CUDA library rely on newer hardware features, which is why we need to determine the compute capability in order to determine the supported versions of CUDA.
2. How to check if your GPU/graphics driver supports a particular CUDA version
The graphics driver is the software that allows your operating system to communicate with your graphics card. Since CUDA relies on low-level communication with the graphics card you need to have an up-to-date driver in order use the latest versions of CUDA.
First, make sure you have an NVIDIA graphics driver installed on your system. You can acquire the newest driver for your system from NVIDIA’s website.
If you’ve installed the latest driver version then your graphics driver probably supports every CUDA version compatible with your graphics card (see section 1). To verify, you can check Table 3 in the CUDA release notes. In rare cases I’ve heard of the latest recommended graphics drivers not supporting the latest CUDA releases. You should be able to get around this by installing the CUDA toolkit for the required CUDA version and selecting the option to install compatible drivers, though this usually isn’t required.
If you can’t, or don’t want to upgrade the graphics driver then you can check to see if your current driver supports the specific CUDA version as follows:
On Windows
- Determine your current graphics driver version (Source https://www.nvidia.com/en-gb/drivers/drivers-faq/)
Right-click on your desktop and select NVIDIA Control Panel. From the
NVIDIA Control Panel menu, select Help > System Information. The
driver version is listed at the top of the Details window. For more
advanced users, you can also get the driver version number from the
Windows Device Manager. Right-click on your graphics device under
display adapters and then select Properties. Select the Driver tab and
read the Driver version. The last 5 digits are the NVIDIA driver
version number.
- Visit the CUDA release notes and scroll down to Table 3. Use this table to verify your graphics driver is new enough to support the required version of CUDA.
On Linux/OS X
Run the following command in a terminal window
nvidia-smi
This should result in something like the following
Sat Apr  4 15:31:57 2020
+-----------------------------------------------------------------------------+
| NVIDIA-SMI 435.21       Driver Version: 435.21       CUDA Version: 10.1     |
|-------------------------------+----------------------+----------------------+
| GPU  Name        Persistence-M| Bus-Id        Disp.A | Volatile Uncorr. ECC |
| Fan  Temp  Perf  Pwr:Usage/Cap|         Memory-Usage | GPU-Util  Compute M. |
|===============================+======================+======================|
|   0  GeForce RTX 206...  Off  | 00000000:01:00.0  On |                  N/A |
|  0%   35C    P8    16W / 175W |    502MiB /  7974MiB |      1%      Default |
+-------------------------------+----------------------+----------------------+

+-----------------------------------------------------------------------------+
| Processes:                                                       GPU Memory |
|  GPU       PID   Type   Process name                             Usage      |
|=============================================================================|
|    0      1138      G   /usr/lib/xorg/Xorg                           300MiB |
|    0      2550      G   /usr/bin/compiz                              189MiB |
|    0      5735      G   /usr/lib/firefox/firefox                       5MiB |
|    0      7073      G   /usr/lib/firefox/firefox                       5MiB |
+-----------------------------------------------------------------------------+
Driver Version: ###.## is your graphic driver version. In the example above the driver version is 435.21.
CUDA Version: ##.# is the latest version of CUDA supported by your graphics driver. In the example above the graphics driver supports CUDA 10.1 as well as all compatible CUDA versions before 10.1.
Note: The CUDA Version displayed in this table does not indicate that the CUDA toolkit or runtime are actually installed on your system. This just indicates the latest version of CUDA your graphics driver is compatible with.
To be extra sure that your driver supports the desired CUDA version you can visit Table 3 on the CUDA release notes page.
3. How to check if a particular version of PyTorch is compatible with your GPU/graphics card compute capability
Even if your graphics card supports the required version of CUDA then it’s possible that the pre-compiled PyTorch binaries were not compiled with support for your compute capability. For example, in PyTorch 0.3.1 support for compute capability <= 5.0 was dropped.
First, verify that your graphics card and driver both support the required CUDA version (see Sections 1 and 2 above), the information in this section assumes that this is the case.
The easiest way to check if PyTorch supports your compute capability is to install the desired version of PyTorch with CUDA support and run the following from a python interpreter
>>> import torch
>>> torch.zeros(1).cuda()
If you get an error message that reads
Found GPU0 XXXXX which is of cuda capability #.#.
PyTorch no longer supports this GPU because it is too old.
then that means PyTorch was not compiled with support for your compute capability. If this runs without issue then you should be good to go.
Update If you’re installing an old version of PyTorch on a system with a newer GPU then it’s possible that the old PyTorch release wasn’t compiled with support for your compute capability. Assuming your GPU supports the version of CUDA used by PyTorch, then you should be able to rebuild PyTorch from source with the desired CUDA version or upgrade to a more recent version of PyTorch that was compiled with support for the newer compute capabilities.
4. Conclusion
If your graphics card and driver support the required version of CUDA (section 1 and 2) but the PyTorch binaries don’t support your compute capability (section 3) then your options are
- Compile PyTorch from source with support for your compute capability (see here)
- Install PyTorch without CUDA support (CPU-only)
- Install an older version of the PyTorch binaries that support your compute capability (not recommended as PyTorch 0.3.1 is very outdated at this point). AFAIK compute capability older than 3.X has never been supported in the pre-built binaries
- Upgrade your graphics card
If your graphics card doesn’t support the required version of CUDA (section 1) then your options are
- Install PyTorch without CUDA support (CPU-only)
- Install an older version of PyTorch that supports a CUDA version supported by your graphics card (still may require compiling from source if the binaries don’t support your compute capability)
- Upgrade your graphics card
Issue
I’m trying to run Pytorch on a laptop that I have. It’s an older model but it does have an Nvidia graphics card. I realize it is probably not going to be sufficient for real machine learning but I am trying to do it so I can learn the process of getting CUDA installed.
I have followed the steps on the installation guide for Ubuntu 18.04 (my specific distribution is Xubuntu).
My graphics card is a GeForce 845M, verified by lspci | grep nvidia:
01:00.0 3D controller: NVIDIA Corporation GM107M [GeForce 845M] (rev a2)
01:00.1 Audio device: NVIDIA Corporation Device 0fbc (rev a1)
I also have gcc 7.5 installed, verified by gcc --version
gcc (Ubuntu 7.5.0-3ubuntu1~18.04) 7.5.0
Copyright (C) 2017 Free Software Foundation, Inc.
This is free software; see the source for copying conditions.  There is NO
warranty; not even for MERCHANTABILITY or FITNESS FOR A PARTICULAR PURPOSE.
And I have the correct headers installed, verified by trying to install them with sudo apt-get install linux-headers-$(uname -r):
Reading package lists... Done
Building dependency tree
Reading state information... Done
linux-headers-4.15.0-106-generic is already the newest version (4.15.0-106.107).
I then followed the installation instructions using a local .deb for version 10.1.
Npw, when I run nvidia-smi, I get:
+-----------------------------------------------------------------------------+
| NVIDIA-SMI 418.87.00    Driver Version: 418.87.00    CUDA Version: 10.1     |
|-------------------------------+----------------------+----------------------+
| GPU  Name        Persistence-M| Bus-Id        Disp.A | Volatile Uncorr. ECC |
| Fan  Temp  Perf  Pwr:Usage/Cap|         Memory-Usage | GPU-Util  Compute M. |
|===============================+======================+======================|
|   0  GeForce 845M        On   | 00000000:01:00.0 Off |                  N/A |
| N/A   40C    P0    N/A /  N/A |     88MiB /  2004MiB |      1%      Default |
+-------------------------------+----------------------+----------------------+

+-----------------------------------------------------------------------------+
| Processes:                                                       GPU Memory |
|  GPU       PID   Type   Process name                             Usage      |
|=============================================================================|
|    0       982      G   /usr/lib/xorg/Xorg                            87MiB |
+-----------------------------------------------------------------------------+
and I run nvcc -V I get:
nvcc: NVIDIA (R) Cuda compiler driver
Copyright (c) 2005-2019 NVIDIA Corporation
Built on Sun_Jul_28_19:07:16_PDT_2019
Cuda compilation tools, release 10.1, V10.1.243
I then performed the post-installation instructions from section 6.1, and so as a result, echo $PATH looks like this:
/home/isaek/anaconda3/envs/stylegan2_pytorch/bin:/home/isaek/anaconda3/bin:/home/isaek/anaconda3/condabin:/usr/local/cuda-10.1/bin:/usr/local/sbin:/usr/local/bin:/usr/sbin:/usr/bin:/sbin:/bin:/usr/games:/usr/local/games:/snap/bin
echo $LD_LIBRARY_PATH looks like this:
/usr/local/cuda-10.1/lib64
and my /etc/udev/rules.d/40-vm-hotadd.rules file looks like this:
# On Hyper-V and Xen Virtual Machines we want to add memory and cpus as soon as they appear
ATTR{[dmi/id]sys_vendor}=="Microsoft Corporation", ATTR{[dmi/id]product_name}=="Virtual Machine", GOTO="vm_hotadd_apply"
ATTR{[dmi/id]sys_vendor}=="Xen", GOTO="vm_hotadd_apply"
GOTO="vm_hotadd_end"

LABEL="vm_hotadd_apply"

# Memory hotadd request

# CPU hotadd request
SUBSYSTEM=="cpu", ACTION=="add", DEVPATH=="/devices/system/cpu/cpu[0-9]*", TEST=="online", ATTR{online}="1"

LABEL="vm_hotadd_end"
After all of this, I even compiled and ran the samples. ./deviceQuery returns:
./deviceQuery Starting...

 CUDA Device Query (Runtime API) version (CUDART static linking)

Detected 1 CUDA Capable device(s)

Device 0: "GeForce 845M"
  CUDA Driver Version / Runtime Version          10.1 / 10.1
  CUDA Capability Major/Minor version number:    5.0
  Total amount of global memory:                 2004 MBytes (2101870592 bytes)
  ( 4) Multiprocessors, (128) CUDA Cores/MP:     512 CUDA Cores
  GPU Max Clock rate:                            863 MHz (0.86 GHz)
  Memory Clock rate:                             1001 Mhz
  Memory Bus Width:                              64-bit
  L2 Cache Size:                                 1048576 bytes
  Maximum Texture Dimension Size (x,y,z)         1D=(65536), 2D=(65536, 65536), 3D=(4096, 4096, 4096)
  Maximum Layered 1D Texture Size, (num) layers  1D=(16384), 2048 layers
  Maximum Layered 2D Texture Size, (num) layers  2D=(16384, 16384), 2048 layers
  Total amount of constant memory:               65536 bytes
  Total amount of shared memory per block:       49152 bytes
  Total number of registers available per block: 65536
  Warp size:                                     32
  Maximum number of threads per multiprocessor:  2048
  Maximum number of threads per block:           1024
  Max dimension size of a thread block (x,y,z): (1024, 1024, 64)
  Max dimension size of a grid size    (x,y,z): (2147483647, 65535, 65535)
  Maximum memory pitch:                          2147483647 bytes
  Texture alignment:                             512 bytes
  Concurrent copy and kernel execution:          Yes with 1 copy engine(s)
  Run time limit on kernels:                     Yes
  Integrated GPU sharing Host Memory:            No
  Support host page-locked memory mapping:       Yes
  Alignment requirement for Surfaces:            Yes
  Device has ECC support:                        Disabled
  Device supports Unified Addressing (UVA):      Yes
  Device supports Compute Preemption:            No
  Supports Cooperative Kernel Launch:            No
  Supports MultiDevice Co-op Kernel Launch:      No
  Device PCI Domain ID / Bus ID / location ID:   0 / 1 / 0
  Compute Mode:
     < Default (multiple host threads can use ::cudaSetDevice() with device simultaneously) >

deviceQuery, CUDA Driver = CUDART, CUDA Driver Version = 10.1, CUDA Runtime Version = 10.1, NumDevs = 1
Result = PASS
and ./bandwidthTest returns:
[CUDA Bandwidth Test] - Starting...
Running on...

 Device 0: GeForce 845M
 Quick Mode

 Host to Device Bandwidth, 1 Device(s)
 PINNED Memory Transfers
   Transfer Size (Bytes)    Bandwidth(GB/s)
   32000000         11.7

 Device to Host Bandwidth, 1 Device(s)
 PINNED Memory Transfers
   Transfer Size (Bytes)    Bandwidth(GB/s)
   32000000         11.8

 Device to Device Bandwidth, 1 Device(s)
 PINNED Memory Transfers
   Transfer Size (Bytes)    Bandwidth(GB/s)
   32000000         14.5

Result = PASS

NOTE: The CUDA Samples are not meant for performance measurements. Results may vary when GPU Boost is enabled.
But after all of this, this Python snippet (in a conda environment with all dependencies installed):
import torch
torch.cuda.is_available()
returns False
Does anybody have any idea about how to resolve this? I’ve tried to add /usr/local/cuda-10.1/bin to etc/environment like this:
PATH="/usr/local/sbin:/usr/local/bin:/usr/sbin:/usr/bin:/sbin:/bin:/usr/games:/usr/local/games"
PATH=$PATH:/usr/local/cuda-10.1/bin
And restarting the terminal, but that didn’t fix it. I really don’t know what else to try.
EDIT — Results of collect_env for @kHarshit
Collecting environment information...
PyTorch version: 1.5.0
Is debug build: No
CUDA used to build PyTorch: 10.2

OS: Ubuntu 18.04.4 LTS
GCC version: (Ubuntu 7.5.0-3ubuntu1~18.04) 7.5.0
CMake version: Could not collect

Python version: 3.6
Is CUDA available: No
CUDA runtime version: 10.1.243
GPU models and configuration: GPU 0: GeForce 845M
Nvidia driver version: 418.87.00
cuDNN version: Could not collect

Versions of relevant libraries:
[pip] numpy==1.18.5
[pip] pytorch-ranger==0.1.1
[pip] stylegan2-pytorch==0.12.0
[pip] torch==1.5.0
[pip] torch-optimizer==0.0.1a12
[pip] torchvision==0.6.0
[pip] vector-quantize-pytorch==0.0.2
[conda] numpy                     1.18.5                   pypi_0    pypi
[conda] pytorch-ranger            0.1.1                    pypi_0    pypi
[conda] stylegan2-pytorch         0.12.0                   pypi_0    pypi
[conda] torch                     1.5.0                    pypi_0    pypi
[conda] torch-optimizer           0.0.1a12                 pypi_0    pypi
[conda] torchvision               0.6.0                    pypi_0    pypi
[conda] vector-quantize-pytorch   0.0.2                    pypi_0    pypi
Solution
PyTorch doesn’t use the system’s CUDA library. When you install PyTorch using the precompiled binaries using either pip or conda it is shipped with a copy of the specified version of the CUDA library which is installed locally. In fact, you don’t even need to install CUDA on your system to use PyTorch with CUDA support.
There are two scenarios which could have caused your issue.
-
You installed the CPU only version of PyTorch. In this case PyTorch wasn’t compiled with CUDA support so it didn’t support CUDA.
-
You installed the CUDA 10.2 version of PyTorch. In this case the problem is that your graphics card currently uses the 418.87 drivers, which only support up to CUDA 10.1. The two potential fixes in this case would be to either install updated drivers (version >= 440.33 according to Table 2) or to install a version of PyTorch compiled against CUDA 10.1.
To determine the appropriate command to use when installing PyTorch you can use the handy widget in the «Install PyTorch» section at pytorch.org. Just select the appropriate operating system, package manager, and CUDA version then run the recommended command.
In your case one solution was to use
conda install pytorch torchvision cudatoolkit=10.1 -c pytorch
which explicitly specifies to conda that you want to install the version of PyTorch compiled against CUDA 10.1.
For more information about PyTorch CUDA compatibility with respect drivers and hardware see this answer.
Edit After you added the output of collect_env we can see that the problem was that you had the CUDA 10.2 version of PyTorch installed. Based on that an alternative solution would have been to update the graphics driver as elaborated in item 2 and the linked answer.
Answered By — jodag
CUDA(or Computer Unified Device Architecture) is a proprietary parallel computing platform and programming model from NVIDIA. Using the CUDA SDK, developers can utilize their NVIDIA GPUs(Graphics Processing Units), thus enabling them to bring in the power of GPU-based parallel processing instead of the usual CPU-based sequential processing in their usual programming workflow.
With deep learning on the rise in recent years, it’s seen that various operations involved in model training, like matrix multiplication, inversion, etc., can be parallelized to a great extent for better learning performance and faster training cycles. Thus, many deep learning libraries like Pytorch enable their users to take advantage of their GPUs using a set of interfaces and utility functions. This article will cover setting up a CUDA environment in any system containing CUDA-enabled GPU(s) and a brief introduction to the various CUDA operations available in the Pytorch library using Python.
Installation
First, you should ensure that their GPU is CUDA enabled or not by checking their system’s GPU through the official Nvidia CUDA compatibility list. Pytorch makes the CUDA installation process very simple by providing a nice user-friendly interface that lets you choose your operating system and other requirements, as given in the figure below. According to our computing machine, we’ll be installing according to the specifications given in the figure below.
Refer to Pytorch’s official link and choose the specifications according to their computer specifications. We also suggest a complete restart of the system after installation to ensure the proper working of the toolkit.
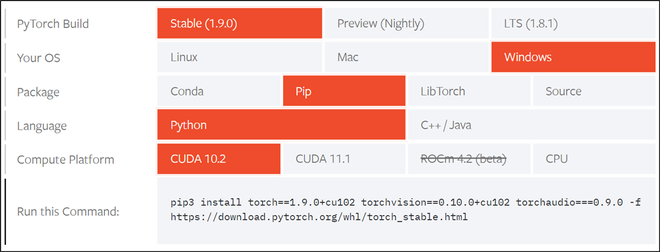
Screenshot from Pytorch’s installation page
pip3 install torch==1.9.0+cu102 torchvision==0.10.0+cu102 torchaudio===0.9.0 -f https://download.pytorch.org/whl/torch_stable.html
Getting started with CUDA in Pytorch
Once installed, we can use the torch.cuda interface to interact with CUDA using Pytorch. We’ll use the following functions:
Syntax:
- torch.version.cuda(): Returns CUDA version of the currently installed packages
- torch.cuda.is_available(): Returns True if CUDA is supported by your system, else False
- torch.cuda.current_device(): Returns ID of current device
- torch.cuda.get_device_name(device_ID): Returns name of the CUDA device with ID = ‘device_ID’
Code:
Python3
import torch
print(f"Is CUDA supported by this system?
{torch.cuda.is_available()}")
print(f"CUDA version: {torch.version.cuda}")
cuda_id = torch.cuda.current_device()
print(f"ID of current CUDA device:
{torch.cuda.current_device()}")
print(f"Name of current CUDA device:
{torch.cuda.get_device_name(cuda_id)}")
Output:

CUDA version
Handling Tensors with CUDA
For interacting Pytorch tensors through CUDA, we can use the following utility functions:
Syntax:
- Tensor.device: Returns the device name of ‘Tensor’
- Tensor.to(device_name): Returns new instance of ‘Tensor’ on the device specified by ‘device_name’: ‘cpu’ for CPU and ‘cuda’ for CUDA enabled GPU
- Tensor.cpu(): Transfers ‘Tensor’ to CPU from it’s current device
To demonstrate the above functions, we’ll be creating a test tensor and do the following operations:
Checking the current device of the tensor and applying a tensor operation(squaring), transferring the tensor to GPU and applying the same tensor operation(squaring) and comparing the results of the 2 devices.
Code:
Python3
import torch
x = torch.randint(1, 100, (100, 100))
print(x.device)
res_cpu = x ** 2
x = x.to(torch.device('cuda'))
print(x.device)
res_gpu = x ** 2
assert torch.equal(res_cpu, res_gpu.cpu())
Output:
cpu
cuda : 0
Handling Machine Learning models with CUDA
A good Pytorch practice is to produce device-agnostic code because some systems might not have access to a GPU and have to rely on the CPU only or vice versa. Once that’s done the following function can be used to transfer any machine learning model onto the selected device
Syntax: Model.to(device_name):
Returns: New instance of Machine Learning ‘Model’ on the device specified by ‘device_name’: ‘cpu’ for CPU and ‘cuda’ for CUDA enabled GPU
In this example, we are importing the pre-trained Resnet-18 model from the torchvision.models utility, the reader can use the same steps for transferring models to their selected device.
Code:
Python3
import torch
import torchvision.models as models
device = 'cuda' if torch.cuda.is_available() else 'cpu'
model = models.resnet18(pretrained=True)
model = model.to(device)
Output:

ML with CUDA
В очередной раз после переустановки Windows осознал, что надо накатить драйвера, CUDA, cuDNN, Tensorflow/Keras для обучения нейронных сетей.
Каждый раз для меня это оказывается несложной, но времязатратной операцией: найти подходящую комбинацию Tensorflow/Keras, CUDA, cuDNN и Python несложно, но вспоминаю про эти зависимости только в тот момент, когда при импорте Tensorflow вижу, что видеокарта не обнаружена и начинаю поиск нужной страницы в документации Tensorflow.
В этот раз ситуация немного усложнилась. Помимо установки Tensorflow мне потребовалось установить PyTorch. Со своими зависимостями и поддерживаемыми версиями Python, CUDA и cuDNN.
По итогам нескольких часов экспериментов решил, что надо зафиксировать все полезные ссылки в одном посте для будущего меня.
Краткий алгоритм установки Tensorflow и PyTorch
Примечание: Установить Tensorflow и PyTorch можно в одном виртуальном окружении, но в статье этого алгоритма нет.
Подготовка к установке
- Определить какая версия Python поддерживается Tensorflow и PyTorch (на момент написания статьи мне не удалось установить PyTorch в виртуальном окружении с Python 3.9.5)
- Для выбранной версии Python найти подходящие версии Tensorflow и PyTorch
- Определить, какие версии CUDA поддерживают выбранные ранее версии Tensorflow и PyTorch
- Определить поддерживаемую версию cuDNN для Tensorflow – не все поддерживаемые CUDA версии cuDNN поддерживаются Tensorflow. Для PyTorch этой особенности не заметил
Установка CUDA и cuDNN
- Скачиваем подходящую версию CUDA и устанавливаем. Можно установить со всеми значениями по умолчанию
- Скачиваем cuDNN, подходящую для выбранной версии Tensorflow (п.1.2). Для скачивания cuDNN потребуется регистрация на сайте NVidia. “Установка” cuDNN заключается в распакове архива и заменой существующих файлов CUDA на файлы из архива
Устанавливаем Tensorflow
- Создаём виртуальное окружение для Tensorflow c выбранной версией Python. Назовём его, например,
py38tf - Переключаемся в окружение
py38tfи устанавливаем поддерживаемую версию Tensorflowpip install tensorflow==x.x.x - Проверяем поддержку GPU командой
python -c "import tensorflow as tf; print('CUDA available' if tf.config.list_physical_devices('GPU') else 'CUDA not available')"
Устанавливаем PyTorch
- Создаём виртуальное окружение для PyTorch c выбранной версией Python. Назовём его, например,
py38torch - Переключаемся в окружение
py38torchи устанавливаем поддерживаемую версию PyTorch - Проверяем поддержку GPU командой
python -c "import torch; print('CUDA available' if torch.cuda.is_available() else 'CUDA not available')"
В моём случае заработала комбинация:
- Python 3.8.8
- Драйвер NVidia 441.22
- CUDA 10.1
- cuDNN 7.6
- Tensorflow 2.3.0
- PyTorch 1.7.1+cu101
Tensorflow и PyTorch установлены в разных виртуальных окружениях.
Итого
Польза этой статьи будет понятна не скоро: систему переустанавливаю я не часто.
Если воспользуетесь этим алгоритмом и найдёте какие-то ошибки – пишите в комментарии
Если вам понравилась статья, то можете зайти в мой telegram-канал. В канал попадают небольшие заметки о Python, .NET, Go.
#pytorch #torch
#pytorch #torch
Вопрос:
Я попробовал несколько решений, которые намекали на то, что делать, когда графический процессор CUDA доступен и CUDA установлен, но Torch.cuda.is_available() возвращается False . Они помогли, но только временно, что означает torch.cuda-is_available() сообщение True, но через некоторое время оно снова переключилось на False. Я использую CUDA 9.0.176 и GTX 1080. Что я должен сделать, чтобы получить постоянный эффект?
Я попробовал следующие методы:
https://forums.fast.ai/t/torch-cuda-is-available-returns-false/16721/5
https://github.com/pytorch/pytorch/issues/15612
Примечание: Когда torch.cuda.is_available() работает нормально, но затем в какой-то момент переключается на False , тогда мне нужно перезагрузить компьютер, а затем он снова работает (в течение некоторого времени).
Комментарии:
1. Я сталкиваюсь с той же проблемой, но внутри docker. Это так раздражает, что мне нужно время от времени перезапускать docker. Вы нашли решение?
Ответ №1:
Также с torch.cuda.is_available () had false .
Но при установке драйвера Nvidia до самой последней версии 436.48 отображается значение True. Ранее я обновил Pytorch до 1.2.0. У меня Windows 10 и Anaconda.

Ответ №2:
Причиной torch.cuda.is_available() False этого является несовместимость между версиями pytorch и cudatoolkit .
По состоянию на июнь 2022 года текущая версия pytorch совместима с cudatoolkit = 11.3, тогда как текущая версия cuda toolkit = 11.7. Источник
Решение:
- Удалите Pytorch для новой установки. Вы не можете установить старую версию поверх новой версии без принудительной установки (с помощью
pip install --upgrade --force-reinstall <package_name>. - Запустите
conda install pytorch torchvision torchaudio cudatoolkit=11.3 -c pytorchдля установки pytorch. - Установите версию CUDA 11.3 из https://developer.nvidia.com/cuda-11.3.0-download-archive .
Все готово.
1. 1 Это решило мою проблему. Я попробовал это с помощью CUDA 11.6, и он отлично работает. (в этом случае cuda-11.6.0-download-archive следует использовать вместе с conda install pytorch torchvision torchaudio cudatoolkit=11.6 -c pytorch -c conda-forge )
Ответ №3:
Ответ №4:
Я тоже видел эту проблему. Причиной была несинхронизация версии CUDA, используемой Pytorch, с установленным драйвером Nvidia. Как и в ответе Джо, решением было обновление драйверов Nvidia. Некоторая другая важная справочная информация, о которой следует знать:
- Для каждого выпуска CUDA требуется минимальная версия драйвера Nvidia (см. Таблицу совместимости здесь).
- Вы можете проверить версию драйвера Nvidia с
nvidia-smiпомощью . - Pytorch поставляется в комплекте с версией CUDA, которая может отличаться от версии, установленной на вашем компьютере.
- Версия CUDA, которую вы установили вручную, отображается при запуске
nvidia-smi. Даже если ваша версия драйвера совместима с этой версией CUDA, она может быть несовместима с версией Pytorch CUDA. - Вы можете получить версию Pytorch CUDA, напечатав
torch.version.cudaпеременную в ipython или в программе Python. Это версия, которая определяет необходимую версию драйвера Nvidia.
Комментарии:
1.
AttributeError: module 'torch.cuda' has no attribute 'version'2. спасибо — должно быть
torch.version.cuda. Я отредактировал сообщение
Table of Contents
Hide
- Why this error occurs?
-
Code Example
- Solutions
- Related Posts
In this article we will see the code solutions for Pytorch assertionerror torch not compiled with cuda enabled.
Why this error occurs?
Cuda is a toolkit which allows GPU to take charge of applications and increase the performance. In order to work with it, it’s essential to have Cuda supported Nvidia GPU installed in your system. Also Pytorch should also support GPU acceleration.
This assertionerror occurs when we try to use cuda on Pytorch version which is for CPU only. So, you have two options to resolve this error –
- Use Pytorch version which is compatible to Cuda. Download right stable version from here.
- Disable Cuda from your code. This could turn out to be tricky as you might not be using Cuda directly but some of the library in your project may. So, you need to troubleshoot that.
Error Code – Let’s first reproduce the error –
1. cuda passed as function parameter –
import torch

my_tensor = torch.tensor([[1, 2, 3], [4, 5, 6]], dtype=torch.float32, device="cuda")
print(my_tensor)
The above code will throw error – assertionerror: torch not compiled with cuda enabled. Here is the complete output –
Traceback (most recent call last):
  File "C:/Users/aka/project/test.py", line 3, in <module>
    my_tensor = torch.tensor([[1, 2, 3], [4, 5, 6]], dtype=torch.float32, device="cuda")
  File "C:Usersakaanaconda3envsdeeplearninglibsite-packagestorchcuda__init__.py", line 166, in _lazy_init
    raise AssertionError("Torch not compiled with CUDA enabled")
AssertionError: Torch not compiled with CUDA enabled
This is because we set the flag device="cuda". If we change it to cpu like device="cpu" then the error will disappear.
2. Dependency using pytorch function with cuda enabled
There are many pytorch functions which copy data to Cuda memory for faster performance. They are generally disabled by default but some dependency of your project could be using those functions and enabling them. So, you need to look into that dependency and disable from there.
For example, torch.utils.data.DataLoader class has parameter pin_memory which, according to pytorch documentation says –
pin_memory (bool, optional) – If
True, the data loader will copy Tensors into device/CUDA pinned memory before returning them.
If a function using this class and setting pin_memory=true, then we will get torch not compiled with cuda enabled error.
Solutions
1. Check Pytorch version
First of all check if you have installed the right version. Pytorch is available with or without Cuda.

2. Check if Cuda is available in installed Pytorch
Use this code to check if cuda is available in your installed Pytorch –
print(torch.cuda.is_available())
3. Create new project environment
Due to a lot of troubleshooting and error handling to resolve bugs, we break our project environment. Try creating a new environment if it solves your Cuda error.
4. Using .cuda() function
Some pytorch functions could be run on GPU by passing them through .cuda(). For example, neural network sequential() function could be run on cuda. So, append or remove it according to your use case –
model = nn.Sequential(OrderedDict([
          ('conv1', nn.Conv2d(1,20,5)),
          ('relu1', nn.ReLU()),
          ('conv2', nn.Conv2d(20,64,5)),
          ('relu2', nn.ReLU())
        ])).cuda()
5. Provide correct device parameter
If a function expects a device parameter then you may provide cuda or cpu according to your use case –
import torch

my_tensor = torch.tensor([[1, 2, 3], [4, 5, 6]], dtype=torch.float32, device="cpu")

print(my_tensor)

This is Akash Mittal, an overall computer scientist. He is in software development from more than 10 years and worked on technologies like ReactJS, React Native, Php, JS, Golang, Java, Android etc. Being a die hard animal lover is the only trait, he is proud of.
Related Tags
- Error,
- python error,
- python-short
🐛 Describe the bug
I don’t seem to be able to use libtorch CUDA 11.3 with Visual studio 2022.
I have set up my already existing project to use libtorch using one of the available resources online, for example https://programmer.group/visual-sudio-2019-libtorch-pytorch-c-library-environment-configuration.html
CPU works well but CUDA is not available. I added the following libraries to Additional dependencies:
c10.lib
c10_cuda.lib
torch_cpu.lib
torch_cuda.lib
If I try the fix described in #31611 by adding /INCLUDE:"[email protected]@[email protected]@YAHXZ",
I get LINK : error LNK2001: unresolved external symbol "int __cdecl at::cuda::warp_size(void)" ([email protected]@[email protected]@YAHXZ)
If I also add torch_cuda_cpp.lib to additional dependencies, CUDA is available but now I get the following error:
Could not run 'aten::empty_strided' with arguments from the 'CUDA' backend. This could be because the operator doesn't exist for this backend, or was omitted during the selective/custom build process (if using custom build). If you are a Facebook employee using PyTorch on mobile, please visit https://fburl.com/ptmfixes for possible resolutions. 'aten::empty_strided' is only available for these backends: [CPU, Meta, BackendSelect, Python, Named, Conjugate, Negative, ADInplaceOrView, AutogradOther, AutogradCPU, AutogradCUDA, AutogradXLA, AutogradLazy, AutogradXPU, AutogradMLC, AutogradHPU, AutogradNestedTensor, AutogradPrivateUse1, AutogradPrivateUse2, AutogradPrivateUse3, Tracer, UNKNOWN_TENSOR_TYPE_ID, Autocast, Batched, VmapMode].

CPU: registered at atensrcATenRegisterCPU.cpp:18433 [kernel]
Meta: registered at atensrcATenRegisterMeta.cpp:12703 [kernel]
BackendSelect: registered at atensrcATenRegisterBackendSelect.cpp:665 [kernel]
Python: registered at ....atensrcATencorePythonFallbackKernel.cpp:47 [backend fallback]
Named: registered at ....atensrcATencoreNamedRegistrations.cpp:7 [backend fallback]
Conjugate: fallthrough registered at ....atensrcATenConjugateFallback.cpp:22 [kernel]
Negative: fallthrough registered at ....atensrcATennativeNegateFallback.cpp:22 [kernel]
ADInplaceOrView: fallthrough registered at ....atensrcATencoreVariableFallbackKernel.cpp:64 [backend fallback]
AutogradOther: registered at ....torchcsrcautogradgeneratedVariableType_2.cpp:10483 [autograd kernel]
AutogradCPU: registered at ....torchcsrcautogradgeneratedVariableType_2.cpp:10483 [autograd kernel]
AutogradCUDA: registered at ....torchcsrcautogradgeneratedVariableType_2.cpp:10483 [autograd kernel]
AutogradXLA: registered at ....torchcsrcautogradgeneratedVariableType_2.cpp:10483 [autograd kernel]
AutogradLazy: registered at ....torchcsrcautogradgeneratedVariableType_2.cpp:10483 [autograd kernel]
AutogradXPU: registered at ....torchcsrcautogradgeneratedVariableType_2.cpp:10483 [autograd kernel]
AutogradMLC: registered at ....torchcsrcautogradgeneratedVariableType_2.cpp:10483 [autograd kernel]
AutogradHPU: registered at ....torchcsrcautogradgeneratedVariableType_2.cpp:10483 [autograd kernel]
AutogradNestedTensor: registered at ....torchcsrcautogradgeneratedVariableType_2.cpp:10483 [autograd kernel]
AutogradPrivateUse1: registered at ....torchcsrcautogradgeneratedVariableType_2.cpp:10483 [autograd kernel]
AutogradPrivateUse2: registered at ....torchcsrcautogradgeneratedVariableType_2.cpp:10483 [autograd kernel]
AutogradPrivateUse3: registered at ....torchcsrcautogradgeneratedVariableType_2.cpp:10483 [autograd kernel]
Tracer: registered at ....torchcsrcautogradgeneratedTraceType_2.cpp:11423 [kernel]
UNKNOWN_TENSOR_TYPE_ID: fallthrough registered at ....atensrcATenautocast_mode.cpp:466 [backend fallback]
Autocast: fallthrough registered at ....atensrcATenautocast_mode.cpp:305 [backend fallback]
Batched: registered at ....atensrcATenBatchingRegistrations.cpp:1016 [backend fallback]
VmapMode: fallthrough registered at ....atensrcATenVmapModeRegistrations.cpp:33 [backend fallback]

Exception raised from reportError at ....atensrcATencoredispatchOperatorEntry.cpp:431 (most recent call first):
00007FFEE7CAA29200007FFEE7CAA230 c10.dll!c10::Error::Error [<unknown file> @ <unknown line number>]
00007FFEE7C843C500007FFEE7C84350 c10.dll!c10::NotImplementedError::NotImplementedError [<unknown file> @ <unknown line number>]
00007FFD5F015C7100007FFD5F015AA0 torch_cpu.dll!c10::impl::OperatorEntry::reportError [<unknown file> @ <unknown line number>]
00007FFD5F6C6AF000007FFD5F66DBB0 torch_cpu.dll!at::_ops::xlogy_Tensor::redispatch [<unknown file> @ <unknown line number>]
00007FFD5F8E73F100007FFD5F8CF610 torch_cpu.dll!at::_ops::zeros_out::redispatch [<unknown file> @ <unknown line number>]
00007FFD5F8E3F7400007FFD5F8CF610 torch_cpu.dll!at::_ops::zeros_out::redispatch [<unknown file> @ <unknown line number>]
00007FFD5F6EB6E800007FFD5F6EB520 torch_cpu.dll!at::_ops::empty_strided::call [<unknown file> @ <unknown line number>]
00007FFD5EF259CB00007FFD5EF258D0 torch_cpu.dll!at::empty_strided [<unknown file> @ <unknown line number>]
00007FFD5F2C24D100007FFD5F2C2130 torch_cpu.dll!at::native::_to_copy [<unknown file> @ <unknown line number>]
00007FFD5FA7C3D600007FFD5FA7BF10 torch_cpu.dll!at::compositeexplicitautograd::xlogy_ [<unknown file> @ <unknown line number>]
00007FFD5FA5A8FB00007FFD5FA3F310 torch_cpu.dll!at::compositeexplicitautograd::bitwise_xor_outf [<unknown file> @ <unknown line number>]
00007FFD5F4EB5AD00007FFD5F45B290 torch_cpu.dll!at::TensorMaker::make_tensor [<unknown file> @ <unknown line number>]
00007FFD5F8DED7700007FFD5F8CF610 torch_cpu.dll!at::_ops::zeros_out::redispatch [<unknown file> @ <unknown line number>]
00007FFD5F8E36EB00007FFD5F8CF610 torch_cpu.dll!at::_ops::zeros_out::redispatch [<unknown file> @ <unknown line number>]
00007FFD5F4EB5AD00007FFD5F45B290 torch_cpu.dll!at::TensorMaker::make_tensor [<unknown file> @ <unknown line number>]
00007FFD5F56326800007FFD5F563190 torch_cpu.dll!at::_ops::_to_copy::redispatch [<unknown file> @ <unknown line number>]
00007FFD60A27F0000007FFD60A27A30 torch_cpu.dll!at::redispatch::_thnn_fused_lstm_cell_backward [<unknown file> @ <unknown line number>]
00007FFD60A4031D00007FFD60A34930 torch_cpu.dll!torch::jit::Node::c_ [<unknown file> @ <unknown line number>]
00007FFD5F50C12B00007FFD5F50BF70 torch_cpu.dll!at::_ops::_to_copy::call [<unknown file> @ <unknown line number>]
00007FFD5F2C2E7900007FFD5F2C2BD0 torch_cpu.dll!at::native::to_dense_backward [<unknown file> @ <unknown line number>]
00007FFD5F2C2B0C00007FFD5F2C29E0 torch_cpu.dll!at::native::to [<unknown file> @ <unknown line number>]
00007FFD5FB6A66800007FFD5FB63F10 torch_cpu.dll!at::compositeimplicitautograd::where [<unknown file> @ <unknown line number>]
00007FFD5FB4DB5D00007FFD5FB1BE50 torch_cpu.dll!at::compositeimplicitautograd::broadcast_to [<unknown file> @ <unknown line number>]
00007FFD5F7E6F4600007FFD5F7E6D70 torch_cpu.dll!at::_ops::to_dtype_layout::call [<unknown file> @ <unknown line number>]
00007FFD5EF4AA8800007FFD5EF4A970 torch_cpu.dll!at::Tensor::to [<unknown file> @ <unknown line number>]
00007FFD5EF9EAE900007FFD5EF9E9F0 torch_cpu.dll!at::tensor [<unknown file> @ <unknown line number>]
00007FF7714295A200007FF7714294B0 SplinterlandsSimulator.exe!main [C:UsersxargosourcereposSplinterlandsSimulatorSplinterlandsSimulatorSplinterlandsSimulator.cpp @ 390]
00007FF77144164C00007FF771441540 SplinterlandsSimulator.exe!__scrt_common_main_seh [d:a01_work20ssrcvctoolscrtvcstartupsrcstartupexe_common.inl @ 288]
00007FFF47C554E000007FFF47C554D0 KERNEL32.DLL!BaseThreadInitThunk [<unknown file> @ <unknown line number>]
00007FFF48DA485B00007FFF48DA4830 ntdll.dll!RtlUserThreadStart [<unknown file> @ <unknown line number>]
Adding torch_cuda_cu.lib to additional dependencies does not solve this issue. The only way I can run CUDA successfully is by calling LoadLibraryA("torch_cuda.dll")
To reproduce
Steps to reproduce the behavior:
The following script throws «Torch is not linked against CUDA» and gets 0 as output.
#include <ATen/ATen.h>
#include <torch/torch.h>
#include <iostream>

int main() {
    try {
        std::cout << torch::cuda::is_available() << std::endl;
        torch::Tensor tensor = at::tensor({ -1, 1 }, at::kCUDA);
    }
    catch (exception& ex) {
        std::cout << ex.what() << std::endl;
    }
}
The following one is working correctly and gets 1 as output.
#include <ATen/ATen.h>
#include <torch/torch.h>
#include <iostream>
#include <Windows.h>

int main() {
    LoadLibraryA("torch_cuda.dll");
    try {
        std::cout << torch::cuda::is_available() << std::endl;
        torch::Tensor tensor = at::tensor({ -1, 1 }, at::kCUDA);
    }
    catch (exception& ex) {
        std::cout << ex.what() << std::endl;
    }
}
Expected behavior
The behaviour keeps consistent in code snippet 1 and code snippet 2.
Versions
PyTorch version: 1.10.0+cu113
Is debug build: False
CUDA used to build PyTorch: 11.3
ROCM used to build PyTorch: N/A
OS: Microsoft Windows 11 Pro
GCC version: Could not collect
Clang version: Could not collect
CMake version: Could not collect
Libc version: N/A
Python version: 3.9.1 (tags/v3.9.1:1e5d33e, Dec 7 2020, 17:08:21) [MSC v.1927 64 bit (AMD64)] (64-bit runtime)
Python platform: Windows-10-10.0.22000-SP0
Is CUDA available: True
CUDA runtime version: 11.3.58
GPU models and configuration: GPU 0: NVIDIA GeForce GTX 1060 with Max-Q Design
Nvidia driver version: 497.09
cuDNN version: Could not collect
HIP runtime version: N/A
MIOpen runtime version: N/A
Versions of relevant libraries:
[pip3] mypy-extensions==0.4.3
[pip3] numpy==1.19.5
[pip3] pytorch-model-summary==0.1.2
[pip3] torch==1.10.0+cu113
[pip3] torchaudio==0.10.0+cu113
[pip3] torchvision==0.11.1+cu113
[conda] Could not collect
cc @malfet @seemethere @peterjc123 @mszhanyi @skyline75489 @nbcsm @jbschlosser @ngimel