TortoiseGit
G.2. Git Tutorial
G.2.1. gittutorial(7)
NAME
gittutorial — A tutorial introduction to Git
SYNOPSIS
DESCRIPTION
This tutorial explains how to import a new project into Git, make
changes to it, and share changes with other developers.
If you are instead primarily interested in using Git to fetch a project,
for example, to test the latest version, you may prefer to start with
the first two chapters of The Git User’s Manual.
First, note that you can get documentation for a command such as
git log —graph with:
$ man git-log
or:
$ git help log
With the latter, you can use the manual viewer of your choice; see
Section G.3.58, “git-help(1)” for more information.
It is a good idea to introduce yourself to Git with your name and
public email address before doing any operation. The easiest
way to do so is:
$ git config --global user.name "Your Name Comes Here"
$ git config --global user.email [email protected]
Importing a new project
Assume you have a tarball project.tar.gz with your initial work. You
can place it under Git revision control as follows.
$ tar xzf project.tar.gz
$ cd project
$ git init
Git will reply
Initialized empty Git repository in .git/
You’ve now initialized the working directory—you may notice a new
directory created, named «.git».
Next, tell Git to take a snapshot of the contents of all files under the
current directory (note the .), with git add:
$ git add .
This snapshot is now stored in a temporary staging area which Git calls
the «index». You can permanently store the contents of the index in the
repository with git commit:
$ git commit
This will prompt you for a commit message. You’ve now stored the first
version of your project in Git.
Making changes
Modify some files, then add their updated contents to the index:
$ git add file1 file2 file3
You are now ready to commit. You can see what is about to be committed
using git diff with the —cached option:
$ git diff --cached
(Without —cached, git diff will show you any changes that
you’ve made but not yet added to the index.) You can also get a brief
summary of the situation with git status:
$ git status
On branch master
Changes to be committed:
Your branch is up-to-date with 'origin/master'.
  (use "git reset HEAD <file>..." to unstage)

        modified:   file1
        modified:   file2
        modified:   file3
If you need to make any further adjustments, do so now, and then add any
newly modified content to the index. Finally, commit your changes with:
$ git commit
This will again prompt you for a message describing the change, and then
record a new version of the project.
Alternatively, instead of running git add beforehand, you can use
$ git commit -a
which will automatically notice any modified (but not new) files, add
them to the index, and commit, all in one step.
A note on commit messages: Though not required, it’s a good idea to
begin the commit message with a single short (less than 50 character)
line summarizing the change, followed by a blank line and then a more
thorough description. The text up to the first blank line in a commit
message is treated as the commit title, and that title is used
throughout Git. For example, Section G.3.50, “git-format-patch(1)” turns a
commit into email, and it uses the title on the Subject line and the
rest of the commit in the body.
Git tracks content not files
Many revision control systems provide an add command that tells the
system to start tracking changes to a new file. Git’s add command
does something simpler and more powerful: git add is used both for new
and newly modified files, and in both cases it takes a snapshot of the
given files and stages that content in the index, ready for inclusion in
the next commit.
Viewing project history
At any point you can view the history of your changes using
$ git log
If you also want to see complete diffs at each step, use
$ git log -p
Often the overview of the change is useful to get a feel of
each step
$ git log --stat --summary
Managing branches
A single Git repository can maintain multiple branches of
development. To create a new branch named «experimental», use
$ git branch experimental
If you now run
$ git branch
you’ll get a list of all existing branches:
  experimental
* master
The «experimental» branch is the one you just created, and the
«master» branch is a default branch that was created for you
automatically. The asterisk marks the branch you are currently on;
type
$ git checkout experimental
to switch to the experimental branch. Now edit a file, commit the
change, and switch back to the master branch:
(edit file)
$ git commit -a
$ git checkout master
Check that the change you made is no longer visible, since it was
made on the experimental branch and you’re back on the master branch.
You can make a different change on the master branch:
(edit file)
$ git commit -a
at this point the two branches have diverged, with different changes
made in each. To merge the changes made in experimental into master, run
$ git merge experimental
If the changes don’t conflict, you’re done. If there are conflicts,
markers will be left in the problematic files showing the conflict;
$ git diff
will show this. Once you’ve edited the files to resolve the
conflicts,
$ git commit -a
will commit the result of the merge. Finally,
$ gitk
will show a nice graphical representation of the resulting history.
At this point you could delete the experimental branch with
$ git branch -d experimental
This command ensures that the changes in the experimental branch are
already in the current branch.
If you develop on a branch crazy-idea, then regret it, you can always
delete the branch with
$ git branch -D crazy-idea
Branches are cheap and easy, so this is a good way to try something
out.
Using Git for collaboration
Suppose that Alice has started a new project with a Git repository in
/home/alice/project, and that Bob, who has a home directory on the
same machine, wants to contribute.
Bob begins with:
bob$ git clone /home/alice/project myrepo
This creates a new directory «myrepo» containing a clone of Alice’s
repository. The clone is on an equal footing with the original
project, possessing its own copy of the original project’s history.
Bob then makes some changes and commits them:
(edit files)
bob$ git commit -a
(repeat as necessary)
When he’s ready, he tells Alice to pull changes from the repository
at /home/bob/myrepo. She does this with:
alice$ cd /home/alice/project
alice$ git pull /home/bob/myrepo master
This merges the changes from Bob’s «master» branch into Alice’s
current branch. If Alice has made her own changes in the meantime,
then she may need to manually fix any conflicts.
The «pull» command thus performs two operations: it fetches changes
from a remote branch, then merges them into the current branch.
Note that in general, Alice would want her local changes committed before
initiating this «pull». If Bob’s work conflicts with what Alice did since
their histories forked, Alice will use her working tree and the index to
resolve conflicts, and existing local changes will interfere with the
conflict resolution process (Git will still perform the fetch but will
refuse to merge — Alice will have to get rid of her local changes in
some way and pull again when this happens).
Alice can peek at what Bob did without merging first, using the «fetch»
command; this allows Alice to inspect what Bob did, using a special
symbol «FETCH_HEAD», in order to determine if he has anything worth
pulling, like this:
alice$ git fetch /home/bob/myrepo master
alice$ git log -p HEAD..FETCH_HEAD
This operation is safe even if Alice has uncommitted local changes.
The range notation «HEAD..FETCH_HEAD» means «show everything that is reachable
from the FETCH_HEAD but exclude anything that is reachable from HEAD».
Alice already knows everything that leads to her current state (HEAD),
and reviews what Bob has in his state (FETCH_HEAD) that she has not
seen with this command.
If Alice wants to visualize what Bob did since their histories forked
she can issue the following command:
$ gitk HEAD..FETCH_HEAD
This uses the same two-dot range notation we saw earlier with git log.
Alice may want to view what both of them did since they forked.
She can use three-dot form instead of the two-dot form:
$ gitk HEAD...FETCH_HEAD
This means «show everything that is reachable from either one, but
exclude anything that is reachable from both of them».
Please note that these range notation can be used with both gitk
and «git log».
After inspecting what Bob did, if there is nothing urgent, Alice may
decide to continue working without pulling from Bob. If Bob’s history
does have something Alice would immediately need, Alice may choose to
stash her work-in-progress first, do a «pull», and then finally unstash
her work-in-progress on top of the resulting history.
When you are working in a small closely knit group, it is not
unusual to interact with the same repository over and over
again. By defining remote repository shorthand, you can make
it easier:
alice$ git remote add bob /home/bob/myrepo
With this, Alice can perform the first part of the «pull» operation
alone using the git fetch command without merging them with her own
branch, using:
alice$ git fetch bob
Unlike the longhand form, when Alice fetches from Bob using a
remote repository shorthand set up with git remote, what was
fetched is stored in a remote-tracking branch, in this case
bob/master. So after this:
alice$ git log -p master..bob/master
shows a list of all the changes that Bob made since he branched from
Alice’s master branch.
After examining those changes, Alice
could merge the changes into her master branch:
alice$ git merge bob/master
This merge can also be done by pulling from her own remote-tracking
branch, like this:
alice$ git pull . remotes/bob/master
Note that git pull always merges into the current branch,
regardless of what else is given on the command line.
Later, Bob can update his repo with Alice’s latest changes using
bob$ git pull
Note that he doesn’t need to give the path to Alice’s repository;
when Bob cloned Alice’s repository, Git stored the location of her
repository in the repository configuration, and that location is
used for pulls:
bob$ git config --get remote.origin.url
/home/alice/project
(The complete configuration created by git clone is visible using
git config -l, and the Section G.3.27, “git-config(1)” man page
explains the meaning of each option.)
Git also keeps a pristine copy of Alice’s master branch under the
name «origin/master»:
bob$ git branch -r
  origin/master
If Bob later decides to work from a different host, he can still
perform clones and pulls using the ssh protocol:
bob$ git clone alice.org:/home/alice/project myrepo
Alternatively, Git has a native protocol, or can use http;
see Section G.3.95, “git-pull(1)” for details.
Git can also be used in a CVS-like mode, with a central repository
that various users push changes to; see Section G.3.96, “git-push(1)” and
Section G.2.4, “gitcvs-migration(7)”.
Exploring history
Git history is represented as a series of interrelated commits. We
have already seen that the git log command can list those commits.
Note that first line of each git log entry also gives a name for the
commit:
$ git log
commit c82a22c39cbc32576f64f5c6b3f24b99ea8149c7
Author: Junio C Hamano <[email protected]>
Date:   Tue May 16 17:18:22 2006 -0700

    merge-base: Clarify the comments on post processing.
We can give this name to git show to see the details about this
commit.
$ git show c82a22c39cbc32576f64f5c6b3f24b99ea8149c7
But there are other ways to refer to commits. You can use any initial
part of the name that is long enough to uniquely identify the commit:
$ git show c82a22c39c   # the first few characters of the name are
                        # usually enough
$ git show HEAD         # the tip of the current branch
$ git show experimental # the tip of the "experimental" branch
Every commit usually has one «parent» commit
which points to the previous state of the project:
$ git show HEAD^  # to see the parent of HEAD
$ git show HEAD^^ # to see the grandparent of HEAD
$ git show HEAD~4 # to see the great-great grandparent of HEAD
Note that merge commits may have more than one parent:
$ git show HEAD^1 # show the first parent of HEAD (same as HEAD^)
$ git show HEAD^2 # show the second parent of HEAD
You can also give commits names of your own; after running
$ git tag v2.5 1b2e1d63ff
you can refer to 1b2e1d63ff by the name «v2.5». If you intend to
share this name with other people (for example, to identify a release
version), you should create a «tag» object, and perhaps sign it; see
Section G.3.134, “git-tag(1)” for details.
Any Git command that needs to know a commit can take any of these
names. For example:
$ git diff v2.5 HEAD     # compare the current HEAD to v2.5
$ git branch stable v2.5 # start a new branch named "stable" based
                         # at v2.5
$ git reset --hard HEAD^ # reset your current branch and working
                         # directory to its state at HEAD^
Be careful with that last command: in addition to losing any changes
in the working directory, it will also remove all later commits from
this branch. If this branch is the only branch containing those
commits, they will be lost. Also, don’t use git reset on a
publicly-visible branch that other developers pull from, as it will
force needless merges on other developers to clean up the history.
If you need to undo changes that you have pushed, use git revert
instead.
The git grep command can search for strings in any version of your
project, so
$ git grep "hello" v2.5
searches for all occurrences of «hello» in v2.5.
If you leave out the commit name, git grep will search any of the
files it manages in your current directory. So
$ git grep "hello"
is a quick way to search just the files that are tracked by Git.
Many Git commands also take sets of commits, which can be specified
in a number of ways. Here are some examples with git log:
$ git log v2.5..v2.6            # commits between v2.5 and v2.6
$ git log v2.5..                # commits since v2.5
$ git log --since="2 weeks ago" # commits from the last 2 weeks
$ git log v2.5.. Makefile       # commits since v2.5 which modify
                                # Makefile
You can also give git log a «range» of commits where the first is not
necessarily an ancestor of the second; for example, if the tips of
the branches «stable» and «master» diverged from a common
commit some time ago, then
$ git log stable..master
will list commits made in the master branch but not in the
stable branch, while
$ git log master..stable
will show the list of commits made on the stable branch but not
the master branch.
The git log command has a weakness: it must present commits in a
list. When the history has lines of development that diverged and
then merged back together, the order in which git log presents
those commits is meaningless.
Most projects with multiple contributors (such as the Linux kernel,
or Git itself) have frequent merges, and gitk does a better job of
visualizing their history. For example,
$ gitk --since="2 weeks ago" drivers/
allows you to browse any commits from the last 2 weeks of commits
that modified files under the «drivers» directory. (Note: you can
adjust gitk’s fonts by holding down the control key while pressing
«-» or «+».)
Finally, most commands that take filenames will optionally allow you
to precede any filename by a commit, to specify a particular version
of the file:
$ git diff v2.5:Makefile HEAD:Makefile.in
You can also use git show to see any such file:
$ git show v2.5:Makefile
Next Steps
This tutorial should be enough to perform basic distributed revision
control for your projects. However, to fully understand the depth
and power of Git you need to understand two simple ideas on which it
is based:
-
The object database is the rather elegant system used to
store the history of your project—files, directories, and
commits. -
The index file is a cache of the state of a directory tree,
used to create commits, check out working directories, and
hold the various trees involved in a merge.
Part two of this tutorial explains the object
database, the index file, and a few other odds and ends that you’ll
need to make the most of Git. You can find it at Section G.2.2, “gittutorial-2(7)”.
If you don’t want to continue with that right away, a few other
digressions that may be interesting at this point are:
-
Section G.3.50, “git-format-patch(1)”, Section G.3.3, “git-am(1)”: These convert
series of git commits into emailed patches, and vice versa,
useful for projects such as the Linux kernel which rely heavily
on emailed patches. -
Section G.3.8, “git-bisect(1)”: When there is a regression in your
project, one way to track down the bug is by searching through
the history to find the exact commit that’s to blame. Git bisect
can help you perform a binary search for that commit. It is
smart enough to perform a close-to-optimal search even in the
case of complex non-linear history with lots of merged branches. -
Section G.4.15, “gitworkflows(7)”: Gives an overview of recommended
workflows. - Section G.2.5, “giteveryday(7)”: Everyday Git with 20 Commands Or So.
- Section G.2.4, “gitcvs-migration(7)”: Git for CVS users.
SEE ALSO
Section G.2.2, “gittutorial-2(7)”,
Section G.2.4, “gitcvs-migration(7)”,
Section G.2.3, “gitcore-tutorial(7)”,
Section G.4.16, “gitglossary(7)”,
Section G.3.58, “git-help(1)”,
Section G.4.15, “gitworkflows(7)”,
Section G.2.5, “giteveryday(7)”,
The Git User’s Manual
GIT
Part of the Section G.3.1, “git(1)” suite.
G.2.2. gittutorial-2(7)
NAME
gittutorial-2 — A tutorial introduction to Git: part two
SYNOPSIS
DESCRIPTION
You should work through Section G.2.1, “gittutorial(7)” before reading this tutorial.
The goal of this tutorial is to introduce two fundamental pieces of
Git’s architecture—the object database and the index file—and to
provide the reader with everything necessary to understand the rest
of the Git documentation.
The Git object database
Let’s start a new project and create a small amount of history:
$ mkdir test-project
$ cd test-project
$ git init
Initialized empty Git repository in .git/
$ echo 'hello world' > file.txt
$ git add .
$ git commit -a -m "initial commit"
[master (root-commit) 54196cc] initial commit
 1 file changed, 1 insertion(+)
 create mode 100644 file.txt
$ echo 'hello world!' >file.txt
$ git commit -a -m "add emphasis"
[master c4d59f3] add emphasis
 1 file changed, 1 insertion(+), 1 deletion(-)
What are the 7 digits of hex that Git responded to the commit with?
We saw in part one of the tutorial that commits have names like this.
It turns out that every object in the Git history is stored under
a 40-digit hex name. That name is the SHA-1 hash of the object’s
contents; among other things, this ensures that Git will never store
the same data twice (since identical data is given an identical SHA-1
name), and that the contents of a Git object will never change (since
that would change the object’s name as well). The 7 char hex strings
here are simply the abbreviation of such 40 character long strings.
Abbreviations can be used everywhere where the 40 character strings
can be used, so long as they are unambiguous.
It is expected that the content of the commit object you created while
following the example above generates a different SHA-1 hash than
the one shown above because the commit object records the time when
it was created and the name of the person performing the commit.
We can ask Git about this particular object with the cat-file
command. Don’t copy the 40 hex digits from this example but use those
from your own version. Note that you can shorten it to only a few
characters to save yourself typing all 40 hex digits:
$ git cat-file -t 54196cc2
commit
$ git cat-file commit 54196cc2
tree 92b8b694ffb1675e5975148e1121810081dbdffe
author J. Bruce Fields <[email protected]> 1143414668 -0500
committer J. Bruce Fields <[email protected]> 1143414668 -0500

initial commit
A tree can refer to one or more «blob» objects, each corresponding to
a file. In addition, a tree can also refer to other tree objects,
thus creating a directory hierarchy. You can examine the contents of
any tree using ls-tree (remember that a long enough initial portion
of the SHA-1 will also work):
$ git ls-tree 92b8b694
100644 blob 3b18e512dba79e4c8300dd08aeb37f8e728b8dad    file.txt
Thus we see that this tree has one file in it. The SHA-1 hash is a
reference to that file’s data:
$ git cat-file -t 3b18e512
blob
A «blob» is just file data, which we can also examine with cat-file:
$ git cat-file blob 3b18e512
hello world
Note that this is the old file data; so the object that Git named in
its response to the initial tree was a tree with a snapshot of the
directory state that was recorded by the first commit.
All of these objects are stored under their SHA-1 names inside the Git
directory:
$ find .git/objects/
.git/objects/
.git/objects/pack
.git/objects/info
.git/objects/3b
.git/objects/3b/18e512dba79e4c8300dd08aeb37f8e728b8dad
.git/objects/92
.git/objects/92/b8b694ffb1675e5975148e1121810081dbdffe
.git/objects/54
.git/objects/54/196cc2703dc165cbd373a65a4dcf22d50ae7f7
.git/objects/a0
.git/objects/a0/423896973644771497bdc03eb99d5281615b51
.git/objects/d0
.git/objects/d0/492b368b66bdabf2ac1fd8c92b39d3db916e59
.git/objects/c4
.git/objects/c4/d59f390b9cfd4318117afde11d601c1085f241
and the contents of these files is just the compressed data plus a
header identifying their length and their type. The type is either a
blob, a tree, a commit, or a tag.
The simplest commit to find is the HEAD commit, which we can find
from .git/HEAD:
$ cat .git/HEAD
ref: refs/heads/master
As you can see, this tells us which branch we’re currently on, and it
tells us this by naming a file under the .git directory, which itself
contains a SHA-1 name referring to a commit object, which we can
examine with cat-file:
$ cat .git/refs/heads/master
c4d59f390b9cfd4318117afde11d601c1085f241
$ git cat-file -t c4d59f39
commit
$ git cat-file commit c4d59f39
tree d0492b368b66bdabf2ac1fd8c92b39d3db916e59
parent 54196cc2703dc165cbd373a65a4dcf22d50ae7f7
author J. Bruce Fields <[email protected]> 1143418702 -0500
committer J. Bruce Fields <[email protected]> 1143418702 -0500

add emphasis
The «tree» object here refers to the new state of the tree:
$ git ls-tree d0492b36
100644 blob a0423896973644771497bdc03eb99d5281615b51    file.txt
$ git cat-file blob a0423896
hello world!
and the «parent» object refers to the previous commit:
$ git cat-file commit 54196cc2
tree 92b8b694ffb1675e5975148e1121810081dbdffe
author J. Bruce Fields <[email protected]> 1143414668 -0500
committer J. Bruce Fields <[email protected]> 1143414668 -0500

initial commit
The tree object is the tree we examined first, and this commit is
unusual in that it lacks any parent.
Most commits have only one parent, but it is also common for a commit
to have multiple parents. In that case the commit represents a
merge, with the parent references pointing to the heads of the merged
branches.
Besides blobs, trees, and commits, the only remaining type of object
is a «tag», which we won’t discuss here; refer to Section G.3.134, “git-tag(1)”
for details.
So now we know how Git uses the object database to represent a
project’s history:
-
«commit» objects refer to «tree» objects representing the
snapshot of a directory tree at a particular point in the
history, and refer to «parent» commits to show how they’re
connected into the project history. -
«tree» objects represent the state of a single directory,
associating directory names to «blob» objects containing file
data and «tree» objects containing subdirectory information. - «blob» objects contain file data without any other structure.
-
References to commit objects at the head of each branch are
stored in files under .git/refs/heads/. - The name of the current branch is stored in .git/HEAD.
Note, by the way, that lots of commands take a tree as an argument.
But as we can see above, a tree can be referred to in many different
ways—by the SHA-1 name for that tree, by the name of a commit that
refers to the tree, by the name of a branch whose head refers to that
tree, etc.—and most such commands can accept any of these names.
In command synopses, the word «tree-ish» is sometimes used to
designate such an argument.
The index file
The primary tool we’ve been using to create commits is git-commit
-a, which creates a commit including every change you’ve made to
your working tree. But what if you want to commit changes only to
certain files? Or only certain changes to certain files?
If we look at the way commits are created under the cover, we’ll see
that there are more flexible ways creating commits.
Continuing with our test-project, let’s modify file.txt again:
$ echo "hello world, again" >>file.txt
but this time instead of immediately making the commit, let’s take an
intermediate step, and ask for diffs along the way to keep track of
what’s happening:
$ git diff
--- a/file.txt
+++ b/file.txt
@@ -1 +1,2 @@
 hello world!
+hello world, again
$ git add file.txt
$ git diff
The last diff is empty, but no new commits have been made, and the
head still doesn’t contain the new line:
$ git diff HEAD
diff --git a/file.txt b/file.txt
index a042389..513feba 100644
--- a/file.txt
+++ b/file.txt
@@ -1 +1,2 @@
 hello world!
+hello world, again
So git diff is comparing against something other than the head.
The thing that it’s comparing against is actually the index file,
which is stored in .git/index in a binary format, but whose contents
we can examine with ls-files:
$ git ls-files --stage
100644 513feba2e53ebbd2532419ded848ba19de88ba00 0       file.txt
$ git cat-file -t 513feba2
blob
$ git cat-file blob 513feba2
hello world!
hello world, again
So what our git add did was store a new blob and then put
a reference to it in the index file. If we modify the file again,
we’ll see that the new modifications are reflected in the git diff
output:
$ echo 'again?' >>file.txt
$ git diff
index 513feba..ba3da7b 100644
--- a/file.txt
+++ b/file.txt
@@ -1,2 +1,3 @@
 hello world!
 hello world, again
+again?
With the right arguments, git diff can also show us the difference
between the working directory and the last commit, or between the
index and the last commit:
$ git diff HEAD
diff --git a/file.txt b/file.txt
index a042389..ba3da7b 100644
--- a/file.txt
+++ b/file.txt
@@ -1 +1,3 @@
 hello world!
+hello world, again
+again?
$ git diff --cached
diff --git a/file.txt b/file.txt
index a042389..513feba 100644
--- a/file.txt
+++ b/file.txt
@@ -1 +1,2 @@
 hello world!
+hello world, again
At any time, we can create a new commit using git commit (without
the «-a» option), and verify that the state committed only includes the
changes stored in the index file, not the additional change that is
still only in our working tree:
$ git commit -m "repeat"
$ git diff HEAD
diff --git a/file.txt b/file.txt
index 513feba..ba3da7b 100644
--- a/file.txt
+++ b/file.txt
@@ -1,2 +1,3 @@
 hello world!
 hello world, again
+again?
So by default git commit uses the index to create the commit, not
the working tree; the «-a» option to commit tells it to first update
the index with all changes in the working tree.
Finally, it’s worth looking at the effect of git add on the index
file:
$ echo "goodbye, world" >closing.txt
$ git add closing.txt
The effect of the git add was to add one entry to the index file:
$ git ls-files --stage
100644 8b9743b20d4b15be3955fc8d5cd2b09cd2336138 0       closing.txt
100644 513feba2e53ebbd2532419ded848ba19de88ba00 0       file.txt
And, as you can see with cat-file, this new entry refers to the
current contents of the file:
$ git cat-file blob 8b9743b2
goodbye, world
The «status» command is a useful way to get a quick summary of the
situation:
$ git status
On branch master
Changes to be committed:
  (use "git reset HEAD <file>..." to unstage)

        new file:   closing.txt

Changes not staged for commit:
  (use "git add <file>..." to update what will be committed)
  (use "git checkout -- <file>..." to discard changes in working directory)

        modified:   file.txt
Since the current state of closing.txt is cached in the index file,
it is listed as «Changes to be committed». Since file.txt has
changes in the working directory that aren’t reflected in the index,
it is marked «changed but not updated». At this point, running «git
commit» would create a commit that added closing.txt (with its new
contents), but that didn’t modify file.txt.
Also, note that a bare git diff shows the changes to file.txt, but
not the addition of closing.txt, because the version of closing.txt
in the index file is identical to the one in the working directory.
In addition to being the staging area for new commits, the index file
is also populated from the object database when checking out a
branch, and is used to hold the trees involved in a merge operation.
See Section G.2.3, “gitcore-tutorial(7)” and the relevant man
pages for details.
What next?
At this point you should know everything necessary to read the man
pages for any of the git commands; one good place to start would be
with the commands mentioned in Section G.2.5, “giteveryday(7)”. You
should be able to find any unknown jargon in Section G.4.16, “gitglossary(7)”.
The Git User’s Manual provides a more
comprehensive introduction to Git.
Section G.2.4, “gitcvs-migration(7)” explains how to
import a CVS repository into Git, and shows how to use Git in a
CVS-like way.
For some interesting examples of Git use, see the
howtos.
For Git developers, Section G.2.3, “gitcore-tutorial(7)” goes
into detail on the lower-level Git mechanisms involved in, for
example, creating a new commit.
SEE ALSO
Section G.2.1, “gittutorial(7)”,
Section G.2.4, “gitcvs-migration(7)”,
Section G.2.3, “gitcore-tutorial(7)”,
Section G.4.16, “gitglossary(7)”,
Section G.3.58, “git-help(1)”,
Section G.2.5, “giteveryday(7)”,
The Git User’s Manual
GIT
Part of the Section G.3.1, “git(1)” suite.
G.2.3. gitcore-tutorial(7)
NAME
gitcore-tutorial — A Git core tutorial for developers
DESCRIPTION
This tutorial explains how to use the «core» Git commands to set up and
work with a Git repository.
If you just need to use Git as a revision control system you may prefer
to start with «A Tutorial Introduction to Git» (Section G.2.1, “gittutorial(7)”) or
the Git User Manual.
However, an understanding of these low-level tools can be helpful if
you want to understand Git’s internals.
The core Git is often called «plumbing», with the prettier user
interfaces on top of it called «porcelain». You may not want to use the
plumbing directly very often, but it can be good to know what the
plumbing does for when the porcelain isn’t flushing.
Back when this document was originally written, many porcelain
commands were shell scripts. For simplicity, it still uses them as
examples to illustrate how plumbing is fit together to form the
porcelain commands. The source tree includes some of these scripts in
contrib/examples/ for reference. Although these are not implemented as
shell scripts anymore, the description of what the plumbing layer
commands do is still valid.
![[Note]](https://documentation.help/TortoiseGit/note.png)
|
Note |
|---|---|
|
Deeper technical details are often marked as Notes, which you can |
Creating a Git repository
Creating a new Git repository couldn’t be easier: all Git repositories start
out empty, and the only thing you need to do is find yourself a
subdirectory that you want to use as a working tree — either an empty
one for a totally new project, or an existing working tree that you want
to import into Git.
For our first example, we’re going to start a totally new repository from
scratch, with no pre-existing files, and we’ll call it git-tutorial.
To start up, create a subdirectory for it, change into that
subdirectory, and initialize the Git infrastructure with git init:
$ mkdir git-tutorial
$ cd git-tutorial
$ git init
to which Git will reply
Initialized empty Git repository in .git/
which is just Git’s way of saying that you haven’t been doing anything
strange, and that it will have created a local .git directory setup for
your new project. You will now have a .git directory, and you can
inspect that with ls. For your new empty project, it should show you
three entries, among other things:
-
a file called HEAD, that has ref: refs/heads/master in it.
This is similar to a symbolic link and points at
refs/heads/master relative to the HEAD file.Don’t worry about the fact that the file that the HEAD link points to
doesn’t even exist yet — you haven’t created the commit that will
start your HEAD development branch yet. -
a subdirectory called objects, which will contain all the
objects of your project. You should never have any real reason to
look at the objects directly, but you might want to know that these
objects are what contains all the real data in your repository. - a subdirectory called refs, which contains references to objects.
In particular, the refs subdirectory will contain two other
subdirectories, named heads and tags respectively. They do
exactly what their names imply: they contain references to any number
of different heads of development (aka branches), and to any
tags that you have created to name specific versions in your
repository.
One note: the special master head is the default branch, which is
why the .git/HEAD file was created points to it even if it
doesn’t yet exist. Basically, the HEAD link is supposed to always
point to the branch you are working on right now, and you always
start out expecting to work on the master branch.
However, this is only a convention, and you can name your branches
anything you want, and don’t have to ever even have a master
branch. A number of the Git tools will assume that .git/HEAD is
valid, though.
|
|
Note |
|---|---|
|
An object is identified by its 160-bit SHA-1 hash, aka object name, |
You have now created your first Git repository. Of course, since it’s
empty, that’s not very useful, so let’s start populating it with data.
Populating a Git repository
We’ll keep this simple and stupid, so we’ll start off with populating a
few trivial files just to get a feel for it.
Start off with just creating any random files that you want to maintain
in your Git repository. We’ll start off with a few bad examples, just to
get a feel for how this works:
$ echo "Hello World" >hello
$ echo "Silly example" >example
you have now created two files in your working tree (aka working directory),
but to actually check in your hard work, you will have to go through two steps:
-
fill in the index file (aka cache) with the information about your
working tree state. - commit that index file as an object.
The first step is trivial: when you want to tell Git about any changes
to your working tree, you use the git update-index program. That
program normally just takes a list of filenames you want to update, but
to avoid trivial mistakes, it refuses to add new entries to the index
(or remove existing ones) unless you explicitly tell it that you’re
adding a new entry with the —add flag (or removing an entry with the
—remove) flag.
So to populate the index with the two files you just created, you can do
$ git update-index --add hello example
and you have now told Git to track those two files.
In fact, as you did that, if you now look into your object directory,
you’ll notice that Git will have added two new objects to the object
database. If you did exactly the steps above, you should now be able to do
$ ls .git/objects/??/*
and see two files:
.git/objects/55/7db03de997c86a4a028e1ebd3a1ceb225be238
.git/objects/f2/4c74a2e500f5ee1332c86b94199f52b1d1d962
which correspond with the objects with names of 557db… and
f24c7… respectively.
If you want to, you can use git cat-file to look at those objects, but
you’ll have to use the object name, not the filename of the object:
$ git cat-file -t 557db03de997c86a4a028e1ebd3a1ceb225be238
where the -t tells git cat-file to tell you what the «type» of the
object is. Git will tell you that you have a «blob» object (i.e., just a
regular file), and you can see the contents with
$ git cat-file blob 557db03
which will print out «Hello World». The object 557db03 is nothing
more than the contents of your file hello.
|
|
Note |
|---|---|
|
Don’t confuse that object with the file hello itself. The |
|
|
Note |
|---|---|
|
The second example demonstrates that you can |
Anyway, as we mentioned previously, you normally never actually take a
look at the objects themselves, and typing long 40-character hex
names is not something you’d normally want to do. The above digression
was just to show that git update-index did something magical, and
actually saved away the contents of your files into the Git object
database.
Updating the index did something else too: it created a .git/index
file. This is the index that describes your current working tree, and
something you should be very aware of. Again, you normally never worry
about the index file itself, but you should be aware of the fact that
you have not actually really «checked in» your files into Git so far,
you’ve only told Git about them.
However, since Git knows about them, you can now start using some of the
most basic Git commands to manipulate the files or look at their status.
In particular, let’s not even check in the two files into Git yet, we’ll
start off by adding another line to hello first:
$ echo "It's a new day for git" >>hello
and you can now, since you told Git about the previous state of hello, ask
Git what has changed in the tree compared to your old index, using the
git diff-files command:
$ git diff-files
Oops. That wasn’t very readable. It just spit out its own internal
version of a diff, but that internal version really just tells you
that it has noticed that «hello» has been modified, and that the old object
contents it had have been replaced with something else.
To make it readable, we can tell git diff-files to output the
differences as a patch, using the -p flag:
$ git diff-files -p
diff --git a/hello b/hello
index 557db03..263414f 100644
--- a/hello
+++ b/hello
@@ -1 +1,2 @@
 Hello World
+It's a new day for git
i.e. the diff of the change we caused by adding another line to hello.
In other words, git diff-files always shows us the difference between
what is recorded in the index, and what is currently in the working
tree. That’s very useful.
A common shorthand for git diff-files -p is to just write git
diff, which will do the same thing.
$ git diff
diff --git a/hello b/hello
index 557db03..263414f 100644
--- a/hello
+++ b/hello
@@ -1 +1,2 @@
 Hello World
+It's a new day for git
Committing Git state
Now, we want to go to the next stage in Git, which is to take the files
that Git knows about in the index, and commit them as a real tree. We do
that in two phases: creating a tree object, and committing that tree
object as a commit object together with an explanation of what the
tree was all about, along with information of how we came to that state.
Creating a tree object is trivial, and is done with git write-tree.
There are no options or other input: git write-tree will take the
current index state, and write an object that describes that whole
index. In other words, we’re now tying together all the different
filenames with their contents (and their permissions), and we’re
creating the equivalent of a Git «directory» object:
$ git write-tree
and this will just output the name of the resulting tree, in this case
(if you have done exactly as I’ve described) it should be
8988da15d077d4829fc51d8544c097def6644dbb
which is another incomprehensible object name. Again, if you want to,
you can use git cat-file -t 8988d… to see that this time the object
is not a «blob» object, but a «tree» object (you can also use
git cat-file to actually output the raw object contents, but you’ll see
mainly a binary mess, so that’s less interesting).
However — normally you’d never use git write-tree on its own, because
normally you always commit a tree into a commit object using the
git commit-tree command. In fact, it’s easier to not actually use
git write-tree on its own at all, but to just pass its result in as an
argument to git commit-tree.
git commit-tree normally takes several arguments — it wants to know
what the parent of a commit was, but since this is the first commit
ever in this new repository, and it has no parents, we only need to pass in
the object name of the tree. However, git commit-tree also wants to get a
commit message on its standard input, and it will write out the resulting
object name for the commit to its standard output.
And this is where we create the .git/refs/heads/master file
which is pointed at by HEAD. This file is supposed to contain
the reference to the top-of-tree of the master branch, and since
that’s exactly what git commit-tree spits out, we can do this
all with a sequence of simple shell commands:
$ tree=$(git write-tree)
$ commit=$(echo 'Initial commit' | git commit-tree $tree)
$ git update-ref HEAD $commit
In this case this creates a totally new commit that is not related to
anything else. Normally you do this only once for a project ever, and
all later commits will be parented on top of an earlier commit.
Again, normally you’d never actually do this by hand. There is a
helpful script called git commit that will do all of this for you. So
you could have just written git commit
instead, and it would have done the above magic scripting for you.
Making a change
Remember how we did the git update-index on file hello and then we
changed hello afterward, and could compare the new state of hello with the
state we saved in the index file?
Further, remember how I said that git write-tree writes the contents
of the index file to the tree, and thus what we just committed was in
fact the original contents of the file hello, not the new ones. We did
that on purpose, to show the difference between the index state, and the
state in the working tree, and how they don’t have to match, even
when we commit things.
As before, if we do git diff-files -p in our git-tutorial project,
we’ll still see the same difference we saw last time: the index file
hasn’t changed by the act of committing anything. However, now that we
have committed something, we can also learn to use a new command:
git diff-index.
Unlike git diff-files, which showed the difference between the index
file and the working tree, git diff-index shows the differences
between a committed tree and either the index file or the working
tree. In other words, git diff-index wants a tree to be diffed
against, and before we did the commit, we couldn’t do that, because we
didn’t have anything to diff against.
But now we can do
$ git diff-index -p HEAD
(where -p has the same meaning as it did in git diff-files), and it
will show us the same difference, but for a totally different reason.
Now we’re comparing the working tree not against the index file,
but against the tree we just wrote. It just so happens that those two
are obviously the same, so we get the same result.
Again, because this is a common operation, you can also just shorthand
it with
$ git diff HEAD
which ends up doing the above for you.
In other words, git diff-index normally compares a tree against the
working tree, but when given the —cached flag, it is told to
instead compare against just the index cache contents, and ignore the
current working tree state entirely. Since we just wrote the index
file to HEAD, doing git diff-index —cached -p HEAD should thus return
an empty set of differences, and that’s exactly what it does.
|
|
Note |
|---|---|
|
git diff-index really always uses the index for its This is not hard to understand, as soon as you realize that Git simply |
However, our next step is to commit the change we did, and again, to
understand what’s going on, keep in mind the difference between «working
tree contents», «index file» and «committed tree». We have changes
in the working tree that we want to commit, and we always have to
work through the index file, so the first thing we need to do is to
update the index cache:
$ git update-index hello
(note how we didn’t need the —add flag this time, since Git knew
about the file already).
Note what happens to the different git diff-* versions here.
After we’ve updated hello in the index, git diff-files -p now shows no
differences, but git diff-index -p HEAD still does show that the
current state is different from the state we committed. In fact, now
git diff-index shows the same difference whether we use the —cached
flag or not, since now the index is coherent with the working tree.
Now, since we’ve updated hello in the index, we can commit the new
version. We could do it by writing the tree by hand again, and
committing the tree (this time we’d have to use the -p HEAD flag to
tell commit that the HEAD was the parent of the new commit, and that
this wasn’t an initial commit any more), but you’ve done that once
already, so let’s just use the helpful script this time:
$ git commit
which starts an editor for you to write the commit message and tells you
a bit about what you have done.
Write whatever message you want, and all the lines that start with #
will be pruned out, and the rest will be used as the commit message for
the change. If you decide you don’t want to commit anything after all at
this point (you can continue to edit things and update the index), you
can just leave an empty message. Otherwise git commit will commit
the change for you.
You’ve now made your first real Git commit. And if you’re interested in
looking at what git commit really does, feel free to investigate:
it’s a few very simple shell scripts to generate the helpful (?) commit
message headers, and a few one-liners that actually do the
commit itself (git commit).
Inspecting Changes
While creating changes is useful, it’s even more useful if you can tell
later what changed. The most useful command for this is another of the
diff family, namely git diff-tree.
git diff-tree can be given two arbitrary trees, and it will tell you the
differences between them. Perhaps even more commonly, though, you can
give it just a single commit object, and it will figure out the parent
of that commit itself, and show the difference directly. Thus, to get
the same diff that we’ve already seen several times, we can now do
$ git diff-tree -p HEAD
(again, -p means to show the difference as a human-readable patch),
and it will show what the last commit (in HEAD) actually changed.
|
|
Note |
|---|---|
|
Here is an ASCII art by Jon Loeliger that illustrates how diff-tree
+----+
| |
| |
V V
+-----------+
| Object DB |
| Backing |
| Store |
+-----------+
^ ^
| |
| | diff-index --cached
| |
diff-index | V
| +-----------+
| | Index |
| | "cache" |
| +-----------+
| ^
| |
| | diff-files
| |
V V
+-----------+
| Working |
| Directory |
+-----------+
|
More interestingly, you can also give git diff-tree the —pretty flag,
which tells it to also show the commit message and author and date of the
commit, and you can tell it to show a whole series of diffs.
Alternatively, you can tell it to be «silent», and not show the diffs at
all, but just show the actual commit message.
In fact, together with the git rev-list program (which generates a
list of revisions), git diff-tree ends up being a veritable fount of
changes. You can emulate git log, git log -p, etc. with a trivial
script that pipes the output of git rev-list to git diff-tree —stdin,
which was exactly how early versions of git log were implemented.
Tagging a version
In Git, there are two kinds of tags, a «light» one, and an «annotated tag».
A «light» tag is technically nothing more than a branch, except we put
it in the .git/refs/tags/ subdirectory instead of calling it a head.
So the simplest form of tag involves nothing more than
$ git tag my-first-tag
which just writes the current HEAD into the .git/refs/tags/my-first-tag
file, after which point you can then use this symbolic name for that
particular state. You can, for example, do
$ git diff my-first-tag
to diff your current state against that tag which at this point will
obviously be an empty diff, but if you continue to develop and commit
stuff, you can use your tag as an «anchor-point» to see what has changed
since you tagged it.
An «annotated tag» is actually a real Git object, and contains not only a
pointer to the state you want to tag, but also a small tag name and
message, along with optionally a PGP signature that says that yes,
you really did
that tag. You create these annotated tags with either the -a or
-s flag to git tag:
$ git tag -s <tagname>
which will sign the current HEAD (but you can also give it another
argument that specifies the thing to tag, e.g., you could have tagged the
current mybranch point by using git tag <tagname> mybranch).
You normally only do signed tags for major releases or things
like that, while the light-weight tags are useful for any marking you
want to do — any time you decide that you want to remember a certain
point, just create a private tag for it, and you have a nice symbolic
name for the state at that point.
Copying repositories
Git repositories are normally totally self-sufficient and relocatable.
Unlike CVS, for example, there is no separate notion of
«repository» and «working tree». A Git repository normally is the
working tree, with the local Git information hidden in the .git
subdirectory. There is nothing else. What you see is what you got.
|
|
Note |
|---|---|
|
You can tell Git to split the Git internal information from |
This has two implications:
-
if you grow bored with the tutorial repository you created (or you’ve
made a mistake and want to start all over), you can just do simple$ rm -rf git-tutorial
and it will be gone. There’s no external repository, and there’s no
history outside the project you created. -
if you want to move or duplicate a Git repository, you can do so. There
is git clone command, but if all you want to do is just to
create a copy of your repository (with all the full history that
went along with it), you can do so with a regular
cp -a git-tutorial new-git-tutorial.Note that when you’ve moved or copied a Git repository, your Git index
file (which caches various information, notably some of the «stat»
information for the files involved) will likely need to be refreshed.
So after you do a cp -a to create a new copy, you’ll want to do$ git update-index --refresh
in the new repository to make sure that the index file is up-to-date.
Note that the second point is true even across machines. You can
duplicate a remote Git repository with any regular copy mechanism, be it
scp, rsync or wget.
When copying a remote repository, you’ll want to at a minimum update the
index cache when you do this, and especially with other peoples’
repositories you often want to make sure that the index cache is in some
known state (you don’t know what they’ve done and not yet checked in),
so usually you’ll precede the git update-index with a
$ git read-tree --reset HEAD
$ git update-index --refresh
which will force a total index re-build from the tree pointed to by HEAD.
It resets the index contents to HEAD, and then the git update-index
makes sure to match up all index entries with the checked-out files.
If the original repository had uncommitted changes in its
working tree, git update-index —refresh notices them and
tells you they need to be updated.
The above can also be written as simply
$ git reset
and in fact a lot of the common Git command combinations can be scripted
with the git xyz interfaces. You can learn things by just looking
at what the various git scripts do. For example, git reset used to be
the above two lines implemented in git reset, but some things like
git status and git commit are slightly more complex scripts around
the basic Git commands.
Many (most?) public remote repositories will not contain any of
the checked out files or even an index file, and will only contain the
actual core Git files. Such a repository usually doesn’t even have the
.git subdirectory, but has all the Git files directly in the
repository.
To create your own local live copy of such a «raw» Git repository, you’d
first create your own subdirectory for the project, and then copy the
raw repository contents into the .git directory. For example, to
create your own copy of the Git repository, you’d do the following
$ mkdir my-git
$ cd my-git
$ rsync -rL rsync://rsync.kernel.org/pub/scm/git/git.git/ .git
followed by
$ git read-tree HEAD
to populate the index. However, now you have populated the index, and
you have all the Git internal files, but you will notice that you don’t
actually have any of the working tree files to work on. To get
those, you’d check them out with
$ git checkout-index -u -a
where the -u flag means that you want the checkout to keep the index
up-to-date (so that you don’t have to refresh it afterward), and the
-a flag means «check out all files» (if you have a stale copy or an
older version of a checked out tree you may also need to add the -f
flag first, to tell git checkout-index to force overwriting of any old
files).
Again, this can all be simplified with
$ git clone git://git.kernel.org/pub/scm/git/git.git/ my-git
$ cd my-git
$ git checkout
which will end up doing all of the above for you.
You have now successfully copied somebody else’s (mine) remote
repository, and checked it out.
Creating a new branch
Branches in Git are really nothing more than pointers into the Git
object database from within the .git/refs/ subdirectory, and as we
already discussed, the HEAD branch is nothing but a symlink to one of
these object pointers.
You can at any time create a new branch by just picking an arbitrary
point in the project history, and just writing the SHA-1 name of that
object into a file under .git/refs/heads/. You can use any filename you
want (and indeed, subdirectories), but the convention is that the
«normal» branch is called master. That’s just a convention, though,
and nothing enforces it.
To show that as an example, let’s go back to the git-tutorial repository we
used earlier, and create a branch in it. You do that by simply just
saying that you want to check out a new branch:
$ git checkout -b mybranch
will create a new branch based at the current HEAD position, and switch
to it.
|
|
Note |
|---|---|
|
If you make the decision to start your new branch at some $ git checkout -b mybranch earlier-commit and it would create the new branch mybranch at the earlier commit, |
You can always just jump back to your original master branch by doing
$ git checkout master
(or any other branch-name, for that matter) and if you forget which
branch you happen to be on, a simple
$ cat .git/HEAD
will tell you where it’s pointing. To get the list of branches
you have, you can say
$ git branch
which used to be nothing more than a simple script around ls .git/refs/heads.
There will be an asterisk in front of the branch you are currently on.
Sometimes you may wish to create a new branch without actually
checking it out and switching to it. If so, just use the command
$ git branch <branchname> [startingpoint]
which will simply create the branch, but will not do anything further.
You can then later — once you decide that you want to actually develop
on that branch — switch to that branch with a regular git checkout
with the branchname as the argument.
Merging two branches
One of the ideas of having a branch is that you do some (possibly
experimental) work in it, and eventually merge it back to the main
branch. So assuming you created the above mybranch that started out
being the same as the original master branch, let’s make sure we’re in
that branch, and do some work there.
$ git checkout mybranch
$ echo "Work, work, work" >>hello
$ git commit -m "Some work." -i hello
Here, we just added another line to hello, and we used a shorthand for
doing both git update-index hello and git commit by just giving the
filename directly to git commit, with an -i flag (it tells
Git to include that file in addition to what you have done to
the index file so far when making the commit). The -m flag is to give the
commit log message from the command line.
Now, to make it a bit more interesting, let’s assume that somebody else
does some work in the original branch, and simulate that by going back
to the master branch, and editing the same file differently there:
$ git checkout master
Here, take a moment to look at the contents of hello, and notice how they
don’t contain the work we just did in mybranch — because that work
hasn’t happened in the master branch at all. Then do
$ echo "Play, play, play" >>hello
$ echo "Lots of fun" >>example
$ git commit -m "Some fun." -i hello example
since the master branch is obviously in a much better mood.
Now, you’ve got two branches, and you decide that you want to merge the
work done. Before we do that, let’s introduce a cool graphical tool that
helps you view what’s going on:
$ gitk --all
will show you graphically both of your branches (that’s what the —all
means: normally it will just show you your current HEAD) and their
histories. You can also see exactly how they came to be from a common
source.
Anyway, let’s exit gitk (^Q or the File menu), and decide that we want
to merge the work we did on the mybranch branch into the master
branch (which is currently our HEAD too). To do that, there’s a nice
script called git merge, which wants to know which branches you want
to resolve and what the merge is all about:
$ git merge -m "Merge work in mybranch" mybranch
where the first argument is going to be used as the commit message if
the merge can be resolved automatically.
Now, in this case we’ve intentionally created a situation where the
merge will need to be fixed up by hand, though, so Git will do as much
of it as it can automatically (which in this case is just merge the example
file, which had no differences in the mybranch branch), and say:
        Auto-merging hello
        CONFLICT (content): Merge conflict in hello
        Automatic merge failed; fix conflicts and then commit the result.
It tells you that it did an «Automatic merge», which
failed due to conflicts in hello.
Not to worry. It left the (trivial) conflict in hello in the same form you
should already be well used to if you’ve ever used CVS, so let’s just
open hello in our editor (whatever that may be), and fix it up somehow.
I’d suggest just making it so that hello contains all four lines:
Hello World
It's a new day for git
Play, play, play
Work, work, work
and once you’re happy with your manual merge, just do a
$ git commit -i hello
which will very loudly warn you that you’re now committing a merge
(which is correct, so never mind), and you can write a small merge
message about your adventures in git merge-land.
After you’re done, start up gitk —all to see graphically what the
history looks like. Notice that mybranch still exists, and you can
switch to it, and continue to work with it if you want to. The
mybranch branch will not contain the merge, but next time you merge it
from the master branch, Git will know how you merged it, so you’ll not
have to do that merge again.
Another useful tool, especially if you do not always work in X-Window
environment, is git show-branch.
$ git show-branch --topo-order --more=1 master mybranch
* [master] Merge work in mybranch
 ! [mybranch] Some work.
--
-  [master] Merge work in mybranch
*+ [mybranch] Some work.
*  [master^] Some fun.
The first two lines indicate that it is showing the two branches
with the titles of their top-of-the-tree commits, you are currently on
master branch (notice the asterisk * character), and the first
column for the later output lines is used to show commits contained in the
master branch, and the second column for the mybranch
branch. Three commits are shown along with their titles.
All of them have non blank characters in the first column (*
shows an ordinary commit on the current branch, — is a merge commit), which
means they are now part of the master branch. Only the «Some
work» commit has the plus + character in the second column,
because mybranch has not been merged to incorporate these
commits from the master branch. The string inside brackets
before the commit log message is a short name you can use to
name the commit. In the above example, master and mybranch
are branch heads. master^ is the first parent of master
branch head. Please see Section G.4.12, “gitrevisions(7)” if you want to
see more complex cases.
|
|
Note |
|---|---|
|
Without the —more=1 option, git show-branch would not output the |
|
|
Note |
|---|---|
|
If there were more commits on the master branch after the merge, the |
Now, let’s pretend you are the one who did all the work in
mybranch, and the fruit of your hard work has finally been merged
to the master branch. Let’s go back to mybranch, and run
git merge to get the «upstream changes» back to your branch.
$ git checkout mybranch
$ git merge -m "Merge upstream changes." master
This outputs something like this (the actual commit object names
would be different)
Updating from ae3a2da... to a80b4aa....
Fast-forward (no commit created; -m option ignored)
 example | 1 +
 hello   | 1 +
 2 files changed, 2 insertions(+)
Because your branch did not contain anything more than what had
already been merged into the master branch, the merge operation did
not actually do a merge. Instead, it just updated the top of
the tree of your branch to that of the master branch. This is
often called fast-forward merge.
You can run gitk —all again to see how the commit ancestry
looks like, or run show-branch, which tells you this.
$ git show-branch master mybranch
! [master] Merge work in mybranch
 * [mybranch] Merge work in mybranch
--
-- [master] Merge work in mybranch
Merging external work
It’s usually much more common that you merge with somebody else than
merging with your own branches, so it’s worth pointing out that Git
makes that very easy too, and in fact, it’s not that different from
doing a git merge. In fact, a remote merge ends up being nothing
more than «fetch the work from a remote repository into a temporary tag»
followed by a git merge.
Fetching from a remote repository is done by, unsurprisingly,
git fetch:
$ git fetch <remote-repository>
One of the following transports can be used to name the
repository to download from:
-
SSH
-
remote.machine:/path/to/repo.git/ or
ssh://remote.machine/path/to/repo.git/
This transport can be used for both uploading and downloading,
and requires you to have a log-in privilege over ssh to the
remote machine. It finds out the set of objects the other side
lacks by exchanging the head commits both ends have and
transfers (close to) minimum set of objects. It is by far the
most efficient way to exchange Git objects between repositories. -
Local directory
-
/path/to/repo.git/
This transport is the same as SSH transport but uses sh to run
both ends on the local machine instead of running other end on
the remote machine via ssh. -
Git Native
-
git://remote.machine/path/to/repo.git/
This transport was designed for anonymous downloading. Like SSH
transport, it finds out the set of objects the downstream side
lacks and transfers (close to) minimum set of objects. -
HTTP(S)
-
http://remote.machine/path/to/repo.git/
Downloader from http and https URL
first obtains the topmost commit object name from the remote site
by looking at the specified refname under repo.git/refs/ directory,
and then tries to obtain the
commit object by downloading from repo.git/objects/xx/xxx…
using the object name of that commit object. Then it reads the
commit object to find out its parent commits and the associate
tree object; it repeats this process until it gets all the
necessary objects. Because of this behavior, they are
sometimes also called commit walkers.The commit walkers are sometimes also called dumb
transports, because they do not require any Git aware smart
server like Git Native transport does. Any stock HTTP server
that does not even support directory index would suffice. But
you must prepare your repository with git update-server-info
to help dumb transport downloaders.
Once you fetch from the remote repository, you merge that
with your current branch.
However — it’s such a common thing to fetch and then
immediately merge, that it’s called git pull, and you can
simply do
$ git pull <remote-repository>
and optionally give a branch-name for the remote end as a second
argument.
|
|
Note |
|---|---|
|
You could do without using any branches at all, by |
It is likely that you will be pulling from the same remote
repository from time to time. As a short hand, you can store
the remote repository URL in the local repository’s config file
like this:
$ git config remote.linus.url http://www.kernel.org/pub/scm/git/git.git/
and use the «linus» keyword with git pull instead of the full URL.
Examples.
- git pull linus
- git pull linus tag v0.99.1
the above are equivalent to:
- git pull http://www.kernel.org/pub/scm/git/git.git/ HEAD
- git pull http://www.kernel.org/pub/scm/git/git.git/ tag v0.99.1
How does the merge work?
We said this tutorial shows what plumbing does to help you cope
with the porcelain that isn’t flushing, but we so far did not
talk about how the merge really works. If you are following
this tutorial the first time, I’d suggest to skip to «Publishing
your work» section and come back here later.
OK, still with me? To give us an example to look at, let’s go
back to the earlier repository with «hello» and «example» file,
and bring ourselves back to the pre-merge state:
$ git show-branch --more=2 master mybranch
! [master] Merge work in mybranch
 * [mybranch] Merge work in mybranch
--
-- [master] Merge work in mybranch
+* [master^2] Some work.
+* [master^] Some fun.
Remember, before running git merge, our master head was at
«Some fun.» commit, while our mybranch head was at «Some
work.» commit.
$ git checkout mybranch
$ git reset --hard master^2
$ git checkout master
$ git reset --hard master^
After rewinding, the commit structure should look like this:
$ git show-branch
* [master] Some fun.
 ! [mybranch] Some work.
--
*  [master] Some fun.
 + [mybranch] Some work.
*+ [master^] Initial commit
Now we are ready to experiment with the merge by hand.
git merge command, when merging two branches, uses 3-way merge
algorithm. First, it finds the common ancestor between them.
The command it uses is git merge-base:
$ mb=$(git merge-base HEAD mybranch)
The command writes the commit object name of the common ancestor
to the standard output, so we captured its output to a variable,
because we will be using it in the next step. By the way, the common
ancestor commit is the «Initial commit» commit in this case. You can
tell it by:
$ git name-rev --name-only --tags $mb
my-first-tag
After finding out a common ancestor commit, the second step is
this:
$ git read-tree -m -u $mb HEAD mybranch
This is the same git read-tree command we have already seen,
but it takes three trees, unlike previous examples. This reads
the contents of each tree into different stage in the index
file (the first tree goes to stage 1, the second to stage 2,
etc.). After reading three trees into three stages, the paths
that are the same in all three stages are collapsed into stage
0. Also paths that are the same in two of three stages are
collapsed into stage 0, taking the SHA-1 from either stage 2 or
stage 3, whichever is different from stage 1 (i.e. only one side
changed from the common ancestor).
After collapsing operation, paths that are different in three
trees are left in non-zero stages. At this point, you can
inspect the index file with this command:
$ git ls-files --stage
100644 7f8b141b65fdcee47321e399a2598a235a032422 0       example
100644 557db03de997c86a4a028e1ebd3a1ceb225be238 1       hello
100644 ba42a2a96e3027f3333e13ede4ccf4498c3ae942 2       hello
100644 cc44c73eb783565da5831b4d820c962954019b69 3       hello
In our example of only two files, we did not have unchanged
files so only example resulted in collapsing. But in real-life
large projects, when only a small number of files change in one commit,
this collapsing tends to trivially merge most of the paths
fairly quickly, leaving only a handful of real changes in non-zero
stages.
To look at only non-zero stages, use —unmerged flag:
$ git ls-files --unmerged
100644 557db03de997c86a4a028e1ebd3a1ceb225be238 1       hello
100644 ba42a2a96e3027f3333e13ede4ccf4498c3ae942 2       hello
100644 cc44c73eb783565da5831b4d820c962954019b69 3       hello
The next step of merging is to merge these three versions of the
file, using 3-way merge. This is done by giving
git merge-one-file command as one of the arguments to
git merge-index command:
$ git merge-index git-merge-one-file hello
Auto-merging hello
ERROR: Merge conflict in hello
fatal: merge program failed
git merge-one-file script is called with parameters to
describe those three versions, and is responsible to leave the
merge results in the working tree.
It is a fairly straightforward shell script, and
eventually calls merge program from RCS suite to perform a
file-level 3-way merge. In this case, merge detects
conflicts, and the merge result with conflict marks is left in
the working tree.. This can be seen if you run ls-files
—stage again at this point:
$ git ls-files --stage
100644 7f8b141b65fdcee47321e399a2598a235a032422 0       example
100644 557db03de997c86a4a028e1ebd3a1ceb225be238 1       hello
100644 ba42a2a96e3027f3333e13ede4ccf4498c3ae942 2       hello
100644 cc44c73eb783565da5831b4d820c962954019b69 3       hello
This is the state of the index file and the working file after
git merge returns control back to you, leaving the conflicting
merge for you to resolve. Notice that the path hello is still
unmerged, and what you see with git diff at this point is
differences since stage 2 (i.e. your version).
Publishing your work
So, we can use somebody else’s work from a remote repository, but
how can you prepare a repository to let other people pull from
it?
You do your real work in your working tree that has your
primary repository hanging under it as its .git subdirectory.
You could make that repository accessible remotely and ask
people to pull from it, but in practice that is not the way
things are usually done. A recommended way is to have a public
repository, make it reachable by other people, and when the
changes you made in your primary working tree are in good shape,
update the public repository from it. This is often called
pushing.
|
|
Note |
|---|---|
|
This public repository could further be mirrored, and that is |
Publishing the changes from your local (private) repository to
your remote (public) repository requires a write privilege on
the remote machine. You need to have an SSH account there to
run a single command, git-receive-pack.
First, you need to create an empty repository on the remote
machine that will house your public repository. This empty
repository will be populated and be kept up-to-date by pushing
into it later. Obviously, this repository creation needs to be
done only once.
|
|
Note |
|---|---|
|
git push uses a pair of commands, |
Your private repository’s Git directory is usually .git, but
your public repository is often named after the project name,
i.e. <project>.git. Let’s create such a public repository for
project my-git. After logging into the remote machine, create
an empty directory:
$ mkdir my-git.git
Then, make that directory into a Git repository by running
git init, but this time, since its name is not the usual
.git, we do things slightly differently:
$ GIT_DIR=my-git.git git init
Make sure this directory is available for others you want your
changes to be pulled via the transport of your choice. Also
you need to make sure that you have the git-receive-pack
program on the $PATH.
|
|
Note |
|---|---|
|
Many installations of sshd do not invoke your shell as the login |
|
|
Note |
|---|---|
|
If you plan to publish this repository to be accessed over http, |
Your «public repository» is now ready to accept your changes.
Come back to the machine you have your private repository. From
there, run this command:
$ git push <public-host>:/path/to/my-git.git master
This synchronizes your public repository to match the named
branch head (i.e. master in this case) and objects reachable
from them in your current repository.
As a real example, this is how I update my public Git
repository. Kernel.org mirror network takes care of the
propagation to other publicly visible machines:
$ git push master.kernel.org:/pub/scm/git/git.git/
Packing your repository
Earlier, we saw that one file under .git/objects/??/ directory
is stored for each Git object you create. This representation
is efficient to create atomically and safely, but
not so convenient to transport over the network. Since Git objects are
immutable once they are created, there is a way to optimize the
storage by «packing them together». The command
$ git repack
will do it for you. If you followed the tutorial examples, you
would have accumulated about 17 objects in .git/objects/??/
directories by now. git repack tells you how many objects it
packed, and stores the packed file in .git/objects/pack
directory.
|
|
Note |
|---|---|
|
You will see two files, pack-*.pack and pack-*.idx, |
If you are paranoid, running git verify-pack command would
detect if you have a corrupt pack, but do not worry too much.
Our programs are always perfect ;-).
Once you have packed objects, you do not need to leave the
unpacked objects that are contained in the pack file anymore.
$ git prune-packed
would remove them for you.
You can try running find .git/objects -type f before and after
you run git prune-packed if you are curious. Also git
count-objects would tell you how many unpacked objects are in
your repository and how much space they are consuming.
|
|
Note |
|---|---|
|
git pull is slightly cumbersome for HTTP transport, as a |
If you run git repack again at this point, it will say
«Nothing new to pack.». Once you continue your development and
accumulate the changes, running git repack again will create a
new pack, that contains objects created since you packed your
repository the last time. We recommend that you pack your project
soon after the initial import (unless you are starting your
project from scratch), and then run git repack every once in a
while, depending on how active your project is.
When a repository is synchronized via git push and git pull
objects packed in the source repository are usually stored
unpacked in the destination.
While this allows you to use different packing strategies on
both ends, it also means you may need to repack both
repositories every once in a while.
Working with Others
Although Git is a truly distributed system, it is often
convenient to organize your project with an informal hierarchy
of developers. Linux kernel development is run this way. There
is a nice illustration (page 17, «Merges to Mainline») in
http://www.xenotime.net/linux/mentor/linux-mentoring-2006.pdf[Randy Dunlap’s presentation].
It should be stressed that this hierarchy is purely informal.
There is nothing fundamental in Git that enforces the «chain of
patch flow» this hierarchy implies. You do not have to pull
from only one remote repository.
A recommended workflow for a «project lead» goes like this:
-
Prepare your primary repository on your local machine. Your
work is done there. -
Prepare a public repository accessible to others.
If other people are pulling from your repository over dumb
transport protocols (HTTP), you need to keep this repository
dumb transport friendly. After git init,
$GIT_DIR/hooks/post-update.sample copied from the standard templates
would contain a call to git update-server-info
but you need to manually enable the hook with
mv post-update.sample post-update. This makes sure
git update-server-info keeps the necessary files up-to-date. -
Push into the public repository from your primary
repository. -
git repack the public repository. This establishes a big
pack that contains the initial set of objects as the
baseline, and possibly git prune if the transport
used for pulling from your repository supports packed
repositories. -
Keep working in your primary repository. Your changes
include modifications of your own, patches you receive via
e-mails, and merges resulting from pulling the «public»
repositories of your «subsystem maintainers».You can repack this private repository whenever you feel like.
-
Push your changes to the public repository, and announce it
to the public. -
Every once in a while, git repack the public repository.
Go back to step 5. and continue working.
A recommended work cycle for a «subsystem maintainer» who works
on that project and has an own «public repository» goes like this:
-
Prepare your work repository, by git clone the public
repository of the «project lead». The URL used for the
initial cloning is stored in the remote.origin.url
configuration variable. -
Prepare a public repository accessible to others, just like
the «project lead» person does. -
Copy over the packed files from «project lead» public
repository to your public repository, unless the «project
lead» repository lives on the same machine as yours. In the
latter case, you can use objects/info/alternates file to
point at the repository you are borrowing from. -
Push into the public repository from your primary
repository. Run git repack, and possibly git prune if the
transport used for pulling from your repository supports
packed repositories. -
Keep working in your primary repository. Your changes
include modifications of your own, patches you receive via
e-mails, and merges resulting from pulling the «public»
repositories of your «project lead» and possibly your
«sub-subsystem maintainers».You can repack this private repository whenever you feel
like. -
Push your changes to your public repository, and ask your
«project lead» and possibly your «sub-subsystem
maintainers» to pull from it. -
Every once in a while, git repack the public repository.
Go back to step 5. and continue working.
A recommended work cycle for an «individual developer» who does
not have a «public» repository is somewhat different. It goes
like this:
-
Prepare your work repository, by git clone the public
repository of the «project lead» (or a «subsystem
maintainer», if you work on a subsystem). The URL used for
the initial cloning is stored in the remote.origin.url
configuration variable. - Do your work in your repository on master branch.
-
Run git fetch origin from the public repository of your
upstream every once in a while. This does only the first
half of git pull but does not merge. The head of the
public repository is stored in .git/refs/remotes/origin/master. -
Use git cherry origin to see which ones of your patches
were accepted, and/or use git rebase origin to port your
unmerged changes forward to the updated upstream. -
Use git format-patch origin to prepare patches for e-mail
submission to your upstream and send it out. Go back to
step 2. and continue.
Working with Others, Shared Repository Style
If you are coming from CVS background, the style of cooperation
suggested in the previous section may be new to you. You do not
have to worry. Git supports «shared public repository» style of
cooperation you are probably more familiar with as well.
See Section G.2.4, “gitcvs-migration(7)” for the details.
Bundling your work together
It is likely that you will be working on more than one thing at
a time. It is easy to manage those more-or-less independent tasks
using branches with Git.
We have already seen how branches work previously,
with «fun and work» example using two branches. The idea is the
same if there are more than two branches. Let’s say you started
out from «master» head, and have some new code in the «master»
branch, and two independent fixes in the «commit-fix» and
«diff-fix» branches:
$ git show-branch
! [commit-fix] Fix commit message normalization.
 ! [diff-fix] Fix rename detection.
  * [master] Release candidate #1
---
 +  [diff-fix] Fix rename detection.
 +  [diff-fix~1] Better common substring algorithm.
+   [commit-fix] Fix commit message normalization.
  * [master] Release candidate #1
++* [diff-fix~2] Pretty-print messages.
Both fixes are tested well, and at this point, you want to merge
in both of them. You could merge in diff-fix first and then
commit-fix next, like this:
$ git merge -m "Merge fix in diff-fix" diff-fix
$ git merge -m "Merge fix in commit-fix" commit-fix
Which would result in:
$ git show-branch
! [commit-fix] Fix commit message normalization.
 ! [diff-fix] Fix rename detection.
  * [master] Merge fix in commit-fix
---
  - [master] Merge fix in commit-fix
+ * [commit-fix] Fix commit message normalization.
  - [master~1] Merge fix in diff-fix
 +* [diff-fix] Fix rename detection.
 +* [diff-fix~1] Better common substring algorithm.
  * [master~2] Release candidate #1
++* [master~3] Pretty-print messages.
However, there is no particular reason to merge in one branch
first and the other next, when what you have are a set of truly
independent changes (if the order mattered, then they are not
independent by definition). You could instead merge those two
branches into the current branch at once. First let’s undo what
we just did and start over. We would want to get the master
branch before these two merges by resetting it to master~2:
$ git reset --hard master~2
You can make sure git show-branch matches the state before
those two git merge you just did. Then, instead of running
two git merge commands in a row, you would merge these two
branch heads (this is known as making an Octopus):
$ git merge commit-fix diff-fix
$ git show-branch
! [commit-fix] Fix commit message normalization.
 ! [diff-fix] Fix rename detection.
  * [master] Octopus merge of branches 'diff-fix' and 'commit-fix'
---
  - [master] Octopus merge of branches 'diff-fix' and 'commit-fix'
+ * [commit-fix] Fix commit message normalization.
 +* [diff-fix] Fix rename detection.
 +* [diff-fix~1] Better common substring algorithm.
  * [master~1] Release candidate #1
++* [master~2] Pretty-print messages.
Note that you should not do Octopus because you can. An octopus
is a valid thing to do and often makes it easier to view the
commit history if you are merging more than two independent
changes at the same time. However, if you have merge conflicts
with any of the branches you are merging in and need to hand
resolve, that is an indication that the development happened in
those branches were not independent after all, and you should
merge two at a time, documenting how you resolved the conflicts,
and the reason why you preferred changes made in one side over
the other. Otherwise it would make the project history harder
to follow, not easier.
SEE ALSO
Section G.2.1, “gittutorial(7)”,
Section G.2.2, “gittutorial-2(7)”,
Section G.2.4, “gitcvs-migration(7)”,
Section G.3.58, “git-help(1)”,
Section G.2.5, “giteveryday(7)”,
The Git User’s Manual
GIT
Part of the Section G.3.1, “git(1)” suite.
G.2.4. gitcvs-migration(7)
NAME
gitcvs-migration — Git for CVS users
SYNOPSIS
DESCRIPTION
Git differs from CVS in that every working tree contains a repository with
a full copy of the project history, and no repository is inherently more
important than any other. However, you can emulate the CVS model by
designating a single shared repository which people can synchronize with;
this document explains how to do that.
Some basic familiarity with Git is required. Having gone through
Section G.2.1, “gittutorial(7)” and
Section G.4.16, “gitglossary(7)” should be sufficient.
Developing against a shared repository
Suppose a shared repository is set up in /pub/repo.git on the host
foo.com. Then as an individual committer you can clone the shared
repository over ssh with:
$ git clone foo.com:/pub/repo.git/ my-project
$ cd my-project
and hack away. The equivalent of cvs update is
$ git pull origin
which merges in any work that others might have done since the clone
operation. If there are uncommitted changes in your working tree, commit
them first before running git pull.
|
|
Note |
|---|---|
|
The pull command knows where to get updates from because of certain |
You can update the shared repository with your changes by first committing
your changes, and then using the git push command:
$ git push origin master
to «push» those commits to the shared repository. If someone else has
updated the repository more recently, git push, like cvs commit, will
complain, in which case you must pull any changes before attempting the
push again.
In the git push command above we specify the name of the remote branch
to update (master). If we leave that out, git push tries to update
any branches in the remote repository that have the same name as a branch
in the local repository. So the last push can be done with either of:
$ git push origin
$ git push foo.com:/pub/project.git/
as long as the shared repository does not have any branches
other than master.
Setting Up a Shared Repository
We assume you have already created a Git repository for your project,
possibly created from scratch or from a tarball (see
Section G.2.1, “gittutorial(7)”), or imported from an already existing CVS
repository (see the next section).
Assume your existing repo is at /home/alice/myproject. Create a new «bare»
repository (a repository without a working tree) and fetch your project into
it:
$ mkdir /pub/my-repo.git
$ cd /pub/my-repo.git
$ git --bare init --shared
$ git --bare fetch /home/alice/myproject master:master
Next, give every team member read/write access to this repository. One
easy way to do this is to give all the team members ssh access to the
machine where the repository is hosted. If you don’t want to give them a
full shell on the machine, there is a restricted shell which only allows
users to do Git pushes and pulls; see Section G.3.121, “git-shell(1)”.
Put all the committers in the same group, and make the repository
writable by that group:
$ chgrp -R $group /pub/my-repo.git
Make sure committers have a umask of at most 027, so that the directories
they create are writable and searchable by other group members.
Importing a CVS archive
First, install version 2.1 or higher of cvsps from
http://www.cobite.com/cvsps/ and make
sure it is in your path. Then cd to a checked out CVS working directory
of the project you are interested in and run Section G.3.34, “git-cvsimport(1)”:
$ git cvsimport -C <destination> <module>
This puts a Git archive of the named CVS module in the directory
<destination>, which will be created if necessary.
The import checks out from CVS every revision of every file. Reportedly
cvsimport can average some twenty revisions per second, so for a
medium-sized project this should not take more than a couple of minutes.
Larger projects or remote repositories may take longer.
The main trunk is stored in the Git branch named origin, and additional
CVS branches are stored in Git branches with the same names. The most
recent version of the main trunk is also left checked out on the master
branch, so you can start adding your own changes right away.
The import is incremental, so if you call it again next month it will
fetch any CVS updates that have been made in the meantime. For this to
work, you must not modify the imported branches; instead, create new
branches for your own changes, and merge in the imported branches as
necessary.
If you want a shared repository, you will need to make a bare clone
of the imported directory, as described above. Then treat the imported
directory as another development clone for purposes of merging
incremental imports.
Advanced Shared Repository Management
Git allows you to specify scripts called «hooks» to be run at certain
points. You can use these, for example, to send all commits to the shared
repository to a mailing list. See Section G.4.6, “githooks(5)”.
You can enforce finer grained permissions using update hooks. See
Controlling access to branches using
update hooks.
Providing CVS Access to a Git Repository
It is also possible to provide true CVS access to a Git repository, so
that developers can still use CVS; see Section G.3.35, “git-cvsserver(1)” for
details.
Alternative Development Models
CVS users are accustomed to giving a group of developers commit access to
a common repository. As we’ve seen, this is also possible with Git.
However, the distributed nature of Git allows other development models,
and you may want to first consider whether one of them might be a better
fit for your project.
For example, you can choose a single person to maintain the project’s
primary public repository. Other developers then clone this repository
and each work in their own clone. When they have a series of changes that
they’re happy with, they ask the maintainer to pull from the branch
containing the changes. The maintainer reviews their changes and pulls
them into the primary repository, which other developers pull from as
necessary to stay coordinated. The Linux kernel and other projects use
variants of this model.
With a small group, developers may just pull changes from each other’s
repositories without the need for a central maintainer.
SEE ALSO
Section G.2.1, “gittutorial(7)”,
Section G.2.2, “gittutorial-2(7)”,
Section G.2.3, “gitcore-tutorial(7)”,
Section G.4.16, “gitglossary(7)”,
Section G.2.5, “giteveryday(7)”,
The Git User’s Manual
GIT
Part of the Section G.3.1, “git(1)” suite.
G.2.5. giteveryday(7)
NAME
giteveryday — A useful minimum set of commands for Everyday Git
SYNOPSIS
Everyday Git With 20 Commands Or So
DESCRIPTION
Git users can broadly be grouped into four categories for the purposes of
describing here a small set of useful command for everyday Git.
-
Individual Developer (Standalone) commands are essential
for anybody who makes a commit, even for somebody who works alone. -
If you work with other people, you will need commands listed in
the Individual Developer (Participant) section as well. -
People who play the Integrator role need to learn some
more commands in addition to the above. -
Repository Administration commands are for system
administrators who are responsible for the care and feeding
of Git repositories.
Individual Developer (Standalone)
A standalone individual developer does not exchange patches with
other people, and works alone in a single repository, using the
following commands.
- Section G.3.65, “git-init(1)” to create a new repository.
- Section G.3.68, “git-log(1)” to see what happened.
-
Section G.3.18, “git-checkout(1)” and Section G.3.10, “git-branch(1)” to switch
branches. - Section G.3.2, “git-add(1)” to manage the index file.
-
Section G.3.41, “git-diff(1)” and Section G.3.129, “git-status(1)” to see what
you are in the middle of doing. - Section G.3.26, “git-commit(1)” to advance the current branch.
-
Section G.3.111, “git-reset(1)” and Section G.3.18, “git-checkout(1)” (with
pathname parameters) to undo changes. - Section G.3.79, “git-merge(1)” to merge between local branches.
- Section G.3.99, “git-rebase(1)” to maintain topic branches.
- Section G.3.134, “git-tag(1)” to mark a known point.
1. Examples
-
Use a tarball as a starting point for a new repository.
-
$ tar zxf frotz.tar.gz
$ cd frotz
$ git init
$ git add .
$ git commit -m "import of frotz source tree."
$ git tag v2.43
$ git commit -m "import of frotz source tree."
$ git tag v2.43 add everything under the current directory.
make a lightweight, unannotated tag.
-
Create a topic branch and develop.
-
$ git checkout -b alsa-audio
$ edit/compile/test
$ git checkout -- curses/ux_audio_oss.c
$ git add curses/ux_audio_alsa.c
$ edit/compile/test
$ git diff HEAD
$ git commit -a -s
$ edit/compile/test
$ git diff HEAD^
$ git commit -a --amend
$ git checkout master
$ git merge alsa-audio
$ git log --since='3 days ago'
$ git log v2.43.. curses/
create a new topic branch.
revert your botched changes in curses/ux_audio_oss.c.
you need to tell Git if you added a new file; removal and
modification will be caught if you do git commit -a later. to see what changes you are committing.
commit everything, as you have tested, with your sign-off.
look at all your changes including the previous commit.
amend the previous commit, adding all your new changes,
using your original message. switch to the master branch.
merge a topic branch into your master branch.
review commit logs; other forms to limit output can be
combined and include -10 (to show up to 10 commits),
—until=2005-12-10, etc. view only the changes that touch what’s in curses/
directory, since v2.43 tag.
 $ git commit -m "import of frotz source tree."
$ git tag v2.43
$ git commit -m "import of frotz source tree."
$ git tag v2.43 
 $ edit/compile/test
$ git diff HEAD
$ edit/compile/test
$ git diff HEAD  $ git commit -a -s
  $ edit/compile/test
$ git diff HEAD^
$ edit/compile/test
$ git diff HEAD^  $ git commit -a --amend
  $ git checkout master
  $ git merge alsa-audio
  $ git log --since='3 days ago'
  $ git log v2.43.. curses/
Individual Developer (Participant)
A developer working as a participant in a group project needs to
learn how to communicate with others, and uses these commands in
addition to the ones needed by a standalone developer.
-
Section G.3.23, “git-clone(1)” from the upstream to prime your local
repository. -
Section G.3.95, “git-pull(1)” and Section G.3.46, “git-fetch(1)” from «origin»
to keep up-to-date with the upstream. -
Section G.3.96, “git-push(1)” to shared repository, if you adopt CVS
style shared repository workflow. -
Section G.3.50, “git-format-patch(1)” to prepare e-mail submission, if
you adopt Linux kernel-style public forum workflow. -
Section G.3.116, “git-send-email(1)” to send your e-mail submission without
corruption by your MUA. -
Section G.3.109, “git-request-pull(1)” to create a summary of changes
for your upstream to pull.
1. Examples
-
Clone the upstream and work on it. Feed changes to upstream.
-
$ git clone git://git.kernel.org/pub/scm/.../torvalds/linux-2.6 my2.6
$ cd my2.6
$ git checkout -b mine master
$ edit/compile/test; git commit -a -s
$ git format-patch master
$ git send-email --to="person <[email protected]>" 00*.patch
$ git checkout master
$ git pull
$ git log -p ORIG_HEAD.. arch/i386 include/asm-i386
$ git ls-remote --heads http://git.kernel.org/.../jgarzik/libata-dev.git
$ git pull git://git.kernel.org/pub/.../jgarzik/libata-dev.git ALL
$ git reset --hard ORIG_HEAD
$ git gc
checkout a new branch mine from master.
repeat as needed.
extract patches from your branch, relative to master,
and email them.
return to master, ready to see what’s new
git pull fetches from origin by default and merges into the
current branch. immediately after pulling, look at the changes done upstream
since last time we checked, only in the
area we are interested in. check the branch names in an external repository (if not known).
fetch from a specific branch ALL from a specific repository
and merge it. revert the pull.
garbage collect leftover objects from reverted pull.
-
Push into another repository.
-
satellite$ git clone mothership:frotz frotz
satellite$ cd frotz
satellite$ git config --get-regexp '^(remote|branch).'
remote.origin.url mothership:frotz
remote.origin.fetch refs/heads/*:refs/remotes/origin/*
branch.master.remote origin
branch.master.merge refs/heads/master
satellite$ git config remote.origin.push
           +refs/heads/*:refs/remotes/satellite/*
satellite$ edit/compile/test/commit
satellite$ git push origin

mothership$ cd frotz
mothership$ git checkout master
mothership$ git merge satellite/master
mothership machine has a frotz repository under your home
directory; clone from it to start a repository on the satellite
machine. clone sets these configuration variables by default.
It arranges git pull to fetch and store the branches of mothership
machine to local remotes/origin/* remote-tracking branches. arrange git push to push all local branches to
their corresponding branch of the mothership machine. push will stash all our work away on remotes/satellite/*
remote-tracking branches on the mothership machine. You could use this
as a back-up method. Likewise, you can pretend that mothership
«fetched» from you (useful when access is one sided). on mothership machine, merge the work done on the satellite
machine into the master branch. -
Branch off of a specific tag.
-
$ git checkout -b private2.6.14 v2.6.14
$ edit/compile/test; git commit -a
$ git checkout master
$ git cherry-pick v2.6.14..private2.6.14
create a private branch based on a well known (but somewhat behind)
tag. forward port all changes in private2.6.14 branch to master branch
without a formal «merging». Or longhand
git format-patch -k -m —stdout v2.6.14..private2.6.14 |
git am -3 -k
An alternate participant submission mechanism is using the
git request-pull or pull-request mechanisms (e.g as used on
GitHub (www.github.com) to notify your upstream of your
contribution.
Integrator
A fairly central person acting as the integrator in a group
project receives changes made by others, reviews and integrates
them and publishes the result for others to use, using these
commands in addition to the ones needed by participants.
This section can also be used by those who respond to git
request-pull or pull-request on GitHub (www.github.com) to
integrate the work of others into their history. An sub-area
lieutenant for a repository will act both as a participant and
as an integrator.
-
Section G.3.3, “git-am(1)” to apply patches e-mailed in from your
contributors. - Section G.3.95, “git-pull(1)” to merge from your trusted lieutenants.
-
Section G.3.50, “git-format-patch(1)” to prepare and send suggested
alternative to contributors. - Section G.3.114, “git-revert(1)” to undo botched commits.
- Section G.3.96, “git-push(1)” to publish the bleeding edge.
1. Examples
-
A typical integrator’s Git day.
-
$ git status
$ git branch --no-merged master
$ mailx
& s 2 3 4 5 ./+to-apply
& s 7 8 ./+hold-linus
& q
$ git checkout -b topic/one master
$ git am -3 -i -s ./+to-apply
$ compile/test
$ git checkout -b hold/linus && git am -3 -i -s ./+hold-linus
$ git checkout topic/one && git rebase master
$ git checkout pu && git reset --hard next
$ git merge topic/one topic/two && git merge hold/linus
$ git checkout maint
$ git cherry-pick master~4
$ compile/test
$ git tag -s -m "GIT 0.99.9x" v0.99.9x
$ git fetch ko && for branch in master maint next pu
    do
        git show-branch ko/$branch $branch
    done
$ git push --follow-tags ko
see what you were in the middle of doing, if anything.
see which branches haven’t been merged into master yet.
Likewise for any other integration branches e.g. maint, next
and pu (potential updates). read mails, save ones that are applicable, and save others
that are not quite ready (other mail readers are available). apply them, interactively, with your sign-offs.
create topic branch as needed and apply, again with sign-offs.
rebase internal topic branch that has not been merged to the
master or exposed as a part of a stable branch. restart pu every time from the next.
and bundle topic branches still cooking.
backport a critical fix.
create a signed tag.
make sure master was not accidentally rewound beyond that
already pushed out. ko shorthand points at the Git maintainer’s
repository at kernel.org, and looks like this:(in .git/config) [remote "ko"] url = kernel.org:/pub/scm/git/git.git fetch = refs/heads/*:refs/remotes/ko/* push = refs/heads/master push = refs/heads/next push = +refs/heads/pu push = refs/heads/maint In the output from git show-branch, master should have
everything ko/master has, and next should have
everything ko/next has, etc. push out the bleeding edge, together with new tags that point
into the pushed history.
 done
$ git push --follow-tags ko
done
$ git push --follow-tags ko 
Repository Administration
A repository administrator uses the following tools to set up
and maintain access to the repository by developers.
-
Section G.3.36, “git-daemon(1)” to allow anonymous download from
repository. -
Section G.3.121, “git-shell(1)” can be used as a restricted login shell
for shared central repository users. -
Section G.3.59, “git-http-backend(1)” provides a server side implementation
of Git-over-HTTP («Smart http») allowing both fetch and push services. -
Section G.4.13, “gitweb(1)” provides a web front-end to Git repositories,
which can be set-up using the Section G.3.66, “git-instaweb(1)” script.
update hook howto has a good
example of managing a shared central repository.
In addition there are a number of other widely deployed hosting, browsing
and reviewing solutions such as:
- gitolite, gerrit code review, cgit and others.
1. Examples
-
We assume the following in /etc/services
-
$ grep 9418 /etc/services
git             9418/tcp                # Git Version Control System
-
Run git-daemon to serve /pub/scm from inetd.
-
$ grep git /etc/inetd.conf
git     stream  tcp     nowait  nobody
  /usr/bin/git-daemon git-daemon --inetd --export-all /pub/scm
The actual configuration line should be on one line.
-
Run git-daemon to serve /pub/scm from xinetd.
-
$ cat /etc/xinetd.d/git-daemon
# default: off
# description: The Git server offers access to Git repositories
service git
{
        disable = no
        type            = UNLISTED
        port            = 9418
        socket_type     = stream
        wait            = no
        user            = nobody
        server          = /usr/bin/git-daemon
        server_args     = --inetd --export-all --base-path=/pub/scm
        log_on_failure  += USERID
}
Check your xinetd(8) documentation and setup, this is from a Fedora system.
Others might be different. -
Give push/pull only access to developers using git-over-ssh.
-
e.g. those using:
$ git push/pull ssh://host.xz/pub/scm/project$ grep git /etc/passwd
alice:x:1000:1000::/home/alice:/usr/bin/git-shell
bob:x:1001:1001::/home/bob:/usr/bin/git-shell
cindy:x:1002:1002::/home/cindy:/usr/bin/git-shell
david:x:1003:1003::/home/david:/usr/bin/git-shell
$ grep git /etc/shells
/usr/bin/git-shell log-in shell is set to /usr/bin/git-shell, which does not
allow anything but git push and git pull. The users require
ssh access to the machine. in many distributions /etc/shells needs to list what is used
as the login shell. -
CVS-style shared repository.
-
$ grep git /etc/group
git:x:9418:alice,bob,cindy,david
$ cd /home/devo.git
$ ls -l
  lrwxrwxrwx   1 david git    17 Dec  4 22:40 HEAD -> refs/heads/master
  drwxrwsr-x   2 david git  4096 Dec  4 22:40 branches
  -rw-rw-r--   1 david git    84 Dec  4 22:40 config
  -rw-rw-r--   1 david git    58 Dec  4 22:40 description
  drwxrwsr-x   2 david git  4096 Dec  4 22:40 hooks
  -rw-rw-r--   1 david git 37504 Dec  4 22:40 index
  drwxrwsr-x   2 david git  4096 Dec  4 22:40 info
  drwxrwsr-x   4 david git  4096 Dec  4 22:40 objects
  drwxrwsr-x   4 david git  4096 Nov  7 14:58 refs
  drwxrwsr-x   2 david git  4096 Dec  4 22:40 remotes
$ ls -l hooks/update
  -r-xr-xr-x   1 david git  3536 Dec  4 22:40 update
$ cat info/allowed-users
refs/heads/master       alice|cindy
refs/heads/doc-update   bob
refs/tags/v[0-9]*       david
place the developers into the same git group.
and make the shared repository writable by the group.
use update-hook example by Carl from Documentation/howto/
for branch policy control. alice and cindy can push into master, only bob can push into doc-update.
david is the release manager and is the only person who can
create and push version tags.
Разработка с использованием сервиса GitHub
Содержание
- Установка git
- Установка git-клиента TortoiseGit
- Принципы работы с репозиторием
- Типовая схема совместной разработки проекта
- Создание и оформление commit-ов
- Запросы на внесение изменений (Pull requests)
- Именование документов
- Использование Мarkdown
1. Установка git
Скачать и установить с официального сайта Git.
Git (произносится «гит») — распределённая система управления версиями. Проект был создан Линусом Торвальдсом для управления разработкой ядра Linux, первая версия выпущена 7 апреля 2005 года.
2. Установка git-клиента TortoiseGit
Скачать и установить с официального сайта TortoiseGit.
TortoiseGit — визуальный клиент системы управления исходными кодами программ Git для ОС Microsoft Windows. Реализован как расширение проводника Windows (shell extension). Подрисовывает иконки к файлам, находящимся под управлением Git, для отображения их статуса в Git.
Пользовательский интерфейс сделан на основе TortoiseSVN, поэтому практически полностью совпадает с ним, за исключением возможностей, специфичных для Git.
3. Принципы работы с репозиторием
Прежде чем начать работу с репозиторием, необходимо сделать его собственное ответвление (fork — произносится «форк»). Для этого необходимо нажать кнопку Fork в правом верхнем углу экрана:

Если появилось окно с выбором организации, то следует выбрать свой профиль.
После этого клонируем собственное ответвление (fork) репозитория:

Для этого используем контекстное меню (длительное нажатие правой клавишей мыши) для требуемого каталога (рекомендуется использовать путь "p:savushkin-r-d"), далее выбираем пункт "Git Clone":

Задаем параметры клонирования:
URL:        https://github.com/savushkin-r-d/hello-tortoisegit.git
Directory:  P:/savushkin-r-d/hello-tortoisegit/
в диалоговом окне:

Далее нажимаем кнопку OK и наблюдаем за ходом операции:

После успешного завершения соответствующий каталог будет содержать репозиторий git.
Чтобы удобно было работать, сразу стоит сделать себе ветку dev для работы (также используя контекстное меню):

Задаем название ветви, комментарий и указываем, что хотим далее работать с ней (активная галочка "Switch to new branch"):

Теперь можно работать с версией в своей ветке dev. Настоятельно рекомендуется использовать ветку для разработки, а не master.
Добавим наш основной репозиторий, чтобы с него можно было обновляться (более подробно про команды):

Нажимаем OK для окна с описанием подхода для хранения настроек:

Далее добавляем основной репозиторий. Задаем имя и путь для основного репозитория:
Remote: upstream
URL:    https://github.com/savushkin-r-d/hello-tortoisegit.git
для соответствующих полей и нажимаем кнопку Add New/Save:

и соглашаемся отключить обновление данного репозитория (нажимаем кнопку "Да"). Также отменяем получение ветвей добавленного репозитория:

(нажимаем кнопку "Нет").
Важно: используйте следующие имена для remote ссылок:
upstream— основной репозиторий (центральный), на нем всегда стабильная версия вmaster;origin— вашforkосновного репозитория.
Разделение на upstream и origin позволяет вам не бояться «сломать» что-либо в основном репозитории. Так как вся ваша работа будет происходить с fork-ом.
4. Типовая схема совместной разработки проекта
Типовая схема совместной работы состоит из следующих этапов:
- Обновление текущей версии до актуального состояния
- Внесение изменений
- Фиксация изменений (commit) в своем репозитории
- Создание запроса на внесение изменений (Pull request) в основной репозиторий
- Доработка по итогам рецензирования
- Удаление ветви после принятия запроса (завершение разработки)
1. Обновление текущей версии до актуального состояния
Далее будет ряд команд, которые позволят получать обновления и работать с основным репозиторием. Предполагается, что для разработки создана ветвь dev (смотри 3. Принципы работы с репозиторием). Для их выполнения необходимо через контекстное меню для каталога репозитория вызвать консоль git:

Отобразится окно консоли для текущего репозитория:

git checkout master        # переключаемся на ветку master
git remote update          # обновляем все remote
git update upstream/master # переносим в наш локальный мастер все изменения
git push origin master     # пушим в наш форк свежий master
git checkout dev           # переключаемся на нашу рабочую ветку
git rebase master          # переносим изменения из мастера в нашу ветку
Результат выполнения данных команд:

Для переноса изменений мы используем rebase — это позволяет сделать историю изменений легкой для чтения (более подробно можно почитать тут или тут). Если интересно чем это лучше merge то можно почитать эту статью.
2. Внесение изменений
Используя редактор (рекомендуется использовать Visual Studio Code) вносим изменения в файлы репозитория.
3. Фиксация изменений (commit) в своем репозитории
Вызываем через контекстное меню команду "Git Commit":

Далее в окне фиксации изменений заполняем комментарий, проверяем корректность вносимых изменений для списка изменяемых файлов и нажимаем кнопку "Commit":

Отображается окно с результатами выполнения операции, далее фиксируем их в своем ответвленном репозитории (fork) — кнопка "Push":

В появившемся окне проверяем корректность параметров:
Ref
Local:  dev
Remote: dev

Destination
Remote: origin
(из локальной ветви dev переносим изменения в удаленный репозиторий на сервер Github):

Нажимаем "ОК" и получаем результат выполнения данной операции:

Далее, если все необходимые изменения внесены, можно создать запрос на внесение изменений (Pull request) для того, чтобы данные изменения попали в основной (upstream) репозиторий.
4. Создание запроса на внесение изменений (Pull request) в основной репозиторий
После фиксации изменений (смотри предыдущий рисунок) переходим по активной ссылке на страницу Github для ветви dev:

В браузере отображается следующая страница, для создания запроса на внесение изменений нажимаем соответствующую кнопку:

Далее отображается страница с параметрами. Необходимо заполнить заголовок запроса, выбрать рецензентов, указать ответственного, добавить поясняющие метки. Также на данной странице проверяются изменения, которые предлагает данный запрос и другая дополнительная информация:

После заполнения всех полей нажимаем на кнопку "Create pull request" для создания запроса. Созданный запрос будет отображаться на соответствующей вкладке "Pull requests".
5. Доработка по итогам рецензирования
Во время рецензирования могут быть выявлены ошибки, предложены улучшения — данные изменения необходимо фиксировать в свою ветку origin/dev — они автоматически отобразятся на странице запроса внесения изменений.
6. Обновление ветви после принятия запроса (завершение разработки)
После принятия запроса необходимо обновить ветвь master (см. пункт Обновление текущей версии до актуального состояния) и переключиться на неё. Для следующей разработки, пересоздать ветвь dev (активная галочка "Force"):

И далее по рассмотренной ранее схеме продолжать разработку.
5. Создание и оформление commit-ов
Каждый commit в репозиторий должен быть атомарным и иметь комментарий. Атомарность коммита заключается в том, что в нем находятся изменения в рамках одной задачи. Например: не стоит делать в одном коммите две такие вещи — переименование термина x в термин y; удаление ненужных файлов.
Стоит из этого сделать два отдельных коммита:
- переименование термина
xв терминy; - удаление ненужных файлов.
Каждый коммит НЕ должен приводить систему в «сломанное» состояние. После каждого из них она должна работать.
Чтобы упростить навигацию по истории к коммитам необходимо приписывать метки:
[метка] Содержание коммита (#issue)
[метка1][метка2] Содержание коммита (#issue)
Возможные варианты меток:
fix— когда были исправления в имеющихся исходниках;test— добавление и изменения в unit-тестах;doc— изменения в документации;img— изменения в фотографиях;config— изменения в конфигурационных файлах и файлах поддержки репозитория (например:.gitignore);review— изменения по комментариям после review.
Например:
- исправили ошибки в поясняющей картинке, тогда коммит выглядит так:
[img][fix] Исправлена ошибка в изображении (#38) // где #38 ссылка на issue
- добавили новые файлы и тесты к ним:
[img][test] Добавлено описание формата X
Таким образом разработчик, глядя на историю будет понимать, что меняется и где.
6. Запросы на внесение изменений (Pull requests)
Официальная документация по созданию Pull request.
К pull requests применяются следующие правила:
- создается из своей ветки на ветку
masterв основном репозитории; - автор НЕ имеет права делать
mergeсвоему merge request; - pull request должен быть просмотрен как минимум 2-мя людьми;
- если имеются автоматические тесты, то мержить pull request с НЕ работающими автоматическими тестами строго запрещено;
- просматривать pull request могут все желающие и высказывать свое мнение по нему или отдельным его частям;
- pull request принимается, когда все кто участвует в дискуссии пришли к «общему знаменателю».
Рецензия:
- для написания комментариев к исходникам в pull request, необходимо перейти на вкладку
Changesи добавлять комментарии к необходимым строкам:
 ;
;
- если ревьювер считает что merge request можно мержить и нет необходимых правок, то он делает
Approve. Если же требуются изменения, тоRequest changes:

7. Именование документов
Все документы (файлы) должны находится в каталоге с кратким точным названием (на английском языке), отражающее содержимое документа. Примеры названий каталогов:
- Description
- Manual
- Scheme
- Report
Непосредственно документы должны иметь название readme и расширение .md (используется язык разметки Мarkdown).
Возможно также использование других необходимых названий.
8. Использование Мarkdown
Данный облегчённый язык разметки повсеместно используется (для написания документации — *.md файла, комментариев и т.д.). Его подробное описание находится здесь.
уважаемые посетители блога, если Вам понравилась, то, пожалуйста, помогите автору с лечением. Подробности тут.
Что такое git? git — это распределенная система управления версиями.
Не так давно проект «Google API в Delphi» успешно переехал на новый адрес и теперь находится под управлением распределенной системы контроля версий Git. Для чего и почему мы это сделали — это вопрос второстепенный, а вот работа с Git, по крайней мере для меня, стала основной. По сути этот пост ни что иное как шпаргалка для себя любимого по выполнению основных операций при работе Git, но может эта шпаргалка поможет кому-то как и мне начать работу с этой DVCS.
Если Вы работаете в Delphi, то в этой статье представлено пошаговое руководство по настройке и работе с Git непосредственно из IDE Delphi
Небольшое введение. О чем вообще пойдет речь
Git — распределённая система управления версиями файлов. Проект был создан Линусом Торвальдсом для управления разработкой ядра Linux.
То обстоятельство, что система создавалась «под Linux» уже как бы намекает на то, что без консоли нам не обойтись. Но не стоит махать руками и кричать «консоль отстой, git — в печь» и все такое. Поверьте — консоль Linux и консоль Windows имеют для обычного пользователя только одно общее свойство — чёрный экран при первом запуске. Команды Linux (ИМХО) просты и запоминаются без проблем, а работать с консолью не составляет особого труда даже для такого чайника, как я.
Самым главным, на мой взгляд, отличием Git от того же SVN является то, что в Git нет такого понятия как главный репозиторий. Каждый разработчик использует свою локальную версию репозитория, в которую делает commit’ы и, при необходимости, синхронизирует все изменения с репозиторием, располагающимся на сервере.
Это обстоятельство и поставило меня в начале работы с Git в тупик.
Как это так commit и не в центральный репозиторий?
Как правильно отправлять данные на сервер?
Как вообще начинать работу?
Эти и ещё многие другие вопросы посещали меня на старте работы с Git. Сейчас я не буду углубляться далеко в теоретические вопросы Git, да и вообще любых систем контроля версия — всего этого полно в Сети. А затрону один практический момент — как начать работу вообще, чтобы потом не было мучительно больно за бесцельно потерянные исходники.
Качаем и устанавливаем софт
Для работы с Git под Windows имеются вполне работоспособные и юзабельные решения, например, msysgit. Однако если Вы ранее имели опыт работы с SVN и использовали в работе TortoiseSVN, то видимо, Вам захочется иметь аналог подобного интерфейса и для Git? Нет проблем вот аналог TortoiseSVN для Git — TortoiseGit.
По сути TortoiseGit после нажатия команды из контекстного меню запускает консольную команду из MSysGit и рисует в окошко ее вывод. Если вы не хотите или просто не хватает времени детально разобраться в консольных командах Git, то TortoiseGit — то, что Вам нужно.
Итак, если Вы работаете под 32-х битной Windows, то Вам необходимо скачать следующий софт:
- msysgit — качаем Git-1.7.1-previewXXXXXXXX.exe (11,6 Mb) Git For Windows
- TortoiseGit. На момент написания статьи последней была версия TortoiseGit-1.5.2.0-32bit.msi (19.6 MB). Новые версии Вы можете найти также по приведенной ссылке.
Получается, что скачать нам надо чуть больше 30 Mb.
Теперь устанавливаем скачанные программы.
Вначале ставим msysgit, а потом TortoiseGit.
При установке msysgit настройки по умолчанию можно не изменять.
При установке TortoiseGit выбираем в окне «Choose SSH Client» второе значение:
После успешной установки обоих продуктов работу над первым этапом можно считать завершенной. Приступим ко второму — получение доступа к репозиторию Git.
Получаем доступ к репозиторию
В качестве примера я буду рассматривать получение доступа к нашему репозиторию, который располагается на github.com.
Распишем все операции по шагам.
1. Регистрация на GitHub’e.
Эта операция не отличается абсолютно ничем от всех прочих регистраций на других сайтах. Единственное, что нам необходимо обязательно запомнить — адрес email который мы указывали при регистрации. Этот адрес можно видеть на главной странице своего профиля:

Профиль на GitHub.com
2. Генерируем ключ для доступа по SSH.
Вот тут хочешь-не хочешь, а надо запускать консоль. После установки msysgit у Вас на рабочем столе появился новый ярлык — Git Bush — вот с помощью него и запускаем консоль.
- Набираем в консоли следующую команду
ssh-keygen -t rsa -C «E-Mail из Вашего профиля»
- На экране появится запрос «Enter file in which to save the key». Пока оставим значение по умолчанию. Жмем Enter.
- Нас попросят ввести пароль. Эту часть тоже пропускаем — впоследствии пароль можно будет установить, а пока — учимся. Жмем опять Enter.
- Сгенерируются два файла один из которых — публичный ключ для доступа.
Если Вы все делали с настройками по умолчанию то файлы будут располагаться в директории:
C:/Documents and Settings/UserName/.ssh/
Заходим в директорию, открываем с помощью «Блокнота» файл ida_rsa.pub и копируем все его содержимое в буфер обмена.
3. Заносим публичный ключ доступа в профиль.
Для записи публичного ключа в профиль:
- Заходим в свой профиль github и жмем ссылку Account Settings (сверху)
- Выбираем пункт «SSH Public Keys»
- Жмем ссылку «Add another public key»
 Перед вами появится форма добавления нового публичного ключа. Вставляем из буфере весь скопированный ранее текст (из файла ida_rsa.pub) только в поле key — поле Title оставляем пустым.
На этом работа с публичными ключами закончена.
4. Просимся в проект.
Для этого достаточно найти наш проект на github и отправить одному из администраторов запрос на предоставление доступа к репозиторию. Или просто отправить мне email с логином на github. После того как вы будите записаны в список разработчиков проекта можно переходить к следующей фазе работы — получение исходников.
Доступ получен, исходники в Вашем распоряжении. Теперь переключаемся на работу с TortoiseGit. Для порядка, каждую из операций, которые мы будем сейчас выполнять я буду также записывать в виде консольной команды — лишним знание работы с консолью никогда не будут.
Итак, выбираем директорию на жестком диске где мы будем хранить все файлы. Далее действуем следующим образом:
1. Вызываем контекстное меню и выбираем пункт «TortoiseGit — Settings«:

В появившемся окне переходим сразу к пункту «Git — Config» и записываем свое имя и адрес электронной почты. Эти данные должны в точности совпадать с теми, что записаны в Вашем аккаунте на github, иначе ваш ключ просто не подойдет.
2. Клонируем репозиторий. Для этого заходим на страницу проекта, и копируем в буфер адрес:
![]() Теперь жмем правой кнопкой мыши на директории, в которой будем хранить исходники и в меню выбираем «Git Clone..«:
Теперь жмем правой кнопкой мыши на директории, в которой будем хранить исходники и в меню выбираем «Git Clone..«:
 В открывшемся окне в поле URL вставляем скопированный адрес и жмем «Ok»:
 Начнется процесс клонирования репозитория.
 Всё вышесказанное можно было бы заменить всего двумя командами в консоли:
cd path/to/dir
git clone URL
После клонирования репозитория Вы автоматически переключитесь на нашу главную ветку (master). Так как каждый из нас занят определенной работой в проекте, то у каждого своя ветвь в репозитории, поэтому и Вам придется создавать свой branch. Делается это достаточно просто.
3. Создаем свою ветку. Для этого жмем правую кнопку мыши на директории в которую мы клонировали репозиторий и выбираем в меню «TortoiseGit — Create Branch«:
 В открывшемся оке задаем название новой ветки и указываем на основании какой ветки репозитория мы будем создавать новую. Жмем «Ок», подтверждая создание ветки. Теперь переключаемся на свой новый branch.
Выбираем в меню «TortoiseGit — Switch/Checkout…«:
В открывшемся окне выбираем нашу новую ветку и жмем «Ок». Убеждаемся, что мы успешно переключились:
 По сути, все что касалось создания нового branch’a в консоли решилось бы всего одной командой:
checkout -b new-branch
4. Программируем. Теперь, когда мы все настроили — открываем необходимый проект в Delphi, вносим свои коррективы, изменяем модули и т.д. В общем ведем нормальную плодотворную работу с проектом.
5. Вносим изменения в репозиторий. После того как внесены какие-то изменения нам необходимо их закрепить в Git. И здесь опять же проявляется отличие этой системы контроля версий от того же SVN. Дело в том, что Commit в Git не сбрасывается сразу на сервер. Для того, чтобы внести изменения в удаленный репозиторий используется команда PUSH. В общем виде работа может быть построена следующим образом:
1. Вносятся изменения в проект
2. Изменения закрепляются в вашем локальном репозитории, используя команду Commit в меню или, используя консоль:
git commit
3. Когда Вам необходимо/удобно/требуется закрепить все изменения на сервере выполняем push в свою ветку (brunch). Команда консоли выглядит так:
git push origin <свое имя бранча>
Здесь стоит, наверное рассмотреть весь процесс на деле. К примеру, мы решили добавить в проект простой текстовый файл с описанием чего либо. Создаем файл, записываем в него данные и добавляем файл в индекс.
Для этого выбираем новый файл, вызываем меню и выбираем «Add…»:
 По рисунку можно видеть, что я вношу в индекс новый файл text.txt. Жмем «Ok».
После того как файл добавлен, можно сразу же сделать Commit — кнопка Commit появится в окне с выводом консоли. Жмем её и откроется окно для внесения Commit’a:
 Заполняем поле с описанием, жмем «Ок» и коммит готов. Если хотите сразу отправить эти изменения в репозиторий, то в окне с выводом консоли появится также кнопка PUSH. Если же Вас не устраивает таскать по 1 файлику туда-сюда или изменения столь незначительны, что их нет смысла отправлять на сервер, то просто продолжаете дальше кодить, а push выполним позднее.
Чтобы выполнить команду push можете поступить следующим образом:
1. Зажимаем Shift и вызываем контекстное меню. В меню должны появится дополнительные команды:
 Выбираем команду Push. Перед Вами откроется окно следующего содержания:

Все, что от Вас требуется на данном этапе — нажать на кнопку (на рисунке она выделена красным) найти в списке удаленную ветку в которую вы делаете push и два раза нажать Ok. Все изменения, произведенные Вами в локальном репозитории отправятся в Сеть.
Вот пожалуй все, что мне пока потребовалось использовать при работе с новой для меня системой контроля версий. Надеюсь эта мини-шпаргалка поможет кому-нибудь кроме меня. А если Вас заинтересовала работа с консолью, то как раз сейчас я изучаю Вот такие топики на habrahabr.ru:
1. Git Workflow.
2. Git Wizardry
Статьи написаны понятным простым языком и касаются как раз работы с Git с нуля.
Книжная полка
 |
Описание: Рассмотрены практические вопросы по разработке клиент-серверных приложений в среде Delphi 7 и Delphi 2005 с использованием СУБД MS SQL Server 2000, InterBase и Firebird. Приведена информация о теории построения реляционных баз данных и языке SQL. Освещены вопросы эксплуатации и администрирования СУБД. |
 |
 |
Описание: Рассмотрены малоосвещенные вопросы программирования в Delphi. Описаны методы интеграции VCL и API. Показаны внутренние механизмы VCL и приведены примеры вмешательства в эти механизмы. Рассмотрено использование сокетов в Delphi: различные режимы их работы, особенности для протоколов TCP и UDP и др. |
|
уважаемые посетители блога, если Вам понравилась, то, пожалуйста, помогите автору с лечением. Подробности тут.
Git клиент
Git-это распределенная система управления версиями, что означает, что вы можете работать локально, но вы также можете делиться или “толкать” свои изменения на другие серверы. Прежде чем вы сможете перенести свои изменения на сервер Git, вам потребуется безопасный канал связи для обмена информацией.
Протокол SSH обеспечивает такую безопасность и позволяет вам аутентифицироваться на удаленном сервере Git, не указывая каждый раз свое имя пользователя или пароль.
Для генерации SSH ключа скачайте и установите https://gitforwindows.org
Запустите C:Program FilesGitgit-bash.exe или в контекстном меню проводника windows выберете «Git Bash Here».
В оболочке введите команду генерации ключа с вашим email адресом
ssh-keygen -t ed25519 -C «nafanasev@gitlab.local»
При создании ключа, будут заданы дополнительные вопросы, есть возможность оставить все опции по умолчанию, нажав Enter.
После окончания генерации, будет создан файл C:Usersnafanasev.sshid_ed25519.pub
Полностью скопируйте содержимое файла и вставьте его в настройки своего профиля gitlab, User Settings — SSH Keys — Add key.
TortoiseGit
Установите TortoiseGit, все настройки можно оставить по умолчанию.
Создайте структуру папок, например:
C:/gitlab/nafanasev/test
где C:/gitlab/ просто папка
nafanasev соответствует названию группы проектов в gitlab — https://gitlab.local/nafanasev
а /test сам репозиторий — https://gitlab.local/nafanasev/test.git
Загрузка репозитория.
В контекстном меню папки C:/gitlab/nafanasev/ выберите TortoiseGit — Settings, в открывшемся окне выберете меню Git и введите Name и Email (должен совпадать с email введенным при генерации ключа). Сохраните изменения.
Вызовите контекстное меню папки C:/gitlab/nafanasev/ и выберете Git clone, в поле URL введите адрес репозитория, в следующем формате: https://gitlab.local/nafanasev/test.git и нажмите ОК. Файлы репозитория загрузятся в указанную папку.
Разработка.
Внесите необходимые изменения в файлы. Для сохранения изменений выполните Git Commit -> «master», в данном случае master это локальная ветка.
И отправьте изменения в gitlab, TortoiseGit — Push, выбрав в поле Remote ветку, отличную от master, обычно dev.
gitforwindows
Если вам не нужна дополнительная программа в виде TortoiseGit, можно ограничится только одним gitforwindows.
В первую очередь, добавьте хранилище кода gitlab в списки репозиториев gitforwindows.
В контекстном меню папки C:/gitlab/nafanasev/test и выберите «Git GUI Here», в открывшемся окне нажмите «Create New Repository». Выберете папку C:/gitlab/nafanasev/test и нажмите Create.
В открывшемся окне выберете Remote — Add и заполните поля
name — nafanasev/test
Location — ссылка вида https://gitlab.local/nafanasev/test.git
Загрузите файлы из репозитория.
Запустите C:Program FilesGitgit-bash.exe и выполните git pull git@gitlab.local:nafanasev/test.git
Разработка.
Создайте новую ветку Branch — Create, и введите ее имя.
Внесите необходимые изменения в файлы
Нажмите последовательно
Rescan
Stage Changed
заполните Commit Message
Commit
Push
Далее необходимо в gitlab создать merge request и смержить ветки.
IntelliJ IDEA
Откройте IntelliJ IDEA выберете VCS — Checkout from Version Control — Git
в поле URL введите ссылку на проект https://gitlab.local/nafanasev/test.git
выбирете папку для хранения проекта в поле Directory C:gitlabnafanasevtest
нажмите кнопку Test для проверки соединения
нажмите кнопку Clone
во всех появившихся окнах, выберете Yes и Next
дял commit нажмите Ctrl+K
для push нажмите Ctrl+Shift+K
Редактирование конфига
При установке git в первую очередь нужно указать имя пользователя и email. Для настройки параметров нужно нажать
ПКМ ⇒ TortoiseGit ⇒ Settings
в разделе Git можно настроить такие параметры как имя, почту, зайти в конфигурационные файлы.
Нужно поменять кодировку на utf-8, для этого нужно зайти в settings ⇒ Git ⇒ Edit glogal .gitconfig и указать encoding = utf-8.
Создать локальный, клонировать удаленный репозиторий
Создание репозитория
ПКМ ⇒ Git create repository here ⇒ Ok.
Для клонирования репозитория перейти в каталог, где будет храниться репозиторий, нажать
ПКМ ⇒ Git clone
Заполнить два обязательных поля:
URL — ссылка на репозиторий
Directory — каталог куда будет скачан репозиторий
Можно так же указать приватный ключ для доступа к репозиторию в поле Load Putty Key.
Кроме того можно клонировать из локального каталога, указав его в строке источника.
Отслеживание (индексация) файлов
Файлы находятся в двух состояниях: отслеживаемые и не отслеживаемые. Отслеживаемые файлы — это те файлы, о которых знает Git.
После редактирования файла git будет его рассматривать как измененный, нужно проиндексировать изменения и зафиксировать (сделать commit).
Посмотреть состояние файлов можно нажав
ПКМ ⇒ TortoiseGit ⇒ Check for modification
или
ПКМ ⇒ TortoiseGit ⇒ Diff
Для того чтобы начать отслеживать новый файл, нужно нажать
ПКМ ⇒ TortoiseGit ⇒ Add и выбрать нужные файлы
или можно не добавлять их таким образом, при этом их можно будет автоматически добавить при коммите.
Коммиты
Для выполнения коммита нужно нажать
ПКМ ⇒ Git Commit, в поле Message написать комментарий.
В нижнем поле будут выведены файлы, которые будут добавлены в коммит, если они небыли индексированы ранее можно отметить их галочками и они добавятся. Затем нужно нажать кнопку Commit.
Чтобы перейти к коммиту нужно зайти в
ПКМ ⇒ TortoiseGit ⇒ Show log
нажать ПКМ по нужному коммиту выбрать Reset to this.
В открывшемся окне, в разделе Reset Type можно выбрать тип перехода:
Soft — файлы и индекс не изменятся, отменится сам коммит
Mixed — файлы не изменятся, отменится индексация
Hard — файлы изменятся таким образом, как они были в коммите на который осуществляется переход
Или зайти зайти в
ПКМ ⇒ TortoiseGit ⇒ Git Switch/Checkout и выбрать Commit.
Для удаления последнего коммита нужно перейти к предыдущему коммиту, выше описано как это сделать, затем нажать ПКМ по нужному коммиту выбрать Revert change by this commit.
История коммитов
История коммитов в виде списка
ПКМ ⇒ TortoiseGit ⇒ Show RefLog
История коммитов с отображением графа
ПКМ ⇒ TortoiseGit ⇒ Show log
Удаление файлов
Выделить нужный файл/файлы/папки затем нажать
ПКМ ⇒ TortoiseGit ⇒ Delete
Отмена действия
Отмена индексации файла и отмена изменений незакоммиченного файла (состояния файла будет как в последнем коммите) осуществляется одинаково
Нужно выбрать файл, нажать ПКМ ⇒ TortoiseGit ⇒ Revert
Ветки
Ветка — это файл, содержащий хэш коммита, на который она указывает. При этом файлы проекта не копируются.
Создание/переключение/слияние
Создание ветки
ПКМ ⇒ TortoiseGit ⇒ Create Branch
Переключение на ветку
ПКМ ⇒ TortoiseGit ⇒ Git Switch/Checkout
Можно выбрать не только ветку, но и коммит
Создание ветки и переход в нее
ПКМ ⇒ TortoiseGit ⇒ Git Switch/Checkout
Поставить галочку Create New Branch, ввести имя ветки
После окончания работы над веткой ее нужно слить с основной, для этого нужно перейти на основную ветку
ПКМ ⇒ TortoiseGit ⇒ Git Switch/Checkout
и сделать merge, при этом указать ветку которую нужно влить
ПКМ ⇒ TortoiseGit ⇒ Merge
Если ветка больше не нужна ее можно удалить зайдя
ПКМ ⇒ TortoiseGit ⇒ Browse references
Если сделать две ветки, работать в одной из них, потом сделать merge в мастер, то в другой ветке этих изменений не будет, если нужно чтоб эти изменения появились в другой ветке, то нужно сделать merge из мастера или из первой ветки
ПКМ ⇒ TortoiseGit ⇒ Git Switch/Checkout
ПКМ ⇒ TortoiseGit ⇒ Merge
Вывод веток
Вывод списка веток
ПКМ ⇒ TortoiseGit ⇒ Browse references
Для отображения всех веток нужно поставить галочку
All Branches внизу окна
Удаление
Все удаления осуществляются в окне
ПКМ ⇒ TortoiseGit ⇒ Browse references
Переименование
Осуществляется в окне
ПКМ ⇒ TortoiseGit ⇒ Browse references
Копирование коммита из одной ветки в другую
Сначала нужно переключится на ветку, в которую нужно перенести коммит
ПКМ ⇒ TortoiseGit ⇒ Git Switch/Checkout
Открыть лог
ПКМ ⇒ TortoiseGit ⇒ Show log
Нажать ПКМ по нужному коммиту, затем Cherry Pick this commit, в открывшемся окне нажать Contune, затем Done
Коммит будет скопирован
Удаленные репозитории
origin — имя по умолчанию для удаленного репозитория.
В настройках в разделе Git ⇒ Remote отображаются подключенные удаленные репозитории, там же можно добавить удаленный репозиторий и его ключ.
Еще можно посмотреть подключенные репозитории в
ПКМ ⇒ TortoiseGit ⇒ Browse references в выпадающем меню remotes
Получение изменений из удаленного репозитория
ПКМ ⇒ TortoiseGit ⇒ fetch связывается с указанным удаленным репозиторием и забирает данные, которых еще нет в локальном репозитории, но не сливает их с локальными данными.
После fetch нужно выполнить слияние
ПКМ ⇒ TortoiseGit ⇒ Merge
ПКМ ⇒ TortoiseGit ⇒ pull забирает данные из удаленного репозитория и сразу сливает их с локальными
Отправка изменений на удаленный репозиторий
Сначала нужно сделать коммит
ПКМ ⇒ Git Commit
и можно отправлять
ПКМ ⇒ TortoiseGit ⇒ push
Если после клонирования удаленного репозитория, в нем были произведены изменения другим человеком, выполнить push не получится, нужно сначала получить изменения через pull или fetch и смержить их с локальным репозиторием. После этого можно будет сделать push.
|
Введение |
|
|
Установка |
|
|
Работа с ветками |
Введение
Обычно git не установлен по умолчанию, поэтому
нужно установить gitbash
TortoiseGit
Устанавливаем TortoiseGit
отсюда
Устанавливаем GIT for Windows
отсюда

После установки Git for Windows появится консоль

Во время установки TortoiseGit Вам нужно будет указать путь до
Git.exe
Git.exe
появится после установки Git for Windows , так что
следите за очерёдностью действий.

Затем нужно приступить к генерации ключей. Я выбираю опцию
Generate PuTTY key pair

После утомительного движения мышью в течении ~ 30 секунд Вы
увидите результат.

Ключи нужно сохранить в директорию на Вашем ПК.
Название и путь до директории желательно запомнить.
Затем Вам нужно посетить страницу загрузки ключей SSH Keys
и загрузить туда
свой PUBLIC key.
Начинаться он должен с ssh-rsa.
Проще всего скопировать его из окна putty

В случае успеха Вы попадёте на

Далее нужно указать путь до ключа в настройках TortoiseGit. Я не знаю где он сейчас
находится в самих настройках. Раньше был в пункте Remotes, если я не ошибаюсь.
Настройки выглядят следующим образом, но мы не будем там ковыряться а введем
путь до ключа на следующем шаге.

Чтобы получить точный url который Вы хотите клонировать зайдите в нужную ветку
(branch) и нажмите на кнопку Clone.

Выберите Clone with SSH. Чтобы скопировать этот адрес нужно нажать на значок
копирования.

Создадим папку Gitlab_test_HeiHei.ru

Кликаем правой кнопкой и выбираем Git Clone

Вставляем адрес, который мы до этого скопировали из GitLab в поле
URL
Затем показываем путь до приватного ключа и нажимаем OK.

В случае успеха TortoiseGit покажет сообщение Success

Ветки — Branches
Когда вы работаете с Git важно разобраться с принципом работы веток.
Если Вы разработчик, то стандартная ветка для Вас скорее всего называется
dev.
В неё Вы делаете свои коммиты или пуши, а старший программист потом объединяет
их в ветку master
Посмотреть на список всех веток можно в разделе Repository → Branches

Там будут ветки master, dev и любые какие придумали разработчики.
Иногда они
могут быть привязаны к определённым историям в планировщике задач
(например
Pivotal Tracker
)
а могут просто появляться для проверки каких-то гипотез.

Чтобы поменять ветку, с которой Вы синхронизировали папку на
Вашем компьютере.

Version control is essential to the success of any software project. It provides the ability for multiple developers to work on the same codebase simultaneously and allows projects to be versioned for release. However, a great deal of programmers fail to leverage the great benefits of version control for their personal projects.
Luckily, Git and TortoiseGit are extremely easy to install and configure on Windows. Now, there’s no excuse not to version control your code!
Here are the topics we will cover today:
- Install Git
- Install Tortoise Git
- Create a new Git repository
- Add an initial codebase to the Git repository
- Change a file and commit
- Clone the repository
Install Git
These are the installation options I used to install Git-1.7.0.2-preview20100309.exe on Windows

Note: You can enable the options to show a Git GUI or Bash shell if you want that option to be available every time you right-click on something in Windows Explorer. I just didn’t want that much space taken up on my right-click men
Lastly, be sure you point your system path to wherever the Git installation resides on your machine.
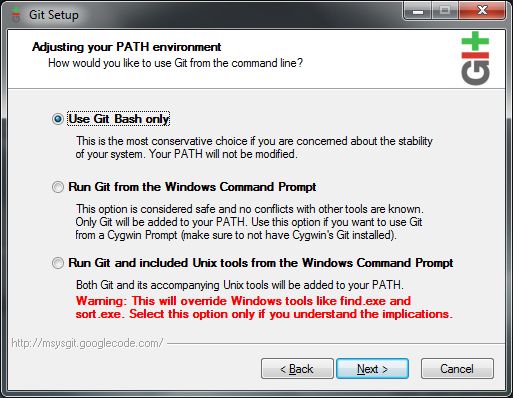
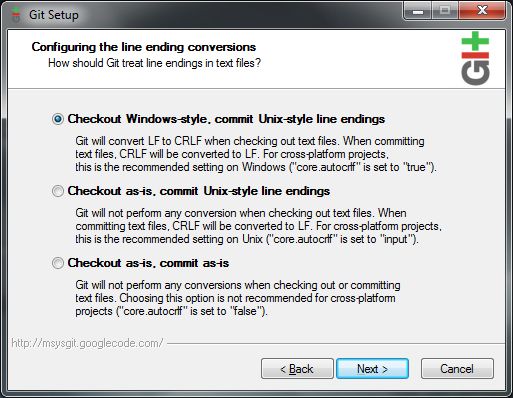
Install Tortoise Git
Download, Install, and restart your machine.
Create a new Git repository
- Create a folder — I’m using D:repo — to be used for your Git repository.
- Right-click the folder and select Git Create Repository Here
You should now be greeted with the following message

Add an initial codebase to the Git repository
- Copy your source files to the git folder.
- Right click on the folder and select Git Commit
- In this case, I added two files. I’m going to check both of them
- click OK.
Now we have a legitimate repository with actual files in it.
Change a file and commit
Now you can change, add, or delete files within the repository. Once you are ready to commit back to the repository, right click and select Git Commit just like above.
Clone the repository
Cloning is one of the great features of Git, and while it isn’t necessarily important for solo projects, it is important enough to mention here.
- Tortoise allows you to clone projects by right clicking on the desired clone folder and selecting Clone
- In the dialog, select the parent repository.
- Click OK
- Now, the cloned repository will be synced up with the main repository. This is useful for multi-person teams.
Conclusion
Git and TortoiseGit make it extremely easy to get personal version control up and running on your machine. Now you can develop your projects with the piece of mind that version control provides with little hassle and setup.
You’ve successfully subscribed to Robert Greiner
Welcome back! You’ve successfully signed in.
Great! You’ve successfully signed up.
Success! Your email is updated.
Your link has expired
Success! Check your email for magic link to sign-in.