Nowadays, people are highly relying on smartphones, and making phone calls is what everyone will do every day. Contacts have become one of the most important types of data, especially for businessmen, who have stored the contacts of significant clients and cooperative partners on their phones. However, storing too much data like contacts on Android will occupy the storage and therefore influence the user experience; and in the case of losing phones or losing data by accident, it is indispensable for all phone users to back up contacts from Android to the computer. But exactly how to transfer contacts from Android to the computer for a backup? This problem is solved. Here are the top 5 ways to teach you how to complete this task. Just read on.
Method 1: How to Transfer Contacts from Android to Computer with Coolmuster Android Assistant
1.1 How to Backup Android Contacts to PC/Mac with 1 Click
1.2 How to Transfer Contacts from Android to Computer Selectively
Method 2: How to Transfer Contacts from Android to PC without Software (Directly)
Method 3: How to Copy Contacts from Android to PC Using Gmail
Method 4: How to Export Contacts from Android to Computer with Bluetooth
Method 5: How to Save Contacts from Android to PC Using Samsung Kies

Method 1: How to Transfer Contacts from Android to Computer with Coolmuster Android Assistant
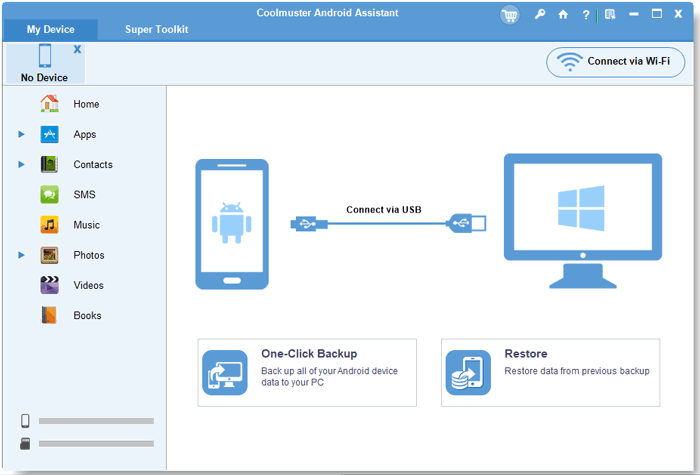
«How do I copy contacts from Android to computer?» I know maybe you are looking for a well-rounded method to help you transfer data from Android to your computer because you want to back up more besides contacts. Then, you’ve come to the right place. Coolmuster Android Assistant is your answer. It is a third-party software, which aims at transferring data between Android and PC. It enables you to breezily transfer contacts, SMS, call logs, music, videos, photos, etc. between PC and your phone.
What’s more, you can also add, delete, unduplicate, edit Android contacts on computer and save contacts as csv or XLS file or other formats (HTML, VCF, Outlook, BAK, XML) . For contacts transfer, it offers you two choices: either to back up all data with 1 click or to transfer selectively. If you’re just using Android phones now, like Samsung Galaxy S10/S10+/S10e, HTC U11+, HUAWEI Mate X, etc., you are encouraged to adopt this method.
Download either the Windows version or the Mac version on your computer and start to transfer contacts from Android to computer now.


1.1 How to Backup Android Contacts to PC/Mac with 1 Click
If you’d like to transfer all your contacts from Android to the computer, you may use the 1-Click Backup function. Here is the step by step guide.
Step 1: Connect Android to the computer with a USB cable.
Install and launch the program on your computer, and make sure your Android is connected to the computer with a USB cable. Then the program starts to detect your device.
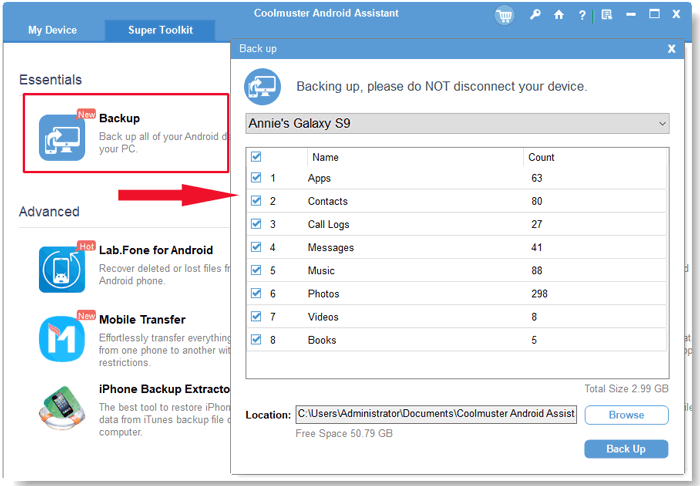
Step 2: Choose the 1-Click Backup option.
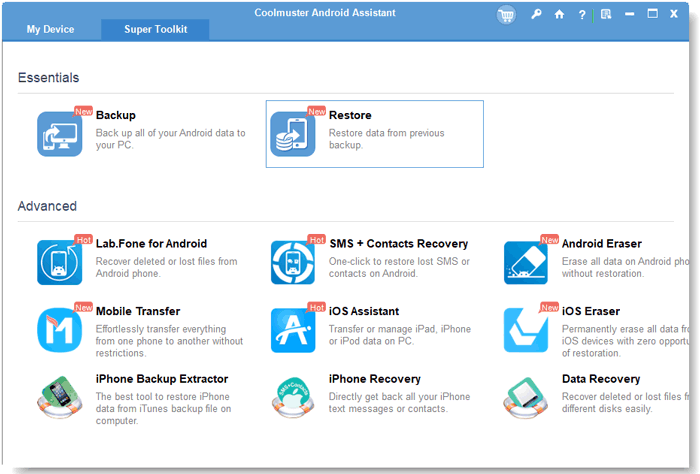
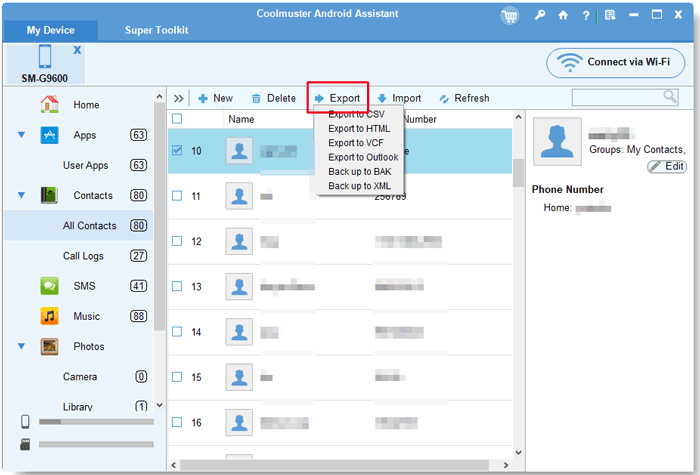
After your Android is successfully connected to the computer, you may go to «Super Toolkit» and choose the option of «Backup«. Then you’ll see an interface like below:
Step 3: Choose «Contacts» to transfer from Android to the computer.
Select «Contacts» from the list and choose an output location on your PC to store the files. Then click «Back Up» button to transfer these contacts from your Android to the computer.
Learn more methods on how to backup and restore Android device on computer and its video tutorial below:
1.2 How to Transfer Contacts from Android to Computer Selectively
It is also available to you if you just want to transfer several contacts from your Android to the computer. The guide is as below.
Step 1: Connect Android to the computer with a USB cable.
Install and launch the program on your computer, and make sure your Android is connected to the computer with a USB cable. Then the program starts to detect your device.
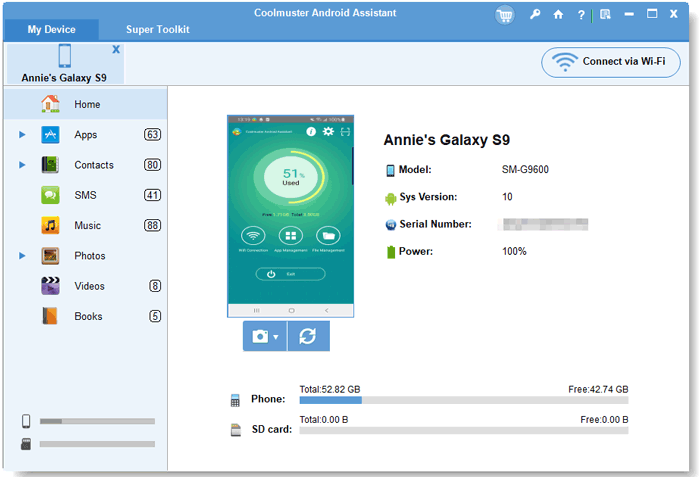
Step 2: Choose the contacts which you want to transfer from Android to the computer.
After your Android is successfully connected to the computer, all your files that can be transferred from Android to the computer will be displayed on the interface in the left panel. Choose «Contacts» and check the items you require. Then click «Export» to transfer the selected contacts from Android to your computer.
Bonus Tip: How to Add/Delete/Modify Android Contacts on Computer
If you want to delete, modify contacts or add contacts to Android, first choose the «Contacts» icon from the left penal and click the «New» button, «Delete» button and «Edit» button respectively to achieve your goal. In terms of «Edit«, you can edit name, email, phone number, website, address, middle name, etc.
See more details on how to manage Android contacts on computer here and its video tutorial below.
Now, are you interested in it? If you are thinking about how to transfer contacts from Android to the computer, please don’t hesitate to download it and have a try.
Further reading:
Top 10 Android PC Suite Review for Windows and Mac
How to Transfer Photos from Android to PC Windows 10
Method 2: How to Transfer Contacts from Android to PC without Software (Directly)
Some of you may don’t want any third-party software involved in the contacts transfer from Android to Windows. Then you can consider transferring your contacts from Android to PC without software, but directly with VCF files involved. This is a traditional method to transfer contacts from Android to computer with USB, but it is quite useful.
Here is the guide to transfer contacts from Android to computer without software:
Step 1: Open «Contacts» app on your Android.
Step 2: In the menu, choose «Manage Contacts» > «Import/Export» > «Export to storage«. Then your contacts will be saved in VCF form in your Android phone memory.

Step 3: Connect your Android to the computer with a USB cable.
Step 4: On your computer, find your device and go to the internal storage. Find the contacts files, copy and paste them to your computer.

Now, your contacts have been transferred from Android to the computer.
Note: Although this method is easy, not all Android phones have such an option allowing you to move all contacts to phone memory. Before using this method, you have to check whether your Android supports to do so.
Can’t miss:
How to Import VCF (vCard) Files to Android Phone?
Transfer iTunes Backup to Android Devices Smoothly
Method 3: How to Copy Contacts from Android to PC Using Gmail
If you have been using the Google account, you can also transfer your contacts from Android to the computer with Gmail. It is easy.
Please follow the instructions below to transfer your contacts from Android to PC with Gmail.
Step 1: Go to «Settings» on your phone, choose «Account» > «Google«.
Step 2: Log in with your Gmail account and enable the «Contacts» option to sync your contacts from Android to Google.
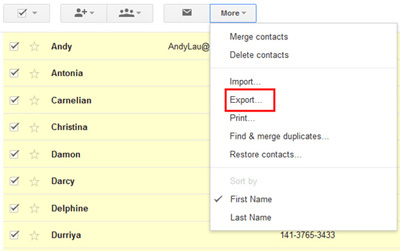
Step 3: Log in to your Google account on your computer. Navigate to «Contacts» and click on «More» > «Export«.
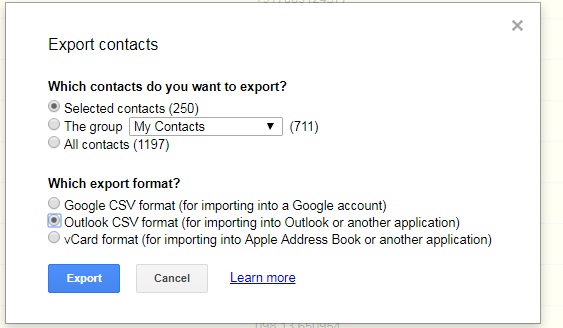
Step 4: Then you can choose which contacts you want to transfer from Android to the computer. After choosing the format, click the «Export» button to transfer your contacts from Android to the computer.
See Also:
How to Transfer Contacts from Android to Gmail
Transfer Files from PC to Tablet and Vice Versa without Hassle
Method 4: How to Export Contacts from Android to Computer with Bluetooth
Using Bluetooth to transfer contacts from Android to the computer is another choice. You are able to transfer your contacts easily and wirelessly. But first of all, you have to make sure both your device and your computer have this application and it is functioning normally.
Follow the steps to start transferring your contacts from Android to the computer with Bluetooth.
Step 1: Turn on the Bluetooth on both your Android and the computer to enable contacts transfer.

Step 2: Pair your Android and the computer. In the Bluetooth menu, choose «Add new device» on both your Android and the computer.
Step 3: Open the «Contacts» app on your Android, choose the contacts that you want to transfer, and then choose «Send via Bluetooth«.
Step 5: Confirm the transfer process on your computer. Now your contacts will be transferred from Android to the computer.
Learn more:
How to Change GPS Location on Android in Different Tools (SAFE & FAST)
Fabulous Android Unlock Apps: Fast Unlock Android Devices Easily
Method 5: How to Save Contacts from Android to PC Using Samsung Kies
If you are Samsung users, luckily, you’ve got one more method to transfer your contacts from Android to the computer: using Samsung Kies. It is an official tool which supports users to back up, restore and manage their Samsung devices data easily. Wonder how to use it?
Follow the steps below to transfer your contacts from Samsung phone to computer.
Step 1: Download and launch the software on your PC.
Step 2: Connect your Samsung to the computer via USB, click «Turn on USB storage» button, and your Android storage memory will be detected by the program.
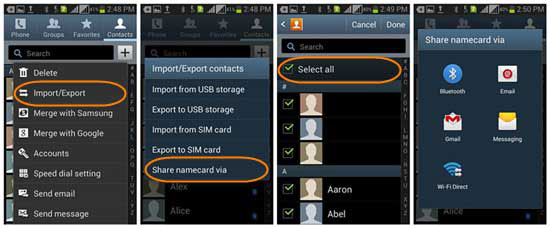
Step 3: On the primary interface, click «Import/Export» > «Export«. Then choose the «Contacts» folder from the list and click «Export» button to transfer your contacts from Samsung to the computer.

Similar references: Sync Samsung Contacts to Outlook with Samsung Kies
Conclusion
Above are the five ways I want to share with you. Each one of them has its own advantages and disadvantages. Just choose the one that suits you the best. However, comparatively speaking, Coolmuster Android Assistant is more useful, because it is suitable for almost any kind of Android phones, and it supports to transfer more types of files. This software is easy to install and use. If you want to transfer your contacts from Android to the computer, you can download it and have a try. I bet it will not let you down.
Related Articles:
How to Transfer Contacts from LG Phone to Computer?
Easily Recover Lost Contacts/SMS from Broken Android Phone
1-Click to Sync Outlook Contacts with Android Mobile Phone?
How to Transfer Contacts & SMS From ZTE Phone to Computer [Hands-on Ways]
How to Transfer Photos from Samsung to Mac for Backup? 4 Ways in 2019
Copy Contacts from Samsung Galaxy S10/S9/S8/S7/Note to Computer


Android Transfer
Top 5 Ways Focusing on How to Transfer Contacts from Android to Computer
If you recently bought a new Windows phone to replace your old Android phone, then you will probably want to transfer all your contacts from the Android mobile to your Windows mobile. This tutorial is written for all users that want to migrate all (or specific) contacts from their Android Phone to their new Windows phone. The method described here is very simple and can be followed by everyone.
Before you continue to follow these steps, make sure that you already have a Google (Gmail) account and you have setup (Added) that account on your Android phone. If you don’t have a Google Account you can easily create one here (it’s free): Create Google Account.
The next thing that is required to transfer your contacts from your Android mobile device to your Windows mobile (by using this method) is to have a Microsoft Account (Windows Live, Hotmail, Outlook) and to have setup (Added) that account in your Windows Phone. If you don’t have a Microsoft account, then you can create a new one here: Sign-Up Microsoft Account.
How to move contacts from an Android to a Windows Mobile.
From your Android Phone, after you have added your Google account, synchronize your Android phone contacts with your Google account contacts. To do that:
- On the Android phone, go to “Settings” > “Accounts and Sync”.
- Under “Manage Accounts”, select (or “Add”) the Google account you used to import WLM contacts.
- Finally press “Sync Contacts”.
Info: When you are syncing your Android mobile with your Google account, then you also sync all your contacts, calendar & Google mail from your phone to that account and vice versa. So if you open your Google account from any computer or mobile device and navigate to e.g. Google contacts page, you can find that all your Android Phone contacts are also stored online.
The next step is to export your Google contacts:
Step 1: Export Google contacts.
From a desktop computer:
1. Sign-in to your Gmail account.

2. In the main Gmail window, press the drop-down arrow next to “Gmail” and choose “Contacts”.


3. In “Contacts” page, press the “More” menu and select “Export”. *
* Note: By doing this you ‘re going to export (and transfer) all your Android contacts to your Windows Phone. In the case that you want to transfer specific contacts or (or Group(s)) then you must select these contacts (or Groups) before you select the “Export” option.

4. At “Export contacts” page, select the “Google CSV format (for importing into a Google account)” option and press “Export”.*
Note: At “Which contact do you want to export section” you have to select “Selected contacts” if you want to transfer only the selected contacts contacts to your Windows phone, or “The group (Group Name)” if you want to transfer a specific group or groups.

4. Finally press “Save” and store the exported contacts file “google.csv” on your computer (e.g. on your “Downloads” folder).

5. Close Google Mail.
Step 2. Import Google contacts into Windows live (Hotmail, Outlook live).
1. Sign-In to your Windows Live (Hotmail) account using a desktop computer: Windows Live (Hotmail) Login Page

2. While on the main window, press the drop-down arrow next to “Outlook” and choose “People”.


3. In “People” page, click at “Start import” icon.

4. At “Import contacts” page, select import from “Google” (icon).

5. At “Import contacts from Google” page, select “Browse”.

6. Navigate to the location where you saved the “google.csv” file, in the previous step, select the “google.csv” file and click “Open”.

7. Press “Upload”.

8. Finally verify that all the imported contacts look correct and then press the “Import” button.

Close Windows live and sync your Windows phone with your Windows live Account.
How to Sync Windows live Contacts to your Windows phone.
Before continuing, first add your Microsoft account (if you haven’t already done that) to your Windows phone. {“Add an account” > “Microsoft account” (or “Windows Live”) > type your MS account username and password and press “Sign in”}.
1. From Windows phone “App list” go to “Settings” > “Email + accounts”.*
2. Tap and hold your finger at your Microsoft account until you see the “sync” option.
3. Tap “sync” to synchronize your Windows live contacts with your Windows phone .
You ‘re done!
If this article was useful for you, please consider supporting us by making a donation. Even $1 can a make a huge difference for us in our effort to continue to help others while keeping this site free:

If you want to stay constantly protected from malware threats, existing and future ones, we recommend that you install Malwarebytes Anti-Malware PRO by clicking below (we
do earn a commision from sales generated from this link, but at no additional cost to you. We have experience with this software and we recommend it because it is helpful and useful):
Full household PC Protection — Protect up to 3 PCs with NEW Malwarebytes Anti-Malware Premium!
25.11.2017

Как известно, самое ценное в телефоне – это содержащиеся в его памяти контакты. И вот вы, например, решили заменить свой старый телефон c Android на новый, работающий с Windows. И тут же возникает вопрос: как перенести все контакты с одного телефона на другой. К счастью, существуют простые средства, которые помогут легко и быстро это сделать.
Копирование контактов между устройствами
Есть множество различных способов скопировать контакты с Android-систем на линейку Windows Phone. В этой статье будут рассмотрены наиболее простые и доступные из них. Ко всему прочему, от пользователя не потребуется установки дополнительного ПО от сторонних разработчиков.
Способ 1: Перенос контактов на SIM-карту
Этот способ отлично подойдет, если у вас старая модель девайса на базе Android. При этом контакты из памяти устройства копируются на SIM-карту, которую затем можно просто вставить в новый телефон или планшет. Метод поддерживается не всеми типами смартфонов или планшетных ПК.
Конкретная последовательность шагов, описываемых далее, а также названия кнопок, пунктов меню и др. зависят от модели устройства и версии Android и могут отличаться.
Чтобы перенести контакты на SIM-карту нужно:
- В меню приложений или на домашнем экране Android выбрать «Контакты».
- Нажать на кнопку с тремя полосами слева.
- Выбрать «Настройки».
- Нажать «Импортировать».
- Указать нужную SIM-карту.


Совет: для получения дополнительных сведений необходимо ознакомиться с официальной инструкцией к устройству.
Способ 2: Через SD-накопитель
Для копирования контактов из памяти девайса на SD необходимо:
- В меню приложений или на домашнем экране Android выбрать «Контакты».
- Нажать справа вверху на кнопку с тремя точками(1).
- Выбрать «Импорт/Экспорт»(2).
- Далее – «Экспорт на носитель».
- Нажать «ОК».


Примечание: вид диалоговых окон и доступные опции могут отличаться в зависимости от версии системы.
Итак, имея готовый файл с контактами, можно приступить к переносу данных уже на Windows-систему. Для этого понадобится на втором устройстве установить приложение «Передача данных» (если оно отсутствует) и подключить к нему SD-накопитель, а затем выполнить следующее:
Скачать Transfer My Data
- Запускаем средство «Передача данных» в Window Phone.
- Нажимаем на кнопку с тремя точками внизу экрана справа.
- Выбираем «Импортировать с SD-карты».
- Ставим галочку «Контакты».
- Дожидаемся завершения операции.
- По завершении копирования диспетчер покажет сообщение о результате работы.


Таким образом, использование microSD-карты для копирования контактов имеет встроенную поддержку в различных системах и может быть рекомендовано к использованию.
Способ 3: Учетные записи
Для использования Gmail-почты с целью переноса контактов с Android-устройства необходимо иметь привязанный Google-аккаунт. В большинстве случаев у пользователя Android он уже есть.

Если у вас нет такой записи:
- Выбираем «Добавить аккаунт».
- Затем — «Новый» и следуем дальнейшим инструкциям по созданию учетной записи.
- Выбрав только что созданный аккаунт, необходимо удостовериться, что опция по синхронизации включена.


Аналогичные манипуляции необходимо будет произвести и на вашем устройстве Windows Phone, если на нем нет привязанного Outlook-аккаунта.
Следующий этап – работа с Gmail:
- Заходим на сайт Гугл-контактов и вводим регистрационные данные своего аккаунта.
- Кликаем по слову «Gmail», которая находится слева вверху и выбираем «Контакты».
- Переходим на обновленную страницу «Контактов».
- Вернувшись в стандартный интерфейс, нажимаем на «Еще» и выбираем строку «Экспорт».
- В появившемся окне необходимо выделить 2 опции: «Мои контакты» и «Формат CSV для Outlook».

- Нажимаем «Экспорт».
- Сохраняем файл на диске.


Примечание: новый интерфейс «Контактов» может не поддерживать перенос данных. В этом случае выбираем опцию «К старой версии», которая находится в самом низу слева.


Теперь, когда у нас есть сохраненные контакты Android на диске ПК, идем дальше:
- Заходим на Outlook-почту и вводим регистрационные данные вашего Windows-аккаунта, нажимаем на значок с квадратиками вверху слева.
- Выбираем иконку «Люди» (или «People» в англоязычной версии).
- Нажимаем кнопку «Управление» («Manage») и останавливаемся на пункте «Импорт контактов» («Import contacts»).
- Кликаем «Gmail».
- Выбрав на своем ПК файл с Google-контактами, нажимаем «Загрузить» («Upload»).


Таким образом, вы смогли перенести все контакты с Android-устройства на привязанную к Windows Phone учетную запись.
Способ 4: Синхронизация аккаунта
Следует помнить, что при синхронизации двух учетных записей происходит перенос контактов в обе стороны. Для получения данных с Google необходимо:
- На домашнем экране выбрать «Настройки».
- Перейти к «Почта + учетные записи».
- Выбрать «Добавить службу».
- Далее — «Google» (или «Gmail»).
- Указать адрес почты и пароль.
- Нажать «Вход».


После добавления новой учетной записи все элементы автоматически синхронизируются. Помимо самой адресной книги, станут доступны также другие данные: почта, задачи, календари, web-каналы и др.
Теперь вы знаете эти простые и доступные способы, поэтому сможете с легкостью перенести все нужные контакты из Android-системы на Windows Phone.