
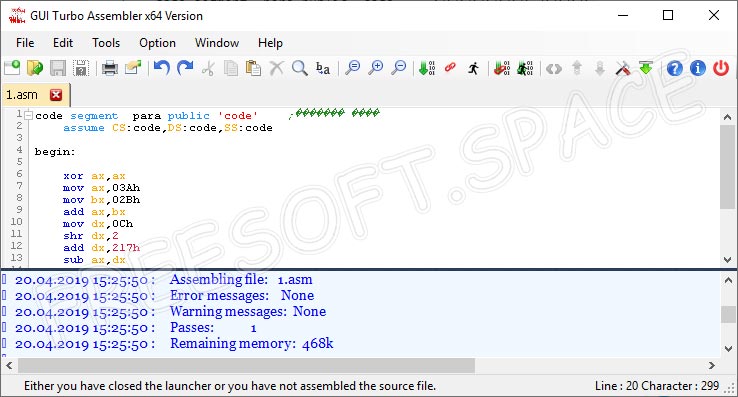
Инструмент, о котором мы расскажем в этом материале, представляет собой программный пакет, используемый для разработки различного софта на языке ассемблера. Предлагаем бесплатно скачать GUI Turbo Assembler 5.0 (TASM) для Windows 10 x32/x64 Bit и познакомиться с данным продуктом ближе. По уже имеющейся на сайте традиции разберемся с возможностями утилиты, сразу после чего поговорим о ее загрузке и инсталляции на компьютер или ноутбук.

Содержание
- Описание и возможности
- Как пользоваться
- Загрузка и установка
- Инструкция по работе
- Достоинства и недостатки
- Похожие приложения
- Системные требования
- Скачать
- Видеообзор
- Вопросы и ответы
Описание и возможности
Программное обеспечение может использоваться как специалистами для полноценной работы, так и новичками для обучения. Приложение включает полноценную справочную систему, где можно найти ответы на все интересующие вас вопросы по теме. Графический интерфейс инструмента для программирования довольно простой и симпатичный. Работать с ним вполне комфортно. К ключевым возможностям можно отнести:
- Удобный поиск и замена отдельных элементов программы в автоматическом режиме.
- Работа с исполняемыми файлами – сбор и запуск.
- Создание и хранение файлов с кодами.
- Отправка файлов с кодами на печатающие устройства.
- Разработка различного софта и его тестирование.
- Работа с расширенными или стандартными сегментарными директивами.

Утилита часто применяется для обучения программированию на языке ассемблере. Для расширения функций программы используются наборы дополнительных макросов.
Как пользоваться
Скачивание и установка приложения проводится довольно быстро и легко. Для этого не понадобится каких-то особых знаний и умений. Читайте инструкцию и выполняйте каждый ее шаг.
Загрузка и установка
Перед загрузкой утилиты важно понимать, что она относится к сложным и многогранным инструментам. Перед началом работы с ней потребуется пройти соответствующее обучение. Но для начала давайте произведем инсталляцию программы на компьютер. Для этого делаем следующее:
- Внизу странички находим ссылку, по которой необходимо перейти для загрузки установочного дистрибутива.
- После распаковки архива запускаем инсталляцию софта, выполним двойной левый клик мышкой по исполняемому компоненту.
- Все дальнейшие действия осуществляются в соответствии с подсказками мастера установки. Изначально приложение будет на английском языке. Изменить его можно в настройках.

TASM в вашем полном распоряжении. Можно смело переходить к изучению и использованию программного обеспечения.
Инструкция по работе
Конечно же, в двух словах описать принципы работы с утилитой не получится. Для полного освоения софта вам потребуется не один день. Единственное, на чем хотелось бы сделать акцент, это то, что ввод, редактирование или копирование кодов здесь осуществляется через удобную панель. На этой же панели расположены основные клавиши для тестирования и запуска готового проекта. Кроме этого, в разделе настроек пользователь может изменить конфигурацию графического интерфейса или воспользоваться некоторыми дополнительными функциями.
При желании изучить все функции программного обеспечения можно почитать обучающую литературу по данной теме или просмотреть видео в сети.
Достоинства и недостатки
Пришло время уделить внимание рассмотрению сильных и слабых сторон приложения, о котором мы говорим сегодня.
Достоинства:
- Бесплатное использование.
- Невысокие системные требования.
- Возможность применения горячих клавиш.
- Можно вести работу с несколькими проектами одновременно.
- Работа с кодами проходит в главном окне.
- Несмотря на простоту, интерфейс весьма удобный.
Недостатки:
- Без знаний основ программирования разобраться с утилитой будет довольно сложно.
Похожие приложения
В качестве среды разработки на ПК или ноутбуке можно также использовать такие решения:
- Free Pascal.
- RadASM.
- Turbo Debugger.
- FASMARM.
- Eonza.
Системные требования
Назовем рекомендуемые параметры электронной машины для стабильной работы софта:
- Центральный процессор: начиная от 1 ГГц.
- Оперативная память: не менее 512 Мб.
- Пространство на жестком диске: от 1 Гб и более.
- Платформа: Microsoft Windows 32/64 Bit.
Скачать
Прямо сейчас у вас есть возможность получить желаемый инструмент на свой ПК по ссылке ниже.
| Версия: | 5.0 |
| Разработчик: | Borland |
| Информация обновлена и актуальна на: | 2022 год |
| Название: | GUI Turbo Assembler |
| Платформа: | Microsoft Windows XP, 7, 8 или 10 |
| Язык: | Русский |
| Лицензия: | Бесплатно |
| Пароль к архиву: | bestsoft.club |
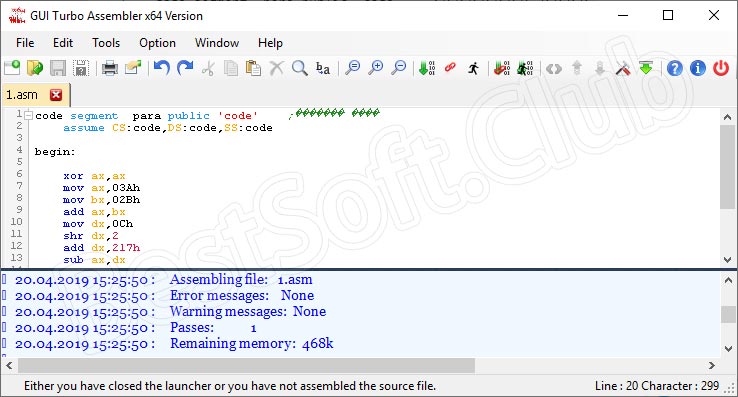
GUI Turbo Assembler 5.0 (TASM)
Видеообзор
Начните изучение программы с этого небольшого ролика. Уверены, он будет полезным для вас.
Вопросы и ответы
Теперь вы можете смело переходить к практике и устанавливать приложение на ПК. Если в процессе этого появятся трудности, мы всегда рады помочь советом. Достаточно лишь описать проблему через форму обратной связи ниже.
( 2 оценки, среднее 3 из 5 )

Сегодня многие современные приложения разрабатываются на языке программирования ассемблере. Для облегчения работы с данным софтом используется программный пакет TASM, речь о котором, собственно говоря, и пойдет в сегодняшнем обзоре. На нашем портале можно бесплатно скачать Turbo Assembler v.5.0 (TASM) для Windows 10 x32/x64 Bit. Перед загрузкой инструмента рекомендуем обязательно ознакомиться с его основными функциями и предназначением.
Содержание
- Описание и возможности
- Как установить
- Достоинства и недостатки
- Похожие приложения
- Системные требования
- Скачать
- Вопросы и ответы
Описание и возможности
Программное обеспечение, обозреваемое в сегодняшней статье, может использоваться разработчиками в двух вариациях. Первый способ – ручной ввод различных команд программирования. Во втором случае речь идет об использовании удобного графического интерфейса, наделенного такими функциями:
- Использование стандартных и расширенных сегментарных директив.
- Разработка и тестирование различных программ.
- Создание и сохранение файлов с кодами.
- Работа с различными элементами кода.
- Работа с отдельными элементами и автоматический поиск их замены.
Если вы не обладаете нужными знаниями в сфере разработки, нет никакого смысла загружать пакет на ПК. Инструмент предназначен для программистов.
Как установить
Обозреваемый сегодня софт является сложным и многофункциональным инструментом для разработки различных приложений. Для того чтобы освоить все функции пакета, необходимо пройти специальные курсы или хотя бы просмотреть обучающие видеоролики в сети. Несмотря на всю сложность утилиты, инсталляция ее проходит по стандартному сценарию. Для этого делаем следующие шаги:
- Переходим вниз данной странички и кликаем по ссылке для загрузки архива с файлом установки приложения.
- Руководствуясь подсказками мастера инсталляции, производим установку инструмента на компьютер или ноутбук.
При первом запуске программного обеспечения видим, что интерфейс на английском языке. Изменить его можно в разделе «Option», перейдя в папку «General».
Достоинства и недостатки
Теперь самое время разобраться с сильными и слабыми аспектами пакета для программирования. Сделаем это в виде небольших списков.
Достоинства:
- Пользовательский интерфейс довольно простой, но очень удобный.
- Удобное редактирование кода, отображаемого в главном окне утилиты.
- Возможность применения горячих клавиш.
- Бесплатное распространение.
- Легковесность и низкие требования к ПК.
- Работа с несколькими проектами параллельно.
Недостатки:
- Новичку разобраться с функциями ПО будет довольно тяжело.
Похожие приложения
Назовем еще несколько интересных решений, используемых в сфере разработки:
- Fasm (flat assembler).
- UASM (HJWasm).
- FASMARM.
- Turbo Debugger.
- Turbo Pascal.
Системные требования
Приложение имеет относительно невысокие требования к параметрам электронной машины. Рассмотрим эти рекомендации немного подробнее:
- ЦП: от 1 ГГц и более.
- ОЗУ: от 512 Мб.
- Место на диске: от 1 ГБ и выше.
- Операционная система: Microsoft Windows XP, 7, 8 или 10.
Скачать
Осталось лишь кликнуть по ссылке и начать использование клиента для программирования на ПК.
| Версия: | v.5.0 |
| Разработчик: | Borland |
| Информация обновлена и актуальна на: | 2022 год |
| Название: | Turbo Assembler |
| Операционная система: | Microsoft Windows 32/64 Бит |
| Язык: | Русский |
| Лицензия: | Бесплатно |
Turbo Assembler v.5.0 (TASM)
Вопросы и ответы
Всего несколько простых шагов и удобная утилита для разработки в вашем полном распоряжении. Надеемся, трудностей с использованием софта у вас не возникнет. Если вопросы появятся, задать их можно специалистам портала через форму обратной связи, расположенную внизу.
( 6 оценок, среднее 1 из 5 )
Hello Guys,
Tasm,or Turbo Assembler/Turbo Debugger By Borland , is one of the most popular assembler used in the world today. it’s used to study the architecture and working of various Microprocessors such as 8085,8086,8051,Pentium Series etc..
But However it doesn’t work / supports the 64 bits of Windows i.e Windows 7 64 bit / Windows 8 Version, so i have created a separate configured Version of the software for the same purpose.,it will run smoothly,with fullscreen mode and has many features such as
- Full Screen Mode Operation On Windows 7 as well as Windows 8 | 8.1 & Windows 10 for Tasm [Turbo Asssembler,TD,turbo Debugger]
- edit option of Microsoft Dos editor integrated [ You can now write your program directly with the dos editor edit in Windows 7/Windows 8 ]
- Inbuilt MS-Dos Editor 2.026 within DosBox
- Auto Mounted the Tasm Files such as tasm,td,and tlink [so that there is no need to mount them everytime , not even one time !! 😀 you open DosBox]
- Mouse Pointer Support
- One Click Installer,No Need of configuring anything,installs in seconds and the Shortcut placed on your Desktop!
- Useful For Students as well as Teachers and Professionals..
- You can save the program directly within it,and open it next time From the Software itself for editing/Use.
Click here to Download The Installation Package Tasm 1.4 Windows 7|Windows 8|8.1 & Windows 10 64bit Version [2-3 MB]
Installation Guide
First of all You Need To Download The TASM from above link- >
Click here to Download The Installation Package Tasm 1.4 Windows 7|Windows 8|8.1 & Windows 10 64bit Version [2-3 MB]
Then , Its Pretty Simple,Just Keep on Clicking Next,Just Don’t change the Install Directory of the software and make sure its “C:tasm 1.4”
- Tasm 1.4 Installation Directory..
Now Launch The Software by the Tasm 1.4 Shortcut Present on your Desktop..
Here are the Basic Function Commands of Tasm are same as that of normal version like
First make sure the screen is showing : C:Tasm> in Dos Command
Now, To Open MS-Dos Editor Type :
edit “yourfilename.extension” and it will open
check the Below screenshot

To Perform Tasm,Tlink And Execution Debugging
The Same commands are used
For Compiling : tasm “filename.asm” [without quotes]
for Linking : tlink “filename.obj” [without quotes]
For Debugger : simply “td” [without quotes] or you can use td “filename” [without quotes]
For Execution : filename.exe
here are the screenies for the above functions


- turbo debugger/td full screen on Windows 7/windows 8

Click here to Download The Installation Package Tasm 1.4 Windows 7|Windows 8 & Windows 10 64bit Version [2-3 MB]
Support
- If you are not able to get fullscreen window press “alt+enter” simultaneously after opening the swiss replica watches program.
- Comment any other ones if you have 😀
|
0 / 0 / 0 Регистрация: 12.11.2014 Сообщений: 26 |
|
|
1 |
|
|
02.03.2017, 08:35. Показов 28855. Ответов 10
Хочу поучиться в Turbo Debugger, но нигде не могу найти его. Нужен на windows 7 х64. Или я не правильно устанавливаю то, что нахожу? Ничего не запускается и выдает ошибки о несовместимости то разрядности, то с windows. Подскажите пожалуйста как правильно установить и где можно скачать. Или же какие-то аналоги похожие есть? Посоветуйте. Спасибо.
__________________
0 |

|
Programming Эксперт 94731 / 64177 / 26122 Регистрация: 12.04.2006 Сообщений: 116,782 |
02.03.2017, 08:35 |
|
Ответы с готовыми решениями: Turbo Debugger Простите за глупый вопрос (а может он и не глупый, не знаю) Суть такова, что при… Отладчик Turbo Debugger Turbo Debugger не хочет работать Дамп памяти в Turbo Debugger 10 |
|
Прощай, Мир! 1672 / 829 / 253 Регистрация: 26.05.2012 Сообщений: 3,057 |
|
|
02.03.2017, 18:02 |
2 |
|
Или же какие-то аналоги похожие есть? FASM
0 |

|
Модератор
8276 / 4180 / 1595 Регистрация: 01.02.2015 Сообщений: 12,999 Записей в блоге: 3 |
|
|
02.03.2017, 19:04 |
3 |
|
Omnom, инструмент выбирается под задание. Если вам всё равно какой ассемблер учить (не определились с задачей), попробуйте начать с ассемблера для Windows. Не очень простой путь…
2 |
|
0 / 0 / 0 Регистрация: 12.11.2014 Сообщений: 26 |
|
|
06.03.2017, 09:14 [ТС] |
4 |
|
Мне нужен именно Turbo Debugger. По учебе. Есть руководство, которое надо изучить, а программу не выдали, где взять не сказали, как устанавливать тоже. А делать как-то надо. Вот начало первой практической: Миниатюры
0 |
|
Модератор
8276 / 4180 / 1595 Регистрация: 01.02.2015 Сообщений: 12,999 Записей в блоге: 3 |
|
|
06.03.2017, 10:05 |
5 |
|
Ясно. Т.е. вам нужно установить DOSBox. Настроить его. Запускать tasm и td. Добавлено через 2 минуты Добавлено через 1 минуту
1 |
|
C++/Delphi/Asm/Py/PHP 6103 / 1858 / 210 Регистрация: 14.12.2014 Сообщений: 3,847 Записей в блоге: 12 |
|
|
06.03.2017, 10:49 |
6 |
|
программу не выдали, где взять не сказали Искать пробовал? Добавлено через 26 секунд
0 |
")
|
0 / 0 / 0 Регистрация: 12.11.2014 Сообщений: 26 |
|
|
14.03.2017, 05:58 [ТС] |
7 |
|
а вы думали я сюда пришла не обшарив каждый уголок?
0 |
|
577 / 374 / 69 Регистрация: 29.03.2013 Сообщений: 784 |
|
|
14.03.2017, 11:53 |
8 |
|
а вы думали я сюда пришла не обшарив каждый уголок? Что вам гугл рассказал?
0 |
|
3405 / 1824 / 489 Регистрация: 28.02.2015 Сообщений: 3,699 |
|
|
14.03.2017, 12:35 |
9 |
|
а вы думали я сюда пришла не обшарив каждый уголок? Borland перестала поддерживать свою серию продуктов TURBO, ещё до массового использования 64-ти битных ОСей. Поэтому найти 64-ти битную версию невозможно. TD есть в пакетах TASM 3.x и 4.x, также в пакетах Borland и Turbo Pascal 7.x ps:есть ещё и GUI Turbo Assembler 64-х битный, но на 32-х битной машине я его не проверял.
1 |
|
Модератор
8276 / 4180 / 1595 Регистрация: 01.02.2015 Сообщений: 12,999 Записей в блоге: 3 |
|
|
14.03.2017, 21:12 |
10 |
|
Omnom, уже прошла неделя с момента публикации первого сообщения. Сегодня вы отвечаете
а вы думали я сюда пришла не обшарив каждый уголок? и впечатление, что советы совсем не пошли впрок. Если непонятно — уточняйте, задавая вопросы на форуме.
0 |
|
C++/Delphi/Asm/Py/PHP 6103 / 1858 / 210 Регистрация: 14.12.2014 Сообщений: 3,847 Записей в блоге: 12 |
|
|
14.03.2017, 22:38 |
11 |
|
а вы думали я сюда пришла не обшарив каждый уголок? Именно так я и думаю, потому что забив в любом поисковике «Скачать Turbo Debugger», сразу выходит куча ссылок, по которым можно его скачать (если не первая, так вторая точно). Есть проги, которые не сразу можно найти, но уж Turbo Debugger отыскать вообще никаких проблем нет… Другое дело, можно не сразу понять как его запускать. Но не смочь найти и скачать саму прогу – это очень странно…
0 |
/*************************************************************************/
                           TSM_INST.TXT
                        TURBO ASSEMBLER 5.0

This file contains details on how to install the TASM 5.0 package.

--------------------------------------------------------------------
                        TABLE OF CONTENTS

SECTION 1     System Requirements  -   Full Installation

SECTION 2     Installing TASM 5.0
              A)   Pre-Installation Notes
                   1)   Backup Disks
                   2)   Disk Compressions
                   4)   Network Installation
              B)   Where to install
              C)   Installation Instructions
              D)   After Installation

SECTION 3     Minimum and Selected Installation Options


SECTION 4     Troubleshooting - Install Issues
              A)   Data Integrity or Bad Section Errors
              B)   Disk Full or Insufficient Disk Space
                   Errors
              C)   GP Fault or Unhandled Exception Errors

SECTION 5     Troubleshooting - Run Time Problems
              A)   Out of Memory Errors
              B)   GP Fault or Unhandled Exception Errors
              C)   Turbo Debugger for Windows

SECTION 6     Icons in the TASM Group Window
              A)   Creating a Program Group Window for TASM
              B)   List of Icons and Executable Files

SECTION 7     Using TASM from Windows

SECTION 8     How to Get A Technical Information Document
              A)   From TechFax
              B)   From Bulletin Boards

SECTION 9     Boot Clean
--------------------------------------------------------------------

SEARCH INSTRUCTIONS:  To go directly to a specific
section, use your editor's search utility and search on
"SECTION -#-" replacing the # with the appropriate section
number.


SECTION -1-  SYSTEM REQUIREMENTS
================================
Before installing TASM please review the minimum
system requirements listed below:

System requirements for a generic full installation
(both 16- and 32-bit installation):
   8 MB system memory  (req. to run Win32)
   Intel 386 or higher
   DOS 5.01 or later
   Windows 3.1 or later (to access Turbo Assembler help file)
   Windows '95 or Windows NT (for targeting those environments)
   Approximately 10 MB hard disk space
   3.5" High Density Disk Drive

Generally, you should use a host environment with a capability that is
equal to or greater than capability of the system you plan to target.
For example, if you are building 32-bit applications for Windows 95 or
Windows NT, you should use TD32 in a Win32 environment.

NOTE: On a compressed hard disk the installation process
might need additional hard disk space. If you are using
a disk compression utility, refer to Section 2, part A.


SECTION -2-  INSTALLING TASM 5.0
================================

A) Pre-Installation Notes
-------------------------
1) Backup Disks
   If you wish to make backup copies of your original disks
   use the DOS DISKCOPY command. You must use the same disk
   size and media (density) when you make your backup set of
   disks. Attempting to copy from 3.5" to 5.25" will cause
   the install program to fail. If you have a bad disk
   contact Borland's Disk Replacement line at (800) 621-3132.

2) Disk Compression
   If you are using a disk compression utility (such as
   Stacker[tm], DoubleSpace[tm], XtraDrive[tm],
   SuperStor[tm], etc.) the estimated available hard disk
   space reported might not be sufficient to install the
   product. During installation, TASM 5.0 copies compressed
   files onto your hard disk. Disk compression utilities
   report available hard disk space assuming that the files
   copied onto the disk can be compressed. Since the files
   that are copied by the installation program are already
   compressed, the disk compression utility cannot compress
   them any further. To solve this, you might need to free
   additional hard disk space for the installation.

3) Network Installation
   If you are installing TASM 5.0 on a network, you may wish
   to consult Technical Information Document number 1738. For
   information on how to receive this document, refer to
   Section 10.


B) Where to Install:
--------------------
This product is designed to be used as a standalone product or in
conjunction with Delphi 2.0 or Borland C++ 5.0.  It can also be used
with Borland/Turbo C++ 4.x, Borland Pascal 7 or Delphi 1.0.  If you are
using Turbo Assembler 5.0 in conjunction with any of these Borland
compilers, you can install Turbo Assembler atop the same directory
heirarchy as your other Borland Tools.

If you use Turbo Assembler 5.0 with any other Borland development tools or
versions, then it is best to install Turbo Assembler to a unique
directory, such as c:tasm.  Both tool sets should be referenced in your
dos path with the most recent version being first in the path.  For custom
configuration requirements, please contact Technical Support.


C) Installation Instructions:
-----------------------------
1. Boot Clean
   It is highly recommended that you boot clean before
   installing TASM 5.0. Booting your system with a clean
   configuration will eliminate any potential software
   conflicts that might arise during installation. Refer to
   Section 10 for instructions on how to boot clean.

2. Insert the TASM 5.0 installation disk into drive A or B.

3. From the DOS prompt type A:INSTALL (or B:INSTALL)
   and press <ENTER>. Do not install from a Windows DOS prompt.

4. Select installation options from the install menu. See
   Section 3 for more details on the installation instructions.

5. Choose START INSTALLATION to begin installation. If problems
   occur during installation, note any error messages and refer to
   Section 5.


D) After Installation:
----------------------
1. After the install has completed, the README file appears.
   The README file contains important information about
   configuring and using TASM 5.0, including late changes
   which might have occurred after the manuals were printed.

2. Modify your CONFIG.SYS so that files and buffers are set
   to at least 40. For example:

	FILES=40
	BUFFERS=40

   Also modify your AUTOEXEC.BAT file by adding to your path
   statement the TASM 5.0 bin directory. For example:

	PATH C:TASMBIN;C:;C:DOS;C:WINDOWS

3. If you are installing Delphi 1.0, or Borland C++ 4.x AFTER
   Turbo Assembler 5.0 has been installed, you will have to manually
   change the system settings that allow these products to coexist:

   In your system.ini file, check your [386Enh] section for multiple
   entries for the device TDDEBUG.386.  Remove duplicate entries of
   TDDEBUG.386 so that only the version from this product is loaded.
   On disk, you may also want to rename or remove the BP7 or BC4.x
   versions of TDDEBUG.386 and TDWINTH.DLL to avoid their accidental
   loading.  You must restart Windows after making changes to system.ini.


4. Changes to SYSTEM.INI file:
   Presuming you have installed Turbo Assembler and Tools to "c:tasm",
   The install program makes these changes to the SYSTEM.INI file:

   1) Adds "device=c:tasmbinwindpmi.386" to support our 32-bit tools.
   2) Adds "device=c:tasmbintddebug.386" to support our debugger.


5. Configuring the Windows NT command prompt:
   To run 16-bit protected-mode programs (tlink) under an NT command
   prompt you need to add the following line to CONFIG.NT:

      ntcmdprompt

    Under the default NT command-line prompt, DOS COMMAND.COM is run
    after returning from a TSR (such as RTM.EXE which bcc and tlink load).
    Adding the above line will cause the original NT CMD.EXE to be run.


SECTION -3-  MINIMUM AND SELECTIVE INSTALLATION OPTIONS
=======================================================
This section outlines the minimum and selective install
options available for TASM 5.0.

There are some files that are common to more than one option.
For example, MAKE.EXE will be installed if either the 16-bit or
the 32-bit command line tools are installed. { Common to 16-bit
and 32-bit tools is [2360K] of files ; Common to the TDWIN and
TDWIN32 options is [504K] of files } Those common files are
included in all the following estimates.

16-bit command line tools        [3085K]
    Install the 16-bit tools (TASM, TLINK).
    (Minimum installation option)

32-bit command line tools        [3163K]
    Install the 32-bit tools (TASM32, TLINK32).

Turbo Debugger for DOS           [1041K]
    Install Turbo Debugger for DOS.
    (Minimum installation option)

Turbo Debugger for Windows       [1533K]
    Install Turbo Debugger for Windows and associated Debugger
    tools (TDWINI setup, wremote).

Turbo Debugger for Win32         [1502K]
    Install Turbo Debugger for Win32 programs.

Examples                         [580K]
    Install Borland TASM examples.

Documentation Files              [6K]
    Install documentation files.


SECTION -4-  TROUBLESHOOTING - INSTALL PROBLEMS
===============================================
This section explains a few common errors encountered during
installation. System configuration and software conflicts
might cause the installation process to fail. If the
installation fails, follow the instructions in Section 10
on how to boot clean. This will eliminate any possible
software conflicts. If booting clean doesn't solve the
problem, or you encounter a problem not mentioned here,
contact Borland Technical Support.

With any of the following installation errors there are
several common steps that can be taken to enable the
installation to complete.

   - Make sure your system meets the minimum requirements.
     Refer to Section 1 for a list of the minimum
     installation requirements.

   - Boot your system with a clean configuration. Refer to
     Section 10 for instructions on how to boot clean.

   - Install the product from your local hard drive. Sometimes
     a timing error between the hard drive and a disk drive will
     generate an error from the TASM install. Installing from
     the hard drive can solve this problem. (Especially in
     conjunction with a clean boot)

     1) Copy the contents of all the diskettes to a temporary
        directory on your hard drive. The following is an example
        of the command:

		COPY *.* c:temp

        If you should get an error during the copying process see
        below for information on how to get a replacement disk set.

     2) Change directories to the temp directory and then type
        install. For example:

	CD c:temp
	INSTALL


A) Data Integrity or Bad Sector on Disk Errors
----------------------------------------------
If you receive either one of these error messages, you
need to get a replacement disk set. Contact Borland's
Disk Replacement Line at (800-621-3132).


B) Disk Full or Insufficient Disk Space Errors
----------------------------------------------
You could also get this error if there is insufficient
hard disk space available to install TASM 5.0.

   - If you are using disk compression read Section -2-
     part A) on reported available disk space when using
     disk compression.


C) GP Fault/Unhandled Exception
-------------------------------
GP Fault or Unhandled Exception errors can occur for a
variety of reasons. Possible reasons for these errors are
explained in Technical Information Document number 649.
Refer to Section 9 for instructions on how to obtain
this document.

   - Turn off Disk Caching and Video/Shadow RAM in CMOS.
     Refer to the documentation for your computer.


SECTION -5-  TROUBLESHOOTING - RUN TIME PROBLEMS
================================================
This section describes common errors encountered when
trying to use tools included in TASM 5.0. System configuration
and software conflicts might cause one of the tools to fail.
If a tool fails, you should boot your system clean to eliminate
any possible software conflicts. Refer to Section 10 for
instructions on how to boot clean. If booting clean does not
solve the problem or you encounter a problem not mentioned here,
contact Borland Technical Support.


A) Out of Memory
----------------
If you are using command-line tools and are getting
"Out of Memory" errors you might have exhausted your
extended (or XMS) memory pool. This is especially true if
you only have 2MB available extended RAM and do not have
a memory manager that provides virtual memory. If you are
experiencing this, please consult the TASM readme file that
can be found in the TASM directory, under the section General,
Out of Memory. This information can also be found in the
Technical Information Document number 1737. For information
on how to receive this document, refer to Section 9.


B) GP Fault/Unhandled Exception/System Hang
-------------------------------------------
GP Fault or Unhandled Exception errors can occur for a
variety of reasons including: not enough memory
available, not enough hard disk space available,
conflicts with optimizations set in the CMOS, and
software conflicts. Technical Information Document
numbers 649 and 1328 address these issues. Refer to
Section 9 for information on how to obtain these files.


C) Turbo Debugger for Windows
-----------------------------
If you experience any strange behavior from the Turbo
Debugger, such as a garbled screen or a system hang upon
execution or exit:

   1)  Make sure that you have the latest Windows drivers
       for your video card.

   2)  Run TDWINI and test a different DLL to resolve a
       possible compatibility problem with your specific
       card.

   3)  Check README.TXT for additional information.

   4)  If you are still experiencing difficulties your
       problem might not be related to the video mode. At
       this point contact Borland Technical Support via
       phone or online help. Refer to Section 10 for more
       information about online options and procedures.


SECTION -6-  ICONS IN THE TASM GROUP WINDOW
===========================================

A) Creating a Program Group Window for TASM 5.0.
------------------------------------------------
If the Borland C++ Program Group Window didn't appear
after installation you can create one by choosing one of
the following options:

   - Generate icons by running the groups.exe:
     From within Windows, choose File|Run, and type:

	   c:windowsgroups.exe groups.b$$

     If nothing appears to happen, it is possible that the
     data file (groups.b$$) was not created properly.

   - Manually creating the icons. Load Windows, choose
     File|New|Program Group, and click on OK. Type the
     name you want for the program group window in the
     "Description:" text box, such as Borland TASM 5.0. Leave
     "Group File" line blank. Click OK. A new Window appears.
     Choose File|New|Program Item to create icons for the
     Windows programs and click OK. Select one of the
     Windows executable programs to create an icon for, such
     as TDW.EXE (you can also use the Browse button). Type
     the name of that executable program in the Description
     text box. Type the full path name to the executable in
     the Command Line text box. Typing a path name for the
     working directory is optional. The default is the
     WINDOWS directory. Click OK. The icon appears in
     the active program group window. Repeat these steps
     for executable program you want to use.


B) List of Icons and Executable Files
-------------------------------------
The following table contains a list of executable files that
each icon calls, as well as the name of the icon for that
executable, if there is one:

    TASM.HLP=F:TASMBIN, Tasm Reference, HELP.ICO
    TDW.EXE=F:TASMBIN, Turbo Debugger for Windows, TDW.ICO
    TDWINST.EXE=F:TASMBIN, TDW Configuration, TDWINST.ICO
    WREMOTE.EXE=F:TASMBIN, Remote Debugging
    WRSETUP.EXE=F:TASMBIN, Remote Setup
    TD.PIF=F:TASMBIN, Turbo Debugger for DOS, TDDOS.ICO
    TDINST.EXE=F:TASMBIN, TD Configuration, TDOSINST.ICO
    TD32.EXE=F:TASMBIN, Turbo Debugger for Win32, TD32.ICO
    TD32INST.EXE=F:TASMBIN, TD32 Configuration, TD32INST.ICO
    TDWINI.EXE=F:TASMBIN, TD Video Configuration


SECTION -7-  USING TASM FROM WINDOWS
====================================
The TASM installation creates a TASM 5.0 group in the Windows
Program Manager. However, the installation program does not
create Windows PIF files to run any of the command line tools.

TASM.EXE and all other 16-bit executable tools can be run through
a regular Windows DOS box.

To run TASM32 from a Windows DOS box, you need to use an icon
created with a PIF file. You can use the PIF file B32TOOLS.PIF
(located in the TASMBIN directory) to run the 32-bit tools
from a Windows DOS box. This PIF file references COMMAND.COM.
When you double click the icon, a DOS box activates, and you
can run TASM32.EXE and TLINK32.EXE from it.


SECTION -8-  HOW TO GET A TECHNICAL INFORMATION DOCUMENT
========================================================
Technical Information Documents contain tips, techniques,
and enhanced information on using Borland development tools,
and information on commonly asked programming questions.
Such documents often include programming examples. These
documents can be accessed via modem or fax. Technical
files which contain binary modules, such as patches for
released Borland products, are normally available only from
those services that can be accessed by modem. Documents can
be accessed from the following sources:


A) Fax the document from Borland's TechFax Service
--------------------------------------------------
Call (800) 822-4269 from a touch-tone phone. When
prompted, enter your FAX number, then enter the document
number you want to receive. The document will be faxed to
you shortly.

Here is a list of common Technical Information Documents:

      * 3       General Catalog of All Documents Available
      * 649     General Protection Faults
      * 1171    Problem Report Form
      * 1010    Installing and Configuring BC++
      * 806     Network Installations
      * 738     Memory Corruption
      * 1561    Clean Boot


B) Download the document from
-----------------------------
   -The Borland Download Bulletin Board Service (DLBBS)
    (408) 431-5096, protocol 8N1
   -The Borland Automated Online Service (OAS)
    (408) 431-5250, protocol 8N1
   -The Borland-supported FTP site on Internet
    ftp.cica.indiana.edu, IP address [129.79.20.27]
   -Borland-supported forums on CompuServe, Genie, BIX.
	For CIS type:
	   go BCPPWIN
             or
	   go BCPPDOS
	and choose library 2

	For BIX type: join Borland

	For GENIE type: Borland

   Below are steps to download a Technical Information
   Document from the Borland DLBBS.

   For proper display, your communication software should
   provide ANSI terminal support. Most packages provide
   VT-100 terminal emulation, which is fine for the DLBBS.
   If you're using a Windows based package, select a screen
   font (such as: Terminal) that includes extended ASCII
   characters.

   Once connected, you'll be prompted to enter your first
   and last name and a password. If you haven't used the
   service before, you'll be asked to verify your name and
   then answer a few questions. The menu-driven system
   guides you through the various product and file
   areas. You'll always receive a list of options when you
   are prompted to make any choice.


   MANEUVERING THE MAIN MENU
   - - - - - - - - - - - - -
   First join the C++ Conference. The Main Menu shows the
   product whose files you can access. At the Main menu,
   type "F" to select the Files menu.


   DOWNLOADING FILES
   - - - - - - - - -
   Once you know the name of the file you want to download,
   type "D" for download at the File menu. When prompted,
   type the full name of the file or files. All Technical
   Information Documents have the form "TI#.ZIP". Replace
   the # with the appropriate document number. For example,
   to download Technical Information Document number 649,
   the full name of the file is TI649.ZIP. If you do not
   know the protocol or download keys to press, refer to
   your telecommunications manual.


   WORKING WITH DOWNLOADED FILES
   - - - - - - - - - - - - - - -
   Most of the files on the Download BBS are stored and
   transferred in an archived (compressed) format and need
   to be unarchived before they can be used. If you don't
   have the unarchiving utility PKUNZIP v.204G or newer,
   download PKZ204G.EXE from the DLBBS and execute it.
   You'll receive PKUNZIP and PKZIP utilities. To unarchive
   the file, type the name of an unarchive utility
   (UNPACK, UNZIP or PKUNZIP) and then the name of the
   archived file. For example:

	PKUNZIP TI649.ZIP


SECTION -9-  BOOT CLEAN
========================
This section describes the process of "booting clean" on
IBM PC's and compatible computers with DOS and/or windows.
This document assumes you have MS-DOS version 5.00 or higher.
"Booting Clean" is the process of booting without loading
device drivers and TSRs. Device drivers such as mouse
drivers, network drivers, TSRs, etc. can cause memory
conflicts.

These device drivers and TSRs are usually loaded in two
files (AUTOEXEC.BAT and CONFIG.SYS typically located on
the root directory of your hard disk). The safest
method of booting clean is to create a "bootable" floppy
disk in drive A:. See the "Making a Boot Disk" section
below.

If you are using a program that runs under Microsoft
Windows, then you might need to make changes to some Windows
configuration files in order to ensure a "clean system
configuration" under Windows. The two files you will need
to examine are WIN.INI and SYSTEM.INI. These files are
located in the WINDOWS subdirectory on your hard disk. The
changes that you will need to make to these files (if any)
are outlined below.


Making a Boot Disk
- - - - - - - - - -
In order to make a bootable floppy disk, follow the
instructions below. NOTE: These instructions assume that
your hard disk is C: and your DOS and WINDOWS subdirectories
appear on this disk. (Most cases):

     1) Place a blank disk in drive A:
     2) type  format a: /s (format the disk)

At this point you now have a bootable floppy disk. Using
EDIT, ensure your AUTOEXEC.BAT and CONFIG.SYS look like
one of the configuration choices below.

Your "clean" system configuration should be exactly like
one of the choices below except replace "<Insert REQUIRED
drivers here>" with any required drivers. The ONLY
required drivers are, for example, disk compression and/or
hard disk access drivers. This does not include mouse
drivers and disk caching utilities such as SmartDrive.


Clean Configuration DOS 5.0 and DOS 6.x running Windows
-------------------------------------------------------
   1) Insert your "bootable floppy" in drive A.
   2) Type "EDIT A:CONFIG.SYS"
   3) Type in the following:

          <Insert REQUIRED drivers here>
          DEVICE=C:DOSHIMEM.SYS
          FILES=40
          BUFFERS=40

   4) Exit the editor (Alt-F, then X, then Y).
   5) Type "EDIT A:AUTOEXEC.BAT"
   6) Type in the following:

          <Insert REQUIRED drivers here>
          PATH=C:WINDOWS;C:DOS;C:BC4BIN
          PROMPT $P$G

   7) Exit the editor (Alt-F, then X, then Y).
   8) Type "CD WINDOWS:
   9) Type "COPY WIN.INI WIN.BAK"
  10) Type "COPY SYSTEM.INI SYSTEM.BAK"
  11) Type "EDIT WIN.INI"
  12) Make sure that the "load=" and "run=" lines in your
      WIN.INI file match the following lines:

          [windows]
          spooler=yes
          load=
          run=
          Beep=yes

  13) Exit the editor (Alt-F, then X, then Y).
  14) Type "EDIT system.ini"
  15) Ensure that your "shell=" line in your SYSTEM.INI file
       matches the following:

          [boot]
          shell=progman.exe

  16) Exit the editor (Alt-F, then X, then Y).
  17) Make sure your "Bootable floppy" is in drive A: and
      reboot your computer.

/**************************** END OF FILE ********************************/

�

GUI Turbo Assembler is an essential Multilingual Integrated Development Environment for Assembly language.
GUI Turbo Assembler comes integrated with Borland Turbo Assembler and Turbo Linker for assembling and building assembly codes. It is powered by DOSBox for handling Borland Turbo Assembler and Turbo Linker in 64-bit environment.
The IDE is loaded with powerful feature like syntax highlighting, code folding along with the other regular features to work with any assembly source code.
It supports compiling and building of assembly codes to windows executable with a single click.
Features
- 64-bit Compatible
- 32-bit Compatible
- Multilingual
- Tab Browsing
- Syntex Highlightening
License
Other License
As a global leader in Social Employee Recognition, Madison delivers intuitive and multi-faceted Recognition, Incentive, and Service Anniversary programs powered by Maestro, our uniquely configurable cloud-based SaaS technology.
User Ratings
5.0
out of 5 stars
★★★★★
★★★★
★★★
★★
★
ease
1 of 5
2 of 5
3 of 5
4 of 5
5 of 5
4 / 5
features
1 of 5
2 of 5
3 of 5
4 of 5
5 of 5
4 / 5
design
1 of 5
2 of 5
3 of 5
4 of 5
5 of 5
4 / 5
support
1 of 5
2 of 5
3 of 5
4 of 5
5 of 5
4 / 5
User Reviews
- All
- ★★★★★
- ★★★★
- ★★★
- ★★
- ★
-
Best GUI for TASM. Thanks to devs.
-
Fantastic project for coding old demo effects in ASM (not that there’s any reason in the world to do that, but that’s how the post-Amiga asm demos were done. So if you want to do it old school, TASM is a must!) Before this app, TASM in D0sbox was pretty much a pain. Works flawlessly. Many thanks to the author!
-
I believe the Web Master needs to update the link listed for the company’s website. It does not take you there but to another persons homepage. Overall however, the downloaded software was great, I liked it better than MASM that I currently use.
-
One of my favourite app. Very easy to use and helpful app. It saved lots of my time.
Thank you1 user found this review helpful.
Read more reviews >
Additional Project Details
Intended Audience
Advanced End Users, System Administrators, Developers, End Users/Desktop, Quality Engineers, Testers
User Interface
.NET/Mono
Programming Language
C#
| 140 КБ, FreeWare | |
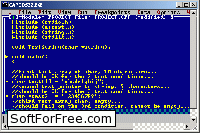
Скриншот программы Turbo debugger 2.0 Руководство пользователя Turbo Debugger — это современный отладчик, позволяющий
|

Рекомендованный софт
 |
LanAgent Standard 7.7
Программа для наблюдения за компьютерами в локальной сети: cкриншоты, работа в программах, сайты, кейлоггер, почта. Выявит «крыс», повысит дисциплину. Скачать Скриншоты |
Комментарии пользователей о программе:
Человек из 90-ых
[о версии «Turbo debugger 2.0 Руководство пользователя»]
Современный отладчик, говорите?
31 Июля, 2013
» Все комментарии
Ваш комментарий программы Turbo debugger 2.0 Руководство пользователя: |
||
| Комментарии публикуются после проверки администратором. При добавлении отрицательного комментария читайте соглашение об использовании. Мы не публикуем: сообщения о креках, кряках, и серийных номерах, не относящиеся к: «Turbo debugger 2.0 Руководство пользователя». |
||
| Ваше имя: | E-mail: | |
| Оценка: | нет 1 2 3 4 5 | |
| *Cообщение (30-1000 зн.): |
||
|
|
||

![]() Программы » Программирование » Другое
Программы » Программирование » Другое
© 2003-2023, SoftForFree.com. Использование материалов сайта разрешается только по договоренности с автором.
Автор проекта не несет ответственности за содержание рекламных материалов и качество программного обеспечения.
Наш проект являтся архивом бесплатных и коммерческих программ, которые размещаются авторами и
производителями ПО, либо их официальными представителями. Мы не распространяем нелицензионное ПО, креки,
серийные номера и любую другую информацию, запрещенную законодательством РФ.
Разделы сайта
Алфавитный указатель
Популярный софт
|
Кратко: Ассемблер. Подробно: Ассемблер. |
|
|
|
|
Информация о программе |
|
| Язык интерфейса: | Русский |
| Автор программы: | |
| Размер файла: | 140 КБ |
| Лицензия: | FreeWare (бесплатная) |
| Стоимость программы: | $0/0 руб. |
| Операционные системы: | Win 9x, Win CE, Win ME, Win NT, Win 2000, Win 2003 Server, Win XP, Win 2008 Server, Win Vista |
| Разрядность: | не указана |
| Добавлено & Обновлено: | 25 Сентября, 2006г. / не обновлялась |
| Просмотров: | Сегодня: 153 Неделя: 153 Всего: 16326 |
| Скачиваний: | Сегодня: 68 Неделя: 68 Всего: 6158 |
Скачивание программы
![]() Turbo debugger 2.0 Руководство пользователя скачать без регистрации
Turbo debugger 2.0 Руководство пользователя скачать без регистрации![]() Turbo debugger 2.0 Руководство пользователя скачать без регистрации #2
Turbo debugger 2.0 Руководство пользователя скачать без регистрации #2![]() Комментарии программы Turbo debugger
Комментарии программы Turbo debugger![]() Все программы автора
Все программы автора![]() Соглашение об использовании материалов сайта
Соглашение об использовании материалов сайта

Рекомендованный софт
 |
LanAgent Standard 7.7
Программа для наблюдения за компьютерами в локальной сети: скриншоты, работа в программах, сайты, кейлоггер, почта. Выявит «крыс», повысит дисциплину. Скачать Скриншоты |
![]() Программы » Программисту » Другое » Turbo debugger 2.0 Руководство пользователя
Программы » Программисту » Другое » Turbo debugger 2.0 Руководство пользователя
Ваше мнение о программе Turbo debugger 2.0 Руководство пользователя: |
||
| Мнения публикуются только после проверки администратором. Перед добавлением плохого мнения читайте соглашение нашего сайта. Не публикуются мнения: о серийных номерах, креках и т.п., оскробительные или не о «Turbo debugger 2.0 Руководство пользователя». |
||
| Ваше имя: | e-Mail: | |
| Оценка: | нет 1 2 3 4 5 | |
| *Мнение (30-1000 зн.): |
||
|
|
||

Полезные программы
Плеер 2.0
Миниатюрный плеер с поддержкой .mpeg .mp3 .mp2 .mp1 .ogg .wma .asf
(немало в 500 кбайтах, используется DirectX).
Скачать Подробнее
LanAgent Standard 7.7
Программа для наблюдения за компьютерами в локальной сети: скриншоты, работа в программах, сайты, кейлоггер, почта. Выявит «крыс», повысит дисциплину.
Скачать Скриншоты