In Windows 7, using the Device Manager, bringing up the properties of a disk, and going to the Policies tab, there are 2 switch items. The write cache, which this question it not about.
and
[X] Turn off Windows write-cache buffer flushing on the device <— this one only!
Microsoft puts a disclaimer on the tab for that item. «To prevent data loss, do not select this checkbox unless the device has a separate power supply that allows the device to flush its buffer in case of a power loss.»
In simple terms , what does this change for file writing, file saving, file copying?
1. Changing write actions for paranoid programs: (fact or fiction)
Does it change the way write flushes work for a program that Forces a cache flush to occur? Some programs are very intent on finishing the write, without speculating, are these programs able to continue thier protective writing, or does this change for those programs also?
2. Types of programs effected:
What are the types of actions/programs that would or would not be efffected by the change? Type, some programs stream, some do quick write outs, some are continuous, some are protective (or any other type you could define in simple terms).
3. Did You see anything, or a benchmark even:
If the setting is on, what are the observable changes in writing? Any loose examples of an observed change in behavior. or observed no change in behavior?
4. What is the holdup or delay :
We know most of these actions are very fast on most computers, The data will eventualy be written. Relative to the the speed of the drive, is the ammount of time significant?
For the purposes of my question, the risk that exists is not one of the questions, if you would like to cover it , it would not get in the way.
What does «Write cache buffer flushing» mean is almost a dupe of this, but the link is for a different OS. Although the A has some info , even the term used in the link is not the same. It also does not answer the most significant things that a user would want to know, that I have tried to outline here.
Hi,
I am sorry that there are some misunderstanding.
I ran dskcache on my computer which only has one hard disk without any problem, so I suspect that there are some compatibility with the RAID. However, you can perform the following steps to modify the “Turn off Windows write-cache buffer flushing on the device» option.
1. Run dskcache without any parameter, you will get the output like the following
——————
Disk device:
\?ide#diskwdc_wd2500js-60mhb5_____________________10.02e04#5&3976d0c4&0&0.0.0#{53f56307-b6bf-11d0-94f2-00a0c91efb8b}
Current settings:
Write Cache is enabled
Power Protect is enabled
——————
2. Open Registry Editor, navigate to the following key:
[HKEY_LOCAL_MACHINESYSTEMControlSet001EnumIDEDiskWDC_WD2500JS-60MHB5_____________________10.02E045&3976d0c4&0&0.0.0Device ParametersDisk]
«CacheIsPowerProtected»=dword:00000001
[HKEY_LOCAL_MACHINESYSTEMCurrentControlSetEnumIDEDiskWDC_WD2500JS-60MHB5_____________________10.02E045&3976d0c4&0&0.0.0Device ParametersDisk]
«CacheIsPowerProtected»=dword:00000001
Note: When the DWORD value is equal to 1, the option in the Write-caching policy is enabled, otherwise is disabled. You will be able find the key in step 2 base on the output of dskcache.
3. Please restart the computer after you modify the registry.
Best Regards,
Vincent Hu
-
Marked as answer by
ip-rob
Wednesday, December 23, 2009 7:33 PM
Page 5 of 16:
Disable Prefetch, SuperFetch, And Windows Write-Cache Buffer Flushing
Disable Prefetch, SuperFetch, And Windows Write-Cache Buffer Flushing
Disable Prefetch and SuperFetch
How to disable:
- Type Regedit into the Start menu’s Search box
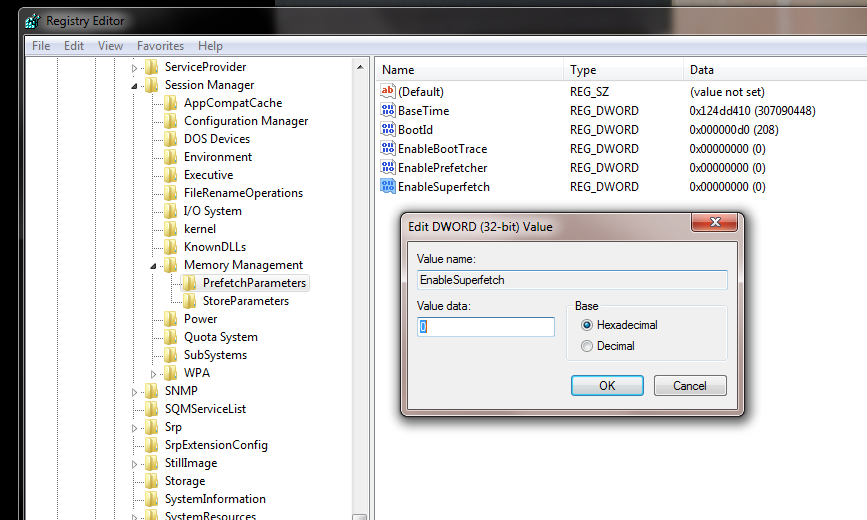
- Select the file path «HKEY_LOCAL_MACHINESYSTEMCurrentControlSetControlSessionManagerMemory ManagementPrefetchParameters»
- Right-click on both EnablePrefetcher and EnableSuperfetch
- Select Modify on each of these to change the value from 1 (or 3) to 0
- Restart
SuperFetch is designed to cache files used often. Given the low access times of SSDs, this option can be disabled. If you installed Windows 7 on an SSD, it should, in fact, be disabled automatically.
Prefetch loads pieces of program files into RAM. By disabling this feature, you free up your system memory.
Disable Windows Write-Cache Buffer Flushing
This is one of those tweaks that isn’t universal to all SSDs. In fact, it’s not recommended if you own an Intel drive, as it purportedly has a negative impact on performance. If anything, take note of your storage subsystem’s performance before and after this alteration to determine if it’s something you really want to use or not.
How to disable:
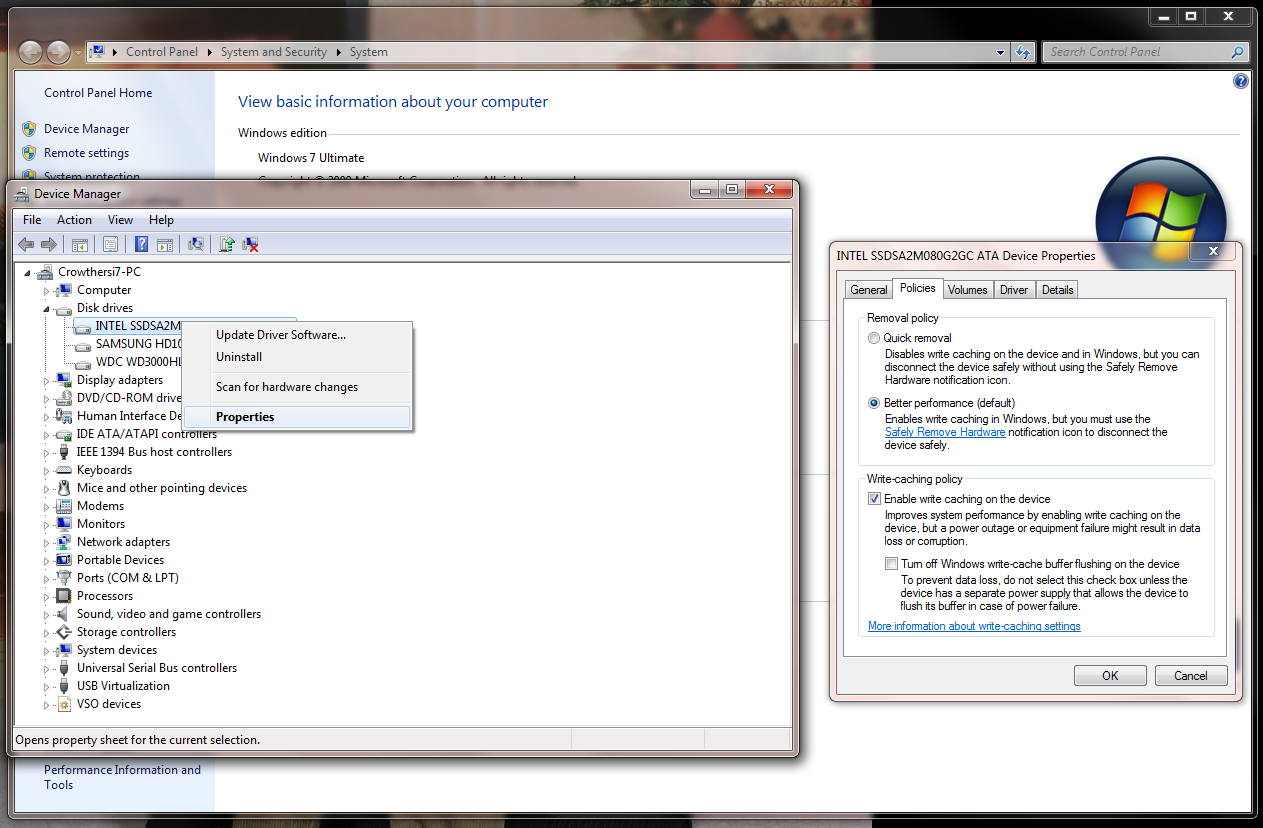
- Right-click Computer in the Start menu, then select Properties
- Select Device Manager
- Select Disk drives
- Right-click your SSD and select Properties
- Under the Polices tab, check the Turn off Windows write-cache buffer flushing on the device box
Per Windows Help, «Write caching in a storage device refers to the use of high-speed volatile memory to collect write commands sent to data storage devices and cache them until the slower storage media (either physical disks or low-cost flash memory) can accommodate them.»
In the case of a hard drive, the operating system flushes commands to a disk’s on-board cache. That doesn’t mean it’s safe yet, though. So, it waits for the drive to report back that cached data has been written to the magnetic media. If you’re more concerned with performance than the integrity of your data, turning off write-cache buffer flushing skips that extra command to flush the internal RAM buffer.
For a more detailed explanation of flushing and the risks associated with turning it off, check out Microsoft employee Raymond Chen’s personal blog post on the topic.
Get instant access to breaking news, in-depth reviews and helpful tips.
Ускорения производительности диска
Скрытый параметр увеличения производительности жесткого диска
Есть один почти скрытый параметр, который по умолчанию выключен в Windows 7. Он может увеличить производительность жесткого диска, но увеличить и вероятность потери данных.
Откройте список дисковых устройств в Диспетчере устройств (devmgmt.msc). Щелкните правой кнопкой мыши на жестком диске, выберите Свойства (Properties), а затем вкладку Политика (Policies). По умолчанию функция Разрешить кэширование записи на диск (Enable write caching on the device) включена. Но другой параметр Отключить очистку буфера кэша записей Windows (Turn off Windows write-cache buffer flushing on thedevice) не выбран.
Оба параметра позволяют Windows дождаться момента низкой активности, прежде чем записать несохраненные данные на диск, что повышает производительность. Но потерять данные можно, если питание прекратит поступать к диску прежде, чем эти данные будут сохранены. Чтобы помочь предотвратить потерю данных, Windows периодически командует диску сохранить поставленные в очередь данные, независимо от состояния активности, — произвести запись кэша из буфера. Второй параметр отключает эту функцию, что может улучшить производительность, но, естественно, с некоторым риском.
Microsoft рекомендует использовать функцию Отключить очистку буфера кэша записей Windows (Turn off Windows write-cache bufferflushing on the device) только для дисков с отдельным источником питания.
Disable Windows Write-Cache Buffer Flushing
- Right-click Computer in the Start menu, then select Properties.
- Select Device Manager.
- Select Disk drives.
- Right-click your SSD and select Properties.
- Under the Polices tab, check the Turn off Windows write-cache buffer flushing on the device box.
- Should I turn off Windows Write-cache buffer flushing on SSD?
- Should I disable write caching Windows 10?
- Should I disable write caching on SSD?
- Should I enable write caching?
- How do I disable my SSD cache?
- How can I change the write caching settings for this device?
- How do I disable my RAM cache?
- How do you disable write caching Windows 10?
- How do I know if my cache is enabled?
- Is Defrag bad for SSD?
- Do you optimize solid state drives?
- Does changing HDD to SSD improve performance?
Should I turn off Windows Write-cache buffer flushing on SSD?
Intel recommends against disabling write-cache buffer flushing on its SSDs.
Should I disable write caching Windows 10?
By default, disk write caching is enabled in Windows 10 for internal drives. For external drives, it is disabled, so they are optimized for quick removal. While disk write caching improves system performance, it can lead to data loss due to power outage or another hardware failure.
Should I disable write caching on SSD?
Disabling indexing on your SSD may help reduce writing to the disk, but think carefully before you decide to do so. Indexing can have a negative impact on your drive’s performance, but it can also massively improve your productivity if you have a lot of data on the drive and you need to find something quickly.
Should I enable write caching?
To answer the question, although write caching does improve performance, its benefit should be carefully balanced against the cost of possible data loss or corruption, and a UPS should always be present if write caching is enabled.
How do I disable my SSD cache?
Disabling the SSD Cache
- Go to Main Menu > Storage Manager > Storage > Cache Acceleration.
- Set the Cache Acceleration toggle switch to .
How can I change the write caching settings for this device?
Right-click the drive on which you want to turn disk write caching on or off, and then click Properties. Click the Policies tab. Click to select or clear the Enable write caching on the disk check box as appropriate. Click OK.
How do I disable my RAM cache?
Follow this procedure to disable Disk Write Caching. Open Computer folder > C Drive > Properties > Hardware tab > Select the Disk Drive > Click on Properties button > Policies tab. Here you can uncheck Enable write caching on the device. Click Apply/OK > Exit.
How do you disable write caching Windows 10?
To Completely Disable Write-Behind Caching
- Right-click My Computer, and then click Properties.
- Click File System, and then click the Removable Disk tab.
- Click to clear the Enable write-behind caching on all removable disk drives option.
- Click OK, click Close, and then restart the computer when prompted.
How do I know if my cache is enabled?
In Device Manager expand “Disk Drives,” right-click on the target hard drive and select “Properties.” Go to the “Policies” tab. To enable Disk Write Caching, check the option “Enable write caching on the device.” As I said earlier, write caching is enabled for internal hard drives by default.
Is Defrag bad for SSD?
With a solid state drive however, it is recommended that you should not defragment the drive as it can cause unnecessary wear and tear which will reduce its life span. … SSDs are able to read blocks of data that are spread out over the drive just as fast as they can read those blocks that are adjacent to one another.
Do you optimize solid state drives?
“Optimization” is Unnecessary
You don’t need to run an SSD optimization program. As long as you’re using Windows 7 or 8, your operating system is already sending all the TRIM commands your SSD needs. For free space consolidation, your drive’s firmware is likely doing a better job than software ever could.
Does changing HDD to SSD improve performance?
Replacing a hard drive with an SSD is one of the best things you can do to dramatically improve the performance of your older computer. Without any moving parts, SSDs operate more quietly, more efficiently, and with fewer parts to break than hard drives that have spinning platters.

The Windows disk write caching feature stores some of your hard disks’ write commands in the memory (RAM), forming a queue. Instead of immediately completing the writing of a file, it saves part of it to complete at a later time, when the slower device can be written to.
Windows 10 Disk Write Caching improves performance
This often means applications can run faster, using the disk write cache to ensure they don’t have to wait for data write requests to actually write to the disk before they can continue. Windows write caching is typically enabled for internal drives by default because of this, but external hard drives or USB drives often don’t use the feature, which can lead to a slow external hard drive.
On the other hand, when you enable write caching you’re introducing a larger chance of data loss. As objects in memory don’t persist across a reboot, sudden power failure or removal of an external drive may mean that some data is irreversibly lost. As a result, there are good reasons to enable or disable the disk write cache, and we’re going to show you how to do that today.
How to Enable or Disable the Disk Write Caching Policy via Device Manager
Disabling or Enabling write caching in Windows 10 is very easy and doesn’t require use of command prompt or the registry. You simply need the Device Manager and a few minutes to fix your Windows caching issues.
- Open Device Manager
Press “Windows + X” to open the Start context menu and click “Device Manager”.

- Open the “Disk Drives” heading and double-click the disk drive

- Disable the Disk Write cache Policy
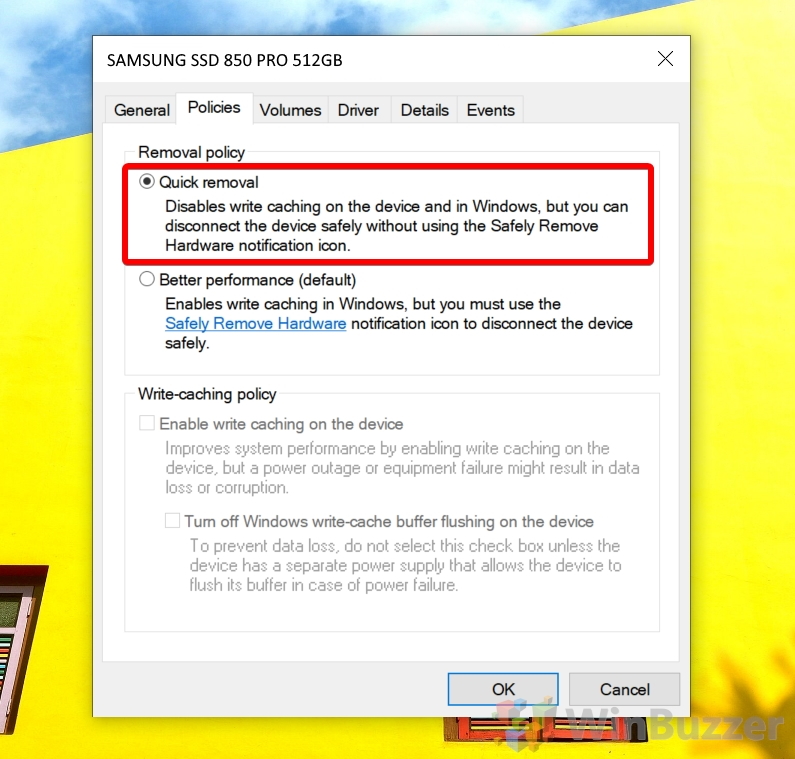
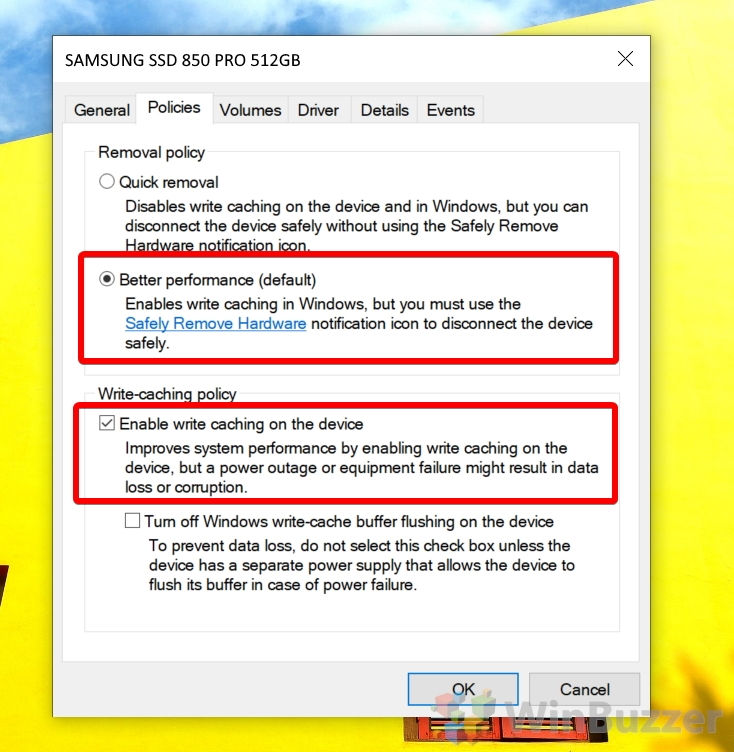
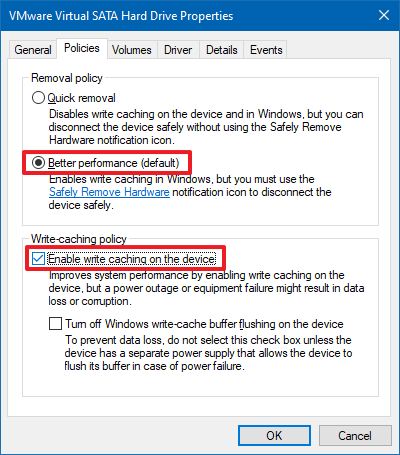
In the device properties, switch to the “Policies” tab and look for the “Removal policy” section. Tick the option called “Quick removal”. This will disable write caching on the device and in Windows, and lets you disconnect devices without using the ‘Safely Remove Hardware icon’ in your system tray.

- Enable the windows disk write caching policy
To enable the disk write cache for a drive, instead tick “Better performance” under the “Removal policy” section and tick “Enable write caching on the device” under “Write-caching policy”.
Be aware that this will mean you’ll have to use the ‘Safely Remove Hardware’ icon in your taskbar before you remove a device to avoid data loss, and that you’ll be at increased risk of data loss or corruption if there’s a power failure.
Warning: You should not tick the “Turn off Windows write-cache buffer flushing on the device” option unless the disk has a separate power supply. Write-cache buffer flushing will cause data loss if the device doesn’t have external power.

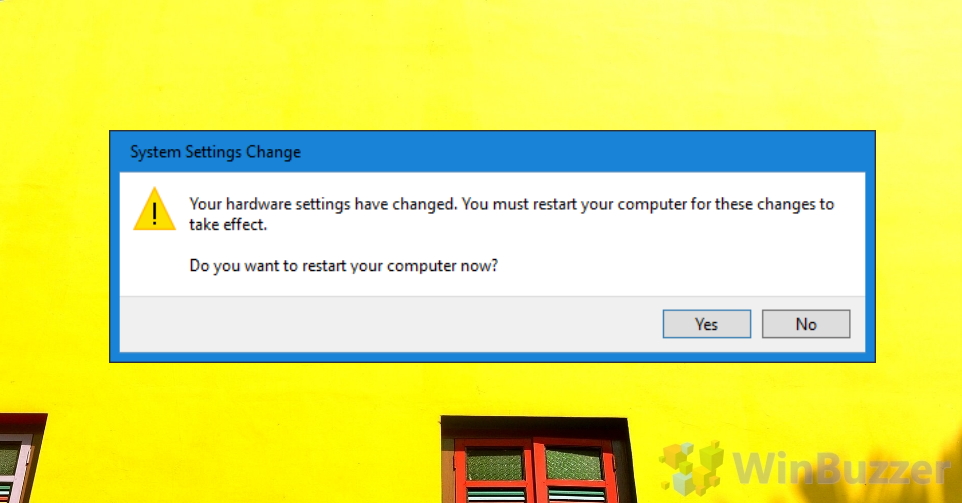
- Accept the prompt to restart your computer
To apply these changes, Windows 10 needs to restart. You can do this by clicking “Yes” on the System Settings Change prompt, or by manually restarting once you’ve finished the other tasks you’re working on.


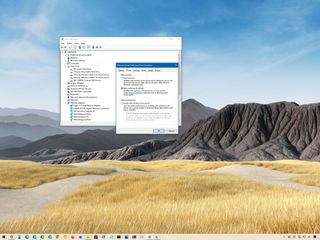
(Image credit: Windows Central)
On Windows 10, disk write caching is a feature that uses the faster system memory to temporarily queue write commands until the storage device is ready to commit them to disk. This approach improves performance since the application doesn’t have to wait for the drive to continue operating.
While it’s a useful feature, the downside is that a system failure, power outage, or accidental removal can result in data loss or corruption. Also, some third-party applications do not support this feature, causing errors and other problems.
As a result, Windows 10 includes two different policies to manage storage devices, including «Quick removal» and «Better performance.» Quick removal is the default setting for external storage, and it does not store any data in memory, making the storage always ready to be disconnected. This means that you can remove the drive skipping the Safely Remove Hardware option without the risk of losing data, but there’s a performance trade-off.
The Better performance option is the default option for internal drives, and it’s the option that enables the disk write caching feature to improve the overall performance of the drive. If the option is enabled, the system will queue temporary data in memory, and later the drive will automatically commit it to disk. However, to prevent data loss, you’ll need to use the Safely Remove Hardware notification icon before disconnecting the external storage.
In this Windows 10 guide, we walk you through the steps to enable or disable the disk write caching policy for external drives.
- How to enable write caching on Windows 10
- How to disable write caching on Windows 10
How to enable disk write caching on Windows 10
To enable disk write caching on Windows 10 for external storage, use these steps:
- Open Start.
- Search for Device Manager and click the top result to open the app.
- Expand the Disk drives branch.
- Right-click the drive you want to enable the feature and select the Properties option.
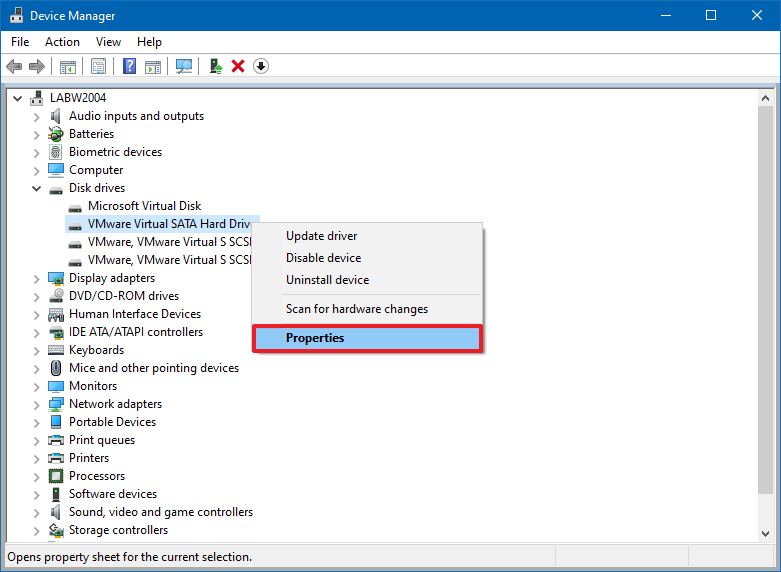
- Click the Policies tab.
- Under the «Removal policy» section, select the Better performance option.
- Under the «Write-caching policy» section, check the Enable write caching on the device option.Quick note: This feature is not supported on every device, so if the option isn’t available or you get an error, you will not be able to turn on the feature.
- (Optional) Check the Turn off Windows write-cache buffer flushing on the device option.Quick tip: This option can cause data loss in the event of power failure. If the drive doesn’t have a separate power supply to allow the device to flush the buffer in case of a power issue, it’s not recommended to enable this option.
- Click the OK button.
- Click the Yes button to restart the device (if prompted).
Once you complete these steps, during drive activity, write commands will be stored inside the system memory until the storage can write them onto disk, increasing system performance. However, in the event of hardware or system failure, or power outage, data loss or corruption may occur.
If you decide to use this option, it’s highly recommended to use the Safely Remove Hardware process to prevent possible data loss on the drive by clicking the device icon in the notification area and selecting the Eject option.
How to disable disk write caching on Windows 10
To disable disk write caching on your device, use these steps:
- Open Start.
- Search for Device Manager and click the top result to open the app.
- Expand the Disk drives branch.
- Right-click the drive you want to disable the feature and select the Properties option.
- Click the Policies tab.
- Under the «Removal policy» section, select the Quick removal option.

- Click the OK button.
- Click the Yes button to restart the device (if prompted).
After you complete the steps, the drive won’t use the system memory as a buffer to store data, decreasing the storage performance. However, the drive will always be ready to be disconnected, minimizing the chances of data loss.
Get the best of Windows Central in in your inbox, every day!
Mauro Huculak is technical writer for WindowsCentral.com. His primary focus is to write comprehensive how-tos to help users get the most out of Windows 10 and its many related technologies. He has an IT background with professional certifications from Microsoft, Cisco, and CompTIA, and he’s a recognized member of the Microsoft MVP community.
In order to increase your SSD longevity and optimize the SSD performance it is recommended to disable the disk write caching. Disk write caching is not required on SSD’s (there is no cache on it).

Want to own ultra-rare NFTs? Join Ultra.io For Rare NFTs and Play-to-Earn Games
Without cache, write caching is not necessary. Also, as you can read above a power outage will have less dramatic consequences. I still need to do some research on this, but it might be even recommended to turn off write caching for your backup HDD drives. Backup drives don’t require a cache, because they are only accessed for backups, so it might be safer to turn off the write cache and prevent possible data loss on all your drives when there is a power outage. Usually, when there is a power outage nothing happens and if something happens you usually only loose data that is currently accessed, but I’d want to be better safe than sorry.
Ok, let’s disable that write cache on your SSD:
1. Step Click on Start
2. Step Enter compmgmt.msc into the search field and hit enter (or right-click on Computer on the Start Menu – then on Manage)
3. Step Uncollapse System Tools
4. Step Click on Device Manager
5. Step Now in the right pane, uncollapse Disk Drives
6. Step Right-Click on your SSD drive and click on Properties
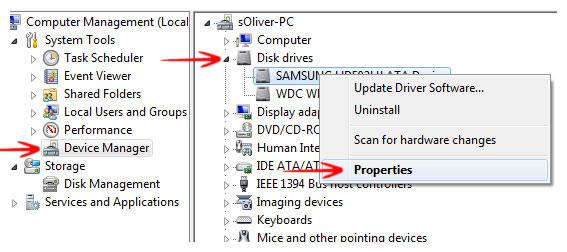
7. Step Go to the tab Policies
8. Step Uncheck “Enable write caching”
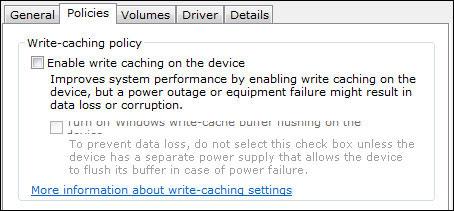
As you can see there’s a graphic bug on this tab and the text below is barely readable. It says something like “Turn off Windows write-cache buffer flushing on the device” – which is not recommended and can cause data loss.
Now, the disk write caching is disabled on the SSD. This is safe to do, but there is a discussion weather or not this will actually speed up your SSD or not. I will have to do my own testings on this one before I can comment on it.
Disk write caching is a Windows inbuilt feature used since 2000 with an intention to increase Windows operating speed as well as data transfer rate. Disk write caching won’t need any third party tools or requires you to play with system registries, you could simply enable or disable it by following guidelines in this tutorial.
Disk write caching refers to highest usage of volatile memory to send write commands to your local or networked disk and cache them until the destination device can adapt them. As disk write cache uses volatile memory, continue power supply is required. Interrupted power supply on disk write cache enabled system can cause data loss, system failure or may leads system to unstable state and prevents you to access your system anymore.
Windows XP has a default option to enable or disable disk write caching unlike in Windows 7 which itself uses this feature whenever required and signals after successfully writing data to the disk and removes cache copy of it, known as write back caching method. However, it increases the risk of more data loss due to mistakenly deleting the cache files before the full data is written to the disk. The same thing happens with removable media storage devices when you remove the media accidentally while any on going write operation. That’s why, every removable media is presented with ‘Safely remove hardware’ option to safely remove the device only when the write operation is completed successfully.
Windows 7 has amazing cache feature known as cache flushing, which periodically sends write commands to the disk for any cache item waiting in the cache to be written on the disk. You can turn of this periodic command by selecting Turn off Windows write cache buffer flushing on the device. However, you are prohibited to turn off this window features unless the device has a constant power supply medium to flush its buffer in case of any failure.
How to Enable / Disable Disk Write Cache:
- Right Click on ‘My Computer’and select ‘Properties’
- Select ‘Hardware’ and click on ‘Device Manager’ tab
- Click on plus ‘+’ sign followed by ‘Disk Drives’ option
- Right click on the media or drive, you want to enable / disable disk write cache and select ‘Properties’ tab
- Click on the ‘Policies’ tab and Check/Uncheck the option ‘Enable Disk Write Caching on the Disk’ to enable or disable the disk write cache on the required media.

- Click ‘OK’ and close the device manager Window. That’s it.

PS:
1) Disk write cache can be enabled for hard drives as well as for any removable media (quick removal storage media devices). To enable disk write cache on removable media, you need to select the radio button entitled ‘Optimize for quick removal’ after inserting the removable media on any of computer USB ports.
2) You need to follow the same steps to enable/disable disk write caching on Windows 7, Vista, 2000 etc. However, the device manager window can be found only in control panel.
About The Author:
Oliver is an expert blogger and tweaks explorer, working with Steallar Hard Drive Recovery, world leader in providing professional data recovery software and services.
Ads