1. Overview
Windows Subsystem for Linux (WSL) allows you to install a complete Ubuntu terminal environment in minutes on your Windows machine, allowing you to develop cross-platform applications without leaving Windows.
In this tutorial, we’ll show you how to get up and running with Ubuntu on WSL. These instructions will work on both Windows 10 or Windows 11.
Whilst WSL is a powerful tool for all users, some features, such as the ability to run graphical Linux applications, are only available on Windows 11. Please check out our Windows 11 tutorial for more information.
2. Install WSL
Installing WSL is now easier than ever. Search for Windows PowerShell in your Windows search bar, then select Run as administrator.

At the command prompt type:
wsl --install
And wait for the process to complete.
For WSL to be properly activated, you will now need to restart your computer.
3. Download Ubuntu
WSL supports a variety of Linux distributions, including the latest Ubuntu release, Ubuntu 20.04 LTS and Ubuntu 18.04 LTS. You can find them by opening the Microsoft store app and searching for Ubuntu.
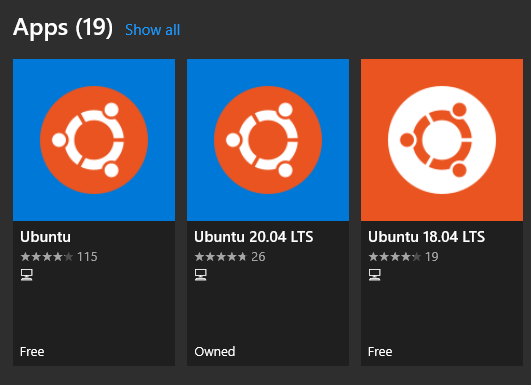
Choose the distribution you prefer and then click on Get as shown in the following screenshot:

Ubuntu will then install on your machine.
The one line install!
There is a single command that will install both WSL and Ubuntu at the same time.
When opening PowerShell for the first time, simply modify the initial instruction to:
wsl --install -d ubuntu
This will install both WSL and Ubuntu! Don’t forget to restart your machine before continuing.
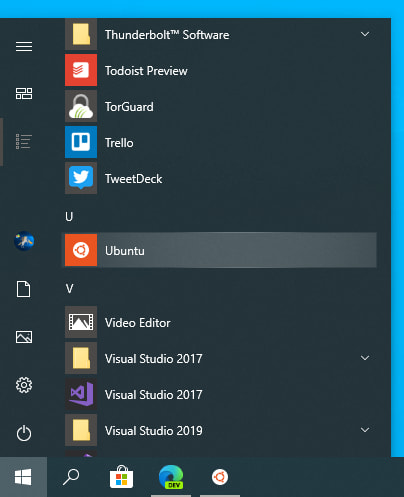
Once installed, you can either launch the application directly from the store or search for Ubuntu in your Windows search bar.
4. Configure Ubuntu
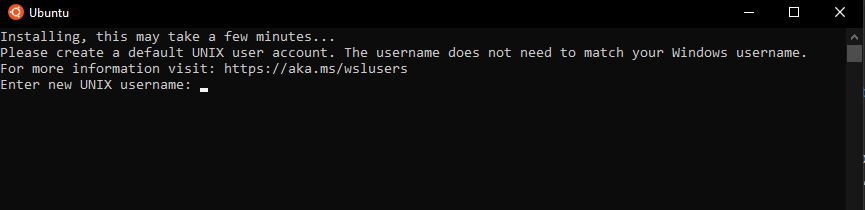
Congratulations, you now have an Ubuntu terminal running on your Windows machine!
If Ubuntu returns an error during this initial installation, then the most common issue is that virtualisation is disabled in your device’s BIOS menu. You will need to turn this on during your device’s boot sequence. The location of this option varies by manufacturer, so you will need to refer to their documentation to find it.
Once Ubuntu has finished its initial setup you will need to create a username and password (this does not need to match your Windows user credentials).
Finally, it’s always good practice to install the latest updates with the following commands, entering your password when prompted.
sudo apt update
Then
sudo apt upgrade
Press Y when prompted.
5. Install your first package
Installing packages on Ubuntu is as easy as using a single command. Below, you will see how to install bpython, a simple python interpreter for trying out ideas, featuring some nice usability features like expected parameters and autocompletion.
To check that you have the latest package lists, type:
sudo apt update
Then install bpython:
sudo apt install bpython
To run the application type:
bpython
And you’re ready to go!

6. Customising your Terminal with Windows Terminal Preview
Since you’re likely to be using your Ubuntu terminal a fair bit, it’s always nice to do some customisation. We recommend installing Windows Terminal Preview to get the most user-friendly setup. You can find it in the Microsoft Store.

Windows Terminal allows you to open multiple Terminal instances as tabs, so you can have PowerShell running alongside Ubuntu. It also includes a number of customisation options. In the below screenshot, we’ve changed the tab name and colour, and configured the terminal appearance to use the Tango Dark theme and the Ubuntu font!
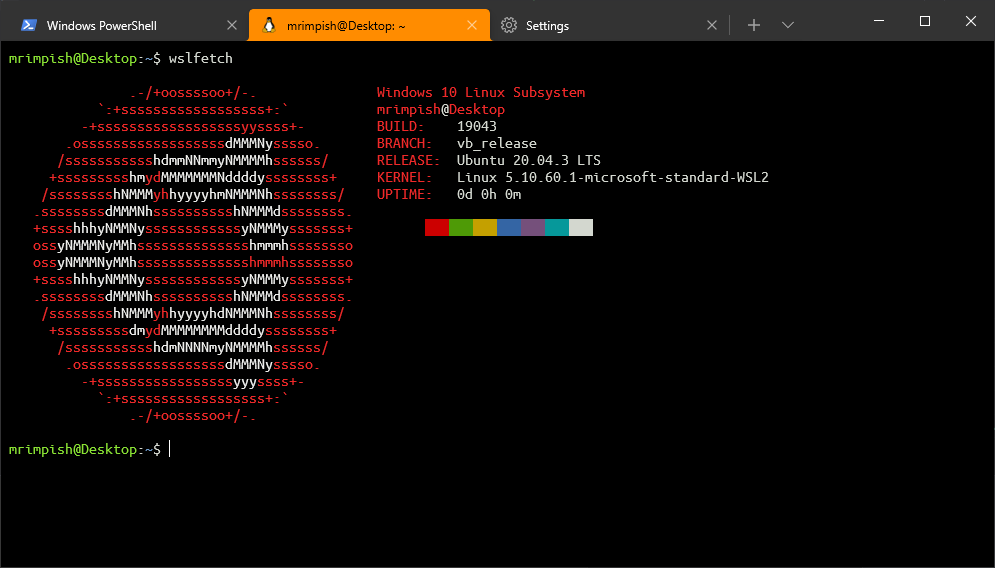
These customisations can be applied universally using the Appearance menu in Settings or to individual profiles which each have their own Appearance menu. Try it yourself to find something you feel comfortable with!

7. Enjoy Ubuntu on WSL!
That’s it! In this tutorial, you’ve seen how to install WSL and Ubuntu, set up your profile, and install your first package. You also got some tips on how to customise your experience.
We hope you enjoy working with Ubuntu inside WSL. Don’t forget to check out our blog for the latest news on all things Ubuntu.
Further Reading
- Install Ubuntu on WSL2 on Windows 11 with GUI Support
- Working with Visual Studio Code on Ubuntu on WSL2
- Enabling GPU acceleration on Ubuntu on WSL2 with the NVIDIA CUDA Platform
- Setting up WSL for Data Science
- WSL on Ubuntu Wiki
- Ask Ubuntu
Was this tutorial useful?
Thank you for your feedback.
вы можете (1) загрузить установщики из магазина Windows или (2) загрузить файл дистрибутива и установить его с помощью таких инструментов, как lxRunOffline или WSL Distrolauncher.
- вы можете установить Ubuntu 18 или многие другие дистрибутивы, используя второй вариант.
загрузка установщика из магазина Windows
можно скачать монтажники от Магазин Windows с помощью Powershell. Например, вы можете скачать версию Ubuntu 16, используя следующую команду
PS> Invoke-WebRequest -Uri https://aka.ms/wsl-ubuntu-1604 -OutFile Ubuntu.appx -UseBasicParsing
в приведенной выше команде, выходной файл Ubuntu.appx. Он должен быть назван таким образом. Вы можете запустить это приложение, чтобы установить в Ubuntu.
PS> Ubuntu.appx
Используя LxRunOffline
сначала необходимо загрузить дистрибутивный файл. Есть много дистрибутивных файлов, доступных в в lxRunOffline Вики.
например, чтобы установить тот же Ubuntu 16 из магазина Microsoft Windows, вы можете скачать файл по адресу
https://lxrunoffline.apphb.com/download/UbuntuFromMS/16
затем вы можете установить дистрибутив linux с помощью lxRunOffline
# lxrunoffline install -n <name> -d <folder> -f <distribution file>

C:wsl> lxrunoffline install -n copy -d c:wslcopy -f 16.04.2-server-cloudimg-amd64-root.tar.gz
для запуска дистрибутива можно использовать тот же lxRunOffline
C:wsl> lxrunoffline run -n copy -w
С помощью DistroLauncher
вы можете использовать некоторые DistroLauncher. Есть много версий основанных на пример Microsoft для создания пользовательских дистрибутивов linux для WSL. Например, вы можете использовать версия Yuk7.
вы должны загрузить файл дистрибутива и launcher.exe. Чтобы использовать тот же файл дистрибутива, упомянутый выше, необходимо переименовать файл дистрибутива в rootfs.tar.gz и пусковая установка на имя распределения вы хотите. Позже вы должны запустить пусковую установку от имени администратора (я получил ошибки, работающие как обычно user)
PS> ren launcher.exe mydistro.exe
PS> ren ..04.2-server-cloudimg-amd64-root.tar.gz rootfs.tar.gz
PS> .mydistro
при первом запуске программы запуска она устанавливает и запускает дистрибутив. В следующий раз, он запускает дистрибутив Linux.
после установки, вы можете управлять дистрибутивов с помощью wslconfig или lxrunoffline команды.
Примечание: в дополнение к файлам дистрибутива, упомянутым выше, вы можете создать новый файл на основе других дистрибутивов linux. Вы можете попробовать инструкции, включенные в проект WSLInstall. Вам может понадобиться дополнительные шаги после установки, чтобы правильно запустить новый linux.
 В Windows 10 появилась новая возможность для разработчиков — оболочка Ubuntu Bash, позволяющая запускать, устанавливать приложения Linux, использовать скрипты bash прямо в Windows 10, все это называется «Подсистема Windows для Linux». В версии Windows 10 1709 Fall Creators Update доступны уже три дистрибутива Linux для установки. Во всех случаях требуется 64-разрядная система для установки.
В этой инструкции — о том, как установить Ubuntu, OpenSUSE или SUSE Linux Enterprise Server в Windows 10 и некоторые примеры использования в конце статьи. Следует также учитывать, что есть некоторые ограничения при использовании bash в Windows: например, нельзя запускать GUI приложения (правда, сообщают об обходных путях с помощью X server). Кроме этого, командами bash нельзя запустить Windows-программы, несмотря на наличие полного доступа к файловой системе ОС.
Установка Ubuntu, OpenSUSE или SUSE Linux Enterprise Server в Windows 10
Начиная с версии Windows 10 Fall Creators Update (версия 1709) установка подсистемы Linux для Windows несколько изменилась по сравнению с тем, что было в предыдущих версиях (для предыдущих версий, начиная с 1607, когда функция была представлена в бета-версии, инструкция — во второй части этой статьи). Также обратите внимание, что в Windows 10 2004 можно установить Kali Linux с графическим интерфейсом.
Теперь необходимые шаги выглядят следующим образом:
- Прежде всего, необходимо включить компонент «Подсистема Windows для Linux» в «Панель управления» — «Программы и компоненты» — «Включение и отключение компонентов Windows».

- После установки компонентов и перезагрузки компьютера, зайдите в Магазин приложений Windows 10 и загрузите оттуда Ubuntu, OpenSUSE или SUSE Linux ES (да, теперь доступно три дистрибутива). При загрузке возможны некоторые нюансы, о которых далее в примечаниях.

- Запустите загруженный дистрибутив как обычное приложение Windows 10 и выполните первоначальную настройку (имя пользователя и пароль).


Для включения компонента «Подсистема Windows для Linux» (первый шаг) можно использовать команду PowerShell:
Enable-WindowsOptionalFeature -Online -FeatureName Microsoft-Windows-Subsystem-Linux
Теперь несколько примечаний, которые могут быть полезны при установке:
- Вы можете установить сразу несколько дистрибутивов Linux.
- При загрузке дистрибутивов Ubuntu, OpenSUSE и SUSE Linux Enterprise Server в русскоязычном магазине Windows 10 заметил следующий нюанс: если просто ввести название и нажать Enter, то нужных результатов в поиске не оказывается, но если начать вводить и затем нажать по появляющейся подсказке, автоматически попадаешь на нужную страницу. На всякий случай прямые ссылки на дистрибутивы в магазине: Ubuntu, OpenSUSE, SUSE LES.
- Запускать Linux можно и из командной строки (не только с плитки в меню Пуск): ubuntu, opensuse-42 или sles-12
Установка Bash в Windows 10 1607 и 1703
Для того, чтобы установить оболочку bash, выполните следующие простые действия.
- Зайдите в параметры Windows 10 — Обновление и безопасность — Для разработчиков. Включите режим разработчика (должен быть подключен Интернет для загрузки необходимых компонентов).

- Зайдите в панель управления — Программы и компоненты — Включение или отключение компонентов Windows, отметьте пункт «Подсистема Windows для Linux».

- После установки компонентов, введите в поиске Windows 10 «bash», запустите предлагаемый вариант приложения и выполните установку. Вы можете задать свое имя пользователя и пароль для bash, либо использовать пользователя root без пароля.


По завершении установки вы можете запускать Ubuntu Bash на Windows 10 через поиск, или создав ярлык для оболочки там, где вам требуется.

Примеры использования Ubuntu Shell в Windows
Для начала отмечу, что автор не является специалистом по bash, Linux и разработке, а примеры ниже — просто демонстрация того, что в Windows 10 bash работает с ожидаемыми результатами для тех, кто разбирается в этом.
Приложения Linux
Приложения в Windows 10 Bash можно устанавливать, удалять и обновлять с помощью apt-get (sudo apt-get) из репозитория Ubuntu.

Использование приложений с текстовым интерфейсом ничем не отличается от такового на Ubuntu, например, вы можете установить Git в Bash и использовать его привычным образом.

Скрипты bash
Вы можете запускать скрипты bash в Windows 10, создать их можно в имеющемся в оболочке текстовом редакторе Nano.

Скрипты bash не могут вызвать программы и команды Windows, но возможен запуск скриптов и команд bash из bat файлов и сценариев PowerShell:
bash -c "команда"
Также вы можете попробовать запускать приложения с графическим интерфейсом в Ubuntu Shell в Windows 10, на этот счет в Интернете уже имеется не одна инструкция и суть способа сводится к использованию Xming X Server для вывода GUI приложения. Хотя официально возможность работы с такими приложениями Майкрософт не заявлена.
Как было написано выше, я не тот человек, который может в полной степени оценить ценность и функциональность нововведения, но вижу как минимум одно применение для себя: различные курсы Udacity, edX и другие, связанные с разработкой проходить будет куда проще, работая с необходимыми инструментами прямо в bash (а в этих курсах обычно демонстрируется работа именно в терминале MacOS и Linux bash).
You can (1) download the installers from the Windows Store or (2) download a distribution file and install it using tools such as lxRunOffline or WSL Distrolauncher.
- You can install Ubuntu 18 or many other distributions using the second option.
Downloading the installer from the Windows Store
You can download the installers from the Windows Store using Powershell. For instance, you can download the Ubuntu 16 version using the following command
PS> Invoke-WebRequest -Uri https://aka.ms/wsl-ubuntu-1604 -OutFile Ubuntu.appx -UseBasicParsing
In the above command, the output file is Ubuntu.appx. It must be named in that way. You can run that application to install the Ubuntu.
PS> Ubuntu.appx
Using LxRunOffline
First, you must download some distribution file. There are many distribution files available in the lxRunOffline wiki.
For instance, to install the same Ubuntu 16 from the Microsoft Windows Store, you can download the file at
https://lxrunoffline.apphb.com/download/UbuntuFromMS/16
Then, you can install the linux distribution using lxRunOffline
# lxrunoffline install -n <name> -d <folder> -f <distribution file>

C:wsl> lxrunoffline install -n copy -d c:wslcopy -f 16.04.2-server-cloudimg-amd64-root.tar.gz
To run the distribution, you may use the same lxRunOffline
C:wsl> lxrunoffline run -n copy -w
Using a DistroLauncher
You can use some DistroLauncher. There are many versions based on the Microsoft example to create custom linux distributions for WSL. For instance, you can use the Yuk7 version.
You must download a distribution file and the launcher.exe. To use the same distribution file mentioned above, you must rename the distribution file to rootfs.tar.gz and the launcher to the distribution name you want. Later you must run the launcher as an Administrator (I got errors running it as a normal user)
PS> ren launcher.exe mydistro.exe
PS> ren .16.04.2-server-cloudimg-amd64-root.tar.gz rootfs.tar.gz
PS> .mydistro
The first time you run the launcher, it installs and run the distribution. The next time, it runs the linux distribution.
After installing, you can manage the distributions using the wslconfig or the lxrunoffline commands.
NOTE: In addition to the distribution files mentioned above, you can create a new file based on other linux distributions. You may try the instructions included in the WSLInstall project. You may need additional steps after the installation to start the new linux correctly.