Windows
The driver includes files for USB and the library uDMX.dll. The USB-files are always used, uDMX.dll is used depending on the lighting software.
As driver installation became more problematic with each newer Windows-version there are several uDMX-drivers that can be installed / tried.
- libusbK: all tested programs worked fine. Try this driver first. DOWNLOAD
- WinUSB: likely more compatile with Windows but not all software worked. uDMXArtnetP5 worked fine, uDMXArtnet did not work. DOWNLOAD
- libusb: the old driver. Not the best solution for Windows 10. DOWNLOAD
INSTALLATION
- Download at least one of the listed drivers
- Uncompress the file whereever you want and then plugin the hardware.
- The operating system will search for a driver.
- Select the file uDMX.inf in the selected directory (of your uncompression)
- After several seconds the driver should be installed. On newer Windows-versions you have to accept that the driver is not digitally signed. If you got problems, please read the FAQ.
- ATTENTION: At this time the file uDMX.dll has to be MANUALLY copied to the directory <Windows>System32 !
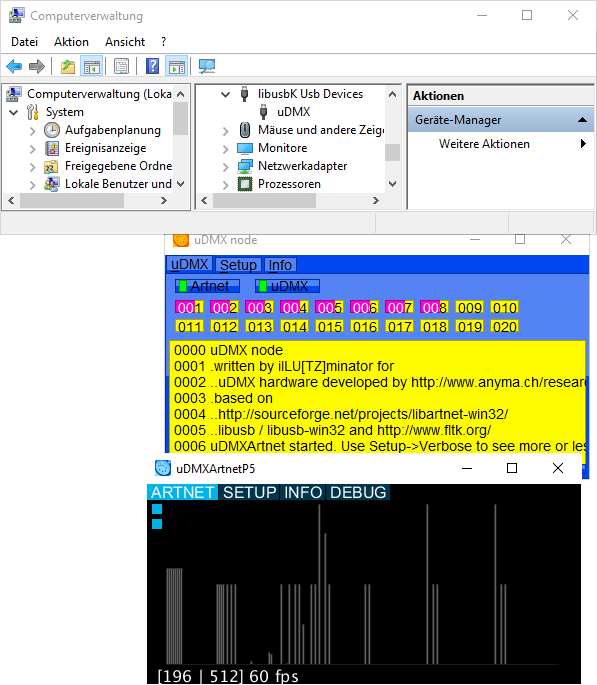 Screenshot: installed uDMX-libusbK-driver on Windows10-64Bit and running artnet-programs.
CONFIGURATION
You can change the following values. Times can only be changed when you use uDMX firmware >= 1.4.
- Number of Channels: can be changed from the default of 512 to a lower value.
- Maximal Bytes to transfer: all tested windows programs only support 1 Byte at a time. Anyhow you should test the value 512 and only reduce the value if you experience problems.
- Break (Reset): Reset time before sending the first DMX value (default 88µs)
- Mark: Time between Reset and startbyte (default 8µs)
- Gap: time between the DMX values (default 0µs). Has to be changed for some devices like Eurolite TS-5, Laserworld EL200RGY … Set value to 20 for those devices.

START CONFIGURATION
If your DMX software does not support starting uDMX configuration, you can call the configuration using the script uDMXConfigure.bat (included in the driver files).
 Testing uDMX
 Testing uDMX
To test the uDMX interface, you can start a simple test-dialog from within the configuration dialog.
With the sliders it is possible to set the values of channels 1-6. The values of these channels are sent to the interface.
LINUX
When using Linux you have to install libusb. Normally programs have to be run as root to get access to usb-devices. To avoid this, create a file z65-anyma-udmx.rules in folder /etc/udev/rules.d with the following content:
SUBSYSTEM==»usb*», ACTION==»add|change», ATTRS{idVendor}==»16c0″, ATTRS{idProduct}==»05dc», MODE=»0666″
SUBSYSTEM==»usb*», ACTION==»add|change», SYSFS{idVendor}==»16c0″, SYSFS{idProduct}==»05dc», MODE=»0666″
MacOSX
probably like Linux
В большинстве случаев установка драйвера проходит автоматически в несколько кликов. Для этого загрузите последнюю версию драйвера с http://www.illutzmination.de/udmxdriver.html?&L=1 и запустите установщик. USB-DMX контроллер можно использовать.
Но в некоторых случаях потребуются дополнительные шаги.
Как установить uDMX драйвер на
Windows 10 (64 бит) или в Windows 8
Если вы уже купили USB-DMX контроллер, загрузите последнюю версию драйвера с http://www.illutzmination.de/udmxdriver.html?&L=1
Остерегайтесь скачивать файлы и драйверы на неофициальных ресурсах, это может быть не безопасно!
Прежде всего, вам нужно внести некоторые изменения в настройки
Windows, чтобы «Отключить принудительное использование подписи драйверов». Это
очень важно для корректной установки драйвера.
1. Удерживая SHIFT, нажимаете RESTART.
2. Ваш компьютер перезагрузится и запустится в «режиме устранения
неполадок». Щелкните «устранение неполадок» (Throubleshoot).
3. Щелкните «Дополнительные параметры». Щелкните «Параметры
запуска».
4. Нажмите «ПЕРЕЗАГРУЗИТЬ».
5. Теперь вы можете выбрать «Отключить принудительное
использование подписи драйверов», нажав функциональную клавишу «F7».
6. Ваш компьютер перезагрузится, и вы готовы к установке драйвера.
Если этой инструкции оказалось недостаточно, посмотрите на просторах Интернет подробные статьи с картинками на тему как «Отключить принудительное использование подписи драйверов».
Установка драйвера
Чтобы установить драйвер правильно, важно прочитать
«libusb-win32-bin-README.txt», там вы найдете подробности по драйверам в
зависимости от особенностей процессора вашего ПК.
1. Переименуйте libusb0_x86.dll в libusb0.dll
и скопируйте его в
правильный каталог операционной системы, в соответствии с инструкцией из файла
«libusb-win32-bin-README.txt» (например, для Windows 10 64 бит это будет папка «C: Windows Syswow64»).
2. Теперь перейдите в
диспетчер устройств (откройте проводник, щелкните правой кнопкой мыши «Мой
компьютер», выберите «Управление»).
3. Щелкните «Диспетчер устройств».
4. Найдите «неизвестное устройство», щелкните правой кнопкой мыши
и выберите «Обновить программное обеспечение драйвера».
5. Теперь выберите «Найти на моем компьютере драйверы».
6. Выберите путь, по которому вы загрузили последнюю версию
драйвера (убедитесь, что вы распаковали пакет драйвера), нажмите Далее.
7. И теперь установка драйвера прошла успешно.
8. Теперь вы готовы к использованию программ для управления световыми приборами, такими как FreeStyler DMX или QLC + и др.
Как установить uDMX драйвер на
другие версии Windows
Это будет
проще, чем инструкция выше, потому что в других версиях Windows
политика безопасности работы со сторонними драйверами не такая жесткая.
1. Загрузите последнюю версию драйвера с http://www.illutzmination.de/udmxdriver.html?&L=1
Остерегайтесь скачивать файлы и драйверы не из официальных
источников!
2. Распакуйте
архив с драйвером и запустите инсталляцию (файл installer_x86 или installer_x64, в зависимости от вашей операционной системы).
3. Файл
uDMX.dll необходимо вручную скопировать в каталог System32 (например C:
WINDOWS system32), чтобы закончить установку.
4. Для некоторых версий Windows
потребуется переименовать libusb0_x86.dll и скопировать его в
правильный каталог операционной системы, в соответствии с инструкцией из файла
«libusb-win32-bin-README.txt».
Теперь
скачайте и установите программу с интерфейсом управления (например, DMXControl
или FreeStyler – свободное использование), при первом запуске в настойках
выберите uDMX-драйвер в выпадающем списке, подключите ваши приборы и
программируйте их работу.
В сложных случаях
Не будем углубляться в причины, сразу к инструкции. Если вышеописанные шаги не дают результат, контроллер не работает, то переходим на сайт https://ftdichip.com/drivers/vcp-drivers/ и скачиваем драйвер под вашу операционную систему. Во FreeStyler и прочих устройство выбирайте устройство управления uDMX либо EUROLITE USB-DMX. Возможно (не обязательно) после установки vcp-drivers потребуется снова повторить инструкцию выше.
————————————————————————
Скачать
последнюю версию FreestyleR DMX
можно на официальном сайте http:/freestylerdmx.be
У нас вы можете купить USB-DMX контроллер.
Более
подробная инструкция Как установить uDMX драйвер в Windows с иллюстрациями (на англ.языке) — https://technologicalmess.wordpress.com/2015/07/01/udmx-getting-it-to-actually-work-on-windows/
These adverts are supporting the forum’s costs and the products/services are not endorsed by the forum owners.
First have you tried?
Log in to Search the Forum for help!
Learn more about using FreeStyler at the FreeStyler WIKI HERE
Learn more about DMX in General at The DMX Wiki HERE
if all else fails and you need a fixture consider the fixture building service HERE
-
Greyfox
- Knows how to turn Lights ON
- Posts: 2
- Joined: June 7th, 2015, 1:10 pm
- FreeStyler Version: 3.5.9
- I Use FreeStyler for: Home Lighting Control
uDMX drivers
OK, I’ve been through the process and created a fixture file. Now having the same problems as many others in that the common uDMX drivers don’t work with windows 7 64 bit. Is there a source for the correct drivers out there? Obviously can’t test the fixture file without the drivers working.
-
lazyman
- Knows how to turn Lights ON
- Posts: 5
- Joined: August 31st, 2015, 11:00 am
- I Use FreeStyler for: Nightclub Lighting
Re: uDMX drivers
Post
by lazyman » August 31st, 2015, 11:15 am
I have had same problem, windows installs driver and tell this is unsigned driver.
When windows is starting try pressing F8 key and there should be boot menu with option, allow unsigned drivers, or something similar, near bottom of the list.
i have choose this option and driver now works.
-
mrstretch
- Knows how to turn Lights ON
- Posts: 8
- Joined: May 30th, 2017, 11:20 am
Re: uDMX drivers
Post
by mrstretch » October 25th, 2017, 6:05 am
solution is easy. its a driver signature issue .. then you load it throught device manager and brows your own desk top and the drivers files in the folder you placed it in..
-
drcarlos1975
- Knows how to turn Lights ON
- Posts: 2
- Joined: October 6th, 2017, 3:18 pm
- FreeStyler Version: 8.4.3
- I Use FreeStyler for: DJ
Re: uDMX drivers
Post
by drcarlos1975 » November 20th, 2017, 4:07 pm
Easiest solution is to download Zadig http://zadig.akeo.ie/
This will get around the signature issue without the need to put the PC into test mode or any of that business.
Load Zadig, select the win32 USB drivers on the uDMX interface and load the driver. Simple as that.
I have tested and had this working on both Win7 32bit, Win10 32bit and Win10 64bit. The interface is stable for a 5hour show running 6 lights.
Sent the instructions to a fellow mobile DJ on mobile DJ forum on Facebook on Saturday after he’d spent a day fruitlessly trying to get it to work, 30 mins later I get a message it was up and running.
Carl.
uDMX — tiny bus powered USB-DMX interface
Probably the smallest USB-DMX Interface in the world….

News
udmx external for Apple Silicon (M1)
udmx external for MacOS Catalina
LXConsole support for uDMX
LXNet2USBDMX support for uDMX
64bit external for Max7 — version 2015-11-09
udmx works with Logelloop
Control the uDMX from within Ableton Live
uDMX on Github
How to update the udmx Firmware
Latest uDMX source code is on Google Code
Control the uDMX from MIDI
uDMX 1.2 released !!
Buy a fully assembled uDMX
Stay informed: Subscribe to the uDMX mailing list
Article: Control uDMX from a web browser
Features
- fits in your pocket
- bus powered — no need for a wall-wart
- can send DMX packets of arbitrary size from 1 to 512 channels. Only got 12 dimmers ? Don’t waste time sending 500 additional zeros 200 times a second…
- command line tool
- dedicated external for Max/MSP and PureData (8 bit resolution)
- USB-MIDI device — send DMX from any MIDI application without any driver needed (7 bit resolution)
- open source
Downloads
Contributions
Below are contributions by some uDMX makers/users. We couldn’t test everything — your feedback is welcome.
uDMX in action
We initially developed the udmx for hauert & reichmuth’s interactive installation TRiCKSTR.
What are you using your udmx for? Send us a link and we’ll make a gallery of udmx projects.
Software
There are three pieces of software:
- the uDMX firmware — running on the ATMega8
- a simple command line utility to set dimmer levels
- an external object for MAX/MSP that communicates directly with the uDMX interface
The command line utility is tested under MacOS X 10.4 and Linux, it should compile under Windows as well
Max/MSP binaries are MacOS X only
See the downloadable archive for the commented source code and binaries
To compile the firmware you’ll need avr-libc (see here how to do this on a macintosh)
To compile the Max external you’ll need the MAX/MSP Software Development Kit
and both the Max external and the commandline tool depend on libusb — open source usb library. For MacOS X, the guys over at www.ellert.se have made handy installer packages for libusb, browse their downloads for the most recent package: http://www.ellert.se/PKGS/
uDMX comes with a handy external object for Max/MSP to control dimmers or other DMX equipment directly from Max/MSP:

Hardware
uDMX is built around a ATMEL ATMega8 microcontroller, very few external parts are used, thanks to Objective Developments firmware only usb driver.
We went for the surface mounted version to keep it as small as possible. It’s a bit a pain to solder by hand, but feasible with lots of patience and not too many drinks the night before.
Very few pins are needed, but unfortunately smaller AVRs don’t have enough SRAM (we need 512 bytes already to buffer the DMX channels) so we have to use at least a Mega8…
The Mega8 is overclocked at 12Mhz, as needed by the usb driver. We power the RS485 transciever directly from the usb bus — it might be a better idea to put in a dc/dc converter and there should be some overvoltage protection.
Ben Suffolk shows how it could be done with his bus powered USB-DMX Interface
There is a 5pin XLR connector for the DMX and the cable of a dead mouse wired directly to the board for USB. D+ is connected to INT0 and is used by the usb-driver, D- on INT1 permits to check regularly if the usb bus is still alive, put the processor into powersave mode when its not, and wake it up again on any bus activity.
Version History
- uDMX 1.4 | 2010-02-09
available from the SVN repository - uDMX 1.2 | 2007-01-07
includes bootloader for easy future firmware upgrades. You can build one from scratch, or order a fully assembled unit online. - uDMX 1.0 | 2006-06-10
probably the smallest USB-DMX Interface in the world. Pretty tough to build… - 0.9.1 beta | 2006-02-16
is our first release. It is a lot easier to build but has some shortcomings…
Warning
Building and using uDMX is AT YOUR OWN RISK.
uDMX draws all its power from the host computer’s USB bus and the DMX and USB lines aren’t galvanically isolated. It may destroy your computer, or worse…
Use at your own risk or don’t use it at all!
And read the license…
License
uDMX is © 2006 [ a n y m a ] — Max & Michael Egger
AVR-USB — firmware-Only USB driver is © Objective Development
Schematics and software are licensed under GNU GPL 2.0;
you can redistribute it and/or modify it under the terms of the
GNU General Public License as published by the Free Software Foundation;
either version 2 of the License, or (at your option) any later version.

uDMX is released in the hope that it will be useful,
but WITHOUT ANY WARRANTY; without even the implied warranty of
MERCHANTABILITY or FITNESS FOR A PARTICULAR PURPOSE.  See the
GNU General Public License for more details.

You should have received a copy of the GNU General Public License
along with this document; if not, write to the Free Software
Foundation, Inc., 59 Temple Place - Suite 330, Boston, MA  02111-1307, USA.
http://www.gnu.org
© 2023 [ a n y m a ]
printed: February 4 2023
url: https://www.anyma.ch/research/udmx/
uDMX is an interesting middle man between your computer and your DMX lighting fixtures. Unlike most DMX computer interfaces, uDMX is most often tiny. I purchased a cheap uDMX interface from eBay, and its width and height are smaller than a credit card, with a thickness of only over 1cm. Although the colour is a 1990’s cream, I was impressed by the size of it. Best of all, it was only £20 including shipping, a massive difference compared to the £139 of ADJ’s MyDMX.
However, my little uDMX interface was an absolute pain to get going – and I’m assuming that’s why you are here.

Contents
- Installing ‘libusb’
- Installing the uDMX driver
- Getting software to control your lights
- Common problems
My uDMX interface came with a mini CD filled with folders of random drivers and installers. If yours has come with one of these discs, then to make things similar you should just download the software I am giving you as links. It will be more up to date then the versions on those discs anyway.
Before we continue, this is a guide for Windows computers only.
STEP 1 – Installing ‘libusb’
uDMX uses a very specific version of a driver called ‘libusb’ to make connections between the software and the hardware. Installing it is simple, however it is different depending on how many ‘bits’ your processor has – this is not as complicated as it sounds. Finding this information out, if you do not know it already, is also very simple.
Notice: Oristo Po has suggested, in the comments, using the program ‘Zadig‘. I’ve never used it before so I can’t guarantee that it works for what we need, but from what I can see, it should install ‘libusb’ for you. If you try it and it works, please let me know! If you use this method, ensure you install Libusb version 0.1, as uDMX requires this version.
First, open your start menu, and right click on ‘Computer’. Click ‘Properties’.

The following window will appear:

In this window, under ‘System type’, you can see whether your operating system is 32-bit or 64-bit. You need to remember this information.
Next, we will need to download version 0.1 of ‘libusb’. If you download this from an alternative source, although there are many new versions of ‘libusb’, it is vital that you get version 0.1 for uDMX to run correctly.
Download ‘libusb0_x86.dll’
Your browser may warn you that this file can be dangerous as the file is a .dll driver file. This is a false positive, you can check it with any antivirus to prove this.
If you are using a 32-bit operating system:
Locate where you saved this file and copy the file. Open your start menu again, and type into the search box ‘C:WindowsSystem32’. Paste ‘libusb0_x86.dll’ into this folder, accepting any warnings Windows gives you.
If you are using a 64-bit operating system:
Locate where you saved this file. Rename this file to ‘libusb0.dll’ – it is very important that it is spelt correctly, with everything in lower case.
Copy the file. Open your start menu again, and type into the search box: “C:Windowssyswow64”, and press enter. Windows Explorer will open. Finally, you need to paste the ‘libusb0.dll’ into this folder. Accept any warnings your computer gives you.

STEP 2 – Installing the uDMX driver
For this next step, you need to download the uDMX driver, which is a small .dll file which your uDMX interface needs to talk to your light controlling programs.
Download ‘uDMX.dll’
Again, your browser may complain and say that the file may be dangerous. This is a false positive, you can check it with your antivirus program.
If your uDMX interface device is not already plugged in, plug it into your PC now. Your computer will attempt (and will almost definitely fail) to search for drivers for your device.

Once your computer has finished looking for drivers, open your start menu and click on ‘Devices and Printers’. Right click on your uDMX device, and click on ‘Properties’.

In the window which appears, click on the ‘Hardware’ tab, and then click on ‘Properties’.

In the window which appears, click on ‘Change settings’ in the ‘General’ tab.

In this window, click on the “Update Driver” button.

In the ‘Update Driver Software’ dialog, click on the large ‘Browse my computer for driver software’ button.

On the next screen, click the ‘Browse’ button. In the small dialog which appears, you need to locate the folder where you saved the ‘uDMX.dll’ file you downloaded earlier. For Windows to find the driver, you need to click on the same folder. Once you’ve done this, click ‘Next’.

Unfortunately, the developers behind uDMX did not get their software digitally signed, resulting in a large, scary pop up box appearing when you attempt to install the driver. This driver is safe, however. You can scan it with your antivirus software, and I have been using it for around 2 years. Click ‘Install this driver software anyway’.

Once you’ve done this, your computer will install the driver software. This may take a few minutes.

Once this has been done, you will see this screen:

You’ve now installed the uDMX driver software! We’re nearly done!
STEP 3 – Getting software to control your lights
Now your drivers and your modified Artnet server is working, you need to get some software to control your lighting fixtures. There are several free options available to you.
My personal preference is FreeStyler. It is open, entirely free and has a community of people willing to help you with any problems. FreeStyler is good for live lighting control, especially for live chases and fast transitions. FreeStyler has plugin support and has several plugins included, such as LedTrix, which allows you to control LED par can chases using animated gifs. The graphical user interface can sometimes be awkward to work with, however. As well as this, I have occasionally come across some minor bugs.
Another free option which I have tested is DMXControl. To me, DMXControl seems a lot less intuitive in comparison to FreeStyler. Whereas FreeStyler shows you most things graphically, DMXControl gives scenes and lights in text-based lists. As well as this, it was difficult to get my fixtures working with it as as far as I could see, there is no option to create custom fixtures. DMXControl does seem ideal for theatre productions, however.
COMMON PROBLEMS
‘X-uDMXArtnet.exe’ can not start – error 7×0… This is caused by the ‘libusb0.dll’ / ‘libusb0_x86.dll’ library not being correctly installed, or a wrong version has been installed. See part 1 of the post for more details on this library.