 Одна из самых частых проблем при подключении к Wi-Fi в Windows 10 — сообщение «Не удается подключиться к этой сети». Информации о причинах проблемы это уведомление не даёт, а потому пользователю подчас сложно разобраться, в чём дело и как решить проблему.
В этой инструкции подробно о том, почему Windows 10 пишет, что не удается подключиться к этой сети и различные способы исправить ситуацию. На схожую тему: Что делать, если не работает Wi-Fi на ноутбуке.
- Простая и частая причина ошибки подключения
- Способы исправить проблему
- MAC-адрес адаптера
- Забыть сеть Wi-Fi и снова подключиться к ней
- Режим полета и отключение беспроводного соединения
- Драйверы Wi-Fi адаптера
- Отключение IPv6
- FIPS
- Другие варианты решения
- Видео инструкция
Одна из самых простых и распространенных причин ошибки при подключении к сети Wi-Fi

Самый простой способ получить ошибку «Не удается подключиться к этой сети» при подключении — ввести неправильный пароль (ключ безопасности сети) от Wi-Fi (иногда при этом сообщается, что введен недопустимый ключ безопасности, а иногда — выводится сообщение, рассматриваемое в статье).
Даже если вы уверены, что всё введено правильно, учитывайте следующие моменты:
- Перепроверьте раскладку клавиатуры при вводе пароля, учитывайте, что заглавные и строчные буквы нужно вводить именно так, как они были заданы в пароле.
- Если вы установили пароль Wi-Fi, содержащий кириллицу или какие-либо спец-символы, это может являться причиной проблемы: попробуйте изменить пароль Wi-Fi на роутере таким образом, чтобы он состоял только из латиницы и цифр.
- Если кто-то из членов семьи мог поменять пароль на Wi-Fi без вашего ведома, уточните этот вопрос у него.
И, наконец, бывает и такое, что очень начинающий пользователь, нажимая по значку Wi-Fi, видит, что там доступно множество сетей, и предполагает, что он ими может пользоваться для доступа в Интернет, хотя это не так: это не ваши сети и вы не можете к ним просто так (не зная пароля) подключиться.
Способы исправить проблему «Не удается подключиться к этой сети»
Если с паролем Wi-Fi гарантированно нет никаких проблем (или он сохранен в системе), попробуйте использовать следующие варианты решения проблемы.
Внимание: прежде чем приступать, проверьте, а сохранится ли проблема, если перезагрузить ноутбук и роутер (выключить роутер из розетки и включить через 10-15 секунд). Если проблема появляется после завершения работы (а также после режима сна или гибернации) и включения ноутбука, но всё работает исправно после перезагрузки, попробуйте отключить быстрый запуск Windows 10 (и выполнить перезагрузку после этого).
Отключите «Случайные аппаратные адреса» в параметрах Wi-Fi, помните о блокировке по MAC-адресу
Если в настройках роутера включена блокировка подключения устройств по их MAC-адресу в настройках Wi-Fi роутера, вы можете получить рассматриваемую ошибку подключения. Также на её появление может повлиять включение опции «Случайные аппаратные адреса» в Windows 10.
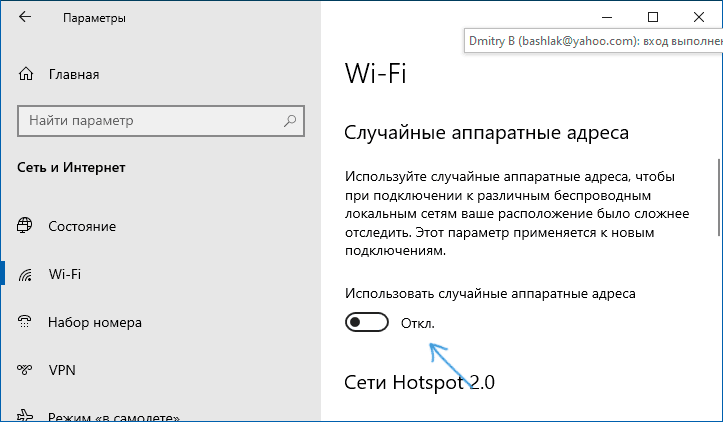
Чтобы проверить, не включена ли эта функция, зайдите в Параметры — Сеть и Интернет — Wi-Fi и, при наличии раздела «Случайные аппаратные адреса» (есть не во всех версиях ОС), отключите эту опцию.
Попробуйте «забыть» сеть Wi-Fi и снова подключиться к ней
Если пароль сети сохранен (не запрашивается при подключении), попробуйте «забыть» сеть, а затем снова подключиться к ней. При использовании этого метода необходимо, чтобы вы помнили пароль вашей сети Wi-Fi. Также его можно посмотреть на другом устройстве: Как посмотреть пароль Wi-Fi в Windows 10, Как посмотреть пароль Wi-Fi на Android.
Чтобы забыть сеть в последних версиях Windows 10, достаточно нажать по её имени в списке подключений и выбрать пункт «Забыть». После этого попробуйте заново подключиться к сети.
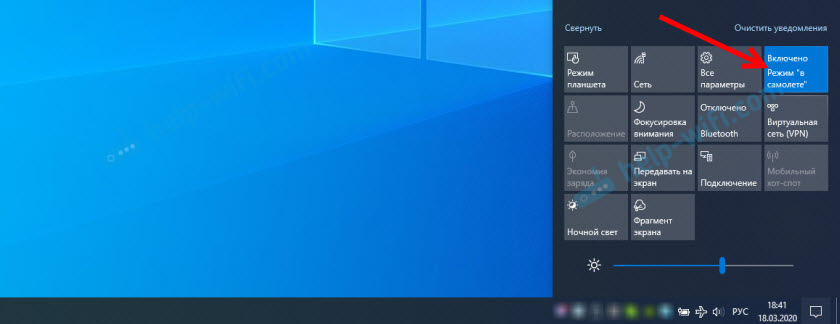
Включение и повторное отключение режима полёта, отключение беспроводного соединения
Если на вашем ноутбуке есть клавиша включения режима полёта попробуйте включить режим полета с помощью неё, а затем снова отключить его, а затем проверить подключение. Если такая клавиша отсутствует, включите «Режим в самолете» в области уведомлений Windows 10.

А после включения режима снова выключите его и вновь попробуйте подключиться к сети Wi-Fi. Если это не помогло, попробуйте следующий вариант:
- Нажмите клавиши Win+R на клавиатуре, введите ncpa.cpl и нажмите Enter.
- В списке найдите ваше беспроводное соединение, нажмите по нему правой кнопкой мыши и выберите пункт «Отключить».
- После того, как оно будет отключено, снова нажмите по нему правой кнопкой мыши и выберите пункт «Подключить».
Далее можно попробовать вновь подключиться к беспроводной сети.
Драйверы Wi-Fi адаптера
Если до недавнего времени проблем с подключением не было, попробуйте такой вариант:
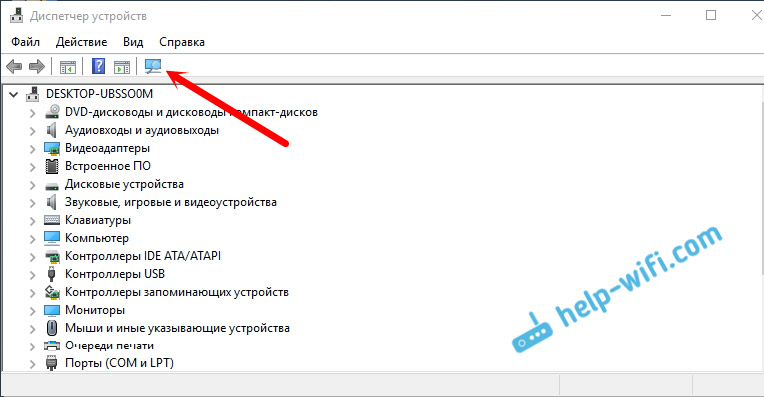
- Зайдите в диспетчер устройств (можно через меню по правому клику на кнопку «Пуск»).
- Перейдите в свойства вашего Wi-Fi адаптера (находится в разделе «Сетевые адаптеры», для перехода в свойства можно дважды нажать по имени адаптера или использовать контекстное меню).
- Посмотрите, активна ли кнопка «Откатить». Если да, используйте её для отката драйвера.
Также можно попробовать использовать точки восстановления Windows 10.
Если же проблема появилась после установки Windows 10 или крупного обновления системы, попробуйте скачать драйвер вашего Wi-Fi адаптера с официального сайта производителя ноутбука (внимание: я понимаю, что у вас не работает Интернет, но вы можете скачать его и на телефон, а потом скопировать на проблемный компьютер) и установить его. Если на сайте производителя драйверы только для предыдущих версий ОС, помните: они обычно прекрасно работают и под Windows 10.
Отключение IPv6 в свойствах подключения
По некоторым отзывам этот метод также иногда оказывается работоспособным:
- Откройте список подключений (Win+R — ncpa.cpl), нажмите правой кнопкой мыши по беспроводному подключению (обычно «Беспроводная сеть») и выберите пункт «Свойства».
- Снимите отметку с IP версии 6 (TCP/IPv6) и примените настройки.


Включение или отключение FIPS
Попробуйте включить или отключить FIPS-совместимые алгоритмы шифрования, для этого в Windows 10 Pro или Enterprise:
- Нажмите клавиши Win+R, введите gpedit.msc и нажмите Enter.
- Перейдите к разделу Конфигурация компьютера — Конфигурация Windows — Параметры безопасности — Локальные политики — Параметры безопасности.
- Найдите пункт «Системная криптография: использовать FIPS-совместимые алгоритмы для шифрования, хэширования и подписывания» и дважды нажмите по нему.
- Установите значение «Включен», если он отключен или наоборот.
После этого сохраните настройки, закройте редактор локальной групповой политики и перезагрузите ваш ноутбук или ПК.
В случае Windows 10 Домашняя запустите редактор реестра (Win+R — regedit) и перейдите к разделу
HKEY_LOCAL_MACHINESystemCurrentControlSetControlLsaFipsAlgorithmPolicy
В правой части окна реестра обратите внимание на значение параметра Enabled.

Если оно равно 0, измените на 1 (после двойного клика по параметру) и наоборот. Затем закройте редактор реестра и перезагрузите систему.
Другие варианты решения проблемы
Среди прочих причин и методов решения проблемы «Не удается подключиться к этой сети» в Windows 10 можно выделить следующие:
- Помните, что плохой прием сети Wi-Fi может также вызывать эту ошибку. Проверьте, сохраняется ли она, когда подключаемый ноутбук находится в непосредственной близости к роутеру. Иногда может помочь выбор свободного канала Wi-Fi.
- Если проблема актуальна для всех устройств, подключающихся к этой Wi-Fi сети, возможно, что-то было изменено в параметрах роутера, возможно, даже кем-то посторонним (изменен пароль Wi-Fi, включена блокировка по MAC-адресу). Решение — попробовать заново выполнить настройку роутера, предпочтительно — с предварительным сбросом на заводские настройки (если для вас это не сложно).
- Если вы устанавливали сторонние антивирусы или файрволлы, попробуйте отключить их, а лучше попробовать полностью удалить с компьютера и выполнить его перезагрузку.
- Если вы отключали какие-либо службы Windows 10 в целях оптимизации, это может оказаться причиной проблемы: попробуйте вновь включить их.
- Попробуйте использовать встроенное средство устранения неполадок сети Windows 10. Даже если оно не исправит ошибку, оно может сообщить о каких-то проблемах, решение для которых удастся найти в Интернете.
- Попробуйте выполнить сброс параметров сети средствами Windows 10.
- Теоретически, причиной проблемы могут быть вирусы на вашем ноутбуке или компьютере. Если есть подозрения на это, попробуйте выполнить соответствующую проверку. Также рекомендую воспользоваться AdwCleaner.
Среди прочих советов часто можно встретить рекомендацию запустить командную строку от имени администратора, затем по порядку использовать следующие команды
netsh winsock reset
netsh int ip reset
ipconfig /release
ipconfig /renew
ipconfig /flushdns
С последующей перезагрузкой. Это может помочь, но, на мой взгляд, излишне: встроенный сброс сети Windows 10 выполняет все указанные действия.
Видео инструкция
Если вы сможете поделиться в комментариях информацией о том, какой именно способ вам помог, это может оказаться полезным для получения статистики по проблеме.
WiFi Internet connection disconnected, Getting Unable to connect or Can’t connect to this network error while connecting to a wifi network? This is most probably occurs because of incorrect network configuration, the problem with the network WiFi adapter or installed driver for the WiFi adapter is outdated and incompatible with the current Windows 10 version. Here are simple fixes to fix the Wifi issue – windows 10 can’t connect to this network or windows was unable to connect to this network issue.
Restart your network devices (router, modem, or laptop) that help fix the problem if a temporary gitch prevents windows 10 to connect to the wifi network.
Temporarily Disable third-party Antivirus (if installed) or remove VPN if configured on your device and try to connect the WiFi network check get succeed.
Start Windows 10 to clean boot state and try to connect to the WiFi network. If any third-party software conflict causing the issue perform a clean boot and resolve the issue.
Forget the wireless connection
If you’re having “Windows 10 can’t connect to this network” error, you might want to “forget” your wireless connection to fix this problem. To forget the wireless network on Windows 10, do the following:
- Open Settings App and go to Network & Internet.
- Go to the Wi-Fi section and click Manage Wi-Fi settings.
- Scroll down to the Manage known networks, select your Wireless network and click Forget.
- After you’ve done that, connect to the same wireless network again.
Run Network Diagnostic Tool
Whenever you face a problem with the network and internet connection, Running the built-in network adapter troubleshooter is probably a good fix that automatically detects and fixes the problems that prevent your PC from connecting to the network and wifi.
- Press Windows key + I to open windows settings.
- Then click Network and internet then select Network troubleshooter.

- This will start diagnostic the problem related to the network and internet.
- During the process, the troubleshooter check network adapter driver compatibility, network configuration etc.
- Well, wait until you complete the troubleshooting process and restart windows.
- Let’s try to reconnect to the WiFi network and check it’s connected.
Reinstall the Network Adapter driver
Incompatible, outdated network adapter drivers mostly cause this type of problem. If the network troubleshooter didn’t fix the problem, We strongly recommend update or reinstall the network adapter driver with the latest version.
- Press Windows + R, type devmgmt.msc and ok,
- This will open the device manager, display all installed driver lists,
- Expand Network adapters, right-click on the installed WiFi driver select uninstall.
- Checkmark on Delete the driver software for this device and click uninstall to confirm the driver uninstallation. Once done restart windows.
- On the next start windows automatically install a basic network Adapter driver for you.
- Now try to connect to the WiFi network.
If the above steps don’t work, try downloading and installing the drivers from the manufacturer’s website.
Install the driver manually
Also, you can manually install the driver following the steps below.
- Again Open Device Manager and find your network adapter.
- Right-click it and choose Update Driver Software.
- Click Browse my computer for driver software.

- Now click on Let me pick from a list of device drivers on my computer.

- Make sure that Show compatible hardware is not checked.
- Find your network adapter manufacturer and select the driver you wish to install.

After you’ve installed the driver, restart your computer and try to connect wifi network again.
Use Network Troubleshooting Commands
If applying the above solutions, Windows 10 can’t connect to this network issue persists, you could run the network troubleshooting commands. Which may help to resolve issues like this.
Open the command prompt as administrator and perform the command below. After that, restart windows and check if Are you able to connect to the WiFi network?
- netsh winsock reset
- netsh int ip reset
- ipconfig /flushdns
Disable IPv6
Disable the IPv6 protocol following the steps below, and try to connect wifi network again.
- Press Windows + R, type ncpa.cpl and click ok
- This will open the network connections window,
- Find your active wifi or ethernet adapter, right-click it and choose Properties.
- Under properties, window locate and uncheck internet protocol version 6 (IPv6)
- Click OK and check if the issue has been resolved.

Change Power Management settings
- Open Device Manager and navigate to the Network Adapters section.
- Locate your wireless adapter and right-click it. Choose Properties from the menu.
- Navigate to the Power Management tab.
- Uncheck Allow the computer to turn off this device to save power and save the changes.

Network Reset (Windows 10 users only)
If nothing else has worked, then a Network Reset would probably help. This is the most probable solution which reinstalls Network adapters & set networking components to default settings and fixes if you face connectivity problems. I personally found Performing network reset to resolve this issue for me. I recommend you try, but first, create a system restore point before performing a network reset.
- Press Window + I keyboard shortcut to open the settings app,
- Select the Network and Internet option
- Then scroll to the option for Network Reset.
- Click on it and initiate the reset, and wait for the task to complete,
- After which, your Windows 10 computer will be restarted.

Now on the next start, try to connect the WiFi network and I am 100% sure this time you successfully get connected. Did these solutions help fix Can’t connect to this network error on windows 10, 8.1 and 7 computers? Let us know in the comments below. Also, Read
- Solved: “No Internet, secured” Wi-Fi Problem in Windows 10
- How To Fix Windows 10 internet connection problems
- Solved: Bluetooth not available on this device windows 10
- Solved: This Site can’t be reached error in Google Chrome, Windows 10
- Solved: Ntoskrnl.exe High CPU usage on Windows 10
- Enable Windows Sandbox feature on Windows 10
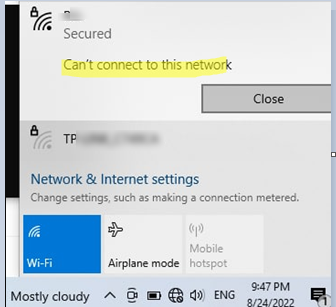
Решил написать о возможных решениях еще одной проблемы с подключением к Wi-Fi в Windows 10. Это ошибка «Не удается подключиться к этой сети». Когда мы в списке доступных сетей выбираем нужную нам сеть, нажимаем подключится, вроде бы идет подключение, но появляется надпись «Не удается подключиться к этой сети». В Windows 10 это выглядит вот так:

Появляться эта ошибка может из-за чего угодно: какой-то сбой в самой системе, или на роутере, смена параметров Wi-Fi сети (пароль, тип шифрования), и т. д. Кстати, самая популярная причина, это как раз смена пароля Wi-Fi сети. Если при попытке подключить свой ноутбук на Windows 10 к Wi-Fi вы видите ошибку что это не возможно, то есть несколько способов, которые могут вам помочь. Сейчас мы их рассмотрим.
«Не удается подключиться к этой сети». Как исправить?
Первым делом перезагрузите ноутбук и роутер. Очень часто обычная перезагрузка помогает, и не нужно будет копаться в настройках.
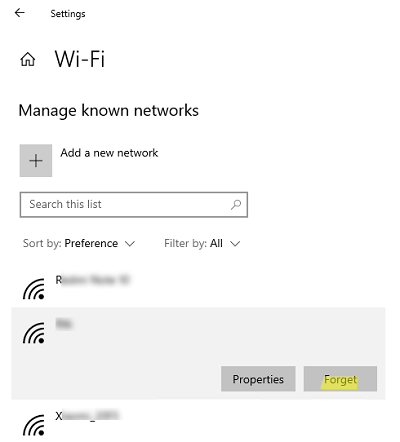
Если же этот способ не помог, то нужно удалить сеть на вашем компьютере (забыть ее). Сделать это так же не сложно. Нажмите на иконку подключения к Wi-Fi и выберите Сетевые параметры.

Дальше, на вкладке Wi-Fi выберите Управление параметрами сети Wi-Fi.
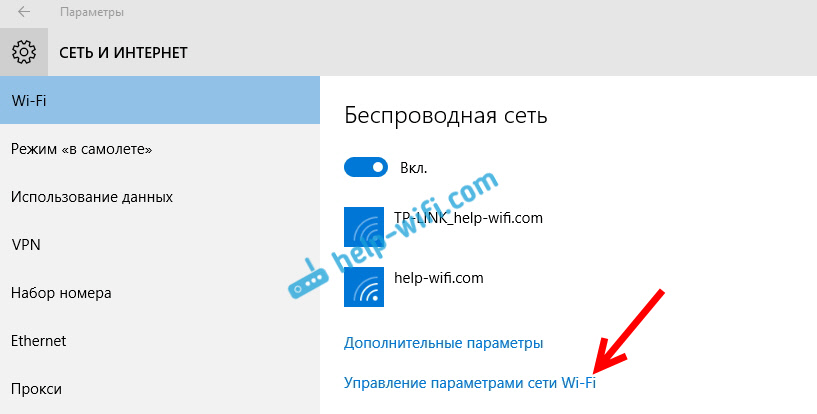
Выберите сеть к которой не удается подключится и нажмите на кнопку Забыть.

После этого попробуйте заново подключится к своей Wi-Fi сети. Нужно будет указать пароль. Можете смотреть эту инструкцию по подключению. Более подробно о том, как «забыть» сеть в Windows 10 я писал здесь.
Обновление: попробуйте отключить антивирус
В комментариях Алекс посоветовал отключить антивирус. Ему это помогло, ошибка «Не удается подключиться к этой сети» пропала, и он смог подключится к интернету. Так что, обязательно попробуйте у себя отключить антивирус. Как правило, нужно нажать правой кнопкой на иконку антивируса на панели уведомлений, и выбрать что-то типа «приостановить защиту».
Отключите встроенный в Windows 10 брандмауэр.
Обновление: обновляем конфигурацию оборудования
Снова же в комментариях Артем написал, что от ошибки «Не удается подключиться к этой сети» он избавился обновлением оборудования в диспетчере устройств. Михаил подтвердил, что ему так же помог этот способ. Поэтому, решил добавить это решение в статью.
Достаточно зайти в диспетчер устройств и нажать на кнопку «Обновить конфигурацию оборудования».
Возможно, вам этот способ так же поможет. Напишите о результатах в комментариях.
Обновление: смените канал Wi-Fi сети
Есть информация, что ошибка «Не удается подключиться к этой сети» может появляться из-за того, что Wi-Fi сеть, к которой не получается подключится работает на 12-том, или 13-том канале.
Для начала я советую несколько раз перезагрузить роутер. Возможно, он автоматически выберет другой канал, и все подключится (если проблема в этом). Если не сработает, то можно самому сменить канал в настройках роутера по этой инструкции: https://help-wifi.com/sovety-po-nastrojke/kak-najti-svobodnyj-wi-fi-kanal-i-smenit-kanal-na-routere/.
Попробуйте установить любой канал, только не 12, или 13-тый. Если это не решило проблему, то рекомендую обратно поставить автоматический выбор канала.
Обновление: включите и отключите режим «В самолете»
В комментариях подсказали, что это помогло решить проблему с подключением к беспроводной сети. Откройте центр уведомлений и активируйте режим «В самолете». Затем отключите его нажав на кнопку еще раз.
Спасибо Марии за подсказку. Поделитесь в комментариях своим решением!
Обновление: удалите Wi-Fi адаптер для его переустановки
И снова совет из комментариев. Алексей рассказал, что эта ошибка у него появилась после обновления Windows 10. Ничего не помогло кроме удаления Wi-Fi адаптера в диспетчере устройств. Сделать это не сложно.

После обновления конфигурации оборудования (кнопка в диспетчере устройств), или перезагрузки компьютера адаптер будет установлен повторно. У Алексея ошибка исчезла и компьютер подключился к Wi-Fi сети.
Обновление: включите «Случайные аппаратные адреса»
Очередная подсказка, которой в комментариях поделился Артем. Он включил функцию «Случайные аппаратные адреса» и Windows 10 подключилась к Wi-Fi сети, ошибка пропала.
Включить ее можно в параметрах, в разделе «Сеть и Интернет» на вкладке «Wi-Fi». Возле «Использовать случайные аппаратные адреса» установите переключатель в положение Вкл.

В двух словах поясню как это работает. Аппаратный адрес — это MAC-адрес. Уникальный адрес Wi-Fi модуля. Он фиксируется роутером при подключении. Если, например, MAC-адрес вашего компьютера заблокирован в настройках роутера, то при подключении будет ошибка. Может быть конфликт MAC-адресов. После включения функции «Случайные аппаратные адреса» Windows 10 начинает каждый раз менять физический адрес при подключении к новым Wi-Fi сетям.
Обновление: меняем ширину канала в свойствах Wi-Fi адаптера
Нужно зайти в диспетчер устройств (можно нажать Win + R и выполнить команду devmgmt.msc), открыть вкладку «Сетевые адаптеры», нажать правой кнопкой на Wi-Fi адаптер (в названии будет «802.11», «Wireless», «Dual Band») и выбрать «Свойства».
На вкладке «Дополнительно» слева нужно выбрать свойство «Ширина канала (диапазон сети)» или «Bandwidth» и слева в выпадающем меню выбрать «20 MHz». Сохраните настройки нажав «Ok».

Если вам известны другие варианты решения проблемы «Не удается подключиться к этой сети», которая появляется в Windows 10, то вы можете поделиться ими в комментариях.
Главная » Уроки и статьи » Интернет
Распространенной считается ошибка «Не удается подключиться к этой сети Wi-Fi» в Windows 10. Определить причину проблемы практически нереально: обычно у пользователя нет никаких зацепок. Поэтому приходится прибегать к куче различных способов устранения ошибки. Здесь будут упомянуты основные методы и возможные причины.
Почему возникает
В первую очередь следует обратить внимание на то, что подобная ошибка возникает при вводе неправильного пароля. Поэтому важно убедиться, что он не менялся. Также подобное может возникать с сохраненными паролями: если система работает нестабильно, она может пытаться использовать не тот код, отличный от изначально сохраненного.
Кроме указанных выше причин, люди иногда жалуются на функции, связанные с интернетом: некоторые из них тоже могут негативно влиять на подключение. Разумеется, сообщение также появляется при плохом соединении.
Как решить проблему подключением к WiFi
Для начала рекомендуется проверить, есть ли в пароле кириллица и специальные символы. И то, и другое может вызывать подобные проблемы. При наличии русских букв рекомендуется попробовать сменить пароль, оставив только цифры, а также английские буквы.
Также, если у вас ноутбук, то «виновником» может оказаться так называемый «Режим полета». Рекомендуется активировать, а затем деактивировать его (найти соответствующий пункт можно на панели задач, в частности в области уведомлений). После проведения процедуры, если ошибка осталась, попробуйте отключить и заново подключить интернет. Чтобы это сделать, следуйте простой инструкции:
- Зайдите в «Параметры», нажав на иконку, отвечающую за сетевое подключение.

- Выберите следующий пункт в настройках:

- В открывшемся окне найдите свою сеть, кликните по ней ПКМ и выберите «Отключить». Подождите немного, а затем вновь подключитесь.

Отключение функций в параметрах
Сначала нужно зайти в настройки ОС. Для этого одновременно нажмите на клавиши Win и I. Далее перейдите в раздел, который отвечает за сеть.

Найдите вкладку, которая подчеркнута красным на изображении ниже:

Около функции случайных адресов будет ползунок. Выставите его на «Откл.».
Важно отметить, что данная функция присутствует не во всех версиях системы. Если его нет – значит случайные адреса не могли стать причиной проблемы.
Удаление сохраненных паролей
В новых версиях операционной системы присутствует возможность «забыть» пароль. Для этого требуется нажать на ее название в списке сетей, а затем выбрать в контекстном меню соответствующий пункт.

Откат и переустановка драйверов
В ряде случаев такая ошибка возникает из-за проблем с Wi-Fi адаптером. Для начала рекомендуется попробовать его откатить. Делается это следующим образом:
- Нужно открыть встроенную утилиту, которая называется «Диспетчер устройств». Проще всего будет написать название в поиск на панели задач.

- В перечне ПО необходимо найти свой адаптер и дважды нажать по нему ЛКМ, чтобы открыть свойства.

- В новом окне перейдите в третью вкладку. Там будет несколько кнопок, в том числе «Откатить». Если она доступна – нажмите на нее и дождитесь окончания процедуры.

Также причина проблемы может крыться в старой или нестабильной версии драйвера. Это, в свою очередь, в большинстве случаев связано с тем, что пользователи слишком полагаются на специальные утилиты, скачивающие ПО в автоматическом режиме. Подобные программы часто не видят «свежие» версии или неправильно проводят установку. Поэтому рекомендуется все сделать самостоятельно (ПО рекомендуется скачивать только с официального сайта; для этого можно использовать, например, телефон).
Активация/деактивация некоторых алгоритмов шифрования
Речь идет о FIPS. В данном случае можно прибегнуть к двум способам: первый более быстрый и простой, но его нельзя использовать на редакции Home, а второй более сложный и опасный. В первом случае процедура делится на несколько шагов:
- Нужно открыть утилиту, отвечающую за политики. Для этого зажмите клавиши Win и R, а потом скопируйте и вставьте туда «gpedit.msc».

- Перейдите по пути, указанному ниже:

- Откройте выделенный параметр двойным нажатием ЛКМ.
- Измените значение на противоположное, а затем нажмите на «OK», чтобы применить изменения.

По окончанию процедуры необходимо перезагрузить ПК.
Если данный метод не подходит, придется изменять реестр. Строго придерживайтесь следующей инструкции:
- Откройте редактор с помощью поиска или окна «Выполнить» (для второго используйте команду «regedit»).

- Перейдите по адресу, выделенному на изображении синим.

- Дважды нажмите по единственному параметру. В строке «Значение» поставьте 0 или 1 в зависимости от того, какое число там стояло изначально. Фактически, это будет то же самое, что и активация политики.

Как и в предыдущем варианте, обязательно перезагрузитесь.
Изменение компонентов подключения
Снова откройте окно с перечнем сетевых подключений (как это сделать, уже упоминалось ранее). Далее нужно нажать ПКМ по желаемому пункту и в появившемся меню выбрать самый последний вариант, т. е. «Свойства». После этого откроется вот такое окно:

В некоторых случаях может помочь отключение следующего компонента (требуется убрать галочку напротив него):

Что делать, если ничто не помогает
Во-первых, обратите внимание на сторонние антивирусы: крайне редко, но они могут оказывать подобный эффект. Попробуйте их отключить, перезагрузить ПК и посмотреть, исчезла ли проблема. Аналогичная ситуация с вредоносным ПО: иногда оно отрицательно влияет на соединение.
Также можно сбросить параметры сети. Для этого опять зайдите в «Параметры» и найдите там соответствующий пункт:

Далее надо будет подтвердить свои намерения. Процедура обычно не занимает много времени.

Если совсем ничего не помогает, можно попробовать специальную утилиту «Устранение неполадок». Хоть она и не обладает высокой результативностью, но лишним это не будет. Она также есть в параметрах ОС:

Также рекомендуется включить все службы, необходимые для работы системы: многие пользователи вручную отключают их, пытаясь повысить оптимизацию и избавиться от «слежки». Это может вызывать разного рода ошибки, в том числе и эту.
В крайнем случае вы всегда можете воспользоваться точками восстановления, если таковые у вас имеются (по умолчанию система их не создает). Конечно, это подразумевает некоторую потерю данных.
Таким образом, ошибка «Не удается подключиться к этой сети Wi-Fi» возникает из-за наличия кириллицы в пароле, неправильной работы функций и политик, связанных с интернетом, а также сторонних программ. Если ни один из указанных способов не помог, остается лишь откатить систему. Также можно найти и выбрать свободный канал, но сделать это непросто, а эффективность такого метода невысокая.
Понравилось? Поделись с друзьями!
Дата: 02.03.2022
Автор/Переводчик: Wolf
При попытке подключиться к одной из доступных Wi-Fi сетей в Windows 10 может появляться ошибка:
Не удается подключиться к этой сети
Can’t connect to this network
Причиной ошибки может быть неправильный пароль, некорректные настройки сетевого профиля WLAN для сохраненной сети (тип шифрования или аутентификации), драйвер Wi-Fi адаптера, измененные настройки точки доступны и т.д. В этой статье мы рассмотрим, как исправить эту ошибку и восстановить Wi-Fi подключение в Windows.
Убедитесь, что вы ввели правильный ключ безопасности (пароль для подключения). Нежелательно использовать в пароле Wi-Fi кириллицу или спец символы.
Самый первый и простой вариант решения проблемы – начните с перезагрузки вашего компьютера и Wi-Fi роутера.
Если предыдущий способ не помог, возможно проблема связана с тем, что изменились настройки Wi-Fi роутера (пароль сети, настройки шифрования) и Windows не может подключиться к вашему роутеру с предыдущими сохраненными настройками в Wi-Fi профиле этой сети. Попробуйте удалить сохраненные настройки беспроводной сети в Windows и переподключиться к точке доступа :
- Перейдите в панель Settings -> Network and Internet -> Wi-Fi -> Manage known networks (или выполните команду быстрого доступа
ms-settings:network-wifi
); - Найдите в списке вашу Wi-Fi сеть и удалите ее (Forget/Забыть);
Можно удалить профиль сети из командной строки:
netsh wlan delete profile name="имя_сети"
- Заново подключитесь к вашей Wi-Fi точке доступа, укажите ключ безопасности сети (пароль для подключения).
Проверьте, что драйвер вашего сетевого адаптера поддерживает типы шифрования и аутентификации, которые разрешены на вашей точке доступа Wi-Fi. Список стандартов и типов шифрования, которые поддерживает ваш Wi-FI драйвер Windows можно вывести с помощью команды:
netsh wlan show all
Например, в моем случае:
Radio types supported : 802.11n 802.11g 802.11b
FIPS 140-2 mode supported : Yes
Authentication and cipher supported in infrastructure mode:
Open None
WPA2-Personal CCMP
Open WEP-40bit
Open WEP-104bit
Open WEP
WPA-Enterprise TKIP
WPA-Personal TKIP
WPA2-Enterprise TKIP
WPA2-Personal TKIP
WPA-Enterprise CCMP
WPA-Personal CCMP
WPA2-Enterprise CCMP
WPA3-Personal CCMP
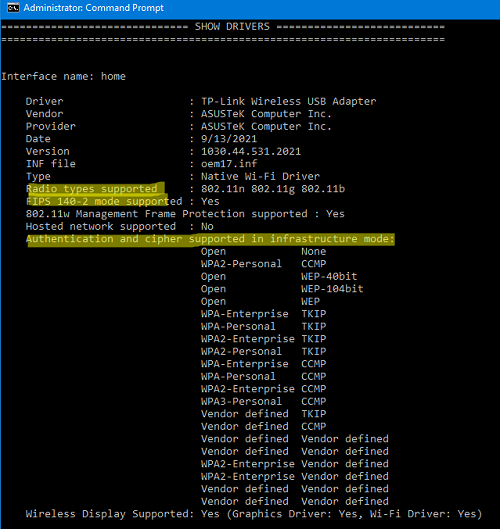
Убедитесь, что эти режимы поддерживаются вашей точкой доступа Wi-Fi (нужно зайти на интерфейс управления вашей точки доступа и проверить настройки безопасности). В некоторых случаях нужно обновить драйвер вашего сетевого адаптера.
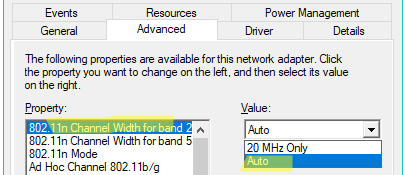
Откройте свойства сетевого драйвера адаптера в Device Manager, перейдите на вкладку Advanced и проверьте, какие режимы разрешены в его настройках. В этом примере режиме 802.11n отключен. Если ваша точка доступа и драйвер адаптера поддерживают его, включите эту опцию.
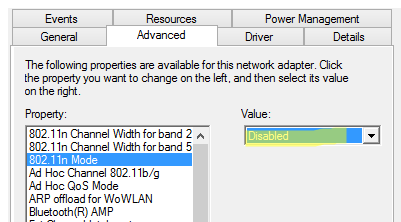
Также попробуйте изменить ширину канала в параметре 802.11n Channel Width for band 2 с
20 MHz
Only на
Auto
.
Удалите/переустановите сетевой драйвер вашего Wi-Fi адаптера (консоль
devmgmt.msc
). Разверните секцию сетевых адаптера, щелкните по вашему Wi-Fi адаптеру и выберите (Удалить устройства/Uninstall device).
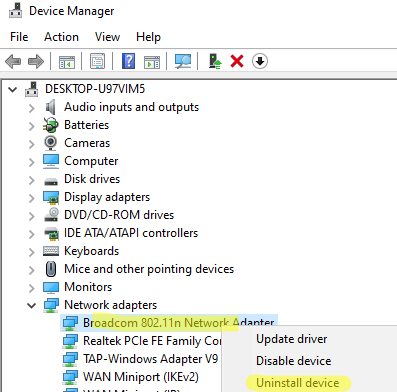
При удалении устройства вам будет предложено также удалить драйвер из хранилища драйверов. Включите опцию Delete the driver software for this device и нажмите Uninstall.
После этого выполните обнаружение новых устройств Actions -> Scan for hardware changes и дождитесь, пока Windows обнаружит ваш Wi-Fi адаптер и установит подходящие драйвера.
Это также сбросит текущие настройки вашего Wi-Fi адаптера (полезно, если вы изменяли их вручную).
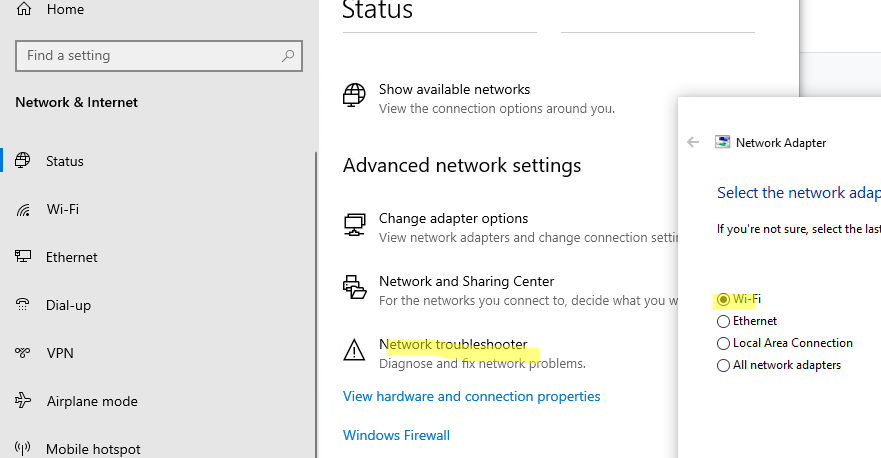
Запустите средство диагностики и устранения неполадок сети Settings -> Network and Internet > Status и нажмите на кнопку Network troubleshooter в секции Advanced network properties (или выполните команду
msdt.exe /id networkdiagnosticsnetworkadapter
). Выберите тип сетевого адаптера Wi-Fi и дождитесь пока мастер найдет и исправит возможные сетевые проблемы.
При появлении ошибки подключения к Wi-Fi сети вы можете найти более подробную информацию о причине ошибки в журнале Event Viewer.
- Откройте консоль Event Viewer (
eventvwr.msc
) и перейдите в раздел Applications and Services Logs -> Microsoft -> Windows -> WLAN-AutoConfig -> Operational; - Проверьте наличие ошибок и предупреждений в этом журнале;
- В моем примере тут нашлось событие EventID 8001 (AcmConnection), со следующим описанием:
Network Adapter: Broadcom 802.11n Network Adapter
Interface GUID: {c8342b50-2894-4d8f-84d7-907fce8e1784}
Connection Mode: Manual connection with a profile
Profile Name: HMNWRK
SSID: HMNWRK
BSS Type: Infrastructure
 Failure Reason:The specific network is not available.
RSSI: 255
Судя по ошибке данная точка доступа Wi-Fi оказалось недоступна (выключена) в момент подключения к ней.
Или еще одна похожая ошибка:
EventID 11006 (MsmSecurity)
WLAN-AutoConfig
Wireless security failed.
Reason: Dynamic key exchange did not succeed within configured time
Здесь похоже, что ваш компьютер не успел обменяться ключами с роутером за определенное время (точка доступа не загрузилась, тормозит, или вне зоны доступа).

Если ничего не помогает, и проблема появляется при подключении к любой Wi-Fi сети (будь то аппаратная точка доступа, или программная Wi-Fi точка доступа на Windows, Linux или Android), очистите таблицу маршрутизации и кэш DNS, выполните полный сброс сетевых настроек в Windows :
route -f
ipconfig /flushdns
netsh int ip reset
netsh int ipv4 reset
netsh int tcp reset
netsh winsock reset
Перезагрузите компьютер и подключитесь к своей сети. Ошибка
“Windows не удалось подключиться к Wi-Fi
” должна исчезнуть.
Несколько дополнительных советов по решению проблемы:
- Слабый и нестабильный сигнал Wi-Fi сети может вызывать эту ошибку. Проверьте уровень сигнала Wi-Fi и наименее загруженные каналы с помощью PowerShell. Попробует переключить вашу точку доступа на один из свободных номеров каналов;
- Измените имя (SSID) Wi-Fi сети на точке доступа;
- Если в настройках роутера жестко задан режима работы беспроводной сети (802.11 b/g/n). попробуйте выбрать тот, режим, который поддерживается драйвером Wi-FI в Windows или переключиться в режим Auto. Например, некоторые старые модели Wi-Fi адаптеров не поддерживают более современный режим 802.11n (работают только в 802.11g);
- Проверьте, не включена ли в настройках Wi-Fi роутера блокировка клиентов по MAC адресу
Troubleshooting network problems in Windows
If you can’t get email, browse the web, or stream music, chances are you’re not connected to your network and can’t get onto the internet. To fix the problem, here are some things you can try.
Things to try first
Try these things first to help you fix or narrow down the connection problem.
-
Make sure Wi‑Fi is turned on. Select the «No internet connection» icon on the right side of the taskbar, and make sure Wi-Fi is turned on. If it isn’t, select it to turn it on. Also, make sure Airplane mode is turned off.
-
Select Manage Wi-Fi connections (>) on the Wi-Fi quick setting, see if a Wi-Fi network you recognize and trust appears in the list of networks. If it does, select the Wi-Fi network, and they try to connect to it. If it says Connected underneath the network name, select Disconnect, wait a moment, and then select Connect again.
-
Try connecting to a network on a different frequency band. Many consumer Wi-Fi routers broadcast at two different network frequency bands: 2.4 GHz and 5 GHz. These will appear as separate networks in the list of available Wi-Fi networks. If your list of available Wi-Fi networks includes both a 2.4 GHz network and a 5 GHz network, try connecting to the other network. To learn more about the differences between 2.4 GHz networks and 5 GHz networks, check out Wi-Fi problems and your home layout.
-
Make sure the physical Wi‑Fi switch on your laptop is turned on. (An indicator light usually shows when it’s on.)
-
Run the Network troubleshooter. The Network troubleshooter can help diagnose and fix common connection problems.
To run the Network troubleshooter
-
Select Start > Settings > System > Troubleshoot > Other troubleshooters .
-
Under Other, select Network Adapter > Run.
-
Follow the steps in the troubleshooter and see if that fixes the problem.
-
Restart your modem and wireless router. This helps create a new connection to your internet service provider (ISP).
When you do this, everyone that is connected to your Wi-Fi network will be temporarily disconnected. The steps you take to restart your modem and router can vary, but here are the general steps.
Note: If you have a cable modem/Wi-Fi router combo device, you only need to follow the steps for the single device.
-
Unplug the power cable for the router from the power source.
-
Unplug the power cable for the modem from the power source.
Some modems have a backup battery. If you unplug the modem and lights stay on, remove the battery from the modem.
-
Wait at least 30 seconds or so.
If you had to remove the battery from the modem, put it back in.
-
Plug the modem back into the power source. The lights on the modem will blink. Wait for them to stop blinking.
-
Plug your router back into the power source.
Wait a few minutes for the modem and router to fully power on. You can usually tell when they’re ready by looking at the status lights on the two devices.
-
On your PC, try to connect again.
Connection problems can be due to a variety of reasons—problems with the website, your device, the Wi-Fi router, modem, or your Internet Service Provider (ISP). Try the following steps to help narrow down the source of the problem.
-
If the «Wi-Fi connected» icon appears on the right side of the taskbar, visit a different website. If the website opens, there might be a problem with the specific website. If you can’t connect to another website, go to the next step.
-
On another laptop or phone, try to connect to the same network. If you can connect, the source of the problem is likely due to your device—go to the section Network troubleshooting on your device. If you can’t connect to the network on any device, continue to the next step.
-
Check to see if there is a problem with the connection to your Wi-Fi router. Do this by using a ping test.
-
Select Search on the taskbar, and type command prompt. The Command Prompt button will appear. To the right of it, select Run as administrator > Yes.
-
At the command prompt, type ipconfig, and then select Enter. Look for the name of your Wi-Fi network within the results, and then find the IP address listed next to Default gateway for that Wi-Fi network. Write down that address if you need to. For example: 192.168.1.1
-
At the prompt, type ping <DefaultGateway> and then select Enter. For example, type ping 192.168.1.1 and select Enter. The results should be something like this:
-
-
Reply from 192.168.1.1: bytes=32 time=5ms TTL=64
-
Reply from 192.168.1.1: bytes=32 time=5ms TTL=64
-
Reply from 192.168.1.1: bytes=32 time=5ms TTL=64
-
Reply from 192.168.1.1: bytes=32 time=5ms TTL=64
-
Ping statistics for 192.168.1.1: Packets: Sent = 4, Received = 4, Lost = 0 (0% loss), Approximate round trip times in milli-seconds: Minimum = 4ms, Maximum = 5ms, Average = 4ms
If you see results like this and are getting a reply, then you have a connection to your Wi-Fi router, so there might be a problem with your modem or ISP. Contact your ISP or check online on another device (if you can) to see if there’s a service outage.
If the results of the ping test indicate that you are not getting a reply from the router, try connecting your PC directly to your modem by using an Ethernet cable (if you can). If you can connect to the internet using an Ethernet cable, it confirms the connection problem is due to the Wi-Fi router. Make sure you’ve installed the latest firmware and see the documentation for your router.
Run network commands
Try running these network commands to manually reset the TCP/IP stack, release and renew the IP address, and flush and reset the DNS client resolver cache:
-
Select Search on the taskbar, and type command prompt. The Command Prompt button will appear. To the right of it, select Run as administrator > Yes.
-
At the command prompt, run the following commands in the listed order, and then check to see if that fixes your connection problem:
-
Type netsh winsock reset and select Enter.
-
Type netsh int ip reset and select Enter.
-
Type ipconfig /release and select Enter.
-
Type ipconfig /renew and select Enter.
-
Type ipconfig /flushdns and select Enter.
-
Uninstall the network adapter driver and restart
If the previous steps didn’t work, try to uninstall the network adapter driver, and then restart your computer. Windows will automatically install the latest driver. Consider this approach if your network connection stopped working properly after a recent update.
Before uninstalling, make sure you have drivers available as a backup. Visit the PC manufacturer’s website and download the latest network adapter driver from there. If your PC can’t connect to the internet, you’ll need to download a driver on a different PC and save it to a USB flash drive so you can install the driver on your PC. You’ll need to know the PC manufacturer and model name or number.
-
Select Search on the taskbar, type device manager, and then select Device Manager from the list of results.
-
Expand Network adapters, and locate the network adapter for your device.
-
Select the network adapter, press and hold (or right-click), and then select Uninstall device > check the Attempt to remove the driver for this device check box > Uninstall.
-
After uninstalling the driver, select Start > Power > Restart .
After your PC restarts, Windows will automatically look for and install the network adapter driver. Check to see if that fixes your connection problem. If Windows doesn’t automatically install a driver, try to install the backup driver you saved before uninstalling.
Check if your network adapter is compatible with the latest Windows Update
If you lost your network connection immediately after upgrading to or updating Windows 11, it’s possible that the current driver for your network adapter was designed for a previous version of Windows. To check, try temporarily uninstalling the recent Windows Update:
-
Select Start > Settings > Windows Update > Update history > Uninstall updates .
-
Select the most recent update, then select Uninstall.
If uninstalling the most recent update restores your network connection, check to see if an updated driver is available:
-
Select Search on the taskbar, type device manager, and then select Device Manager from the list of results.
-
Expand Network adapters, and locate the network adapter for your device.
-
Select the network adapter, press and hold (or right-click), then select Update driver > Search automatically for updated driver software, and then follow the instructions.
-
After installing the updated driver, select Start > Power > Restart if you’re asked to restart, and see if that fixes the connection issue.
If Windows can’t find a new driver for your network adapter, visit the PC manufacturer’s website and download the latest network adapter driver from there. You’ll need to know the PC manufacturer and model name or number.
Do one of the following:
-
If you couldn’t download and install a newer network adapter driver, hide the update that’s causing you to lose your network connection. To learn how to hide updates, see Hide Windows Updates or driver updates.
-
If you could successfully install updated drivers for your network adapter, then reinstall the latest updates. To do this, select Start > Settings > Windows Update > Check for updates.
Use network reset
Using network reset should be the last step you try. Consider using it if the steps above don’t help to get you connected.
This can help solve connection problems you might have after upgrading from Windows 10 to Windows 11. It can also help to fix the problem where you can connect to the internet, but can’t connect to shared network drives. Network reset removes any network adapters you have installed and the settings for them. After your PC restarts, any network adapters are reinstalled, and the settings for them are set to the defaults.
-
Select Start > Settings > Network & internet > Advanced network settings > Network reset.
Open Network & Internet Status settings -
On the Network reset screen, select Reset now > Yes to confirm.
Wait for your PC to restart, and see if that fixes the problem.
Notes:
-
After using network reset, you might need to reinstall and set up other networking software you might be using, such as VPN client software or virtual switches from Hyper‑V (if you’re using that or other network virtualization software).
-
Network reset might set each one of your known network connections to a public network profile. In a public network profile, your PC is not discoverable to other PCs and devices on the network, which can help make your PC more secure. However, if your PC is used for file or printer sharing, you’ll need to make your PC discoverable again by setting it to use a private network profile. To do this, select Start > Settings > Network & internet > Wi-Fi . On the Wi-Fi screen, select Manage known networks > the network connection you want to change. Under Network profile type, select Private.
Check your Wi-Fi settings
Wi-Fi adapter manufacturers might have different advanced settings you can change based on your network environment or connection preferences.
Check the Wireless Mode setting for your network adapter and make sure it matches the capabilities of the network you’re trying to connect to. If it doesn’t match, you won’t be able to connect, and the network might not appear in the list of available networks. The Wireless Mode will often be set to Auto or something similar by default, which enables connection for every kind of network that’s supported.
To find the wireless mode setting
-
In Device Manager, select Network adapters, and then double-click the network adapter name.
-
Select the Advanced tab and look for a Wireless Mode setting. Make sure it’s set to the mode your network is using.
Wi-Fi profile settings
Windows uses the Wi-Fi profile to save the settings that are needed to connect to a Wi-Fi network. These settings include the network security type, key, network name (SSID), and so on. If you can’t connect to a Wi-Fi network that you could connect to before, it’s possible that the network settings might have changed or the profile is corrupted.
To fix this, remove (or «forget») the network connection, then reconnect to the network. When you forget a network connection, it removes the Wi-Fi network profile from your PC.
To forget a network
-
Select Start > Settings > Network & internet .
-
Select Wi-Fi , then select Manage known networks.
-
Select the network you want to forget, then select Forget.
Afterwards, select the Wi-Fi icon on the taskbar and try to reconnect to the network to renew the network connection.
Check your home layout
Your Wi-Fi network might be affected by the network’s frequency band, channel congestion, and/or signal strength. For more info, see Wi-Fi problems and your home layout.
Check for additional symptoms for the «No internet connection» icon.
There may be additional troubleshooting steps you can try, depending on which symptoms you’re having. To view these steps, check out Wi-Fi connection icons and what they mean.
Related topics
-
Setting up a wireless network
-
How to find your wireless network password
-
Analyze the wireless network report
-
Wi-Fi tools and apps
-
Make a Wi-Fi network public or private in Windows
Things to try first
Try these things first to help you fix or narrow down the connection problem.
-
Make sure Wi‑Fi is turned on. Select the «No internet connection» icon
on the right side of the taskbar, and make sure Wi-Fi is turned on. If it isn’t, select it to turn it on. Also, make sure Airplane mode is turned off.

-
Afterwards, see if a Wi-Fi network you recognize and trust appears in the list of networks. If it does, select the Wi-Fi network, and they try to connect to it. If it says Connected underneath the network name, select Disconnect, wait a moment, and then select Connect again.
-
Try connecting to a network on a different frequency band. Many consumer Wi-Fi routers broadcast at two different network frequency bands: 2.4 GHz and 5 GHz. These will appear as separate networks in the list of available Wi-Fi networks. If your list of available Wi-Fi networks includes both a 2.4 GHz network and a 5 GHz network, try connecting to the other network. To learn more about the differences between 2.4 GHz networks and 5 GHz networks, check out Wi-Fi problems and your home layout.
-
Make sure the physical Wi‑Fi switch on your laptop is turned on. (An indicator light usually shows when it’s on.)
-
Run the Network troubleshooter. The Network troubleshooter can help diagnose and fix common connection problems.
To run the Network troubleshooter
-
Select the Start button > Settings > Network & Internet > Status.
Open Network & Internet Status settings -
Under Change your network settings, select Network troubleshooter.
-
Follow the steps in the troubleshooter, and see if that fixes the problem.
-
Restart your modem and wireless router. This helps create a new connection to your internet service provider (ISP).
When you do this, everyone that is connected to your Wi-Fi network will be temporarily disconnected. The steps you take to restart your modem and router can vary, but here are the general steps. (Note: If you have a cable modem/Wi-Fi router combo device, you only need to follow the steps for the single device.)-
Unplug the power cable for the router from the power source.
-
Unplug the power cable for the modem from the power source.
Some modems have a backup battery. If you unplug the modem and lights stay on, remove the battery from the modem.
-
Wait at least 30 seconds or so.
If you had to remove the battery from the modem, put it back in.
-
Plug the modem back into the power source. The lights on the modem will blink. Wait for them to stop blinking.
-
Plug your router back into the power source.
Wait a few minutes for the modem and router to fully power on. You can usually tell when they’re ready by looking at the status lights on the two devices.
-
On your PC, try to connect again.
-
Connection problems can be due to a variety of reasons—problems with the website, your device, the Wi-Fi router, modem, or your Internet Service Provider (ISP). Try the following steps to help narrow down the source of the problem.
-
If the «Wi-Fi connected» icon appears on the right side of the taskbar, visit a different website. If the website opens, there might be a problem with the specific website. If you can’t connect to another website, go to the next step.
-
On another laptop or phone, try to connect to the same network. If you can connect, the source of the problem is likely due to your device—go to the section Network troubleshooting on your device. If you can’t connect to the network on any device, continue to the next step.
-
Check to see if there is a problem with the connection to your Wi-Fi router. Do this by using a ping test.
-
In the search box on the taskbar, type command prompt. The Command Prompt button will appear. To the right of it, select Run as administrator > Yes.
-
At the command prompt, type ipconfig, and then select Enter. Look for the name of your Wi-Fi network within the results, and then find the IP address listed next to Default gateway for that Wi-Fi network. Write down that address if you need to. For example: 192.168.1.1
-
At the prompt, type ping <DefaultGateway> and then select Enter. For example, type ping 192.168.1.1 and select Enter. The results should be something like this:
-
-
Reply from 192.168.1.1: bytes=32 time=5ms TTL=64
-
Reply from 192.168.1.1: bytes=32 time=5ms TTL=64
-
Reply from 192.168.1.1: bytes=32 time=5ms TTL=64
-
Reply from 192.168.1.1: bytes=32 time=5ms TTL=64
-
Ping statistics for 192.168.1.1: Packets: Sent = 4, Received = 4, Lost = 0 (0% loss), Approximate round trip times in milli-seconds: Minimum = 4ms, Maximum = 5ms, Average = 4ms
If you see results like this and are getting a reply, then you have a connection to your Wi-Fi router, so there might be a problem with your modem or ISP. Contact your ISP or check online on another device (if you can) to see if there’s a service outage.
If the results of the ping test indicate that you are not getting a reply from the router, try connecting your PC directly to your modem by using an Ethernet cable (if you can). If you can connect to the internet using an Ethernet cable, it confirms the connection problem is due to the Wi-Fi router. Make sure you’ve installed the latest firmware and see the documentation for your router.
Run network commands
Try running these network commands to manually reset the TCP/IP stack, release and renew the IP address, and flush and reset the DNS client resolver cache:
-
In the search box on the taskbar, type command prompt. The Command Prompt button will appear. To the right of it, select Run as administrator > Yes.
-
At the command prompt, run the following commands in the listed order, and then check to see if that fixes your connection problem:
-
Type netsh winsock reset and selectEnter.
-
Type netsh int ip reset and select Enter.
-
Type ipconfig /release and select Enter.
-
Type ipconfig /renew and select Enter.
-
Type ipconfig /flushdns and select Enter.
-
Uninstall the network adapter driver and restart
If the previous steps didn’t work, try to uninstall the network adapter driver, and then restart your computer. Windows will automatically install the latest driver. Consider this approach if your network connection stopped working properly after a recent update.
Before uninstalling, make sure you have drivers available as a backup. Visit the PC manufacturer’s website and download the latest network adapter driver from there. If your PC can’t connect to the internet, you’ll need to download a driver on a different PC and save it to a USB flash drive so you can install the driver on your PC. You’ll need to know the PC manufacturer and model name or number.
-
In the search box on the taskbar, type device manager, and then select Device Manager from the list of results.
-
Expand Network adapters, and locate the network adapter for your device.
-
Select the network adapter, press and hold (or right-click), and then select Uninstall device > check the Attempt to remove the driver software for this device check box > Uninstall.
-
After uninstalling the driver, select the Start button > Power > Restart.
After your PC restarts, Windows will automatically look for and install the network adapter driver. Check to see if that fixes your connection problem. If Windows doesn’t automatically install a driver, try to install the backup driver you saved before uninstalling.
Check if your network adapter is compatible with the latest Windows Update
If you lost your network connection immediately after upgrading or updating Windows 10, it’s possible that the current driver for your network adapter was designed for a previous version of Windows. To check, try temporarily uninstalling the recent Windows Update:
-
Select the Start button, then select Settings > Update & Security >Windows Update > View update history >Uninstall updates.
-
Select the most recent update, then select Uninstall.
If uninstalling the most recent update restores your network connection, check to see if an updated driver is available:
-
In the search box on the taskbar, type device manager, and then select Device Manager from the list of results.
-
Expand Network adapters, and locate the network adapter for your device.
-
Select the network adapter, select Update driver >Search automatically for updated driver software, and then follow the instructions.
-
After installing the updated driver, select the Start button > Power > Restart if you’re asked to restart, and see if that fixes the connection issue.
If Windows can’t find a new driver for your network adapter, visit the PC manufacturer’s website and download the latest network adapter driver from there. You’ll need to know the PC manufacturer and model name or number.
Do one of the following:
-
If you couldn’t download and install a newer network adapter driver, hide the update that’s causing you to lose your network connection. To learn how to hide updates, see Hide Windows Updates or driver updates.
-
If you could successfully install updated drivers for your network adapter, then reinstall the latest updates. To do this, select the Start button, then select Settings > Update & Security > Windows Update > Check for updates.
Use network reset
Using network reset should be the last step you try. Consider using it if the steps above don’t help to get you connected.
This can help solve connection problems you might have after upgrading from a previous version of Windows to Windows 10. It can also help to fix the problem where you can connect to the internet, but can’t connect to shared network drives. Network reset removes any network adapters you have installed and the settings for them. After your PC restarts, any network adapters are reinstalled, and the settings for them are set to the defaults.
Note: To use network reset, your PC must be running Windows 10 Version 1607 or later. To see which version of Windows 10 your device is currently running, select the Start button, then select Settings > System > About.
-
Select the Start button, then select Settings > Network & Internet > Status > Network reset.
Open Network & Internet Status settings -
On the Network reset screen, select Reset now > Yes to confirm.
Wait for your PC to restart, and see if that fixes the problem.
Notes:
-
After using network reset, you might need to reinstall and set up other networking software you might be using, such as VPN client software or virtual switches from Hyper‑V (if you’re using that or other network virtualization software).
-
Network reset might set each one of your known network connections to a public network profile. In a public network profile, your PC is not discoverable to other PCs and devices on the network, which can help make your PC more secure. However, if your PC is used for file or printer sharing, you’ll need to make your PC discoverable again by setting it to use a private network profile. To do this, select the Start button, then select Settings > Network & Internet > Wi-Fi . On the Wi-Fi screen, select Manage known networks > the network connection you want to change > Properties. Under Network profile, select Private.
Check your Wi-Fi settings
Wi-Fi adapter manufacturers might have different advanced settings you can change based on your network environment or connection preferences.
Check the Wireless Mode setting for your network adapter and make sure it matches the capabilities of the network you’re trying to connect to. If it doesn’t match, you won’t be able to connect, and the network might not appear in the list of available networks. The Wireless Mode will often be set to Auto or something similar by default, which enables connection for every kind of network that’s supported.
To find the wireless mode setting
-
In Device Manager, select Network adapters, and then double-click the network adapter name.
-
Select the Advanced tab and look for a Wireless Mode setting. Make sure it’s set to the mode your network is using.
Wi-Fi profile settings
Windows uses the Wi-Fi profile to save the settings that are needed to connect to a Wi-Fi network. These settings include the network security type, key, network name (SSID), and so on. If you can’t connect to a Wi-Fi network that you could connect to before, it’s possible that the network settings might have changed or the profile is corrupted.
To fix this, remove (or «forget») the network connection, then reconnect to the network. When you forget a network connection, it removes the Wi-Fi network profile from your PC.
To forget a network
-
Select the Wi-Fi network icon on the right side of the taskbar, then select Network & Internet settings.
-
Select Wi-Fi , then select Manage known networks.
-
Select the network you want to forget, then select Forget.
Afterwards, select the Wi-Fi icon on the taskbar and try to reconnect to the desired network to renew the network connection.
Check your home layout
Your Wi-Fi network might be affected by the network’s frequency band, channel congestion, and/or signal strength. For more info, see Wi-Fi problems and your home layout.
Check for additional symptoms for the «No internet connection» icon 
There may be additional troubleshooting steps you can try, depending on which symptoms you’re having. To view these steps, check out Wi-Fi connection icons and what they mean.
Related topics
-
Setting up a wireless network
-
How to find your wireless network password
-
Analyze the wireless network report
-
Wi-Fi tools and apps
-
Make a Wi-Fi network public or private in Windows 10
-
Make sure Wi-Fi is turned on.
-
Swipe in from the right edge of the screen, select Settings, then select the Network icon.
-
Turn on Wi-Fi.
-
-
Make sure the physical Wi‑Fi switch on your laptop is turned on. (An indicator light usually shows when it’s on.)
-
Make sure your PC isn’t in airplane mode.
-
Swipe in from the right edge of the screen, select Settings, then select the Network icon.
-
Turn off Airplane mode.
-
-
Move closer to the router or access point if you can.
-
If you don’t see the network name at all, the router or access point might not be set to broadcast the network name. In this case, you’ll need to connect to it manually.
-
Swipe in from the right edge of the screen, and then select Settings.
-
Select the Network icon, and then select Hidden network.
-
Type the network name and select Next.
-
Type the password and select Next.
-
Follow any additional instructions to get connected.
-
-
The network will be added to your list of networks and will be available to connect to when your computer is in range of the network. To connect to the network, follow these steps:
-
Open Connect to a Network by selecting the network icon in the notification area.
-
Select Unnamed Network, select Connect, and then type the network information. The network will be added to your list of networks and will be available to connect to in the future when your computer is in range of the network..
-
Let Windows try to help you fix the problem. Try running the Network troubleshooter to see if it can diagnose and fix the problem.
Select the Start button, start typing Network problems, and then select Identify and repair network problems in the list.
The Network Troubleshooter (mentioned above) can help diagnose and fix common connection problems. After using that, try running the network commands below because the combination of doing these two things can help you get connected.
If your problem isn’t fixed after running the Network troubleshooter, try to:
-
Reset the TCP/IP stack.
-
Release the IP address.
-
Renew the IP address.
-
Flush and reset the DNS client resolver cache.
Here’s how to run networking commands in a command prompt:
-
Select the Start button, start typing cmd, right-click Command Prompt in the list, select Run as Administrator, and then select Yes.
-
At the command prompt, run the following commands in the listed order and then check to see if that fixes your connection problem:
-
Type netsh winsock reset and press Enter.
-
Type netsh int ip reset and press Enter.
-
Type ipconfig /release and press Enter.
-
Type ipconfig /renew and press Enter.
-
Type ipconfig /flushdns and press Enter.
-
This helps create a new connection to your Internet service provider (ISP). When you do this, everyone that is connected to your Wi-Fi network will be temporarily disconnected.
The steps you take to restart your modem and router can vary, but here are the general steps:
-
Unplug the power cable for the router from the power source.
-
Unplug the power cable for the modem from the power source.
Some modems have a backup battery. So if you unplug the modem and lights stay on, remove the battery from the modem.
-
Wait at least 30 seconds or so.
If you had to remove the battery from the modem, put it back in.
-
Plug the modem back into the power source. The lights on the modem will blink. Wait for them to stop blinking.
-
Plug your router back into the power source.
Wait a few minutes for the modem and router to fully power on. You can usually tell when they’re ready by looking at the status lights on the two devices.
-
On your PC, try to connect again.
Make sure it’s not a problem with your cable modem or Internet service provider (ISP). If it is, contact your ISP.
-
Select the Start button, start typing cmd, right-click Command Prompt in the list, select Run as Administrator, and then select Yes.
-
At the command prompt, type ipconfig.
Look for the IP address listed next to Default gateway. Write down that address if you need to. For example, 192.168.1.1.
-
At the prompt, type ping <Default gateway> and press Enter. For example, type ping 192.168.1.1 and press Enter.
The result should be something like this:
Reply from 192.168.1.1: bytes=32 time=5ms TTL=64
Reply from 192.168.1.1: bytes=32 time=5ms TTL=64
Reply from 192.168.1.1: bytes=32 time=5ms TTL=64
Reply from 192.168.1.1: bytes=32 time=5ms TTL=64
Ping statistics for 192.168.1.1: Packets: Sent = 4, Received = 4, Lost = 0 (0% loss), Approximate round trip times in milli-seconds: Minimum = 4ms, Maximum = 5ms, Average = 4ms
If the ping is successful and you see results similar to the results above, but you can’t connect to the Internet on your PC, there may be a problem with your modem or Internet service provider (ISP).
If you’re still having trouble connecting to a network, it might be related to your network adapter.
-
Try using the Network Adapter troubleshooter to automatically find and fix some problems. This troubleshooter will disable and re-enable the adapter, and try some other common repairs.
Select the Start button, start typing Troubleshooting, and then select Troubleshooting in the list. Select View all > Network Adapter.
-
Update the network adapter driver. An outdated or incompatible network adapter driver can cause connection problems. Check to see if an updated driver is available.
-
Select the Start button, start typing Device Manager, and then select it in the list.
-
In Device Manager, select Network adapters, right-click your adapter, and then select Properties.
-
Select the Driver tab, and then select Update Driver.
-
Select Search automatically for updated driver software.
-
If Windows can’t find a new driver for your network adapter, visit the PC manufacturer’s website and download the latest network adapter driver from there. If your PC can’t connect to the Internet, you’ll need to download a driver on a different PC and save it to a USB flash drive so you can install the driver on your PC. You’ll need to know the PC manufacturer and model name or number.
Here are some things to check and try with your router if you’re at home and having trouble getting connected.
-
If you don’t see the network name, sign in to your router and check to see if it’s set to broadcast the network name.
-
Connect your PC to your router using an Ethernet cable.
-
Open your web browser and type the IP address for your wireless router. (For example, 192.168.1.1 or 172.16.0.0—check the documentation for your router to find the default IP address.)
-
Sign in with your user name and password, then make sure an option labeled Enable SSID Broadcast, Wireless SSID broadcast, or something similar is turned on. This setting is often on a Wireless Settings page.
-
-
Check to see if your Wi-Fi network uses Media Access Control (MAC) address filtering for security. If it does, you’ll need to add the MAC address for your PC to the access list on your router before you can connect.
-
Select the Start button. Start typing cmd and right-click Command Prompt in the list. Select Run as Administrator, and then select Yes.
-
At the command prompt, type ipconfig /all.
Write down the address that appears next to Physical Address for your wireless network adapter. This is the address you’ll need to add to the access list on your router.
To add the MAC address to the access list on your router:
-
Open your web browser and type the IP address for your wireless router. (For example, 192.168.1.1 or 172.16.0.0—check the documentation for your router to find the default IP address.)
-
Sign in with your user name and password, then look for a setting that says MAC Address Filter or something similar.
-
Add the MAC address you wrote down for your PC to the access list and save your changes.
On your PC, try to connect to the Wi-Fi network again.
-
-
Make sure Wi-Fi is turned on.
-
On a laptop, open Windows Mobility Center by selecting the Start
button and then selecting Control Panel > Mobile PC > Windows Mobility Center. -
Look in the Wireless Network section. If Wi-Fi is on, the button should say Turn wireless off.
-
-
Make sure the physical Wi‑Fi switch on your laptop is turned on. (An indicator light usually shows when it’s on.)
-
Check and make sure your PC isn’t in airplane mode.
-
Move closer to the router or access point if you can.
-
If you don’t see the network name at all, the router or access point might not be set to broadcast the network name. In this case, you’ll need to connect to it manually.
-
Open Manage Wireless Networks by selecting the Start
button, and then selecting Control Panel. In the search box , type wireless and then select Manage wireless networks. -
Select Add, and then select Manually create a network profile.
-
Type the network information.
-
If you want Windows to automatically connect when the network is in range, select the Start this connection automatically check box.
-
Select the Connect even if the network is not broadcasting check box, select Next, and then select Close.
-
-
The network will be added to your list of networks and will be available to connect to when your computer is in range of the network. To connect to the network, follow these steps:
-
Open Connect to a Network by selecting the network icon in the notification area.
-
Select Unnamed Network, select Connect, and then type the network information. The network will be added to your list of networks and will be available to connect to in the future when your computer is in range of the network..
-
 button and then selecting Control Panel > Mobile PC > Windows Mobility Center.
Let Windows try to help you fix the problem. Try running the Network troubleshooter to see if it can diagnose and fix the problem.
Open the Network troubleshooter by right-clicking the network icon in the notification area and then selecting Troubleshoot problems.
The Network Troubleshooter (mentioned above) can help diagnose and fix common connection problems. After using that, try running the network commands below because the combination of doing these two things can help you get connected.
If your problem isn’t fixed after running the Network troubleshooter, try to:
-
Reset the TCP/IP stack.
-
Release the IP address.
-
Renew the IP address.
-
Flush and reset the DNS client resolver cache.
Here’s how to run networking commands in a command prompt:
-
Select the Start button
. Type cmd in the search box, right-click cmd in the list, select Run as administrator, and then select Yes. -
At the command prompt, run the following commands in the listed order and then check to see if that fixes your connection problem:
-
Type netsh winsock reset and press Enter.
-
Type netsh int ip reset and press Enter.
-
Type ipconfig /release and press Enter.
-
Type ipconfig /renew and press Enter.
-
Type ipconfig /flushdns and press Enter.
-
This helps create a new connection to your Internet service provider (ISP). When you do this, everyone that is connected to your Wi-Fi network will be temporarily disconnected.
The steps you take to restart your modem and router can vary, but here are the general steps:
-
Unplug the power cable for the router from the power source.
-
Unplug the power cable for the modem from the power source.
Some modems have a backup battery. So if you unplug the modem and lights stay on, remove the battery from the modem.
-
Wait at least 30 seconds or so.
If you had to remove the battery from the modem, put it back in.
-
Plug the modem back into the power source. The lights on the modem will blink. Wait for them to stop blinking.
-
Plug your router back into the power source.
Wait a few minutes for the modem and router to fully power on. You can usually tell when they’re ready by looking at the status lights on the two devices.
-
On your PC, try to connect again.
Make sure it’s not a problem with your cable modem or Internet service provider (ISP). If it is, contact your ISP.
-
Select the Start button
. Type cmd in the search box, right-click cmd in the list, select Run as administrator, and then select Yes. -
At the command prompt, type ipconfig.
Look for the IP address listed next to Default gateway. Write down that address if you need to. For example, 192.168.1.1.
-
At the prompt, type ping <Default gateway> and press Enter. For example, type ping 192.168.1.1 and press Enter.
The result should be something like this:
Reply from 192.168.1.1: bytes=32 time=5ms TTL=64
Reply from 192.168.1.1: bytes=32 time=5ms TTL=64
Reply from 192.168.1.1: bytes=32 time=5ms TTL=64
Reply from 192.168.1.1: bytes=32 time=5ms TTL=64
Ping statistics for 192.168.1.1: Packets: Sent = 4, Received = 4, Lost = 0 (0% loss), Approximate round trip times in milli-seconds: Minimum = 4ms, Maximum = 5ms, Average = 4ms
If the ping is successful and you see results similar to the results above, but you can’t connect to the Internet on your PC, there may be a problem with your modem or Internet service provider (ISP).
If you’re still having trouble connecting to a network, it might be related to your network adapter.
-
Try using the Network Adapter troubleshooter to automatically find and fix some problems. This troubleshooter will disable and re-enable the adapter, and try some other common repairs.
Open the Network Adapter troubleshooter by selecting the Start button
and then selecting Control Panel. In the search box, type troubleshooter and then select Troubleshooting > View all > Network Adapter. -
Update the network adapter driver. An outdated or incompatible network adapter driver can cause connection problems. Check to see if an updated driver is available.
-
Open Device Manager by selecting the Start button
, selecting Control Panel, selecting System and Security, and then, under System, selecting Device Manager . If you’re prompted for an administrator password or confirmation, type the password or provide confirmation. -
In Device Manager, select Network adapters, right-click your adapter, and then select Properties.
-
Select the Driver tab, and then select Update Driver.
-
Select Search automatically for updated driver software.
-
 . If you’re prompted for an administrator password or confirmation, type the password or provide confirmation.
If Windows can’t find a new driver for your network adapter, visit the PC manufacturer’s website and download the latest network adapter driver from there. If your PC can’t connect to the Internet, you’ll need to download a driver on a different PC and save it to a USB flash drive so you can install the driver on your PC. You’ll need to know the PC manufacturer and model name or number.
Here are some things to check and try with your router if you’re at home and having trouble getting connected.
-
If you don’t see the network name, sign in to your router and check to see if it’s set to broadcast the network name.
-
Connect your PC to your router using an Ethernet cable.
-
Open your web browser and type the IP address for your wireless router. (For example, 192.168.1.1 or 172.16.0.0—check the documentation for your router to find the default IP address.)
-
Sign in with your user name and password, then make sure an option labeled Enable SSID Broadcast, Wireless SSID broadcast, or something similar is turned on. This setting is often on a Wireless Settings page.
-
-
Check to see if your Wi-Fi network uses Media Access Control (MAC) address filtering for security. If it does, you’ll need to add the MAC address for your PC to the access list on your router before you can connect.
-
Select the Start
button. Type cmd in the search box and right-click cmd in the list. Select Run as administrator, and then select Yes. -
At the command prompt, type ipconfig /all.
Write down the address that appears next to Physical Address for your wireless network adapter. This is the address you’ll need to add to the access list on your router.
To add the MAC address to the access list on your router:
-
Open your web browser and type the IP address for your wireless router. (For example, 192.168.1.1 or 172.16.0.0—check the documentation for your router to find the default IP address.)
-
Sign in with your user name and password, then look for a setting that says MAC Address Filter or something similar.
-
Add the MAC address you wrote down for your PC to the access list and save your changes.
On your PC, try to connect to the Wi-Fi network again.
-
Having trouble connecting to the WiFi network? Suddenly after a recent windows update, WiFi gets disconnected and try to reconnect results “can’t connect to this network” Or sometimes after Change WiFi password Windows fails to connect to the WiFi network with the error message Can’t Connect To This Network. A number of users report the same issue “unable to connect to wifi” on the Microsoft forum:
After upgrading to Windows 10 21H2 can’t connect to my Wifi network. At same time i can connect to others, but when I try to connect to my network the message: Can’t connect to this network. After that the network disappears from the list, I tried to add manually but nothing.
Windows 10 Can’t Connect To This Network
Internet & Network connection problems are most commonly caused by disconnected cables or by routers and modems that aren’t working correctly. Again incorrect network configuration, Outdated network adapter driver, Security software etc cause frequent disconnect or Can’t connect to this network error. Whatever the reason, here 5 solutions that help to fix Internet & Network connection problems.
Fix Temporary glitch with Restarting Network Devices
First of all Power cycle modem-router-computer, that most of the time fix Internet and network connections if any temporary glitch causes the problem.
- Simply power off Router, Switch and modem (if installed) at same also restart your Windows 10 PC/Laptop
- Wair a few minutes and then Turn on all network devices include the router, switch and modem and wait for all its lights to turn up.
- Once Done try to connect the WiFi network this helps.
Forget the wireless connection
- Open Settings App and go to Network & Internet.
- Go to the Wi-Fi section and click Manage Wi-Fi settings.
- Scroll down to the Manage known networks, select your Wireless network and click Forget.
- After you’ve done that, connect to the same wireless network again.
— Advertisement —
Run Network Adapter Troubleshooter
Windows has a built-in Network adapter troubleshooter that helps with checking problems prevent To Connect WiFi network. Run the troubleshooter and let windows detect and fix it for you.
- Open Control panel
- Change the view by (small icon) and Click on Troubleshooting
- Select Hardware and Sound, then click on Network adapters
- This will open the network adapter troubleshooter
- From Advanced and checkmark on “Apply repairs automatically”
- Click next and follow on-screen instructions to let windows check and fix the problem with Wireless and Other network adapters.
- Restart windows after complete the troubleshooting process, and check there is no more error while connecting to the WiFi network.
Uninstall and Re-install Network Adapter
Mostly this error “Can’t connect to this network” occurs when there’s something wrong with your network adapter driver, it’s corrupted or not compatible with the current windows version. If the network adapter troubleshooter fails to fix the problem, you must try to update or reinstall the driver for the network adapter that probably fixes the problem for you.
— Advertisement —
Before move forward: On a different PC Visit your Device manufacturer site. look for the latest available Driver version for the network adapter, Download and save it to your local drive.
- Press Windows Key + X to access the Power user menu, and select Device Manager from the list.
- This will display all installed driver list. Find your network adapter, right-click on it and select Uninstall from the context menu.
- Make sure you check the “Delete the driver software for this device” box and click OK.
- After uninstalling, restart your computer.
- Wait till windows automatically detect and re-install the Network adapter. Check if it solved the problem.
- If windows didn’t detect the network driver, simply Install the driver that was previously downloaded from the device manufacturer’s website.
- Restart windows to take effect the changes, Now connect to Wireless network, check it works.
Disable IPv6
- Press Windows + R, type ncpa.cpl and ok
- Right, click on the wireless adapter and select properties.
- Under Wireless Adapter properties locate the Internet Protocol Version 6 (TCP /IPv6) box and uncheck it.
- Click on Ok and save the changes that you made. Restart your computer to apply them. Check if you can connect to the network now.
— Advertisement —
Read more: Difference between IPv4 and IPv6
Change channel width
Again some of the users mention Changing channel width for the wireless network adapter helps them to fix the Windows 10 can’t connect to this network issue.
- Again open the Network adapters window using ncpa.cpl command.
- locate your wireless adapter, right-click on it and select Properties from the context menu.
- When the Properties window opens, click the Configure button and switch to the Advanced tab.
- Under property, list select Wireless mode and select value change the value of Wireless mode so it matches the value of Wireless mode on your router.
- In most cases, 802.11b (or 802.11g) should work, but if it doesn’t, try experimenting with different options.
- Click on Ok and save the changes that you made. Check if the network connection is working fine again.
Network Reset (Windows 10 Users only)
If none above not working, try the network reset option would probably help. Personally, for me, this option worked and help to reconnect to my wireless network again.
- Open Settings and click on “Network & Internet”
- Then, click “Status” on the left. Scroll Down, You’ll find an option on the right called “Network reset.” Click on it.
- Your pc will be Restarted itself, so make sure you have everything saved and ready to shut down. Click the “Reset now” button when you’re ready.
- Network Reset Confirmation popup will appear, Click Yes to confirm the same and Reset the Network Settings to the default setup.
- This Will Take Flew minute to Perform the Reset process after that windows automatically restart.
- Now connect to your wireless network, hope this time you get connected.
Did these solutions help to fix Windows Network and internet connection problem “can’t connect to this network”? Let us know on the comments below, also read
- Solved: Err_Connection_Timed_Out Error problem in Google Chrome
- Fix Windows cannot communicate with the device or resource (Primary DNS Server)
- Ethernet doesn’t have a valid IP configuration (Unidentified Network) Windows 10
- Solved: One or More Network Protocols Are Missing in Windows 10
- Solved: WiFi Keeps Disconnecting after Windows 10 update
Most common cause for this connection error is an outdated driver
by Milan Stanojevic
Milan has been enthusiastic about technology ever since his childhood days, and this led him to take interest in all PC-related technologies. He’s a PC enthusiast and he… read more
Updated on January 12, 2023
Reviewed by
Alex Serban

After moving away from the corporate work-style, Alex has found rewards in a lifestyle of constant analysis, team coordination and pestering his colleagues. Holding an MCSA Windows Server… read more
- Windows 10 sometimes won’t connect to the Internet, and there can be a multitude of reasons for that.
- Depending on the exact error, there are various solutions that you can try out, with varying levels of difficulty.
- Network problems are common and this message is a generic one from Windows.
- There are two general types of network problems, some of them being categorized as physical and others as setup-related.
XINSTALL BY CLICKING THE DOWNLOAD FILE
This software will keep your drivers up and running, thus keeping you safe from common computer errors and hardware failure. Check all your drivers now in 3 easy steps:
- Download DriverFix (verified download file).
- Click Start Scan to find all problematic drivers.
- Click Update Drivers to get new versions and avoid system malfunctionings.
- DriverFix has been downloaded by 0 readers this month.
Internet access is crucial for many people in this day and age, and there have been reports that users are getting Windows 10 can’t connect to this network message while trying to establish an Internet connection.
This in turn can cause a wide range of problems, including not being able to work remotely, stopping you from researching a problem, and even not allowing you to enjoy a relaxing time with your family watching your favorite shows.
No matter which category you fit in, solving network issues as fast and as securely as possible is of paramount importance.
In this guide, we will cover every way of dealing with network issues, including the most common solutions for general problems, and also step-by-step information for troubleshooting specific issues.
- Why is my laptop is showing Can’t connect to this network?
- The most common solutions to dealing with network issues
- How can I fix Windows 10 can’t connect to a wireless network?
- 1. Modify network adapter settings
- 2. Modify Internet properties settings
- 3. Manage wireless connections
- Windows 10 can’t connect to this network after an update
- 1. Use Command Prompt
- 2. Uninstall the antivirus software
- 3. Check if IPv4 and IPv6 protocols are enabled
- Windows 10 can’t connect to this network, enter APN and try again
- Windows 10 can’t connect to this network and WEP problems
- Windows 10 can’t connect to the network after waking from Sleep Mode
- 1. Disable IPv6 / Change Power Management settings
- 2. Change Power Options
- 3. Turn off the Connect to Wi-Fi hotspots option
- Windows 10 can’t connect to the network after a password change
- What can I do to prevent these issues from occurring again?
Why is my laptop is showing Can’t connect to this network?
This issue can occur if your PC isn’t connected to the Internet there are multiple causes for this issue, but the most common is your adapter settings.
In some instances, it’s possible that Windows can’t find the Wi-Fi network, and that’s usually caused by a problem with your adapter, so you need to check it.
Many reported that their HP laptop is not connecting to Wi-Fi, and if you encounter this problem, then you should update your drivers.
The most common solutions to dealing with network issues
➡ Check for a faulty connection
A problem with your actual network connection is one of the most common issues, and it can be split into two categories:
- Setup-related issues
As you might expect, not having the right login details will surely cause connectivity issues, so it is best to check in advance that the credentials you used are correct.
If you find that the information you used to log into your network is not correct, you could get in contact with your Internet Service Provider and request that they are refreshed.
- Physical problems
When it comes down to the physical part of this issue, a connection that can not be maintained or used properly can include problems with the router, problems with the network card on your device, and even problems with the cables connected to the router/network card.
To check for physical problems, make sure that the router is running optimally, and that all the respective lights are turned on.
Furthermore, it would be recommended that you check if the cables are cut, or have any other sort of damage (both to and from your router/ethernet port, etc).
➡ Check your drivers
As we all know by now, drivers are an essential element to any hardware that we use, bridging the gap between software and the device itself, and having issues with drivers is not going to help.
If this important element is not fully updated, or if the driver gets corrupted, a full re-install should resolve this issue. (more details about this step in the guide below).
➡ Make sure the ISP has a good connection
In some cases, you might find that even if the above-mentioned elements are all ticked without problems, the ISP might have problems with the distribution of the Internet on their network.
To find out if that is the case, you should contact your ISP by phone and ask if everything is running smoothly on their side.
If they don’t report any issues, then it is safe to assume that the issue is local, so let’s dive into the steps you need to follow in order to resolve this annoying problem once and for all.
How can I fix Windows 10 can’t connect to a wireless network?
1. Modify network adapter settings
- Change the channel width for your network adapter
- Press Win Key + X and choose Settings.

- Choose Network & Internet.

- Click Change adapter options.
- Locate your wireless adapter and right-click it. Choose Properties from the menu.

- Click the Configure button.

- Choose the Advanced tab.

- Select the 802.11d from the Property list and set the value to Enabled.
- Click OK to save the changes.
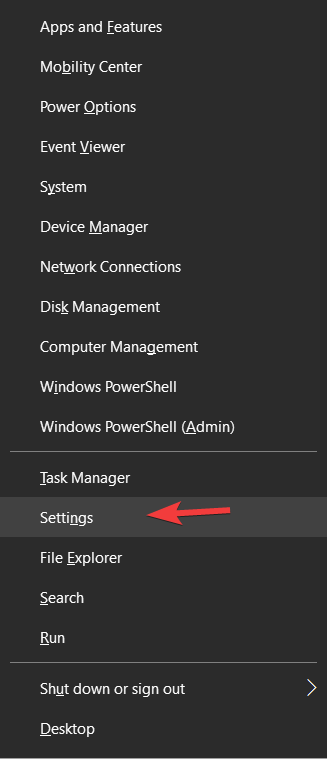
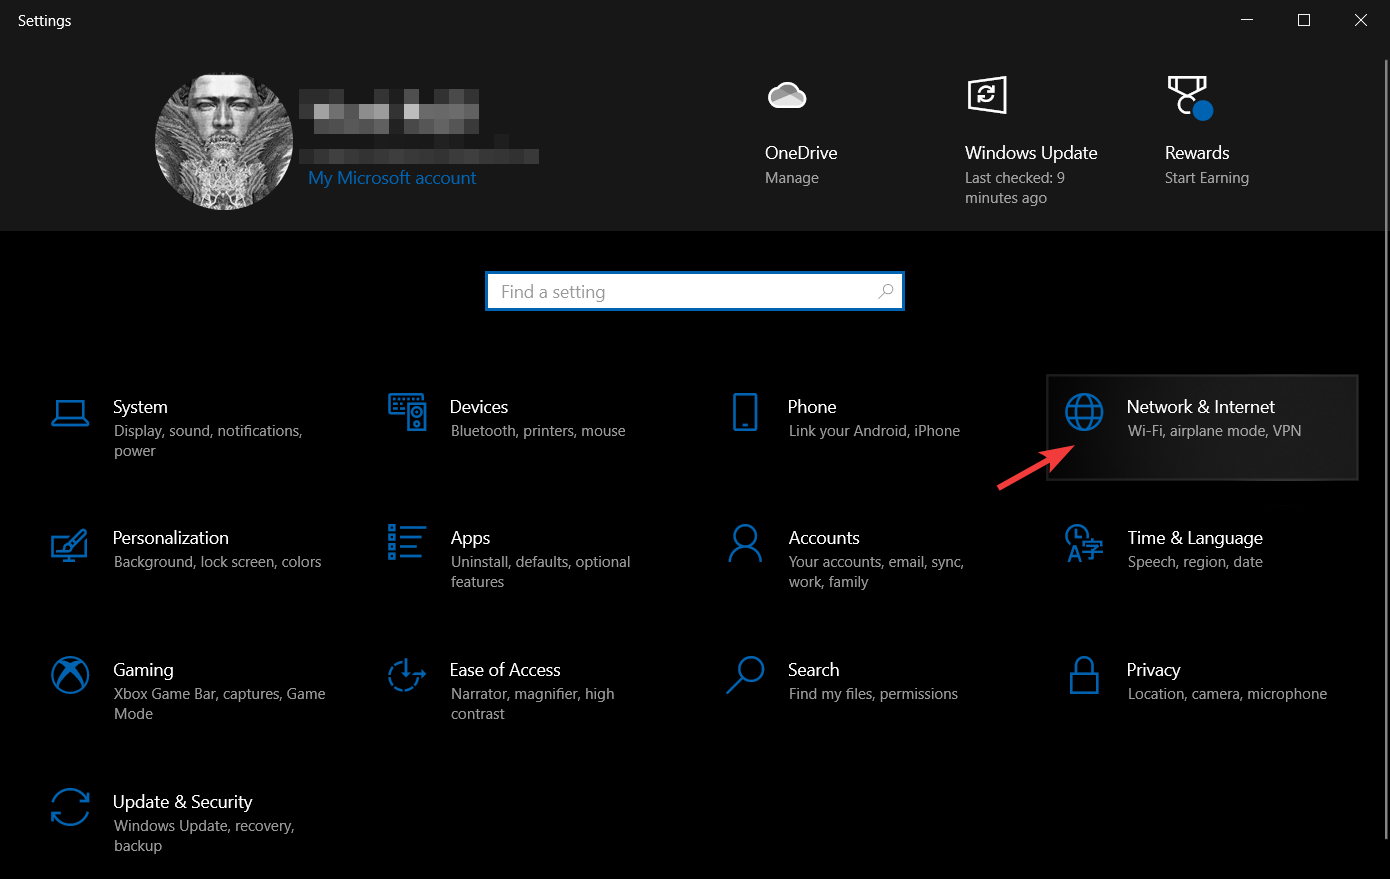

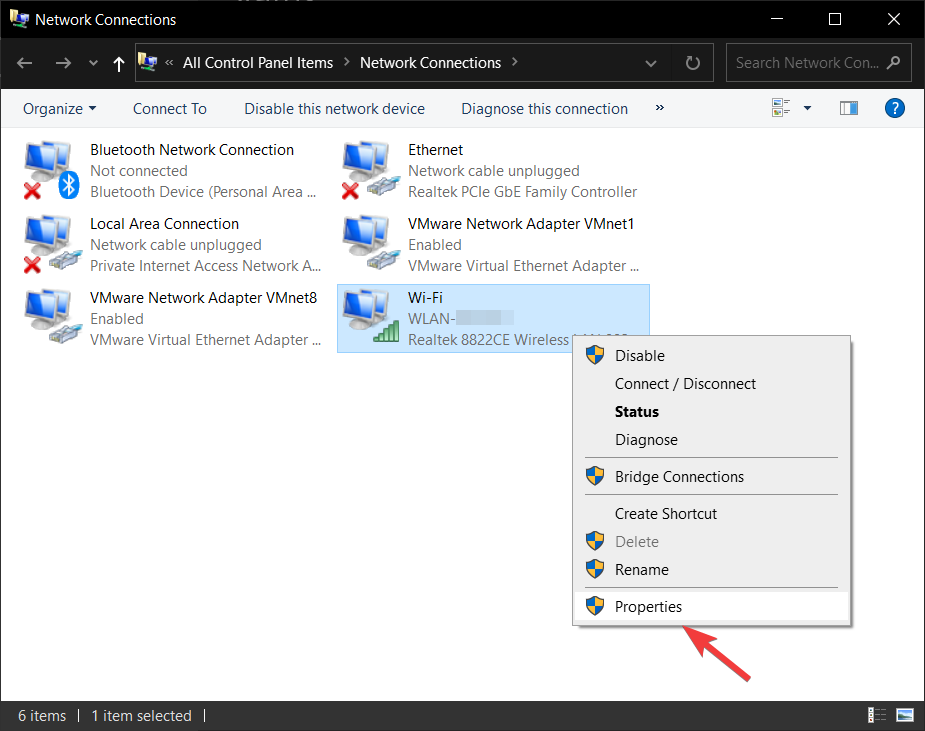
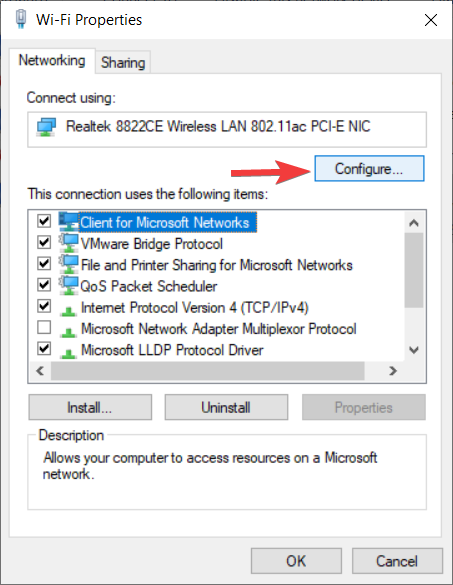
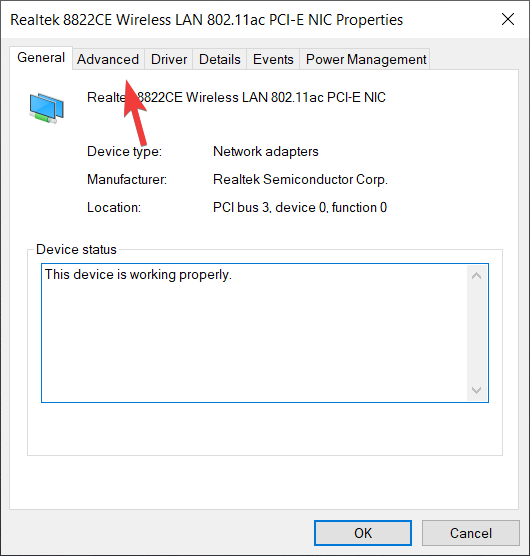
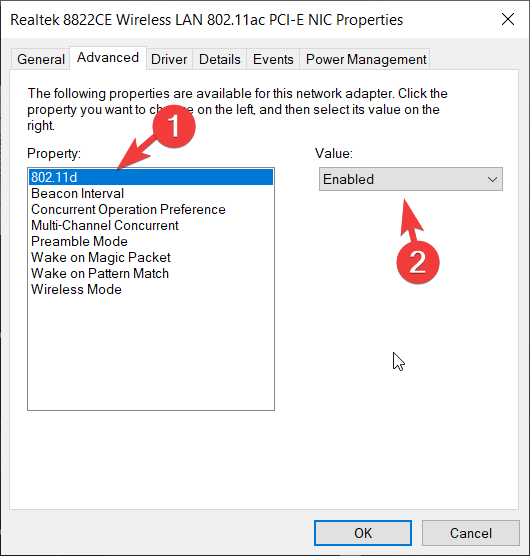
- Update your network adapter driver manually
- Press the Win Key + X, and choose Device Manager from the list.

- Under the Network adapters dropped-down, find the wireless network adapter in the list (The exact name will depend on your system configuration).

- Right-click it and choose Update Driver Software.

- Click Browse my computer for driver software.

- Now click on Let me pick from a list of device drivers on my computer.

- Make sure that Show compatible hardware is not checked.

- Find your network adapter manufacturer and select the driver you wish to install.
- After you’ve installed the driver, restart your computer.
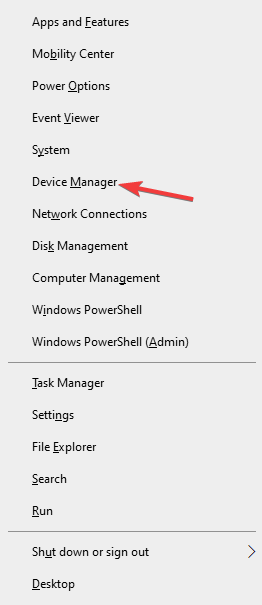
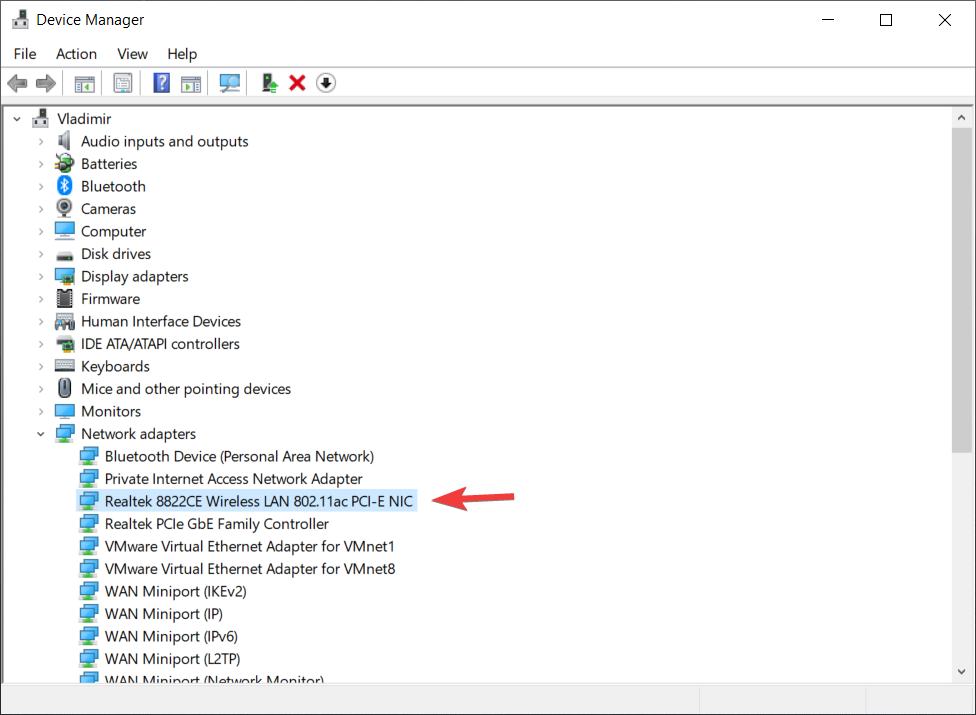
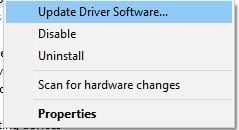
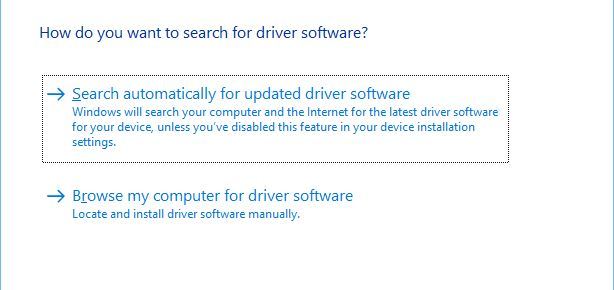
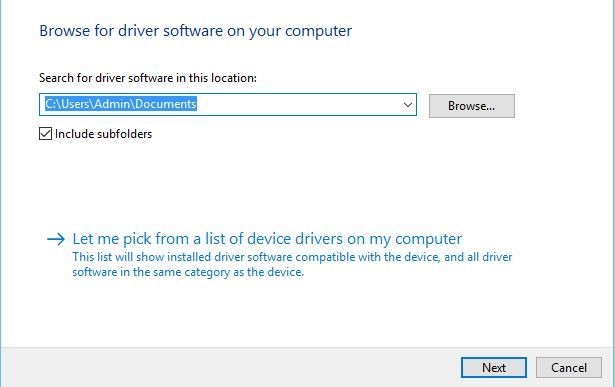
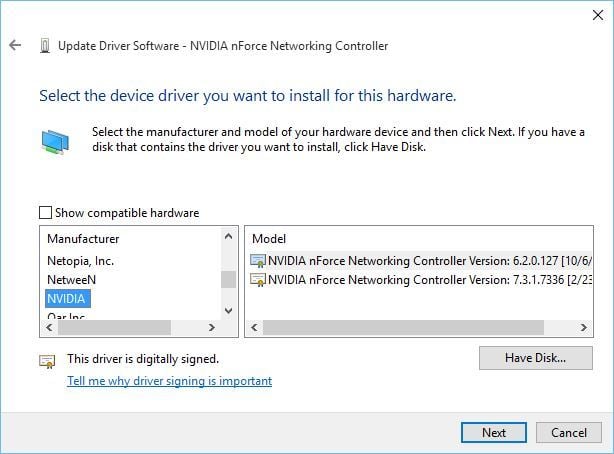
Did you know that you can update drivers automatically? Updating drivers manually can be tedious and a bit hard to follow, but there’s a way to automate this process.
By using specialized driver updater software like DriverFix you can automatically update all drivers on your PC with just a few clicks.
- Make sure that your adapter and router are using the same security type
In order to protect your data, wireless connections come with certain security types such as WPA2-PSK (AES) or WPA-PSK (AES).
For your network connection to work properly, your router and computer need to use the same security type.
You can set the security type for your router by following the instructions from your router’s instruction manual.
After you’ve set a specific security type on your router, you need to check if the same security type is being used on your computer as well.
To do that, you need to follow these steps:
- Right-click the network connection icon next to your clock, and choose Open Network & Internet settings.

- Choose Network and Sharing Center.
- Click on your connection link.

- Choose Wireless Properties.

- In the Security tab, you should see your connection security type.

- After choosing the correct one, simply click OK.
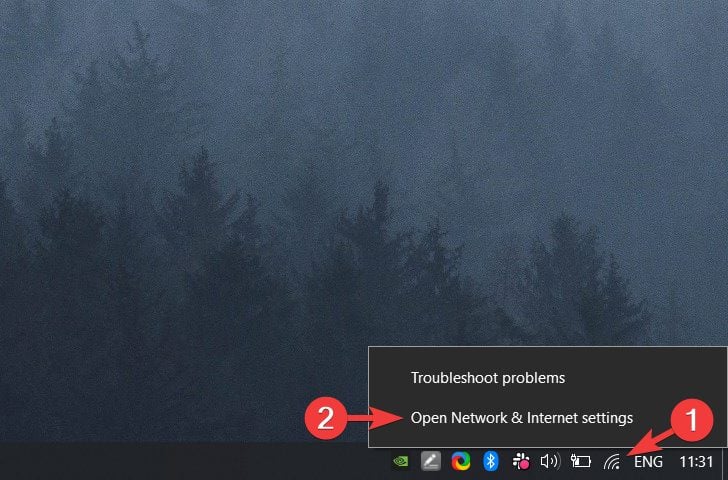

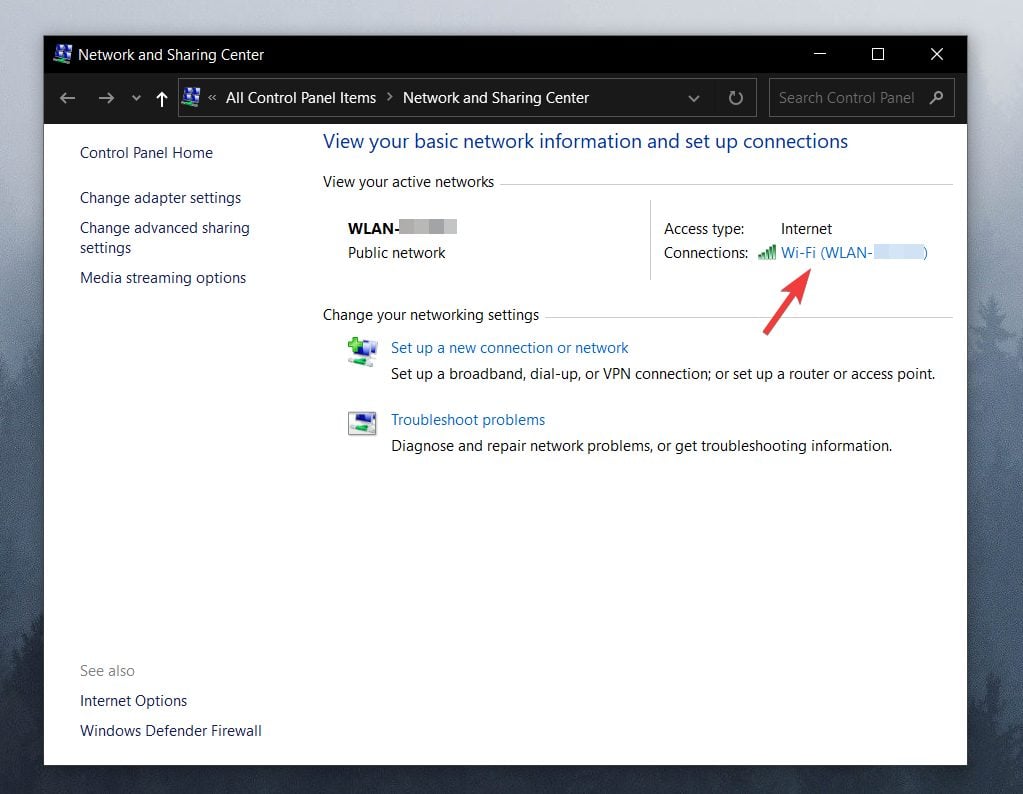
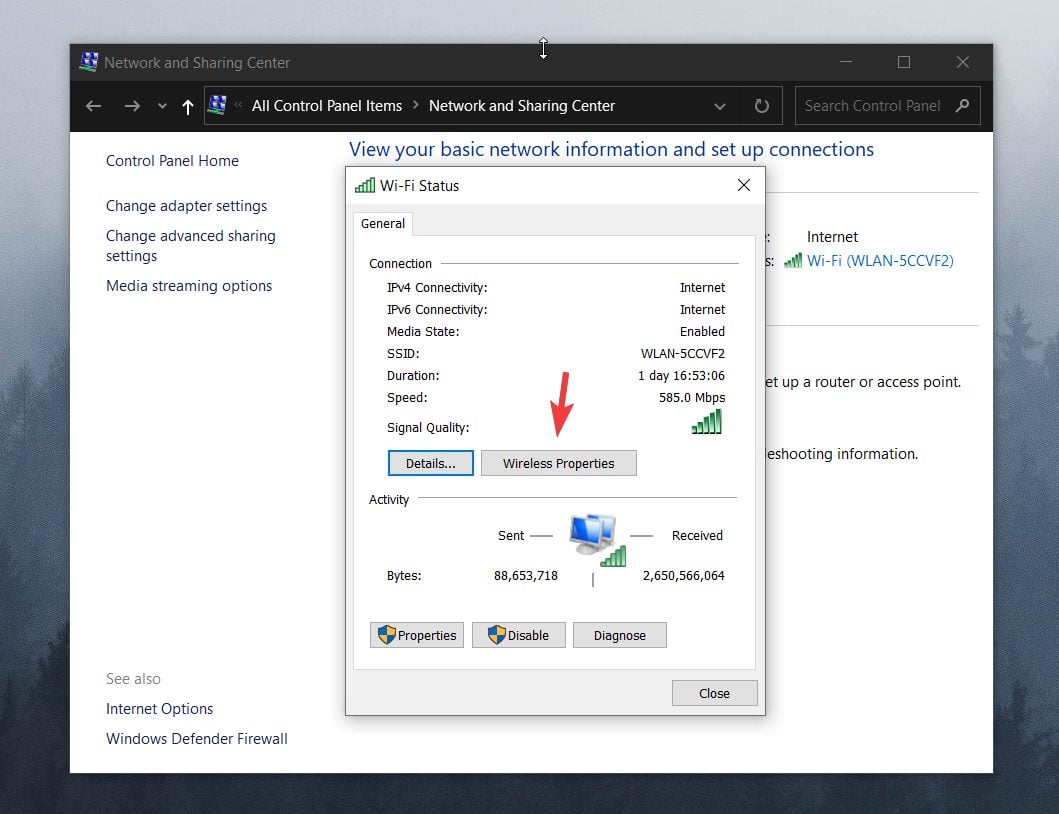


NOTE
The security type section should show the same security type that your router is using. You might have to try several different security types before you find the right one.
- Uninstall your network adapter
- Press Win Key + X and choose Device Manager from the list.

- Locate your network adapter and right-click it.
- Choose Uninstall. (If asked, check to Delete the driver software for this device and click OK.)

- After the driver has been uninstalled, restart your computer and Windows 10 will automatically install the new driver.
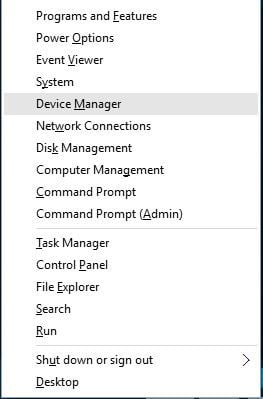
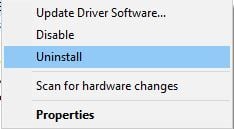
If you find that Windows didn’t install the drivers automatically after the restart process, simply follow these steps.
- Change your network adapter
If nothing else works, maybe you should change your network adapter.
Certain USB Wi-Fi adapters aren’t compatible with Windows 10, and if that’s the case, you might have to replace your current adapter with a newer model.
2. Modify Internet properties settings
- Change the wireless network mode
- Right-click the network connection icon from the taskbar and choose Open Network & Internet settings.
- Choose Network and Sharing Center.
- Click Change adapter settings, locate your wireless network adapter, right-click it and choose Properties from the menu.

- When the Properties window opens, click the Configure button.

- Go to the Advanced tab.
- Select Wireless mode from the Property list and modify its value from the drop-down menu. (In most cases IEEE 802.11b/g should work, but if it doesn’t, try experimenting with different options.)
- Press OK.
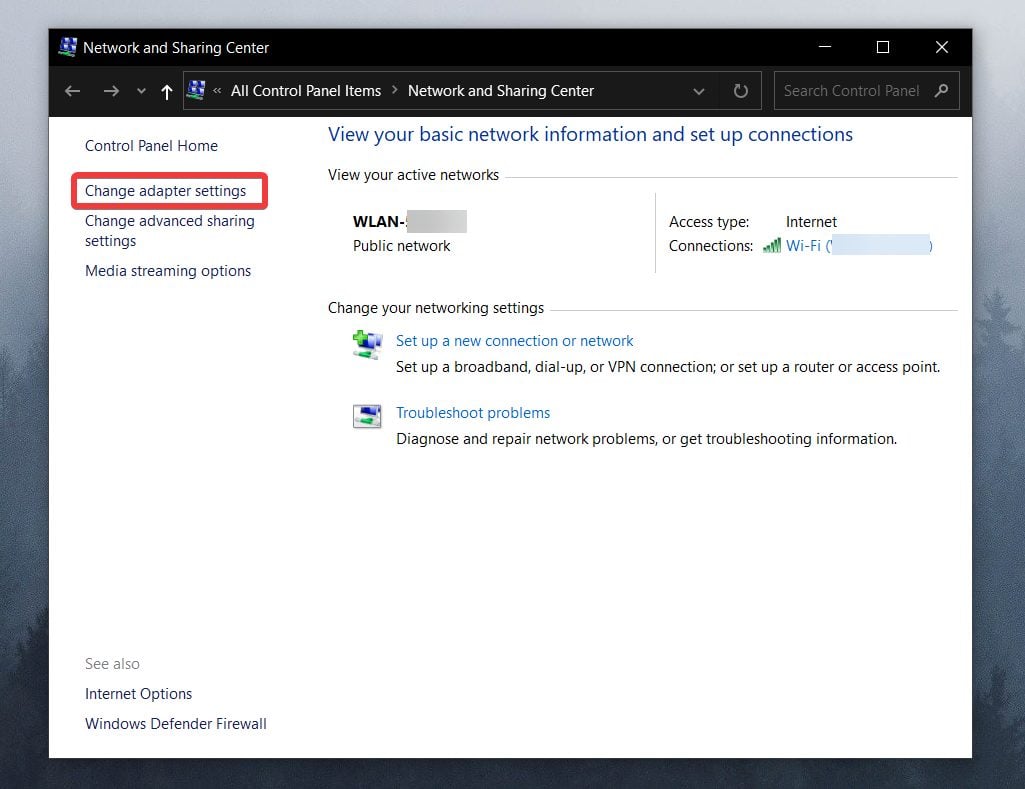
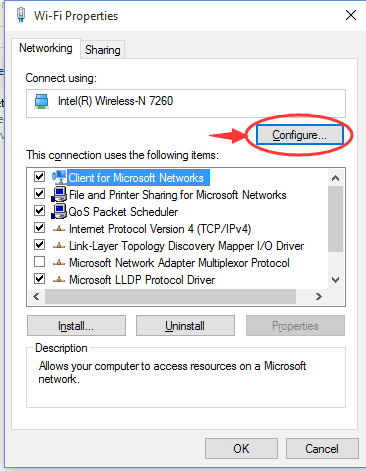

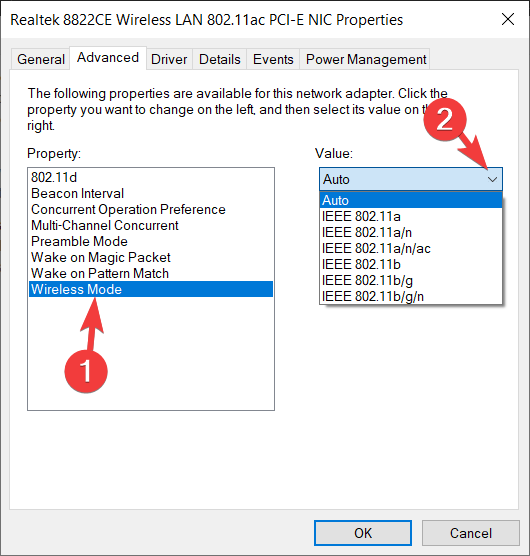
You can change the wireless network mode for your router and your wireless adapter. In order for your network to work, your router and network adapter need to use the same or similar network mode.
If you want to change the network mode of your router, you’ll need to check the instruction manual, but in most cases, it won’t be necessary to change the wireless network mode on your router.
- Disable IPv6 on your computer and router
- Open Network & Internet settings by right-clicking your network icon in the taskbar.

- Click the Network and Sharing Center option.
- Click on your current connection.
- In the Connection status window, click the Properties button.

- Find Internet Protocol Version 6 (TCP /IPv6) and uncheck it.

- Click OK button to save the changes.
- Restart your computer in order to apply the changes.
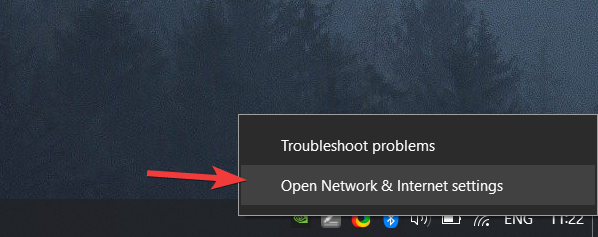
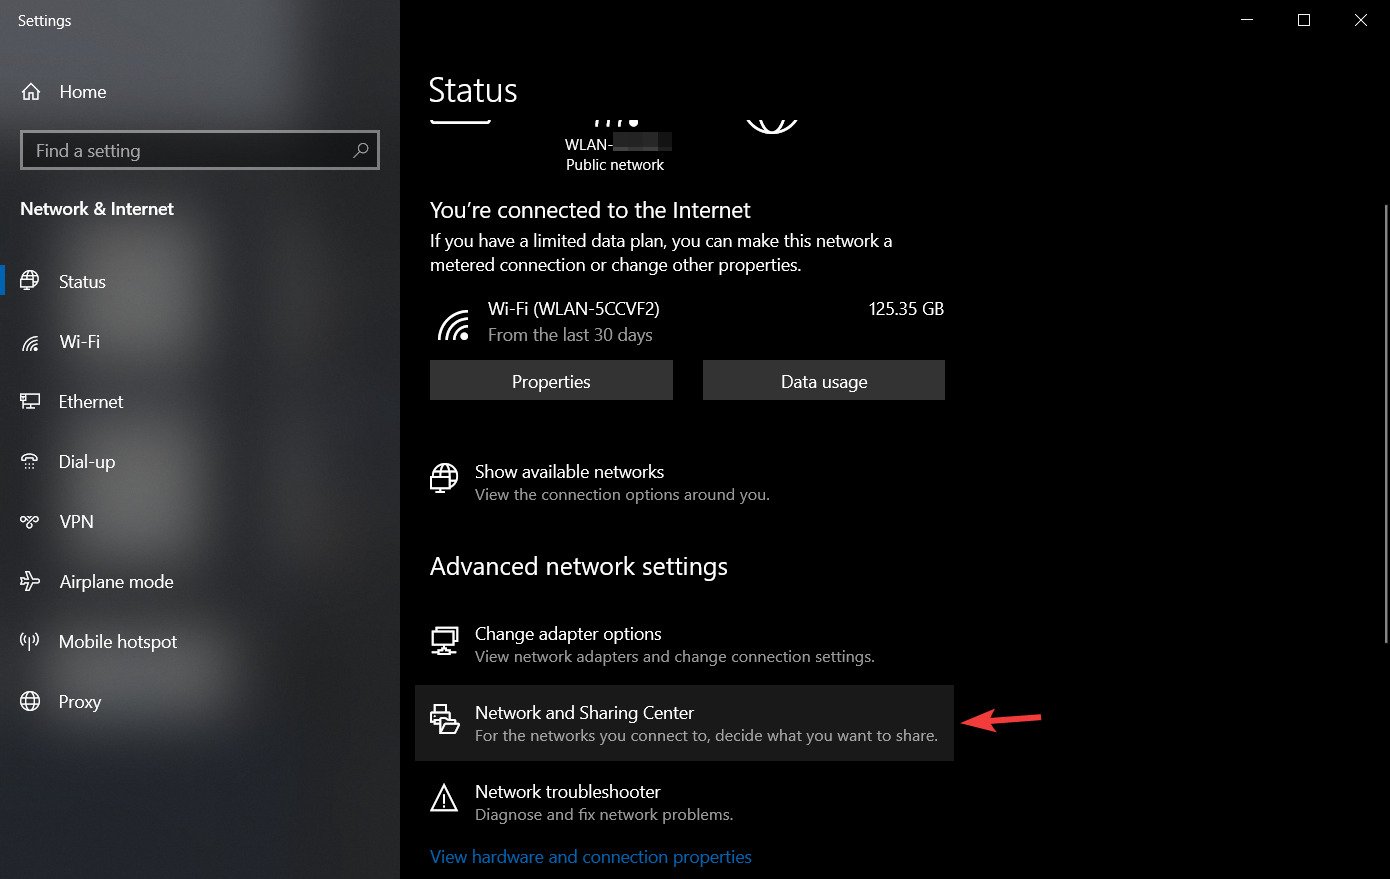
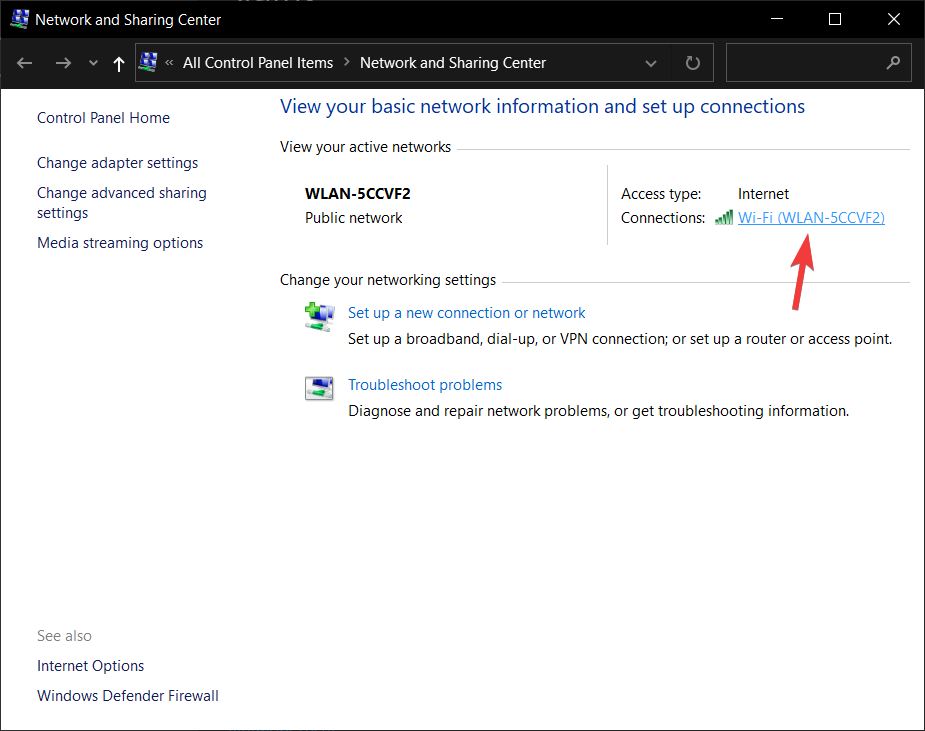
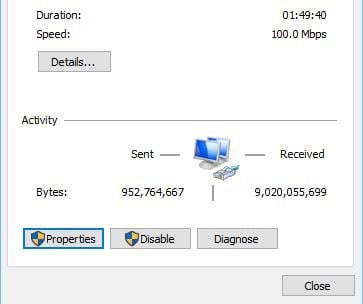
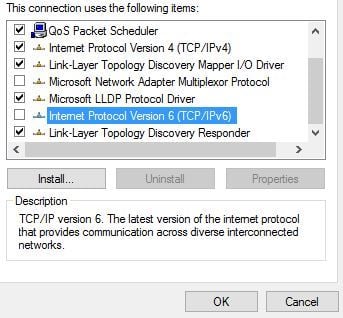
If the problem still persists, you might have to disable IPv6 on your router.
Disabling IPv6 on your router is a complicated process, and it’s different for every type of router, so before you do that, check your router’s instruction manual.
If you encounter any issues or if your network protocol is missing, be sure to check out this guide that will help you get back on track.
3. Manage wireless connections
- Disable and enable your wireless connection
- Click the search button and input Network.
- Choose Settings from the list.

- Choose Network & Internet.
- Click Change adapter options.

- Locate your wireless connection, right-click it and choose Disable.

- Right-click the same connection again and choose Enable.
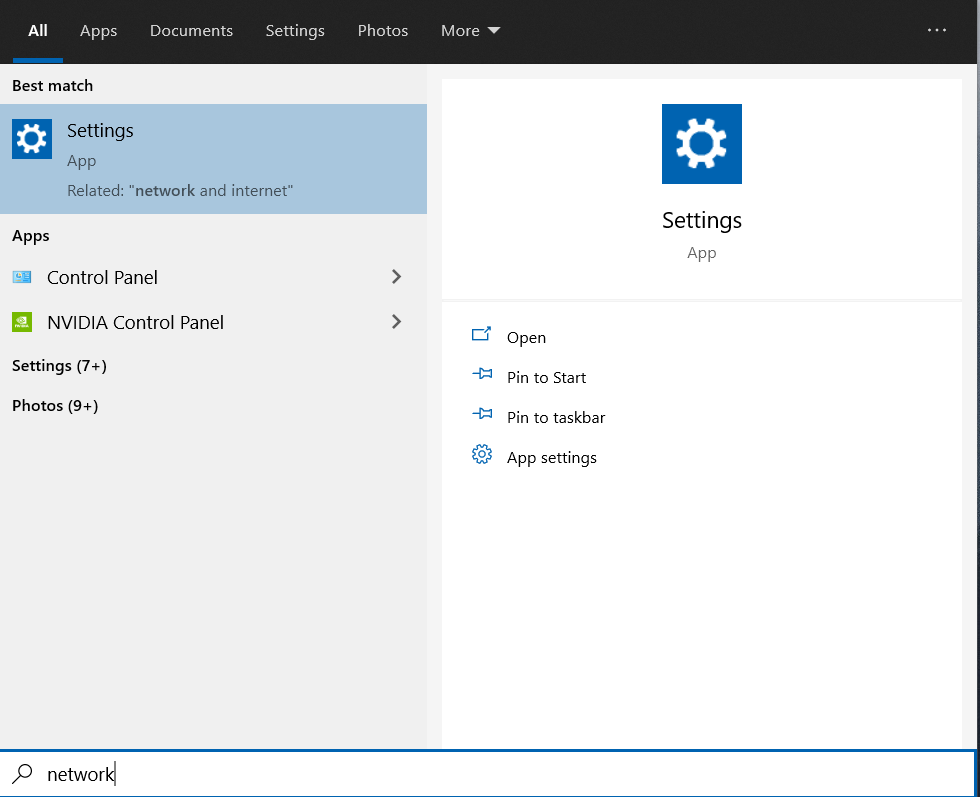
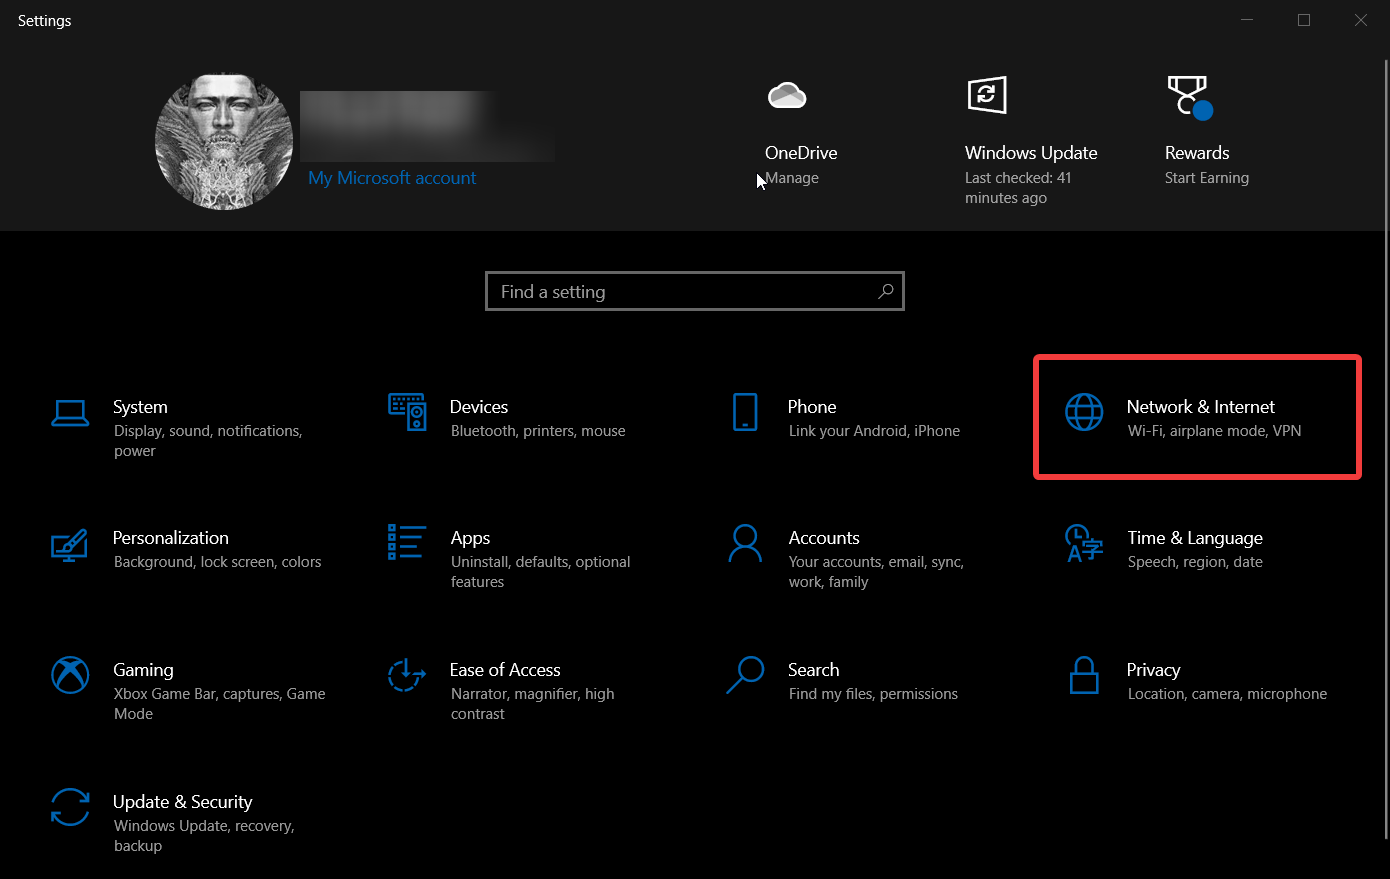
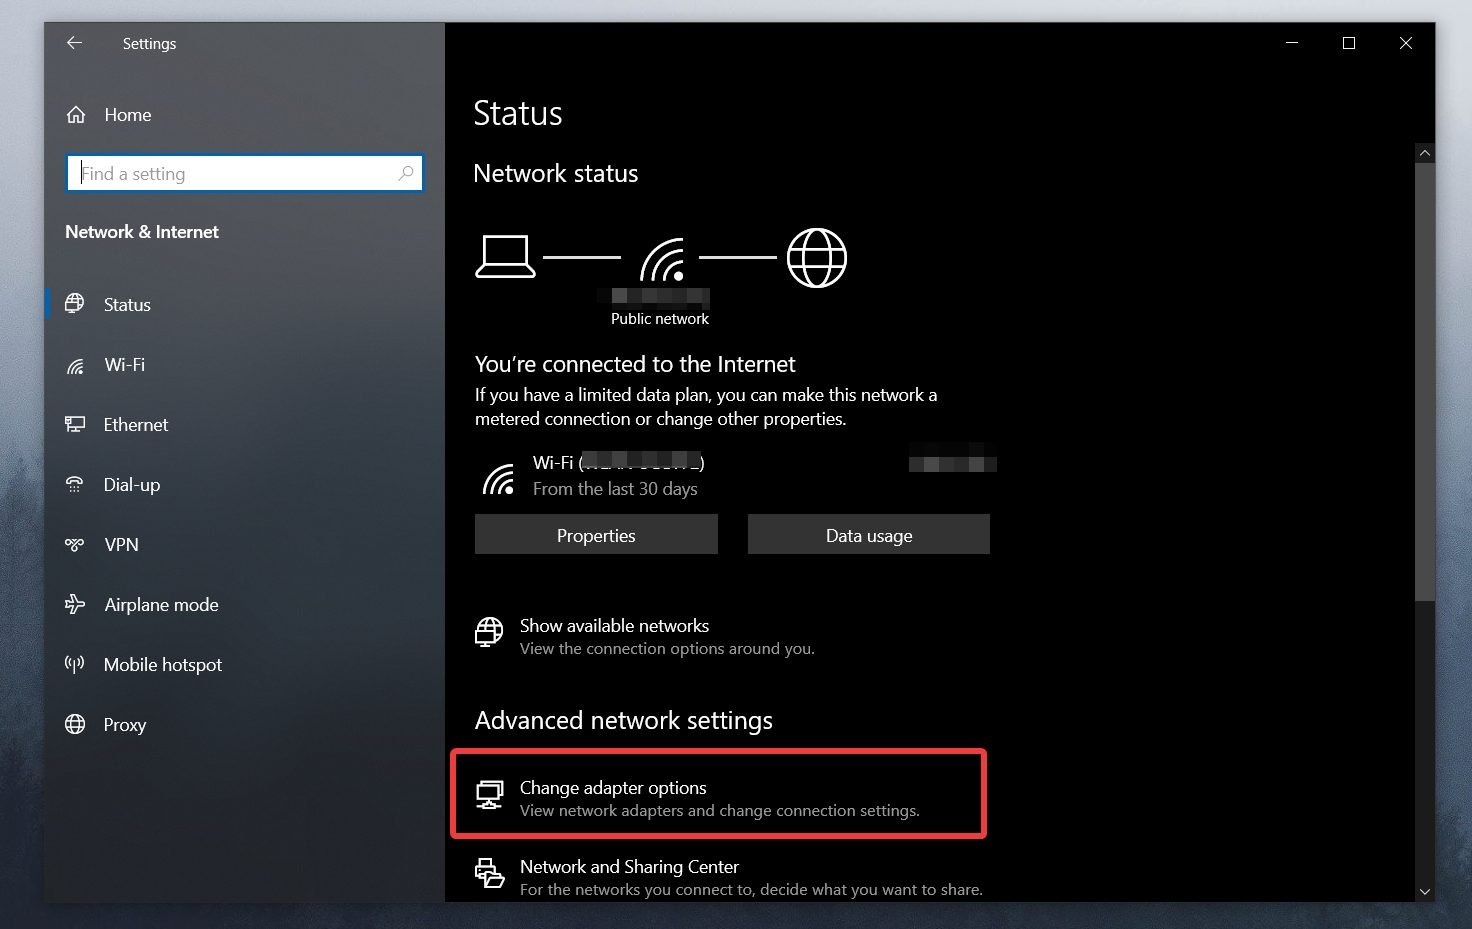
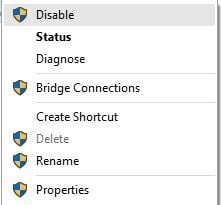
- Forget the wireless connection
- Press Win + X keys and click on Settings.

- Navigate to Network & Internet.
- Go to Wi-Fi section.
- Click on Manage known networks.
- Select your Wireless network and click Forget.
- After you’ve done that, connect to the same wireless network again.
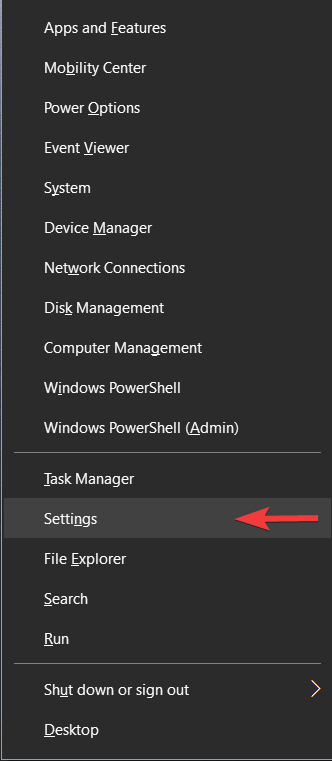
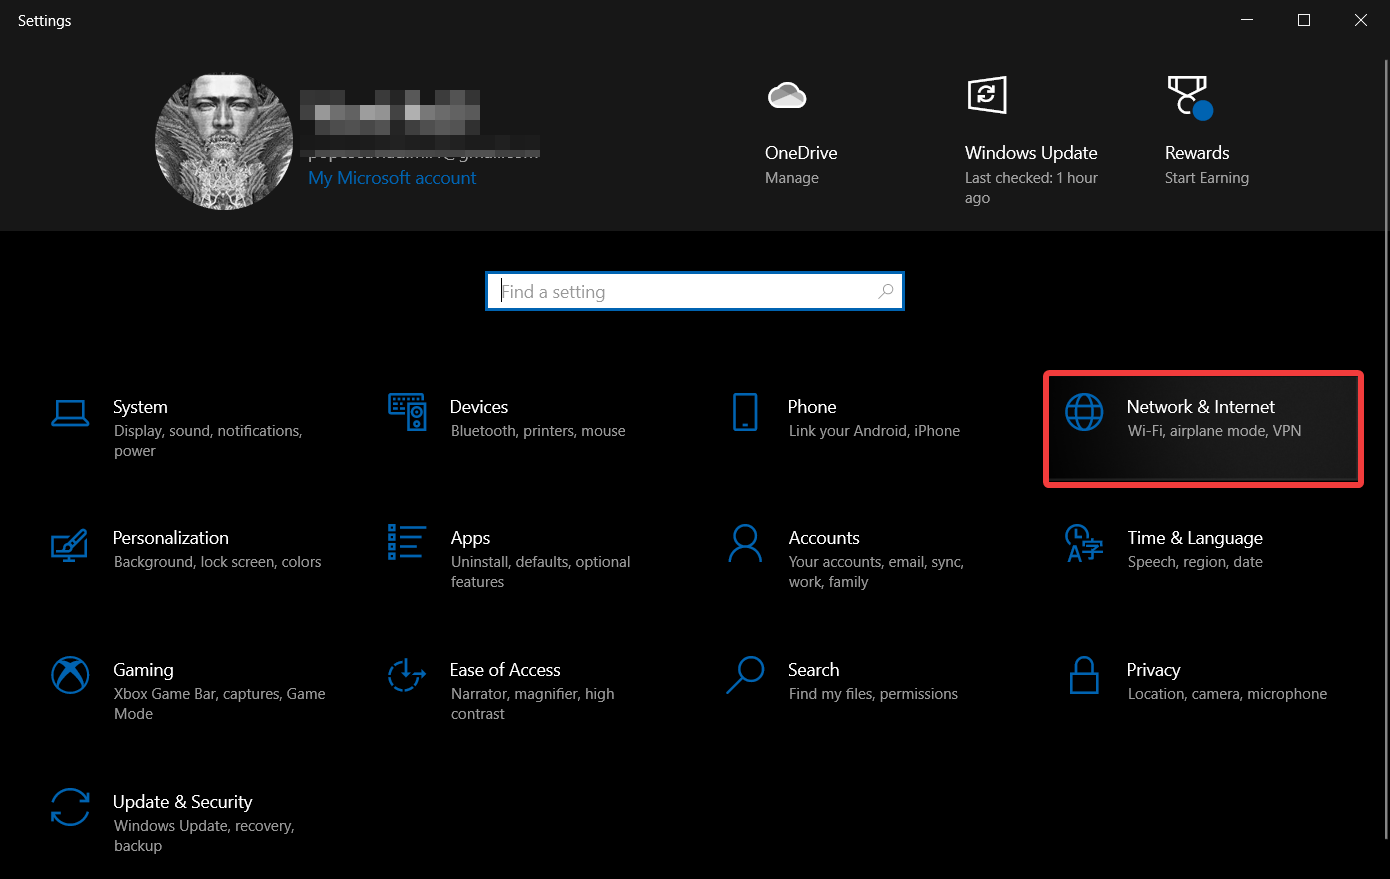
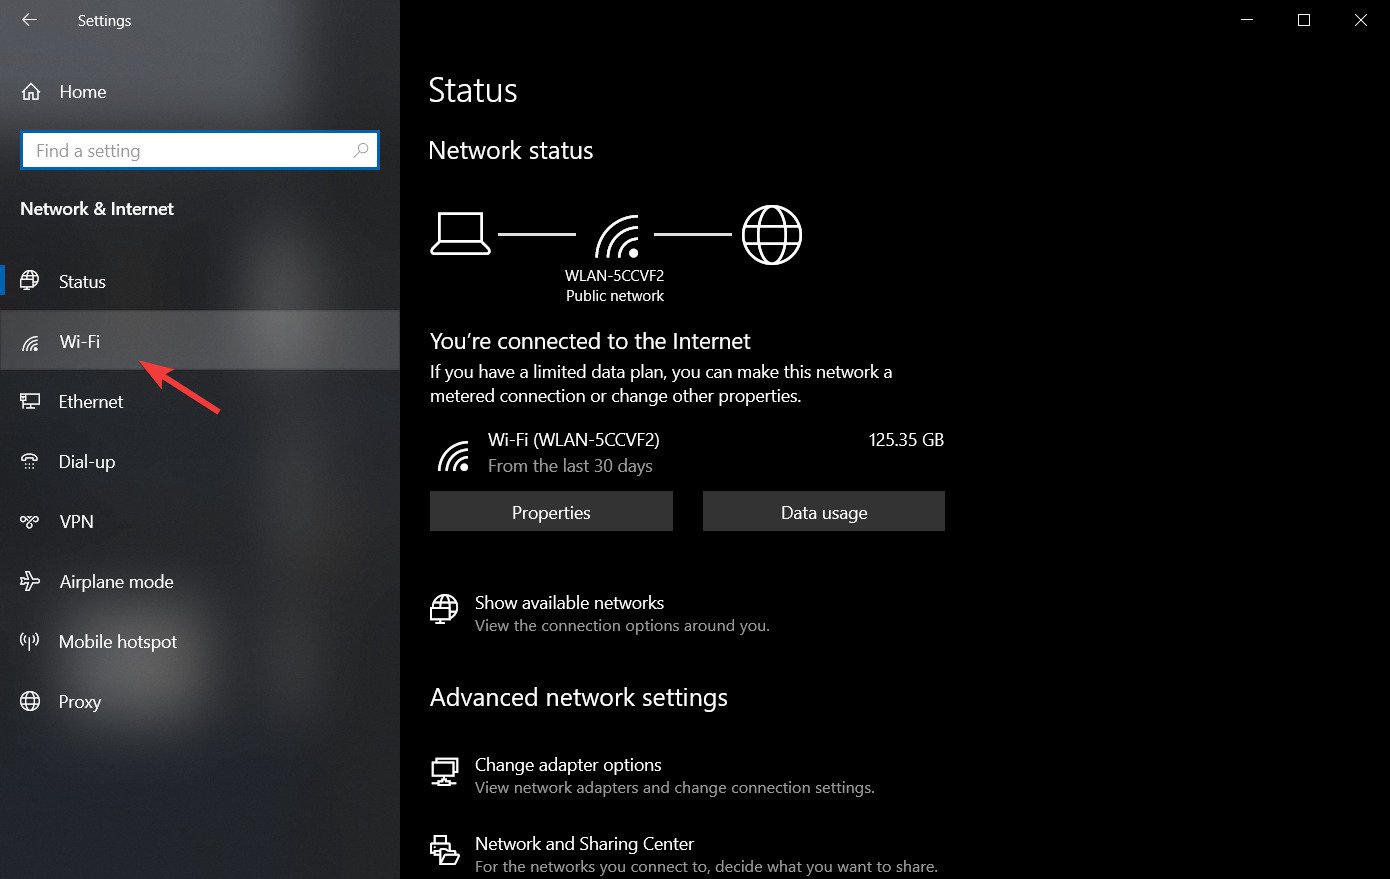
- Add the connection manually
- Right-click the network icon next to your clock.
- Choose Open Network & Internet settings.
- Open the Network and Sharing Center.

- Click Set up a new connection or network.

- Choose Manually connect to a wireless network and click Next.
- Enter the requested information such as network name, security key, and security type.
- Click Next to finish the process.
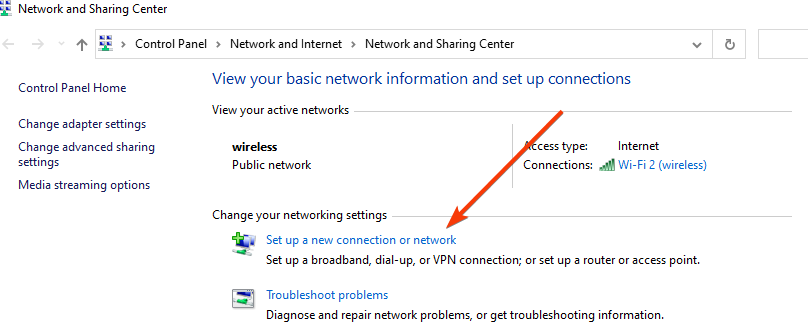
After you’ve created a new network connection, everything should be working without any problems. If the issue persists, try changing the security type of your new network.
- Use ipconfig /release command
- Press the Win Key + X and from the list choose Command Prompt (Admin).

- When Command Prompt starts, enter the following lines and after each line press Enter to run it:
ipconfig /releaseipconfig /renew
- Close Command Prompt and try to connect to the network again.
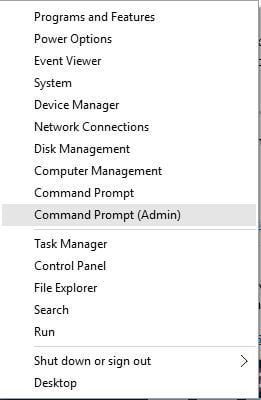
Some PC issues are hard to tackle, especially when it comes to corrupted repositories or missing Windows files. If you are having troubles fixing an error, your system may be partially broken.
We recommend installing Restoro, a tool that will scan your machine and identify what the fault is.
Click here to download and start repairing.
It is possible that in some instances you won’t be able to run Command Prompt with admin rights but the solution for this issue is pretty straightforward.
Windows 10 can’t connect to this network after an update
1. Use Command Prompt
- Press Win Key + X and choose Command Prompt (Admin) or the PowerShell (Admin) equivalent.

- When Command Prompt starts, type the following and press Enter to run it:
reg delete HKCRCLSID{988248f3-a1ad-49bf-9170-676cbbc36ba3} /va /f

- Now enter the following line and press Enter to run it:
netcfg -v -u dni_dne
- Close Command Prompt and restart your computer.
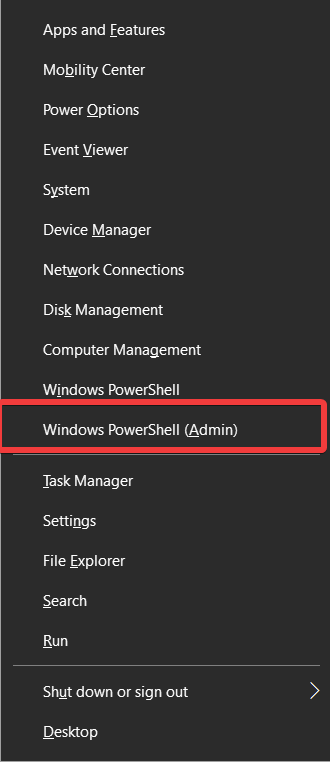
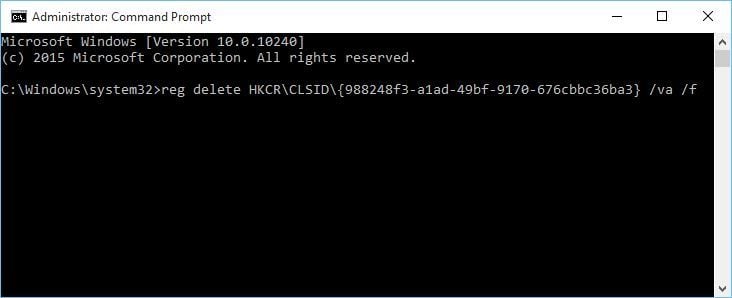

2. Uninstall the antivirus software
- Press the Win Key + X and choose Apps and features.

- Locate your antivirus software and click Uninstall.
- Restart your computer.
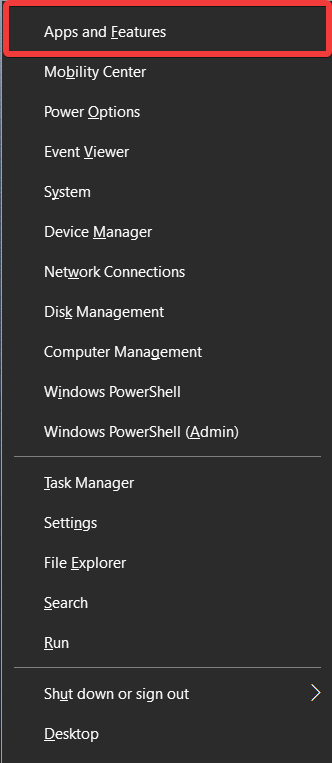
For Norton users, there’s this complete guide to uninstall the antivirus. Also, there’s a similar uninstall guide regarding McAfee.
If your network connection starts working, you can install your antivirus software again, making sure to allow the Internet connection through the settings of the app.
3. Check if IPv4 and IPv6 protocols are enabled
- Right-click the network icon next to your Windows clock and click Open Network & Internet settings.
- Choose the Network and Sharing Center.
- Click Change adapter options.
- Find your adapter, right-click it and choose Properties.
- Make sure that IPv4 and IPv6 protocols are enabled.
- Click OK and check if the issue has been resolved.
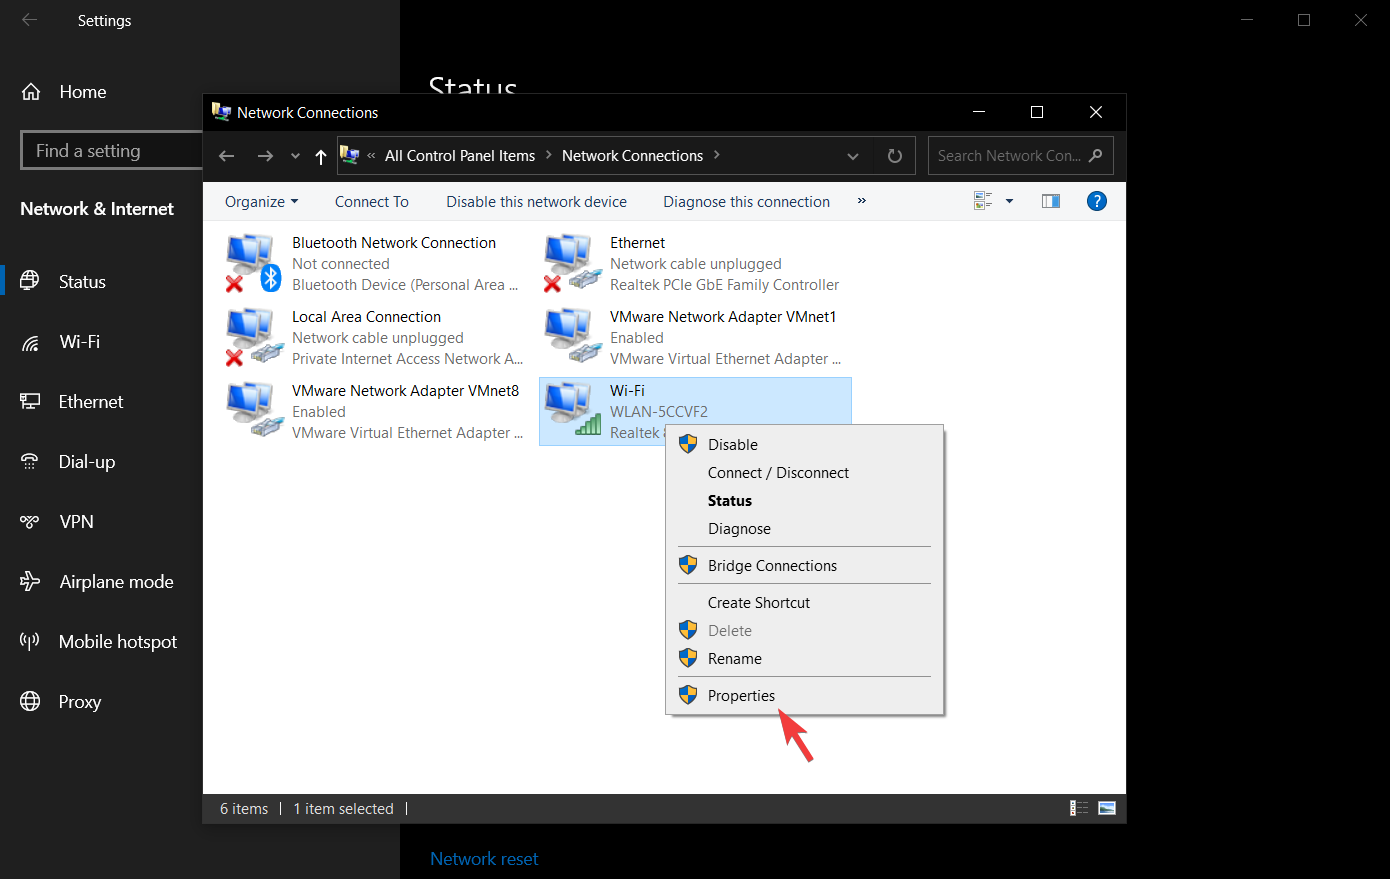
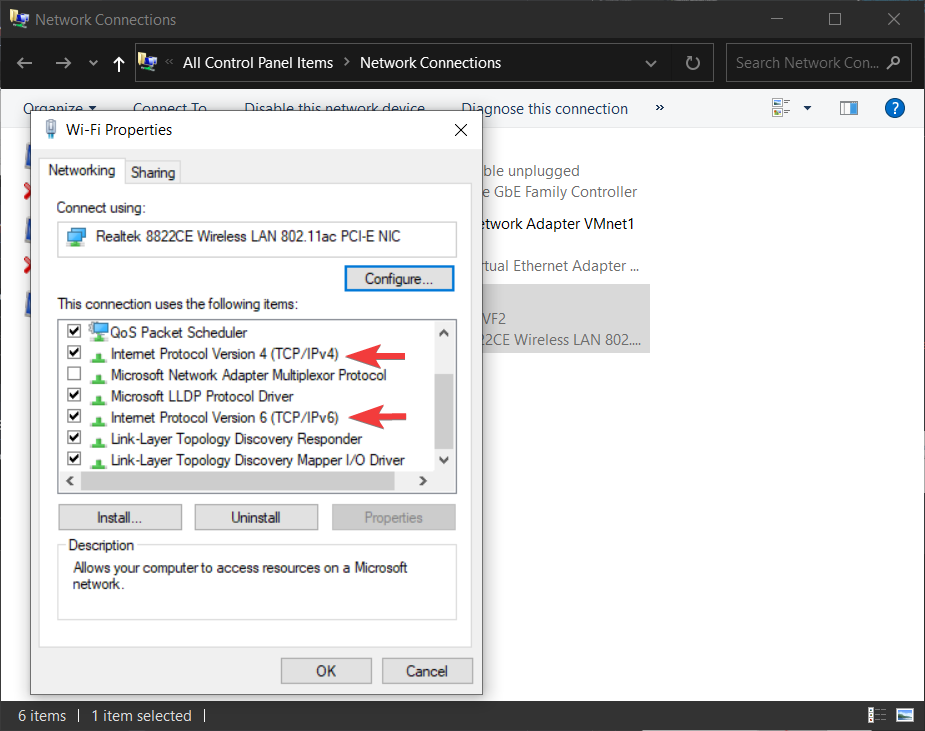
Some users might find that they can’t access the IPv4 proprieties, but there is a simple fix for this problem.
Windows 10 can’t connect to this network, enter APN and try again
This error occurs when trying to use your Windows 10 device to connect to a cellular network, and will stop you from accessing data altogether.
To eliminate the possibility of having network issues that stem from your PC, simply follow these steps:
- Connect your PC to an Ethernet or Wi-Fi network.
- Open a browser and check to see if web pages are loading.
- If the Internet is connected, then contact your mobile ISP and ask for APN credentials.
- Use the credentials to sign into the mobile network.
If the Internet doesn’t connect through Ethernet or Wi-Fi, then it is safe to assume that your PC is not set up properly. To resolve this, simply follow the other methods described in this guide.
Windows 10 can’t connect to this network and WEP problems
We have already covered how to create a wireless connection manually in this article, but in order to connect to the network that uses WEP security, you have to set the Security type to WEP for your new connection.
Follow these steps to do so:
- Right-click the network connection icon and click on Open Network & Internet settings.
- Choose Network and Sharing Center from the menu that appears.
- Click on the link of your Internet connection.
- Click on the Wireless Properties button.
- Open the Security tab, and choose WEP as your network security type.
- Click OK.
We should also mention that the WEP security type isn’t the safest, and it’s advised that you switch to the WPA2 security type.
- Wi-Fi is not connecting automatically on Windows 10/11
- Fix Can’t connect to this network error in Windows 11
- Windows 10/11 can’t find WiFi network [STEP-BY-STEP GUIDE]
Windows 10 can’t connect to the network after waking from Sleep Mode
1. Disable IPv6 / Change Power Management settings
We have already explained how to disable IPv6 in this article, under the Modify internet properties settings solution.
If you’re getting Windows 10 can’t connect to this network message after your computer wakes up from Sleep Mode, you need to do check the Power Management settings for your adapter.
To do that, follow these steps:
- Press Win Key + X and open the Device Manager.
- Navigate to the Network Adapters section.
- Locate your wireless adapter and right-click it. Choose Properties from the menu.

- Navigate to the Power Management tab.
- Uncheck Allow the computer to turn off this device to save power and save the changes.


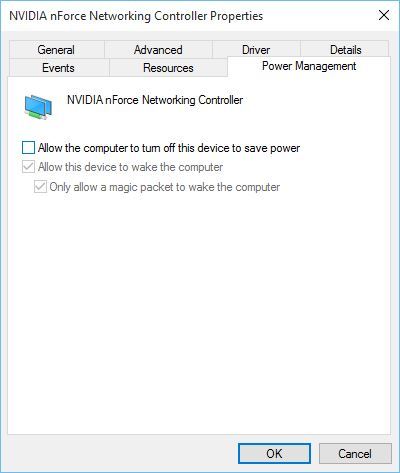
If you use a USB network adapter, you’ll have to repeat this step for all USB devices in Device Manager.
After doing this, if your PC won’t recognize the USB devices, there are a few great solutions to apply.
2. Change Power Options
- Press Win Key + S and type Power.
- Open the Power & Sleep settings.
- Click the Additional power settings link from the Related settings section.
- Find your selected power plan and click the Change plan settings.

- Now click Change advanced power settings.

- Navigate through the list and go to Wireless Adapter Settings, and choose Power Saving Mode.
- Change its Setting to Maximum Performance and save the changes.

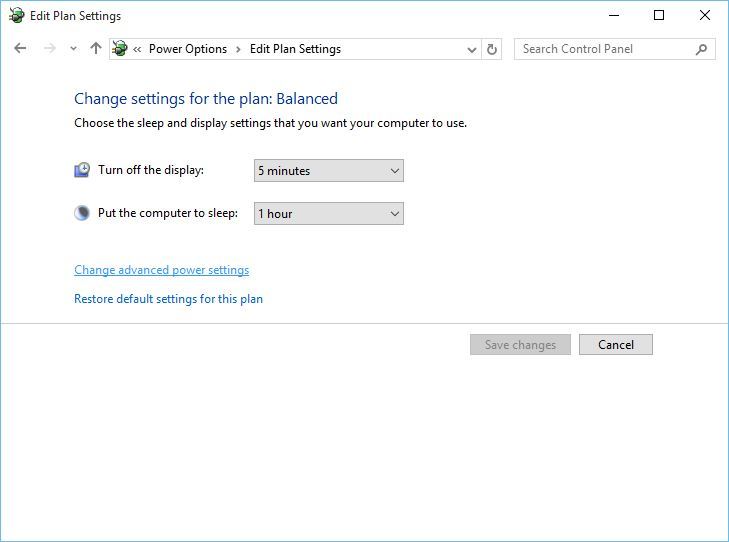
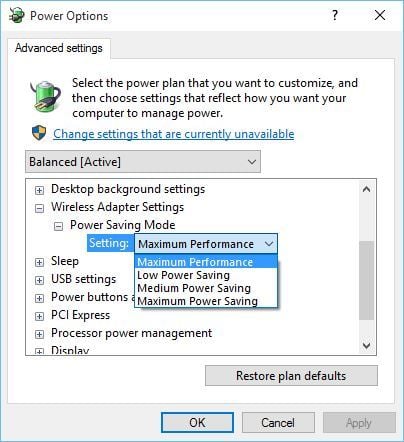
If this solution doesn’t work, you can also try changing your power plan to High Performance. To do that, follow these steps:
- Open Power Options.
- Select the High-performance power plan.
- Click OK to apply the settings.
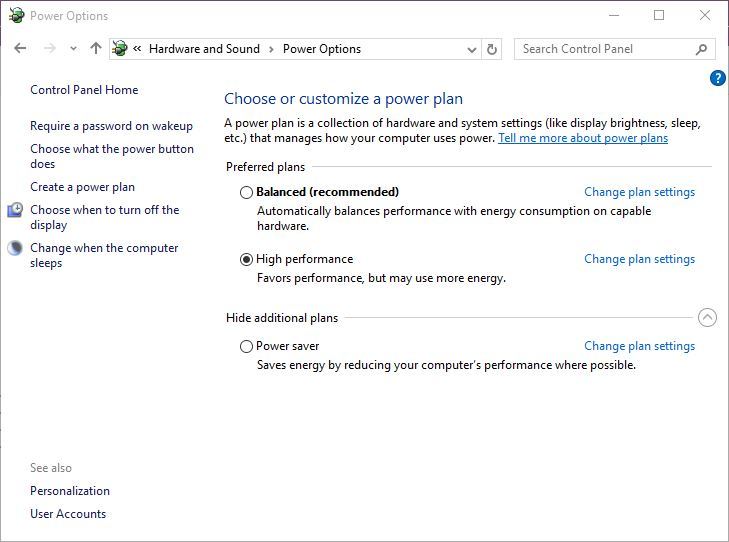
Some users have stated that their power plan settings are completely missing, and there are few fixes you can try if that is the case.
3. Turn off the Connect to Wi-Fi hotspots option
- Press Win Key + X and open Settings.

- Navigate to Network & Internet.
- Go to Wi-Fi and click on Manage Wi-Fi settings.
- Make sure that Connect to Wi-Fi hotspots and Send information about Wi-Fi connections to help discover nearby Wi-Fi are turned off.

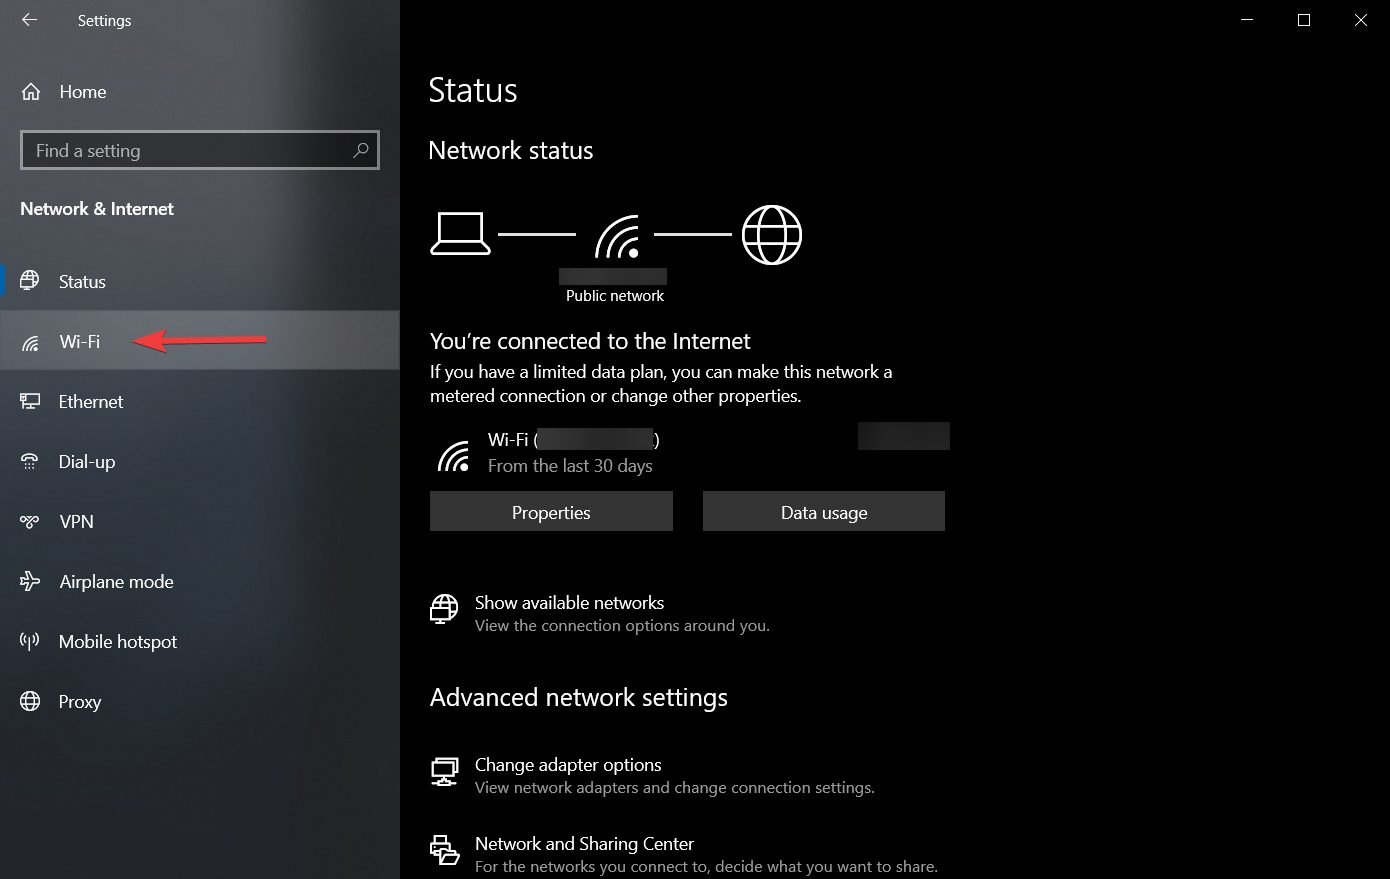
Few users have reported that this solution has worked for them, so you might give it a try.
If Windows doesn’t find your Wi-Fi adapter, check out this article to fix the issue.
5.4. Disable and enable your network connection / turn on and off Airplane mode
In order to fix Windows 10 can’t connect to this network error, you can disable and enable your network connection to fix the problem.
In addition, you can try turning the Airplane mode on and off in order to fix this problem.
For any Airplane mode errors, you may encounter there’s this awesome guide that can be of help.
Windows 10 can’t connect to the network after a password change
If you’ve recently changed your password for the wireless network and now can’t connect to your network, you might want to forget the connection, as shown in a previous solution.
In addition, you need to check if the security type on your computer matches the security type on your router (also described above).
Additionally, toggle the option to connect automatically to your network to Off. This will allow you to input your new password.
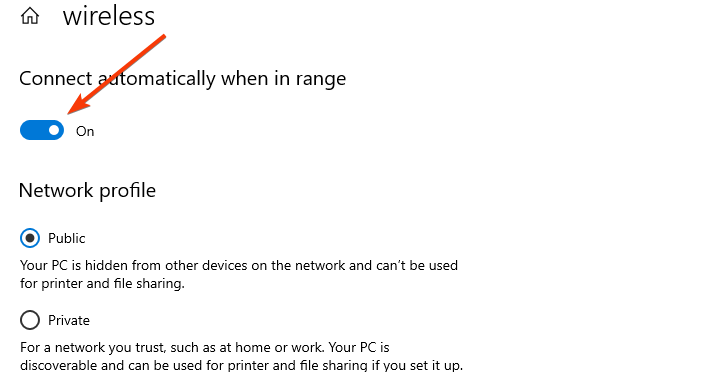
What can I do to prevent these issues from occurring again?
➡ Keep your OS updated
Keeping your Windows 10 OS updated at all times not only protects you from encountering network issues but also keeps you safe.
The latest Windows 10 release, updates the security features of your PC that will keep third parties away from your personal data, while also improving and fixing known bugs.
➡ Ensure that all drivers are updated constantly
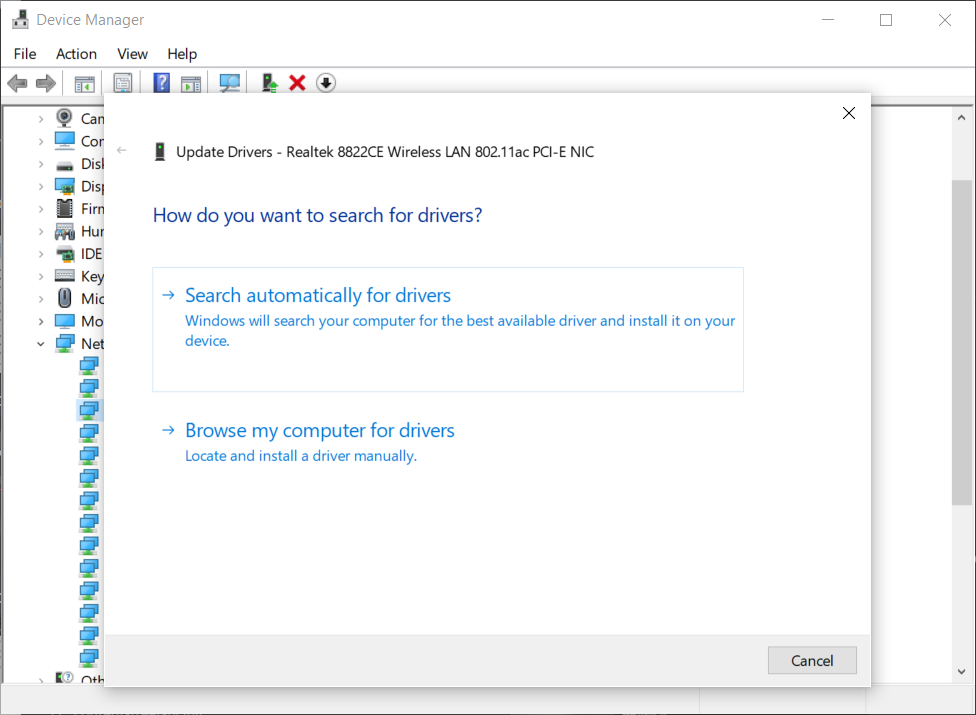
To achieve this, you should either regularly use the Device Manager to manually search for updates for each of the important drivers, or you can use automatic and specialized software to do this job for you.
➡ Keep your network login credentials accessible
Losing your network credentials is not a huge problem, but it is enough to cause you unnecessary stress when dealing with network issues.
If you have this information easily accessible, then you can first test out if the credentials were used correctly, and if not, simply contact your ISP provider for more details.
Dealing with network issues is never pleasant, especially if you were getting ready for a Netflix binge-watch session with your loved ones, or were requiring your Internet connection for online gaming.
Following our advice will certainly offer you a fighting chance in solving these issues as fast as possible, and once you do, our recommendations for preventing them from ever bothering you again can also come in very handy,
There can be many causes that can result in your device not being able to connect to the Internet. We truly hope that our solutions have been helpful and that you’ve managed to resolve this issue.
If you have any questions, feel free to reach out to us in the comments section below.
![]()