With the release of Windows Subsystem for Android, users have been encountering the “Unable to start Windows Subsystem for Android” error message while trying to start the environment. The reason that this problem occurs is very well explained in the error message as well which essentially is virtualization. If you do not have virtualization enabled on your Windows 11 operating system, the Windows Subsystem for Android environment will not be able to initialize and thus the error message occurs. You can fix this problem pretty simply by enabling virtualization on your computer which is what we are going to show you in this article so just follow through.

As it turns out, Microsoft recently made the Windows Subsystem for Android available to the Insider Preview users which, much like the working of the Windows Subsystem for Linux, allows you to run Android apps natively on your computer. This means that you do not have to install a third party emulator on your system in order to play an Android game or use any other Android app on your computer.
However, since the feature is just available in the Insiders Preview Beta channel, there also are not many options to choose from when it comes down to installing the applications. This is because Microsoft has limited the apps, for now, and only a selected group of applications are allowed to be installed via the Amazon Appstore. Luckily, you can sideload Android apps which allows you to essentially run any Android application on your computer using Windows Subsystem for Android. In addition to that, since this is based on the Windows Subsystem for Android, you are going to enable virtualization on your computer otherwise the error message mentioned above will appear. This can be pretty easily fixed, so let us get started with that without further delay.
Turn on Windows Virtual Machine Platform
As it turns out, the first thing that you should do when you encounter the error message in question is to make sure that you have the Virtual Machine Platform feature enabled on your computer. Windows has a bunch of optional features that come built-in that you can choose to install or turn on via the Windows Features window.
While some of these features are enabled by default when you install Windows, most of them are not which is quite obvious because not everyone is going to need them. Thus, if you do need a specific feature, you will have to turn it on manually which is pretty convenient and easy to do. To do this, follow the instructions given down below:
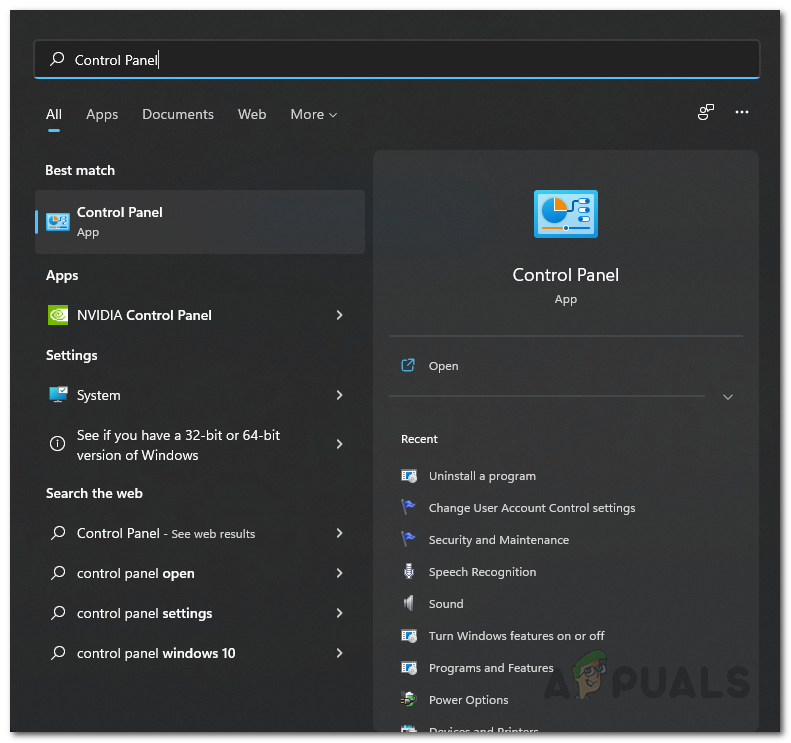
- First of all, open up the Control Panel by searching for it in the Start Menu.

Opening up Control Panel - Then, in the Control Panel window, click on the Programs option.

Control Panel - There, click on the Turn Windows Features on or off option.
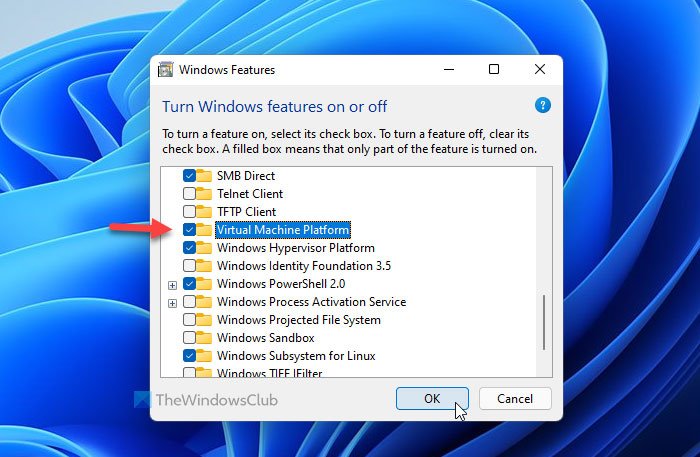
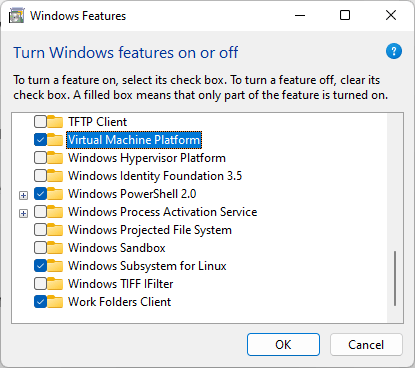
Opening up Windows Features Window - This will bring up another window called Windows Features.
- Inside that window, from the list of features, look for Virtual Machine Platform and click on the checkbox to tick it.

Enabling Virtual Machine Platform - Then, click the OK button.
- Once you have done that, go ahead and restart your computer for the feature to be installed.
- After your system boots up, try using the Windows Subsystem for Android again to see if the error message still appears.


Enable Virtualization from BIOS
In addition to turning on the Virtual Machine Platform feature on your computer, you will also have to enable virtualization from BIOS. Since you are going to run Android applications, virtualization is pretty important as it allows programs to emulate hardware which then enables it to run other operating systems like Android.
If this case is applicable, you can enable virtualization pretty easily from the BIOS menu. The exact steps may vary a little depending on the manufacturer of your motherboard but the overall procedure remains the same. Follow the instructions down below to enable virtualization:
- First of all, go ahead and restart your computer.
- As your computer is booting up, you will have to boot into the BIOS menu. To do that, press the respective key for your motherboard which usually is DEL, F2, F10 or ESC.
- Once you have booted into BIOS, you will have to go to Advanced Mode. For that, press the F7 button on your keyboard to switch from EZ Mode.

Switching to Advanced Mode - After you are in Advanced Mode, switch to the Advanced tab given at the top.

Navigating to Advanced TAB - There, click on the CPU Configuration option.

Navigating to CPU Configuration - Now, if you are using an Intel CPU, you need to look for Intel Virtualization Technology. Once located, go ahead and switch it to Enabled.
- In case of AMD processors, you should be looking for SVM Mode which stands for Secure Virtual Machine. Once you have found it, switch it to Enabled.

Enabling SVM Mode - After that, press the F10 key on your keyboard to save the changes and restart your computer.
- Once your computer boots up, you should no longer be getting the error message in question.


Enable Nested Virtualization
Finally, if you have installed Windows 11 in a virtual machine to use the Windows Subsystem for Android, you will need to enable nested virtualization for the virtual machine on the host. As apparent from the name itself, nested virtualization essentially allows you to run virtual machine instances inside a virtual machine. It is basically a virtualception.
Now, the process of enabling nested virtualization may differ depending on the hypervisor that you are using. For VirtualBox and VMware, the procedure is pretty simple as you can find the option in the virtual machine settings. In case of VirtualBox, the option is called Nested VT-x/AMD-V while in case of VMware, you will be looking for nested virtualization. If you are using Hyper-V, you will have to take a command line approach but it is rather simple to do and you can find various guides on the internet. Once you have enabled nested virtualization, the error message should just go away.

Kamil Anwar
Kamil is a certified MCITP, CCNA (W), CCNA (S) and a former British Computer Society Member with over 9 years of experience Configuring, Deploying and Managing Switches, Firewalls and Domain Controllers also an old-school still active on FreeNode.
Download PC Repair Tool to quickly find & fix Windows errors automatically
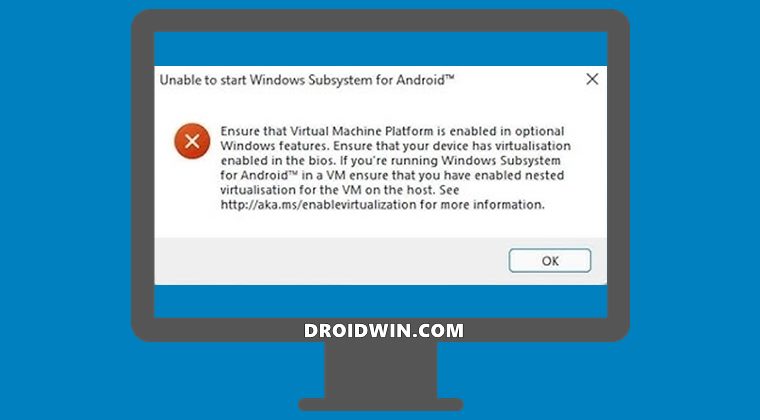
While starting Windows Subsystem for Android on Windows 11, if you are unable to start Windows Subsystem for Android, here are some fixes you need to check. If you get this error, you cannot open and use Windows Subsystem for Android on your Windows 11 computer even if it is installed correctly.

The entire error message says:
Unable to start Windows Subsystem for Android
Ensure that Virtual Machine Platform is enabled in optional Windows feature. Entire that your device has virtualization enabled in the bios. If you’re running Windows Subsystem for Android in a VM ensure that you have enabled nested virtualization for the VM on the host. See http://aka.ms/enablevirtualization for more information.
Although the solutions are already mentioned in the error message, you might not be able to fix them at times. Therefore, you may need to follow all the subsequent steps one after one.
If you are unable to start Windows Subsystem for Android on Windows 11, follow these suggestions:
- Enable Virtual Machine Platform
- Enable Hyper-V
- Enable Windows Hypervisor Platform
- Turn on Virtualization
- Enable Nested virtualization
1] Enable Virtual Machine Platform
It is the first thing you need to check. Even when you try to install the Windows Subsystem for Android on Windows 11, you must have Virtual Machine Platform enabled on your PC. Otherwise, it might cause some issues. If you disabled it by mistake, you would get the aforementioned error message while opening Windows Subsystem for Android. Therefore, follow these steps to verify or enable Virtual machine platform on Windows 11:
- Press Win+S and type turn Windows features on or off.
- Click on the individual search result.
- Ensure that the Virtual Machine Platform is ticked.
- If not, make a tick and click the OK button.
After that, it might take some time to get installed on your computer. Following that, restart your computer and check if it solves the issue or not.
2] Enable Hyper-V
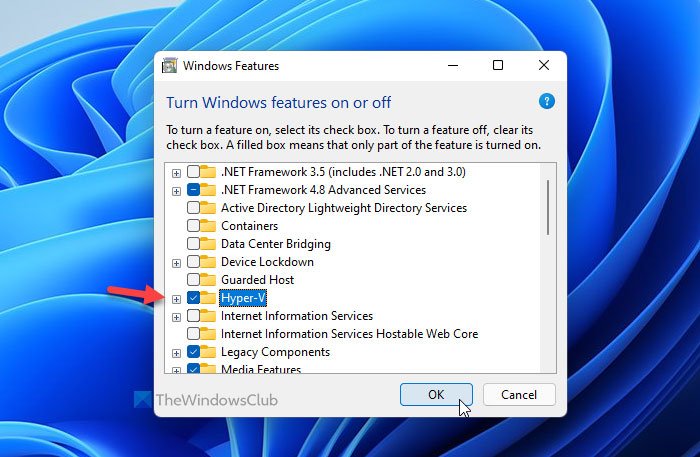
It is the second thing you need to verify if it is enabled on your computer or not. For that, you need to open the Windows Features panel. To do so, search for Windows features in the Taskbar search box and click on the corresponding search result. After that, check if there is a tick in the Hyper-V checkbox. If not, make a tick and click the OK button.
Next, you need to restart your computer to get the change. Once done, you can try to open the Windows System for Android app.
3] Enable Windows Hypervisor Platform
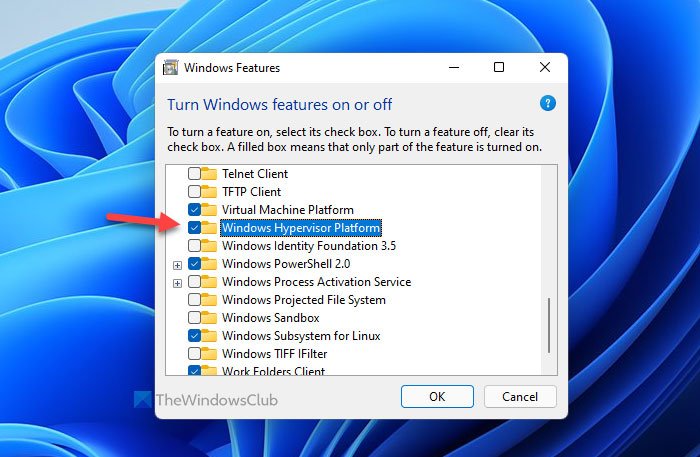
It is another feature that needs to be activated to open Windows Subsystem for Android on Windows 11. The best thing is that you can find it in the same place where you got others. Therefore, open the Windows Features window on your computer, and check if the Windows Hypervisor Platform is checked or not. If not, make a tick and click the OK button.
4] Turn on Virtualization
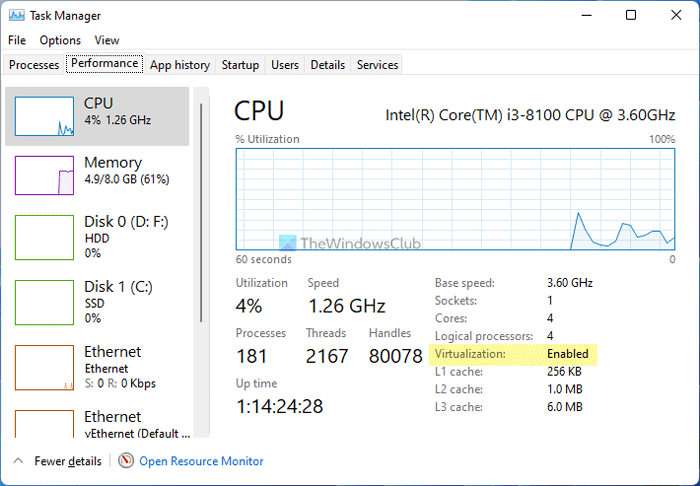
In order to use Windows Subsystem for Android, you must enable virtualization at the hardware level. To verify if you have enabled it already or not, you can press Ctrl + Shift + Esc and switch to the Performance tab. Then, check if the status of Virtualization is Enabled or Disabled. If it is showing as Disabled, you need to open BIOS and enable virtualization.
5] Enable Nested virtualization
It is probably the last thing you need to check when using Windows Subsystem for Android on a virtual machine. Let’s assume that you installed Windows 11 on the virtual machine. If you try to install Windows Subsystem for Android on Windows 11, you must enable Nested Virtualization. Otherwise, you cannot use another virtual machine inside of Windows 11 that is installed on VirtualBox or any other virtual machine software.
How do you fix the Unable to start Windows Subsystem for Android?
To fix the Unable to start Windows Subsystem for Android error on Windows 11, you need to turn on the Virtual Machine Platform, enable virtualization at hardware level from BIOS, and activate nested virtualization. Other than these, you can enable Hyper-V and Windows Hypervisor Platform.
That’s all! Hope this guide helped.

Sudip loves to engage with the latest technology & gadgets. Apart from writing about all things technology, he is a Photoshop junkie and a football enthusiast.
In this guide, we will show you the steps to fix the Unable to start Windows Subsystem for Android error. The ability to run Android apps on the PC was always among the most requested features by the tech enthusiast. So when the Redmond giants announced that they were adding the Windows Subsystem for Android in the latest OS build, it managed to receive quite a few positive receptions.
While its release got slightly delayed, it’s now finally available for the beta testers (yes, for the beta tester and not for the developer preview users!). As a result, you could now easily install your preferred Android games, sideload the desired APKs, or even install the Play Store onto your Windows 11 PC. But since the feature is currently in the beta stage, a few bugs and issues are imminent.
Among them, “Unable to start Windows Subsystem for Android” is one of the most common errors that users are currently facing. If you are also getting bugged with this issue, then fret not. In this guide, we will make show you the steps to rectify this issue once and for all. So without further ado, let’s get started.
The aforementioned error accompanies the following error message: Ensure that Virtual Machine Platform is enabled in optional Windows features. This message is popping up as and when users are trying to launch Windows Subsystem for Android. So what is the plausible explanation for this error? Well, it is happening because Virtualisation stands disabled on your Windows 11 PC. In simpler words, Virtualisation is needed to run non-native Windows apps inside the Windows ecosystem.

Since Android apps are also part of the non-native app environment, you will need to enable the Virtualisation on your PC. If you don’t do so, then you wouldn’t be able to install and run Android apps in Windows 11. With that in mind, this guide will show you three different methods to enable Virtualisation in Windows 11 that shall help you fix the Unable to start Windows Subsystem for Android error. This should also fix the “Ensure that Virtual Machine Platform is enabled in optional Windows features” error.
Method 1: Enable Virtualization in Windows 11 via Control Panel
- Open Control Panel from the Start Menu and click on Programs and Features.

- Then click on ‘Turn Windows features on or off’ from the left menu bar.
- Now, checkmark ‘Virtual Machine Platform’ and ‘Windows Hypervisor Platform’ and click OK.

- Finally, restart your PC for the changes to take place. Once it boots up, the Unable to start Windows Subsystem for Android error should be fixed.


Method 2: Enable Virtualization in Windows 11 from BIOS
- To begin with, power off your PC. Then turn it back on. As soon as it is booting up, continuously press the Esc key. This shall bring up the Start menu. Now just press the key that corresponds to BIOS (which is usually F10).
- Your PC shall now boot to the BIOS. Go to its Advanced tab and you should see the Intel Virtualization Technology, enable it.

- On the other hand, AMD users would see the SVM Mode (Secure Virtual Machine). Make sure to enable it.

- Now save the changes and reboot your PC to the OS. Once it boots up, the Unable to start Windows Subsystem for Android error should be fixed.


Method 3: Enable Nested Virtualization in Virtual Machine
If you are running Windows 11 inside a Virtual Machine, then you should consider enabling the Nested Virtualization. This will then allow you to run virtual machine instances inside the Virtual Machine itself!
With this, we round off the guide on how you could fix the Unable to start Windows Subsystem for Android error. This shall also fix the Ensure that Virtual Machine Platform is enabled in optional Windows features error message. If you have any queries concerning the aforementioned steps, do let us know in the comments. We will get back to you with a solution at the earliest. Moroever, given below are some other WSA guides that deserve your attention:
- How to Install and Run Android Apps on Windows 11
- How to Install Windows Subsystem for Android on Unsupported PC
- Fix: IP Address Unavailable in Windows Subsystem for Android
- Sideload Android Apps on Windows 11 [Without Amazon App Store]
- Install Google Play Store in Windows 11 via Windows Subsystem for Android
- How to Install Windows 11 on any PC using Virtual Machine
About Chief Editor

Sadique Hassan
administrator
A technical geek by birth, he always has a keen interest in the Android platform right since the birth of the HTC Dream. The open-source environment always seems to intrigue him with the plethora of options available at his fingertips. “MBA by profession, blogger by choice!”
-
MiniTool
-
MiniTool News Center
- How to Fix Unable to Start Windows Subsystem for Android in Win11
By Vera | Follow |
Last Updated November 18, 2022
![]()
If you run into the error message “unable to start Windows Subsystem for Android” when trying to start this environment, what should you do to fix the virtualization not enabled error in Windows 11? Read this post and you can find some useful solutions offered by MiniTool Solution to help you out.
Windows 11 Unable to Start Windows Subsystem for Android
In Windows 11, there is a feature called Virtualization that creates a virtualized environment so that you can run non-native applications on the system. This means all supported computers should be able to run Android apps natively in Windows 11 without installing a third-party emulator on the system.
Tip: Windows Subsystem for Android isn’t released to anyone except for Windows Insiders. If you want to run Android apps in Windows 11, you can follow the method in this post — How to Sideload Android Apps on Windows 11 via APK File.
But with the release of Windows Subsystem for Android to Insiders, you may get an error saying “unable to start Windows Subsystem for Android” when starting the environment.

From the error window, you can know the reason is the virtualization problem. If you don’t enable virtualization in Windows 11, the Windows Subsystem for Android environment can’t be enabled to initialize. As a result, the error appears. To get rid of this issue, you can follow the methods below. It is easy to fix it and let’s go to see them.
How to Fix Virtualization Not Enabled Windows 11
Enable Virtual Machine Platform
When getting the above error, the first thing you should do is to ensure that Virtual Machine Platform is enabled. This is the given suggestion by Windows.
How to do this thing? The instructions are here:
Step 1: Open Control Panel in Windows 11 and view all the items by Category.
Step 2: Click Programs and click the Turn Windows features on or off link.
Step 3: In the Windows Features interface, scroll down to find Virtual Machine Platform and then tick the checkbox of this feature. Also, you can check Windows Hypervisor Platform.
Step 4: Next, click OK to save the change.
Step 5: Restart your computer and then see the error is removed.
Enable Virtualization in BIOS
In addition to enabling Virtual Machine Platform, you should also make sure virtualization is enabled in BIOS. To run Android apps, you must enable virtualization. How can you do this task? Follow the steps below.
Step 1: Boot your PC to the BIOS menu by pressing a specific key like DEL, F2, F10, or ESC during the reboot process.
Step 2: Locate the section for CPU configuration.
Step 3: Find the settings for Virtualization and the similar name may be Intel Virtualization Technology, SVM, AMD-V, Hyber-V, Vanderpool, or VT-X.
Step 4: Enable the option for Virtualization.
Step 5: Press F10 to save the changes and restart your computer.
Enable Nested Virtualization
If you install Windows 11 in a virtual machine to run Windows Subsystem for Android, you need to enable nested virtualization. Or else, the error “unable to start Windows Subsystem for Android” appears on Windows 11.
The way to enable nested virtualization is different depending on the hypervisor. For VirtualBox and VMware, you can easily find this option in the virtualization settings. For VirtualBox, enable Nested VT-x or AMD-V. For Hyper-V, you need to use a command-line way. Go to find the detailed wizards on the Internet.
After enabling nested virtualization, you can run Windows Subsystem for Android without any error.
About The Author

Position: Columnist
Vera is an editor of the MiniTool Team since 2016 who has more than 5 years’ writing experiences in the field of technical articles. Her articles mainly focus on disk & partition management, PC data recovery, video conversion, as well as PC backup & restore, helping users to solve some errors and issues when using their computers. In her spare times, she likes shopping, playing games and reading some articles.
В этом руководстве мы покажем вам, как исправить ошибку «Невозможно запустить подсистему Windows для Android». Возможность запуска приложений Android на ПК всегда была одной из самых востребованных функций энтузиастами технологий. Поэтому, когда гиганты из Редмонда объявили о добавлении подсистемы Windows для Android в последнюю сборку ОС, она получила довольно много положительных отзывов.
Хотя его выпуск немного задержался, теперь он, наконец, доступен для бета-тестеров (да, для бета-тестеров, а не для пользователей предварительной версии для разработчиков!). В результате теперь вы можете легко установить свои любимые игры для Android, загрузить нужные APK или даже установить Play Store на свой ПК с Windows 11. Но поскольку эта функция в настоящее время находится на стадии бета-тестирования, некоторые ошибки и проблемы неизбежны.
Среди них «Невозможно запустить подсистему Windows для Android» — одна из самых распространенных ошибок, с которыми в настоящее время сталкиваются пользователи. Если вы также получаете прослушивание с этой проблемой, то не волнуйтесь. В этом руководстве мы покажем вам, как решить эту проблему раз и навсегда. Итак, без лишних слов, приступим.
Вышеупомянутая ошибка сопровождается следующим сообщением об ошибке: Убедитесь, что платформа виртуальных машин включена в дополнительных функциях Windows. Это сообщение появляется, когда пользователи пытаются запустить подсистему Windows для Android. Итак, каково правдоподобное объяснение этой ошибки? Что ж, это происходит потому, что виртуализация отключена на вашем ПК с Windows 11. Проще говоря, виртуализация необходима для запуска сторонних приложений Windows внутри экосистемы Windows.
Поскольку приложения Android также являются частью неродной среды приложений, вам необходимо включить виртуализацию на вашем ПК. Если вы этого не сделаете, вы не сможете устанавливать и запускать приложения Android в Windows 11. Имея это в виду, в этом руководстве будут показаны три различных метода включения виртуализации в Windows 11, которые помогут вам исправить Ошибка «Не удалось запустить подсистему Windows для Android». Это также должно исправить ошибку «Убедитесь, что платформа виртуальной машины включена в дополнительных функциях Windows».
Способ 1: включить виртуализацию в Windows 11 через панель управления
- Откройте панель управления из меню «Пуск» и нажмите «Программы и компоненты».
- Затем нажмите «Включить или отключить функции Windows» в левой строке меню.
- Теперь отметьте «Платформа виртуальной машины» и «Платформа гипервизора Windows» и нажмите «ОК».
- Наконец, перезагрузите компьютер, чтобы изменения вступили в силу. После загрузки ошибка «Невозможно запустить подсистему Windows для Android» должна быть исправлена.
Способ 2: включить виртуализацию в Windows 11 из BIOS
- Для начала выключите компьютер. Затем снова включите его. Как только он загрузится, непрерывно нажимайте клавишу Esc. Это вызовет меню «Пуск». Теперь просто нажмите клавишу, соответствующую BIOS (обычно это F10).
- Теперь ваш компьютер должен загрузиться в BIOS. Перейдите на вкладку «Дополнительно», и вы должны увидеть технологию виртуализации Intel, включите ее.
- С другой стороны, пользователи AMD увидят режим SVM (безопасная виртуальная машина). Обязательно включите его.
- Теперь сохраните изменения и перезагрузите компьютер в ОС. После загрузки ошибка «Невозможно запустить подсистему Windows для Android» должна быть исправлена.
Способ 3: включить вложенную виртуализацию на виртуальной машине
Если вы используете Windows 11 внутри виртуальной машины, вам следует рассмотреть возможность включения вложенной виртуализации. Это позволит вам запускать экземпляры виртуальной машины внутри самой виртуальной машины!
На этом мы завершаем руководство о том, как исправить ошибку «Невозможно запустить подсистему Windows для Android». Это также должно исправить сообщение об ошибке «Убедитесь, что платформа виртуальной машины включена в дополнительных функциях Windows». Если у вас есть какие-либо вопросы относительно вышеупомянутых шагов, сообщите нам об этом в комментариях. Мы вернемся к вам с решением в ближайшее время. Кроме того, ниже приведены некоторые другие руководства WSA, которые заслуживают вашего внимания:
Если при запуске подсистемы Windows для Android в Windows 11 вы не можете запустить подсистему Windows для Android, вам необходимо проверить несколько исправлений. Если вы получаете эту ошибку, вы не можете открыть и использовать подсистему Windows для Android на своем компьютере с Windows 11, даже если она установлена правильно.
Во всем сообщении об ошибке говорится:
Невозможно запустить подсистему Windows для Android
Убедитесь, что платформа виртуальных машин включена в дополнительной функции Windows. Все, что на вашем устройстве включена виртуализация в BIOS. Если вы используете подсистему Windows для Android на виртуальной машине, убедитесь, что вы включили вложенную виртуализацию для виртуальной машины на узле. См. Http://aka.ms/enablevirtualization для получения дополнительной информации.
Хотя решения уже упомянуты в сообщении об ошибке, иногда вы не сможете их исправить. Следовательно, вам может потребоваться выполнить все последующие шаги один за другим.
Если вам не удается запустить подсистему Windows для Android в Windows 11, следуйте этим советам:
- Включить платформу виртуальных машин
- Включить Hyper-V
- Включить платформу гипервизора Windows
- Включите виртуализацию
- Включить вложенную виртуализацию
1]Включить платформу виртуальных машин
Это первое, что вам нужно проверить. Даже когда вы пытаетесь установить подсистему Windows для Android в Windows 11, на вашем ПК должна быть включена платформа виртуальных машин. В противном случае это может вызвать проблемы. Если вы отключили его по ошибке, вы получите вышеупомянутое сообщение об ошибке при открытии подсистемы Windows для Android. Поэтому выполните следующие действия, чтобы проверить или включить платформу виртуальной машины в Windows 11:
- Нажмите Win + S и введите, чтобы включить или выключить функции Windows.
- Щелкните по отдельному результату поиска.
- Убедитесь, что платформа виртуальной машины отмечена галочкой.
- Если нет, поставьте галочку и нажмите кнопку ОК.
После этого установка на ваш компьютер может занять некоторое время. После этого перезагрузите компьютер и проверьте, решает ли он проблему или нет.
2]Включить Hyper-V
Это второе, что вам нужно проверить, включена ли она на вашем компьютере или нет. Для этого вам нужно открыть панель «Возможности Windows». Для этого найдите функции Windows в поле поиска на панели задач и щелкните соответствующий результат поиска. После этого проверьте, стоит ли галочка в чекбоксе Hyper-V. Если нет, поставьте галочку и нажмите кнопку ОК.
Затем вам необходимо перезагрузить компьютер, чтобы изменения вступили в силу. После этого вы можете попробовать открыть приложение «Система Windows для Android».
3]Включить платформу гипервизора Windows
Это еще одна функция, которую необходимо активировать, чтобы открыть подсистему Windows для Android в Windows 11. Лучше всего, что вы можете найти ее там же, где и другие. Поэтому откройте Возможности системы Windows на вашем компьютере и проверьте, отмечена ли платформа гипервизора Windows или нет. Если нет, поставьте галочку и нажмите кнопку ОК.
4]Включите виртуализацию
Чтобы использовать подсистему Windows для Android, необходимо включить виртуализацию на аппаратном уровне. Чтобы проверить, включили ли вы его уже или нет, вы можете нажать Ctrl + Shift + Esc и переключиться на вкладку «Производительность». Затем проверьте, находится ли виртуализация в состоянии «Включено» или «Отключено». Если он отображается как Отключено, вам необходимо открыть BIOS и включить виртуализацию.
5]Включить вложенную виртуализацию
Вероятно, это последнее, что вам нужно проверять при использовании подсистемы Windows для Android на виртуальной машине. Предположим, вы установили Windows 11 на виртуальную машину. Если вы пытаетесь установить подсистему Windows для Android в Windows 11, необходимо включить вложенную виртуализацию. В противном случае вы не сможете использовать другую виртуальную машину внутри Windows 11, установленную на VirtualBox или любом другом программном обеспечении виртуальной машины.
Как исправить невозможность запуска подсистемы Windows для Android?
Чтобы исправить ошибку «Не удается запустить подсистему Windows для Android» в Windows 11, необходимо включить платформу виртуальных машин, включить виртуализацию на аппаратном уровне из BIOS и активировать вложенную виртуализацию. Помимо этого, вы можете включить Hyper-V и платформу гипервизора Windows.
Это все! Надеюсь, это руководство помогло.
.
As we know, Microsoft has been working hard to bring Android apps support on its latest version Windows 11. Microsoft recently officially released a preview of Android app support on the new Operating System. Only those Windows 11 Beta Channel users can now install and run Windows Subsystem for Android on Windows 11.
There are certain criteria that users must follow to install the Windows Subsystem for Android. Users need to set the PCs region to the United States, must enable Virtualization, and a few more to install Android app support on Windows 11. However, in this article, we will show you how to install and run Windows Subsystem for Android on Windows 11 and fix the installation error. Let’s have a look.
Contents
- 1 Basic requirements to install Android apps on Windows 11:
- 1.1 Steps to Install Windows Subsystem for Android on Windows 11:
- 1.2 Steps to Install Amazon Appstore:
- 1.3 Manually Install Windows Subsystem for Android from Winget:
- 1.4 Steps to install Windows Subsystem for Android with PowerShell:
- 1.5 Steps to resolve ‘Unable to start Windows Subsystem for Android’ error:
- 1.6 Sideload Android Apps on Windows 11:
Basic requirements to install Android apps on Windows 11:
- You must be a Windows 11 Beta Channel user to install the Windows subsystem for Android on Windows 11: To know your built version, you must launch the RUN dialog box, then type “winver” and press OK. Additionally, to enrol on Beta Version,
- Firstly, launch Settings->Windows Update-> Windows Insider Program -> Get Started button-> then select Link an account->Continue->select Beta Channel-> click on Continue-> select Restart now.
- Enable Virtualization technology: Make sure the Virtualization feature is enabled on your system. Open Task Manager-> Performance tab-> from the right bottom side, check Virtualization is enabled or not. If not, then you need to follow these below steps,
Press on the Windows icon ->select Restart ->Once your system restarts and the manufacturer’s logo appears on the screen, click on the BIOS hotkey. Generally, the hotkey will be F1, F2, F12, Del or Esc, depending on the model and brand. Now locate and select Virtualization settings in BIOS. Depending on the model, the settings section will be like Virtual, Virtualization, VT-X, or SVM. Then enable the Virtualization feature, Save and exit from the settings.
- Verify your Microsoft Store Version: Ensure you are using Microsoft Store version 22110.1402.6.0 or higher. To check it, open M.S. Store->click on Profile Picture->App Settings-> there check your store version.
- Set System region to U.S: To set the region, Settings-> Time & Language->Language & Region->Country or Region-> choose United States.
Steps to Install Windows Subsystem for Android on Windows 11:
You can follow the below-given steps to install Android apps on your Windows 11,
- Firstly, download Windows Subsystem for Android from the Microsoft Store.
- If you found a green Install button, click on it and follow the on-screen instructions to continue with the installation process.
- Once you have installed Windows Subsystem for Android, then you need to install Amazon Appstore.
Steps to Install Amazon Appstore:
- Firstly go to the Amazon Appstore page and click on the Install button.
- Once installed, sign in using an account and begin to download Android apps. (make sure you need to use the United States-based Amazon account).
- Now you are done, and you can download and install any available Android apps from Amazon Appstore.
Manually Install Windows Subsystem for Android from Winget:
You can also download Windows Subsystem for Android from Winget. To do so, you can follow these below steps,
Note: This option is only available for users inside the U.S.A.
- Firstly, type cmd in the search bar and launch Command Prompt with administrative access.
- Inside the Command Prompt window, type or copy then paste the following command, and press Enter to install W.S.A. from Winget.
Winget install 9p3395vx91nr -s msstore
- Now Enter “Y” to continue with the installation process.
- Again type or copy then paste the following command and press Enter to install Amazon Appstore,
winget install 9njhk44ttksx -s msstore
- Once done, restart the system and check for improvement.
Steps to install Windows Subsystem for Android with PowerShell:
If you have a System with the Dev Channel, then you can install Windows Subsystem for Android forcibly. To do so,
- Firstly, go to the rg-adguard.net official website.
- Then select the Productid option and in the nearby type box, type 9p3395vx91nr, select the Slow option and tick the check button.
- Now from the list, click on the MicrosoftCorporationII.WindowsSubsystemForAndroid_1.7.32815.0_neutral_~_8wekyb3d8bbwe.msixbundle link to save it. (The size of this app package will be around 1.2 GB).
- Then click on the Desktop Start button, type Powershell and open the Powershell Command prompt with administrative access.
- Now in the PowerShell Prompt, type or copy then paste the following commands and press Enter to alter the folder’s directory with the Msixbundle file.
cd C:PATHTOMsixbundle
- In the above command, edit “PATH” with the location where you saved the app package earlier.
- Again type the following command and press Enter to install the Windows Subsystem for Android,
Add-AppxPackage MicrosoftCorporationII.WindowsSubsystemForAndroid_1.7.32815.0_neutral_~_8wekyb3d8bbwe.msixbundle
- In the above command, edit the “Apppackage” with the one you downloaded just earlier.
- Once done, the Windows Subsystem for Android and Amazon Appstore will install on your Windows 11.
Steps to resolve ‘Unable to start Windows Subsystem for Android’ error:
At times, users will encounter an error while trying to launch Windows Subsystem for Android. In this scenario, you need to enable both the Virtual Machine Platform and Windows Hypervisor Platform feature. To do so, you can easily follow these steps,
- Firstly, open the Settings app and select the Apps option from the left pane menu.
- Then select Optional features and click on the More Windows features option.
- In the newly opened window, tick the checkbox beside the options Virtual Machine Platform and Windows Hypervisor Platform feature.
- Once done, the installation process will work fine now.
Sideload Android Apps on Windows 11:
Another advantage of the Windows Subsystem for Android is it allows to sideload apps. Specifically, there are currently a limited number of apps in the App Library of the Amazon Appstore. Instead of Google Play Store, you can install its alternatives, such as Aurora Store, to simplify the A.P.K. installation procedure. In order to sideload apps, you can install any reliable tools available online.
So these are all about installing Windows Subsystem for Android (W.S.A.) on your Windows 11. However, if you have any queries or doubts after reading this article, then please leave a comment in the below-given comment box.