New issue
Have a question about this project? Sign up for a free GitHub account to open an issue and contact its maintainers and the community.
By clicking “Sign up for GitHub”, you agree to our terms of service and
privacy statement. We’ll occasionally send you account related emails.
Already on GitHub?
Sign in
to your account
Comments
![]()
System.InvalidOperationException:
Failed to deploy distro docker-desktop to C:UsersChakrit RakhuangAppDataLocalDockerwsldistro: exit code: -1
stdout: Error: 0xffffffff
stderr:
at Docker.Core.WslShortLivedCommandResult.LogAndThrowIfUnexpectedExitCode(String prefix, ILogger log, Int32 expectedExitCode) in C:workspacesstable-2.3.xsrcgithub.comdockerpinatawinsrcDocker.CoreWslCommand.cs:line 119
at Docker.Engines.WSL2.WSL2Provisioning.d__17.MoveNext() in C:workspacesstable-2.3.xsrcgithub.comdockerpinatawinsrcDocker.DesktopEnginesWSL2WSL2Provisioning.cs:line 169
— End of stack trace from previous location where exception was thrown —
at System.Runtime.ExceptionServices.ExceptionDispatchInfo.Throw()
at System.Runtime.CompilerServices.TaskAwaiter.HandleNonSuccessAndDebuggerNotification(Task task)
at Docker.Engines.WSL2.WSL2Provisioning.d__8.MoveNext() in C:workspacesstable-2.3.xsrcgithub.comdockerpinatawinsrcDocker.DesktopEnginesWSL2WSL2Provisioning.cs:line 78
— End of stack trace from previous location where exception was thrown —
at System.Runtime.ExceptionServices.ExceptionDispatchInfo.Throw()
at System.Runtime.CompilerServices.TaskAwaiter.HandleNonSuccessAndDebuggerNotification(Task task)
at Docker.Engines.WSL2.LinuxWSL2Engine.d__24.MoveNext() in C:workspacesstable-2.3.xsrcgithub.comdockerpinatawinsrcDocker.DesktopEnginesWSL2LinuxWSL2Engine.cs:line 94
— End of stack trace from previous location where exception was thrown —
at System.Runtime.ExceptionServices.ExceptionDispatchInfo.Throw()
at System.Runtime.CompilerServices.TaskAwaiter.HandleNonSuccessAndDebuggerNotification(Task task)
at Docker.ApiServices.StateMachines.TaskExtensions.d__0.MoveNext() in C:workspacesstable-2.3.xsrcgithub.comdockerpinatawinsrcDocker.ApiServicesStateMachinesTaskExtensions.cs:line 29
— End of stack trace from previous location where exception was thrown —
at System.Runtime.ExceptionServices.ExceptionDispatchInfo.Throw()
at System.Runtime.CompilerServices.TaskAwaiter.HandleNonSuccessAndDebuggerNotification(Task task)
at Docker.ApiServices.StateMachines.StartTransition.d__5.MoveNext() in C:workspacesstable-2.3.xsrcgithub.comdockerpinatawinsrcDocker.ApiServicesStateMachinesStartTransition.cs:line 67
— End of stack trace from previous location where exception was thrown —
at System.Runtime.ExceptionServices.ExceptionDispatchInfo.Throw()
at Docker.ApiServices.StateMachines.StartTransition.d__5.MoveNext() in C:workspacesstable-2.3.xsrcgithub.comdockerpinatawinsrcDocker.ApiServicesStateMachinesStartTransition.cs:line 92
madamovych reacted with eyes emoji
![]()
Version: 2.3.0.4 (46911)
Channel: stable
Sha1: d4f5fcf98140180eeef00e02c1c8bb0ad69e35d3
Started on: 2020/08/24 15:53:13.437
Resources: C:Program FilesDockerDockerresources
OS: Windows 10 Enterprise
Edition: Enterprise
Id: 2004
Build: 19041
BuildLabName: 19041.1.amd64fre.vb_release.191206-1406
File: C:UsersChakrit RakhuangAppDataLocalDockerlog.txt
CommandLine: «C:Program FilesDockerDockerDocker Desktop.exe»
You can send feedback, including this log file, at https://github.com/docker/for-win/issues
[15:53:13.704][GUI ][Info ] Starting…
[15:53:13.773][ComponentVersions ][Info ] Edition community
[15:53:13.775][ComponentVersions ][Info ] Edition community
[15:53:14.823][AppMigrator ][Info ] Current version: 6. Latest version: 6
[15:53:14.884][TrackingSettings ][Info ] Crash report and usage statistics are enabled
[15:53:14.888][SegmentApi ][Info ] Usage statistic: Identify
[15:53:15.228][SegmentApi ][Info ] Usage statistic: appLaunched
[15:53:16.279][ApplicationTemplatesTracking][Info ] Cannot list templates
[15:53:16.279][SegmentApi ][Info ] Usage statistic: eventTemplatesInfo
[15:53:16.281][SegmentApi ][Info ] Usage statistic: heartbeat
[15:53:16.557][LoggingMessageHandler][Info ] [9a7f340a] GET http://backend/version
[15:53:18.111][LoggingMessageHandler][Info ] [9a7f340a] GET http://backend/version -> 200 OK (took 1555ms)
[15:53:18.192][LoggingMessageHandler][Info ] [73bcf73e] GET http://backend/hyperv/vhdx-size?path=C:%5CProgramData%5CDockerDesktop%5Cvm-data%5CDockerDesktop.vhdx
[15:53:18.684][LoggingMessageHandler][Info ] [73bcf73e] GET http://backend/hyperv/vhdx-size?path=C:%5CProgramData%5CDockerDesktop%5Cvm-data%5CDockerDesktop.vhdx -> 200 OK (took 491ms)
[15:53:18.716][LoggingMessageHandler][Info ] [db35d73f] POST http://backend/migrate/app
[15:53:18.726][LoggingMessageHandler][Info ] [db35d73f] POST http://backend/migrate/app -> 204 NoContent (took 10ms)
[15:53:18.736][Engines ][Debug ] Starting
[15:53:18.747][LoggingMessageHandler][Info ] [9e1abc78] POST http://backend/versionpack/enable
[15:53:18.969][LoggingMessageHandler][Info ] [9e1abc78] POST http://backend/versionpack/enable -> 204 NoContent (took 218ms)
[15:53:19.448][GoBackendProcess ][Info ] Starting C:Program FilesDockerDockerresourcescom.docker.backend.exe -addr unix:.pipedockerBackendApiServer
[15:53:19.506][GoBackendProcess ][Info ] Started
[15:53:19.582][MutagenProcess ][Info ] Starting C:ProgramDataDockercli-pluginsdocker-mutagen.exe mutagen daemon run
[15:53:19.607][MutagenProcess ][Info ] Started
[15:53:19.664][EngineStateMachine][Debug ] sending state Docker.ApiServices.StateMachines.StartTransition to state change sink
[15:53:19.666][EngineStateMachine][Debug ] State Docker.ApiServices.StateMachines.StartTransition sent to state change sink
[15:53:19.673][EngineStateListener][Debug ] received state Docker.ApiServices.StateMachines.StartTransition from LinuxWSL2
[15:53:19.679][EngineStateNotificationRecorder][Debug ] Registered state {«State»:»starting»,»Mode»:»linux»,»date»:1598259199}
[15:53:19.680][SystrayNotifications][Info ] Docker is starting
[15:53:19.722][LinuxWSL2Engine ][Info ] Terminating lingering processes and wsl distros and patching host file
[15:53:19.732][LoggingMessageHandler][Info ] [01ffbea6] POST http://backend/dns/refresh-hosts
[15:53:21.821][MutagenProcess ][Info ] [forwarding] Looking for existing sessions
[15:53:21.879][MutagenProcess ][Info ] [forwarding] Session manager initialized
[15:53:21.879][MutagenProcess ][Info ] [sync] Looking for existing sessions
[15:53:21.879][MutagenProcess ][Info ] [sync] Session manager initialized
[15:53:23.895][DockerHub ][Info ] Login successfull
[15:53:24.851][LoggingMessageHandler][Info ] [01ffbea6] POST http://backend/dns/refresh-hosts -> 204 NoContent (took 5119ms)
[15:53:34.975][LoggingMessageHandler][Info ] [426a008a] GET http://unix/versions
[15:53:35.434][LoggingMessageHandler][Info ] [426a008a] GET http://unix/versions -> 200 OK (took 459ms)
[15:53:36.397][GoBackendProcess ][Info ] started port-forwarding control server on \.pipedockerVpnKitControl
[15:53:36.487][GoBackendProcess ][Info ] ⇨ http server started on .pipedockerVpnKitControl
[15:53:36.649][GoBackendProcess ][Info ] listening on unix:\.pipedockerVpnkitData for data connection
[15:53:36.719][GoBackendProcess ][Info ] ⇨ http server started on .pipedockerBackendApiServerForGuest
[15:53:36.792][GoBackendProcess ][Info ] enabling filesystem caching
[15:53:36.792][GoBackendProcess ][Info ] filesystem exports are: (2)
[15:53:36.810][GoBackendProcess ][Info ] volume control server listening on \.pipedockerVolume
[15:53:36.818][GoBackendProcess ][Info ] filesystem server listening on 00000000-0000-0000-0000-000000000000:00001003-facb-11e6-bd58-64006a7986d3
[15:53:36.828][GoBackendProcess ][Info ] file ownership will be determined by the calling user («fake owner» mode)
[15:53:36.828][GoBackendProcess ][Info ] using mfsymlinks
[15:53:36.841][GoBackendProcess ][Info ] ⇨ http server started on .pipedockerBackendApiServer
[15:53:41.107][WSL2Provisioning ][Info ] Checking docker-desktop
[15:53:49.172][WSL2Provisioning ][Info ] deploying WSL distro docker-desktop to C:UsersChakrit RakhuangAppDataLocalDockerwsldistro
[15:53:57.392][WSL2Provisioning ][Error ] Failed to deploy distro docker-desktop to C:UsersChakrit RakhuangAppDataLocalDockerwsldistro: exit code: -1
stdout: Error: 0xffffffff
stderr:
[15:53:57.401][LinuxWSL2Engine ][Info ] Stopping windows side processes
[15:53:57.641][LinuxWSL2Engine ][Info ] Stopping engine
[15:53:57.725][LoggingMessageHandler][Info ] [9c1f0816] POST http://backend/windowsfeatures/check
[15:53:59.190][LoggingMessageHandler][Info ] [9c1f0816] POST http://backend/windowsfeatures/check -> 200 OK (took 1456ms)
[15:53:59.850][LinuxWSL2Engine ][Info ] Terminating lingering processes and wsl distros and patching host file
[15:53:59.850][LoggingMessageHandler][Info ] [f02f33e0] POST http://backend/dns/refresh-hosts
[15:53:59.993][LoggingMessageHandler][Info ] [f02f33e0] POST http://backend/dns/refresh-hosts -> 204 NoContent (took 143ms)
[15:54:00.001][WSL2Provisioning ][Info ] Checking docker-desktop
[15:54:00.001][WSL2Provisioning ][Info ] deploying WSL distro docker-desktop to C:UsersChakrit RakhuangAppDataLocalDockerwsldistro
[15:54:02.128][WSL2Provisioning ][Error ] Failed to deploy distro docker-desktop to C:UsersChakrit RakhuangAppDataLocalDockerwsldistro: exit code: -1
stdout: Error: 0xffffffff
stderr:
[15:54:02.129][LinuxWSL2Engine ][Info ] Stopping windows side processes
[15:54:02.338][LinuxWSL2Engine ][Info ] Stopping engine
[15:54:02.525][EngineStateMachine][Debug ] sending state Docker.ApiServices.StateMachines.FailedToStartState to state change sink
[15:54:02.525][EngineStateMachine][Debug ] State Docker.ApiServices.StateMachines.FailedToStartState sent to state change sink
[15:54:02.525][EngineStateListener][Debug ] received state Docker.ApiServices.StateMachines.FailedToStartState from LinuxWSL2
[15:54:02.526][EngineStateNotificationRecorder][Debug ] Registered state {«State»:»failed to start»,»Mode»:»linux»,»date»:1598259242}
[15:54:02.527][SystrayNotifications][Error ] Failed to deploy distro docker-desktop to C:UsersChakrit RakhuangAppDataLocalDockerwsldistro: exit code: -1
stdout: Error: 0xffffffff
stderr:
[15:54:02.710][GUI ][Info ] Sending Bugsnag report f267437b-2665-465a-8c9a-be373412b960…
[15:54:02.882][GUI ][Info ] Bugsnag report f267437b-2665-465a-8c9a-be373412b960 sent
[15:54:02.884][SegmentApi ][Info ] Usage statistic: eventCrash
[15:54:02.893][Diagnostics ][Warning] Starting to gather diagnostics as User : ‘C:Program FilesDockerDockerresourcescom.docker.diagnose.exe’ gather.
[15:54:03.010][Engines ][Error ] Start failed with Failed to deploy distro docker-desktop to C:UsersChakrit RakhuangAppDataLocalDockerwsldistro: exit code: -1
stdout: Error: 0xffffffff
stderr:
at Docker.Core.WslShortLivedCommandResult.LogAndThrowIfUnexpectedExitCode(String prefix, ILogger log, Int32 expectedExitCode) in C:workspacesstable-2.3.xsrcgithub.comdockerpinatawinsrcDocker.CoreWslCommand.cs:line 119
at Docker.Engines.WSL2.WSL2Provisioning.d__17.MoveNext() in C:workspacesstable-2.3.xsrcgithub.comdockerpinatawinsrcDocker.DesktopEnginesWSL2WSL2Provisioning.cs:line 169
— End of stack trace from previous location where exception was thrown —
at System.Runtime.ExceptionServices.ExceptionDispatchInfo.Throw()
at System.Runtime.CompilerServices.TaskAwaiter.HandleNonSuccessAndDebuggerNotification(Task task)
at Docker.Engines.WSL2.WSL2Provisioning.d__8.MoveNext() in C:workspacesstable-2.3.xsrcgithub.comdockerpinatawinsrcDocker.DesktopEnginesWSL2WSL2Provisioning.cs:line 78
— End of stack trace from previous location where exception was thrown —
at System.Runtime.ExceptionServices.ExceptionDispatchInfo.Throw()
at System.Runtime.CompilerServices.TaskAwaiter.HandleNonSuccessAndDebuggerNotification(Task task)
at Docker.Engines.WSL2.LinuxWSL2Engine.d__24.MoveNext() in C:workspacesstable-2.3.xsrcgithub.comdockerpinatawinsrcDocker.DesktopEnginesWSL2LinuxWSL2Engine.cs:line 94
— End of stack trace from previous location where exception was thrown —
at System.Runtime.ExceptionServices.ExceptionDispatchInfo.Throw()
at System.Runtime.CompilerServices.TaskAwaiter.HandleNonSuccessAndDebuggerNotification(Task task)
at Docker.ApiServices.StateMachines.TaskExtensions.d__0.MoveNext() in C:workspacesstable-2.3.xsrcgithub.comdockerpinatawinsrcDocker.ApiServicesStateMachinesTaskExtensions.cs:line 29
— End of stack trace from previous location where exception was thrown —
at System.Runtime.ExceptionServices.ExceptionDispatchInfo.Throw()
at System.Runtime.CompilerServices.TaskAwaiter.HandleNonSuccessAndDebuggerNotification(Task task)
at Docker.ApiServices.StateMachines.StartTransition.d__5.MoveNext() in C:workspacesstable-2.3.xsrcgithub.comdockerpinatawinsrcDocker.ApiServicesStateMachinesStartTransition.cs:line 67
— End of stack trace from previous location where exception was thrown —
at System.Runtime.ExceptionServices.ExceptionDispatchInfo.Throw()
at Docker.ApiServices.StateMachines.StartTransition.d__5.MoveNext() in C:workspacesstable-2.3.xsrcgithub.comdockerpinatawinsrcDocker.ApiServicesStateMachinesStartTransition.cs:line 92
— End of stack trace from previous location where exception was thrown —
at System.Runtime.ExceptionServices.ExceptionDispatchInfo.Throw()
at System.Runtime.CompilerServices.TaskAwaiter.HandleNonSuccessAndDebuggerNotification(Task task)
at Docker.ApiServices.StateMachines.EngineStateMachine.d__14.MoveNext() in C:workspacesstable-2.3.xsrcgithub.comdockerpinatawinsrcDocker.ApiServicesStateMachinesEngineStateMachine.cs:line 72
— End of stack trace from previous location where exception was thrown —
at System.Runtime.ExceptionServices.ExceptionDispatchInfo.Throw()
at System.Runtime.CompilerServices.TaskAwaiter.HandleNonSuccessAndDebuggerNotification(Task task)
at Docker.Engines.Engines.d__24.MoveNext() in C:workspacesstable-2.3.xsrcgithub.comdockerpinatawinsrcDocker.DesktopEnginesEngines.cs:line 109)
[15:54:26.581][GoBackendProcess ][Info ] external: GET /events 200 «Go-http-client/1.1» «
[15:54:26.584][GoBackendProcess ][Info ] external: GET /forwards/list 200 «Go-http-client/1.1» «
[15:54:26.586][GoBackendProcess ][Info ] mutagen sync list —output json
[15:54:26.641][GoBackendProcess ][Info ] mutagen C:ProgramDataDockercli-pluginsdocker-mutagen.exe mutagen sync list —output json: nulln
[15:54:26.642][GoBackendProcess ][Info ] external: GET /sync 200 «Go-http-client/1.1» «
[15:57:26.762][Diagnostics ][Info ] Uploading diagnostics 80E9D45E-88E8-42F8-B0A6-C8328A7251BF/20200824085403
[15:58:09.485][Diagnostics ][Info ] Uploaded succesfully diagnostics 80E9D45E-88E8-42F8-B0A6-C8328A7251BF/20200824085403
[15:59:00.567][ErrorReportWindow ][Info ] Open logs
[15:59:00.601][ErrorReportWindow ][Info ] Open logs
![]()
80E9D45E-88E8-42F8-B0A6-C8328A7251BF/20200824085403
![]()
![]()
I finally got this resolved after following these steps:
(from #7208)
- Uninstall Docker and WSL 2 kernel.
- Go to the Control Panel -> Programs -> Turn Windows features on or off
- Uncheck the following: Containers, Hyper-V, Windows Subsystem for Linux
- Restart the system
- Install Docker without the WSL2 enabled/checked in the first screen
- Go to the Control Panel -> Programs -> Turn Windows features on or off
- Turn on/check the Windows Subsystem for Linux
- Restart the system.
- Do not install the WSL2 Kernel when reinstalling Docker.
I was not able to launch the Ubuntu WSL initially (got the same error messages in the first post), I then ran «wsl —update» and was able to launch the Ubuntu WSL and got Docker started running again.
My system now has wsl kernel 4.19.128 and Build 20201.rs_prerelease.200822-1922, and the default wsl version is now version 2.
Hope this helps. Cheers.
ShAnD0o reacted with thumbs down emoji
ihsan606, dantondelima, joaosn, vehbirestelica, alprde, Dantervill, Rafiere, VinothRabinsonTR, camposdennis, saber13812002, and BestLemoon reacted with laugh emoji
jacgg, rocarmo, aarshps, manuesperon, Free5Dev, ihsan606, dantondelima, calel95, kevinboy666, rlin04, and 7 more reacted with hooray emoji
saber13812002 reacted with confused emoji
muchaisam, singhmeet11, rocarmo, aarshps, Genibiba, manuesperon, malonejv, poonasor, ihsan606, dantondelima, and 13 more reacted with heart emoji
Simka997, ugurdinch, HMazharHameed, rocarmo, aarshps, guilhermegrigolettoj2, dantondelima, calel95, joaosn, alprde, and 4 more reacted with rocket emoji
Yipeng1994 and saber13812002 reacted with eyes emoji
![]()
I performed similar steps to @ngd929 and was able to start docker without wsl exiting with code: -1:
- Uninstall Docker and WSL 2 kernel.
- Uncheck Containers, Hyper-V, Windows Subsystem for Linux in Windows features
- Restart the system
- Install Docker Desktop
- Restart System
- Start Docker Desktop
Thanks!
saber13812002 reacted with hooray emoji
rifaterdemsahin and saber13812002 reacted with heart emoji
saber13812002 reacted with rocket emoji
saber13812002 reacted with eyes emoji
![]()
@ngd929 You saved my day! Thanks a lot. However, for me, I had to install the WSL2 update again to get my Docker Desktop start, otherwise it kept on complaining to get it and wouldn’t start.
So I believe steps by @ZacharyGonzales-Wellsky has actually worked.
By the way I am running Windows 10 Enterprise version 2004, and Docker Desktop 2.4.0.0
![]()
The problem is in WSL as it becomes unresponsive and returns a service error if you try the following command in PowerShell:
wsl -l -v
I believe the process can be simplified a bit more with:
- Uncheck Windows Subsystem for Linux in Windows Features
- Reboot
- Turn the feature back on
- Re-apply the WSL2 update
- Reboot
No need to uninstall/reinstall Docker Desktop.
This got me back up and running with Windows 10 Home (which requires WSL2) and Docker Desktop 2.4.0
KaustubhSathe, yulio94, Eschechola, MMShep97, MarcPetitdemange, srizzon, digitlimit, and M-Yazdan2000 reacted with laugh emoji
bzaugt, Eschechola, MMShep97, MarcPetitdemange, srizzon, digitlimit, martin-kristensen, and M-Yazdan2000 reacted with hooray emoji
yulio94, Eschechola, Eshva, pranavmalvawala, RehantheCoder, SureshAgastya, vishalsharmaeic, MMShep97, FelipeClaudio, MarcPetitdemange, and 5 more reacted with heart emoji
digitlimit reacted with rocket emoji
Yipeng1994 reacted with eyes emoji
![]()
I was not able to launch the Ubuntu WSL initially (got the same error messages in the first post), I then ran «wsl —update» and was able to launch the Ubuntu WSL and got Docker started running again.
Followed your steps, but when running «wsl —update», it doesn’t seem to be an option, it just outputs the help/usage info. The state I’m in is after running previous nine steps/bullet points, and then upon reboot and starting docker shows the message suggesting to install the kernel update:

I closed out of that dialog, restarted docker, and then all-the-things started working 🤷
![]()
![]()
I’ve just faced the issue on the latest version of Docker but it was resolved once I «Quit Docker Desktop» and launched it again

![]()
Appreciated. Thank you for helpful solution here.
![]()
![]()
![]()
The problem is in WSL as it becomes unresponsive and returns a service error if you try the following command in PowerShell:
wsl -l -vI believe the process can be simplified a bit more with:
- Uncheck Windows Subsystem for Linux in Windows Features
- Reboot
- Turn the feature back on
- Re-apply the WSL2 update
- Reboot
No need to uninstall/reinstall Docker Desktop.
This got me back up and running with Windows 10 Home (which requires WSL2) and Docker Desktop 2.4.0
Thank you. I followed the steps that you mentioned and it fixed the issue.
![]()
I had the same issue and was able to solve it by:
- enabling Intel Virtualization Technology in my BIOS
- allowing NUMA spanning in Hyper-V settings
- reinstalling Docker with WSL-2 option ticked and installing WSL2 Linux kernel update package for x64 machines
![]()
The problem is in WSL as it becomes unresponsive and returns a service error if you try the following command in PowerShell:
wsl -l -vI believe the process can be simplified a bit more with:
- Uncheck Windows Subsystem for Linux in Windows Features
- Reboot
- Turn the feature back on
- Re-apply the WSL2 update
- Reboot
No need to uninstall/reinstall Docker Desktop.
This got me back up and running with Windows 10 Home (which requires WSL2) and Docker Desktop 2.4.0
Thank you so much, it really helped me.
![]()
FWIW all I had to do was run the following commands in PowerShell and then restart docker and it started to work.
wsl --unregister docker-desktop-data
wsl --shutdown
Unfortunately, I lost all images that were cached locally.
namatoj, GiovannaK, and Pranav016 reacted with heart emoji
![]()
Got this after automatic upgrade to 3.1.0
Tried everything listed, nothing helps
![]()
After upgrade to 3.1.0 mine started crashing as well, I had to disable Acrylic DNS Proxy.
Now it seems to be ok again, but I lost some features I was using.
You can find more info in:
microsoft/WSL#4364 (comment)
Edited: As said by @yuptogun, if you are using Laravel Valet you can try to stop it.
valet stop. I noted that if you stop valet, start WSL, and after WSL working, start valet again, it works.
![]()
To add to the upper comment, this includes the case that you have Laravel Valet running.
Try valet stop if you have one.
![]()
I also had this problem after an upgrade to 3.1.0. After trying multiple suggested solutions here, I finally got it working by doing the following.
- Uninstall Docker 3.1.0 and WSL from Control Panel
- Download and install Docker Dekstop 3.2.2
- Turn off Windows features
a. Go to the Control Panel -> Programs -> Turn Windows features on or off
b. Uncheck the following: Windows Subsystem for Linux
c. Reboot - Turn on Windows features
a. Open Powershell in Admin mode
b. Enable WSL w/dism.exe /online /enable-feature /featurename:Microsoft-Windows-Subsystem-Linux /all /norestart
c. Enable Virtual Machine w/dism.exe /online /enable-feature /featurename:VirtualMachinePlatform /all /norestart
d. Reboot - Check that WSL is installed and working (run
wsl -helpfrom Powershell) - Download and install the Linux kernel update package
- Set WSL 2 as your default version (run
wsl --set-default-version 2from Powershell) - Install and launch a Linux distribution (from Microsoft Store)
- Start Docker Desktop
The installation of a separate Linux distribution might be superfluous, but I kept running into issues with wsl without it. Specially starting Docker Desktop wo/ the presence of a Linux distribution seems to interfere with WSL leading it to freeze and just return this message: The service cannot be started, either because it is disabled or because if has no enabled devices associated with it..
EDIT: In case anyone else is also experiencing that WSL becomes sporadically unresponsive w/ the above mentioned error message, then restarting LxssManager is a possible solution that avoids the need to disable/enable features. See suggested solutions as posted in microsoft/WSL#5836 and microsoft/WSL#3386. Running sc config LxssManager start=auto from the command line in admin-mode worked for me.
![]()
![]()
Like @Aeilert , I too had to download and install the Linux kernel update package. The non-Windows Insider section of this reference helped.
![]()
System.InvalidOperationException:
Failed to deploy distro docker-desktop to C:UsersperoperoAppDataLocalDockerwsldistro: exit code: -1
stdout: ���:
![]()
Like #8204 (comment) above, I had to disable Acrylic DNS then relaunch Docker Desktop and it started fine.
![]()
FWIW all I had to do was run the following commands in PowerShell and then restart docker and it started to work.
wsl --unregister docker-desktop-data
wsl --shutdown
Unfortunately, I lost all images that were cached locally.
This solved the problem for me. I’m very glad that I didn’t need to uninstall and reinstall WSL.
![]()
I finally got this resolved after following these steps:
(from #7208)
- Uninstall Docker and WSL 2 kernel.
- Go to the Control Panel -> Programs -> Turn Windows features on or off
- Uncheck the following: Containers, Hyper-V, Windows Subsystem for Linux
- Restart the system
- Install Docker without the WSL2 enabled/checked in the first screen
- Go to the Control Panel -> Programs -> Turn Windows features on or off
- Turn on/check the Windows Subsystem for Linux
- Restart the system.
- Do not install the WSL2 Kernel when reinstalling Docker.
I was not able to launch the Ubuntu WSL initially (got the same error messages in the first post), I then ran «wsl —update» and was able to launch the Ubuntu WSL and got Docker started running again.
My system now has wsl kernel 4.19.128 and Build 20201.rs_prerelease.200822-1922, and the default wsl version is now version 2.
Hope this helps. Cheers.
but this wont run Linux based containers on windows right?
![]()
Still happening consistently for me, as of a couple of weeks ago after a windows insiders update. Have tried all of the above steps from @alpharameeztech — but still failing with the same error 
![]()
Nothing in here even worked for me. I finally got it to start by:
- Removing
.wslconfigin my user directory- Killing all docker processes and services
wsl --shutdown- Then I started docker desktop again, and it finally started up
I placed the
.wslconfigfile back in my home directory, and it wouldn’t start again. I took.wslconfigaway again, and it started successfully again. I can say that the culprit here was definitely.wslconfig.For future reference, this is my wslconfig that caused Docker not to start.
[wsl2]
memory=512MB
processors=2
Perhaps Docker should look into this issue here. When I changed the config to
1GB, I didn’t have Docker starting issues anymore
Thanks god it was this silly error, the other solutions were a big chaos. The file .wslconfig was causing a crash because a low memory configuration, looks like the «2 to 4 GB» default comment isn’t a suggestion, the file have to has min 2GB of memory. What I don’t understand is why Docker think that the problem was the access to the «C:Users<username>AppDataLocalDockerwsldistro» folder. That makes no sense.
Anyway, my file looks like this now and Dockers works well (I’m using a VM for run Docker that’s why I’m using 1 processor)
[wsl2]
memory=2GB
processors=1
![]()
Had this error.
Nothing suggested in here worked until I deleted the
%USERPROFILE%.wslconfigfile.
It worked for me as well! Thanks, @xsonic !!
![]()
![]()
![]()
I selected the Docker autoupdate from 3.5.0 (I think) to 3.5.2 on Win 11. The install failed. Uninstalling, rebooting and installing 3.5.2 still failed Uninstalled, rebooted and installed 3.5.0 still failed
renamed .wslconfig to .xwslconfig in usersusername after rsuggestion by XSonic uninstall, reboot and install 3.5.0 succeeded
the wslconfig I had set the ram to 8GB as a max, and added 2 processors
type .xwslconfig [wsl2] kernel=C:tempmyCustomKernel memory=8GB # Limits VM memory in WSL 2 to 8 GB processors=2 # Makes the WSL 2 VM use two virtual processors
please quote the first line out # , in your .wslconfig (c:usersabc.wslconfig) file:
microsoft/WSL#5107 (comment)
![]()
The problem is in WSL as it becomes unresponsive and returns a service error if you try the following command in PowerShell:
wsl -l -vI believe the process can be simplified a bit more with:
- Uncheck Windows Subsystem for Linux in Windows Features
- Reboot
- Turn the feature back on
- Re-apply the WSL2 update
- Reboot
No need to uninstall/reinstall Docker Desktop.
This got me back up and running with Windows 10 Home (which requires WSL2) and Docker Desktop 2.4.0
Has anyone encountered this issue with a corporate laptop? Our IT team could follow these steps and it works, but the issues comes back regardless the next day. Seems like something is reverting in the WSL2 update.
![]()
![]()
@Asmedeus998 Thank you! This worked for me when none of the other steps did!
![]()
Tried many times to uninstall and reinstalling docker following each time a different procedure, then @Asmedeus998 pointed solution finally solved my issue. I was using Acrylic DNS that was using port 53.
![]()
For me the DNS Client service was disabled. I had to do something like these settings, except I had to set HKEY_LOCAL_MACHINESYSTEMCurrentControlSetservicesDnscache to 2 and then restart
![]()
I also had this problem after an upgrade to 3.1.0. After trying multiple suggested solutions here, I finally got it working by doing the following.
- Uninstall Docker 3.1.0 and WSL from Control Panel
- Download and install Docker Dekstop 3.2.2
- Turn off Windows features
a. Go to the Control Panel -> Programs -> Turn Windows features on or off
b. Uncheck the following: Windows Subsystem for Linux
c. Reboot- Turn on Windows features
a. Open Powershell in Admin mode
b. Enable WSL w/dism.exe /online /enable-feature /featurename:Microsoft-Windows-Subsystem-Linux /all /norestart
c. Enable Virtual Machine w/dism.exe /online /enable-feature /featurename:VirtualMachinePlatform /all /norestart
d. Reboot- Check that WSL is installed and working (run
wsl -helpfrom Powershell)- Download and install the Linux kernel update package
- Set WSL 2 as your default version (run
wsl --set-default-version 2from Powershell)- Install and launch a Linux distribution (from Microsoft Store)
- Start Docker Desktop
The installation of a separate Linux distribution might be superfluous, but I kept running into issues with
wslwithout it. Specially starting Docker Desktop wo/ the presence of a Linux distribution seems to interfere with WSL leading it to freeze and just return this message:The service cannot be started, either because it is disabled or because if has no enabled devices associated with it..EDIT: In case anyone else is also experiencing that WSL becomes sporadically unresponsive w/ the above mentioned error message, then restarting
LxssManageris a possible solution that avoids the need to disable/enable features. See suggested solutions as posted in microsoft/WSL#5836 and microsoft/WSL#3386. Runningsc config LxssManager start=autofrom the command line in admin-mode worked for me.
Thanks man! Really appreciate it
![]()
Execute: wsl -l -v
If does not connect follow this:
Go to the Control Panel -> Programs -> Turn Windows features on or off
Uncheck Windows Subsystem for Linux in Windows Features
Reboot
Turn the feature back on
Reboot
Now open Docker Desktop
![]()
i installed latest version 4.4.4.0 and getting bellow error tried restart,reinstall,clean and purge ,didnt work i have enabled WSL2
System.InvalidOperationException:
Failed to deploy distro docker-desktop to C:UsersUSERNAME.sAppDataLocalDockerwsldistro: exit code: -529697949
stdout:
stderr:
at Docker.ApiServices.WSL2.WslShortLivedCommandResult.LogAndThrowIfUnexpectedExitCode(String prefix, ILogger log, Int32 expectedExitCode) in C:workspacesPR-17132srcgithub.comdockerpinatawinsrcDocker.ApiServicesWSL2WslCommand.cs:line 146
at Docker.Engines.WSL2.WSL2Provisioning.d__17.MoveNext() in C:workspacesPR-17132srcgithub.comdockerpinatawinsrcDocker.EnginesWSL2WSL2Provisioning.cs:line 168
— End of stack trace from previous location where exception was thrown —
at System.Runtime.ExceptionServices.ExceptionDispatchInfo.Throw()
at System.Runtime.CompilerServices.TaskAwaiter.HandleNonSuccessAndDebuggerNotification(Task task)
at Docker.Engines.WSL2.WSL2Provisioning.d__8.MoveNext() in C:workspacesPR-17132srcgithub.comdockerpinatawinsrcDocker.EnginesWSL2WSL2Provisioning.cs:line 77
— End of stack trace from previous location where exception was thrown —
at System.Runtime.ExceptionServices.ExceptionDispatchInfo.Throw()
at System.Runtime.CompilerServices.TaskAwaiter.HandleNonSuccessAndDebuggerNotification(Task task)
at Docker.Engines.WSL2.LinuxWSL2Engine.d__28.MoveNext() in C:workspacesPR-17132srcgithub.comdockerpinatawinsrcDocker.EnginesWSL2LinuxWSL2Engine.cs:line 179
— End of stack trace from previous location where exception was thrown —
at System.Runtime.ExceptionServices.ExceptionDispatchInfo.Throw()
at System.Runtime.CompilerServices.TaskAwaiter.HandleNonSuccessAndDebuggerNotification(Task task)
at Docker.ApiServices.StateMachines.TaskExtensions.d__0.MoveNext() in C:workspacesPR-17132srcgithub.comdockerpinatawinsrcDocker.ApiServicesStateMachinesTaskExtensions.cs:line 29
— End of stack trace from previous location where exception was thrown —
at System.Runtime.ExceptionServices.ExceptionDispatchInfo.Throw()
at System.Runtime.CompilerServices.TaskAwaiter.HandleNonSuccessAndDebuggerNotification(Task task)
at Docker.ApiServices.StateMachines.StartTransition.d__5.MoveNext() in C:workspacesPR-17132srcgithub.comdockerpinatawinsrcDocker.ApiServicesStateMachinesStartTransition.cs:line 67
— End of stack trace from previous location where exception was thrown —
at System.Runtime.ExceptionServices.ExceptionDispatchInfo.Throw()
at Docker.ApiServices.StateMachines.StartTransition.d__5.MoveNext() in C:workspacesPR-17132srcgithub.comdockerpinatawinsrcDocker.ApiServicesStateMachinesStartTransition.cs:line 92
Diagnose returned following results

Hope this helps
![]()
Just a note for anyone seeing this while running a split vpn. Disable the split vpn and viola, Docker starts working again.
![]()
After a few hours I found that the problem was the .wslconfig file.
Docker needs at least 1GB to work, I was putting 512MB and it failed.
![]()
I couldn’t get this or android subsystem working, until I saw it mentioned here if port 53 is in use it can cause problems for these subsystems; disabled acrylic dns-proxy and problem solved.
![]()
The problem is in WSL as it becomes unresponsive and returns a service error if you try the following command in PowerShell:
wsl -l -vI believe the process can be simplified a bit more with:
- Uncheck Windows Subsystem for Linux in Windows Features
- Reboot
- Turn the feature back on
- Re-apply the WSL2 update
- Reboot
No need to uninstall/reinstall Docker Desktop.
This got me back up and running with Windows 10 Home (which requires WSL2) and Docker Desktop 2.4.0
This worked for me, thank you! 🙏
![]()
The problem is in WSL as it becomes unresponsive and returns a service error if you try the following command in PowerShell:
wsl -l -vI believe the process can be simplified a bit more with:
- Uncheck Windows Subsystem for Linux in Windows Features
- Reboot
- Turn the feature back on
- Re-apply the WSL2 update
- Reboot
No need to uninstall/reinstall Docker Desktop.
This got me back up and running with Windows 10 Home (which requires WSL2) and Docker Desktop 2.4.0
This worked for me too thanks
![]()
This was a recurring issue for me and it took me a stupidly long time to realize that NordVPN was causing it. If I disconnect from the VPN, problem’s solved.
For the future Google searcher.
![]()
![]()
The problem is in WSL as it becomes unresponsive and returns a service error if you try the following command in PowerShell:
wsl -l -v
I believe the process can be simplified a bit more with:
- Uncheck Windows Subsystem for Linux in Windows Features
- Reboot
- Turn the feature back on
- Re-apply the WSL2 update
- Reboot
No need to uninstall/reinstall Docker Desktop.
This got me back up and running with Windows 10 Home (which requires WSL2) and Docker Desktop 2.4.0This worked for me too thanks
does not work

![]()
After a few hours I found that the problem was the
.wslconfigfile.Docker needs at least 1GB to work, I was putting 512MB and it failed.
i dont it is the data size…i clean it and nothing changes

![]()
I could fix it.
I got the error:
Failed to deploy distro docker-desktop to C:UsersXYZAppDataLocalDockerwsldistro: exit code: -1
How I fixed it:
- Open an admin powershell and try
wsl --update - After some time (ca. 25sec) the command opens something like this (if it fails):

-
Here you are stuck now because the update does not continue. You can close these windows for now.
-
Download this tool MS install/uninstall troubleshooter
-
Execute the troubleshooter -> Next
-
Choose problems with uninstalling (something like this)
-
Find in the list «Windows Subsystem for Linux Update» -> Press next and let Windows do its thing
-
If its done restart your PC
-
Then open an admin powershell and try again
wsl --update— This time the update will work and you can finally start docker desktop again.
Let me know if that works for you as well.
![]()
@danleonard-nj
This was a recurring issue for me and it took me a stupidly long time to realize that NordVPN was causing it. If I disconnect from the VPN, problem’s solved.
For the future Google searcher.
@brianhaddock
Just a note for anyone seeing this while running a split vpn. Disable the split vpn and viola, Docker starts working again.
The two of you combined resolved my encountering of this issue — disabling NordVPN’s Split Tunnelling feature works a treat, and I still get to use the VPN. Thank you!
![]()
Hey all (and the future people who run into this issue),
I tried the aforementioned solutions on my company’s Alienware m15 which supposedly has «virtualization enabled» on my 9th Gen i7 in task manager, but no BIOS options to enable Intel Virtualization technology.
I got a VM running a deactivated copy of Win10 Pro in Hyper-V, and tried uninstalling X, enabling Y, rebooting Z after disabling W, No dice. I tried many orderings of numerous solutions above. Still nothing. I was beginning to think hope was lost and It’s my machine’s fault or some IT policy. I even tried wsl --install Ubuntu-20.04 to see if I could get Docker loaded on that. CMD told me that «The virtual machine could not be started because a required feature is not installed.» Oh joy…
I then stumbled upon this article https://blog.davidchristiansen.com/2016/11/run-hyper-v-docker-on-virtual-machine/ and I tried this command Set-VMProcessor -VMName "Win10 VM2" -ExposeVirtualizationExtensions $true where Win10 VM2 is your VM name, and BINGO. That solved my multi day issue.
Then I scrolled further on this page and saw that @NikolaosWakem wrote the solution as well:
If you use HyperV VM’s for client development (like me
and are trying to get Docker Desktop running on the VM.. run
Set-VMProcessor -VMName <VMName> -ExposeVirtualizationExtensions $truehttps://docs.microsoft.com/en-us/virtualization/hyper-v-on-windows/user-guide/nested-virtualization
 and are trying to get Docker Desktop running on the VM.. run
For me, WindowsFeatures such as Containers, Hyper-V and its subsidiaries, Virtual Machine Platform, Windows Subsystem for Linux were all enabled and WSL 2 Kernel update was also installed before I ran the above command on my host’s admin account in CmdPrompt (Admin).
Hope this helps someone avoid days worth of troubleshooting.
Cheers,
Daniel
![]()
Guys that steps worked for me:
- Uninstall Docker + wsl2
- Make sure Windows Subsystem for Linux, Containers and Hyper-V in Windows Features are all checked (wsl was only checked for me, so check them all)
- Reboot
- download WSL2 (with administration privilege) using the command in the powershell -> wsl —install
- download Docker with WSL2 feature checked.
I hope you find this helpful!
![]()
None of these instructions worked for me. Here is what did the trick for my Win10 Home:
- Optional: Do all the latest Windows updates.
- In elevated Command Prompt paste:
DISM /Online /Enable-Feature /All /FeatureName:MSMQ-Container DISM /Online /Enable-Feature /All /FeatureName:MSMQ-DCOMProxy DISM /Online /Enable-Feature /All /FeatureName:MSMQ-Server DISM /Online /Enable-Feature /All /FeatureName:MSMQ-HTTP DISM /Online /Enable-Feature /All /FeatureName:MSMQ-Multicast DISM /Online /Enable-Feature /All /FeatureName:MSMQ-Triggers DISM /Online /Enable-Feature /All /FeatureName:WCF-MSMQ-Activation45 DISM /Online /Enable-Feature /All /FeatureName:WAS-WindowsActivationService DISM /Online /Enable-Feature /All /FeatureName:WAS-ProcessModel DISM /Online /Enable-Feature /All /FeatureName:WAS-NetFxEnvironment DISM /Online /Enable-Feature /All /FeatureName:WAS-ConfigurationAPI
In my scenario, I needed to install WSL 2 and my computer didn’t have it.
Installing it made docker run successfully.
Try the below steps if you are installing docker for the first time.
First, we need to activate WSL from Windows.
Control Panel -> Programs -> Turn Windows features Turn On or Off
You need to check
- Windows Subsystem For Linux
- Windows Hypervisor Platform
- Virtual Machine Platform
Then Click ok

After that, you need to Enable WSL 1 and update it to WSL 2 (https://learn.microsoft.com/en-us/windows/wsl/install-win10#manual-installation-steps)
To Install WSL 1 which comes built-in, open PowerShell as Administrator and run:
dism.exe /online /enable-feature /featurename:Microsoft-Windows-Subsystem-Linux /all /norestart
After that download the WSL 2 update from Microsoft. Use below this: WSL2 Linux kernel update package for x64 machines
After installing the above package, you need to set WSL 2 as the default version.
Open PowerShell as Administrator and run:
wsl --set-default-version 2
Now restart your computer. Now your docker should work.
Please note that to update to WSL 2, you must be running Windows 10.
- For x64 systems: Version 1903 or higher, with Build 18362 or higher.
- For ARM64 systems: Version 2004 or higher, with Build 19041 or higher.
by Tashreef Shareef
Tashreef Shareef is a software developer turned tech writer. He discovered his interest in technology after reading a tech magazine accidentally. Now he writes about everything tech from… read more
Updated on August 26, 2020
XINSTALL BY CLICKING THE DOWNLOAD FILE
This software will repair common computer errors, protect you from file loss, malware, hardware failure and optimize your PC for maximum performance. Fix PC issues and remove viruses now in 3 easy steps:
- Download Restoro PC Repair Tool that comes with Patented Technologies (patent available here).
- Click Start Scan to find Windows issues that could be causing PC problems.
- Click Repair All to fix issues affecting your computer’s security and performance
- Restoro has been downloaded by 0 readers this month.
Docker Desktop is a software application for Windows machines that allows the developers to build production-ready container applications easily. However, some users have reported Hyper-V and container features are not enabled error while installing Docker Desktop in the computer. You can find similar issues in the Reddit community as well.
Does anyone have any ideas how to enable Hyper-v and containers on Windows 10 Pro 64bit with compatible hardware (according to msinfo32) and all requirements met ie BIOS virtualisation enabled, >4GB RAM and so on. Despite all this none of the commands in powershell or cmd succeed.They complain that one or more parent features must be enabled. There is no error when enabling via Windows features but after the restart Hyper-v regresses to disabled.
If you are troubled by this error, here are a couple of troubleshooting tips to help you fix Hyper-v and containers features are not enabled error in Windows computer.
How to fix Hyper-v and containers features are not enabled
1. Enable Virtualization in BIOS for Hyper-V
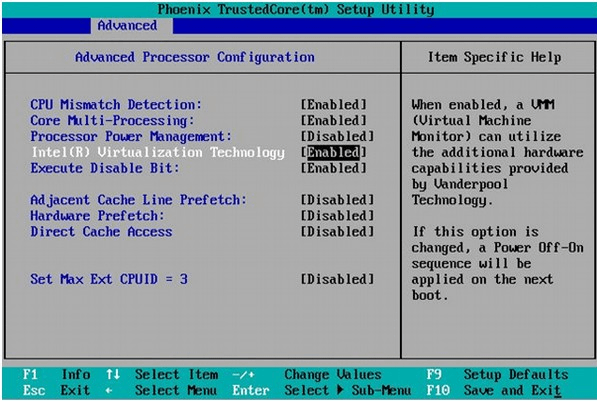
- If you haven’t already, you need to enable Hyper-V in BIOS before Docker can install and enable containers features.
- Shutdown your computer if it is on.
- Restart the computer and press F2 to open the BIOS setup. The function key can be different depending on the motherboard maker.
- Use the right-arrow key to navigate to the Advanced tab.
- Choose the Virtualization Technology and hit enter.
- Select Enable and hit Enter again.
- Save the changes (F10) and exit.
- Try to run Docker and check if the Hyper-v and containers features are not enabled error is resolved.
How to use Windows Sandbox and VirtualBox VMs simultaneously
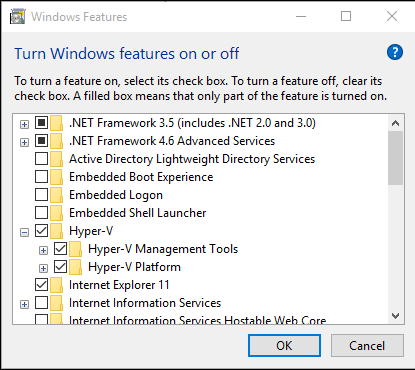
2. Enable Hyper-V in Windows 10
- If the issue persists, you may have to manually enable Hyper-V virtualization feature in Windows 10.
- Press Windows Key + R to open Run.
- Type control and click OK.
- In the Control Panel, go to Programs > Programs and Features.
- From the left pane, click on Turn Windows Features on or off.

- Select Hyper-V in the Windows Features window.
- Click OK to apply the changes.
- Once the installation is completed, you are prompted to restart the computer.
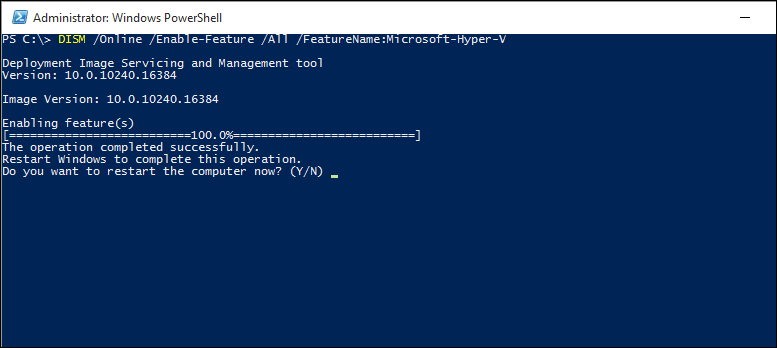
Enable Hyper-V with CMD and DISM
- Alternatively, you can also use DISM and PowerShell command to enable Hyper-V.
- Right-click on Start and select PowerShell (admin).

- In the PowerShell window, type the following command and hit enter.
DISM /Online /Enable-Feature /All /FeatureName:Microsoft-Hyper-V - Close the PowerShell window and launch Docker. Check for any improvements.
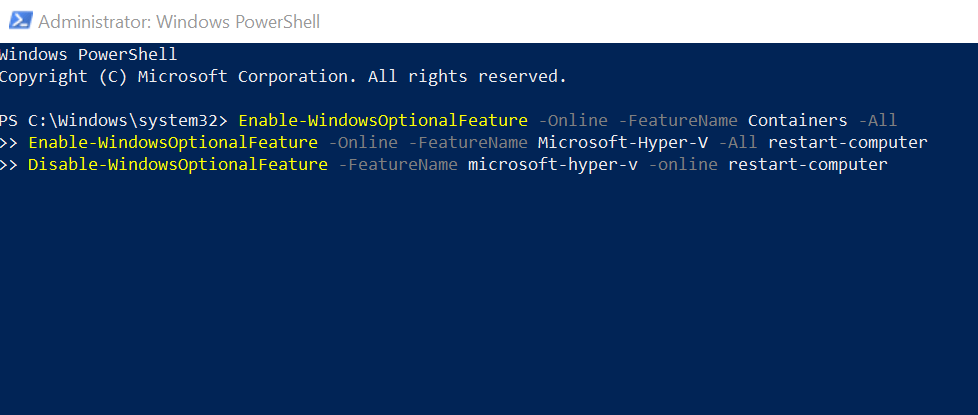
3. Try to Remove and Reinstall Hyper-V
- If you have already installed Hyper-V, it is possible that the installation may be corrupt resulting in Hyper-v and containers features are not enabled error. Try to remove and install Hyper-V manually to see if that helps.
- Right-click on Start and select Windows PowerShell (Admin).

- In the PowerShell window type the following command and hit enter one by one.
Disable-WindowsOptionalFeature -FeatureName microsoft-hyper-v -online restart-computer
Enable-WindowsOptionalFeature -Online -FeatureName Microsoft-Hyper-V -All restart-computer
Enable-WindowsOptionalFeature -Online -FeatureName Containers -All - Check for any improvements.
- If the issue persists, try to run the following command in the PowerShell and check if it helps.
MOFCOMP %SYSTEMROOT%System32WindowsVirtualization.V2.mof
RELATED STORIES YOU MAY LIKE:
- The best virtual machines for Windows 10 to use today
- How to run 16-bit apps in Windows 10 64-bit [STEP-BY-STEP GUIDE]
- Windows Virtual Desktop might arrive by the end of the year
![]()
Newsletter

Docker is an open-source containerization platform that enables developers to package apps into containers and standardized executable components combining application source code with the operating system (OS) libraries and dependencies required to run that code in any environment. The Docker Engine and client aren’t included with Windows and need to be installed and configured individually. You need Docker in order to work with Windows Containers. Docker consists of the Docker Engine (dockerd.exe), and the Docker client (docker.exe).
To run containers on Windows Server, you need a physical server or virtual machine running Windows Server 2022, Windows Server (Semi-Annual Channel), Windows Server 2019, or Windows Server 2016 as of the time of writing this article. More on this later. Kindly refer to these related guides: How to create and deploy a local Registry Server with Docker Image, how to Pull your first Nginx Container Image from Docker Hub and deploy it to your local machine, Azure DevOps and GitHub integration for Docker and Kubernetes deployment, how to create a static pod in Kubernetes, and how to install, register and start GitLab Runner on Windows.
GitLab Runner only supports the following versions of Windows as of the time of writing this piece which follows the support lifecycle for Windows. You can use the following hyperlink for more information.
- Windows Server 20H2.
- Windows Server 2004.
- Windows Server 1809.
This means that Docker only supports Docker Desktop on Windows for those versions of Windows 10 that are still within Microsoft’s servicing timeline:
- Long-Term Servicing Channel, versions for 5 years after their release date. Note that we don’t support versions that are on extended support.
- Semi-Annual Channel versions for 18 months after their release date. We don’t support these versions after mainstream support ends.
This is the case for both the Windows binaries that we distribute and also for the Docker executor.
You can create a free Docker account for personal or small business users, however, for larger businesses, there is a monthly fee. For more details, see the
- Our Docker Subscription Service Agreement includes a change to the terms of use for Docker Desktop
- It remains free for small businesses (fewer than 250 employees AND less than $10 million in revenue), personal use, education, and non-commercial open-source projects.
- It requires a paid subscription for professional use in larger enterprises.
- The effective date of these terms is August 31, 2021. There is a grace period until January 31, 2022 for those that will require a paid subscription to use Docker Desktop.
- The existing Docker Free subscription has been renamed Docker Personal and we have introduced a Docker Business subscription .
- The Docker Pro, Team, and Business subscriptions include commercial use of Docker Desktop.
Some of the key features of Docker Desktop include:
- Ability to containerize and share any application on any cloud platform, in multiple languages and frameworks
- Easy installation and setup of a complete Docker development environment
- Includes the latest version of Kubernetes
- Automatic updates to keep you up to date and secure
- On Windows, the ability to toggle between Linux and Windows Server environments to build applications
- Fast and reliable performance with native Windows Hyper-V virtualization
- Ability to work natively on Linux through WSL 2 on Windows machines
- Volume mounting for code and data, including file change notifications and easy access to running containers on the localhost network
- In-container development and debugging with supported IDEs.
System requirements
Below are the hardware prerequisites are required to successfully run Client Hyper-V on Windows 10:
– 64-bit processor with Second Level Address Translation (SLAT),
– 4GB system RAM, and
– BIOS-level hardware virtualization support must be enabled in the BIOS settings. And, If this is not done, you will be prompted with the following error “Please enable the Virtual Machine Platform Windows Feature and ensure Virtualization is enabled in the BIOS“.
Your Windows machine must meet the following requirements to successfully install Docker Desktop.
1: Windows 10 64-bit: Pro 2004 (build 19041) or higher, or Enterprise or Education 1909 (build 18363) or higher.
2: For the WSL2 backend, please enable the WSL 2 feature on Windows. For detailed instructions, refer to these guides: What is Windows Subsystem for Linux (WSL), how to install WSL on Windows Server via Server Manager and PowerShell, and how to install WSL on Windows 10. You can install WSL with the following command wsl --install by entering the command either in PowerShell or the Command Prompt.

Alternatively, you can use the following command to install it very quickly as well.
dism.exe /online /enable-feature /featurename:Microsoft-Windows-Subsystem-Linux /all /norestart
3: Download and install the WSL2 Linux kernel update package for x64 machines. You can also see this guide for more information Linux kernel update package.


4: Hyper-V and Containers Windows features must be enabled. Here is a similar guide to work you through how to install RSAT on Windows 10 via Windows features, and on a server, see how to install RSAT on Windows Server. You may also want to see this very detailed guide discussing “how to enable or disable DotNet Framework (NetFx3) via PowerShell, Control Panel, and DISM in Windows“.
5: To do this, launch the Windows Control Panel and click on Programs, and then on “Turn Windows features on or Off”.


As you can see, we already have the Hyper-V feature installed. We will have to check the “Container” feature as shown below.

Ensure both the Hyper-V and Containers Windows features must be enabled. When you are done, click on OK.

After these steps, Windows will search and apply the settings and you will be required to restart afterward.


Windows Server Containers use Hyper-V isolation by default on Windows 10 in order to provide developers with the same kernel version and configuration that will be used in production.
You need Docker in order to work with Windows Containers. Docker consists of the Docker Engine (dockerd.exe), and the Docker client (docker.exe). You can install Docker on Windows 10 Professional and Enterprise editions by using the following steps.
The Docker Desktop can be downloaded from the following link as shown below.

It typically downloads to your Downloads folder, or you can run it from the recent downloads bar at the bottom of your web browser.
– To install the Docker Desktop, double-click on the Docker Desktop Installer.exe to run the installer.
Ensure you install the latest version of the Docker engine to avoid vulnerabilities
Accept the User Account Control. You may want to learn how to turn UAC on or off in Windows.

When prompted, ensure the install required Windows components for WSL 2 option is selected on the Configuration page.


This will unpack and install as shown below


As you can see below, the installation has succeeded. Just Close and Logout

If you get this window close and restart, you may run into issues which means, the prerequisites defined above were not correctly follwed. I just had to simulate this on a different PC in my Lab. You have to click on close and restart and ensure you install WSL, the package update etc as defined above.
Note: If your admin account is different from your user account, you must add the user to the docker-users group. Run Computer Management as an administrator and navigate to Local Users and Groups > Groups > docker-users. Right-click to add the user to the group. Log out and log back in for the changes to take effect.

Start Docker Desktop
The Docker Desktop does not start automatically after installation. To start Docker Desktop, search for Docker, and select Docker Desktop in the search results.
Note: You can just click on the Docker Desktop available on the desktop of your PC because we selected to have it installed on the Desktop.

The Docker menu displays the Docker Subscription Service Agreement window. It includes a change to the terms of use for Docker Desktop. Please refer to the 3rd paragraph above for more information.

As you can see, Docker is now installed and started.

You may want to sign into Docker Hub with your Docker IDas shown below

If you wish to check for updates after logging in, please navigate to the Software Updates and click on Check for Updates.

Now, let’s run some Docker commands. Below are some possible commands that you can run.


Currently, this is the version of Docker Desktop we are running

Before you can use Docker, you will need to install the container images. For more information, see docs for our container base images.
Containers and images created with Docker Desktop are shared between all user accounts on machines where it is installed. This is because all Windows accounts use the same VM to build and run containers. Note that it is not possible to share containers and images between user accounts when using the Docker Desktop WSL 2 backend. Nested virtualization scenarios, such as running Docker Desktop on a VMWare or Parallels instance might work, but there are no guarantees [Reference: Docker Docs].
Uninstall Docker Desktop
Uninstalling Docker Desktop destroys Docker containers, images, volumes, and other Docker-related data local to the machine, and removes the files generated by the application. To uninstall Docker Desktop from your Windows machine, please follow the steps discussed below.
From the Windows Start menu, select Settings > Apps > Apps & features as shown below
– Select Docker Desktop from the Apps & features list and then select Uninstall.
Alternatively, you could also launch Windows Control Panel, click on programs and Features and have the Docker Desktop uninstalled. Click Uninstall to confirm your selection.

To uninstall Docker on Windows Server 2016
From an elevated PowerShell session, use the Uninstall-Package and Uninstall-Module cmdlets to remove the Docker module and its corresponding Package Management Provider from your system, as shown in the following example:
Uninstall-Package -Name docker -ProviderName DockerMsftProvider
Uninstall-Module -Name DockerMsftProvider
You can find the Package Provider that you used to install Docker with PS C:> Get-PackageProvider -Name *Docker*
Clean up Docker data and system components
After you uninstall Docker, you’ll need to remove Docker’s default networks so their configuration won’t remain on your system after Docker is gone. You can do this by running the following cmdlet:
Get-HNSNetwork | Remove-HNSNetworkTo remove Docker’s default networks on Windows Server 2016.
Get-ContainerNetwork | Remove-ContainerNetworkRun the following cmdlet to remove Docker’s program data from your system:
Remove-Item "C:ProgramDataDocker" -RecurseRemove features associated with Docker/containers on Window
This includes the “Containers” feature, which is automatically enabled on any Windows 10 or Windows Server 2016 when Docker is installed. It may also include the “Hyper-V” feature, which is automatically enabled on Windows 10 when Docker is installed but must be explicitly enabled on Windows Server 2016.
Note: The Hyper-V feature is a general virtualization feature that enables much more than just containers. Before disabling the Hyper-V feature, make sure there are no other virtualized components on your system that require Hyper-V.
To remove Windows features on Windows 10:
- Go to Control Panel > Programs > Programs and Features > Turn Windows features on or off.
- Find the name of the feature or features you want to disable—in this case, Containers and (optionally) Hyper-V.
- Uncheck the box next to the name of the feature you want to disable.
- Select “OK”.
To remove Windows features on Windows Server 2016: From an elevated PowerShell session, run the following cmdlets to disable the Containers and (optionally) Hyper-V features from your system:
Remove-WindowsFeature Containers
Remove-WindowsFeature Hyper-V
Reboot your system
To finish uninstallation and cleanup, run the following cmdlet from an elevated PowerShell session to reboot your system:
Restart-Computer -ForceI hope you found this blog post helpful. If you have any questions, please let me know in the comment session.
I just installed docker for the first time to try it out, but after installing Docker onto my computer I get this error every time I start it.
System.InvalidOperationException:
Failed to deploy distro docker-desktop to C:Users*User*AppDataLocalDockerwsldistro: exit code: -1
stdout: The service cannot be started, either because it is disabled or because it has no enabled devices associated with it.
To be honest I have no idea what this error means. Has anyone seen this before and knows how to fix it?
Uninstall Docker.
Uncheck Containers, Hyper-V, Windows Subsystem for Linux in Windows features
Restart the system
Install Docker Desktop
Restart System
Start Docker Desktop
After following this solution Docker was able to kind of start without giving me any errors. The reason I say kind of is because it was taking forever to actually start up. That’s when I found this solution which seems to reset Docker (I’m not sure if it deletes or messes with existing containers because I had none) and get it working like new.
Docker is a platform for creating and deploying applications in self-sufficient containers. The installation of Docker is pretty easy in Linux, but this is usually not the case with Windows. In this post, I will show you how to install Docker in Windows 10 or Windows 11 in multiple ways. You’ll learn there is indeed a way that makes the Docker Desktop installation in Windows as simple as in Linux.
Contents
- Prerequisites
- Docker with WSL2 backend
- Docker with Hyper-V backend
- Install Docker using the GUI
- Install Docker using winget
- Install Docker using PowerShell
- Author
- Recent Posts

Surender Kumar has more than twelve years of experience in server and network administration. His fields of interest are Windows Servers, Active Directory, PowerShell, web servers, networking, Linux, virtualization, and penetration testing. He loves writing for his blog.
Latest posts by Surender Kumar (see all)
- Extending LVM space in Ubuntu — Thu, Feb 2 2023
- Backup in Proxmox VE — Thu, Jan 26 2023
- Snapshots in Proxmox VE — Wed, Jan 25 2023
Prerequisites
You might already be aware that Docker relies on virtualization technology. On Windows, Docker can use either the Windows Subsystem for Linux (WSL) 2 or Hyper-V as a backend.
Docker with WSL2 backend
The current version of Docker Desktop only works on the 64-bit edition of Windows, whether you’re running Windows 10 or Windows 11. To run Docker with the WSL2 backend, your system must meet the following prerequisites:
- Windows 10: Home/Pro 21H1 (build 19043) or higher, or Enterprise/Education 20H2 (build 19042) or higher
- Windows 11: Home/Pro version 21H2 or higher, or Enterprise/Education version 21H2 or higher
- WSL2 feature enabled
- Linux kernel update package for WSL2
- For WSL2, the following are the hardware requirements:
- 64-bit CPU with second-level address translation (SLAT)
- Hardware virtualization support, which must be enabled in BIOS/UEFI
- 4 GB RAM
Docker with Hyper-V backend
To be able to run Docker with a Hyper-V backend and Windows containers, your system must meet the following prerequisites:
- Windows 10: Pro 21H1 (build 19043) or higher, or Enterprise/Education 20H2 (build 19042) or higher
- Windows 11: Pro/Enterprise/Education version 21H2 or higher
- Optional Windows features for Hyper-V and Containers must be enabled

Enable Hyper V and Containers windows features for Docker

For Hyper-V, following are the hardware requirements:
- 64-bit CPU with second-level address translation (SLAT)
- Hardware virtualization support, which must be enabled in BIOS/UEFI
- 4 GB RAM
In addition to the aforementioned requirements, if you want to run Docker in a Hyper-V guest VM, you need to enable nested virtualization by running this PowerShell command on the Hyper-V host:
Set-VMProcessor -VMName <VMName> -ExposeVirtualizationExtensions $True

Enable nested virtualization for a VM on Hyper V host using PowerShell
Make sure your VM is powered off before running this command. Without nested virtualization support, Docker will not work in a VM, and you will receive the error message shown below.

Docker desktop cannot start An unexpected error occurred
Install Docker using the GUI
To install Docker Desktop in Windows using the GUI, follow these steps:
Download Docker Desktop. You will see a configuration screen, as shown in the screenshot:

Docker desktop configuration Use WSL 2 instead of Hyper V recommended
To use Docker with the WSL 2 backend, check the box that says Use WSL 2 instead of Hyper-V (recommended). If you want to use Hyper-V instead, uncheck this option and click OK.
When the installation is complete, click the Close and Restart button to restart your computer.

Close Docker installer and restart the computer to complete installation
After restarting, you will be able to run Docker Desktop using either a shortcut or a command prompt. If you did not install WSL 2 before installing Docker, you will receive the WSL 2 installation is incomplete error when you try to start Docker.

Docker desktop error WSL 2 installation is incomplete
To fix this error, run the wsl —update command in an elevated PowerShell console, and restart your computer.

Installing WSL2 kernel updates to fix the WSL 2 installation is incomplete error
Install Docker using winget
Winget is a command-line package manager for modern versions of Windows, which works just like apt or DNF in Linux. If you have a little experience with package installation in Linux, you probably know that you usually just have to type a command and the package is ready for use. Well, winget does the exact same thing in Windows. All you need is Windows 10 1809 (build 17763) or Windows 11. To install Docker in Windows using winget, follow these steps:
Launch an elevated command prompt or PowerShell console, and type the following command:
winget install --exact --id Docker.DockerDesktop --accept-source-agreements --accept-package-agreements

Installing docker desktop in windows using winget
The —exact (or -e in short) parameter tells winget to find the package using an exact match. The installation can take a while, but it is pretty much automatic, so there is nothing you need to do but wait.
When the command is finished, open a new command prompt (or PowerShell console) and run the docker —version command.
If you try to run docker —version in the same command prompt, you will likely see The term ‘docker’ is not recognized as the name of a cmdlet, function, script file, or operable program error, as shown in the screenshot.

The term docker is not recognized as the name of a cmdlet function script file or operable program
This error occurs because your current command session (cmd or PowerShell) is still using the old environment variables. To be able to recognize the newly added Docker variable, you must reload the environment variables. Launching a new command session is the easiest way to load new variables.
Install Docker using PowerShell
To install Docker Desktop using PowerShell, follow these steps:
Download Docker Desktop.
Once the installer package is downloaded, open an elevated PowerShell console or Windows Terminal, and type the following command to start Docker installation:
Start-Process "D:Docker Desktop Installer.exe" -Wait -NoNewWindow "install --quiet --accept-license"

Installing Docker silently using PowerShell
Make sure you adjust the installer path. The -Wait parameter causes the Start-Process cmdlet to wait for the new process to finish, and the -NoNewWindow parameter prevents the new process from opening in a new window. The —quiet switch is offered by Docker’s install command and suppresses the installation information. To see the information, skip this switch. Since we are using PowerShell, notice how —quiet and other flags are enclosed in quotes along with the install command—this is very important to avoid errors. By default, Docker will use the WSL 2 backend, but you could include the —backend=hyper-v flag to use the Hyper-V backend instead.
Once the above command is finished, you will see a shortcut for Docker Desktop on your desktop. Double-click the shortcut to launch Docker.
All of these installation methods are self-sufficient, so there is nothing additional you need to do. But you may still get an error message that says Docker Desktop – Access denied. You are not allowed to use Docker. You must be in the «docker-users» group.
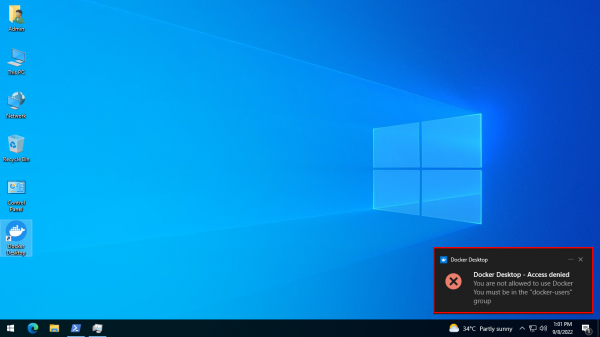
Docker Desktop – Access denied. You are not allowed to use Docker. You must be in the docker users group
If you get this error, run the following command in an elevated PowerShell console:
Add-LocalGroupMember -Group "docker-users" -Member $env:UserName -Verbose

Adding the current user to the docker users group using PowerShell
Don’t forget to log off and log on again after running this command. If you want to delegate another user to run Docker Desktop, you can specify that username with the -Member parameter instead of $env:UserName.
Subscribe to 4sysops newsletter!
That was all for this guide. You just learned how to install Docker in Windows using the GUI, winget, and PowerShell. I am curious to know which method you prefer, and why.