Building and delivering for Universal Windows Platform
Universal Windows Platform: Generated project with IL2CPP scripting backend
Use the Universal Windows PlatformAn IAP feature that supports Microsoft’s In App Purchase simulator, which allows you to test IAP purchase flows on devices before publishing your application. More info
See in Glossary (UWP) Build Settings to configure and build your application for UWP. The UWP Build Settings are part of the Build Settings window.
To view the UWP Build Settings:
- Select File > Build Settings.
- From the list of platforms in the Platform pane, select UWP.
Note: Universal Windows Platform only shows in the Platform list if you’re using Unity on a Windows computer. - If the Build button isn’t visible and Build And Run is greyed out, select Switch Platform. The UWP Build Settings now have an effect on the build.
You can configure the following settings for your build:
| Property | Description | |
|---|---|---|
| Architecture | Select from the following CPU architectures to build (only applies to Build And Run) for UWP. | |
| Intel 64-bit | 64-bit Intel CPU. | |
| Intel 32-bit | 32-bit Intel CPU. | |
| ARM 64-bit | 64-bit ARM CPU. | |
| ARM 32-bit | 32-bit ARM CPU. | |
| Build Type | Select the Visual Studio project or build type to generate. | |
| XAML Project | Integrates Unity within a full XAML environment. This results in some performance loss, but lets you use XAML elements in your application. | |
| D3D Project | Integrates Unity in a basic app window. This results in the best performance. | |
| Executable Only | Hosts the project in a pre-built executable for rapid iteration. This setting has the quickest iteration speed because it doesn’t require you to build the generated project in Visual Studio. It offers the same performance as D3D Project builds. | |
| Target SDK Version | Select the Windows 10 SDK installed on the local PC to build the application against. This setting is relevant only when calling Windows 10 APIs directly from scripts.
Note: Unity requires the base Windows 10 SDK version 10.0.10240.0 or higher for building UWP apps, and doesn’t support Windows 8/8.1 SDKs. |
|
| Minimum Platform Version | Select the minimum Windows 10 release version required to run the app.
Note: This setting is only relevant if you’re using Windows features or APIs that aren’t available in the base Windows 10 version (10.0.10240). |
|
| Visual Studio Version | Specify the Visual Studio version if you have multiple versions installed. | |
| Build and Run on | Select the target device or transport to deploy and launch the app during Build And Run. | |
| Local Machine | Deploys and launches the app on the local PC. | |
| Remote Device (via Device Portal) | Deploys and launches the app to a connected device over the Device Portal transport. For more information, see documentation on Windows Device Portal deployment. | |
| Build Configuration | Select the build configuration (only applies to Build And Run).
Note: These build configurations are the same as those available in the Visual Studio project that Unity generates. |
|
| Debug | Produces a build that contains additional code you can use for debugging, and enables the ProfilerA window that helps you to optimize your game. It shows how much time is spent in the various areas of your game. For example, it can report the percentage of time spent rendering, animating, or in your game logic. More info See in Glossary for your build. |
|
| Release | Produces a build that has debug code stripped out, and enables the Profiler for your build. | |
| Master | Produces a build that’s fully optimized for release. | |
| Copy References | Disable this setting to allow the generated solution to reference Unity files from Unity’s installation folder instead of copying them to the build folder. This can save up to 10 GB of disk space, but you can’t copy the build folder to another PC. Unity also builds your application faster when you disable this setting. | |
| Copy PDB files | Enable this setting to include Microsoft program database (PDB) files in the built Player. PDB files contain debugging information for your application, but might increase the size of your Player. For more information, see documentation on Windows debugging. | |
| Development Build | A development build includes scripting debug symbols. When you select this option, Unity sets the DEVELOPMENT_BUILD scripting define. Your build then includes preprocessor directives that set DEVELOPMENT_BUILD as a condition.
For more information, see Platform dependent compilation. |
|
| Autoconnect Profiler | Indicates whether to automatically connect the Profiler to the built application when it runs.
This property is visible only when Development Build is enabled. |
|
| Deep Profiling | Indicates whether to enable Deep Profiling in the Profiler. This makes the Profiler instrument every function call in your application so it returns more detailed profiling data. This option might slow down script execution.
This property is visible only when Development Build is enabled. |
|
| Script Debugging | Indicates whether to allow debugging for the application’s script code.
This property is visible only when Development Build is enabled. |
|
| Scripts Only Build | Builds only the scripts in the current Project. Unity rebuilds the scripts in your application, and leaves data files from previously executed builds intact. It significantly improves iteration times if you only change the code in your application.
This property is visible only when Development Build is enabled. Note: You need to build the entire Project once before you can use this setting. |
|
| IL2CPPA Unity-developed scripting back-end which you can use as an alternative to Mono when building projects for some platforms. More info See in Glossary Code Generation |
Defines how Unity manages IL2CPP code generation. | |
| Faster runtime | Generates code optimized for runtime performance. | |
| Faster (smaller) builds | Generates code optimized for build size and iteration. This setting generates less code and produces a smaller build, but may reduce runtime performance, especially for generic code. Use this option when faster build times are important, such as when iterating on changes. | |
| CompressionA method of storing data that reduces the amount of storage space it requires. See Texture Compression, Animation Compression, Audio Compression, Build Compression. See in Glossary Method |
Specifies the method Unity uses to compress the data in your Project when it builds the Player. This includes AssetsAny media or data that can be used in your game or project. An asset may come from a file created outside of Unity, such as a 3D Model, an audio file or an image. You can also create some asset types in Unity, such as an Animator Controller, an Audio Mixer or a Render Texture. More info See in Glossary, ScenesA Scene contains the environments and menus of your game. Think of each unique Scene file as a unique level. In each Scene, you place your environments, obstacles, and decorations, essentially designing and building your game in pieces. More info See in Glossary, Player settingsSettings that let you set various player-specific options for the final game built by Unity. More info See in Glossary, and GI data. |
|
| Default | The Default compression is set to None. | |
| LZ4 | LZ4 is a fast compression format that’s useful for development buildsA development build includes debug symbols and enables the Profiler. More info See in Glossary. This compression can improve loading time of applications built with Unity. For more information, see BuildOptions.CompressWithLz4. |
|
| LZ4HC | LZ4HC is a high compression variant of LZ4 that’s slower to build but produces better results for release builds. This compression can improve loading time of applications built with Unity. For more information, see BuildOptions.CompressWithLz4HC. |
Additional resources:
- Integrate Unity into UWP applications
Building and delivering for Universal Windows Platform
Universal Windows Platform: Generated project with IL2CPP scripting backend
Integrating Unity into UWP applications
Windows Device Portal Deployment
To create a build for UWP, go to Build Settings (menu: File > Build Settings). In the Platform list, select Universal Windows PlatformAn IAP feature that supports Microsoft’s In App Purchase simulator, which allows you to test IAP purchase flows on devices before publishing your application. More info
See in Glossary, then select the Switch Platform button.
Note: Universal Windows Platform only shows in the Platform list if you’re using Unity on a Windows computer.
Unity doesn’t support Windows Phone development.
Building UWP applications with Unity
The main workflow when building a game or application for UWP using Unity is as follows:
When you click Build in the Build Settings window:
-
Unity generates and exports a Visual Studio Project.
-
Open the generated Project’s .sln file in Visual Studio.
-
Use Visual Studio to build your final application.
When you click Build And Run, Unity builds an app executable that can run independently.
UWP Build Settings
Use these settings to configure how Unity builds your application.
| Setting | Function | |
|---|---|---|
| Target Device | Choose from the following options to build your app for any device, or select a specific device: Any device, PC, Mobile, or HoloLens. | |
| Architecture | Select the type of CPU to build for (only applies to Build And Run). | |
| x64 | 64-bit CPU. | |
| x86 | 32-bit CPU. | |
| ARM | 32-bit ARM CPU. | |
| ARM64 | 64-bit ARM CPU. | |
| Build Type | Select the type of Visual Studio project or build to generate. | |
| XAML Project | Visual Studio project that integrates Unity within a full XAML environment. This results in some performance loss, but lets you use XAML elements in your application. | |
| D3D Project | Visual Studio project that integrates Unity in a basic app window. This results in the best performance. | |
| Executable Only | Hosts the project in a pre-built executable for rapid iteration. This setting has the quickest iteration speed because it doesn’t require you to build the generated project in Visual Studio. It offers the same performance as D3D Project builds. | |
| Target SDK Version | The Windows 10 SDK installed on the local PC to build the application against. This setting is only relevant when calling Windows 10 APIs directly from scripts.
Note: Unity requires the base Windows 10 SDK version 10.0.10240.0 or higher for building UWP apps, and doesn’t support Windows 8/8.1 SDKs. |
|
| Minimum Platform Version | Minimum Windows 10 release version required to run the app.
Note: This setting is only relevant if you’re using Windows features or APIs that aren’t available in the base Windows 10 version (10.0.10240). |
|
| Visual Studio Version | Target a specific Visual Studio release if you have multiple versions installed. | |
| Build and Run on | Select the target device or transport to deploy and launch the app during Build And Run. | |
| Local Machine | Deploys and launches the app on the local PC. | |
| Remote Device (via Device Portal) | Deploys and launches the app to a connected device over the Device Portal transport.
To deploy over the Device Portal, you must enter the connection and authentication information in these additional fields: — Device Portal Address (required) For more information, see documentation on Windows Device Portal deployment. |
|
| Build Configuration | Select the build type (only applies to Build And Run). Note: These build configurations are the same as those available in the Visual Studio project that Unity generates. |
|
| Debug | Produces a build that contains additional code you can use for debugging, and enables the ProfilerA window that helps you to optimize your game. It shows how much time is spent in the various areas of your game. For example, it can report the percentage of time spent rendering, animating, or in your game logic. More info See in Glossary for your build. |
|
| Release | Produces a build that has debug code stripped out, and enables the Profiler for your build. | |
| Master | Produces a build that is fully optimized for release. | |
| Copy References | Disable this setting to allow the generated solution to reference Unity files from Unity’s installation folder instead of copying them to the build folder. This can save up to 10 GB of disk space, but you can’t copy the build folder to another PC. Unity also builds your application faster when you disable this setting. | |
| Copy PDB files | Enable this setting to include Microsoft program database (PDB) files in the built Standalone Player. PDB files contain debugging information for your application, but might increase the size of your Player. For more information, see documentation on Windows debugging. | |
| Development BuildA development build includes debug symbols and enables the Profiler. More info See in Glossary |
A development build includes scripting debug symbols. When you select the Development Build setting, you can also select the Autoconnect Profiler, Script Debugging, and Scripts Only Build setting. It also enables the DEVELOPMENT_BUILD #define.
For more information about #define directives, see documentation on Platform dependent compilation. |
|
| Autoconnect Profiler | Automatically connect the Profiler to the build. Only available if you enable the Development Build setting. For more information on the Profiler, see Profiler overview. | |
| Deep Profiling | When you enable Deep Profiling, Unity profiles all of your script code and records all function calls. This is useful to pinpoint performance issues with your game code. However, it uses a lot of memory and might not work with very complex scriptsA piece of code that allows you to create your own Components, trigger game events, modify Component properties over time and respond to user input in any way you like. More info See in Glossary. For more information, see documentation on deep profiling. |
|
| Script Debugging | Attach script debuggers to the Player remotely. Only available if you enable the Development Build setting. | |
| Scripts Only Build | Enable this setting to build just the scripts in the current Project. Only available if you enable the Development Build setting.
Once enabled, Unity only rebuilds the scripts in your application, and leaves data files from a previously executed build intact. It significantly improves iteration times if you only change the code in your application. Note: You need to build the entire Project once before you can use this setting. |
|
| Compression Method | Compress the data in your Project at build time. This includes Assets, ScenesA Scene contains the environments and menus of your game. Think of each unique Scene file as a unique level. In each Scene, you place your environments, obstacles, and decorations, essentially designing and building your game in pieces. More info See in Glossary, Player settingsSettings that let you set various player-specific options for the final game built by Unity. More info See in Glossary, and GI data. Choose between the following methods: |
|
| Default | Default compressionA method of storing data that reduces the amount of storage space it requires. See Texture Compression, Animation Compression, Audio Compression, Build Compression. See in Glossary is set to None. |
|
| LZ4 | A fast compression format that is useful for development builds. LZ4 compression can significantly improve loading time of applications built with Unity. For more information, see BuildOptions.CompressWithLz4. | |
| LZ4HC | LZ4HC — A high compression variant of LZ4 that is slower to build but produces better results for release builds. LZ4HC compression can significantly improve loading time of applications built with Unity. For more information, see BuildOptions.CompressWithLz4HC. |
Integrating Unity into UWP applications
Windows Device Portal Deployment
Чтобы создать сборку для UWP, перейдите в раздел Настройки сборки (меню: Файл > Настройки сборки). В списке Платформа выберите Универсальная платформа WindowsФункция IAP, которая поддерживает симулятор Microsoft In App Purchase, который позволяет протестировать потоки покупок IAP на устройствах перед публикацией приложения. Дополнительная информация
См. Словарь, затем выберите Переключить платформу кнопка.
Примечание. Универсальная платформа Windows отображается в списке Платформа, только если вы используете Unity на компьютере с Windows.
Unity не поддерживает разработку для Windows Phone.
Создание приложений UWP с помощью Unity
Основной рабочий процесс при создании игры или приложения для UWP с помощью Unity выглядит следующим образом:
Когда вы нажимаете Построить в окне Настройки сборки:
-
Unity создает и экспортирует проект Visual Studio.
-
Откройте файл .sln сгенерированного проекта в Visual Studio.
-
Используйте Visual Studio для создания окончательного приложения.
Когда вы нажимаете Сборка и запуск, Unity создает исполняемый файл приложения, который может работать независимо.
Настройки сборки UWP
Используйте эти параметры для настройки того, как Unity создает ваше приложение.
| Настройки | Функции | |
|---|---|---|
| Target Device | Выберите один из следующих вариантов, чтобы создать приложение для любого устройства, или выберите конкретное устройство: Любое устройство, ПК, Мобильное или HoloLens. | |
| Architecture | Выберите тип процессора для сборки (применимо только к Build And Run). | |
| x64 | 64-bit CPU. | |
| x86 | 32-bit CPU. | |
| ARM | 32-bit ARM CPU. | |
| ARM64 | 64-bit ARM CPU. | |
| Build Type | Выберите тип проекта или сборки Visual Studio для создания. | |
| XAML Project | Проект Visual Studio, который интегрирует Unity в полную среду XAML. Это приводит к некоторой потере производительности, но позволяет использовать элементы XAML в приложении. | |
| D3D Project | Проект Visual Studio, который интегрирует Unity в базовое окно приложения. Это приводит к лучшей производительности. | |
| Executable Only | Размещает проект в предварительно созданном исполняемом файле для быстрой итерации. Этот параметр имеет наибольшую скорость итерации, поскольку не требует сборки сгенерированного проекта в Visual Studio. Он предлагает ту же производительность, что и сборки D3D Project. | |
| Target SDK Version | Windows 10 SDK, установленный на локальном ПК для сборки приложения. Этот параметр имеет значение только при вызове API-интерфейсов Windows 10 непосредственно из скриптов.
Примечание. Unity требует базовой версии Windows 10 SDK 10.0.10240.0 или выше для создания приложений UWP и не поддерживает Windows 8/8.1 SDK. |
|
| Minimum Platform Version | Минимальная версия выпуска Windows 10, необходимая для запуска приложения.
Примечание. Этот параметр имеет значение только в том случае, если вы используете функции или API Windows, недоступные в базовой версии Windows 10 (10.0.10240). |
|
| Visual Studio Version | Ориентируйтесь на конкретный выпуск Visual Studio, если у вас установлено несколько версий.. | |
| Build and Run on | Выберите целевое устройство или транспорт для развертывания и запуска приложения во время Build And Run.. | |
| Local Machine | Развертывает и запускает приложение на локальном ПК. | |
| Remote Device (via Device Portal) | Развертывает и запускает приложение на подключенном устройстве через транспорт портала устройств.
Для развертывания через портал устройств необходимо ввести информацию о соединении и аутентификации в следующих дополнительных полях: – Адрес портала устройств (обязательно) Дополнительную информацию см. в документации по развертыванию портала устройств Windows. |
|
| Build Configuration | Выберите тип сборки (применимо только к Build And Run). Примечание. Эти конфигурации сборки такие же, как и доступные в проекте Visual Studio, который генерирует Unity. |
|
| Debug | Создает сборку, содержащую дополнительный код, который можно использовать для отладки, и открывает окно Profiler, помогающее оптимизировать игру. Он показывает, сколько времени вы тратите на различные области вашей игры. Например, он может сообщать о проценте времени, затраченном на рендеринг, анимацию или игровую логику. Дополнительная информация См. в Словарь свою сборку. |
|
| Release | Создает сборку, в которой удален код отладки, и включает Profiler для вашей сборки. | |
| Master | Создает сборку, полностью оптимизированную для выпуска. | |
| Copy References | Отключите этот параметр, чтобы сгенерированное решение могло ссылаться на файлы Unity из папки установки Unity, а не копировать их в папку сборки. Это может сэкономить до 10 ГБ дискового пространства, но вы не сможете скопировать папку сборки на другой компьютер. Unity также быстрее создает ваше приложение, если вы отключите этот параметр.. | |
| Copy PDB files | Включите этот параметр, чтобы включить файлы базы данных программы Microsoft (PDB) во встроенный автономный проигрыватель. Файлы PDB содержат отладочную информацию для вашего приложения, но могут увеличить размер вашего проигрывателя. Дополнительные сведения см. в документации по отладке Windows. | |
| Development BuildСборка разработки включает символы отладки и включает профилировщик. Подробнее См. в Словарь |
Сборка для разработки включает символы отладки сценариев. При выборе параметра Сборка для разработки также можно выбрать параметры Профилировщик автоподключения, Отладка скриптов и Сборка только скриптов настройка. Это также включает DEVELOPMENT_BUILD #define.
Дополнительную информацию о директивах #define см. в документации по платформенно-зависимой компиляции. |
|
| Autoconnect Profiler | Автоматически подключать Profiler к сборке. Доступно только при включении параметра Разработка. Дополнительную информацию о Profiler см. в обзоре Profiler. | |
| Deep Profiling | Когда вы включаете Глубокое профилирование, Unity профилирует весь код вашего скрипта и записывает все вызовы функций. Это полезно для выявления проблем с производительностью кода вашей игры. Однако он использует много памяти и может не работать с очень сложными скриптамифрагмент кода, позволяющий создавать собственные Компоненты, запускайте игровые события, изменяйте свойства Компонентов с течением времени и реагируйте на ввод данных пользователем любым удобным для вас способом. Подробнее См. в Словарь. Дополнительные сведения см. в документации по глубокому профилированию.. |
|
| Script Debugging | Удаленно подключайте отладчики скриптов к проигрывателю. Доступно только при включении параметра Разработка. | |
| Scripts Only Build | Включите этот параметр, чтобы создавать только сценарии в текущем проекте. Доступно только при включении параметра Разработка.
После включения Unity только перестраивает скрипты в вашем приложении и оставляет файлы данных из ранее выполненной сборки нетронутыми. Это значительно сокращает время итерации, если вы изменяете только код в своем приложении. Примечание. Прежде чем использовать этот параметр, необходимо один раз собрать весь проект. |
|
| Compression Method | Сжимайте данные в своем проекте во время сборки. Сюда входят ресурсы, сценыСцена содержит окружение и меню вашей игры. Думайте о каждом уникальном файле сцены как об уникальном уровне. В каждой сцене вы размещаете свое окружение, препятствия и декорации, по сути проектируя и создавая свою игру по частям. Подробнее См. в Словарь, Настройки игрокаНастройки, которые позволяют вам установить различные параметры игрока для окончательной игры, созданной Unity. Подробнее См. в Словарь и данные GI. Выберите один из следующих методов: |
|
| Default | сжатие по умолчаниюМетод хранения данных, уменьшающий объем требуемого дискового пространства. См. Сжатие текстур, Сжатие анимации, Сжатие звука, Сжатие компоновки. Для параметра См. в Словарь установлено значение Нет. |
|
| LZ4 | Формат быстрого сжатия, полезный для сборок разработки. Сжатие LZ4 может значительно сократить время загрузки приложений, созданных с помощью Unity. Дополнительные сведения см. в разделе BuildOptions.CompressWithLz4. | |
| LZ4HC | LZ4HC — вариант LZ4 с высокой степенью сжатия, сборка которого выполняется медленнее, но дает лучшие результаты при выпуске сборок. Сжатие LZ4HC может значительно сократить время загрузки приложений, созданных с помощью Unity. Дополнительные сведения см. в разделе BuildOptions.CompressWithLz4HC. |
Всем привет! В эти праздничные выходные мы с удовольствием поделимся с вами подборкой свежих материалов о разработке самых разных приложений для Windows 10.
Давно хотели создать собственную игру?
Самый простой способ сделать игру на Unity 5
Потратив чуть больше часа, вы сможете получить представление о платформе Unity, настроить рабочую среду, создать базовые элементы игры и запустить ее на Windows 10 в качестве универсального приложения.
Подробнее по сссылке.
Все, что вам необходимо знать для того, чтобы начать разработку универсального приложения для Windows 10 теперь собрано в виде видео-материалов на русском языке, в том числе подробное описание универсальной платформы Windows (UWP) и базовые принципы работы UWP приложения:
Введение в разработку универсальных приложений на платформе Windows
Подробнее по ссылке.
И в преддверии 8го марта, мы вспоминаем наш проект Love2Code, который призван не только рассказать широкому кругу людей про самые простые способы создания приложений, но и поделиться с окружающими историями девушек давно и успешно реализовавших себя в индустрии IT.
На сегодня все! Добрых вам выходных и хорошего настроения! 
Once enabled, Unity only rebuilds the scripts in your application, and leaves data files from a previously executed build intact. It significantly improves iteration times if you only change the code in your application.
Источник
Что такое Universal Windows Platform (UWP)?


Универсальная платформа Windows (UWP) – это специальная платформа для создания приложений на Windows 10. Вы можете разрабатывать приложения для UWP с помощью всего одного набора API, одного пакета приложений и одного магазина для доступа ко всем устройствам Windows 10 – ПК, планшета, телефона, Xbox, HoloLens, Surface Hub и других. Легче поддерживать несколько размеров экрана, а также различные модели взаимодействия, будь то сенсор, мышь и клавиатура, игровой контроллер или ручка. В основе приложений UWP лежит идея, что пользователи хотят, чтобы их работа, их задачи были мобильными через ВСЕ устройства, чтобы можно было использовать любое устройство, наиболее удобное или производительное для конкретной задачи.
UWP является гибким: вам не нужно использовать C# и XAML, если вы этого не хотите. Вам нравится развиваться в Unity или MonoGame? Предпочитаете JavaScript? Не проблема, используйте все, что хотите. У вас есть настольное приложение C++, которое вы хотите расширить с помощью функций UWP и продавать в магазине? И тут все будет работать.
В итоге вы можете потратить свое время на работу со знакомыми языками программирования, фреймворками и API-интерфейсами, все в одном проекте, и иметь тот же самый код, который работает на огромном диапазоне оборудования Windows из существующих сегодня. После того, как вы написали свое приложение UWP, вы можете опубликовать его в магазине на обозрение всего мира.
Итак, что такое UWP-приложение?
Основа API-интерфейсов универсальной платформы Windows (UWP) одинакова для всех классов устройства Windows. Если ваше приложение использует только основные API-интерфейсы, оно будет запускаться на любом устройстве Windows 10, независимо от того, планируете ли вы использование настольного ПК, гарнитуры Xbox или наушников Mixed Reality.
Тема связана со специальностями:
Элементы пользовательского интерфейса используют эффективные пиксели, поэтому они могут отображать макет в зависимости от количества пикселей экрана, доступных на устройстве. И они хорошо работают с несколькими типами ввода, такими как клавиатура, мышь, сенсорный экран, ручка и контроллеры Xbox One. Если вам нужно дополнительно адаптировать свой пользовательский интерфейс к определенному размеру экрана или устройству, новые панели макетов и инструменты помогут вам в этом.
Используйте язык, который вы уже знаете
Приложения UWP используют Windows Runtime, собственный API, встроенный в операционную систему. Этот API реализован на C++ и поддерживается на C#, Visual Basic, C++ и JavaScript. Некоторые варианты написания приложений в UWP включают:
Видео курсы по схожей тематике:

UX/UI Design Стартовый

UX/UI Design мобильных приложений

Создаем игру типа “Pokémon Go“
Microsoft Visual Studio 2017 предоставляет шаблон приложения UWP для каждого языка, который позволяет вам создать единый проект для всех устройств. Когда ваша работа будет завершена, вы можете создать пакет приложений и отправить его в Windows Store из Visual Studio, чтобы сделать ваше приложение доступным для клиентов на любом устройстве Windows 10.
Приложения UWP оживают в Windows
Наконец, вы можете использовать данные о роуминге и Windows Credential Locker, чтобы обеспечить постоянный роуминг на всех экранах Windows, где пользователи запускают ваше приложение. Данные о роуминге дают вам простой способ сохранить пользовательские настройки и настройки в облаке, не создавая собственную инфраструктуру синхронизации. И вы можете хранить учетные данные пользователя в хранилище учетных данных, где безопасность и надежность являются главным приоритетом.
Монетизируйте ваше приложение
В Windows вы можете выбрать, как вы будете монетизировать свои приложения на телефонах, планшетах, ПК и других устройствах. Вот несколько способов заработать деньги с помощью вашего приложения и услуг, которые оно предоставляет. Все, что вам нужно сделать, это выбрать то, что лучше подходит для вас:
Бесплатные вебинары по схожей тематике:

Tips&Tricks: How to Survive Meetings with Foreign Customers

Как выживать тестировщику в Agile среде

User Interface – тонкости и детали
Как начать?
Более подробный обзор UWP читайте в официальном Руководстве по приложениям для универсальной платформы Windows. Затем ознакомьтесь с настройкой Get set up, чтобы загрузить инструменты, необходимые для начала создания приложений, и напишите свое первое приложение!
Источник
Продукты и технологии:
Windows 10, Universal Windows Platform, Unity, Visual Studio
В статье рассматриваются:
Windows 10 предлагает много новых средств для разработчиков игр и для геймеров. С появлением Universal Windows Platform (UWP) разработчики могут ориентироваться на ПК, планшеты и мобильные устройства с Windows 10 (т. е. смартфоны), Xbox One и HoloLens, используя единую кодовую базу. Кроме того, произошло слияние различных Windows Store в один, и Microsoft сделала доступными Xbox Live Services на платформе Windows 10 наряду с приложением Xbox, которое резко увеличивает степень погружения геймера в игры на всех семействах устройств с Windows.
Для разработчиков игр Unity является одной из самых популярных игровых инфраструктур и движков. Поддерживая 21 платформу, она обладает лучшей поддержкой кросс-платформенной разработки среди всех инфраструктур, доступных сегодня. Ее редактор в сочетании с поддержкой скриптов на C# делает ее в высшей степени продуктивной средой разработки игр. Благодаря Asset Store с сообществом Unity и растущим возможностям Unity в области развлечений и сбора аналитической информации разработка игр с погружением в виртуальную среду (immersive games) еще никогда не была столь легка.
Раз уж все сложилось так удачно, мы обязаны написать об этом! Эта статья даст вам все необходимое для того, чтобы ваши Unity-игры отлично работали в Windows 10. Это не введение ни в Unity, ни в UWP-приложения. Мы предполагаем, что вы уже знакомы с ними, и вместо этого сосредоточимся на разъяснениях того, что изменилось с появлением Windows 10, и советах из серии «Вы должны это знать» по созданию впечатляющих «Универсальных Игр Windows» (Universal Windows Games, UWG). Мы будем делать это, используя практический подход, и проведем вас по нескольким изменениям, внесенным нами в игру-пример Chomp (рис. 1) для ее оптимизации под Windows 10.
.png "universal windows platform build support unity что это")
Рис. 1. Игра Chomp
Chomp начала свою жизнь как игра, написанная с применением Unity для Windows 8.1. Как видно из рис. 1, это довольно простая лабиринтная игра, похожая на знаменитую Pac-Man. Этот пример создан в качестве пособия для разработчиков, демонстрирующего, как писать игры с использованием Unity, поэтому ее простота была ключевым условием. Но теперь, когда появилась Windows 10 и Unity стала поддерживать эту новую ОС, Chomp понадобилось обновить. Исходный код для Chomp см. по ссылке bit.ly/ChompUnity. Скачайте его и следуйте за нами.
Чтобы получить UWP-версию нашей игры, мы могли бы просто экспортировать игру, используя профиль Windows 10 в Unity, но это не дало бы нам приложение, оптимизированное под Windows 10. Она не обрабатывает выполнение в окне, полноэкранный режим, сенсорный ввод и т. д. Итак, давайте посмотрим, что мы сделали для эффективного переноса этой игры с Windows 8.1 на Windows 10.
Приступаем к работе (обязательные требования)
UWP-приложения (и UWG) требуют разработки и тестирования в Windows 10 с помощью Visual Studio 2015. В любой редакции Visual Studio 2015 есть все, что нужно для создания игр, — даже в бесплатном Visual Studio Community 2015!
Также вам понадобится Unity версии 5.2.1p2 или выше. Unity 5.2 теперь устанавливает Visual Studio Community 2015 и Visual Studio 2015 Tools for Unity (VSTU), так что на практике, чтобы приступить к работе, достаточно установить Unity и указать правильные параметры в процессе установки (рис. 2).
.png "universal windows platform build support unity что это")
Рис. 2. Установка Unity с правильными параметрами дает все, что нужно для начала работы
Примечание Для разработчиков, использующих Mac, новой альтернативой является применение редактора Visual Studio Code совместно с проектами Unity. Более подробно об этом варианте см. по ссылке bit.ly/UnityVSCode.
Разработка под Windows 10
Разработка под Windows 10 следует точно тому же процессу, с которым вы уже знакомы. Но появился новый SDK для UWP-приложений под платформу Windows Store (рис. 3), который будет экспортировать игру как UWP-приложение.
.png "universal windows platform build support unity что это")
Рис. 3. Ориентация на Windows 10 в Unity
Ниже перечислены некоторые важные элементы, работающие «за кулисами» при экспорте для разработки под Windows 10 и UWP.
Новые шаблоны проектов
Процесс компиляции в Unity теперь генерирует проект Visual Studio 2015, совместимый с UWP. Как вы, вероятно, знаете, в этой новой системе проектов появились некоторые важные изменения.
Упомянутые выше отличия значимы в период выполнения, но новые шаблоны Unity делают эти изменения прозрачными для разработчика, поэтому давайте сосредоточимся на том, как подстроить и отшлифовать вашу игру под Windows 10.
Подстройка и шлифовка игры под Windows 10
Одна кодовая база для множества форм-факторов — ключевая особенность UWP, но, когда дело доходит до игр, все равно могут потребоваться некоторые оптимизации и адаптация для конкретных форм-факторов. Чаще всего это включает механизмы ввода (например, сенсорный, с клавиатуры, от мыши и геймпада), изменение размеров окна, оптимизация ресурсов и реализация интеграции платформенной функциональности (native integration) (например, использование активных плиток [live tiles], уведомлений или Cortana) для каждого конкретного форм-фактора. Мы исследуем, как обстоит с этим дело в UWG.
Окна Универсальные Windows-приложения теперь размещаются в окнах с изменяемым размером вместо выполнения в полноэкранном режиме, как это было в Windows 8 и 8.1, поэтому масштабирование окна теперь является одним из факторов, который вы должны учитывать в своих играх и приложениях. Большинство из этих отличий прозрачно для Unity-разработчика, потому что свойства Screen.height и Screen.width по-прежнему сообщают о доступном пространстве экрана в пикселях.
Windows 10 также включает новые API для входа в полноэкранный режим и выхода из него, и эти возможности предоставляются через Unity-класс Screen заданием свойства Screen.fullScreen. Рекомендуется реализовать стандартные клавиши-ускорители для входа в полноэкранный режим и выхода из него. Они широко варьируются у разных издателей, но наиболее распространенный ускоритель, который переключает между режимами, — клавиша F11 или комбинация Alt+Enter. В случае Chomp мы хотели дать игрокам возможность играть в полноэкранном режиме, поэтому реализовали клавишу-переключатель:
Наличие многооконного режима требует другого обязательного изменения в играх для Windows 10: вы должны обрабатывать смену фокуса ввода. На многооконном рабочем столе, если окно вашей игры вне фокуса ввода, вы должны ставить игру и ее музыкальное сопровождение на паузу, так как пользователь может взаимодействовать с другим окном. Unity абстрагирует это взаимодействие с помощью одинакового на всех платформах API: метода OnApplicationPause. Этот метод вызывается для всех активных MonoBehaviours, когда фокус ввода меняется. Мы обрабатываем это в Chomp, как показано на рис. 4.
Рис. 4. Игра ставится на паузу, когда фокус ввода меняется
Обратите внимание на асимметрию: когда игра теряет фокус ввода, игра и звук ставятся на паузу, а когда она получает фокус ввода, мы снимаем с паузы только звуковое сопровождение. Дело здесь вот в чем. Когда игра ставится на паузу, мы также показываем диалоговое окно паузы в самой игре, а когда фокус возвращается, игра ждет подтверждения от пользователя, что он действительно хочет возобновить игру. Этот диалог обрабатывает восстановление состояния игры из Pause обратно в Running.
Внеся эти два изменения, теперь мы должным образом обрабатываем возможность входа в полноэкранный режим и выхода из него и ставим игру на паузу, когда наше окно теряет фокус.
Ввод В более ранних выпусках Unity была отличная поддержка ввода в Windows-игры, и с выходом Windows 10 она не изменилось. Ввод от мыши, с геймпада и сенсорный ввод остаются элегантно абстрагированными с помощью класса Input и диспетчера ввода (Input Manager) в Unity.
Самое важное, что нужно помнить в отношении ввода, — убедиться в том, что вы реализуете столько механизмов ввода, сколько имеет смысл в вашей игре. В случае Chomp мы хотим поддерживать клавиатуру, геймпад и сенсорный ввод. Не забывайте, что UWG могут выполняться на любом устройстве, поэтому обеспечьте игрокам максимальные удобства во вводе. Наиболее часто спрашивают, как распознавать, требуется ли показывать сенсорные элементы управления (вроде виртуального джойстика или панели для переключения направлений [D-pad]), когда игра запускается на сенсорном устройстве вроде смартфона.
Один из способов определить, надо ли показывать сенсорный джойстик, — выяснить, выполняется ли игра на смартфоне. Если да, тогда имело бы смысл отображать этот джойстик и включать его по умолчанию. Чтобы определить конкретную платформу, на которой выполняется игра (например, смартфон или Xbox), можно проверить, реализован ли соответствующий контракт. Именно так Chomp распознает, что она выполняется в Windows 10 Mobile:
Заметьте, что в этом коде мы используем препроцессор UNITY_WSA_10_0, чтобы определить, выполняется ли компиляция для Windows 10. Без этой проверки код не удалось бы скомпилировать в сборках, не предназначенных для Windows 10.
Держать виртуальный джойстик видимым постоянно — это один из подходов, но может оказаться, что лучше отображать его, только когда пользователь реально использует сенсорный ввод на устройстве. Windows 10 включает новый API — Windows.UI.ViewManagement.UIViewSettings.UserInteractionMode, который определяет, в каком режиме выполняется данная копия Windows 10 — планшетном (сенсорный ввод) или традиционном настольном (мышь/клавиатура). Этот API должен работать в UI-потоке Windows, поэтому из Unity вы должны вызов UI-потока для его маршалинга. Мы добавили в Chomp код (рис. 5), чтобы определять, взаимодействует ли пользователь с приложением с помощью сенсорного ввода.
Рис. 5. Код, определяющий, используется ли сенсорный ввод
Теперь, реализовав эти два метода, можно обновить Chomp, чтобы эта игра делала обоснованный выбор, когда показывать джойстик. Если она выполняется на мобильном устройстве или если используется сенсорный режим взаимодействия, UseJoystick вернет true и мы покажем джойстик:
Закончив с поддержкой масштабируемого окна и обработкой ввода, мы переходим к использованию преимуществ новых «родных» Windows API для расширения функциональности нашей игры.
Если код, который вы хотите добавить, слишком велик для подстановки или если поведение требуется абстрагировать (между платформами), вы можете по-прежнему использовать плагины. Для Windows 10 группа Microsoft Developer Experience Games Evangelism (мы являемся ее членами) предлагает несколько новых плагинов с открытым исходным кодом, которые упростят вам интеграцию с Windows 10. Вы найдете эти плагины по ссылке bit.ly/Win10UnityPlugins. На сегодняшний день в открытом доступе находятся следующие плагины.
Ранее в Chomp не было механизма покупок из приложения, поэтому мы решили добавить его в игру, используя плагин Store. Так что Chomp поддерживает теперь покупку бустеров (boosters) и дополнительных лабиринтов (mazes).
Импортировав пакет, мы можем ссылаться на Store API из Chomp. Сначала мы вызываем Store.LoadListingInformation, предоставляя метод обратного вызова, который выполняется при завершении операции; тем самым мы получаем список всех элементов, доступных для покупки. Если вызов был успешным, мы перебираем возвращенные элементы ProductListing в цикле и используем их для заполнения цен в нашем UI (рис. 6).
Рис. 6. Перечисление элементов, доступных для покупки из приложения
После выбора пользователем элемента, который он хочет приобрести, выполнение транзакции требует написания всего нескольких строк кода. На рис. 7 показан добавленный нами код для покупки новых лабиринтов для игры.
Рис. 7. Покупка из приложения
Как видите, использовать новые плагины для реализации платформенной функциональности достаточно легко.
Передача в магазин
Передача в Windows Store стала еще проще. Теперь вы можете передать либо один пакет, включающий все двоичные файлы, либо по одному пакету для каждой платформы/архитектуры.
Если вы хотите разделить свои пакеты или поддерживать игру только на определенных платформах, то можете вручную отредактировать файл package.appxmanifest и настроить элемент TargetDeviceFamily:
Три возможных семейства устройства перечислены ниже.
Если вы ориентируетесь на мобильную или настольную платформу, но не на консоли и другие семейства Windows, то можете указать в манифесте два семейства устройств (подставьте вместо «x» и «y» нужные цифры):
Заметьте, что для каждого семейства устройств могут быть разные MinVersion и MaxVersion. Это станет удобно в будущем, когда Windows 10 Mobile начнет поставляться с более высоким номером версии, чем настольная Windows 10. Однако пока мы советуем оставить версии по умолчанию (10.0.10240.0).
.png "universal windows platform build support unity что это")
Рис. 8. Включение файлов базы данных символов программы
Наконец, когда вы передаете продукт в Windows Store через портал разработчика, убедитесь, что вы выбрали правильную аппаратную конфигурацию. Store теперь позволяет указывать аппаратные требования, такие как сенсорный ввод или клавиатура, чтобы ваша игра устанавливалась только на подходящие устройства (рис. 9).
.png "universal windows platform build support unity что это")
Рис. 9. Страница Hardware Preferences на портале разработчика
Это лишь начало!
Эта статья — краткий обзор для Unity-разработчиков из серии «что нового там внутри». Мы показали это, перенеся свою простую игру в Windows 10 и добавив несколько новых возможностей. Из-за ограниченного пространства мы сосредоточились на основах и специфических для игр обязательных изменений, не став демонстрировать вам каждое новое средство на платформе Windows 10. Если вы хотите создать игру с погружением в ее виртуальную среду, подумайте об использовании дополнительных средств, таких как новый центр уведомлений на настольных компьютерах, Cortana, новые шаблоны активных плиток и новые Xbox Live Services API. С выпуском Windows 10 компания Microsoft постепенно открывает доступ к Xbox Live Services. Вам не нужно писать консольную игру — у вас просто должна быть отличная игра, работающая в Windows 10 и желание задействовать преимущества сервисов таблиц лидеров, достижений (achievements), игры на разных устройствах (cross-device play) и др. Для доступа к этим сервисам зарегистрируйтесь на программу ID@Xbox по ссылке xbox.com/id.
Visual Studio 2015 Tools for Unity
Starting with the 5.2 release, Unity includes Visual Studio 2015 Tools for Unity (VSTU), making Visual Studio the new default code editor for Unity projects on Windows. This change will bring improved IntelliSense, syntax coloring in the editor and a great C# debugger. To configure your default script editor, select the Edit | Preferences menu option in the Unity Editor. Your choices might include MonoDevelop (built-in), Visual Studio 2015, Visual Studio 2013 or the option to browse for further options.
VSTU also includes a few shortcuts for more easily writing code for Unity. For example, if you right-click within a MonoBehaviour class, the context menu will have a new Implement MonoBehaviours entry, which lets you quickly inject a MonoBehaviour method signature into your class.
In that same context menu, there’s also a Quick MonoBehaviours entry, which performs a similar function but with a less-intrusive dialog where you can type the method name you’re searching for, and the signature is again injected. Both of these methods are accessible from shortcut key accelerators for even more rapid use (Ctrl+Shift+M and Ctrl+Shift+Q).
Beyond the editor enhancements, one of the best features when using VSTU is the streamlined debugger integration with the Unity Editor. When a Unity project is open in Visual Studio, you’ll automatically see an “Attach to Unity” button for debugging in the standard Debug toolbar. Figure A shows where this button is located. This button will automatically find the Unity Editor’s process and attach to it. From there you can seamlessly set breakpoints, analyze variable values and do most everything else you’d expect to do with Visual Studio. VSTU even has experimental support for breaking on exceptions. For even more details on VSTU 2.0 features, check out the blog post, “Visual Studio Tools for Unity 2.0,” at bit.ly/VSTUInfo.
Note: If you aren’t targeting Windows 10 and using Visual Studio 2013, there’s a downloadable package that brings all the goodness we described here to Visual Studio 2013 Community Edition users. You can download this extension at bit.ly/VSTU2013.
Хайме Родригес (Jaime Rodriguez) — руководитель группы Microsoft Developer Experience Games Evangelism. Вы можете найти его в Twitter (@jaimerodriguez) или через его блог на jaimerodriguez.com.
Брайен Пик (Brian Peek) — старший разработчик-идеолог игр в Microsoft. Является «хардкорным» геймером, занимался разработкой игр для Windows, консолей и всего остального, что можно программировать. Часто выступает на конференциях разработчиков. Следите за его заметками в Twitter (@BrianPeek) или читайте его блог на brianpeek.com.
Выражаем благодарность за рецензирование статьи экспертам Microsoft Сандживу Двиведи (Sanjeev Dwivedi) и Адаму Тьюлиперу (Adam Tuliper).
Источник
Adblock
detector
Easy Unity VR Tutorial for Beginners
In this blog we will create a VR demo scene in which the player will be able to move (teleport) and interact with game objects in a VR environment.
If you already have Unity installed and know how to create a new 3D project, you can jump to add modules or XR settings
Installing Unity and modules
Installing Unity Hub
Unity VR Tutorial. Unity Hub is an application used for handling different Unity editor settings, such as editor version, creating a new project or opening an existing one, etc.
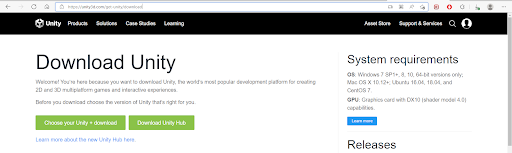
For installing Unity Hub click on the Download Unity Hub button here: Download — Unity (unity3d.com) (see image below).
The page also displays the computer requirements. A PC or laptop with Windows OS is the recommended option.
Unity Hub is a standalone application that streamlines the way you find, download, and manage your Unity Projects and installations. More info here
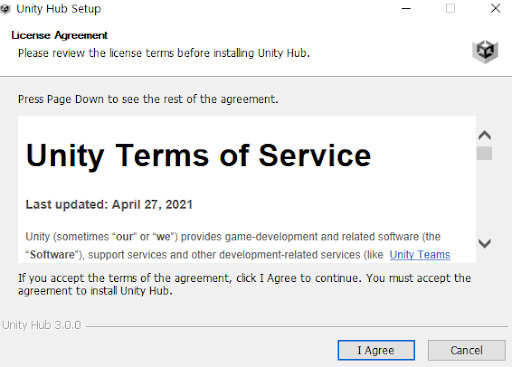
After the file has been downloaded, double click on it to install. A new window will appear.
- You should read the text and click on “I agree” to continue
- Select the installation folder
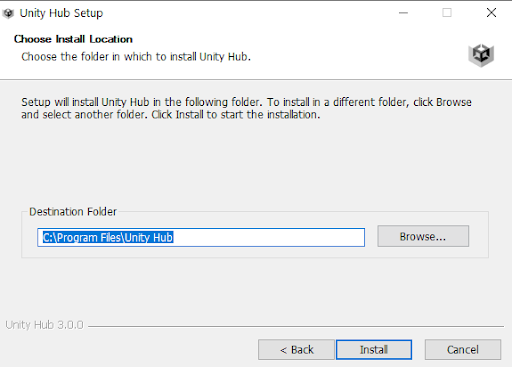
- Click on Finish to start Unity Hub
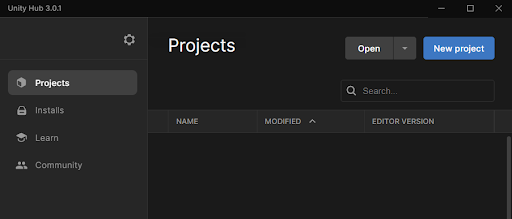
A new window like this should appear.
Let me introduce you to Unity Hub!
Installing Unity
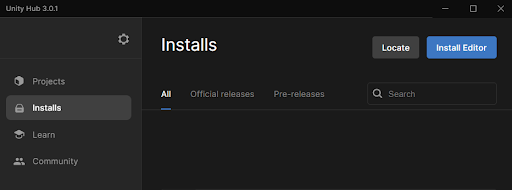
Unity VR Tutorial: In Unity Hub, click on Installs (left) and later on Install editor (blue button, right)
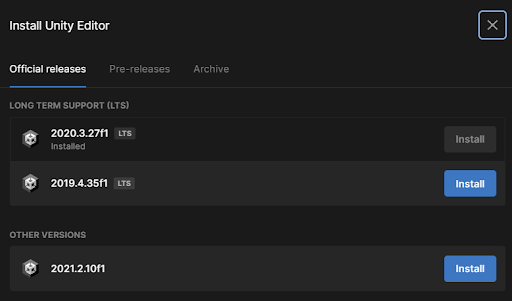
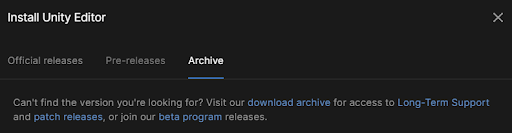
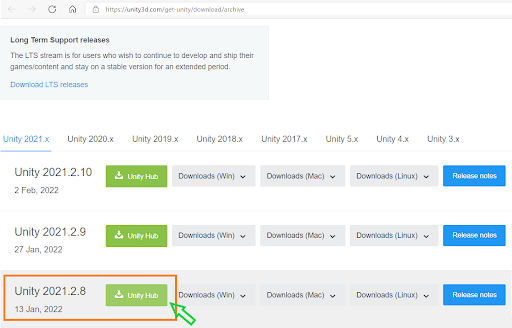
For this tutorial we’ll use the 2021.2.8f1 version, so we’ll need to click on the Archive tab and click on download archive link (blue text, see image below). It will redirect you to the Unity archive webpage, in which you will find the editor versions that can be installed.
Click on the Unity Hub button of Unity version 2021.2.8
Adding Unity modules and Script editor
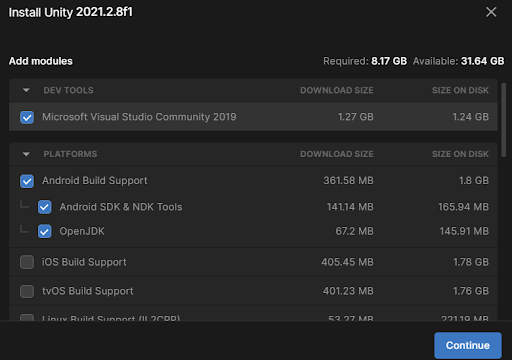
An Oculus app is created (built) with Android OS, so we will need to install some additional modules in Unity.
After clicking on the button described above, a new window should appear (see image below). Select the following options:
- Microsoft Visual Studio Community 2019
- Android Build Support
- Android SDK & NDK Tools
- OpenJDK
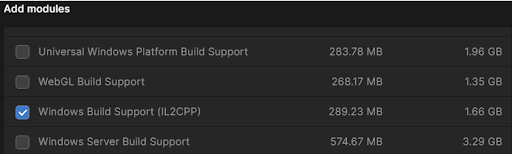
- Windows Build Support (IL2CPP)
Although in this tutorial we won’t create scripts, it is recommended to install Visual Studio.
Visual Studio is a C# editor, the script programming environment used in Unity. The Community version is free. More info here
Creating a new project
Do you remember the main window in Unity Hub?

This is used for several purposes. One of them is creating new projects.
- To create a new project, click on the blue button at the top right
In the next window:
- Check if the Unity editor version is correct (2021.2.8f1)
- Select 3D. This will be our project’s template.
Why not the VR template? because it doesn’t include the XR Interaction Toolkit (this is a Unity software package) that will be used in this tutorial.
- Choose a Project name and its Location
- Click on the Create project button
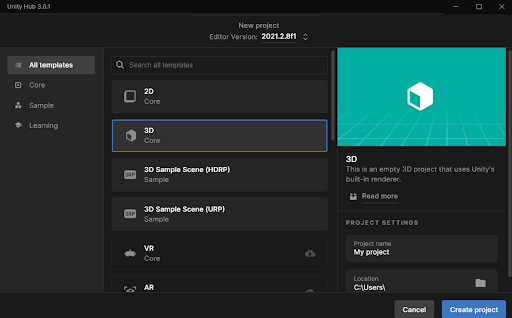
3D will be our project’s template.
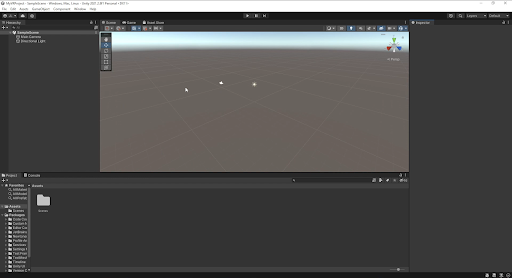
After some time, the Unity editor will be loaded, and a new window will appear for you to give it a try clicking on the different options available to familiarize with the editor.
XR Settings configuration
XR is a term used to include several types of applications such as VR (Virtual Reality), MR(Mixed Reality) and AR(Augmented Reality). More info here
To configure our Unity project for XR, we will need to use a software package called XR Plugin Management . It manages and helps the user with loading, initialization, settings, and build support for XR.
XR Plugin Management
- Go to Edit/Project Settings
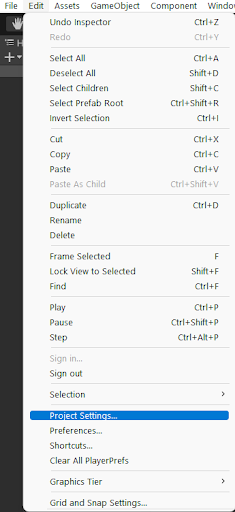
- Click on XR Plugin Management (bottom left)
- Click on Install XR Plugin Management
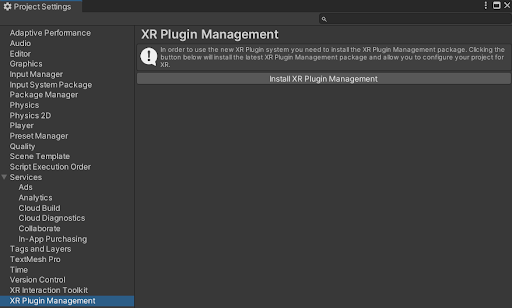
Now the XR Plugin Management option will look like this:
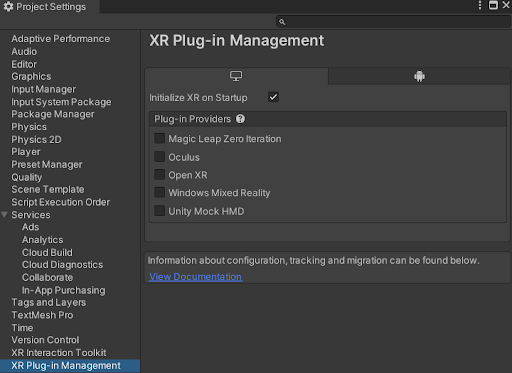
In the Unity manual, the description of this package is: “ provides simple management of XR plug-ins. Manages and offers help with loading, initialization, settings, and build support for XR plug-ins. ”
- Among the options above, check OpenXR with PC tab selected
What is OpenXR?
It’s a standardized interface that allows you to configure several XR inputs (i.e. Oculus Quest 2, for the Oculus Quest 2 Tutorial) in a single project and translate them into multiple headsets and platforms. More info here
A new window may appear asking you to enable Unity’s Input System.
- If you’re working on a new fresh project, Click on Yes. Otherwise, if you are using the old Input Manager, you should consider both options
After the step above, a warning message may appear:
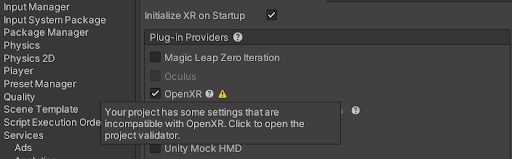
- Click on the yellow icon. It will show a new window
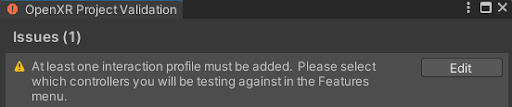
- Click on Edit
- Select the Oculus touch controller profile as shown below from the new window
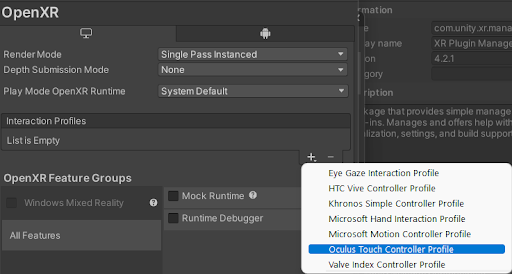
Interaction profile: type of configuration required for the headset you’ll be interacting with.
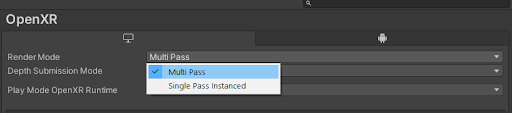
Multi-Pass renders the Scene into two images shown separately for each eye, and is the recommended option.
Single-Pass combines both images into a single double-width Texture, where only the relevant half is displayed to each eye.
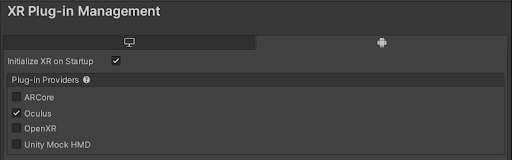
- Select Oculus option below XR Plugin Management. It should look like this:

Configuring VR inputs as actions
Inputs are actions taken from the Player through a device (for example mobile, PC or VR headset like the Oculus Quest or Meta Quest for the Oculus Quest 2 Tutorial, Meta Quest Tutorial) that will be identified by the game engine editor (Unity) and will “trigger” or execute some other actions in the program, application or game.
One example is firing. When the player presses (input action) the “Fire” button on a mobile game, it starts to spawn bullets (action triggered in the game) in a certain direction.
Now we will configure the XR Interaction toolkit, a framework that works pretty well with OpenXR.
Installing XR Interaction Toolkit
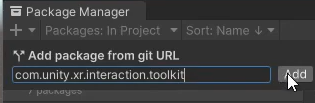
- Go to Window/Package Manager
- Click on the + button
- Select “Add package from git URL”
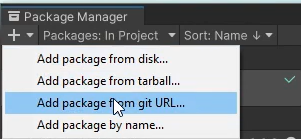
- Write “com.unity.xr.interaction.toolkit” and click on Add
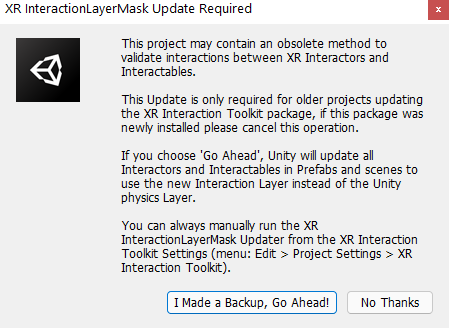
It will show a warning window informing you that if you have an older XR Interaction Toolkit version you should make a backup before updating to this newer one.
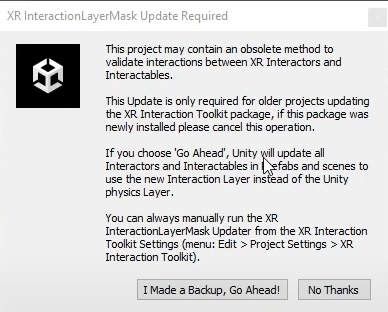
- Click on “I Made a Backup” if you have a new fresh project or, well, if you made a backup
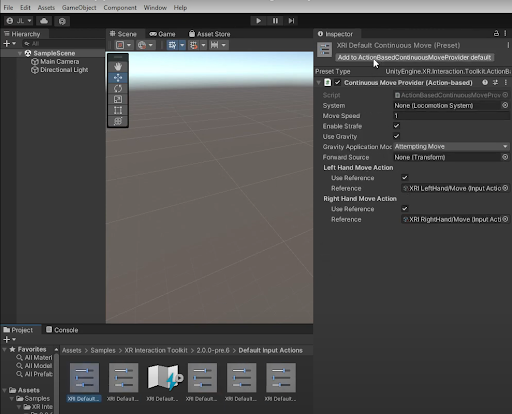
- After installed, select the package and import the Default Input Actions
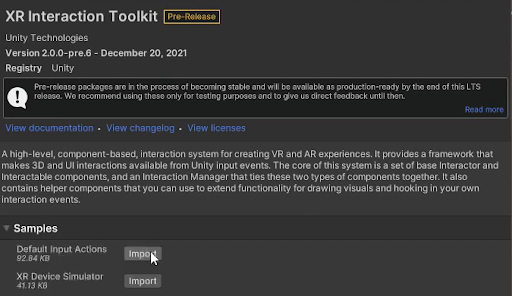
These Default Input Actions are pre-configured actions that are already set up and ready to go.
The XR Interaction Toolkit will identify the inputs in the Unity’s VR project and will use OpenXR that will be in charge of translating them into the desired VR platform (in this case, Oculus)
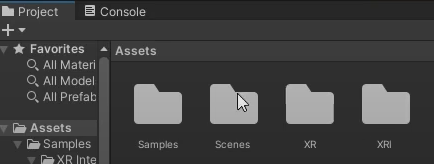
Your assets folder in the project tab should look similar to this:
If you go into the XR Interaction Toolkit folder, you should have these sample XR interaction files (except by the file with the blue ray):

Select each file and Add it to the project by clicking on “Add to …” in the inspector tab
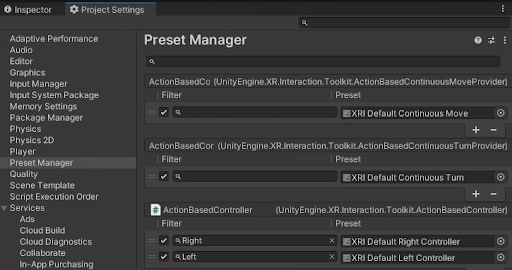
Go to Edit/Project Settings/Preset Manager and write “Right” and “Left” for the corresponding Action Controllers (see image below, bottom middle)
Scene configuration
XR Origin
Normally, when you play a game, all the interactions (including camera movement) happen inside the device (for example mobile, PC or VR headset like the Oculus Quest or Meta Quest for the Oculus Quest 2 Tutorial, Meta Quest Tutorial), and can be watched by the player from outside through the device’s display.
VR apps usually are called VR experiences, because they generate, well, an immersive experience.
Immersive experience means that the player feels like “being part” of the game, and in this case, also the scene.
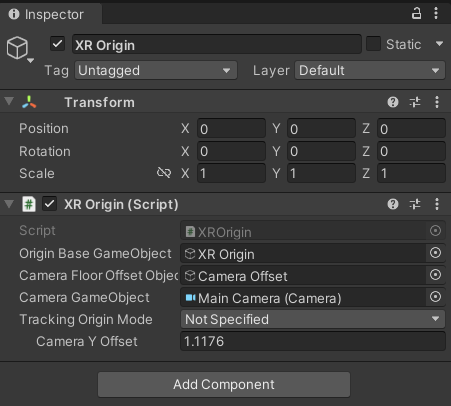
In Unity, the camera and sound are “attached” to a gameobject called XR Origin.
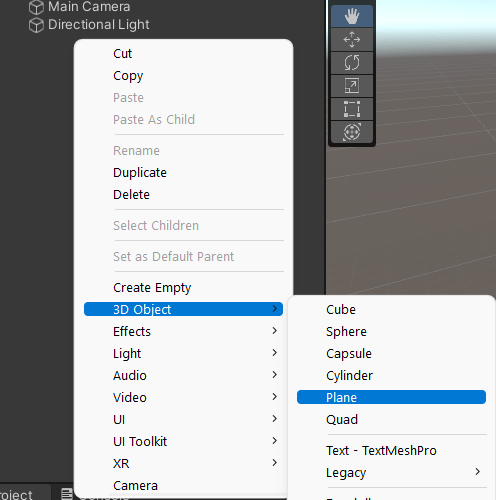
For creating a XR Origin in Unity:
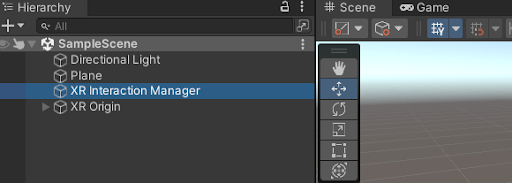
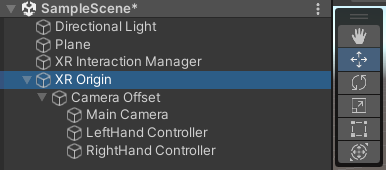
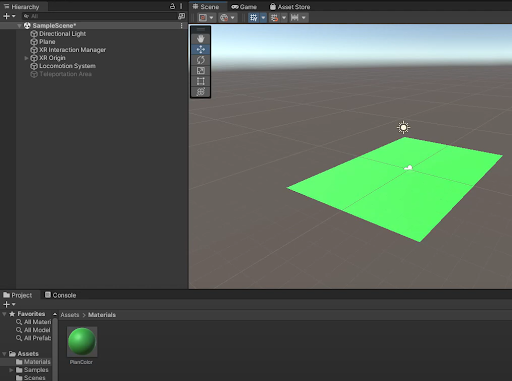
- In the hierarchy tab, right click on an empty space to create a plane
- Click again on an empty space in the hierarchy to create a XR origin (action-based) game object
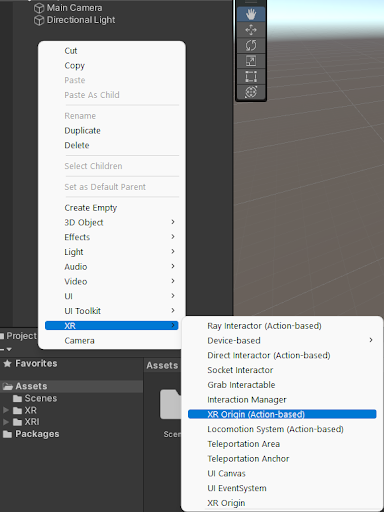
The difference between XR Origin and XR Origin (action-based) is that the first one has just the head camera and the second one also has the controllers.
The XR Interaction Manager game object that contains the script with the same name is automatically imported
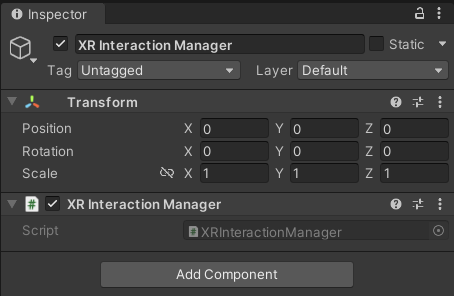
Input Action Manager
Now it’s time to add a component to the XR Interaction Manager in order to configure input actions in our VR scene:
- Add the “Input Action Manager” component
- Click on the Action Assets option
- Click on the plus button at right
- Add the XRI Default Input Actions file
See the steps below
The hierarchy should look like this:
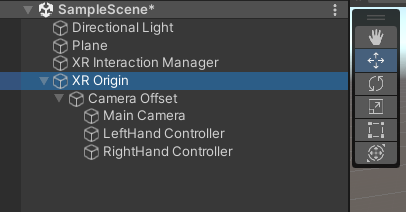
Left and Right Hand Controllers
In a VR device (for example mobile, PC or VR headset like the Oculus Quest or Meta Quest for the Oculus Quest 2 Tutorial, Meta Quest Tutorial), usually the player will have a headset and 2 hand controllers.
Both Left and Right Hand Controllers must have the following actions configured in the inspector
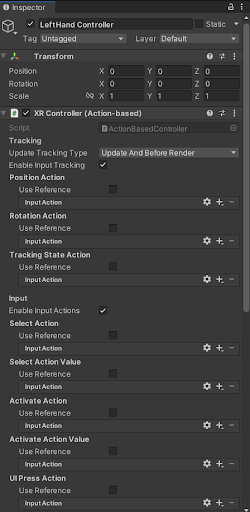
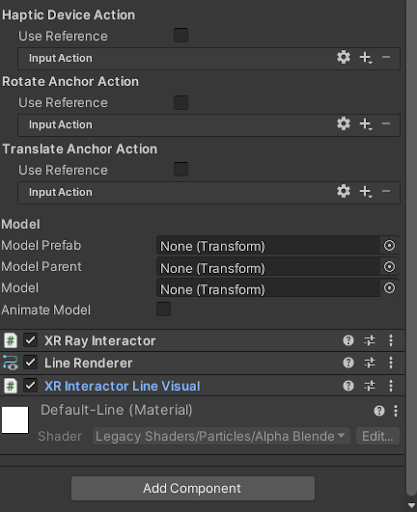
And XR Origin must look something like this:
Testing Oculus headset and hand controllers in Unity
After following the steps above, the Unity editor is ready for checking if our headset and hand controllers are identified by the Unity editor.
At the top middle in the Unity editor, you’ll find a button with a play icon
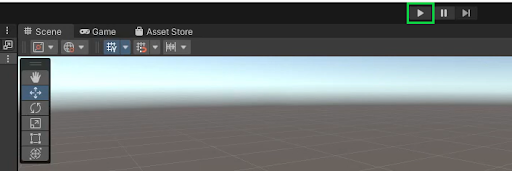
When this button is pressed, Unity enters Play mode
Play mode is used for testing a project quickly in Unity, and this is how we will check if our VR app demo is working fine on the VR headset (for example mobile, PC or VR headset like the Oculus Quest or Meta Quest for the Oculus Quest 2 Tutorial, Meta Quest Tutorial).
If you are using Mac or Linux, you will need to compile the apk and run it on the headset. To do this, you’ll need to follow the steps described here
If you are using Windows OS, the next step is to configure Oculus Link in your Oculus device (for example mobile, PC or VR headset like the Oculus Quest or Meta Quest for the Oculus Quest 2 Tutorial, Meta Quest Tutorial). The steps required are described in the Oculus Link official guide webpage or here
After Oculus Link is installed, we can test our progress so far entering Play mode in Unity.
For this, you need to enable Oculus Link in your headset, go back to the Unity editor and press the Play mode button at the middle top. Now, go back to your headset and move your head and hands
Locomotion System
It’s time to move around our VR scene . Now, we will configure something called “Locomotion System”
- Go to Hierarchy, right click and add a Locomotion System (action-based)
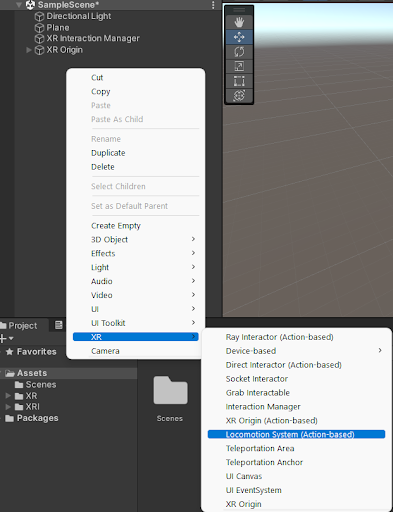
You should get in the inspector something like the image below while the Locomotion System is selected in the inspector
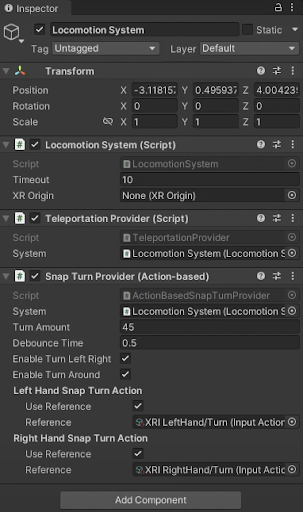
This way you have added a Locomotion System into the scene. Now we need to configure it.
Teleportation Area
It’s used for teleportation in the scene. For creating a Teleportation Area:
- Go to hierarchy, right click and create a Teleportation Area
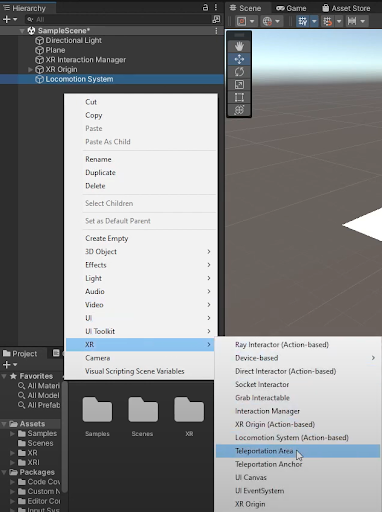
It will generate a new plane with a Teleportation Area script. This will be the area we will be able to teleport around.
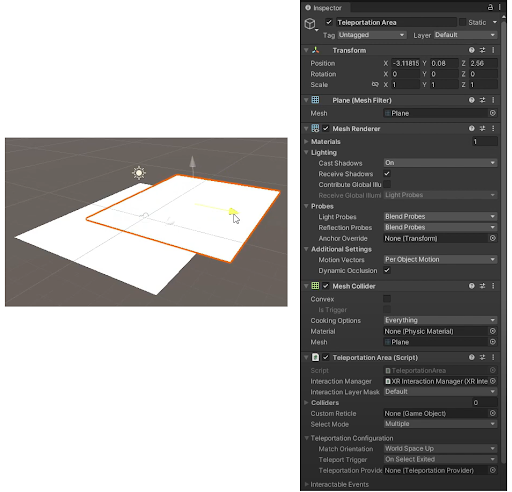
Maybe you’ve noticed that there is also a Teleport Anchor option
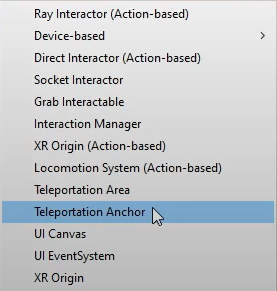
The main difference is that the Teleport Area will allow you to teleport to any point on the plane, and Teleport Anchor is only for teleporting to a specific position where you point your cursor at.
For this tutorial, we will use the previous plane game object for moving around the scene.
- Disable the Teleportation Area game object you’ve just created
- Select the Plane and Add a Teleportation Area component
- In project tab, create a new folder called Materials
- Inside that folder, right click and create a new material. You can name it as PlaneColor
- Change the material’s color (maybe green)
- Apply the material to the plane
- Enter Play mode and test it out in your VR headset
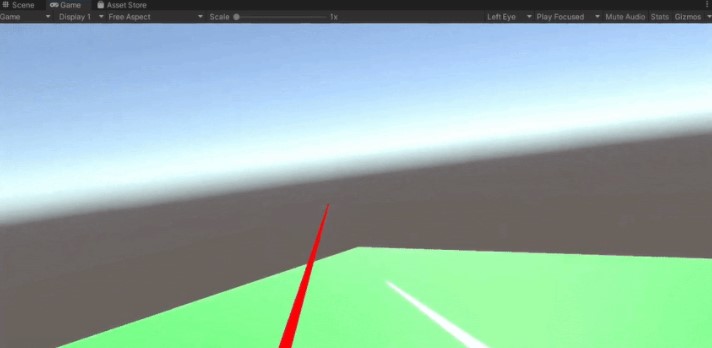
When the XR ray turns white, it means that the Teleportation Area has been hit
To teleport, press the grip button when the line is white
For rotation, use the Joystick button
Continuous Move
There is another locomotion system: continuous move. To make it work in the current plane:
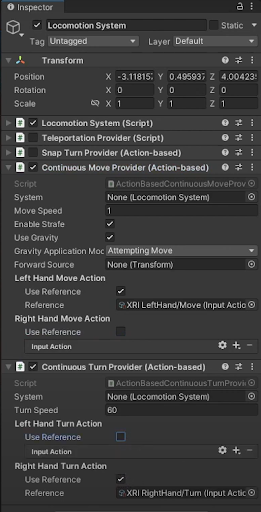
- Add a Continuous Move Provider component
- Add a Continuous Turn Provider component
- Uncheck Right Hand Move Action and Left Hand Turn Action
- Uncheck Teleportation Provider and Snap Turn Provider
If you enter Play mode, teleportation will be disabled and you can move and turn using the Joysticks. However, this locomotion system causes something called “motion sickness” in most people, so it’s suggested to use Continuous Move Provider just in very specific cases and use teleportation instead.
VR motion sickness happens when you’re moving around in a VR environment, but your body feels like it’s sitting or standing in one place.
Grabbable objects
It allows you to interact with game objects in VR
- Create a cube
- Modify its scale to 0.3
- While the cube is select in hierarchy, add a XR Grab Interactable component in the inspector
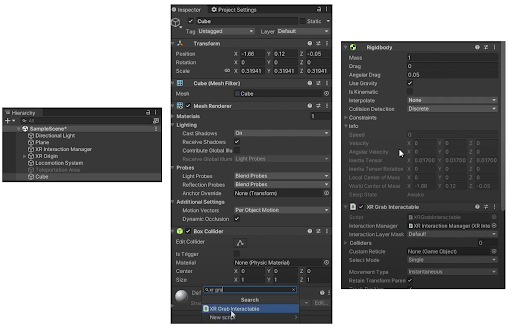
When adding the XR Grab Interactable component, it will automatically add a Rigidbody, so that we can pick the cube up and interact with it in a physics-based way
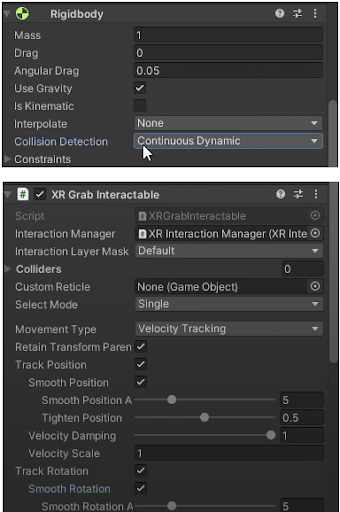
For better performance:
- Modify Movement Type to Velocity Tracking
- Enable Smooth Position and Rotation
- Rigidbody: change Collision Detection to Continuous Dynamic
If you enter play mode, you’ll be able to grab the cube when the ray is white using the grip button
So far, you’ve created your first VR demo with Locomotion System and object interactions.
Feel free to now play around and enjoy yourself using Unity’s endless features!
I hope you enjoyed this Unity VR Tutorial (Oculus Quest 2 Tutorial, Oculus Quest Tutorial Meta Quest Tutorial). If you’re a beginner, you may also want to try the free C# Coding Course to get started with VR Programming.
How to set up a Windows build slave to support Unity3D builds, without installing Visual Studio?
I need to set up Windows build agents (product isn’t important) to build Unity3D projects.
I would deeply like to avoid installing Visual Studio (any version), since it is a large set of downloads during the build agent packer baking process, and takes a long time to actually process the installation, and invariably causes a reboot to be necessary which I then need to manage.
I’m aware it’s possible to create offline installations; I want to avoid VS entirely, if it’s unnecessary to the build.
I’m in this position because I’m unfamiliar enough with Unity3D to know whether VS is being installed «because that’s what developers have on their workstations» (i.e. by accident of association), or because there’s an actual dependency within it (like msbuild target files or what have you).
Is this possible? If so, what are the combinations of hopefully-smaller dependencies that are necessary to install? For example, Windows build tools, etc?
Intro to porting Unity games to UWP: Building and deploying
Did you know that you can easily get your Unity 3D game into the Windows Store simply by creating it in Unity or porting an existing game to the Universal Windows Platform (UWP)? That’s a big deal, because the Windows Store opens up the whole spectrum of Windows 10 devices, and their users, to your game: PCs, tablets, Windows 10 phones, Xbox One, and even HoloLens.
In this post, we’re going to go over how to deploy a game from Unity 3D to a UWP project and then build your new UWP game in Visual Studio.
What you need
To develop, compile, and submit a Unity game to the Windows Store, you will need:
- – Either the Unity free version or Unity Pro will work. The add-ons for publishing to the Windows Store are free for both basic and Unity Pro users. – You can use any Visual Studio SKU, including the free Visual Studio Community. To target Universal Windows Platform, you will need at least Visual Studio 2015 Update 1. – If you do not own a Windows 10 license, you can get a 90-day evaluation version. If you are running Mac OS X or will install on Apple hardware, check different options for installing using Boot Camp, VMWare, or Parallels. – This will be needed to submit your game to the Windows Store. During this process you will register and get verified as an individual or as a business who can submit apps and games to the store. This registration allows you to submit apps and games to PC, Phone, Tablet and also in the future to HoloLens and Xbox. There is a small registration fee for individuals to sign up, although free Dev Center accounts are often available through Microsoft-sponsored programs (e.g. for startups).
- Windows 10 test devices – While the Visual Studio simulators and emulators can replicate multi-touch and different display resolutions, it is recommended that you test on a real ARM mobile device with touch capability if you are developing a mobile/touch experience.
In this post, we will use Unity 5.3.3, Visual Studio 2015 Update 1, and Windows 10 Version 1511. For your benefit, it is recommended that you use at least Unity 5.3.2. Newer versions may have a different application programming interface.
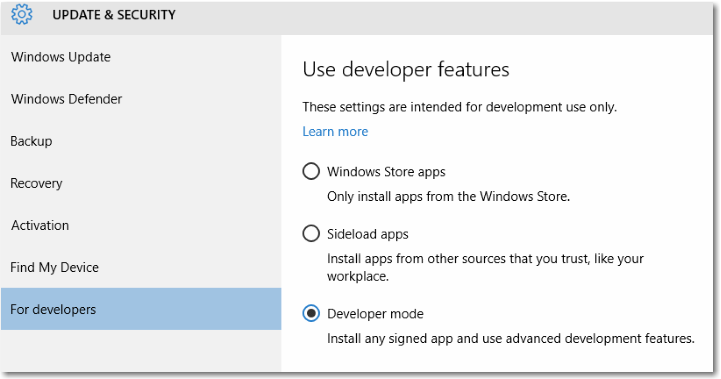
Configuring developer mode in Windows 10
For Windows 10, whether using a desktop, tablet, or phone, you need to enable that device for development under System Settings.
To do so, navigate to System Settings and choose “Update & security.” Then choose, “For developers.” From here, you can simply select and enable “Developer mode.”
Deploying your game from Unity
For the purposes of this post, let’s assume that you have already created a game in Unity. If you haven’t, though, there are several great Unity 3D tutorials available to get you started.
If your game was originally built for iOS or Android, it is important that you don’t have any platform specific controls or DLLs before attempting this. If you have platform specific code or libraries, the process outlined in this post may throw errors before you get to the end.
To start, we’re going to open up your Unity project and configure the build settings. To configure your settings in Unity, first click “File,” then “Build Settings.”

Next, choose Windows Store in the Platform Window. Then select Universal 10 in the SDK dropdown.
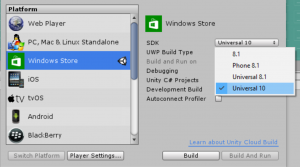
Select XAML in the UWP Build Type dropdown.
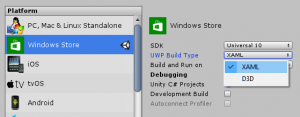
Next, click the Player Settings… button.
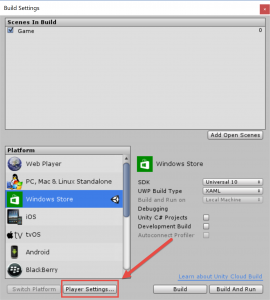
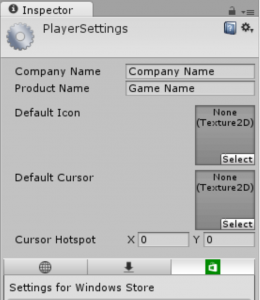
Enter your game details in the “Player Settings” window such as your default icon and product name. Your build settings are now properly configured in Unity3D to allow you to export to UWP.
Click on the Build button in the Build Settings window. You will be prompted with a Build Windows Store dialog to select a folder for building your game.
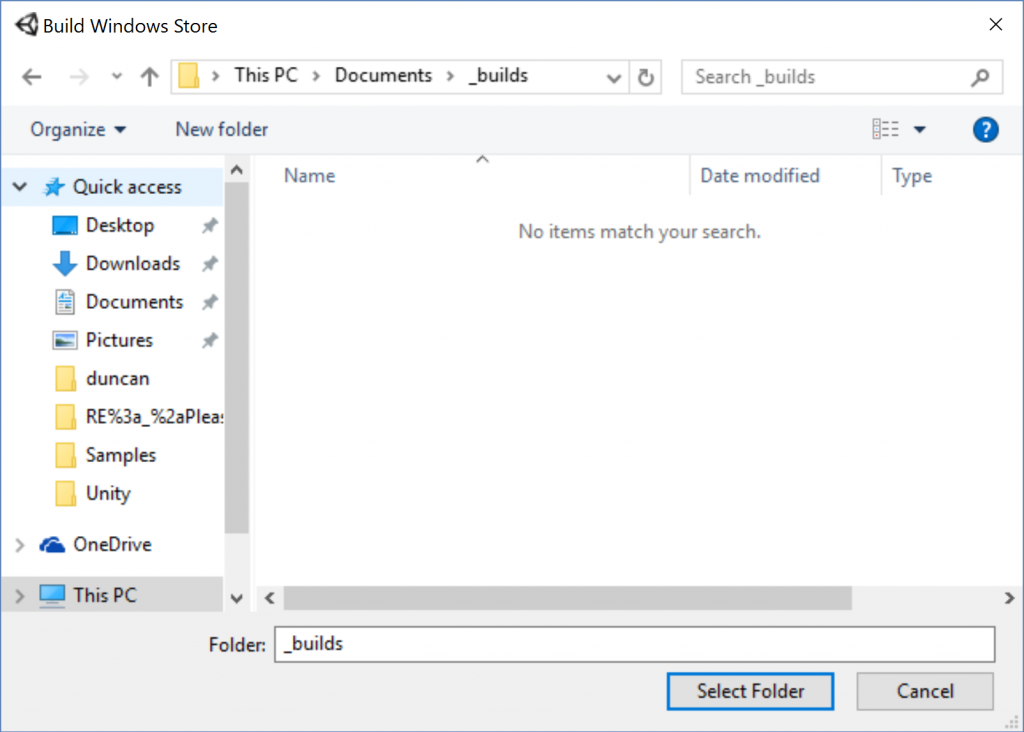
Once you have selected the folder, Unity will begin building your game, targeting the platform you selected. This can take several minutes if you have a lot of assets.
A Windows Explorer window should now display the folder containing all the files generated by Unity.
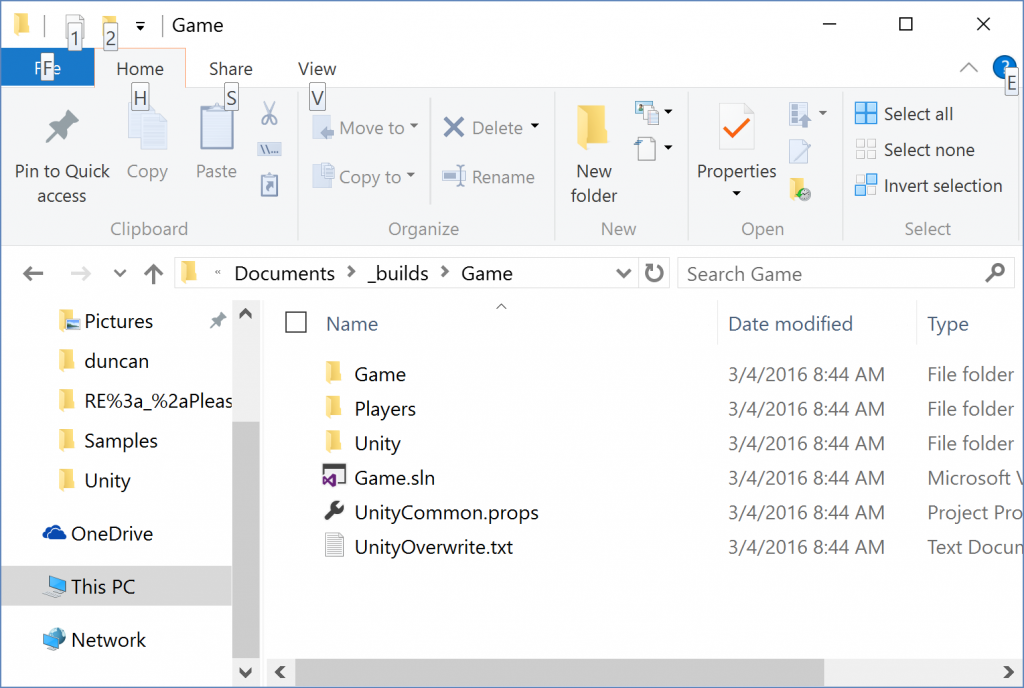
You will need to remember the location of your Visual Studio solution for the next step.
Building your UWP game in Visual Studio
From here on out, you’ll be working in Visual Studio. We’ve already exported your Unity 3D game into a UWP solution.
To get started in Visual Studio, navigate to the folder where you deployed the solution and open it in Visual Studio.
In order to distribute your UWP app to other users, either on the store or for sideloading, you need to follow the steps to create an appxupload package for it. When you create the appxupload, an additional appx package will be generated to use for testing and sideloading.
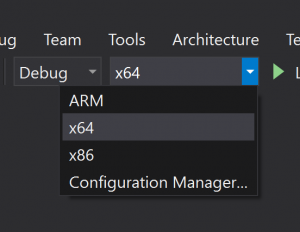
First, select either x86 or x64 from the platform dropdown as the platform.
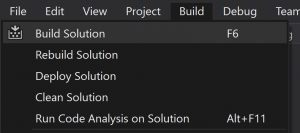
From the menu, click Build -> Build Solution or press F6.
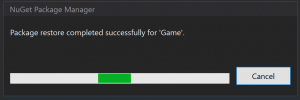
Allow the NuGet Package Manager to restore packages.
Set the target to Local Machine. Then click Run. You can watch the progress of the build in the Output window.

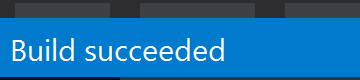
Finally, verify that the build succeeded.
Now you are ready to deploy your app in Windows Store.
Note: If you intend to share the app with friends outside of Windows Store first, you can also sideload this app to install it on any Windows 10 device.
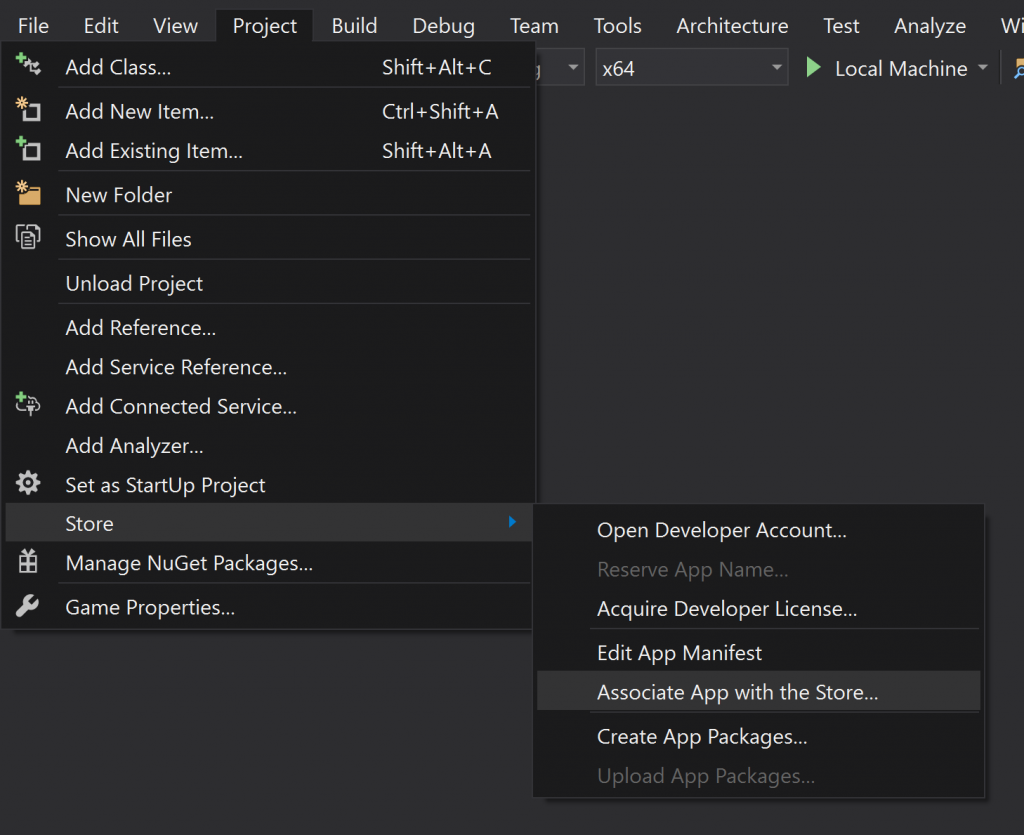
You will need to associate your app to with the Windows Store. To do so, navigate to the Project menu and choose Store -> Associate App with the Store….
Your app is now enabled for test purchase and notification scenarios if you choose to do so.
When you associate your app with the store, the following values are downloaded to the app manifest file for the current project on your local machine:
- Package Display Name
- Package Name
- Publisher ID
- Publisher Display Name
- Version
Note that you can override the default package.appxmanifest file by creating a custom .xml file for the manifest. As a general rule, however, you do not want to do this and really don’t want to alter the manifest file at all if you aren’t completely sure of what you are doing.
Wrapping Up
In this post, we’ve covered how to take your Unity 3D game and prepare it for deployment to the Windows Store. By using Unity 3D and Visual Studio together in your development toolchain, you can gain a much wider audience for your games. Just as exciting, you can potentially deploy your games to a greater variety of devices from tablets to phablets to gaming consoles to the latest emerging technologies built around Windows 10.
“Follow along to gather all the necessary dependencies to build and deploy a Unity app to Hololens using the Mixed Reality Toolkit 2 (MRTK2)”
Overview
In this article we are going to be gathering the necessary dependencies to build and deploy a Unity app to Hololens using the Mixed Reality Toolkit 2 (MRTK2). The MRTK 2 supports both Hololens 1 and 2 as well as OpenVR. However, building to the Hololens requires a Windows OS to install the Windows SDK.
Video Walkthrough
If you are a visual learner, check out the video that walks through the core concepts of this post:
MRTK2 Requirements with Unity
When using Unity and MRTK2 we’ll need the following items:
- Unity 2018.4 LTS, 2019.1.x or 2019.2.x – In this post we will be using the latest version of Unity 2019.2.
- Visual Studio 2019 – MRTK2 for Hololens requires the Windows SDK 10.0.18362. The easiest way to set this up is installing VS 2019, which we cover below.
- Unity UWP Build Support – Needed for Unity to build to Hololens as a Platform.
- Developer Mode – Lets us build and deploy to Hololens.
- Holographic Remoting Player (Optional) – This lets us quickly run Unity’s Play Mode directly on our Hololens device.
Windows Updates
Before we get started, we’ll need the latest Windows Updates on both our PC and Hololens. Go to Settings -> Update & Security -> Windows Updates and click Check for Updates. Once we’re up to date, we are ready to move on.
Visual Studio Tools
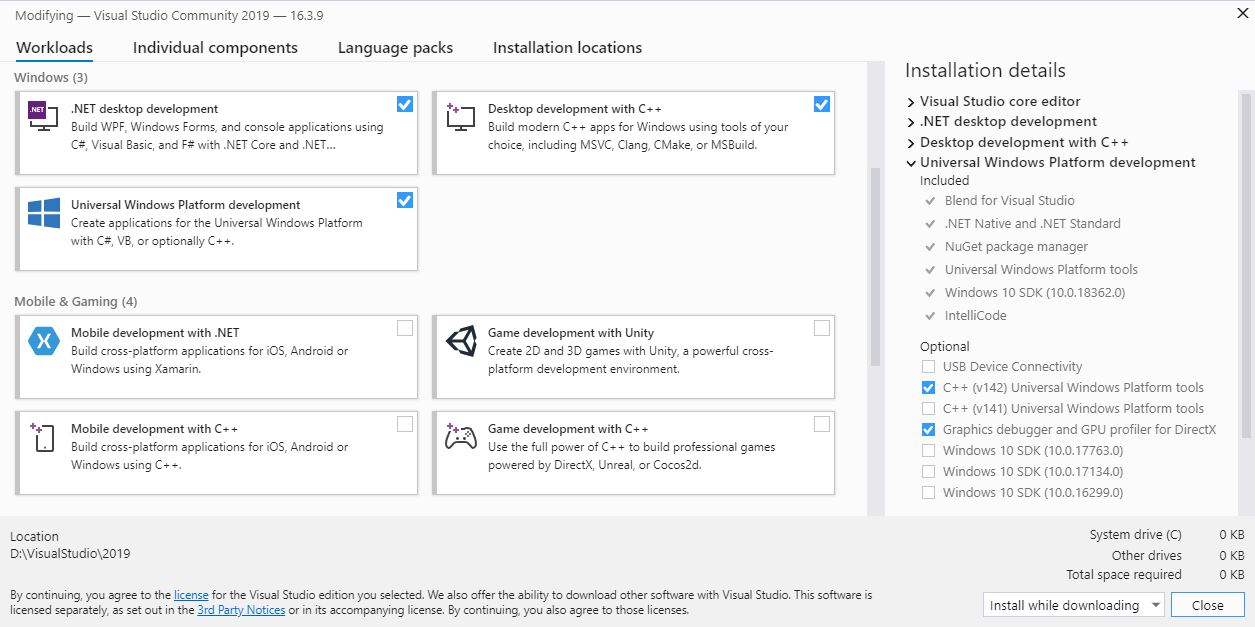
We recommend installing Visual Studio 2019 through the Visual Studio Installer to easily add all of the dependencies for Hololens development. When installing, make sure to check the .NET desktop development, Desktop development with C++ and Universal Windows Platform development workloads. Under the Universal Windows Platform development optional packages, check C++ (v142) Universal Windows Platform tools. If you already have VS 2019, you can run the VS Installer and click Modify by VS 2019 to add the components.
Once you have VS 2019 and its workloads installed, you may want to set it as Unity’s editor. To do this, go into Unity and under Edit -> Preferences -> External Tools change the External Script Editor to Visual Studio 2019. If it’s not an option you can Browse to the .exe and open it. (Ours is under D:/VisualStudio/2019/Common7/IDE/dotenv.exe, yours may differ)
Adding Unity’s UWP Platform Module
The easiest way to install Unity’s UWP Build Support is by using Unity Hub. Under the Installs tab, click on the three dots at the top right of your Unity installation, then click Add Modules. For Unity 2019, there is one option Universal Windows Platform Build Support. For Unity 2018, there are two, UWP Build Support (.NET) and UWP Build Support (IL2CPP). The choice is up to you, .NET Build Support is no longer in Unity after 2018 and was replaced by IL2CPP. The .NET module builds faster and allows C# script editing in the Visual Studio Solution that Unity builds to.
Enabling Developer Mode for Unity MRTK2 Building and Deploying
You will need to set this up on both you PC and Hololens. First, go into Settings -> Updates & Security -> For Developers and then turn Developer Mode. You can turn on Enable Device Portal on your Hololens, if you’d like to connect to it through Windows Device Portal. However, this isn’t necessary to build over USB.
Installing Holographic Remoting Player
The Holographic Remoting Player app lets us quickly test our Unity scene through Play mode directly on our Hololens. This is very helpful to quickly test our app. Make sure your Hololens is fully updated, then go to the Microsoft Store and install the app. You can also do this directly on your Hololens.
Wrap Up
In conclusion, we have installed everything we need to begin Hololens development with Unity using MRTK2! Now you are ready to create a simple Hololens app with Unity.
Checkout our tutorial here to get started. This is hidden