TL;DR: В APPX-файл Universal Windows Platform можно упаковать обычный exe-файл, который будет запускаться в Windows 10 (сборка 1607 и новее) примерно так же, как обычные exe-файлы. Это можно использовать для атак социальной инженерии, с помощью рассылки через email — почтовые провайдеры не блокируют файлы APPX. Файл должен быть подписан действующей цифровой подписью.
Universal Windows Platform
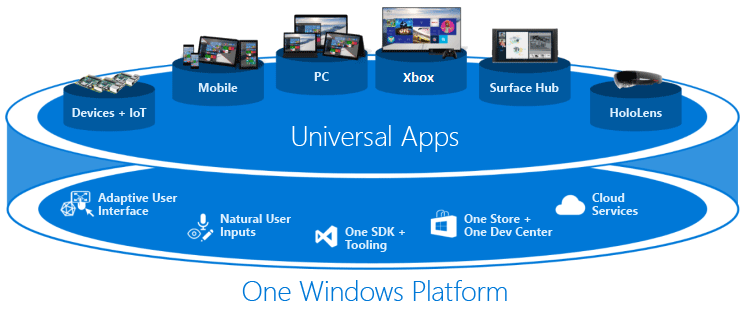
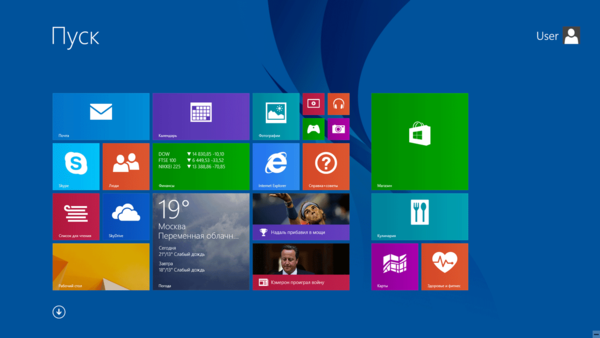
Universal Windows Platform — (сравнительно) новый стандарт для создания универсальных приложений под Windows 10, Windows 10 Mobile, Xbox One и Hololens. Стандарт появился с выходом Windows 10, и предоставляет API с ограничением привилегий и изоляцией, формат контейнера и метаданных внутри него.
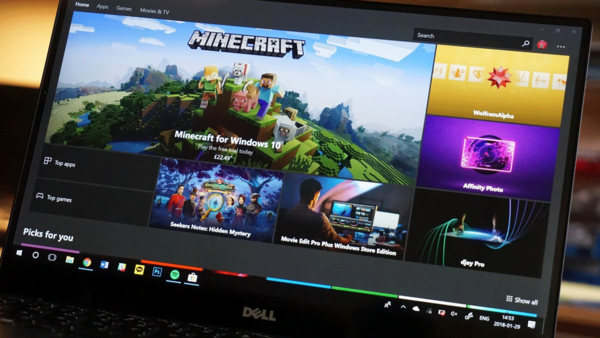
UWP-приложения широко представлены в Microsoft Store. Они самодостаточны, безопасны, не требуют прав администратора для установки, хранят настройки в строго отведённых местах, и могут быть удалены начисто, прямо из «пуска».
UWP — попытка Microsoft избавиться от старых архитектурных подходов к разработке программ: внедрить разделение привилегий так, как это сделано на мобильных платформах, уйти от WinAPI GUI с пиксельной сеткой (для полноценной поддержки экранов любой плотности пикселей).
Программы UWP можно писать на C#, C++, VB и JS, а в качестве GUI-фреймфорка предлагается к использованию XAML, DirectX и HTML.
До недавнего времени, UWP-программы могли быть только изолированными, но в сборке Windows 10 1607 Microsoft реализовала Desktop Bridge — возможность упаковки любых Win32-программ в виде UWP, без использования UWP API, ограничений привилегий и изоляции.
Эта функция открывает простор для атак социальной инженерии.
Формат APPX
UWP стандартизирует файловый формат APPX — обычный ZIP-архив, с определённой структурой. В APPX-файле должен быть AppxManifest.xml — файл с описанием содержимого пакета, который можно сгенерировать или создать самостоятельно.
В AppxManifest.xml указано название программы, описание, иконка, требуемые привилегии, имя файла для запуска и точка входа внутри него.
Чтобы APPX-файл можно было установить, он должен быть подписан действующей цифровой подписью с возможностью подписи кода, доверенного удостовещяющего центра.
Пример файла AppxManifest.xml с отключенной изоляцией
<?xml version="1.0" encoding="utf-8"?>
<Package
	xmlns="http://schemas.microsoft.com/appx/manifest/foundation/windows10"
  xmlns:uap="http://schemas.microsoft.com/appx/manifest/uap/windows10"
  xmlns:rescap="http://schemas.microsoft.com/appx/manifest/foundation/windows10/restrictedcapabilities">
  <Identity Name="MyCompany.MySuite.MyApp" Version="1.0.0.0"
Publisher="CN=Contoso Software, O=Contoso Corporation, C=US"
ProcessorArchitecture="x64" />
    <Properties>
       <DisplayName>test</DisplayName>
       <PublisherDisplayName>test</PublisherDisplayName>
			 <Description>test</Description>
      <Logo>logo.png</Logo>
    </Properties>
    <Resources>
      <Resource Language="en-us" />
    </Resources>
	  <Dependencies>
	  <TargetDeviceFamily Name="Windows.Desktop" MinVersion="10.0.14316.0" MaxVersionTested="10.0.15063.0" />
	  </Dependencies>
	  <Capabilities>
	    <rescap:Capability Name="runFullTrust"/>
	  </Capabilities>
    <Applications>
      <Application Id="MyApp" Executable="MyApp.exe" EntryPoint="Windows.FullTrustApplication">
        <uap:VisualElements DisplayName="MyApp" Description="MyApp"	Square150x150Logo="logo.png"
				   Square44x44Logo="logo.png"	BackgroundColor="#666666" />
      </Application>
     </Applications>
  </Package>
Самый простой вариант упаковки существующего Win32 exe-файла в appx с помощью Desktop Bridge — написать файл манифеста вручную, и создать appx-контейнер с помощью утилиты makeappx.exe, входящей в состав Windows SDK.
makeappx.exe pack /d input_directory /p output.appxЗатем подписать с помощью signtool.exe:
signtool.exe sign /f "mycert.pfx" /p "123456" /fd sha256 /tr http://timestamp.comodoca.com/?td=sha256 /td sha256 output.appxПреимущества APPX для социальной инженерии
APPX-файлы можно использовать в почтовых рассылках, в качестве замены exe-файлам, в случах, когда почтовый сервер фильтрует письма с exe-вложениями.
Установка APPX происходит в один клик, не требует прав администратора. В установщике галочка запуска программы после установки отмечена по умолчанию, и программа сразу запустится, если пользователь её не уберет.
Your browser does not support HTML5 video.
Все популярные почтовые сервисы не блокируют APPX-файлы в приложениях к письму.
У Gmail есть странная особенность: файл должен быть размером больше 4 мегабайт.
Резюме
Преимущества APPX Desktop Bridge для вирусных рассылок:
- Можно использовать «как exe-файл»
- Не накладывает изоляции и ограничений привилегий
- Устанавливается и запускается в один клик
- Не фильтруется почтовыми серверами
Недостатки:
- Требует сертификата для подписи кода
- Работает только в Windows 10 1609 и новее
Ссылки
Пример файла APPX Desktop Bridge (с самоподписным сертификатом)
Инструкция по упаковке APPX
Инструкция по созданию файла манифеста вручную
Информация о Desktop Bridge
Universal Windows Platform: WinRT API in C# scripts
Universal Windows Platform: IL2CPP scripting back end
This page details the Player settings specific to the Universal Windows platformAn IAP feature that supports Microsoft’s In App Purchase simulator, which allows you to test IAP purchase flows on devices before publishing your application. More info
See in Glossary. For a description of the general Player settings, see Player SettingsSettings that let you set various player-specific options for the final game built by Unity. More info
See in Glossary.
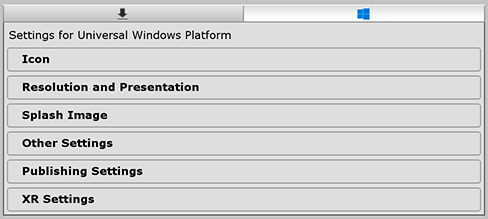
You can find documentation for the properties in the following sections:
- Icon
- Resolution and Presentation
- Splash Image
- Other Settings
- Publishing Settings
- XR Settings
Icon
Use the Icon settings to customize the branding for your app on the Windows Store.
Expand the Store Logo section to specify the image that appears on the Store description page for the application. You can add up to eight different resolutions.
Tile section
Customize the general appearance of your Windows Store tiles with these settings:
| Setting | Function | |
|---|---|---|
| Short name | Set an abbreviated name for the app. | |
| Show name on | Indicate each icon image you want the name to appear on: Medium Tile, Large Tile, or Wide Tile. | |
| Foreground text | Choose whether you want to use Light or Dark text on the app’s Tile. | |
| Background color | Specify what color you want to use for the background. | |
| Default Size | Choose what size you want to use as the default size for the Tile. | |
| Not Set | Don’t use a default size. | |
| Medium | Use a medium size. | |
| Wide | Use a wide size. |
Unity copies these options directly to the Package.appxmanifest file.
Tiles and Logos section
Specify the images your tiles display on the Windows Store with these settings:
| Setting | Function |
|---|---|
| Square 44×44 Logo | Set a 44×44 logo image to use on the app’s tile. You can set up to 10 resolutions. |
| Square 71×71 Logo | Set a 71×71 logo image to use on the app’s tile. You can set up to 5 resolutions. |
| Square 150×150 Logo | Set a 150×150 logo image to use on the app’s tile. You can set up to 5 resolutions. |
| Square 310×310 Logo | Set a 310×310 logo image to use on the app’s tile. You can set up to 5 resolutions. |
| Wide 310×150 Logo | Set a 310×150 logo image to use on the app’s tile. You can set up to 5 resolutions. |
Resolution and Presentation
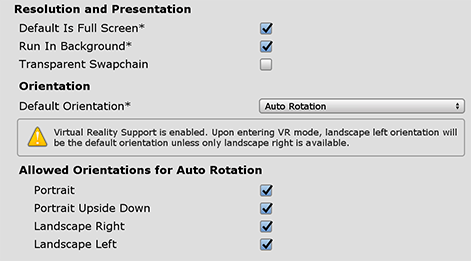
Use the Resolution and Presentation section to customize aspects of the screen’s appearance.
| Setting | Function |
|---|---|
| Default is Fullscreen | Set the window to the full-screen native resolution of the display. Unity renders app content at the resolution set by script (or by user selection when the built application launches), but scales it to fill the window. When scaling, Unity adds black bars to the rendered output to match the aspect ratioThe relationship of an image’s proportional dimensions, such as its width and height. See in Glossary chosen in the Player settings, so that the content isn’t stretched. This process is called letterboxing. |
| Run In background | Enable this option to make the game keep running (rather than pausing) if the app loses focus. |
| Transparent Swapchain | Sets AlphaMode on the swap chain to DXGI_ALPHA_MODE_PREMULTIPLIED. This setting is only used for UWP projects that use the XAML build type. By enabling this setting, you can compose Unity content with other XAML content in your application. For more information, see the PlayerSettings.WSA.transparentSwapchain. |
Orientation
Choose the game’s screen orientation from the Default Orientation drop-down menu:
| Setting | Function |
|---|---|
| Portrait | Orient the screen so that the device’s Home button appears at the bottom. |
| Portrait Upside Down | Orient the screen so that the device’s Home button appears at the top. |
| Landscape Left | Orient the screen so that the device’s Home button appears on the right side. |
| Landscape Right | Orient the screen so that the device’s Home button appears on the left side. |
| Auto Rotation | Screen orientation changes with device orientation. This is the default. |
When you set the orientation to Auto Rotation, the Allowed Orientations for Auto Rotation section appears.
Allowed Orientations for Auto Rotation
This section is only visible when Default Orientation is set to Auto Rotation.
Because Auto Rotation changes screen orientation to match the device, you may want to limit the screen orientations allowed (for example, locking a device to landscape).
Enable each orientation you want to allow by checking its box in this section:
| Setting | Function |
|---|---|
| Portrait | Allow portrait orientation. |
| Portrait Upside Down | Allow portrait upside-down orientation. |
| Landscape Right | Allow landscape right orientation (home button on the left side). |
| Landscape Left | Allow landscape left orientation (home button is on the right side). |
Splash Image
Above the common Splash Screen settings, the Player Settings settings allow you to specify splash images for the Universal Windows platform.
Use the Virtual Reality Splash Image property to select a custom splash image to be displayed in Virtual RealityA system that immerses users in an artificial 3D world of realistic images and sounds, using a headset and motion tracking. More info
See in Glossary displays.
Below the common Splash Screen settings, there are a few additional sections:
- Windows
- Windows Holographic
- Overwrite background color
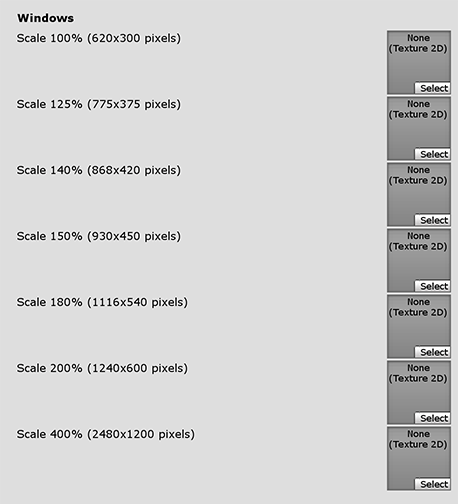
Windows
Set the foreground image you want to use in your app’s splash screen. You can add up to seven different resolutions.
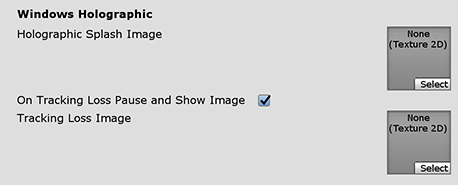
Windows Holographic
Use these settings to customize the holographic splash image for Mixed Reality applications.
Set a Holographic Splash Image to appear during startup. This image appears for five seconds (or until the app finishes loading).
Tracking Loss
A Mixed Reality headset needs to build world-locked coordinate systems from its environment, in order to allow holograms to stay in position. Tracking loss occurs when the headset loses track of where it is (can’t locate itself) in the world. This leads to a breakdown in spatial systems (spatial mapping, spatial anchors, spatial stages).
When this happens, Unity stops rendering holograms, pauses the game, and displays a notification. You can customize the notification image that appears by enabling the On Tracking Loss Pause and Show Image property, and then selecting the image to display with the Tracking Loss Image property.
For more information, see Recommended settings for Unity.
Overwrite background color
The common Splash Screen settings allow you to set the Background Color for when no background image is set, which applies to all platforms.
To override this for the Universal Windows platform, you can enable the Overwrite background color property and then use the Background color setting to choose a different color.
Other Settings
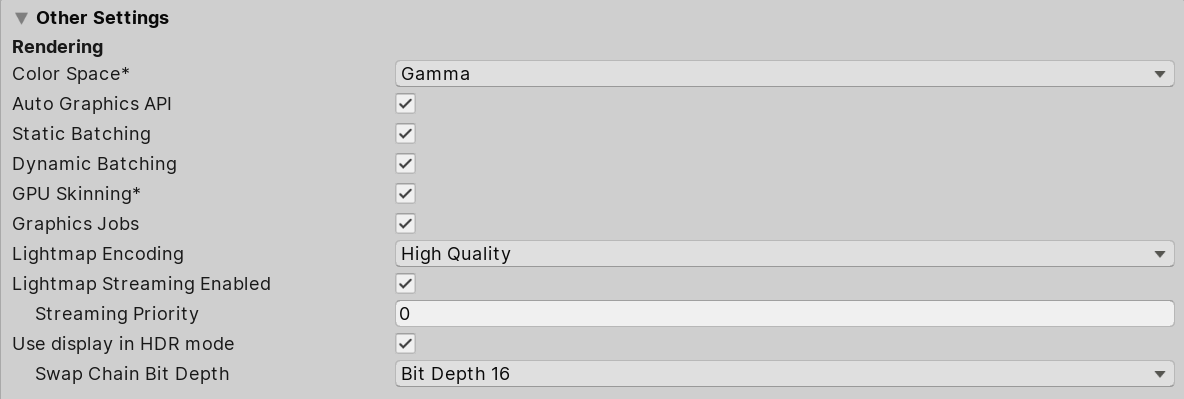
This section allows you to customize a range of options organized into the following groups:
- RenderingThe process of drawing graphics to the screen (or to a render texture). By default, the main camera in Unity renders its view to the screen. More info
See in Glossary - Configuration
- Optimization
- Logging
- Legacy
Rendering
Use these settings to customize how Unity renders your game for the Univeral Windows platform.
| Setting | Function |
|---|---|
| Color Space | Choose which color space should be used for rendering: Gamma or Linear. See the Linear rendering overview for an explanation of the difference between the two. |
| Auto Graphics API | Disable this option to manually pick and reorder the graphics APIs. By default this option is enabled, and Unity uses Direct3D11. |
| Static BatchingA technique Unity uses to draw GameObjects on the screen that combines static (non-moving) GameObjects into big Meshes, and renders them in a faster way. More info See in Glossary |
Enable this option to use Static batching. |
| Dynamic BatchingAn automatic Unity process which attempts to render multiple meshes as if they were a single mesh for optimized graphics performance. The technique transforms all of the GameObject vertices on the CPU and groups many similar vertices together. More info See in Glossary |
Enable this option to use Dynamic Batching (activated by default). |
| GPU Skinning | Enable this option to use DX11/ES3 GPU skinningThe process of binding bone joints to the vertices of a character’s mesh or ‘skin’. Performed with an external tool, such as Blender or Autodesk Maya. More info See in Glossary. |
| Graphics Jobs (Experimental) | Enable this option to instruct Unity to offload graphics tasks (render loops) to worker threads running on other CPU cores. This is intended to reduce the time spent in Camera.Render on the main thread, which is often a bottleneck. Note: This feature is experimental. It may not deliver a performance improvement for your project, and may introduce new crashes. |
| Lightmap Streaming Enabled | Whether to use Mipmap Streaming for lightmaps. Unity applies this setting to all lightmaps when it generates them. Note: To use this setting, you must enable the Texture Streaming Quality setting. |
| Streaming Priority | Set the priority for all lightmaps in the Mipmap Streaming system. Unity applies this setting to all lightmaps when it generates them. Positive numbers give higher priority. Valid values range from –128 to 127. |
|
Use Display In HDR__high dynamic range See in Glossary Mode|Enable this checkbox to make the game automatically switch to HDR__ mode output when it runs. This only works on displays that support this feature. If the display does not support HDR mode, the game runs in standard mode. |
|
| Swap Chain Bit Depth | Select the number of bits in each color channel for swap chain buffers. You can select Bit Depth 10 or Bit Depth 16. The option to choose bit depth only becomes available when HDR Mode is enabled. For further information on bit depth see the Scripting API page for D3DHDRDisplayBitDepth. |
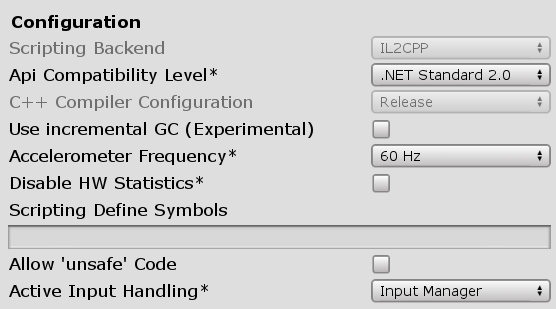
Configuration
| Setting | Function | |
|---|---|---|
|
Scripting BackendA framework that powers scripting in Unity. Unity supports three different scripting backends depending on target platform: Mono, .NET and IL2CPP. Universal Windows Platform, however, supports only two: .NET and IL2CPP. More info See in Glossary |
The scripting backend used by the build. | |
| IL2CPP | Unity’s .NET runtime. This is the only option available for Universal Windows Platform. | |
| API Compatibility Level | There are two options for API compatibility level: .NET 4.0, and .NET Standard 2.0. This setting can affect compatibility with 3rd-party libraries. However, it has no effect on Editor-specific code (code in an Editor directory, or within an Editor-specific Assembly Definition). Tip: If you are having problems with a third-party assembly, you can try the suggestion in the API Compatibility Level section below. |
|
| C++ Compiler Configuration | Choose the C++ compiler configuration used when compiling IL2CPP generated code. Note: This property is disabled for the Universal Windows platform because it is chosen in generated Visual Studio project. |
|
| Use incremental GC | Use the incremental garbage collector, which spreads garbage collection over several frames to reduce gc-related spikes in frame duration. | |
| Accelerometer Frequency | Define how often to sample the accelerometer. If you choose Disabled, then no samples are taken. Otherwise, you can choose from 15Hz, 30Hz, 60Hz and 100Hz frequencies. | |
| Scripting Define Symbols | Set custom compilation flags. For more details, see Platform dependent compilation. | |
| Allow ‘unsafe’ Code | Enable support for compiling ‘unsafe’ C# code in a pre-defined assembly (for example, Assembly-CSharp.dll). For Assembly Definition Files ( .asmdef), click on one of your .asmdef files and enable the option in the Inspector window that appears. |
|
| Active Input Handling | Choose how you want to handle input from users. | |
| Input Manager | Use the traditional Input settings. | |
| Input System (Preview) | Use the Input system. The Input System is provided as a preview packageA preview package is in development and not yet ready for production. A package in preview might be at any stage of development, from the initial stages to near completion. See in Glossary for this release. To try a preview of the Input System, install the InputSystem package. |
|
| Both | Use both systems side by side. |
API Compatibility Level
You can choose your mono API compatibility level for all targets. Sometimes a 3rd-party .NET library uses functionality that’s outside of your .NET compatibility level. To understand what’s going on in such cases, and how to best fix it, try following these suggestions:
- Install ILSpy for Windows.
- Drag the .NET assemblies for the API compatilibity level that you are having issues with into ILSpy. You can find these under
Frameworks/Mono/lib/mono/YOURSUBSET/. - Drag in your 3rd-party assembly.
- Right-click your 3rd-party assembly and select Analyze.
- In the analysis report, inspect the Depends on section. The report highlights anything that the 3rd-party assembly depends on, but that is not available in the .NET compatibility level of your choice in red.
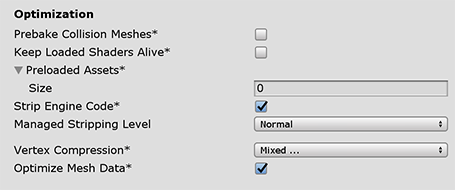
Optimization
| Setting | Function | |
|---|---|---|
| Prebake CollisionA collision occurs when the physics engine detects that the colliders of two GameObjects make contact or overlap, when at least one has a Rigidbody component and is in motion. More info See in Glossary Meshes |
Enable this option to add collision data to Meshes at build time. | |
| Keep Loaded ShadersA program that runs on the GPU. More info See in Glossary Alive |
Enable this option to prevent shaders from being unloaded. | |
| Preloaded Assets | Set an array of Assets for the player to load on startup. To add new Assets, increase the value of the Size property and then set a reference to the Asset to load in the new Element box that appears. |
|
| Strip Engine Code | Enable code stripping. This setting is only available with the IL2CPP Scripting Backend. Most games don’t use all necessary DLLs. With the Strip Engine Code option enabled, you can strip out unused parts to reduce the size of the built player on iOS devices. If your game is using classes that would normally be stripped out by the option you currently have selected, you’ll be presented with a Debug message when you make a build. |
|
| Managed Stripping Level | Choose how aggressively Unity strips unused managed (C#) code. | |
| Normal | Remove unreachable managed code to reduce build size and .NET/IL2CPPA Unity-developed scripting back-end which you can use as an alternative to Mono when building projects for some platforms. More info See in Glossary build times. |
|
| Aggressive | Run UnityLinker in a less conservative mode than normal, reducing code size even further than what Normal can achieve. However, this additional reduction may come with tradeoffs. For more information, see ManagedStrippingLevel. | |
| Vertex Compression | Set vertex compressionA method of storing data that reduces the amount of storage space it requires. See Texture Compression, Animation Compression, Audio Compression, Build Compression. See in Glossary per channel. For example, you can enable compression for everything except positions and lightmapA pre-rendered texture that contains the effects of light sources on static objects in the scene. Lightmaps are overlaid on top of scene geometry to create the effect of lighting. More info See in Glossary UVs. Whole MeshThe main graphics primitive of Unity. Meshes make up a large part of your 3D worlds. Unity supports triangulated or Quadrangulated polygon meshes. Nurbs, Nurms, Subdiv surfaces must be converted to polygons. More info See in Glossary compression set per imported object overrides where vertex compression is set on objects. Everything else obeys these vertex compression settings. |
|
| Optimize Mesh Data | Enable this option to remove any data from Meshes that is not required by the Material applied to them (such as tangents, normals, colors, and UVs). |
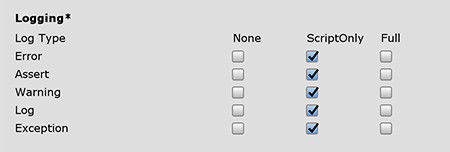
Logging
Select what type of logging to allow in specific contexts.
Check one box that corresponds to each Log Type (Error, Assert, Warning, Log, and Exception) when running scriptsA piece of code that allows you to create your own Components, trigger game events, modify Component properties over time and respond to user input in any way you like. More info
See in Glossary (ScriptOnly) , all the time (Full), or never (None).
Legacy
Enable the Clamp BlendShapes (Deprecated) option to clamp the range of blend shape weights in SkinnedMeshRenderers.
Publishing Settings
Use these settings to customize building your Universal Windows app. These options are organized into the following groups:
- Packaging
- Certificate
- Streaming Install
- Application UI
- File and Protocol Associations
- Misc
- Capabilities
- Supported Device Families
Unity stores these settings in the Package.appxmanifest file when creating a Visual Studio solution for the first time.
Note: If you build your project on top of the existing one, Unity doesn’t overwrite the Package.appxmanifest file if it’s already present. That means if you change any of the Player settings, you need to check Package.appxmanifest. If you want to regenerate Package.appxmanifest, delete it and rebuild your project from Unity.
For more information, see Microsoft’s documentation on App package manifest.
Supported orientations from Player Settings are also populated to the manifest (Package.appxmanifest file in Visual Studio solution). On Universal Windows Apps, Unity resets the orientation to the one you used in the Player settings, regardless of what you specify in the manifest. This is because Windows itself ignores those settings on desktop and tablet computers.
Tip: You can always change supported orientations using Unity scripting API.
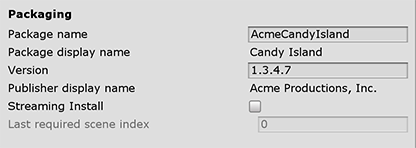
Packaging
| Setting | Function |
|---|---|
| Package name | Enter the name to identify the package on the system. The name must be unique. |
| Package display name | The Product Name value that you set at the top of the Player settings appears here. This is the name of the app as it will appear on the Windows Store. |
| Version | Enter the version for the package using a string in quadA primitive object that resembles a plane but its edges are only one unit long, it uses only 4 vertices, and the surface is oriented in the XY plane of the local coordinate space. More info See in Glossary notation: Major.Minor.Build.Revision. |
| Publisher display name | The Company Name value that you set at the top of the Player settings appears here. This is the user-friendly name of the publisher. |
| Streaming Install | Enable this option to create a AppxContentGroupMap.xml manifest file containing streamable Assets for the SceneA Scene contains the environments and menus of your game. Think of each unique Scene file as a unique level. In each Scene, you place your environments, obstacles, and decorations, essentially designing and building your game in pieces. More infoSee in Glossary. To include Scene Assets by default, use the Last required scene index setting. Assets in Scenes with a scene index above the Last required scene index are specified as streamable in the manifest file. |
| Last required scene index | Enter the index number from the Scenes In Build list on the Build Settings window that corresponds to the last scene in that list that must be present in the game build. For an application to start, Unity requires any scene index at or less than the specified index. To require all files in the list, use the index of the last scene in the list. Scenes with a greater scene index must include shared Assets for Scenes with a lesser index. The order of scenes in the Build Settings dialog may be important to allow the application to locate the required assets. Note: By default, the Streaming Install option is disabled, which means that this setting is not available. To make this property editable, enable the Streaming Install option first. |
Certificate
Every Universal Windows App needs a certificate which identifies a developer.
You can click the Select button to choose your certificate file (.pfx) from your local computer. The name of the file you selected appears on the Select button.
If you don’t have a certificate file already, you can generate a file in Unity:
-
Click the Create button. The Create Test Certificate for Windows Store dialog window appears.
-
Enter the name of the package publisher in the Publisher text box.
-
Enter the password for the certificate in the Password text box and then again in the Confirm password text box.
-
Click the Create button.
The window closes and the Certificate section displays the name you entered for both the Publisher and Issued by values. The Expiration date is set to one year from the time you created the certificate.
Streaming Install
If you enable Streaming Install, Unity generates an AppxContentGroupMap.xml file containing streamable Assets. To include Scene Assets in the AppxContentGroupMap.xml file by default, use the Last required scene index setting, which uses the scene index in the Build Settings dialog. Assets in Scenes with a scene index above the Last required scene index are specified as streamable in the generated manifest. For an application to start, Unity requires any scene index at or less than the specified index.
Scenes with a greater scene index must include shared assets for Scenes with a lesser index. The order of scenes in the Build Settings dialog may be important to allow the application to locate the required assets.
Application UI
Unity copies these options directly to the Package.appxmanifest file.
The Dispay name value that you set at the top of the Player Settings settings appears in this section. This is the full name of the app.
Enter the text you want to appear on the app’s tile on the Windows Store in the Description text box. This defaults to the Package display name value.
File and Protocol Associations
The settings under the File Type Associations, File Types, and Protocol sections allow you to set up your Windows Store app as the default handler for a certain file type or URI scheme.
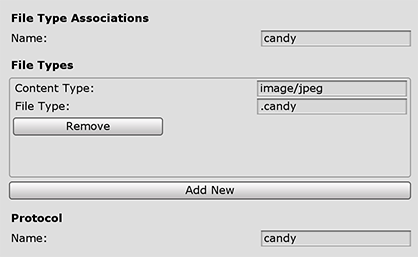
Under the File Type Associations section, enter the name (lowercase only) for a group of file types in the Name text box. These are files that share the same display name, logo, info tip, and edit flags. Choose a group name that can stay the same across app updates.
If you are setting this up as a file association:
- Click the Add New button. An empty entry appears in the File Types list. You can add multiple file types.
- Enter the MIME content type in the Content Type text box for a particular file type. For example, image/jpeg.
- Enter the file type to register for in the File Type text box, preceded by a period (for example, .jpeg).
If you are setting this up as an association with a URI scheme, enter the protocol in the Name text box.
For more information, see Auto-launching with file and URI associations (XAML)
Misc
Unity receives input by subscribing to events. The Input Source setting defines where (which sources) to get input from. Currently this only applies to mouse and touch input, as keyboard input always comes from CoreWindow.
| Value | Function |
|---|---|
| CoreWindow | Subscribe to CoreWindow events. This is the default. |
| Independent Input Source | Create Independent Input Source and receive input from it. |
| SwapChainPanel | Subscribe to SwapChainPanel events. |
Capabilities
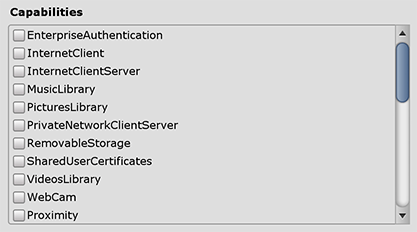
Use the Capabilities section to enable APIs or resources you want your app to access. These could be pictures, music, or devices such as the cameraA component which creates an image of a particular viewpoint in your scene. The output is either drawn to the screen or captured as a texture. More info
See in Glossary or the microphone.
| Capability | Function |
|---|---|
| EnterpriseAuthentication | Windows domain credentials enable a user to log into remote resources using their credentials, and act as if a user provided their user name and password. |
| InternetClient | Apps can receive incoming data from the Internet. Cannot act as a server. No local network access. |
| InternetClientServer | Same as InternetClient but also enables peer-to-peer (P2P) scenarios where the app needs to listen for incoming network connections. |
| MusicLibrary | Accesses the user’s Music, allowing the app to enumerate and access all files in the library without user interaction. This capability is typically used in jukebox apps that make use of the entire Music library. |
| PicturesLibrary | Accesses the user’s Pictures, allowing the app to enumerate and access all files in the library without user interaction. This capability is typically used in photo apps that make use of the entire Pictures library. |
| PrivateNetworkClientServer | Provides inbound and outbound access to home and work networks through the firewall. This capability is typically used for games that communicate across the local area network (LAN), and for apps that share data across a variety of local devices. |
| RemovableStorage | Accesses files on removable storage, like USB keys and external hard drives. |
| SharedUserCertificates | Allows your app to add and access software and hardware-based certificates in the Shared User store, such as certificates stored on a smart card. This capability is typically used for financial or enterprise apps that require a smart card for authentication. |
| VideosLibrary | Accesses the user’s Videos, allowing the app to enumerate and access all files in the library without user interaction. This capability is typically used in movie-playback apps that make use of the entire Videos library. |
| WebCam | Accesses the video feed of a built-in camera or external webcam, which allows the app to capture photos and videos. Note: This only grants access to the video stream. In order to grant access to the audio stream as well, the Microphone capability must be added. |
| Proximity | Enables multiple devices in close proximity to communicate with one another. This capability is typically used in casual multi-player games and in apps that exchange information. Devices attempt to use the communication technology that provides the best possible connection, including Bluetooth, Wi-Fi, and the Internet. |
| Microphone | Accesses the microphone’s audio feed, which allows the app to record audio from connected microphones. |
| Location | Accesses location functionality that retrieved from dedicated hardware like a GPS sensor in the PC or derived from available network info. |
| HumanInterfaceDevice | Enables access to Human Interface Device APIs. See How to specify device capabilities for HID for details. |
| AllJoyn | Allows AllJoyn-enabled apps and devices on a network to discover and interact with each other. |
| BlockedChatMessages | Allows apps to read SMS and MMS messages that have been blocked by the Spam Filter app. |
| Chat | Allows apps to read and write all SMS and MMS messages. |
| CodeGeneration | Allows apps to access the following functions which provide JIT capabilities to apps VirtualProtectFromApp CreateFileMappingFromApp OpenFileMappingFromApp MapViewOfFileFromApp |
| Objects3D | Allows apps to have programmatic access to the 3D objectA 3D GameObject such as a cube, terrain or ragdoll. More info See in Glossary files. This capability is typically used in 3D apps and games that need access to the entire 3D objects library. |
| PhoneCall | Allows apps to access all of the phone lines on the device and perform the following functions. Place a call on the phone line and show the system dialer without prompting the user. Access line-related metadata. Access line-related triggers. Allows the user-selected spam filter app to set and check block list and call origin information. |
| UserAccountInformation | Accesses the user’s name and picture. |
| VoipCall | Allows apps to access the VOIP calling APIs in the Windows.ApplicationModel.Calls namespace. |
| Bluetooth | Allows apps to communicate with already paired bluetooth devices over both Generic Attribute (GATT) or Classic Basic Rate (RFCOMM) protocol. |
| SpatialPerception | Provides programmatic access to spatial mappingThe process of mapping real-world surfaces into the virtual world. See in Glossary data, giving mixed reality apps information about surfaces in application-specified regions of space near the user. Declare the spatialPerception capability only when your app will explicitly use these surface meshes, as the capability is not required for mixed reality apps to perform holographic rendering based on the user’s head pose. |
| InputInjectionBrokered | Allows apps to inject various forms of input such as HID, touch, pen, keyboard or mouse into the system programmatically. This capability is typically used for collaboration apps that can take control of the system. |
| Appointments | Accesses the user’s appointment store. This capability allows read access to appointments obtained from the synced network accounts and to other apps that write to the appointment store. With this capability, your app can create new calendars and write appointments to calendars that it creates. |
| BackgroundMediaPlayback | Changes the behavior of the media-specific APIs like the MediaPlayer and AudioGraph classes to enable media playback while your app is in the background. All active audio streams will no longer mute, but will continue to be audible when an app transitions to the background. Additionally, app lifetime will be extended automatically while playback is occurring. |
| Contacts | Accesses the aggregated view of the contacts from various contacts stores. This capability gives the app limited access (network permitting rules apply) to contacts that were synced from various networks and the local contact store. |
| LowLevelDevices | Allows apps to access custom devices when a number of additional requirements are met. |
| OfflineMapsManagement | Allows apps to access offline maps. |
| PhoneCallHistoryPublic | Allows apps to read cellular and some VOIP call history information on the device. This capability also allows the app to write VOIP call history entries. |
| PointOfService | Enables access to APIs in the Windows.Devices.PointOfService namespace. This namespace lets your app access Point of Service (POS) barcode scanners and magnetic stripe readers. The namespace provides a vendor-neutral interface for accessing POS devices from various manufacturers from a UWP app. |
| RecordedCallsFolder | Allows apps to access the recorded calls folder. |
| RemoteSystem | Allows apps to have access to a list of devices associated with the user’s Microsoft Account. Access to the device list is necessary to perform any operations that persist across devices. |
| SystemManagement | Allows apps to have basic system administration privileges such as shutting down or rebooting, locale, and timezone. |
| UserDataTasks | Allows apps to have access to the current state of the tasks setting. |
| UserNotificationListener | Allows apps to have access to the current state of the notifications setting. |
For more information, see App capability declarations.
Unity copies these options directly to the Package.appxmanifest file.
Note: If you build your game on top of previous package, Package.appxmanifest won’t be overwritten.
Supported Device Families
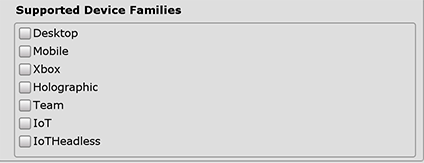
A device family identifies the APIs, system characteristics, and behaviors across a class of devices. It also determines the set of devices on which your app can be installed from the Store. See Microsoft’s Device families overview for more information.
| Setting | Function |
|---|---|
| Desktop | Windows Desktop Extension SDK API contracts for UWP |
| Mobile | Windows Mobile Extension SDK API contracts for UWP |
| Xbox | Xbox Live Extension SDK API contracts for UWP |
| Holographic | Hololens (self-contained, holographic computer) used for Mixed Reality apps |
| Team | Windows Team Extension SDK API contracts for UWP. This is commonly used for Microsoft Surface Hub devices. |
| IoT |
Windows IoT Extension SDK API contracts for UWP. Note Currently, apps targeting IoT or IoTHeadless are not valid in the app store and should be used for development purposes only. |
| IoTHeadless | Similar to IoT but without any UI. Note Currently, apps targeting IoT or IoTHeadless are not valid in the app store and should be used for development purposes only. |
For more information, see Device family availability.
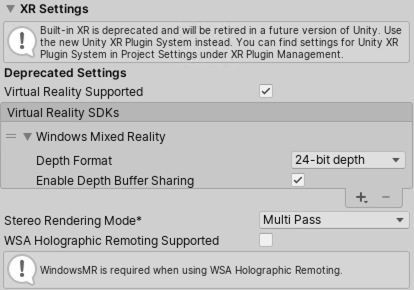
XR Settings
Note: Built-in support for XRAn umbrella term encompassing Virtual Reality (VR), Augmented Reality (AR) and Mixed Reality (MR) applications. Devices supporting these forms of interactive applications can be referred to as XR devices. More info
See in Glossary SDKs is deprecated and will be retired in a future version of Unity. Use the Unity XR Plug-inA set of code created outside of Unity that creates functionality in Unity. There are two kinds of plug-ins you can use in Unity: Managed plug-ins (managed .NET assemblies created with tools like Visual Studio) and Native plug-ins (platform-specific native code libraries). More info
See in Glossary System instead. For more information, see XR Plug-in Architecture.
| Property: | Function: | |
|---|---|---|
| Virtual Reality Supported | Enable native VR support for the Unity Editor and your game builds. | |
| Virtual Reality SDKs | Add and remove Virtual Reality SDKs from the list. This list is only available available when the Virtual Reality Supported is enabled. To add an SDK to the list, click the plus (+) button. To remove an SDK from the list, select it and then click the minus (-) button. Some of the SDKs provide extra settings that appear here. For details, see XR SDKs. |
|
| Stereo Rendering Mode | Choose how you want to render for a virtual reality device. | |
| Multi Pass | This is the normal rendering modeA Standard Shader Material parameter that allows you to choose whether the object uses transparency, and if so, which type of blending mode to use. More info See in Glossary. Unity renders the Scene twice: first to render the left-eye image; and then again for the right-eye image. |
|
| Single Pass | Render both eye images at the same time into one packed Render TextureA special type of Texture that is created and updated at runtime. To use them, first create a new Render Texture and designate one of your Cameras to render into it. Then you can use the Render Texture in a Material just like a regular Texture. More info See in Glossary. This means that the whole Scene is only rendered once, which significantly reduces CPU processing time. |
|
| Single Pass Instanced (Preview) | The GPU performs a single render pass, replacing each draw call with an instanced draw call. This heavily decreases CPU use, and slightly decreases GPU use, due to the cache coherency between the two draw calls. Using this mode significantly reduces the power consumption of your application. | |
| WSA Holographic Remoting Supported | Enable this option to use WSA Holographic Remoting. To use this, you must add the Windows Mixed Reality SDK. |
- Support for Universal Windows Platform streaming install added in 2018.3 NewIn20183
- Input System preview added in Unity 2019.1
- Vuforia removed in Unity 2019.3NewIn20193
- Built-in support for XR SDKs marked as deprecated in Unity 2019.3.
Universal Windows Platform: WinRT API in C# scripts
Universal Windows Platform: IL2CPP scripting back end
Universal Windows Platform: WinRT API in C# scripts
Universal Windows Platform: IL2CPP scripting back end
This page details the Player settings specific to the Universal Windows platformAn IAP feature that supports Microsoft’s In App Purchase simulator, which allows you to test IAP purchase flows on devices before publishing your application. More info
See in Glossary. For a description of the general Player settings, see Player SettingsSettings that let you set various player-specific options for the final game built by Unity. More info
See in Glossary.
You can find documentation for the properties in the following sections:
- Icon
- Resolution and Presentation
- Splash Image
- Other Settings
- Publishing Settings
- XR Settings
Icon
Use the Icon settings to customize the branding for your app on the Windows Store.
Expand the Store Logo section to specify the image that appears on the Store description page for the application. You can add up to eight different resolutions.
Tile section
Customize the general appearance of your Windows Store tiles with these settings:
| Setting | Function | |
|---|---|---|
| Short name | Set an abbreviated name for the app. | |
| Show name on | Indicate each icon image you want the name to appear on: Medium Tile, Large Tile, or Wide Tile. | |
| Foreground text | Choose whether you want to use Light or Dark text on the app’s Tile. | |
| Background color | Specify what color you want to use for the background. | |
| Default Size | Choose what size you want to use as the default size for the Tile. | |
| Not Set | Don’t use a default size. | |
| Medium | Use a medium size. | |
| Wide | Use a wide size. |
Unity copies these options directly to the Package.appxmanifest file.
Tiles and Logos section
Specify the images your tiles display on the Windows Store with these settings:
| Setting | Function |
|---|---|
| Square 44×44 Logo | Set a 44×44 logo image to use on the app’s tile. You can set up to 10 resolutions. |
| Square 71×71 Logo | Set a 71×71 logo image to use on the app’s tile. You can set up to 5 resolutions. |
| Square 150×150 Logo | Set a 150×150 logo image to use on the app’s tile. You can set up to 5 resolutions. |
| Square 310×310 Logo | Set a 310×310 logo image to use on the app’s tile. You can set up to 5 resolutions. |
| Wide 310×150 Logo | Set a 310×150 logo image to use on the app’s tile. You can set up to 5 resolutions. |
Resolution and Presentation
Use the Resolution and Presentation section to customize aspects of the screen’s appearance.
| Setting | Function |
|---|---|
| Default is Fullscreen | Set the window to the full-screen native resolution of the display. Unity renders app content at the resolution set by script (or by user selection when the built application launches), but scales it to fill the window. When scaling, Unity adds black bars to the rendered output to match the aspect ratioThe relationship of an image’s proportional dimensions, such as its width and height. See in Glossary chosen in the Player settings, so that the content isn’t stretched. This process is called letterboxing. |
| Run In background | Enable this option to make the game keep running (rather than pausing) if the app loses focus. |
| Transparent Swapchain | Sets AlphaMode on the swap chain to DXGI_ALPHA_MODE_PREMULTIPLIED. This setting is only used for UWP projects that use the XAML build type. By enabling this setting, you can compose Unity content with other XAML content in your application. For more information, see the PlayerSettings.WSA.transparentSwapchain. |
Orientation
Choose the game’s screen orientation from the Default Orientation drop-down menu:
| Setting | Function |
|---|---|
| Portrait | Orient the screen so that the device’s Home button appears at the bottom. |
| Portrait Upside Down | Orient the screen so that the device’s Home button appears at the top. |
| Landscape Left | Orient the screen so that the device’s Home button appears on the right side. |
| Landscape Right | Orient the screen so that the device’s Home button appears on the left side. |
| Auto Rotation | Screen orientation changes with device orientation. This is the default. |
When you set the orientation to Auto Rotation, the Allowed Orientations for Auto Rotation section appears.
Allowed Orientations for Auto Rotation
This section is only visible when Default Orientation is set to Auto Rotation.
Because Auto Rotation changes screen orientation to match the device, you may want to limit the screen orientations allowed (for example, locking a device to landscape).
Enable each orientation you want to allow by checking its box in this section:
| Setting | Function |
|---|---|
| Portrait | Allow portrait orientation. |
| Portrait Upside Down | Allow portrait upside-down orientation. |
| Landscape Right | Allow landscape right orientation (home button on the left side). |
| Landscape Left | Allow landscape left orientation (home button is on the right side). |
Splash Image
Above the common Splash Screen settings, the Player Settings settings allow you to specify splash images for the Universal Windows platform.
Use the Virtual Reality Splash Image property to select a custom splash image to be displayed in Virtual RealityA system that immerses users in an artificial 3D world of realistic images and sounds, using a headset and motion tracking. More info
See in Glossary displays.
Below the common Splash Screen settings, there are a few additional sections:
- Windows
- Windows HolographicThe former name for Windows Mixed Reality. More info
See in Glossary - Overwrite background color
Windows
Set the foreground image you want to use in your app’s splash screen. You can add up to seven different resolutions.
Windows Holographic
Use these settings to customize the holographic splash image for Mixed Reality apps.
Set a Holographic Splash Image to appear during startup. This image appears for five seconds (or until the app finishes loading).
Tracking Loss
A Mixed Reality headset needs to build world-locked coordinate systems from its environment, in order to allow holograms to stay in position. Tracking loss occurs when the headset loses track of where it is (can’t locate itself) in the world. This leads to a breakdown in spatial systems (spatial mapping, spatial anchors, spatial stages).
When this happens, Unity stops rendering holograms, pauses the game, and displays a notification. You can customize the notification image that appears by enabling the On Tracking Loss Pause and Show Image property, and then selecting the image to display with the Tracking Loss Image property.
For more information, see Recommended settings for Unity.
Overwrite background color
The common Splash Screen settings allow you to set the Background Color for when no background image is set, which applies to all platforms.
To override this for the Universal Windows platform, you can enable the Overwrite background color property and then use the Background color setting to choose a different color.
Other Settings
This section allows you to customize a range of options organized into the following groups:
- RenderingThe process of drawing graphics to the screen (or to a render texture). By default, the main camera in Unity renders its view to the screen. More info
See in Glossary - Configuration
- Optimization
- Logging
- Legacy
Rendering
Use these settings to customize how Unity renders your game for the Univeral Windows platform.
| Setting | Function |
|---|---|
| Color Space | Choose which color space should be used for rendering: Gamma or Linear. See the Linear rendering overview for an explanation of the difference between the two. |
| Auto Graphics API | Disable this option to manually pick and reorder the graphics APIs. By default this option is enabled, and Unity uses Direct3D11. |
| Static BatchingA technique Unity uses to draw GameObjects on the screen that combines static (non-moving) GameObjects into big Meshes, and renders them in a faster way. More info See in Glossary |
Enable this option to use Static batching. |
| Dynamic BatchingAn automatic Unity process which attempts to render multiple meshes as if they were a single mesh for optimized graphics performance. The technique transforms all of the GameObject vertices on the CPU and groups many similar vertices together. More info See in Glossary |
Enable this option to use Dynamic Batching (activated by default). |
| GPU Skinning | Enable this option to use DX11/ES3 GPU skinningThe process of binding bone joints to the vertices of a character’s mesh or ‘skin’. Performed with an external tool, such as Blender or Autodesk Maya. More info See in Glossary. |
| Graphics Jobs (Experimental) | Enable this option to instruct Unity to offload graphics tasks (render loops) to worker threads running on other CPU cores. This is intended to reduce the time spent in Camera.Render on the main thread, which is often a bottleneck. Note: This feature is experimental. It may not deliver a performance improvement for your project, and may introduce new crashes. |
| Lightmap Streaming Enabled | Enable this option to load only the lightmap mip maps as needed to render the current game Cameras. This value applies to the lightmap textures as they are generated. Note: To use this setting, you must enable the Texture Streaming Quality setting. |
| Streaming Priority | Set the lightmap mip map streaming priority to resolve resource conflicts. These values are applied to the light map textures as they are generated. Positive numbers give higher priority. Valid values range from –128 to 127. |
Configuration
| Setting | Function | |
|---|---|---|
| Scripting Runtime Version | Choose which .NET runtime to use in your project. For more details, see Microsoft’s .NET documentation. | |
| .NET 3.5 Equivalent (Deprecated) | A .NET runtime which implements the .NET 3.5 API. This functionality is deprecated, and should no longer be used. Please use .NET 4. | |
| .NET 4.x Equivalent | A .NET runtime which implements the .NET 4 API. This API is newer than .NET 3.5, and as such, it offers access to more APIs, is compatible with more external libraries, and supports C# 6. This is the default scripting runtime. | |
|
Scripting BackendA framework that powers scripting in Unity. Unity supports three different scripting backends depending on target platform: Mono, .NET and IL2CPP. Universal Windows Platform, however, supports only two: .NET and IL2CPP. More info See in Glossary |
The scripting backend used by the build. | |
| IL2CPP | Unity’s .NET runtime. This is the only option available for Universal Windows Platform. | |
| API Compatibility Level | There are two options for API compatibility level: .NET 4.0, or .NET Standard 2.0. Tip: If you are having problems with a third-party assembly, you can try the suggestion in the API Compatibility Level section below. |
|
| C++ Compiler Configuration | Choose the C++ compiler configuration used when compiling IL2CPP generated code. Note: This property is disabled for the Universal Windows platform because it is chosen in generated Visual Studio project. |
|
| Accelerometer Frequency | Define how often to sample the accelerometer. If you choose Disabled, then no samples are taken. Otherwise, you can choose from 15Hz, 30Hz, 60Hz and 100Hz frequencies. | |
| Disable HW Statistics | Enable this option to instruct the application not to send information about the hardware to Unity. For more details, see Unity Hardware Statistics. | |
| Scripting Define Symbols | Set custom compilation flags. For more details, see Platform dependent compilation. | |
| Allow ‘unsafe’ Code | Enable support for compiling ‘unsafe’ C# code in a pre-defined assembly (for example, Assembly-CSharp.dll). For Assembly Definition Files ( .asmdef), click on one of your .asmdef files and enable the option in the Inspector window that appears. |
|
| Active Input Handling | Choose how you want to handle input from users. | |
| Input Manager | Use the traditional Input settings. | |
| Input System (Preview) | Use the Input system. The Input System is provided as a preview packageA preview package is in development and not yet ready for production. A package in preview might be at any stage of development, from the initial stages to near completion. See in Glossary for this release. To try a preview of the Input System, install the InputSystem package. |
|
| Both | Use both systems side by side. |
Optimization
| Setting | Function | |
|---|---|---|
| Prebake Collision Meshes | Enable this option to add collisionA collision occurs when the physics engine detects that the colliders of two GameObjects make contact or overlap, when at least one has a rigidbody component and is in motion. More info See in Glossary data to Meshes at build time. |
|
| Keep Loaded Shaders Alive | Enable this option to prevent shadersA small script that contains the mathematical calculations and algorithms for calculating the Color of each pixel rendered, based on the lighting input and the Material configuration. More info See in Glossary from being unloaded. |
|
| Preloaded Assets | Set an array of Assets for the player to load on startup. To add new Assets, increase the value of the Size property and then set a reference to the Asset to load in the new Element box that appears. |
|
| Strip Engine Code | Enable code stripping. This setting is only available with the IL2CPP Scripting Backend. Most games don’t use all necessary DLLs. With the Strip Engine Code option enabled, you can strip out unused parts to reduce the size of the built player on iOS devices. If your game is using classes that would normally be stripped out by the option you currently have selected, you’ll be presented with a Debug message when you make a build. |
|
| Managed Stripping Level | Choose how aggressively Unity strips unused managed (C#) code. | |
| Normal | Remove unreachable managed code to reduce build size and .NET/IL2CPPA Unity-developed scripting back-end which you can use as an alternative to Mono when building Projects for some platforms. More info See in Glossary build times. |
|
| Aggressive | Run UnityLinker in a less conservative mode than normal, reducing code size even further than what Normal can achieve. However, this additional reduction may come with tradeoffs. For more information, see ManagedStrippingLevel. | |
| Vertex Compression | Set vertex compressionA method of storing data that reduces the amount of storage space it requires. See Texture Compression3D Graphics hardware requires Textures to be compressed in specialised formats which are optimised for fast Texture sampling. More info See in Glossary, Animation CompressionThe method of compressing animation data to significantly reduce file sizes without causing a noticable reduction in motion quality. Animation compression is a trade off between saving on memory and image quality. More info See in Glossary, Audio Compression, Build Compression. See in Glossary per channel. For example, you can enable compression for everything except positions and lightmapA pre-rendered texture that contains the effects of light sources on static objects in the scene. Lightmaps are overlaid on top of scene geometry to create the effect of lighting. More info See in Glossary UVs. Whole MeshThe main graphics primitive of Unity. Meshes make up a large part of your 3D worlds. Unity supports triangulated or Quadrangulated polygon meshes. Nurbs, Nurms, Subdiv surfaces must be converted to polygons. More info See in Glossary compression set per imported object overrides where vertex compression is set on objects. Everything else obeys these vertex compression settings. |
|
| Optimize Mesh Data | Enable this option to remove any data from Meshes that is not required by the Material applied to them (such as tangents, normals, colors, and UVs). |
Logging
Select what type of logging to allow in specific contexts.
Check one box that corresponds to each Log Type (Error, Assert, Warning, Log, and Exception) when running scriptsA piece of code that allows you to create your own Components, trigger game events, modify Component properties over time and respond to user input in any way you like. More info
See in Glossary (ScriptOnly) , all the time (Full), or never (None).
Legacy
Enable the Clamp BlendShapes (Deprecated) option to clamp the range of Blend Shape weights in SkinnedMeshRenderers.
Publishing Settings
Use these settings to customize building your Universal Windows app. These options are organized into the following groups:
- Packaging
- Certificate
- Streaming Install
- Application UI
- File and Protocol Associations
- Compilation
- Misc
- Capabilities
- Supported Device Families
Unity stores these settings in the Package.appxmanifest file when creating a Visual Studio solution for the first time.
Note: If you build your project on top of the existing one, Unity doesn’t overwrite the Package.appxmanifest file if it’s already present. That means if you change any of the Player settings, you need to check Package.appxmanifest. If you want to regenerate Package.appxmanifest, delete it and rebuild your project from Unity.
For more information, see Microsoft’s documentation on App package manifest.
Supported orientations from Player Settings are also populated to the manifest (Package.appxmanifest file in Visual Studio solution). On Universal Windows Apps, Unity resets the orientation to the one you used in the Player settings, regardless of what you specify in the manifest. This is because Windows itself ignores those settings on desktop and tablet computers.
Tip: You can always change supported orientations using Unity scripting API.
Packaging
| Setting | Function |
|---|---|
| Package name | Enter the name to identify the package on the system. The name must be unique. |
| Package display name | The Product Name value that you set at the top of the Player settings appears here. This is the name of the app as it will appear on the Windows Store. |
| Version | Enter the version for the package using a string in quadA primitive object that resembles a plane but its edges are only one unit long, it uses only 4 vertices, and the surface is oriented in the XY plane of the local coordinate space. More info See in Glossary notation: Major.Minor.Build.Revision. |
| Publisher display name | The Company Name value that you set at the top of the Player settings appears here. This is the user-friendly name of the publisher. |
| Streaming Install | Enable this option to create a AppxContentGroupMap.xml manifest file containing streamable AssetsAny media or data that can be used in your game or Project. An asset may come from a file created outside of Unity, such as a 3D model, an audio file or an image. You can also create some asset types in Unity, such as an Animator Controller, an Audio Mixer or a Render Texture. More infoSee in Glossary for the Scene. To include Scene Assets by default, use the Last required scene index setting. Assets in ScenesA Scene contains the environments and menus of your game. Think of each unique Scene file as a unique level. In each Scene, you place your environments, obstacles, and decorations, essentially designing and building your game in pieces. More info See in Glossary with a scene index above the Last required scene index are specified as streamable in the manifest file. |
| Last required scene index | Enter the index number from the Scenes In Build list on the Build Settings window that corresponds to the last scene in that list that must be present in the game build. For an application to start, Unity requires any scene index at or less than the specified index. To require all files in the list, use the index of the last scene in the list. Scenes with a greater scene index must include shared Assets for Scenes with a lesser index. The order of scenes in the Build Settings dialog may be important to allow the application to locate the required assets. Note: By default, the Streaming Install option is disabled, which means that this setting is not available. To make this property editable, enable the Streaming Install option first. |
Certificate
Every Universal Windows App needs a certificate which identifies a developer.
You can click the Select button to choose your certificate file (.pfx) from your local computer. The name of the file you selected appears on the Select button.
If you don’t have a certificate file already, you can generate a file in Unity:
-
Click the Create button. The Create Test Certificate for Windows Store dialog window appears.
-
Enter the name of the package publisher in the Publisher text box.
-
Enter the password for the certificate in the Password text box and then again in the Confirm password text box.
-
Click the Create button.
The window closes and the Certificate section displays the name you entered for both the Publisher and Issued by values. The Expiration date is set to one year from the time you created the certificate.
Streaming Install
If you enable Streaming Install, Unity generates an AppxContentGroupMap.xml file containing streamable Assets. To include Scene Assets in the AppxContentGroupMap.xml file by default, use the Last required scene index setting, which uses the scene index in the Build Settings dialog. Assets in Scenes with a scene index above the Last required scene index are specified as streamable in the generated manifest. For an application to start, Unity requires any scene index at or less than the specified index.
Scenes with a greater scene index must include shared assets for Scenes with a lesser index. The order of scenes in the Build Settings dialog may be important to allow the application to locate the required assets.
Application UI
Unity copies these options directly to the Package.appxmanifest file.
The Dispay name value that you set at the top of the Player Settings settings appears in this section. This is the full name of the app.
Enter the text you want to appear on the app’s tile on the Windows Store in the Description text box. This defaults to the Package display name value.
File and Protocol Associations
The settings under the File Type Associations, File Types, and Protocol sections allow you to set up your Windows Store app as the default handler for a certain file type or URI scheme.
Under the File Type Associations section, enter the name (lowercase only) for a group of file types in the Name text box. These are files that share the same display name, logo, info tip, and edit flags. Choose a group name that can stay the same across app updates.
If you are setting this up as a file association:
- Click the Add New button. An empty entry appears in the File Types list. You can add multiple file types.
- Enter the MIME content type in the Content Type text box for a particular file type. For example, image/jpeg.
- Enter the file type to register for in the File Type text box, preceded by a period (for example, .jpeg).
If you are setting this up as an association with a URI scheme, enter the protocol in the Name text box.
For more information, see Auto-launching with file and URI associations (XAML)
Misc
Unity receives input by subscribing to events. The Input Source setting defines where (which sources) to get input from. Currently this only applies to mouse and touch input, as keyboard input always comes from CoreWindow.
| Value | Function |
|---|---|
| CoreWindow | Subscribe to CoreWindow events. This is the default. |
| Independent Input Source | Create Independent Input Source and receive input from it. |
| SwapChainPanel | Subscribe to SwapChainPanel events. |
Capabilities
Use the Capabilities section to enable APIs or resources you want your app to access. These could be pictures, music, or devices such as the cameraA component which creates an image of a particular viewpoint in your scene. The output is either drawn to the screen or captured as a texture. More info
See in Glossary or the microphone.
| Capability | Function |
|---|---|
| EnterpriseAuthentication | Windows domain credentials enable a user to log into remote resources using their credentials, and act as if a user provided their user name and password. |
| InternetClient | Apps can receive incoming data from the Internet. Cannot act as a server. No local network access. |
| InternetClientServer | Same as InternetClient but also enables peer-to-peer (P2P) scenarios where the app needs to listen for incoming network connections. |
| MusicLibrary | Accesses the user’s Music, allowing the app to enumerate and access all files in the library without user interaction. This capability is typically used in jukebox apps that make use of the entire Music library. |
| PicturesLibrary | Accesses the user’s Pictures, allowing the app to enumerate and access all files in the library without user interaction. This capability is typically used in photo apps that make use of the entire Pictures library. |
| PrivateNetworkClientServer | Provides inbound and outbound access to home and work networks through the firewall. This capability is typically used for games that communicate across the local area network (LAN), and for apps that share data across a variety of local devices. |
| RemovableStorage | Accesses files on removable storage, like USB keys and external hard drives. |
| SharedUserCertificates | Allows your app to add and access software and hardware-based certificates in the Shared User store, such as certificates stored on a smart card. This capability is typically used for financial or enterprise apps that require a smart card for authentication. |
| VideosLibrary | Accesses the user’s Videos, allowing the app to enumerate and access all files in the library without user interaction. This capability is typically used in movie-playback apps that make use of the entire Videos library. |
| WebCam | Accesses the video feed of a built-in camera or external webcam, which allows the app to capture photos and videos. Note: This only grants access to the video stream. In order to grant access to the audio stream as well, the Microphone capability must be added. |
| Proximity | Enables multiple devices in close proximity to communicate with one another. This capability is typically used in casual multi-player games and in apps that exchange information. Devices attempt to use the communication technology that provides the best possible connection, including Bluetooth, Wi-Fi, and the Internet. |
| Microphone | Accesses the microphone’s audio feed, which allows the app to record audio from connected microphones. |
| Location | Accesses location functionality that retrieved from dedicated hardware like a GPS sensor in the PC or derived from available network info. |
| HumanInterfaceDevice | Enables access to Human Interface Device APIs. See How to specify device capabilities for HID for details. |
| AllJoyn | Allows AllJoyn-enabled apps and devices on a network to discover and interact with each other. |
| BlockedChatMessages | Allows apps to read SMS and MMS messages that have been blocked by the Spam Filter app. |
| Chat | Allows apps to read and write all SMS and MMS messages. |
| CodeGeneration | Allows apps to access the following functions which provide JIT capabilities to apps VirtualProtectFromApp CreateFileMappingFromApp OpenFileMappingFromApp MapViewOfFileFromApp |
| Objects3D | Allows apps to have programmatic access to the 3D object files. This capability is typically used in 3D apps and games that need access to the entire 3D objectsA 3D GameObject such as a cube, terrain or ragdoll. More info See in Glossary library. |
| PhoneCall | Allows apps to access all of the phone lines on the device and perform the following functions. Place a call on the phone line and show the system dialer without prompting the user. Access line-related metadata. Access line-related triggers. Allows the user-selected spam filter app to set and check block list and call origin information. |
| UserAccountInformation | Accesses the user’s name and picture. |
| VoipCall | Allows apps to access the VOIP calling APIs in the Windows.ApplicationModel.Calls namespace. |
| Bluetooth | Allows apps to communicate with already paired bluetooth devices over both Generic Attribute (GATT) or Classic Basic Rate (RFCOMM) protocol. |
| SpatialPerception | Provides programmatic access to spatial mappingThe process of mapping real-world surfaces into the virtual world. More info See in Glossary data, giving mixed reality apps information about surfaces in application-specified regions of space near the user. Declare the spatialPerception capability only when your app will explicitly use these surface meshes, as the capability is not required for mixed reality apps to perform holographic rendering based on the user’s head pose. |
| InputInjectionBrokered | Allows apps to inject various forms of input such as HID, touch, pen, keyboard or mouse into the system programmatically. This capability is typically used for collaboration apps that can take control of the system. |
| Appointments | Accesses the user’s appointment store. This capability allows read access to appointments obtained from the synced network accounts and to other apps that write to the appointment store. With this capability, your app can create new calendars and write appointments to calendars that it creates. |
| BackgroundMediaPlayback | Changes the behavior of the media-specific APIs like the MediaPlayer and AudioGraph classes to enable media playback while your app is in the background. All active audio streams will no longer mute, but will continue to be audible when an app transitions to the background. Additionally, app lifetime will be extended automatically while playback is occurring. |
| Contacts | Accesses the aggregated view of the contacts from various contacts stores. This capability gives the app limited access (network permitting rules apply) to contacts that were synced from various networks and the local contact store. |
| LowLevelDevices | Allows apps to access custom devices when a number of additional requirements are met. |
| OfflineMapsManagement | Allows apps to access offline maps. |
| PhoneCallHistoryPublic | Allows apps to read cellular and some VOIP call history information on the device. This capability also allows the app to write VOIP call history entries. |
| PointOfService | Enables access to APIs in the Windows.Devices.PointOfService namespace. This namespace lets your app access Point of Service (POS) barcode scanners and magnetic stripe readers. The namespace provides a vendor-neutral interface for accessing POS devices from various manufacturers from a UWP app. |
| RecordedCallsFolder | Allows apps to access the recorded calls folder. |
| RemoteSystem | Allows apps to have access to a list of devices associated with the user’s Microsoft Account. Access to the device list is necessary to perform any operations that persist across devices. |
| SystemManagement | Allows apps to have basic system administration privileges such as shutting down or rebooting, locale, and timezone. |
| UserDataTasks | Allows apps to have access to the current state of the tasks setting. |
| UserNotificationListener | Allows apps to have access to the current state of the notifications setting. |
For more information, see App capability declarations
Unity copies these options directly to the Package.appxmanifest file.
Note: If you build your game on top of previous package, Package.appxmanifest won’t be overwritten.
Supported Device Families
A device family identifies the APIs, system characteristics, and behaviors across a class of devices. It also determines the set of devices on which your app can be installed from the Store. See Microsoft’s Device families overview for more information.
| Setting | Function |
|---|---|
| Desktop | Windows Desktop Extension SDK API contracts for UWP |
| Mobile | Windows Mobile Extension SDK API contracts for UWP |
| Xbox | Xbox Live Extension SDK API contracts for UWP |
| HolographicThe former name for Windows Mixed Reality. More info See in Glossary |
HololensAn XR headset for using apps made for the Windows Mixed Reality platform. More info See in Glossary (self-contained, holographic computer) used for Mixed Reality apps |
| Team | Windows Team Extension SDK API contracts for UWP. This is commonly used for Microsoft Surface Hub devices. |
| IoT |
Windows IoT Extension SDK API contracts for UWP. Note Currently, apps targeting IoT or IoTHeadless are not valid in the app store and should be used for development purposes only. |
| IoTHeadless | Similar to IoT but without any UI. Note Currently, apps targeting IoT or IoTHeadless are not valid in the app store and should be used for development purposes only. |
For more information, see Device family availability.
XR Settings
| Property: | Function: | |
|---|---|---|
| Virtual Reality Supported | Enable native VR support for the Unity Editor and your game builds. | |
| Virtual Reality SDKs | Add and remove Virtual Reality SDKs from the list. This list is only available available when the Virtual Reality Supported is enabled. To add an SDK to the list, click the plus (+) button. To remove an SDK from the list, select it and then click the minus (-) button. Some of the SDKs provide extra settings that appear here. For details, see XR SDKs. |
|
| Stereo Rendering Mode | Choose how you want to render for a virtual reality device. | |
| Multi Pass | This is the normal rendering modeA Standard Shader Material parameter that allows you to choose whether the object uses transparency, and if so, which type of blending mode to use. More info See in Glossary. Unity renders the Scene twice: first to render the left-eye image; and then again for the right-eye image. |
|
| Single Pass | Render both eye images at the same time into one packed Render TextureA special type of Texture that is created and updated at runtime. To use them, first create a new Render Texture and designate one of your Cameras to render into it. Then you can use the Render Texture in a Material just like a regular Texture. More info See in Glossary. This means that the whole Scene is only rendered once, which significantly reduces CPU processing time. |
|
| Single Pass Instanced (Preview) | The GPU performs a single render pass, replacing each draw call with an instanced draw call. This heavily decreases CPU use, and slightly decreases GPU use, due to the cache coherency between the two draw calls. Using this mode significantly reduces the power consumption of your application. | |
| Vuforia Augmented Reality Supported | Enable this option to use Vuforia Augmented Reality SDK, which is required when using the Vuforia Virtual Reality SDK. | |
| WSA Holographic Remoting Supported | Enable this option to use WSA Holographic Remoting. To use this, you must add the Windows Mixed RealityA mixed reality platform developed by Microsoft, built around the API of Windows 10. More info See in Glossary SDK. |
- 2018–11–28 Page amended with limited editorial review
- Support for Universal Windows Platform streaming install added in 2018.3 NewIn20183
- Input System preview added in Unity 2019.1
Did you find this page useful? Please give it a rating:
Universal Windows Platform: WinRT API in C# scripts
Universal Windows Platform: IL2CPP scripting back end
Чтобы создать сборку для UWP, перейдите в раздел Настройки сборки (меню: Файл > Настройки сборки). В списке Платформа выберите Универсальная платформа WindowsФункция IAP, которая поддерживает симулятор Microsoft In App Purchase, который позволяет протестировать потоки покупок IAP на устройствах перед публикацией приложения. Дополнительная информация
См. Словарь, затем выберите Переключить платформу кнопка.
Примечание. Универсальная платформа Windows отображается в списке Платформа, только если вы используете Unity на компьютере с Windows.
Unity не поддерживает разработку для Windows Phone.
Создание приложений UWP с помощью Unity
Основной рабочий процесс при создании игры или приложения для UWP с помощью Unity выглядит следующим образом:
Когда вы нажимаете Построить в окне Настройки сборки:
-
Unity создает и экспортирует проект Visual Studio.
-
Откройте файл .sln сгенерированного проекта в Visual Studio.
-
Используйте Visual Studio для создания окончательного приложения.
Когда вы нажимаете Сборка и запуск, Unity создает исполняемый файл приложения, который может работать независимо.
Настройки сборки UWP
Используйте эти параметры для настройки того, как Unity создает ваше приложение.
| Настройки | Функции | |
|---|---|---|
| Target Device | Выберите один из следующих вариантов, чтобы создать приложение для любого устройства, или выберите конкретное устройство: Любое устройство, ПК, Мобильное или HoloLens. | |
| Architecture | Выберите тип процессора для сборки (применимо только к Build And Run). | |
| x64 | 64-bit CPU. | |
| x86 | 32-bit CPU. | |
| ARM | 32-bit ARM CPU. | |
| ARM64 | 64-bit ARM CPU. | |
| Build Type | Выберите тип проекта или сборки Visual Studio для создания. | |
| XAML Project | Проект Visual Studio, который интегрирует Unity в полную среду XAML. Это приводит к некоторой потере производительности, но позволяет использовать элементы XAML в приложении. | |
| D3D Project | Проект Visual Studio, который интегрирует Unity в базовое окно приложения. Это приводит к лучшей производительности. | |
| Executable Only | Размещает проект в предварительно созданном исполняемом файле для быстрой итерации. Этот параметр имеет наибольшую скорость итерации, поскольку не требует сборки сгенерированного проекта в Visual Studio. Он предлагает ту же производительность, что и сборки D3D Project. | |
| Target SDK Version | Windows 10 SDK, установленный на локальном ПК для сборки приложения. Этот параметр имеет значение только при вызове API-интерфейсов Windows 10 непосредственно из скриптов.
Примечание. Unity требует базовой версии Windows 10 SDK 10.0.10240.0 или выше для создания приложений UWP и не поддерживает Windows 8/8.1 SDK. |
|
| Minimum Platform Version | Минимальная версия выпуска Windows 10, необходимая для запуска приложения.
Примечание. Этот параметр имеет значение только в том случае, если вы используете функции или API Windows, недоступные в базовой версии Windows 10 (10.0.10240). |
|
| Visual Studio Version | Ориентируйтесь на конкретный выпуск Visual Studio, если у вас установлено несколько версий.. | |
| Build and Run on | Выберите целевое устройство или транспорт для развертывания и запуска приложения во время Build And Run.. | |
| Local Machine | Развертывает и запускает приложение на локальном ПК. | |
| Remote Device (via Device Portal) | Развертывает и запускает приложение на подключенном устройстве через транспорт портала устройств.
Для развертывания через портал устройств необходимо ввести информацию о соединении и аутентификации в следующих дополнительных полях: – Адрес портала устройств (обязательно) Дополнительную информацию см. в документации по развертыванию портала устройств Windows. |
|
| Build Configuration | Выберите тип сборки (применимо только к Build And Run). Примечание. Эти конфигурации сборки такие же, как и доступные в проекте Visual Studio, который генерирует Unity. |
|
| Debug | Создает сборку, содержащую дополнительный код, который можно использовать для отладки, и открывает окно Profiler, помогающее оптимизировать игру. Он показывает, сколько времени вы тратите на различные области вашей игры. Например, он может сообщать о проценте времени, затраченном на рендеринг, анимацию или игровую логику. Дополнительная информация См. в Словарь свою сборку. |
|
| Release | Создает сборку, в которой удален код отладки, и включает Profiler для вашей сборки. | |
| Master | Создает сборку, полностью оптимизированную для выпуска. | |
| Copy References | Отключите этот параметр, чтобы сгенерированное решение могло ссылаться на файлы Unity из папки установки Unity, а не копировать их в папку сборки. Это может сэкономить до 10 ГБ дискового пространства, но вы не сможете скопировать папку сборки на другой компьютер. Unity также быстрее создает ваше приложение, если вы отключите этот параметр.. | |
| Copy PDB files | Включите этот параметр, чтобы включить файлы базы данных программы Microsoft (PDB) во встроенный автономный проигрыватель. Файлы PDB содержат отладочную информацию для вашего приложения, но могут увеличить размер вашего проигрывателя. Дополнительные сведения см. в документации по отладке Windows. | |
| Development BuildСборка разработки включает символы отладки и включает профилировщик. Подробнее См. в Словарь |
Сборка для разработки включает символы отладки сценариев. При выборе параметра Сборка для разработки также можно выбрать параметры Профилировщик автоподключения, Отладка скриптов и Сборка только скриптов настройка. Это также включает DEVELOPMENT_BUILD #define.
Дополнительную информацию о директивах #define см. в документации по платформенно-зависимой компиляции. |
|
| Autoconnect Profiler | Автоматически подключать Profiler к сборке. Доступно только при включении параметра Разработка. Дополнительную информацию о Profiler см. в обзоре Profiler. | |
| Deep Profiling | Когда вы включаете Глубокое профилирование, Unity профилирует весь код вашего скрипта и записывает все вызовы функций. Это полезно для выявления проблем с производительностью кода вашей игры. Однако он использует много памяти и может не работать с очень сложными скриптамифрагмент кода, позволяющий создавать собственные Компоненты, запускайте игровые события, изменяйте свойства Компонентов с течением времени и реагируйте на ввод данных пользователем любым удобным для вас способом. Подробнее См. в Словарь. Дополнительные сведения см. в документации по глубокому профилированию.. |
|
| Script Debugging | Удаленно подключайте отладчики скриптов к проигрывателю. Доступно только при включении параметра Разработка. | |
| Scripts Only Build | Включите этот параметр, чтобы создавать только сценарии в текущем проекте. Доступно только при включении параметра Разработка.
После включения Unity только перестраивает скрипты в вашем приложении и оставляет файлы данных из ранее выполненной сборки нетронутыми. Это значительно сокращает время итерации, если вы изменяете только код в своем приложении. Примечание. Прежде чем использовать этот параметр, необходимо один раз собрать весь проект. |
|
| Compression Method | Сжимайте данные в своем проекте во время сборки. Сюда входят ресурсы, сценыСцена содержит окружение и меню вашей игры. Думайте о каждом уникальном файле сцены как об уникальном уровне. В каждой сцене вы размещаете свое окружение, препятствия и декорации, по сути проектируя и создавая свою игру по частям. Подробнее См. в Словарь, Настройки игрокаНастройки, которые позволяют вам установить различные параметры игрока для окончательной игры, созданной Unity. Подробнее См. в Словарь и данные GI. Выберите один из следующих методов: |
|
| Default | сжатие по умолчаниюМетод хранения данных, уменьшающий объем требуемого дискового пространства. См. Сжатие текстур, Сжатие анимации, Сжатие звука, Сжатие компоновки. Для параметра См. в Словарь установлено значение Нет. |
|
| LZ4 | Формат быстрого сжатия, полезный для сборок разработки. Сжатие LZ4 может значительно сократить время загрузки приложений, созданных с помощью Unity. Дополнительные сведения см. в разделе BuildOptions.CompressWithLz4. | |
| LZ4HC | LZ4HC — вариант LZ4 с высокой степенью сжатия, сборка которого выполняется медленнее, но дает лучшие результаты при выпуске сборок. Сжатие LZ4HC может значительно сократить время загрузки приложений, созданных с помощью Unity. Дополнительные сведения см. в разделе BuildOptions.CompressWithLz4HC. |
admin / 11.06.2018
Universal windows platform
Leave feedback
Содержание
- Universal Windows Platform Player Settings
- Certificate
- Compilation
- When Compilation Overrides is set to:
- Misc
- Independent Input Source
- Capabilities
- Создание программы
- Что нужно знать для создания полезных программ?
- Создаем универсальные приложения под Windows 10
- Словарь общих терминов, относящихся к программированию.
- Введение в UWP
- Что такое Universal Windows Platform
- Universal Windows Platform
- Почему UWP?
- Что необходимо для разработки под UWP
- What exactly IS a Universal Windows Platform (UWP) app?
- Как активировать стороннюю установку приложений в Windows 10
- Universal Windows Platform
- Как выполнить стороннюю установку приложений на Windows 10
- Как установить элемент на форму?
- Как изменить настройки элемента?
- Как задать действие для элемента?
- Universal Windows Platform (UWP)
-
- Недокументированные возможности HiAsm
- Настройки HiAsm
- Графика в HiAsm
-
Universal Windows Platform Player Settings
This page details the Player Settings specific to Universal Windows Platform. For a description of the general Player Settings, see documentation on Player Settings.
Most of these settings are transferred to the Package.appxmanifest file when creating Visual Studio solution for the first time.
Note: If you build your project on top of the existing one, Unity won’t overwrite the Package.appxmanifest file if it’s already present. That means if you change something in Player Settings, you should be sure to check Package.appxmanifest. If you want to regenerate Package.appxmanifest, delete it and rebuild your project from Unity.
To learn more, see Microsoft’s documentation on App package manifest.
Settings from Packaging, Application UI, Tile, Splash screen, and Capabilities directly transfer to settings in the Package.appxmanifest file.
Supported orientations from Player Settings are also populated to the manifest (Package.appxmanifest file in Visual Studio solution). On Universal Windows Apps Unity will reset orientation to the one you used in Player Settings, regardless what you specify in the manifest. This is because Windows itself ignores those settings on desktop and tablet computers. Note, that you can always change supported orientations using Unity scripting API.
Certificate
Every Universal Windows App needs a certificate which identifies a developer, Unity will create a default certificate, if you won’t provide your own.
Compilation
As you know, Unity uses Mono when compiling script files, and you can use the API located in .NET 3.5. Compilation Overrides allows you to use .NET for Universal Windows Platform (also known as .NET Core) in your C# files, the API is available here.
When Compilation Overrides is set to:
- None — C# files are compiled using Mono compiler.
- Use .Net Core — C# files are compiled using Microsoft compiler and .NET Core, you can use Windows Runtime API, but classes implemented in C# files aren’t accessible from the JS language. Note: when using API from Windows Runtime, it’s advisable to wrap the code with ENABLE_WINMD_SUPPORT define, because the API is only avaible when building to Universal Windows Platform, and it’s not available in Unity Editor.
- Use .Net Core Partially — C# files not located in Plugins, Standard Assets, Pro Standard Assets folders are compiled using Microsoft compiler and .NET Core, all other C# files are compiled using Mono compiler. The advantage is that classes implemented in C# are accessible from the JS language. Note: You won’t be able to test .NET Core API in Unity Editor, because it doesn’t have access to .NET Core, so you’ll be able to test the API only when running Universal Windows App.
Note: You cannot use .NET Core API in JS scripts.
Here’s a simple example of how to use .NET Core API in scripts.
Misc
Unprocessed Plugins contains a list of plugins which are ignored by Unity’s preprocessing tools (like SerializationWeaver, AssemblyPreprocessor, rrw). Usually you don’t need to modify this list, unless you’re getting an error that Unity’s failed to preprocess your plugin.
If you add a plugin to this list, Unity won’t inject additional IL code into your assembly used for serialization purposes, but if your plugin isn’t referencing UnityEngine.dll, that’s fine, because Unity won’t serialize any data from your plugin.
Independent Input Source
This allows you to enable an option for independent input source. Basically this makes your input more responsive, and usually you want this option to be enabled.
Low Latency Presentation API Lets you enable Low Latency Presentation API, basically this create D3D11 swapchain with DXGI_SWAP_CHAIN_FLAG_FRAME_LATENCY_WAITABLE_OBJECT flag, read more here and should increase input responsiveness. This option is disabled by default because on hardware with older GPU drivers, this option makes game laggy, if you enable this option — be sure to profile your game if the performance is still acceptable.
Capabilities
These options are directly copied to Package.appxmanifest.
Note: If you build your game on top of previous package, Package.appxmanifest won’t be overwritten.
• 2017–05–16 Page amended with no editorial review
Did you find this page useful? Please give it a rating:
Thanks for rating this page!
Report a problem on this page
What kind of problem would you like to report?
Thanks for letting us know! This page has been marked for review based on your feedback.
If you have time, you can provide more information to help us fix the problem faster.
Provide more information
You’ve told us this page needs code samples. If you’d like to help us further, you could provide a code sample, or tell us about what kind of code sample you’d like to see:
You’ve told us there are code samples on this page which don’t work. If you know how to fix it, or have something better we could use instead, please let us know:
You’ve told us there is information missing from this page. Please tell us more about what’s missing:
You’ve told us there is incorrect information on this page. If you know what we should change to make it correct, please tell us:
You’ve told us this page has unclear or confusing information. Please tell us more about what you found unclear or confusing, or let us know how we could make it clearer:
You’ve told us there is a spelling or grammar error on this page. Please tell us what’s wrong:
You’ve told us this page has a problem. Please tell us more about what’s wrong:
Thanks for helping to make the Unity documentation better!
Universal Windows Platform: WinRT API in C# scripts
Universal Windows Platform: WinRT API in C# scripts
Автор: Дегтярев Михаил.
Создание программы
Что нужно знать для создания полезных программ?
Прежде всего, необходимо знать, хотите вы создавать программы, которые запускаются на вашем (или чужом) компьютере или вы хотите заниматься разработкой веб-страниц, или же нужна программа, которая только отображает информацию или это будет участие в разработке определенной функции. Если вы не знаете еще, то не волнуйтесь!
Информация на этом сайте даст вам хорошую основу, чтобы выяснить, куда вам двигаться.
Вы увидите, что большинство книг и веб-сайты, с которыми вы сталкиваетесь по программирование для начинающих в целом показывают вам только текст программы. Этот стиль программирования восходит к временам оперативных вычислений. Некоторые из Вас могут помнить времена использования DOS или, возможно, системы VAX в школе, где нужно было вводить команды в командной строке («C: >»), чтобы добиться своей цели. Поскольку большинство языков программирования были написаны, когда интерфейс командной строки являлся основным интерфейсом, то многие обучающие руководства вы найдете полезными для этого метода обучения. Вы, вероятно, больше заинтересованы в создании программ с оконным интерфейсом, которые работают в виде открытого окна в вашей операционной системы. Окна и инструменты, которые обычно используются в программах с оконным интерфейсом (меню, файлы справки, открывать и сохранять файлы, и т.д.), находятся в так называемой интегрированной среде разработки (IDE) программирование для чайников. Эти среды обеспечивают элементы, которые можно перетащить в свои программы, поэтому вам не придется писать разные типы инструментов «с нуля» – это очень полезное нововведение в программировании для начинающих. Несмотря на это множество обучающих курсов начинаются с работы и вводом текста в консольном режиме и это может ввести в заблуждение человека, который пытается узнать и понять программирование. Вы, наверное, не заинтересованы в написании консольных программ с интерфейсом командной строки, но это почти все, что преподают. Будьте уверены, есть способы, чтобы легко написать оконные приложения. Visual Basic предназначен для написания приложений Windows. Языки, такие как C и C + + не предназначены специально для Windows, но с использованием таких инструментов, как IDE Microsoft Visual C + + и Borland C + + Builder вы сможете адаптировать свои знания и для написания Windows программ.
Если вы хотите создавать веб-страницы или программы, которые функционируют в Интернете, у вас есть несколько путей использовать основы программирования.
Если вы просто хотите создать веб-страницы с текстом и графическим содержанием, то HTML является лучшим выбором для вас. Если вы хотите создать более интерактивную страницу и страницы с более развитыми содержание, изучение PHP и MySQL могут удовлетворить эти запросы и позволят выполнить все, что это вы хотите сделать. Если вы хотите создать довольно продвинутой программы, которые используют Интернет, чтобы были разные функции, то стоит обратиться к более сложному в использовании Java и может быть вы найдете то, что вы ищете.
Словарь общих терминов, относящихся к программированию.
Compiler — компилятор, программа, которая читает текст программы, который вы написали («код») и переводит его в зависимости от языка спецификаций в исполняемый файл программы.
Database — база данных представляет собой файл, который содержит информацию в структурированном виде, в некоторых отношениях похож на электронную таблицу. Они часто используются в программировании для хранения данных и получения данных обратно для использования программы.
Алгоритм — алгоритм представляет собой набор инструкций и шагов для решения проблемы. Если кто-то спросил, как что-то сделать, а вы им сказали «сделать это, потом это, потом это, затем это и если вы увидите это, то сделать еще что-то». Вы только что дали им алгоритм. Алгоритмы программы используются для получения результатов, основанных на введенных данных.
Объектно-ориентированное — объектно-ориентированном программировании (ООП) последняя тенденции в языках программирования. ООП редизайн, так программисты думают о решении проблемы — вместо того чтобы использовать функциональный и алгоритмический подход, вы думаете об «объектах» в программе и что они должны делать. Не задумывайтесь слишком много о концепции ООП в качестве человека занимающегося программированием для начинающего. Когда настанет время узнать об ООП, тогда вы найдете нужную информацию, а в некоторых случаях может никогда не придется вам этим заниматься.
Платформа — платформа описывает тип оборудования и операционных систем , на которых предстоит работать вашей программе. Например, Intel и Windows, или Mac и Mac OS.
Если возник вопрос, то вы можете получить ответ: форум программистов
Введение в UWP
Что такое Universal Windows Platform
Последнее обновление: 12.04.2017
UWP (Universal Windows Platform) представляет собой унифицированную платформу для создания и запуска приложений в Windows 10 и Windows 10 Mobile.
UWP стала результатом фолюции более ранних технологий. Так, с выходом Windows 8 была внедрена новая архитектурная платформа для приложений — Windows Runtime (WinRT), которая позволяла запускать приложения в так называемом режиме Modern (Metro) на десктопах, планшетах. Затем с выходом Windows 8.1 и Windows Phone 8.1 эта технология получила развитие — появились «универсальные приложения», которые можно было запускать сразу Windows 8.1 и WP8.1. И в июле 2015 года официально вышла новая ОС Windows 10. Она использует платформу UWP, которая представляет собой развитие Windows Runtime.
Как подсказывает название платформы, она является универсальной — универсальной для всех устройств экосистемы Windows 10.
Universal Windows Platform
А это обычные дестопы, планшеты, мобильные устройства, устройства IoT (интернет вещей), Xbox, устройства Surface Hub. И приложение UWP может одинаково работать на всех этих платформах, если на них установлена Windows 10.
Почему UWP?
Программирование под UWP несет ряд преимуществ:
-
Широта распространения. На текущий момент (апрель 2017) Windows 10 установлена уже более чем на 400 миллионах устройств. На десктопах Windows 10 уже опередила Windows 8/8.1.
-
Поддержка широкого круга устройств. Десктопы, планшеты, смартфоны, большие планшеты Surface Hub, различные IoT-устройства, в перспективе устройства виртуальной реальности HoloLens — круг устрйоств, на которых может работать Windows 10 действительно широк.
-
Поддержка разных языков и технологий программирования. UWP-приложения можно создавать с помощью таких языков, как Visual C++, C#, Visual Basic, JavaScript. В качестве технологии для создания графического интерфейса Visual C++, C# и Visual Basic используют XAML, JavaScript применяет HTML. Кроме того, С++ может вместо XAML использовать DirectX. То есть достаточно распространенные и и знакомые многим технологии.
-
Магазин приложений и удобство распространения. Windows Store представляет собой прекрасное место для распространения UWP-приложений, как платных, так и бесплатных. Сами возможности платформы и магазина Windows Store позволяют использовать разные способы монетизации. Например, можно интегрировать в приложения блоки для показа рекламы через различные SDK. Можно распространять за определенную плату, причем оплату можно гибко настраивать. При необходимости можно встроить предоставление ознакомительной версии, после использования которой пользователь может решить, покупать приложение или нет. И также можно монетизировать по модели freemium, при которой приложение условно бесплатное, а отдельные услуги внутри приложения предоставляются за определенную плату. Причем все эти возможности монетизации обесечиваются встроенными инструментами SDK.
-
Богатые возможности платформы. UWP многое наследует от Windows Runtime из Windows 8.1 и в то же время предоставляет много новых функцональностей, как, более богатые возможности по интеграции с облаком, использование Cortana, системы уведомлений в Win10 и многое другое.
Что необходимо для разработки под UWP
Для программирования под UWP необходима ОС Windows 10. Все другие операционные системы, как Windows 8.1/8/7, не говоря уже о Windows XP, не подходят!
Также потребуется среда разработки Visual Studio 2017 Community. Это полнофункциональная бесплатная среда разработки, которую можно загрузить с официального сайта по адресу https://www.visualstudio.com/downloads/download-visual-studio-vs.
Также можно использовать версию VS 2015, а все остальные предыдущие версии Visual Studio — 2013, 2012, 2010 и т.д. с UWP не работают.
При установке Visual Studio 2017 в программе установщика необходимо отметить соответствующий пункт:
Перед чем как начать создание приложений, убедитесь, что в центре обновления в Windows 10 установлена соответствующая опция для разработчиков:
И имея Windows 10 и установленную Visual Studio 2017, можно приступать к разработке приложений.
НазадСодержаниеВперед
Автор: EKP stat
Дата: 2014-01-21 09:56
Не будет большим преувеличением, если мы скажем, что Microsoft — это одна из известнейших корпораций мира и, наверно, самая известная в IT-отрасли. Ворвавшиеся в начале 80-х годов прошлого века первые массовые персональные компьютеры работали с операционными системами тогда еще малоизвестной Microsoft. Прошло более 30 лет и сейчас операционные системы (ОС) семейства Windows используются на большинстве ПК в мире. В настоящее время Microsoft является одной из крупнейших транснациональных компаний по производству программного обеспечения для многих видов вычислительной техники. Здесь и персональные компьютеры, игровых приставки, КПК, смартфоны. Также у Microsoft есть подразделения по производству игровых консолей Xbox, аксессуаров для персональных компьютеров, таких как клавиатуры, мыши и т. д.
С 2012 года корпорация выпускает планшетные компьютеры — Surface I/II. Продукты Microsoft продаётся более чем в 80 странах мира. Штаб-квартира компании находится в городе Редмонд штат Вашигтон США. В настоящее время сотрудников корпорации составляет около 90 тысяч человек по всему миру.
История создания Microsoft
Все началось в 1975 году, когда друзья-студенты Гарварда Билл Гейтс и Пол Аллен, прочитав опубликованную 1 января 1975 года в журнале Popular Electronics статью о персональном компьютере Altair 8800, разработали для него интерпретатор языка Basic. Всего через месяц — 1 февраля, было подписано лицензионное соглашение с компанией Micro Instrumentation and Telemetry Systems (MITS), производителем данонго ПК, об использовании Basic в составе ПО для Altair. В этом же году Билл Гейтс в письме к Аллену предложил вполне простое название для их компании — MICROcomputer SOFTware («программное обеспечение для микрокомпьютеров»),но с первичным с написанием через дефис. Свой первый год новая компания с тремя сотрудникми закончила с оборотом всего в 16005 долларов.
В июле 1977 года Microsoft начинает продажу своего второго языка программирования — FORTRAN, а уже в 1978 — COBOL-80 для микропроцессорных систем 8080, Z-80 и 8085.В том же году фирмы Radio Shack и Apple покупают у Microsoft лицензию на Бейсик. Но настоящий успех приходит к компании, когда в 1980 году IBM предложило Microsoft начать разработку базовой операционной системы для всех выпускаемых ею PC. К тому моменту в Microsoft работало 39 человек — компания разрабатывала и поставляла IBM языки программирования, но подходящей ОС у Гейтса не было. Он рекомендовать IBM обратиться к сопернику Microsoft, фирме Digital Research, которая уже имела в своём распоряжении довольно популярную систему CP /M, установленную на многих 8-разрядных компьютерах. Но в скором времени руководству IBM была направлено предложение о необходимости перехода на более мощный 16-рязрядный процессор 8080 от Intel, вследствие чего CP /M была отвергнута, и с Digital Research заключили договор на разработку новой операционной системы.
У Microsoft появилось время, чтобы опередить DR. Пол Аллен установил контакт с маленькой компанией Seattle Compute Products, располагавшей нужной операционной системой, но не успевшей оптимизировать её к моменту появления IBM PC. В придачу к покупки разработки Seattle Computer, 86-DOS, Microsoft пригласила на работу её создателя — Тима Паттерсона. В результате был заключен контракт с IBM, по которому IBM взяла на себя расходы на производство системы и пообещала продавать компьютеры только с PC-DOS, отчисляя при этом Microsoft проценты с каждого проданного ПК. С начала 80-х годов ХХ века производство компьютеров на Западе начало стремительно расти. IBM пока сохраняла лидерство, но уже не могла считаться монополистом. Начало 1983 года было ознаменовано выпуском персонального компьютера Lisa от Apple, на котором впервые использовался графический интерфейс. Но куда более успешным стал Apple Macintosh, выпущенный в 1984 году. Успехом Apple немедленно воспользовалась Microsoft — ее первые продукты с графическим интерфейсом, редакторы Word и Excel, были разработаны для Macintosh. В 1983 году пути двух основателей компании разошлись — Пол Аллен покинул Microsoft, продав свои акции по 10 долларов за штуку. Мировую славу компании принесла знаменитая линейка ОС с графическим интерфейсом — Windows. Версия Windows 1.0 появилась в 1985 году и по сути являлась надстройкой к DOS. К последующим ее продуктам вы вернемся несколько позже.
Современная деятельность корпорации
В настоящее время Microsoft является одним из крупнейших мировых производителей широкого спектра программного и аппаратного обеспечения, наиболее известны из которого операционные системы семейства Windows Окна, а также программы для работы с документами семейства Microsoft Office. Сегодня корпорация производит множество других перспективных продуктов: комплекты серверных программ, игры, средства разработки программ, игровые консоли Xbox. За время существования компании было выпущено несколько версий графических оболочек для MS-DOS — от Windows 1.0 до Windows 3.x; операционных систем, наследовавших совместимость с MS-DOS, таких как Windows 95, Windows 98 и Windows ME; а также самостоятельных операционных систем семейства NT: Windows NT 4, Windows 2000 (Windows NT 5.0), Windows XP (Windows NT 5.1), Windows Server 2003 (Windows NT 5.2), Windows Vista (Windows NT 6), Windows 7 (Windows NT 6.1). В 2012 году корпорация выпустила новую версию Windows 8, а в 2013-м — ее обновленную версию — Windows 8.1.
What exactly IS a Universal Windows Platform (UWP) app?
Кроме этого Microsoft предлагает серверные программы, продаваемые под названием Microsoft Servers (ранее Windows Server System). Главной частью является Windows Server 2012 (как текущая версия) — операционная система для серверов. Отметим, что в данное подразделение входит интернет-сервис MSN, станция кабельного телевидения MSNBC и интернет-магазин Microsoft Slate.
Бизнес-подразделение Microsoft занимается разработкой финансовых и бизнес-приложений для различных компаний. Оно выпускает Microsoft Office — линейку офисных приложений компании.
Подразделение развлечений и устройств продвигает бренд Windows на другие рынки. Примерами этого продвижения могут служить Windows CE для КПК и создание смартфонов под управлением ОС Windows Mobile и Windows Phone.
В июле 2013 года было объявлено о реорганизации структуры корпорации, в ходе которой будут созданы четыре новые группы. Первая — группа операционных систем во главе с Терри Майерсоном. Вторая группа по производству устройств и другого технического обеспечения. Третья группа во главе с Ци Лю будет заниматься приложениями и услугами Microsoft Office. Четвёртая группа будет отвечать за «облачные» технологии. Останутся и несколько более мелких подразделений, таких как отдел перспективных исследований, маркетинга, финансов, юридический и ряд других. Заметим, что в 2010-м году количество сотрудников компании достигло 89 тысяч постоянных работников.
Из некоторых финансовых показателей можно отметить, что выручка корпорации в 2010-м финансовом году достигла 62,5 млрд долларов а чистая прибыль — 18,8 млрд долларов. По итогам 2012 года выручка Microsoft составила 74 млрд доллара, чистая прибыль — около миллиардов.
Также менеджмент компании активно занимается поглощением более мелких перспективных компаний. Например, до 2011 года крупнейшей сделкой по поглощению была покупка Microsoft компании aQuantive, занимавшейся интернет-рекламой, совершенная в 2007 году за 6,333 млрд долларов. В 2011 году корпорация приобрела специализирующейся на интернет-телефонии компанию Skype Limited за 8,5 млрд долларов. В начале сентября 2013 года Microsoft объявила о покупке у финской Nokia ее подразделения по производству и обслуживанию мобильных телефонов Devices & Services за 5,44 млрд евро.
Данная сделка была одобрена собранием акционеров Nokia уже в ноябре.
Собственники Microsoft и бизнес-культура
В настоящее время Биллу Гейтсу принадлежит около 7,55% акций Microsoft, Стиву Балмеру — еще 4,66%, на других менеджеров корпорации приходится менее 1%, а остальные ценные бумаги находятся в свободном обращении на бирже NASDAQ. Рыночная капитализация компании в конце 25 октября поднялась чуть выше отметки в 300 миллиардов долларов Отметим, что неисполнительным председателем совета директоров компании является Билл Гейтс.
Microsoft часто характеризуют тем, что её бизнес-культура построена вокруг разработчиков. Большие средства каждый год идут на рекрутинг молодых разработчиков ПО, обученных в университетах, и содержание их в компании. Стремясь заинтересовать и привлечь лучших, Microsoft начинает работать даже с учениками старших классов школы. Кроме этого ключевые решения на всех уровнях принимают разработчики или бывшие разработчики. Текучесть кадров в компании составляет около 8%. В Microsoft также существует практика предоставления полностью оплаченного долгосрочного отпуска. Предоставляется полная медицинская страховка. Также есть возможность работать удаленно и неполную рабочую неделю.
Другие материалы из раздела Крупнейшие корпорации
Windows 10
Как активировать стороннюю установку приложений в Windows 10
В операционной системе Windows 10 компания Microsoft продолжает продвигать новую платформу универсальных предложений, которые скачиваются из магазина Windows Store. Однако, как и в случае с системой Android и рядом других, можно скачивать приложения из-за пределов магазина — так называемая сторонняя загрузка.
Для Windows 10 это означает, что приложение не прошло процедуру сертификации для попадания в магазин и работы на Windows-устройствах. По умолчанию операционная система блокирует такие приложения.
Universal Windows Platform
Причина — желание защитить пользователей и их устройства. Сертифицированное приложение означает надёжность, отсутствие вредоносного кода и незадокументированных действий.
Есть ряд причин для сторонней установки приложений. Например, если вы или ваш друг разработчик и вы хотите протестировать создаваемое приложение перед его отправкой на допуск в магазин. Можно найти приложение в вебе и установить его на своё устройство, существует немало сайтов с доступными для скачивания программами.
Как выполнить стороннюю установку приложений на Windows 10
Откройте Параметры > Обновление и безопасность > Для разработчиков > Использование функций разработчика > Неопубликованные приложения. Нажмите «Да» в окне подтверждения с описанием риска. Перезагрузите компьютер.
Ещё здесь есть опция «Режим разработчика», которая даёт дополнительные возможности, помимо сторонней установки приложений.
Рекомендуется устанавливать приложения только из доверенных источников, чтобы не повредить устройства и не подвергать опасности данные на них. Это же руководство можно использовать для сторонней установки приложений на смартфонах на Windows 10 Mobile.
Приветствую всех читателей Softhardware.ru! На просторах Интернета существует одна замечательная бесплатная программа для создания программ для компьютера, именно о ней и пойдет речь в сегодняшней статье.
Многие пользователи иногда задумываются о самостоятельном создании компьютерной программы, и на это существуют разные причины, например:
- Вы хотите автоматизировать свою работу, но не нашли готовую программу для этих целей.
- Вы хотите создать программу из любопытства, вам просто интересен процесс
- У вас есть отличная идея по разработке программы, которая способна совершить революцию в мире hi-tech и поставить ваше имя в одну линейку вместе с Биллом Гейтсом и Стивом Джобсом
Не смотря на разнообразие этих причин, всех их объединяет одна трудность — чтобы разработать программу, нужно знать языки программирования. Для изучения синтаксиса любого языка программирования, достаточно пару месяцев, а для того чтобы понять логику языка и научиться применять её на практике, потребуются годы. Но, как известно безвыходных ситуаций не бывает! В нашем случае нам поможет программа для создания программ для компьютера, которую вы сможете скачать абсолютно бесплатно!
Забегая вперед, скажу — дочитав до конца эту статью, уже через пару часов вы сможете создать свои простенькие программы. Итак, приступим.
Наша программа для создания программ для компьютера называется HiAsm.
HiAsm – это мощная визуальная система разработки приложений, с помощью которой можно разработать свою программу без использования программирования. С помощью HiAsm вы можете создавать различные аудио и видеоплееры, браузеры, онлайн чаты и многое другое. Все эти приложения вы можете создать без единой строчки программного кода, визуальная среда всё сделает за вас!
Перед началом работы с программной для создания программ для компьютера, предлагаю её скачать и установить.
Скачать HiAsm 4.4
После скачивания, вам нужно пройти стандартную процедуру установки данного приложения.
1. Выбираем нужный язык, в моём случае это русский.
2. Продолжаем установку.
3. Принимаем условия лицензионного соглашения.
4. Выбираем место на жестком диске для установки программы для создания программ для компьютера.
5. Указываем имя и адрес электронной почты (так как подтверждение ящика не требуется, то почту можно указать любую)
6. Завершаем процесс установки программы.
После того как вы установили HiAsm, можно перейти к запуску. Запустив нашу программу для создания программ для компьютера, мы увидим следующее окно:
Для того чтобы начать создавать своё приложение, нужно кликнуть по пункту главного меню «Файл», затем «Новый…», выбрать «Windows» (если хотим создать приложение под ОС Windows) и нажимаем «Ок”.
Таким образом, мы получим форму для нашей будущей программы, которая пока содержит единственный элемент, называющийся MainForm.
Форма является фундаментом программы, на которой будут базироваться различные элементы. Для добавлений элементов в нашу программу, кликаем по одноименному пункту в левой верхней части программы для создания программ для компьютера.
Открылось вкладка, имеющая огромную коллекцию различных элементов. Благодаря наличию столь большого арсенала, вы можете создать очень серьезное приложение, которое будет отвечать всем вашим требованиям.
Чтобы показать принцип работы HiAsm, я создам простую программу, которая будет иметь одну кнопку, нажимая на которую будет изменяться заголовок формы с «Form» на «Привет».
Как установить элемент на форму?
Итак, находим кнопку в панели элементов (при наведении курсора на элемент, всплывет подсказка с его названием), кликаем по ней левой кнопкой мыши, затем наводим курсор в ту часть формы, в которой мы хотим её разместить.
Как изменить настройки элемента?
Для того чтобы настроить нашу кнопку, переходим в правую верхнюю часть программы и нажимаем «Cвойства». Теперь мы видим вкладку со всеми свойствами нашей кнопки. Сейчас нас интересует свойство «Caption», которое отвечает за надпись на кнопке.
По умолчанию оно имеет значение «Push», мы изменим его на «Нажми».
Как задать действие для элемента?
Теперь нам предстоит самая сложная часть в создании приложения с помощью программы для создания программ для компьютера – нам нужно сделать так, чтобы кнопка нашей программы начала работать. После того как вы поймете смысл этой операции, она станет для вас простой и логичной.
Universal Windows Platform (UWP)
Для того чтобы наша кнопка изменяла название формы программы, нам нужно установить связь кнопки с главной формой (элемент MainForm). Для этого наводим курсор мыши на зеленую точку, расположенную на нашей кнопке, затем зажимаем левую кнопку мыши и начинаем протягивать линию до центра MainForm.
Теперь нужно дважды кликнуть по проложенному отрезку и установить название формы, которое появится после клика по кнопке. После двойного клика по отрезку, откроется «Редактор данных».
Если вы хотите установить текстовое название формы, то выбираем String, а если числовое, то Integer или Real. Выбираем тип данных «String» и вводим в поле слово «Привет».
На этом наша программа готова и теперь её нужно протестировать. Для этого сохраняем наш проект – «Файл», затем «Сохранить как» и выбираем место для сохранения. Для запуска нам нужно кликнуть по зеленой стрелочке или нажать клавишу F9.
Наша программа запустилась, теперь проверяем её работоспособность – нажимаем на нашу кнопку.
Как мы можем заместить, заголовок формы изменился и это значит, что программа работает!
Чтобы вы могли запускать программу без HiAsm, нужно создать exe файл. Для этого кликаем по пункту главного меню «Запуск» и нажимаем «Компилировать».
Поздравляю, только что сами вы создали программу для Windows! Для облегчения процесса создания программ, я рекомендую ознакомиться со следующими понятиями из программирования:
- типы данных;
- понятие событий в объектно-ориентированном программировании;
- свойства компонентов среды программирования Delphi.
Знание этих понятий намного облегчат процесс создания программ в HiAsp. В этой статье мы рассмотрели отличную бесплатную программу для создания программ для компьютера, также создали своё первое приложение и проверили его на работоспособность. Для того чтобы вам было быстрее разобраться в программе HiAsp, я подобрал несколько достаточно хороших видео уроков, посвященных этой замечательной среде создания программ. Желаю приятного просмотра!
Недокументированные возможности HiAsm
Настройки HiAsm
Графика в HiAsm
А знаете ли Вы, каккие бесплатные программы для скачивания фильмов являются лучшими?
FILED UNDER : IT
Свежие записи
- Страница удалена картинка
- Лучший банк для бизнеса
- Операционная система для нокиа
- Что такое диакритические знаки
- Модератор в вк
- Как делать игры
- Где хранится история скайпа
- Фстэк модель угроз
- Переименовать компьютер в домене
- Преподавание в вузе
- Топ моб сайтов
- Матрица поворота в трехмерном пространстве
- Crm система
- Арктический лед – полярные льды
- Mikrotik sxt lite 2
- Что такое стек
- Хостинг на домашнем компьютере
- Видео фон для сайта
- Интернет-продажи в России: статистика, аналитика, конверсия, прогноз
- Как работает биткоин
Универсальная платформа Windows (UWP) – это специальная платформа для создания приложений на Windows 10. Вы можете разрабатывать приложения для UWP с помощью всего одного набора API, одного пакета приложений и одного магазина для доступа ко всем устройствам Windows 10 – ПК, планшета, телефона, Xbox, HoloLens, Surface Hub и других. Легче поддерживать несколько размеров экрана, а также различные модели взаимодействия, будь то сенсор, мышь и клавиатура, игровой контроллер или ручка. В основе приложений UWP лежит идея, что пользователи хотят, чтобы их работа, их задачи были мобильными через ВСЕ устройства, чтобы можно было использовать любое устройство, наиболее удобное или производительное для конкретной задачи.

UWP является гибким: вам не нужно использовать C# и XAML, если вы этого не хотите. Вам нравится развиваться в Unity или MonoGame? Предпочитаете JavaScript? Не проблема, используйте все, что хотите. У вас есть настольное приложение C++, которое вы хотите расширить с помощью функций UWP и продавать в магазине? И тут все будет работать.
В итоге вы можете потратить свое время на работу со знакомыми языками программирования, фреймворками и API-интерфейсами, все в одном проекте, и иметь тот же самый код, который работает на огромном диапазоне оборудования Windows из существующих сегодня. После того, как вы написали свое приложение UWP, вы можете опубликовать его в магазине на обозрение всего мира.
Итак, что такое UWP-приложение?
Что делает приложение UWP особенным? Вот некоторые из характеристик, которые отличают приложения UWP в Windows 10.
- Существует общая среда API для всех устройств
Основа API-интерфейсов универсальной платформы Windows (UWP) одинакова для всех классов устройства Windows. Если ваше приложение использует только основные API-интерфейсы, оно будет запускаться на любом устройстве Windows 10, независимо от того, планируете ли вы использование настольного ПК, гарнитуры Xbox или наушников Mixed Reality.
- Расширение SDK позволяет вашему приложению делать классные вещи на определенных типах устройств
Расширение SDK добавляет специализированные API для каждого класса устройства. Например, если ваше приложение UWP нацелено на HoloLens, вы можете добавить функции HoloLens в дополнение к обычным API-интерфейсам UWP. Если вы используете универсальные API-интерфейсы, ваш пакет приложений может работать на всех устройствах, работающих под управлением Windows 10. Но если вы хотите, чтобы ваше приложение UWP использовало API-интерфейсы устройства тогда, когда оно работает на определенном классе устройства, вы можете проверить, существует ли API до его вызова во время выполнения.
- Приложения упакованы с использованием формата упаковки .AppX и распространяются из магазина
Все приложения UWP распространяются как пакет AppX. Это обеспечивает надежный механизм установки и гарантирует, что ваши приложения могут быть развернуты и обновлены без проблем.
- Одно хранилище для всех устройств
После регистрации в качестве разработчика приложений вы можете отправить свое приложение в магазин и сделать его доступным для всех типов устройств или только тех, какие вы выберете. Вы загружаете и управляете всеми своими приложениями для устройств Windows в одном месте.
- Приложения поддерживают адаптивные элементы управления и ввода
Элементы пользовательского интерфейса используют эффективные пиксели, поэтому они могут отображать макет в зависимости от количества пикселей экрана, доступных на устройстве. И они хорошо работают с несколькими типами ввода, такими как клавиатура, мышь, сенсорный экран, ручка и контроллеры Xbox One. Если вам нужно дополнительно адаптировать свой пользовательский интерфейс к определенному размеру экрана или устройству, новые панели макетов и инструменты помогут вам в этом.
Используйте язык, который вы уже знаете
Приложения UWP используют Windows Runtime, собственный API, встроенный в операционную систему. Этот API реализован на C++ и поддерживается на C#, Visual Basic, C++ и JavaScript. Некоторые варианты написания приложений в UWP включают:
Видео курсы по схожей тематике:
- XAML UI и C#, VB или C++ backend
- DirectX UI и C++ backend
- JavaScript и HTML
Microsoft Visual Studio 2017 предоставляет шаблон приложения UWP для каждого языка, который позволяет вам создать единый проект для всех устройств. Когда ваша работа будет завершена, вы можете создать пакет приложений и отправить его в Windows Store из Visual Studio, чтобы сделать ваше приложение доступным для клиентов на любом устройстве Windows 10.
Приложения UWP оживают в Windows
В Windows ваше приложение может предоставлять актуальную информацию в режиме реального времени вашим пользователям и заставлять их возвращаться снова. В современной экономике приложений ваше приложение должно участвовать в жизни ваших пользователей. Windows предоставляет вам множество ресурсов, чтобы помочь вашим пользователям вернуться в ваше приложение:
- Живые фрагменты и экран блокировки отображают контекстно-зависимую и своевременную информацию.
- Push-уведомления приносят сигналы в реальном времени, отправляя предупреждения вашему пользователю, когда это необходимо.
- Центр действий – это место, где вы можете организовывать и отображать уведомления и контент, на которые пользователи должны обратить внимание.
- Background — исполнение и триггеры оживляют ваше приложение, когда пользователю это нужно.
- В вашем приложении могут использоваться голосовые и Bluetooth-устройства LE, чтобы помочь пользователям взаимодействовать с окружающим миром.
- Поддержка богатых, цифровых чернил и инновационного набора.
- Cortana добавляет индивидуальность вашему программному обеспечению.
- XAML предоставляет вам инструменты для создания плавных анимированных пользовательских интерфейсов.
Наконец, вы можете использовать данные о роуминге и Windows Credential Locker, чтобы обеспечить постоянный роуминг на всех экранах Windows, где пользователи запускают ваше приложение. Данные о роуминге дают вам простой способ сохранить пользовательские настройки и настройки в облаке, не создавая собственную инфраструктуру синхронизации. И вы можете хранить учетные данные пользователя в хранилище учетных данных, где безопасность и надежность являются главным приоритетом.
Монетизируйте ваше приложение
В Windows вы можете выбрать, как вы будете монетизировать свои приложения на телефонах, планшетах, ПК и других устройствах. Вот несколько способов заработать деньги с помощью вашего приложения и услуг, которые оно предоставляет. Все, что вам нужно сделать, это выбрать то, что лучше подходит для вас:
Бесплатные вебинары по схожей тематике:
- Платная загрузка – это самый простой вариант. Просто назовите цену.
- Система нескольких пробных попыток позволит пользователям оценить ваше приложение перед его покупкой. Это обеспечит более легкую конверсию, чем более традиционные варианты «freemium».
- Используйте скидки для привлечения внимания к своим приложениям.
- Также доступны покупки и реклама в приложении.
Как начать?
Более подробный обзор UWP читайте в официальном Руководстве по приложениям для универсальной платформы Windows. Затем ознакомьтесь с настройкой Get set up, чтобы загрузить инструменты, необходимые для начала создания приложений, и напишите свое первое приложение!
Источник.

Научиться настраивать MikroTik с нуля или систематизировать уже имеющиеся знания можно на углубленном курсе по администрированию MikroTik. Автор курса, сертифицированный тренер MikroTik Дмитрий Скоромнов, лично проверяет лабораторные работы и контролирует прогресс каждого своего студента. В три раза больше информации, чем в вендорской программе MTCNA, более 20 часов практики и доступ навсегда.
Microsoft потратила годы на то, чтобы подтолкнуть разработчиков к созданию специальных приложений для универсальной платформы Windows (Universal Windows Platform, UWP), но сегодня она забила последний гвоздь в гроб UWP.
Компания наконец-то разрешила разработчикам добавлять полностью нативные игры Win32 в Microsoft Store, а это значит, что многие игры, публикуемые разработчиками в других популярных магазинах, таких как Steam, теперь не нужно перестраивать для UWP.
«Мы понимаем, что Win32 — это формат приложений, который любят использовать разработчики игр, а геймеры любят играть, поэтому мы рады сообщить, что мы обеспечим полную поддержку нативных игр Win32 для Microsoft Store в Windows», — пояснил глава Microsoft по играм Фил Спенсер. «Это откроет больше возможностей как для разработчиков, так и для геймеров, предоставляя возможности контроля и настройки которые они ожидают от открытой игровой экосистемы Windows».
Фил Спенсер, глава игрового подразделения Microsoft
Это большой шаг вперед для магазина приложений Windows, учитывая, что игры являются одними из самых загружаемых программ из магазинов. Ранее разработчики были вынуждены публиковать игры для Windows 10 через универсальную платформу Windows, которая просто не имеет того уровня возможностей, которые привыкли видеть в Windows на протяжении многих лет.
Недавно Microsoft объявила о своих планах по переводу браузера Edge на движок Chromium и отказе от UWP, чтобы сделать его доступным для Windows 7, Windows 8 и macOS. Джо Бельфиоре из Microsoft признался в интервью The Verge в начале прошлого месяца, что UWP только «вставляла палки в колеса» для Edge. «Дело не в том, что UWP — это плохо, но UWP не является зрелой 35-летней платформой, для которой написано огромное количество приложений», — сказал тогда Бельфиоре.
Я слышал много историй, когда инженеры и разработчики Microsoft жаловались на то, что UWP накладывает ограничения на свои приложения, и сторонним разработчикам часто приходилось выбирать между созданием приложения UWP для Windows 10 или традиционным настольным приложением, которое будет работать в Windows 7, Windows 8 и Windows 10.
Microsoft постоянно расширяла свое определение UWP, чтобы позволить разработчикам переупаковывать настольные приложения в Microsoft Store, но первоначальное видение приложений нового стиля, которые будут работать на ПК, телефонах, планшетах, Xbox и HoloLens становилось все более маловероятным.
Microsoft также приостановила работы над своей версией Office с поддержкой сенсорного ввода, предпочитая вместо этого сосредоточиться на облачных решениях, iOS, Android и настольных приложениях. Office всегда был центральным элементом UWP и хорошим примером того, как можно создать большое и требовательное приложение на новой платформе. Microsoft наконец прислушалась к разработчикам и больше не пытается навязывать им UWP.
«Вы сказали, что хотите, чтобы мы продолжили разделять многие части универсальной платформы, чтобы их можно было применять отдельно», — пояснил Кевин Галло, руководитель платформы Microsoft для разработчиков Windows, в начале прошлого месяца. Это означает, что со временем разработчики смогут использовать некоторые из положительных сторон UWP.
В отдельном интервью ZDNet Галло рассказал, что «к тому времени, когда мы закончим, останутся только «приложения для Windows». Еще не все готово, но компания стремится сделать каждую функцию UWP доступной для разработчиков.
В конечном итоге, это хорошая новость как для разработчиков, так и для пользователей Windows. Теперь мы должны увидеть больше игр в Магазине Microsoft, которые работают так, как того ожидают геймеры, и, надеемся, больше приложений. Магазин Windows был полон барахла на протяжении многих лет, и Microsoft с трудом привлекала туда разработчиков.
Старый подход Microsoft к магазину вызывал резкую критику закрытой платформы в Windows 10 и попыток компании заставить разработчиков распространять приложения через Microsoft Store. Microsoft даже создала версии Windows S и Windows RT в которых установка обычных приложений была заблокирована.
Новый шаг Microsoft по добавлению своих игр в Steam — это хороший признак того, что Спенсер меняет внутри Microsoft больше, чем просто консоль Xbox. Теперь нам нужно подождать, чтобы увидеть, что разработчики приложений и игр на этот раз сделают с Microsoft Store и платформой приложений Windows, которая станет гораздо менее ограничена.
Автор: Том Уоррен (Tom Warren)
Источник: Microsoft’s Universal Windows Platform app dream is dead and buried
Научиться настраивать MikroTik с нуля или систематизировать уже имеющиеся знания можно на углубленном курсе по администрированию MikroTik. Автор курса, сертифицированный тренер MikroTik Дмитрий Скоромнов, лично проверяет лабораторные работы и контролирует прогресс каждого своего студента. В три раза больше информации, чем в вендорской программе MTCNA, более 20 часов практики и доступ навсегда.
Once enabled, Unity only rebuilds the scripts in your application, and leaves data files from a previously executed build intact. It significantly improves iteration times if you only change the code in your application.
Введение в UWP
Что такое Universal Windows Platform
UWP (Universal Windows Platform) представляет собой унифицированную платформу для создания и запуска приложений в Windows 10 и Windows 10 Mobile.
UWP стала результатом эволюции более ранних технологий. Так, с выходом Windows 8 была внедрена новая архитектурная платформа для приложений — Windows Runtime (WinRT), которая позволяла запускать приложения в так называемом режиме Modern (Metro) на десктопах, планшетах. Затем с выходом Windows 8.1 и Windows Phone 8.1 эта технология получила развитие — появились «универсальные приложения», которые можно было запускать сразу Windows 8.1 и WP8.1. И в июле 2015 года официально вышла новая ОС Windows 10. Она использует платформу UWP, которая представляет собой развитие Windows Runtime.
Как подсказывает название платформы, она является универсальной — универсальной для всех устройств экосистемы Windows 10. А это обычные дестопы, планшеты, мобильные устройства, устройства IoT (интернет вещей), Xbox, устройства Surface Hub. И приложение UWP может одинаково работать на всех этих платформах, если на них установлена Windows 10.
Почему UWP?
Программирование под UWP несет ряд преимуществ:
Широта распространения . На текущий момент (апрель 2017) Windows 10 установлена уже более чем на 400 миллионах устройств. На десктопах Windows 10 уже опередила Windows 8/8.1.
Поддержка широкого круга устройств . Десктопы, планшеты, смартфоны, большие планшеты Surface Hub, различные IoT-устройства, в перспективе устройства виртуальной реальности HoloLens — круг устрйоств, на которых может работать Windows 10 действительно широк.
Поддержка разных языков и технологий программирования . UWP-приложения можно создавать с помощью таких языков, как Visual C++, C#, Visual Basic, JavaScript. В качестве технологии для создания графического интерфейса Visual C++, C# и Visual Basic используют XAML, JavaScript применяет HTML. Кроме того, С++ может вместо XAML использовать DirectX. То есть достаточно распространенные и и знакомые многим технологии.
Магазин приложений и удобство распространения . Windows Store представляет собой прекрасное место для распространения UWP-приложений, как платных, так и бесплатных. Сами возможности платформы и магазина Windows Store позволяют использовать разные способы монетизации. Например, можно интегрировать в приложения блоки для показа рекламы через различные SDK. Можно распространять за определенную плату, причем оплату можно гибко настраивать. При необходимости можно встроить предоставление ознакомительной версии, после использования которой пользователь может решить, покупать приложение или нет. И также можно монетизировать по модели freemium, при которой приложение условно бесплатное, а отдельные услуги внутри приложения предоставляются за определенную плату. Причем все эти возможности монетизации обесечиваются встроенными инструментами SDK.
Богатые возможности платформы . UWP многое наследует от Windows Runtime из Windows 8.1 и в то же время предоставляет много новых функцональностей, как, более богатые возможности по интеграции с облаком, использование Cortana, системы уведомлений в Win10 и многое другое.
Что необходимо для разработки под UWP
Для программирования под UWP необходима ОС Windows 10. Все другие операционные системы, как Windows 8.1/8/7, не говоря уже о Windows XP, не подходят !
Также потребуется среда разработки Visual Studio 2017 Community. Это полнофункциональная бесплатная среда разработки, которую можно загрузить с официального сайта по адресу https://www.visualstudio.com/downloads/download-visual-studio-vs.
Также можно использовать версию VS 2015, а все остальные предыдущие версии Visual Studio — 2013, 2012, 2010 и т.д. с UWP не работают.
При установке Visual Studio 2017 в программе установщика необходимо отметить соответствующий пункт:
Перед чем как начать создание приложений, убедитесь, что в центре обновления в Windows 10 установлена соответствующая опция для разработчиков:

И имея Windows 10 и установленную Visual Studio 2017, можно приступать к разработке приложений.
Разработка приложений для универсальной платформы Windows (UWP) Develop apps for the Universal Windows Platform (UWP)
Благодаря универсальной платформе Windows и единому ядру Windows одно и то же приложение можно запускать на любом устройстве Windows 10 — от телефонов и до настольных компьютеров. With the Universal Windows Platform and our one Windows core, you can run the same app on any Windows 10 device, from phones to desktops. Используйте Visual Studio со средствами разработки универсальных приложений Windows для создания этих приложений. Create these Universal Windows apps with Visual Studio and the Universal Windows App development tools.
Запускайте приложение в Windows 10 Phone, на настольных компьютерах Windows 10 или в Xbox. Run your app on a Windows 10 phone, a Windows 10 desktop, or an Xbox. Это один и тот же пакет приложения! It’s the same app package! С появлением единого унифицированного ядра (OneCore) Windows 10, один пакет приложения может работать на всех платформах. With the introduction of the Windows 10 single, unified core, one app package can run across all platforms. Несколько платформ располагают пакетами SDK расширений, которые можно добавить в приложение для реализации конкретных поведений платформы. Several platforms have extension SDKs that you can add to your app to take advantage of platform-specific behaviors. Например, пакет SDK для расширений для мобильных устройств обрабатывает нажатие кнопки «Назад» в Windows Phone. For example, an extension SDK for mobile handles the back button being pressed on a Windows phone. Если вы ссылаетесь в своем проекте на пакет SDK расширений, просто добавьте проверки времени выполнения, чтобы убедиться, что этот SDK доступен на этой платформе. If you reference an extension SDK in your project, then just add runtime checks to test if that SDK is available on that platform. Таким способом можно иметь один и тот же пакет приложения для каждой платформы! That’s how you can have the same app package for each platform!
Что такое ядро Windows? What is the Windows core?
Для ОС Windows был впервые выполнен рефакторинг, в результате чего было создано общее ядро для всех платформ Windows 10. For the first time, Windows has been refactored to have a common core across all Windows 10 platforms. Это один общий источник, одно общее ядро Windows, один стек ввода-вывода файла и одна модель приложения. There is one common source, one common Windows kernel, one file I/O stack, and one app model. Для пользовательского интерфейса предусмотрена только одна платформа пользовательского интерфейса XAML и одна платформа пользовательского интерфейса HTML. For the UI, there is just one XAML UI framework and one HTML UI framework. Вы можете сосредоточиться на создании превосходных приложений, так как процесс запуска приложений на разных устройствах Windows 10 значительно упрощен. You can concentrate on creating a great app, because we’ve made it easy to have your app run on different Windows 10 devices.
Что такое универсальная платформа Windows? What exactly is the Universal Windows Platform?
Универсальная платформа Windows — это просто коллекция контрактов и версий. The Universal Windows Platform is simply a collection of contracts and versions. Они позволяют нацеливаться на среду, в которой может работать приложение. These allow you to target where your app can run. Вам больше не нужно ориентироваться на операционную систему, теперь вы ориентируетесь на одно или несколько семейств устройств. You no longer target an operating system; now you target one or more device families. Дополнительные сведения см. в разделе Введение в работу с универсальной платформой Windows. Learn more details by reading Intro to the Universal Windows Platform.
Требования Requirements
Средства разработки универсальных приложений Windows поставляются с эмуляторами, которые позволяют узнать, как ваши приложения выглядят на разных устройствах. The Universal Windows App development tools come with emulators that you can use to see how your app looks on different devices. Чтобы использовать эти эмуляторы, необходимо установить соответствующее программное обеспечение на физическом компьютере. If you want to use these emulators, you need to install this software on a physical machine. Физический компьютер должен работать под управлением версии Windows 8.1 Профессиональная (x64) или более поздней и иметь процессор, который поддерживает клиент Hyper-V и преобразование адресов второго уровня (SLAT). The physical machine must run Windows 8.1 (x64) Professional edition or higher, and have a processor that supports Client Hyper-V and Second Level Address Translation (SLAT). Если на виртуальной машине выполнена установка Visual Studio, эмуляторы на ней работать не могут. The emulators cannot be used when Visual Studio is installed on a virtual machine.
Ниже приведен список необходимого программного обеспечения. Here is the list of software that you need:
Windows 10. Windows 10. Visual Studio 2017 поддерживает разработку UWP только в Windows 10. Visual Studio 2017 supports UWP development only on Windows 10. Дополнительные сведения см. в разделах Целевые платформы и Системные требования для Visual Studio. For more details, see Visual Studio Platform targeting and System requirements.
Visual Studio. Visual Studio. Вам также потребуется необязательная рабочая нагрузка «Разработка приложений для универсальной платформы Windows». You will also need the optional Universal Windows Platform development workload.
Windows 10. Windows 10. Visual Studio 2019 поддерживает разработку UWP только в Windows 10. Visual Studio 2019 supports UWP development only on Windows 10. Дополнительные сведения см. в разделах Целевые платформы и Системные требования для Visual Studio. For more details, see Visual Studio Platform targeting and System requirements.
Visual Studio. Visual Studio. Вам также потребуется необязательная рабочая нагрузка «Разработка приложений для универсальной платформы Windows». You will also need the optional Universal Windows Platform development workload.
После установки программного обеспечения нужно разрешить разработку на устройстве Windows 10. After installing this software, you need to enable your Windows 10 device for development. См. раздел Разрешение разработки на устройстве. See Enable your device for development. (Вам больше не нужна лицензия разработчика для каждого устройства Windows 10.) You no longer need a developer license for each Windows 10 device.
Универсальные приложения Windows Universal Windows apps
Выберите предпочтительный язык разработки (C#, Visual Basic, C++ или JavaScript), чтобы создать приложение универсальной платформы Windows для устройств Windows 10. Choose your preferred development language from C#, Visual Basic, C++ or JavaScript to create a Universal Windows Platform app for Windows 10 devices. Ознакомьтесь со статьей о создании первого приложения или видеороликом с обзором инструментов для Windows 10. Read Create your first app or watch the Tools for Windows 10 Overview video.
При наличии существующих приложений Магазина Windows 8.1, приложений для Windows Phone 8.1 или универсальных приложений Windows, созданных с помощью Visual Studio 2015, вам потребуется перенести их, чтобы использовать последнюю версию универсальной платформы Windows. If you have existing Windows Store 8.1 apps, Windows Phone 8.1 apps, or Universal Windows apps that were created with Visual Studio 2015, you’ll need to port these apps to use the latest Universal Windows Platform. См. раздел Перенос приложения из среды выполнения Windows 8.x в UWP. See Move from Windows Runtime 8.x to UWP.
После создания универсального приложения Windows нужно упаковать его, чтобы установить на устройстве Windows 10 или отправить в Магазин Windows. After you create your Universal Windows app, you must package your app to install it on a Windows 10 device or submit it to the Windows Store. См. раздел Упаковка приложений. See Packaging apps.
Adblock
detector

