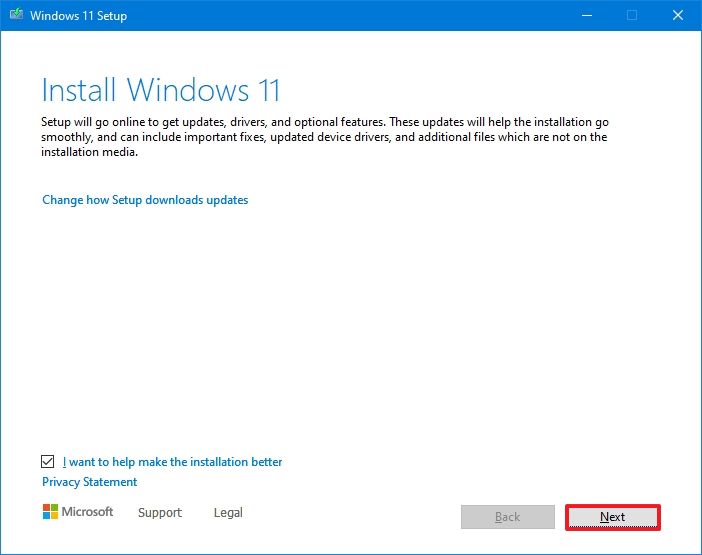
Installing Windows 11 on a device that does not meet Windows 11 minimum system requirements is not recommended. If you choose to install Windows 11 on ineligible hardware, you should be comfortable assuming the risk of running into compatibility issues.
Your device might malfunction due to these compatibility or other issues. Devices that do not meet these system requirements will no longer be guaranteed to receive updates, including but not limited to security updates.
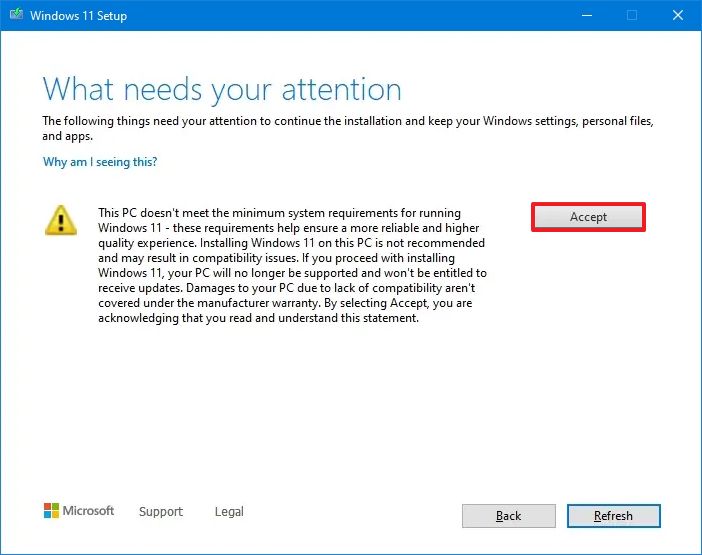
The following disclaimer applies if you install Windows 11 on a device that doesn’t meet the minimum system requirements:
This PC doesn’t meet the minimum system requirements for running Windows 11 — these requirements help ensure a more reliable and higher quality experience. Installing Windows 11 on this PC is not recommended and may result in compatibility issues. If you proceed with installing Windows 11, your PC will no longer be supported and won’t be entitled to receive updates. Damages to your PC due to lack of compatibility aren’t covered under the manufacturer warranty.
Before you install Windows 11
If you are unsure if your device meets the Windows 11 minimum system requirements and have Windows 10 already installed, you can download the PC Health Check app, which will assess eligibility and identify components of your device that don’t meet the minimum requirements. The app will also link to info that details steps you can take to make your device meet the minimum system requirements. To learn more, download and install PC Health Check app.
After you install Windows 11
When Windows 11 is installed on a device that does not meet the minimum system requirements, we’ll notify you using a watermark on your Windows 11 desktop. You might also see a notification in Settings to let you know the requirements are not met.
If you’re experiencing issues after upgrading to Windows 11 and your device does not meet the minimum system requirements, we recommend you go back to Windows 10.
To go back to Windows 10, select Start > Settings > System > Recovery > Go back .
This option is only available for 10 days following your upgrade, after which time the files needed to perform this function will be removed to free up disk space on your device.
Related articles
Upgrade to Windows 11: FAQ
Getting ready for the Windows 11 upgrade
Ways to install Windows 11
Managing Windows 11 “System requirements not met” message in your organization
Need more help?
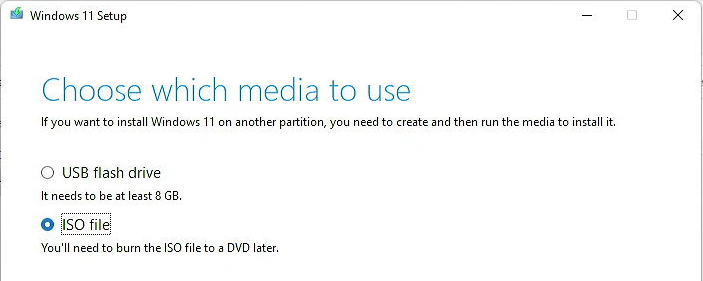
If you have a computer with unsupported hardware, you may upgrade to Windows 11, but not through Windows Update. Instead, you will have to use a bootable USB flash drive or ISO file to manually perform a clean install or in-place upgrade.
Microsoft left the loophole open, but it doesn’t mention it anywhere in the documentation, nor is it supported. According to the company, installing Windows 11 on unsupported hardware is an option for organizations. However, anyone could upgrade at their own risk knowing there is no guarantee of system stability and driver compatibility.
In other words, you can continue with the setup manually if you choose to install Windows 11 on incompatible hardware. However, you must confirm that the upgrade will have an “unsupported state.” Microsoft defines an “unsupported state” as a device that does not meet the minimum system requirements, and as a result, it won’t be entitled to receive updates from Windows Update. Although these devices may continue to receive updates anyway, the company isn’t obligated to provide security and driver updates or technical support.
This guide will teach you how to install Windows 11 (version 21H2 or 22H2) on a computer with incompatible hardware. Since the device does not officially support the new version of Windows, it’s not recommended to use this workaround unless you know the risks and understand that stability, compatibility, and updates are not guaranteed.
- Install Windows 11 on unsupported hardware from USB
- Upgrade to Windows 11 on unsupported hardware from ISO file
- Upgrade to Windows 11 on unsupported hardware from Registry
Using the ISO file to perform a clean installation, you will need to create a bootable media using a third-party tool like Rufus or Command Prompt to start the setup process with a USB flash drive.
In addition, you also have to make sure the device can start from USB, which means you will have to change the UEFI settings. Since most computers have different settings, you must check your manufacturer support website for more specific details.
To install Windows 11 on an unsupported PC, use these steps:
-
Start the unsupported PC with the Windows 11 USB flash drive.
-
Press any key to continue.
-
Use the Shift + F10 keyboard shortcut to open Command Prompt.
-
Type the following command and press Enter:
regedit

-
Navigate the following path:
HKEY_LOCAL_MACHINESYSTEMSetup
-
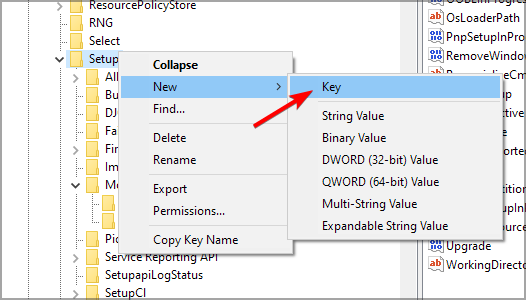
Right-click the Setup (folder) key, select New, and then the Key option.

-
Name the key LabConfig and press Enter.
-
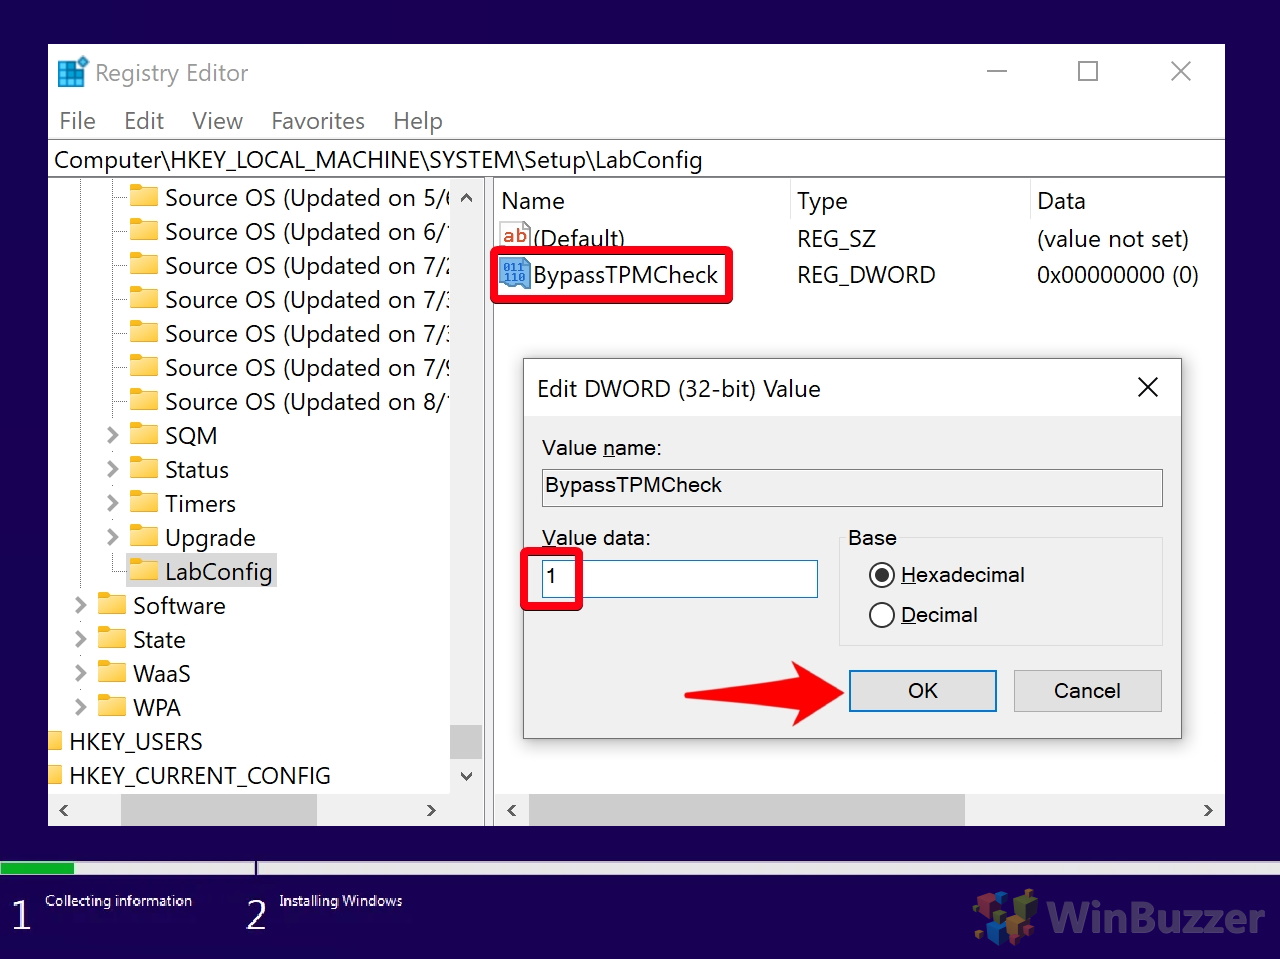
Right-click the LabConfig (folder) key, select New, and then the DWORD (32-bit) Value option.
-
Name the key BypassTPMCheck and press Enter.
-
Double-click the newly created key and set its value from 0 to 1.

-
Click the OK button.
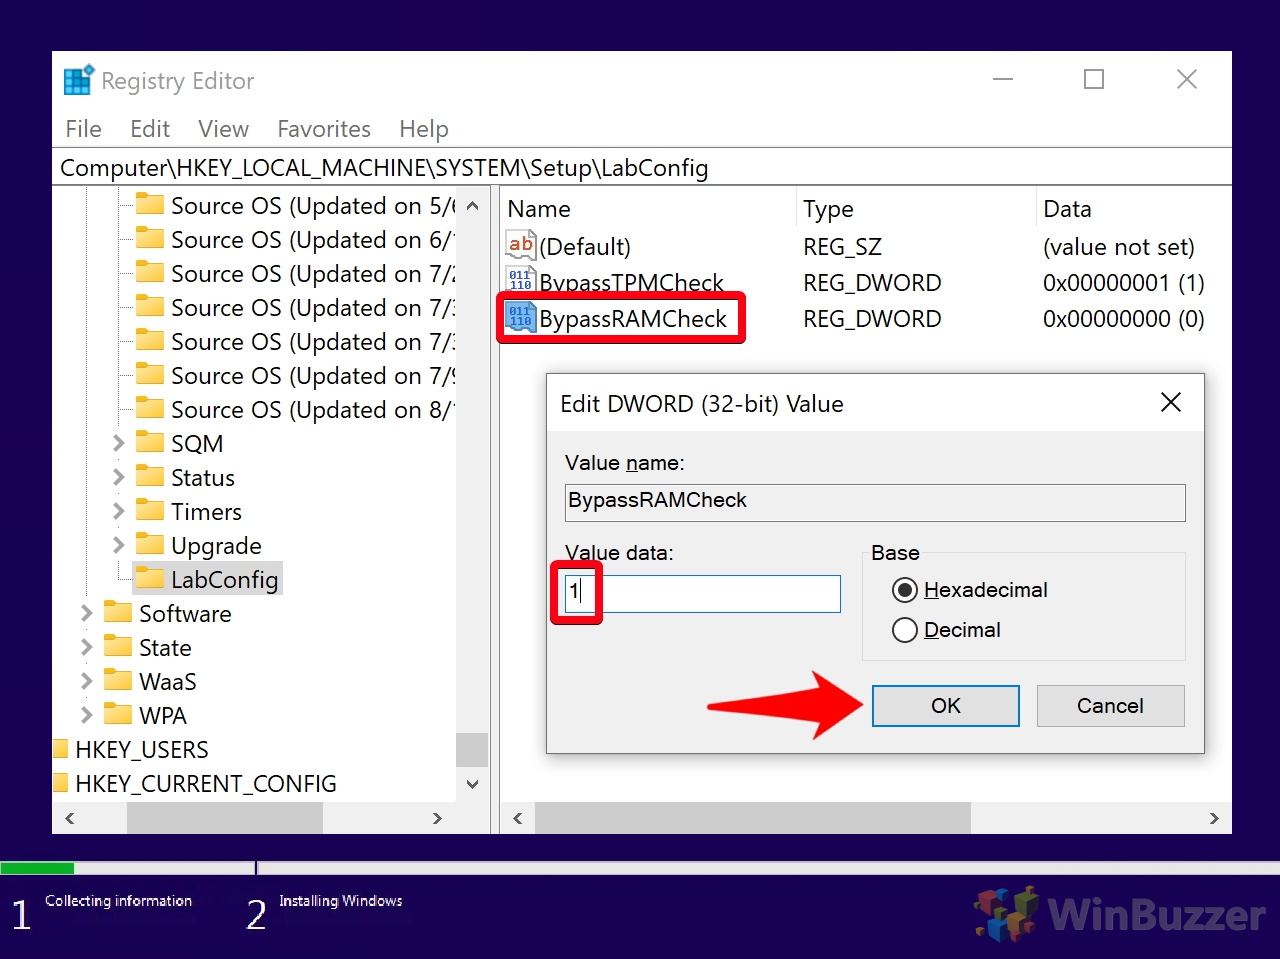
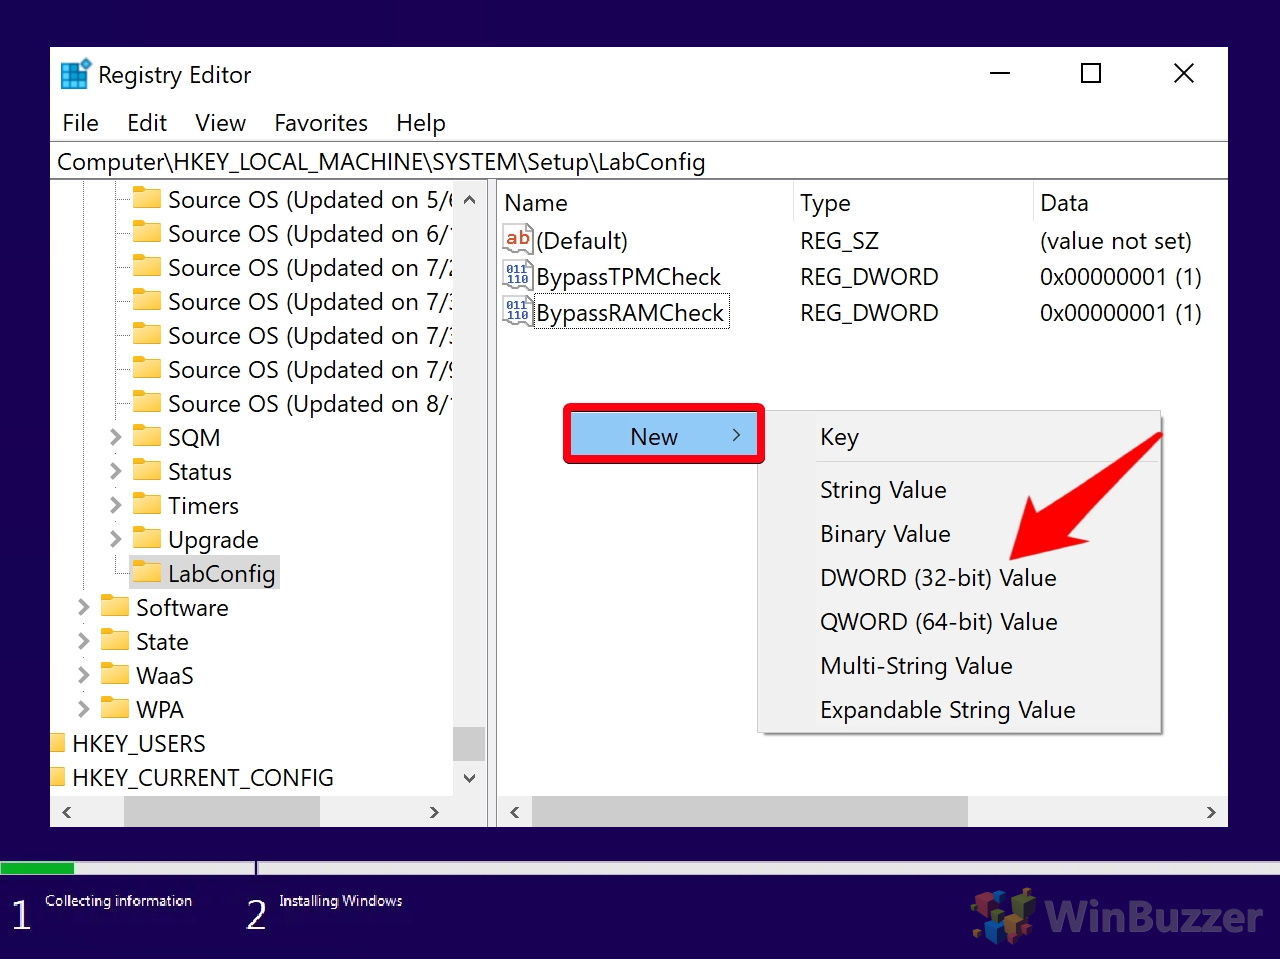
-
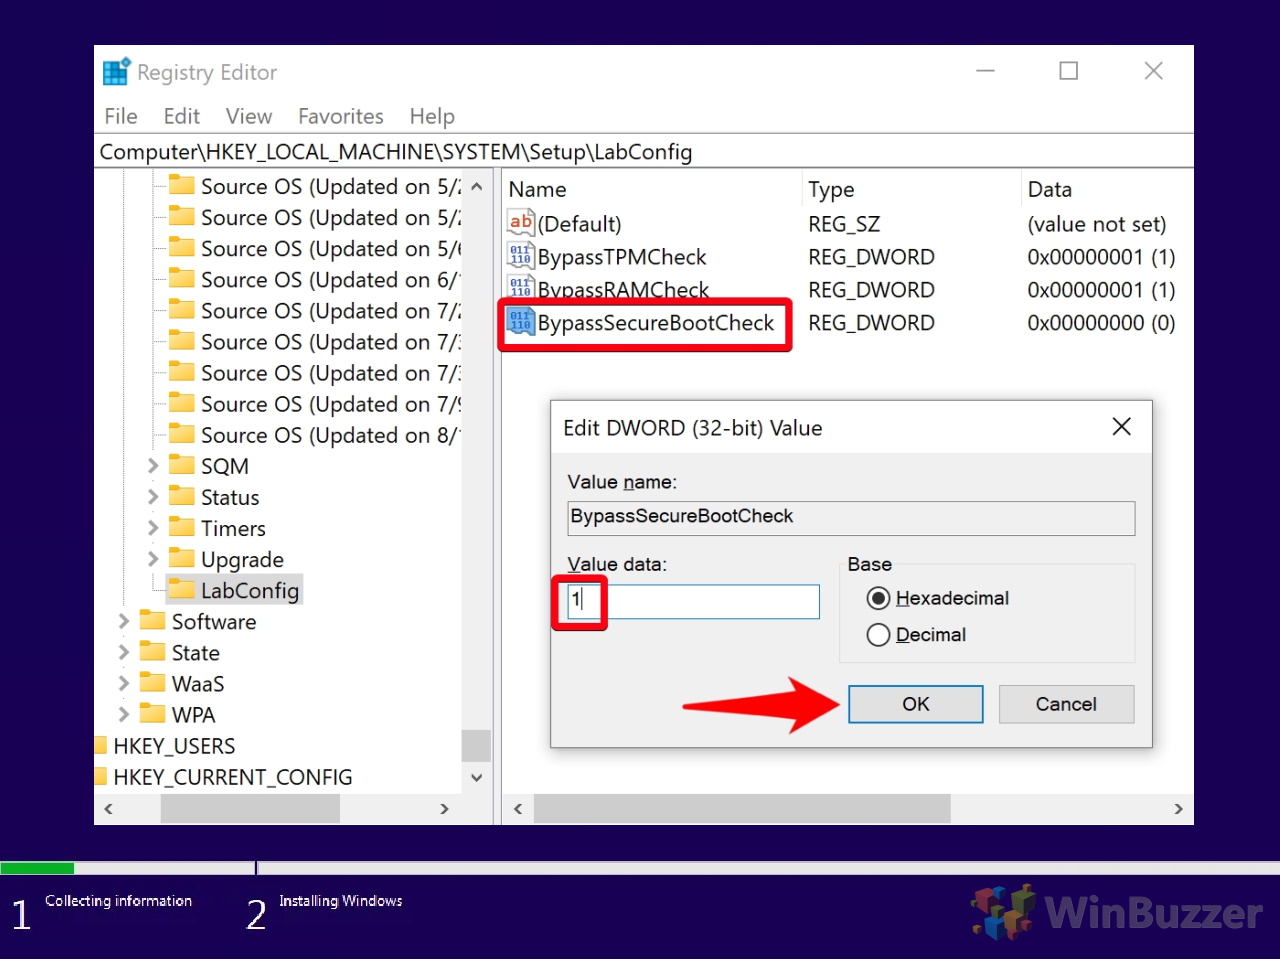
Right-click the LabConfig (folder) key, select New, and then the DWORD (32-bit) Value option.
-
Name the DWORD BypassSecureBootCheck and press Enter.
-
Double-click the newly created key and set its value from 0 to 1.

-
Click the OK button.
-
Click the Next button.

-
Click the Install now button.

-
Click the I don’t have a product key option if you are reinstalling. If Windows 11 has been previously activated after the installation, reactivation will happen automatically.

-
Select the edition of “Windows 11” that your license key activates (if applicable).
-
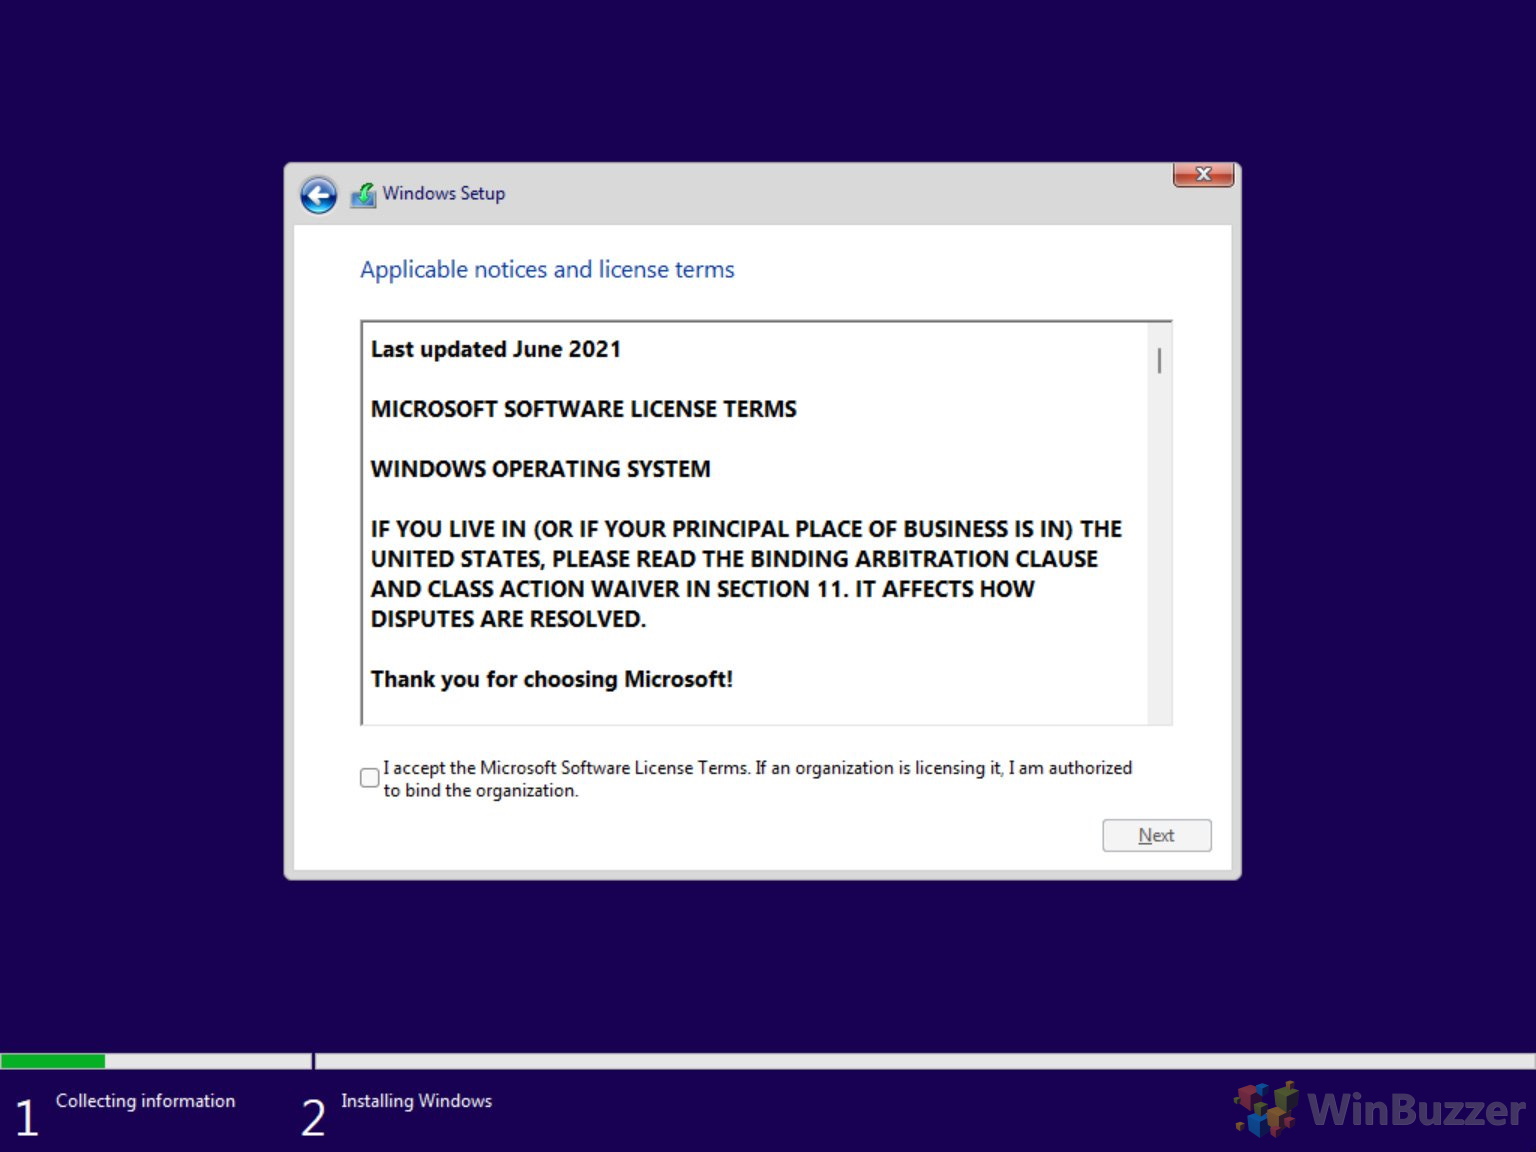
Check the “I accept the license terms” option.
-
Click the Next button.
-
Select the “Custom: Install Windows only (advanced)” option.

-
Select each partition in the hard drive you want to install Windows 11 and click the Delete button. (Usually, the “Drive 0” is the drive that contains all the installation files.)

Warning: Deleting a partition also deletes all data on the drive. Also, it is not required to delete the partitions from a secondary hard drive.
-
Select the hard drive (“Drive 0 Unallocated Space”) to install Windows 11 on an unsupported device.

-
Click the Next button.
-
Select your region on the first page of the out-of-the-box experience (OOBE) after the installation.

-
Click the Yes button.
-
Select your keyboard layout setting.
-
Click the Yes button.
-
Click the Skip button if you don’t require configuring a second layout.
-
The computer will automatically connect to the network using an Ethernet connection. If you have a Wi-Fi connection, you must set up the connection manually (a security key may be required).
-
(Optional) Confirm a name for the computer.
-
Click the Next button. (The device will restart automatically.)
-
Select the “Set up for personal use” option for Windows 11 Pro. The “Home” edition does not have this option.
-
Click the Next button.
-
Confirm your Microsoft account email to create an account.
-
Click the Next button.
-
Confirm your Microsoft account password.
-
Click the Next button.
-
Click the Create PIN button.
-
Create a new four-digit PIN.
-
Click the OK button.
-
Select the “Set up as new device” option. (Or select to restore your settings from a previous installation.)
-
Click the Next button.
-
Confirm your privacy settings best suit your situation by turning on or off the toggle switch for each item.
-
Click the Next button.
-
Click the Next button again.
-
Click the Accept button.
-
(Optional) On the “Customize your device” page, select one or more ways you plan to use the device to allow the setup to suggest tools and services customization during this experience.
-
Click the Accept button to continue. (Or click the Skip button to skip this setup part.)
-
Select the “Back up my files with OneDrive” to automatically upload your Desktop, Pictures, and Documents folders to the cloud, or Select the “Only save file to this PC” option.
-
Click the Next button.
-
Click the “No, thanks” button to skip the Microsoft 365 setup.


Once you complete the steps, Windows 11 will install in an unsupported state, which means you may not get security or driver updates.
Upgrade to Windows 11 on unsupported hardware from ISO file
Alternatively, you can perform an in-place upgrade of Windows 11 with an ISO file on a device that doesn’t meet the system requirements. However, you will need to run a script to bypass the TPM, Secure Boot, and processor check.
1. Bypass Windows 11 requirement checks
To bypass the minimum system requirements to install Windows 11, use these steps:
-
Open MediaCreationTool.bat GitHub page.
-
Click the Code button from the top-right corner and the Download Zip option.

-
Select the MediaCreationToo.bat-main folder and click the Extract all button.

-
Click the Browse button.
-
Select the extraction location and click the Select folder button.
-
Click the Extract button.
-
In the extracted folder, inside the MediaCreationToo.bat-main folder, open the bypass11 folder.
-
Right-click the “Skip_TPM_Check_on_Dynamic_Update.cmd” file and select the Run as administrator option.

-
Click the More info option.
-
Click the Run anyway button.


Once you complete the steps, you can mount an ISO file to begin the installation of Windows 11 on unsupported hardware (see steps below). If the script is not working, restart the computer and run it several times.
2. Upgrade to Windows 11 from ISO
To upgrade an incompatible computer to Windows 11 (version 22H2 or 21H2) with an ISO file, use these steps:
-
Open Microsoft Support website.
-
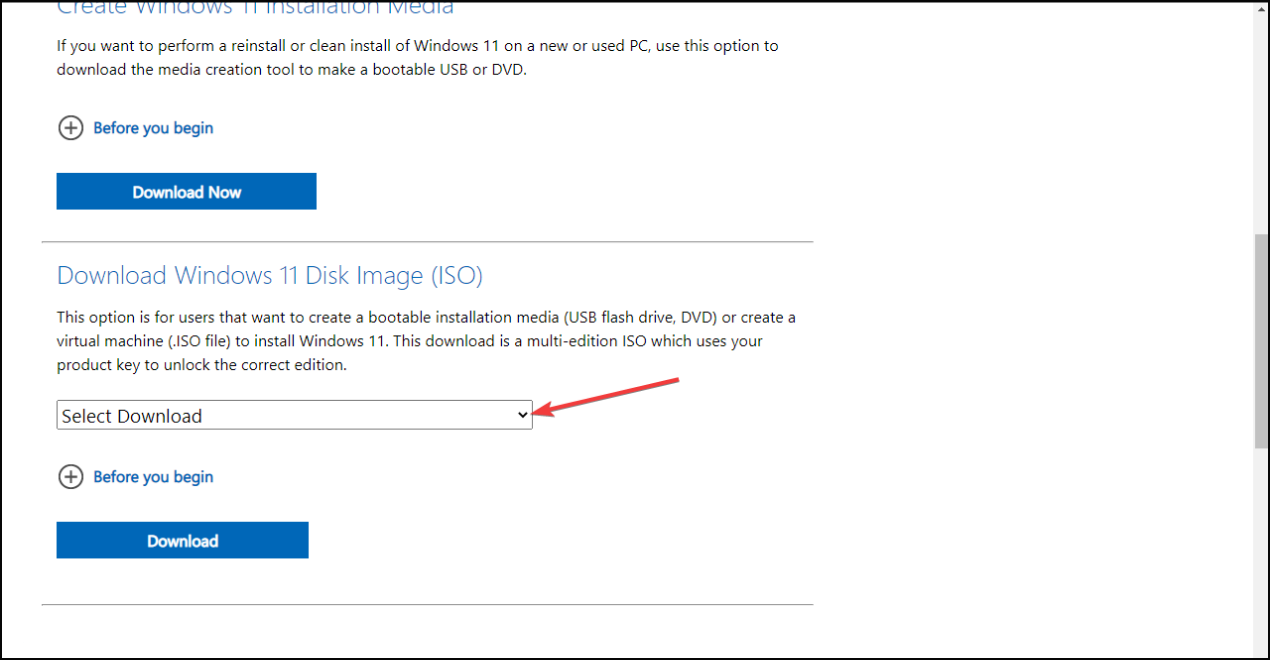
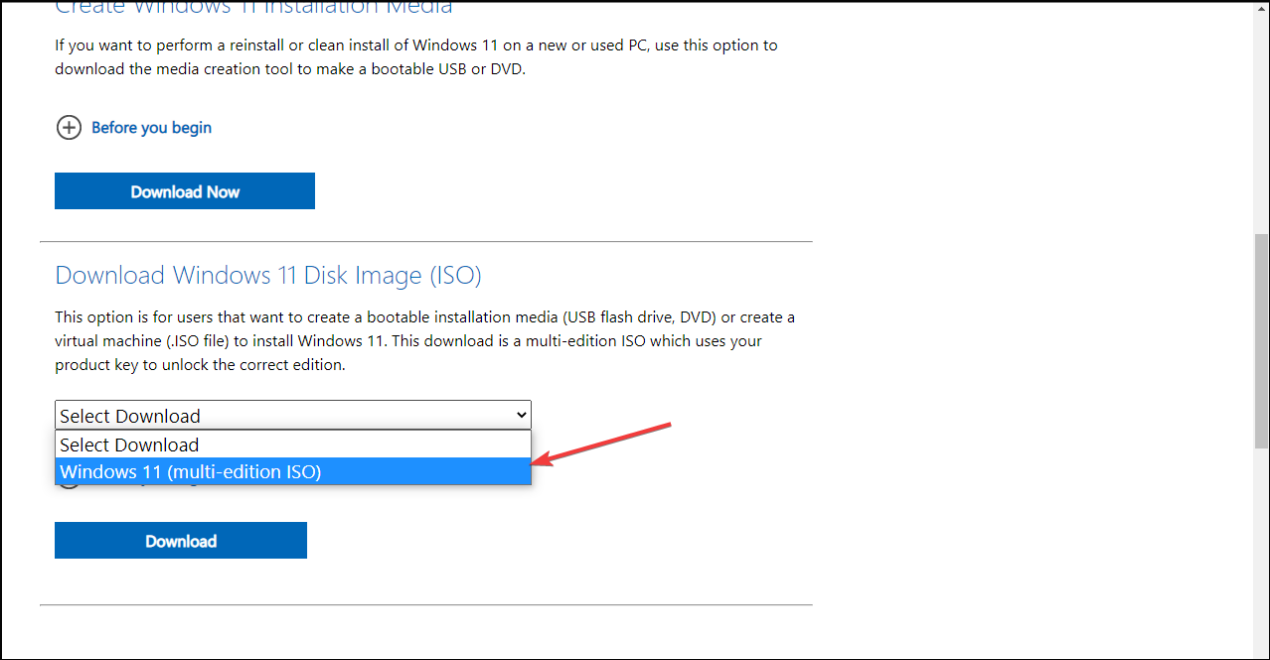
Under the “Download Windows 11 Disk Image (ISO)” section, select the Windows 11 option.
-
Click the Download button.
-
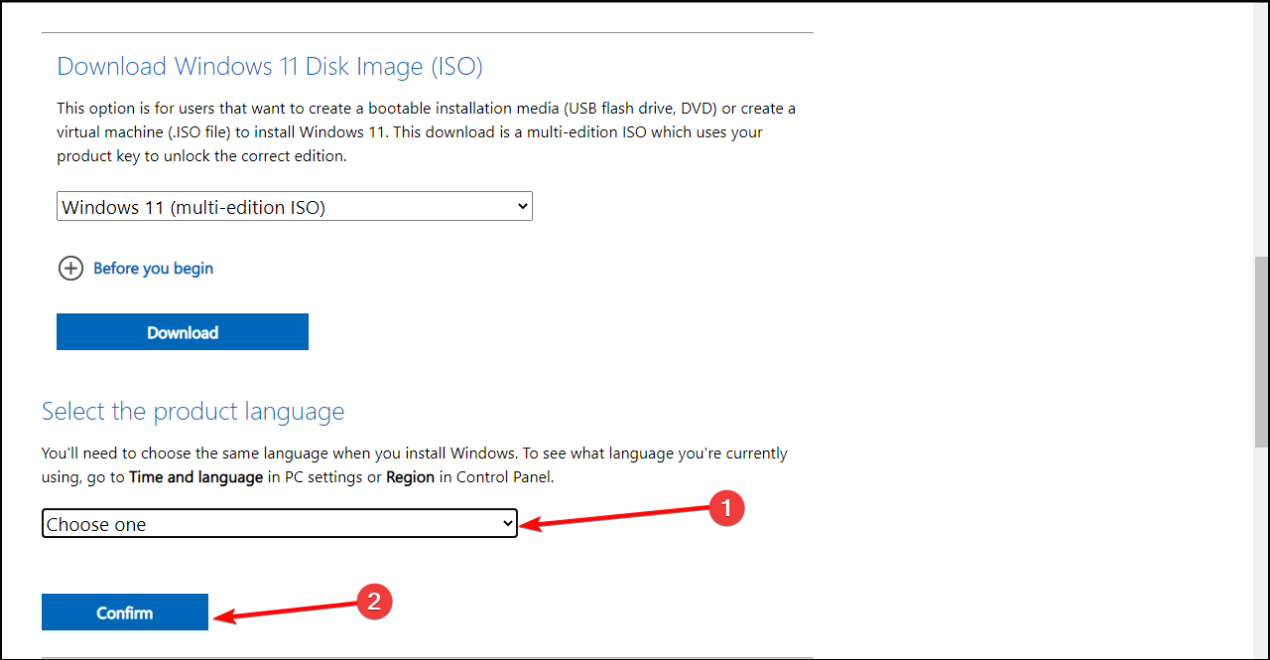
Select the installation language.
-
Click the Confirm button.
-
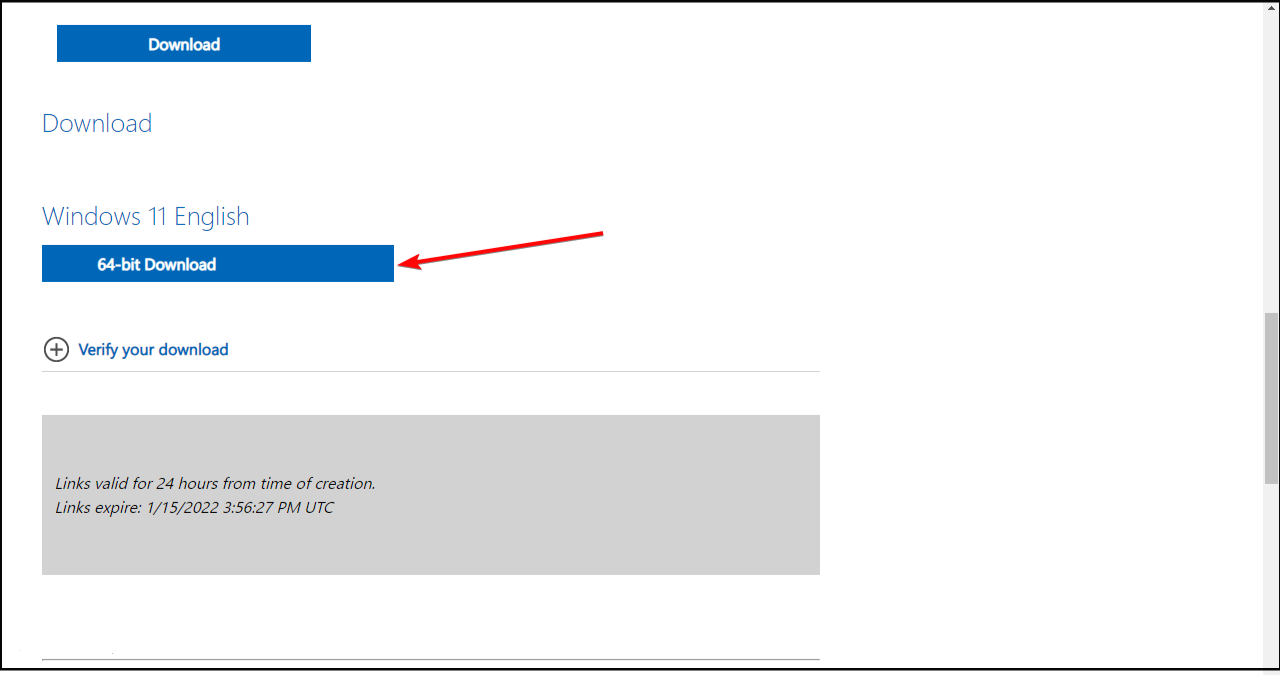
Click the Download button to save the Windows 11 ISO file on the device.
-
Right-click the ISO file, select the Open with submenu, and choose the Windows Explorer option.
-
Click on the mounted drive from the left navigation pane.
-
Double-click the Setup file to begin the Windows 11 upgrade process.
-
(Optional) Click the “Change how Windows Setup downloads updates” option.

-
Select the “Not right now” option.
-
Click the Next button.
-
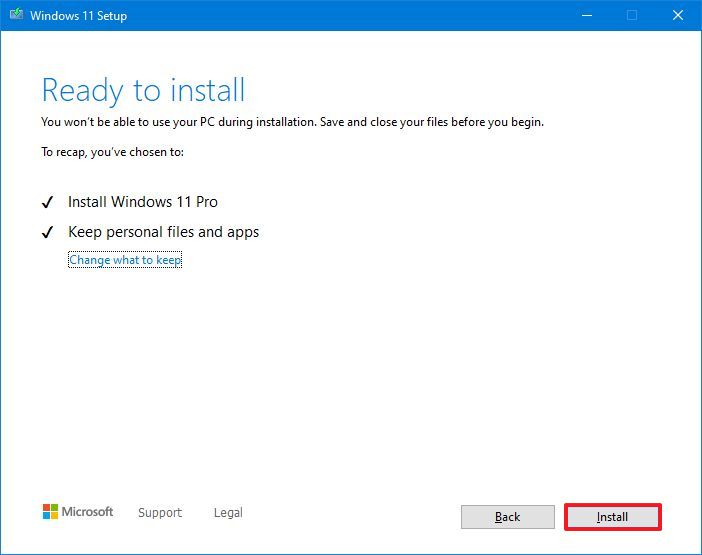
Click the Install button to upgrade while keeping files and apps.


If you want to start fresh with a clean installation of Windows 11, click the “Change what to keep” option, select the Nothing option, click the Next button, and then click the Install button.
After you complete the steps, the setup will continue to upgrade the laptop or desktop computer to the Windows 11 2022 Update (version 22H2). However, Windows 11 will run in an unsupported state that won’t guarantee updates, nor will you receive support from Microsoft.
Upgrade to Windows 11 on unsupported hardware from Registry
Although it’s not supported, Microsoft has published a workaround to bypass the Windows 11 requirements to continue the setup by editing the Registry. However, the computer needs a TPM 1.2 chip, and UEFI firmware with Secure Boot enabled. (These steps may or may not work on Windows 11 22H2.)
1. Edit Registry to bypass official checks
To bypass the minimum system requirements to upgrade to Windows 11 22H2, use these steps:
-
Open Start.
-
Search for regedit and click the top result to open the Registry Editor.
-
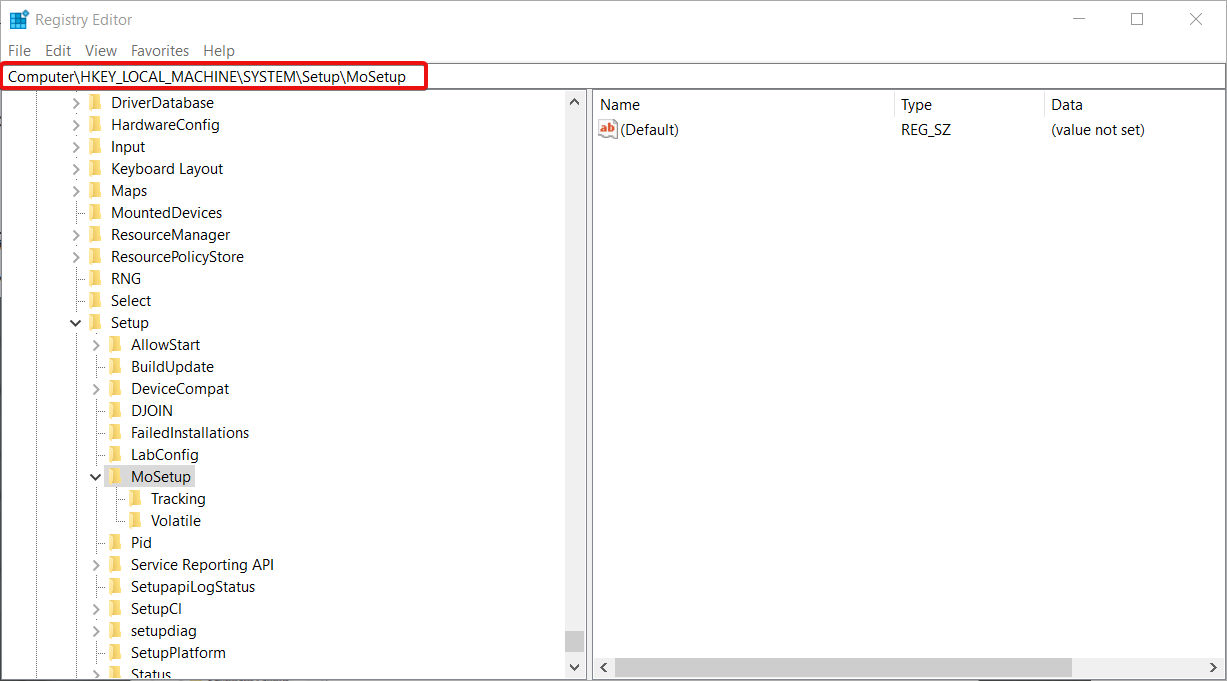
Navigate to the following path:
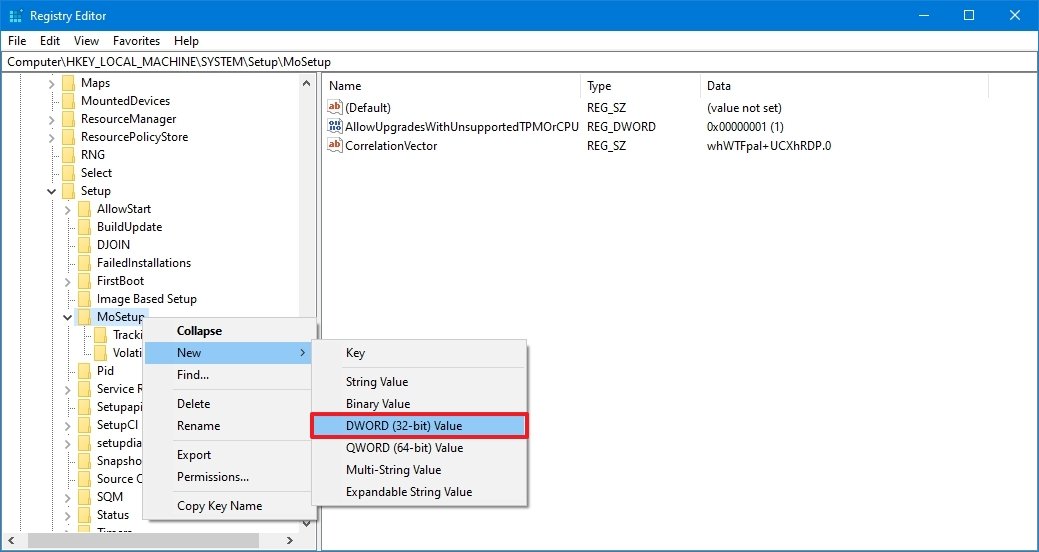
HKEY_LOCAL_MACHINESYSTEMSetupMoSetup
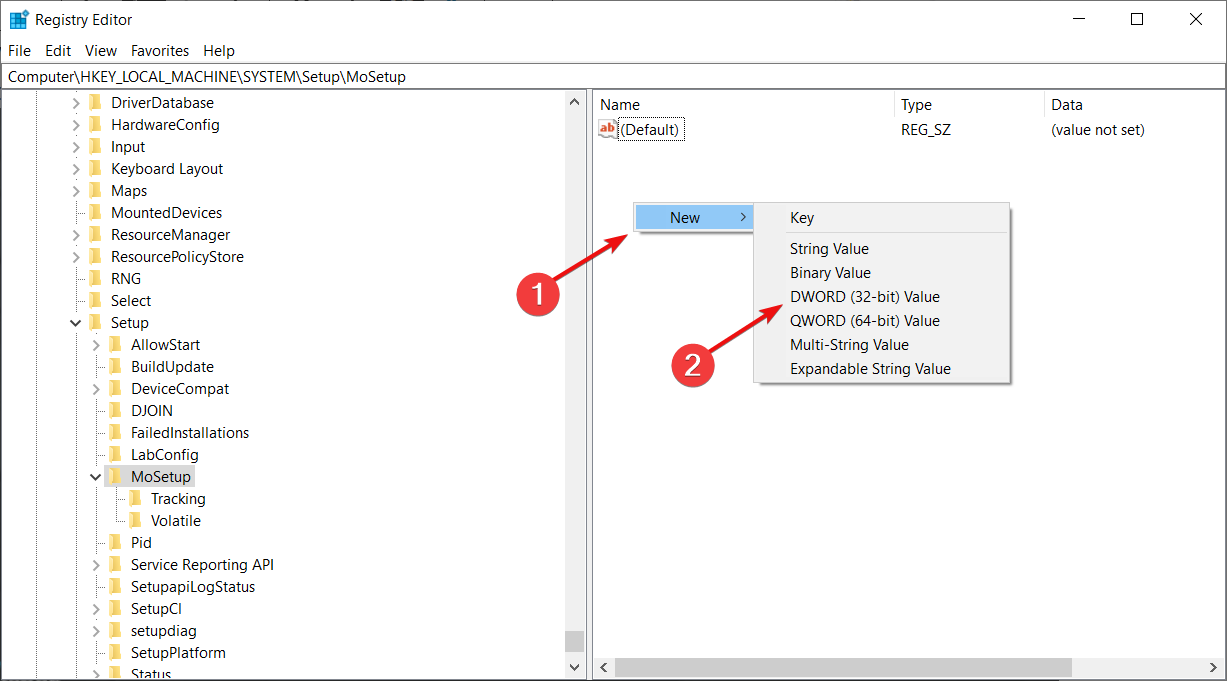
-
Right-click the MoSetup (folder) key, select the New submenu, and choose the DWORD (32-bit) Value option.
-
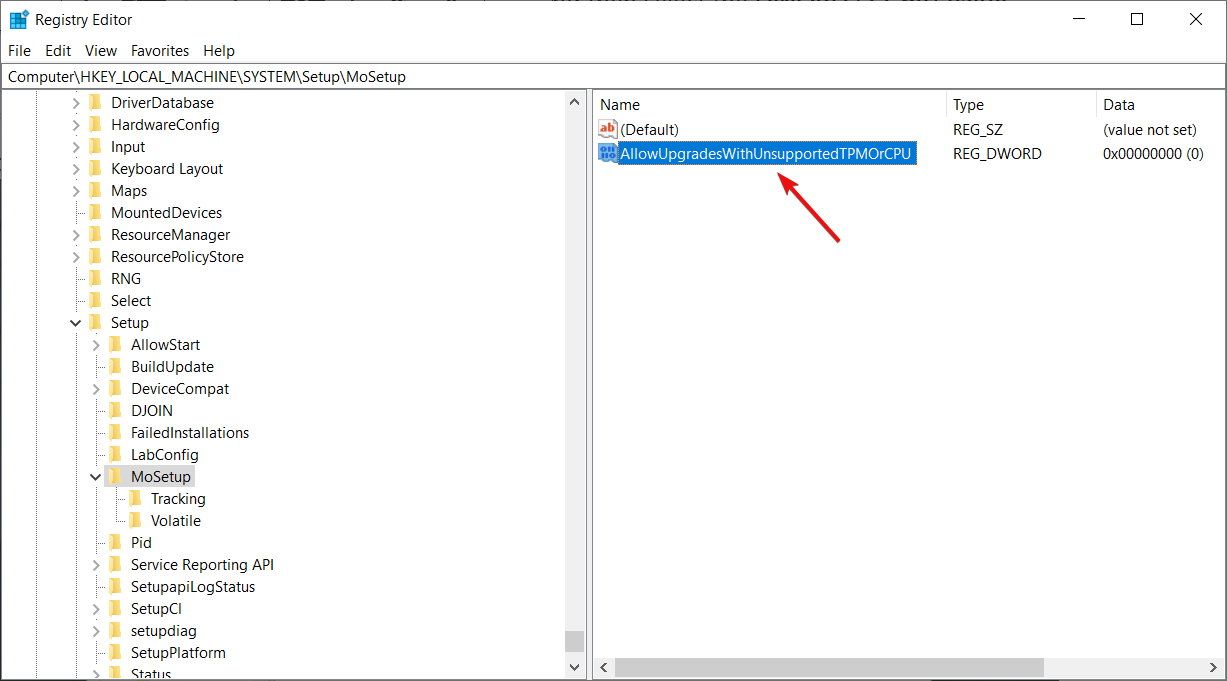
Name the key AllowUpgradesWithUnsupportedTPMOrCPU and press Enter.
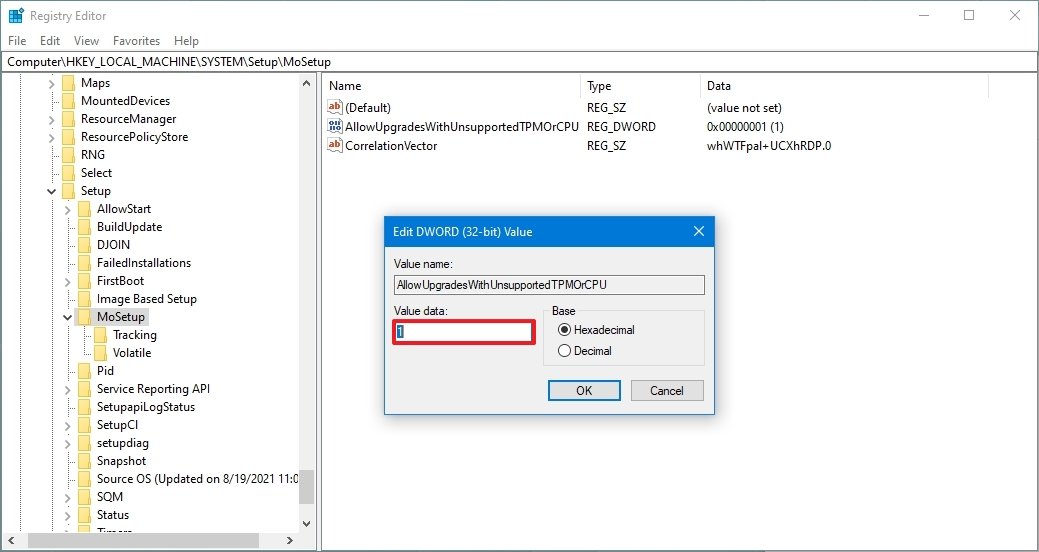
-
Double-click the newly created key and set its value from 0 to 1.


Once you complete the steps, you can mount an ISO file or connect a USB media to begin the installation of Windows 11 on unsupported hardware.
2. Upgrade to Windows 11 using ISO file
To begin the Windows 11 upgrade process, use these steps:
-
Open Microsoft Support website.
-
Under the “Download Windows 11 Disk Image (ISO)” section, select the Windows 11 option.
-
Click the Download button.
-
Select the installation language.
-
Click the Confirm button.
-
Click the Download button to save the Windows 11 ISO file on the device.
-
Right-click the ISO file, select the Open with submenu, and choose the Windows Explorer option.
-
Click on the mounted drive from the left navigation pane.
-
Double-click the Setup file to begin the Windows 11 upgrade process.
-
(Optional) Click the Change how Windows Setup downloads updates option.
-
Select the “Not right now” option.
-
Click the Next button.
-
Click the Accept button to agree to the terms.
-
Click the Install button to upgrade while keeping your files and apps.

If you want to start fresh with a clean installation of Windows 11, click the Change what to keep option, select the Nothing option, click the Next button, and then click the Install button.
Once you complete the steps, the setup will continue upgrading the device to Windows 11.
(Image credit: Windows Central)
Although Windows 11 has a higher system requirement, you may still be able to perform an in-place upgrade on an unsupported computer by editing the Registry of the current setup and using the official installation media.
Microsoft does not support devices running on unsupported hardware, but it offers a Registry workaround (opens in new tab) to bypass the trusted platform module (TPM) version 2.0 and processor requirements to install Windows 11. However, using this method, the computer will still need TPM 1.2, Secure Boot, 4GB of RAM, 64GB of storage, and a processor with at least two cores to proceed with the upgrade.
The workaround is meant for organizations that need to experiment with Windows 11 and apps, but anyone can use it to upgrade an unsupported device as long as they know that system stability and compatibility won’t be guaranteed.
In this Windows 11 guide, we will walk you through the steps to upgrade a device that doesn’t meet the minimum system requirements.
How to upgrade unsupported device to Windows 11
Upgrading a computer that does not meet the minimum requirements to Windows 11 is a three-step process. You first need to create an installation media. Then you need to edit the Registry to apply the official workaround to bypass the official requirements of Windows 11, and finally, you need to proceed with the in-place upgrade process.
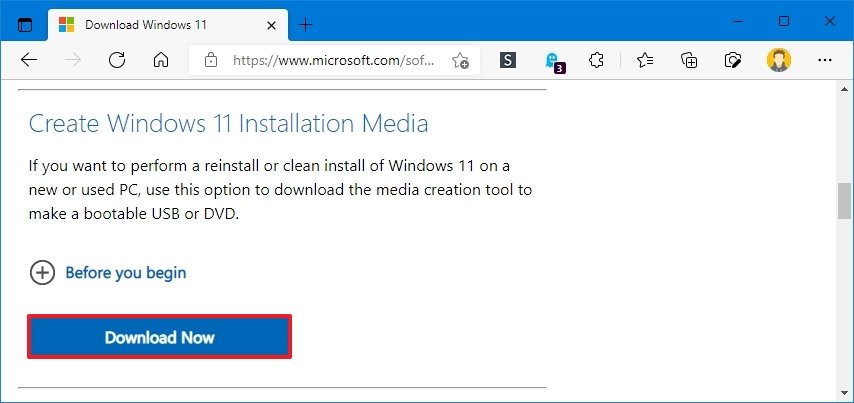
To download and create a Windows 11 USB installation media, use these steps:
- Open the Microsoft download website (opens in new tab).
- Under the «Create Windows 11 Installation Media» section, click the Download Now button to save the file to your device.
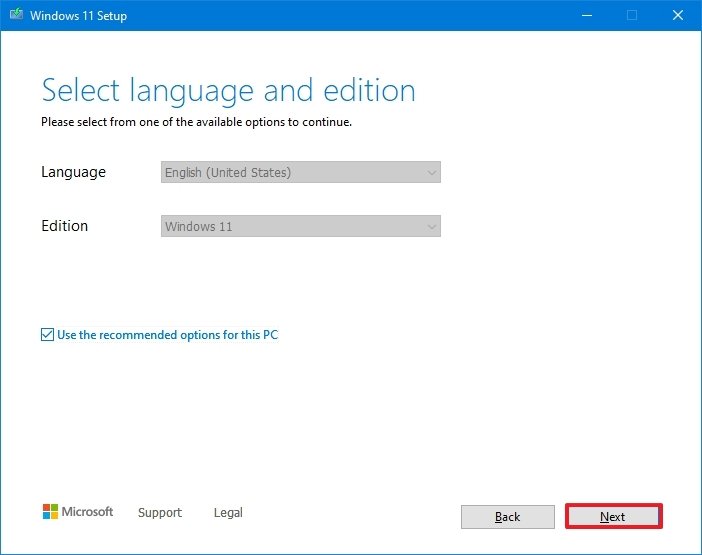
- Double-click the MediaCreationToolW11.exe file to launch the tool.
- Click the Accept button to agree to the terms.
- Click the Next button.
- Select the USB flash drive option.
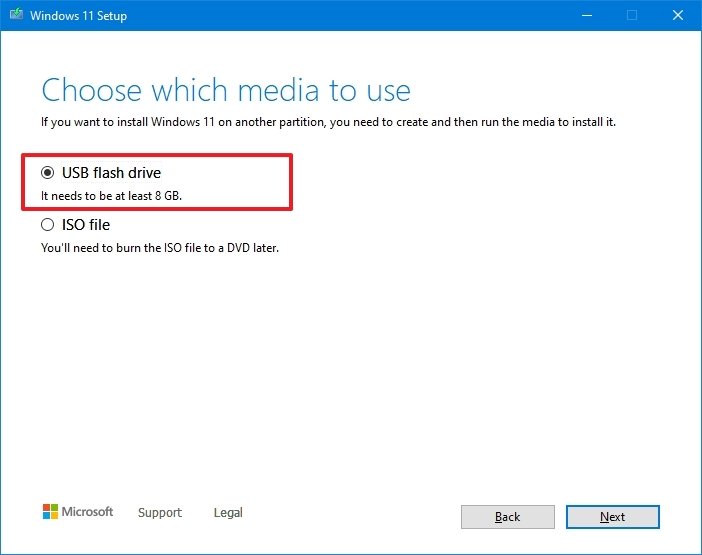
- Click the Next button.
- Select the USB flash drive to create the installation media.
- Click the Next button.
- Click the Finish button.
Once you complete the steps, continue with the instructions below to edit the Registry to bypass the Windows 11 system requirements.
Unsupported Registry workaround
To apply the Microsoft workaround to install Windows 11 on a computer that doesn’t meet the requirements, use these steps:
- Open Start.
- Search for regedit and click the top result to open the Registry Editor.
- Navigate to the following path:
HKEY_LOCAL_MACHINESYSTEMSetupMoSetup - Right-click the MoSetup (folder) key, select the New submenu and choose the DWORD (32-bit) Value option.
- Name the key AllowUpgradesWithUnsupportedTPMOrCPU and press Enter.
- Double-click the newly created key and set its value from 0 to 1.
- Click the OK button.
After you complete the steps, you will be able to install Windows 11 on a device that does not have a supported processor or TPM 2.0 (TPM 1.2 will still be required).
Windows 11 in-place upgrade
To upgrade an unsupported Windows 10 device to Windows 11, use these steps:
- Open File Explorer.
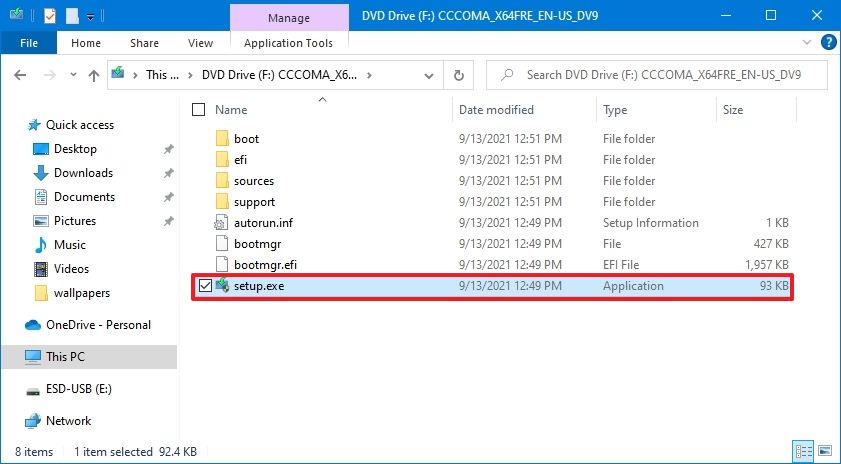
- Click on This PC from the left pane.
- Under the «Devices and drives» section, open the USB installation media.
- Double-click the setup.exe file to begin the upgrade process.
- Click the Next button.
- Click the Accept button to confirm that this Windows 11 installation is not supported.
- Click the Install button.
Once you complete the steps, the computer should upgrade to Windows 11, bypassing the TPM 2.0 and processor requirements. Since this is an in-place upgrade, the settings, apps, and files will be transferred to the new setup automatically.
More Windows resources
For more helpful articles, coverage, and answers to common questions about Windows 10 and Windows 11, visit the following resources:
- Windows 11 on Windows Central — All you need to know
- Windows 11 help, tips, and tricks
- Windows 10 on Windows Central — All you need to know
Get the best of Windows Central in in your inbox, every day!
Mauro Huculak is technical writer for WindowsCentral.com. His primary focus is to write comprehensive how-tos to help users get the most out of Windows 10 and its many related technologies. He has an IT background with professional certifications from Microsoft, Cisco, and CompTIA, and he’s a recognized member of the Microsoft MVP community.
 Если попробовать выполнить обновление до Windows 11 на компьютере или ноутбуке, где отсутствует или отключен доверенный платформенный модуль TPM 2.0, установлен процессор неподдерживаемого поколения или имеются другие проблемы с совместимостью, вы получите сообщение «Этот компьютер не соответствует минимальным требованиям к системе для установки Windows 11». Однако, это можно обойти.
В этой инструкции о простом способе выполнить автоматическое обновление системы до Windows 11 без TPM 2.0 и в случае, если есть другие несоответствия минимальным требованиям к системе. Также может быть полезным: обновление до Windows 11 22H2 на компьютере, не отвечающем системным требованиям.
Автоматическое обновление до Windows 11 без проверки совместимости с помощью Universal Media Creation Tool
Вы можете найти различные способы обхода минимальных системных требований Windows 11 для обновления для установки на несовместимый компьютер, например редактирование образа ISO или реестра. Также можно использовать чистую установку ОС с флешки, однако это не всегда удобно.
Я предлагаю использовать Universal Media Creation Tool — простой скрипт, изначально разработанный для возможности загрузки старых версий системы, но позволяющий также выполнить обновление до Windows 11 на неподдерживаемых компьютерах, минуя проверку наличия TPM 2.0, поколения процессора и других аппаратных характеристик. Способ обновления состоит из следующих шагов:
- Зайдите на официальную страницу скрипта Universal Media Creation Tool официальную страницу скрипта Universal Media Creation Tool и скачайте архив с файлами, нажав по стрелке рядом с кнопкой Code, а затем — кнопку Download ZIP.
- Распакуйте архив в удобное вам расположение.
- Запустите файл MediaCreationTool.bat из папки.
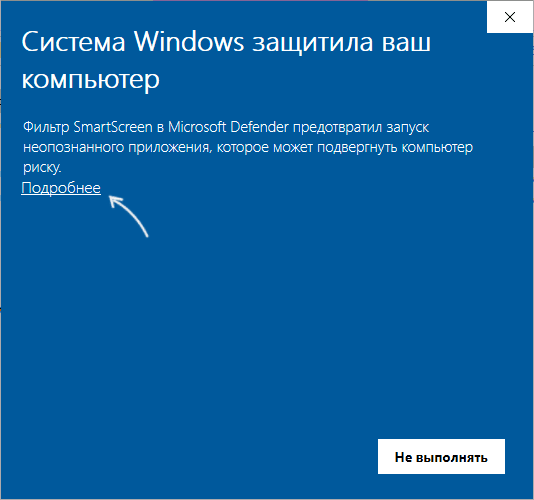
- После запуска файла вы можете получить уведомление фильтра SmartScreen, связанное с тем, что программа неизвестна системе. Нажмите «Подробнее», а затем — выполнить в любом случае.

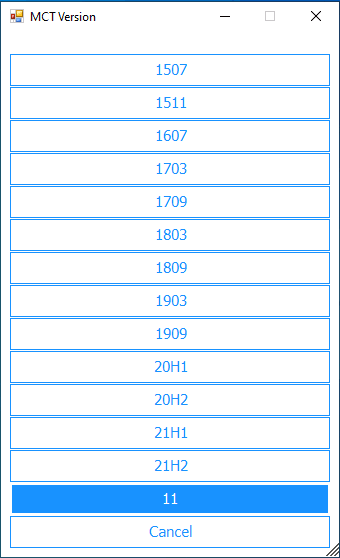
- После запуска откроется командная строка и окно, в котором требуется выбрать версию системы, выбираем Windows 11.

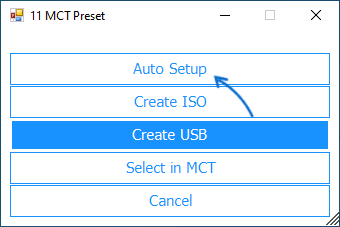
- В следующем окне предлагается выбрать необходимое действие, в нашем случае — Auto Setup (автоматическая установка).

- После запуска автоматической установки сначала будут загружены необходимые файлы напрямую с сайта Майкрософт (что можно будет увидеть в окне командной строки), затем, после подтверждения в PowerShell запустится программа установки.
- Несмотря на то, что в программе установки будет указано, что выполняется загрузка Windows 10, по факту загружается обновление до Windows 11: суть в том, что для установки используется Media Creation Tool от предыдущей системы.

- Останется лишь дождаться завершения загрузки, «создания носителя» (по факту, никакой носитель не записывается и установки Windows 11 — всё это будет выполнено полностью автоматически, компьютер будет перезагружаться в процессе.
- После этапа «Работа с обновлениями» вы попадете на экран входа в Windows 11, а после входа будет выполнена подготовка к первому запуску.


В результате вы получите обновлённую до Windows 11 систему с возможностью отката обновления при необходимости, всё что потребуется с вашей стороны после 6-го шага — дождаться завершения процесса и не выключать компьютер. При «зависании» на каком-либо проценте, лучше не торопитесь что-либо предпринимать, подождите (даже если это займёт около часа). Читатели сообщают, что первые накопительные обновления на установленную таким образом систему успешно пришли.

Официальный способ пропустить проверку модуля TPM и поколения процессора от Майкрософт
На официальной странице, посвященной установке Windows 11, Майкрософт предлагает собственный метод обхода проверки наличия модуля TPM 2.0, однако указывается, что наличие как минимум TPM 1.2 всё равно требуется. Поколение процессора проверяться не будет. Необходимые шаги:
- Нажмите клавиши Win+R на клавиатуре и введите regedit в окно Выполнить, после чего нажмите Enter.
- Перейдите к разделу реестра
HKEY_LOCAL_MACHINESYSTEMSetupMoSetup
- Нажмите правой кнопкой мыши в правой панели редактора реестра, выберите Создать — Параметр DWORD (32 бита) и создайте параметр с именем AllowUpgradesWithUnsupportedTPMOrCPU
- Дважды нажмите по параметру и задайте значение 1 для него.
- Закройте редактор реестра и запустите помощник по установке Windows 11 с официального сайта для обновления.
Как поведёт установка обновления в случае отсутствия модуля TPM даже версии 1.2 — сказать не могу, жду ваших отзывов в комментариях.
Помощник по установке Windows 11 в режиме совместимости
Ещё один способ (в комментариях сообщают, что уже не срабатывает) — использовать официальный помощник по установке Windows 11 с официального сайта https://www.microsoft.com/ru-ru/software-download/windows11, но запустить его в режиме совместимости с Windows 7. Для этого:
- Скачиваем помощник по установке в удобное расположение.
- Нажав правой кнопкой мыши по загруженному файлу выбираем пункт Свойства в контекстном меню
- На вкладке «Совместимость» отмечаем пункт «Запустить программу в режиме совместимости с» и указываем Windows 7.
- Применяем настройки и запускаем помощник по установке.
Сообщали, что в этом случае проверка совместимости системы с Windows 11 не производится и установка обновления выполняется успешно, но, похоже, уже нет.
В случае, если вы будете использовать один из предложенных способов обновления неподдерживаемой системы до Windows 11, прошу поделиться результатами, особенно интересны следующие моменты: обновление на Legacy-системах с MBR диском, а также результаты при обновлении не с Windows 10, а с более ранних систем (в этих сценариях скрипт мною опробован не был). Также вы можете создать загрузочный ISO или загрузочную флешку для чистой установки без проверки TPM 2.0 или TPM 1.2, поколения процессора и состояния безопасной загрузки.
Since a few weeks, Microsoft has released their 22H2 update. This update has some new features and bugfixes. With the introduction of Windows 11 also came some restrictions on supported hardware. Like the need for a fairly recent CPU, TPM 2.0 and secure boot. The 22H2 update seems to change some things that could prevent to work around the hardware checks. The original method to upgrade from Windows 10 to 11 on unsupported hardware is no longer working and also on Windows 11 installations that used any of the workarounds to overcome the hardware check, the 22H2 update will most likely not be offered through Windows update. In this article I will describe alternative and how to still upgrade Windows 11 22H2 on unsupported hardware, either running already on Windows 11 or from Windows 10.
YouTube Video
If you are interested, I also created a YouTube video from this blogpost. If you prefer classic text, you can just follow the rest of this article:
For the upgrade from Windows 10 to Windows 11 22H2:
For the upgrade from an existing Windows 11 install to Windows 11 22H2:
Introduction
If you would be looking to do a fresh install or dual boot, the original workaround still works for the 22H2 version. I did an extensive article on that which you can find here: https://jensd.be/1472/windows/install-windows-11-on-unsupported-hardware.
The workaround that I will explain here works for both upgrading from Windows 10 or to upgrade to Windows 11 22H2 on an unsupported system that is already on Windows 11.
From Windows 10
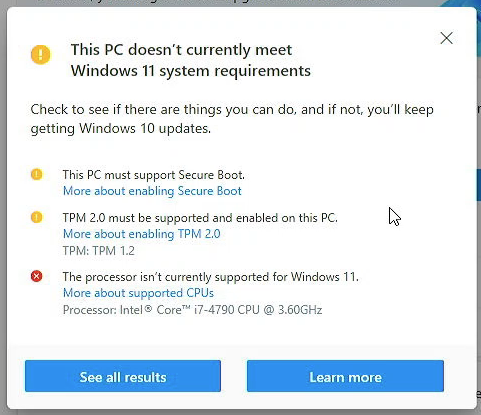
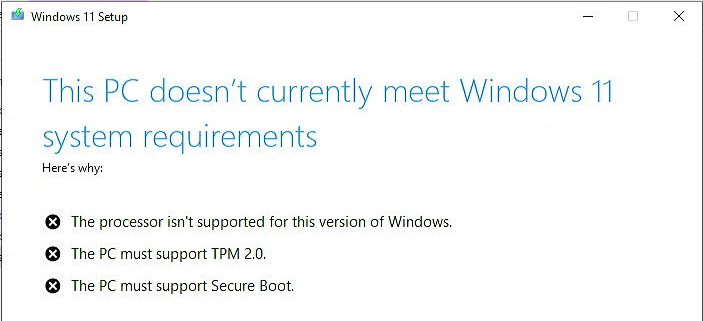
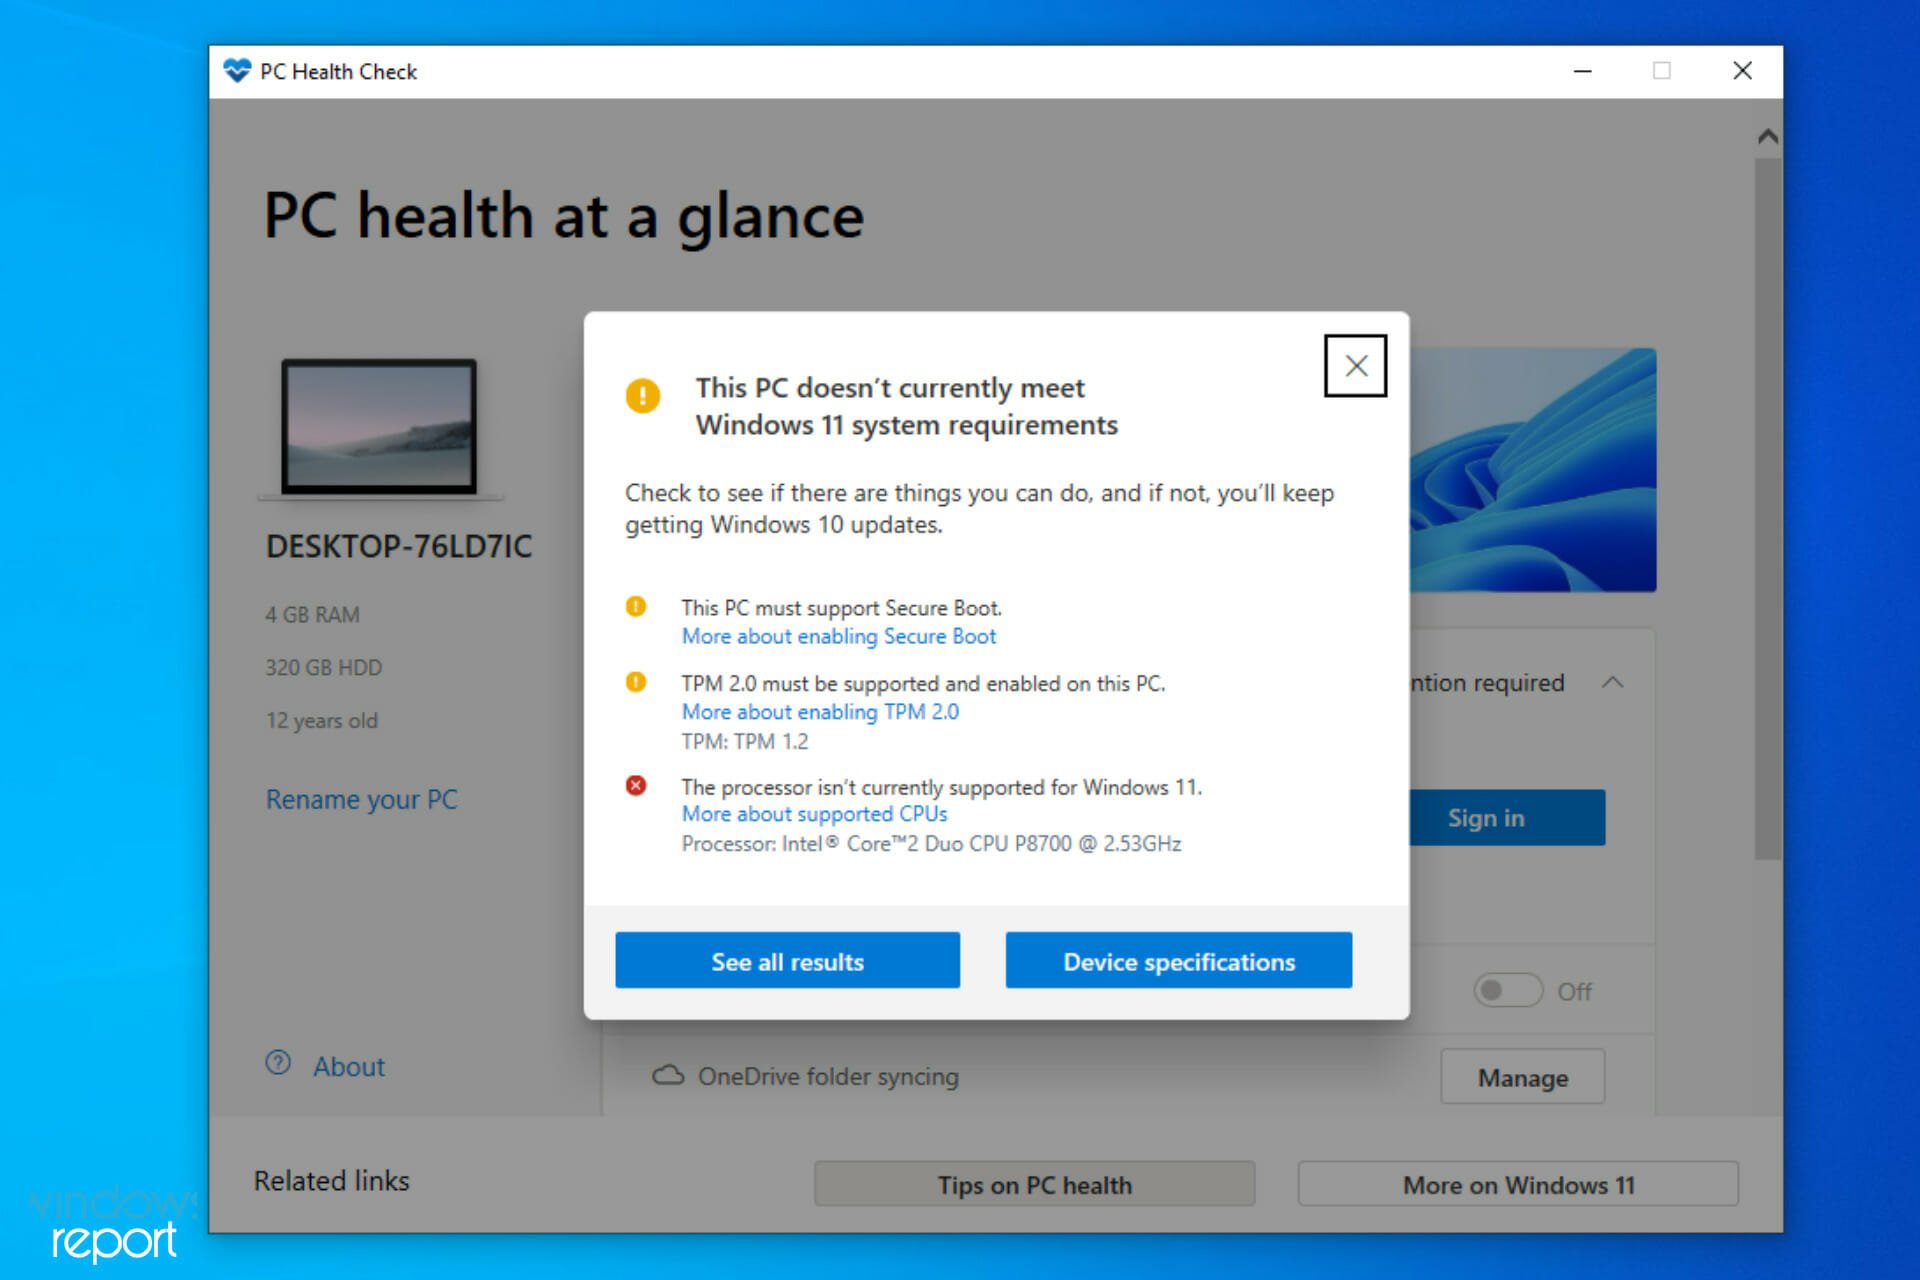
If you’re currently on Windows 10, home or pro, You will probably see a message in Windows update about upgrading to Windows 11. The PC health check application can be used to find out if that is possible and gives more details. For example, on a Dell OptiPlex 9020, which I will use for the rest of the article, it tells us that this machine does not have a supported CPU, no TPM 2.0 and no secure boot.
When trying to run the upgrade from the installation media for Windows 11, it basically tells us the same thing and we are not able to continue.
From Windows 11 where the 22H2 update is not being offered
If you are already on Windows 11 and do not get the update to 22H2 offered, for example because you worked around the hardware checks for an unsupported system, the chance is high that the upgrade to 22H2 is never shown in Windows Update.
For example, on my Dell Optiplex 9020, which has unsupported hardware, I do not get to see the 22H2 update:
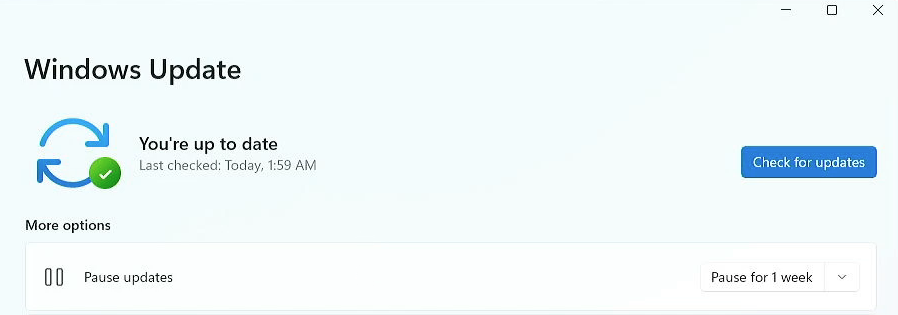
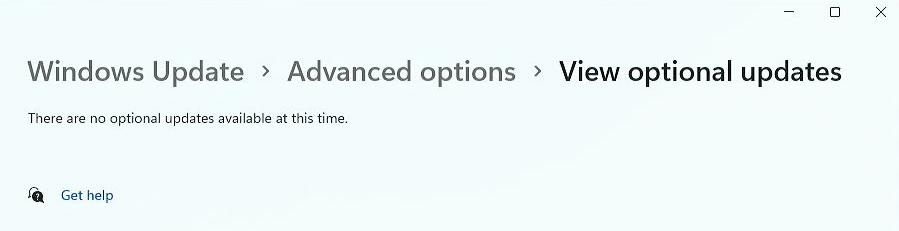
Windows Update tells me everything is up to date and there are no optional updates available either:
Solution
The solution to this is to use the installer from the ISO to upgrade to 22H2. Obviously, we will need to work around the hardware check that is part of the installer.
To work around this in the past, we could simply delete a file, called appraiserres.dll from the installation media and there would not be any hardware check. With the 22H2 release, this method no longer works and if you try to use it, you would see the following.
Fortunately, it’s not very hard to fix this. The only difference in the procedure is that we now will need to replace the file with a version that is always telling that the hardware is fine, rather than removing it.
This method works for both Home and Pro. After upgrading, if you had an activated system, the new version will be activated as well.
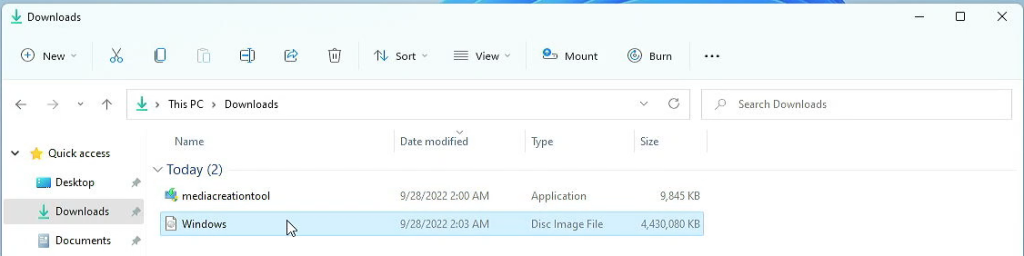
Step 1) Get the Windows 11 ISO
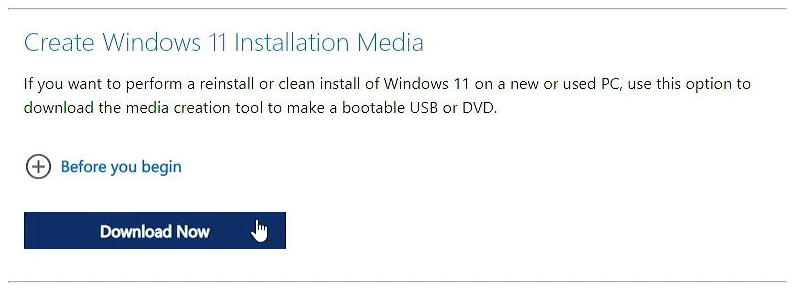
To start, we need to download the Windows 11 22H2 ISO. You could simply download the ISO from Microsoft’s website but this can lead to a mismatch with the language version of your original Windows installation. By using the Media Creation Tool instead, it will detect the correct version and there is more chance for success.
On the Microsoft Windows 11 download page, which you can find here: https://www.microsoft.com/en-us/software-download/windows11, click on Download now in the Create Windows 11 Installation Media section:
Once downloaded open the file from your Downloads folder:

Accept the licensing terms and leave the recommended version as is selected automatically. As mentioned this prevents a language mismatch which would not allow you to keep your files during the upgrade:
In the next screen, Choose to download the ISO file rather than creating installation media and save it in your Downloads folder as well:
Let the tool do the rest of the work and once completed, click Finish:
Step 2) Apply the workaround
Now that we have the ISO downloaded with the Media Creation Tool, navigate to where you decided to save the ISO file. We can now mount this ISO by simply double-clicking on it:
As you can see, this creates an extra virtual DVD drive on this computer representing the ISO file which we downloaded.
Since we need to replace a file here we will first need to copy all of the contents of the mounted ISO to a new folder on the desktop. First create that folder, I’ll call it 22H2:
Then we can, from the DVD drive, select all files and copy them in the 22H2 folder on the desktop:

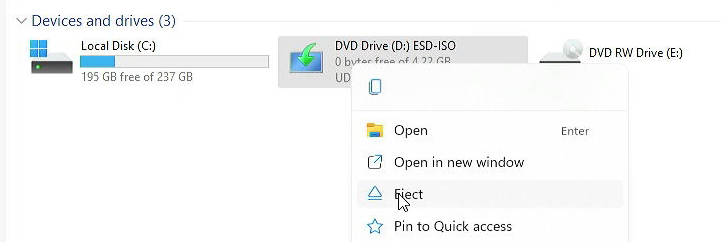
Since we have a copy, we no longer need the ISO so we can right click on the virtual DVD drive and choose Eject. If you’re short on space you can now also delete the file from your Downloads folder:
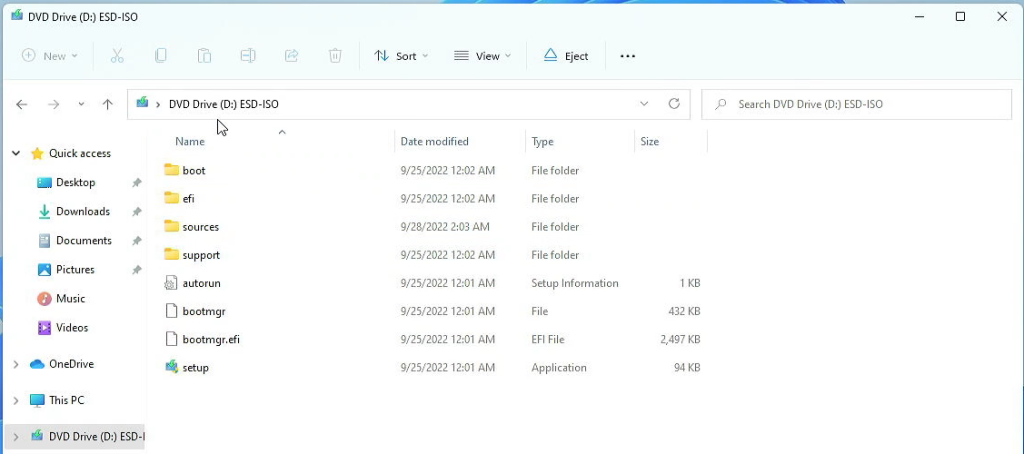
At this point we need to replace the appraiserress.dll file, this file is located in the sources folder and it is responsible for the hardware check.
You can download the modified version of this file from here: https://jensd.be/download/appraiserres.zip. Once you have downloaded the zip file with the modified appraiserress.dll, open it and simply drag it into the sources folder:
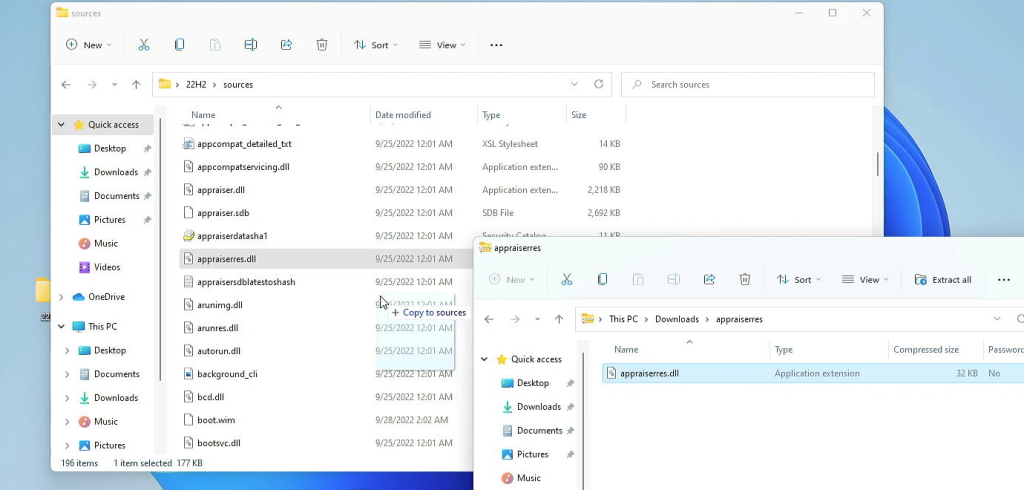
Then confirm that you want to replace it:

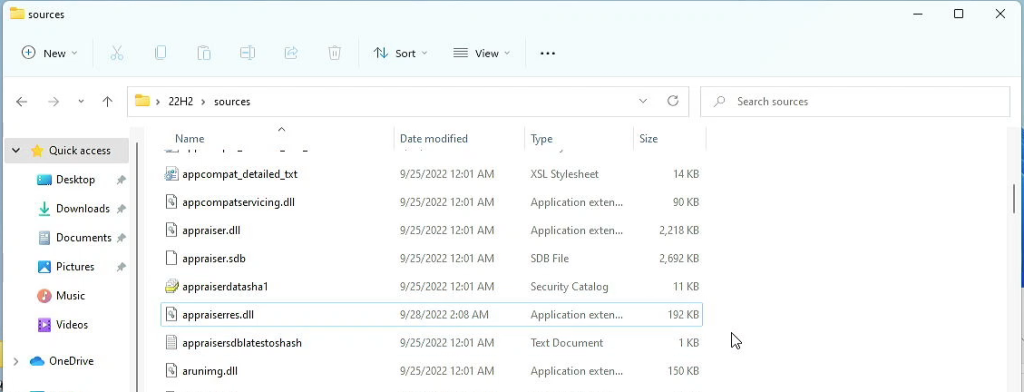
To double-check, make sure that the file size in the sources folder is now 192 kilobytes:
That’s all we had to do to apply the workaround to the installer and we’re ready to start installing the upgrade.
All preparation is done at this point and now we can just launch setup.exe from the 22H2 folder:

In the first step, make sure to disable any updates as that might undo the replaced file. To do so, go to “Change how Setup downloads updates” and check “Not right now”:
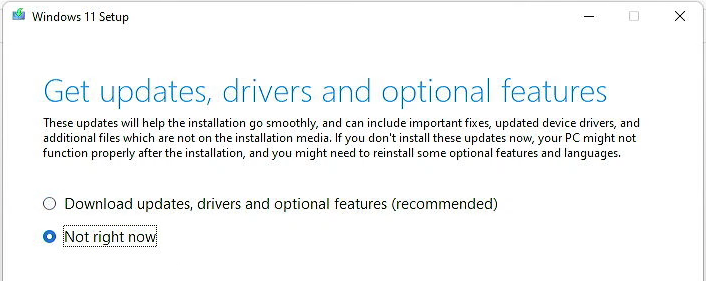
If this doesn’t work or you want to be very sure, you can also disconnect the cable or disconnect from wifi.
The rest of the steps should be pretty straightforward. Accept the licensing terms and if all goes well, you should see the following screen. Click Install to continue with the upgrade:
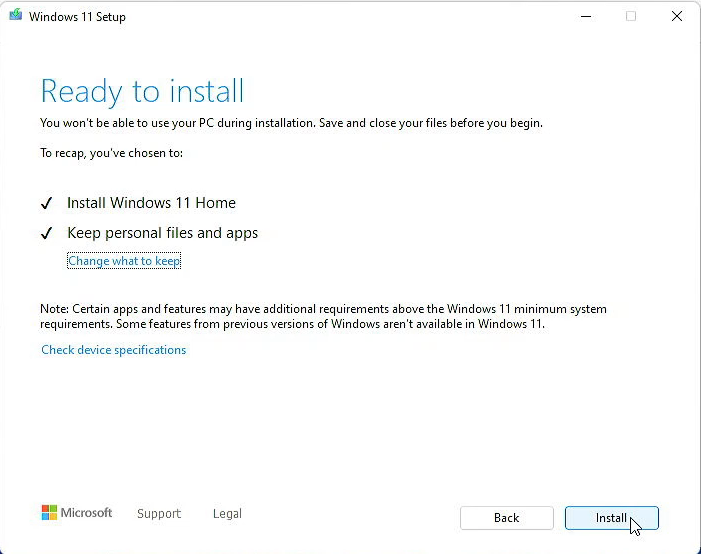
Once you do, the upgrade will take place and your current installation will become Windows 11 22H2 not important if you started this from Windows 10 or already from Windows 11.

This takes a bit of time and one or more reboots, I think it was around 15 minutes on my Dell OptiPlex 9020. If your user is password protected, you will need to log in at some point.

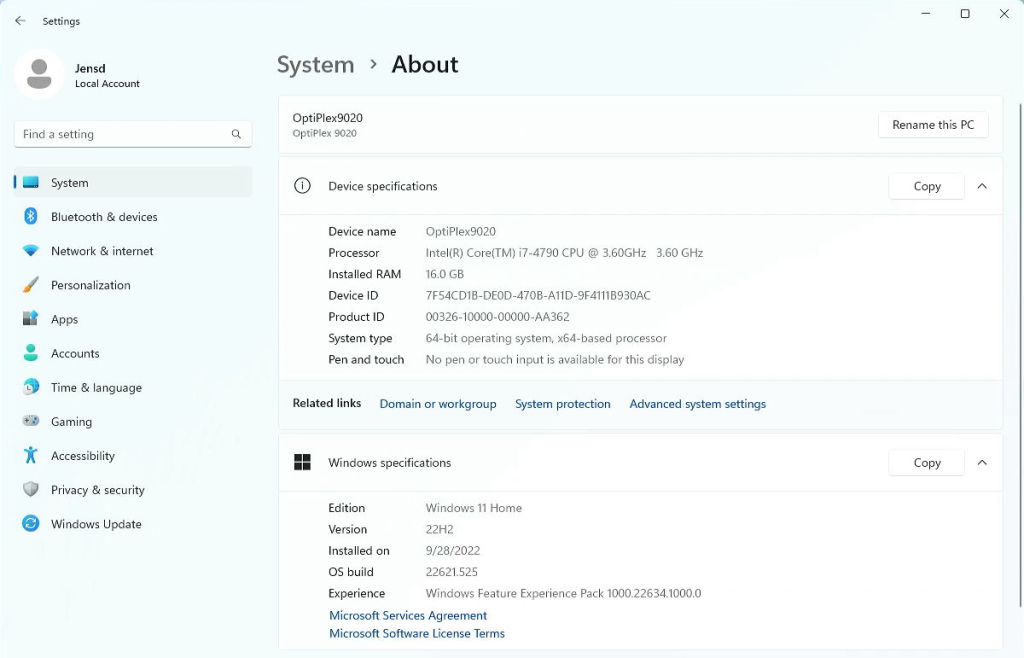
Eventually if all goes fine, you should be greeted with your trusty desktop but this time running Windows 11 22H2. About this PC shows us clearly that we are on Windows 11 22H2, still on the same unsupported hardware:
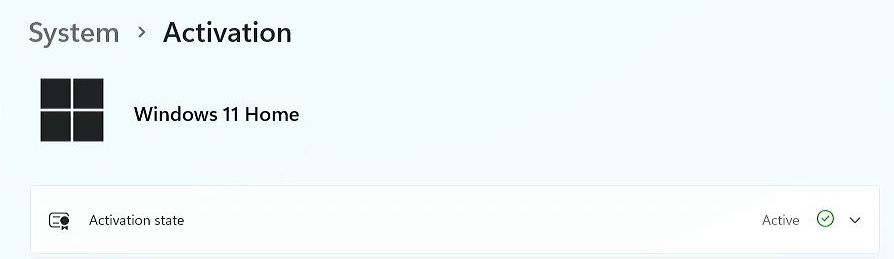
As I mentioned in the beginning, the installation stays activated as it was:
And in case you would be curious, updates seem to work fine as well. Probably until the next big feature update, which time will tell:
Step 4) Cleanup
At this point you can also safely delete the folder that we created from the desktop:
Hope this post can help you to upgrade to Windows 11 22H2.
Содержание
- Как обновиться до Windows 11 на неподдерживаемом компьютере
- Автоматическое обновление до Windows 11 без проверки совместимости с помощью Universal Media Creation Tool
- Официальный способ пропустить проверку модуля TPM и поколения процессора от Майкрософт
- Помощник по установке Windows 11 в режиме совместимости
- How to Install Windows 11 without TPM / with Unsupported CPU
- How to install Windows 11 without TPM 2.0 / TPM 1.2
- How to auto-create a Windows 11-ISO without TPM-check for installation
- How to upgrade to Windows 11 with unsupported CPU / without TPM 1.2
- How to upgrade to Windows 11 without any TPM (TPM 2.0 / TPM 1.2)
- Windows 11 supported Intel processors
- Intel 8th generation (Coffee Lake; Whiskey Lake; Amber Lake)
- Intel 9th generation (Coffee Lake Refresh)
- Intel 10th generation (Comet Lake; Ice Lake; Amber Lake)
- Intel 11th generation (Tiger Lake)
- Windows 11 supported AMD processors
- AMD Ryzen 2000 series (Zen+; Zen)
- AMD Ryzen 3000 series (Zen 2; Zen+)
- AMD Ryzen 4000 series (Zen 2)
- AMD Ryzen 5000 series (Zen 3)
Как обновиться до Windows 11 на неподдерживаемом компьютере
Если попробовать выполнить обновление до Windows 11 на компьютере или ноутбуке, где отсутствует или отключен доверенный платформенный модуль TPM 2.0, установлен процессор неподдерживаемого поколения или имеются другие проблемы с совместимостью, вы получите сообщение «Этот компьютер не соответствует минимальным требованиям к системе для установки Windows 11». Однако, это можно обойти.
В этой инструкции о простом способе выполнить автоматическое обновление системы до Windows 11 без TPM 2.0 и в случае, если есть другие несоответствия минимальным требованиям к системе. Также может быть полезным: обновление до Windows 11 22H2 на компьютере, не отвечающем системным требованиям.
Автоматическое обновление до Windows 11 без проверки совместимости с помощью Universal Media Creation Tool
Вы можете найти различные способы обхода минимальных системных требований Windows 11 для обновления для установки на несовместимый компьютер, например редактирование образа ISO или реестра. Также можно использовать чистую установку ОС с флешки, однако это не всегда удобно.
Я предлагаю использовать Universal Media Creation Tool — простой скрипт, изначально разработанный для возможности загрузки старых версий системы, но позволяющий также выполнить обновление до Windows 11 на неподдерживаемых компьютерах, минуя проверку наличия TPM 2.0, поколения процессора и других аппаратных характеристик. Способ обновления состоит из следующих шагов:
- Зайдите на официальную страницу скрипта Universal Media Creation Tool официальную страницу скрипта Universal Media Creation Tool и скачайте архив с файлами, нажав по стрелке рядом с кнопкой Code, а затем — кнопку Download ZIP.
- Распакуйте архив в удобное вам расположение.
- Запустите файл MediaCreationTool.bat из папки.
- После запуска файла вы можете получить уведомление фильтра SmartScreen, связанное с тем, что программа неизвестна системе. Нажмите «Подробнее», а затем — выполнить в любом случае.

- После запуска откроется командная строка и окно, в котором требуется выбрать версию системы, выбираем Windows 11.
- В следующем окне предлагается выбрать необходимое действие, в нашем случае — Auto Setup (автоматическая установка).
- После запуска автоматической установки сначала будут загружены необходимые файлы напрямую с сайта Майкрософт (что можно будет увидеть в окне командной строки), затем, после подтверждения в PowerShell запустится программа установки.
- Несмотря на то, что в программе установки будет указано, что выполняется загрузка Windows 10, по факту загружается обновление до Windows 11: суть в том, что для установки используется Media Creation Tool от предыдущей системы.
- Останется лишь дождаться завершения загрузки, «создания носителя» (по факту, никакой носитель не записывается и установки Windows 11 — всё это будет выполнено полностью автоматически, компьютер будет перезагружаться в процессе.
- После этапа «Работа с обновлениями» вы попадете на экран входа в Windows 11, а после входа будет выполнена подготовка к первому запуску.
В результате вы получите обновлённую до Windows 11 систему с возможностью отката обновления при необходимости, всё что потребуется с вашей стороны после 6-го шага — дождаться завершения процесса и не выключать компьютер. При «зависании» на каком-либо проценте, лучше не торопитесь что-либо предпринимать, подождите (даже если это займёт около часа). Читатели сообщают, что первые накопительные обновления на установленную таким образом систему успешно пришли.
Официальный способ пропустить проверку модуля TPM и поколения процессора от Майкрософт
На официальной странице, посвященной установке Windows 11, Майкрософт предлагает собственный метод обхода проверки наличия модуля TPM 2.0, однако указывается, что наличие как минимум TPM 1.2 всё равно требуется. Поколение процессора проверяться не будет. Необходимые шаги:
- Нажмите клавиши Win+R на клавиатуре и введите regedit в окно Выполнить, после чего нажмите Enter.
- Перейдите к разделу реестра
- Нажмите правой кнопкой мыши в правой панели редактора реестра, выберите Создать — Параметр DWORD (32 бита) и создайте параметр с именем AllowUpgradesWithUnsupportedTPMOrCPU
- Дважды нажмите по параметру и задайте значение 1 для него.
- Закройте редактор реестра и запустите помощник по установке Windows 11 с официального сайта для обновления.
Как поведёт установка обновления в случае отсутствия модуля TPM даже версии 1.2 — сказать не могу, жду ваших отзывов в комментариях.
Помощник по установке Windows 11 в режиме совместимости
Ещё один способ (в комментариях сообщают, что уже не срабатывает) — использовать официальный помощник по установке Windows 11 с официального сайта https://www.microsoft.com/ru-ru/software-download/windows11, но запустить его в режиме совместимости с Windows 7. Для этого:
- Скачиваем помощник по установке в удобное расположение.
- Нажав правой кнопкой мыши по загруженному файлу выбираем пункт Свойства в контекстном меню
- На вкладке «Совместимость» отмечаем пункт «Запустить программу в режиме совместимости с» и указываем Windows 7.
- Применяем настройки и запускаем помощник по установке.
Сообщали, что в этом случае проверка совместимости системы с Windows 11 не производится и установка обновления выполняется успешно, но, похоже, уже нет.
В случае, если вы будете использовать один из предложенных способов обновления неподдерживаемой системы до Windows 11, прошу поделиться результатами, особенно интересны следующие моменты: обновление на Legacy-системах с MBR диском, а также результаты при обновлении не с Windows 10, а с более ранних систем (в этих сценариях скрипт мною опробован не был). Также вы можете создать загрузочный ISO или загрузочную флешку для чистой установки без проверки TPM 2.0 или TPM 1.2, поколения процессора и состояния безопасной загрузки.
Источник
How to Install Windows 11 without TPM / with Unsupported CPU
Don’t have a TPM 2.0 chip? We show you how to install Windows 11 without TPM with a handy regedit bypass.
Much controversy has come from Microsoft’s decision to restrict Windows 11 to machines that support TPM 2.0, with the company itself even seeming uncertain about the move.
The upgrade or installation of Windows 11 also fails on other unsupported hardware such as certain older CPUs.
We have already shown you how to check if your PC has a TPM chip. Today, we’ll be teaching you how to install Windows 11 without TPM 2.0 chip or how to install it if your PC has only TPM 1.2 or an unsupported CPU. If you are unsure about the Windows 11 processor requirements, please check the official lists of Intel and AMD CPUs that will work with Windows 11 at the end of this article.
What is a TPM 2.0 Chip?
TPM stands for Trusted Platform Module, which may not mean much to you alone. Essentially, TPM is a security module typically soldered onto the motherboard in the form of a chip. It acts as a cryptographic processor and offers a hardware-based approach to generating hashes and storing cryptographic keys, biometric data, user data, and more.
Rooting the cryptography in hardware makes it all but impossible for attackers to tamper with and access this data, protecting against malware, ransomware, and sophisticated nation-state attacks. While older PCs might use a TPM 1.2 chip, most PCs using TPM usually run with a newer TPM 2.0 chip. There are no other public versions in between.
Is it safe to install Windows 11 without TPM 2.0 Chip?
Despite what Microsoft’s Windows 11 compatibility tool may tell you, installing Windows 11 without TPM is quite simple. All it requires is putting a few registry entries or using a script based tool to activate a Windows 11 TPM 2.0 bypass.
Before you do so, however, you should consider that TPM 2.0 is used to power many of Windows 11’s security features. This includes measured boot, Windows Hello, SecureBIO, WD System Guard, and Device Health Attestation. When you run Windows 11 without a TPM chip, you won’t have access to these features and may be putting your data more at risk as a result.
If possible, then, we recommend that you install a discrete TPM 2.0 module or wait and upgrade your hardware. It’s likely Windows 11 will only rely on TPM more in the future and we can’t guarantee that Microsoft won’t disable this bypass at a later point.
The Windows 11 TPM 2.0 bypass
If you really can’t do the above or just want to take the new OS for a test drive, however, this is how you install Windows 11 on unsupported hardware. You can either tweak the installation routine yourself (methods 1 & 3), use a wrapper-tool for Microsoft´s Media Creation Tool to get an ISO/USB without the Windows 11 TPM-check (method 2) or apply a Windows 11 TPM 2.0 bypass for upgrading a running Windows 10 system to Windows 11 (method 4).
How to install Windows 11 without TPM 2.0 / TPM 1.2
As mentioned, installing Windows 11 without TPM requires a few registry entries. The easiest way to bypass the Windows 11 TPM check this is to try to install Windows 11 via an ISO or the Insider program, then follow the steps below if you get a “This PC can’t run Windows 11” message.
If you see the message “This PC does not meet the system requirement”, minimize the installer, go to registry, edit the entries, then go back to the installer, Press back button once, and continue. If you prefer to do this the easy way you can avoid the standard setup/installation provided by Microsoft and use one of the methods shown after this one.
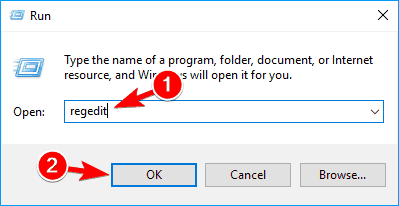
- Press Shift + F10 to open Command Prompt and run the “regedit” command
Add a new key in the “Setup” key
In the Registry Editor, navigate to ComputerHKEY_LOCAL_MACHINESYSTEMSetup . Right-click on the “Setup” folder in your sidebar and select “New > Key”.
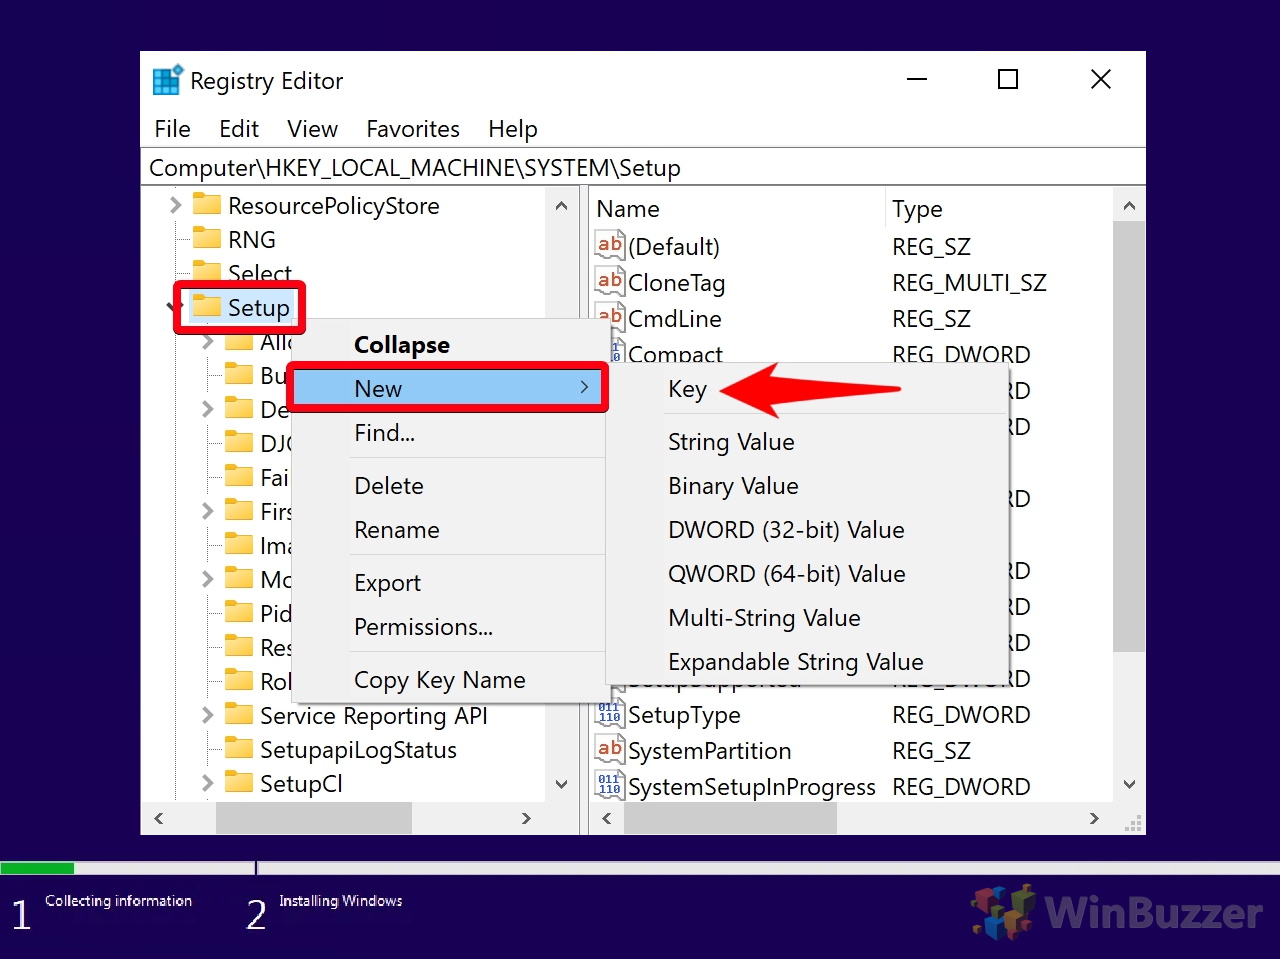
Name the key “LabConfig” and add a new DWORD
After you name your folder, you can create the DWORD by right-clicking in any blank space in the main pane and selecting “DWORD (32-bit) Value”.

Name the value “BypassTPMCheck” and set the value data to 1.
It’s important the capitalization and spelling are exactly the same. You can modify the value data by double-clicking your new DWORD and changing the “Value data” text box. Press “OK” when you’re done to save the changes.
Create another DWORD called “BypassRAMCheck”
Again, make sure the capitalization and spelling is exactly the same as above.

Change the value data to 1
Remember, you can access the value data field by double-clicking on the “BypassRAMCheck” key. Press “OK” to apply it.
Create a new DWORD called “BypassSecureBootCheck”
Change the value data of SecureBootCheck to 1 and press “OK”
Close the Registry Editor and press the back button on your Windows 11 setup
You’ll find the back button in the top-left corner.
![]()
Install Windows 11 on your unsupported hardware
You can now go through the setup process as normal. Your installer should no longer tell you your PC is incompatible.
How to auto-create a Windows 11-ISO without TPM-check for installation
You can use Microsoft´s Media Creation Tool with the script-based tool Universal MediaCreationTool wrapper (Universal MCT wrapper) to automatically download Windows 11 from Microsoft´s servers and create ISO-files where the TPM check has been removed. If you want to use this ISO to upgrade Windows 10 to Windows 11 dynamically from a running system, you will additionally need to activate the TPM bypass shown in method 4 below.
- Download and unzip Universal MCT wrapper
Download Universal MCT wrapper from GitHub, unpack the ZIP-file and run “MediaCreationTool.bat”. If you want to learn more about the project, you find everything here.
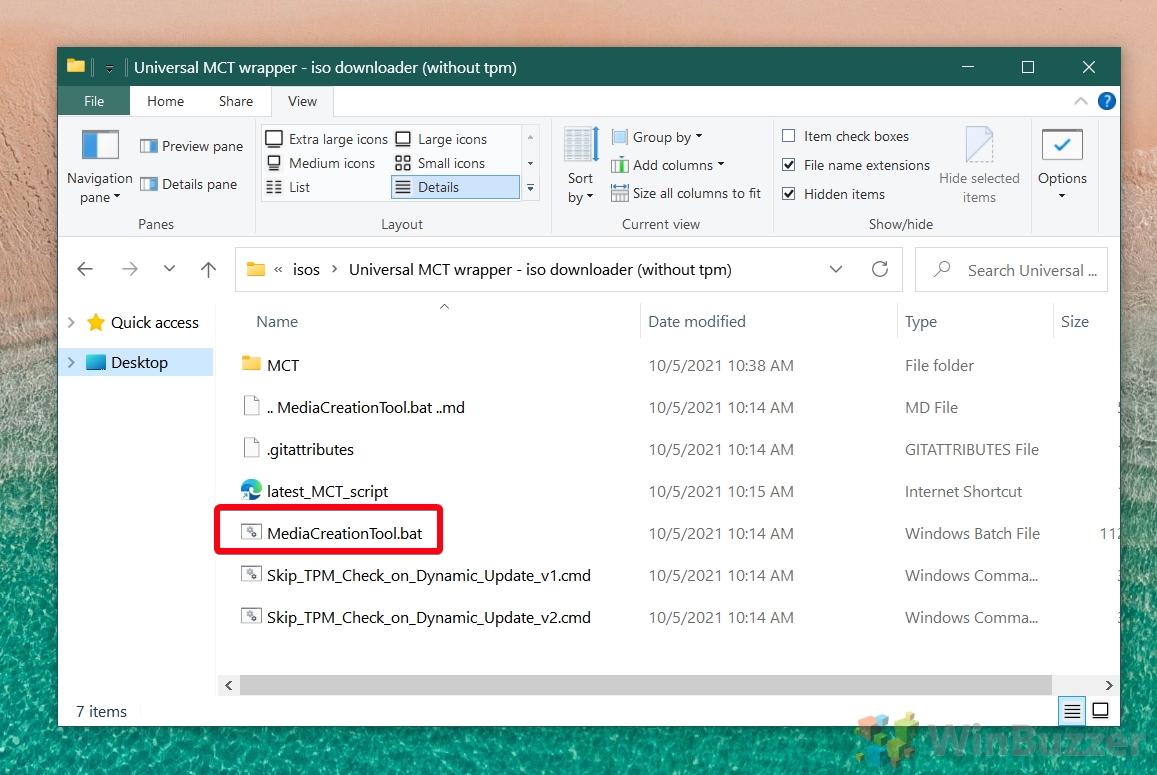
Click on “11” to select “Windows 11”

Choose “Create ISO” or “Create USB” based on your preference.
“Create USB” will automatically create a bootable USB-stick which can be used for a fresh installation of “Windows 11”.

Wait until the Media Creation Tool has finished downloading Windows 11
After the download of Windows 11 has been finished, the Media Creation Tool will close automatically and Universal MCT wrapper will create an ISO/USB which allows installing Windows 11 without TPM.
Wait for Universal MCT wrapper to finish

Use ISO/USB to install Windows 11 without TPM
The ISO to install Windows 11 without TPM can be found in the main folder of Universal MCT wrapper.

Install Windows 11 without Trusted Platform Module
You use the ISO/USB to either install Windows 11 without TPM-check on a PC or as a virtual machine with VMware, Virtualbox, or Hyper-V.

How to upgrade to Windows 11 with unsupported CPU / without TPM 1.2
If your PC fails to upgrade to Windows 11 because of an unsupported CPU and/or that your device only has TPM 1.2 instead of TPM 2.0, you can fix that quickly. Just apply the following registry-tweak to add a bypass for unsupported CPU and TPM 1.2.

Navigate to folder and check for existing DWORD
Use the address bar to navigate to “HKEY_LOCAL_MACHINESYSTEMSetupMoSetup” and check if the DWORD “AllowUpgradesWithUnsupportedTPMOrCPU” is located there. If it is missing, right-click in the right pane, select “New > DWORD (32-bit) Value”, and name the new DWORD “AllowUpgradesWithUnsupportedTPMOrCPU”.

Edit DWORD “AllowUpgradesWithUnsupportedTPMOrCPU”
Double click on “AllowUpgradesWithUnsupportedTPMOrCPU”, type “1” in “Value data” and save with “OK”.

How to upgrade to Windows 11 without any TPM (TPM 2.0 / TPM 1.2)
If you want to directly upgrade Windows 10 to Windows 11 without a TPM 2.0 chip, you can use the wrapper tool from the previous step to activate a bypass with a simple click. This method is also needed if you run the Windows 11 upgrade from a previously created ISO created with method 2.
- Run the Windows 11 TPM 2.0 bypass
Double-click on “Skip_TPM_Check_on_Dynamic_Update_v2.cmd” as admin to remove the TPM-check for updates. If this does not work, you can try alternatively “Skip_TPM_Check_on_Dynamic_Update_v1.cmd”.

Wait for confirmation
If you see a PowerShell window popping up with a green bar stating “Skip TPM Check on Dynamic Update [Installed]…” the TPM 2.0 bypass has been activated and you should be able to upgrade from Windows 10 to Windows 11 without TPM 2.0. Running the respective CMD-script again will re-activate the TPM-check.

Windows 11 supported Intel processors
Windows 11 supports intel processors from Intel’s 8th generation or newer which means CPUs from mid-2017 onwards. Here we provide a selection of the most popular consumer-level CPUs. Microsoft has a full list of all supported Intel processors for Windows 11, including chips from the Atom, Celeron, Pentium, Xeon and Core series.
Intel 8th generation (Coffee Lake; Whiskey Lake; Amber Lake)
Desktop
- Core i3-8100
- Core i5-8400
- Core i5-8600
- Core i5-8600K
- Core i7-8700
- Core i7-8700K
- Core i7-8086K
Mobile
- Core m3-8100Y
- Core i5-8200Y
- Core i3-8130U
- Core i3-8145U
- Core i3-8100H
- Core i5-8250U
- Core i5-8250U
- Core i5-8400H
- Core i7-8650U
- Core i7-8665U
- Core i7-8750H
Intel 9th generation (Coffee Lake Refresh)
- Core i3-9100
- Core i5-9400
- Core i5-9600
- Core i5-9600K
- Core i7-9700
- Core i7-9700K
- Core i9-9900
- Core i9-9900K
Intel 10th generation (Comet Lake; Ice Lake; Amber Lake)
Desktop
- Core i3-10100
- Core i5-10400
- Core i5-10600
- Core i5-10600K
- Core i7-10700
- Core i7-10700K
- Core i9-10900
- Core i9-10900K
Mobile
- Core i3-10100Y
- Core i3-10100U
- Core i5-10210U
- Core i5-10200H
- Core i5-10400H
- Core i7-10510U
- Core i7-10710U
- Core i7-10750H
- Core i7-10850H
- Core i9-10980HK
Intel 11th generation (Tiger Lake)
Desktop
- Core i3-11100
- Core i5-11400
- Core i5-11600
- Core i5-11600K
- Core i7-11700
- Core i7-11700K
- Core i9-11900
- Core i9-11900K
Mobile
- Core i3-1115G4
- Core i5-1135G7
- Core i5-11300H
- Core i7-1165G7
- Core i7-1185G7
- Core i7-11375H
Windows 11 supported AMD processors
For AMD, Windows 11 CPU compatibility goes back to processors released in 2018 or later. This includes 2nd generation Ryzen (Zen+) chips and above. Microsoft also has a full AMD list, including chips from AMDs Athlon, EPYC, Ryzen and Ryzen Threadripper series. Below is a list of the more common consumer-level CPUs. Unfortunately CPU like the 3300X, 3700, 4600HS and 5900H are missing, even though all are all very recent.
AMD Ryzen 2000 series (Zen+; Zen)
Desktop
- Ryzen 3 2300X
- Ryzen 5 2600
- Ryzen 7 2700
- Ryzen 7 2700X
- Ryzen Threadripper 2920X
- Ryzen Threadripper 2950X
- Ryzen Threadripper 2970WX
- Ryzen Threadripper 2990X
AMD Ryzen 3000 series (Zen 2; Zen+)
Desktop
- Ryzen 3 3100
- Ryzen 5 3600
- Ryzen 7 3700X
- Ryzen 9 3900
- Ryzen 9 3900X
- Ryzen 9 3950X
- Ryzen Threadripper 3960X
- Ryzen Threadripper 3970X
- Ryzen Threadripper 3990X
- Ryzen Threadripper 3995WX
- Ryzen 3 3200G**
- Ryzen 5 3400G**
- Ryzen 3 3300U
- Ryzen 5 3500U
- Ryzen 5 3550H
- Ryzen 7 3700U
- Ryzen 7 3750H
AMD Ryzen 4000 series (Zen 2)
Desktop
- Ryzen 3 4300G
- Ryzen 5 4600G
- Ryzen 7 4700G
Mobile
- Ryzen 3 4300U
- Ryzen 5 4500U
- Ryzen 5 4600H
- Ryzen 7 4700U
- Ryzen 7 4800HS
- Ryzen 7 4800H
- Ryzen 9 4900HS
- Ryzen 9 4900H
AMD Ryzen 5000 series (Zen 3)
Desktop
- Ryzen 5 5600X
- Ryzen 7 5800X
- Ryzen 9 5900X
- Ryzen 9 5950X
Mobile
- Ryzen 3 5400U
- Ryzen 5 5600U
- Ryzen 5 5600HS
- Ryzen 5 5600H
- Ryzen 7 5800U
- Ryzen 7 5800HS
- Ryzen 7 5800H
- Ryzen 9 5900HS
- Ryzen 9 5900HX
- Ryzen 9 5980HS
- Ryzen 9 5980HX
That’s it for this Windows 11 tutorial. Now that you have it installed, you may want to check out all the major features coming to the OS, including focus sessions and the new snipping tool.
If you decide it’s not for you, you may instead want to check out our tutorial on how to roll back a Windows update. Technically, it’s for Windows 10, but as you’ll notice not much has changed between versions, so the process is more or less the same.
Источник
Installing Windows 11 on unsupported CPU is simple with Rufus
by Radu Tyrsina
Radu Tyrsina has been a Windows fan ever since he got his first PC, a Pentium III (a monster at that time). For most of the kids of… read more
Published on December 2, 2022
Reviewed by
Alex Serban

After moving away from the corporate work-style, Alex has found rewards in a lifestyle of constant analysis, team coordination and pestering his colleagues. Holding an MCSA Windows Server… read more
- Microsoft doesn’t allow you to install Windows 11 on an unsupported processor, but can work around that by modifying your registry.
- Alternatively, you can use third-party tools to create installation media for Windows 11.
XINSTALL BY CLICKING THE DOWNLOAD FILE
- Download Restoro PC Repair Tool that comes with Patented Technologies (patent available here).
- Click Start Scan to find Windows 11 issues that could be causing PC problems.
- Click Repair All to fix issues affecting your computer’s security and performance
- Restoro has been downloaded by 0 readers this month.
Windows 11 system requirements are somewhat high, and many are wondering if it is possible to install Windows 11 on an unsupported CPU.
There is a way to bypass the CPU check when installing Windows, and today we’re going to show you the best ways to do that.
Just in case you want to know what the minimum system requirements for Windows 11 are, here’s a checklist you look through:
- Processor: Your computer’s processor should be one gigahertz (GHz) or faster with two or more cores on a compatible 64-bit processor or system on a chip (SoC)
- RAM: The PC’s ram size should be 4 gigabytes (GB) or greater
- Storage: A storage size of 64 GB* or greater is required to install this Windows
- You should note that additional storage space might be required to download updates and enable specific features
- Graphics card: Should be compatible with DirectX 12 or later, with a WDDM 2.0 driver
- System firmware: UEFI, Secure Boot capable
- TPM: Trusted Platform Module (TPM) version 2.0
- Display: High definition (720p) display, 9” or greater monitor, 8 bits per color channel
We also have an article detailing the Windows 11 technical specifications that might offer more information about this.
Can I install Windows 11 on unsupported CPU?
The good news is that there is a way to install Windows 11 on an unsupported CPU. However, users do have a few concerns:
- Safety – Microsoft has advised against it since you’re missing important features such as TPM 2.0. For more information, our Windows 11 and TPM guide.
- Compatibility issues – According to Microsoft, running Windows 11 on unsupported devices can lead to compatibility or performance issues in the feature. Speaking of performance, you can make Windows 11 faster with a couple of quick tweaks.
However, if you are interested in learning how to install Windows 11 on an unsupported PC, we will show you how. We’ve broken down the entire process from start to finish into simple steps.
What happens if you install Windows 11 on unsupported CPU?
It is not recommended to install Windows 11 on an unsupported CPU computer since there may be compatibility difficulties caused by doing so.
Your personal computer’s warranty will not cover any damage that occurs as a result of software or hardware incompatibility.
Will unsupported CPU get Windows 11 updates?
If you continue with the installation of Windows 11, Microsoft will stop providing support for your computer and you will no longer be able to get updates.
How do I install Windows 11 on an unsupported computer?
- Can I install Windows 11 on unsupported CPU?
- How do I install Windows 11 on an unsupported computer?
- 1. Download the Windows 11 ISO
- 2. Bypass the CPU check by editing the Windows Registry
- 3. Install Windows 11 from the ISO image
- 4. Install Windows 11 on unsupported CPU from USB
- What happens if you run Windows 11 on unsupported hardware?
- Should you upgrade an unsupported CPU?

NOTE
Before installing Windows 11 on unsupported machines, we recommend you back up important data first. AOMEI Backupper is an excellent solution; it will keep your system safe and prevent data loss.
1. Download the Windows 11 ISO
- If you wonder How do I bypass the CPU isn’t supported Windows 11?, download Windows 11 Disk Image (ISO).
- Open the Select Download dropdown.

- Select Windows 11.
- Hit the Download button.
- Click the Choose one dropdown, select your product language, and then hit Confirm.
- Click 64-bit Download. This is how to install Windows 11 on unsupported CPU via ISO.


NOTE
The typical way to update your PC to the latest update is by using the Windows 11 Installation Assistant. Unfortunately, this doesn’t work in this case because your system doesn’t meet the minimum requirement.
The first to install Windows 11 on an unsupported CPU is to download the Disk Image (ISO) from the official website. The file should be around 5.1GB.
While the ISO file is downloading, you can move on to the next step.
2. Bypass the CPU check by editing the Windows Registry
- Press the Windows key + R to start Run, type regedit, and click OK to launch the Registry Editor.

- Navigate to the following path:
HKEY_LOCAL_MACHINESYSTEMSetupMoSetup
- In the right pane, you can right-click, select New and then select the DWORD (32-bit) Value.
- Once the value is created, you can rename it to AllowUpgradesWithUnsupportedTPMOrCPU.
- You can now double-click on this new value and enter 1 into the Value data field. Then, finally, hit OK and close the registry editor. This is how to install Windows 11 on unsupported CPU via regedit.

A few users reported that MoSetup key is hidden. To fix that, right-click it’s parent key, in this case it’s Setup, and choose the option to create a new key.
Some PC issues are hard to tackle, especially when it comes to corrupted repositories or missing Windows files. If you are having troubles fixing an error, your system may be partially broken.
We recommend installing Restoro, a tool that will scan your machine and identify what the fault is.
Click here to download and start repairing.
Name the key MoSetup, and you’ll get a message that the key is already available. Now you should be able to access it.
Once you restart your PC and go for the following solution, the system will ignore any shortcomings regarding your CPU, even with the TPM 2.0 requirement.
- How to download Windows 11 ISO or update from Windows 10
- How to Change Real Time Update Speed in Task Manager
- How to Check Your Windows Experience Index on Windows 11
- How to Password Protect Zip Files in Windows 11 [3 Tips]
3. Install Windows 11 from the ISO image
- After downloading the ISO, press Windows key + E to launch File Explorer.

- Locate the ISO, right-click on it and select Mount.

- A new virtual drive will appear on your PC. Access it and double-click on the setup.exe file to start the installation process.

After installation, you should see a warning message instead of a rejection one. This message offers an option to install Windows 11 without losing your data.
Again, we must reiterate that you back up your important data before starting this process.
4. Install Windows 11 on unsupported CPU from USB
NOTE
If you choose this method, make sure to back up all important files from the destination drive, in order to prevent file loss.
- Download Windows 11 ISO.
- Download Rufus.

- Start the application.
- Click on Select and pick your Windows 11 ISO file. Next set Image option to Extended Windows 11 Installation.

- Click on Start. When asked to format the drive click OK.
- Wait for the process to finish.
- Once the process is done, boot from the USB drive and install Windows 11. This is how to install Windows 11 on unsupported CPU with Rufus.

What happens if you run Windows 11 on unsupported hardware?
While Microsoft allows you to install Windows 11 on an unsupported PC, it does not come without risks. For example, after the installation, you might notice that your PC might start to malfunction due to compatibility issues.
Also, your PC will stop receiving updates, mainly but not limited to only security updates. Lastly, if your system crashes because of this installation, it will not be covered by the manufacturer’s warranty.
Should you upgrade an unsupported CPU?
Let’s be clear about this. If you’re still yet to decide if you want to go through with the procedure to install Windows 11 on an unsupported laptop, we recommend against doing so.
This is because Microsoft warns that there is a high tendency to experience bugs. They have also warned that they may eventually stop rendering security updates for unsupported PCs running this OS.
So, it might not be ideal for upgrading to the new OS if you don’t have said requirements. However, if you don’t mind a bit of lagging here and there, feel free to follow the steps we’ve provided above.
To avoid any issues, you may also install Windows 11 on a virtual machine and test it to its full extent before loading it onto your primary device.
If you’re still experiencing problems with installing this recent OS, then you can take a look at our piece on how to install Windows 11 on unsupported TPM besides the CPU that we have covered today.
As you probably know, another essential requirement for installing Windows 11 is for your PC to support the Secure Boot feature.
If you get an error regarding that, we can help you with a guide on bypassing the Secure Boot requirement and going on with the installation.
You’re welcome to comment to let us know if our solution was helpful or if you have other tips on installing Windows 11 on an unsupported device that you feel should be added to the list.
![]()
Newsletter
Quick Links
- Before you start
- Using Rufus to create a custom ISO
- Bypassing requirements with the Registry Editor
- Install Windows 11 with launch parameters
- Conclusion
Windows 11 is the latest version of the most popular operating system in the world, and it was first released to the public on October 5th, 2021, though early previews began on June 24th of that year. This version of Windows changed a lot, from the design language to dropping support for a lot of older hardware. Indeed, Windows 11 has some hefty system requirements compared to previous versions of Windows, so there are a lot of unsupported PCs you can’t install it on.
The most notable change for many is the new requirement for a Trusted Platform Module (TPM), but it also bumps the minimum RAM required to 4GB and it requires an x64-based processor, on top of having a fairly restrictive list of supported CPUs.
All of that means that many users are left without an official path to upgrade to Windows 11, even if their PC still runs well enough for them. While there isn’t much you can do about compatibility if you have an x86 CPU, you can bypass the requirements for specific CPUs or TPM support, which allows most Windows PCs to upgrade to Windows 11. In this article, we’re going to show you how to do that.
Before you start
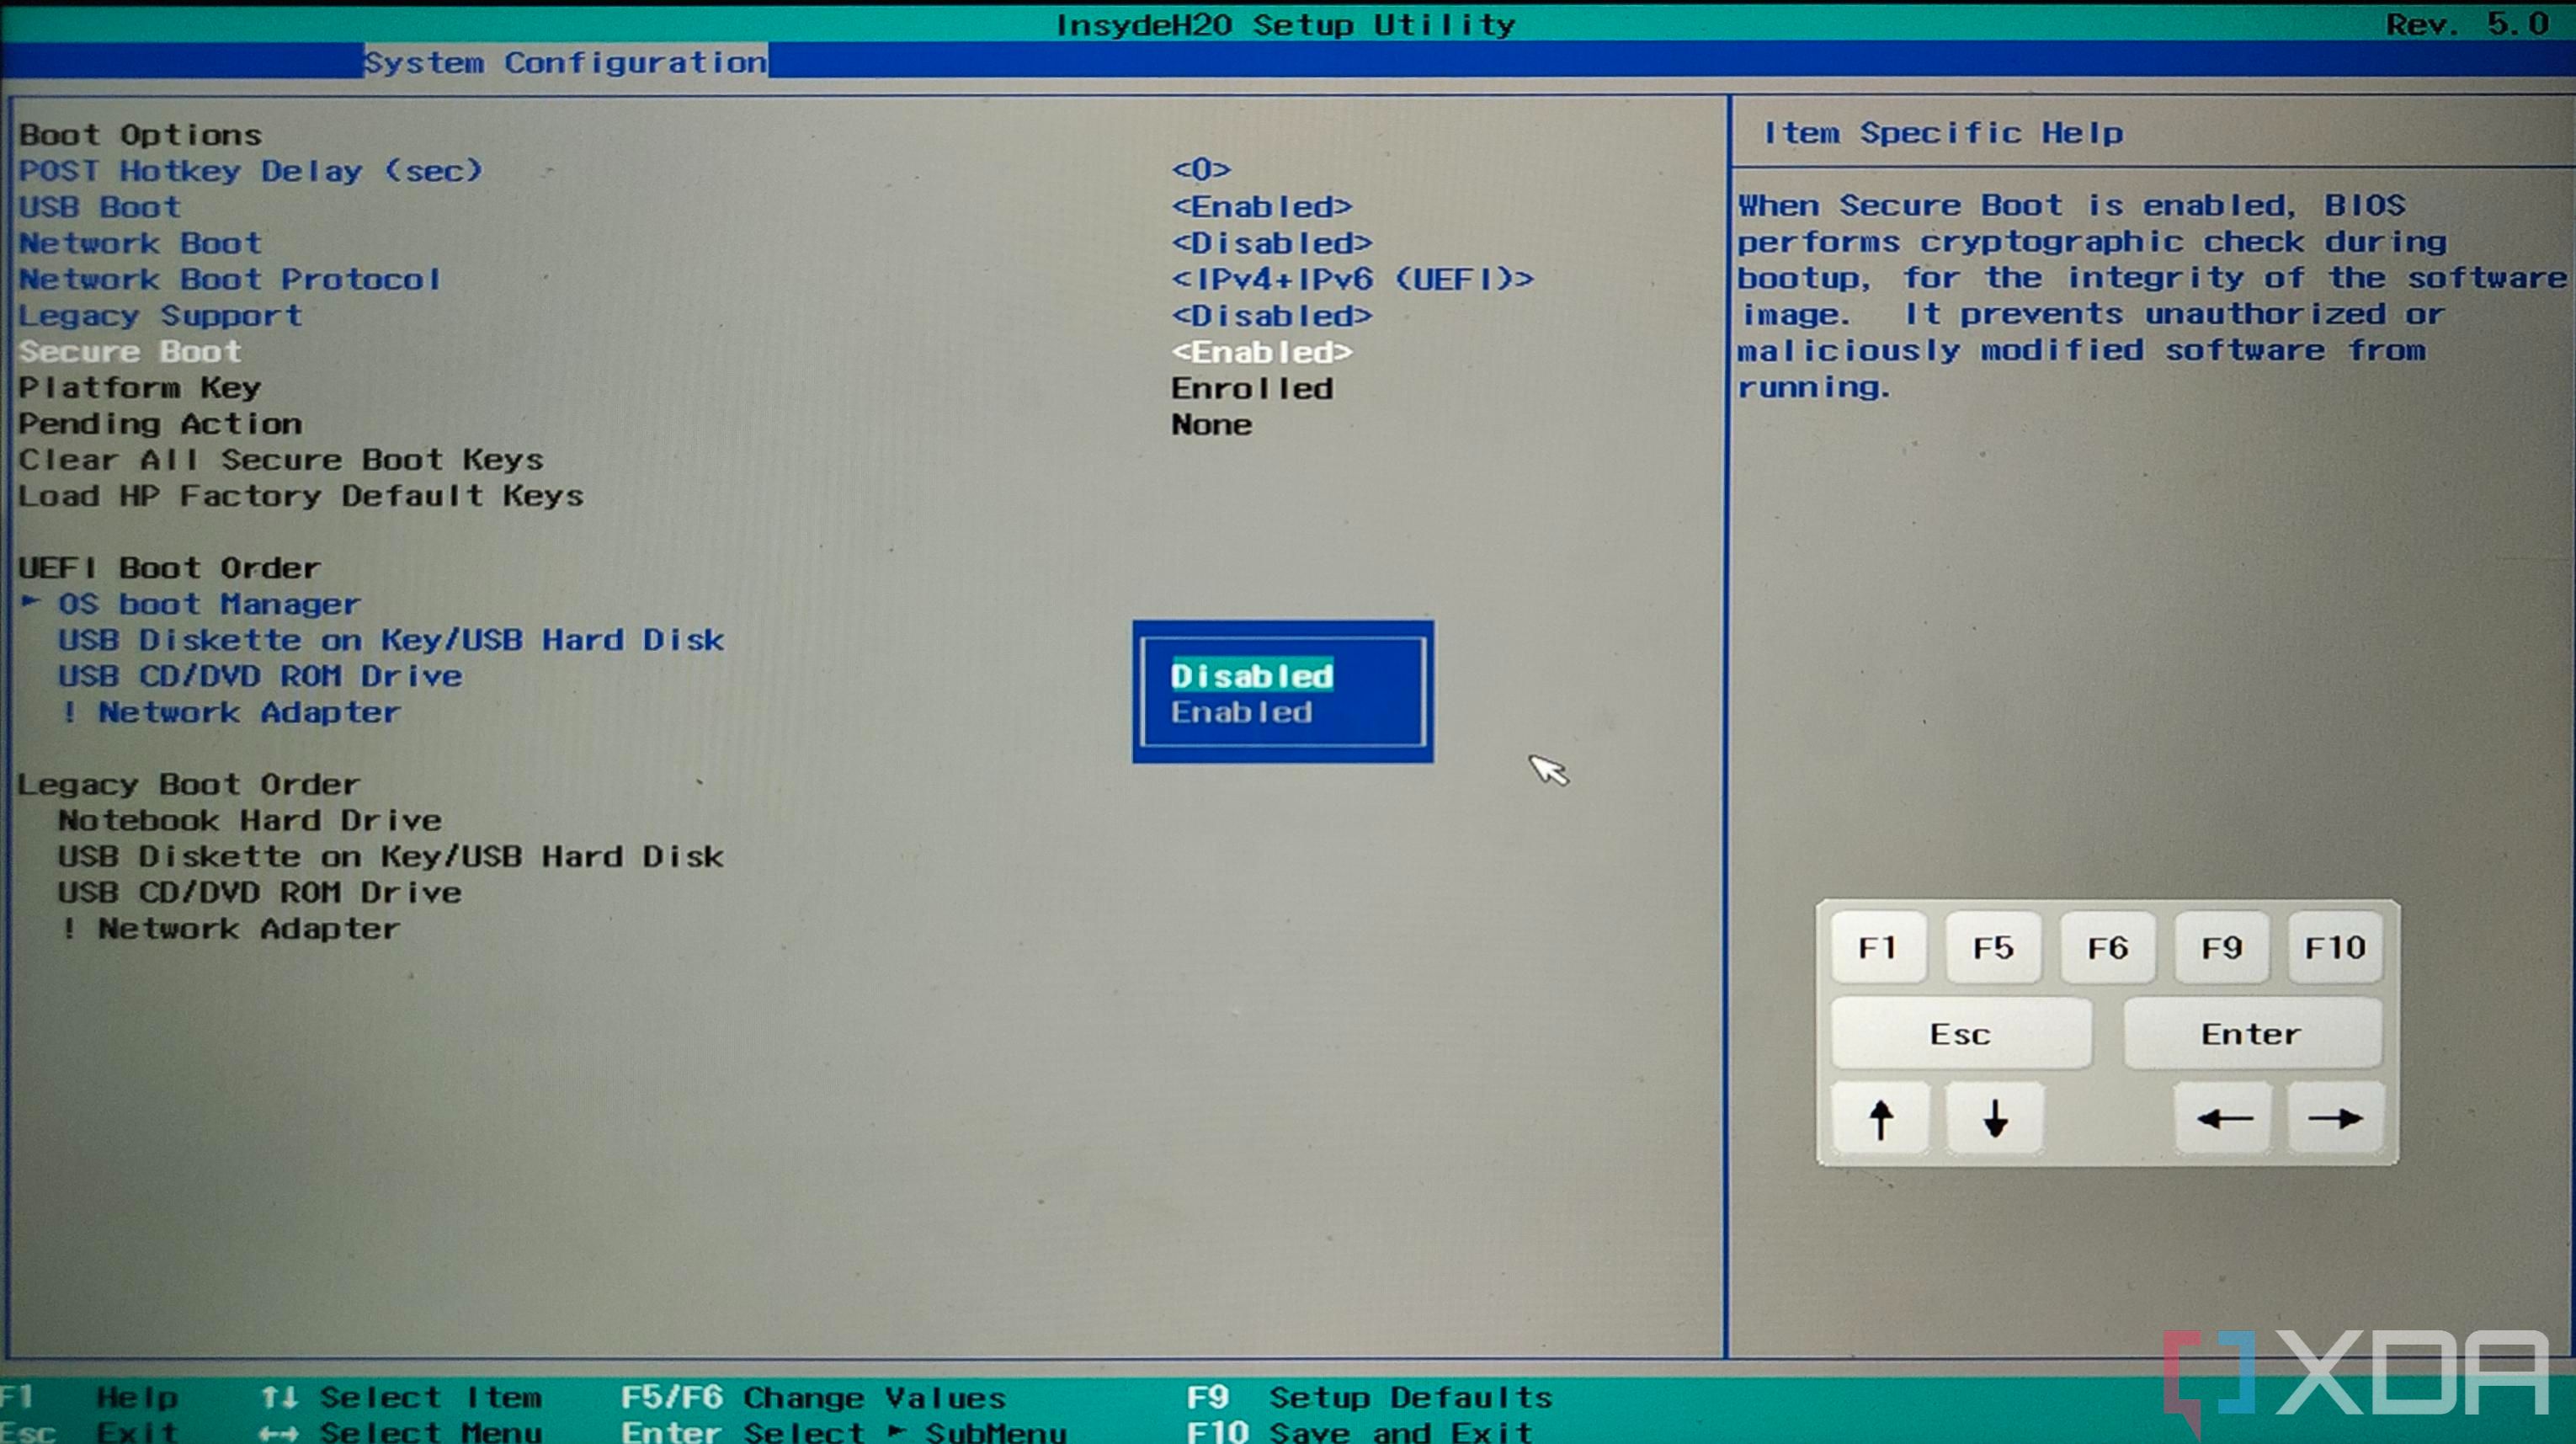
One thing that’s worth keeping in mind before starting this process is that in some cases, your PC may have TPM or Secure Boot support (another Windows 11 requirement), but it’s disabled in the BIOS. A good starting point is to head into your computer’s BIOS, which you can do by pressing Esc, F1, F12, or another key on your keyboard. It varies by device, so you may need to look up the specific key that opens the BIOS or boot options menu on your computer.
You’ll usually find settings related to Secure Boot and TPM in the Security section of your BIOS, so take a look there and make sure those features are enabled. If you don’t find them, they might not be supported, which is where this guide comes in.
Also, bear in mind that if you install Windows 11 on an unsupported PC, you may not be able to get future updates. Security updates shouldn’t be much of a problem, but you may end up needing to repeat this process if Microsoft releases a big update, like Windows 11 version 22H2 was. Additionally, some unsupported hardware has a good reason to not be supported. Performance and stability may not be the best on some older PCs.
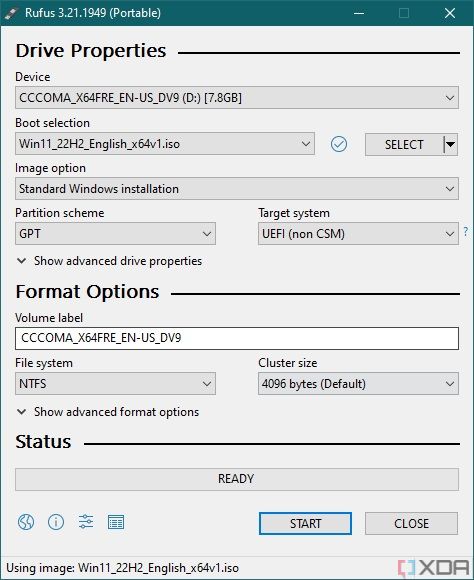
Using Rufus to create a custom ISO
Rufus is a very useful tool for creating bootable installation drives for Windows and other operating systems. It’s been around for a long time, and with Windows 11, the developer actually added some features to make it easier to install the new OS on unsupported machines. For this, you’ll need a USB flash drive with nothing on it (or data you don’t care about losing), but otherwise, this is easily the best method for anyone to use. If the USB drive has important data, be sure to create a backup before you start.
Here’s what you need to do to get this working:
- Start by downloading an ISO file for Windows 11 on this page. The option to download an ISO is the third one, but you can also create an ISO using the Media Creation Tool on this page.
- Download the latest version of Rufus from the official website. It comes in both installable and portable versions, and you can use whatever you prefer.
- Plug in the USB flash drive you’re going to use as installation media. It’s optional, but we’d recommend unplugging any other drives so you don’t risk erasing them by accident.
- Launch Rufus, and pay attention to the options you’ll see here. Start by choosing the right flash drive under Device near the top.
- Under Boot selection click the Select button and look for the ISO file you downloaded. A few default settings will be applied, and you shouldn’t need to change them. You can change the name of the drive if you want it to be easier to identify, though.

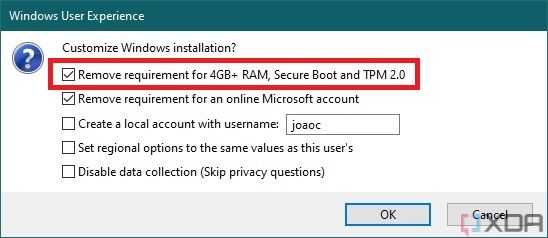
- Click Start at bottom of the window.
- You’ll see a prompt with a series of options, but the only one you need is at the top. This will disable all the compatibility checks for Secure Boot, TPM, specific CPUs, and even RAM (though we still wouldn’t recommend installing Windows 11 if you don’t meet the RAM requirements). It should be enabled by default, but if it isn’t make sure to enable it.

- Click OK and Rufus will start moving the Windows 11 installation files to the flash drive. This process can take a while, especially if you have a slower USB port.
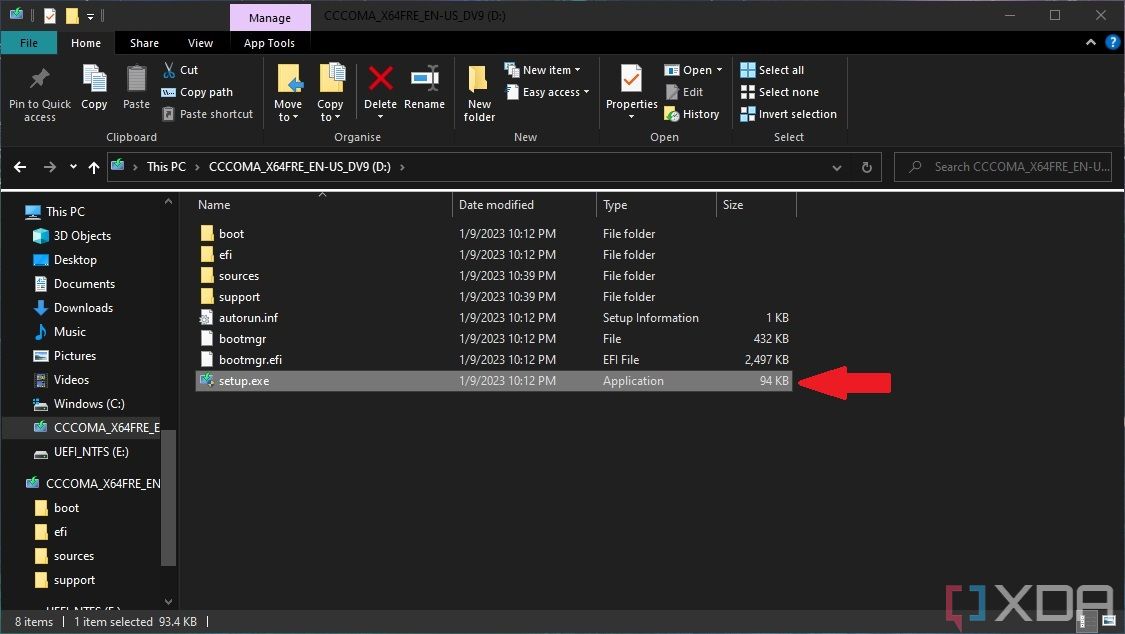
- When the process is finished, you’ll have a USB flash drive that you can use to install Windows 11 on almost any PC that doesn’t meet the requirements. Open the USB drive and launch the setup file to begin the installation.
Alternatively, you can use the USB drive as a boot device if you want to perform a clean install. For that, check out our guide on how to install Windows 11 where we explore that specific path.

- Follow the installation process as normal. Click Accept when you see the Windows 11 license terms, and then Install when you see the summary screen for the installation options. Windows 11 will begin installing.
Once it finishes installing, you may see some additional configuration steps, but after that, you’ll be on the Windows 11 desktop. You’re ready to use Windows 11 as you would on an officially supported PC. But you’ll have to keep in mind that some of these requirements exist for a reason, so some older hardware may experience poor performance or stability.
Bypassing requirements with the Registry Editor
One way you can try to bypass the system requirements for Windows 11 is to modify some registry values on your PC using the Registry Editor. Using the Registry Editor isn’t something we recommend inexperienced users do, but if you know how to get around and you follow the steps below, you should be able to do this without much of a problem.
This method is ideal if you have an older TPM (such as a TPM 1.2) or if the only problem you’re facing is having a supported CPU. It’s not going to work for PCs with no TPM at all or to by pass other requirements.
Either way, the first thing you’ll want to do is download an ISO for Windows 11, just like we did for the method above. Then follow these steps:
- Press Windows + R on your keyboard to open the Run dialog and type regedit, then press Enter.
- The Registry Editor should open. On the left-side pane, navigate to HKEY_LOCAL_MACHINESYSTEMSetupMoSetup.
- Right-click the empty space on the right and select New, then DWORD (32-bit) Value.
- Enter AllowUpgradesWithUnsupportedTPMOrCPU as the name and save it. Then, double-click it and set the value to 1, then click OK.
- Now, double-click the ISO file you downloaded to mount it as a virtual drive.
- The drive should automatically open after mounting it, or you can find it on the This PC page. Run the setup file inside and begin the installation.
- If your only hurdle was CPU compatibility or having an older TPM, the installation should now proceed as normal.
If that still doesn’t work, it may be because your PC has no TPM whatsoever, which may be the case for many custom-built PCs, for example.
Install Windows 11 with launch parameters
There’s one last trick you can try if you don’t have a USB drive and you’re running into other issues. This one can be a bit risky for an upgrade due to potential compatibility and driver issues, however. We would definitely steer less experienced users toward the Rufus solution at the top.
This trick involves running the Windows 11 installer as if it were a Windows Server installer, which bypasses the compatibility checks that would usually prevent you from installing Windows 11. It can cause compatibility issues with some drivers and other settings if you’re upgrading an existing PC, but there are ways to make it safer. This method was first shared by AveYo on GitHub. Here is what you need to do:
- Download a Windows 11 ISO, just as we did for the methods above.
- Double-click and mount the ISO as a virtual drive, and the new drive should open automatically. Take note of the drive letter in the address bar. In our case, it’s E:, but it may vary.

- Open a Command Prompt window. You can do this by searching for cmd in the Start menu and pressing Enter.
- Enter the following text, replacing E: with the correct drive letter for your specific case.
E:setup.exe /Product Server /Compat IgnoreWarning /MigrateDrivers All
- The setup should launch, labeled as a Windows Server installer.
- Click through the process as you normally would, and Windows 11 will begin installing.
If you followed all of these steps, you should soon have your computer running Windows 11 without any problems.
Conclusion
There are many reasons why Windows 11 may not run on your specific PC, but this workaround with Rufus is currently the best way to fix all of them. There are some things you can’t work around, but most of the big new requirements for Windows 11 can be bypassed this way. It does require a USB drive, which not everyone will have, but it’s worth it for the ease of use and the low level of risk. If you really don’t want to get a USB drive, the other solutions should also help you.
Of course, the best way to get Windows 11 is probably to buy a new PC that supports it. We have a list of PCs that support Windows 11, but any Windows laptop you can buy today should ship with Windows 11, or at least support it. You can always check out our round-up of the best laptops available right now if you’re looking for recommendations.