Несколько лет назад, после долгого ожидания, была выпущена Windows 8. Реакции были разные на кардинально переработанный внешний вид windows. Независимо от вашего личного мнения, каждый может согласиться, что новая ОС от Microsoft доминирует на долгие годы. Windows 8 получив огромное количества внимания, компания откинула на обочина очень много функций, которые только сейчас в Windows 10 начинают реализоваться. Одним из таких новшеств стала Windows To Go (WTG).
Что такое Windows To Go?
Windows To Go позволяет установить полностью функциональную среду Windows 10/8. Операционная система установленная на внешний жесткий диск или USB-флешку, по примеру ранее создаваемых Live CD. Загрузочная флешка Windows To Go, делает портативную систему по аналогии Linux, который предназначен для запуска с USB дисков или флешек. С WIndows To Go вы можете запустить вашу систему на любом компьютере и в любой точке мира.
Эта функция ориентирована в первую очередь на корпоративных клиентов с идеей, что корпоративная среда может быть взята где угодно. WTG обеспечивает защищенную среду, полного программного обеспечения, когда сотрудник работает удаленно или с общего компьютера. Поскольку Windows To Go была разработана с учетом этого особого использования, Microsoft официально не поддерживает использование НЕ корпоративных версий Windows в среде WTG. Как говорится не поддерживает и это не означает, что это невозможно.
Существует несколько способов установить в USB флешку любую версию Windows 10/8. Просто надо знать, что там сообщается, какие ограничения. Некоторые ограничения включают в себя отсутствие защиты BitLocker, нет доступа к магазину, и невозможность загрузки BIOS и на компьютерах с UEFI.
Различия между Windows To Go и обычной установкой Windows
Windows To Go предназначен для любой работы, как и в обычных версиях Виндовс. Майкрософт отключила ряд функций:
- Внутренние диски работают в автономном режиме (не подключены к сети), чтобы данные случайно небыли раскрыты.
- Модуль доверенной платформы (TPM) не используется. Это связано с тем, что TPM привязан к определенному компьютеру, а диски Windows To Go предназначены для перемещения между компьютерами.
- Гибернация отключена по умолчанию, чтобы сделать простоту для перемещения между компьютерами.
- Среда восстановления Windows недоступна. Если вам нужно восстановить диск с Windows To Go, Microsoft предложит вам перезаписать его на новый.
- Обновление или перезагрузка рабочего пространства Windows для Go не поддерживается. Сброс настроек производителя для компьютеров не применяется при запуске WTG.
- Windows 8 или Windows 8.1 WTG-диски не могут быть обновлены до Windows 10, а также не могут быть обновлены диски Windows 10 WTG до будущих версий Windows 10. Следовательно, для новых версий диск нужно отформатировать.
Кроме того, диски Windows to Go можно загружать на несколько компьютеров. Поэтому, когда диск WTG загружается первым, он обнаруживает все аппаратные средства на главном компьютере. Затем он установит все необходимые драйверы, которые могут потребовать нескольких перезагрузок. Впоследствии, когда Windows to Go USB загружается на этом хост-компьютере, он сможет идентифицировать этот компьютер и автоматически загрузить правильные драйверы.
Требование к компьютеру
Windows to Go будет работать на оборудовании, которое было сертифицировано для использования с Windows 7 или новее. Если вы хотите убедиться, прежде чем начать использование, то вот некоторые характеристики:
- Должна быть возможность загрузки с USB.
- Минимальный 1 ГГц процессор.
- Минимум 2 ГБ ОЗУ.
- Убедитесь, что архитектура образа Windows совместима с процессором. Это означает, что вы не сможете запустить 64-разрядную версию Windows для перехода на 32-разрядный процессор.
- Windows to go с компьютера под управлением Windows RT не поддерживается.
- Windows to go для перехода на Mac не поддерживается.
USB-флешка для Windows to go
Теоретически, любой USB 2.0 или 3.0 диск с 16 ГБ дискового пространства будет работать с Windows для Go, но:
- При этом USB 3.0 будет работать вдвое быстрее, что позволит ускорить копирования файлов и быстродействие.
- Лучше использовать флешку не менее 32 Гб для хранения большего количества файлов и информации.
- Избегайте дешевых USB-накопителей из-за большого количества циклов чтения / записи во время нормальной работы Windows.
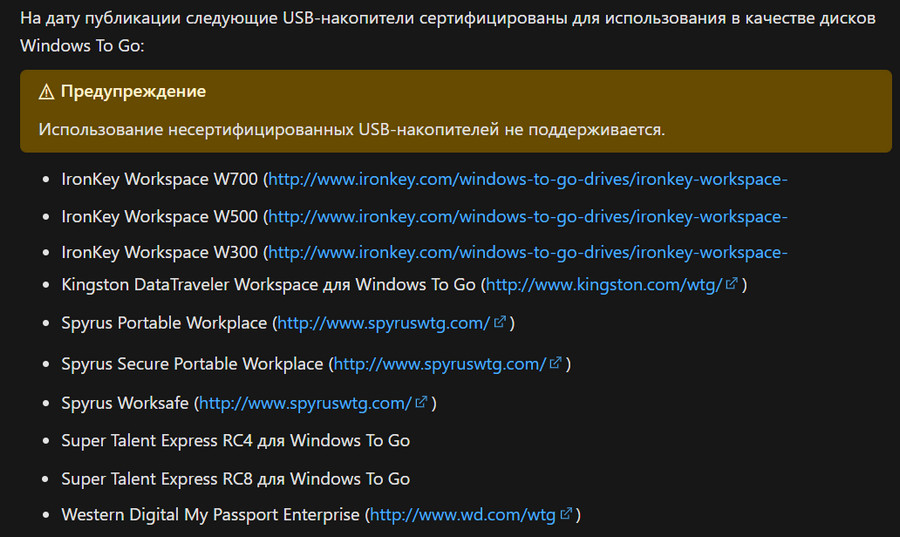
- Microsoft выявила некоторые USB-накопители, сертифицированные WTG, в случае, если вам любопытно.
Как создать флешку Windows To Go с любыми версиями Windows
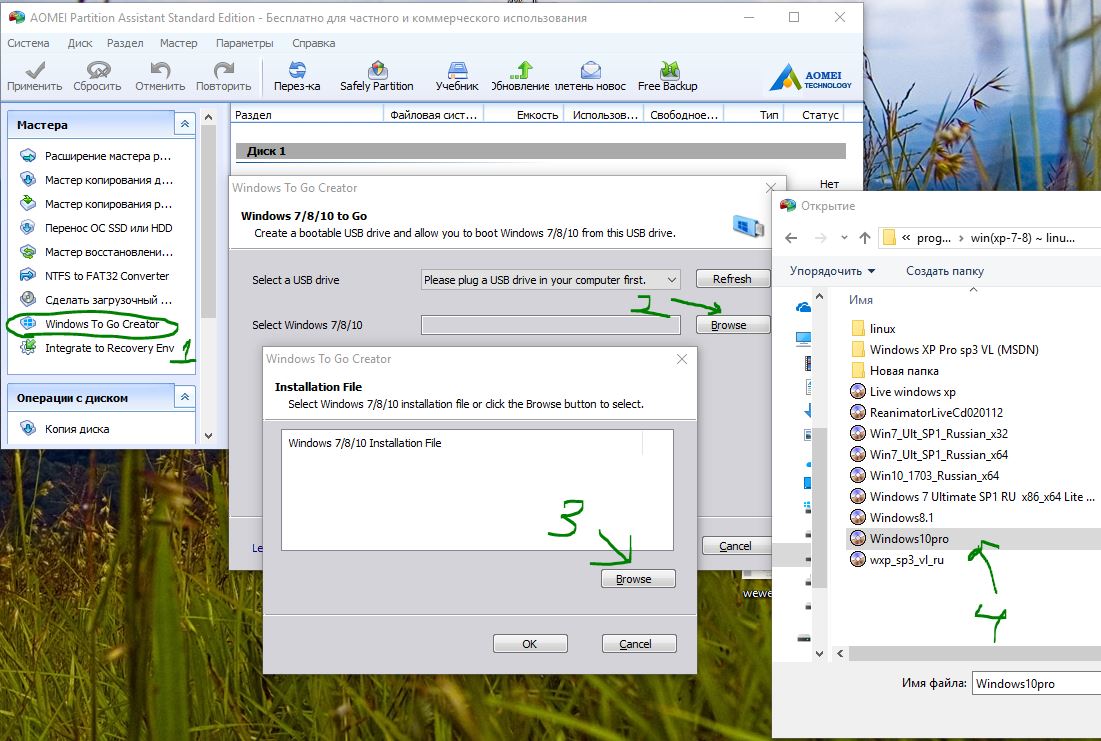
1 способ. Существует несколько способов настройки среды windows. При скачивании программ с сайтов не пугайтесь, сайты на английских языках, а скаченные программы на русском. Рассмотрим некоторые из них. Необходимо иметь флешку, сам образ виндовс 10 или виндовс 8. Скачайте приложение AOMEI Partition Assistant и установите его на компьютер. Вставьте свою флешку или внешний диск в компьютер. Запустите скаченную программу и выполните следующие шаги:

- Нажмите Windows To Go Creator.
- Нажмите Browse, чтобы выбрать iso образ windows.
- Нажмите еще раз Browse и укажите путь к вашему образу windows 10 Pro на компьютере или другой версии виндовс.
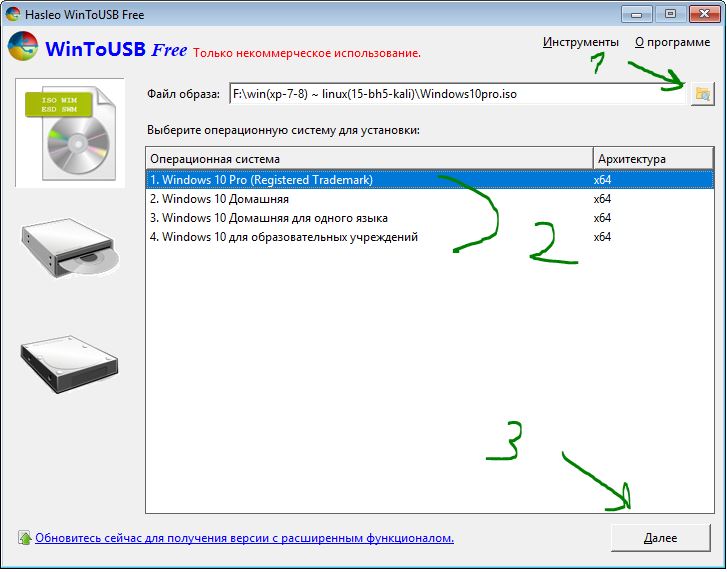
2 способ. WinToUSB — еще одна бесплатная утилита, которая имеет простой графический интерфейс. WinToUSB можно создать Windows To Go из любой версии Windows 8.х – 10 ISO. Кроме того, WinToUSB может клонировать существующую установку Windows вашего компьютера для диска WTG.
- Подключите флешку или внешний диск к компьютеру.
- Запустите установленную программу WinToUSB.
- Выберите образ любой версии Windows на вашем компьютере.
- Выберите тип операционной системы и нажмите далее.
3 способ. Rufus (V. 2.0 и выше) – можно создать Windows to go с любым выпуском Windows 10. C Руфусом почти точно так же, как создание загрузочного USB. Просто помните, что вы должны выбрать вариант «Windows To GO» вместо стандартного «загрузочные USB».

Смотрите еще:
- Загрузочная флешка для установки windows 7/8.1/10
- Как установить windows 10, 8.1, 7, хр с флешки или диска
- Как скачать windows 10, 8, 7 официально с сайта microsoft
- Как скачать ISO Windows 10 S
- Проверка плохих драйверов с Windows Driver Verifier
[ Telegram | Поддержать ]
Привет, друзья. В этой публикации рассмотрим, как сделать Windows To Go с помощью профильной программы, т.е. программы, специально предназначенной для таких дел – WinToUSB. Windows To Go – это функция в корпоративной редакции Windows 8.1 и в редакциях начиная с профессиональной Windows 10, позволяющая устанавливать операционную систему на внешние носители данных – флешки, USB-HDD, USB-SSD. При этом такая система способна загружаться на любых компьютерах, с любым отличным железом. Т.е., по сути, Windows To Go – это создание портативной Windows, по типу WinPE LiveUSB. Реализуемая в самих Windows 8.1 и 10 функция Windows To Go имеет массу ограничений, тогда как программы, предлагающие эту же функцию, более лояльны к пользователю. Одна из таких программ – WinToUSB. Давайте посмотрим, как сделать Windows To Go с помощью этой программы на примере установки или клонирования на внешний носитель Windows 10, совместимой с BIOS UEFI/Legacy.
Как сделать Windows To Go с помощью программы WinToUSB
Windows To Go и способы её создания
Итак, друзья, Windows To Go – это портативная Windows 8.1 или 10 LiveUSB, загружающаяся на любом компьютерном железе. Это такая Windows, в которую, если вы возьмёте внешний носитель с собой, в ваше отсутствие никто не залезет, никто не сломает ваш пароль, никто не будет рыться в ваших файлах. Риск быть изъятой оперативными сотрудниками у портативной Windows в разы ниже, чем у установленной на внутреннем жёстком диске, вам всего лишь нужно будет вовремя среагировать и надёжно спрятать внешний носитель. Свою портативную Windows вы можете носить всегда с собой, а попасть в неё сможете, подключив носитель к любому компьютерному устройству, способному запускаться с внешних носителей, которое у вас будет под рукой. В самой Windows эта функция рассчитана на корпоративных пользователей, в частности, на корпоративных системных администраторов.
Но у этой функции, реализуемой операционной системой, масса условностей:
-
Во-первых, чтобы установить Windows To Go на внешний носитель с использованием штатного функционала Windows 8.1 или 10, нам нужны определённые редакции. Для Windows 8.1 это Enterprise, для Windows 10 – любая начиная с Professional и выше. И, какую операционную систему и её редакцию мы используем для создания Windows To Go, такая система и установится на внешний носитель. Т.е. сделать Windows To Go из компактных базовых редакций Windows 8.1 Core и Windows 10 Home мы не сможем.
-
В-третьих, начиная с версии 2004 Windows 10 разработка Windows To Go прекращена, и эта функция удалена из операционной системы.
Вот так всё печально у компании Microsoft, так что если вы используете актуальную версию Windows 10, вы при любом раскладе не сделаете Windows To Go. Благо, тема Windows To Go подхвачена многими сторонними программами, и с их помощью вы сможете создать портативную Windows LiveUSB на внешнем носителе. Это такие программы как Rufus и AOMEI Partition Assistant – мануалы по созданию Windows To Go с их участием рассматривались на нашем сайте. Также это программы ImageX, GImageX, Dism++ и, конечно же, программа, о которой речь пойдёт ниже – WinToUSB. Сторонние программы, создающие Windows To Go, не имеют условностей Microsoft, могут создавать портативную Windows LiveUSB из разных версий и редакций системы, совместимую с режимами работы BIOS UEFI/Legacy, с использованием разных внешних носителей.
Однако и сторонние программы, создающие Windows To Go, могут быть капризны к внешним носителям, могут не принимать флешки с недостаточным объёмом, либо в принципе сами модели флешек. Но, не примет одна программа, можно попробовать с использованием другой программы. Хотя, друзья, Windows To Go, конечно же, лучше устанавливать на внешние жёсткие диски с интерфейсом подключения USB 3.0 или Thunderbolt. Если вы хотите заиметь портативную Windows на обычной флешке, пусть даже с подключением USB 3.0 – это плохая затея. Такая операционная система будет жутко тормозить, вы не сможете на ней полноценно работать. Ну а скоростные флешки USB 3.1/3.2 стоят пока что неоправданно дорого, по их цене можно купить USB-SSD на 120-250 Гб, причём интерфейс подключения у таких может быть также USB 3.1/3.2, а не только USB 2.0/3.0. На обычную флешку, друзья, лучше записать годный какой-нибудь WinPE и использовать его по мере надобности. Смотрите обзор лучших по мнению нашего сайта WinPE в статье «Аварийные LiveDisk’и на базе WinPE: обзор».
Ну и давайте уже создадим Windows To Go программой WinToUSB.
Windows To Go в программе WinToUSB
WinToUSB – одна из лучших программ для создания Windows To Go, это вообще, как видим из названия, профильная программа для установки Windows на внешние носители информации. Программа поддерживает USB- и Thunderbolt-носители, в частности, многие флешки. Может устанавливать портативные Windows 7, 8.1, 10 в любых редакциях, можете устанавливать серверные Windows начиная с Windows Server 2008 R2. Может устанавливать с установочных образов ISO, WIM, ESD, SWM, VHD, VHDX, а может клонировать используемую на внутреннем диске компьютера Windows. Может создавать Windows To Go с поддержкой только UEFI или только Legacy, а может с поддержкой UEFI/Legacy. В базовой части возможностей программа WinToUSB бесплатная, но сюда, увы, не входят возможности по созданию UEFI/Legacy совместимой Windows To Go, использование редакции Enterprise Windows 8.1 и редакций от Pro и выше Windows 10, а также серверных систем. И нельзя использовать внешние Thunderbolt-носители. Ограничения снимаются в платных редакциях программы WinToUSB, и одну из их — Professional, снимающую все ограничения, кроме возможности установки серверных Windows, можно заполучить совершенно бесплатно, подробности смотрим в статье «WinToUSB Professional: бесплатный ключ». Ну а бесплатную редакцию вы можете скачать на сайте разработчика программы —
Hasleo Software
.
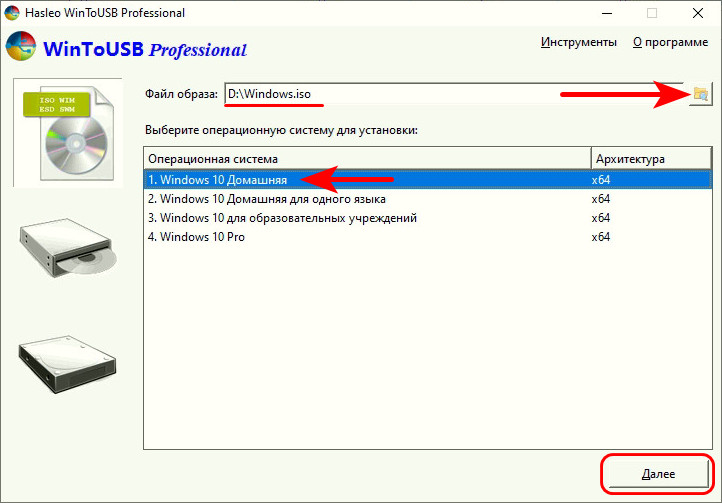
Итак, как сделать Windows To Go с помощью программы WinToUSB? Если на внешнем носителе нужна новая чистая Windows 10, в окне программы в графе «Файл образа» указываем путь к установочному образу, в нашем случае это ISO-образ. Далее выбираем редакцию системы, в нашем случае установка будет производится на флешку 32 Гб, потому выбираем самую компактную редакцию Windows 10 – Home. Жмём «Далее».
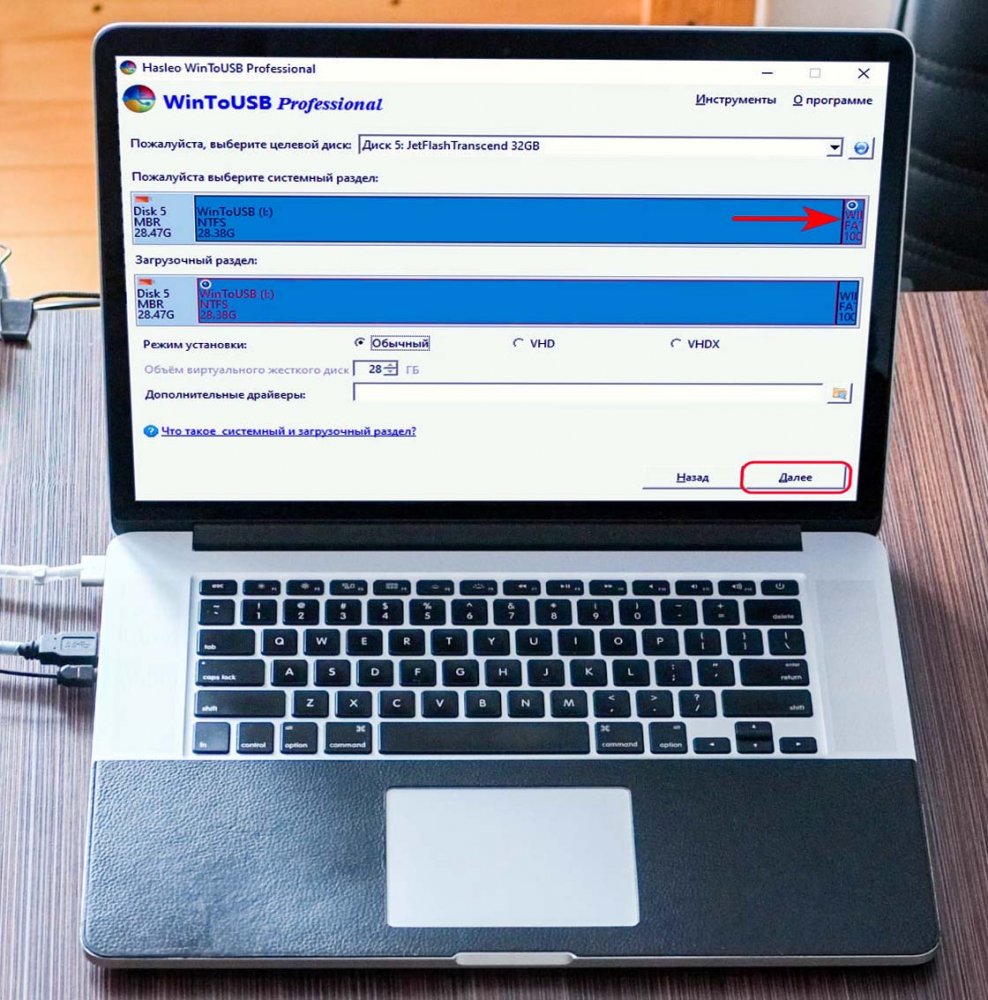
Если же хотим на внешний носитель скопировать текущую Windows, установленную на внутреннем жёстком диске, с которой сейчас и работаем, жмём последний программный раздел с системной информацией и кнопку «Next».
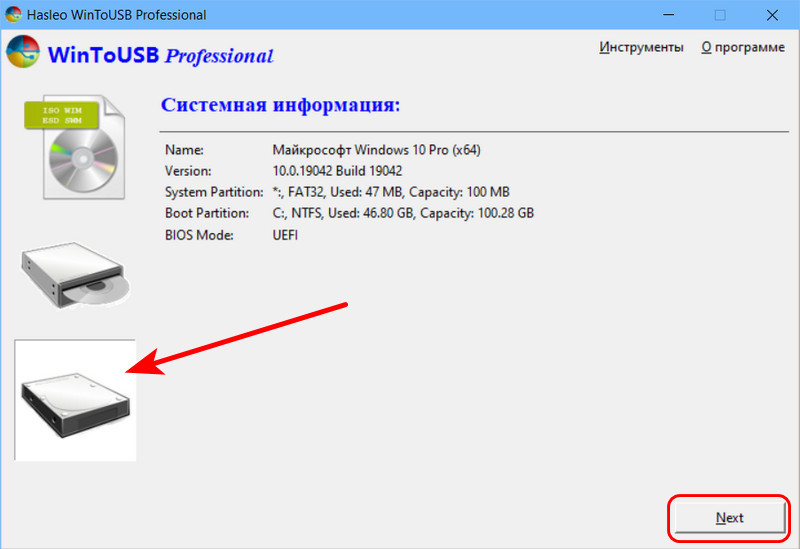
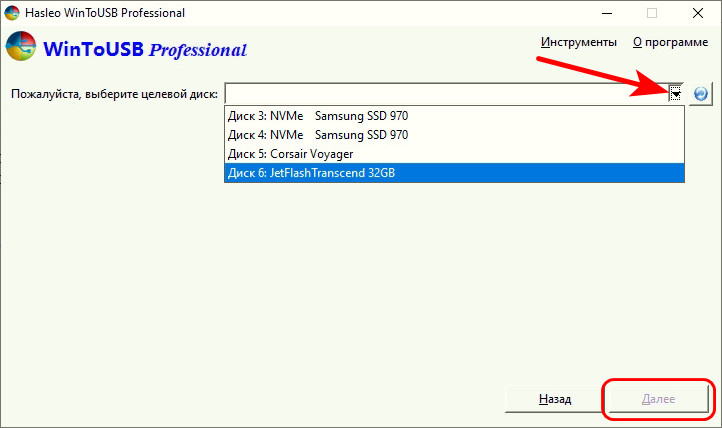
Только, друзья, прежде посмотрите, сколько ваша текущая Windows занимает места на диске С. Будет ли такое место на внешнем носителе. И неплохо будет перед копированием текущей Windows почистить её от хлама. Далее в обоих случаях действуем следующим образом. Указываем внешний носитель, на котором хотим сделать Windows To Go. Жмём «Далее».
Выбираем схему разделов «MBR для BIOS UEFI», таким образом портативная Windows будет совместима с любым режимом работы BIOS – и UEFI, и Legacy. И жмём «Да» для запуска форматирования внешнего носителя.
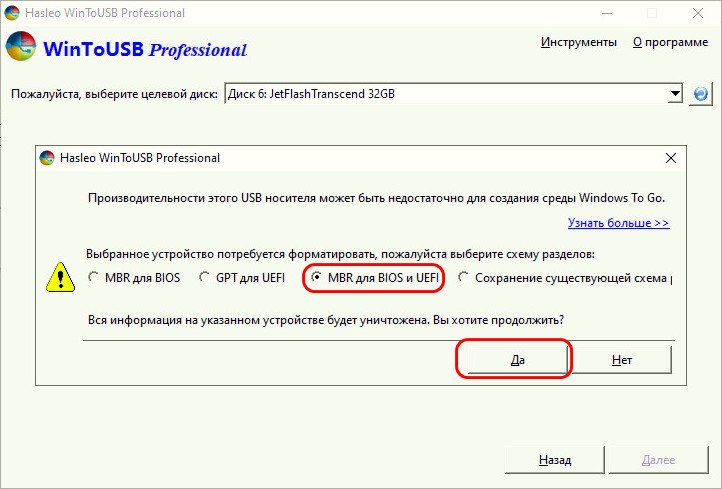
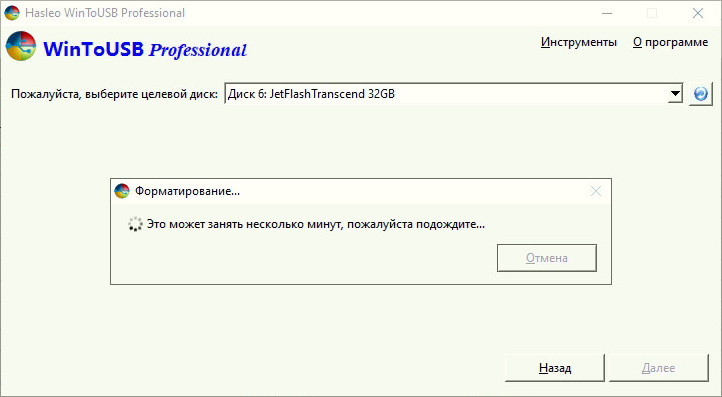
Произойдёт форматирование.
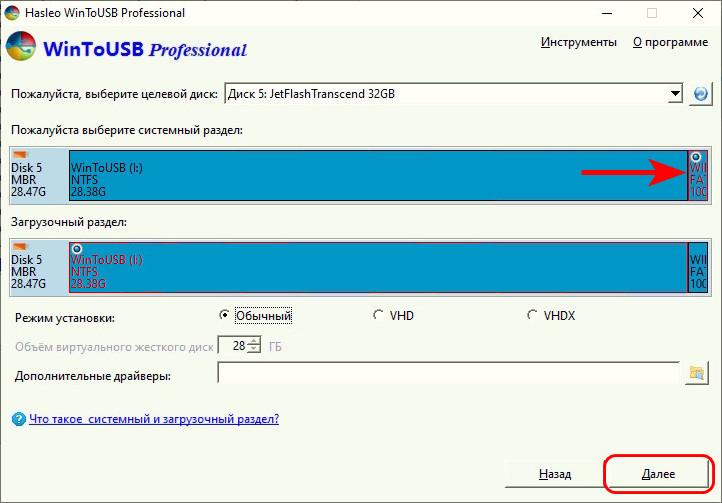
На этапе выбора разделов нам ничего выбирать не нужно, разделы Windows и её загрузчика выбраны и так. Но здесь можем видеть принцип обеспечения программой совместимости Windows To Go с UEFI/Legacy: WinToUSB при форматировании носителя создала на нём диск со стилем разметки MBR, и создала на диске раздел загрузчика на 100 Мб. Последний — это активный основной раздел, но с файловой системой не NTFS, а FAT32, благодаря чему операционная система сможет загружаться в режиме UEFI, равно как и в Legacy. Режим установки оставляем по умолчанию, жмём «Далее».
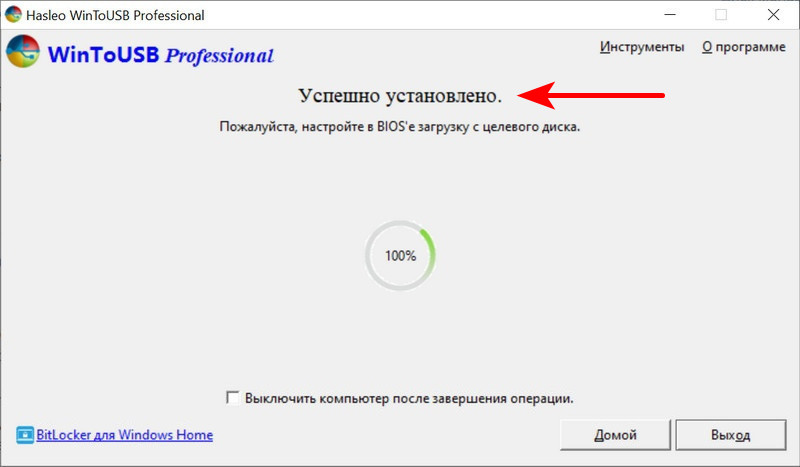
Запустится копирование файлов Windows To Go на внешний носитель. Прогресс операции сможем наблюдать в центре окна WinToUSB.
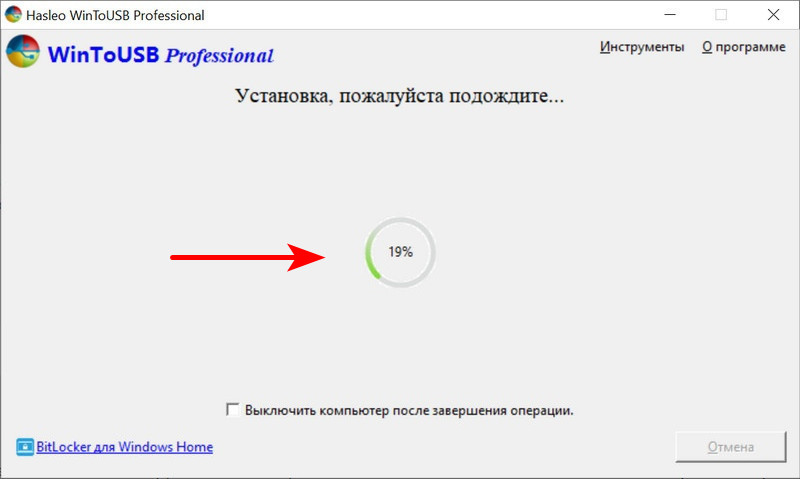
Дожидаемся полного завершения создания Windows To Go.
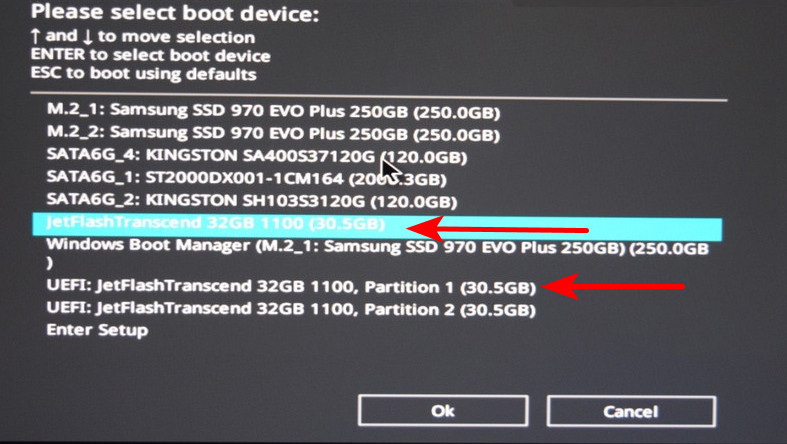
Перезагружаем компьютер, вызываем Boot-меню BIOS и запускаемся с внешнего носителя с Windows To Go. Носитель можем выбрать в любом режиме – хоть в Legacy, хоть в UEFI, значения не имеет.
Далее если мы копировали текущую Windows, просто запускаем систему. А если устанавливали новую с установочного образа, загрузившись с флешки, нам нужно пройти процесс доустановки Windows 10 – выбрать локализацию, раскладки клавиатуры, создать первую пользовательскую учётную запись и т.п.
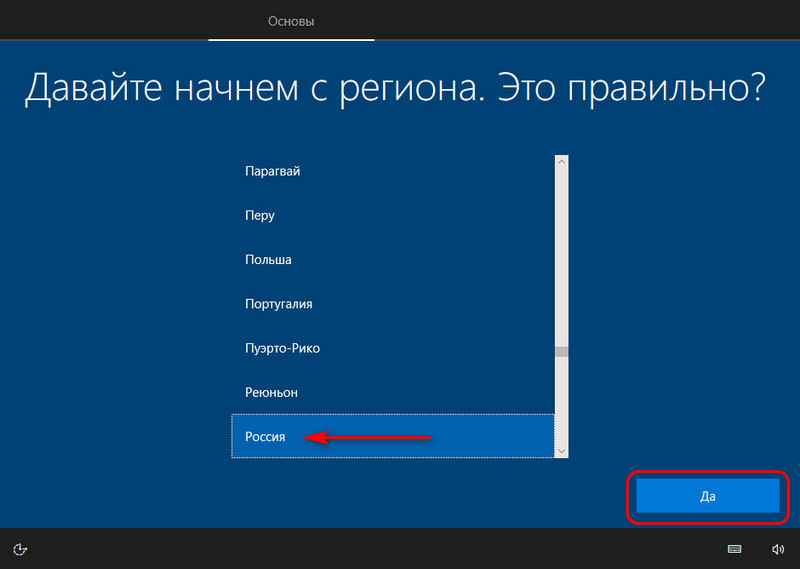
Процесс доустановки Windows 10 стандартный, такой же, как у обычной установки на внутренний диск компьютера, обо всех нюансах можете почитать в статье «Как установить Windows 10». Ну и уже как система полностью себя установит и настроит, можем ею пользоваться.
Содержание
- Подготовительные мероприятия
- Создаем диск Windows To Go
- Способ 1: Rufus
- Способ 2: AOMEI Partition Assistant
- Способ 3: ImageX
- Заключение
- Вопросы и ответы
Windows To Go — это компонент, который находится в составе Windows 8 и Windows 10. С его помощью можно запустить ОС напрямую со съемного накопителя, будь то флешка или внешний жесткий диск. Другими словами, есть возможность инсталлировать полноценную ОС Windows на носитель, и запускать любой компьютер с нее. В статье будет рассказано, как создать диск Windows To Go.
Подготовительные мероприятия
Прежде чем начинать создание флешки Windows To Go, необходимо сделать некоторые приготовления. Нужно иметь накопитель с объемом памяти не менее 13 Гб. Это может быть как флешка, так и внешний жесткий диск. Если его объем будет меньше указанного значения, велик шанс, что система попросту не запустится или будет сильно зависать при работе. Также нужно заранее загрузить на компьютер образ самой операционной системы. Напомним, что для записи Windows To Go подойдут следующие версии операционной системы:
- Windows 8;
- Windows 10.
В целом это все, что нужно подготовить перед тем, как приступать непосредственно к созданию диска.
Создается он при помощи специальных программ, имеющих соответствующую функцию. Ниже будут перечислены три представителя такого программного обеспечения, и предоставлена инструкция по созданию диска Windows To Go в них.
Способ 1: Rufus
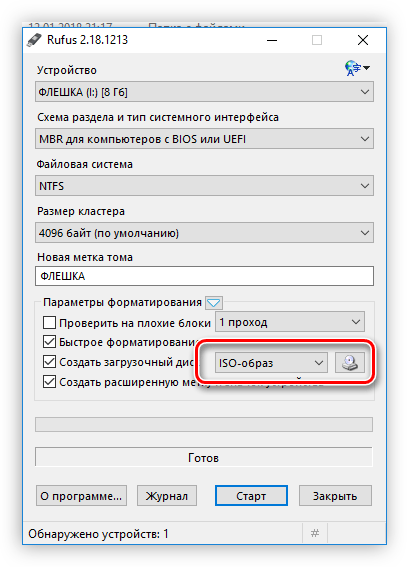
Rufus — одна из лучших программ, с помощью которой можно записать Windows To Go на флешку. Характерной особенностью является то, что она не требует установки на компьютер, то есть вам нужно скачать и запустить приложение, после чего можно сразу приступать к работе. Пользоваться им очень просто:
- Из выпадающего списка «Устройство» выберите свою флешку.
- Нажмите на иконку с изображением диска, расположенную в правой стороне окна, предварительно выбрав из выпадающего списка рядом значение «ISO-образ».
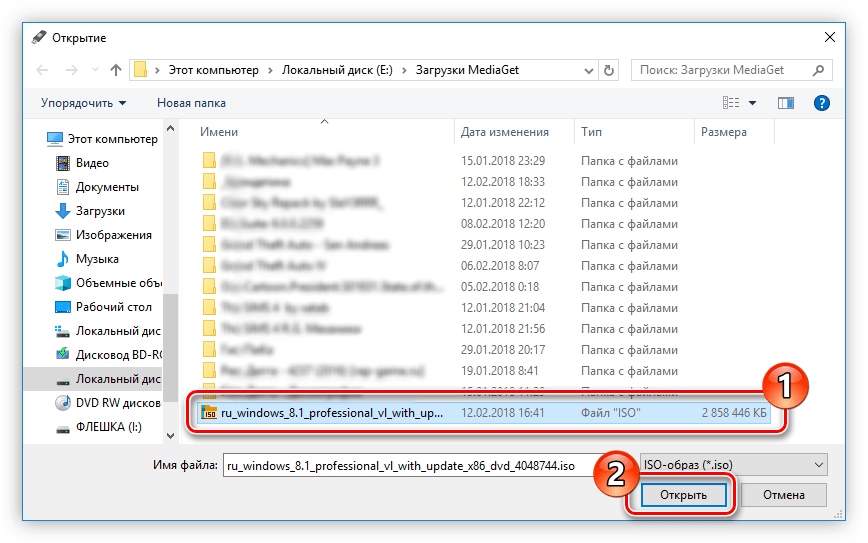
- В появившемся окне «Проводника» проложите путь к ранее загруженному образу операционной системы и нажмите «Открыть».
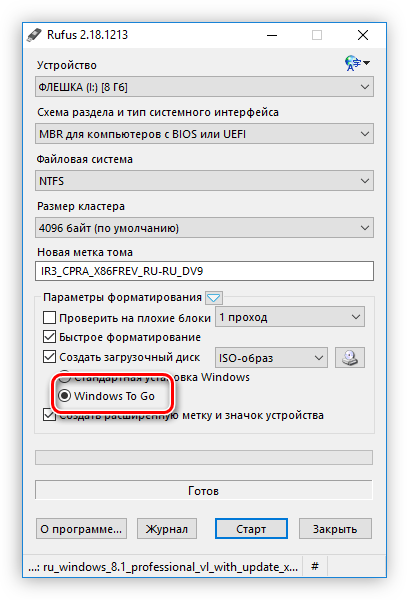
- После того как образ будет выбран, установите переключатель в области «Параметры форматирования» на пункт «Windows To Go».
- Нажмите кнопку «Старт». Остальные настройки в программе можно не изменять.

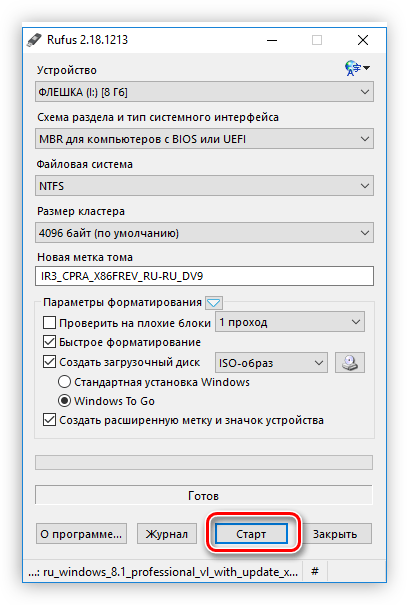
После этого появится предупреждение о том, что с накопителя будет стерта вся информация. Нажмите «ОК» и запись начнется.
Читайте также: Как пользоваться Rufus
Способ 2: AOMEI Partition Assistant
В первую очередь программа AOMEI Partition Assistant предназначена для работы с жесткими дисками, но помимо основных возможностей, с ее помощью можно создать диск Windows To Go. Делается это следующим образом:
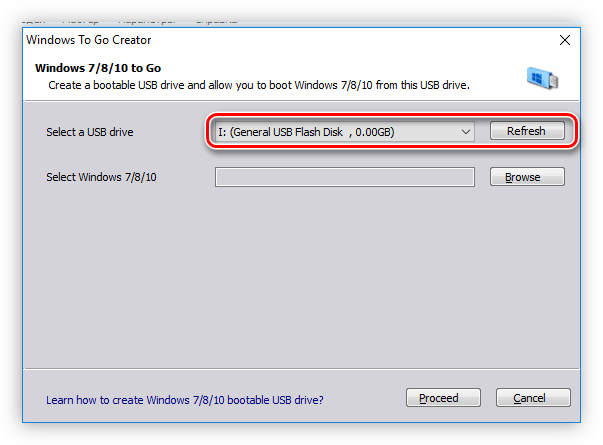
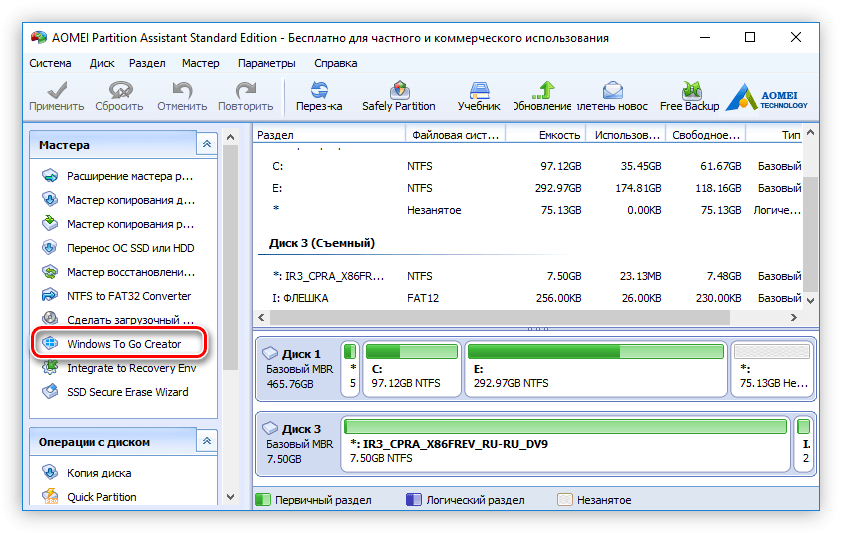
- Запустите приложение и нажмите по пункту «Windows To Go Creator», который находится на левой панели в меню «Мастера».
- В появившемся окне из выпадающего списка «Select a USB drive» выберите вашу флешку или же внешний накопитель. Если его вы вставили после открытия окна, нажмите кнопку «Refresh», чтобы список обновился.
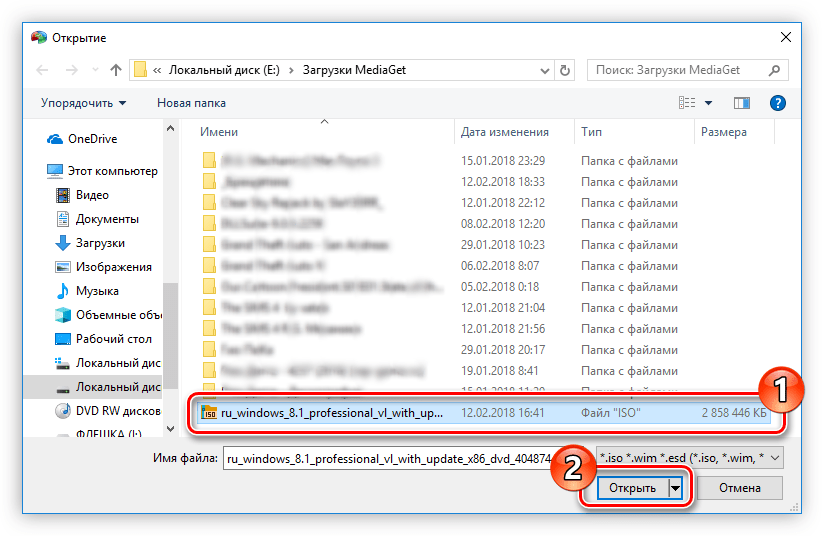
- Нажмите кнопку «Browse», после чего нажмите ее снова в открывшемся окне.
- В окне «Проводника», которое откроется после нажатия, перейдите в папку с образом Windows и дважды кликните по нему левой кнопкой мыши (ЛКМ).
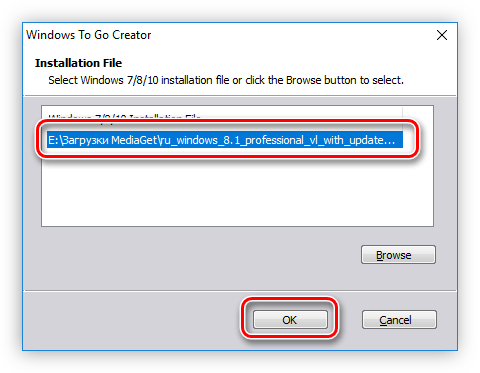
- Проверьте в соответствующем окне правильно ли проложен путь к файлу, и нажмите кнопку «ОК».
- Нажмите кнопку «Proceed», чтобы начался процесс создания диска Windows To Go.


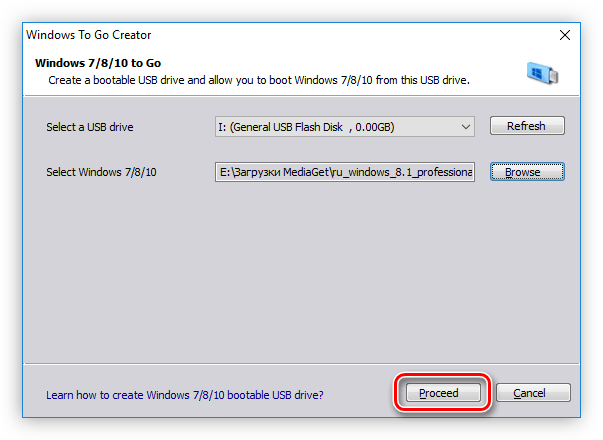
Если все действия выполнены верно, после завершения записи диска вы можете незамедлительно его использовать.
Способ 3: ImageX
С помощью этого способа создание диска Windows To Go займет ощутимо больше времени, но он в равной степени эффективен в сравнении с предыдущими программами.
Шаг 1: Загрузка ImageX
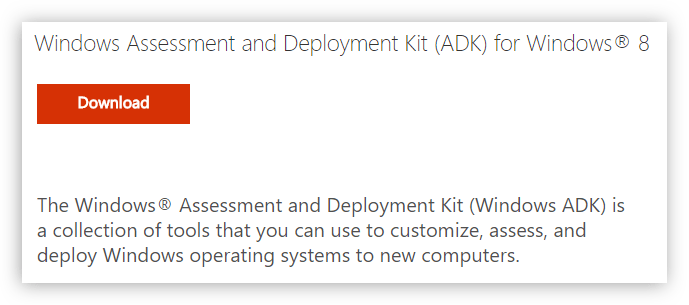
ImageX является частью пакета программного обеспечения Windows Assessment and Deployment Kit, следовательно, чтобы установить приложение на компьютер, необходимо установить этот самый пакет.
Скачать Windows Assessment and Deployment Kit с официального сайта
- Перейдите на официальную страницу загрузки пакета по ссылке, расположенной выше.
- Нажмите кнопку «Download», чтобы начать загрузку.
- Перейдите в папку с загруженным файлом и дважды кликнете по нему для запуска инсталлятора.
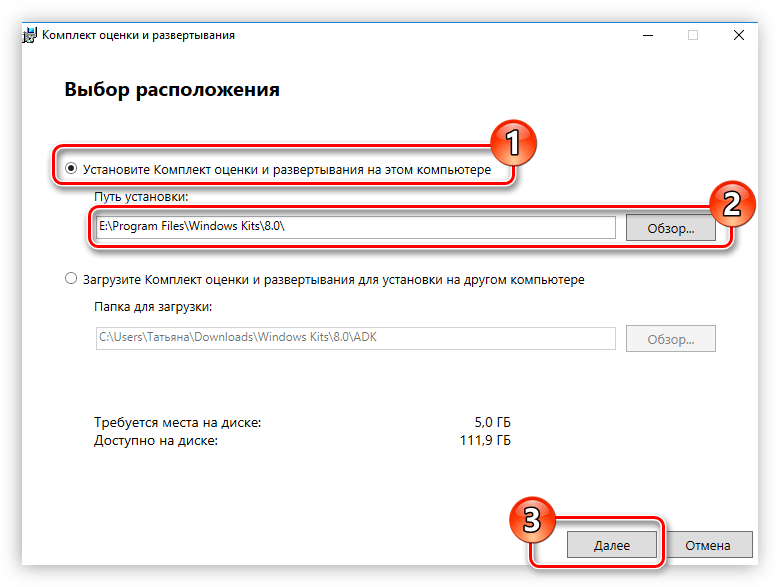
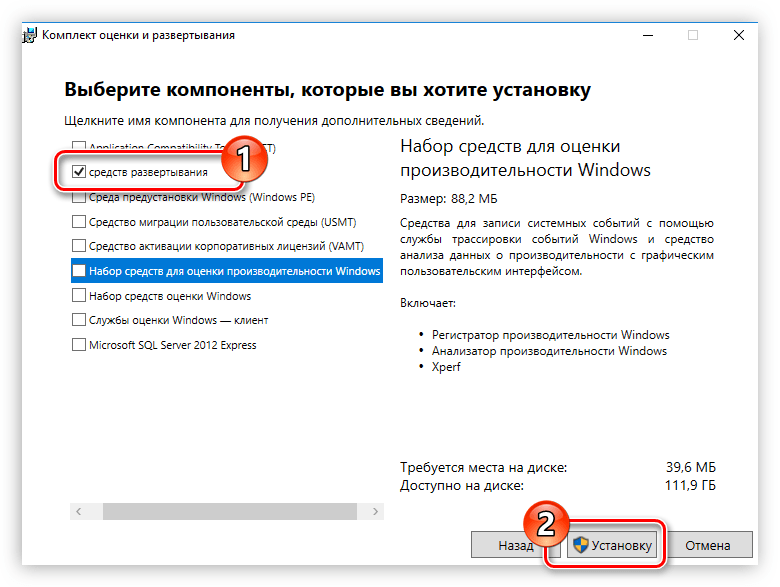
- Установите переключатель в положение «Установите Комплект оценки и развертывания на этом компьютере» и укажите папку, в которую будут установлены компоненты пакета. Сделать это можно как вручную, прописав путь в соответствующем поле, так и с помощью «Проводника», нажав кнопку «Обзор» и выбрав папку. После этого нажмите «Далее».
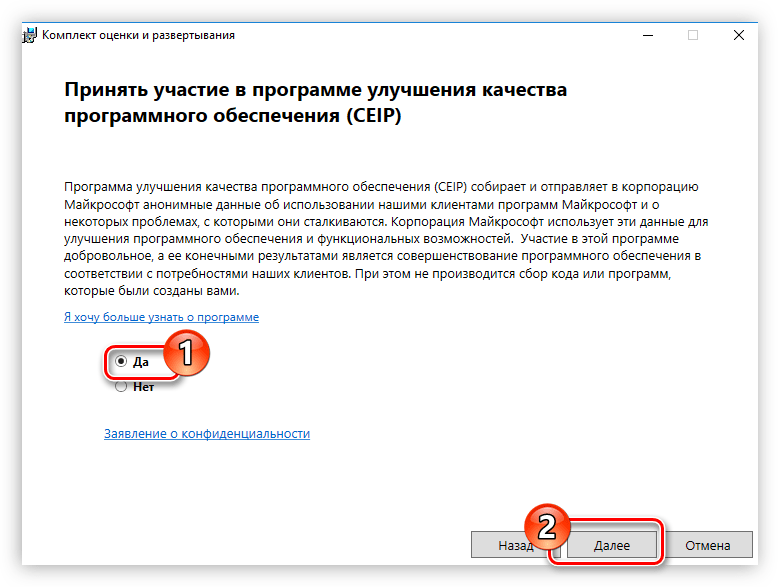
- Согласитесь или, наоборот, откажитесь принимать участие в программе улучшения качества программного обеспечения, установив переключатель в соответствующее положение и нажав кнопку «Далее». Этот выбор ни на что не повлияет, так что принимайте решение на свое усмотрение.
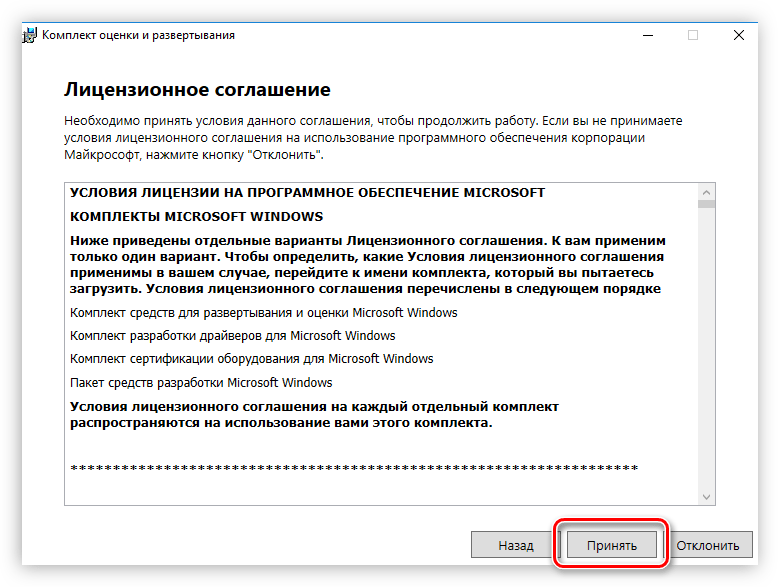
- Примите условия лицензионного соглашения, нажав кнопку «Принять».
- Установите галочку напротив пункта «средств развертывания». Именно этот компонент необходим для установки ImageX. Остальные галочки можете при желании убрать. После выбора нажмите кнопку «Установить».
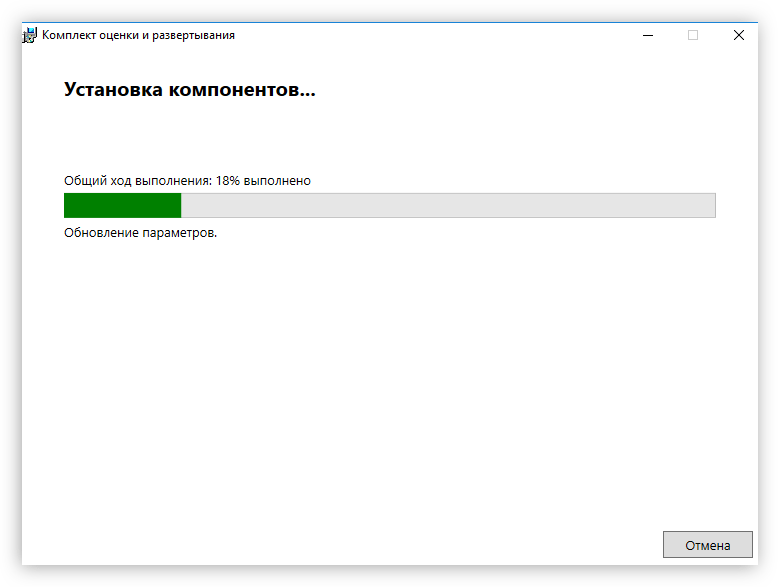
- Дождитесь окончания процесса инсталляции выбранного программного обеспечения.
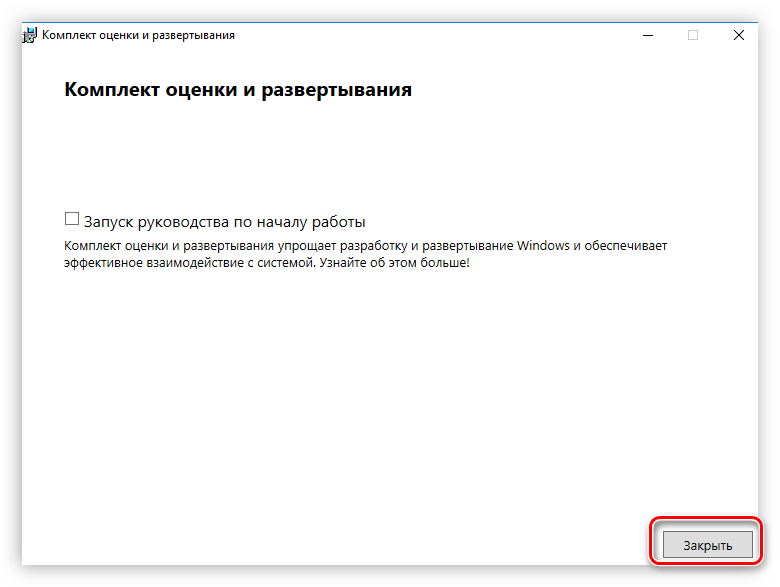
- Нажмите кнопку «Закрыть» для завершения установки.
На этом установку нужного приложения можно считать оконченной, но это лишь первый этап в создании диска Windows To Go.
Шаг 2: Установка графической оболочки для ImageX
Итак, только что было установлено приложение ImageX, но работать в нем сложно, так как отсутствует графический интерфейс. К счастью, разработчики с сайта FroCenter об этом позаботились и выпустили графическую оболочку. Скачать ее можно с их официального сайта.
Скачать GImageX с официального сайта
Загрузив ZIP-архив, извлеките из него файл FTG-ImageX.exe. Для исправной работы программы вам необходимо поместить его в папку с файлом ImageX. Если в установщике Windows Assessment and Deployment Kit на этапе выбора папки, в которую будет установлена программа, вы ничего не изменяли, то путь, куда надо переместить файл FTG-Image.exe, будет следующим:
C:Program FilesWindows Kits8.0Assessment and Deployment KitDeployment Toolsamd64DISM
Примечание: если вы пользуетесь 32-разрядной операционной системой, то вместо папки «amd64» необходимо перейти в папку «x86».
Читайте также: Как узнать разрядность системы
Шаг 3: Монтирование образа Windows
Приложение ImageX, в отличие от предыдущих, работает не с ISO-образом операционной системы, а непосредственно с файлом install.wim, в котором находятся все компоненты необходимые для записи Windows To Go. Поэтому перед его использованием нужно будет смонтировать образ в системе. Сделать это можно с помощью программы Daemon Tools Lite.
Подробнее: Как смонтировать ISO-Образ в системе
Шаг 4: Создание диска Windows To Go
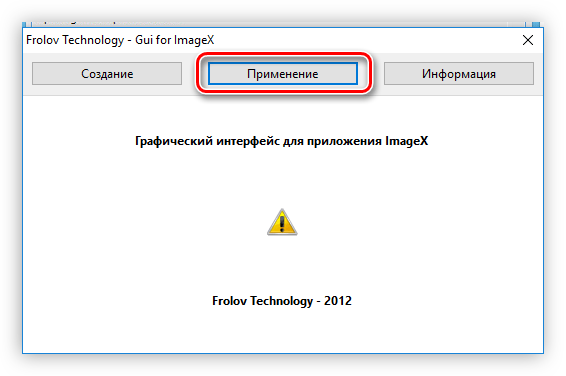
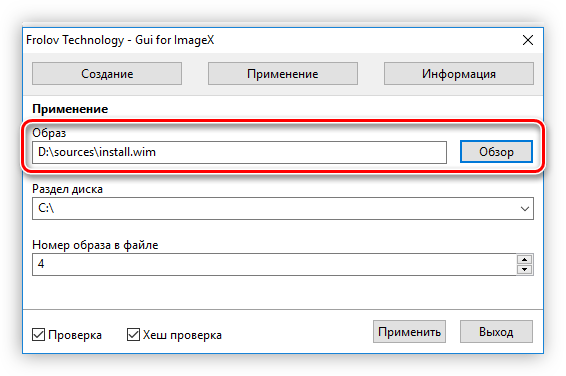
После того как образ Windows был смонтирован, можно запускать приложение FTG-ImageX.exe. Но делать это необходимо от имени администратора, для чего нажмите по приложению правой кнопкой мыши (ПКМ) и выберите одноименный пункт. После этого в открывшейся программе произведите следующие действия:
- Нажмите кнопку «Применить».
- Укажите в графе «Образ» путь к файлу install.wim, что находится на смонтированном ранее диске в папке «sources». Путь к нему будет следующий:
X:sourcesГде X — это буква смонтированного диска.
Как и в случае с установкой Windows Assessment and Deployment Kit, сделать это можно самостоятельно, вписав его с клавиатуры, или с помощью «Проводника», который открывается после нажатия кнопки «Обзор».
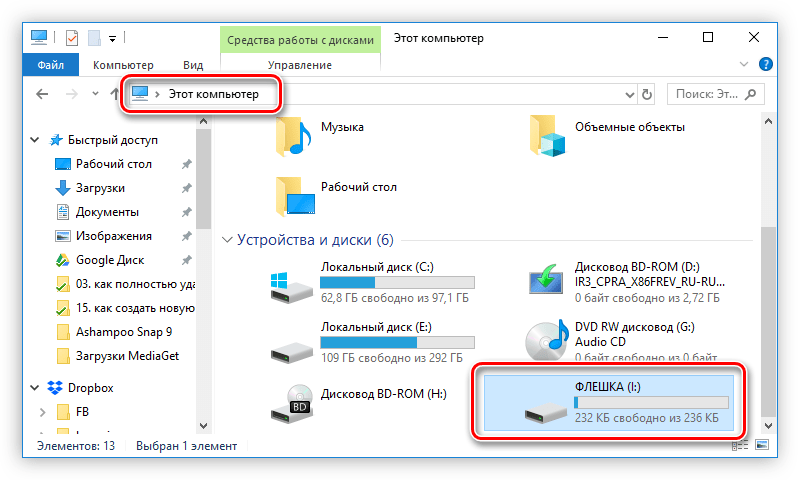
- В выпадающем списке «Раздел диска» выберите букву вашего USB-накопителя. Посмотреть ее можно в «Проводнике», открыв раздел «Этот компьютер» (или «Мой компьютер»).
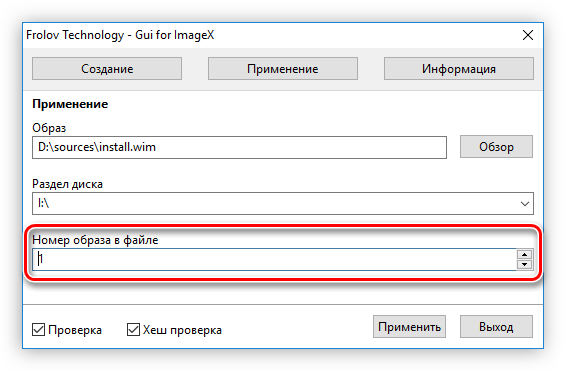
- На счетчике «Номер образа в файле» поставьте значение «1».
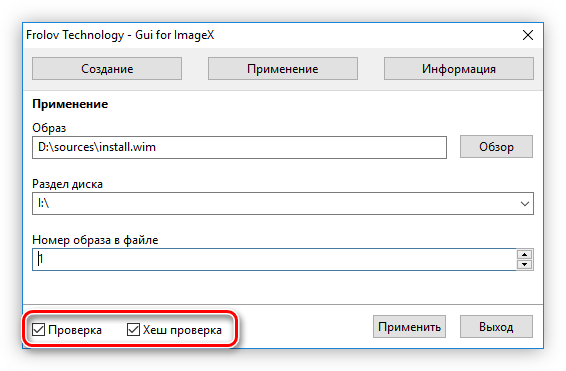
- Чтобы исключить появление ошибок при записи и использовании Windows To Go, установите галочки на пунктах «Проверка» и «Хеш проверка».
- Нажмите кнопку «Применить» для начала создания диска.
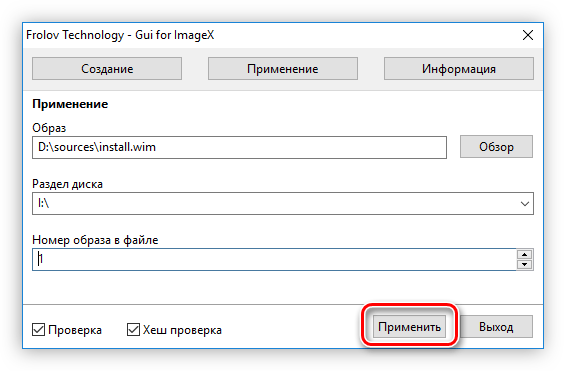
После выполнения всех действий откроется окно «Командной строки», в котором будут отображаться все процессы, выполняемые при создании диска Windows To Go. По итогу система вас уведомит сообщением об успешном окончании этой операции.
Шаг 5: Активация раздела флешки
Теперь нужно активировать раздел флешки, чтобы компьютер смог с нее запуститься. Это действие выполняется в средстве «Управление дисками», которое проще всего открыть через окно «Выполнить». Вот что нужно делать:
- Нажмите на клавиатуре Win+R.
- В появившемся окне введите «diskmgmt.msc» и нажмите «ОК».
- Откроется утилита «Управление дисками», в которой нужно нажать по разделу USB-накопителя ПКМ и в контекстном меню выбрать пункт «Сделать раздел активным».

Примечание: чтобы определить, какой из разделов принадлежит флешке, проще всего ориентироваться по объему и букве диска.
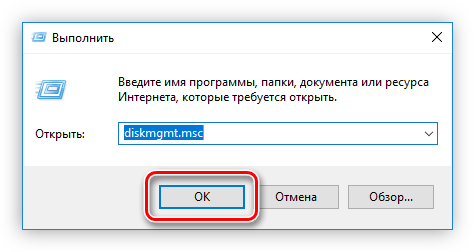
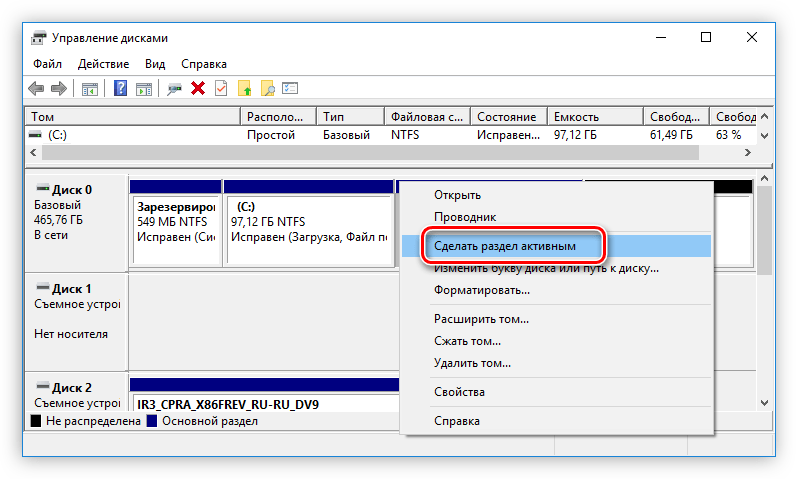
Раздел активен, можно переходить к последнему этапу создания диска Windows To Go.
Читайте также: Управление дисками в Windows
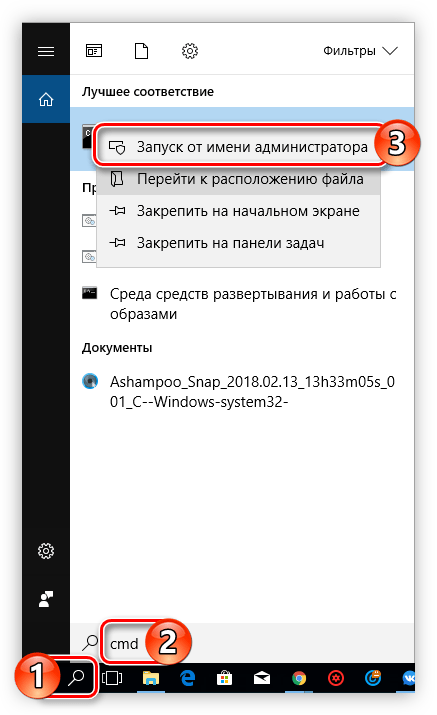
Шаг 6: Внесение изменений в загрузчик
Чтобы компьютер при запуске смог обнаружить Windows To Go на флешке, необходимо внести некоторые коррективы в системный загрузчик. Все эти действия выполняются через «Командную строку»:
- Откройте консоль от имени администратора. Для этого выполните поиск по системе с запросом «cmd», в результатах нажмите ПКМ по «Командная строка» и выберите «Запуск от имени администратора».

Подробнее: Как запустить командную строку в Windows 10, Windows 8 и Windows 7
- Перейдите, используя команду CD, в папку system32, расположенную на флешке. Для этого необходимо выполнить следующую команду:
CD /d X:Windowssystem32Где X — это буква USB-накопителя.
- Внесите изменения в системный загрузчик флешки, для этого выполните:
bcdboot.exe X:/Windows /s X: /f ALLГде X — это буква флешки.
Пример выполнения всех этих действий приведен на скриншоте ниже.
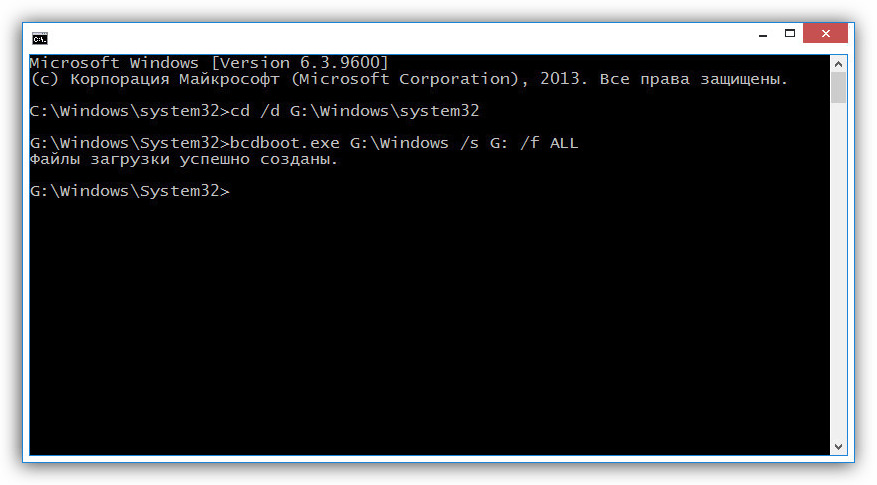
На этом создание диска Windows To Go с помощью ImageX можно считать оконченным.
Заключение
Доступно как минимум три способа создания диска Windows To Go. Первые два в большей степени подходят рядовому пользователю, так как их выполнение не такое трудоемкое и требует меньше времени. Но приложение ImageX хорошо тем, что оно работает непосредственно с самим файлом install.wim, а это положительно отражается на качестве записи образа Windows To Go.

Компания Microsoft постоянно работает над совершенствованием своих продуктов, добавляя новые функции для операционной системы. С выходом Windows 8 у юзеров появилась возможность использовать портативную версию ОС. В «десятке» опция сохранилась. Но многие до сих пор, встречая название Windows To Go, не понимают, что это в операционной системе Windows 10. На этот вопрос и постарается отметить данный материал.
Что такое Windows To Go
Windows To Go – это интерфейс, отвечающий за создание переносной Win на флешке. Таким образом, на компьютер, где вы планируете использовать ОС, не обязательно устанавливать Windows 10. Достаточно просто подключить USB-накопитель с соответствующим интерфейсом.
Среда Windows To Go ориентирована на корпоративных клиентов Microsoft, чтобы те могли использовать операционку в любой точке мира вне зависимости от устройства. И это действительно оказывается удобно, когда человек вынужден совершать частые поездки, а под рукой отсутствует ноутбук с предустановленной ОС.
Важно. Технология Windows To Go поддерживается на «десятке» для корпоративных клиентов и образовательных учреждений. В Windows 10 Home она отсутствует.
Различия между Windows To Go и обычной установкой Windows
Основная разница между стандартной и портативной версией операционной системы заключается в удобстве. Пользователю Windows To Go не нужно заморачиваться над установкой среды, а достаточно просто подключить флешку к компьютеру. Windows 10 сразу же будет готова к работе.

Одновременно с этим выделяются и другие отличия Windows To Go от обычной операционки, касающиеся функционирования ОС:
- встроенный накопитель будет работать только в автономном режиме;
- не доступен TPM;
- деактивирована гибернация;
- становится недоступной среда восстановления;
- у пользователя нет возможности обновить или откатить ОС.
Кроме того, портативную версию операционки можно устанавливать на неограниченное число компьютера. И эта особенность определенно относится к списку достоинств. Однако факторы, выделенные ранее, скорее стоит рассматривать в качестве недостатков, которые не позволяют использовать Windows 10 по максимуму.

Требование к компьютеру
Как и любая другая операционка, WTG работает только в том случае, если компьютер пользователя соответствует базовым требованиям. Для бесперебойной работы портативной версии ОС необходимо соответствие следующим параметрам:
- процессор – работающий на частоте 1 ГГц и выше;
- оперативная память – не менее 2 Гб;
- интерфейс для загрузки с USB.
Также, загружая Windows To Go на флешку, важно соотнести архитектурные особенности «железа». WTG представлена в версиях для 32-битных и 64-битных ПК. Поэтому перед началом загрузки нужно в обязательном порядке ознакомиться с характеристиками компьютера.

USB-флешка для Windows To Go
Определенные требования имеются и по отношению к флешке. Несмотря на то, что теоретически функция будет работать на любом внешнем накопителе, рекомендуется ознакомиться со списком поддерживаемых устройств, представленном на сайте Microsoft. Наконец, следует принять во внимание несколько особенностей работы WTG:
- на флешке, поддерживающей протокол USB0, операционка будет работать заметно быстрее, чем в случае с USB 2.0;
- необходимо выбирать накопитель, рассчитанный минимум на 32 Гб свободного пространства;
- не стоит использовать дешевые флешки от неизвестных производителей, поскольку разработчик ОС не сможет гарантировать работоспособность портативной среды.
Помимо выбора USB-накопителя пользователь должен позаботиться о выборе программного обеспечения для настройки WTG. В его качестве будут выступать приложения, рассмотренные ниже.
Rufus
Это не только популярная, но и очень удобная программа, позволяющая подготовить флешку к использованию WTG. Перед этим вам потребуется скачать на компьютер портативную версию ОС. Далее нужно действовать по следующему алгоритму:
- Подключите USB-накопитель к компьютеру.
- Запустите Rufus.
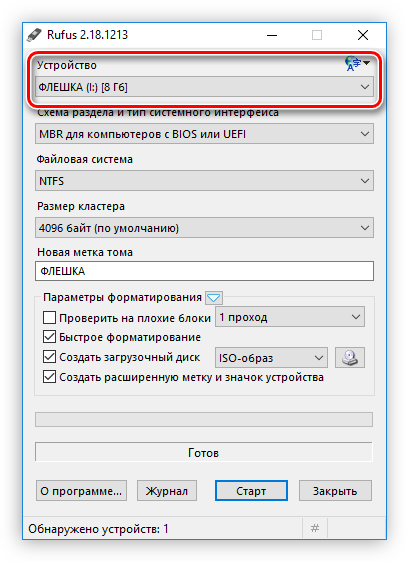
- Во вкладке «Устройство» выберите накопитель для WTG.

- Опуститесь вниз и отметьте галочками все пункты за исключением «Проверить на плохие блоки».
- Напротив пункта «Создать загрузочный диск» установите параметр «ISO-образ» и нажмите кнопку, расположенную справа.

- Укажите путь к пакету портативной ОС.
- Отметьте пункт «Windows To Go».
- Нажмите на кнопку «Старт».

Теперь остается подождать пару минут, пока закончится запись. После этого останется подключить флешку к нужному компьютеру и начать пользоваться портативной версией операционки.
AOMEI Partition Assistant
Еще одно приложение, которое потенциально может вам пригодиться. По аналогии с Rufus, перед записью необходимо скачать образ ОС на компьютер. Далее важно отдельно рассмотреть инструкцию для AOMEI Partition Assistant, так как интерфейс этой программы в значительной степени отличается от той, которую мы рассматривали ранее. Итак, действуйте следующим образом:
- После подключения флешки запустите приложение.
- Перейдите в раздел «Windows To Go Creator».
- Через пункт «Select a USB Drive» укажите путь к внешнему накопителю.

- Во вкладке «Select Windows» выберите образ системы.
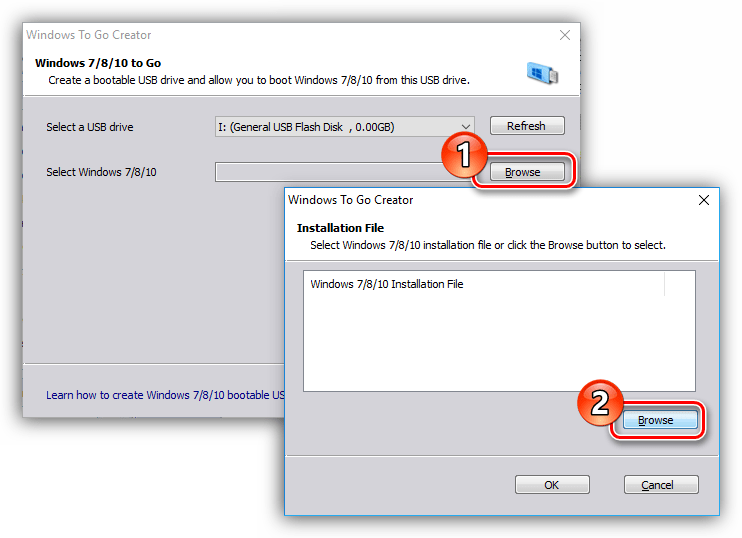
- Нажмите на кнопку «Proceed».

Таким образом, даже при отсутствии русского языка AOMEI Partition Assistant становится отличным инструментом для подготовки загрузочного диска. Алгоритм действий выглядит максимально просто, и вы вряд ли запутаетесь в процессе выполнения операции.
ImageX
Заключительная программа, о которой хотелось бы рассказать в этой подборке. Но сразу же учтите, что ImageX – не самый удобный инструмент поставленной задачи. Для начала вам придется скачать и установить на компьютер одноименное приложение.

Далее для него потребуется графическая среда. В этом качестве может выступать GImageX. Только после этого ImageX будет готов к созданию загрузочной флешки. Запустите приложение, откройте вкладку «Применение», укажите пути для USB-накопителя и образа ОС, а затем нажмите на кнопку «Применить».
Знаете ли вы, что вы можете установить Windows 11 или Windows 10 на USB-накопитель, например, на быстрый твердотельный накопитель USB или карту памяти USB? Вы хотите создать переносную установку Windows To Go? Если вы хотите иметь возможность загружать Windows 11 или Windows 10 с USB-накопителя на любом компьютере, где бы вы ни находились, читайте дальше. В этом руководстве мы покажем вам, как выполнить установку Windows 11 или Windows 10 (Windows To Go) на USB-накопитель.
Шаг 1. Загрузите ISO-файл Windows
Во-первых, вам нужен ISO-файл Windows 11 или Windows 10. Вы можете скачать их бесплатно с веб-сайта Microsoft или использовать другие инструменты, предназначенные для этой цели.
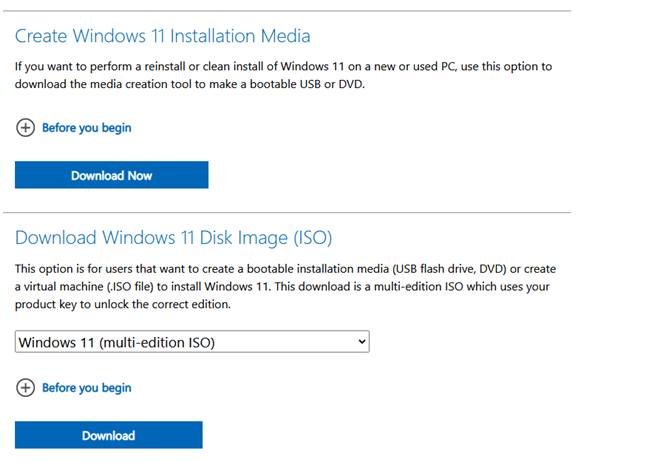
Загрузите ISO-файл Windows 11 или Windows 10.
Шаг 2. Скачайте и запустите Rufus
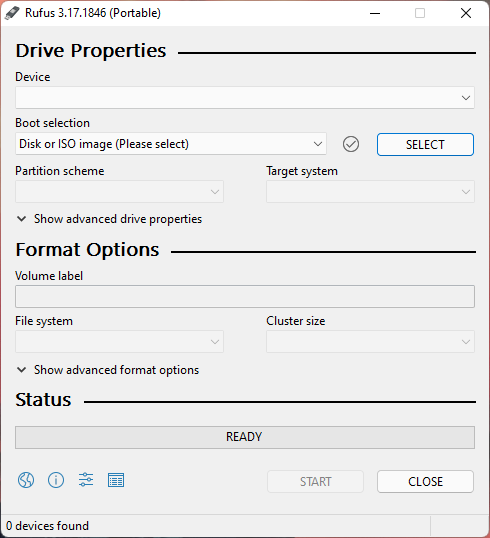
Далее вам нужно скачать Rufus. На его веб-странице найдите ссылки для скачивания и выберите последнюю версию. Обратите внимание, что вы также можете получить Rufus в виде портативного приложения, которое вы можете запустить сразу после его загрузки, без необходимости устанавливать что-либо на свой компьютер.

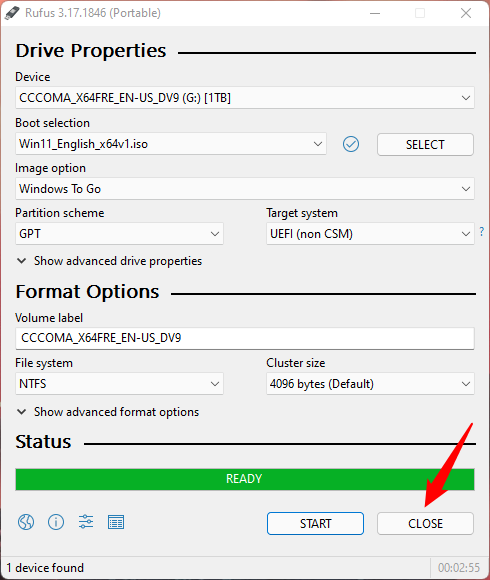
Когда вы запустите Rufus, вы должны увидеть следующее:
Теперь, когда у вас есть Rufus и ISO-файл Windows 10 или Windows 11, пришло время начать настоящую работу. Во-первых, возьмите USB-накопитель, например портативный SSD или USB-накопитель, и подключите его к компьютеру. Убедитесь, что он достаточно велик для установки Windows To Go. Мы рекомендуем использовать USB-накопитель емкостью не менее 64 ГБ.
После того, как вы подключили его к компьютеру, в окне Rufus используйте список устройств вверху, чтобы выбрать его.
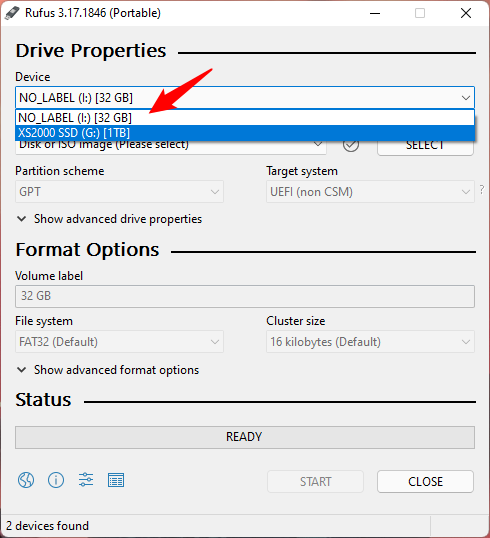
Как видно на предыдущем изображении, мы решили использовать портативный твердотельный накопитель Kingston XS2000 емкостью 1 ТБ. Это сверхбыстрый SSD-накопитель, на котором с легкостью можно запустить Windows. Когда вы загружаете Windows с него, вы не чувствуете никаких задержек.
Шаг 4. Настройте Rufus для создания USB-накопителя Windows To Go.
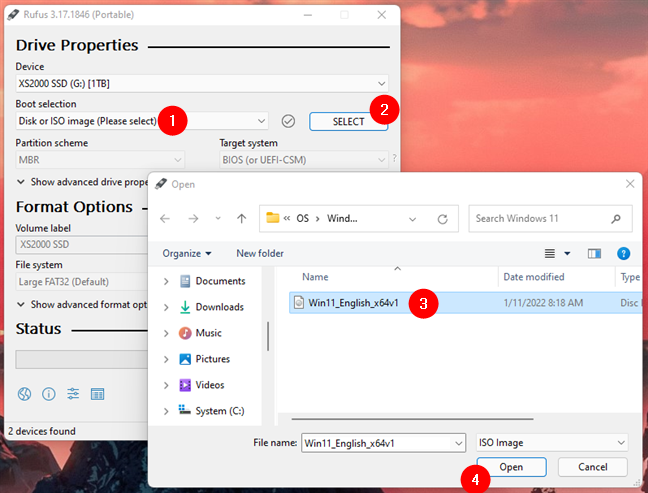
Далее необходимо настроить установку Windows To Go. Нажмите или коснитесь списка выбора загрузки из Rufus и выберите Диск или ISO-образ. Затем нажмите кнопку «Выбрать» рядом с ним и выберите ISO-файл Windows 11 или Windows 10, который вы загрузили на первом этапе этого руководства.
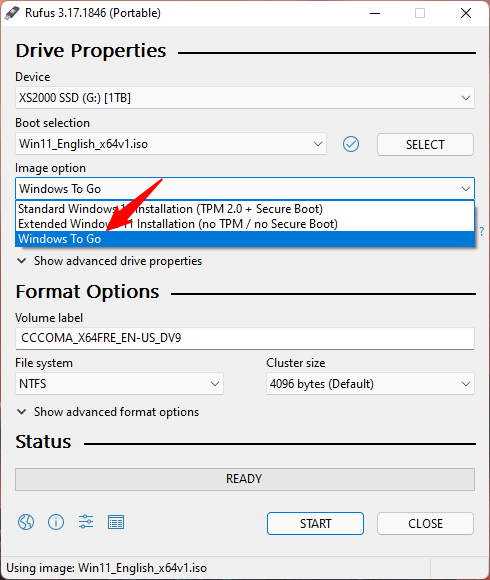
Нажмите или коснитесь списка параметров изображения от Rufus и выберите Windows To Go. В зависимости от того, выбрали ли вы ISO-файл Windows 11 или Windows 10, параметры в этом списке могут различаться. Однако Windows To Go присутствует в обоих случаях.
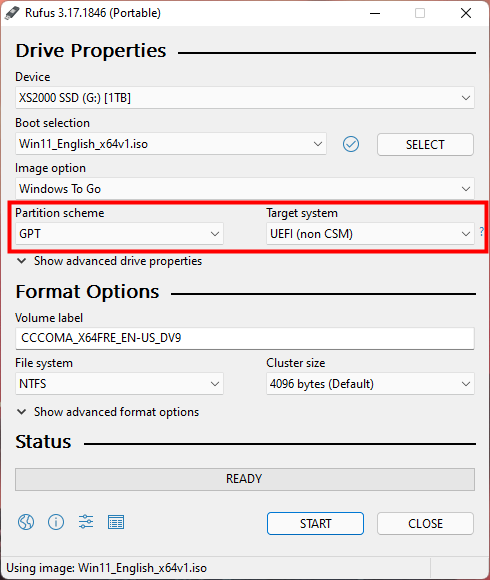
Следующим шагом является выбор схемы разделов и целевой системы. Для каждого есть два варианта, которые вы должны выбрать в зависимости от того, на каких типах компьютеров вы собираетесь использовать USB-накопитель Windows To Go в будущем:
- Выберите схему разделов GPT и целевую систему UEFI (не CSM), если вы собираетесь использовать диск Windows To Go для загрузки компьютеров, на которых работает только UEFI. Это лучший выбор, если вы будете использовать Windows To Go только на новых компьютерах и ноутбуках.
- Выберите схему раздела MBR и целевую систему BIOS (или UEFI-CSM) , если вы собираетесь использовать диск Windows To Go для загрузки старых компьютеров, которые все еще используют BIOS, или компьютеров, настроенных для работы в модуле поддержки совместимости (который позволяет системам UEFI эмулировать устаревшую среду BIOS). Это правильный выбор, если вам нужно, чтобы ваш накопитель Windows To Go был совместим с как можно большим количеством компьютеров.
СОВЕТ. Если вы хотите узнать больше о том, что такое UEFI и BIOS, прочитайте статью, которую мы опубликовали некоторое время назад: Что такое BIOS? Что означает БИОС?
Шаг 5. Установите Windows на USB-накопитель
Мы почти готовы. Остальные настройки в Rufus оставьте как есть, и нажмите кнопку Start внизу.
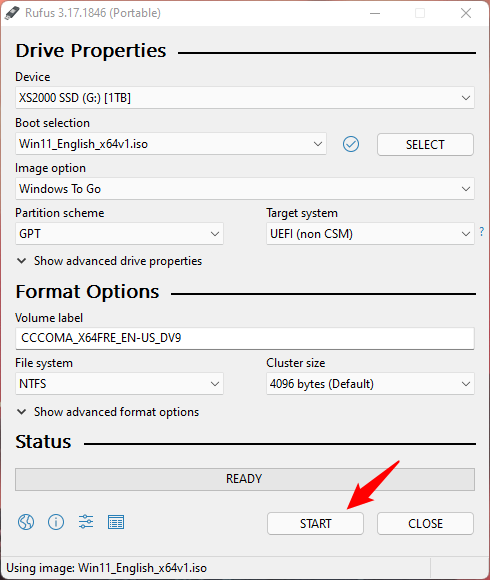
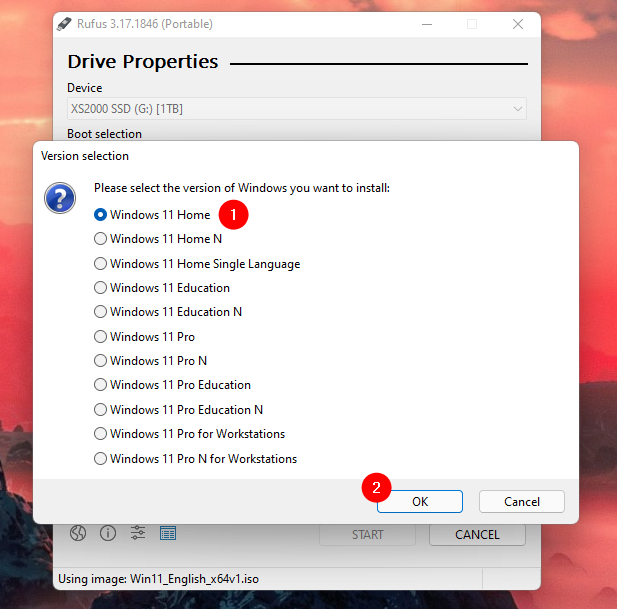
В зависимости от загруженного вами ISO-файла Windows 11 или Windows 10 Rufus попросит вас выбрать выпуск Windows, который вы хотите установить на USB-накопитель. Выберите тот, который вы предпочитаете, и нажмите или коснитесь OK.
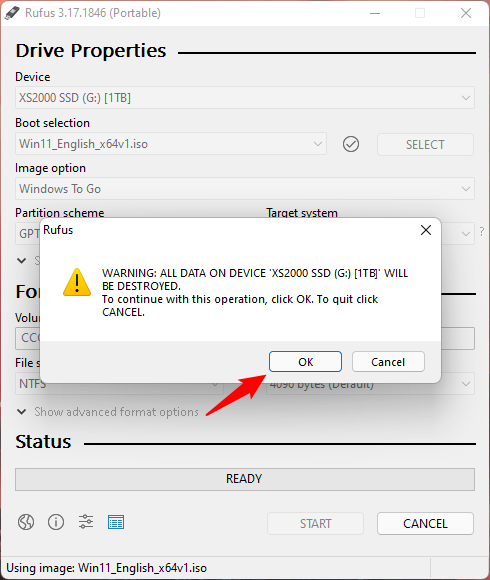
Далее Руфус предупреждает вас, что USB-накопитель, на который вы собираетесь установить Windows, будет стерт, а все данные на нем уничтожены. Убедитесь, что на нем нет ничего, что вам может понадобиться, и нажмите OK, чтобы продолжить.
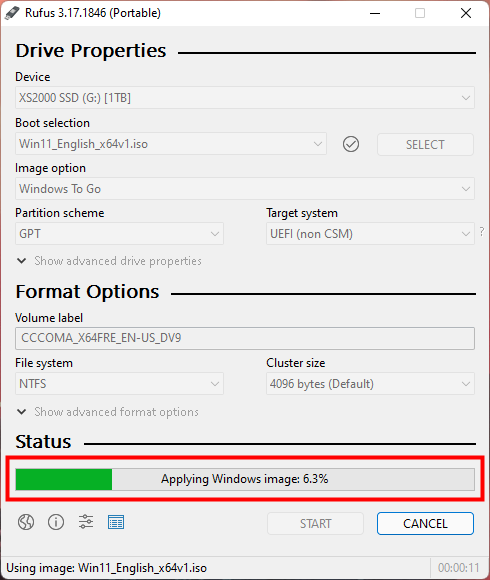
Теперь все, что вам осталось сделать, это дождаться, пока Rufus установит Windows 11 или Windows 10 на USB-накопитель. При желании вы можете следить за ходом выполнения в области состояния окна.
Когда закончите, просто нажмите «Закрыть», чтобы завершить создание USB-накопителя Windows To Go.
Шаг 6. Загрузите любой компьютер с помощью USB-накопителя Windows To Go.
Теперь вы можете отключить USB-накопитель Windows To Go от компьютера. Подключите его к любому другому компьютеру и загрузитесь с него.
Обратите внимание, что при первом использовании USB-накопителя Windows To Go вам потребуется завершить настройку для Windows 11 или Windows 10, в зависимости от того, какую из них вы установили на USB-накопитель.
Затем вы можете начать использовать Windows 11 или Windows 10 на любом компьютере.
ВАЖНО: И последнее, что нужно помнить. Если вы создали учетную запись Microsoft в портативной установке, всякий раз, когда вы загружаете USB-накопитель Windows To Go на новый компьютер, Windows 11 и Windows 10 попросят вас подтвердить, кто вы, попросив ввести свой пароль и создать новый PIN-код. Однако, если вы используете локальную учетную запись пользователя, этого не должно происходить.
Почему вы хотите установить Windows на USB-накопитель?
Теперь вы знаете, как создать USB-накопитель Windows To Go с Windows 11 или Windows 10. Зачем вам это нужно? Это было для работы или просто для развлечения? 🙂 Знаете ли вы другие, лучшие способы сделать это, чем тот, который мы вам показали? Дайте нам знать в комментариях ниже.
Contents
Uses of Windows To Go
Preliminary Notes
Changing BIOS Settings
The Official Tool: Microsoft’s WTG
Alternate WTG Creation Tools
Creating a WTG Drive via Cloning
Eligible USB Drives
Performance
Activation
Installing Programs
Update: Cloning Desktop to USB
.
Since I wrote this post, I have found that I mostly use the Update at the end. That procedure may be simpler than a different procedure suggested by How-To Geek (Hoffman, 2015).
Uses of Windows To Go
This post discusses the option of configuring a USB drive that can run Windows 10. This sort of device could be very useful. For instance:
- For security purposes, it could be easier to maintain physical control over the location of a USB drive running Windows 10 (which could fit in purse or pocket) than over the location of an entire computer. An example arose in the case of the Evil Maid attack (see my post on Windows 10 security), where a laptop had to be left in an office, hotel room, or other place vulnerable to a third party who wanted to install a keylogger or other spyware, or who had obtained a password and who planned to use it to retrieve sensitive data. It could be advantageous, in that sort of situation, to be able to hide or carry away the USB drive containing the OS. Likewise, whenever there was a risk of computer theft, the user could cut his/her potential losses by keeping everything on a USB drive in his/her pocket, rather than on a drive inside the computer.
- When using someone else’s unsecured computer (i.e., one that allows USB booting), it could be handy to be able to run your own system and its programs, configured in your own preferred way.
- When Windows was configured to a user’s preferences, it would be a waste of time and effort to go through the same steps all over again, to install and configure it on another computer. WTG offered the potential of cloning your perfect configuration to a USB drive that would run it immediately on any compatible machine. Thus, sometimes I preferred to run my desktop computer’s Windows 10 installation on my laptop via a WTG USB drive, even though the laptop had its own Win10 installation mounted on a fast internal solid state drive, just because the desktop installation was more fully configured and thus more useful for my purposes.
- A hard disk (HDD) or solid-state drive (SSD) in a computer without an operating system (OS), or whose OS was not working properly, might contain important data. It might be inconvenient if not impossible to remove that data drive and connect it to another computer. Sometimes the easiest if not the only way to access that data might be to boot that computer using an OS on a USB drive. Linux bootable USB tools might not be able to access files that were encrypted using Windows-only tools, or to run Windows software that could work with files on that machine without moving them elsewhere.
With a reasonably capable USB drive and a strong computer, performance may not be an issue. For instance, I was writing these words in the Opera browser, on a Windows 10 system running from a 64GB Samsung MUF-64AB/AM FIT Plus USB drive that was now available for $17, plugged into a USB 2.0 (not 3.0) port on the front of my relatively powerful desktop computer. In addition to Opera, I was running Chrome with about 20 tabs open and Firefox with a dozen tabs open, along with Bitdefender antivirus. There were also more than 60 background processes running, according to Task Manager. At times, I also had up to three separate DoubleKiller processes running, each comparing files in two separate drives or folders. Performance felt the same as when I booted Windows 10 from the SSD inside this computer: I experienced no delays at all — not in Opera, and not when adding or viewing tabs in the other browsers. I was reminded that this was not my normal Win10 installation only when I went looking for a program or a configuration that I had not yet set up on this USB drive — and I minimized those by including a folder full of portable versions of commonly used programs, so that I could run those without installing them.
Preliminary Notes
In this post, I refer to the Windows key (sometimes called WinKey) as simply Win. So, for example, Win-I means hold the Windows key and hit the I key, and Win-R means WinKey-R. The Windows key was the key with the Windows logo on it, typically located near the lower left (and, at least on desktop keyboards, also near the lower right) corner of the keyboard.
Commands in this post are shown in italics. It is possible to run commands via Win-R. But if a command fails, it may be because it is not being run in an elevated command window. (Easy way to open an elevated command window: Win-R > cmd > Ctrl-Shift-Enter.) If it was not clear which character appeared in a command (e.g., is that a one or an L; is it a zero or an oh; is there a space between those two characters), a solution was to copy and paste it into Notepad or directly into the command box.
I started writing this post in 2018, put it down, and am now finishing it in September 2019. Descriptions of specific functionality mostly refer to version 1903. (For version information, use Win-I > System > About.) For present purposes, functionality seemed to be about the same as in earlier versions. Users interested in running earlier versions were best advised to make and keep Windows 10 system downloads: such older downloads generally ceased to be available online when Microsoft released a new version. Current versions were available by using the Win10 Media Creation Tool to download an ISO. Alternately, How-To Geek (Glenn, 2018) recommended the Windows and Office ISO Download Tool.
Changing BIOS Settings
The processes described below entailed a lot of rebooting and fooling with the BIOS and plugging and unplugging USB drives. It may be helpful to offer a few remarks about that.
The first step was to learn how to access the BIOS setup utility and related features. The BIOS would respond to a startup instruction (e.g., turning on the power) and would prepare the way for the Windows operating system to take over. Typically, the user could hit a key (most commonly F2 or maybe Del or Esc) to get into the BIOS, and then hit another key (usually F10) to save and exit. Until Windows 10, the user could also hit F8 to start Windows in Safe Mode. F12 usually opened a boot device menu, allowing the user to choose which disk was going to boot the computer.
The difference between Legacy and UEFI booting could be a little confusing. Basically, UEFI was the wave of the future, but many USB drives required Legacy mode to boot. So I might have to hit F2 at startup to get into the BIOS setup; change to Legacy mode and/or turn off Secure Boot; hit F10 to reboot; and then hit F12 during reboot to choose to boot the WTG drive. Then, after I was done with the WTG drive, I would have to go back into BIOS and change back from Legacy to UEFI boot.
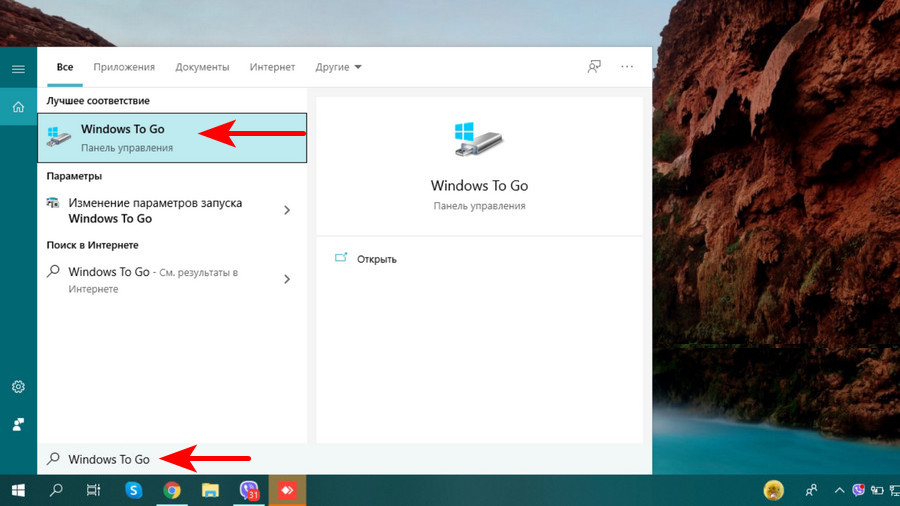
The Official Tool: Microsoft’s WTG
The official way to get Windows 10 on a USB drive was to use Microsoft’s own Windows To Go (WTG) approach (via Control Panel). Unfortunately, on July 11, 2019, Microsoft announced that it was discontinuing WTG. Its reasons were (a) WTG did not support feature upgrades, and therefore would remain locked into a specific version (e.g., 1809), and (b) Windows would not run WTG unless the user could insert a specific model of USB drive that was officially approved for use with WTG — and, unfortunately, most of those models had ceased to be available.
WTG was further limited in supposedly being available only for Windows 10 (and  Enterprise and Education editions. In the Enterprise version, Business News Daily (Warner, 2018) said they started the WTG setup process by simply searching their system for Windows To Go. Others pointed out that there was also a WTG option in the Control Panel, with tutorials (by e.g., TenForums) to walk me through. (Control Panel was accessible in various ways, including Win-R > control.) As of April 2017, Microsoft agreed with Warner: “Windows To Go is a feature in Windows 10 Enterprise and Windows 10 Education.” And yet my Win10 Pro desktop also had a WTG option in Control Panel, and it ran when I tried it. Apparently Microsoft had used one of its updates to add WTG to Win10 Pro. But my laptop’s Win10 Home still lacked it.
Alternate WTG Creation Tools
It seemed there must be other ways of creating a WTG drive from a downloaded Windows 10 ISO. It wouldn’t be official Windows To Go, but I wound up calling it that anyway, for lack of a better term.
As I rooted around, looking for guidance, I found a SuperUser discussion and a TechSpot article indicating that there were actually at least a half-dozen different ways of proceeding. Some seemed pretty technical (e.g., Admin). I probably could have worked through them. But as I would discover, I could go through a lot of hassle, wait hours for the USB drive to be created, and then see that it didn’t work. One kind of failure would leave the computer saying, “Just a moment,” where I found that message would linger onscreen forever. Another kind of failure would leave me with a WTG version of the classic BSOD: the screen would say, “Your PC ran into a problem and needs to restart,” leading to the “Why did my PC restart?” loop (see other post).
Hasleo’s WinToUSB
Hasleo’s WinToUSB seemed to be the most prominent non-Microsoft WTG tool. The instructions basically told me to go with the default (i.e., choose the top icon on the left, the one with an image of a disc on top of a page, bringing up the Image File selection box). I selected the ISO that I had just downloaded using Media Creation Tool. I was doing this on the desktop computer, which had Windows 10 Pro installed, so I selected Windows 10 Pro (not Pro N) as my OS of choice. I clicked Next and then used the drop-down arrow (or the button, if there was no drop-down arrow) to designate a USB drive as the destination. That gave me a choice of using MBR or GPT. I was prepared to choose GPT, due to its reported superiority, but PCMag said I should choose MBR for BIOS. (The alternative, MBR for BIOS and UEFI, was not available in the free version of WinToUSB.) WinToUSB then did some calculation and, after a minute, gave me a choice among Legacy, VHD, or VHDX installation modes. Here, PCMag recommended Legacy. (PCWorld agreed: “If you can, pick Legacy mode; that’s the simplest way to go. Only try installing Windows in VHD mode if you have issues installing Legacy.”) Then WinToUSB proceeded. After maybe a half-hour, it finished. I clicked Exit.
I used WinToUSB a number of times. It did produce some working WTG drives. It also produced some that didn’t work. Another problem was that, starting with (I think) version 4.5, the free version of WinToUSB ceased to offer a WTG capability, at least for Win10 versions 1809+. So if you didn’t save earlier versions of Win10 and WinToUSB, WinToUSB was no longer a free option. Even if you did have those earlier versions, you would face the prospect of an eventual Microsoft forced upgrade. Even with a relatively fast USB 3.0 drive, an upgrade from 1803 to 1809 took hours. And, given 1809’s checkered reputation, there was always the risk that the upgrade would trash the USB drive.
AOMEI Partition Assistant
AOMEI Partition Assistant (APA) offered another way to create a WTG drive. To use it, I went to its left panel > Wizards > All Tools > Windows To Go Creator > Create Windows To Go with system disc/ISO. I made multiple efforts with this option. At first, I found that this tool produced working WTG drives and, moreover, that it seemed to offer certain capabilities I was not finding in other software. I wrote a whole blog post about it, but now I think that writing effort was rather confused. Suffice it to say that eventually I had enough experiences of waiting for hours while APA struggled with an ISO file, only to abort with an error message (e.g., “Failed to format“). I decided to see if some other tool could do better.
FlashBoot
FlashBoot offered Free and Pro ($30) versions. The chief difference, for present purposes, was that both versions were supposedly able to create a bootable WTG USB drive, but only the Pro version offered the additional capability of creating a bootable clone of a WTG USB drive. For the moment, then, the Free version would suffice. With trepidations due to its reputation (3.6 stars from 9 raters for the portable version on Softpedia; 3.7 stars from 62 raters for the installed version), I gave it a whirl. It offered to put a Win10 installation ISO onto a USB drive, to make a bootable USB WTG drive, or to create and restore an image of a USB drive. Each of those options led to a subsequent screen, which in some cases could be confusing.
It seemed the free option that I wanted here was the one provided by the “Full OS > USB” option. From there, I selected the option for Windows 10 UEFI, designated the Windows 10 x64 1903 ISO as my source, and designated a 32GB Silicon Power USB drive as my target. Neither the program itself nor the 162-page User Guide specified the units that I should use, for the option to leave unallocated space at the end of the drive. It was probably looking for a value in bytes rather than mega- or gigabytes, but I didn’t want to experiment with that, so I didn’t select that option. After a few minutes, the attempt failed with two error messages. In brief, they were “The requested operation is unsupported” and “Extraction backend does not support symbolic links.”
Rufus
Rufus had become well-known as a preferred tool for creating USB drives that could boot Linux and other tools and operating systems. But as TechSpot noted, its WTG capability (existing since 2015) was not obvious in some versions. I frankly didn’t know it was there until I saw websites telling me about it. Maybe that was because the option was there only for Win10 ISOs, whereas I had mostly used Rufus for other purposes. As explained by AIO Boot, the “Image option” choice was between a Standard Windows Installation (i.e., set up the target USB drive as a bootable installer, for use in installing Win10 to some other drive) or Windows To Go (i.e., set up the target USB drive to run Windows itself, not to install somewhere else).
I first tried Rufus with 32-bit Win10 Pro 1809. It worked: the old 32-bit computer on which I tried it did boot successfully, where neither Hasleo nor AOMEI had been able to produce a working solution. (Note: in my experience so far, a 32-bit WTG drive would boot a 64-bit computer, but a 64-bit WTG drive would not boot a 32-bit computer.)
I thought maybe it worked only because I followed the instructions telling me to replace C:WindowsSystem32DriversWppRecorder.sys, on the finished WTG drive, with a copy of that file from some older version of Win10. Getting that file was a hassle. There may have been a way for me to extract it from an older downloaded Win10 ISO, or maybe I could have just used one of the older copies lying around on my computer. What I did, instead, was to mount a drive image of a Win10 1803 installation, using the AOMEI Backupper software I had used to create that image, and then extract a copy from there. Regardless of how I got it, I then had to insert it into the indicated place in the USB drive’s filesystem, and for that I had to take ownership. That wasn’t a big deal, once I looked up how to do it. Hasleo claimed that its software now automated this solution, which seemed to conflict with Rufus’s view that it could not legally do that. So the Rufus approach seemed to work, at least for purposes of 32-bit Win10 Pro.
Later, I tried again, on a different machine, using Rufus 3.6, without replacing WppRecorder.sys. This time, I used the same 64-bit Windows 10 version 1903 ISO that I had tried with FlashBoot (above). Installing on the slow 32GB Silicon Power USB drive was frightfully slow: it took more than five hours. But the job completed, and the Silicon Power USB drive did boot a computer. Unfortunately, the Win10 startup process stalled for hours at “Getting Ready.” That is, apparently Win10 felt the need to adjust itself to the computer I was booting — but the adjustment process wasn’t going well. I powered down and tried again. This time, I got an error:
The computer restarted unexpectedly or encountered an unexpected error. Windows installation cannot proceed. To install Windows, click “OK” to restart the computer, and then restart the installation.
When I restarted and hit F12 at bootup to select the Silicon Power USB drive for booting, I noticed there were two different Silicon Power entries in the boot menu. I chose the first one, “Windows Boot Manager (UFD 3.0 Silicon-Power32G),” as distinct from “USB HDD: UFD 3.0 Silicon-Power32G.” It seemed that the first, failed effort to boot this USB drive might somehow have added a duplicate item to the boot list. But both failed. A search for information on the error message led to an Appuals suggestion that I hit Shift-F10 to open a command prompt (without clicking OK, which would reboot the machine). At the prompt, I typed regedit and then went to HKEY_Local_Machine/SYSTEM/SETUP/STATUS/ChildCompletion > setup.exe > right-click > Modify > Value data = 3 > OK. Then click OK on the error window to restart. Restarting (actually, everything) was really slow with this Silicon Power drive, but I let it take its slow, natural course, so that it had time to write whatever it needed to write. On reboot, that proved to be the solution: the drive booted and went on into Windows. But then it, too, hung for a long time at a screen saying, “Just a moment …” Eventually I powered the machine down after all, and rebooted. This time it got through to the actual setup screens, where it solicited my responses to a few basic setup questions. But then it crashed, and I was in the WTG Setup Loop. This was a failed installation. I knew Rufus could produce working x64 WTG drives, but this Silicon Power drive was not going to be one of them. It seemed that, as a WTG process lengthened from minutes into hours (e.g., the process of creating this Silicon Power drive, its odds of failing increased.
Other Possibilities
As an alternate possibility, a user named Mitch reported that Spyrus, one of the (expensive) USB drive manufacturers qualifying for Microsoft’s official WTG program (above), used its own WTG creation software, was therefore not dependent on the continuation of Microsoft’s WTG program, and was thus committed to continue selling its own WTG-compatible USB drives for years to come. There probably were other vendors in the WTG universe who likewise offered WTG-type software solutions not listed here. Within my knowledge and my budget, however, my conclusion here was that Rufus was the way to go, for purposes of creating a bootable WTG USB drive from a Windows 10 installation ISO.
Creating a WTG Drive via Cloning
The preceding section discusses software used to create bootable USB drives from a Windows 10 ISO file. There was another possibility: I might be able to clone an existing system onto a USB drive. The source could be a Windows 10 installation on a traditional HDD or SSD; or perhaps the source could itself be a WTG USB drive. The size of the target drive would depend on the size of the source and its anticipated growth. Cloning would have the advantage of copying an already configured system, but that could also be its drawback: a complete system could be large, requiring not only a larger USB drive (which, these days, was no big deal) but also more time for copying.
There appeared to be a number of disk cloning tools. Whether they would successfully clone a bootable Windows USB was another question. I started by returning to Hasleo’s WinToUSB 4.9. Hasleo offered tutorials on several processes of potential interest, including how to clone an existing Windows 10 installation to a WTG USB drive or to an external HDD and how to clone one WTG USB drive to another.
I decided to start with that last option. I had a working 32-bit Windows 10 WTG installation on a slow SanDisk USB drive, and I wanted to see if I could use that to create a working WTG system on a slightly faster Silicon Power USB drive. The SanDisk was 64GB and the Silicon Power was only 32GB; but the contents of the source (SanDisk) USB drive were only 22GB. Following Hasleo’s instructions, I booted the SanDisk, installed WinToUSB on it, and ran WinToUSB. Their instructions didn’t quite match what I was seeing, but I gathered that I was supposed to click the icon whose tooltip said, “Physical to USB. Clone current system (Windows 7 or later) to an USB drive.” I selected that and clicked Next. That produced an error: “Cloning Windows To Go Workspace is not supported in the trial/free version.” So that took care of Hasleo, at least for the moment.
Next stop: AOMEI. Here, we had two choices: one AOMEI webpage said I could use AOMEI Backupper to clone a bootable USB drive; another AOMEI webpage said I could use AOMEI Partition Assistant (APA). I started with APA. The webpage said I should use APA’s left panel > Wizards > All Tools > Disk Copy Wizard. I went with the default Copy Disk Quickly. It only recognized four drives and, at the moment, including internal drives, I had more than that. It didn’t seem to allow me to refresh the view after I removed an extraneous USB drive, so I thought I would have to start over; but then, after a moment, it asked if I wanted to “reload the properties.” I said OK. But it still didn’t recognize the drive I was going to use as my target. Windows 10 Disk Management (diskmgmt.msc) recognized it; why didn’t APA? I restarted APA and tried again. Still the same result. Evidently APA was not the tool for this job. Maybe if I’d had another USB drive to experiment with but, at the moment, I didn’t.
I turned to AOMEI Backupper. The webpage advised me to go into Clone > Disk Clone > select source and destination disks > Start Clone. It didn’t balk at the fact that the target was smaller than the source: either it wasn’t checking or it was smart enough to realize that the contents of the source should fit on the target. I went ahead with the process. I wasn’t present at the conclusion, but after 20 minutes it had only reached 14% complete. Nonetheless, when I returned several hours later, it said, “The operation has been completed successfully.” I tried to boot a 32-bit computer with the clone. That failed: I got only a blinking cursor. The BIOS setup utility recognized it; it just didn’t seem to be bootable. I tried to boot a 64-bit computer with it. That failed. But the source USB drive was able to boot that too. AOMEI Backupper failed this test.
Rufus, the last of the tools tried above, did not seem to offer a cloning option, and FlashBoot’s cloning option was not free and, after my WTG experience (above), not encouraging. I would probably pay Hasleo before FlashBoot, if it came to that. But for now, I turned away from the WTG tools that were supposedly capable of cloning a bootable drive as well, and looked instead at tools that only offered a cloning option.
One such tool was EaseUS Todo Backup. I had previously found that its Clone option was not able to produce a bootable SD card, cloned from a bootable WTG USB drive, even though I had been able to create a bootable WTG SD card from scratch; but it did produce a bootable USB clone — slowly, though, taking more than two hours. I didn’t retest EaseUS at this point because I wanted to become more familiar with the vendors and tools that I was already using to some extent. I knew MiniTool from its Partition Wizard, which was my first choice in partitioning software. MiniTool’s ShadowMaker offered a free version that was reportedly capable of making a bootable clone of the existing Windows 10 system (i.e., the system on which it was running) onto a USB drive. This would have the advantages and drawbacks of clones discussed above. Pending further experience, I was not sure whether I would need Universal Restore or other features available only in the Pro version. The price of the Pro version ($29 lifetime for one PC) was another reason to consider MiniTool first: the Pro version of the EaseUS software cost $59.
But before trying that new MiniTool utility, I wanted to try Macrium Reflect. I had been considering Macrium and AOMEI as my default drive imaging tool. Since AOMEI wasn’t working well for WTG USB cloning, Macrium was next in line. At first, in Macrium’s (to my eye) confused program screen, there wasn’t a cloning option per se. It seemed the approach with Macrium was going to be to create a backup image of the source USB drive, and then restore that image to the target USB drive. That was OK — I was happy to have a backup of the USB drive, if I could find a backup tool that would work. In my previous exploration, trying a half-dozen USB drive imaging tools, I found that AOMEI Backupper and PassMark Image USB were the only ones that made a halfway tolerable attempt at creating a restorable USB drive image. I hoped Macrium would be better. So I started by looking for ways to reduce the size of the files on the WTG drive, following steps detailed in another post. I was thinking that I should run Macrium from another drive, so that the WTG drive would not be in use. But I found that, when I booted with another drive, Macrium did not detect the WTG USB drive as a source drive for imaging. So I rebooted with the WTG USB drive and went into Macrium’s menu > Backup > Image Selected Disks > select the USB drive > designate an output file name and location > run the backup. The Macrium backup image, saved to an external HDD, was created in under 20 minutes. Did it work? I don’t recall. At this point, the desktop computer’s Windows installation went blooey, and the testing was paused and somewhat scrambled.
I did eventually work out a technique for cloning from one working WTG USB drive to another. As detailed in the alternate method section of another post, the general idea was to condition a target drive by using Rufus to put a WTG installation on the USB drive, and then overwrite that Windows installation by using Macrium to clone from the source WTG USB drive to the target WTG USB drive, and then (I think) using MiniTool Partition Wizard to set it active. Later, I also worked out a method for cloning an installed (desktop computer) Windows 10 system to USB (below).
Eligible USB Drives
The basic process for creating a bootable Windows 10 USB drive was to download the Windows 10 ISO using Microsoft’s Media Creation Tool (above) and then install that ISO onto a USB drive using one of the software options just described. This raised the question of which USB drive was best for the purpose.
In Windows 10 versions supporting WTG, the official Microsoft WTG process began with Win-R > control > Windows To Go. When I clicked that link, it searched for a USB drive and couldn’t find one, for a very good reason: I hadn’t plugged one in. I took this opportunity to do so. The drive I inserted was a 16GB SanDisk. WTG said, “This USB drive is too small. Insert or choose one that’s at least 32 GB.”
Everybody seemed to be saying that, for real WTG, I would need a certified USB thumb drive. Models specifically recommended by Microsoft, with prices quoted by Warner (2018), were the Imation IronKey Workspace ($418.23), Kingston DataTraveler Workspace ($161.89), SPYRUS Windows to Go USB 3.0 ($347.13), Super Talent USB 3.0 RC4 Windows To Go Drive ($364.03), and Western Digital My Passport Enterprise with Windows to Go ($80). At prices like that, couldn’t I just buy another computer? I mean, it was enough of a sacrifice to have to run Win10 at all, never mind spending hundreds of dollars for the privilege.
I did have a 64GB SanDisk USB device, but I wasn’t sure it would be fast enough. For best performance, various sources said I would want to use a USB 3.0 drive, with a USB 3.0 port and cable. USB 3.0 ports would typically be distinguishable from USB 2.0 by a blue rather than black connector and the letters SS (i.e., SuperSpeed) along with the USB trident. Microsoft (Patel, 2012) discussed multiple points of relevance here, including particularly the fact that, in Control Panel > Device Manager > Universal Serial Bus Controllers, I would see “Intel(R) USB 3.0 eXtensible Host Controller” if the system was USB 3.0-compatible. I did see that, on both desktop and laptop.
I had bought that SanDisk USB drive on eBay, where strange things can happen. I wanted to verify that I was getting actual USB 3.0 speed. In Win10 on the desktop, I went to Win-I (i.e., Settings) > Devices > Bluetooth & Other Devices (because my version of Win10 no longer had the Connected Devices option) > look to see if the USB device is accompanied by the note, “Device can perform faster when connected to USB 3.0.” I did have that note. This was apparently a way of telling me that the desktop computer’s black front-panel USB port was not USB 3.0. I repositioned the USB drive to a blue rear-panel port and looked again. Now it said, “Connected to USB 3.0.” This apparently meant that, if the drive really was USB 3.0, it would now feel free to operate at USB 3.0 speeds.
But was it really a USB 3.0 drive? To answer that question, a SuperUser discussion led to USB Device Tree Viewer (UDTV) (4.5 stars from 22 raters on Softpedia). The USB drive was showing as drive G in Windows File Explorer, so I looked in UDTV for drive G. I found it under the USB 3.0 host controller part of the USB tree, in UDTV’s left pane. I clicked on it. The right pane filled with info about the SanDisk. A SuperUser answer discussing UDTV told me that, at least in Windows 8 and 10, there would be little letters at the left edge of the USB trident icon visible onscreen. And so there were. For most devices, the little letter in UDTV was an H, indicating “High Speed” (i.e., USB 1.1 or 2.0). But for the SanDisk drive G, the little letter was an S, indicating Super Speed (i.e., USB 3.0). Also, if I did look in the right pane, I would see a Connection Information section containing a Device Bus Speed item. The latter contained a note indicating that it was not actually High-Speed; rather, in the immediately following Connection Information V2 section, I would see that USB 300 was the supported protocol — which was presumably another way of saying USB 3.0. It seemed, then, that I had a USB 3.0 drive plugged into a USB 3.0 port.
Despite all that, the WTG tool from Control Panel was not satisfied. It said,
This is a removable drive and isn’t compatible with Windows To Go. Choose a drive that meets the required hardware specifications.
It provided a link to a webpage that had no particular relevance. My search led to the short list of approved devices cited above. So if I wanted to run Windows 10 from a bootable USB drive, I would have to look elsewhere. That led to the software alternatives discussed above.
Performance
I did proceed to use that SanDisk USB drive to run Windows 10 x64 Home on my laptop for several days. Then the USB drive had a meltdown. The system suddenly crashed, and after that the USB drive stopped working, until some fixit utility brought it back to life. Meanwhile, on the desktop computer, the Samsung FIT Plus 64GB USB drive continued to function. The Samsung, enjoying a USB 2.0 port on the front panel of the relatively fast desktop computer (Intel Core i7 4790, 24GB DDR3 RAM) was producing a much more responsive user experience than the SanDisk, plugged into a USB 3.0 port on my laptop (Intel Core i5 7200U, 20GB RAM 15-15-15-36).
It wasn’t clear how much of that speed was due to the computer rather than the USB drive. To find out, I tried running benchmark tests on both computers, booted with that same Samsung USB drive. I discussed several benchmarking tools in an earlier post, but this time I wanted a portable tool. UserBenchmark (UB) seemed to be fairly well received (e.g., 4.3 stars from 35 raters on Softpedia), so I tried that. It wasn’t an in-depth testing tool — it only ran for a minute or two — but its results were interesting.
I compared both the desktop and laptop computers, with native and WTG installations. That is, on each computer, I took scores from the Windows installation on the computer’s solid state drive (SSD) and also from the WTG installation on the Samsung FIT Plus 64GB USB drive. The native installations were basic, with virtually no other software installed. The WTG installation on the Samsung FIT USB drive did have Chrome and Firefox installed, but not much else, and those weren’t running when I ran the test.
The results from UB’s calculations were presented in webpages on the UB website. The results for individual system components looked like this:

Note in particular that, as shown in that image, UB gave me values for the average benchmark (in that example, 66%), for the “Bench” for this particular system (71.9%), and for the performance expectations (82nd percentile). Here’s what those numbers mean:
- Average: 66%. This means that, based on about 110,000 samples in the UB database, systems using the Intel i7-4790 processor performed 66% as fast as the fastest mainstream CPUs.
- Benchmark: 72%. The CPU shown in this example ran 72% as fast as the fastest mainstream CPUs. That is, it was well above the average for Intel i7-4790 CPUs in the UB database.
- Percentile: 82. This means that only 18% (i.e., 100-82) of Intel i7-4790 CPUs performed better than this CPU.
For each of the four installations that I tested, the UB webpages gave an overall percentile value. That value was apparently calculated as a weighted average of individual component values. As such, the overall percentile value did not seem very helpful. It seemed to make more sense to focus on individual components. Those results were as follows (with links to the webpages showing the specific results):
Windows 10 running from the desktop computer’s SSD:
– CPU: average 66%, benchmark 70%, 72nd percentile
– Graphics Card: average 4%, benchmark 4%, 73rd percentile
– Samsung 850 EVO SSD: average 104%, benchmark 114%, 80th percentile
– Kingston DataTraveler USB: average 13%, benchmark 6%, 19th percentile
– G.Skill RipjawsX RAM: average 46%, benchmark 51%, 74th percentile
These results say that my CPU beat the average. Apparently this type of Intel CPU almost always performed about the same, so my measly 4% improvement put me up into the 72nd percentile: only 28% of these Intel CPUs performed better than mine, in the native Win10 installation on the desktop. I assumed the improvement was due to a good motherboard. Later, it occurred to me that the explanation was probably that I had very little software installed on the system, so the CPU wasn’t distracted from the test. I should mention that that Moo0 System Monitor offered a handy and perhaps accurate way of seeing what was impairing performance.
The situation with my graphics card seemed dire — its score was only 4% as fast as the fastest mainstream graphics cards — but the reality appeared to be that most of the world’s graphics cards did poorly in that comparison. My card’s performance was (more precisely) only 3.95% as fast as those leaders — but my graphics card was actually performing above expectations, because the average was (again, more precisely) only 3.69%.
I will postpone comment, for the moment, on other components, pausing only to note that the cheap Kingston USB drive was the one from which I was running this portable version of UB. I assume that didn’t make any practical difference in the test, which was surely loaded into RAM. I ran the UB test from the Kingston drive in all of my tests, so hopefully its impact was negligible in any case.
Now let’s compare the results I got when I booted that same desktop computer with the Samsung FIT Plus 64GB USB drive, and ran WTG (i.e., Windows 10) from that USB drive. Here are the results (excluding the graphics card and the Kingston USB drive, whose values were almost identical to those shown above):
- CPU: average 66%, benchmark 72%, 82nd percentile
- Samsung 850 EVO SSD: average 104%, benchmark 109%, 63rd percentile
- Samsung FIT USB: average 43%, benchmark 30%, 41st percentile
- G.Skill RipjawsX RAM: average 46%, benchmark 43%, 49th percentile
The CPU actually did better in the WTG installation than in the native Win10 desktop installation. Better testing would be advisable to confirm that finding. It was not clear why that would happen. Possibly it was relevant that the USB drive was maybe two years newer; its chips may have been faster than those on the SSD. I got this result despite the fact that the WTG installation had more software installed and more background processes running.
The Samsung EVO SSD was noticeably slower here than in the native desktop test (above). That was also true of the G.Skill RAM. The WTG installation seems to have used the SSD and RAM less effectively than the native system did. The SSD scores were still quite good. It probably would have helped if I had used a faster USB drive, and if I been using one of the desktop’s rear-panel USB 3.0 ports rather than its more convenient front-panel USB 2.0 port. It is not clear whether this would explain the dramatic difference in RAM scores.
I neglected to insert the Samsung FIT USB drive before running the native desktop test, because I wasn’t booting from the FIT for that test, so I don’t have a comparison value for that. I assumed that its poor score here — well below the average of scores produced by systems using that device — was due to the fact that it was busy running the Windows 10 system.
Generally, these results suggest that the WTG device was actually quite good — that, with a little attention to detail, I might get performance more or less similar to that of a native Win10 installation on an SSD. Of course, the WTG drive would look much better in some regards than a native system running Win10 from an HDD.
Note that this exploration was using just one benchmarking tool. It would have been interesting to compare results with other, more detailed benchmarking tools. Note also that benchmarks are no substitute for real-world experience. A thorough test might time actual performance on demanding tasks, such as video editing or massive spreadsheet calculations.
Now, let’s turn to the laptop tests. First, we have the laptop’s native Windows 10 installation:
- CPU: average 37%, benchmark 41%, 81st percentile
- Graphics Card: average 5%, benchmark 6%, 86th percentile
- Samsung 850 EVO SSD: average 113%, benchmark 82%, 4th percentile
- Samsung FIT USB: average 43%, benchmark 72%, 84th percentile
- Kingston DataTraveler USB: average 13%, benchmark 5%, 11th percentile
- Hynix RAM: average 49%, benchmark 68%, 91st percentile
The desktop’s Intel Core i7-4790 CPU was obviously much stronger than the laptop’s Intel Core i5-7200U. In my interpretation, Acer helped by putting the laptop’s CPU into a relatively strong motherboard. The graphics performance was actually stronger than the desktop. Yes, I did have Samsung 850 EVO SSDs in both the desktop and the laptop. But here, the laptop stumbled badly. Why would its SSD perform at only the 4th percentile among similar units? The answer, I think, must be that I had encrypted drive C on the laptop. Its contents were accessible at the moment — I had entered the VeraCrypt password — but I think this was a measure of the encryption overhead. Which, if that’s correct was very substantial.
It made sense that the Samsung FIT USB drive would perform better here: it was not being used to run Windows. I was surprised that the Kingston drive performed worse in the laptop, where it was plugged in (via an adapter) to a USB 3.1 port, than in a USB 2.0 port in the desktop. It appears the laptop’s Hynix RAM actually averaged better scores than the desktop’s G.Skill RAM. As with the CPU, this machine’s outstanding RAM performance was presumably due to a solid motherboard.
Finally, the scores from the laptop’s WTG test:
- CPU: average 37%, benchmark 42%, 94th percentile
- Samsung FIT USB: average 43%, benchmark 31%, 44th percentile
- Kingston DataTraveler USB: average 13%, benchmark 14%, 59th percentile
- Hynix RAM: average 51%, benchmark 67%, 86th percentile
I was not sure why UB did not provide scores for the graphics card. A drive encryption issue rendered the Samsung 850 EVO SSD unavailable for testing at the moment.
Regarding the CPU, I got weird results, when I first ran the test, so I re-ran it. It took me a while to notice their warning that test accuracy was impaired due to excessive CPU activity. In other words, I needed to kill processes. I did have a couple of browsers running. But I may have overdone it: I also went into taskmgr and killed some background processes. So maybe the unusually high score for the CPU was due to this being a virginal system with almost nothing running aside from the benchmarker. But that was even more true of the laptop’s native Win10 installation: it didn’t even have browsers or other third-party software installed, much less running. And yet WTG got better CPU scores on both desktop and laptop. So that was interesting.
For both the native and WTG tests on the laptop, UB warned that the CPU was throttled to 92%. But when I checked the Power settings in Control Panel, I saw 100%. So I wasn’t sure where that throttling might be taking place. Samsung FIT USB performance here was consistent with its performance on the desktop, supporting the impression that it was impaired in testing due to the fact that it was simultaneously running the operating system. I wasn’t sure why UB didn’t detect and provide a warning about that. The Kingston improvement, compared with the laptop’s native installation, may have been due to the fact that I initially tested it via a little USB 3.1 adapter I bought on eBay. I thought adapting it to the USB 3.1 port would make it faster. Apparently the cheap adapter was not wired for performance. The Kingston USB drive did seem to do better through that port when I plugged it into a good external USB hub. Finally, there was a minor inconsistency in the average RAM figures for the Hynix RAM, but the performance was about the same as in the laptop’s native Win10 installation.
To summarize, this brief and imperfect analysis of UB scores suggested several thoughts regarding WTG:
- Benchmarking is a practical performance improvement activity, capable of highlighting issues that you might not notice otherwise.
- Pending more thorough testing, WTG appeared able to compete fairly well against a native Windows 10 installation on SSD.
- WTG performance appeared likely to depend on the quality as well as capacity of USB 2.0, 3.0, and/or 3.1 ports, adapters, and drives.
Activation
Microsoft‘s comment on WTG activation seemed to be intended for corporate users. Even so, parts of it meshed with my experience, so far, in using these non-official WTG drives that I had created. They said,
To remain activated, KMS client computers must renew their activation by connecting to the KMS host on periodic basis. … In a KMS configuration the activation validity interval is 180 days.
Translated into ordinary user-speak, the idea seemed to be that I would have to plug my WTG drive back into the mother ship at least once every six months.
In other words, the WTG drive would have the same Windows Product and/or Key ID numbers as one of my actual computers. It seemed that I had to have a real, valid Windows 10 installation, on a computer, in order to activate a WTG drive, and apparently I had to reaffirm the connection with that physical installation now and then. If that WTG drive didn’t have the right ID number, activation on its source computer would require me to use something like Magical Jelly Bean Keyfinder to get those numbers from my computer, and then go to Win-I > Update & Security > Activation > Change product key. One activation error read as follows:
We can’t activate Windows on this device because you don’t have a valid digital license or product key. If you think you do have a valid license or key, select Troubleshoot below. Error code: 0x803F7001
A search for that error code led to a Microsoft page stating that this error could result if this was the first time I had installed Win10 on that PC, or if I had changed the hardware on a previously activated Windows 10 PC, or if I reinstalled the wrong edition of Windows 10, or if I purchased the PC with Win10 preinstalled and this was the first boot.
WTG would not be very helpful if the USB drive only worked on the mother ship. Fortunately, that was not the situation. The WTG drive would not be activated for use on other machines, but it would still work. Within my experience, at least, the advice was therefore to activate it on its source computer, but then feel free to use it elsewhere. When used elsewhere, at Win-I > Update & Security > Activation, it would say, “Windows is not activated.” There would also be an activation message in the lower right corner of the desktop. But then Windows would say that the WTG drive was activated when I used it to boot the computer where I had activated it.
For posterity, here are my notes from one activation attempt:
I went into Win-R > Control Panel > System. It said, “Windows is not activated.” A search led, incidentally, to a Microsoft Answer suggesting that one could use NPPR9-FWDCX-D2C8J-H872K-2YT43 as the license key to register a Win10 installation as Enterprise rather than Educational or Pro versions. I wasn’t sure what significance that had; I just recorded it for possible future use.
More to the point, a SuperUser discussion seemed to say that the activation opportunity for Win10 could be rather open-ended. Another such discussion suggested using an administrative command prompt to run slmgr /dlv or slmgr /xpr or slmgr /dli to determine the number of remaining available reboots. Microsoft said, “The Windows To Go workspace needs to renew its activation every 180 days.” Such materials suggested that activation would not necessarily be an urgent concern for a casual user of WTG. There also didn’t seem to be a problem with using the WTG drive and the physical installation at the same time, involving two different computers.
Did that mean I had to create a separate WTG drive for each computer, if for some reason I wanted more than one WTG drive? I think the answer was yes and no. Yes, the WTG drive needed to be authenticated in connection with a specific computer. I wasn’t sure that I was necessarily limited to one WTG drive per computer. But no, I had not yet tested this, but it seemed I might just create one WTG drive, clone it, and then change the ID numbers on the others so that each would correspond with its own computer.
Installing Programs
Over some months of using WTG drives intermittently, I had several fail or die. Thus I had three reasons to use portable rather than installed programs, to the extent possible: (1) installed programs were more likely to run processes that could drag down the CPU, as seen in the benchmarking (above), even when I was not deliberately running the actual program; (2) it took time and hope to install programs, and these resources could be drained as one had to keep repeating the process; and (3) installed programs required more disk space, which meant a larger USB drive, which was less of an issue nowadays, but still might matter to the person who was trying to squeeze a Win10 installation onto a 16GB or small USB drive. (But beware the installation that didn’t have enough space for Windows updates and for other natural program growth!)
At this writing, I was still not confident of cloning tools (above). I hadn’t done much cloning, and the attempts I had made — at cloning or at making and restoring backup images — had met with mixed success. So far, it seemed, making an image or copy of a USB drive was not as straightforward and reliable as the process of making an image or copy of a regular (SSD or HDD) drive. So I had to assume that I would find myself occasionally setting up another WTG drive, with the software installation and configuration chores that might entail.
On the WTG drive that I was using to write these words, I had some installed programs, and I also had some portable programs. As an alternative that I could also use in other computers that might lack my preferred programs, I also had a separate USB drive containing those same portable programs. I kept that PORTABLES drive in sync with my WTG drives. On the PORTABLES drive, I also stored installers for the programs that I installed on WTG drives. The list would change with continued use, but the programs I had installed on this Samsung WTG drive were as follows:
- Bitdefender antivirus
- Classic Shell (for old-style Start menu)
- Everything (file finder)
- IrfanView (for audio and image viewing and editing)
- Browsers: Firefox, Chrome, Opera
- WinRAR (for file zipping)
- Adobe (PDF) Reader DC
- AOMEI Backupper Standard
- AOMEI Partition Assistant Standard
- Macrium Reflect
- MiniTool Partition Wizard
- VeraCrypt
- OBS Studio (for video screen capture)
- VLC media player
- K-Lite Codec Pack (Mega)
- Moo0 SystemMonitor
- Touchpad Blocker
And then there were quite a few portables, some of which were backups or alternates in case of problems with the installed versions:
- 7-Zip
- Beyond Compare
- Adobe Reader 9.0 Portable Lite
- CrystalDiskInfo
- Daphne
- DoubleKiller
- Everything
- Firefox
- ImgBurn
- IrfanView
- LibreOffice
- Magical Jelly Bean Keyfinder
- MD5 & SHA Checksum Utility
- Moo0 SystemMonitor
- PatchMyPC
- Q-Dir
- Recuva
- Remove Empty Directories
- Rufus
- Speccy
- Stickies
- TestDisk & PhotoRec
- TreeSizeFree
- Ultimate Windows Tweaker
- UserBenchmark
- VeraCrypt
- VLC Media Player
- Windows 10 Media Creation Tool
- Windows ISO Downloader
- Windows Update MiniTool
- WinRAR
With all that, the WTG USB drive contained a total of 45GB of files, of which the largest chunks belonged to the Windows folder (28GB), Program Files (6GB), Users (4GB), Program Data (2GB), and Program Files (x86) (2GB) folders. While I was writing this post, I cloned the 64GB Samsung FIT USB 3.1 drive to a 128GB version of the same drive, available for under $30. It seemed unlikely that this installation would ever outgrow that. As an alternative, an affordable and high-capacity external USB 3.1 (or, possibly even better, an eSATA) SSD (e.g., 500GB Samsung ($98) and WD ($90) models) could accommodate program files plus a data partition. Note that, if the computer already had an internal data drive, one among many Microsoft FAQs advised that I could access it by using Win-R > diskmgmt.msc > go to the lower left corner of the Disk Management screen > right-click on the desired disk > Online.
Finally, when I had the WTG drive the way I wanted it, I would want to make a backup, by creating a drive image, an ISO, or a clone. If I paid for a premium version of some drive imaging programs (e.g., Macrium Reflct), I could obtain the Universal Restore feature, so that these USB drives might be able to restore a single basic Win10 image to a variety of computers. In that case, for some users the most flexible solution would be to construct the basic Win10 installation on a 32-bit machine, so as to have a single tool capable of restoring an encrypted drive C on both 32- and 64-bit computers.
Update: Cloning Desktop to USB
After several months of successful use of Windows 10 on the 128GB Samsung, I came up against the situation that some had warned about: that Win10 installation was version 1803; it had now reached the point where Microsoft would no longer maintain it; and Win-I > Update & Security was refusing to upgrade it to a more recent version. Instead, it seemed I would have to make a new WTG USB drive.
At this point, my desktop computer was running version 1909, and that was slated to remain in service until May 2021. Moreover, the desktop computer’s installation was fully developed, with many other programs and settings installed. To avoid the chore of recreating a full installation on this Samsung USB drive, I decided to try to clone the desktop onto the USB drive. To do that, after failures using methods described above and in another post, I decided to proceed by the two-step drive image method: first, make a backup image of the desktop’s Win10 installation, and then restore that image to the Samsung USB drive. Drive (as distinct from partition) cloning might have been an option, but the source SSD contained a data partition that did not belong (and would not fit) on the Samsung USB.
Before making the drive image, I went through some of the major space-reducing steps listed in another post. I also used MiniTool Partition Wizard to make sure the USB drive contained no partitions and was in GPT rather than MBR format. Then, in AOMEI, I indicated that I wanted to create a system backup. It detected drive C and the accompanying ESP partition. I went with the defaults and created the backup. Finally, to restore that backup onto the Samsung USB drive, I used Restore > Select Image File > browse to the .adi image file that I had just created > select that > Open > make sure “Restore this system backup” was selected > check “Restore system to other location” > Next > select the USB drive > Next > check the “SSD Alignment” box. (I was not actually able to find clear guidance on whether that box applied to USB drives, but it appeared not to be harmful.) Then Start Restore. The first time I tried this, it took AOMEI roughly an hour and a half to restore the image to the USB drive. On a later try, on the same USB drive, already wiped to leave no partitions, it took four hours. It was not clear why the two tries differed so much in that regard.
To my surprise and pleasure, that USB drive succeeded in booting another computer. Note: in order to boot from the USB, I had to go into the target computer’s BIOS/UEFI. I got there by hitting F2 during bootup. (The owner’s manual for some other computer or motherboard might specify some other key.) In the BIOS, I had to set the Boot setting to UEFI (not Legacy), and Secure Boot had to be turned off.
It was also best to set boot priority in the BIOS, at least temporarily, so that this WTG USB drive would be the first one to boot. Without that, some of the adaptations listed below could be problematic. After finishing those adaptations, it might be necessary or convenient to change the boot order back to the way it was previously. After doing that, I might have to hit F12 (or some other key; see manual) at reboot, to get a boot menu (i.e., a list of drives eligible to boot the machine). Then I could select the WTG USB drive and boot from there.
At first, it didn’t look like the WTG USB drive was going to boot the target system: it started up, and then shut down. It took another one or two startups after that, for it to get through its “Getting devices ready” phase and boot all the way into Windows. If it had not worked, maybe I could have done some troubleshooting using the Kyhi Multitool, with its best-available free versions of a number of useful tools (especially those found in its Start menu > All Programs > HD Tasks > Imaging and Partition Tools).
My next step was to adapt this WTG USB drive to run as desired on the machines where I was most likely to use it. As I already knew, this was going to take a while. Even on a relatively fast USB drive, the early hours would be slow, as the new WTG installation seemed to be acquainting itself with various aspects of my installation. Evidently the Windows installation was storing information that would help it to run faster. This was best done on a machine that could just sit there for hours, not being needed, while it sorted itself out. It seemed that, the more I used that USB drive on that machine in advance, the better it would be prepared for prime time, when I would need it to function like a native installation. During those hours, I made adaptations of two types:
One-Time Tweaks and Fixes for the WTG USB Drive (booted on any computer)
- Use a partition tool (e.g., diskmgmt.msc, MiniTool Partition Wizard) to check whether Windows has assigned a drive letter to the small initial boot partition on the WTG USB drive (which may exist only on GPT drives). If so, check that partition’s contents and use that tool to remove that drive letter.
- Use that same partition tool to change drive letters as desired. I normally set the built-in DVD drive, if any, to be drive Y, so that it would not be popping up as drive D or E, thereby interfering with the letters that I preferred to assign to other drives.
- If needed, run the Win10RegEdit.reg file that I used to modify new Windows installations.
- Since I had configured the desktop Windows system to look for drive D for some purposes, I also found it helpful to use that partition tool to create a small NTFS partition at the end of the WTG USB drive and make that drive D. In the case of Olympus Digital Wave Player (DWP, an old program I used to upload files from a digital voice recorder), I also had to create the higher-level folder (D:Current) that DWP needed in order to create its program folders, as dictated by the settings in Win10RegEdit.reg (above). If I made no such registry edit, there could instead be an issue of permissions for the C: folders where such programs would upload by default.
- Win-I (i.e., Settings) > Update & Security > Activation > verify that Windows was activated on the WTG USB drive. Also check that other software was licensed or activated as needed. For instance, I had only a limited number of licenses with Microsoft Office and Norton Antivirus. Such programs might not continue to function on any number of WTG spinoffs. The method of identifying license status seemed to vary among Office versions. For Office 2016, I ran cscript “C:Program FilesMicrosoft OfficeOffice16ospp.vbs” /dstatus. If I was in luck, that said, “LICENSE STATUS: LICENSED.” Alternately, it might say, “LICENSE STATUS: OOT GRACE,” with an ensuing explanation, like, “The Software Licensing Service reported that the application is running within the valid out of tolerance grace period.” Later, that might evolve to, “LICENSE STATUS: —NOTIFICATIONS—” with “ERROR DESCRIPTION: The Software Licensing Service reported that the hardware ID binding is beyond the level of tolerance.” (With no version of Office installed, that command produced, “No installed product keys detected.”) To continue with Microsoft Office in those adverse cases, I might have to look for the product key, or else uninstall the overused license, and then either hunt around for an older version or buy a new license. For antivirus, I might have to log in and manage devices or buy additional licenses. As alternatives, there were competitive free office suites and antivirus packages. Examples drawing considerable praise at the moment included LibreOffice (arguably the best free cross-platform suite, available as a portable) and Avast.
- Check that programs you expect to see in the system tray (i.e., lower right corner of Windows screen) (e.g., antivirus) are working and updated. Try essential productivity software (e.g., browser, spreadsheet). If browsers (e.g., Firefox, Chrome) are synced, log in (perhaps after making sure you have a backup of their open tabs) to keep this installation up to date.
- Win-I > System > Power & sleep > Additional power settings > Choose what closing the lid does. At least one of my target machines was a laptop, so it was going to do funky things when I closed the lid, which had not been an option on the desktop where I created the WTG USB drive. That is, this option might be visible only when running the WTG drive on a laptop.
- Win-I > System > About > Rename this PC. This could be useful when viewing systems in a network, and for figuring out where a poorly labeled drive image came from. For mine, I used the name of the desktop computer that created it, so I would know its source, plus the letters WTG at the end of the name. Windows only allowed hyphens (“-“) to separate words in the name.
- Win-E > resize an Explorer window to the size and shape that I wanted Explorer windows to open in. This was especially worthwhile if the resolution of the target computer’s display differed from that of the source computer. Don’t allow it to snap to edges or other sizes; that will negate the effort. When it’s at the desired size, close the window and it will remember the size, though not the location. Likewise for other windows.
- Win-R > taskschd.msc > Task Scheduler Library > right-click on batch files that I had scheduled to run on the source machine, but might not want to run on the target machine at all, or at least not with the same settings > revise, Disable, or Delete. Note also the option to export tasks as backup.
- System startup folder (C:ProgramDataMicrosoftWindowsStart MenuProgramsStartUp) > revise items set to run at startup, as needed, to suit the WTG context. If this folder contains a batch file that runs at startup, consider modifying its name to avoid seeing it overwritten during a sync with a later-updated desktop Start menu. Note also the individual user’s separate Startup folder (%appdata%MicrosoftWindowsStart MenuPrograms).
- In those same folders for individual user and all users (i.e., one level up from the Startup folder), hide unwanted folders built into Windows 10.
- Win-R > appwiz.cpl > uninstall programs not wanted or needed on this installation. If there were many, arguably the better approach would be to customize a version of the desktop installation first, to produce a minimal Windows installation to which I would then add (rather than subtract) programs, before cloning that via AOMEI (above).
- Win-R > cmd > Ctrl-Shift-Enter > should produce an Administrator command window > sfc /scannow. If it finds errors, run it again.
- In the same Admin command window, run chkdsk /r. This would check the WTG drive on reboot. If there was another boot drive in the system, this would run CHKDSK on the default boot drive, which might not be the USB drive. To overcome that, it might be necessary to set the WTG USB drive as the default boot drive (at least temporarily) in the BIOS.
- After a reboot, run CCleaner (but keep an eye on what it proposes to remove) and/or Win-R > cleanmgr > select drive C > OK > Clean up system files (if it offered that button, so as to get a more complete listing) > select drive C again > OK > see if it gave me anything substantial.
Having completed those steps on one computer, I could consider using the same WTG USB drive to boot other computers where I might need it. Doing so might raise additional driver issues — but could make the WTG more robust and ready for action in a pinch. In that case, the following steps would be advisable, not only for the primary machine, but for all machines that I was likely to boot using the WTG drive.
Tweaks and Fixes to Revisit on Each Computer Running the WTG Drive
- Win-I > Update & Security > View optional updates. This option might not be visible if I had updates paused. Clicking it showed me drivers and other updates that the source machine (or any other machine) had not needed, but that might be helpful or necessary on this target machine. If these included display updates, they could mess with the display, possibly requiring a reboot to clear things up. Another post discussed problems I had with one attempt to install updates on a WTG drive.
- Win-I > System > Display > adjust resolution etc. as desired. Fix font sizes in other noticeable places. Example: I was using Classic Start Menu, which had its own controls for fonts used in its menus. To make mine smaller, I tried (without success) Classic Start Menu > Settings > Menu Look tab > Override system DPI: 96. To make it larger, it might have been sufficient to use Skin tab > select a skin > Large font. Some of these settings would only be effective after closing and restarting ClassicStartMenu.exe (or just rebooting the system).
- Win-R > devmgmt.msc > try to update drivers to fix any items that are still having problems after finishing Windows updates (including relevant optional updates). Some items here may have been relevant only on the source machine. Right-click > Uninstall device (thereby allowing the system to add them back as needed on reboot) would solve some but not all Device Manager problems. As examples of more difficult situations, in one case Device Manager had two items listed under “Other Devices,” for which Windows was apparently not able to find drivers. My solution for each was to right-click on it > Update driver > Browse my computer for drivers > point it to a specific folder. That folder contained the drivers that I had previously extracted from a working Windows 10 installation on this same computer, using Double Driver as discussed in another post. Another possibility: use a driver updater. Still, as indicated in a separate post, it was still possible that, in rare instances, the suggested solutions would fail.
- Win-R > dfrgui > optimize drives as indicated.
- Except where there was a system in place for checking each computer’s RAM regularly, this could be one of the rare instances when such a test could identify the culprit behind system malfunctions or data corruption. To schedule it to run on reboot: Win-R > mdsched > Enter > Check for problems the next time I start my computer. One way to view the results of the test: Win-R > eventvwr > left pane of Event Viewer > Windows Logs > System > right pane > Filter Current Log > Event sources: Memory Diagnostics-Results > OK. On one machine, however, the Windows Memory Diagnostic kept freezing up, partway through the job. A Linux Tech Tips discussion indicated that many had had this problem. It appeared that PassMark’s MemTest86 was the consensus alternative. I had no problem using that download to create a bootable USB that ran MemTest86 9.4. With luck, I would soon complete a post on converting that USB to an ISO.
- Except as indicated above, in most instances I would presumably not need the fixes listed in another post – but it couldn’t hurt to review them, just in case.
When the WTG USB drive was updated with drivers and other tweaks for all machines where it was going to be used (or as many as possible), a good final step was to use AOMEI Backupper to make an image of this WTG USB drive, while it was running, in the machine where I was most likely to use it. That way, I might not have to recreate it from scratch if some future Windows Update screwed it up.