Для того, чтобы начать работать с системой контроля версий Git ее необходимо предварительно установить. Рассмотрим варианты установки этой VCS под MS Windows и Linux.
Установка Git под Windows
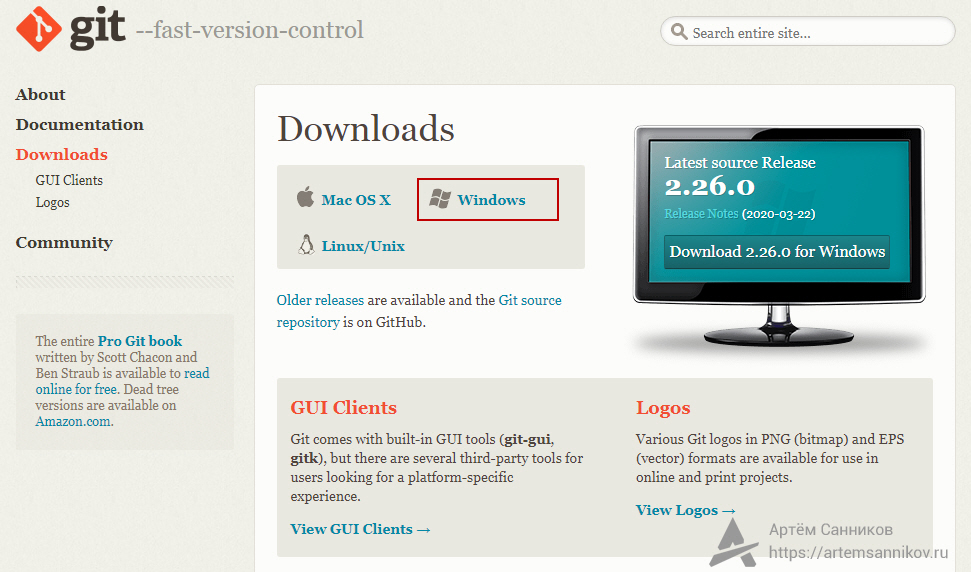
Для установки Git под Windows необходимо предварительно скачать дистрибутив. Для этого перейдите на страницу https://git-scm.com/
Если вы зашли из под операционной системы (ОС) Windows, главная страница сайта будет выглядеть примерно так, как показано на рисунке ниже. Для других ОС отличие будет заключаться в том, что изменится область для скачивания дистрибутива (см. правый нижний угол).

Для того чтобы скачать Git нужно нажать на кнопку Downloads for Windows, расположенную в правой части окна.
Процесс дальнейшей установки Git выглядит так.
1. Запустить установочный файл
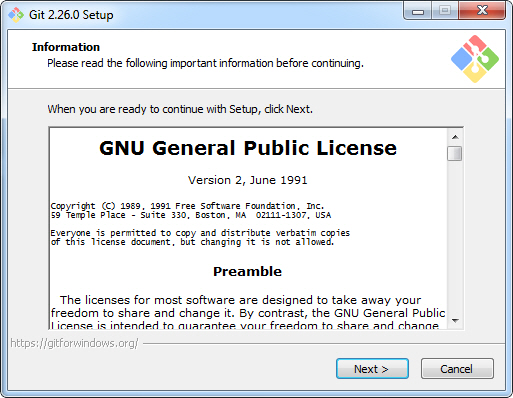
2. Ознакомиться, если есть желание, с лицензионным соглашением и нажать на кнопку Next

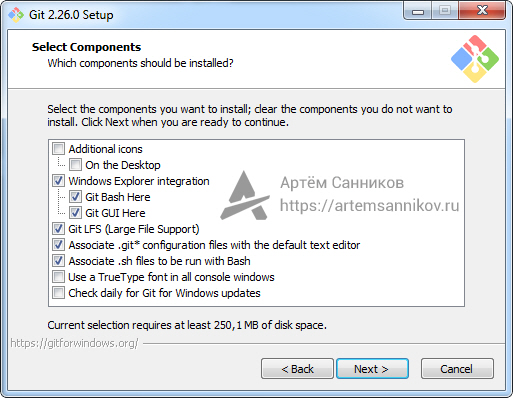
3. Выбрать компоненты, которые следует установить

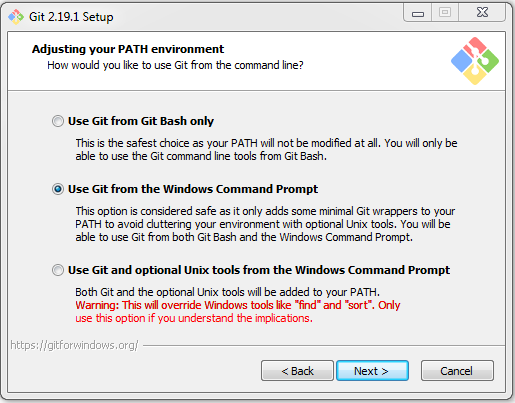
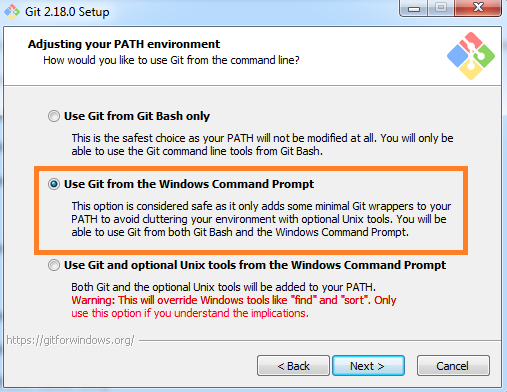
4. Указать способ использования Git

В этом окне доступны три возможных варианта:
- Use Git from Git Bash only
Переменная PATH не модифицируется и работа с Git возможна только через специализированную оболочку, которая называется Git Bash.
- Use Git from the Windows Command Prompt
В этом случае происходит минимальная модификация переменной окружения PATH, которая позволит работать с Git через командную стоку Windows. Работа через Git Bash также возможна.
- Use Git and optional Unix tools from the Windows Command Prompt
В переменную PATH вносится значительное количество модификаций, которые позволят, в рамках командной строки Windows, использовать как Git так и утилиты Unix, которые поставляются вместе с дистрибутивом Git.
Наша рекомендация: опция Use Git from the Windows Command Prompt.
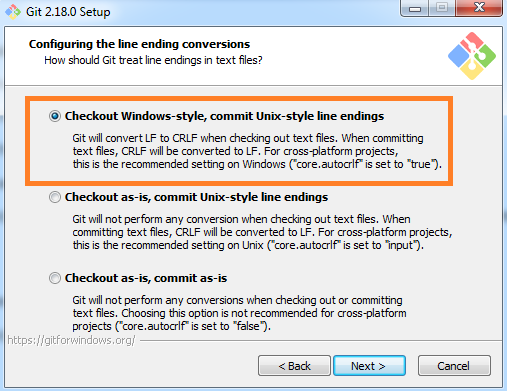
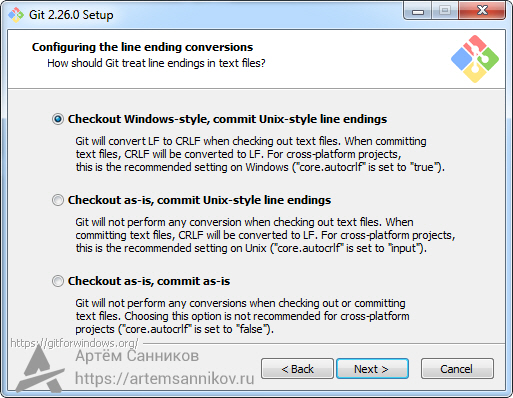
5. Настройка правил окончания строки

Существует два варианта формирования конца строки в текстовых файлах – это Windows стиль и Unix стиль. Данное окно позволяет выбрать одну из опций, определяющих правило формирования окончания строки:
- Checkout Windows-style, commit Unix-style line endings
Checkout (операция извлечения документа из хранилища и создания рабочей копии) производится в Windows стиле, а commit (операция отправки изменений в репозиторий) в Unix стиле.
- Checkout as-is, commit Unix-style line endigns
Checkout производится в том формате, в котором данные хранятся в репозитории, а commit осуществляется в Unix стиле.
- Checkout as-is, commit as-is
Checkout и commit производятся без дополительных преобразований.
Наша рекомендация: опция Checkout Windows-style, commit Unix-style line endings.
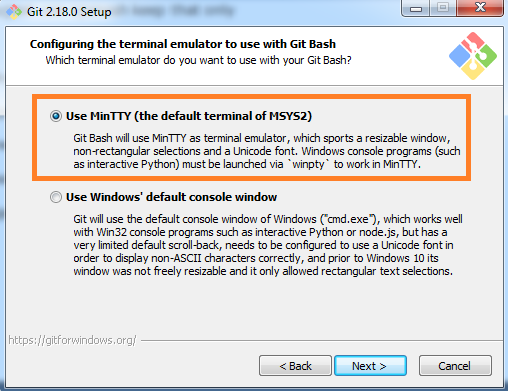
6. Выбор эмулятора терминала, который будет использован с Git Bash

Возможен выбор из двух вариантов:
- Use MinTTY (the defaul terminal of MSYS2)
Git Bash будет использовать в качестве эмулятора терминала MinTTY.
- Use Windows’ default console window
Git будет использовать Windows консоль (“cmd.exe”).
Наша рекомендация: опция Use MinTTY (the defaul terminal of MSYS2).
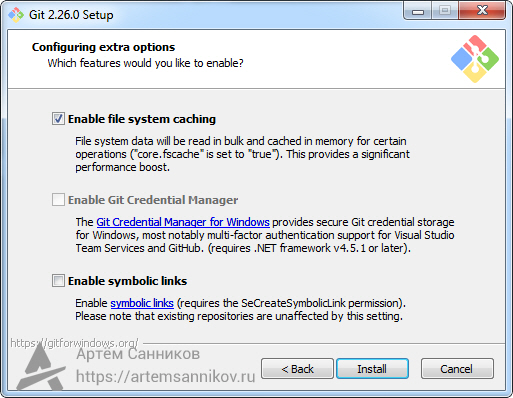
7. Настройка дополнительных параметров

Доступны следующие параметры:
- Enable file system caching
Включение операции кэширования при работе с файлами. Эта опция позволит значительно повысить производительность.
- Enable Git Credential Manager
Предоставляет возможность работы с защищенным хранилищем.
- Enable symbolic links
Активирует работу с символьными ссылками.
Наша рекомендация: опции Enable file system caching и Enable Git Credential Manager.
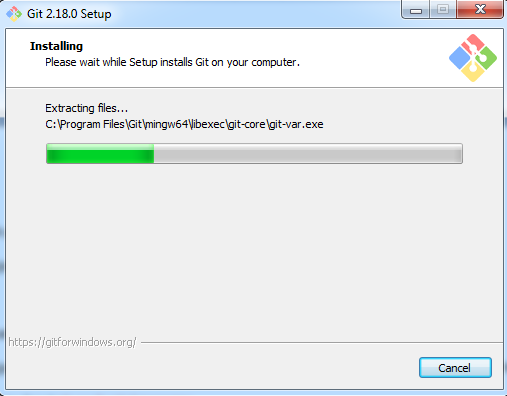
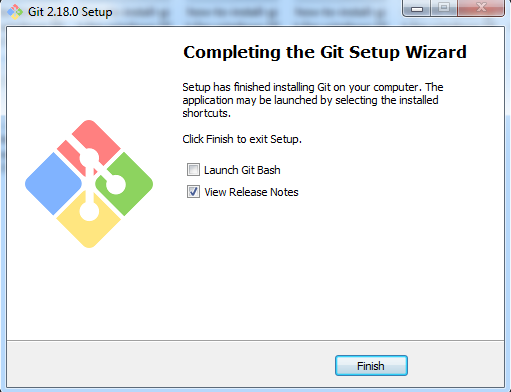
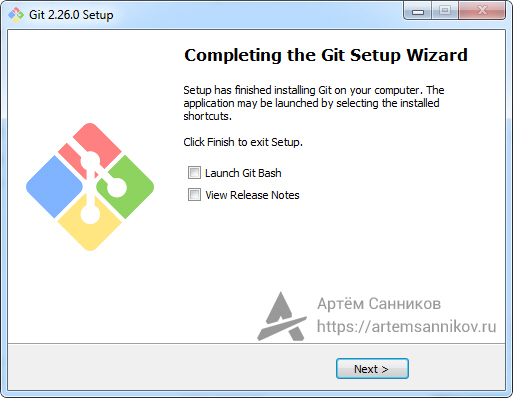
8. Завершение установки
После нажатия на кнопку Install будет произведена установка Git на Windows, по окончании установки пользователь получит соответствующее сообщение.

Установка Git под Linux
Для установки Git под Linux, также необходимо зайти на сайт https://git-scm.com/ и перейти в раздел Downloads. В зависимости от используемой вами версии операционной системы Linux необходимо выбрать тот или иной способ установки Git.
Debian/Ubuntu
> apt-get install git
Fedora
(Fedora 21)
> yum install git
(Fedora 22)
> dnf install git
Gentoo
> emerge --ask --verbose dev-vcs/git
Arch Linux
> pacman -S git
openSUSE
> zypper install git
Mageia
> urpmi git
FreeBSD
> pkg install git
Solaris 9/10/11 (OpenCSW)
> pkgutil -i git
Solaris 11 Express
> pkg install developer/versioning/git
OpenBSD
> pkg_add git
Alpine
> apk add git
Рекомендуем классный курс по git от GeekBrains, перейдите по ссылке и найдите в разделе “Курсы” курс “Git. Быстрый старт”. Это бесплатный видеокурс, зарегистрируйтесь и начинайте получать новые знания.
<<< Git для начинающих. Часть 1. Что такое системы контроля версий?
Git для начинающих. Часть 3. Настройка Git>>>
I agree with the other answers’ general analysis and am also unable to predict exactly what kind of conflicts you could run into. I know I haven’t noticed anything awry myself taking the third option. But I can add a little to what the options actually do as of 2018.
I experimented with a variety of installation configurations while deciding how to suggest my team transition to git, including these options. This is what I actually observed the installation doing to my path, as of git for Windows v2.19.1.
Use Git from Git Bash only
As it states, no modifications are made to your system’s path. Entering a simple git status on the Windows command prompt, cmd.exe, will fail with 'git' is not recognized as an internal or external command, operable program or batch file.
Use Git from the Windows Command Prompt
Can I just change the order of the directories in the PATH to prevent conflicts?
Is this what the 2nd option does? («Use Git from the Windows Command Prompt — This option is considered safe as it only adds some minimal Git wrappers»)
Changing the order is always an option for you, but no, the second choice appears to have nothing to do with ordering. (Path additions seem to go to the end of the path regardless. I’m a little suspicious this changed at some point.) It’s a question of which directories are added to the path, and is different between the second and third options.
When it says it will add «minimal» Git wrappers to your PATH, what it appears to actually do is add the cmd folder of the (coming) installation to the path. This is the option I eventually suggested to my team. We now have C:Program FilesGitcmd on our paths.
What’s in the cmd directory? For me, only six files:
- git.exe
- git-gui.exe
- gitk.exe
- git-lfs.exe
- start-ssh-agent.cmd
- start-ssh-pageant.cmd
As with Anaksunaman’s answer, I’m not sure when this would not be enough. Any of the normal commands starting with git <some command> would work from the inclusion of git.exe.
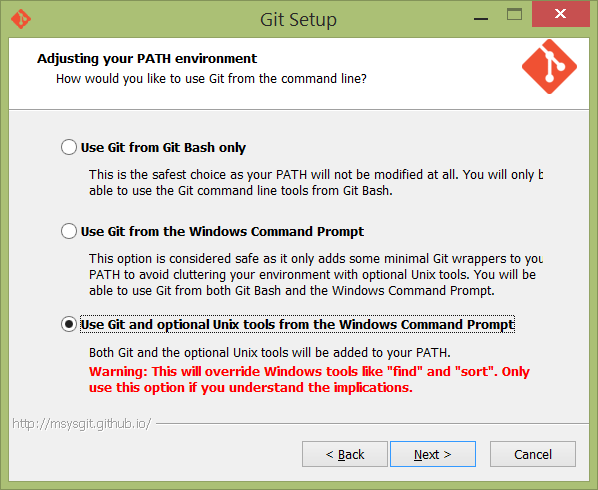
Use Git and optional Unix tools from the Windows Command Prompt
This includes the second option’s adding <Install dir>Gitcmd to the path, and also adds <Install dir>Gitmingw64bin and <Install dir>Gitusrbin to the path. Both directories have a significant number of executables, including find, sort, and kill as mentioned in other answers.
Rather than listing what’s probably a couple hundred items, I’d encourage the concerned user to take option two, complete the installation, and go take a look at those directories. If you’re satisfied with the risk, adding <Install dir>Gitmingw64bin and <Install dir>Gitusrbin to your path yourself would be equivalent to taking a time machine back and selecting the third option.
Система контроля версий Git полезна не только для программистов но и для системных администраторов. Рассмотрим процесс установки программного обеспечения, а также настройки подключения к репозиторию GitHub, на сервере под управлением ОС Windows.
Немного теории.
Git — одна из популярных современных систем контроля версий. В основном используется разработчиками программного обеспечения с целью отслеживания изменений в программных продуктах в ходе их разработки. Изначально Git создали для помощи в разработке ядра Linux, однако из-за своих преимуществ, проект ушел в массы.
Приступаем к установке.
Открываем официальный сайт проекта, кликаем по 64-битной версии для Windows.
 .
.
Загрузка начнется автоматически, дожидаемся ее окончания. Запускаем полученный файл.
Программа установки приветствует нас лицензионным соглашением. Кликаем по кнопке “Next”.

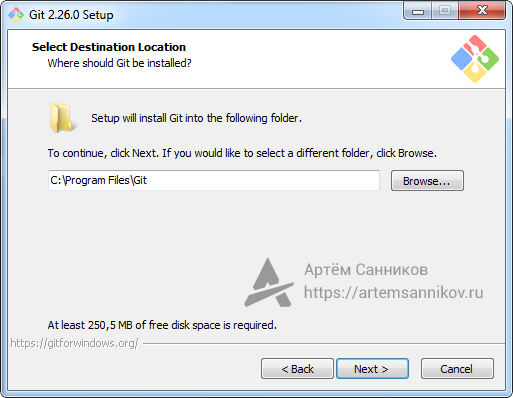
На следующем шаге указываем путь установки. Нас устраивает указанный по умолчанию. Кликаем “Next”.

На этапе выбора компонентов, отметим галочкой создание ярлыка Git на рабочем столе и переходим к следующему этапу.

Теперь программа установки предлагает создать ярлык в меню Пуск. Если в этом не видите необходимости, установите соответствующую галку. Кликаем по кнопке “Next”.

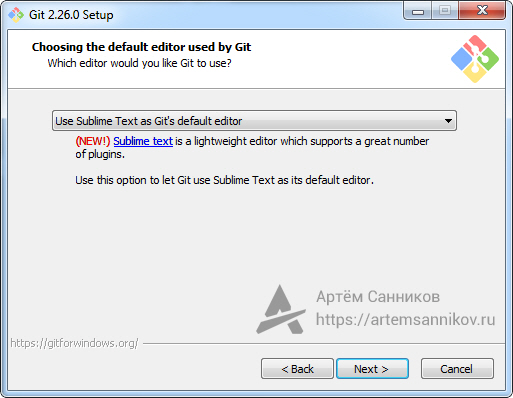
На следующем этапе, установщик предложит выбрать редактор для git по умолчанию. Для новичков лучше использовать nano, для тех, кто любит посложнее — Vim. Хотя допускается использование Notepad++ и прочего. Переходим к следующему шагу.
Теперь программа установщик спрашивает как Вы собираетесь использовать командную строку:
- Use Git from Git Bash only — использование только из командной строки Bash.
- Use Git from the Windows Command Prompt — использование командной строки Bash, а также минимальный набор команд Git из командной строки Windows.
- Use Git and optional Unix tools from the Windows Command Prompt — использование Git и утилит Unix из командной строки Windows. При выборе этой опции будут перезаписаны некоторые утилиты ОС Windows, например find и sort.
Оставляем первый вариант и двигаемся дальше.

Теперь установщик спрашивает о том, какую библиотеку следует использовать для HTTPS-соединений. Оставляем openssl и переходим к следующему шагу.

Следующий шаг можно назвать самым значимым. Вопрос программы установки в том, какой формат завершения строки использовать. Одной из отличительных особенностей Windows от Unix-подобных систем — символ перехода на новую строку в файлах, а именно, LF и CRLF — управляющие символ для переноса строки в Unix и Windows соответственно.
Мы рекомендуем выбрать параметр предложенный системой — отладка файла в формате Windows, а загрузка файла — в Unix-формате. Кликаем по кнопке “Далее”.

На данном этапе, программа запросит каким терминалом пользоваться далее:
- MinTTY — терминал Unix;
- Windows — стандартный терминал (командная строка) Windows.
В нашем случае оставляем “как есть” и двигаемся дальше.

На следующем шаге, установщик попросит отметить необходимые функции:
- File system caching — кэширование файловой системой.
- Git Credential Manager — включить менеджер учетных данных.
- Symbolic links — разрешить использование символьных ссылок.
Выбираем то, что необходимо и переходим к следующему шагу.

На данном шаге, программа установки предлагает использовать экспериментальную опцию. Использовать ее или нет — решать Вам. Кликаем по кнопке “Install”.

Программа приступает к копированию файлов. Дожидаемся окончания процесса.

По окончании процесса установки нажимаем “Finish”.

Подключаемся к репозиторию.
Предполагается, что у вас уже есть своя учетная запись на github/gitlab. Если нет, то, в случае с github, проходим несложный процесс регистрации на сайте. Затем авторизуемся на нем и создаем репозиторий. Для этого кликаем по кнопке “Start a project”.

Указываем имя репозитория и кликаем по кнопке “Create repository”.

Репозиторий создан.
Добавляем файлы.
Предположим, что у нас есть файл, который необходимо добавить в репозиторий git или gitlab. Открываем папку, где располагается файл, кликаем правой кнопкой мыши по свободному месту и из открывшегося контекстного меню выбираем “Git Bash Here”.

Откроется командная строка. Последовательно выполняем следующие команды:
git config --global user.email "youmail@example.com"
git config --global user.name "Ваше имя"
Таким образом мы указали нашу почту и имя.

Для того, чтобы начать отслеживать изменения в текущей папке, выполняем следующие команды:
git init
git add .

Выполняем свой первый коммит и добавляем изменения на сервер:
git commit -m "Init"
Важно. Чтобы внести изменения на сервер, следует использовать для github:
git remote add origin https://github.com/пользователь/название_репозитория.git
git push -u origin master
Для gitlab:
git remote add gitlab https://server/namespace/project.git
git push -u gitlab master

После запуска команды, откроется окно авторизации. Вводим данные, которые использовали при регистрации.

Настройка аутентификации по SSH-ключам.
Для начала создадим ключ:
ssh-keygen -t rsa -b 4096 -C "<a href="mailto:yourmail@gmail.com">yourmail@gmail.com</a>"
В ходе генерации ключа, программа запросит ввод парольной фразы, которая необходима для защиты самого ключа. Можно ответить на вопрос двойным нажатием на Enter.
Закрытый ключ будет находиться по пути C:Users<Пользователь>.sshid_rsa. Открытый ключ — C:Users<Пользователь>.sshid_rsa.pub

Запускаем SSH-агента:
eval $(ssh-agent -s)
Добавляем ключи к ssh-агенту:
ssh-add ~/.ssh/id_rsa

Добавляем созданный ключ на сервер Git. На сайте github, в верхнем правом углу, кликаем по иконке учетной записи, выбираем “Setting”.

На обновленной странице, в левом меню, выбираем “SSH and PGP keys”, а в основной части окна, напротив SSH keys, кликаем по кнопке “New SSH key”.

Заполняем поле Title. В поле Key вставляем содержимое файла C:Users<Пользователь>.sshid_rsa.pub
Кликаем по кнопке “Add SSH key”.

Если все выполнено правильно, появится примерно такая запись:
Для проверки настроек, выполняем команду:
ssh -T git@<домен или ip-адрес git-сервера>
Например:
ssh -T <a href="mailto:git@github.com">git@github.com</a>
В ходе выполнения команды, программа запросит: “Уверены ли вы в продолжении соединения”. Это стандартный вопрос безопасности. Отвечаем — yes.
Если все выполнено правильно, программа выведет приветственную речь.

191028
Санкт-Петербург
Литейный пр., д. 26, Лит. А
+7 (812) 403-06-99
![]()
700
300
ООО «ИТГЛОБАЛКОМ ЛАБС»
191028
Санкт-Петербург
Литейный пр., д. 26, Лит. А
+7 (812) 403-06-99
![]()
700
300
ООО «ИТГЛОБАЛКОМ ЛАБС»
14th January 2015
If you’re going to be getting into coding, especially Front End, Node.js, or Angular.js development, you’re likely going to need (or want) to use Github and version control in your workflow. In this article I’m going to go over how to set up Github for your Windows system, and how to get it to work with the excellent console emulator, Cmder.
Until you start using it, you never really learn how awesome version controlling your projects can be. Without version control, you’re working with static files in a generally fixed location, and if you want to back up your project at a certain point in time, you have to manually create a copy of your project and store that somewhere. When you work in teams, this can quickly become convoluted and difficult to manage. With version control, you can automate the process a bit more, and you gain the flexibility to be able to work in multiple locations and with other developers without needing to transfer files over email, thumbdrives, or ftp.
If you’d like to learn more about the history of Version Control, I encourage you to check out the Git Documentation Chapter, Getting Started — About Version Control.
Setting Up Git
Step 1: Download and Launch the Git Installer
Navigate to https://git-for-windows.github.io/ and click «Download» to download Git for Windows. This will send you to the latest compiled executable hosted on Github. When I wrote this blog post this downloaded Git-1.9.5_preview20141217.exe, which is the version I wrote this post using. Please keep this in mind in case there are any issues. Once this file is downloaded, launch this file.
Step 2: Complete the Git Setup
- After you run the installer, the Git Setup window will appear. Click «Next >» to get started.
- On the Information page you’ll be presented with the program’s GPL License text. Click «Next >» to continue.
- On the Select Components page you can leave the Additional icons options unchecked and every other option set as their default. Click «Next >» to continue.

- On the Adjusting your PATH environment page you’re presented with three choices. What this page is really offering you:
- Use Git from Git Bash only — If you choose this option, you’ll only be able to use the
gitcommand, and other unix tools, by launching a shortcut to the Git Bash client. You will not be able to use this commands from the Windows Command Prompt. - Use Git from the Windows Command Prompt — If you choose this option, you’ll be able to use ONLY the
gitcommand from the Windows Command Prompt. The rest of the unix tools will only be able to be run by launching a shortcut to the Git Bash client. - Use Git and optional Unix tools from the Windows Command Prompt [My Personal Recommendation] — If you choose this option, you’ll be able to use the
gitcommand from the Windows Command Prompt AS WELL AS all the extra unix tools such asls,pwd, andssh-keygenfrom the Windows Command Prompt. Yes, this does replace some Windows-based tools, such asfindwith the unix version, but unless you’re creating python scripts or batch scripts to manage Windows in some fashion, you can get away with this option with little to no issue.
When you have made your decision, click «Next >»
- Use Git from Git Bash only — If you choose this option, you’ll only be able to use the
- On the Configuring the line ending conversions page, you’re presented with three more options. What I would recommend is instead of letting Git manage line ending conversions for you, you instead manage your files line endings from within your IDE. In a future article I may go over how to set up line endings in Sublime Text which is my preferred of handling line endings. With this in mind, I recommend you select Checkout as-is, commit as-is as we will manage line endings ourselves. Click «Next >» to commit to the install.
You should now have Git installed, and you can technically stop reading this part of the tutorial as you have all the functionality to use Git. But for Quality of Life reasons, I recommend that you continue reading, and follow the instructions for setting up Cmder. The Windows Command Prompt doesn’t make copying and pasting as easy as the terminal does in Linux or Mac, and Cmder fixes that issue while adding some additional features and visual enhancements.
Setting up Cmder
Step 1: Download and Extract Cmder Mini
Navigate to http://bliker.github.io/cmder/ and scroll down to the Download section. Click «Download mini» to download a zip file for Cmder. Once the cmder_mini.zip file has finished downloading, extract the contents to a location of your choosing. I recommend that you extract the contents to C:cmder.
Step 2: Set up Cmder to launch Git Bash
- Navigate to C:cmder on your hard drive and launch Cmder.exe.
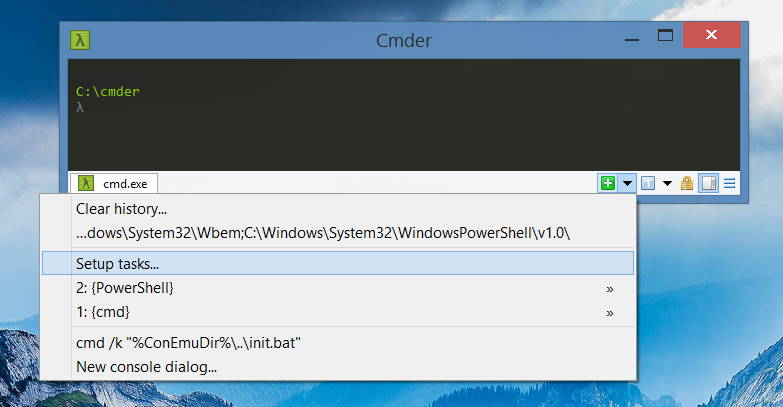
- In the bottom tab bar area of Cmder, you’ll see a green ‘+’ button, click the dropdown next to that green button and click «Setup Tasks…»
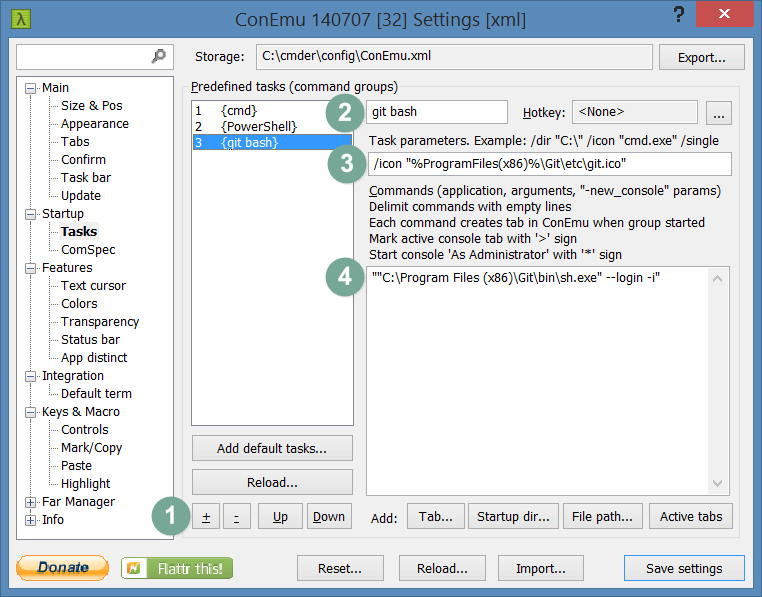
- You should now be presented with an options page which will let you edit the Startup > Tasks options. We have 4 things to do here to add our Git Bash installation to Cmder.
- Under the «Reload…» button, click the «+» (add) button. This will add a new blank task.
- Enter a name for your task. Let’s name it
git bash - Set the icon for this task to Git’s icon by typing in the Task Parameters field,
/icon "%ProgramFiles(x86)%Gitetcgit.ico" - Now all we need to do to finish creating this task is add the command to launch Git Bash. Depending on how you set up Git earlier when choosing how to adjust your PATH environment…
- If you selected either Use Git from Git Bash only or Use Git from the Windows Command Prompt, you will want to type in the following command:
""C:Program Files (x86)Gitbinsh.exe" --login -i" - If you selected the third option, Use Git and optional Unix tools from the Windows Command Prompt, you can type in the following command:
"sh --login -i"
- If you selected either Use Git from Git Bash only or Use Git from the Windows Command Prompt, you will want to type in the following command:
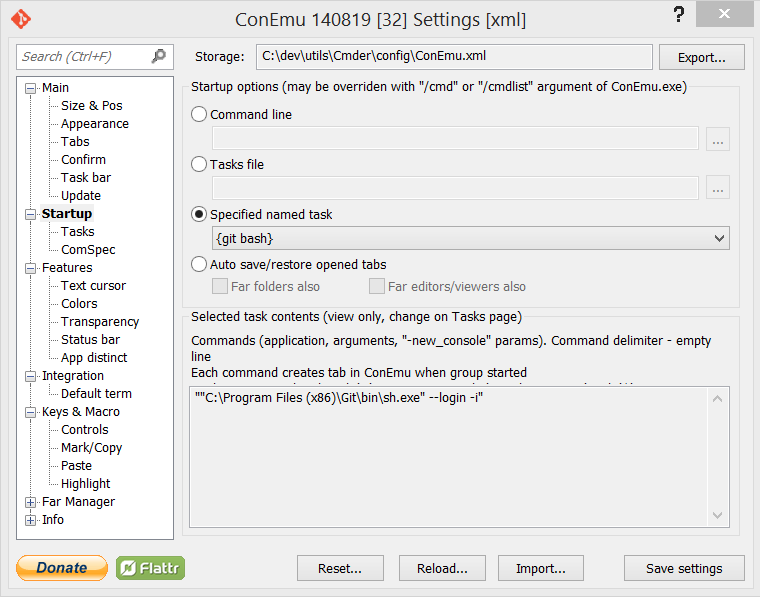
- Now before you click «Save settings,» let’s go ahead and click on the «Startup» option in the left options menu (the parent to Tasks). We’re going to select the radio option, «Specified named task» and select {git bash}.
- Now we can click «Save settings» (unless you want to go through the rest of the options and change font size and other behaviors). Every time you open Cmder, it will automatically run Git Bash by default, and you will have access to all the neat unix tools that Windows doesn’t provide, in a clean, easily resizable, and fully customizable console!
At this time you may want to create shortcuts for Cmder on your taskbar, desktop, or start menu. You can do this by navigating back to C:cmder and right-clicking on the Cmder.exe file, where you have an option to «Pin to Start,» «Pin to Taskbar,» and/or «Send to» > «Desktop (Create Shortcut).»
If you have any comments or questions about this article, or are interested in me writing an article about another topic or issue you are curious about or needing help with, feel free to shoot me an email: and…@awmoore.com
in the following steps i will show how to install git for windows clearly.
Git is installed or not you can check by using git version command.
git – -version
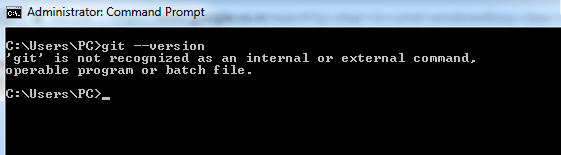
Here you can see git is not recognized as an internal or external command. that means git is not installed in my system.
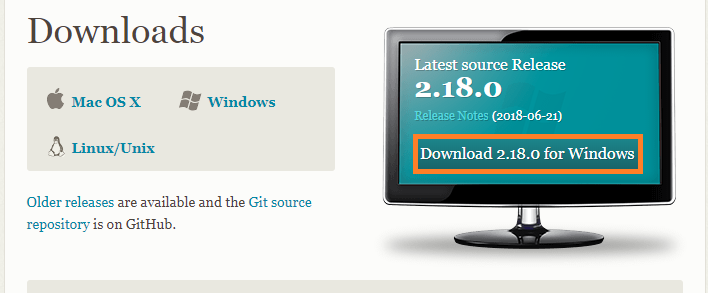
Go to git official website https://git-scm.com/downloads and download git executable file for windows
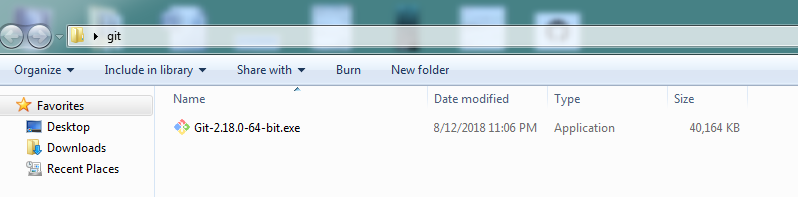
Go to the folder where you downloaded git exe file and double click and run that git exe file.
it will show you GNU general public license
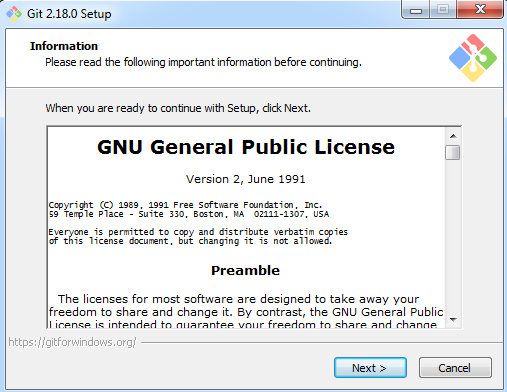
click on next
git home directory for windows-install git for windows
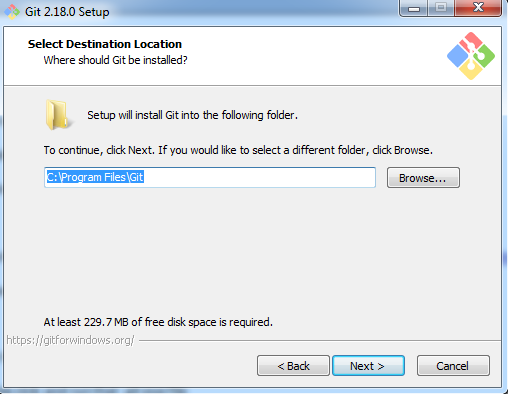
It will ask you to select destination location, destination location is nothing but git home directory. Here only git related all configuration files will be stored.
It will suggest you like C:Program FilesGit Iam keeping this default path only.
If you want you can change in your case.
click on next
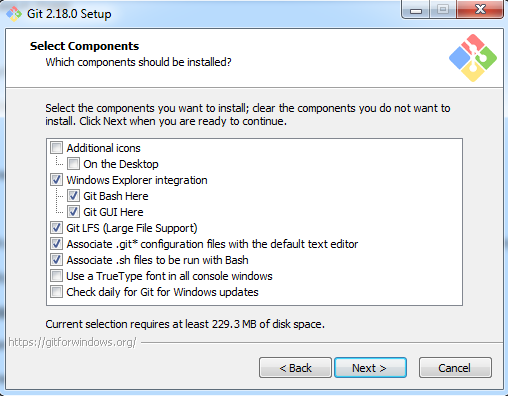
It will show you select components keep default values only.
click on next
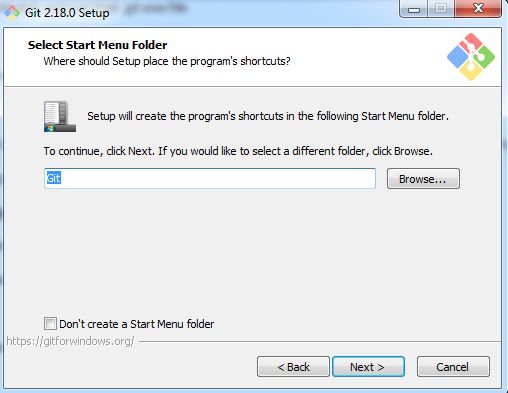
It will ask to you select where should place the programs shortcuts keep default value only.
choose editor for git-install git for windows

It will ask you to select files editor it will show you different options.
- nano editor
- vim editor
- notepad++
- use visual studio code as gits default editor
If you have any experience on vim editor or nano editor keep anyone. otherwise you can choose notepad++ .In my case iam choosing vim editor.
click on next
It will ask you to choose how would you like to use git from the command line.
it will show three options
- use git from gitbash only
- git from windows command prompt
- use git and optional unix tools from the windows command prompt
It will suggest you one default value use git from windows command prompt keep that only.
click on next
It will ask you which secure shell client program would you like git to use.
it will suggest you use openssh keep that only.
now it will ask you which ssl/tls library would like git to use for https connections.
It will suggest you, use the openssl library keep that only.
click on next
It will ask you, how should git treat line endings in text files?
It will suggest checkout windows-style,commit unix-style line endings keep that only.
click on next
It will ask you, which terminal emulator do you want to use with your git bash?
It will suggest use mintty keep that only.
click on next

It will ask you,which features would you like to enable?
It will suggest you to enable file system caching,enable git credential manager keep both like that only
- know more about git credential manager
click on install
install git for windows
so now git will install in git home directory C:Program FilesGit
click on finish
Now open command prompt.
If you already opened command prompt close it reopen and
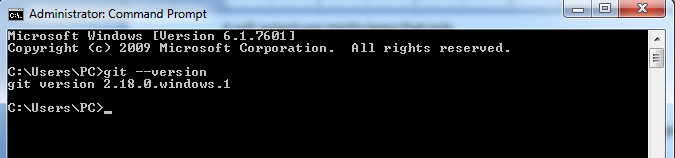
enter git – -version
Now you can see git commands are working.
Now we have successfully installed git for windows.

Introduction
In this tutorial you will install Git Bash on your Windows operating system. Git Bash is one of the most popular packages on Windows system. It comprises of git and bash. Git was created in 2005 by Linus Torvalds, and was built around a Unix-based system, such as the Linux operating system and MacOS. These operating systems have a built-in shell called bash that allows Git to run smoothly.
On the other hand, Windows is not a unix-based system and uses a different shell from bash, which git doesn’t support out of the box. To bridge the gap, Git Bash was created. Git bash installs both git and bash shell on a Windows system giving it access to command line tools that allow git to run properly. Additionally, git bash also installs bash tools such as ssh, cat, nano that makes developing on Windows easier.
What is Git?
Git is an open-source version control system for tracking source code changes when developing software. It keeps a commit history which allows you to revert to a stable state in case you mess up your code. Another common use for git is collaboration. git also allows multiple developers to collaborate on the same code base. it tracks all the changes each developer has made, and once the changes are accepted, the changes are merged into one code base which is deployed in production.
What is Bash?
Bash is a Unix command-line shell. The name is an acronym for the ‘Bourne-Again Shell’. A shell is a command line interpreter that gives the user an interface to interact with the computer through the use of commands.
Bash has a lot of useful commands, such as rsync,ssh, SCP, etc., which are not available on windows by default.
Now that you have an idea of that git bash and the tools it installs on Windows, you will download git bash in the next section.
Prerequisites
To follow this tutorial you will need:
- Windows administrator privileges.
- A text editor. You can download Visual Studio Code or Notepad++.
Step 1: Downloading Git Bash
In this section, you will download Git Bash executable from the official website.
Open your preferred browser and visit Git Bash downloads page by clicking the following link: Git Download Page
Once the page loads, click the Download for Windows button.

Next, you will be redirected to a different page and download will start automatically in a few seconds.

Tip: If the download doesn’t start, click on the click here to download manually link.
Now that you have downloaded the Git Bash executable, you will run the installer.
Step 2: Running the Installer
In this step you will start the Git Bash installation wizard. Go into your Downloads directory or the location where your browser download things in. Click the Git Bash executable(.exe file) to run the installer.
Windows will prompt you with the message “Do you want to allow this app to make changes to your device?”, click Yes.
Next, read the GNU General Public License and click Next.

Step 3: Selecting the Destination Location
In this step, the installer will ask you select the location you want to install Git Bash. Proceed with the default option, and click Next.

Step 4: Selecting Components
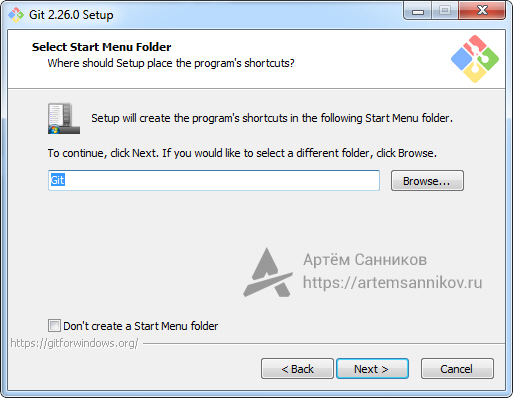
Select the components you want to install. I prefer selecting the Additional icons component which creates a Git Bash shortcut on the desktop. After you’ve selected the components, click Next.

The installer will ask you to choose the folder to create Start Menu folder. Proceed with the default name by clicking Next.

Step 6: Choosing the Default Editor for Git
In this step, the installer will ask you to choose the default editor for Git. By default it chooses Vim, please don’t proceed with the Vim editor as it has a steep learning curve.
Instead, choose a text editor that you like. If you looking for recommendations, you can download Visual studio code or notepad++ which are much easier to use and restart the installation wizard.
I prefer Visual Studio code, so I will select that.

After choosing the editor, click Next.

Step 7: Adjusting the Name of the Initial Branch in New Repositories.
The installer will now ask you to choose the branch name for new repositories. Naming a branch master used to be a popular naming convection, but lately there has been a shift to naming branches main. This due to negative association with the word master. Even GitHub changed the default branch name from master to a more inclusive name main.
So in this step, we will name the branch name main. select the Override the default branch name for new repositories option, and type main. After that, click Next.

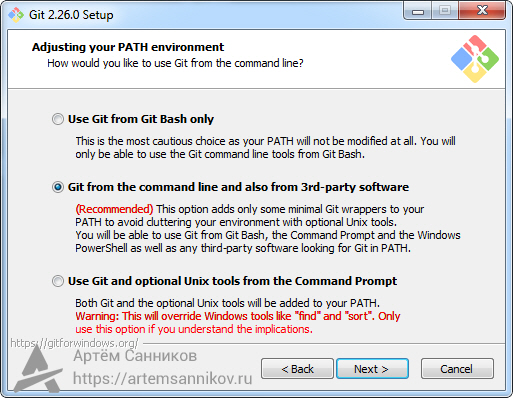
Step 8: Adjusting your PATH Environment
In this section, the installer will ask you to choose how you want to use Git. It offers you the following options:
-
Use Git from Git Bash only: allows you to run Git and Bash commands in the Git Bash terminal only. The commands won’t work on Windows Command Line(CMD) or PowerShell.
-
Git from the command line and also from 3rd-party software(recommended): allows you to run Git commands only on CMD, PowerShell and when you need bash commands, you will need to open the Git Bash terminal.
-
Use Git and optional Unix tools from the Command Prompt: Allows you to run both Git and Bash commands on CMD or Powershell. This option overrides default CMD tools like find and sort.
We will go with the default option Git from the command line and also from 3rd-party software. We will be able to use Git on all terminals: CMD, PowerShell and Git Bash terminal. And we can always open the Git Bash Terminal when we need more bash tools. Click Next to proceed.

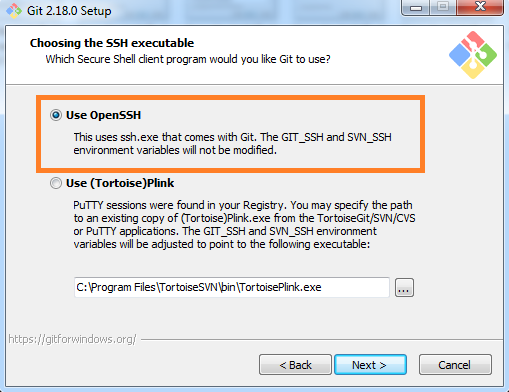
Step 9: Choosing the SSH executable
Select the Secure Shell(SSH) client, it’s recommended to go with the default option. So select Use bundled OpenSSH, and click Next.

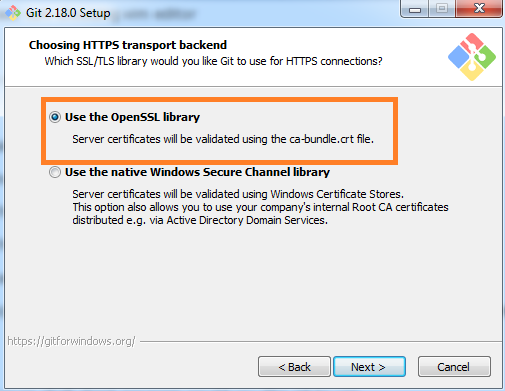
Step 10: Choosing HTTPS Transport Backend
The installer will ask you to choose the SSL/TLS library for Git HTTPS connections. Proceed with the default option Use the OpenSSL library and click Next.

Step 11: Configuring the Line Ending Conversions
In this step, you will be prompted to choose how Git should treat line endings in text files. Since you are on Windows system, go with the default option Checkout Windows-Style, commit Unix-style line endings and click Next.

Step 12: Configuring the Terminal Emulator to use with Git Bash
Choose the terminal emulator you want Git Bash to use. MinTTY works well, so I would recommend you to proceed with the default option Use MinTTY(the default terminal of MSYS2) and click Next.

Step 13: Choosing the Default Behaviour of git pull
In this step, the installer asks you if you want to change the default behaviour of git pull(a git command). Unless you know what you doing, proceed with the default option Default (fast-forward or merge) and click Next.

Step 14: Choosing a Credential Manager
In this step, you will be asked to choose a credential manager. Proceed with the default option Git Credential Manager Core and click Next.

Select the features you want. I find the default options sufficient for my needs. You can proceed with them and click Next.

Step 16: Configuring Experimental Options
If you are feeling adventurous, you can try new experimental features. I like to play it safe and I don’t enable them, so I will proceed to start the installation process by clicking Install.

Step 17: Waiting for Git Bash to install
In this step, you take a step back and wait for a few minutes for the Setup Wizard to install Git Bash on your computer.

Step 18: Completing the Installation
After the installation has finished, select Launch Git Bash and click Finish to launch Git Bash.

The Git Bash terminal will now open and you will be able to enter Git and Bash commands.

Congratulations on successfully installing Git Bash.
Step 19: Launching Git Bash
The following are just some tips on how you can easily launch Git Bash.
1. Right-click on any folder, anywhere and it will have the launch Git Bash option on the context menu.

2. If you enabled the “Additional icons” option on Step 4, you can easily launch Git Bash by clicking the Git Bash desktop icon.

As mentioned in Step 7, you will be able to run Git commands on Git bash terminal, Windows Command Prompt, and Powershell.
Quickly, lets verify that Git works on CMD and PowerShell by typing the following commands:
git --version tells you the Git version currently installed on your system.


Conclusion
In this article you installed Git Bash on your windows system. You also verified that Git works on CMD, and PowerShell. You are now ready to start learning Git. Visit gittutorial — A tutorial introduction to Git to learn the basics.
Thanks for reading.
Открываем официальный сайт и загружаем стабильную версию версию Git.
https://git-scm.com/
Далее запускаем установочный файл и следуем инструкции
Указываем директорию для установки
Отмечаем нужные пункты галочкой и идём дальше
Задаём имя директории, которая будет отображаться в меню — Пуск
Указываем текстовый редактор, который будет задан по умолчанию при редактировании файлов
Выбираем вариант использования Git:
- Use Git from Git Bash only (использование только командной строки Bash);
- Git from the command line and also from 3rd-party software (использование Git из Git Bash или из командной строки Windows);
- Use Git and optional Unix tools from the Command Prompt (использование утилиты Unix из командной строки Windows).
Указываем какая библиотека будет использоваться при установке соединения HTTPS:
- Use the OpenSSL (сертификаты сервера будут проверяться с помощью ca-bundle.crt);
- Use the Windows Secure Channel library (проверка сертификатов сервера будет производиться библиотеками Windows).

Выбираем вариант, как будут обрабатываться строки:
- Checkout Windows-style, commit Unix-style line endings (Git произведет замену всех окончаний строк в ваших файлах с Windows-стиля ( r n) на Unix-стиль ( r) непосредственно перед фиксацией в репозитории);
- Checkout as-is, commit Unix-style line endings (Git будет изменять все окончания строк в ваших файлах с Windows-стиля ( r n) на Unix-стиль ( r) непосредственно перед фиксацией в репозитории);
- Checkout as-is,commit as-is (Git не будет выполнять изменения по окончанию строк при фиксации или извлечении).
Выбираем эмулятор по умолчанию для Git Bash:
- Use MinTTY (терминал Unix);
- Use Windows default console window (использовать консоль Windows по умолчанию).

Если нужен дополнительный функционал, отмечаем галочкой нужный пункт
- Enable file system caching (кэширование файлов);
- Enable Git Credential Manager (доступ к некоторым Git-репозиториям, используя вашу учетную запись Microsoft вместо ключей HTTPS / SSH);
- Enable symbolic links (поддержка символических ссылок).
Git успешно установлен
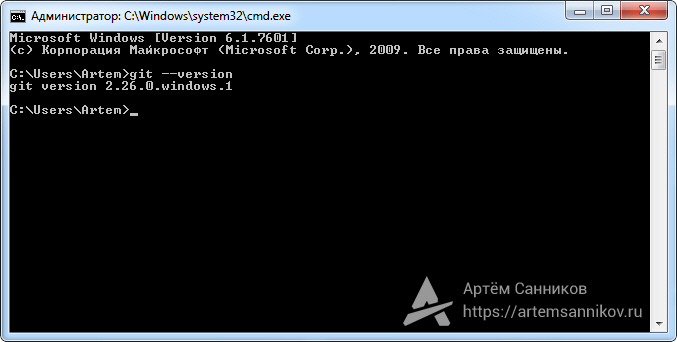
Теперь открываем командную строку и проверяем версию Git, при помощи команды:
git --version
Метки: Git.