During the installation of Git on my Windows machine, I selected «Use the OpenSSL library» for HTTPS Transport backend.
I would like to switch to «Native Windows Secure Channel library» for HTTPS Transport.
Is this possible without re-installing git on Windows?
![]()
smci
31.4k18 gold badges112 silver badges146 bronze badges
asked Aug 17, 2017 at 18:30
![]()
I found the setting for «schannel» or «openssl» with Git for Windows 2.14.2, 64 bit in file:
C:Program FilesGitmingw64etcgitconfig
Example config for OpenSSL:
[http]
sslCAInfo = C:/Program Files/Git/mingw64/ssl/certs/ca-bundle.crt
sslBackend = openssl
Example config for Windows native:
[http]
sslCAInfo = C:/Program Files/Git/mingw64/ssl/certs/ca-bundle.crt
sslBackend = schannel
answered Oct 30, 2017 at 14:25
![]()
JasonSJasonS
1311 silver badge4 bronze badges
You can check out this thread from the Git for Windows maintainer:
Yes, it is possible, and you can find out how exactly it is done by
inspecting the source code for the installer, which is at
https://github.com/git-for-windows/build-extra in the
installer/install.iss file (this file is also easily found by agit grep).
"Secure Channel"The relevant part is when the installer tests for the GC_WinSSL option to
do more interesting stuff than recording the user’s choice:
if RdbCurlVariant[GC_WinSSL].Checked and (not
    ReplaceFile(BinDir+'curl-winsslcurl.exe',BinDir+'curl.exe') or not
    ReplaceFile(BinDir+'curl-winssllibcurl-4.dll',BinDir+'libcurl-4.dll'))
then begin
            Log('Line {#__LINE__}: Replacing curl-openssl with curl-winssl failed.');
end;
(See
https://github.com/git-for-windows/build-extra/blob/97c8294b584ae4b99059a1194a5eba24ee2ff1ab/installer/install.iss#L1774)In other words, the installer will simply try to replace the curl.exe and
libcurl-4.dll files in mingw64bin (or the 32-bit equivalent) by the
files in mingw64curl-winssl.
answered Aug 18, 2017 at 5:36
![]()
VonCVonC
1.2m508 gold badges4244 silver badges5066 bronze badges
This is now offically supported with Git 2.20 (Q4 2018): On platforms with recent cURL library, http.sslBackend configuration variable can be used to choose a different SSL backend at runtime.
The Windows port uses this mechanism to switch between OpenSSL and
Secure Channel while talking over the HTTPS protocol.
See commit b67d40a (25 Oct 2018), and commit 21084e8 (15 Oct 2018) by Johannes Schindelin (dscho).
See commit 93aef7c (25 Oct 2018) by Brendan Forster (shiftkey).
(Merged by Junio C Hamano — gitster — in commit d7b1859, 02 Nov 2018)
http: add support for selecting SSL backends at runtimeAs of version 7.56.0, curl supports being compiled with multiple SSL
backends.This patch adds the Git side of that feature: by setting
http.sslBackendto «openssl» or «schannel«, Git for Windows can now choose the SSL
backend at runtime.This comes in handy on Windows because Secure Channel («schannel») is
the native solution, accessing the Windows Credential Store, thereby
allowing for enterprise-wide management of certificates.
For historical reasons, Git for Windows needs to support OpenSSL still, as it has
previously been the only supported SSL backend in Git for Windows for
almost a decade.The patch has been carried in Git for Windows for over a year, and is
considered mature.
answered Nov 4, 2018 at 3:55
![]()
VonCVonC
1.2m508 gold badges4244 silver badges5066 bronze badges
Подглава 1.5:
https://git-scm.com/book/en/v2/Getting-Started-Installing-Git
https://git-scm.com/book/ru/v2/Введение-Установка-Git
В этой подглаве коротко описано, как можно установить программу «Git» на свой компьютер разными способами. Порядок установки зависит от операционной системы, установленной на компьютере. В подглаве описан порядок установки для Unix-подобных операционных систем и для операционных систем семейства «Windows». Заключительная часть подглавы посвящена тому, как можно собрать исполняемый файл программы «Git» из исходников (это программа с открытыми исходниками) на Unix-подобной операционной системе.
У меня на компьютере установлена операционная система «Windows 10 Pro» (64-разрядная), поэтому меня интересовал раздел данной подглавы, посвященный установке программы «Git» на компьютер с операционной системой семейства «Windows». Этот раздел данной подглавы маленький, состоит всего из двух параграфов, но всё необходимое там описано. Вот страница официального сайта программы «Git», посвященная установке этой программы на компьютер с операционной системой из семейства «Windows»:
https://git-scm.com/download/win
Хоть в учебнике сказано, что после перехода по этой ссылке должно начаться автоматическое скачивание дистрибутива программы «Git», этого не происходит. Видимо, с 2014 года (время написания учебника) это убрали.
В учебнике отмечено, что с указанной страницы можно скачать не оригинальную программу «Git» (которая, как я понимаю, работает только на Unix-подобных операционных системах), а отдельную программу для операционных систем «Windows», которая называется «Git for Windows».
Вот ссылки на исходники оригинальной программы «Git»:
https://git.kernel.org/pub/scm/git/git.git/
https://www.kernel.org/pub/software/scm/git/
https://github.com/git/git
Вот ссылка на исходники программы «Git for Windows»:
https://github.com/git-for-windows/git
У программы «Git for Windows» есть собственный отдельный сайт, у которого есть два адреса URL (оба этих адреса ведут на один и тот же сайт):
http://git-for-windows.github.io
https://gitforwindows.org
В описании проекта «Git for Windows» на веб-сервисе «GitHub» сказано, что программа «Git for Windows» является форком оригинальной программы «Git», содержащим изменения, нужные при работе в операционных системах семейства «Windows».
Что интересно, на данный момент номера версий для оригинальной программы «Git» и для программы «Git for Windows» совпадают. Вероятно, разработчики этих отдельных программ как-то согласуют свои действия друг с другом.
Установка на практике
Итак, я перешел на страницу, упомянутую выше:
https://git-scm.com/download/win
и нажал там на первую же ссылку для скачивания «Click here to download», хотя ниже есть еще ссылки на разные версии дистрибутива. Эта ссылка указывает на один из дистрибутивов, расположенных на веб-сервисе «GitHub» по следующему адресу:
https://github.com/git-for-windows/git/releases/
Я скачал файл с таким названием (его размер 47,9 Мбайт):
Git-2.35.1.2-64-bit.exe
Из названия этого файла видно, что это дистрибутив программы «Git for Windows» версии 2.35.1(2) для операционной системы семейства «Windows» (64-разрядной), не младше «Windows Vista». Это самая свежая версия этой программы на данный момент, датированная 1 февраля 2022 года.
Я запустил эту программу-установщик. Она установила программу «Git for Windows» в следующую папку, затребовав 263,9 Мбайт места на жестком диске:
C:Program FilesGit
Список устанавливаемых компонентов программы «Git for Windows» я оставил по умолчанию:

Далее установщик попросил выбрать текстовый редактор, который программа «Git for Windows» будет использовать по умолчанию. Я выбрал из предложенного списка текстовый редактор «Notepad++», которым давно пользуюсь.
Далее предлагается возможность сменить умолчательное название первоначальной ветки нового репозитория, создаваемого с помощью программы «Git for Windows» (команда git init), с «master» на какое-нибудь другое. Эта функция установщика, очевидно, была добавлена после известного скандала, случившегося года два назад (см. тут). Тогда каким-то американцам не понравилось название «master» (одно из значений этого слова переводится на русский язык как «господин» или «хозяин») из-за того, что оно, якобы, неприятно напомнило им о судьбе когда-то угнетавшихся в США негров.
Лично меня слово «master» не смущает, так как в данном случае оно используется в другом значении («главный»). Поэтому я оставил опцию по умолчанию: «Let Git decide» (позволить программе «Git» самой решать). Это значит, что пока что умолчательное имя для первоначальной ветки остаётся «master», но в будущих версиях программы это может измениться. На уже существующие репозитории эта опция не влияет.
Далее установщик предлагает выбрать один из трех вариантов настройки переменной среды PATH: 1) не изменять эту переменную среды. Там сказано, что в этом случае программу «Git for Windows» можно будет запустить только из «Git Bash» (я пока не знаю точно, что это такое, но подозреваю, что это программа-эмулятор командной строки «bash» из Unix-подобных операционных систем); 2) прописать путь к программе «Git for Windows» в этой переменной среды. В этом случае программу «Git for Windows» можно будет запустить из командной строки «cmd.exe» или из программы «Windows PowerShell» без указания полного пути к исполняемому файлу программы; 3) Прописать в этой переменной среды кроме пути к программе «Git for Windows» еще пути к каким-то дополнительным утилитам. Это может повлиять на работу обычных утилит операционной системы «Windows».
По умолчанию выбрана вторая опция из этих трех. Ее я и оставил выбранной.
Далее я выбирал из двух опций насчет использования SSH (тут подробнее). Выбрал опцию по умолчанию: будет использоваться программа «ssh.exe», которая установится сейчас вместе с программой «Git for Windows».
Выбрал опцию (предлагается два варианта) насчет библиотеки SSL/TLS, используемой программой «Git for Windows» при соединениях по протоколу HTTPS: «Use the native Windows Secure Channel library» (использовать встроенную в операционную систему «Windows» библиотеку).
Настройка преобразований окончаний строк: есть три опции. Оставил опцию по умолчанию: «Checkout Windows-style, commit Unix-style line endings» (при получении текстовых файлов из каталога «Git» в рабочую копию для изменения конвертировать LF в CRLF, при коммитах конвертировать CRLF в LF). Там сказано, что это рекомендуемая опция в кроссплатформенных проектах для операционной системы «Windows».
Настройка эмулятора терминала: есть две опции: 1) использовать «MinTTY»; 2) использовать умолчательное для операционной системы «Windows» окно консоли. Выбрал вторую опцию.
Выбор поведения команды git pull: есть три опции. Выбрал первую: «Default (fast-forward or merge)», так как там сказано, что это стандартное поведение этой команды.
Выбор «credential helper» (по-русски «менеджер учетных данных»): есть две опции. Я выбрал опцию «None» (не использовать менеджер учетных данных).
Настройка дополнительных опций: есть два флага: 1) «Enable file system caching» (включить кэширование при работе с файлами), по умолчанию флаг установлен; 2) «Enable symbolic links» (включить символические ссылки), по умолчанию флаг не установлен. Оставил умолчания.
Настройка экспериментальных опций: есть два флага, по умолчанию оба не установлены. Оставил, как есть.
Только после этого началась и успешно закончилась установка программы.
Выводы
В целом мне понравилось, как сделана программа-установщик. Однако, при установке требуется настроить слишком много опций. Это минус. Очевидно, что большинство из этих опций можно сконфигурировать уже после установки программы «Git for Windows», поэтому их настройку следовало бы отложить до момента после установки.
О настройке большинства из перечисленных опций я имею довольно смутное представление, поскольку являюсь новичком в использовании программы «Git for Windows». Надеюсь, позже будет возможность перенастроить вышеуказанные опции при необходимости.
Я пока что не знаю, как проверить работоспособность установленной программы. Продолжу читать учебник дальше. Думаю, в следующих главах всё станет понятно.
Git for Windows
Git for Windows (also available from git-scm.com) is a
MinGW build of Git and various other tools. It includes:
- Git, Git LFS, tig (ncurses Git repo browser/interface)
- OpenSSH (dunno if it’s Win32-OpenSSH or not)
- ssh-pageant, to let OpenSSH use PuTTY’s Pageant
- mintty and Bash (used by ‘Git Bash Here’ menu item in Explorer)
- GPG / GNU Privacy Guard (PGP), curl, perl, tcl/tk, MSYS21
- OpenSSL, zlib
- Root certs
Installation Summary
The install options used in previous installations can be found in one of
the following files:
C:Program FilesGitetcinstall-options.txt
C:Program Files (x86)Gitetcinstall-options.txt
%USERPROFILE%AppDataLocalProgramsGitetcinstall-options.txt
/etc/install-options.txt
Below, ✓ indicates things that should be selected/enabled, and ✗ things
that should be deselected/disabled.
- If you are going to use Visual Studio Code, or have another
favourite editor, install it before installing Git. - Download the installer from the gitforwindows.org and run it; the
following steps/choices will appear as the install wizard progresses.
(Not all steps are shown here; what to do for those not shown should be
obvious when you see them.) - Select Components: ensure that the following are checked:
- ✓ Windows Explorer integration: Git Bash Here
- ✓ Associate .sh files to be run with Bash
- Default editor: If your preferred option is not in the list, leave it at
the default (Vim). This can easily be changed later. - Adjusting PATH: «Git from the command line and also from 3rd-party software.»
- SSH executable: «Use OpenSSH.»
- HTTPS backend: «Use the native Windows Secure Channel library.»
- Line ending conversions: «Checkout as-is, commit as-is.» (Line endings
should be handled by your editor, not by Git. Even Windows 10 Notepad
now handles Unix line endings.) - Terminal emulator: «Use MinTTY.»
- Behaviour of
git pull: «Only ever fast-forward.» - Credential helper: None.
- Extra options:
- ✓ Enable file system caching
- ✗ Enable symbolic links
- ✗ Enable experimental support for pseudo consoles.
(As of 2.28.0.windows.1 this produces odd behaviour such as dropping
CRs and spawning Windows consoles with your output.)
File Modes
Some Windows filesystems (particularly FAT ones) don’t support setting
an executable bit, and this will cause files where Git has recorded
the executable bit set to be marked as changed. Set git config --local core.filemode false to suppress checking of the file mode for
that repo. Git probes the filesystem when a repo is cloned and sets
this automatically if the filesystem doesn’t support executable bits.
To set the executable bit on a new file when committing on such a system,
use git add --chmod=+x. (≤2.10 use git update-index --chmod=+x after
staging the file.)
For filesystems that do support filemode and have the executable bit set,
but where git is still complaining that it’s modified, use git update-index --skip-worktree --chmod=+x:
$ st
## main...origin/main [behind 4]
 M bin/f9post
$ dif
diff --git a/bin/f9post b/bin/f9post
old mode 100755
new mode 100644
$ git update-index --skip-worktree --chmod=+x bin/f9post
$ st
## main...origin/main [behind 4]
TLS (SSL) Libraries
First, a warning: lots of people recommend git config --global http.sslVerify false; this disables all authentication and should not
be done.
Git for Windows comes with a MinGW OpenSSL library; this will be used
by curl and the like. Git itself can be configured
(without reinstallation, but for just that user) to use this or the
native Windows Secure Channel library via one of the following:
git config --global http.sslBackend openssl
git config --global http.sslBackend schannel
Certificate Management
(XXX This applies to Unix as well, and so should be in another sedoc file.)
Git can be configured to use specific certificates (client
and/or server) for specific sites. Setting server certs is useful both
for sites using a non-public PKI (e.g., a self-signed cert) and for
environments using corporate MITM.
To set the CA cert to use for a site:
git config --global http.SITE-URL.sslcainfo 'CERT-FILE-PATH'
# E.g.:
git config --global http.https://git.myserver.com/.sslcainfo "C:CertsMyCACert.crt"
so-46332681 has further useful information and discussion on certificate
issues when using Git.
Credential Management
Recent versions of Git for Windows install and configure Git
Credential Manager for Windows if that box is checked during
the install process. This installs the git credential-manager
program and sets credential.helper=manager in the Git system
configuration. That configuration key is multivalue (each helper is
tried in turn) and thus cannot be overridden; you need to remove it
from the system gitconfig or, possibly, setting $GIT_CONFIG_NOSYSTEM.
For manual setting:
git config -g credential.helper manager
Git Credential Manager for Windows will store the credentials in the
Windows Credential Manager, accessible from «Control Panel » User
Accounts Credential Manager.» The «Windows Credentials» section will
have «Generic Credentials» list which will include the HTTP URLs
prefixed with git:, e.g., git:https://git@git.mydomain.com/. If
you have an incorrect credential in the manager, you can replace it or
delete it here.
This isn’t particularly secure; you can get the cleartext of a
password (and the username) stored there by sending a request to it
using the git-credential protocol, e.g.,
echo "protocol=https
host=git.mycompany.com
" | git credential-manager get
When using this kind of credential storage you should issue a separate
access token (e.g., a GitHub personal access token) that
you use nowhere else and perhaps expire it on a regular basis.
Using 2FA on your GitHub account (as you should!) somewhat increases
your security against this general class of attack as you will not be
able to use just your password to authenticate; you’ll have to use a
personal access token instead in these situations. However, the
additional security you gain is merely being able to limit the scope
of the token and easily cancel it without affecting other tokens used
by other machines or applications.
TortoiseGit
TortoiseGit provides a Windows File Explorer extension for Git
commands, a nice stand-alone Git log browser, and copies of PuTTY’s
pageant.exe and puttygen.exe.
— Advertisement —
Let’s talk a little bit about Git. This is a tool that performs a version control function on code in a distributed fashion. In other words, it’s an application that allows you to keep track of the versions, fixes, and modifications you’re working on in a project. This form of version control is very useful for teamwork. Likewise, if a project has a large number of files, this tool helps to have better control over them. The version control system helps to record changes made to the code. Furthermore, it records who made the changes and can restore deleted or modified code. In addition, there is no overwritten code because Git keeps multiple copies in the repository. Well, in this post we’re going to see how to install Git on Windows 10.
Downloading Git.
The first thing we have to do is go to the official website of the project and download the latest version.

Git installation.
After downloading, just run the installer. In the first window, you accept the license and proceed with the installation.

Then select the installation directory.

Then select some settings to install. I recommend you not to modify anything and continue with the installation.

The wizard offers to create a shortcut in the Start Menu.

Setting Up the Git Installation Parameters in Windows 10
In the next window, select the editor. It is important to realize, that the wizard itself does not recommend using the program’s default editor. Consequently, it is possible to select another one from the list. In my case, I chose Notepad ++ as it is very intuitive and comfortable to use. However, the user can select any of them.

In the next window, select the PATH environment. We recommend using Git as a command line so you can use git bash to launch commands from Git itself. So, leave the default option and continue with the process.

Next, select the SSL/TLS library that Git will use to manage the HTTPS connections. The options are OpenSSL and Windows Secure Channel library. Make your selection according to your needs. Select OpenSSL as the transport layer. On the other hand, if you want to manage the certificates through the Active Directory Domain Services. So you need to select the native Windows library.

Now set up the line ending conversions. The default is a Windows-style checkout. In other words, LF is converted to CRLF when checking out text files and vice versa at commit time. Git implements this conversion to correctly display line jumps in Windows. Likewise, other options can be selected according to the user’s needs.

Here in this window, Git will use a Linux command-line emulator. But in this case, it will be supported by git bash because we’ll be using Git on Windows.

Please leave the following options by default.

Git is offering to enable experimental options. In this case, it improves startup speed but can cause instability. So don’t select it and continue the installation.

After all the parameters are set, the wizard will begin installing the Git client. Please wait a few moments until he finishes his work.

Testing Git.
Once the installation is complete, enter Git into the search bar and launch the git bash. Note that this terminal has the basic functionality and utilities of a Unix shell.

We’ve finally seen how to install Git on Windows 10. It is one of the most widely used version control systems today. I hope this post is useful to you. Before saying goodbye, I invite you to see the article about Syncthing on Windows 10
If you run your TFS on prem and use git for windows you may run into two issues. The first occurs if you use SSL for your TFS. The second occurs if you are behind a proxy.
Use Git for Windows with a corporate SSL certificate
If you have a corporate SSL certificate and want to clone your repo from the console or VSCode you get the following error:
fatal: unable to access ‘https://myserver/tfs/DefaultCollection/_git/Proj/’: SSL certificate problem: unable to get local issuer certificate
The solution is described in MSDN article. It is outdated – that’s why I will explain it here. Export your root Certificate to a file. You can do this from within your browser. Open your TFS, click the lock symbol right to the url, and click view certificate. In the tab “Cerification Path” select the root and click view certificate again.

In the “Details” tab is a button to export the certificate. Use Base-64 encoded X.509 and save it to a file anywhere on your disk.

Locate the “ca-bundle.crt” file in your git folder (current version C:Program FilesGitusrsslcerts but is has changed in the past). Copy the file to your user profile. Open it with a text editor like VSCode and add the content of your exported certificate to the end of the file.

Now we have to configure git to use the new file:
git config --global http.sslCAInfo C:/Users/<yourname>/ca-bundle.crt
This will add the following entry to your .gitconfig file in the root of your user profile.
[http]
    sslCAInfo = C:/Users/<yourname>/ca-bundle.crt
If you are behind a proxy, it is pretty easy and well documented how you configure git to use it. The problem is that after that you cannot access your local TFS server. For that to work you have to add an exception for your local URL.
Open the .gitconfig file in the root of your user profile. Locate the http section. If your TFS uses SSL and you followed step one you should already have an entry with an sslCAInfo item. Add the url of your TFS to the section had and add a new section without the url. Add a proxy item to both items. Leave it blank for the entry that has your TFS url in it.
[http]
    proxy = "http://httpproxy.contoso.com:2233"
[http "https://tfs.contoso.com/tfs/"]
    proxy = ""
    sslCAInfo = C:/Users/<yourname>/ca-bundle.crt

That’s it. Now you can work with repos in your company network and in the internet. This is true for all kind of git repos – not only TFS.
Did you know you can access Linux utilities directly on your Windows operating system? Perhaps you’re looking for a separate terminal to run Git and Linux commands. If so, give it a shot to learn about Git Bash (Bourne Again Shell).
Not a reader? Watch this related video tutorial!
Not seeing the video? Make sure your ad blocker is disabled.
In this tutorial, you’ll learn what Git Bash is, install it on Windows, and run some basic commands on Git Bash terminal.
Prerequisites
The demonstrations in this tutorial are on a Windows 10 PC version 1909, but any other version (7-8.1) of Windows PC will work.
What is Git Bash?
Before you look at what Git Bash is, let’s go over what Git is. Git is a version control system for controlling changes in software development. Like macOS and Linux, operating systems already have a command-line terminal where you can run Git and Linux commands directly. But for Windows, you have the Windows command prompt, which is a non-Unix terminal.
How can you run Git and Linux commands in Windows? Git Bash will do the trick. Git Bash is an emulator that provides an emulation layer for Git to run Linux commands on Windows PCs. An emulator enables one specific system to behave like another computer system.
Downloading and Installing Git (Bash)
Now that you know a little about Git Bash let’s see how you can download and install it. There are three different ways of downloading the Git software for Windows OS, as shown below.
- Through Git’s official website
- Through a separate project on GitHub called Git for Windows.
- Through a software package manager like Chocolatey
Download Git with any of the three ways you prefer, but this tutorial will use the official website.
After downloading Git, let’s start installing it on your Windows PC.
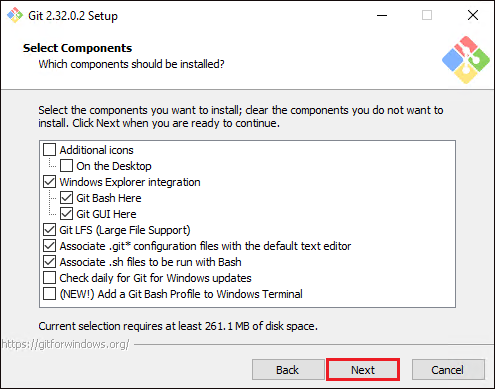
1. Launch the installer you downloaded and click Next through the steps until you get to the Select Components screen.
2. Now, check the boxes of additional components you want to include in the installation. Leave the ones selected by default, as shown below, and click Next.
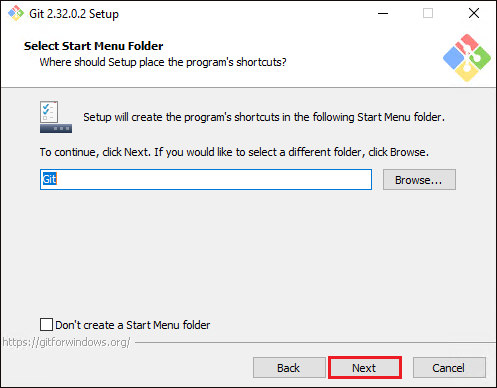
3. Leave the default for creating a shortcut in the start menu folder, and click Next.
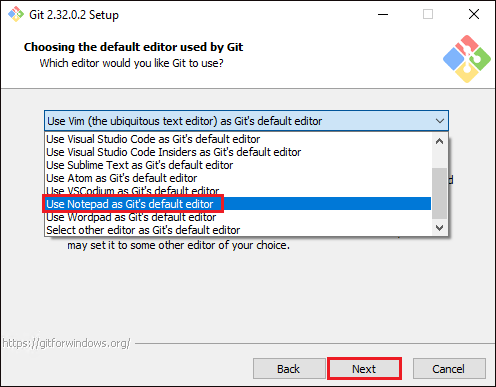
4. Select Use Notepad as Git’s default editor from the drop-down list as a default editor to use with Git, and click Next. Now Git files like ~./gitconfig will open in Notepad by default.
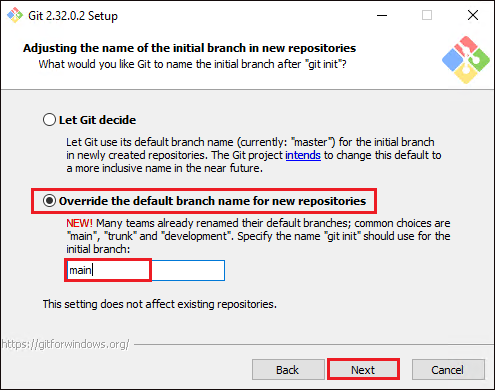
5. Select the Override the default branch name for new repositories option as the default branch name (main) for Git to use. When you initialize a Git repository, Git will use this branch name by default.
The default branch name used to be “master” for Git repositories. But many people found “master” an offensive word. So GitHub followed the Software Freedom Conservancy’s suggestion and provided an option to override the default branch name when initializing a Git repository.
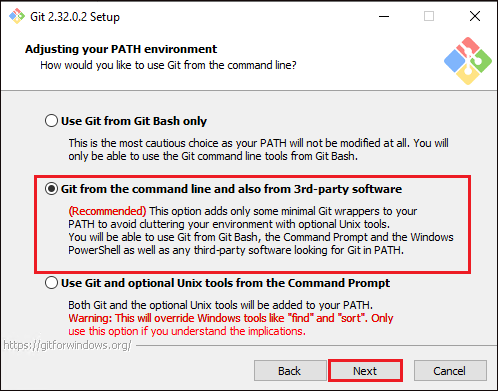
6. Now, select Git from the command line and also from 3rd-party software option so that Git command can be executed from different tools. Some of those tools are Command Prompt, PowerShell or any other 3rd party software tools, along with the Git Bash console.
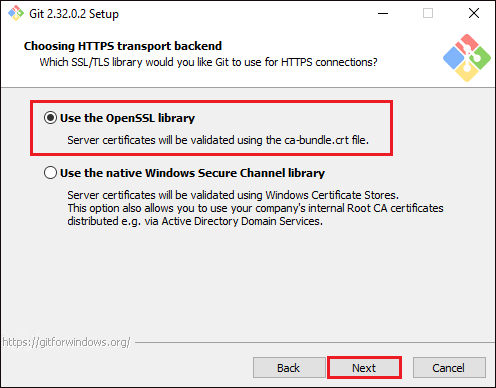
7. Select the Use the OpenSSL library option to let Git validate certificates with OpenSSL, and click Next. OpenSSL is a cryptographic library that contains open-source implementation of SSL and TLS protocols.
If you are using Git in an organization with enterprise-managed certificates, select the User the native Windows Secure Channel library option instead.
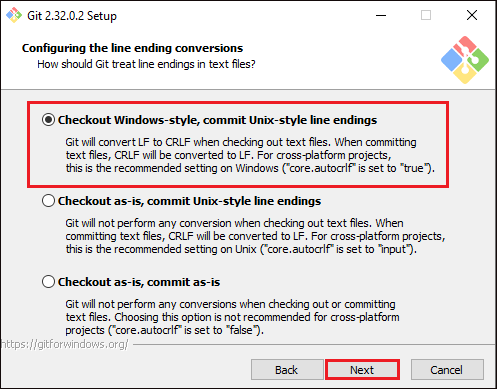
8. Leave the default Checkout Windows-style, commit Unix-style line endings option selected, and click Next.
If you configure “Windows-style” line ending conversions, when you hit return on your keyboard after executing a Git command, Git will insert an invisible character called line ending. When different contributors make changes from different operating systems, Git might produce unexpected results.
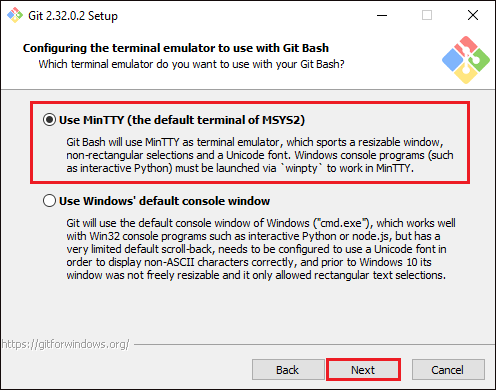
9. Select the Use Mintty (the default terminal of MSYS2) option as the default terminal emulator to run commands, and click Next. Mintty is the default terminal of MSYS2. MSYS2 is a collection of tools and libraries that provides a Unix-like environment for software distribution and a building platform for Windows.
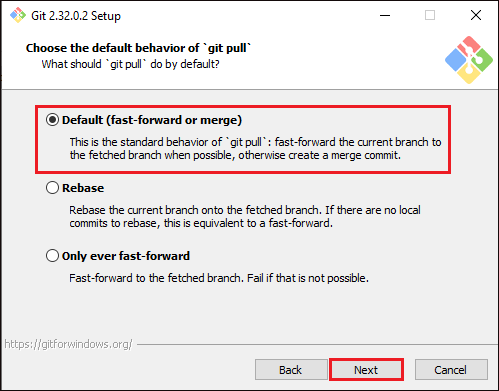
10. Select the Default (fast-forward or merge) option below as git pull command’s default behavior. The git pull command is the shorthand for git fetch and git merge, which fetches and incorporates changes from a remote repository into the current branch.
Perhaps you want to merge a new branch to the master. If so, Git would directly merge using fast-forward without going through git fetch and git merge commands. The merge is only possible if there are no commits on master from when you’ve created the new branch.
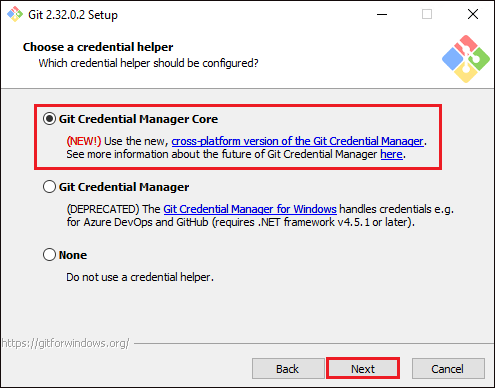
git pull Command 11. Select the Git Credential Manager Core as the default Git credential helper, and click Next. Git credential helpers are external programs that Git can prompt for input data, like usernames and passwords. These input data can be stored in memory for a limited time or stored on the disk.
Git Credential Manager Core is based on the .NET framework and will provide multi-factor HTTPS authentication with Git.
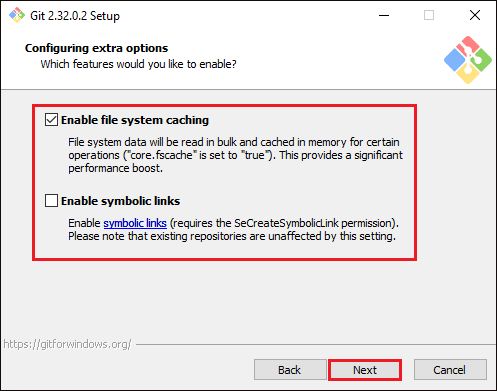
12. Leave the extra features on default, as shown below, and click Next. The Enable file system caching option is checked to provide quick results when executing Git commands.
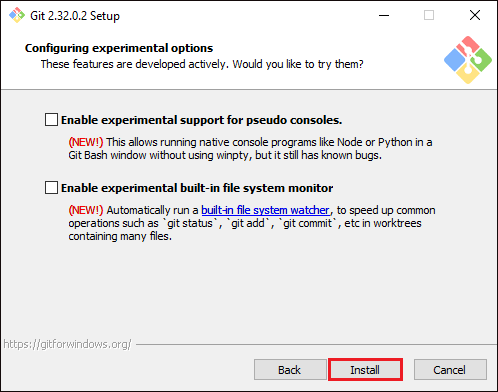
13. Ensure to leave both options below at default (pseudo console and built-in file system monitor) as they are still in an experimental stage, and click Install.
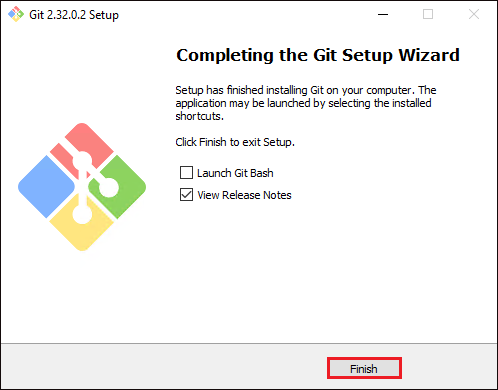
14. Complete the installation and close the installation wizard by clicking on Finish.
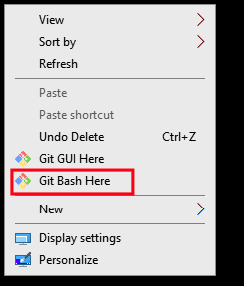
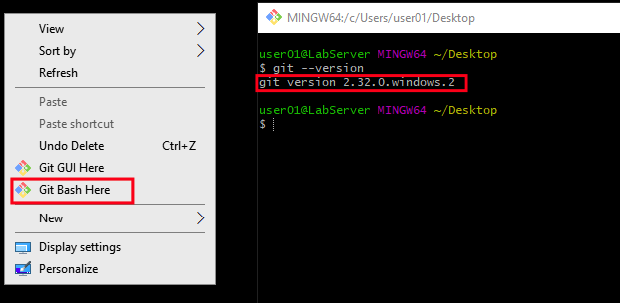
15. Finally, right-click on your desktop and select Git Bash Here from the context menu, as shown below, to launch Git Bash terminal. Launching Git Bash from your desktop is one of the quickest ways to do so, but the same process goes when you right-click on a folder.
16. Run the git command below to verify Git Bash is installed and its current version (--version).
You can see below the current Git version in this tutorial is version 2.32.0.windows.2.
Running Git Commands in Different Terminals
Now that you have Git Bash on your PC, it’s time to learn some Git commands. Running Git commands isn’t limited to Git Bash console only. Did you know you can run Git commands in the command prompt too? Yes!
Let’s run Git commands both on Git Bash console and command prompt to declare variables accessible in both terminals.
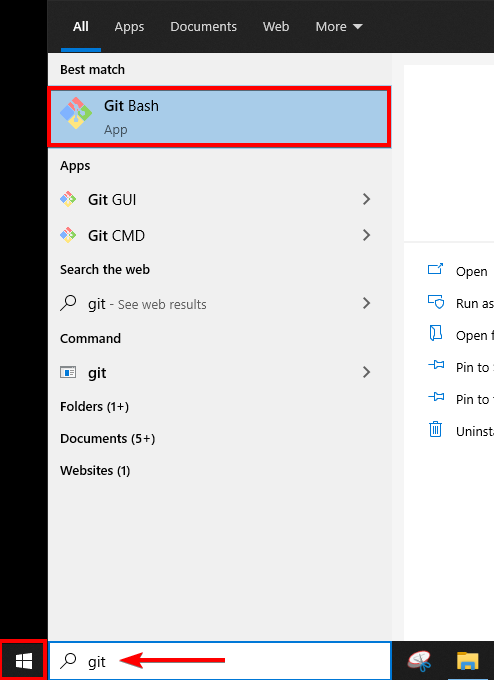
1. Launch Git Bash console by clicking on the Start button, type git, and click on Git Bash.
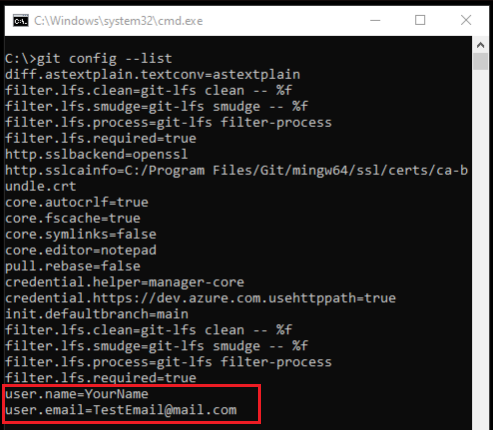
2. Run the below git config command to add your name (YourName) as your git username (user.name). The git config command administers configuration variables that control how Git looks and operates.
Pass the --global option to the git config command to define the configuration variable (YourName) in the ~/.gitconfig file specifically.
git config --global user.name "YourName"3. Now open the command prompt and run the below git config command to add your email ("[email protected]") as your git user email (--global user.email) in the ~/.gitconfig file.
4. In the same command prompt window, run the below git config command to list (--list) all the configuration variables in Git.
You can see below that even though you’ve added variables in the ~/.gitconfig file via different consoles, the variables are accessible and displayed in the command prompt.
Running Linux Commands in Git Bash
As you can tell, all Git commands work in both Git Bash and the command prompt. And since Git is delivered as a Unix-style command-line environment, let’s try running a Linux command on the Git Bash console!
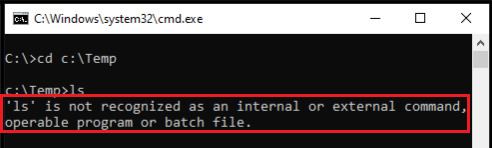
Run the ls command both in Git Bash console and command prompt to list the files and folders in the working directory.
In the screenshots below, you can see that the Git Bash console returns an output, while the command prompt throws an error, saying the ‘ls’ command is not recognized.

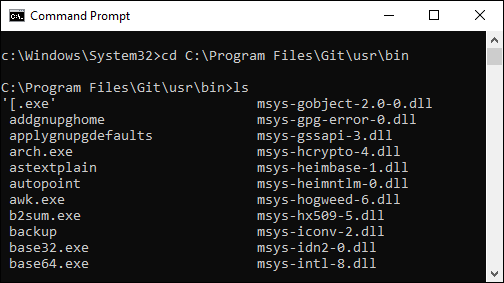
You can run Linux commands on the command prompt so long as you change the directory to C:Program FilesGitusrbin first.
In the command prompt, run the commands below to change the working directory to C:Program FilesGitusrbin and run the ls command.
cd C:Program FilesGitusrbin # Change directory to where Linux utilities are stored
ls # Linux command that lists all files and folders in the working directory
Below, you can see that you didn’t get an error after running the ls command this time, but the command returned results instead.
Conclusion
This tutorial aims to explain what Git Bash is and the steps for Git software installation. You’ve learned what Git Bash is and that running Git commands both on Git Bash and command prompt is possible.
Next time when you have to run Git commands, which console would turn to?
I found the setting for «schannel» or «openssl» with Git for Windows 2.14.2, 64 bit in file:
C:Program FilesGitmingw64etcgitconfig
Example config for OpenSSL:
[http]
sslCAInfo = C:/Program Files/Git/mingw64/ssl/certs/ca-bundle.crt
sslBackend = openssl
Example config for Windows native:
[http]
sslCAInfo = C:/Program Files/Git/mingw64/ssl/certs/ca-bundle.crt
sslBackend = schannel
You can check out this thread from the Git for Windows maintainer:
Yes, it is possible, and you can find out how exactly it is done by
inspecting the source code for the installer, which is at
https://github.com/git-for-windows/build-extra in the
installer/install.iss file (this file is also easily found by agit grep).
"Secure Channel"The relevant part is when the installer tests for the GC_WinSSL option to
do more interesting stuff than recording the user’s choice:
if RdbCurlVariant[GC_WinSSL].Checked and (not
    ReplaceFile(BinDir+'curl-winsslcurl.exe',BinDir+'curl.exe') or not
    ReplaceFile(BinDir+'curl-winssllibcurl-4.dll',BinDir+'libcurl-4.dll'))
then begin
            Log('Line {#__LINE__}: Replacing curl-openssl with curl-winssl failed.');
end;
(See
https://github.com/git-for-windows/build-extra/blob/97c8294b584ae4b99059a1194a5eba24ee2ff1ab/installer/install.iss#L1774)In other words, the installer will simply try to replace the curl.exe and
libcurl-4.dll files in mingw64bin (or the 32-bit equivalent) by the
files in mingw64curl-winssl.
This is now offically supported with Git 2.20 (Q4 2018): On platforms with recent cURL library, http.sslBackend configuration variable can be used to choose a different SSL backend at runtime.
The Windows port uses this mechanism to switch between OpenSSL and
Secure Channel while talking over the HTTPS protocol.
See commit b67d40a (25 Oct 2018), and commit 21084e8 (15 Oct 2018) by Johannes Schindelin (dscho).
See commit 93aef7c (25 Oct 2018) by Brendan Forster (shiftkey).
(Merged by Junio C Hamano — gitster — in commit d7b1859, 02 Nov 2018)
http: add support for selecting SSL backends at runtimeAs of version 7.56.0, curl supports being compiled with multiple SSL
backends.This patch adds the Git side of that feature: by setting
http.sslBackendto «openssl» or «schannel«, Git for Windows can now choose the SSL
backend at runtime.This comes in handy on Windows because Secure Channel («schannel») is
the native solution, accessing the Windows Credential Store, thereby
allowing for enterprise-wide management of certificates.
For historical reasons, Git for Windows needs to support OpenSSL still, as it has
previously been the only supported SSL backend in Git for Windows for
almost a decade.The patch has been carried in Git for Windows for over a year, and is
considered mature.