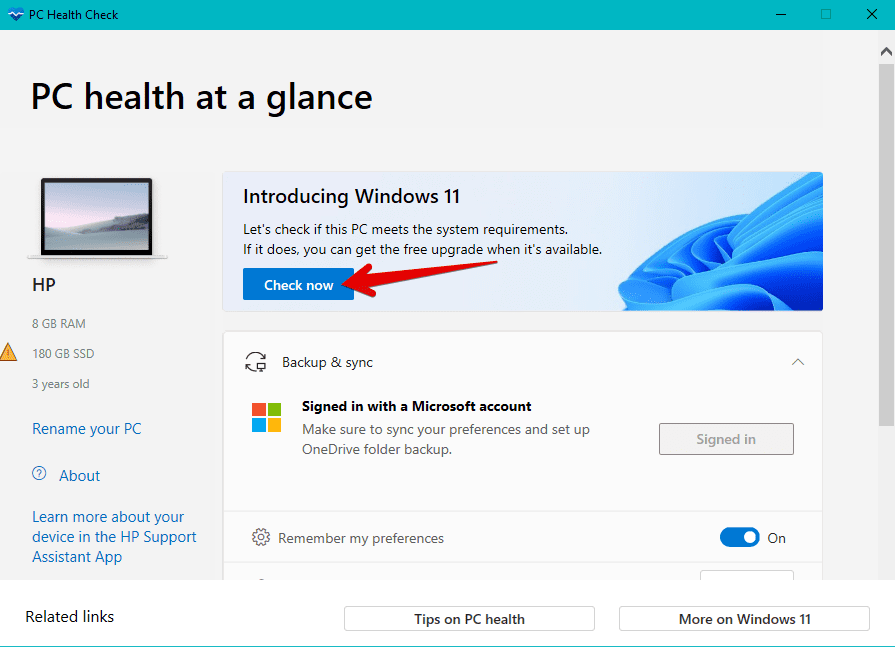
PC Health Check app brings you up to date info on your Windows device health, helping you take action to improve your device performance and troubleshoot performance problems. It is periodically updated based on customer feedback to help you make the most of your Windows PC.
How to open PC Health Check
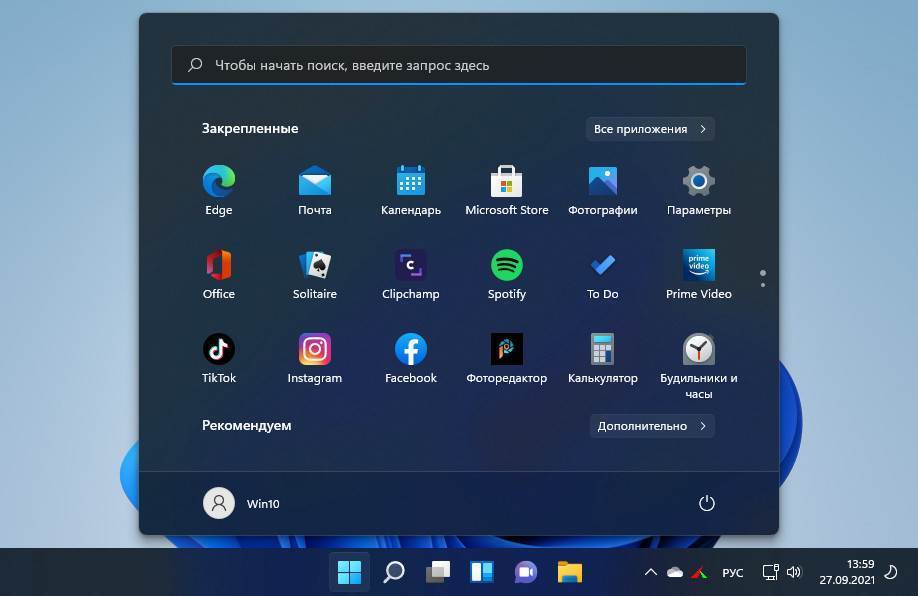
In Windows, use Search on the taskbar to search for “PC Health Check,” then select it from the list of results.
If a PC Health Check update is available, you can quickly install it for the latest version.
If you don’t have PC Health Check installed, you can install it by going to https://aka.ms/GetPCHealthCheckApp and following the prompts to download and install the app.

Check Windows 11 eligibility
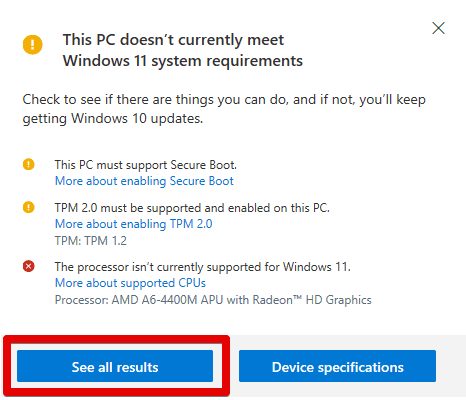
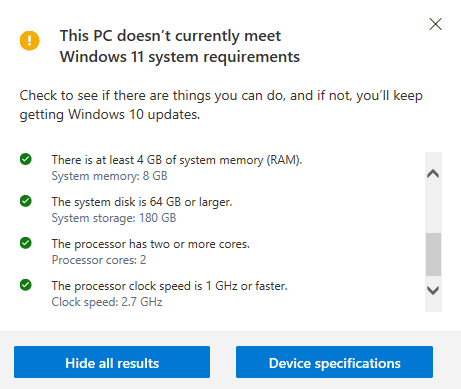
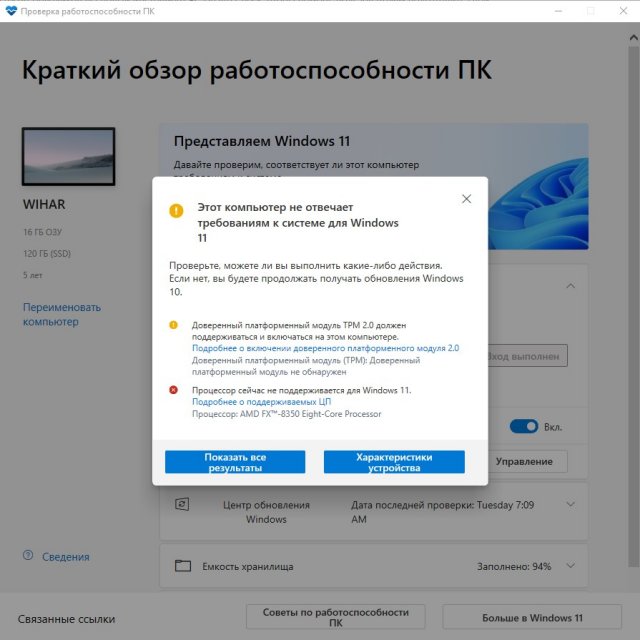
If you’re currently running Windows 10, PC Health Check provides a comprehensive eligibility check for your device to ensure it meets the Windows 11 minimum system requirements. You’ll get info on why your device is or isn’t eligible, plus info on what you can do if your device doesn’t meet the requirements.
Select Check now to see if your device can run Windows 11.
Backup & sync
Sign in with your Microsoft account or create a new one to sync your preferences across your devices, such as passwords, Microsoft Edge browser settings like favorites and reading lists, themes, and more.
You can also back up your photos and files to OneDrive. They’ll then be protected and accessible across your devices.
Windows Update
Regular Windows updates help keep your device running smoothly and securely. If your device isn’t up to date or needs attention, PC Health Check will let you know.
Select Open Windows Update to go right to Windows Update in Settings.
Battery capacity
Use this section of PC Health Check to get info on how your batteries are performing compared to their original capacity for devices with one or two batteries. Battery capacity will be available for devices older than 3 years.
Select See battery saving tips for steps you can take to improve battery.
Storage capacity
See how much storage space is being used for your device’s main drive, which contains your files, apps, and Windows. You’ll see the percentage your drive is full.
Expand this section of the app for info on how much free space is left. Select Manage storage settings to turn on Storage Sense or get other cleanup recommendations.
Startup time
Get info on the startup time for your device, along with more info about what affects these times. Select Manage your startup programs to review and change your startup apps.
Tips on PC Health
Select Tips on PC Health to learn more ways to improve your device performance.
See your device specifications
You can find more info about your device below its image, including your device age and storage amounts. Select Rename your PC to give your device a different name.
Need more help?
В этой статье, друзья, будем говорить о том, как обновить Windows 7, 8.1 или 10 до Windows 11 на компьютерах, которые не отвечают её минимальным системным требованиям. Т.е. о том, как обновиться до Windows 11 без TPM 2.0, Secure Boot и UEFI и с неподдерживаемым процессором. Требования 11-й Windows жёсткие, технически не аргументированные, на деле являют собой стратегический шаг компании Microsoft по вытеснению из пользовательского обихода старых и относительно таковых компьютеров. Если у нас компьютер не отвечает системным требованиям Windows 11, мы не получим обновление до неё в центре обновления нашей текущей версии Windows. И не сможем обновиться до Windows 11 с помощью официальных инструментов обновления, предложенных Microsoft для соответствующих требованиям компьютеров. Но мы сможем установить Windows 11 с нуля и обновиться до неё на неподдерживаемых компьютерах с использованием сторонних инструментов. Давайте посмотрим, как обновиться до Windows 11, если ваш компьютер не соответствует её системным требованиям.
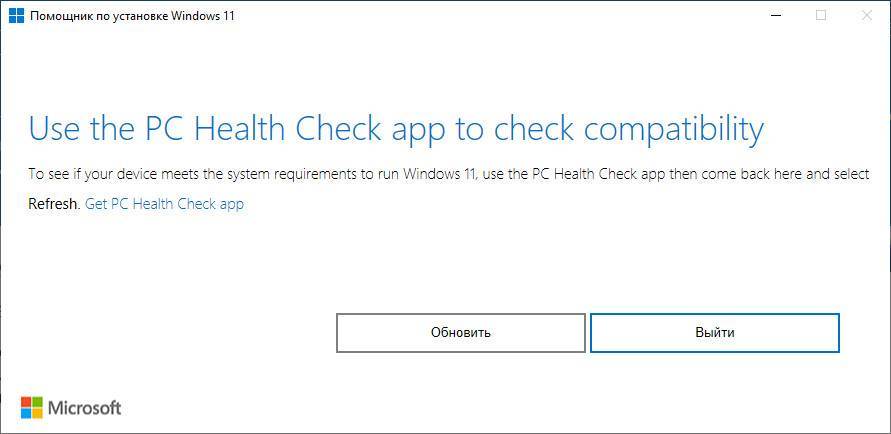
Что являет собой Windows 11 в целом, стоит ли в принципе заморачиваться с её обновлением и переходить на неё, друзья, можете посмотреть в статье о презентации Windows 11 и в её комплексном обзоре. Ещё можете посмотреть на операционную систему детально в публикациях, посвящённых работе с ней. Новая 11-я Windows, бесспорно, хороша, но из-за своих системных требований может стать головной болью для тех, у кого компьютеры не отвечают этим требованиям. На таких компьютерах обновиться до Windows 11 не сможем с помощью официальных инструментов обновления от Microsoft — утилиты «Помощник по установке Windows 11» и установочного ISO-образ Windows 11. Утилита выдаст нам уведомление «Use the PC Health Check app to check compatibility», т.е. отправит нас к использованию утилиты на предмет совместимости с Windows 11.
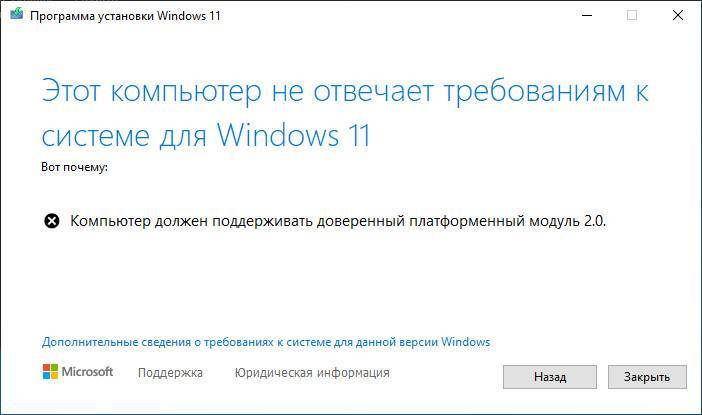
А обновление с помощью установочного ISO Windows 11 застопорится на этапе проверки системных требований с выдачей нам компонентов, которые не тянут на 11-ю Windows.
Проверить, соответствует или не соответствует ваш компьютер требованиям Windows 11, можно с помощью различных утилит, подробности в статье «Как проверить компьютер на совместимость с Windows 11». Если не соответствует, в статье о системных требованиях Windows 11 найдёте пояснения и руководства по устранению причин несоответствия. Если эти причины вы не можете устранить без радикального апгрейда компьютера, а таковой пока что невозможен, добро пожаловать в зону аутсайдеров. В этой зоне вы сможете:
- Установить Windows 11 с нуля различными обходными способами, описанными в статье «Как установить Windows 11 без TPM 2.0, Secure Boot и UEFI»,
- Обновляться до Windows 11 с помощью различных обходных способов, о чём будем говорить предметно ниже.
Благо, соответствие или несоответствие системным требованиям никак не влияет на перенос лицензии на Windows 11. Обновившись до Windows 11 с Windows 8.1 или 10, перенесём лицензию в новую операционную систему и лицензии. Вместе с лицензией перенесём также свою учётную запись, пользовательские данные, хранящиеся в папках на диске С, установленные программы с их настройками. Но программы переносятся только при обновлении до Windows 11 с Windows 10 и 8.1.
Важно: при обновлении Windows 7 до Windows 11 установленные программы и их настройки не будут перенесены. Если у вас Windows 7, и вы хотите перенести программы, вам нужно сначала обновиться с Windows 7 до Windows 10. А потом Windows 10 обновить до Windows 11 по этой статье. Ещё нюанс: не сможем обновиться до Windows 11, если у нас исходной операционной системой будет Windows 10 с долгосрочным обслуживанием LTSB или LTSC. И не сможем обновиться на 32-разрядных операционных системах, ибо Windows 11 – только 64-разрядная.
Как обновиться до Windows 11, если компьютер не отвечает её системным требованиям? Друзья, с обновлением до Windows 11 на компьютерах, не отвечающих системным требованиям, не всё просто, в отличие от новой установки. Проверка компонентов компьютера на предмет соответствия Windows 11 прочно вшита в процесс обновления, и никакие правки реестра и подмены файлов в образе установки, которые работали с первыми инсайдерский сборками, со стабильной операционной системой нынче не работают. Microsoft серьёзно намерена ограничить использование Windows 11 и укрепляет механизмы блокировки установки системы на неподдерживаемые ПК и ноутбуки. Но на всякое действие есть противодействие, и сколь бы Microsoft не ставила преград, найдутся способы их обхода.
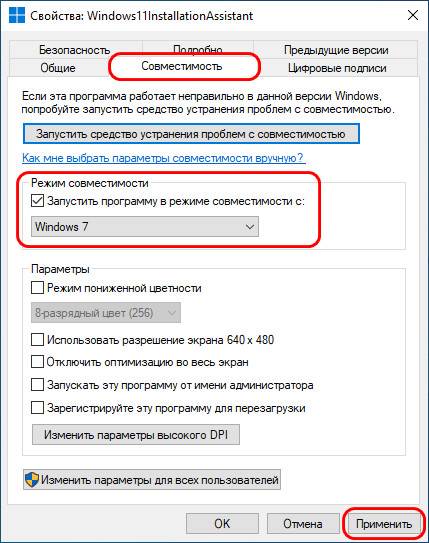
Упомянутая выше утилита «Помощник по установке Windows 11» — это один из официальных инструментов обновления Windows 10 до Windows 11. Она не работает для Windows 7 и 8.1. И она не будет работать, если ваш компьютер не отвечает системным требованиям Windows 11, но можно сделать один нехитрый трюк, и в Windows 10 она будет работать. Нужно запустить эту утилиту в режиме совместимости со старыми версиями Windows, например, с Windows 7. Как скачать эту утилиту, и как выполнить с её помощью обновление, смотрите в статье сайта про официальные способы обновления до Windows 11. В случае с неподдерживаемыми 11-й Windows компьютерами делаем всё то же, только перед запуском утилиты «Помощник по установке Windows 11» давайте в её контекстном меню выберем «Свойства».

Зайдём в свойствах в раздел «Совместимость» и установим режим совместимости с Windows 7. Нажмём «Применить»
И только после этого можем запускать утилиту и работать с ней. Будет ли этот трюк работать в дальнейшем, кто знает. Потому, безусловно, нужны дополнительные механизмы решения поставленной задачи.
Простой и удобный способ, как обновить Windows 11 до последней версии или до инсайдерской ветви на компьютерах, которые не отвечают требованиям операционной системы – бесплатная утилита WinPass11. Детально об этом способе – в статье «WinPass11: как обновить Windows 10 и 11 до актуальной Windows 11 без TPM и прочих требований».
На всякое действие есть противодействие – этот жизненный закон претворили в жизнь энтузиасты с GitHub. И предложили для компьютеров, которые не соответствуют Windows 11, решения по обновлению. Это решения и для Windows 10, и также для Windows 8.1 и 7. Решения эти, правда, могут сработать, а могут нет. Но, как говорится, спрос не ударит в лоб. Вы ничего не теряете, если попробуете.
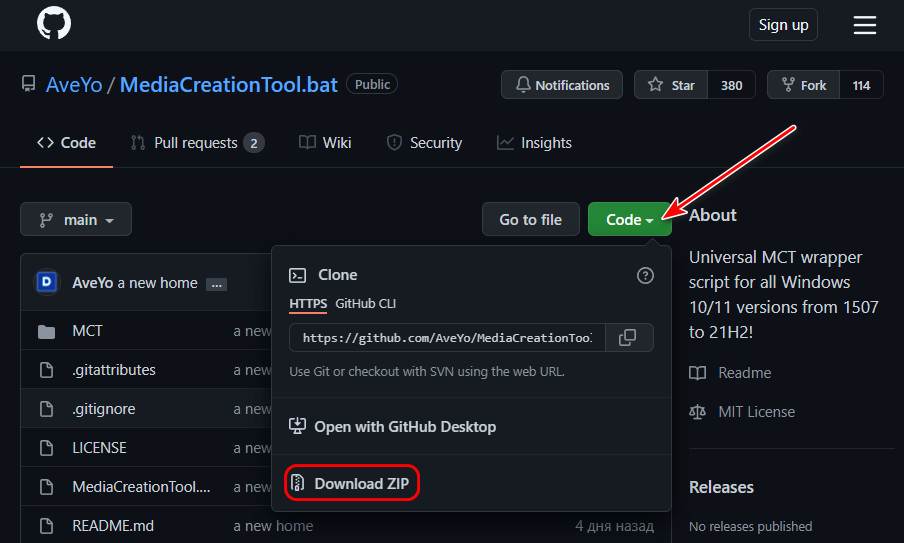
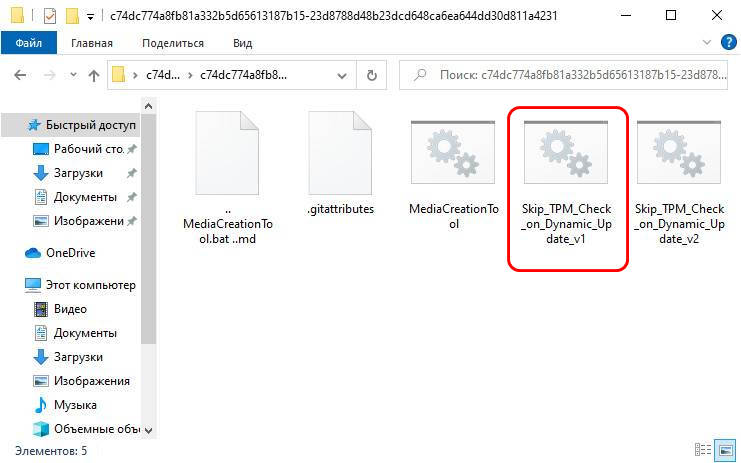
Энтузиасты на GitHub выложили комплект инструментов Universal MediaCreationTool, позволяющий создавать установочные образы Windows 10 и 11 в разных их версиях с помощью кастомной утилиты MediaCreationTool. Но главное – в число этих инструментов входит скрипт пропуска проверки соответствия требованиям Windows 11 перед обновлением, а также механизм обновления до Windows 11, который работает для компьютеров, не отвечающих её требованиям. Качаем на GitHub архив с инструментами.
Распаковываем архив. И давайте рассмотрим отдельно два способа обновления до Windows 11, предлагаемые инструментами в этом архиве.
В распакованной папке есть два файла сценария командной строки:
- Skip_TPM_Check_on_Dynamic_Update_v1 — первый скрипт, это скрипт пропуска проверки соответствия требованиям Windows 11 перед обновлением до неё;
- Skip_TPM_Check_on_Dynamic_Update_v2 — второй скрипт, он отменяет первый скрипт.
Запустив первый скрипт, возможно, сможем после этого обновиться с использованием официального установочного образа Windows 11.
После чего качаем установочный ISO-образ Windows 11 с сайта Microsoft и пробуем обновиться с его помощью.
Важно: друзья, повторный запуск первого скрипта отменяет его действие. Если у вас что-то не получается, запустите скрипт по новой.
Если способ не сработает, пробуем следующий.
В распакованной папке у нас будет также файл сценария командной строки MediaCreationTool. Это подобие оригинальной утилиты загрузки Windows от Microsoft, выполненное в скрипте.
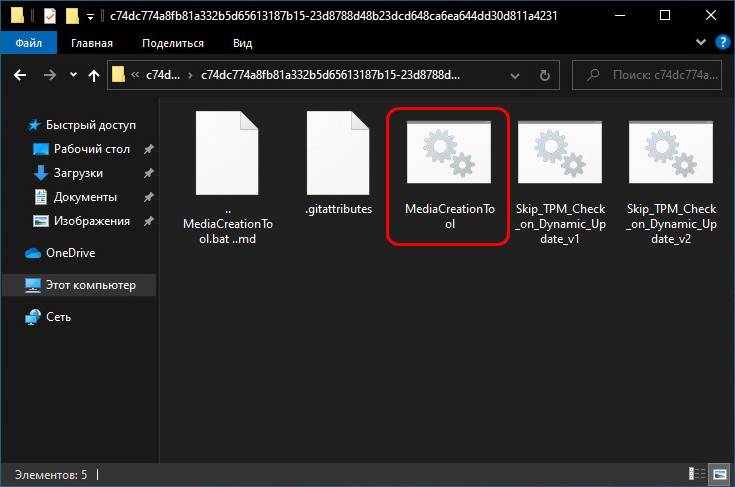
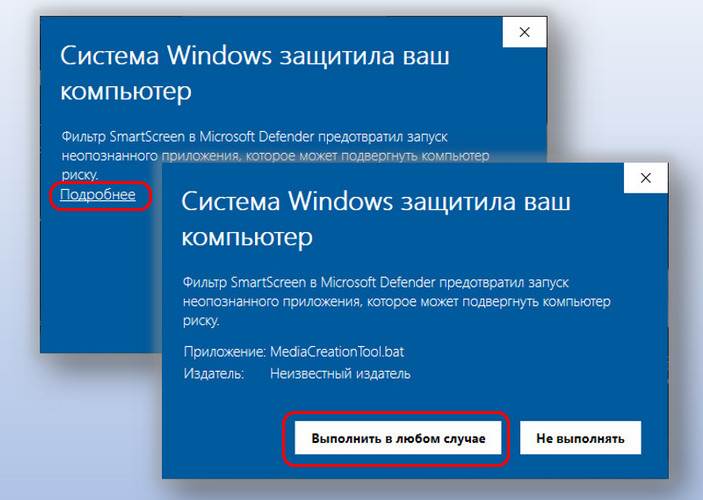
Запускаем этот скрипт. Обходим фильтр SmartScreen: жмём «Подробнее», затем – «Выполнить в любом случае».
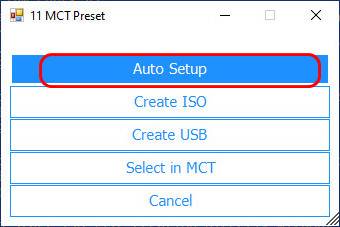
После запуска скрипта у нас появится окошко с версиями Windows 10 и 11. Выбираем «11».
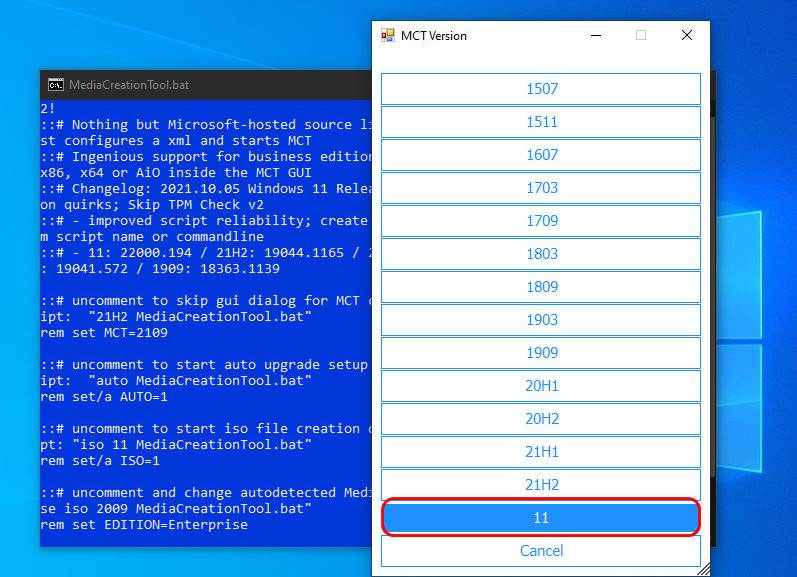
Далее жмём «Auto Setup».
И у нас запустится процесс обновления до Windows 11. Он полностью автоматизированный, мы лишь будем наблюдать его этапы. Друзья, пусть вас не смущает, что на первых этапах процесс обновления будет происходит в окне программы установки Windows 10. Так надо.
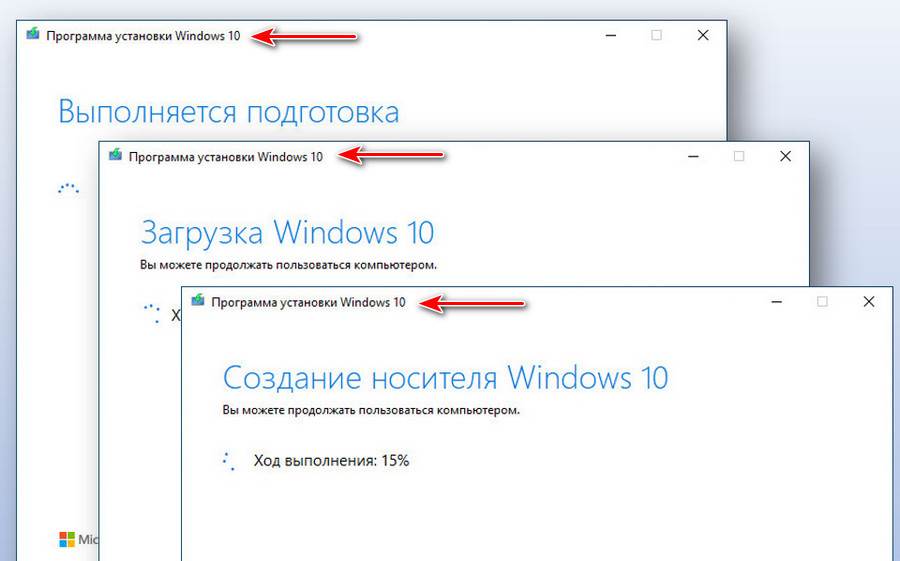
Позднее процесс обновления перейдёт на программу установки Windows 11.

Запустится установка Windows 11.
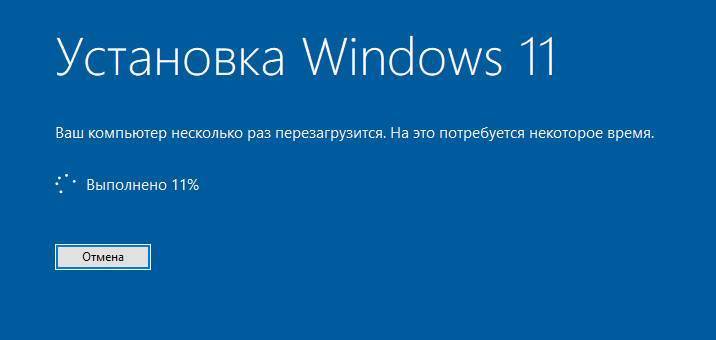
Далее пойдут этапы внедрения обновлений в предзагрузочном режиме.
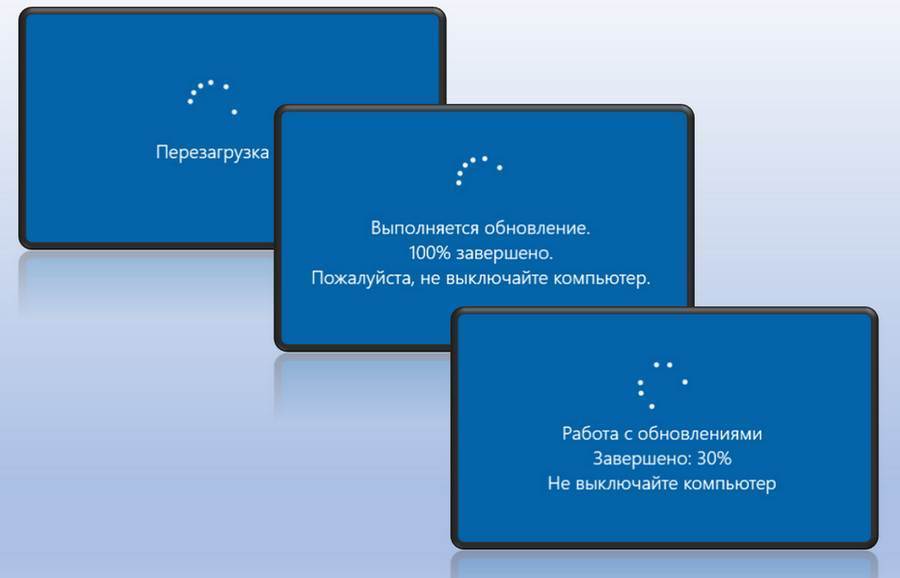
Завершающие этапы.
 И всё – будем наблюдать обновлённую до Windows 11 операционную систему.
Подменяем программу установки Windows 11 на программу установки Windows 10, которая не производит проверку соответствия компьютера требованиям Windows 11, способ описан в этой статье, в пункте «Отредактированный установочный ISO Windows 11».
Вот это, друзья, как обновиться до Windows 11 на не отвечающих системным требованиям компьютерах.
Windows 11 имеет определенные требования к аппаратному обеспечению компьютеров. Компьютеры, которые не соответствуют минимальным системным требованиям, не могут быть обновлены до Windows 11.
Вы можете использовать приложение PC Health Check Microsoft, чтобы проверить, можно ли запустить Windows 11 на вашем компьютере.
Для этого выполните следующие действия:
- Перейдите на страницу https://aka.ms/GetPCHealthCheckApp, чтобы загрузить установочный пакет приложения PC Health Check Microsoft.

Вы также можете посетить официальный веб-сайт Microsoft https://www.microsoft.com/ru-ru/windows/windows-11, чтобы получить подробную информацию о Windows 11.
Нажмите ЗАГРУЗИТЬ ПРИЛОЖЕНИЕ PC HEALTH CHECK (DOWNLOAD PC HEALTH CHECK APP) в разделе Проверьте совместимость (Check for compatibility) на официальном веб-сайте Microsoft, чтобы загрузить и установить приложение.

- Дважды нажмите на установочный пакет, чтобы установить приложение PC Health Check, затем нажмите Готово (Finish).
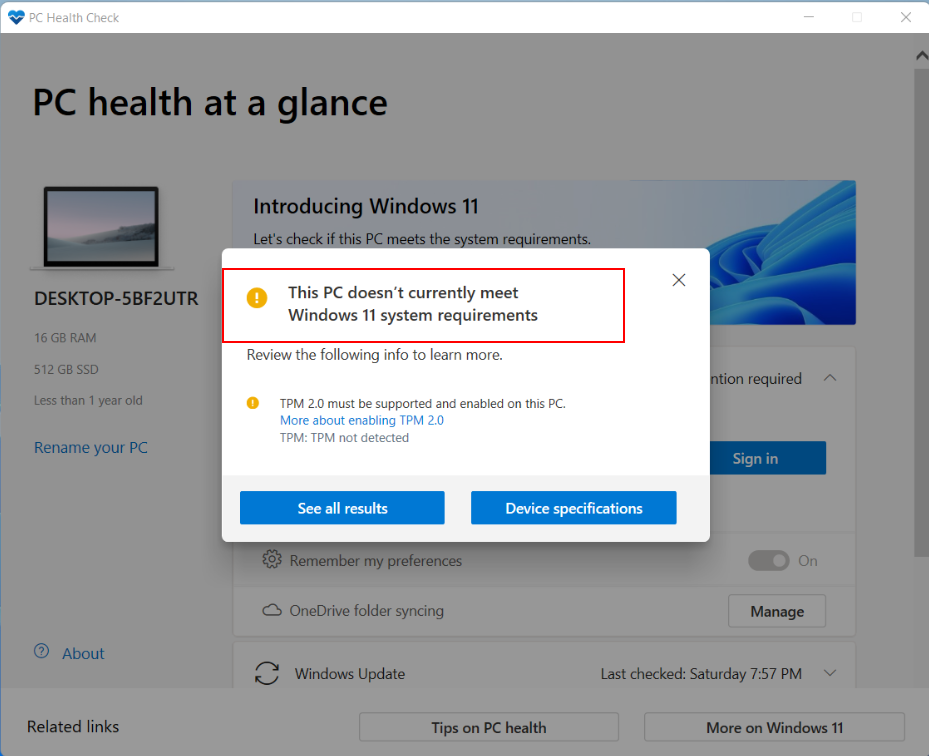
- Нажмите Проверить сейчас (Check now) под надписью Представляем Windows 11 (Introducing Windows 11), чтобы посмотреть результаты проверки.

- Если отображается надпись Этот компьютер соответствует требованиям Windows 11 (This PC meets Windows 11 requirements), вам необходимо только ожидать обновления от Microsoft.

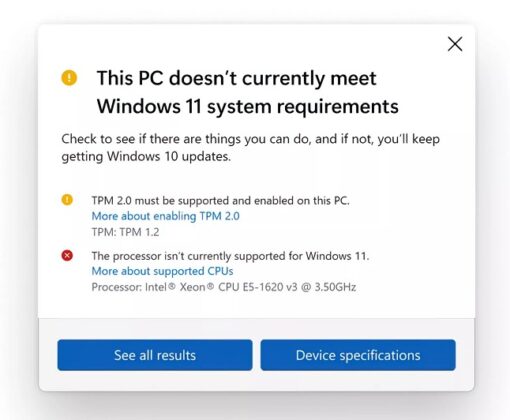
- Если отображается надпись Этот компьютер не отвечает требованиям к системе для Windows 11 (This PC doesn’t currently meet Windows 11 system requirements), нажмите Показать все результаты (See all results), чтобы посмотреть причины несовместимости компьютера с системой Windows 11.
Если в результатах указана причина, связанная с модулем TPM, см. информацию по ссылке https://consumer.huawei.com/en/support/content/ru-ru15825140/. Если ваше устройство оснащено модулем TPM, включите TPM и нажмите Проверить сейчас (Check now), чтобы проверить, можно ли использовать Windows 11 на этом компьютере.
Если указаны другие причины, связанные с аппаратным обеспечением, это означает, что аппаратное обеспечение вашего компьютера не соответствует требованиям к установке Windows 11.
- Если отображается надпись Этот компьютер соответствует требованиям Windows 11 (This PC meets Windows 11 requirements), вам необходимо только ожидать обновления от Microsoft.


Windows 11 is the latest iteration of Microsoft’s new operating system that comes packed with several exciting features. The upgrade was made 7 years after the release of Windows 10, so the progress made between this time frame has been nothing but substantial. However, the future of Windows now looks better than ever as this recent addition has opened up a world of possibilities for PC users. From being a full-fledged gaming station through Xbox Game Pass to running Android applications in the coming time, we’re entering the generation of Windows, as the company CEO Satya Nadella has proclaimed.
- Windows 11 is great and all, but it misses out on many prevalent Windows 10 features. Find out which ones using this link.
However, the one major catch with Windows 11 is that it won’t be available on all devices that run Windows 10. There are specific eligibility criteria that devices have to meet to upgrade to Windows 11 for free. Find out everything you need to know about the minimum requirements for the upgrade using this article. Therefore, if you’re also stuck in a spiral, wondering whether your PC has what it takes to receive the free revamp, we might have just the solution you’ve been looking for, and it comes under the name of “PC Health Check.”
Let’s dive right into the raison d’etre of this article now.
What is the PC Health Check application?
The PC Health Check application is a tool that performs a wide variety of functions on a Windows device. It used to be available for download separately a while back. Still, the developers have force-installed the software on every device running Windows 10 in the wake of a system update released in October this year. The update was coined “KB5005463” and brought along a bevy of bug fixes and stability improvements with itself too.
To come back on the topic at hand, the PC Health Check is similar to a diagnostics application that analyzes your system’s storage, CPU, the browser you’re using, and whether you have antivirus enabled on the device or not. It features a “helpful tips” section that gives you tidbits on making your system perform better. However, don’t expect too earth-shattering information as the advice is merely basic.
That said, the PC Health Check app’s most significant strength doesn’t lie in its PC analysis nor the supposedly helpful information that it displays within the application interface to nudge users in the right direction. Its best feature is that it can tell you right off the bat whether your PC is decked out enough to upgrade to Windows 11 officially without any workarounds or alternatives.
But it’s worth noting here that the ultimatum given to you by the PC Health Check application isn’t carved in stone. There are different ways to install Windows 11 on a PC, even if the device doesn’t check off the minimum system requirements needed for the upgrade. For instance, you can manually bypass the TPM 2.0 requirement yourself and even enable Secure Boot to upgrade to Windows 11.
Still, if you’d like to find out whether your Windows PC can effortlessly get the upgrade, then the PC Health Check application can give you a definitive answer. The following section will expand on that, so let’s jump into that out right away.
How to use the PC Health Check application
The PC Health Check application can now be found pre-installed on your PC with the update that arrived early two months back in October. However, if you haven’t updated your system since then and see the impending Windows update icon in your Status Tray area, which is found in the bottom-right corner, you have two ways to proceed from here on out. The first one is to update your Windows PC and get the PC Health Check application painlessly—no extra steps involved.
To do that, you must go to your “Settings,” click on “Update and Security,” and then proceed to click on “Check for updates.” If you’ve got any pending ones, you’ll be prompted to go forth with the install easily there. Do that, and you’ll have the application sitting on your PC. The following is simply an elaborative screenshot that helps you understand where to get your updates.
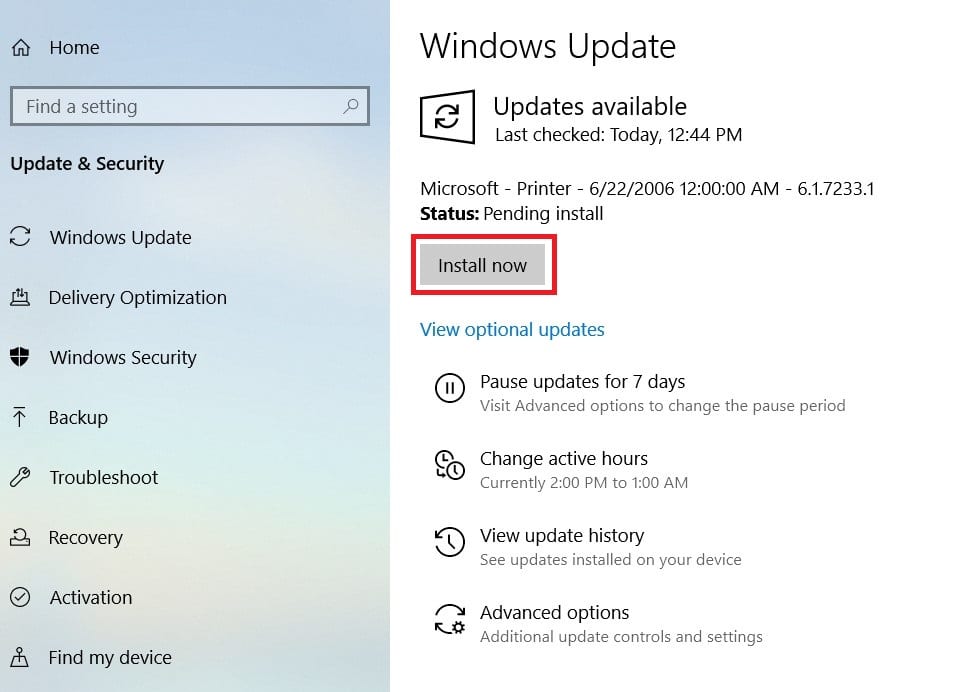
Installing Updates
The second method to get the PC Health Check application on your system is to grab the tool online without updating the PC. Although we do recommend updating your PC to keep it maintained in the best possible shape, you can always choose this route if you’re not feeling up for it or there’s any other reason that’s hindering you from doing so. You can use this direct link to begin the installation of the PC Health Check setup or head over to the Windows Insider Preview for the PC Health Check app. You will have to sign in with your account on this page, and the only way the download will be accessible to you is if you have already enrolled in the Windows Insider program.
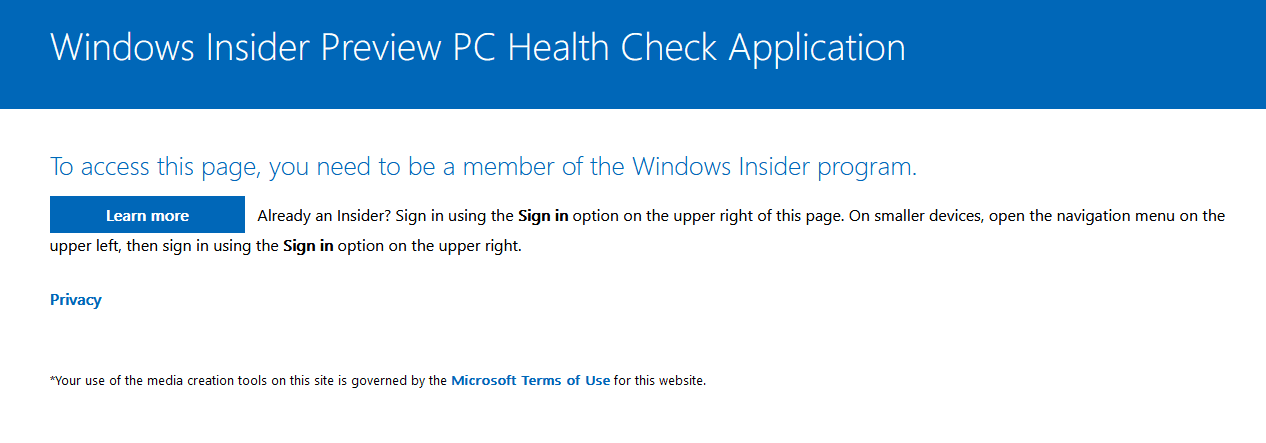
Windows Insider Preview PC Health Check application
Once you finally have the PC Health Check application installed on your system, you can quickly check whether your Windows PC is eligible for the next significant upgrade or not. The following steps will guide you on using the PC Health Check app to do just that. Let’s begin.
1. To get started, go to the “Windows Start” menu and search for the application. Type in “PC Health Check,” and the application should appear on the screen. Be sure to click on “Run as administrator” to launch the application with admin privileges. This should remove any potential problems you might run into without having an administrator’s features.
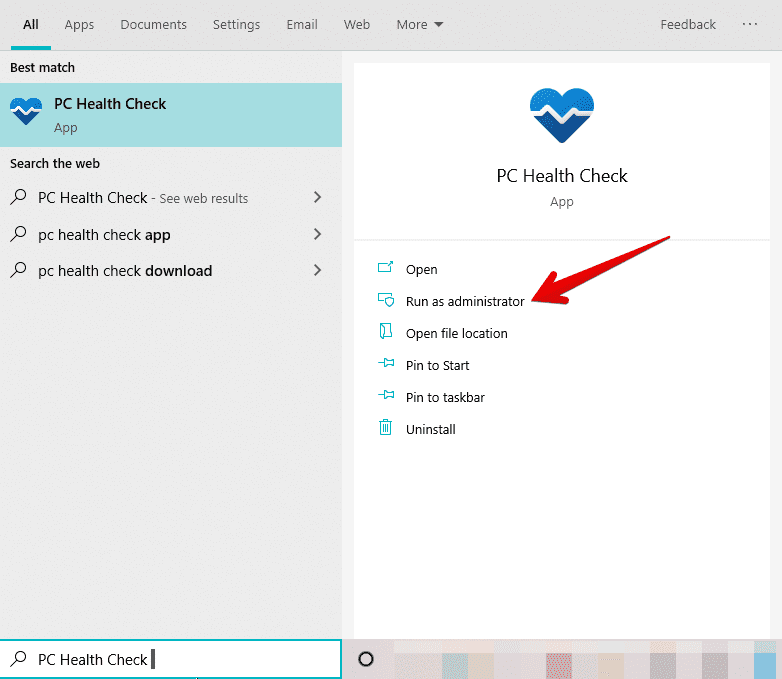
Running the PC Health Check application as an administrator
2. The last step should launch the PC Health Check application for you on your Windows PC. The option for checking whether your PC can upgrade to Windows 11 or not will be vividly apparent on the PC Health Check app window. The following screenshot specifies where to click to begin the verification process.
Clicking on Check now to verify the eligibility for a Windows PC
3. After you click on “Check now,” the system will take a minute to analyze the device’s specifications and load up the results. The next screen you’ll see on the window will show you your results. The application will clearly state whether your PC is eligible for the upgrade or not. It will also display helpful information regarding the specifications that your device lacks. You can always click on “See all results” for the complete list of lacking hardware and software requirements.
The check results
4. As you can see from the screenshot below, the application will now display the full results that have been extracted from your Windows PC. You’ll now be seeing an expansive collection of entries that will include both types of specifications: the one that the device in question fulfills and the one it does not. Take a close, hard look here and evaluate whether you need a new, Windows 11-compatible PC or simply some tweaking here and there.
Full results from the PC Health Check app
That’s all about using the PC Health Check application to check Windows 11 upgrade compatibility. We hope that you’ve found the tutorial helpful for your cause. Whether you got positive results or not, the following section will discuss what could be done next after using the PC Health Check application.
What to do next
There are only two ways that this can go from here on out: either you’re eligible for the Windows 11 upgrade or not. If you luckily are and have been shown positive results, you’re in for a big treat. Check out this article for a detailed guide on how to upgrade to Windows 11. You should be sorted according to the instructions laid out in the guide, but it necessitates that you tick the preliminary Windows 11. However, if that isn’t an option for you, let’s talk about what you can do from there on out.
It appears that if you want to install Windows 11 on your PC but do not fit the requirements to do so, you first have to check which specifications the computer fails to fulfill. If it is something like the TPM 2.0 requirement, you can easily bypass it using our step-by-step tutorial. In addition to that, you can also clean install Windows 11 on any device. Doing so doesn’t require the minimum specifications to be fulfilled. Still, your experience can get very dismal if the PC you’re installing the operating system on isn’t good for performance.
Furthermore, Microsoft does not recommend installing Windows 11 by unsupported, unofficial methods, but the process has been outlined if you have to do this. Lastly, there’s just the easy way out left to be discussed that doesn’t involve upgrading at all. All you have to do is keep using Windows 10 on your PC until you acquire the funds to buy a better PC that gets things done.
Besides, Windows 10 has a contract signed that allows it to be supported until October 2025 by Microsoft. This means security updates, bug fixes, and perhaps, newer features down the road until the allotted period. All in all, you have three ways to go about the situation at hand. After reading through all of them, we hope that you have now come to a definite conclusion, similar to how we’ve reached the conclusion of this article.
Similar Read: How to create a Windows 11 USB installer drive.
Conclusion
Windows 11 is the next big thing that will stay for the years to come. It has some fantastic features going for it, such as a newly upgraded Xbox Game Pass that makes gaming on Windows devices better than ever before, a fresher, clean layout, and an even simplified user interface that makes short work of any complications a user might face. However, given all these advantages, it only makes sense for the developer to introduce a significant upgrade to those systems that can handle all the heavy load.
That is why all PCs currently running Windows 10 won’t be receiving the Windows 11 upgrade. You can grab more information regarding the subject from our Windows 11 Upgrade FAQ guide. In this article, we have talked about a specific application that Microsoft has recently introduced automatically to our devices so users can quickly check their device’s upgrade status. There is no need to get into the verification process manually now that you have the PC Health Check application standing ready by your side.
We hope that you have found this helpful write-up. Do let us know down in the comments section whether your PC is already eligible or will you be upgrading to Windows 11 or not. We would love to hear your thoughts on the matter!
- Similar Read: Top 10 Windows 11 FAQ
Эпопея с выходом новой версии операционной системы от Microsoft, похоже, подходит к завершающей стадии. Сегодня любой желающий может приобрести компьютер с предустановленной системой, а тем, кто хочет мигрировать с «десятки», в Microsoft советую проверить, соответствует ли их компьютер спецификациям Windows 11. Сделать это можно вручную, ознакомившись с минимальными системными требованиями новинки, но у многих пользователей при этом могут возникнуть вопросы, касающиеся не очень хорошо задокументированных требований. В частности, о поддержке модуля безопасности TPM, причём не ниже версии 2.0.

Для этой категории юзеров компания разработала отдельную утилиту, чего раньше никогда не делала. И, нужно сказать, первый блин вышел комом: из-за жалоб пользователей практически сразу после публикации ссылки на программу она была удалена для доработок. В настоящее время этот инструмент снова доступен, а мы попробуем разобраться, как им пользоваться.
Как проверить совместимость с Windows 11 утилитой PC Health Check
Для начала следует ознакомиться с минимальными системными требованиями, предъявляемыми к компьютеру, владелец которого намеревается перейти на новую версию ОС. Они таковы:
- 64-битный процессор или SoC с тактовой частотой не ниже 1 ГГц и количеством ядер от 2 и более;
- 4 ГБ ОЗУ;
- минимум 64 ГБ свободного места на диске;
- UEFI с Secure Boot;
- модуль безопасности TPM0;
- совместимый с DirectX 12 видеоадаптер;
- монитор с разрешением не ниже 720p (для ноутбуков – с диагональю от 9″);
- наличие учётной записи Microsoft.
Со списком совместимых процессоров можно ознакомиться, перейдя по ссылке на официальном сайте.

Если у вас возникли сомнения по поводу того, отвечают ли характеристики вашего компьютера перечисленным требованиям, имеет смысл воспользоваться утилитой PC Health Check от Microsoft, доступной по следующей ссылке.

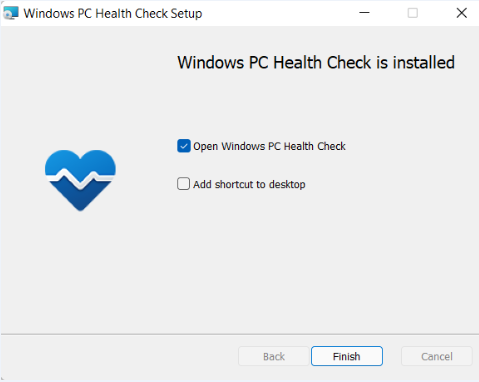
Инсталляция программы производится стандартным образом: кликаем по файлу WindowsPCHealthCheckSetup.msi, который появится в нижней статусной строке браузера, соглашаемся с условиями лицензионного соглашения и жмём кнопку «Установить».


После запуска утилиты необходимо нажать кнопку «Проверить сейчас», и через некоторое время программа проинформирует вас о том, годится ли ваш компьютер для перехода на Windows 11.

Если результат окажется положительным, вы получите уведомление о том, что обновление для перехода на новую версию операционной системы в скором времени станет доступно.

В случае, если сообщение будет противоположным (компьютер несовместим с Windows 11), нужно нажать кнопку «Learn More», чтобы узнать подробности, почему вы не сможете мигрировать на Windows 11.

Что делать, если PC Health Check не запускается
Как отмечают многие пользователи, даже после доработки утилита работает не всегда корректно, а в некоторых случаях вообще не запускается. Причины, по которым при открытии программы PC Health Check возникает ошибка, могут быть разными:
- сбой в работе компьютера;
- недоступность сети;
- сбои в работе сервиса;
- использование старой версии утилиты.
Если для вас критически важно проверить свой ПК на совместимость с Windows 11, но фирменная программа не запускается или при её работе возникают ошибки, предлагаем вашему вниманию небольшой обзор методов, которые помогут справиться с возникшей проблемой.
Перезапуск компьютера/ноутбука
Если ПК работает длительное время без перезагрузки, его память засоряется, что сказывается на стабильности функционирования. Большинство пользователей в курсе, что простая перезагрузка помогает решить проблему – компьютер снова становится шустрым.

Может оказаться, что ошибка при запуске PC Health Check как раз и вызвана сбоем в работе операционной системы, и часто после перезапуска компьютера утилита стартует в штатном режиме и работает без ошибок.
Проверка доступности сети
Если интернет сбоит, велика вероятность, что скачанный файл содержит ошибки, которые и препятствуют его нормальному запуску или установке. В таких случаях можно воспользоваться сервисом speedtest.net, который протестирует ваше интернет-соединение и определит, насколько оно стабильно. Как вариант, можно попробовать открыть в браузере другие вкладки, чтобы убедиться, что сайты грузятся, как обычно или, наоборот, очень медленно, или вообще не открываются.

В последнем случае свяжитесь с вашим провайдером и опишите проблему, а после её решения попробуйте запустить программу снова.
Восстановление системных файлов
Если, кроме ошибки при запуске утилиты PC Health Check, ваш компьютер и в остальном демонстрирует не очень стабильную работу – возможно, в этом виновны испорченные системные файлы, для восстановления которых Windows имеет целый арсенал инструментов.
Можно попробовать воспользоваться одним из них:
Переустановка программу
Как вы помните, одной из причин неудачного запуска PC Health Check может являться сбой при загрузке файла на компьютер, поэтому стоит попробовать выполнить повторную установку утилиты. Для этого нужно сначала удалить проблемную версию приложения. Сделать это можно стандартным способом, зайдя в «Параметры» и затем в «Приложения».

После этого снова заходим на официальный сайт Microsoft и повторно скачиваем инсталлятор с последующей установкой утилиты.

Если программа запустится нормально, то через несколько секунд вы сможете узнать, подходит ли ваш компьютер для перехода на Windows 11.

Отключение Интернета
Ещё одной причиной неудачного старта PC Health Check пользователи называют попытку сразу после запуска выполнить обновление до свежей версии программы на сайте производителя. И, как результат, эта попытка по неизвестным причинам оказывается неудачной. Представители Microsoft утверждают, что знают о проблеме и работают над ней, но пока что есть, то есть.

В таких случаях можно посоветовать на время запуска утилиты отключить доступ к сети, как правило, PC Health Check при этом продолжит работу в штатном режиме.

Повторение попытки запуска программы через некоторое время
Если при отключенном интернете программа тоже не хочет запускаться – значит, нужно просто подождать. Бывает, что сервера из-за большого наплыва посетителей или хакерских атак бывают перегруженными, поэтому обращение утилиты к ним оказываются блокированными.
Поэтому попробуйте запустить PC Health Check позже, например, через несколько часов – обычно этого времени бывает достаточно, чтобы технические специалисты справились с высокой нагрузкой на сетевое оборудование.
Если ничего из перечисленного не помогло, приведём ещё несколько проверенных советов. Возможно, один из них и сработает:
- зайдите в «Диспетчер задач» во вкладку «Процессы», найдите там PC Health Check, удалите процесс из памяти и после этого попробуйте повторно запустить программу;
- запустите полное сканирование установленной на вашем ПК антивирусной программой – если она выявит угрозы, устраните их, используя предложенные способы, после чего перезагрузите компьютер и попробуйте выполнить запуск утилиты снова;

- возможно, ваш компьютер оказался перегруженным из-за большого количества запущенных программ, и для PC Health Check в оперативной памяти просто не осталось места. Попробуйте напрямую или с помощью диспетчера задач закрыть ненужные программы или процессы, тем самым освободив ресурсы ПК.


Отметим, что, если вам удалось решить проблему с запуском PC Health Check, но результат её работы оказался неутешительным, это ещё не окончательный приговор. В сети уже имеется немало материала, объясняющего, как устанавливать Windows 11 на компьютер, который забракован этой утилитой. Остаётся добавить, что работать на новой операционной системе при несоответствии заявленным системным требованиям вам вряд ли понравится.
Последние три месяца Microsoft провела тестирование приложения «Проверка работоспособности ПК» для Windows 10, бесплатного инструмента, который позволяет каждому определить, почему его компьютер не соответствует минимальным требованиям Windows 11. После всестороннего тестирования приложение Microsoft для проверки совместимости наконец-то было запущено, а именно: она вышла из бета-тестирования и теперь доступна всем, кто хочет ее попробовать.
Инструмент проверки работоспособности ПК был впервые опубликован в последнюю неделю июня, но был удален с веб-сайта компании после того, как пользователи отметили проблемы с приложением. Позже приложение было повторно выпущено для ряда инсайдеров Windows для тестирования, прежде чем оно станет общедоступным (не инсайдерам).
Обновленная версия средства проверки работоспособности ПК была размещена на веб-сайте компании в минувшие выходные, и мы заметили ее сегодня. Этот новый инструмент проверки работоспособности ПК показывает полную картину того, почему устройство не соответствует минимальным требованиям Windows 11.
Представители Microsoft в социальных сетях еще не сообщили пользователям о доступности PC Health Check Tool. Инструмент был ранее указан, который выйдет «скоро», но теперь можно загрузить его с
официальной ссылки
.
Что такое инструмент Проверки работоспособности ПК?
Инструмент по проверки работоспособности ПК был создан, чтобы помочь людям определить, может ли их текущая конфигурация ПК работать с Windows 11. Если ваше устройство не соответствует требованиям, вам, вероятно, придется заменить его к 2025 году или же вы можете использовать официальные лазейки для установки Windows 11.
Как вы можете видеть на скриншоте выше, PC Health Check Tool просто проверяет, соответствует ли ваш компьютер системным требованиям. В противном случае приложение сообщит вам, почему нет, и предоставит ссылки на документацию Microsoft.
Требования Windows 11
В Windows 11 Microsoft постепенно прекращает поддержку старых процессоров и устройств, поставляемых без TPM 2.0. В отличие от Windows 10, для Windows 11 требуется процессор Intel Core 8-го поколения, Ryzen 2000 и новее.

Microsoft недавно еще раз протестировала производительность старых процессоров, чтобы выяснить, можно ли использовать какой-либо из них для Windows 11. После обширного тестирования Microsoft пояснила, что старые процессоры не будут поддерживаться из-за ошибок синего экрана смерти и проблем с совместимостью драйверов, но вот эти процессоры 7-го поколения будут поддерживаться:
- Intel Core X и Xeon W.
- Intel Core 7820HQ в Surface Studio.
В дополнение к более новому процессору для Windows 11 требуется TPM, безопасная загрузка (Secure Boot), 4 ГБ оперативной памяти, 64 ГБ памяти постоянной и поддержка DirectX 12.
Microsoft планирует разрешить Windows 11 на неподдерживаемом оборудовании через модифицированные ISO-образы и Media Creation Tool, но не ожидайте регулярных обновлений или поддержки от компании.
Скачать и установить обновленную версию PC Health Check вы можете по ссылке ниже.
Microsoft has re-released its PC Health Check app, which tells you if your PC meets Windows 11 hardware requirements. Here’s how to use the tool and two third-party alternatives to assess a PC’s ability to upgrade to Windows 11.
Mark Hachman / IDG 
In late June, Microsoft announced Windows 11, noted that the upcoming OS would have more stringent hardware requirements than Windows 10, and released a utility named PC Health Check to permit users to assess the upgrade readiness of their PCs. Just four days later, however, Microsoft withdrew the tool from circulation, citing issues with its “level of detail or accuracy.” In other words, it was telling many users that their hardware couldn’t run Windows 11, but it wasn’t telling them why.
To partially make up for the loss of the PC Health Check app, Microsoft published more detailed minimum system requirements for Windows 11, but it also noted that those requirements might change after the company factored in feedback from testers in its Windows Insider program.
As of August 27, the PC Health Check tool is back, and there’s no shortage of third-party options available to those who’d like a report on a PCs’ compliance with — or violation of — the minimum system requirements for Windows 11, which will begin rolling out on October 5. I’ll walk you through the system requirements as they stand now, as well as how to use the PC Health Check app and two alternative tools to check a PC’s Windows 11 upgrade readiness.
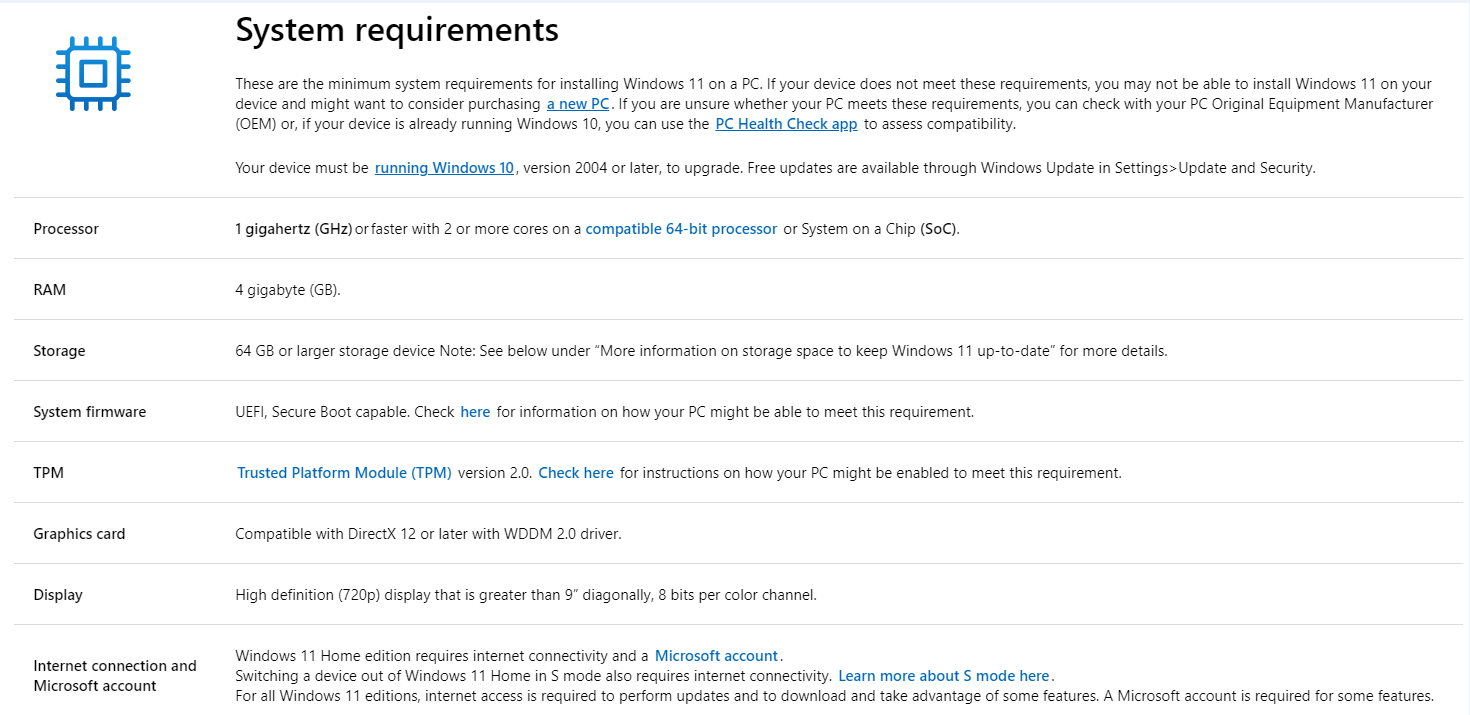
Windows 11 system requirements
According to Microsoft’s Windows 11 overview page, the following items delineate the basic requirements a PC must meet for Windows 11 to install properly on that machine. At present, Microsoft has relaxed those restrictions, so that out-of-compliance PCs can run Windows 11 within the Insider Program. But when the official release goes out later this year, those machines will no longer be able to upgrade to newer Windows 11 versions.
- Processor: 64-bit architecture at 1 GHz or faster; Intel: eight-generation or newer (details); AMD Ryzen 3 or better (details); Qualcomm Snapdragon 7c or higher (details)
- RAM: 4 GB or higher
- Storage: 64 GB or larger storage device
- System firmware: UEFI, Secure Boot capable
- TPM: Trusted Platform Module (TPM) version 2.0
- Graphics card: Direct X12 or later capable; WDDM 2.0 driver or newer
- Display: High-def (720p) display, larger than 9” diagonal in size, 8 bits per color channel (or better)
- Internet connection/MSA: Windows 11 Home edition requires internet connectivity and a Microsoft Account (MSA) to complete device setup on first use. Switching out of Windows 11 Home in S mode likewise requires internet connectivity. For all Windows 11 editions, internet access is needed for updates, and to download and use certain features. An MSA is required for some features as well.
Just recently the company also relaxed its CPU restrictions to include certain high-end seventh-generation Intel processors found in some of its Microsoft Surface Studio 2 PCs, as well as certain Xeon processors. (See the details link for Intel in the first list item above.) Otherwise, the limitations stated above are unchanged.
Using Microsoft’s PC Health Check
Start by downloading PC Health Check; it’s a Microsoft Installer file named WindowsPCHealthCheckSetup.msi. Run this file and the program installs itself.
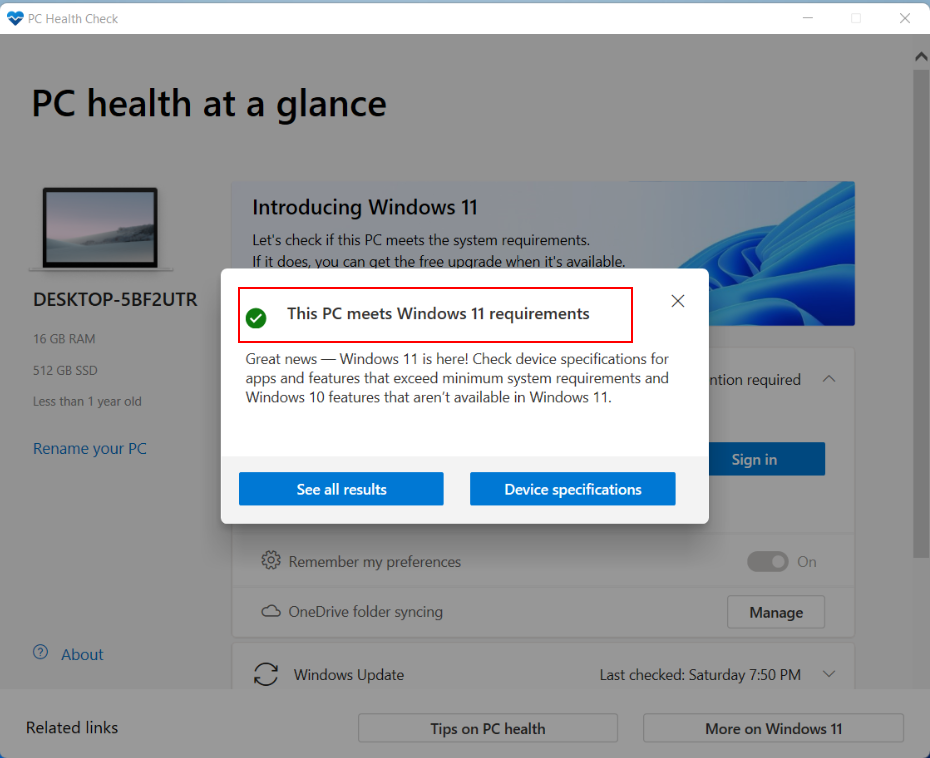
To run the program, type PC Heal into the search box, then run the app from the Start menu. To run its built-in Windows 11 compatibility check, click the Check now button inside the “Introducing Windows 11” pane at the top of the app window, as shown in Figure 1:
Figure 1: Click Check now in the PC Health Check app to run its compatibility checker. (Click image to enlarge it.)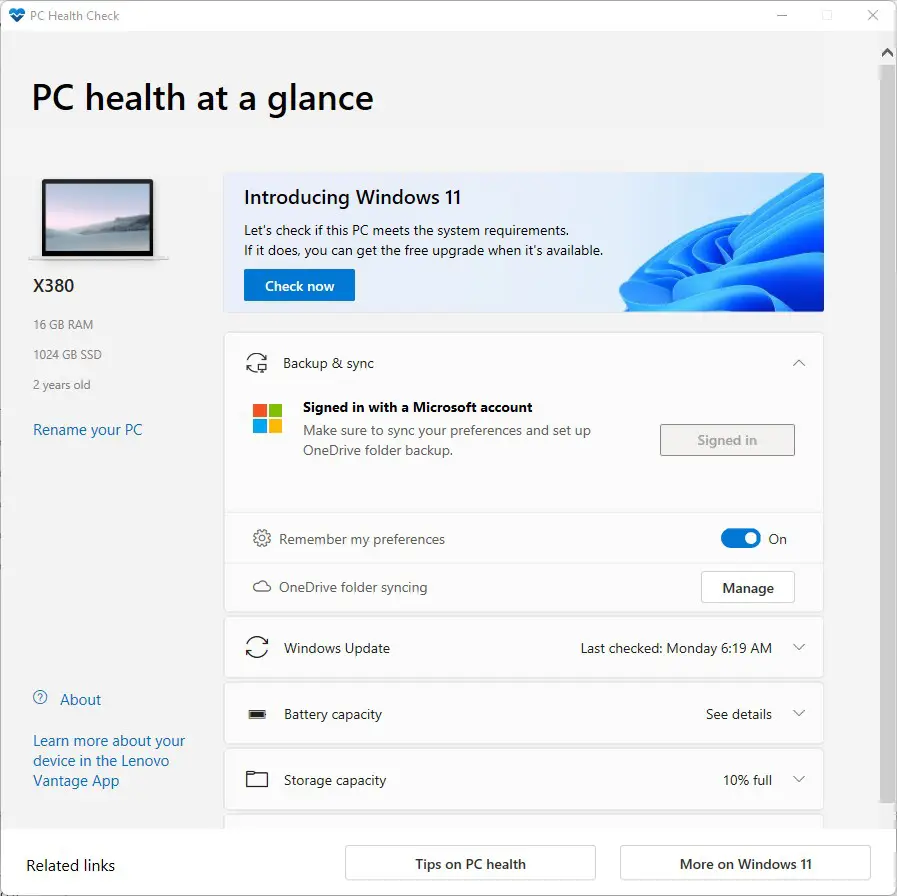 IDG
IDG
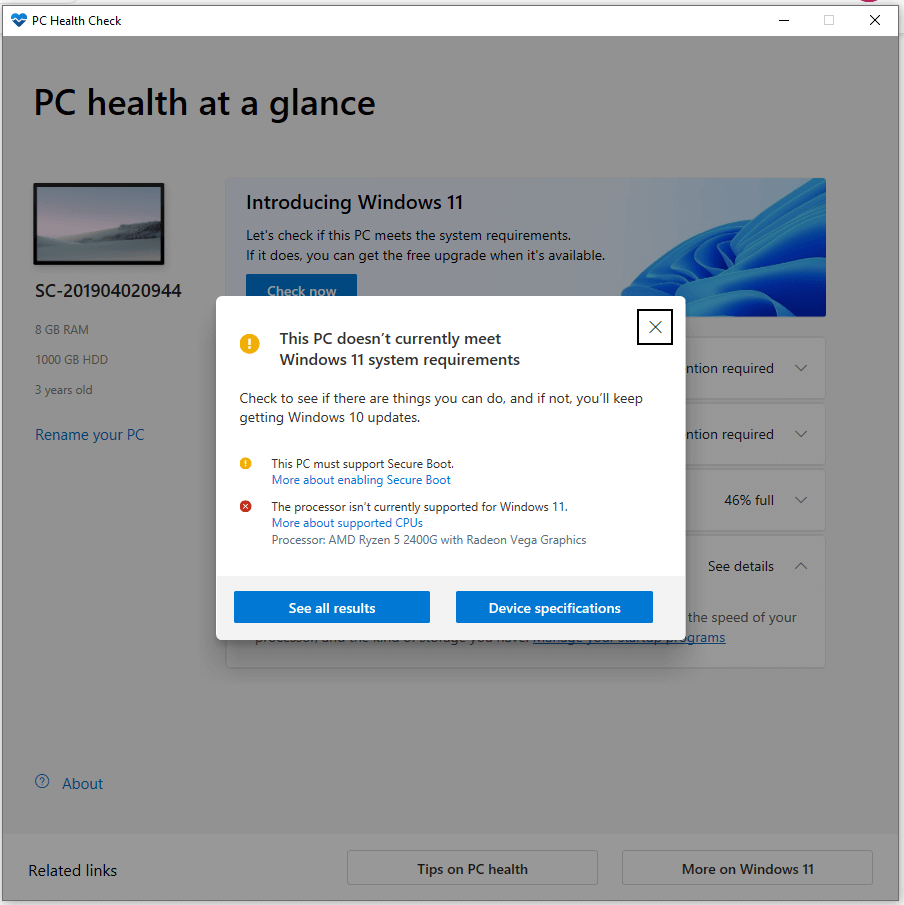
The program returns one of three possible windows after the compatibility check runs. Those that pass the check get a “meets requirements” message (Figure 2, left); those that fail get a “doesn’t currently meet” message (center); and those from PCs running Windows Education or Enterprise or another Windows version managed by an IT department get a message that reads “Your organization manages updates on this PC” (right) but no compatibility check. I’m running Enterprise on my production PC and have flagged this as an error or problem with Microsoft via its Feedback Hub.
Figure 2: From left to right, passing grade, failing grade, and no grade, respectively. (Click image to enlarge it.)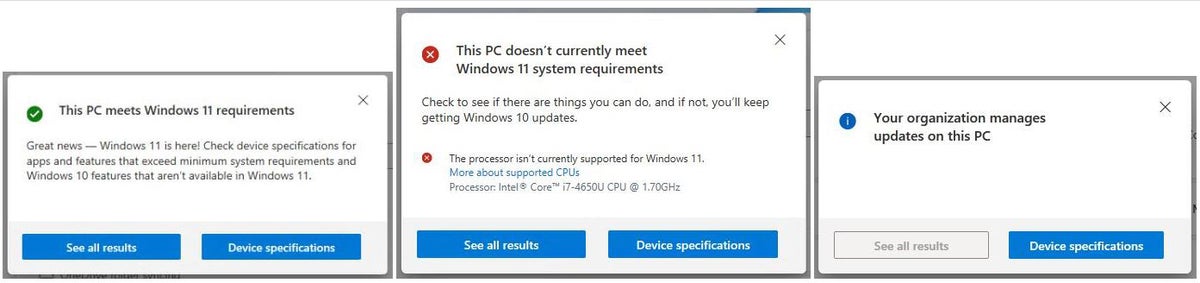 IDG
IDG
Click the See all results button to see more details for both passing and failing PCs. The failing PC is a 2014 vintage Surface Pro 3 that fails because its fourth-generation Intel CPU is not supported. The passing grade goes to a 2018 Lenovo ThinkPad X380 Yoga, which has an eighth-generation Intel CPU and other necessary components. Some of the details for both machines appear in Figure 3.
Figure 3: My 2018 Lenovo X380 Yoga (left) passes, but the 2014 Surface Pro 3 (right) fails. (Click image to enlarge it.)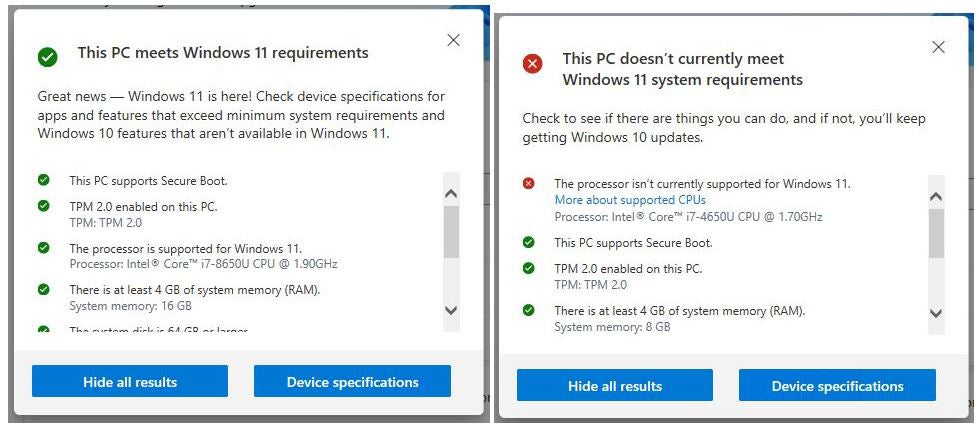 IDG
IDG
Microsoft’s PC Health Check will work for most Windows PCs. Those running Windows 10 Education or Enterprise may be out of luck. Ditto for Windows PCs centrally managed via Group Policy in an organization’s IT environment. YMMV, as they say. And, of course, you might not wish to join the Windows Insider program. That’s why I also recommend the two third-party compatibility check tools in the next section.
Two good alternative Windows 11 compatibility checkers
Though more options are available, I have found two third-party tools to be eminently useful to check a PC for Windows 11 compatibility in enough detail to make them worthwhile:
- WhyNotWin11: a GitHub-based project that runs as a standalone Windows application and reports on a series of checks it performs when run.
- Windows 11 Compatibility Check: a Windows batch file that runs inside an administrative PowerShell session or Command Prompt window to report its findings on PC attributes and capabilities.
Either of these tools can provide you ample intelligence to determine if your PC is ready for Windows 11, with one caveat. Older PCs whose CPUs qualify under the processor requirement may include hardware-based TPM chips of version 1.3 or older (lower in number). These CPUs can emulate TPM 2.0, so what looks like a failure to meet Windows 11 requirements at the hardware level can be offset in software. I will explain further in the section on the Windows 11 Compatibility Check script below.
WhyNotWin11
WhyNotWin11 is a GitHub project whose source code is publicly available. The latest release as I write this story is version 2.4.0 (but you can always click the “Latest” button on the home page to jump to the most current vesion). Click the link labeled Download the latest stable release and you’ll end up with a file named WhyNotWin11.exe. By default it resides in the Downloads folder (C:Users<username>Downloads), where you can execute the program directly.
It takes a little while to download the WMIC (Windows Management Instrumentation command-line utility) on which it’s based. When it completes its various checks, it displays their results as shown in Figures 4 (from an incompatible system) and 5 (from a compatible one).
Figure 4: WhyNotWin11 results for a PC running on a sixth-gen (i7-6700) Intel chip with no TPM support. This PC will not support Windows 11. Figure 5: WhyNotWin11 results for a PC running on an eleventh-gen (i7-1180G7) Intel chip with TPM 2.0 support. This PC is running Windows 11 and meets all requirements. IDG
IDG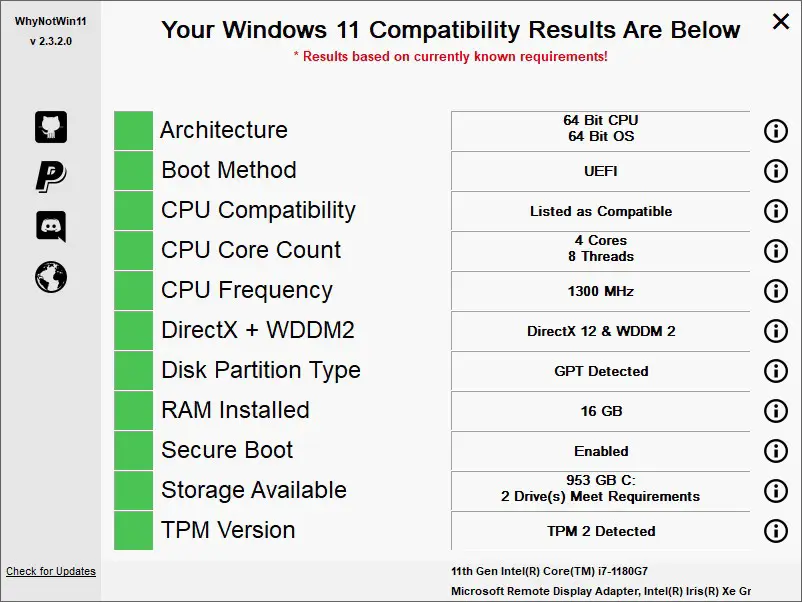 IDG
IDG
Understanding WhyNot11’s output is simple: green meets it meets a requirement, red means it doesn’t, and amber means it may or may not meet the final requirements but doesn’t meet current requirements. There’s been a lot of flap about where Microsoft should draw the line on CPU generations, so amber is a sop to those with high hopes for inclusion of older generations. As of the end of August, a few select seventh-generation Intel Core and Xeon processors were allowed into the “meets requirements” group, but no further additions are on the table, according to Microsoft.
Windows 11 Compatibility Check script
This tool, named Windows 11 Compatibility Check, comes from the community website Windows ElevenForum. Its author, JB Carreon, offers his work as freeware. It comes in the form of a batch file named W11CompChk.bat. Downloads for this tool reside on its History page. As I write this story, the most current version is numbered 1.4.1, for which dates and download links are readily visible.
Once it’s loaded onto your PC, you can simply right-click its entry in File Explorer while holding down the left-hand Shift key on the keyboard. From the resulting pop-up menu, select Copy as path. This copies the full file path into your paste buffer. Next, open an administrative Command Prompt window, paste in the string, and remove the leading and trailing quotation marks («»).
The batch file will then execute. It will show progress, and then a report when it finishes its various checks. Figure 6 shows results from an incompatible PC (the same one as in Figure 4 preceding); Figure 7 shows results from a compatible PC (the same one as in Figure 5).
Figure 6: Script output for a sixth-generation Intel i7-6700 CPU PC with no TPM. Again, this PC does not meet Windows 11 requirements. Figure 7: Script output for an eleventh-generation Intel system with TPM 2.0 emulation, which Windows 11 Compatibility Check incorrectly identifies as version 1.3. Despite the script’s assessment, this PC is compatible with Windows 11.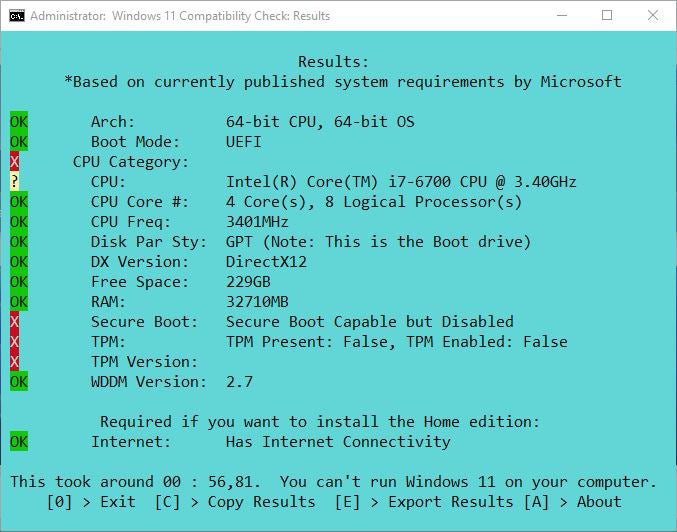 IDG
IDG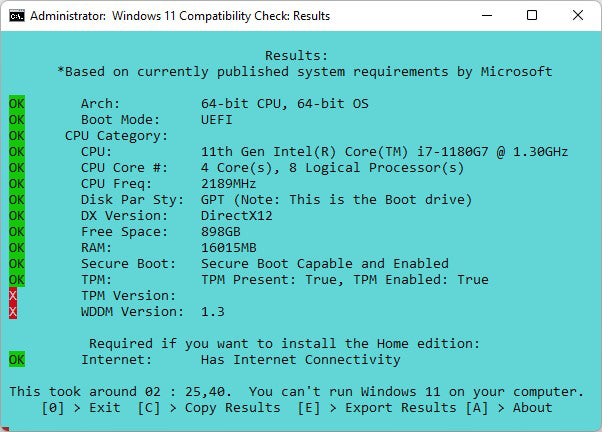 IDG
IDG
Note in Figure 7 how the Windows 11 Compatibility Check script has been tripped up. While the tool does show that TPM is enabled, it erroneously reports an outdated 1.3 version based on the physical TPM chip present. That chip is emulating TPM 2.0 and therefore does meet the Windows 11 requirements.
Any of these tools will do, but…
Microsoft’s PC Health Check gets the job done, except for those running Enterprise or Education versions, those whose PCs are under central IT management, or those who are not Windows Insiders. Both it and WhyNotWin11 are smart enough to check which version of TPM is active in the Windows runtime environment. Thus, they correctly identify the TPM as meeting the “version 2.0 or higher” requirement.
If you run the TPM.msc snap-in for the Microsoft Management Console on that PC (you must be logged in with administrative privileges), in fact, it shows you that its “Specification version” is indeed 2.0 (see Figure 8, lower right). That meets the stated requirement and means that the Lenovo X12 ThinkPad in question (built in 2021) will happily and successfully run Windows 11.
Figure 8: The important field is “Specification Version,” which reads 2.0 and meets requirements.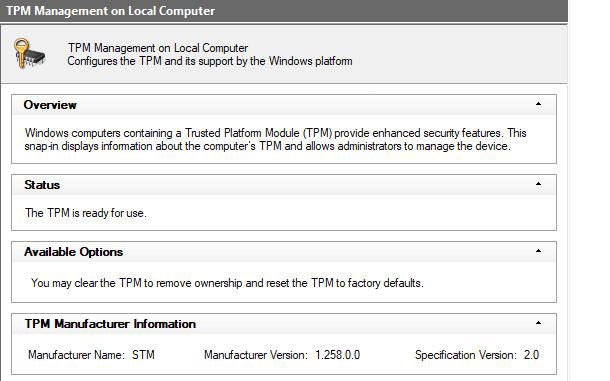 IDG
IDG
Any tool covered here will help you figure out if (and why) a PC meets or fails the Windows 11 system requirements. I like all three, but I give WhyNotWin11 a slight edge because it gets TPM right and runs on Enterprise, Education, and centrally managed Windows PCs.
Copyright © 2021 IDG Communications, Inc.
Программа PC Health Check позволяет определить, соответствует ли компьютер минимальным системным требованиям Windows 11. Её впервые представили в июне, но почти сразу удалили из-за «недостаточного уровня точности».
После доработок и тестирования участниками предварительной программы приложение вышло из беты и доступно для скачивания с официального сайта. Обновлённая версия показывает более точную информацию о совместимости и предоставляет ссылки на документацию.
Напомним, Windows 11 официально не поддерживается устройствами без модуля TPM 2.0 и процессорами ниже Intel Core 8-го поколения / AMD Zen+, но Microsoft всё-таки сделала несколько исключений: для Intel Core X, Intel Xeon W и Intel Core i7-7820HQ, который установлен в моноблоке Surface Studio 2.
Компания позиционирует такие требования повышенной отказоустойчивостью системы и совместимостью с драйверами, но позволит пользователям устанавливать ОС «на свой страх и риск» через ISO-образ.
Остальные требования включают в себя 4 ГБ оперативной памяти, 64 ГБ свободного места на диске, видеоадаптер с DirectX 12 и WDDM 2.0, а также поддержку UEFI и Secure Boot. Скачать утилиту для проверки устройства можно по ссылке.
Windows 11 выйдет 5 октября 2021 года, пользователи Windows 10 смогут обновить систему бесплатно.
Microsoft offers the free PC Health Check app for Windows to help Windows 10 users check for Windows 11 compatibility and also check the Windows computer’s health. This post from MiniTool teaches you how to download and use the PC Health Check app with a detailed guide. A free data recovery guide is also provided to help you recover deleted or lost files.
Microsoft has released its newest Windows OS — Windows 11. Windows 11 is available for free download and upgrade for qualified Windows 10 users now. If your Windows 10 computer meets the system requirements of Windows 11, you can easily upgrade from Windows 10 to Windows 11.
To help users easily identify if their computers support Windows 11, Microsoft released a free app – PC Health Check. This post teaches you how to download and use the PC Health Check app to check if your PC can run Windows 11 and test your computer health like backup & sync, Windows Update, disk usage status, etc.
Where to Download PC Health Check App for Windows 10/11
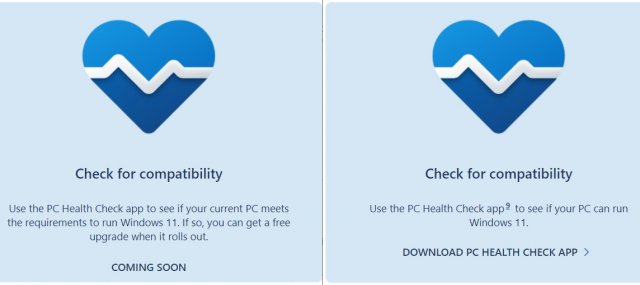
- You can go to the official Microsoft Windows 11 website in your Chrome browser.
- Scroll down to find the Check for compatibility section.
- You can see two clickable links here. You can click the Download PC Health Check App link to instantly download the PC Health Check app to your computer. Here you can also click the See Minimum System Requirements link to check the system requirements of Windows 11 OS.
- After the download process finishes, you can click the WindowsPCHealthCheckSetup.msi file at the left-bottom of the browser to open the Windows PC Health Check Setup window. Let the PC Health Check app automatically install. Click Finish and open the PC Health Check app.

How to Use PC Health Check App for Windows 10 to Check Windows 11 Compatibility
- After you download PC Health Check for Windows 10, you can double-click its shortcut on the desktop screen to launch the app.
- On the main UI of the app, you can click the Check now button and it will automatically check if your computer hardware meets the requirements of Windows 11.
- When it finishes testing, you may have two results. One is “This PC meets Windows 11 requirements”, and you can click the See all results button to check the detailed information. Another result is “This PC doesn’t currently meet Windows 11 system requirements” or “This PC can’t run Windows 11”. Still, you can click the See all results button to check if there are things you can do to meet the requirements of Windows 11.
Use PC Health Check to Check Your Computer Health (Update, Disk Usage, Startup Time, etc.)
Aside from compatibility check for Windows 11, the Microsoft PC Health Check app also provides several other features to help you check and display the health and performance of your Windows 10/11 computer. You can check the details below.
1. Rename Your PC
After you open PC Health Check, it will automatically check and display your computer information and performance data. You can have a glance at your PC health.
On the left side, it displays your computer name, RAM, HDD storage, computer age. You can click Rename your PC link to quickly open the About window in Windows Settings. Here you can click Rename this PC button under Device specifications to give your computer a new name.
2. Backup & sync
If you have set up backup and sync for your computer system and files, it will show a “Backed up” or “Backing up” message.
If you haven’t turned on the backup and sync feature of your PC system and data, it will display an “Attention required” notification.
You can expand the Backup & sync option and click the Sign in button to sign in to your computer with a Microsoft account or create a new Microsoft account. Then you can sync your preferences across your devices like password, Microsoft Edge browser settings, themes, etc. You can also set up OneDrive to sync and back up your photos and files to OneDrive.

3. Windows Update
Microsoft releases Windows updates regularly to help keep users’ devices running smoothly and securely. If your PC isn’t up-to-date, it will display an “Attention required” notification.
You can expand the Windows Update section in the PC Health Check app and click the Open Windows Update link to access the Windows Update screen in Settings. Here you can click the Check for updates button to check and download the latest Windows 10/11 updates for your device.

4. Storage Capacity
The Storage Capacity section shows the percentage of the used storage of your computer’s primary drive (system drive) that contains your Windows system, files, and apps. It also displays how much free storage space is left of the main drive. You can click the Manage storage settings link to open the Storage window in Settings.
Here you can see the storage usage state of your compute drives. You can optionally turn on the option of Storage sense. By turning on this option, Windows can automatically free up space by getting rid of files you don’t need like temporary files or content in Windows Recycle Bin. Still, you can also adjust many other storage settings in this window.

5. Battery capacity
The battery capacity option in Windows PC Health Check will be available for computers older than 3 years. This section displays information about how your batteries perform compared to the original battery capacity. You can click the See battery saving tips link to check the tips to improve the battery life of your computer.
6. Startup time
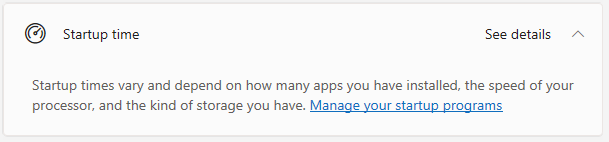
The Startup time feature of the PC Health Check app explains what affects the startup time of PC. The Startup time of a computer depends on how many apps you have installed, the speed of the CPU, the type of storage you have, etc. You can click Manage your startup programs to customize the startup apps on your Windows 10/11 computer.
7. Tips on PC health
You can click the Tips on PC health button at the bottom of the PC Health Check app to check the other tips to improve your Windows 10/11 computer’s performance.
8. More on Windows 11
You can click the More on Windows 11 button to open the official website of Windows 11 to know more information about the new Windows 11 OS.
How to Uninstall PC Health Check App
If you don’t need the PC Health Check app anymore or the app has problems, you can go to Control Panel to uninstall or repair it.
- Press Windows + R, type appwiz.cpl, and press Enter to quickly open the Programs and Features window in Control Panel.
- Find and right-click Windows PC Health Check from the list. To uninstall PC Health Check, you can choose Uninstall To repair the PC Health Check app, you can choose the Repair option.
If your computer has problems or works with low performance, you can download PC Health Check for Windows 10/11 to use the app to diagnose your computer’s health and performance.
If you lost some important data due to computer problems, you can try a professional data recovery program to restore lost data.
MiniTool Power Data Recovery is a professional data recovery program for Windows. You can use this program to easily recover any deleted or lost files, photos, videos, etc. from Windows PC or laptop, USB flash drive, SD/memory card, external hard drive, SSD, etc.
It helps you restore data from various data loss situations including recovering data from a corrupted drive, recovering data from a formatted hard drive, recovering data from an unbootable PC, etc.
It equips an extremely intuitive interface and it is 100% clean. Download and install MiniTool Power Data Recovery on your Windows computer and check its simple user guide below.
Free Download
- For an external drive, you should connect it to your Windows computer first. Then launch MiniTool Power Data Recovery.
- On the main UI, select the target drive that you want to scan and click Scan. If you don’t know which drive to choose, you can click the Devices tab and choose the whole disk or device and click Scan.
- After the scan process finishes, you can check the scan result to find if the target files are there, if so, check them and click the Save Choose a new device or place to store the recovered files.

Click to Tweet
Best Free Disk Partition Manager to Help You Manage Hard Drives
As stated above, the PC Health Check app for Windows 10/11 helps you diagnose the storage usage rate of your system drive (C drive). If it finds the C drive is almost full, you can delete some unnecessary files to free up some disk space or extend the C drive to fix the problem.
MiniTool Partition Wizard is a free disk partition manager for Windows 11/10. It offers various disk management features to let you easily manage your hard drives from all aspects.
You can use MiniTool Partition Wizard to easily extend the C drive without data loss and use its Space Analyzer feature to analyze hard drive space and delete unnecessary large files and folders.
Besides, you can also use this application to create, delete, resize, format, wipe partitions, change drive letter, convert disk/partition format, test hard drive speed, migrate OS to HDD/SSD, clone disk, and more.
Free Download

From the above introduction of the Windows PC Health Check app, you can see it can identify your PC’s backup and sync status and let you set up the backup and sync state.
Here we also introduce a professional PC backup software program that helps you easily back up the Windows system and data.
MiniTool ShadowMaker is a top PC backup program. You can use it to select files and folders or partitions on your Windows computer to back up to an external hard drive, USB flash drive, or network drive. You can even select the whole disk content to back up.
It also lets you easily backup and restore Windows OS.
File sync, schedule automatic backup, incremental backup, clone disk, and many other backup features are also included in this program.
Free Download

Bottom Line
This post teaches you how to download PC Health Check for Windows 10/11 and offers a user guide for the Windows PC Health Check app. You can use this app to easily check if your Windows 10 computer is compatible with Windows 11 and use it to diagnose your Windows 10/11 computer’s health/performance. Hope it helps.
MiniTool Software also provides popular programs like MiniTool MovieMaker, MiniTool Video Converter, MiniTool Video Repair, and more. If you have any issues with using MiniTool Software programs, please contact [email protected].