Have an issue you can’t solve? I offer consulting engagements and can be reached here: consulting[а𝐭]amorales[․]org
Last Updated 2020-01-03
After months of testing I recommend deploying FSLogix Profile Containers instead of User Profile Disks. You can find my guide here. Some of the items below apply to FSL Profile Containers.
User Profile Disks (UPDs) are great for load balanced RDS farms since it allows users to seamlessly roam from server to server. The goal of this article will be to configure the RDS and file servers in a way that maximizes performance and reduces the likelihood of UPD disconnects.
I’ll keep this updated any time I find new improvements.
Use FSLogix
Before you even consider deploying UPDs you need to be aware of this limitation. On Server 2012 and 2016 (Server 2019 does not have this issue, but it doesn’t support Office) the Windows Search index is machine wide. This means that when a UPD is disconnected the user’s index data is deleted. The result is that the next time the user logs into the RDS and opens Outlook their search index will need to rebuild. This will become a major issue when you have 5+ users on a server and the index throttles itself. You could disable the index back off, but it will lead to performance issues and it won’t actually fix the issue.
The solution is to configure FSLogix Office 365 containers. What they have done is create their own «UPD» that stores all the user’s Outlook and index data. The next time the user signs into the server their index will load instantly.
Location of Servers
In order to reduce latency and the likelihood of a UPD disconnect; the server hosting the UPD share should be on the same VMware host as the RDS servers. This might not always be possible based on your configuration, but it is ideal since it keeps all the network traffic within VMware.
Use ReFS for the UPD drive
Using ReFS as the file system of the drive that will host the UPDs will improve VHDX performance. This will be evident when creating UPDs(first login) and when they need to expand. More info here.
Set all your servers to High Performance
Make sure that all your servers are set to a High Performance power plan. This will make sure that none of the power settings lead to disconnections.
Compact your UPDs
UPDs are dynamic VHDX files that can expand up to 20GB by default. The UPD automatically expands any time the user adds data to it, but it never compacts once data is removed. As a result, you may end up with a ton of blank used space.
The script below can be configured as a scheduled task on your file server. It will go through your UPD share and compact any VHDX files that are not in use.
Compact-UPDs.ps1
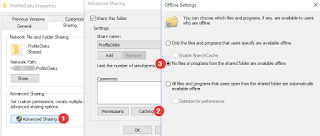
Disable Share Caching
Disabling share caching can prevent some rare situations where the UPD fails to dismount from the RDS server. It also has no negative effects since there is no need to cache the UPD files.
Go to the Caching Settings of the profile disk share and select «No files or programs from the shared folder are available offline»
Restart your RDS servers after the File Server
If you have scheduled restarts, make sure that the RDS servers restart after the File Server. If a user left their session open on the RDS and the file server restarts their session will get stuck. Restarting the RDS servers after the file server ensures that all sessions are cleared.
Delete Inactive Printer Ports
Don’t do this on 2019 servers! It will break redirection.
There is an issue where printer redirection ports don’t get cleared out when users log out. This can result in long login times. This article says that it only affects 2008 R2, but I have seen 2012 and 2016 servers with thousands of unused ports. Thankfully there is an application that can delete them.
- Download InactiveTSPort from the archive https://archive.codeplex.com/?p=inactivetsport
- go to the releases/1 folder and rename the file «46d7de43-82ec-4984-b550-6580a82ee735» to «DeleteInactivePortSilently.exe«
- Create a scheduled task that runs the exe every few days


Delete bad folders under the Users Folder
Have you ever looked at your C:Users folder and seen a ton of .BACKUP-0 folders? I have a possible cause of the issue on the next point. These .BACKUP-## folders can lead to some issues like Outlook not being able to find the OST of a user when launched.
Set the script below as a scheduled task that runs every morning. The script uses DelProf2 to delete all the folders under the C:Users directory. This will only delete profiles of users that are not logged in. I exclude the UvhdCleanupBin folder since its purpose seems to be a bit of a mystery.
Create scheduled Task Remove-UPDOldProfilesScheduledTask.ps1
Remove-LocalUPDProfiles.ps1

Log users out of the Server before restarting it
This is a bit of speculation, but I believe that the .BACKUP-## folder issue is caused by restarting the server while UPDs are attached. If you restart servers on a schedule, then it might be worth creating a script that logs all users out of the RDS before it is restarted.
Delete old firewall rules at logoff
Every time a user logs into an RDS server several Firewall rules are created. These rules are never deleted and over time you will have thousands of unnecessary rules on all your servers. These rules can lead to performance issues and crashing. Also, the rules will show up even if you have the firewall disabled.
Install KB4467684 and create a GPO that creates the following reg key:
HKEY_LOCAL_MACHINESYSTEMCurrentControlSetServicesSharedAccessParametersFirewallPolicy
DeleteUserAppContainersOnLogoff (DWORD)
Value: 1
The next time a user logs in and back out of a server the rules will be cleared. More info here.
Redirect Common User Folders
Use folder redirection to store common user folders (Documents, Desktop, Downloads, etc.). This will allow you minimize the size of UPDs and it will make management easier. For instance, if you upgrade from Server 2012 to 2016 you will only need to worry about user settings and not their documents.
AV Exclusions
Make sure to exclude VHDX files from your AV, and make sure that they actually show up on the client’s exclude list. In my case simply excluding *.vhdx files from ESET did not do the trick. I had to create the exclusions below.
\SERVER*.vhdx (File Server)
\EXAMPLE.COM*.VHDX (DFS namespace) (you only need this if you’re deploying FSLogix)
L:*.vhdx (Local drive on the file server)
Storing data on the UPD
The RDS session properties give you two choices on how to store data. «Store all user settings and data on the user profile disk» and «store only the following folders on the user profile disk». I opt for «Store all user settings and data on the user profile disk» this ensures that none of the user’s data is lost.
If i need to exude something I use the exclude list.
Start Menu not working?
Excluding the paths below and creating the reg key might help with the issue. See thread with more info here and here.
Exclude:
AppDataLocalPackages (Folder)
AppDataLocalMicrosoftWindowsUsrclass.dat (File) (This is supposed to cause users to lose their default Apps, but I have not seen that occur[see here for other things that might be lost])
After some testing I have confirmed that the notification area icon settings will not persist across sessions if Usrclass.dat is excluded. All non system icons will be hidden again the next time a user signs in.

Reg key:
HKCUSoftwareMicrosoftWindowsCurrentVersionImmersiveShellStateStoreResetCache
DWORD
1
Have any ideas or improvements? Share them in the comments. Also, let me know if you think I got anything wrong.
Технология Microsoft FSLogix используется для управления профилями пользователей и позволяет заменить перемещаемые профили (Roaming Profiles) и User Profile Disks (UPD) в сценариях RDS, VDI и Windows Virtual Desktop (WVD). Сервис FSLogix позволяет динамически подключать контейнеры с профилями пользователей из сетевых ресурсов. Возможно использование как в on-premises решениях, так и в Azure (в качестве хранилища профилей можно использовать Azure Files). В этой статье мы рассмотрим, как использовать перемещаемые профили пользователей FSLogix вместо User Profile Disks в RDS развертываниях Windows Server 2019/2022.
Содержание:
- Для чего нужные контейнеры FSLogix?
- Установка и настройка FSLogix для профилей пользователей на Windows Server 2019 RDS
- Расширенная настройка профилей FSLogix на Windows Server RDS
Для чего нужные контейнеры FSLogix?
Концепция FSLogix похоже на привычную технологию RDS User Profile Disks (UPD), когда профили пользователей хранятся в виде виртуальных VHDX дисков и подключаются по сети при входе пользователя в систему. Однако FSLogix позволяет преодолеть многие недостатки UPD в средах RDS и позволяет:
- Существенно увеличить скорости загрузки профиля по сети, и как следствие уменьшается время входа/выхода в систему для пользователя;
- Оптимизирован для приложений Office 365 (Microsoft 365 for Enterprise);
- Один и тот же профиль можно использовать в разных RDS коллекциях, и фермах RDS VDI и даже физических компьютерах;
- Профиль FSLogix можно подключать сразу в несколько сессий (на чтение);
- В UPD поисковый индекс Windows очищается при выходе пользователя и его нужно генерировать заново в следующий раз. В FSLogix можно сохранять индекс в перемещаемом профиле;
- Обеспечивает доступность файлов кэша Outlook (OST, Outlook Cached Mode), индекса (поиска) Outlook, кэша и данных MS Teams и т.д.
- Перемещаемые FSLogix профили можно исопльзовать даже на отдельностоящих хостах RDSH.
Решение FSLogix бесплатно для использования в on-premises развертываниях RDS, при условии, что у вас приобретены RDS CAL и установлены на сервере лицензирования RDS.
Установка и настройка FSLogix для профилей пользователей на Windows Server 2019 RDS
Рассмотрим, как установить и настроить FSLogix для терминальной RDS фермы на базе Windows Server 2019.
- Скачайте FSLogix по этой ссылке (https://aka.ms/fslogix/download, около 180 Мб). Доступ к утилите свободный;
- Распакуйте архив и установите агент FSLogic FSLogix_Appsx64ReleaseFSLogixAppsSetup.exe на RDSH сервера;
- Затем скопируйте файлы административных политик FSLogix в центральное хранилище административных шаблонов GPO на контроллере домена (fslogix.admx в PolicyDefinitions, и fslogix.adml в PolicyDefinitionsen-US).
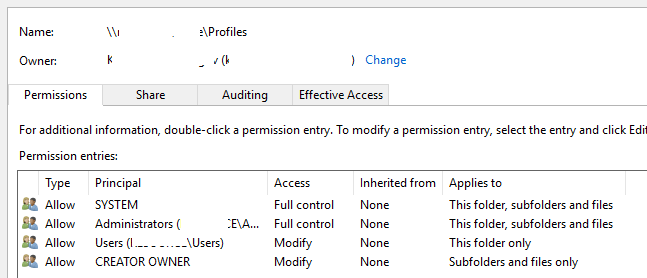
Создайте на файловом сервере сетевую папку, в которой будут хранится контейнеры с профилями пользователей FSLogic. Например, \msk-fsShareProfiles.
Задайте следующие NTFS права доступа на сетевую папку:
| User Account | Folder | Permissions |
|---|---|---|
| Users | This Folder Only | Modify |
| Creator / Owner | Subfolders and Files Only | Modify |
Теперь вы можете создать GPO для настройки параметров FSLogix для RDS серверов.
Откройте консоль управления доменными GPO (
gpmc.msc
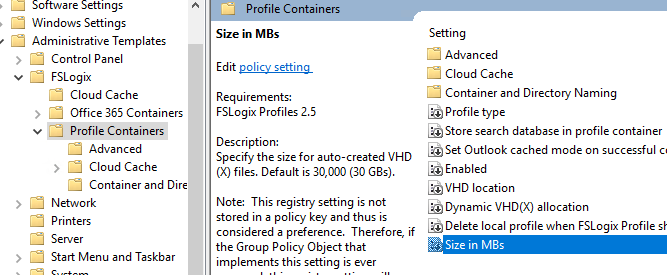
), создайте новую политику и назначьте ее на OU с вашими RDSH серверами. Разверните Computer Configuration -> Policies -> Administrative Templates -> FSLogix. Настройте следующие параметры GPO:
- Profile Containers -> Enabled – включить профили FSLogix;
- Profile Containers -> VHD Location – указать UNC путь к каталогу профилей (\msk-fsShareProfiles);
- Profile Containers -> Delete local profile when FSLogix Profile should apply – удалить локальный профиль при использовании FSLogix;
- Profile Containers -> Size in MB – максимальный размер файла профиля, по умолчанию 30000 (30 Гб);
- Profile Containers -> Dynamic VHD(X) allocation = Enabled. Если не включить эту политику, то VHD/VHDX диски профилей пользователей сразу создаются максимального размера;
- Profile Containers -> Advanced -> Prevent login with temporary profile – не создавать временные профили пользователей;
- Profile Containers -> Advanced -> Prevent login with failure – запретить вход при неполадках FSLogix;
- Profile Containers -> Advanced -> Locked VHD retry count = 3, указать количество попыток VHD(X) файл, если он заблокирован другим процессом;
- Profile Containers -> Container and Directory Naming -> Virtual disk type – использовать VHDX тип виртуального диска для профиля вместо стандартного VHD;
- Profile Containers -> Container and Directory Naming -> Swap directory name components – использовать %username%_SID в качестве формата для каталогов профилей пользователей (вместо SID_%username%);
- Profile Containers -> Store search database in profile container = Disabled (не хранить в профиле индексную базу Windows Search);
- Enable logging = All logs enabled — включить логи FSLogix
- Path to logging files – путь к логам FSLogix (\msk-fsShareFSLogixLogs %COMPUTERNAME%);
- Days to keep log files – сколько дней хранить логи (7 дней достаточно).
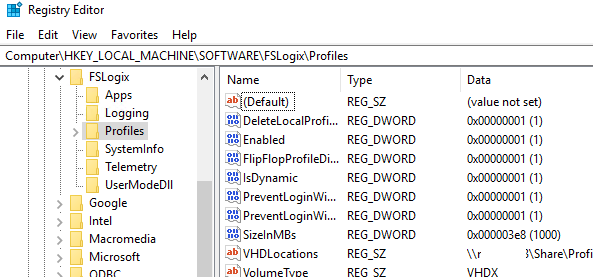
Перезагрузите Windows Server, чтобы применить новые настройки GPO. Системные настройки профилей FSLogix хранятся в следующей ветке реестра HKLMSOFTWAREFSLogixProfiles.
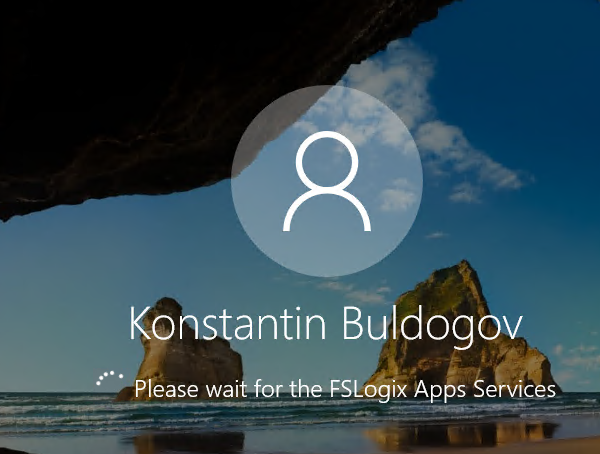
Теперь при входе RDP пользователя на экране должно появляться уведомление:
Please wait for the FSLogix Apps Services
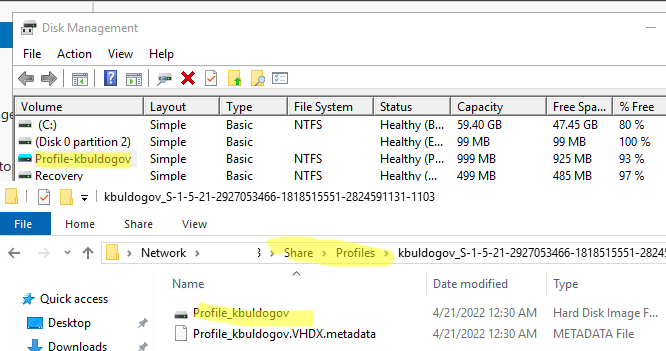
После входа вы можете запустить консоль управления дисками (Disk Management) и убедиться, что FSLogix профиль пользователя смонтирован как VHDX диск. В указанном сетевом каталоге при этом появился новый каталог для профиля пользователя.
В каталоге
C:Program FilesFSLogixApp
s есть несколько дополнительных утилит для администратора:
Расширенная настройка профилей FSLogix на Windows Server RDS
При установке агента FSLogixAppsSetup на сервере, в списке локальных групп появляются несколько дополнительных групп. Вы можете вывести этот список с помощью командлета Get-LocalGroup:
Get-LocalGroup -Name "*fslo*"
- FSLogix ODFC Exclude List — Members of this group are on the exclude list for Outlook Data Folder Containers
- FSLogix ODFC Include List — Members of this group are on the include list for Outlook Data Folder Containers
- FSLogix Profile Exclude List — Members of this group are on the exclude list for dynamic profiles
- FSLogix Profile Include List — Members of this group are on the include list for dynamic profiles

Эти группы позволяют указать пользователей или группы, для которых нужно включить или отключить создание профилей FSLogix.
По умолчанию перемещаемые профили создаются для всех пользователей. Чтобы иметь возможность локального входа на сервер для группы администраторов при неполадках FSLogix, нужно добавить группу администраторов в локальную группу FSLogix Profile Exclude List.
Проще всего это сделать с помощью групповой политики Restricted Group (Computer Configuration -> Windows Settings -> Security Settings -> Restricted Groups -> Add Group -> FSLogix Profile Exclude List) или Group Policy Preferences (Computer Configuration –> Preferences –> Control Panel Settings –> Local Users and Group –> New -> Local Group -> FSLogix Profile Exclude List).
Более подробно использование GPO для добавления пользователей в локальные группы описано в отдельной статье.
Чтобы исключить определенные каталоги из перемещаемого профиля FSLogix, вы можете использовать файл redirection.xml. Каталоги из этого файла перенаправляются в локальные папки на диске сервера.
Путь к этому XML файлу с настройками задается в параметре GPO FSLogix -> Profile Containers -> Advanced -> Provide RedirXML file to customize redirections. Можно исключить Temp папки, каталоги кеша IE, Chrome и т.д.
Пример такого файла указан ниже:
<?xml version="1.0"?>
<FrxProfileFolderRedirection ExcludeCommonFolders="0">
<Excludes>
<Exclude Copy="0">AppDataLocalLow</Exclude>
<Exclude Copy="0">AppDataLocalPackages</Exclude>
<Exclude Copy="0">AppDataLocalMicrosoftWindowsTemporary Internet Files</Exclude>
<Exclude Copy="0">AppDataLocalMicrosoftWindowsExplorer</Exclude>
<Exclude Copy="0">AppDataLocalMicrosoftWindowsWebCache</Exclude>
<Exclude Copy="0">AppDataLocalTemp</Exclude>
<Exclude Copy="0">AppDataLocalDiagnostics</Exclude>
<Exclude Copy="0">AppDataLocalComms</Exclude>
<Exclude Copy="0">AppDataLocalGoogleChromeUser DataDefaultCache</Exclude>
</Excludes>
</FrxProfileFolderRedirection>
Проанализируйте профили пользователей и установленные программы и добавьте в файл новые исключения.
Добавьте исполняемые файлы FSLogix в исключения вашего антивируса (frxdrv.sys, frxdrvvt.sys, frxccd.sys, frxccd.exe, frxccds.exe, frxsvc.exe).
Содержание
- User profile disks в rds windows server 2019
- Вопрос
- Ответы
- Все ответы
- Установка роли Remote Desktop Services Host (RDSH) на Windows Server 2019 в рабочей группе
- Установка роли Remote Desktop Services в Windows Server 2019
- Настройка роли Remote Desktop Licensing, добавление RDS лицензий (CAL)
- Настройка роли Remote Desktop Session Host в рабочей группе
- [Решено] User Profile Disks – не работает меню «Пуск»
- User profile disks в rds windows server 2019
- Вопрос
- Все ответы
User profile disks в rds windows server 2019

Вопрос
Ответы
— нет фишек связанных с fsrm (всякие там квоты, дедупы и пр.), зато есть нечто подобное связанное с vhd.
— файлы находяться в «контейнере» что немного усложняет поиск по каталогам профилей (например вы получаете вопрос от главбуха что был документ с именем blackbuh.xls у 2х сотрудников но они оба в отпуске а файл срочно нужен.
The opinion expressed by me is not an official position of Microsoft
Все ответы
— нет фишек связанных с fsrm (всякие там квоты, дедупы и пр.), зато есть нечто подобное связанное с vhd.
— файлы находяться в «контейнере» что немного усложняет поиск по каталогам профилей (например вы получаете вопрос от главбуха что был документ с именем blackbuh.xls у 2х сотрудников но они оба в отпуске а файл срочно нужен.
The opinion expressed by me is not an official position of Microsoft
По поводу второго пункта так есть приписка о нечто доподном для vhd.
По третьему пункту найдите по профилям все файлы с расширением doc в имени которых есть слово buh. Сравните трудозатраты поиска по каталогам и поиска по дискам (при условии что профилей >100)
The opinion expressed by me is not an official position of Microsoft
О том что такие сценарии (когда все хорошо) возможны я так же писал.
Только у меня сослаться не было на кого 🙂
The opinion expressed by me is not an official position of Microsoft
хммм. когда у вас количество пользователей измеряется десятками а то и сотнями тысяч человек, вы первый же будете смотреть на людей говорящих про глупости, и советующих тыкать мышкой и вводить каждый раз пароль, как на гоммм. солдат на вошь, вот. это значится раз.
а то что к вам пользователи не обращаются с вопросом например восстановления или поиска данных, дык это у вас надо спросить. они вообще в курсе что это возможно? и если они в курсе, они уверены что вы с этим справитесь, а не пошлете их? вот я зная людей могу утверждать, что так или иначе люди теряют, случайно удаляют, перезаписывают нужные документы ПОСТОЯННО, вне зависимости от компетенции, склада ума, социального статуса и страны проживания. да есть люди которые это делают чаще, некоторые реже. но такие случаи происходят всегда. Пусть даже один раз в 3 года(обычно гораздо чаще, классический случай, когда человечек выходит из отпуска и не может найти срочно-важные-нужные доки.) так вот раз в 3 года в компании на 10000 человек это вам будет
10 случаев в день. и тут уже встает вопрос, а вы вообще точно знаете о чем говорите?
я уже не говорю про управлениеанализ данных находящихся в монопольном доступе, имхо это ваще адовый гемор.
Источник
Установка роли Remote Desktop Services Host (RDSH) на Windows Server 2019 в рабочей группе
В этой статье описано, как установить и настроить роль терминального сервера Remote Desktop Session Host в рабочей группе (без домена Active Directory) и без всех дополнительных ролей (Connection Broker, Remote Desktop Web Access, RDS Gateway).
Windows Server с ролью RDSH (Remote Desktop Session Host) позволяет одновременно подключаться к серверу по RDP нескольким пользователям (по умолчанию в Windows Server разрешены только 2 административных RDP подключения). Для каждого пользователя создается отдельная сессия и он получает доступ к персональному рабочему столу
Если вы планируете используете отдельный RDS сервер в рабочей группе, имейте в виду, что его функциональность ограничена. Он не может масштабироваться до полноценной RDS фермы, нельзя создавать отдельные коллекцию или RemoteApp, нет брокера, нельзя использовать User Profile Disks для профилей пользователей, отсутствуют средства централизованного управления, при проведении операций обслуживания RDP сервис будет недоступен.
Установка роли Remote Desktop Services в Windows Server 2019
Предполагаем, что вы уже установили сервер с Windows Server и выполнили базовые настройки (ip адрес, имя сервера, время/дата, установили обновления и т.д.). Теперь можно установить службу RDS.
Для этого можно использовать Server Manager или PowerShell.

Также вы можете установить нужные роли Windows Server с помощью PowerShell:

Проверьте, какие RDS роли установлены на сервере:

Настройка роли Remote Desktop Licensing, добавление RDS лицензий (CAL)
Следующий этап – настройка роли Remote Desktop Licensing, которая обеспечивает лицензирование RDP подключений пользователей к вашему RDS серверу. Вы можете установить и активировать роль Remote Desktop Licensing на данном хосте (если он у вас один), либо можете разместить роль RDLicensing на другом сервере. Один сервер с ролью RDS Licensing можете выдавать лицензии неограниченному количеству RDSH хостов.
Если вы решили использовать локальный сервер RDLicensing, активируйте сервер лицензий RDS и установите клиентские лицензии (RDS CAL) согласно гайду по ссылке.

Настройка роли Remote Desktop Session Host в рабочей группе

Если вы не нацелите ваш RDSH сервер на сервер лицензирования RDS, который может выдать пользователям лицензии, ваш сервер будет находится в триальном режиме. В этом режиме службы RDS работают в течении всего 120 дней (при каждом подключении в трее будет появляться сообщение “ Служба удаленных рабочих столов перестанет работать через xxx дней ”). После окончания grace периода ваши пользователи не смогут подключится к RDS с ошибкой:
В локальной GPO нужно настроить параметры лицензирования RDS:
Дополнительно в локальных GPO вы можете настроить лимиты (таймауты) на длительность RDP сессий и правила отключения пользователей при неактивности.
Теперь нужно создать для пользователей локальные учетные записи на RDS сервере, под которыми они будут аутентифицироваться. Можно создать пользователей с помощью оснастки lusrmgr.msc или через PowerShell:
Чтобы разрешить пользователю подключаться к серверу через службы Remote Desktop Services, нужно добавить аккаунт в локальную группу Remote Desktop Users. Добавьте пользователей вручную через консоль управления группами или через PowerShell:

При первом входе устройству пользователя выдается временная лицензия (особенности RDS Per Device лицензирования). При втором входе выдается постоянная лицензия, которая появится в консоли Remote Desktop Licensing Manager. Лицензия выдается на срок от 52 до 89 дней (случайное число).
Если у вас исчерпаны Per Device лицензии, вы можете вручную отозвать лицензии для некоторых устройств пользователей. Воспользуйтесь консоль RDSLicensing или таким PowerShell скриптом:
Если вам нужно подключиться в RDP сессию пользователя, вы можете воспользоваться режимом теневого подключения RDS (он работает на RDSH в рабочей группе).
Источник
[Решено] User Profile Disks – не работает меню «Пуск»

Доброго времени суток уважаемые форумчане!
1. Имеем свежеустановленный «Windows Server 2019 Standard», который введён в домен.
2. На нем поднята служба удалённых рабочих столов.
3. Настроил, чтобы профили пользователей сохранялись на отдельных виртуальных дисках – «User Profile Disks в RDS Windows Server». Делал по этой статье:
https://winitpro.ru/index.php/2015/04/28/user-profile-disks-v-rds-windows-server-2012/
4. В моем конкретном случае был реализован «второй вариант» из указанной статьи, а именно, чтобы на дисках сохранялись только избранные папки пользовательского профиля («Рабочий стол», «Документы», «Загрузки», «Изображения», «Данные перемещаемого профиля пользователя» и «Данные реестра пользователя»).
Но вот после применения настроек для «User Profile Disks» и перезагрузке сервера, в меню «Пуск» исчезли иконки (в том числе и плитки) и перестало работать вовсе. Для лучшего понимания данной ситуации, привожу скриншот ( «start_menu_absent_icons.png» )
Гугление по этой теме не принесло результатов по исправлению указанного бага…
Как временное решение (костыль) был написан скрипт, который перезапускает службу/процесс «Проводник» (Explorer) и добавлен в автозагрузку. Эта идея была позаимствована вот тут:
Прошу Вашей помощи разобраться в этом непростом для меня вопросе!
Источник
User profile disks в rds windows server 2019
Вопрос
Running a test RDS2019 server with UserProfile disks hosted on an RDSbroker share on 2016.
Everything was fine but since the weekend, logging new users onto this server caused a black screen. The system became completely unresponsive. Upon investigation, we’re noticing the following errors..
1) Disk 4 has the same disk identifiers as one or more disks connected to the system. Go to Microsoft’s support website (http://support.microsoft.com) and search for KB2983588 to resolve the issue.
2) An error was detected on device DeviceHarddisk4DR24 during a paging operation.
4) The system failed to flush data to the transaction log. Corruption may occur in VolumeId: \?Volume<7483659d-0000-0000-0000-100000000000>, DeviceName: DeviceHarddiskVolume27.
(A device which does not exist was specified.)
5) The IO operation at logical block address 0x24ea0 for Disk 4 (PDO name: Device0000131) was retried.
For issue 1 i’ve looked at the KB and checked several other posts, using diskpart to look at the uniqueid, they are all different.
2) Related? not sure
3, 4 and 5 I could do with some advice please.
Все ответы
Please help to confirm more details for us to understand your issue.
1. Did this issue occur for all the user accounts(admin/non-admin) or only the newly created user account?
2. Have you tried any methods to recover the server like rebooting or check task manager and kill pending program?
3. Is there any event logs rather than UPD related errors?
4. What kind of web browser has been installed on session host server?
5. When did the black screen occur? Was the user ever managed to see desktop of session host?
Looking forward to your response.
Please remember to mark the replies as answers if they help.
If you have feedback for TechNet Subscriber Support, contact tnmff@microsoft.com.
Is there any update? Please feel free to let us know if more assistance needed.
Please remember to mark the replies as answers if they help.
If you have feedback for TechNet Subscriber Support, contact tnmff@microsoft.com.
Please help to confirm more details for us to understand your issue.
1. Did this issue occur for all the user accounts(admin/non-admin) or only the newly created user account?
2. Have you tried any methods to recover the server like rebooting or check task manager and kill pending program?
3. Is there any event logs rather than UPD related errors?
4. What kind of web browser has been installed on session host server?
5. When did the black screen occur? Was the user ever managed to see desktop of session host?
Looking forward to your response.
Please remember to mark the replies as answers if they help.
If you have feedback for TechNet Subscriber Support, contact tnmff@microsoft.com.
I backed out of this piece of work as we needed to do some other updates. Back on it now.
to answer your questions
1. Admin accounts are effected and user accounts, this is when the profile disk mounts on use login
2. Server has been rebooted
5. Occurred between logons. All users affected. Seems ok now though after a restart.
Doing some further testing.
All users logging onto the server, get assigned a profile disk. Every user who logs on generates event 158
Does anyone have any advice please? It’s a 2019 server fully patched.
here’s some info that may help
DISKPART> list disk
DISKPART> select disk 3
Disk 3 is now the selected disk.
DISKPART> uniqueid disk
DISKPART> select disk 4
Disk 4 is now the selected disk.
DISKPART> uniqueid disk
DISKPART> select disk 5
Disk 5 is now the selected disk.
DISKPART> uniqueid disk
DISKPART> select disk 6
Disk 6 is now the selected disk.
DISKPART> uniqueid disk
I get event id 158 for all these disks.
exact same issue with RDS, we also have blank screens and the event 158
server gets totally frozen and requires a reboot
maybe some profile disks are hitting their size limits. I know they never reclaim white space so really hard to troubleshoot in a large environment. I think I’m going to increase the size and then delete everyones profile disks so everythings clean
We have the same issue on our Windows Server 2019 RDHS collection. At some point the user «desktop» goes black and we have to reboot the server to fix the issue, which end up that that all user lost their unsave work!
We take a look at the VHDX for the user and they indead have all the same disk identifier (GPT) event if disk part show a MBR uniqueid who differ.
Path : \servershareUVHD-S- — 1006.vhdx
Path : \ server share UVHD-S- -11597.vhdx
DiskIdentifier : F69E260C-D4C3-4C49-83D4-DA035026FB2B
John and Glen any solution on your side?
We will ResetDiskIdentifier tonight on all disk via the following script and let`s you know.
There is another megathread on technet regarding rds blank screens. I’ll try and find it if I can
I’m not sure the disk identifiers are the root cause though as I’m sure we had the same issue on RDS2016 and never had a single blank screen. Now we are on 2019 with new server hardware, we used to get them multiple times a day. They have significantly dropped, although we’re not sure if we have 100% fixed them.
So far we have done:
Increased size of profile disks and given everyone new ones
Disabled ipv4 and ipv6 offloading on the nics
Made the microsoft recommended registry key to delete user created firwewall rules at logoff
Disabled RDS timeouts across the board (everything set to never)
We have also updated all the servers bios/network card firmware. I’m going to wait a week to see if we get anymore. If you find anything, please let me know.
I did read up a lot about this issue, a lot of people get it when running firefox on rds which crashes the windows audio service. This does not apply to us, but something to test next time you get one is if you can CTRL_ALT_END and get into task manager, then click run and a command to restart the audio service. If the blank screens go and the server recovers you know you are on to something.
Guid reset haven`t change anything, No one have reach the max size of their profile disk and we already have in place the registry key for the firewall.
We have 4-5 crash this morning, most of our user are falling back to our deprecated 2008R2 RD farm. We just deploy that new infra this week to all user, we had 10-12 users on a single server for two week without issue.
I am updating the server to disabled the offloading.
We are running on VMWare, I am wondering if the display driver could not be a issue there.
I am completely clueless
We’ve just had a server fail with a black screen.
Back to square one
We remove UPD and install FSlogic, we are just starting to put load on the new server, will let’s you know if we seem good or not.
We had another crash as soon we hit 18 users.
With event log error : Windows was unable to save all the data for the file C:Users[UserName]AppDataLocalMicrosoftWindowsNotificationswpndatabase.db-shm. The data has been lost. This error may be caused by a failure of your computer hardware or network connection. Please try to save this file elsewhere.
Our next thought is a network bottleneck, we use VmWare esxi, and the default network card is a 1Gig card (e1000), they have a 10Gig card(VMXNET3), we are updating them on the host and file server tonight as our entire esxi infrastructure run over a 10Gig physical network.
FSLogix sounds like a brilliant idea, I’ll look into this today.
Just for info, our RDS SH servers are all physical with 2x10gb intel nics so I’m not sure it’s a network issue.
The fact Microsoft bought out FSLogix and are giving it away free speaks volumes about their own technololgy. Profile disks is yet another b@stardised technology built for one purpose, yet used for another. After all these years, they never got profiles or remote desktop working properly. I read that RDS will ultimately come to an end in the next few years anyway as they move to this new Windows 10 session based stuff.
Yesterday afternoon we had 2 servers fail with black screens. We have removed profile disks to see if we get anymore. If we last a week, we know 100% it’s those.
also, notice on one of our servers it’s moved from the network domain profile, to guest/public. maybe not related but we’re checking it out anyway.
On our side, we remove the User Profile Disk and use Folder redirection and FSLogix Office Container for Outlook and Teams.
For a week now no crash, previously with both UPD and FSLogic full container as soon we hit some load (around 15-18 users) it was crashing with NTFS error in the event log and black screen.
We are deploying to 50 users tomorrow will see what happens!
@Glen but I am worries that with any of those technologies you still hit a black screen.
Glen Harrison, I’m intrigued by your statement about «RDS will ultimately come to an end in the next few years. » Do you have a link that points to this? I certainly want to prepare ahead of time to find an alternative.
About UPD, I use these. I did notice that, once user hits the max., it generates a lot of error for that user’s session. What I did to fix this was of 2 things:
1. Use Redirected Folders so that files saved on Desktop and Documents are stored outside of UPD.
2. Redirect both Temp variables so that they point to C:Temp rather than AppData within UPD.
3. Set up Outlook mailboxes outside of the UPD, e.g., within User’s Documents folder, which is redirected outside of UPD.
I’ve been running this RDS since start of 2018 with just 20GB UPD for each person. No black screen or other issues related to UPD. I do get the «same disk identifier» errors but this hasn’t stopped us from working; it’s only showing up in the Event Log and several forums pointed out that this can be ignored (really, Microsoft, you can do better than writing this «error» into the log and having us waste time trying to resolve this when it doesn’t need resolving).
Источник
RDS User Profile Disks are an alternative to roaming profiles and folder redirection in the RDS scenarios.
As part of our Server Management Services, we assist our customers to setup User Profile Disk in Windows.
Today, let’s see some of its benefits and how our Support Engineers configure it.
User Profile Disks (UPD)
User Profile Disks (UPD) is a new feature of Remote Desktop Services in Windows Server 2012.
The whole point of UPD is to store user and apps data in a separate VHDX disk on the network shared folder. This virtual disk is mounted to the user session as soon as we sign in to the RDS server, and unmounted when we log out.
Let us now focus on some key suggestions from our Support Engineers.
Benefits of RDS User Profile Disks
- Configuration and deployment is simple
- Maintain on pooled virtual desktops that get rolled back after logoff
- Less logon and logoff time
- Specific to the collection, cannot use on multiple computers simultaneously
- Administrators can have granular control of exactly which locations get saved to the virtual hard disk (VHDX)
- Stored on Server Message Block (SMB) shares, cluster shared volumes, SANs, or local storage.
Points to note before we configure RDS User Profile Disks
- User profile disks are for a single collection.
A user connecting to two different collections will have two separate profiles;
- Properties are set automatically upon creation and contain all profile data and registry settings by default.
These properties can be defined prior to creation or after in the ‘Session Collection’ properties from ‘Server Manager’;
- A form of central file share is required as the UNC path of this share is to provide in the wizard during initial configuration.
One major benefit of these file shares is that when more RDS hosts are added to support the collection, those hosts automatically add to the ACL of the share, not requiring an administrator to take any action in modifying security permissions;
- Single session.
If a user logs into one RDS host, they cannot connect to another and they cannot have more than one session active on a single host;
- User Profile Disks are created using a naming scheme that corresponds to a user’s GUID and makes identifying the UPD associated with a user a very risky task.
Best practices when working with RDS User Profile Disks
Given that a user will have a UPD respective to each collection, each will therefore require respective file shares. It’s advisable to name each file share according to the collection with which it associates.
Leverage the benefits of new file server technology in Server 2012 R2 – Scale Out File Server (SOFS)
+ SOFS differs from clustered file servers in that all file shares on all nodes are always active instead of being active on one node at any given time – active/active instead of active/passive
Configuring RDS User Profile Disks on Windows
First of all, it is necessary to create a shared folder on any corporate file server to store user profiles as VHDX disk.
For example, the path to our folder will be: \rdvh1DemoLabOficeApp.
Servers which are a part of RDS collection should have full access permission to access this shared folder.
In a single RDS collection, there can exist only one VHDX profile file for one user. If a user connects to the resources from different collections, we should create a separate profile disk for each.
We can configure RDS User Profile Disks in the collection settings of Remote Desktop Services. We can enable this mode while creating a new collection.
In our example, the collection already exists, so in the Server Manager console, we select this collection and in the upper left corner click Tasks -> Edit Properties.
Here. in User Profile Disks section we ‘Enable’ user profile disks, specify the path to the previous shared folder (\rdvh1DemoLabOficeApps) and a maximum profile disk size. Then we save the changes.
Once done, we make sure to change NTFS permissions for Profile Disks folder. In our case, the collection consists of one RDSH01 server, which has full control permission.
Hence, a full Control permissions is given to the RDSH01 server on the shared folder level.
When we add new RD Session Host servers to the RDS collection, the wizard automatically changes the folder permissions and gives access to the new servers.
It is very convenient, since when scaling a terminal farm we do not need to remember to set permissions for the profile folder.
[Need help to configure RDS User Profile Disks on Windows? We are available 24*7]
UPD: User profile as VHDX file
First, we have to go to the network shared folder with user profiles. There is a UVHD-template.vhdx file. This file is the user profile disk template.
When a user logs on to the RDS server for the first time, this template copies and renames as a VHDX file, with user SID in its name.
To match an UPD file name with the user name, we must use a separate script.
For example, we can convert the SID to an account name by using the Get-ADUser cmdlet:
Get-ADUser -Identity S-1-5-21-32549751-3956249758-2943215497-23733695-
What does User profile disk contain?
Right-click the VHDX file and select Mount. The UPD disk can only be used in one session on one RDS host (exclusive access). We cannot mount an UPD VHDX disk if the user is currently using it on the RDS server.

As we can see, the VHDX disk contains a set of folders and files of a standard user profile. At logon, a user gets completely transparent access to the data in the profile.
On the side of RD Session Host server, a .vhdx user’s file is mounted to the C:users and looks like this:

Note that the UPD drive is bound to the RDS server Windows OS version. We cannot transfer (use) an UPD user profile from an RDS server from one version of Windows Server to another.
Data is written to the vhdx file in real time. When copying data to a user profile on an RDS server, the size of the vhdx file on the shared storage increments immediately.
If the user profile folder already exists in the system, the folder with an old profile renames to the -BACKUP-.
The VHDX disk is mounted when the user session starts on a VDI or RDS server. A list of connected UPD disks with profiles can be listed using the mountvol utility.
-
The three options:
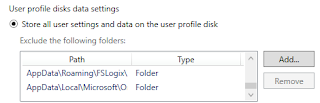
By default, a User Profile Disk contains all the user profile contents. However, we can exclude certain folders from the list of synchronized directories in the RDS collection settings.
Thus, all the changes made during the user’s terminal session to the folders in the list of excluded directories are not saved into the VHDX disk on the shared folder.

The second option allows us to save only specific directories in the UPD profile.

If necessary, the last option allows us to implement the scenarios for saving the settings of the Start Screen, in appsfolder.itemdata-ms file.
In this example, we have only added the path to AppDataLocalMicrosoftWindows folder as an additional path to be saved in the UPD.

[Stuck with User Profile Disks? We are here for you]
Resizing RDS User Profile Disks Using PowerShell
We can extend the virtual vhdx drive with the user’s UPD profile using the PowerShell cmdlet Resize-VirtualDisk from the Hyper-V module.
Net use U: \rdvh1DemoLabOficeApps
Resize-VHD -Path u:UVHD-.vhdx -SizeBytes 40GB
Net use U: /delete
If we want to run the Resize-VHD cmdlet from a desktop with Windows 10, we must install the feature: Hyper-V -> Hyper-V Platform -> Hyper-V Services.
Now we need to extend the volume from the GUI of the Disk Management console (Action -> Attach VHD -> Extend volume).
Or we use the following PowerShell script to automatically extend the vhdx file to the maximum available size:
<#
.Synopsis
This script extend size of VHDX file and resize the disk partition to Max
#>
Param(
[Parameter(Mandatory=$true,ValueFromPipeline=$true)]
[alias(“Path”)]
[string]$vhdxFile,
[Parameter(Mandatory=$true,ValueFromPipeline=$true)]
[alias(“Size”)]
[int64]$vhdxNewSize
)
begin{
try {
Mount-VHD -Path $vhdxFile -ErrorAction Stop
}
catch {
Write-Error “File $vhdxFile is busy”
Break
}
$vhdx = Get-VHD -Path $vhdxFile
if ($vhdx.Size -ge $vhdxNewSize){
Write-Warning “File $vhdxFile already have this size!”
$vhdx | Dismount-VHD
Break
}
}
process{
Dismount-VHD -Path $vhdxFile
Resize-VHD -Path $vhdxFile -SizeBytes $vhdxNewSize
$vhdxxpart = Mount-VHD -Path $vhdxFile -NoDriveLetter -Passthru | Get-Disk | Get-Partition
$partsize = $vhdxxpart | Get-PartitionSupportedSize
$vhdxxpart | Resize-Partition -Size $partsize.SizeMax
}
end{
Dismount-VHD -Path $vhdxFile
}
Note that we cannot extend the user’s UPD disk with an active RDS session.
To reduce the size of the UPD file, we can use the commands:
resize-VHD \rdvhDemoLabOficeAppsUVHD-.vhdx –ToMinimumSizeAnd then:
Optimize-vhd -path \rdvh1DemoLabOficeAppsUVHD-.vhdx -mode fullSo, we have discussed the major peculiarities of User Profile Disks in RDS/VDI solutions running Windows Server 2016 and 2012 R2.
UPD configuration is much easier than the configuration of roaming profiles or redirected folders. The disks connects to the RDS collection and cannot damage while using the shared profile by several servers.
We can store the User Profile Disks in SMB shares, CSV, SOFS, SAN or on the local disks.
If we are planning to store UPD profiles on DFS servers, we must install Windows Server 2012 R2. If we are using previous versions of Windows Server, we will get an error:
Unable to enable user disks on rVHDShare. Could not create template VHD. Error Message: The network location “\bobcares.comnamesp
Also it is desirable to use the version SMB 3.02 on the file server side (Windows Server 2012 R2) or higher.
Anyway, since User Profile Disks is a relatively new technology, prior to mass UPD implementations, we recommend to test their work and possible problems in a test environment.
[Need assistance to configure RDS User Profile Disks? We are happy to help.]
Conclusion
In short, RDS User Profile Disks is an alternative to roaming profiles and folder redirection in the RDS scenarios. Today, we saw how our Support Engineers configure the same.
PREVENT YOUR SERVER FROM CRASHING!
Never again lose customers to poor server speed! Let us help you.
Our server experts will monitor & maintain your server 24/7 so that it remains lightning fast and secure.
GET STARTED
var google_conversion_label = «owonCMyG5nEQ0aD71QM»;
у upd есть + и они же — такие как:
— индивидуальный доступ — который не позволяет использовать диск в 2 фермах одновременно (что может быть актуально в больших компаниях где задачи деляться по серверам и есть сотрудники которые должны работать на нескольких серверах.
Так же эта фича, вам как администратору не даст доступ в случае необходимости (служебные расследования и пр. задачи когда это необходимо). Далее случается когда пользюк вышел с сервера, вошел на другой сервер, а первый по каким
то причинам не отмонтировал диск…
— нет фишек связанных с fsrm (всякие там квоты, дедупы и пр.), зато есть нечто подобное связанное с vhd.
— файлы находяться в «контейнере» что немного усложняет поиск по каталогам профилей (например вы получаете вопрос от главбуха что был документ с именем blackbuh.xls у 2х сотрудников но они оба в отпуске а файл
срочно нужен…
Несмотря на все эти предрассудки есть и такие админы которые пишут тут что проблем нет и их все устраивает. Так что все написанное является лишь некоторыми факторами которые следует у себя потестить и понять это для вас +
или —
The opinion expressed by me is not an official position of Microsoft

Microsoft FSLogix technology is used to manage user profiles and allows you to replace Roaming Profiles and User Profile Disks (UPD) in RDS, VDI, and Windows Virtual Desktop (WVD) scenarios. The FSLogix service allows you to dynamically connect containers with user profiles from network resources. It can be used both in on-premises solutions and in Azure (you can use Azure Files as a profile storage). In this article, we’ll look at how to use FSLogix Roaming User Profiles instead of User Profile Disks in RDS deployments of Windows Server 2019/2022.
What are the FSLogix containers for?
The concept of FSLogix is similar to the familiar RDS User Profile Disks (UPD) technology, when user profiles are stored as virtual VHDX disks and connected over the network when a user logs into the system. However, FSLogix overcomes many of the shortcomings of UPD in RDS environments and allows you to:
- Significantly increase the speed of loading a profile over the network, and as a result, the login / logout time for the user is reduced;
- Optimized for Office 365 apps (Microsoft 365 for Enterprise);
- The same profile can be used across multiple RDS collections, RDS VDI farms, and even physical computers;
- FSLogix profile can be connected to several sessions at once (for reading);
- In UPD, the Windows search index is cleared when the user logs out and needs to be regenerated the next time. In FSLogix, you can store an index in a roaming profile;
- Ensures availability of Outlook cache files (OST, Outlook Cached Mode), Outlook index (search), MS Teams cache and data, etc.
- Roaming FSLogix profiles can be used even on standalone RDSH hosts.
The FSLogix solution is free for use in on-premises RDS deployments, provided you have purchased the RDS CAL and installed it on an RDS license server.
Installing and configuring FSLogix for user profiles on Windows Server 2019 RDS.
Consider how to install and configure FSLogix for a terminal RDS farm based on Windows Server 2019.
- Download FSLogix from this link (https://aka.ms/fslogix/download, about 180 Mb). Access to the utility is free;
- Unzip the archive and install the FSLogic agent on the RDSH server
FSLogic FSLogix_Appsx64ReleaseFSLogixAppsSetup.exe
- Then copy the FSLogix administrative policy files to the central GPO administrative template store on the domain controller ( fslogix.admx in PolicyDefinitions, and fslogix.adml in PolicyDefinitionsen-US).
Create a network folder on the file server where containers with FSLogic user profiles will be stored. For example, \msk-fsShareProfiles.
Set the following NTFS permissions on the network folder:
| User Account | Folder | Permissions |
|---|---|---|
| Users | This Folder Only | Modify |
| Creator / Owner | Subfolders and Files Only | Modify |
.png)
Now you can create a GPO to configure FSLogix settings for RDS servers.
Open the domain GPO management console (gpmc.msc), create a new policy and assign it to the OU with your RDSH servers. Expand Computer Configuration -> Policies -> Administrative Templates -> FSLogix. Configure the following GPO settings:
- Profile Containers -> Enabled — enable FSLogix profiles;
- Profile Containers -> VHD Location – specify the UNC path to the profile directory (\msk-fsShareProfiles);
- Profile Containers -> Delete local profile when FSLogix Profile should apply – delete local profile when using FSLogix;
- Profile Containers -> Size in MB – maximum profile file size, default 30000 (30 GB);
- Profile Containers -> Dynamic VHD(X) allocation = Enabled. If you do not enable this policy, VHD/VHDX user profile disks are immediately created with the maximum size;
- Profile Containers -> Advanced -> Prevent login with temporary profile — do not create temporary user profiles;
- Profile Containers -> Advanced -> Prevent login with failure — prevent login with FSLogix failure;
- Profile Containers -> Advanced -> Locked VHD retry count = 3, specify the number of attempts to retry a VHD(X) file if it is locked by another process;
- Profile Containers -> Container and Directory Naming -> Virtual disk type – use VHDX virtual disk type for profile instead of standard VHD;
- Profile Containers -> Container and Directory Naming -> Swap directory name components — use %username%_SID as format for user profile directories (instead of SID_%username%);
- Profile Containers -> Store search database in profile container = Disabled (do not store the Windows Search index database in the profile);
- Enable logging = All logs enabled — enable FSLogix logs
- Path to logging files – path to FSLogix logs (\msk-fsShareFSLogixLogs %COMPUTERNAME%);
- Days to keep log files — how many days to keep logs (7 days is enough).
.png)
Reboot Windows Server to apply the new GPO settings. System settings for FSLogix profiles are stored in the following registry branch HKLMSOFTWAREFSLogixProfiles.
.png)
Now, when an RDP user logs in, a notification should appear on the screen:
Please wait for the FSLogix Apps Services

Once logged in, you can launch the Disk Management console and verify that the FSLogix user profile is mounted as a VHDX disk. This creates a new directory for the user profile in the specified network directory.
.png)
The s directory C:Program FilesFSLogixApp contains a few additional utilities for the administrator:
- frxtray.exe — a utility that displays the FSLogix window in the system tray and allows you to check that the user is logged in with an FSlogix profile;
.png)
- ConfigurationTool.exe is a utility for configuring FSLogix profiles.
.png)
Advanced configuration of FSLogix profiles on Windows Server RDS.
When the FSLogixAppsSetup agent is installed on the server, several additional groups appear in the list of local groups. You can display this list using the Get-LocalGroup cmdlet:
Get-LocalGroup -Name «*fslo*»
- FSLogix ODFC Exclude List — Members of this group are on the exclude list for Outlook Data Folder Containers
- FSLogix ODFC Include List — Members of this group are on the include list for Outlook Data Folder Containers
- FSLogix Profile Exclude List — Members of this group are on the exclude list for dynamic profiles
- FSLogix Profile Include List — Members of this group are on the include list for dynamic profiles
.png)
These groups allow you to specify users or groups for which you want to enable or disable FSLogix profiling.
By default, roaming profiles are created for all users. To be able to log on to the server locally for the Administrators group when FSLogix is experiencing problems, you must add the Administrators group to the local group FSLogix Profile Exclude List.
The easiest way to do this is with the Restricted Group policy (Computer Configuration -> Windows Settings -> Security Settings -> Restricted Groups -> Add Group -> FSLogix Profile Exclude List) or Group Policy Preferences (Computer Configuration -> Preferences -> Control Panel Settings –> Local Users and Group –> New -> Local Group -> FSLogix Profile Exclude List).
To exclude certain directories from an FSLogix roaming profile, you can use the redirection.xml file . The directories in this file are redirected to local folders on the server’s disk.
The path to this XML file with settings is set in the GPO parameter FSLogix -> Profile Containers -> Advanced -> Provide RedirXML file to customize redirections . You can exclude Temp folders, IE cache directories, Chrome, etc.
An example of such a file is shown below:
<?xml version=»1.0″?> <FrxProfileFolderRedirection ExcludeCommonFolders=»0″>
<Excludes>
<Exclude Copy=»0″>AppDataLocalLow</Exclude> <Exclude Copy=»0″>AppDataLocalPackages</Exclude>
<Exclude Copy=»0″>AppDataLocalMicrosoftWindowsTemporary Internet Files</Exclude>
<Exclude Copy=»0″>AppDataLocalMicrosoftWindowsExplorer</Exclude>
<Exclude Copy=»0″>AppDataLocalMicrosoftWindowsWebCache</Exclude>
<Exclude Copy=»0″>AppDataLocalTemp</Exclude>
<Exclude Copy=»0″>AppDataLocalDiagnostics</Exclude>
<Exclude Copy=»0″>AppDataLocalComms</Exclude>
<Exclude Copy=»0″>AppDataLocalGoogleChromeUser DataDefaultCache</Exclude>
</Excludes>
</FrxProfileFolderRedirection>
Analyze user profiles and installed programs and add new exclusions to the file.
Add FSLogix executable files to your antivirus exclusions (frxdrv.sys, frxdrvvt.sys, frxccd.sys, frxccd.exe, frxccds.exe, frxsvc.exe).
Disadvantages.
Good technology, but many pitfalls. For example, a profile is versioned and can only be used on computers with the same OS version. That is, you cannot use the same profile for 2012R2 and 2019. This is a limitation of the profiles themselves, not fslogix. I am not aware of the incompatibility of 2016-2019-2022 and various Windows 10 builds. Also a year ago, the technology had problems with indexing and the manuals recommended making special settings for indexing, including indexing in Outlook. Compatibility with 365 programs is practically a setting for these programs, that is, with Office 365 on the fslogix installation computer, some are recommended, but if there is no office, then others, although they may also have been finalized.
From useful to the bargain.
To convert UPD -> FSLogix, you can use the ready-made Migrate UPD Profiles to FSLogix script: https://github.com/andif888/convert-udp-fslogix
RDS remote desktop server, FSLogix, configuration file migration, policy is applied, the modification does not take effect: https://docs.microsoft.com/en-us/answers/questions/437992/rds-remote-desktop-server-fslogix-configuration-fi.html
FSLogix Deploy: https://docs.microsoft.com/en-us/answers/questions/336201/fslogix-deploy.html
Install and Configure Remote Desktop Services RDS on Windows Server 2019.
In this post I will go step by step to include everything you need to do to build an RDS farm that will include x2 RDS Broker Server, x2 RDS Session Hosts and x1 SQL Server. I will go over how to achieve HA for the entire environment and what you will need to do to get everything up and running.
Design Overview
For this deployment I want to use the below:
2x RDS Broker Server
2x RDS Session Hosts
Users are to connect to the RDS Broker Servers as below and then redirected to the RDS Session Hosts. From there they can then connect to other target servers.

As the clients will be connecting to the RDS Broker Servers we need to add DNS Round Robin for the RDS Broker Servers in DNS. For example we have rdsbroker1.domain.com with IP 10.10.20.10 and rdsbroker2.domain.com with IP 10.10.20.11. We would add a new DNS name for the RDS Broker Cluster of:
rdsbrokercluster.domain.com IP 10.10.20.10
rdsbrokercluster.domain.com IP 10.10.20.11
In Microsoft DNS please ensure DNS Round Robin is also enabled.
Installing the RDS Server Roles
First do a basic installation of Windows Server 2019 Standard on x5 servers. Once your servers are ready all we need to add all of the servers into one single console for the RDS deployment.
Open the Server Manager and click 3. Add other servers to manage

Add in all the soon to be broker and session host servers and click ok

Click 4. Create a server group, give it a name and add the soon to be RDS servers to it and click ok

Here is the group, click on it

You will see all the RDS servers available

The deployment of an RDS infrastructure is facilitated by the tool built into the server managers, in a single command the following roles will be installed:
• Remote Desktop Session Host
• Broker
• Remote Desktop Access via the Web
From server manager click add roles and features

Click next

Select Remote Desktop Services installation and click Next

Select a standard deployment and click next

Select session-based deployment and click Next

Click Next

Add the first broker server and click Next (we will add the second in later when we configure HA)

Select install the RD Web Access role on the RD connection broker
Select the session host and click Next

Add the RD Session host servers and click Next

Confirm is all ok and select Restart if required, click Deploy

Roles are deployed


Create a collection to specify the hosts and who can access them
Open server manager and click Remote Desktop Services, click collections and click Create Session Collection

Click next

Name the collection

Select your session host servers and click Next

Add the groups that are allowed to login to the host servers

Enter path of user profile disk folder (the NTFS and share permissions must allow full control for the RDS server AD objects – we will come back to this later)

Confirm all is correct and click create

Configurations are applied

Select the collection and click Tasks, Edit properties

Edit the session properties so that sessions can expire

Select the security options

Select any server weighting

Configure client settings and click ok

Open RDS Licensing

Add the license servers (I used the session hosts)

Click Add

Licensing configuration is applied

Right click on RD Licensing and click select RD licensing mode

Select the license mode and click Apply> Ok

From the session host where we install the license server role click Tools> Remote Desktop Services> Remote Desktop Licensing Manager

Right click and Activate server

Select Automatic Connection

Enter company details

Enter email

Click Next to add licenses

Select Enterprise Agreement

Enter agreement number

Enter license details and click Next

License is installed

Go to License server and open RDS License Console. Right click license server and click Review configuration

Click add to group


Repeat on any additional license servers (I split 50:50 between my session hosts)
Preparing for the RDS Broker HA Configuration
First we need to create the user profile disk folder on a server and share. This needs to be highly available so I store mine on a replicated DFS folder. On a file server create a folder for RDS profiles and share. The RDS session hosts need full control.

Do the same for NTFS permissions

Create AD security group and add broker servers

For the purpose of this guide and because we do not want to focus on SQL too much we will just use a standalone SQL Express database. However for highly available setups the best solution is to use Always On Availability Groups as in my guide here.
Next Setup new 2019 server and install SQL Express, I used SQL Server Express 2019 (latest available). Install SQL Management Studio and login. Then add a new login for RDS servers

Click search

Select the RDS Server Broker group

Select dbcreator in roles

Login is added to the list

Click New Database

Name the database

Database is added

Modify the login you created to make it db owner

On the RDS servers install the SQL client from the install media

Next on your SQL servers add the broker server accounts to the Remote Management Users group


Configure RDS Broker Servers for HA
Go to RDP Overview and right click the connection broker, then click Configure High Availability

Click Next

Select dedicated database server

Enter RDS broker cluster name and input connection string and click next

The connection string I used for this setup is:
DRIVER=SQL Server Native Client 11.0;SERVER=VMMGTRDSSQL101;Trusted_Connection=Yes;APP=Remote Desktop Services Connection Broker;DATABASE=RDSHA
If you are using multiple subnets and SQL Availability Groups, your string should look more like the below – using the DNS name of your SQL listener
DRIVER=SQL Server Native Client 11.0;SERVER=aglinuxrds;MultiSubnetFailover=True;Trusted_Connection=Yes;APP=Remote Desktop Services Connection Broker;DATABASE=RDSHA
If this doesn’t work try this, MultiSubnetFailover=Yes changes from True at one of the client versions
DRIVER=SQL Server Native Client 11.0;SERVER=aglinuxrds;Trusted_Connection=Yes;MultiSubnetFailover=Yes;APP=Remote Desktop Services Connection Broker;DATABASE=RDSHA;
If you have any problems at this stage first check your SQL server is listening on port 1433
Powershell (from the SQL server)
If not, open SQL configuration manager and click SQL Server Network Configuration>Protocols>TCP/IP and ensure the right IPs are enable and port 1433 is added as below

Click Configure

The task is executed, click close

Adding a broker server
From the deployment overview Right click on the RD Connection Broker click add RD Connection Broker Server

Click Next

Add the second RDS Broker server and click Next

Click Add

The wizard should complete

If you have any issues at this stage connecting to the database check the SQL server log

I was seeing this

Check that the logins are still applied as db_owner – for some reason mine had dropped out even though it was definitely set and worked for the first server

Here is a PowerShell script you can use to test your SQL connection (Should just return True or False)
function Test-SQLConnection
{
    [OutputType([bool])]
    Param
    (
        [Parameter(Mandatory=$true,
                    ValueFromPipelineByPropertyName=$true,
                    Position=0)]
        $ConnectionString
    )
    try
    {
        $sqlConnection = New-Object System.Data.SqlClient.SqlConnection $ConnectionString;
        $sqlConnection.Open();
        $sqlConnection.Close();

        return $true;
    }
    catch
    {
        return $false;
    }
}


Test-SQLConnection "DRIVER=SQL Server Native Client 11.0;SERVER=VMMGTRDSSQL101;Trusted_Connection=Yes;APP=Remote Desktop Services Connection Broker;DATABASE=RDSHA"
Create a certificate to secure the connection to the RDS Broker server
Open IIS on the RDS Broker server and go to Server Certificates

Click Create New Certificate Request> Make bit length 2048

Save the request file

Click Finish

Go to the certificate authority server and issue the certificate using the request file from the RDS Broker. Simply open the command line and enter the following:
certreq -submit -attrib "CertificateTemplate:WebServer" wintelbastionreq.txt
Save the certificate output as a .cer file and copy it back onto the RDS Broker.
Go to IIS again and Server Certificates, then click complete certificate request. Select the .cer file you just collected from the CA and select the Personal Store.

Open the certificate console by going to Start>Run certlm.msc
You will see the certificate installed in the personal computer store

Right click on the certificate and click Export

Select .PFX and click Next

Specify a password and select SHA256

Save the .pfx file

Go back to the RDS Deployment Overview> Select Tasks> Properties> Certificates. Click Select existing certificate and enter the path to the .pfx file you just saved and enter the password you specified

The certificate is deployed to both RDS Broker servers and now used to secure the connection

Connecting clients to RDS Broker
I just wanted to use a normal RDP connection for clients to connect to the brokers and then be redirected to the session hosts. To do this first you need to check the below registry entry:
Check registry entry for your collection (may differ to actual collection name). Mine was as below:
HKEY_LOCAL_MACHINESOFTWAREMicrosoftWindows NTCurrentVersionTerminal ServerCentralPublishedResourcesPublishedFarmsDomain_-_Wintel_Bas
Copy collection name from registry.
Create an .rdp file open in Notepad and add these lines to it:
use redirection server name:i:1
loadbalanceinfo:s:tsv://MS Terminal Services Plugin.1.Domain_-_Wintel_Bas
full address:s:WINTELBASTION.DOMAIN.COM
Brokers should now redirect to Sessions hosts
(@stalker_slx)
Estimable Member
Присоединился: 4 года назад
Доброго времени суток уважаемые форумчане!
1. Имеем свежеустановленный «Windows Server 2019 Standard», который введён в домен.
2. На нем поднята служба удалённых рабочих столов.
3. Настроил, чтобы профили пользователей сохранялись на отдельных виртуальных дисках – «User Profile Disks в RDS Windows Server». Делал по этой статье:
https://winitpro.ru/index.php/2015/04/28/user-profile-disks-v-rds-windows-server-2012/
4. В моем конкретном случае был реализован «второй вариант» из указанной статьи, а именно, чтобы на дисках сохранялись только избранные папки пользовательского профиля («Рабочий стол», «Документы», «Загрузки», «Изображения», «Данные перемещаемого профиля пользователя» и «Данные реестра пользователя»).
Но вот после применения настроек для «User Profile Disks» и перезагрузке сервера, в меню «Пуск» исчезли иконки (в том числе и плитки) и перестало работать вовсе. Для лучшего понимания данной ситуации, привожу скриншот («start_menu_absent_icons.png»)
Гугление по этой теме не принесло результатов по исправлению указанного бага…
Как временное решение (костыль) был написан скрипт, который перезапускает службу/процесс «Проводник» (Explorer) и добавлен в автозагрузку. Эта идея была позаимствована вот тут:
«Что делать, если не работает Пуск в Windows 10»
https://internetua.com/csto-delat-esli-ne-rabotaet-pusk-v-windows-10
Прошу Вашей помощи разобраться в этом непростом для меня вопросе!
На чтение 12 мин Просмотров 3.1к. Опубликовано 07.10.2021
Содержание
- Введение.
- Обзор
- Настройка файлового сервера.
- Установка приложения.
- Установка и настройка групповых политик.
- Конфигурационный файл Redirections.xml
- Исключение администраторов из группы FSLogix.
- Критическая проблема FSLogix.
- Конвертация профилей UDP в FSLogix.
- Заключение.
Введение.
После основной конфигурации терминальной фермы, профиль пользователя нужно централизованно подгружать на каждый из серверов сеанса удаленного рабочего стола. По умолчанию используется User Profile Disks начиная с Windows Server 2012R2, конечно мы не говорим об устаревших технологиях по типу перенаправляемых профилейпапок, но также есть и другие решения, в данном случае мы применяем FSlogix.
FSLogix Profile Container преобразует профиль пользователя в VHDX-файл и перенаправляет его на общий сетевой ресурс (Fileshare). Пока пользователь входит в систему, агент подключается к FileShare и проверяет, существует ли VHDX-файл для вошедшего в систему пользователя. Если это так, то виртуальный диск монтируется к папке C:Users. Если соответствующий VHDX-файл не найден в FileShare, для пользователя создаётся и монтируется новый VHDX-файл.

Обзор
Если говорить о разнице UPD и FSLogix, у последнего больше возможностей и преимуществ. Для простых сред всё так же может использоваться UDP, но чисто практически я не вижу в этом ни какого смысла, UDP ни как не развивается Microsoft, имеет свои некоторые проблемы и недостатки.
1. Недостатки UDP:
- Периодическое зависание диска и создание Temp профиля. При том, что даже была создана групповая политика, предотвращающая создание временного профиля, но это не помогло избежать данной проблемы. Как результат, приходиться очищать в реестре bak запись, чтоб профиль корректно вновь стал подгружаться.
- При росте профиля, более длительный вход и выход из системы.
- Техническая реализация UDP не позволяет обращаться программам в TEMPTMP папки. С последним с чем столкнулся, это невозможность установить плагины для браузера. Костыли которые предлагают в интернете по перемещению этих папок вызывают другие проблемы.
- Каждый раз, когда загружается профиль, пересоздается кэш индекса, что вызывает дополнительную нагрузку и проблемы с поиском.
- Создаются backup папки профилей, которые дублируются и не очищаются.
2. Преимущества FSLogix:
- Полнофункциональное решение для перемещаемых профилей. Он заботится обо всем, что происходит в папке C:Users%username%. Системные папки (например, Рабочий стол, Загрузки и т.д.) Присутствуют вместе со всеми пользовательскими настройками и предпочтениями ( То есть Реестром, данными приложений и т.д.). Поскольку компоненты Office 365 подпадают под эти категории, все, что с ними связано, обрабатывается как часть контейнера профиля.
- Более высокая производительность.
- Сокращает время входа в систему и выхода из системы.
- Снижает трафик и нагрузку на файловые серверы.
- Оптимизирован для Office 365.
- Расширенные групповые политики.
- Маскировка приложений (Application Masking) может управлять доступом к приложениям, шрифтам, принтерам и прочим элементам. Доступ может контролироваться на уровне пользователей, диапазонов IP-адресов или прочих критериев.
- Контроль версий Java (Java Version Control) может указывать версию Java, которая будет использоваться определенными URL и/или приложениями.
Настройка файлового сервера.
Я сэкономлю ресурсы и время, потому расположу на контроллере домена.
1. Создаем структуру папок:
C:FSLogixLogs
C:FSLogixProfiles
C:FSLogixRedirections
2. Расшариваем папки и устанавливаем права:
| C:FSLogixProfiles | СОЗДАТЕЛЬ-ВЛАДЕЛЕЦ – Изменение: Только для подпапок и файлов. Доступ к профилю владельца. Пользователи домена – Изменение: Только для этой папки. Требуется во время создания профиля. |
| C:FSLogixLogs | Компьютеры домена – Полный доступ: Для этой папки, ее подпапок и файлов. Требуется доступ компьютерам для создания логов. |
| C:FSLogixRedirections | Пользователи домена – Чтение: Для этой папки, ее подпапок и файлов. Требуется для чтения пользователями конфигурационного файла Redirections.xml. |
Установка приложения.
- Переходим на сайт Microsoft и скачиваем FSLogix: https://docs.microsoft.com/en-us/fslogix/install-ht
- Открываем архив и инсталлируем x64ReleaseFSLogixAppsSetup.exe на RDSH сервера.
Установка и настройка групповых политик.
1. Установим на наш контроллер домена политики fslogix.adml и fslogix.admx из архива по пути: oilservice.localSYSVOLoilservice.localPoliciesPolicyDefinitions, что бы они отреплицировались на другие КД.
2. Создаем новую политику, нацеливаем ее на объекты наших компьютеров RDSH серверов.
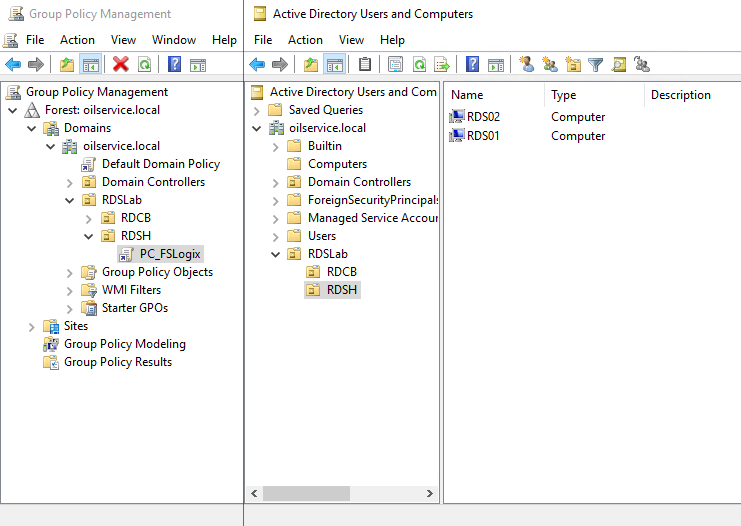
3. Настраиваем политику: Computer Configuration->Polices->Administrative Templates->FSLogix
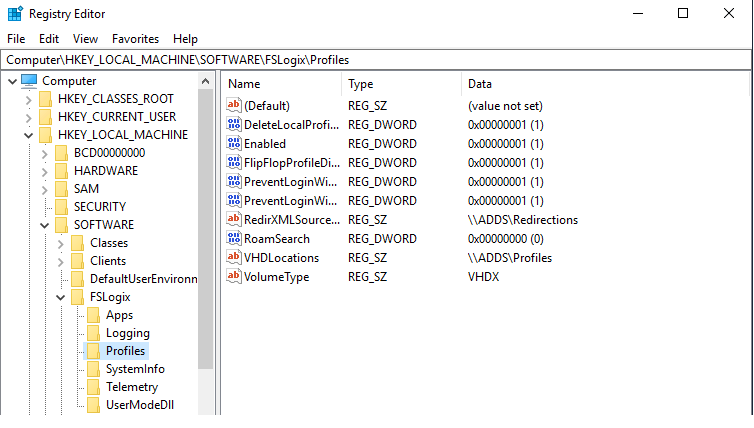
| FSLogixEnable logging | Enabled. Only specifically enabled logs. Включаем основные логи работы профилей. |
| FSLogixPath to logging files | Enabled. \ADDSLogs%COMPUTERNAME% По этому пути создадутся подпапки с именем RDSH серверов. |
| FSLogixDays to keep log files | Enabled. Days to keep log files 3. Три дня более чем достаточно. |
| FSLogixProfile ContainersStore search database in profile container | Enabled. Store search database in profile container. Disabled. Отключаем сохранение базы поиска в профиле. |
| FSLogixProfile ContainersEnabled | Enabled. Включаем сам FSLogix. |
| FSLogixProfile ContainersVHD Location | Enabled. \ADDSProfiles Путь хранения наших профилей. |
| FSLogixProfile ContainersDelete local profile when FSLogix Profile should apply. | Enabled. Производит удаление локального профиля. |
| FSLogixProfile ContainersSize in MBs | Enabled. Установите максимальный размер профиля. По умолчанию 30Gb. |
| FSLogixProfile ContainersAdvancedProvide RedirXML file to customize redirections | Enabled. \ADDSRedirections Путь конфигурационного файла. |
| FSLogixProfile ContainersAdvancedPrevent login with temporary profile | Enabled. Предотвращает создание Temp профиля. |
| FSLogixProfile ContainersAdvancedPrevent login with failure | Enabled. Предотвращает вход пользователя в систему в случае сбоя при подключении контейнера FSLogix. |
| FSLogixProfile ContainersContainer and Directory NamingVirtual disk type | Enabled. Выбираем VHDX диск, вместо VHD по умолчанию. |
| FSLogixProfile ContainersContainer and Directory NamingSwap directory name components | Enabled. Косметическая правка, папка с профилем по умолчанию имеет имя SID_%username%, делаем обратно %username%_SID, считаю так более удобней. |
4. Перезагружаем RDSH сервера. Видим в реестре, что политика применила изменения. Тестируем.
5. Вход произведен успешно. Профиль прицепился.
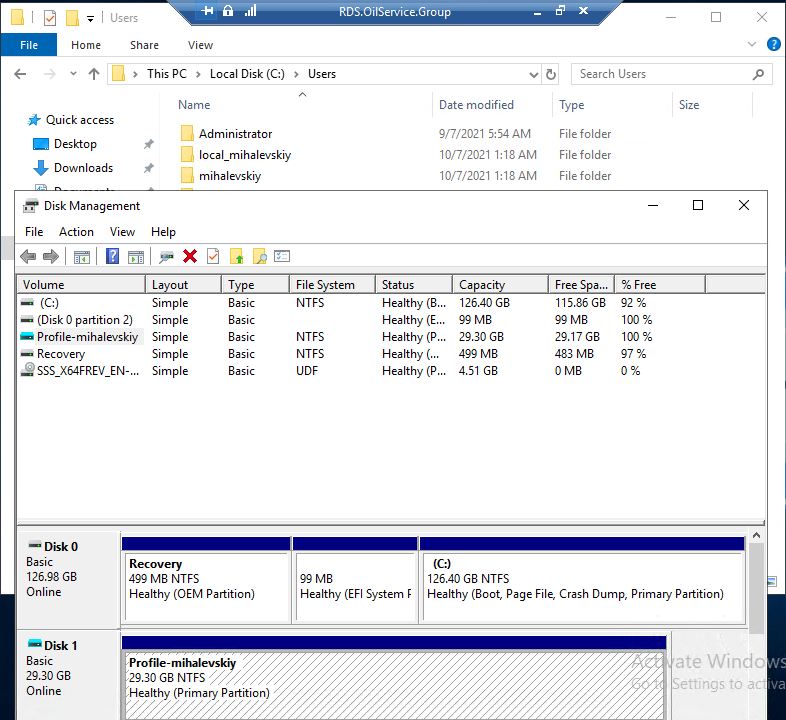
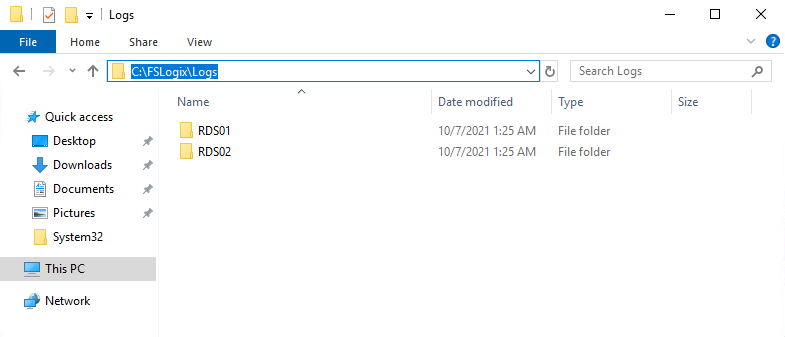
6. На условном нашем файловом сервере появились профили:

7. Так же создалась структура папок для логов:
Конфигурационный файл Redirections.xml
Мы сконфигурировали путь для этого файла: \ADDSRedirections
Теперь необходимо положить туда этот файл и пользоваться его преимуществом.
Файл redirections.xml используется для управления тем, какие папки перенаправляются из контейнера профиля на диск C:
Он также может, при желании, синхронизировать содержимое этих папок с контейнером профиля и из него при выходе пользователя из системы и входе в систему соответственно.
Более подробно можно ознакомиться здесь: Using Redirections.xml to configure what to copy to a profile with FSLogix
Я приведу листинг моего конфига, файлы которые я перемещаю на локальный диск и не сохраняю после выхода. Таким образом я очищаю профиль от разного мусора.
<?xml version="1.0"?>
<FrxProfileFolderRedirection ExcludeCommonFolders="0">
	<Excludes>
		<Exclude Copy="0">AppDataLocalLow</Exclude>
		<Exclude Copy="0">AppDataLocalPackages</Exclude>
		<Exclude Copy="0">AppDataLocalAdobe</Exclude>
		<Exclude Copy="0">AppDataLocalTemp</Exclude>
		<Exclude Copy="0">AppDataLocalDiagnostics</Exclude>
		<Exclude Copy="0">AppDataLocalComms</Exclude>
		<Exclude Copy="0">AppDataLocalGoogleChromeUser DataDefaultCache</Exclude>
		<Exclude Copy="0">AppDataLocalGoogleChromeUser DataDefaultCached Theme Image</Exclude>
		<Exclude Copy="0">AppDataLocalGoogleChromeUser DataDefaultJumpListIcons</Exclude>
		<Exclude Copy="0">AppDataLocalGoogleChromeUser DataDefaultJumpListIconsOld</Exclude>
		<Exclude Copy="0">AppDataLocalGoogleChromeUser DataDefaultStorage</Exclude>
		<Exclude Copy="0">AppDataLocalGoogleChromeUser DataDefaultLocal Storage</Exclude>
		<Exclude Copy="0">AppDataLocalGoogleChromeUser DataDefaultSessionStorage</Exclude>
		<Exclude Copy="0">AppDataLocalGoogleChromeUser DataDefaultMedia Cache</Exclude>
		<Exclude Copy="0">AppDataLocalGoogleChromeUser DataDefaultGPUCache</Exclude>
		<Exclude Copy="0">AppDataLocalGoogleChromeUser DataDefaultWebApplications</Exclude>
		<Exclude Copy="0">AppDataLocalGoogleChromeUser DataDefaultSyncData</Exclude>
		<Exclude Copy="0">AppDataLocalGoogleChromeUser DataDefaultSyncDataBackup</Exclude>
		<Exclude Copy="0">AppDataLocalGoogleChromeUser DataDefaultPepper DataShockwave FlashCacheWriteableAdobeRoot</Exclude>
		<Exclude Copy="0">AppDataLocalGoogleChromeUser DataWidevineCDM</Exclude>
		<Exclude Copy="0">AppDataLocalGoogleChromeUser DataEVWhitelist</Exclude>
		<Exclude Copy="0">AppDataLocalGoogleChromeUser Datapnacl</Exclude>
		<Exclude Copy="0">AppDataLocalGoogleChromeUser Datarecovery</Exclude>
		<Exclude Copy="0">AppDataLocalGoogleChromeUser DataShaderCache</Exclude>
		<Exclude Copy="0">AppDataLocalGoogleChromeUser DataSwReporter</Exclude>
		<Exclude Copy="0">AppDataLocalGoogleChromeUser DataSwiftShader</Exclude>
		<Exclude Copy="0">AppDataLocalGoogleChromeUser DataPepperFlash</Exclude>
		<Exclude Copy="0">AppDataLocalMicrosoftTokenBrokerCache</Exclude>
		<Exclude Copy="0">AppDataLocalMicrosoftNotifications</Exclude>
		<Exclude Copy="0">AppDataLocalMicrosoftInternet ExplorerDOMStore</Exclude>
		<Exclude Copy="0">AppDataLocalMicrosoftInternet ExplorerRecovery</Exclude>
		<Exclude Copy="0">AppDataLocalMicrosoftMSOIdentityCRLTracing</Exclude>
		<Exclude Copy="0">AppDataLocalMicrosoftMessenger</Exclude>
		<Exclude Copy="0">AppDataLocalMicrosoftUEV</Exclude>
		<Exclude Copy="0">AppDataLocalMicrosoftWindowsApplication Shortcuts</Exclude>
		<Exclude Copy="0">AppDataLocalMicrosoftWindowsMail</Exclude>
		<Exclude Copy="0">AppDataLocalMicrosoftWindowsWebCache</Exclude>
		<Exclude Copy="0">AppDataLocalMicrosoftWindowsWebCache.old</Exclude>
		<Exclude Copy="0">AppDataLocalMicrosoftWindowsAppCache</Exclude>
		<Exclude Copy="0">AppDataLocalMicrosoftWindowsExplorer</Exclude>
		<Exclude Copy="0">AppDataLocalMicrosoftWindowsGameExplorer</Exclude>
		<Exclude Copy="0">AppDataLocalMicrosoftWindowsDNTException</Exclude>
		<Exclude Copy="0">AppDataLocalMicrosoftWindowsIECompatCache</Exclude>
		<Exclude Copy="0">AppDataLocalMicrosoftWindowsiecompatuaCache</Exclude>
		<Exclude Copy="0">AppDataLocalMicrosoftWindowsNotifications</Exclude>
		<Exclude Copy="0">AppDataLocalMicrosoftWindowsPRICache</Exclude>
		<Exclude Copy="0">AppDataLocalMicrosoftWindowsPrivacIE</Exclude>
		<Exclude Copy="0">AppDataLocalMicrosoftWindowsRoamingTiles</Exclude>
		<Exclude Copy="0">AppDataLocalMicrosoftWindowsSchCache</Exclude>
		<Exclude Copy="0">AppDataLocalMicrosoftWindowsTemporary Internet Files</Exclude>
	</Excludes>
</FrxProfileFolderRedirection>
Исключение администраторов из группы FSLogix.
Правильно будет исключить администраторов из группы FSLogix, для предотвращения создания профиля. Это справедливо, если будут какие-то неполадки и чтоб у Вас была возможности зайти на сервер.
- Открываем групповую политику и переходим в раздел: Computer Configuration->Windows Settings->Security Settings->Restricted Groups->Add Group-> Задаем имя: FSLogix Profile Exclude List и добавляем группу администраторы домена.
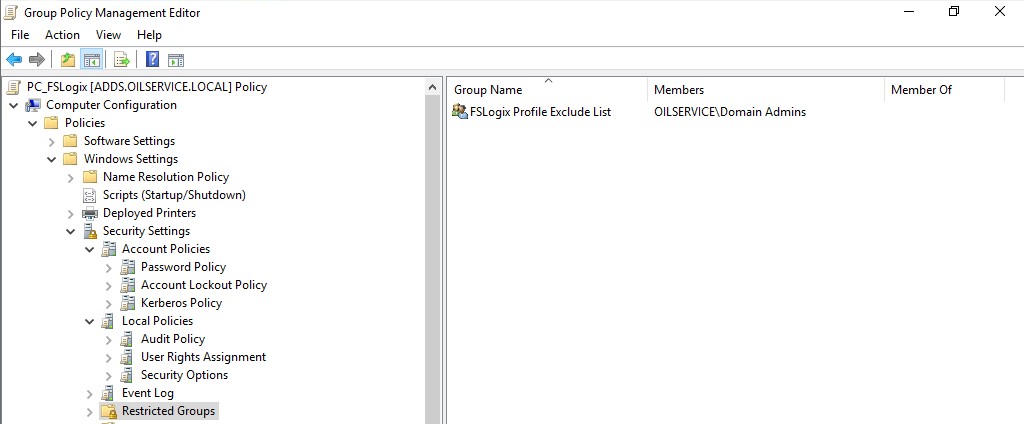
- Так же есть группа включения: FSLogix Profile Include List. По умолчанию ВсеEveryone. Можете переназначить на пользователей домена.
Критическая проблема FSLogix.
И вроде бы всё отлично, но вот почему-то Microsoft не может иногда что-то довести до ума или может годами делать исправления. Это коснулось и FSLogix.
Последний баг: Периодически возникает сбой при входе:The Group Policy Client service failed the sign-in. Access is denied.
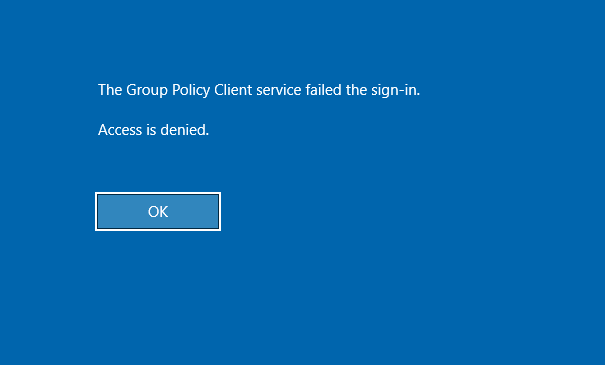
Давняя и большая тема на technet посвященная данной ошибке: sLogix – Unclean logoff causing locked files until server reboot
RobertBerggren, дает временное решение и говорит, что выпуск новой версии FSLogix в ноябре решит это.
RobertBerggren-1701 asnwered
Необходимо найти сервер, на котором осталась папка local_username затронутого пользователя, добраться в реестре до:
HHKLMSOFTWAREMicrosoftWindows NTCurrentVersionProfileServiceReferencesSID
И установить значение:
REG_BINARY: RefCount
Value: 00 00 00 00
После этого пользователь может успешно снова зайти.
UPD: 18.01.2022. Здесь я предлагаю решение с помощью PowerShell: https://techcommunity.microsoft.com/t5/fslogix-blog/fslogix-2105-hf-01-2-9-7979-62170-released/ba-p/2948136
Ну а тут: https://techcommunity.microsoft.com/t5/azure-virtual-desktop-feedback/idb-p/AzureVirtualDesktop/status-key/AzureVirtualDesktop_Planned багу признали и обещают исправить в следующей версии.
UPD: 1/25/2022 Исправлено: The FSLogix 2201 Public Preview is now available
FSLogix now correctly handles cases where the Windows Profile Service refCount registry value is set to an unexpected value.
Конвертация профилей UDP в FSLogix.
Моя ферма каждый день насчитывает примерно 400~ активных сеансов. Профилей около 500.
Конвертацию я начал с 9 вечера. До 8 утра успешно конвертировались все 500 профилей.
Скрипт который я использовал: convert-udp-fslogix
В интернете можно найти и аналоги, но этот быстрый, простой, удобный и делает исключения, которые не нужно переносить:
$Excludes = @("Profile", "Uvhd-Binding", "`$RECYCLE.BIN", "System Volume Information")Ключом $updroot мы указываем путь до UDP профилей.
Ключом $fslogixroot указываем новое расположение профилей FSLogix.
На выходе получим папки с профилями SID_%username%, но как выше мы помним, мы поменяли политикой имя папки на %username%_SID, потому после конвертации и отдельным скриптом делаю переименование:
$path = '\ADDSProfiles'

(Get-ChildItem $path -dir).name | ForEach{sl $path}{
    $newName = $_ -replace "(s-.+?d)_(.+)", '$2_$1'
    if($_ -ne $newName){Rename-Item -li $_ $newName}
}
Хотя то же самое можно поменять и в самом скрипте.
Заключение.
Если определяться, какую систему выбирать для профилей, я остановлюсь на FSLogix. На системе, которая поддерживается, дорабатывается и имеет расширенные настройки.
Да, как я выше написал, есть один неприятный баг( Хотя можно засунуть скрипт в планировщик и спать спокойно, у меня он уже оттестирован ), но, даже с моим количеством пользователей, я получаю пару заявок в неделю, а то и две, на проблемы со входом, потому с этим можно жить с учетом всех плюсов системы ну и дай Бог, Microsoft исправит и эту проблему.
Спасибо, что дочитали. В следующей статье мы будем разворачивать высокую доступность.
С Уважением, Андрей.