In Windows 8.1 Pro my initial location for the Temporary Internet Files folder was:
C:Users<user name>AppDataLocalMicrosoftWindowsINetCache.
I moved them to E:Temporary Internet Files using the Move Folder option in Internet Options. Is there any way to move them back to my initial location? I have tried the Reset option in Internet Options but the folder remains at E:Temporary
Internet Files. I have even tried un-installing and re-installing Internet Explorer 11 via the Windows Features window and the folder remains at E:Temporary Internet Files.I have tried moving them back to the initial location using the Move Folder feature in Internet Options but it automatically creates a Temporary Internet Files folder at the chosen location.
C:Users<user name>AppDataLocalMicrosoftWindowsINetCacheTemporary Internet Files and not the initial location
C:Users<user name>AppDataLocalMicrosoftWindowsINetCache.
The only way that I have found to get them back to C:Users<user name>AppDataLocalMicrosoftWindowsINetCache is by creating a new user account.
Hi,
It’s actually very easy to set IE back to the Inetcache folder.
I found out how to do it after few hours having the same issue.
All you have to do is edit two registry keys, reboot and all is back to it’s Original location.
The correct path is %USERPROFILE%AppDataLocalMicrosoftWindowsINetCache
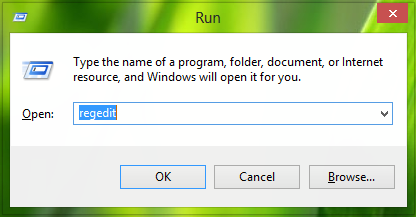
Press windows key + R to get the Run dialog and enter regedit end press ok.
In te registry editor go to the following key:
HKEY_USERS.DEFAULTSoftwareMicrosoftWindowsCurrentVersionExplorerUser Shell Folders
Double click the cache key and enter the initial location like this including capitals:
%USERPROFILE%AppDataLocalMicrosoftWindowsINetCache
Press ok to confirm and you will see the key changed.
Then go to the following registry key:
HKEY_CURRENT_USERSoftwareMicrosoftWindowsCurrentVersionExplorerUser Shell Folders
Look at the cache key, it should be automatically changed to the correct location as well, if not double click it and enter the correct location end pres ok to confirm:
%USERPROFILE%AppDataLocalMicrosoftWindowsINetCache
Reboot your pc, login and open Internet explorer and check the location of Temporary internet files.
Now it should be at it’s initial location before you moved it to another harddrive.
Hope this will fix it right for you.
regards,
Bas
-
Edited by
Thursday, May 8, 2014 8:58 AM
-
Proposed as answer by
Bas2577
Thursday, May 8, 2014 8:59 AM -
Marked as answer by
tracit99
Thursday, May 8, 2014 12:32 PM
Как правило, все, что мы просматриваем с помощью Internet Explorer, он всегда сохраняет некоторые данные в папке временных файлов, чтобы мы могли быстрее просматривать веб-страницы. К временно сохраненным данным относятся кэшированные веб-страницы, изображения и другие носители. По умолчанию последняя версия Internet Explorer 11 сохраняет временные файлы Интернета и данные веб-сайтов в папке по следующему адресу:
C: Пользователи <имя пользователя> AppData Local Microsoft Windows INetCache
Вы можете изменить место временного сохранения данных следующим образом.
Открыть Internet Explorer в окне настроек или запустите команду inetcpl.cpl. На Общий вкладка Интернет-свойства в окне нажмите Настройки под История просмотров Заголовок. На Настройки данных веб-сайта В окне, у вас есть возможность переместить временный файл в нужную папку, см. снимок экрана ниже.
Недавно я изменил местоположение временного интернет-файла, следуя вышеупомянутому способу, но когда я попытался восстановить его до значения по умолчанию, это не сработало. Мне не удалось восстановить папку временных файлов Интернета.
Когда он использовал параметр «Переместить в» для восстановления, временные файлы были сгенерированы в:
C: Users <имя пользователя> AppData Local Microsoft Windows INetCache Temporary Internet Files
местоположение, а не по умолчанию
C: Users <имя пользователя> AppData Local Microsoft Windows INetCache
расположение.
Сброс Internet Explorer не устранил эту проблему, вот как исправить это, отредактировав реестр Windows.
Восстановить папку временных интернет-файлов для Internet Explorer
1. Нажмите комбинацию клавиш Windows + R, введите команду put regedit в диалоговом окне «Выполнить» и нажмите Войти открыть Редактор реестра.
2. Перейдите сюда:
HKEY_USERS .DEFAULT Software Microsoft Windows CurrentVersion Explorer Папки пользовательской оболочки
3. На правой панели показанного выше окна найдите строку реестра с именем Cache. Он должен показывать настроенное вами местоположение, которое вы указали для сохранения временных данных. Дважды щелкните по нему, чтобы получить это:
4. В Изменить строку коробка, так что теперь откройте, положите Данные значения который является местом хранения временных файлов по умолчанию, как показано ниже, и нажмите OK:
% USERPROFILE% AppData Local Microsoft Windows INetCache
5. Затем перейдите к следующему разделу реестра и выполните те же действия, что и на предыдущем шаге для ключа Cache:
HKEY_CURRENT_USER Software Microsoft Windows CurrentVersion Explorer Папки пользовательской оболочки
Когда вы закончите, вы можете закрыть Редактор реестра и перезагрузите компьютер, чтобы решить вашу проблему.
Сообщите нам, помогло ли это.
.
Если вы не помните, чтобы самостоятельно изменяли расположение этой папки, особенно если ваш компьютер работает ненормально, обязательно запустите сканирование на наличие вредоносных программ, чтобы удалить любую потенциально нежелательную программу, которая могла изменить местоположение папки без вашего ведома.
Эти шаги работают с Windows 10 по Windows XP, но есть различия, о которых следует помнить, поэтому они упомянуты ниже.
Другой способ сделать это изменение — использовать реестр Windows . Использовать Internet Explorer намного проще, как описано выше, но если по какой-то причине вы не можете, попробуйте этот метод.
-
Программное обеспечение Microsoft Windows CurrentVersion Explorer Папки оболочки пользователя
-
Дважды щелкните « Кэш» в правой части редактора реестра.
-
Введите правильное значение для вашей версии Windows:
Windows 10 и 8:
% USERPROFILE% AppData Local Microsoft Windows iNetCacheWindows 7 и Vista:
% USERPROFILE% AppData Local Microsoft Windows Временные файлы ИнтернетаWindows XP:
% USERPROFILE% Local Settings Temporary Internet Files -
Выберите ОК .
-
Повторите шаги 3-5 , но при этом пути, а также в HKEY_CURRENT_USER улей :
Программное обеспечение Microsoft Windows CurrentVersion Explorer Shell Folders -
Закройте редактор реестра.
Все еще не можете изменить папку?
Если после внесения изменений, указанных выше, расположение папки « Временные файлы Интернета » по-прежнему не изменится, даже после перезагрузки, есть несколько вещей, на которые следует обратить внимание.
С учетом вышесказанного некоторые антивирусные программы чрезмерно защищают реестр и предотвращают изменения, поэтому даже если вы вносите изменения самостоятельно, антивирусная программа может блокировать ваши попытки. Если вы уверены, что в настоящее время у вас нет вредоносных программ, временно отключите антивирусную программу и повторите попытку.
Если папку можно изменить, когда антивирусная программа выключена, перезагрузите компьютер и проверьте снова, чтобы быть уверенным. Если местоположение новой папки остается, снова включите программное обеспечение безопасности. Внесенные изменения должны сохраняться, так как антивирусная программа не была активна во время изменения.

Windows operating system has a lot of complex programs and programming built into it. These programmings decide how an action or program should respond and how its processing and results will be executed. For example, when you download a file, it gets downloaded to a pre-defined location in your system, unless you wish to change it manually. While Windows offers the option to make changes as per your requirements, sometimes some of the changes occur due to different reasons such as technical faults, virus and malware intrusion, applications downloaded from an unreliable source, etc.
One such error that users generally face in their Windows system is the change in the location of internet files. If you ever face this issue on your computer, you can overcome this problem by following the information provided in this guide below. The below-mentioned information will help you overcome the problem by helping you learn to reset the temporary internet files location to default.
The issue with the change in the location of Temporary Internet Files is generally denoted by a Yellow caution icon on the system. If you are seeing a Yellow caution icon on your Windows computer, you will need to run the Troubleshooting process to identify the problem. If the troubleshooting process results in the message that reads “Temporary Internet files location has changed”, you can reset the location of the temporary internet files to default by following the steps provided below.
- A web browser such as Internet Explorer saves a part of data in the pre-defined temporary files folder to enhance the browsing experience. BY default, the address of this location is –
“C:UsersusernameAppDataLocalMicrosoftWindowsINetCache”
- In the above-mentioned location, you will find the cached internet pages, downloaded images, videos, audios, and other multimedia saved by Internet Explorer. These cached internet pages allow you to load web pages at lightning-fast speeds.
Well, what’s a bit concerning about Internet Explorer’s temporary files location is that if the location of the temporary file is ever changed, then even if you uninstall the Internet Explorer browser, it won’t help you undo the change.
- In such a case, the best way to reset the temporary internet files location to default is to consider editing some two registry keys and restart your computer. You will just need to remember that the default location would be –
“C:UsersusernameAppDataLocalMicrosoftWindowsINetCache”
- To begin with, you will first need to press Windows Key + R key on your keyboard. Doing so will open the Run dialog box on your computer screen.
- Once the Run dialog box opens on your screen, you will need to enter “Regedit” in the provided field and press the OK As you will press the “OK” button, it will open the Windows registry editing window on your computer screen.
- Once you are on the registry editing window, you will need to edit the relevant registry keys. For this, you will need to go to the following location –
HKEY_USERS.DEFAULTSoftwareMicrosoftWindows|CurrentVersionExplorerUser Shell Folders
- Once you are on the location, you will need to double-click on the highlighted Cache key and enter the address of the original default location –
- %USERPROFILE%AppDataLocal|MicrosoftWindows|INetCache
- Then, you will need to click on the OK button to move with the editing. Here, you will need to modify the last key. For this, you will need to open the following key:
- HKEY_CURRENT_USERSoftwareMicrosoftWindowsCurrentVersionExplorerUser Shell Folders
- After that, you will again need to go to the Cache key and check whether it was moved automatically to the right location or not. You will need to repeat the previous steps if it wasn’t moved automatically. So, you will need to double click the cache and enter the default location which is – %USERPROFILE%AppDataLocal|MicrosoftWindows|INetCache. Then, you will need to confirm your action by pressing the OK
- After pressing the OK button, you will restart your computer and log in. Once your computer restarts, you will need to open the Internet Explorer browser on your computer to check whether or not the temporary internet files location has been configured to back to the default location.
Steps to Check whether the Default Location Was Restarted
Once you have followed the above-mentioned instructions, you would want to make sure that the default location of your Temporary internet file was restored. For this, you will need to follow the step-by-step instructions provided below.
- On your computer, you will need to open the Internet Explorer web browser.
- Once you have opened the Internet Explorer web browser on your computer, you will need to click on the Tools This will open the drop-down menu on your screen.
- From the drop-down menu that appears on your screen, you will need to click on the Internet Options. You will be directed to the Internet Options section on your computer.
- In the Internet Options section, you will need to click on the General tab. This will take you to the General section of your Internet Explorer browser.
- In the General section, you will need to click on the Settings Doing so will take you to the settings section of your Internet Explorer web browser.
- In the Settings section window, you will need to check the Current location field and see whether the field is showing the following location or not:
C:UserAppDataLocalMicrosoftWindowsINetCache
NOTE: If the current location section of the Website Data Settings window doesn’t show the above-mentioned location in the field, you will need to check the steps you followed earlier and see if you missed or incorrectly followed any of the given instructions.
InetCache folder missing
Inetcache is a default system folder that is usually hidden, however, it can be visible through the system folders in the folder view. This folder is known for storing addresses of the sites you visit, allowing faster response the next time you visit them. While the InetCache folder doesn’t run into trouble, however, if ever the InetCache folder goes missing, you can locate it by numerous methods. Below you can find information about one such method.
- Start by connecting your Android mobile device to your Windows computer.
- Next, you will need to go to the storage drive of your Android device and trying playing an audio file (preferably an mp3 file).
- As you will play audio for the first time, the file will get downloaded to the “INetCache/IE/..” location.
- Simply click on this link in “Downloading 1 item to (location name)” in order to find the INetCache folder.
Temporary Internet files current location blank
If you find the Temporary Internet Files current location blank, consider performing the following troubleshooting steps:
Perform a Clean Reboot
- Firstly, you will need to sign in to your computer as an administrator. In case you do not have an administrator account, you can easily create one.
- Next, you will need to type MSConfig in the search box of the taskbar, and then select the System Configuration from the results.
- Now, you will need to select the Hide all Microsoft services under the Services tab of System Configuration. Then, you will need to select Disable all
- Then, you will need to select the Open Task Manager in the Startup tab of System Configuration.
- Next, you will need to select the item under Startup in the Task Manager section for each startup item. Then, press the Disable option and close the Task Manager
- After that, go to the Startup tab in the System Configuration section and select the OK
- Now when you will restart your computer, it will be in a clean boot condition.
Boot in Safe Mode to Check if the Problem Persists
- Press the Windows logo and R keys on your keyboard together. This will open the Run
- In the provided field of the Run window, you will need to enter MSConfig and press the OK
- Next, you will need to select the Boot tab.
- Then, you will need to clear the checkbox next to the Safe Boot option under Boot options.
Use the System File Checker Tool
- Start by launching an elevated command prompt. For this, you will need to run the inbox Deployment Image Servicing and Management (DISM) tool before running the System File Checker.
You will need to enter the following command in the provided field and press the Enter key on your keyboard. You may need to wait for a couple of minutes before the command operation gets completed.
DISM.exe /Online ?/Cleanup-image /Restorehealth
/Source:C;RepairSourceWindows /Limit Access
NOTE: Make sure to replace the C:RepairSourceWindows with the location of your repair source.
- Now, in the command prompt, you will need to enter the command – sfc /scannow in the provided field and press the Enter key on your keyboard. This command will allow you to scan all the protected system files, and replace corrupted files with a cached copy located in a compressed folder at %WinDir%System32dllcache.
This placeholder represents the Windows operating system folder. For example, C;Windows.
- Once you are done with the process, you are likely to see one of these messages on your screen:
- Windows Resource Protection Didn’t Find any Integration Violations: This implies that you don’t have corrupt or missing files in your system.
- Windows Resource Protection Couldn’t Perform the Requested Operation: In order to resolve the problem, you will need to perform the System File Checker scan in the Safe mode. Also, make sure that PendingRenames and PendingDeletes folders exist under the %WindDir%WinSxSTemp
- Windows Resource Protection found corrupted files and repaired them Successfully – Details are available in the Log%WinDir%LogsCBSCBS.log.
- Windows Resource Protection found corrupt files however it couldn’t fix some of them. Details are available in the Log %WinDir%LogsCBSCBS.log – In order to repair the corrupted files through a manual process, you will need to check the details in the System File Checker process to identify the corrupted file, and then replace the corrupted file manually with a known good copy of the file.
DISM
Clear Errors in Windows Update using the DISM or Through System Update Readiness Tool
- Start by launching a command prompt (run as administrator) and enter the following command. Then press the Enter key on your keyboard.
DISM.exe /online /Cleanup- image /Restorehealth
NOTE: Make sure that you replace the C:RepairSourceWindows placeholder with the location of your repair source.
- Next, you will need to enter sfc /scannow command and press Enter key on your keyboard. You may need to wait for several minutes to allow the command operation gets completed.
- After that, you will need to close the command prompts, and then again run the Windows Update.
Following these workarounds should help you overcome the problem, however, if the problem persists, consider creating a new user account temporarily to check if the problem occurs in that account. In case it does, then the problem might be with your user account, and you should recreate it.
Temporary Internet files location Windows 10 Chrome
If you are looking to find the Temporary Internet files location in Windows 10 Chrome, there are numerous ways to do it. One of the ways is to follow the steps provided below:
- On your Windows 10 computer, open a Google Chrome Web Browser.
- Once you have opened the Chrome browser, you will need to click on the More Menu option located in the top-right corner. A drop-down menu will appear on your screen.
- From the drop-down menu, you will need to select the More Tools This will expand the options further.
- From the expanded options, you will need to click on the Developer Tools
- In the Developer Tools section, you will need to navigate to the “Application” tab and locate the “Application” tab.
- In the Application tab, you will need to look for the “Cache Storage” option.
Cannot find Temporary Internet Files folder
In case you are unable to find the Temporary Internet Files folder, you can locate it by following the information provided below.
- On your computer, go to the Start option. This will expand the menu on your screen.
- From the expanded menu, you will need to click on the Control Panel
- Under Control Panel, you will need to select the Internet Options. You can also find the same window in IE (Tools > Options).
- Next, you will need to go to the General Tab and navigate to the Browsing History
- Under the Browsing History section, click on the Settings
- Now, in the window that appears – Current Location displays where Temporary Internet files are being saved.
So, these are the step-by-step instructions you will need to follow to reset the default location of temporary internet files in your Internet Explorer web browser of your Windows computer. In most of the cases, you will be easily able to fix the issue in your Internet Explorer web browser.
by Madalina Dinita
Madalina has been a Windows fan ever since she got her hands on her first Windows XP computer. She is interested in all things technology, especially emerging technologies… read more
Updated on March 26, 2021

XINSTALL BY CLICKING THE DOWNLOAD FILE
This software will keep your drivers up and running, thus keeping you safe from common computer errors and hardware failure. Check all your drivers now in 3 easy steps:
- Download DriverFix (verified download file).
- Click Start Scan to find all problematic drivers.
- Click Update Drivers to get new versions and avoid system malfunctionings.
- DriverFix has been downloaded by 0 readers this month.
In this article, I will show you how to reset temporary Internet files location to default. This fix is useful if you have been getting some errors or warnings on Internet Explorer perhaps from programs or games that need to use the default saving location.
Errors may also come when trying to edit some settings via the Windows 10 Registry.
Why Internet Explorer (IE) Saves Files in a Temporary Location
IE saves certain data inside the aforementioned temporary files folder to enhance our browsing experience.
Ordinarily, the address of this location is C:Usersuser nameAppDataLocalMicrosoftWindowsINetCache
Here you will find cached internet pages, downloaded images, and multimedia as saved by IE. Primarily, whatever cached therein enables web pages to load at lightning-fast speeds.
Anyway, the thing with Internet Explorer’s temporary files location is that if by any chance you had changed it to a new folder/location, even uninstalling explorer won’t work. Here is what works.
How can I reset Temporary Internet files location to default?
Modify your registry
You will have to edit some two registry keys and reboot your PC. Remember we want to move back to:
C:Usersuser nameAppDataLocalMicrosoftWindowsINetCache
- Press Windows Key + R. This will initialize the Run dialog as shown below.

- Now type regedit and press ok. This will open Window’s 10 registry editing window.

- It’s now time to edit the relevant registry keys so navigate to this key:
HKEY_USERS.DEFAULTSoftwareMicrosoftWindowsCurrentVersionExplorerUser Shell Folders- Double-click the highlighted Cache key and type the address of the initial default location as shown below (Observe capitalization):
%USERPROFILE%AppDataLocalMicrosoftWindowsINetCache

- Now click OK to proceed with the editing.
- We shall now modify the last key. Open this key:
HKEY_CURRENT_USERSoftwareMicrosoftWindowsCurrentVersionExplorerUser Shell Folders
- Again, go to the Cache key and check it if it was automatically moved to the right location.

- You will repeat the previous steps if it wasn’t so double click the cache, type the default location
(%USERPROFILE%AppDataLocalMicrosoftWindowsINetCache)then confirm by pressing OK. - Now restart your PC and login. You will then open your Internet Explorer browser window to confirm that you have reset temporary internet files location to default.


Looking for a secure and private web browser? Check out our UR Browser review!
How To Check If The Default Location Was Restored
- Launch Internet Explorer.
- Click on IE’s tools icon.
- Then click Internet options.
- In the General tab, click Settings.
This is what you should see if all went well in your quest to reset temporary internet files location to default.

There you go, we hope that this guide helped you reset temporary Internet files location to its default directory. If you found this guide helpful, feel free to let us know by using the comment section below.
RELATED STORIES YOU NEED TO CHECK OUT:
- How to open Temporary Internet Files in Windows 10
- FIX: Internet Explorer 11 Crashes in Windows 10, 8.1, 8
- Where is Internet Explorer in Windows 10?
Still having issues? Fix them with this tool:
SPONSORED
If the advices above haven’t solved your issue, your PC may experience deeper Windows problems. We recommend downloading this PC Repair tool (rated Great on TrustPilot.com) to easily address them. After installation, simply click the Start Scan button and then press on Repair All.
![]()
Newsletter
Содержание
- 1 Сбросить пути к папке оболочки по умолчанию с помощью файлов реестра
- 2 Список папок оболочки их расположение по умолчанию в Windows 10
В этом посте представлен список папок оболочки пользователя в Windows 10 и их пути по умолчанию. Если вы переместили или переместили папку оболочки, вы можете восстановить ее в папку по умолчанию в большинстве случаев на вкладке «Расположение». Однако в некоторых случаях нельзя использовать вкладку «Расположение», т. Е. Когда две специальные папки, такие как Музыка а также Видео слиться и указать на то же место. В этом случае нажатие кнопки «Восстановить по умолчанию» на вкладке «Свойства» папки вызывает ошибку.
В таких случаях сброс соответствующих путей к папке оболочки в реестре является единственным возможным решением. В этой статье представлены файлы .reg, необходимые для быстрого возврата к путям папок оболочки по умолчанию, а также список папок оболочки и их путь по умолчанию для справки.
Сбросить пути к папке оболочки по умолчанию с помощью файлов реестра
- w10_usf_defaults_hkcu.zip — Windows 10 Shell Folder Сброс настроек по умолчанию для HKCU *
- w10_usf_defaults_hklm.zip — Windows 10 Shell Folder Сброс настроек по умолчанию для HKLM *
- w10_usf_clear_override_hkcu.zip — Windows 10 Очистите переопределяющие значения реестра для HKCU (см. таблицу 2)
* HKCU — сокращение от HKEY_CURRENT_USER HKLM — это HKEY_LOCAL_MACHINE
Список папок оболочки их расположение по умолчанию в Windows 10
Для каждого пользователя: для текущей учетной записи специальные пути к папкам хранятся в следующем разделе реестра:
HKEY_CURRENT_USERSOFTWAREMicrosoftWindowsCurrentVersionExplorerUser Shell Folders
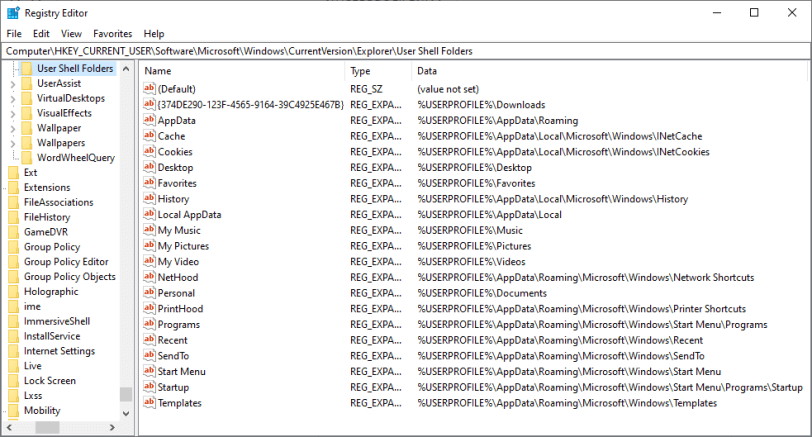
| Имя папки оболочки — тип значения: REG_EXPAND_SZ | Место расположения |
| {374DE290-123F-4565-9164-39C4925E467B} | % USERPROFILE% Загрузки |
| Данные приложения | % USERPROFILE% AppData Roaming |
| кэш | % USERPROFILE% AppData Local Microsoft Windows INetCache |
| Печенье | % USERPROFILE% AppData Local Microsoft Windows INetCookies |
| рабочий стол | % USERPROFILE% Desktop |
| Избранные | % USERPROFILE% Favorites |
| история | % USERPROFILE% AppData Local Microsoft Windows History |
| Локальные AppData | % USERPROFILE% AppData Local |
| Моя музыка | % USERPROFILE% Music |
| Мои картинки | % USERPROFILE% Pictures |
| Мое видео | % USERPROFILE% Видео |
| NetHood | % USERPROFILE% AppData Roaming Microsoft Windows Сетевые ярлыки |
| личный | % USERPROFILE% Documents |
| PrintHood | % USERPROFILE% AppData Roaming Microsoft Windows Ярлыки принтера |
| программы | % USERPROFILE% AppData Roaming Microsoft Windows Меню Пуск Программы |
| последний | % USERPROFILE% AppData Roaming Microsoft Windows Recent |
| Отправить | % USERPROFILE% AppData Roaming Microsoft Windows SendTo |
| Стартовое меню | % USERPROFILE% AppData Roaming Microsoft Windows Start Menu |
| Запускать | % USERPROFILE% AppData Roaming Microsoft Windows Пуск Меню Программы Автозагрузка |
| Шаблоны | % USERPROFILE% AppData Roaming Microsoft Windows Templates |
Заметка: {374DE290-123F-4565-9164-39C4925E467B} представляет Загрузки папки.
Следующие элементы не существуют в чистой установке Windows 10, но они создаются только при перенаправлении этих папок в Microsoft OneDrive. Если существуют следующие значения, расположение, определенное в следующих значениях, имеет приоритет. В случае любого конфликта, следующие значения могут быть удалены, так что используются значения по умолчанию (выше).
Чтобы очистить или сбросить значения по умолчанию для всех этих значений ниже, загрузите файл w10_usf_clear_override_hkcu.zip.
Выйдите из системы и войдите в систему, чтобы изменения вступили в силу.
| Имя значения (переопределение) | Папка оболочки, путь которой переопределен |
| {3B193882-D3AD-4EAB-965A-69829D1FB59F} | Сохраненные картинки |
| {AB5FB87B-7CE2-4F83-915D-550846C9537B} | Фотопленка |
| {B7BEDE81-DF94-4682-A7D8-57A52620B86F} | Скриншоты |
| {F42EE2D3-909F-4907-8871-4C22FC0BF756} | Местные документы |
| {7D83EE9B-2244-4E70-B1F5-5393042AF1E4} | Локальные загрузки |
| {} A0C69A99-21C8-4671-8703-7934162FCF1D | Местная музыка |
| {0DDD015D-B06C-45D5-8C4C-F59713854639} | Местные Картинки |
| {35286a68-3c57-41a1-bbb1-0eae73d76c95} | Местные видео |
По системе: общие специальные пути к папкам хранятся в следующем разделе реестра:
HKEY_LOCAL_MACHINESOFTWAREMicrosoftWindowsCurrentVersionExplorerUser Shell Folders
| Имя папки оболочки — тип значения: REG_EXPAND_SZ | Место расположения |
| {3D644C9B-1FB8-4f30-9B45-F670235F79C0} | % PUBLIC% Загрузки |
| Общие AppData | %Данные программы% |
| Общий рабочий стол | % PUBLIC% Desktop |
| Общие документы | % PUBLIC% Documents |
| Общие программы | % ProgramData% Microsoft Windows Пуск Меню Программы |
| Общее меню «Пуск» | % ProgramData% Microsoft Windows Пуск |
| Общий запуск | % ProgramData% Microsoft Windows Пуск Меню Программы Автозагрузка |
| Общие шаблоны | % Programdata% Microsoft Windows Templates |
| CommonMusic | % PUBLIC% Music |
| CommonPictures | % PUBLIC% Pictures |
| CommonVideo | % PUBLIC% Видео |
Заметка:
{3D644C9B-1FB8-4f30-9B45-F670235F79C0}значение представляет папку Public Downloads.- Ценности
CommonMusic,CommonPictures,CommonVideoотдельные слова (без пробела в них.)
СВЯЗАННЫЙ: [Исправить] Случайно объединенные папки «Музыка», «Изображения», «Видео» или «Загрузки»
Те, кто перешел с Windows XP на Windows Vista, были озадачены тем, где находятся временные файлы Интернета в этой операционной системе.
Содержание
- Где находится папка временных интернет-файлов
- Где находится файл index.dat
- Расположение папки временных файлов Интернета
- Управление интернет-кешем
- Контроль, как Internet Explorer должен использовать кэш
Где находится папка временных интернет-файлов
Начиная с Windows Vista и далее в Windows 7 , папка временных файлов Интернета находится по адресу:
C: Users имя пользователя AppData Local Microsoft Windows Temporary Internet Files
В Windows 8 и Windows 8.1 интернет-кэш или временные интернет-файлы хранятся в этой папке:
C: Users имя пользователя AppData Local Microsoft Windows INetCache
Предполагая, что ваша Windows установлена на диске C. Чтобы увидеть это, вам нужно не только установить флажок Показать скрытые файлы и папки в параметрах папки, но и снять флажок Скрыть защищенные файлы/папки операционной системы .
Где находится файл index.dat
А затем, где находится файл index.dat , расположенный в Windows 7 | 8? Index.dat – это файлы, скрытые на вашем компьютере, которые содержат все веб-сайты, которые вы когда-либо посещали. Каждый URL и каждая веб-страница указаны там. Чтобы получить к нему доступ, вам нужно будет ввести в адресной строке Explorers следующее местоположение и нажать кнопку «Перейти»:
C: Users имя пользователя AppData Local Microsoft Windows Временные файлы Интернета Content.IE5
Только тогда вы сможете увидеть файл index.dat. Заключение ? Папка Content.IE5 очень скрыта !
Теперь возникает естественный вопрос: почему Microsoft решила присвоить ей статус Защищенных системных файлов/папок?
В конце концов, папка «Temporary Internet Files» (Cache) является рассадником и источником распространения вирусов, троянских загрузчиков и других вредоносных программ, загружаемых из Интернета. Помимо вашей папки «Windows», это одна из папок, в которой можно найти большинство таких вредоносных файлов. Так почему же такой «очаг» получает такую защиту, когда даже некоторым Windows dll не предоставляются такие привилегии?
Расположение папки временных файлов Интернета
Работа в Интернете может привести к определенным угрозам безопасности. Вы можете столкнуться с вредоносными программами на вашем компьютере, или троянский загрузчик тайно загрузит нежелательную программу, или вы даже можете обнаружить, что ваш браузер взломан! Невинно нажимая на ссылку в электронном письме или даже вводя неверный веб-адрес, вы можете обнаружить, что ваш браузер посещает «враждебный» сайт.
Для защиты от этих угроз IE в Windows Vista и более поздних версиях работает в защищенном режиме . А кэш теперь рассматривается как виртуальная папка с теми же низкими привилегиями, что и у самого процесса Internet Explorer.
Вообще говоря, в Windows 7 процессы выполняются с уровнями целостности, определенными функцией MIC (обязательный контроль целостности). «Защищенный режим» Internet Explorer, работает как процесс с «низкими привилегиями». Это предотвращает запись в Internet Explorer областей файловой системы или реестра, для которых требуются более высокие права! Затем происходит следующее: Windows создает набор папок и файлов для использования с Internet Explorer в защищенном режиме.
Эти папки и файлы имеют тот же уровень Низких привилегий, что и Internet Explorer. Эти 4 папки с «низкими привилегиями», используемые Internet Explorer в Windows при повседневной работе, – это «Кэш», «Куки», «История» и «Temp».
- % LocalAppData% Microsoft Windows Временные файлы Интернета Низкий
- % AppData% Microsoft Windows Cookies Low
- % LocalAppData% Microsoft Windows History Low
- % LocalAppData% Temp Low
Windows 7/8 также создает Виртуальные папки для хранения файлов, которые Internet Explorer пытается сохранить в защищенных местах. Таким образом, вместо того, чтобы вызывать сбой надстройки при попытке записать файл данных в папку Windows или Program Files, Windows 7 или Vista перенаправляет операцию записи в виртуальный эквивалент. Таким образом, программа продолжает работать, считая, что она записала файлы в системную папку; мало понимая, что данные фактически были записаны в виртуализированную скрытую папку, которая отражает фактический путь и хранится в папке «Временные файлы Интернета».
Аналогичным образом, если есть какая-либо попытка записи в реестр, она перенаправляется в область с низким уровнем целостности реестра.
Управление интернет-кешем
Для управления Интернет-кешем откройте Internet Explorer> Свойства обозревателя> Инструменты> Свойства обозревателя> Вкладка «Общие»> История просмотра.

Выберите нужный размер для своего кэша здесь.Вы также можете просмотреть Загруженные программы здесь, нажав «Просмотр объектов» . Вместо того, чтобы скрывать папку и т. Д. В параметрах папки explors, вы можете просмотреть содержимое папки «Временные файлы Интернета», просто нажав «Просмотреть файлы» . Если вы хотите переместить кеш в другое место, нажмите «Переместить папку» , чтобы сделать это. Вам будет предложено установить новое местоположение.
Контроль, как Internet Explorer должен использовать кэш
У вас есть 4 варианта:
- Каждый раз, когда я захожу на веб-страницу : это гарантирует, что информация, которую вы видите, всегда актуальна, но может немного замедлить просмотр.
- Каждый раз, когда я запускаю Internet Explorer : это приведет к тому, что IE будет проверять наличие более новой версии, один раз за сеанс IE. Проверка выполняется при первом посещении страницы, но не до тех пор, пока вы не перезапустите браузер.
- Автоматически . Это опция по умолчанию. Здесь IE видит частоту обновления страниц. Если страница не обновляется часто, IE уменьшает частоту, с которой он проверяет эту страницу.
- Никогда . С помощью этой опции Internet Explorer никогда не проверяет наличие новых файлов и всегда отображает содержимое кеша.
Примечание. Даже после обновления страницы у вас создается впечатление, что ваш IE, кажется, читает из кэша, как, например, чтение вчерашних новостей, когда он должен загружаться заново, просто нажмите и удерживайте клавишу Shift, а затем нажмите, чтобы Refresh.
Всегда полезно очищать кэш время от времени, в зависимости от ваших привычек просмотра. Сделайте это еженедельно или хотя бы ежемесячной привычкой. Вы можете использовать утилиту очистки диска или Quick Clean, чтобы сделать это.
Перейдите сюда, чтобы узнать, почему создаются временные файлы в Windows, и здесь, чтобы прочитать о папке «Расположение файлов cookie» в Windows 7/8. Папка установщика Windows – это еще одна системная папка, о которой вы можете прочитать.
Пост портирован с WinVistaClub.com и обновлен и выложен здесь.
Download PC Repair Tool to quickly find & fix Windows errors automatically
Generally, whatever we browse using Internet Explorer, it always saves some of the data inside the temporary files folder so that it could offer a faster browsing experience to us. The temporarily saved data covers the cached web pages, images, and other media. By default, the latest Internet Explorer 11, saves the Temporary Internet Files and website data to the folder at the following location:
C:Users<user name>AppDataLocalMicrosoftWindowsINetCache
You can change the temporary data saving location in the following manner.
Open Internet Explorer settings window or run inetcpl.cpl command. On the General tab of Internet Properties window, click Settings under Browsing History heading. On the Website Data Settings window, you have the option to move the temporary file location to your desired folder, refer to the below screenshot.

Recently, I have changed the temporary internet file location by following above-mentioned way, but when I tried to restore it back to default, it won’t work. I was unable to restore the temporary internet files folder.
When it used Move to option to restore, the temporary files got generated into:
C:Users<user name>AppDataLocalMicrosoftWindowsINetCacheTemporary Internet Files
location and not in default
C:Users<user name>AppDataLocalMicrosoftWindowsINetCache
location.
Resetting Internet Explorer didn’t fix this problem, so here is how to fix this, by editing the Windows Registry.
Restore temporary internet files folder for Internet Explorer
1. Press Windows Key + R combination, type put regedit in Run dialog box and hit Enter to open the Registry Editor.
2. Navigate here:
HKEY_USERS.DEFAULTSoftwareMicrosoftWindowsCurrentVersionExplorerUser Shell Folders

3. In the right pane of above-shown window, look for the registry string named as Cache. It must be showing the customized location you’ve provided to save temporary data. Double click on the same to get this:
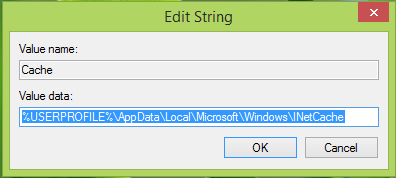
4. In the Edit String box so open now, put the Value data which is the default temporary file storage location as following and click OK:
%USERPROFILE%AppDataLocalMicrosoftWindowsINetCache
5. Next, go to the following registry key and make the same manipulation as we have done in the previous step for the Cache key:
HKEY_CURRENT_USERSoftwareMicrosoftWindowsCurrentVersionExplorerUser Shell Folders
When you’re done, you may close the Registry Editor and reboot the machine to get your problem fixed.
Let us know if this helped.

An Electrical Engineer by profession, Kapil is a Microsoft MVP and a Windows Insider MVP. Please read the entire post & the comments first & create a system restore point before making any changes to your system.