В этой статье о том, что представляет собой диск PortableBaseLayer в Windows 10, для чего он нужен и как его можно отключить и удалить при необходимости.
Назначение виртуального диска PortableBaseLayer
Диск PortableBaseLayer — это виртуальный диск .vhdx, создающийся автоматически и подключающийся к системе, когда вы активируете функцию «Песочница Windows 10» (Windows Sandbox) и представляющий собой хранилище виртуальной машины, используемой для возможностей песочницы.
Несмотря на то, что в информации о диске указан размер в 8 Гб, в действительности на диске он занимает менее 1 Гб по умолчанию.
Убедиться в этом можно, заглянув в папку
C:ProgramDataMicrosoftWindowsContainersBaseImagesБуквенно-цифровой_идентификатор
и обратив внимание на размер файла BaseLayer.vhdx (учитывайте, что папка ProgramData скрытая, перейти к ней можно, введя C:ProgramData в адресную строку проводника и нажав Enter).
Как отключить и удалить диск PortableBaseLayer в Windows 10
Отключить этот диск и удалить соответствующий ему файл стандартными средствами не получится. Тем не менее, сделать это возможно, пожертвовав функциональностью «Песочницы»:
- Зайдите в Панель управления (открыть её можно используя поиск на панели задач) — «Программы и компоненты».
- Слева выберите «Включение и отключение компонентов Windows».
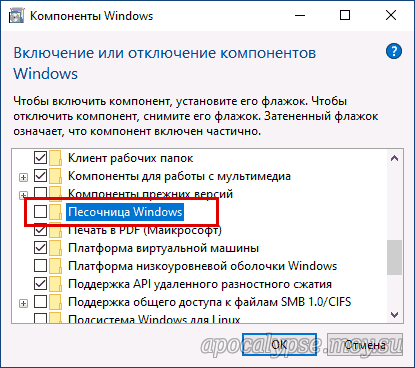
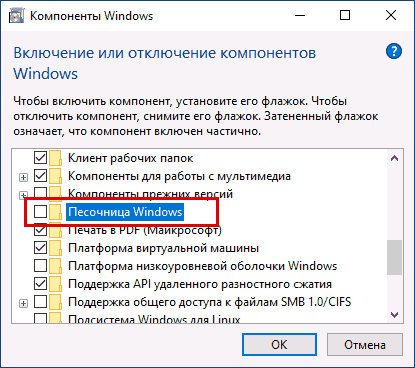
- В списке компонентов снимите отметку с «Песочница Windows» и нажмите «Ок». Вам будет предложено перезагрузить компьютер, сделайте это.
- После перезагрузки диск PortableBaseLayer будет отключен. Примечание: в одном из моих тестов он по какой-то причине исчез только после второй перезагрузки.
- Cам файл диска останется в прежнем расположении C:ProgramDataMicrosoftWindowsContainersBaseImages. Пройдите по этому пути и удалите файл виртуального жесткого диска BaseLayer.vhdx, после отключения в системе он удалится без проблем.
Примечание: при тестировании способов удаления рассматриваемого диска обратил внимание, что если песочница была установлена с помощью скрипта в Windows 10 Домашняя (стандартно в этой редакции функция отсутствует), то удаление предлагаемым методом не срабатывает. Решения (простого и безопасного) пока не подобрал.
Содержание
- Что это за диск PortableBaseLayer в Windows 10 1903 и как его отключить
- Базовые образы контейнеров
- Windows Server Core
- Nano Server
- Windows
- Windows Server
- Обнаружение образов
- Выбор базового образа
- Рекомендации
- Базовые образы для участников программы предварительной оценки Windows
- Сравнение образов Windows Server Core и Nano Server
- Сравнение Windows и Windows Server
- Container Base Images
- Windows Server Core
- Nano Server
- Windows
- Windows Server
- Image discovery
- Choosing a base image
- Guidelines
- Base images for Windows Insiders
- Windows Server Core vs Nanoserver
- Windows vs Windows Server
- C programdata microsoft windows containers baseimages
- What is PortableBaseLayer Partition in Windows 10 Disk Management
- What is PortableBaseLayer that shows up in Disk Management
- What is Windows Sandbox?
- Acronis True Image backup fails (as of 9/July/2019)
- Is PortableBaseLayer related to Reserved Storage?
- Enable or Disable Reserved Storage
Что это за диск PortableBaseLayer в Windows 10 1903 и как его отключить
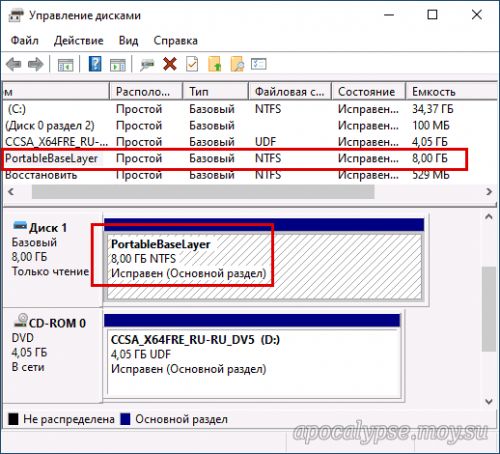
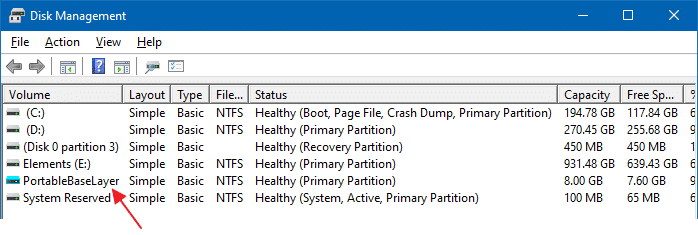
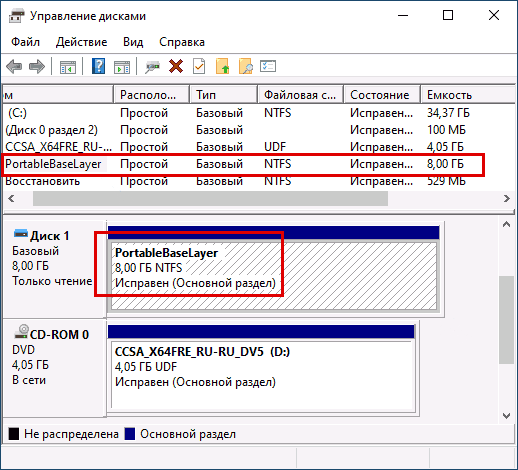
Открыв оснастку управления дисками в последней версии Windows 10, вы неожиданно для себя можете обнаружить базовый диск с файловой системой NTFS и меткой PortableBaseLayer, доступный только для чтения. Этот же диск может быть обнаружен при работе с консольной утилитой Diskpart и прочими сторонними менеджерами дисков. Откуда он и как он мог там появиться, если вы не устанавливали на компьютер дополнительных накопителей и не подключали флешек?
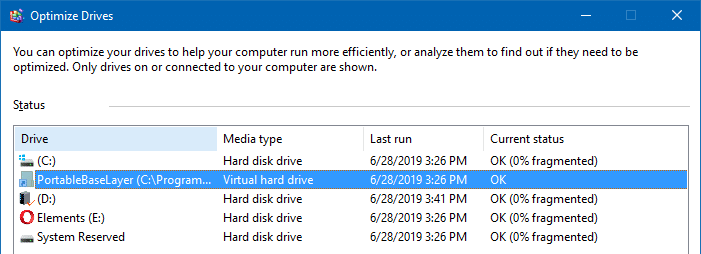
PortableBaseLayer представляет собой виртуальный диск, автоматически создаваемый и подключаемый в Windows 10 1903 при включении компонента Песочница. Физически этот диск представлен файлом BaseLayer.vhdx — контейнером для хранения файлов виртуальной машины. Его размер в оснастке управления дисками указан 8 Гб, но в реальности он меньше 1 Гб.
Убедиться в его наличии вы можете сами, проследовав в Проводнике по адресу:
C:ProgramDataMicrosoftWindowsContainersBaseImagesID
Где ID — идентификатор компонента.
Если вы не пользуетесь Песочницей, то наверняка захотите отключить PortableBaseLayer.
Встроенной оснасткой управления дисками Windows 10 поддерживается создание, подключение и отключение виртуальных дисков, но PortableBaseLayer диск особый и отключить его с помощью штатной оснастки не получится.
Чтобы от него избавиться, вам нужно деактивировать сам компонент «Песочница Windows».
Откройте командой optionalfeatures оснастку «Включение и отключение компонентов Windows», найдите в списке компонент «Песочница Windows», снимите с него галочку и нажмите «OK».
Источник
Базовые образы контейнеров
В Windows предлагается четыре базовых образа контейнера, на основе которых пользователи могут создавать контейнеры. Каждый базовый образ содержит отдельный тип ОС Windows или Windows Server, имеет свой размер на диске и конкретный набор API Windows.
Windows Server Core
Nano Server
Windows
Предоставляет полный набор API Windows.
Windows Server
Предоставляет полный набор API Windows.
Базовый образ Windows Server доступен только с выпуском Windows Server 2022 Insider Preview.
Обнаружение образов
Все базовые образы контейнеров Windows обнаруживаются через Docker Hub. Для обслуживания этих образов контейнеров Windows используется mcr.microsoft.com, реестр контейнеров Майкрософт (MCR). Поэтому команды получения для базовых образов контейнеров Windows выглядят следующим образом:
Реестр MCR не имеет своих средств для каталогов, а предназначен для поддержки уже имеющихся каталогов, таких как Docker Hub. Благодаря глобальному охвату Azure и сочетанию с Azure CDN в MCR реализуется единообразная и быстрая процедура извлечения образа. Клиенты Azure, рабочие нагрузки которых выполняются в Azure, получают такие преимущества, как более высокая производительность в сети и тесная интеграция с MCR (источником образов контейнеров Майкрософт), с Azure Marketplace и все большим числом служб Azure, в которых контейнеры предлагаются в качестве формата пакета развертывания.
Выбор базового образа
Рекомендации
Вы можете выбрать любой образ, но есть ряд рекомендаций.
Базовые образы для участников программы предварительной оценки Windows
Для каждого базового образа контейнера Майкрософт предоставляет версию для предварительной оценки. В таких образах контейнеров содержатся последние и лучшие доработки функций. Эти образы рекомендуется использовать при запуске узла с версией для предварительной оценки Windows (программа предварительной оценки Windows или Windows Server). Приведенные ниже образы для участников программы предварительной оценки доступны в Docker Hub:
Сравнение образов Windows Server Core и Nano Server
Windows Server Core и Nanoserver — самые распространенные базовые образы. Основное различие между этими образами заключается в том, что в Nano Server поверхность API значительно меньше. В образе Nano Server нет PowerShell, WMI и стека обслуживания Windows.
Сравнение Windows и Windows Server
Размер образа Windows Server (3,1 ГБ) немного меньше, чем образа Windows (3,4 ГБ). Образ Windows Server также наследует все улучшения производительности и надежности образа Server Core, имеет поддержку GPU и не ограничивает число подключений IIS. Чтобы использовать образ Windows Server, вам потребуется установка Windows Server 2022 на базе сборки Insider Preview 20344. Дополнительные сведения см. на странице загрузки Windows Insider Preview.
Источник
Container Base Images
Windows offers four container base images that users can build from. Each base image is a different type of the Windows or Windows Server operating system, has a different on-disk footprint, and has a different set of the Windows API set.
Windows Server Core
Nano Server
Windows
Provides the full Windows API set.
Windows Server
Provides the full Windows API set.
Image discovery
All Windows container base images are discoverable through Docker Hub. The Windows container base images themselves are served from mcr.microsoft.com, the Microsoft Container Registry (MCR). This is why the pull commands for the Windows container base images look like the following:
The MCR does not have its own catalog experience and is meant to support existing catalogs, such as Docker Hub. Thanks to Azure’s global footprint and coupled with Azure CDN, the MCR delivers an image pull experience that is consistent and fast. Azure customers, running their workloads in Azure, benefit from in-network performance enhancements as well as tight integration with the MCR (the source for Microsoft container images), Azure Marketplace, and the expanding number of services in Azure that offer containers as the deployment package format.
Choosing a base image
How do you choose the right base image to build upon? For most users, Windows Server Core and Nanoserver will be the most appropriate image to use. Each base image is briefly described below:
Guidelines
While you’re free to target whichever image you want to use, here are some guidelines to help steer your choice:
Base images for Windows Insiders
Microsoft provides «insider» versions of each container base image. These insider container images carry the latest and greatest feature development in our container images. When you’re running a host that is an insider version of Windows (either Windows Insider or Windows Server Insider), it is preferable to use these images. The following insider images are available on Docker Hub:
Windows Server Core vs Nanoserver
Windows Server Core and Nanoserver are the most common base images to target. The key difference between these images is that Nanoserver has a significantly smaller API surface. PowerShell, WMI, and the Windows servicing stack are absent from the Nanoserver image.
Windows vs Windows Server
The Windows Server image (3.1 GB) is slightly smaller in size from the Windows image (3.4 GB). The Windows Server image also inherits all the performance and reliability improvements from the Server Core image, has GPU support, and has no limits for IIS connections. To use the latest Windows Server image, you’ll need a Windows Server 2022 installation. The Windows image is not available for Windows Server 2022.
Источник
C programdata microsoft windows containers baseimages
|
Из них: Из них: Сейчас на сайте: Кто был? |
—>
|
Открыв оснастку управления дисками в последней версии Windows 10, вы неожиданно для себя можете обнаружить базовый диск с файловой системой NTFS и меткой PortableBaseLayer, доступный только для чтения. Этот же диск может быть обнаружен при работе с консольной утилитой Diskpart и прочими сторонними менеджерами дисков. Откуда он и как он мог там появиться, если вы не устанавливали на компьютер дополнительных накопителей и не подключали флешек?
Ответ очень прост.
PortableBaseLayer представляет собой виртуальный диск, автоматически создаваемый и подключаемый в Windows 10 1903 при включении компонента Песочница. Физически этот диск представлен файлом BaseLayer.vhdx — контейнером для хранения файлов виртуальной машины. Его размер в оснастке управления дисками указан 8 Гб, но в реальности он меньше 1 Гб.
Убедиться в его наличии вы можете сами, проследовав в Проводнике по адресу:
C:ProgramDataMicrosoftWindowsContainersBaseImagesID
Где ID — идентификатор компонента.
Если вы не пользуетесь Песочницей, то наверняка захотите отключить PortableBaseLayer.
Встроенной оснасткой управления дисками Windows 10 поддерживается создание, подключение и отключение виртуальных дисков, но PortableBaseLayer диск особый и отключить его с помощью штатной оснастки не получится.
Чтобы от него избавиться, вам нужно деактивировать сам компонент «Песочница Windows».
Откройте командой optionalfeatures оснастку «Включение и отключение компонентов Windows», найдите в списке компонент «Песочница Windows», снимите с него галочку и нажмите «OK».
В результате компьютер будет перезагружен, функция виртуализации отключена, а вместе с ней отключен и виртуальный диск. Сам файл BaseLayer.vhdx, однако, останется в прежнем расположении, поэтому после всего вам нужно будет зайти в указанную выше папку и удалить его вручную. Исключение составляет Windows 10 Домашняя с принудительно установленной в неё Песочницей, в ней описанный способ отключения диска PortableBaseLayer не сработает.
Загрузка…
ДЛЯ ПРОСМОТРА САЙТА РЕКОМЕНДУЕТСЯ ИСПОЛЬЗОВАТЬ: Uran — браузер от uCoz на базе проекта Chromium. | Google Chrome | Opera | Firefox
 Star Wars: Squadrons: Видеообзор |
||
 Gamesblender № 472: Crysis Remastered перенесли после утечки, а Ubisoft показала королевскую битву |
||
 Обзор Windows 10 May 2020 Update – все ближе к совершенству |
||
 Gamesblender 465: ремейк Mafia, нереальные красоты Unreal Engine 5 и показ Ghost of Tsushima |
||
 Streets of Rage 4: Видеообзор |
||
 Predator: Hunting Grounds: Видеообзор |
||
 Gears Tactics: Видеообзор |
||
 XCOM: Chimera Squad: Видеообзор |
||
 10 самых ожидаемых стратегий 2020 года |
||
 Gamesblender 459: Sony снова перенесла The Last of Us Part II, а Mount & Blade II покоряет Steam |
||
 Во что поиграть на этой неделе — 16 июня + Лучшие скидки на игры |
||
 Во что поиграть на этой неделе — 19 января (Street Fighter 5: Arcade Edition, InnerSpace) |
||
 Игромания! ИГРОВЫЕ НОВОСТИ, 26 февраля (Корсары 4, Call of Cthulhu, Five Nights at Freddy’s) |
||
 Игромания! ИГРОВЫЕ НОВОСТИ, 26 августа (Insomniac Games, Microsoft, Rockstar, Denuvo, SW: B II) |
||
 Игромания! Игровые новости, 28 ноября (PS VR, Project Genom, Nintendo Switch, Monster Hunter) |
||
 Во что поиграть на этой неделе — 29 декабря (Rage Room, Disassembly Line, Back to the Egg!) |
||
 Во что поиграть на этой неделе — 17 ноября (Star Wars: Battlefront 2, LEGO Marvel Super Heroes 2) |
||
 Лучшие БОЕВИКИ 2016 |
||
|
Всего материалов: Из них: Из них: Сейчас на сайте: Кто был? |
||
—>
Если на странице вы заметили в посте отсутствие изображений, просьба сообщить , нажав на кнопку. После прочтения материала » Что это за диск PortableBaseLayer в Windows 10 1903 и как его отключить «, можно просмотреть форум и поискать темы по данной игре.
Если вам понравился материал «Что это за диск PortableBaseLayer в Windows 10 1903 и как его отключить», — поделитесь ним с другими.
|
|||||||||||||||||||||||||||||||||||||||||||||||||||||||||||||||||||
| —>Категория : Статьи: Windows 10 | —>Добавил : Фокусник (21.06.2019) | |||||||||||||||||||||||||||||||||||||||||||||||||||||||||||||||||||
| —>Просмотров : 567 | —> Теги : PortableBaseLayer, Windows 10 1903, Windows 10 |
Внимание: Все ссылки и не относящиеся к теме комментарии будут удаляться. Для ссылок есть форум.
Adblock
detector
Windows 10: What is this large folder?
Discus and support What is this large folder? in Windows 10 Support to solve the problem; I noticed this folder contains c. 6GB of files — C:ProgramDataMicrosoftWindowsContainersBaseImages
What’s the purpose of that folder?
132688
Discussion in ‘Windows 10 Support’ started by Steve C, May 16, 2019.
-
What is this large folder?
I noticed this folder contains c. 6GB of files — C:ProgramDataMicrosoftWindowsContainersBaseImages
What’s the purpose of that folder?
-
Files & Folders View as medium or large Icons
To assist you better, we would suggest that you try to follow the steps below:
- Open File Explorer.
- Once you are viewing a folder, right click an empty space within the File Explorer window and select View from the dialogue menu, then choose Large or any icon you wanted to use. Alternatively, you can use the following shortcut keys on the keyboard to
change your View settings:
- CTRL + SHIFT + 1 Extra Large
- CTRL + SHIFT + 2 Large icons
- CTRL + SHIFT + 3 Medium Icons
- CTRL + SHIFT + 4 Small Icons
- CTRL + SHIFT + 5 List
- CTRL + SHIFT + 6 Details
- CTRL + SHIFT + 7 Tiles
- CTRL + SHIFT + 8 Content
3. Once you have the view set, you can make it the default view for
every folder.
4. Click Apply, then click OK.
Update us on the result.
-
Large thumbnails as default to entire folders. Is possible?
Hi Kris,
We’d love to help you out with your concern.
You can set large thumbnails as default by doing the following steps:
- Go to the folder that you want to change the view settings and set it to Large view.
- Click on View tab, then click Options (Note: If a menu drops down, select
Change folder and search options). - From Options, click on the View tab, then click on the
Apply to Foldersbutton. - Click on OK.
Let us know how it goes.
-
What is this large folder?
Gray bar at bottom of each folder in large icons view
- What are the changes made or things you’ve done before the issue start? I ran hitmanpro.
- Do this gray bar displays on all folders and files in the File Explorer?
The gray bar does display on all folders in the File Explorer but not individual files themselves. The gray bar only displays on all folders in view as Extra Large Icons, Large Icons, and Medium Icons. The gray bar does not show when view is either in Small
Icons or List, or Details. - Does the folders and files with the gray bar can still be accessed successfully?
Yes all folders with the gray bar and the individual files in the folders can be accessed.
I am currently running System File Checker and will let you know if that works.
If if doesn’t work then I’ll run DISM or System Update Readiness tool as suggested.
Thank you so much.
*UPDATE*
The results of System File Checker says «Windows Resource Protection did not find any integrity violations.«
Now I’ll run DISM or System Update Readiness Tool as suggested.
What is this large folder?
-
What is this large folder? — Similar Threads — large folder
-
Transferring fairly large folder~60 GB from external HDD to my Android phone, transferring…
in Windows 10 Network and Sharing
Transferring fairly large folder~60 GB from external HDD to my Android phone, transferring…: Hello,I am on Windows 10 64-bit and File Explorer and I have been attempting to transfer a fairly large folder~60 GB from my external HDD1.8 TB total size with ~300 GB remaining to my S20 Ultra 5G464 GB total w/ ~220 GB remaining both of which are connected via USB to a USB… -
Transferring fairly large folder~60 GB from external HDD to my Android phone, transferring…
in Windows 10 Gaming
Transferring fairly large folder~60 GB from external HDD to my Android phone, transferring…: Hello,I am on Windows 10 64-bit and File Explorer and I have been attempting to transfer a fairly large folder~60 GB from my external HDD1.8 TB total size with ~300 GB remaining to my S20 Ultra 5G464 GB total w/ ~220 GB remaining both of which are connected via USB to a USB… -
Transferring fairly large folder~60 GB from external HDD to my Android phone, transferring…
in Windows 10 Software and Apps
Transferring fairly large folder~60 GB from external HDD to my Android phone, transferring…: Hello,I am on Windows 10 64-bit and File Explorer and I have been attempting to transfer a fairly large folder~60 GB from my external HDD1.8 TB total size with ~300 GB remaining to my S20 Ultra 5G464 GB total w/ ~220 GB remaining both of which are connected via USB to a USB… -
Picture folder move error, a couple large folders ‘lost’
in Windows 10 Gaming
Picture folder move error, a couple large folders ‘lost’: My SSD drive is full. So I tried to take a shortcut and move the entire picture folder to a different drive. It worked, or seemed too, but I noticed the SSD card didn’t free up any space. I have determined that some of my folders where I kept my photographs are GONE. They are… -
Picture folder move error, a couple large folders ‘lost’
in Windows 10 Software and Apps
Picture folder move error, a couple large folders ‘lost’: My SSD drive is full. So I tried to take a shortcut and move the entire picture folder to a different drive. It worked, or seemed too, but I noticed the SSD card didn’t free up any space. I have determined that some of my folders where I kept my photographs are GONE. They are… -
Picture folder move error, a couple large folders ‘lost’
in Windows 10 Network and Sharing
Picture folder move error, a couple large folders ‘lost’: My SSD drive is full. So I tried to take a shortcut and move the entire picture folder to a different drive. It worked, or seemed too, but I noticed the SSD card didn’t free up any space. I have determined that some of my folders where I kept my photographs are GONE. They are… -
Extremely slow to load of Downloads folder in Windows 10 containing large files — explorer…
in Windows 10 Network and Sharing
Extremely slow to load of Downloads folder in Windows 10 containing large files — explorer…: It is a very common issue apparently — I have found out the cause for my case, but was not able to come out with a solution. It is quite annoying. please do not bother with posting «set to General Items» solution — it does not work in this case, I have already set up the… -
Extremely slow to load of Downloads folder in Windows 10 containing large files — explorer…
in Windows 10 Gaming
Extremely slow to load of Downloads folder in Windows 10 containing large files — explorer…: It is a very common issue apparently — I have found out the cause for my case, but was not able to come out with a solution. It is quite annoying. please do not bother with posting «set to General Items» solution — it does not work in this case, I have already set up the… -
Extremely slow to load of Downloads folder in Windows 10 containing large files — explorer…
in Windows 10 Software and Apps
Extremely slow to load of Downloads folder in Windows 10 containing large files — explorer…: It is a very common issue apparently — I have found out the cause for my case, but was not able to come out with a solution. It is quite annoying. please do not bother with posting «set to General Items» solution — it does not work in this case, I have already set up the…
Users found this page by searching for:
-
can i delete ProgramDataMicrosoftWindowsContainersBaseImages
,
-
what is C:ProgramDataMicrosoftWindowsContainersBaseImages

This topic has been deleted. Only users with topic management privileges can see it.
Re: Nothing to see
I get the same from yesterday. Windows 10 Pro 1809 17763.194. I tried with latest versions of Opera, Firefox, Chrome all showing same results.
Latest from logs says.
[2018-12-19 19:13:18.919-0360] No tasks to perform.
[2018-12-19 19:16:18.932-0360] Checking in with server
[2018-12-19 19:16:18.933-0360] Server = > ‘agent.vulndetect.com’
[2018-12-19 19:16:18.949-0360] Connecting to server: agent.vulndetect.com
[2018-12-19 19:16:19.741-0360] Server returned 201 =>
[2018-12-19 19:16:19.744-0360] Check-in complete
[2018-12-19 19:16:19.744-0360] Next scheduled check-in is in 3 minutes
[2018-12-19 19:16:19.744-0360] Current configuration:
version:: 0.10.11.0
server : agent.vulndetect.com
guid1::
guid2::
guid3::
checkInInterval : 180 seconds
checkInRetryDelay : 60 seconds
maxCheckInRetryCount : 2
dataRetryDelay : 600 seconds
inspectionWindow : 21600 seconds
timezoneOffset : -360 minutes
serverTime : 2018-12-19 19:16:20 (UTC)
nextInspectionTime : 2018-12-20 13:10:00 (local time)
checkInNow:: false
noFilesystem : false
noRegistry : false
noWinUpdate : false
noSystem : false
noPackage:: true
[2018-12-19 19:16:19.744-0360] No tasks to perform.
@Tom Thanks. It worked now.
Though it scanned some of the Containers sub directories like below, but it did complete — Enumerated filesystem in 15.439ms
Adobe Flash Player 32.0.0.114 Ok
By: Adobe Systems Incorporated
Based on: C:ProgramDataMicrosoftWindowsContainersBaseImages2bf54f2a-aaae-44b6-af12-df9f443cfa5bFilesUsersAll UsersMicrosoftWindowsContainersBaseImages2bf54f2a-aaae-44b6-af12-df9f443cfa5bFilesWindowsSystem32MacromedFlashFlash.ocx
Open product homepage
curl 7.55.1 Insecure
Recommended version: 7.63 Ok
By: haxx.se
Based on: C:ProgramDataMicrosoftWindowsContainersBaseImages2bf54f2a-aaae-44b6-af12-df9f443cfa5bFilesUsersAll UsersMicrosoftWindowsContainersBaseImages2bf54f2a-aaae-44b6-af12-df9f443cfa5bFilesWindowsSystem32curl.exe
Open product homepage
Some are marked as Unknown / Untracked
Microsoft Office 2016	16.0.11126.20200	                   Unknown
Microsoft Outlook 2016	16.0.11126.20266	           Unknown
Microsoft PowerPoint 2016	16.0.11126.20266	   Unknown
Microsoft Word 2016	16.0.11126.20266	                   Unknown
Opera Internet Browser	58.0.3135.53	Untracked Unknown
Amazon Kindle for PC	1.25.1.52064	        Untracked  Ok
@KI108 We now have a new version of the agent, can you please test it and report back to us?
https://test.vulndetect.com/dl/secteerSetup.exe
The new version is NOT available from the normal download location yet.
@Tom Sure, I will once you update the agent. Thanks for looking into it.
@KI108 Sorry for the long wait, we are planning to make improvements to the agent during next week. I hope you have time to test later in the week.
@KI108 Yes, this was expected
We did not have time to work on changes to the agent yet, and this is something that we need to investigate and test properly, before we deploy it.
And I’m afraid that we need to clear an issue or two more before we can fix this one, sorry.
I’ll keep you posted when there is news.
@Tom
It worked this time.
Last CheckIn a minute ago
Last Inspection a minute ago
Next CheckIn in an hour
Next Inspection in a day
Though it did the c: and came back with the bad allocation after all the 0x00000005 => Access is denied.
Also the version still shows version:: 0.10.11.0 in the log. With the back -end changes you mentioned in other post of Nothing to see was this supposed to change?
@Tom
It was set to 08:20 CST and I had changed to 09:20 CST to force it yesterday but it still didn’t do anything.
Last CheckIn 14 minutes ago
Last Inspection 7 days ago
Next CheckIn in 9 minutes
Next Inspection in 9 minutes
Will see what happens in the next 10 minutes
@Tom
I have emailed the log to you. Thanks for looking into it.
@KI108 No, the agent will run if the PC is turned on. So no need for logging in via browser.
But I suppose this could be because even the automatic inspection is failing for you.
Could you send me your log again via email?
@Tom
Another question. Does one need to be logged in through browser for inspections to work? The reason I ask is, I did not login to vulndetect.com for few days and when i logged in today, I see last inspection 6 days ago.
Last CheckIn a minute ago
Last Inspection 6 days ago
Next CheckIn in 11 minutes
For some reason there is an issue in that folder, that cause the structure to recurse / loop endlessly.
We are looking at approaches to avoid following such loops (in a generic way, rather than excluding that specific folder). Due to the holidays a solution is not right around the corner, but it is on the high priority list and we will address it soon.
For the time being I ran Secteer immediate for path C:Program files and again with C:Program Files (x86) to see if any software was not latest and I found two.
After Secunia PSI went away, I have been using PatchMyPC, SUMO, Heimdal Pro to see what needs updating. Unlike Secunia which used to show almost everything, these 3 give bits and pieces and that is why I was looking for a better option.
Thanks for looking into this.
Like Secteer excludes scanning Recycle Bin, similarly this directory structure of Containers needs to be excluded also.
C:ProgramDataMicrosoftWindows
and
C:UsersAll UsersMicrosoftWindows
That’s my thought.
@Tom Once again appreciate your time and patience in resolving these issues.
C:ProgramDataMicrosoftWindowsContainers
Directory of C:ProgramDataMicrosoftWindowsContainers
10/02/2018 11:00 PM <DIR> .
10/02/2018 11:00 PM <DIR> ..
12/21/2018 06:47 PM <DIR> BaseImages
12/22/2018 11:54 AM <DIR> Dumps
12/21/2018 08:20 PM <DIR> Sandboxes
12/21/2018 08:20 PM <DIR> Zygotes
0 File(s) 0 bytes
6 Dir(s) 230,609,969,152 bytes free
Directory of C:ProgramDataMicrosoftWindowsContainersBaseImages
12/21/2018 06:47 PM <DIR> .
12/21/2018 06:47 PM <DIR> ..
12/21/2018 06:47 PM <DIR> 81d3cadc-05e5-4680-9e82-e479c73896b6
0 File(s) 0 bytes
Directory of C:ProgramDataMicrosoftWindowsContainersBaseImages81d3cadc-05e5-4680-9e82-e479c73896b6
12/21/2018 06:47 PM <DIR> .
12/21/2018 06:47 PM <DIR> ..
12/21/2018 06:46 PM <DIR> Files
12/21/2018 06:47 PM <DIR> Snapshot
12/21/2018 06:46 PM 4,194,304 SystemTemplate.vhdx
12/21/2018 06:46 PM 75,497,472 SystemTemplateBase.vhdx
2 File(s) 79,691,776 bytes
4 Dir(s) 230,609,874,944 bytes free
File folder
C:ProgramDataMicrosoftWindows
3.23 GB (3,469,314,133 bytes)
10,497 Files, 1,134 Folders
Read-only (Only applies to files in folder)
These were Containers Properties under C:ProgramDataMicrosoftWindows
Basically it starts of with 34% memory and slowly increased around 80%, before it quit with bad allocation. The Secteer itself starts of around 2 MB or so and slowly went past 2000 MB or so.
Mostly it was c:ProgramDataMicrosoftWindows… or UsersAll UsersMicrosoftWindowsContainersBaseImagese5ee5788-c3b5-420c-9baa-16c0eee19a9e which was doing recursively inside up to 23 times in one path like below
[2018-12-21 18:10:58.180-0360] Error (a) enumerating directory ‘c:UsersAll UsersMicrosoftWindowsContainersBaseImagese5ee5788-c3b5-420c-9baa-16c0eee19a9eFiles
UsersAll UsersMicrosoftWindowsContainersBaseImagese5ee5788-c3b5-420c-9baa-16c0eee19a9eFiles
UsersAll UsersMicrosoftWindowsContainersBaseImagese5ee5788-c3b5-420c-9baa-16c0eee19a9eFiles
UsersAll UsersMicrosoftWindowsContainersBaseImagese5ee5788-c3b5-420c-9baa-16c0eee19a9eFiles
UsersAll UsersMicrosoftWindowsContainersBaseImagese5ee5788-c3b5-420c-9baa-16c0eee19a9eFiles
UsersAll UsersMicrosoftWindowsContainersBaseImagese5ee5788-c3b5-420c-9baa-16c0eee19a9eFiles
UsersAll UsersMicrosoftWindowsContainersBaseImagese5ee5788-c3b5-420c-9baa-16c0eee19a9eFiles
UsersAll UsersMicrosoftWindowsContainersBaseImagese5ee5788-c3b5-420c-9baa-16c0eee19a9eFiles
UsersAll UsersMicrosoftWindowsContainersBaseImagese5ee5788-c3b5-420c-9baa-16c0eee19a9eFiles
UsersAll UsersMicrosoftWindowsContainersBaseImagese5ee5788-c3b5-420c-9baa-16c0eee19a9eFiles
UsersAll UsersMicrosoftWindowsContainersBaseImagese5ee5788-c3b5-420c-9baa-16c0eee19a9eFiles
UsersAll UsersMicrosoftWindowsContainersBaseImagese5ee5788-c3b5-420c-9baa-16c0eee19a9eFiles
UsersAll UsersMicrosoftWindowsContainersBaseImagese5ee5788-c3b5-420c-9baa-16c0eee19a9eFiles
UsersAll UsersMicrosoftWindowsContainersBaseImagese5ee5788-c3b5-420c-9baa-16c0eee19a9eFiles
UsersAll UsersMicrosoftWindowsContainersBaseImagese5ee5788-c3b5-420c-9baa-16c0eee19a9eFiles
UsersAll UsersMicrosoftWindowsContainersBaseImagese5ee5788-c3b5-420c-9baa-16c0eee19a9eFiles
UsersAll UsersMicrosoftWindowsContainersBaseImagese5ee5788-c3b5-420c-9baa-16c0eee19a9eFiles
UsersAll UsersMicrosoftWindowsContainersBaseImagese5ee5788-c3b5-420c-9baa-16c0eee19a9eFiles
UsersAll UsersMicrosoftWindowsContainersBaseImagese5ee5788-c3b5-420c-9baa-16c0eee19a9eFiles
UsersAll UsersMicrosoftWindowsContainersBaseImagese5ee5788-c3b5-420c-9baa-16c0eee19a9eFiles
UsersAll UsersMicrosoftWindowsContainersBaseImagese5ee5788-c3b5-420c-9baa-16c0eee19a9eFiles
UsersAll UsersMicrosoftWindowsContainersBaseImagese5ee5788-c3b5-420c-9baa-16c0eee19a9eFiles
UsersAll UsersMicrosoftWindowsContainersBaseImagese5ee5788-c3b5-420c-9baa-16c0eee19a9eFiles
UsersWDAGUtilityAccountAppDataLocalApplication Data’ : 0x00000005 => Access is denied.
@Tom
As mentioned in chat
Running immediate
with «C:» gave
[2018-12-21 18:05:10.392-0360] Enumerating ‘c:’
[2018-12-21 18:05:10.419-0360] Recycle Bin: c:$Recycle.Bin
[2018-12-21 18:05:10.421-0360] Skipping ‘c:$Recycle.Bin’, since it is a Recycle Bin
[2018-12-21 18:05:10.442-0360] Error (a) enumerating directory ‘c:Documents and Settings’ : 0x00000005 => Access is denied.
[2018-12-21 18:05:21.171-0360] Error (a) enumerating directory ‘c:ProgramDataApplication Data’ : 0x00000005 => Access is denied.
[2018-12-21 18:05:21.173-0360] Error (a) enumerating directory ‘c:ProgramDataDesktop’ : 0x00000005 => Access is denied.
[2018-12-21 18:05:21.174-0360] Error (a) enumerating directory ‘c:ProgramDataDocuments’ : 0x00000005 => Access is denied.
[2018-12-21 18:05:21.768-0360] Error (a) enumerating directory ‘c:ProgramDataMicrosoftDiagnosisFeedbackHub’ : 0x00000005 => Access is denied.
Error (a) enumerating directory ‘c:ProgramDataMicrosoftDiagnosisTenantStorageP-ARIA’ : 0x00000005 => Access is denied.
[2018-12-21 18:05:21.769-0360] Error (a) enumerating directory ‘c:ProgramDataMicrosoftDiagnosisTimeTravelDebuggingStorage’ : 0x00000005 => Access is denied.
[2018-12-21 18:05:21.968-0360] Error (a) enumerating directory ‘c:ProgramDataMicrosoftWindowsContainersBaseImagese5ee5788-c3b5-420c-9baa-16c0eee19a9eFilesDocuments and Settings’ : 0x00000005 => Access is denied.
[2018-12-21 18:05:22.381-0360] Error (a) enumerating directory ‘c:ProgramDataMicrosoftWindowsContainersBaseImagese5ee5788-c3b5-420c-9baa-16c0eee19a9eFilesProgramDataApplication Data’ : 0x00000005 => Access is denied.
[2018-12-21 18:05:22.381-0360]
Just for the record, this answer was sent in the private chat to @KI108 :
The «Error => bad allocation» you see in the log, that is due to the agent not being able to allocate memory.
This puzzles us as it doesn’t use more than 40MB on any of our test boxes, we have really done a lot to limit the memory footprint.
But, this lead us to look at another thing, it is spending around 10 minutes enumerating your filesystem, this usually takes less than a minute, depending on type of drive, system load and number of apps and AV products. Regardless, 10 minutes seems to be a very long time compared to what we normally see.
We suspect there may be a «looping path issue» or multiple symlinks to directories with a lot of files. But this is guess work.
I would appreciate is you could do two things:
-
Monitor the RAM usage in task manager while running the «secteer.exe —immediate»
-
Run
secteer.exe --immediate --path="c:program files"
or
secteer.exe --immediate --path="c:program filesmozilla firefox"
or something else specifc
@Tom
Sent. Thanks for looking into my issue. I appreciate your time and patience to try and resolve it.
@KI108 Could you send me your hostname in the chat, then I will go see what we get in the server logs
@Tom
Yes there is authToken in there. I had removed it for posting to the website. But in configuration it just lists
Last Agent IP Address
I removed it here
Last CheckIn
a minute ago
Last Inspection
2 days ago
Next CheckIn
in an hour
Next Inspection
in a day
Host name
I removed it here
Days of week to run inspections
Monday
Tuesday
Wednesday
Thursday
Friday
Saturday
Sunday
Hour of day to run inspections
: 15:45 —> I have changed it multiple times and tried
Inspections will run at this time each selected day.
I have changed the Hour of day to run the inspections multiple times to the nearest increment , Installed secteersetup.exe multiple times etc. . but still the same.
I don’t see anything in Configurations to setup.
Per one of the notes i had run — immediate command and it said it sent it to vulndetect yesterday. But still nothing happens.
Thanks for the any help.
Last Updated on February 7, 2022 by rudyooms
After seeing Damien van Robaeys doing some awesome stuff with Windows Sandbox, I noticed I didn’t write anything about Windows Sandbox…. Even while I was using it for a while now. So, I decided to do a blog about it.
I will divide this blog into multiple parts:
1.Information about Sandbox
2.Installation of Sandbox
3.How to configure Sandbox?
4.Adding/Changing files/Registry settings in the sandbox Baseline
5.Improving the use of sandbox
6.What you thought wasn’t working with sandbox?
1. Information About Sandbox
Windows Sandbox provides a lightweight desktop environment to safely run applications in a nice protected and isolated environment. You can run sandbox on Windows 10 pro/enterprise or education. Software installed inside the Windows Sandbox environment remains “sandboxed” and runs separately and isolated from the host machine.
The sandbox instance is a dynamically generated image that uses the files from the host filesystem itself. Most OS files are immutable and can be freely shared with Windows Sandbox.
More on this (Reparse points) later.
Sandbox doesn’t have persistent storage, so running Windows Sandbox is temporary. When it’s closed, all the software and files and the config is deleted. You get a brand-new sandbox instance every time you open it. But I guess that one is obvious when looking at this warning when closing Sandbox
When taking a good look at Windows Sandbox you could say it looks much like Application Guard for Office apps. WDAG also launches an Office instance in an isolated environment. And like I told in this blog about Credential Guard: “Virtualization is just like segmentation”
Now we know, Sandbox is almost the same as Windows Defender Application Guard, let’s look at what 3 components it uses to deliver us this fantastic product
*CMservice.DLL
*VMcompute.exe
*VMWP.exe
You could see it for yourself by opening the task manager and take a look at all the running processes.
And by opening “services.msc” You could take a guess where CMService stands for. If that service isn’t running, Sandbox will not work!
Okay, now we are pretty sure it’s “just” a Virtual Machine, there should be a virtual hard disk somewhere with it. And yes there is, open explorer and browse to:
C:ProgramDataMicrosoftWindowsContainersSandboxes
You will notice when you are not running Sandbox only one folder exists and when starting sandbox it will create a second one
Let’s try to open/mount the huge 4 MB VHDX to take a look at what’s inside.
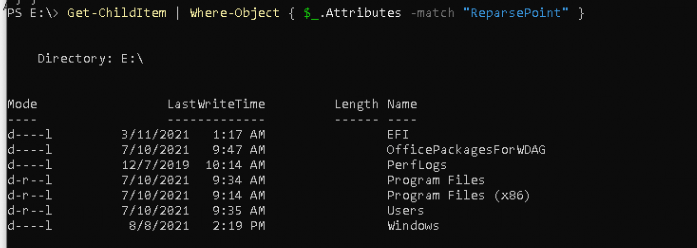
Did you notice the nice grey crosses and the attributes?
These grey crosses are telling us these folders are Reparse Points. A reparse point is best explained as a symbolic link/windows shortcut. It will make sure these folders are linked to the host itself. I guess that’s why the image isn’t that big.
Please note software and applications installed on the host aren’t directly available in the sandbox. If you need specific applications available inside the Windows Sandbox environment, they must be explicitly installed within the environment. More on this on what I am missing in Windows Sandbox and how to improve Sandbox…
2. Installation of Sandbox
It’s very nice to know some background information but we still need to test it. Let’s start the installation of Sandbox.
You can open Powershell and run this command to Install Sandbox
Get-WindowsOptionalFeature -online -FeatureName Containers-DisposableClientVM
Or if you prefer the GUI option:
Of course, when you want to run sandbox inside a VM (just like me) you need to make sure hyper-v nesting is enabled
Set-VMProcessor -VMName <VMName> -ExposeVirtualizationExtensions $true
3.How to configure Sandbox?
Now we know it’s very easy to install Sandbox we need to know some background information to understand how to configure sandbox. When launching sandbox without any modifications, it will spin up a default image.
However, many times you want to redirect some folders or make sure a startup script is launched when launching sandbox. When you want to make use of some additional folders and installation media, you can use config files that allow you to customize the sandbox during startup.
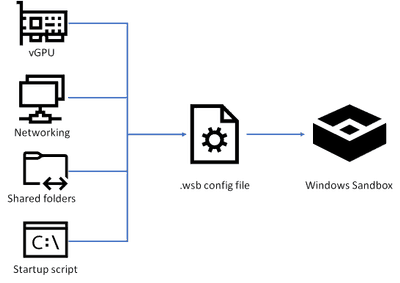
The sandbox configuration files are formatted as XML and use the .wsb file extension. Of course, you can specify multiple different settings to configure the Windows Sandbox.
I guess this picture explains it all!
So you can configure all options you want in a WSB config file and just double-click on it to start Windows Sandbox with all your defined settings.
Let’s look at this XML file example and how to configure it
<Configuration>
<VGpu>Default</VGpu>
<Networking>Default</Networking>
<MappedFolders>
   <MappedFolder>
     <HostFolder>C:Usersrudyoomsdesktopsandbox</HostFolder>
     <ReadOnly>true</ReadOnly>
   </MappedFolder>
</MappedFolders>
<LogonCommand>
   <Command>explorer.exe C:usersWDAGUtilityAccountDesktopdesktop</Command>
</LogonCommand>
</Configuration>
I will point out the 2 most important options you can configure:
Shared Folders – This will share a folder from the host with the guest and you can specify if it has read or write permissions.
Startup Script – This script/command will be launched when a sandbox instance spins up
Let’s explain what happens when we launch sandbox with the XML configuration, I showed you above:
My desktop folder sandbox from my host machine (C:UsersrudyoomsDesktopsandbox) will be read-only redirected/mapped to the wdagutilityaccount desktop folder (C:UsersWDAGUtilityAccountDesktopDesktop) of the sandbox guest instance.
When specifying the command “explorer.exe C:usersWDAGUtilityAccountDesktopDesktop” it will open explorer in the desktop folder.
4.Adding/Changing installation files to the Sandbox Baseline
As you know by now, when you launch sandbox, a new clean instance will be started. If we don’t want to use the “shared folder” option, how are we going to add some files to the baseline? There is always another way to get more sand in the sandbox!
It will only take 5 little steps
- We need to stop the CMservice I showed you earlier before we could change anything, so let’s do so.
2. Open/mount/double click on the baselayer.vhdx. You can find this file inside the C:ProgramDataMicrosoftWindowsContainersBaseImagesguid folder
3. Add files to a specific existing folder as I show below
4. While at it we are also changing the default PowerShell execution policy, otherwise you will need to change it every time sandbox launches. To do so Open Regedit, Click/open the “HKLM” and Click on “file” and “load hive”
and select the “ntuser.dat” from .FilesUsersWDAGUtilityAccountntuser.dat
5. Give it a name and browse to the name you gave it (in the example, I am using “testkey”)
6. Create some new keys as I show below inside the softwaremicrosoft key.
7. After you have created the keys, let’s add the strings necessary to configure the default PowerShell Execution Policy. To do this you will need to create 2 new strings: “Executionpolicy” and “Path”
8. Make sure you unload the registry “hive” and unmount the baselayer.vhdx from your device
9. Start the “Cmservice” service again and open a sandbox instance and you will notice the files you added are persistent available in the container, now let’s check the default PowerShell Execution Policy!
5.Improving the use of Sandbox
As told at the beginning of this blog, I love the possibility of testing an Intunewin file in Windows Sandbox. There could only be one person who created this beautiful tool: Damien!
Download and install it now!
RunInSandbox: Run PS1, VBS, EXE, MSI, intunewin, extract ZIP, share folder directly in Windows Sandbox from a right-click | Syst & Deploy (systanddeploy.com)
The only thing you will need to do after the installation is right-clicking on the file and click on test the intunewin in sandbox and put in the install command.
UPDATE 22-08-2021
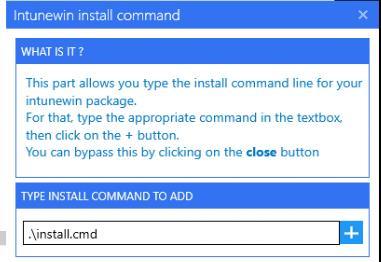
After talking to Damien, We noticed there was some confusion about the install command. I am using PowerShell a lot! When you need to launch a Script from within a PowerShell session you will need to enter it like this: “. ” So I did it without even thinking…
But of course, you could also just enter the normal install command: msiexec /i “msifile.msi”/q
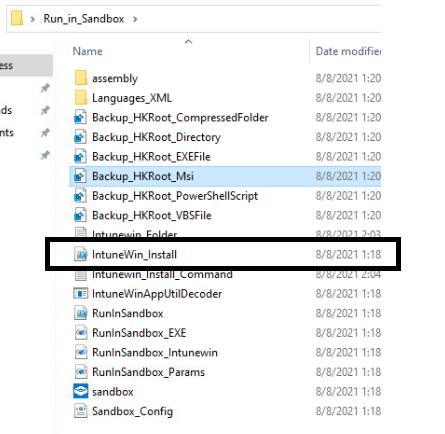
It will launch a sandbox instance and it will try to install the package. If it’s not working and you need to start troubleshooting why… just open Powershell as admin and browse to the “run_in_sandbox” desktop folder. You will notice the Intunewin_install script.
When running this script, it will extract the intunewin file to the c:windowstempintunewin folder and from there you could continue to troubleshoot the installation even further!
I love this tool.
6. What you thought wasn’t working with Sandbox?
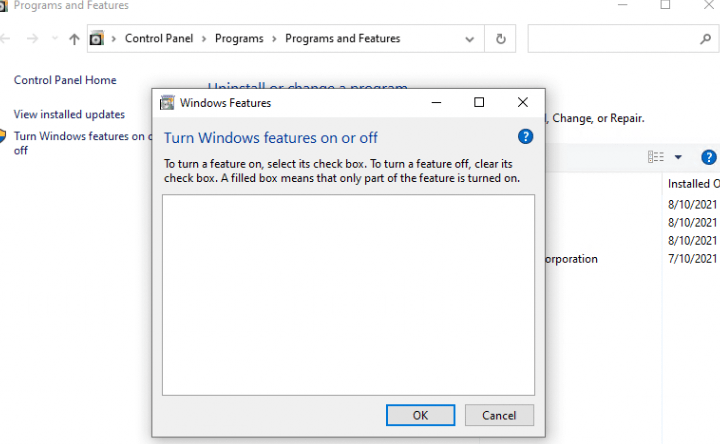
In my opinion not that much, except for one very important Windows Feature! And that one important could be Dot.Net Framework 3.5.
Or run PowerShell to detect which Dot.Net framework versions are installed.
Get-ChildItem ‘HKLM:SOFTWAREMicrosoftNET Framework SetupNDP’ -recurse |
Get-ItemProperty -name Version,Release -EA 0 |
Where { $_.PSChildName -match ‘^(?!S)p{L}’} |
Select PSChildName, Version, Release
You could ask why I want/need to have Dot.net framework 3.5 inside my sandbox? There could be only one reason, you would think of: PowerShell App Deployment Toolkit (PSADT)!
So why not install Dot.Net manually? You will need to make sure you have enabled the trusted installer when you are installing additional features. You could try it for your own (even when I can tell you it’s not going to work)
Set-Service -Name "Trustedinstaller" -Status running -StartupType automatic
md c:install
$download_url = "https://download.microsoft.com/download/2/0/E/20E90413-712F-438C-988E-FDAA79A8AC3D/dotnetfx35.exe"
$local_download_url = "c:installdot35.exe"

$wc = New-Object net.webclient
$wc.Downloadfile($download_url, $local_download_url)
c:installdot35.exe /q /norestart
Or use the DISM tool, but both will fail:
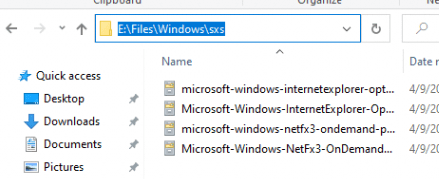
And here is why…. C:windows may not point to a valid Windows folder…
But luckily!!, it’s a good thing when you don’t move or rename the deploy-application.exe, you don’t need to have dot.net 3.5 installed!
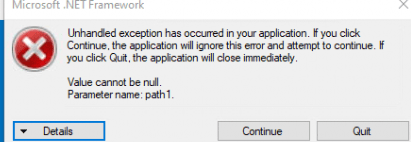
If you choose to rename or move it, it will prompt you for the Dot.net requirement. To resume, you could still test Win32 applications which are deployed with PSADT. But of course, when you are testing win32 applications with a dot.net 3.5 requirement like for example Snelstart, they will give you some dot.net framework errors!
Conclusion
When you are deploying Win32 Apps daily you will know by now what can go wrong but if things go south you will need to know why. Sandbox is the way to go to test the deployment and installation of your Win32 packages even when Dot.net 3.5 is missing
I guess I am going to tell you it once again: Damien his solution is a great addon when using sandbox!



 Парней 1124
  Девушек 303