Проблема
При запуске компьютера может появляться следующее сообщение об ошибке.
Нет диска в устройстве. Вставьте диск в устрйоство DeviceharddiskDr1.
При попытке распечатать документ Microsoft Word появляется следующее сообщение об ошибке.
CiceroUIWndFrame,WINWORD.EXENoDiskDeviceHarddisk1DR1
Причина
Подобное поведение наблюдается в случае выполнения следующих условий.
-
Наличие съемного дисковода, такого как Zip-дисковод lomega, обозначенного буквой C.
-
Отсутствие в съемном дисководе съемного диска.
Решение
Для решения этой проблемы воспользуйтесь одним из описанных ниже способов.
-
Перед запуском компьютера вставьте съемный диск в съемный дисковод.
-
Обозначьте съемный дисковод другой буквой, отличной от буквы C.
Чтобы изменить в Windows XP букву, обозначающую дисковод, выполните следующие действия.
-
Войдите в систему с учетной записью администратора.
-
Вставьте диск в съемный дисковод.
-
В меню Пуск щелкните правой кнопкой мыши пункт Мой компьютер и выберите команду Управление.
-
Щелкните значок Управление дисками.
-
Правой кнопкой мыши щелкните раздел диска, логический диск или том, который требуется изменить, и выберите команду Изменить букву диска или путь к диску.
-
Выберите съемный дисковод, нажмите кнопку Изменить, выберите для него нужную букву диска и нажмите кнопку OK.
-
Статус
Данное поведение является подтвержденной ошибкой продуктов Майкрософт, перечисленных в начале данной статьи.
Нужна дополнительная помощь?
If you are on this page, probably you are suffering this “there is no disk in the drive” issue and try to figure it out. Well, in this article, you will learn a few solutions that may be helpful to solve no disk error Windows 7/8/10.
Error – There Is No Disk in the Drive
When you start your computer, you may receive the following error message:
“There is no disk in the drive. Please insert a disk into drive DeviceHarddiskDr.”
This comes in the form of a popup, and even you click the option to cancel, retry, or continue, you only make the popup continue to come up. The only way to exit the pop-up window is to close the process in Task Manager.
According to a survey, many Windows users are troubled by the error “there is no disk in the drive, please insert a disk into drive”. If you do a Google search, you will find a lot of confusing information related to this issue. Here is an example we extracted from community.spiceworks.com:
I just installed Spiceworks on my Win 7 machine and now I am getting an error:
“spiceworks.exe — No Disk
There is no disk in the drive. Please insert a disk into drive DeviceHarddisk1DR1”
Read a few other posts about this but doesn’t seem to be working for me.
Let me know what kind of answers you guys find? Thanks!
Possible Causes for No Disk Error Windows 7/8/10
Generally speaking, this is caused by a removable disk that contains no media. According to support.microsoft.com, “there is no disk in the drive” can occur when either of the following conditions is true:
- You have a removable drive configured as drive letter C.
- You do not have a removable disk in the removable disk drive.
Tip: The removable disk here includes external hard drives, USB drives, floppy disk drives, optical drives and USB multi-card readers.
In light of these potential factors that cause this irritating error, we decide to assist you with the best resolutions to fix there is no disk in the drive.
Solution 1. Restart Computer
Have you tried restarting the machine? The Windows popup appears because the application is attempting to scan all of the listed drives. If a drive was probably removed without the OS being aware, no disk in drive error Windows 10/8/7 appears. Restarting Windows probably fixes it right away.
Are you using some sorts of removable media on this machine, like a USB hard drive or CD ROM device? In addition, mobile phones being connected to your PC sometimes can also cause this issue. Get them off your PC and have a check.
Solution 3. Upgrade or Uninstall
This way is put forward by Spiceworks users. Usually, when seeing such an error message, we would suspect the problem lies in the application mentioned in the pop-up window. According to Spiceworks users’ description, after upgrading the Spiceworks to the latest version, “there is no disk in the drive” error no longer happening.
But to some users, only uninstalling makes sense. When they reinstall, the error comes back. So we suggest having a try on upgrading the application which brings the error message to the latest version or uninstalling it and then having a check.
Solution 4. Edit Registry
By Google search, you will find this solution is mentioned in several Windows support forums and YouTube channels. Altering your Windows Registry can turn off the error message, not knowing what problem this would cause.
Tip: If a problem occurs after altering Windows Registry, then you can reverse this fix.
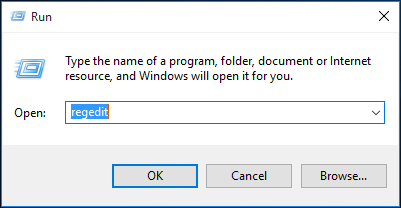
Step 1. Press Win + R keys to call out the Run box. Then type “regedit” in the blank and press OK. Registry Editor will require the user account control, click “Yes” when you see it.
Step 2. Now follow this path to reach the ErrorMode key and make the changes:
“HKEY_LOCAL_MACHINESYSTEMCurrentControlSetControlWindows”
- Navigate to ErrorMode in the right panel.
- Double click on it and change the value data from 0 to 2.
- Then change the Base from “Hexadecimal” to “Decimal”.
- Finally, press “OK” to save this change.

Exit Registry Editor and check if “there is no disk in the drive” issue persists. If this solution does not help, continue reading the next one.
Solution 5. Disable Unused Drive in Device Manager
If you have multiple USB media connected and some of them you will never use, you may consider disabling such drives.
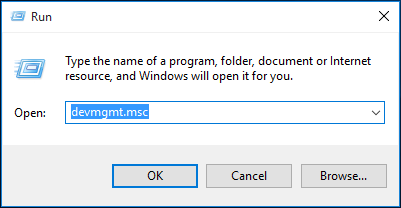
Step 1. Press Win + R to open the Run dialog. Then type “devmgmt.msc” and click OK.
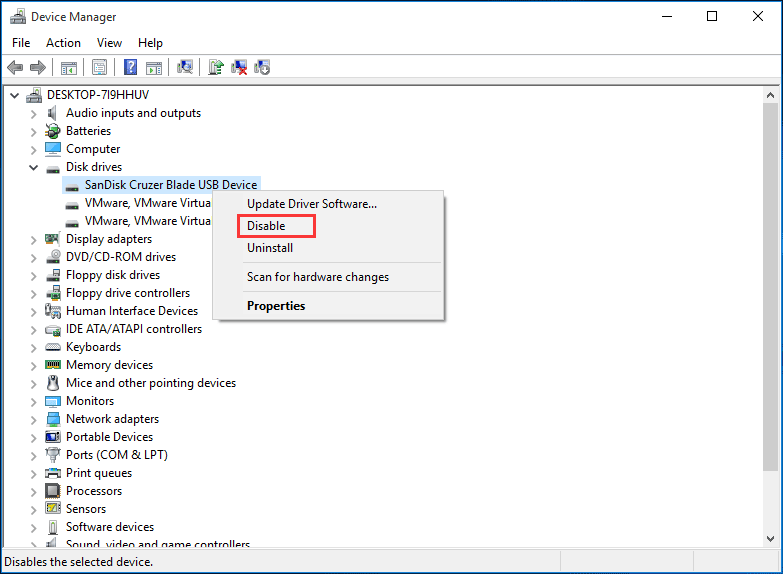
Step 2. In the Device Manager window, expand Disk Drives and find the removable drive which keeps reporting “there is no disk in the drive” issue. Then right-click on it and select “Disable”.
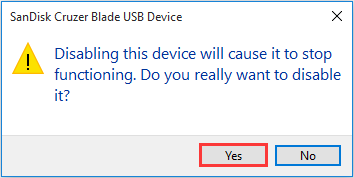
Step 3. Immediately you will receive a message saying “Disabling this device will cause it to stop functioning. Do you really want to disable it?” At this time, click “Yes”.
Step 4. After rebooting, check out whether this issue is solved or not.
Tip: Next time when you need to use this removable disk, you just connect it to your machine, go back to Device Manager and then enable the removable disk.
Solution 6: Change Drive Letter
Like what we have mentioned in the above content, if the drive letter C is assigned to another removable disk, “there is no disk in the drive” issue can also appear.
To resolve no disk in drive error Windows 10/8/7, change the drive letter assignment for the removable drive to any letter other than C. You can use one of the following methods:
Use Partition Manager
First of all, you may consider employing a professional yet free partition manager to do this as such software usually brings easier operations. Here MiniTool Partition Wizard is recommended.
MiniTool Partition Wizard offers a user-friendly interface and easy-to-follow instructions. With this freeware, the problem of there is no disk in the drive can be perfectly solved.
Download and install it on the computer first and follow the wizard below.
Free Download
- Launch MiniTool Partition Wizard Free to get its main interface.
- Select the partition you want to change its drive letter and choose “Change Drive Letter” from the action panel.
- In the pop-up window, drop down the New Drive Letter box and choose a drive letter you prefer. Then press “OK” to confirm.
- Click “Apply” to save this change.
Use Disk Management
In addition to using third-party partition manager, Windows troubleshooting Disk Management utility is a good choice for you to reset drive letter. Here you just need to follow the simple steps below:
- Insert a removable disk before you start the computer. Then log on to the computer as Administrator.
- Right-click on This PC, click Manage and then Disk Management under Storage.
- Right-click the partition or volume on the removable disk you want to change, and then click “Change Drive Letter and Paths” from the context menu.
- In the pop-up window, click “Change” and then choose the drive letter you want to use and click “OK”.
- Click “Yes” when you receive the message that reads “Some programs that rely on drive letters might not run correctly. Do you want to continue?” Disk Management will finish this job within one minute.
Solution 7. Reformat the Hard Drive
Formatting is helpful and necessary when your removable drives become corrupted, unreadable, inaccessible so that “there is no disk in the drive” error occurs. However, formatting will definitely lead to data loss.
Here you can employ the “Copy Partition” feature of MiniTool Partition Wizard to back up the hard drive.
Free Download
Step 1. Select the removable disk from which you need to save data and choose “Copy Partition” from the action panel.

Step 2. In the pop-up window, choose an unallocated space which is large enough to save all data on the removable disk and click “Next”. (Tip: if there is no unallocated space, you may have to use “Move/Resize Partition” feature to shrink a partition for enough unallocated space.)
Step 3. Here you can adjust the newly created partition size by dragging the slider bar or keep it that way and click “Finish”.
Step 4. Back to the main interface, you can preview the newly created partition which will hold all data on the removable disk. Finally, you can click “Apply” to execute the partition copy.
Tip: If there is more than one partition located on the removable drive, use “Copy Disk” feature instead. If there are just a few files you need, you can totally use Copy & Paste way to save important data to a safe location.
After making data backup, it is time to do the formatting.
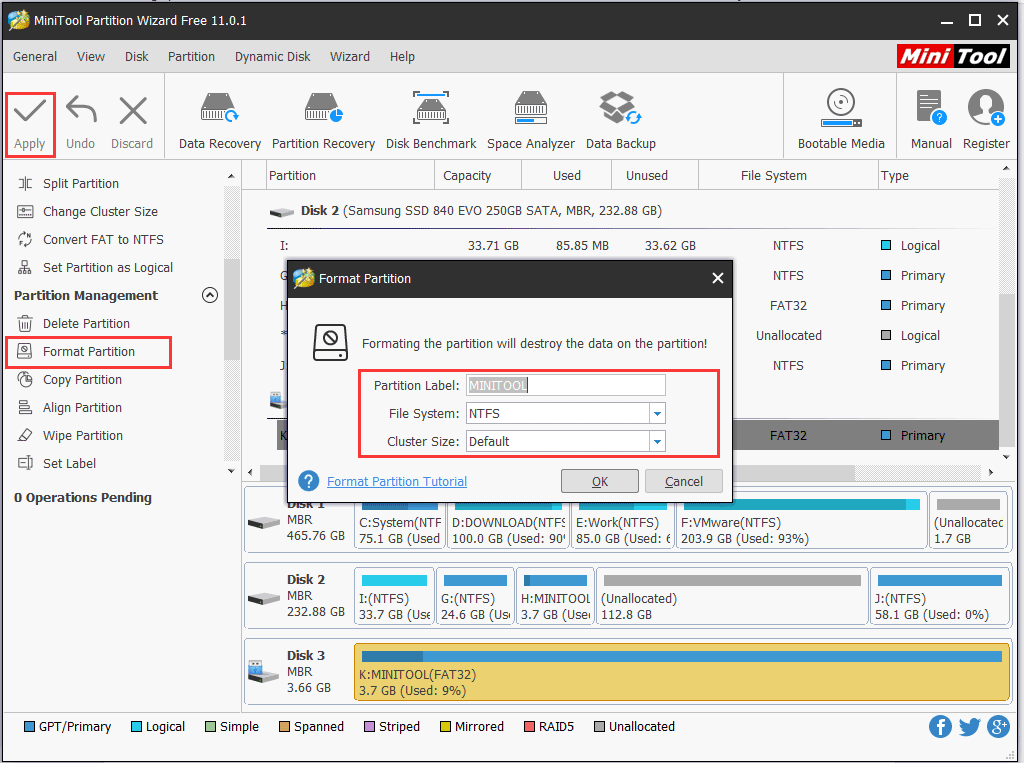
- Select the drive to be formatted and choose “Format Partition” from the action panel.
- In the pop-up window, select a file system and click “OK” button to go back to the main interface.
- Finally, you need to click “Apply” button to start the formatting.
Solution 8. Check Disk Errors
It is not impossible that some disk errors can also bring “there is no disk in the drive” error. Luckily, with MiniTool Partition Wizard, you can easily have a check for the removable disk and fix some errors.
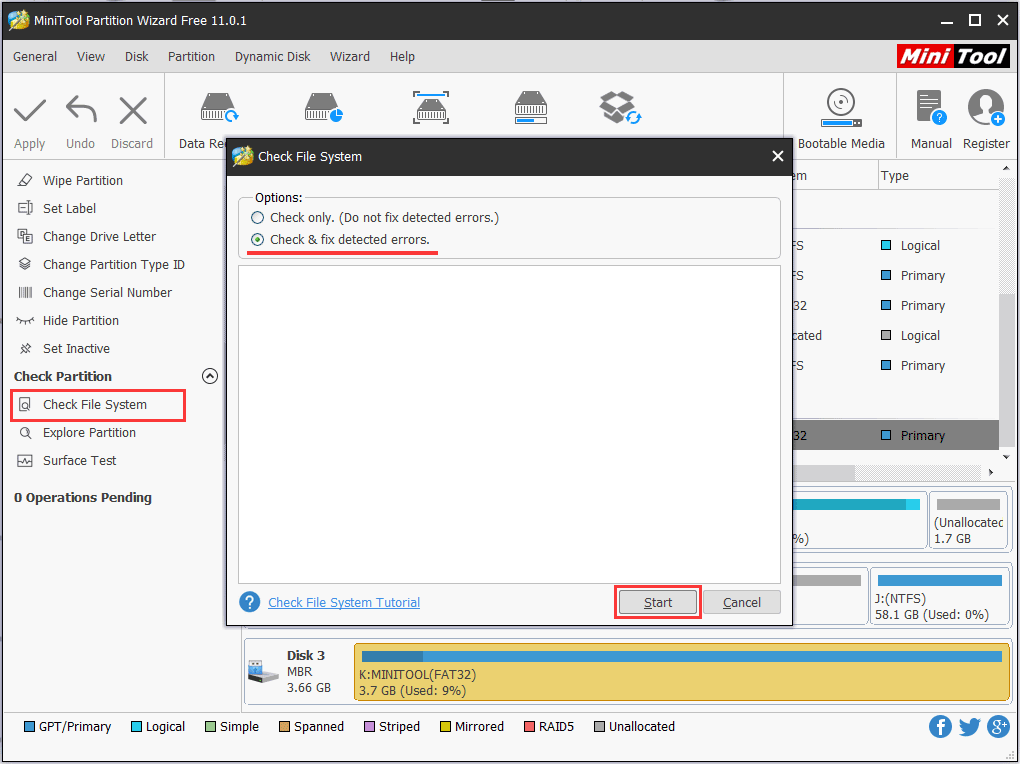
Check File System
- In the main interface of MiniTool Partition Wizard Free, find the removable disk that keeps reporting no disk in the drive error and choose “Check File System” from the action panel.
- In the pop-up window, select an option to check the file Here we recommend choosing “check & fix detected errors”.
- Finally, click the “Start” button and wait for MiniTool Partition Wizard to finish.
Check Bad Sectors
Also, you may wonder if there are some bad sectors on the hard drive, leading to no disk error Windows 7/8/10. Here MiniTool Partition Wizard Free can make detection of a disk or partition for sector errors. After the test completes, a report will be produced.
- Select the removable disk which you suspect the existence of bad sectors and choose “Surface Test” from the action panel.
- In the pop-up window, click “Start Now” and this partition manager will start scanning every sector of the selected hard drive, checking for bad sectors. For hard disk errors, they will be marked with red blocks.
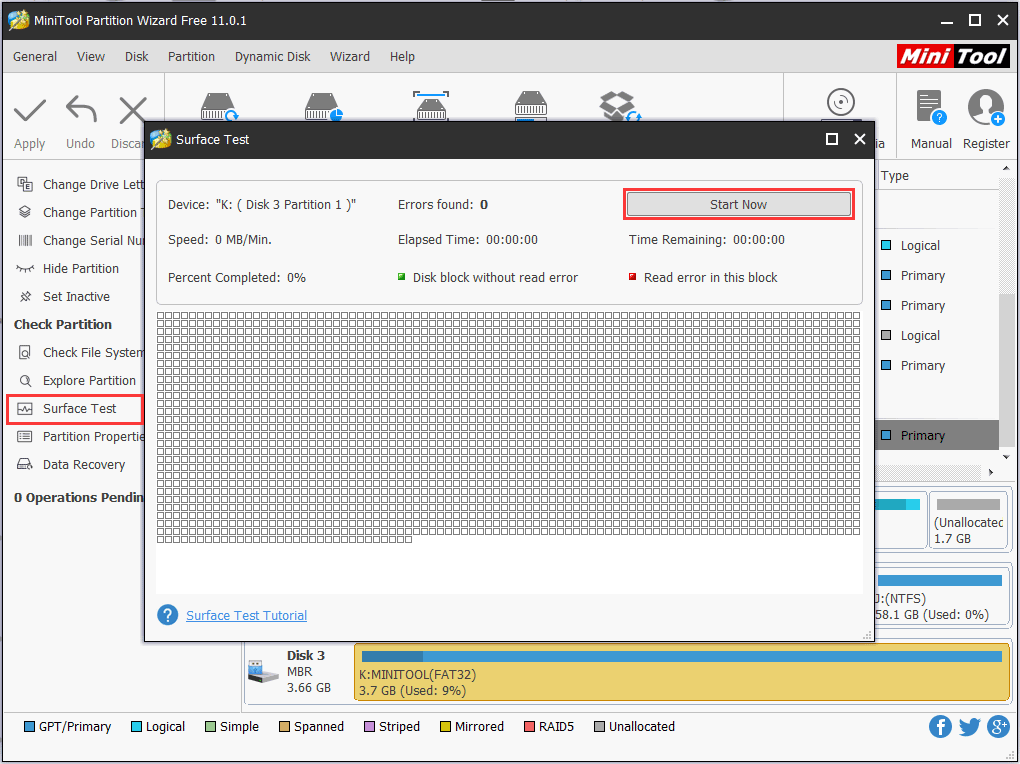
When the scanning is finished, you know the health condition of your disk and whether you need to replace the hard drive. If there are bad sectors on the removable disk, you should seek for professional aid to shield these sectors. If you intend to abandon this disk, data rescue should be the first concern.
Tip: “Surface Test” feature is very helpful in resolving Boot Device Not Found issue.
“I found several useful solutions that should be very helpful to you guys to address ‘no disk in the drive issue’. Here I would like to share them with all of you.”Click to Tweet
Summary
Reading here, we guess you have learned some solutions to fix “there is no disk in the drive, please insert a disk into drive” error. If you have a nice suggestion, welcome to leave it in the following comment section, this would help more users.
For any questions towards using MiniTool Partition Wizard, please contact us by sending an email to [email protected]. Thanks in advance!
If you are on this page, probably you are suffering this “there is no disk in the drive” issue and try to figure it out. Well, in this article, you will learn a few solutions that may be helpful to solve no disk error Windows 7/8/10.
Error – There Is No Disk in the Drive
When you start your computer, you may receive the following error message:
“There is no disk in the drive. Please insert a disk into drive DeviceHarddiskDr.”
This comes in the form of a popup, and even you click the option to cancel, retry, or continue, you only make the popup continue to come up. The only way to exit the pop-up window is to close the process in Task Manager.
According to a survey, many Windows users are troubled by the error “there is no disk in the drive, please insert a disk into drive”. If you do a Google search, you will find a lot of confusing information related to this issue. Here is an example we extracted from community.spiceworks.com:
I just installed Spiceworks on my Win 7 machine and now I am getting an error:
“spiceworks.exe — No Disk
There is no disk in the drive. Please insert a disk into drive DeviceHarddisk1DR1”
Read a few other posts about this but doesn’t seem to be working for me.
Let me know what kind of answers you guys find? Thanks!
Possible Causes for No Disk Error Windows 7/8/10
Generally speaking, this is caused by a removable disk that contains no media. According to support.microsoft.com, “there is no disk in the drive” can occur when either of the following conditions is true:
- You have a removable drive configured as drive letter C.
- You do not have a removable disk in the removable disk drive.
Tip: The removable disk here includes external hard drives, USB drives, floppy disk drives, optical drives and USB multi-card readers.
In light of these potential factors that cause this irritating error, we decide to assist you with the best resolutions to fix there is no disk in the drive.
Solution 1. Restart Computer
Have you tried restarting the machine? The Windows popup appears because the application is attempting to scan all of the listed drives. If a drive was probably removed without the OS being aware, no disk in drive error Windows 10/8/7 appears. Restarting Windows probably fixes it right away.
Are you using some sorts of removable media on this machine, like a USB hard drive or CD ROM device? In addition, mobile phones being connected to your PC sometimes can also cause this issue. Get them off your PC and have a check.
Solution 3. Upgrade or Uninstall
This way is put forward by Spiceworks users. Usually, when seeing such an error message, we would suspect the problem lies in the application mentioned in the pop-up window. According to Spiceworks users’ description, after upgrading the Spiceworks to the latest version, “there is no disk in the drive” error no longer happening.
But to some users, only uninstalling makes sense. When they reinstall, the error comes back. So we suggest having a try on upgrading the application which brings the error message to the latest version or uninstalling it and then having a check.
Solution 4. Edit Registry
By Google search, you will find this solution is mentioned in several Windows support forums and YouTube channels. Altering your Windows Registry can turn off the error message, not knowing what problem this would cause.
Tip: If a problem occurs after altering Windows Registry, then you can reverse this fix.
Step 1. Press Win + R keys to call out the Run box. Then type “regedit” in the blank and press OK. Registry Editor will require the user account control, click “Yes” when you see it.
Step 2. Now follow this path to reach the ErrorMode key and make the changes:
“HKEY_LOCAL_MACHINESYSTEMCurrentControlSetControlWindows”
- Navigate to ErrorMode in the right panel.
- Double click on it and change the value data from 0 to 2.
- Then change the Base from “Hexadecimal” to “Decimal”.
- Finally, press “OK” to save this change.
Exit Registry Editor and check if “there is no disk in the drive” issue persists. If this solution does not help, continue reading the next one.
Solution 5. Disable Unused Drive in Device Manager
If you have multiple USB media connected and some of them you will never use, you may consider disabling such drives.
Step 1. Press Win + R to open the Run dialog. Then type “devmgmt.msc” and click OK.
Step 2. In the Device Manager window, expand Disk Drives and find the removable drive which keeps reporting “there is no disk in the drive” issue. Then right-click on it and select “Disable”.
Step 3. Immediately you will receive a message saying “Disabling this device will cause it to stop functioning. Do you really want to disable it?” At this time, click “Yes”.
Step 4. After rebooting, check out whether this issue is solved or not.
Tip: Next time when you need to use this removable disk, you just connect it to your machine, go back to Device Manager and then enable the removable disk.
Solution 6: Change Drive Letter
Like what we have mentioned in the above content, if the drive letter C is assigned to another removable disk, “there is no disk in the drive” issue can also appear.
To resolve no disk in drive error Windows 10/8/7, change the drive letter assignment for the removable drive to any letter other than C. You can use one of the following methods:
Use Partition Manager
First of all, you may consider employing a professional yet free partition manager to do this as such software usually brings easier operations. Here MiniTool Partition Wizard is recommended.
MiniTool Partition Wizard offers a user-friendly interface and easy-to-follow instructions. With this freeware, the problem of there is no disk in the drive can be perfectly solved.
Download and install it on the computer first and follow the wizard below.
Free Download
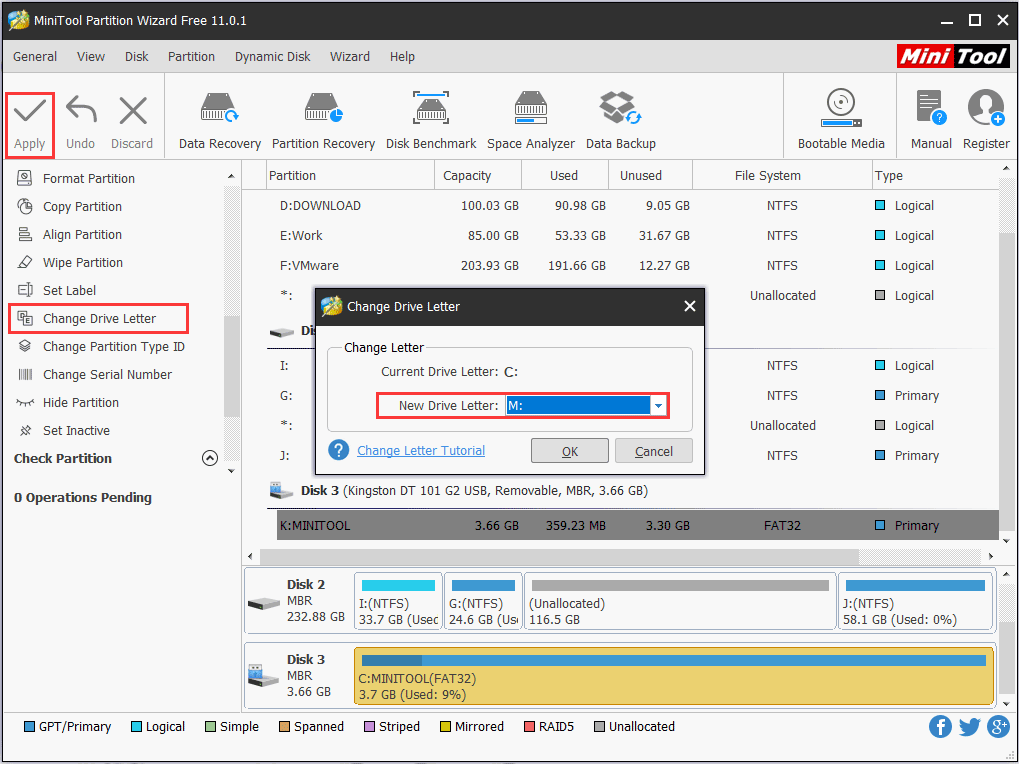
- Launch MiniTool Partition Wizard Free to get its main interface.
- Select the partition you want to change its drive letter and choose “Change Drive Letter” from the action panel.
- In the pop-up window, drop down the New Drive Letter box and choose a drive letter you prefer. Then press “OK” to confirm.
- Click “Apply” to save this change.
Use Disk Management
In addition to using third-party partition manager, Windows troubleshooting Disk Management utility is a good choice for you to reset drive letter. Here you just need to follow the simple steps below:
- Insert a removable disk before you start the computer. Then log on to the computer as Administrator.
- Right-click on This PC, click Manage and then Disk Management under Storage.
- Right-click the partition or volume on the removable disk you want to change, and then click “Change Drive Letter and Paths” from the context menu.
- In the pop-up window, click “Change” and then choose the drive letter you want to use and click “OK”.
- Click “Yes” when you receive the message that reads “Some programs that rely on drive letters might not run correctly. Do you want to continue?” Disk Management will finish this job within one minute.
Solution 7. Reformat the Hard Drive
Formatting is helpful and necessary when your removable drives become corrupted, unreadable, inaccessible so that “there is no disk in the drive” error occurs. However, formatting will definitely lead to data loss.
Here you can employ the “Copy Partition” feature of MiniTool Partition Wizard to back up the hard drive.
Free Download
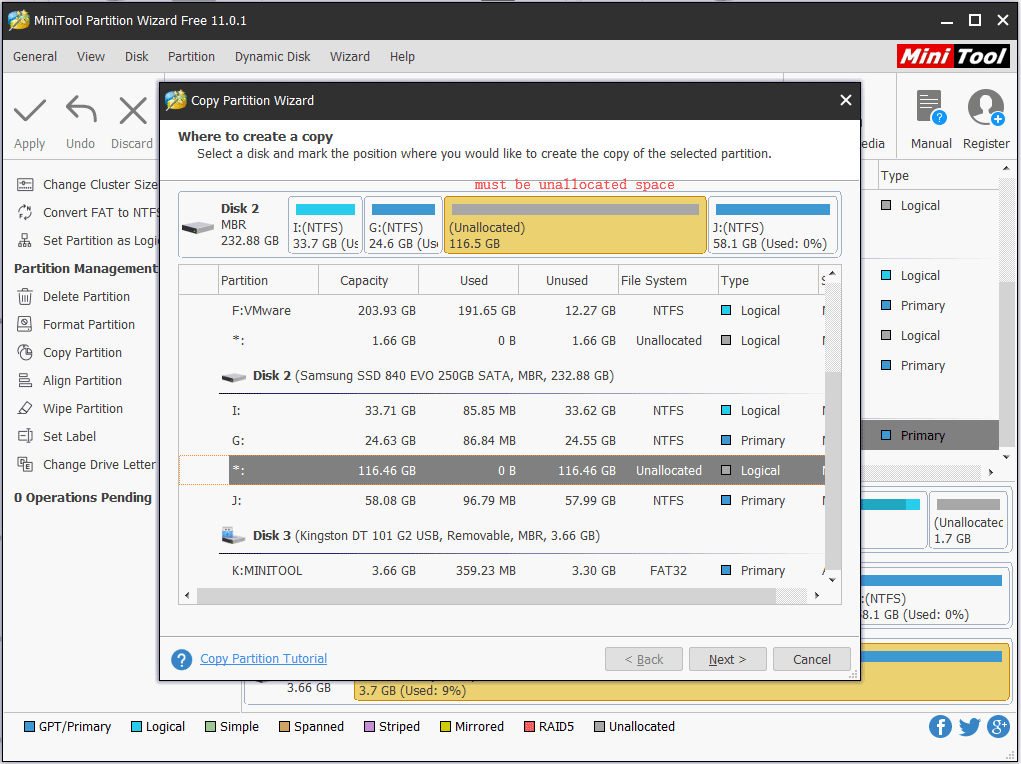
Step 1. Select the removable disk from which you need to save data and choose “Copy Partition” from the action panel.
Step 2. In the pop-up window, choose an unallocated space which is large enough to save all data on the removable disk and click “Next”. (Tip: if there is no unallocated space, you may have to use “Move/Resize Partition” feature to shrink a partition for enough unallocated space.)
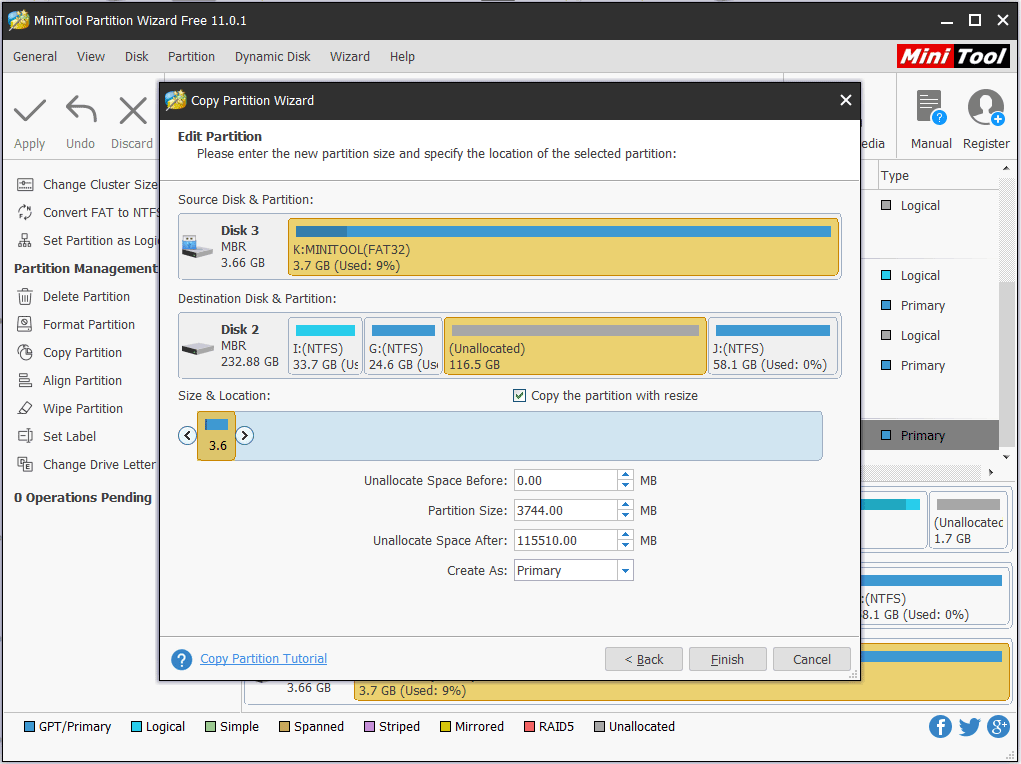
Step 3. Here you can adjust the newly created partition size by dragging the slider bar or keep it that way and click “Finish”.
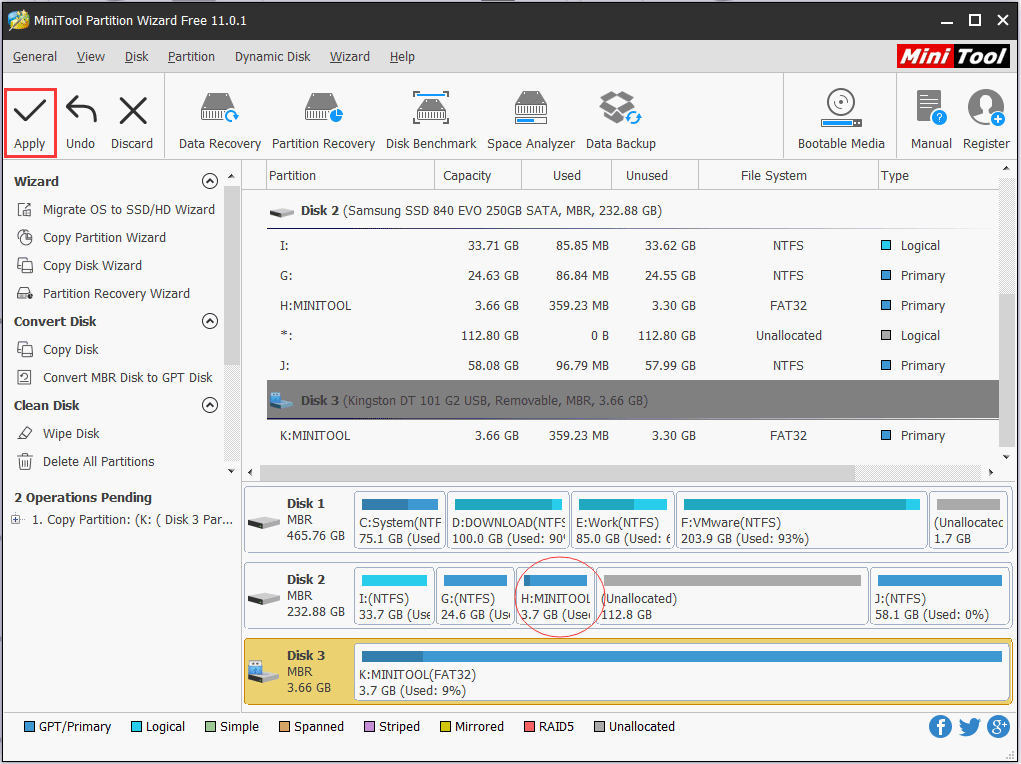
Step 4. Back to the main interface, you can preview the newly created partition which will hold all data on the removable disk. Finally, you can click “Apply” to execute the partition copy.
Tip: If there is more than one partition located on the removable drive, use “Copy Disk” feature instead. If there are just a few files you need, you can totally use Copy & Paste way to save important data to a safe location.
After making data backup, it is time to do the formatting.
- Select the drive to be formatted and choose “Format Partition” from the action panel.
- In the pop-up window, select a file system and click “OK” button to go back to the main interface.
- Finally, you need to click “Apply” button to start the formatting.
Solution 8. Check Disk Errors
It is not impossible that some disk errors can also bring “there is no disk in the drive” error. Luckily, with MiniTool Partition Wizard, you can easily have a check for the removable disk and fix some errors.
Check File System
- In the main interface of MiniTool Partition Wizard Free, find the removable disk that keeps reporting no disk in the drive error and choose “Check File System” from the action panel.
- In the pop-up window, select an option to check the file Here we recommend choosing “check & fix detected errors”.
- Finally, click the “Start” button and wait for MiniTool Partition Wizard to finish.
Check Bad Sectors
Also, you may wonder if there are some bad sectors on the hard drive, leading to no disk error Windows 7/8/10. Here MiniTool Partition Wizard Free can make detection of a disk or partition for sector errors. After the test completes, a report will be produced.
- Select the removable disk which you suspect the existence of bad sectors and choose “Surface Test” from the action panel.
- In the pop-up window, click “Start Now” and this partition manager will start scanning every sector of the selected hard drive, checking for bad sectors. For hard disk errors, they will be marked with red blocks.
When the scanning is finished, you know the health condition of your disk and whether you need to replace the hard drive. If there are bad sectors on the removable disk, you should seek for professional aid to shield these sectors. If you intend to abandon this disk, data rescue should be the first concern.
Tip: “Surface Test” feature is very helpful in resolving Boot Device Not Found issue.
“I found several useful solutions that should be very helpful to you guys to address ‘no disk in the drive issue’. Here I would like to share them with all of you.”Click to Tweet
Summary
Reading here, we guess you have learned some solutions to fix “there is no disk in the drive, please insert a disk into drive” error. If you have a nice suggestion, welcome to leave it in the following comment section, this would help more users.
For any questions towards using MiniTool Partition Wizard, please contact us by sending an email to [email protected]. Thanks in advance!
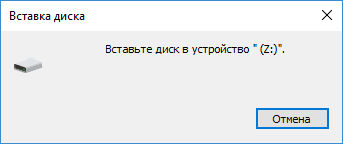
Вставьте диск в устройство при открытии флешки — что делать?
 Одна из распространенных проблем с USB накопителями (также может произойти и с картой памяти) — вы подключаете флешку к компьютеру или ноутбуку, а Windows пишет «Вставьте диск в устройство» или «Вставьте диск в устройство съемный диск». Происходит это непосредственно при подключении флешки или попытке открыть её в проводнике, если она уже подключена.
В этой инструкции — подробно о возможных причинах того, что флешка ведет себя таким образом, а сообщение Windows просит вставить диск, хотя съемный накопитель уже подключен и о способах исправить ситуацию, которые должны подойти для Windows 11, Windows 10, 8.1 и 7.
Проблемы со структурой разделов на флешке или ошибки файловой системы — простые варианты решения
Одна из распространенных причин такого поведения USB флешки или карты памяти — испорченная структура разделов или ошибки файловой системы на накопителе.
Поскольку Windows не обнаруживает пригодных к работе разделов на флешке, вы видите сообщение о том, что требуется вставить диск.
Произойти это может в результате неправильного извлечения накопителя (например, в то время, когда с ним производятся операции чтения-записи) или сбоя питания. В некоторых случаях причиной может оказаться и аппаратная неисправность накопителя.
Простые способы исправить ошибку «Вставьте диск в устройство» включают в себя:
- Если на флешке нет важных данных — попробовать отформатировать её стандартными средствами Windows (правый клик по флешке — форматировать, при этом не обращайте внимание на «емкость неизвестна» в диалоге форматирования и используйте параметры по умолчанию).

- В ситуации, когда простое форматирование выполнить невозможно, запустите командную строку, Терминал Windows или PowerShell от имени администратора и по порядку используйте следующие команды для очистки и повторного создания разделов на флешке (данные будут удалены, будьте внимательны при указании номера диска):
diskpart
list disk
select disk N (N меняем на номер флешки)
clean
create partition primary
format fs=fat32 quick (или ntfs вместо fat32)
exit

- Если на флешке перед произошедшим находились важные файлы, которые требуется сохранить, попробуйте способы, описанные в отдельной инструкции Как восстановить диск RAW (может сработать даже если в управлении дисками раздел на флешке отображается иначе, чем в файловой системе RAW). В частности, может помочь восстановление потерянного раздела в DMDE.


Также ошибка может возникнуть, если полностью удалить все разделы на съемном накопителе и не создать нового основного раздела. В этом случае для решения проблемы вы можете зайти в управление дисками Windows, нажав клавиши Win+R и введя diskmgmt.msc, затем в нижней части окна найти флешку, нажать правой кнопкой мыши по области «не распределена», выбрать пункт «Создать простой том» и далее следовать указаниям мастера создания томов. Хотя сработает и простое форматирование, из пункта 1 выше. Также может пригодиться: Флешка пишет диск защищен от записи.

Примечание: иногда проблема может оказаться в ваших USB разъемах или драйверах USB. Прежде чем приступать к следующим шагам, по возможности проверьте работоспособность флешки на другом компьютере, а если такой возможности нет — использовать другие разъемы USB на вашем компьютере.
В том случае, если описанные простые способы не приводят ни к какому результату, то попробовать оживить флешку можно следующими методами:
- Если USB-накопитель исправно читается на других устройствах, попробуйте установить оригинальные драйверы чипсета и, при наличии, драйверы USB с сайта производителя вашей материнской платы (для ПК) или ноутбука.
- Программы для ремонта флешек — речь идет о «программном» ремонте, особое внимание обратите на последний раздел статьи, в котором описывается способ найти ПО конкретно для вашего накопителя. Также, именно в контексте «Вставьте диск» для флешки часто помогает приведенная там же программа JetFlash Online Recovery (она для Transcend, но работает со многими другими накопителями).
- Низкоуровневое форматирование флешки — полное удаление всей информации с накопителя и очистка секторов памяти, включая загрузочные сектора и таблицы файловых систем.
Видео инструкция
И, наконец, если никакие из предлагаемых вариантов не помогают, а найти дополнительные способы исправить ошибку «вставьте диск в устройство» (при этом работающие) не удается — возможно, накопитель придется заменить. Заодно может пригодиться: Бесплатные программы для восстановления данных (можно попробовать вернуть информацию, которая была на флешке, но в случае аппаратных неисправностей, вероятнее всего, не получится).
USB накопитель, вполне возможно, является наиболее часто используемым разделом для сохранения файлов, фотографий, аудио и записей в зависимости от размера USB-накопителя. Также нельзя отрицать, что USB накопитель уязвим для различных ошибок. При использовании USB вы можете часто получать сообщение об ошибке «Вставьте диск на съемный диск». Проблема «Вставьте диск в устройство usb накопитель» всегда возникает на нечитаемом, непригодном для использования или недоступном USB-накопителе, флэш-накопителе или SD-карте. В случае, если вы расстроены этой проблемой, следуйте инструкциям, чтобы узнать, как устранить проблему и возобновить работу.

Часть 1: Причины вставьте диск в съемный диск
В тот момент, когда вы получаете уведомление «Вставьте диск на съемный диск» при попытке открыть гаджет, это, вероятно, потому что:
- Вы неправильно подключили съемный диск
- Ваш компьютер не может прочитать ваш USB накопитель
- Устройство, которое вы используете, нечитаемо
Что Происходит, Когда Возникает ошибка «Вставьте диск на съемный диск»?
- При попытке открыть USB накопитель вы получите всплывающее окно с сообщением об ошибке «Вставьте диск на съемный диск».
- При проверке его свойств USB накопитель показывает 0 используемых байт и 0 доступных байт.
- USB накопитель не может быть отформатирован, поскольку «Windows не удалось завершить форматирование».
- В разделе Управление дисками USB накопитель указан как «Без носителя».
Предполагая, что вы не знаете о конкретной причине ошибки, мы предлагаем вам ознакомиться с исправлениями, которые мы привели ниже.
Если вы попытаетесь исправить ошибку «Вставьте диск в съемный диск E», вы вернете свой диск «наполовину» к жизни. Это означает, что вы не исправили его полностью, но все же намного лучше, чем его первоначальное состояние. Если вы хотите восстановить данные с вашего недоступного USB-накопителя до устранения проблемы, вы можете использовать Tenorshare 4DDiG Data Recovery. Это продвинутый инструмент восстановления данных, который может восстановить ваши носители и восстановить все виды файлов в несколько кликов.
- Восстановление данных с недоступных/неопознанных/необнаруженных дисков.
- Восстановление файлов с Windows, Mac, USB-накопителя, SD-карты, внешних устройств, цифровой камеры и т. д.
- Поддержка более 1000 типов данных, включая фотографии, видео, аудио, документы и многое другое.
- Поддержка различных сценариев потери, таких как удаление, форматирование, повреждение, RAW и т. д.
- Более высокий показатель успеха, чем у конкурентов.
- Легкие и простые шаги.
- Шаг 1: Подключите поврежденный USB-порт
После установки Tenorshare 4DDiG Data Recovery на свой ПК запустите программное обеспечение и подключите поврежденный USB накопитель. После обнаружения диска выберите его и нажмите кнопку Пуск, чтобы продолжить.
- Шаг 2: Сканируйте USB накопитель
- Шаг 3: Предварительный просмотр и восстановление файлов с диска
4DDiG немедленно сканирует ваш диск со всех сторон, чтобы обнаружить потерянные данные и предоставить вам доступ к существующим файлам. Затем вы можете увидеть результат сканирования, который показывает количество найденных документов. Вы можете нажать кнопку «Глубокое сканирование», чтобы получить результат углубленного сканирования.
4DDiG просматривает и восстанавливает различные типы записей, такие как фотографии, записи, аудио, отчеты и многое другое. Вы можете нажать на кнопку «Восстановить», чтобы получить их обратно с вашего жесткого диска и сохранить в уникальном месте.
Часть 3: Как исправить флэш-накопитель с надписью «Вставить диск»?
После восстановления данных с USB-накопителя с помощью 4DDiG, теперь вы можете приступить к устранению проблемы без каких-либо проблем.
Исправление 1: Измените порт USB
В большинстве случаев вы подключаете USB к компьютеру через один из передних USB-портов. Поскольку передние USB-порты подключены к материнской плате с помощью кабеля, в то время как задние USB-порты подключаются непосредственно к материнской плате, задние USB-порты более стабильны по сравнению с передними. Следовательно, подключите USB накопитель к компьютеру через задние USB-порты и проверьте, существует ли проблема.
Исправление 2: Попробуйте разогреть или охладить диск вручную
Вставьте USB накопитель в ПК и нагрейте USB накопитель с помощью фена.
Подождите некоторое время, а затем извлеките и снова вставьте USB накопитель. Посмотрите, может ли ваш компьютер получить доступ к вашим данным теперь.
Если этот метод не работает, извлеките и охладите USB накопитель в течение некоторого времени, а затем попробуйте подключить его еще несколько раз. Проверьте, работает ли это на этот раз.
Если вышеуказанные меры не помогли устранить ошибку «Вставьте диск в устройство usb накопитель Windows 10», не волнуйтесь, так как вы можете положиться на Tenorshare 4DDiG для восстановления ваших важных данных на нем.
Исправление 3: Назначьте новую букву диска
В случае, если буква диска вашего USB-накопителя совпадает с буквой диска одного из разделов вашего компьютера, вы получите сообщение «В накопителе нет диска. Вставьте диск в дисковод» ошибка. Чтобы вручную назначить другую букву диска вашему USB-накопителю:
Войдите в систему с учетной записью администратора на вашем компьютере и нажмите Windows + X, чтобы открыть Управление дисками.
Щелкните правой кнопкой мыши раздел вашего съемного диска и в разделе Управление дисками измените букву диска и пути к нему.
Измените букву диска на уникальную букву диска.
Исправление 4: Сканирование Изменений оборудования
Функция «Проверка на наличие изменений в оборудовании» используется для проверки и загрузки изменений, внесенных вами в ваше оборудование. Выполнение этой операции также полезно для устранения проблемы «Вставьте диск в дисковод D».
С этого компьютера перейдите в меню «Управление» и откройте «Диспетчер устройств».
Найдите и щелкните правой кнопкой мыши свой USB накопитель, затем в этот момент выберите «Обновить конфигурацию оборудования».
После сканирования еще раз проверьте, правильно ли работает ваш диск.
Исправление 5: Обновление драйвера
Предполагая, что у вас возникла проблема с устройством, вам следует рассмотреть возможность обновления драйвера. Драйверы — это то, что обеспечивает взаимодействие между вашим компьютером и аппаратным устройством. Для обновления драйверов:
С этого компьютера перейдите в меню «Управление» и откройте «Диспетчер устройств».
Найдите и щелкните правой кнопкой мыши свой USB накопитель, затем в этот момент выберите «Обновить драйверы».
Проверьте, снова ли ваш диск начал работать должным образом.
Исправление 6: Исправьте Недоступный USB Накопитель С Помощью Diskpart
В поле поиска меню «Пуск» введите cmd для командной строки. Щелкните правой кнопкой мыши и запустите командную строку от имени администратора. В окне командной строки введите прилагаемые данные, перечисленные ниже, и нажмите «Ввод» после каждой команды:
Diskpart> list disk
Diskpart> select disk A (A — это номер диска, присвоенный вашему USB)
Diskpart> clean
Diskpart> create partition primary
Diskpart> active
Diskpart> Select partition 1
Diskpart> format fs=fat32
Исправление 7: Попробуйте Средство устранения неполадок оборудования и устройств
Перейдите в приложение «Настройки» и откройте «Обновления и безопасность».
Перейдите в раздел Устранение неполадок и нажмите опцию «Дополнительные средства устранения неполадок».
Выберите Оборудование и устройства, запустите средство устранения неполадок и подождите.
Следуйте инструкциям, указанным на экране вашего компьютера, и перезагрузите компьютер.
Исправление 8: Удалите раздел и создайте новый
Чтобы стереть раздел, вам необходимо открыть Управление дисками. Здесь найдите свой диск и щелкните по нему правой кнопкой мыши, чтобы удалить вкладку тома. После этого создайте другой том и щелкните правой кнопкой мыши свой диск. В раскрывающемся списке выберите «Новый простой том». Настройте основные параметры (размер, букву диска и т.д.) для диска и нажмите «ОК». В настоящее время перезагрузите компьютер и повторно подключите USB накопитель. Проблема «Вставьте диск в дисковод Windows 10» должна исчезнуть.
Исправление 9: Восстановите диск путем форматирования
Щелкните правой кнопкой мыши «Мой компьютер» и откройте «Управление дисками» в меню «Управление».
Щелкните правой кнопкой мыши на жестком диске, USB/SD-карте и выберите «форматировать «.
Сбросьте файловую систему (NTFS/FAT32) и переименуйте гаджет.
Нажмите «Готово», чтобы завершить ремонт гаджета с ошибкой «SD-карта, вставьте диск».
Часто задаваемые вопросы
1. Как исправить вставьте диск 1?
Вы можете устранить ошибку «Вставьте диск 1», используя функцию Diskpart из командной строки. Мы уже упоминали выше метод, который вы можете использовать, чтобы избавиться от этой проблемы.
2. Как исправить ошибку отсутствия диска в приводе?
Шаг 1: Нажмите Window + R, чтобы открыть окно Запуска.
Шаг 2: Разверните раздел Дисковые накопители и щелкните правой кнопкой мыши нужный жесткий диск, USB или SD-карту, чтобы отключить его.
Шаг 3: Перезагрузите компьютер, и проблема «на диске Windows 10 нет диска», скорее всего, будет решена.
Заключение:
Мы предоставили возможные исправления для проблемы «Windows 10, вставьте диск в дисковод». Честно говоря, если какой-либо из этих методов не устраняет проблему «Вставьте диск в устройство usb накопитель», почти наверняка на вашем диске есть аппаратные проблемы. В таком случае вы можете потерять свои данные. А вот и 4DDiG для вашего спасения. Чтобы вернуть свои данные, вы можете использовать программное обеспечение для восстановления данных Tenorshare 4DDiG.
Вам Также Может Понравиться
-
Home>>
- USB >>
- Как исправить Вставьте диск в устройство usb накопитель?