Virtio-win guest tools installer is a msi (Microsoft installer) created with Wix Toolset which installs:
Virtio-win drivers — KVM/QEMUY windows guest drivers for both paravirtual and emulated hardware, more on Github Repo.
Spice guest agent and driver — Spice is an open remote computing solution, providing client access to remote machine display and devices, more info on the Offical website.
The installer can be built in two ways, using oVirt CI mock runner tool and a manual build using make.
Before buidling the installer you must have the virtio-win drivers localy on the format which they are distributed on the iso:
|-Balloon['2k12', '2k12R2', '2k16', '2k19', '2k22', '2k3', '2k8', '2k8R2', 'w10', 'w11', 'w7', 'w8', 'w8.1', 'xp']
|-NetKVM['2k12', '2k12R2', '2k16', '2k19', '2k22', '2k3', '2k8', '2k8R2', 'w10', 'w11', 'w7', 'w8', 'w8.1', 'xp']
|-pvpanic['2k12', '2k12R2', '2k16', '2k19', '2k22', '2k8', '2k8R2', 'w10', 'w11', 'w7', 'w8', 'w8.1']
|-fwcfg['2k12', '2k12R2', '2k16', '2k19', '2k22', 'w10', 'w11', 'w8', 'w8.1']
|-qemupciserial['2k12', '2k12R2', '2k16', '2k19', '2k22', '2k8', '2k8R2', 'w10', 'w11', 'w7', 'w8', 'w8.1']
|-vioinput['2k12', '2k12R2', '2k16', '2k19', '2k22', '2k8R2', 'w10', 'w11', 'w7', 'w8', 'w8.1']
|-viorng['2k12', '2k12R2', '2k16', '2k19', '2k22', '2k8', '2k8R2', 'w10', 'w11', 'w7', 'w8', 'w8.1']
|-vioscsi['2k12', '2k12R2', '2k16', '2k19', '2k22', '2k8', '2k8R2', 'w10', 'w11', 'w7', 'w8', 'w8.1']
|-vioserial['2k12', '2k12R2', '2k16', '2k19', '2k22', '2k3', '2k8', '2k8R2', 'w10', 'w11', 'w7', 'w8', 'w8.1', 'xp']
|-viostor['2k12', '2k12R2', '2k16', '2k19', '2k22', '2k3', '2k8', '2k8R2', 'w10', 'w11', 'w7', 'w8', 'w8.1', 'xp']
|-viofs['2k12', '2k12R2', '2k16', '2k19', '2k22', 'w10', 'w11', 'w8', 'w8.1']
|-viogpu['2k12', '2k12R2', '2k16', '2k19', '2k22', 'w10', 'w11', 'w8', 'w8.1']
Introduction
VirtIO Drivers are paravirtualized drivers for kvm/Linux (see http://www.linux-kvm.org/page/Virtio). In short, they enable direct (paravirtualized) access to devices and peripherals for virtual machines using them, instead of slower, emulated, ones.
A quite extended explanation about VirtIO drivers can be found here http://www.ibm.com/developerworks/library/l-virtio.
At the moment these kind of devices are supported:
- block (disks drives), see Paravirtualized Block Drivers for Windows
- network (ethernet cards), see Paravirtualized Network Drivers for Windows
- balloon (dynamic memory management), see Dynamic Memory Management
You can maximize performances by using VirtIO drivers. The availability and status of the VirtIO drivers depends on the guest OS and platform.
Windows OS Support
Windows does not have native support for VirtIO devices included.
But, there is excellent external support through opensource drivers, which are available compiled and signed for Windows:
https://fedorapeople.org/groups/virt/virtio-win/direct-downloads/archive-virtio/?C=M;O=D
Note that this repository provides not only the most recent, but also many older versions.
Those older versions can still be useful when a Windows VM shows instability or incompatibility with a newer driver version.
The binary drivers are digitally signed by Red Hat, and will work on 32-bit and 64-bit versions of Windows
Installation
Using the ISO
You can download the latest stable or you can download the most recent build of the ISO.
Normally the drivers are pretty stable, so one should try out the most recent release first.
You can access the ISO can in a VM by mounting the ISO with a virtual CD-ROM/DVD drive on that VM.
Wizard Installation
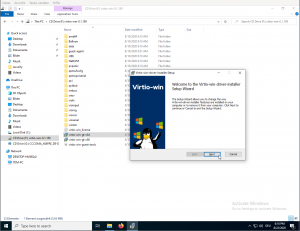
You can use an easy wizard to install all, or a selection, of VirtIO drivers.
- Open the Windows Explorer and navigate to the CD-ROM drive.
- Simply execute (double-click on) virtio-win-gt-x64
- Follow its instructions.
- (Optional) use the virtio-win-guest-tools wizard to install the QEMU Guest Agent and the SPICE agent for an improved remote-viewer experience.
- Reboot VM
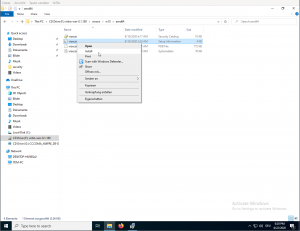
Manual Installation
- Open the Windows Explorer and navigate to the CD-ROM drive.
- There you can see that the ISO consists of several directories, each having sub-directories for supported OS version (for example, 2k19, 2k12R2, w7, w8.1, w10, …).
- Balloon
- guest-agent
- NetKVM
- qxl
- vioscsi
- …
- Navigate to the desired driver directories and respective Windows Version
- Right-click on the file with type «Setup Information»
- A context menu opens, select «Install» here.
- Repeat that process for all desired drivers
- Reboot VM.
Downloading the Wizard in the VM
You can also just download the most recent virtio-win-gt-x64.msi or virtio-win-gt-x86.msi from inside the VM, if you have already network access.
Then just execute it and follow the installation process.
Troubleshooting
Try an older version of the drivers first, if that does not helps ask in one of our support channels:
https://pve.proxmox.com/wiki/Get_support
Further Reading
https://docs.fedoraproject.org/en-US/quick-docs/creating-windows-virtual-machines-using-virtio-drivers/index.html
http://www.linux-kvm.org/page/WindowsGuestDrivers
The source code of those drivers can be found here: https://github.com/virtio-win/kvm-guest-drivers-windows
http://www.linux-kvm.org/page/WindowsGuestDrivers/Download_Drivers
See also
- Paravirtualized Block Drivers for Windows
- Paravirtualized Network Drivers for Windows
- Dynamic Memory Management
I have Ubuntu 20.04 server as my host machine and QEMU-KVM v6.0.0 as hypervisor. I created simple virtual machine configuration using SATA storage and successfully installed Windows 7 SP1 64 bit. After this all manuals suggest to add temporary virtio disk, get Windows 7 to install necessary drivers and then switch to new disk type.
I downloaded a set of latest stable drivers from https://fedorapeople.org/groups/virt/virtio-win/direct-downloads/archive-virtio/, attached a downloaded image file to virtual machine and attempted to install drivers.
Nothing worked at all. Windows 7 successfully identifies driver files as being signed by Red Hat Inc., however it refuses to load drivers because it is unable to verify digital signature until any trusted root certificates.
I might be able to sacrifice some disk IO performance, I might not need to run virtual machine at absolute maximum IO speeds, but exactly the same situation is observed with 3 other devices, exported from hypervisor: graphics, ACPI, memory manager and something else…
I might be missing something, since even this post on this site suggest to install drivers for Windows 10 from the same location and Windows 7 and Windows 10 are no different in regard with driver signatures.
How to properly configure Virt-Manager (QEMU/KVM) with Windows guest
Please, help.
This document describes how to obtain virtIO drivers and additional software agents for Windows virtual machines running on kernel-based virtual machines (KVM). virtIO is a virtualization standard for network and disk device drivers.
Fedora cannot ship Windows virtIO drivers because they cannot be built automatically as part of Fedora’s build system: the only way to build Windows virtIO drivers is on a machine running Windows. In addition, shipping pre-compiled sources is generally against Fedora policies. Microsoft does not provide virtIO drivers, you must download them yourself in order to make virtIO drivers available for Windows VMs running on Fedora hosts.
The drivers in these repos are licensed under the GPLv2 license.
VirtIO-Win Repo Overview
There is a yum|dnf repo available via the RPM package manager (RPM) that ships virtio-win packages. You can use these RPMs to install driver binaries and agent installers into the /usr/share directory on your host machine. You can then share the bits with Windows VMs running on the host.
The .repo file provides two different repositories:
-
virtio-win-stable — This repository provides builds of virtio-win that roughly correlate to what was shipped with the most recent Red Hat Enterprise Linux release, meaning these builds have undergone testing and are considered stable. This repo is enabled by default.
-
virtio-win-latest — This repository provides the latest driver builds. The builds may be bug free, development quality, or completely broken. Caveat emptor. This repo is disabled by default.
Fedora VirtIO Drivers vs. RHEL VirtIO Drivers
The RPMs in the virtio-win-stable repository are the same driver builds as what is shipped with Red Hat Enterprise Linux. All the Windows binaries are from builds done on Red Hat’s internal build system, which are generated using publicly available code. For more details about how the RPM and repo are built, see the README for this repo.
The drivers are cryptographically signed with Red Hat’s vendor signature. However they are not signed with Microsoft’s WHQL signature.
| Historically the .iso files shipped on alt.fedoraproject.org did not match the layout of the .iso shipped with Red Hat Enterprise Linux. This changed in April 2015. |
The current Fedora RPM/ISO directory structure is laid out to mirror exactly the layout that is shipped with the latest release of Red Hat Enterprise Linux. This is so that users and developers don’t seen any differences between the two distros.
-
The
.isodirectories are named after the driver code directories from the upstream driver git tree. -
Below the driver directories, the
$winversion/$arch/directory naming
is a Windows convention. -
The RPM layout is arbitrary in that it ships the
.vfdcontent in thedrivers/dir, but not many of the other drivers from the.iso. This seems to be an historical oversight and should probably be fixed.
Installing the Windows VirtIO Repository
Install the repo file using the following command:
# wget https://fedorapeople.org/groups/virt/virtio-win/virtio-win.repo
  -O /etc/yum.repos.d/virtio-win.repo
Then install the virtio-win package:
Enabling the latest Windows VirtIO Repository
By default, the virtio-win-latest repository is disabled and virtio-win-stable repo is enabled.
To enable the virtio-win-latest repo with DNF:
# dnf --enablerepo=virtio-win-latest upgrade virtio-win
RPM contents
The virtio-win RPM package contains the following files:
-
/usr/share/virtio-win/*.iso— ISO CDROM containing all the drivers. -
/usr/share/virtio-win/*.vfd— VFD floppy images for using during install of Windows XP -
/usr/share/virtio-win/drivers— Copy of the extracted VFD driver contents -
/usr/share/guest-agent/*.msi— QEMU Guest Agent 32bit and 64bit MSI installers
ISO contents
ISO is used to install paravirtual drivers in Windows guests. The virtio-win/*.iso included in the RPM contains the following bits:
-
NetKVM/— Virtio network driver -
viostor/— Virtio block driver -
vioscsi/— Virtio Small Computer System Interface (SCSI) driver -
viorng/— Virtio RNG driver -
vioser/— Virtio serial driver -
Balloon/— Virtio memory balloon driver -
qxl/— QXL graphics driver for Windows 7 and earlier. (build virtio-win-0.1.103-1 and later) -
qxldod/— QXL graphics driver for Windows 8 and later. (build virtio-win-0.1.103-2 and later) -
pvpanic/— QEMU pvpanic device driver (build virtio-win-0.1.103-2 and later) -
guest-agent/— QEMU Guest Agent 32bit and 64bit MSI installers -
qemupciserial/— QEMU PCI
serial device driver -
*.vfdVFD floppy images for using during install of Windows XP
| If you previously used isos from alt.fedoraproject.org, note that the current isos have a different file layout that matches the layout of the Red Hat Enterprise Linux isos. If you need old isos for backwards compatiblity you can find them on the deprecated isos page. |
 Обновлено: 13.03.2020
Опубликовано: 11.12.2019
После установки гостевой операционной системы Windows на гипервизор KVM мы можем столкнуться с проблемой отсутствия драйверов. Как правило, больше всего неудобств вызывает отсутствие сетевых драйверов. Мы рассмотрим универсальный способ установки драйверов на Windows, который установлен на виртуальную машину KVM.
Предполагается, что наш KVM установлен на операционную систему семейства Linux, например, CentOS или Ubuntu. Все команды в данной инструкции будут выполняться из командной строки.
Загрузка драйверов и их монтирование
Первым делом загрузим ISO образ с набором драйверов и примонтируем его к операционной системе. Для этого заходим на хост виртуализации по SSH и вводим команду:
wget https://fedorapeople.org/groups/virt/virtio-win/direct-downloads/stable-virtio/virtio-win.iso -P /data/kvm/iso/
* где https://fedorapeople.org/groups/virt/virtio-win/direct-downloads/stable-virtio/virtio-win.iso — источник файла iso с драйверами KVM; /data/kvm/iso/ — каталог на сервере, в который мы загрузим образ.
* если при вводе команды система выдаст ошибку, необходимо установить wget командой yum install wget или apt-get install wget.
Дожидаемся загрузки файла на сервер, после чего создаем конфигурационный файл для монтирования образа в операционную систему:
vi /etc/libvirt/qemu/guest-virtio-drivers.xml
Добавляем в него следующее:
<disk type=’file’ device=’cdrom’>
<driver name=’qemu’ type=’raw’/>
<source file=’/data/kvm/iso/virtio-win.iso’/>
<target dev=’hdb’ bus=’ide’/>
<readonly/>
<address type=’drive’ controller=’0′ bus=’0′ target=’0′ unit=’1’/>
</disk>
* /data/kvm/iso/virtio-win.iso — путь до файла, который мы загрузили на сервер. В данном файле мы создали описание для монтирования устройства cdrom.
С помощью созданного файла XML мы монтируем ISO образ в CDROM на виртуальной машине:
virsh update-device WIN /etc/libvirt/qemu/guest-virtio-drivers.xml
* где WIN — имя виртуальной машины.
Установка драйверов
Подключаемся к виртуальной машине с помощью VNC. Мы должны увидеть примонтированный CD-ROM с драйверами virtio:

Кликаем правой кнопкой мыши по пуск и выбираем Диспетчер устройств:

* в ранних версиях Windows необходимо кликнуть правой кнопкой мыши по Мой компьютер — Управление — Диспетчер устройств.
В разделе «Другие устройства» кликаем правой кнопкой мыши по устройству, для которого необходим драйвер и выбираем Обновить драйверы:

В открывшемся окне выбираем Выполнить поиск драйверов на этом компьютере:

… и выбираем наш CD-ROM с драйверами:

Если система выдаст предупреждение безопасности, кликаем по Установить:

Драйвер установлен. Повторяем процедуру для каждого устройства, для которого система не смогла установить драйвер.
![]()
Была ли полезна вам эта инструкция?
Да Нет
Important: On Red Hat Enterprise Linux 7, Windows guest virtual machines are supported only under specific subscription programs, such as Advanced Mission Critical (AMC). If you are unsure whether your subscription model includes support for Windows guests, contact customer support.
Paravirtualized drivers enhance the performance of guests, decreasing guest I/O latency and increasing throughput to near bare-metal levels. It is recommended to use the paravirtualized drivers for fully virtualized guests running I/O heavy tasks and applications.
virtio drivers are KVM’s paravirtualized device drivers, available for Windows guest virtual machines running on KVM hosts. These drivers are included in the virtio package. The virtio package supports block (storage) devices and network interface controllers.
The KVM virtio drivers are automatically loaded and installed on the following:
- Red Hat Enterprise Linux 4.8 and newer
- Red Hat Enterprise Linux 5.3 and newer
- Red Hat Enterprise Linux 6 and newer
- Red Hat Enterprise Linux 7 and newer
- Some versions of Linux based on the 2.6.27 kernel or newer kernel versions
Versions of Red Hat Enterprise Linux in the list above detect and install the drivers. Additional installation steps are not required.
In Red Hat Enterprise Linux 3 (3.9 and above), manual installation is required.
Note: PCI devices are limited by the virtualized system architecture. Refer to Guest Virtual Machine Device Configuration for additional limitations when using assigned devices.
Using KVM virtio drivers, the following Microsoft Windows versions are expected to run similarly to bare-metal-based systems:
-
Windows Server versions: See Certified guest operating systems for Red Hat Enterprise Linux with KVM
-
Windows Desktop (non-server) versions:
- Windows 7 (32-bit and 64-bit versions)
- Windows 8 (32-bit and 64-bit versions)
- Windows 8.1 (32-bit and 64-bit versions)
- Windows 10 (32-bit and 64-bit versions)
Note: Network connectivity issues sometimes arise when attempting to use older virtio drivers with newer versions of QEMU. Keeping the drivers up to date is therefore recommended.
Installing the KVM Windows virtio Drivers
This section covers the installation process for the KVM Windows virtio drivers. The KVM virtio drivers can be loaded during the Windows installation or installed after the guest’s installation.
You can install the virtio drivers on a guest virtual machine using one of the following methods:
- hosting the installation files on a network accessible to the virtual machine
- using a virtualized CD-ROM device of the driver installation
disk .isofile - using a USB drive, by mounting the same (provided) .ISO file that you would use for the CD-ROM
- using a virtualized floppy device to install the drivers during boot time (required and recommended only for Windows Server 2003)
This procedure describes installation from the paravirtualized installer disk as a virtualized CD-ROM device.
-
Download the drivers
The virtio-win package contains the virtio block and network drivers for all supported Windows guest virtual machines.
Note: The virtio-win package can be found here. Search for virtio-win and click Download Latest. It requires access to one of the following channels:- RHEL Client Supplementary (v. 7)
- RHEL Server Supplementary (v. 7)
- RHEL Workstation Supplementary (v. 7)
Download and install the virtio-win package on the host with the
yumcommand.# yum install virtio-winThe list of virtio-win packages that are supported on Windows operating systems, and the current certified package version, can be found here.
Note that the Red Hat Enterprise Virtualization Hypervisor and Red Hat Enterprise Linux are created on the same code base, so the drivers for the same version (for example, Red Hat Enterprise Virtualization Hypervisor 3.3 and Red Hat Enterprise Linux 6.5) are supported for both environments.
The virtio-win package installs a CD-ROM image,
virtio-win.iso, in the/usr/share/virtio-win/directory. -
Install the virtio drivers
When booting a Windows guest that uses virtio-win devices, the relevant virtio-win device drivers must already be installed on this guest. The virtio-win drivers are not provided as inbox drivers in Microsoft’s Windows installation kit, so installation of a Windows guest on a virtio-win storage device (
viostor/virtio-scsi) requires that you provide the appropriate driver during the installation, either directly from thevirtio-win.isoor from the supplied Virtual Floppy imagevirtio-win<version>.vfd.
Installing the Drivers on an Installed Windows Guest Virtual machine
This procedure describes installing the virtio drivers with a virtualized CD-ROM after Windows is installed.
Follow this procedure to add a CD-ROM image with virt-manager and then install the drivers.
-
Open virt-manager and the guest virtual machine
Open virt-manager, then open the guest virtual machine from the list by double-clicking the guest name.
-
Open the hardware window
Click
 on the toolbar at the top of the window to view virtual hardware details.
Click Add Hardware at the bottom of the new view that appears.
A wizard opens for adding the new device.
-
Select the ISO file
Ensure that the Select managed or other existing storage radio button is selected, and browse to the virtio driver’s
.isoimage file. The default location for the latest version of the drivers is/usr/share/virtio-win/virtio-win.iso.Change the Device type to IDE cdrom and click Forward to proceed.

-
Reboot
Reboot or start the virtual machine to begin using the driver disk. Virtualized IDE devices require a restart to for the virtual machine to recognize the new device.
-
Open the Device Manager
For information on opening Device Manager, refer to the Windows documentation.
-
Start the driver update wizard
-
View available system devices
Expand System devices by clicking on the arrow to its left.

-
Locate the appropriate device
There are up to four drivers available: the balloon driver, the serial driver, the network driver, and the block driver.
- Balloon, the balloon driver, affects the PCI standard RAM Controller in the System devices group.
- vioserial, the serial driver, affects the PCI Simple Communication Controller in the System devices group.
- NetKVM, the network driver, affects the Network adapters group. This driver is only available if a virtio NIC is configured. Configurable parameters for this driver are documented in Appendix E, NetKVM Driver Parameters.
- viostor, the block driver, affects the Disk drives group. This driver is only available if a virtio disk is configured.
Right-click on the device whose driver you wish to update, and select Update Driver from the pop-up menu.
This example installs the balloon driver, so right-click on PCI standard RAM Controller.
-
Open the driver update wizard
From the drop-down menu, select Update Driver Software to access the driver update wizard.

-
-
Specify how to find the driver
The first page of the driver update wizard asks how you want to search for driver software. Click Browse my computer for driver software.

-
Select the driver to install
-
Open a file browser
Click Browse.
-
Browse to the location of the driver
A separate driver is provided for each combination of operating systems and architectures. The drivers are arranged hierarchically according to their driver type, the operating system, and the architecture on which they will be installed:
driver_type/os/arch/.For example, the Balloon driver for a Windows 7 operating system with an x86 (32-bit) architecture, resides in the
Balloon/w7/x86directory.Once you have navigated to the correct location, click OK.
-
Click Next to continue
The following screen is displayed while the driver installs:
-
-
Close the installer
The following screen is displayed when installation is complete:
Click Close to close the installer.
-
Reboot
Reboot the virtual machine to complete the driver installation.


Installing Drivers During the Windows Installation
You can install the virtio drivers during a Windows installation.
This method allows a Windows guest virtual machine to use the virtio drivers for the default storage device.
-
Install the virtio-win package
# yum install virtio-winNote: The virtio-win package can be found here.
It requires access to one of the following channels:
- RHEL Client Supplementary (v. 7)
- RHEL Server Supplementary (v. 7)
- RHEL Workstation Supplementary (v. 7)
-
Creating the guest virtual machine
Important: Create the virtual machine, as normal, without starting the virtual machine. Follow one of the procedures below.
Select one of the following guest-creation methods, and follow the instructions.
-
Create the guest virtual machine with
virshThis method attaches the virtio driver floppy disk to a Windows guest before the installation.
If the virtual machine is created from an XML definition file with
virsh, use thevirsh definecommand not thevirsh createcommand.-
Create, but do not start, the virtual machine. Refer to Defining a Guest Virtual Machine with an XML File for details on creating virtual machines with the
virshcommand. -
Add the driver disk as a virtualized floppy disk with the
virshcommand. This example can be copied and used if there are no other virtualized floppy devices attached to the guest virtual machine. Note that vm_name should be replaced with the name of the virtual machine.# virsh attach-disk *vm_name* /usr/share/virtio-win/virtio-win.vfd fda --type floppyContinue with step 3.
-
-
Create the guest virtual machine with virt-manager and changing the disk type
-
At the final step of the virt-manager guest creation wizard, check the Customize configuration before install checkbox.

Click Finish.
-
Open the Add Hardware wizard
Click Add Hardware in the bottom left of the new panel.
-
Select storage device
Storage is the default selection in the Hardware type list.

Ensure that the Select managed or other existing storage radio button is selected.
Click Browse.
In the window that opens, click Browse Local.
Navigate to
/usr/share/virtio-win/virtio-win.vfd, and click Select to confirm.Change Device type to Floppy disk.
Click Finish to continue.
-
Confirm settings
Review the device settings.

You have now created a removable device accessible by your virtual machine.
-
Change the hard disk type
Select the disk and click Remove.

Add a new virtual storage device by clicking Add Hardware.
Change the Device type from IDE disk to Virtio Disk.
Click Finish to confirm the operation.
-
Ensure settings are correct
Review the settings for VirtIO Disk 1.

When you are satisfied with the configuration details, click Begin Installation.
Continue with step 3.
-
-
Create the guest virtual machine with
virt-installAppend the following parameter exactly as listed below to add the driver disk to the installation with the
virt-installcommand:--disk path=/usr/share/virtio-win/virtio-win.vfd,device=floppyImportant: If the device you want to add is a disk (that is, not a floppy disk or a CD-ROM), you will also need to add the
bus=virtiooption to the end of the--diskparameter:--disk path=/usr/share/virtio-win/virtio-win.vfd,device=disk,bus=virtioBased on the version of Windows you are installing, append the relevant option to the
virt-installcommand. For a list of Windows versions and the appropriate option, run the following command:osinfo-query osThe following is an example of the option for Windows 7:
--os-variant win7
-
-
Additional steps for driver installation
During the installation, additional steps are required to install drivers.
For information on installing these drivers, refer to the documentation for the version of Windows that you are installing.


Pinned Comments
jetm commented on 2021-07-02 17:04 (UTC)
After the virtio-win 0.1.196 update, note these two changes:
-
ISO image is copied at
/var/lib/libvirt/images -
The Windows XP floppies are not distributed anymore as upstream remove the support
joelkay commented on 2022-10-21 15:59 (UTC)
0.1.225.1-1 seems to not install on Win11 VM, not sure if I’m allowed to post issues like this?
Downgraded back to 0.1.221.1-1 and it installed without any issues
eclairevoyant commented on 2022-07-30 20:05 (UTC)
Is there a reason the .install file is included when it doesn’t do any action? I think it can be removed, along with the commented install= line in the PKGBUILD
solsticedhiver commented on 2022-01-27 20:43 (UTC)
virt-v2v expects virtio-win drivers (the iso is prefered) to be in /usr/share/virtio-win
The package could install a symlink towards the iso, there too ?
Note: I just created virt-v2v package and would like to include virtio-win as optdepends
softwarerat commented on 2021-09-22 14:09 (UTC)
@SamLukeYes I am aware that it’s not included in upstream anymore, but i my opinion, you should download XP floppies from the last version where it was still available (0.1.190).
SamLukeYes commented on 2021-09-22 01:03 (UTC)
@softwarerat It is upstream that doesn’t distribute XP floppies any more. If you want those floppies, you can simply download them from the release archive.
softwarerat commented on 2021-09-21 17:22 (UTC)
Please add Windows XP floppies again
jetm commented on 2021-08-28 18:46 (UTC)
@thisischrys Do you know this is voluntary work that is based on collaboration from others? Instead of being rude, could you be more helpful by providing which Windows versions are supported?
thisischrys commented on 2021-08-28 18:39 (UTC)
Older windows versions are not supported, please adjust Description accordingly to avoid wasting people’s time.
jetm commented on 2021-07-02 17:04 (UTC)
After the virtio-win 0.1.196 update, note these two changes:
-
ISO image is copied at
/var/lib/libvirt/images -
The Windows XP floppies are not distributed anymore as upstream remove the support
chiphead commented on 2021-07-02 08:42 (UTC)
Is this supposed to be the stable or the latest?
version does not match either.