(Image credit: Windows Central)
Although it’s now possible to run a number of Linux distros natively on Windows 10, these environments can be somewhat limited in features and tools you can use. Also, you can only pick from three distros, including Ubuntu, SUSE Linux Enterprise, and OpenSUSE Leap, and you’re stuck with the command-line interface, which means that you can’t run any of the graphical experiences (e.g., GNOME, KDE, XFCE) or Linux-based graphical applications.
Of course, you can always install your favorite Linux distro on a second machine, but if you don’t have one, it’s still possible to run a full-blown version of Linux using a virtual machine (VM).
If you’re running Windows 10, you can enable Hyper-V on your device to create a VM to install your preferred distro whether you’re a developer or an enthusiast who just wants to know what’s the Linux fuzz all about.
In this Windows 10 guide, we’ll walk you through the steps to install most Linux distributions on virtual machines using Microsoft’s Hyper-V virtualization feature.
- Guide requirements
- How to enable Hyper-V on Windows 10
- How to create a virtual machine using Hyper-V
- How to install Ubuntu Linux using Hyper-V on Windows 10
Guide requirements
To run a Linux virtual machine on Windows 10, you’ll need the following:
- A computer with support for Hyper-V.
- An ISO file to install your preferred Linux distribution.
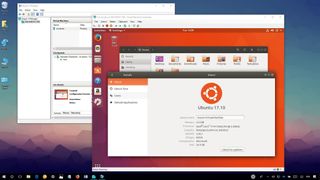
In this guide, we’ll be using Ubuntu version 17.10, which you can download from the official Ubuntu website. However, it’s possible to install version 16.04, which might be a more stable version of the open source project, and you can also install other distros, including:
- CentOS and Red Hat Enterprise Linux.
- Debian.
- SUSE.
- Oracle Linux.
- FreeBSD.
How to enable Hyper-V on Windows 10
Hyper-V is a virtualization technology from Microsoft available on Windows 10 Pro, Enterprise, and Education, and it allows you to create one or multiple virtual machines to install and run different OSes on the same physical hardware.
Verifying Hyper-V support
Although Hyper-V is part of Windows 10, there is a minimum hardware requirement a computer must meet to enable the feature.
- 64-bit CPU with Second Level Address Translation (SLAT).
- Processor must support VM Monitor Mode Extension (VT-c on Intel chips).
- 4GB of memory at a minimum.
In addition, you have to make sure the Virtualization Technology and Hardware Enforced Data Execution Prevention options are enabled on your system BIOS.
You can quickly verify your computer has the required support for Hyper-V using Systeminfo:
- Open Start.
- Search for Command Prompt and click the top result.
- Type the following command and press Enter:
systeminfo.exe - Under Hyper-V Requirements, if the result reads Yes, then you can run Hyper-V.
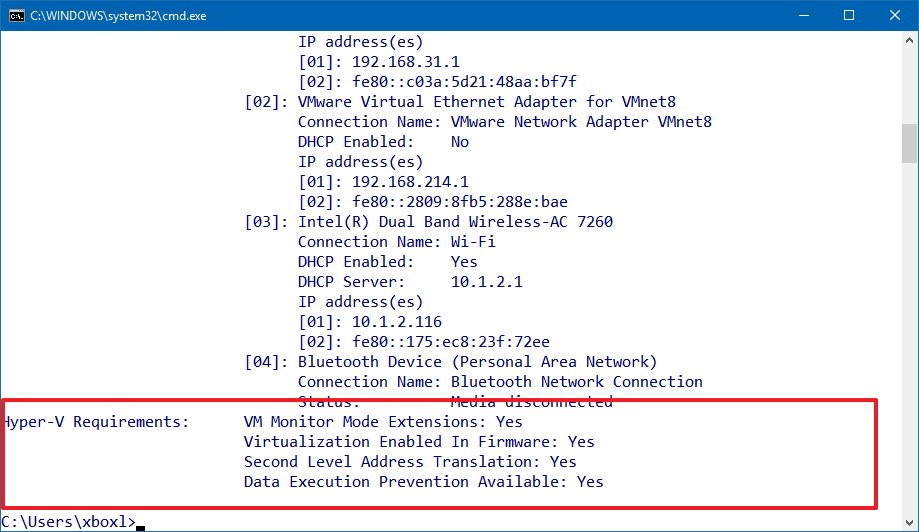
If the command displays No under Hyper-V Requirements, then your hardware doesn’t support this feature, or you need to make sure to enable it manually.
Enabling Hyper-V
Use the following steps to enable Hyper-V on Windows 10:
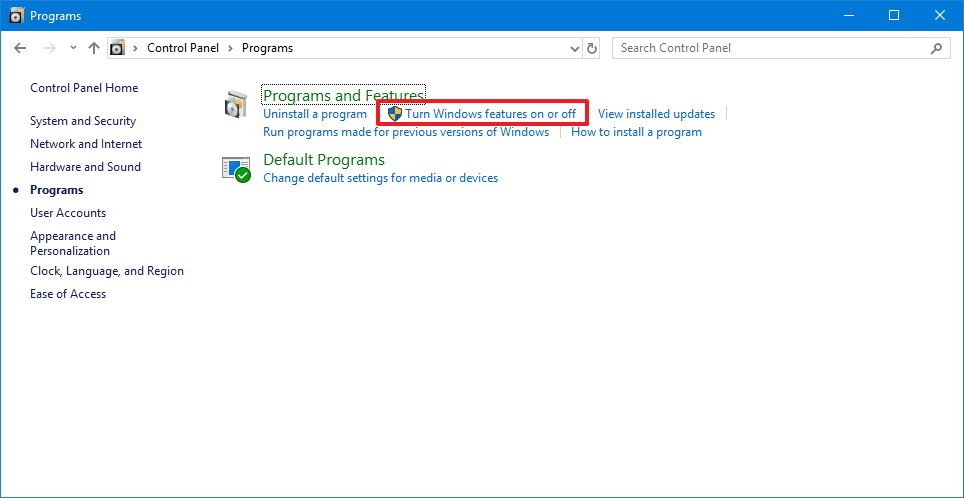
- Open Control Panel.
- Click on Programs.
- Click on Turn Windows features on or off.
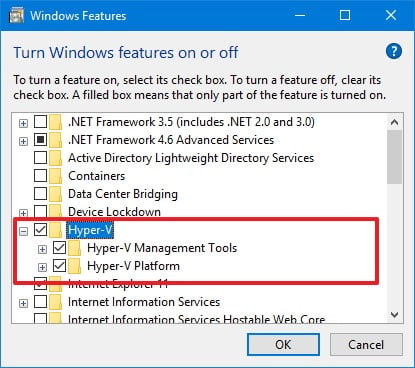
- Check the Hyper-V option making sure: Hyper-V Management Tools and Hyper-V Platform are also selected.
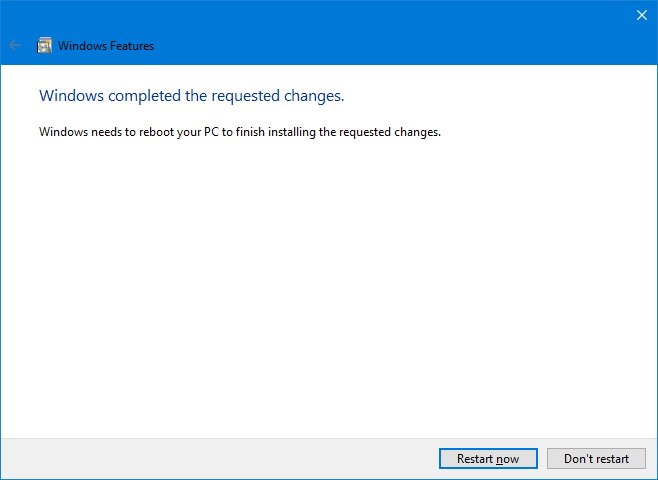
- Click OK to begin the process.
- After the installation completes, click Restart now to apply the changes.
How to create a virtual machine using Hyper-V
Once you’ve completed adding the virtualization layer to Windows 10, you’ll need to create a virtual machine for the Linux distribution you want to use.
However, before you do that, you must create a virtual switch to allow the VM to connect to the internet.
Creating a virtual switch
Use the following steps to configure a virtual switch on Hyper-V:
- Open Start.
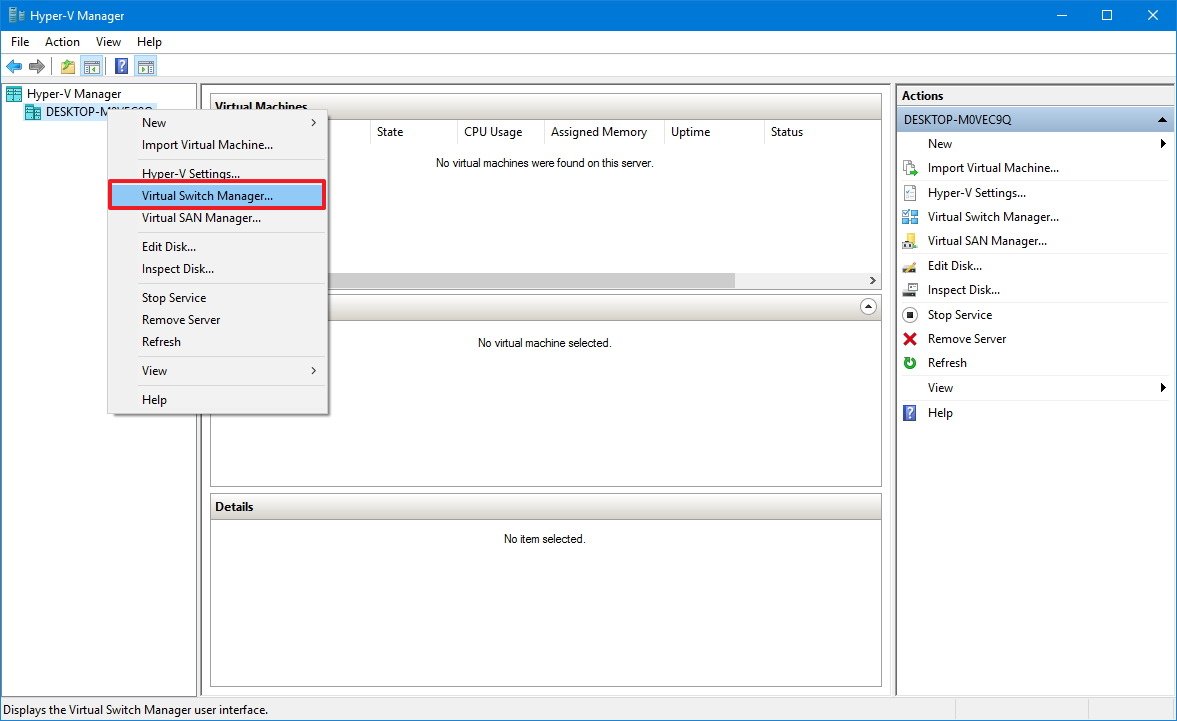
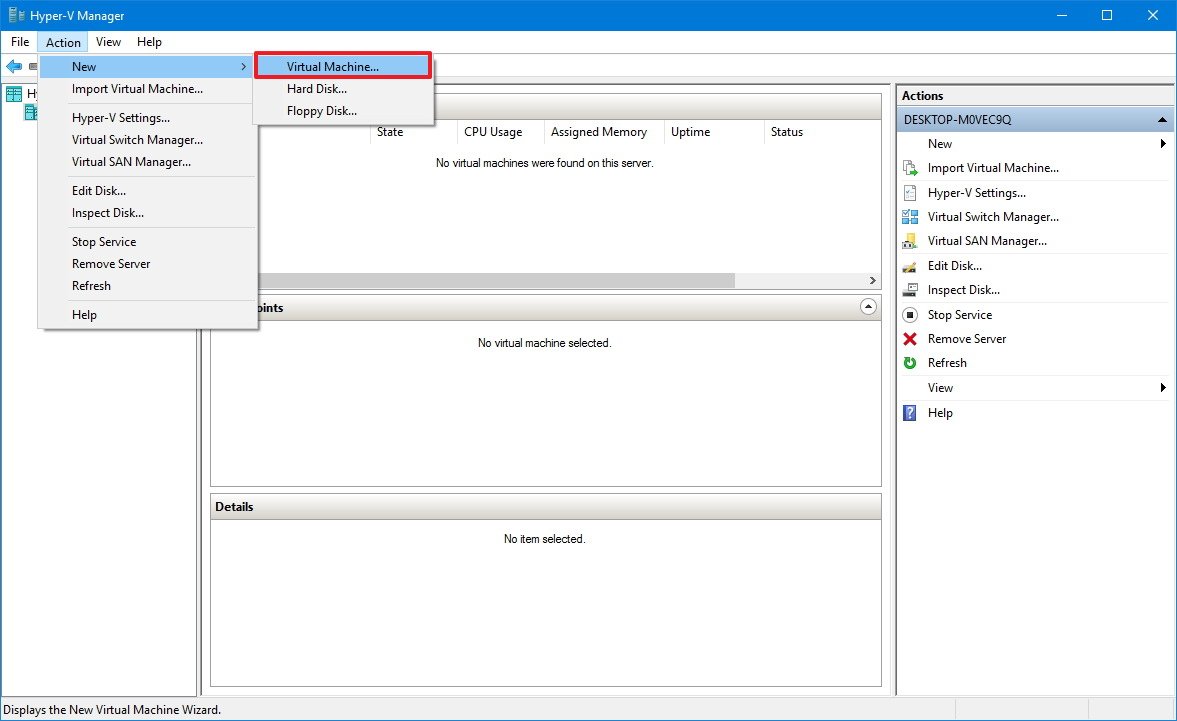
- Search for Hyper-V Manager and click the top result.
- Click on the Action menu.
- Select New and click on Virtual Switch Manager.
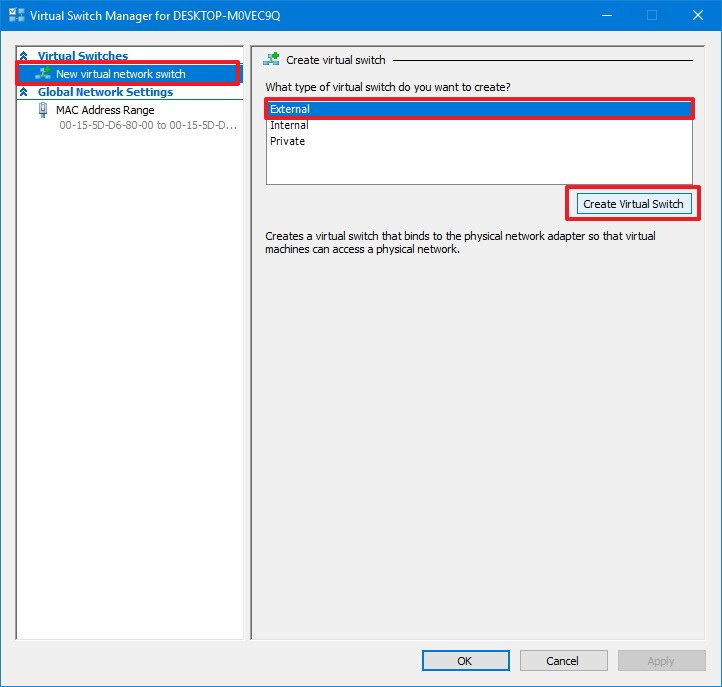
- On the left pane, select New virtual network switch.
- On the right, select External.
- Click the Create Virtual Switch button.
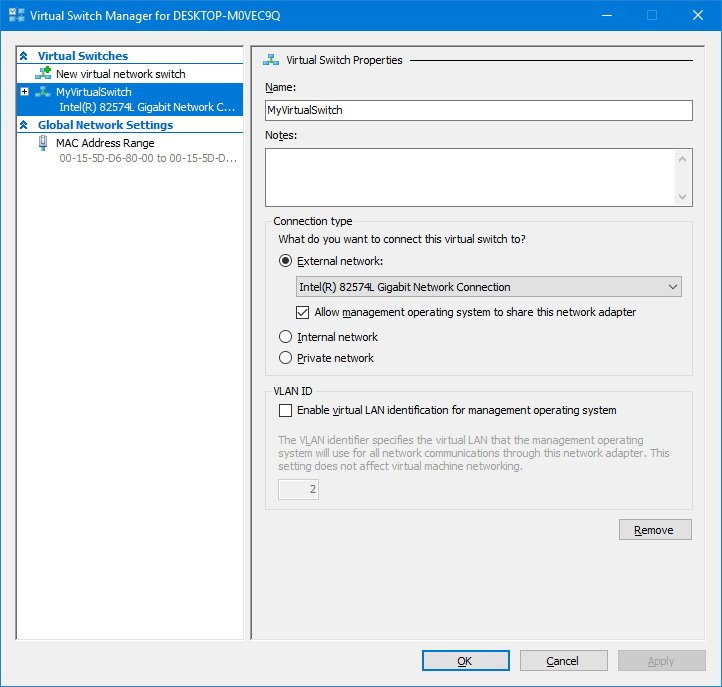
- Enter a new descriptive name for the switch (e.g., MyVirtualSwitch).
- Under connection type, make sure your network adapter is select on External network.
- Click Apply.
- Click OK.
Creating a virtual machine
After creating the virtual switch, you can proceed to create a new virtual machine:
- Open Start.
- Search for Hyper-V Manager and click the top result.
- Click on the Action menu.
- Select New and click on Virtual Machine.
- Click the Next button.
- Enter a descriptive name for your virtual machine (e.g., vm-ubuntu).
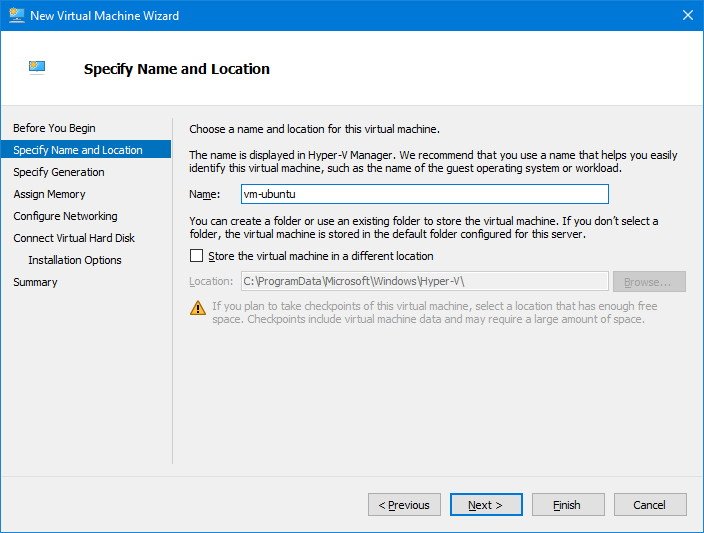
- Use the default location to store your virtual machine, or check the Store the virtual machine in a different location option to select a different path.
- Click Next to continue.
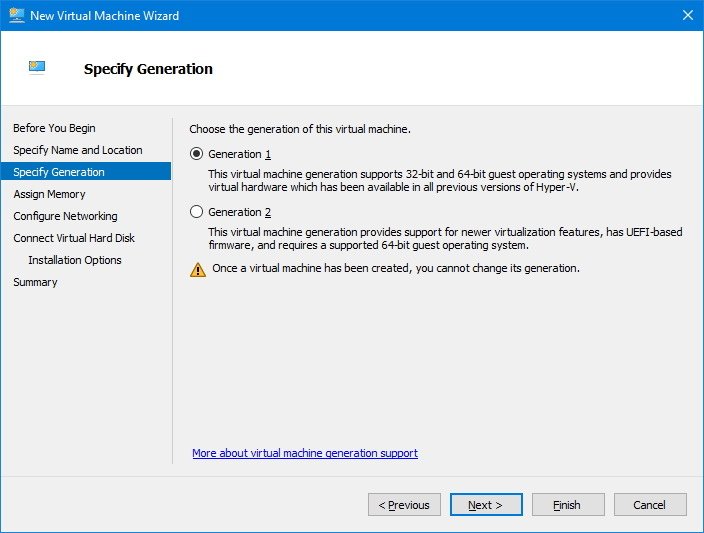
- You can leave the default Generation 1 option selected. Or you can select Generation 2 if you want a UEFI-based firmware.
- Click Next.
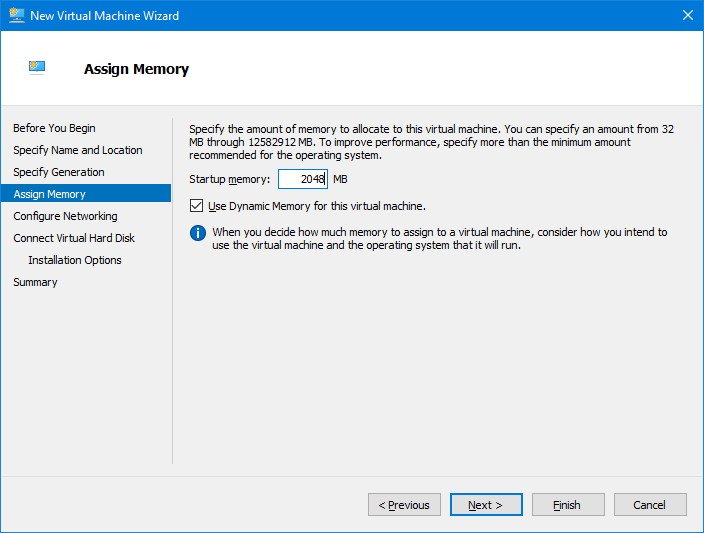
- Select the amount of RAM to allocate for your virtual machine. In the case of Ubuntu, you need a minimum of 2GB of memory.You can allocate as much memory as you want, but this setting will always depend on the physical memory available on your computer.
- Click Next.
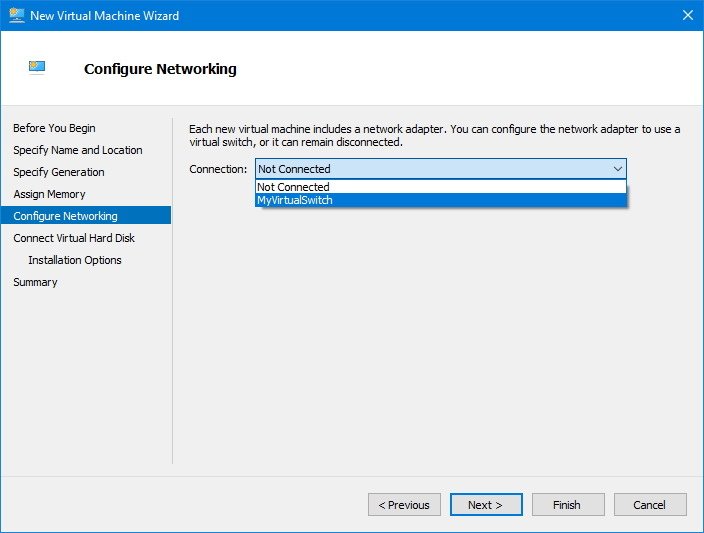
- Use the drop-down menu to select the virtual switch you created earlier.
- Click Next.
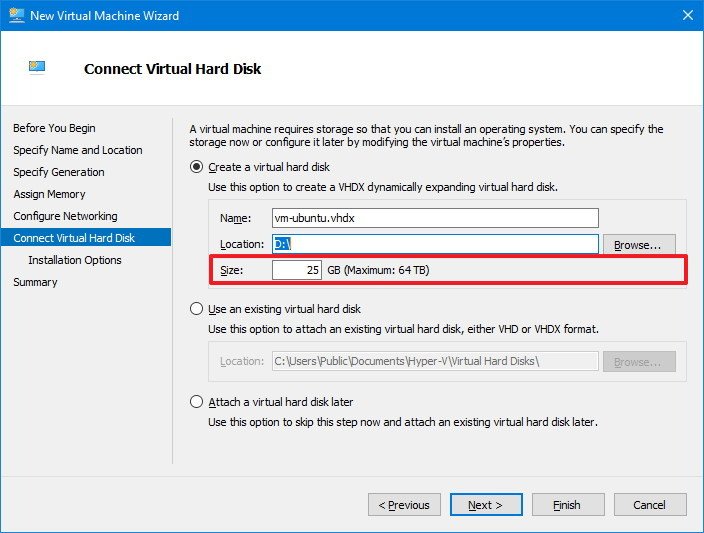
- You can leave all the default settings to create a virtual hard drive, but under Size make sure to allocated at least 25GB of storage, which is the minimum required to run Ubuntu.
- Click Next to continue.
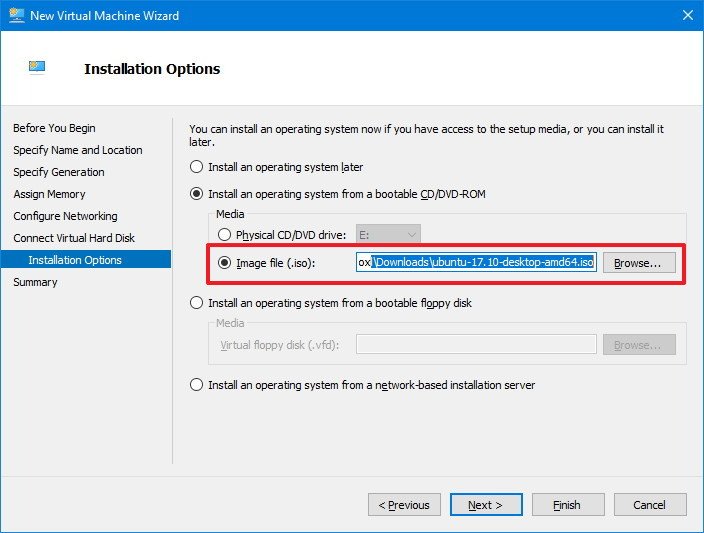
- On Installation options, select the Install an operating system from a bootable CD/DVD-ROM option.
- Select the Image file (.iso) option.
- Select the path for the ISO file with the Ubuntu installation files.
- Click Next.
- Click Finish.
How to install Ubuntu Linux using Hyper-V on Windows 10
The last step is to start the virtual machine and install the Linux distribution you want to use.
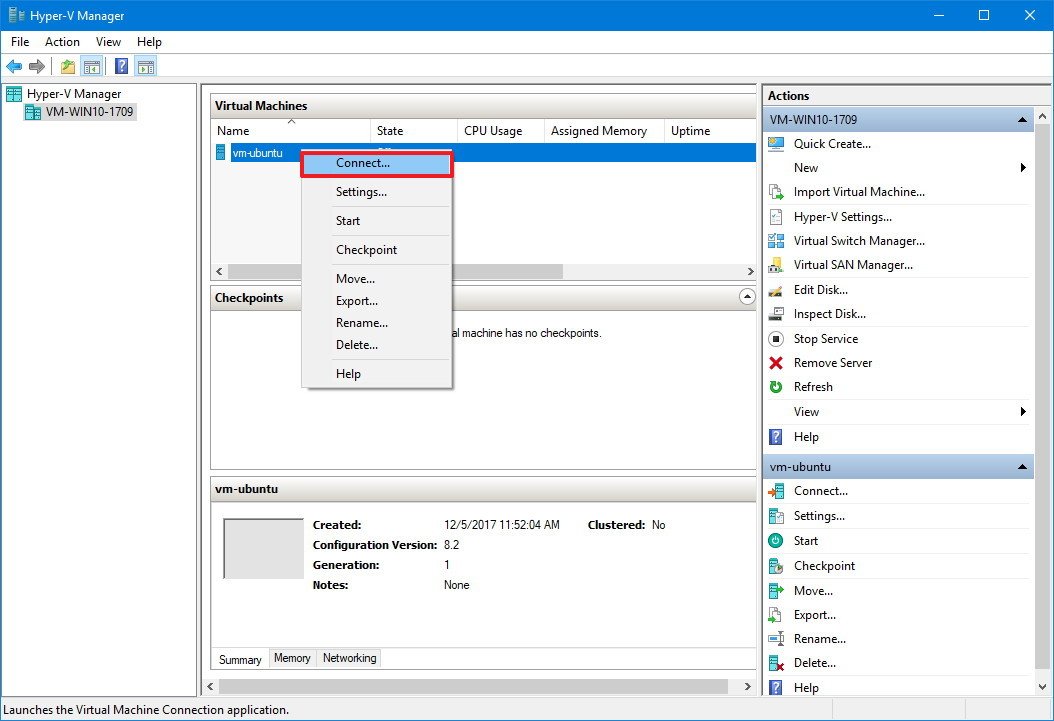
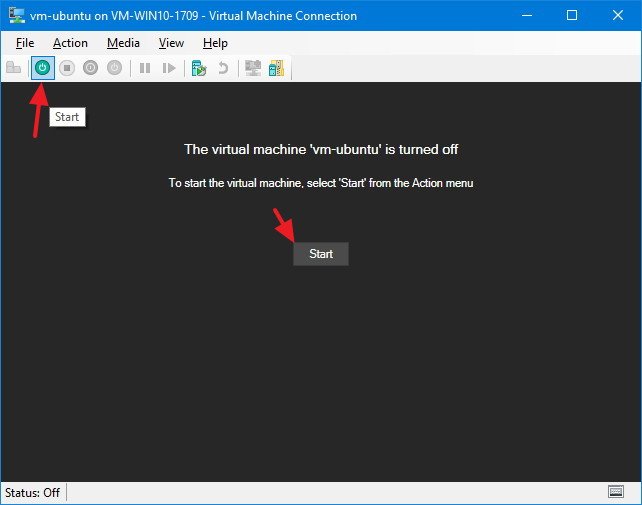
- On Hyper-V Manager, under Virtual Machine, right-click the newly created device, and select Connect.
- Click the Start (power) button.
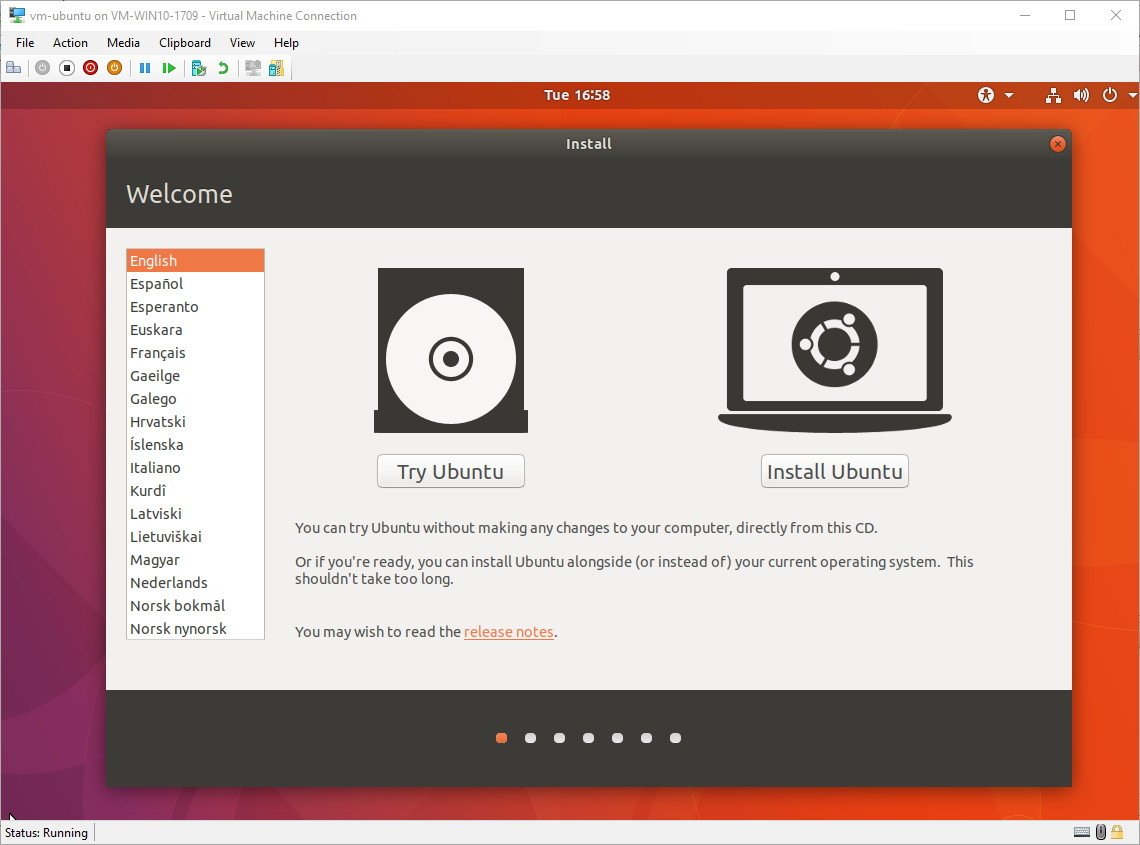
- Select your language.
- Click the Install Ubuntu button.
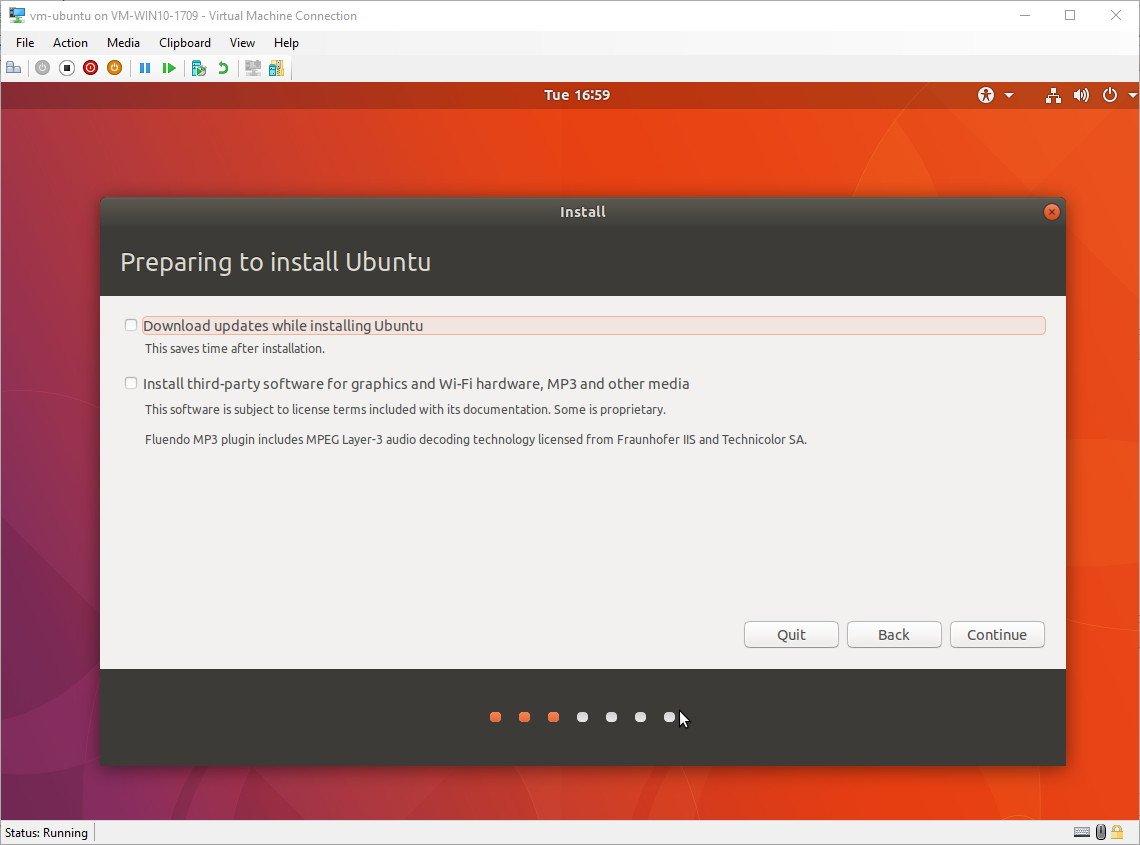
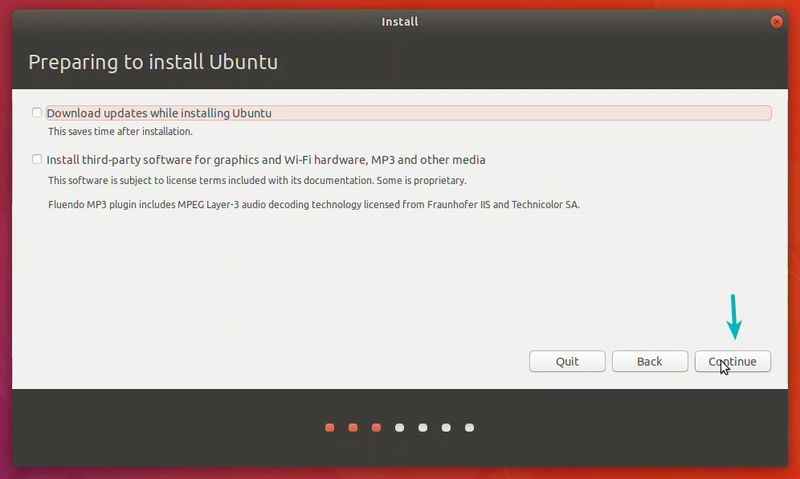
- Check the Install third-party software for graphics and Wi-Fi hardware, Flash, MP3 and other media option.
- Click Continue.
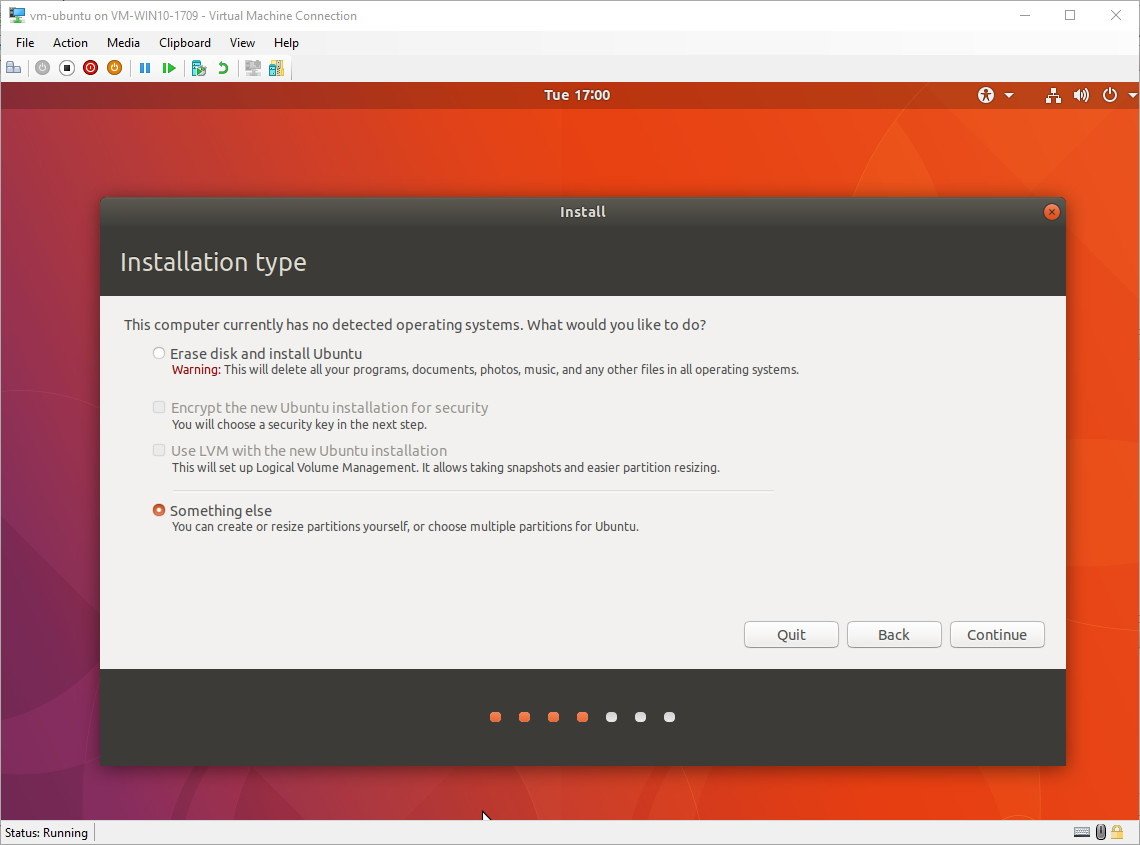
- Select the Something else option.
- Click Continue.
- Double-click the /dev/sda drive.
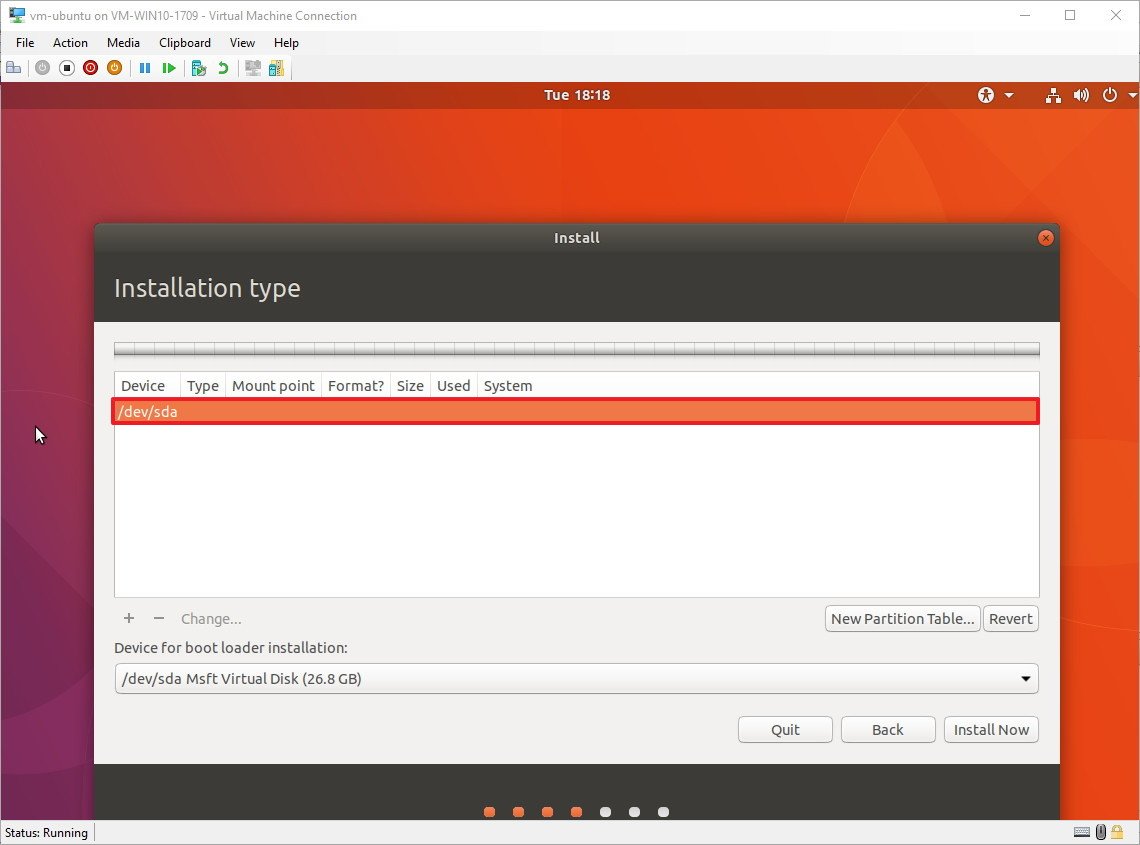
- Click Continue.
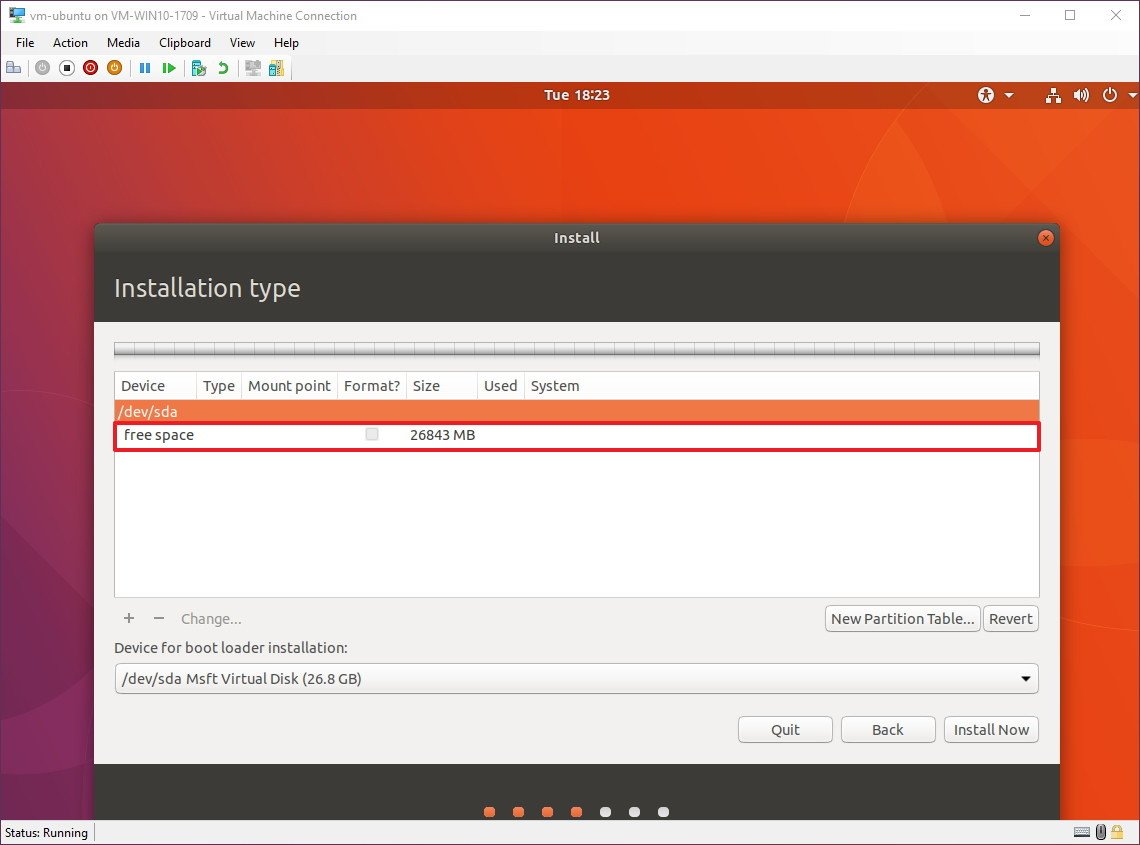
- Double-click free space.
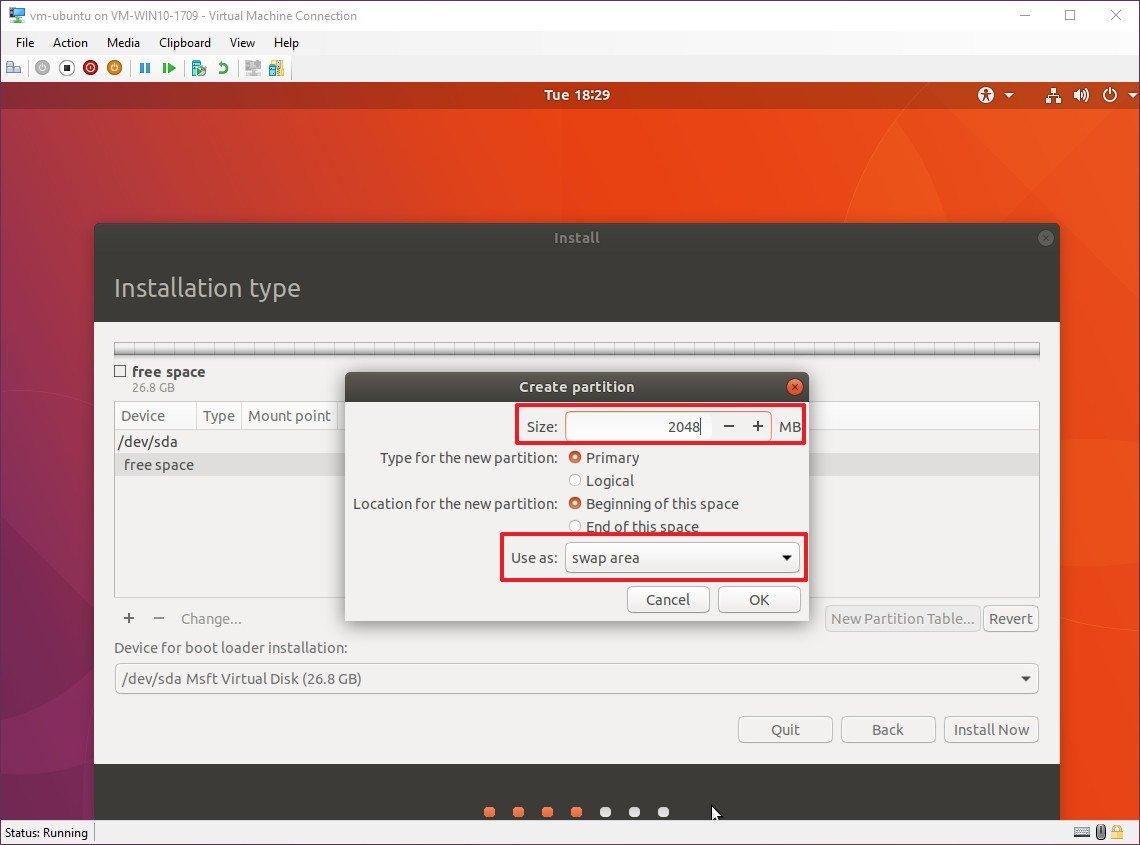
- Under «Use as,» use the drop-down menu and select Swap area to create a swap partition.
- Under «Size,» select the amount of space for the swap partition, which should be about 2x of the amount of RAM allocated for the virtual machine.
- Click OK.
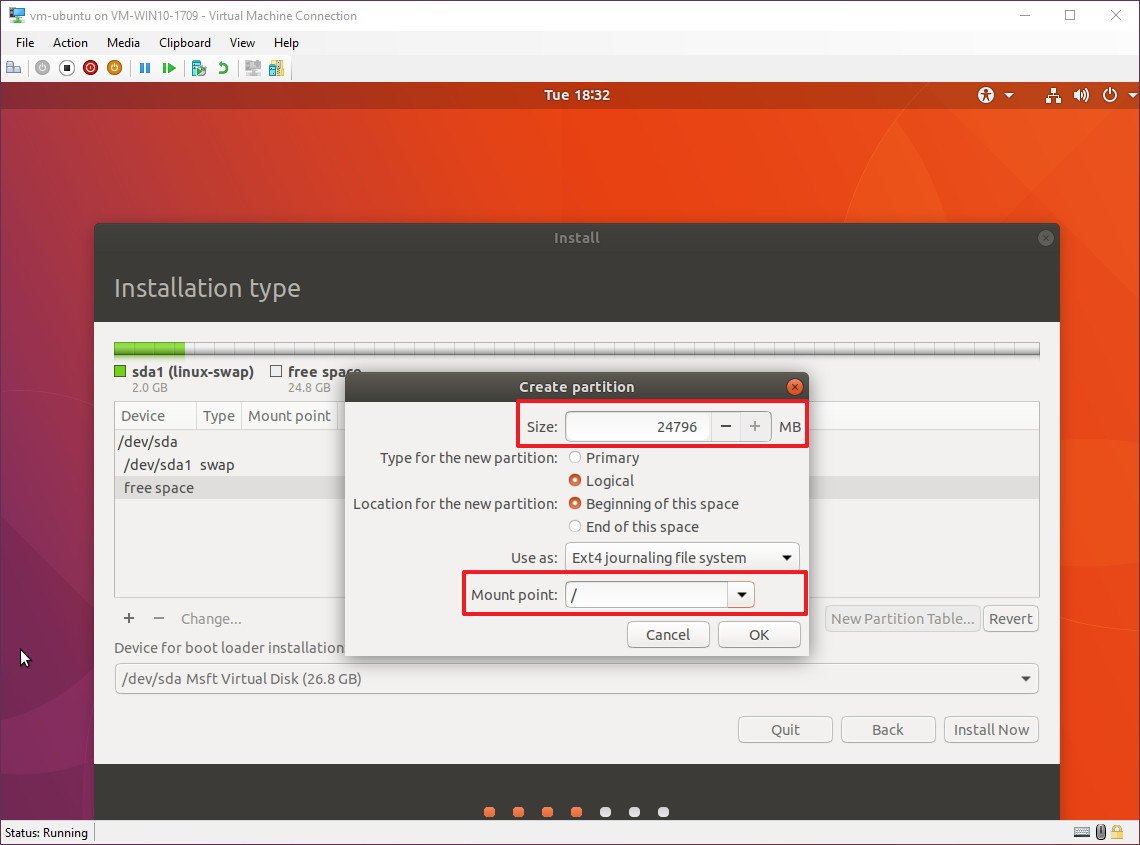
- Double-click free space again.
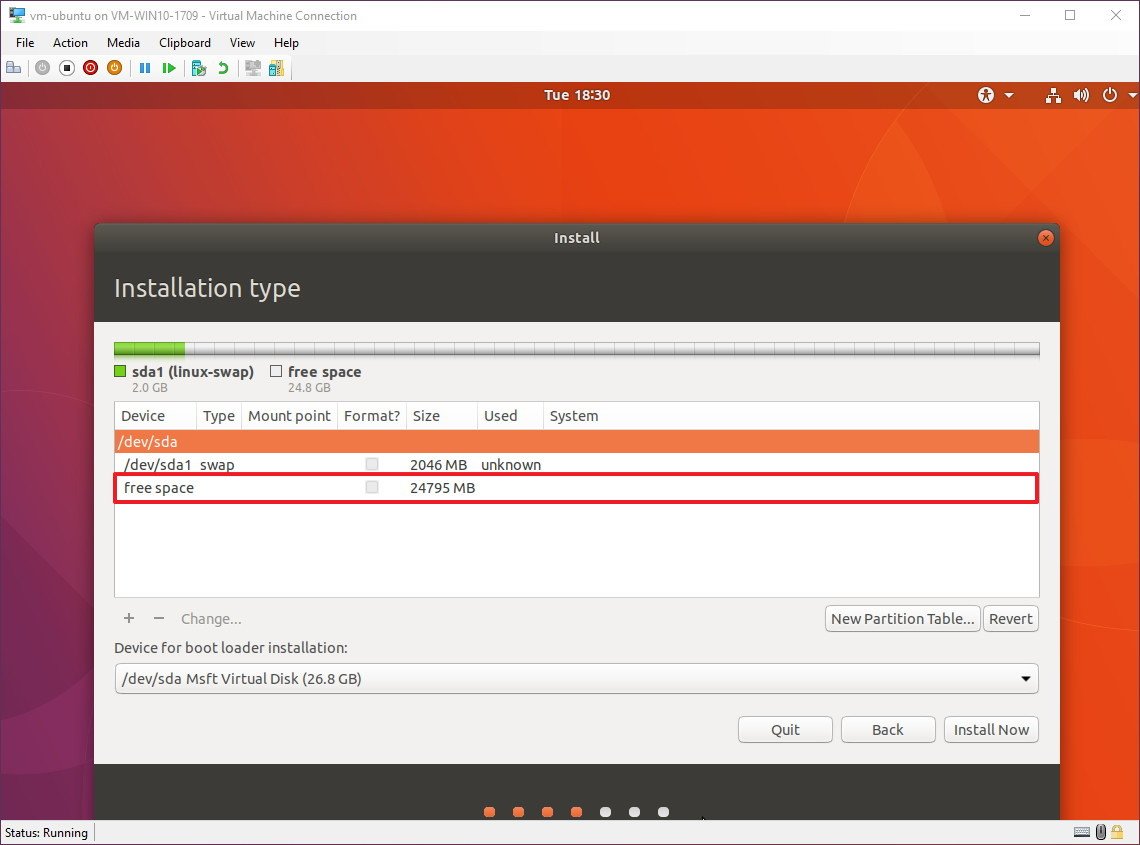
- Select the amount of space to allocate for the installation.
- Under «Mount point,» use the drop-down menu and select root /.
- Click OK.
- Select the ext4 partition from the list.
- Click the Install Now button.
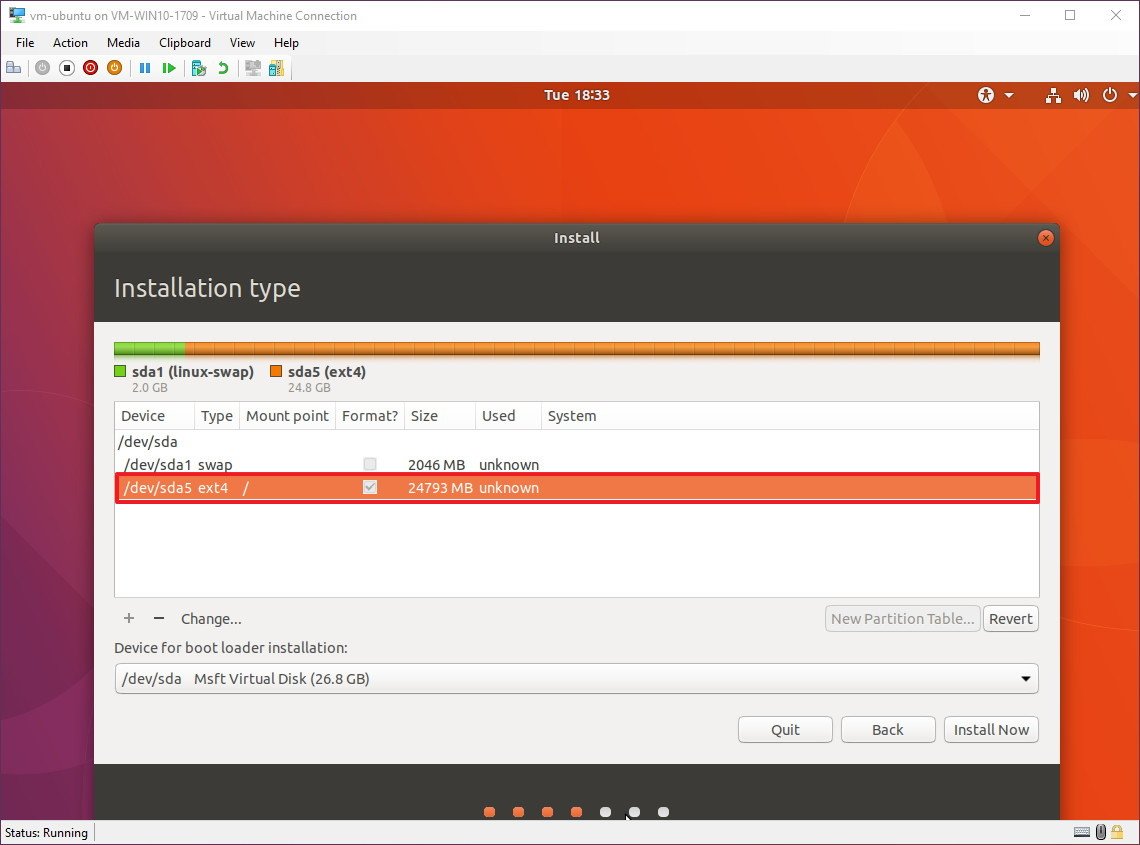
- Click Continue to install Ubuntu.
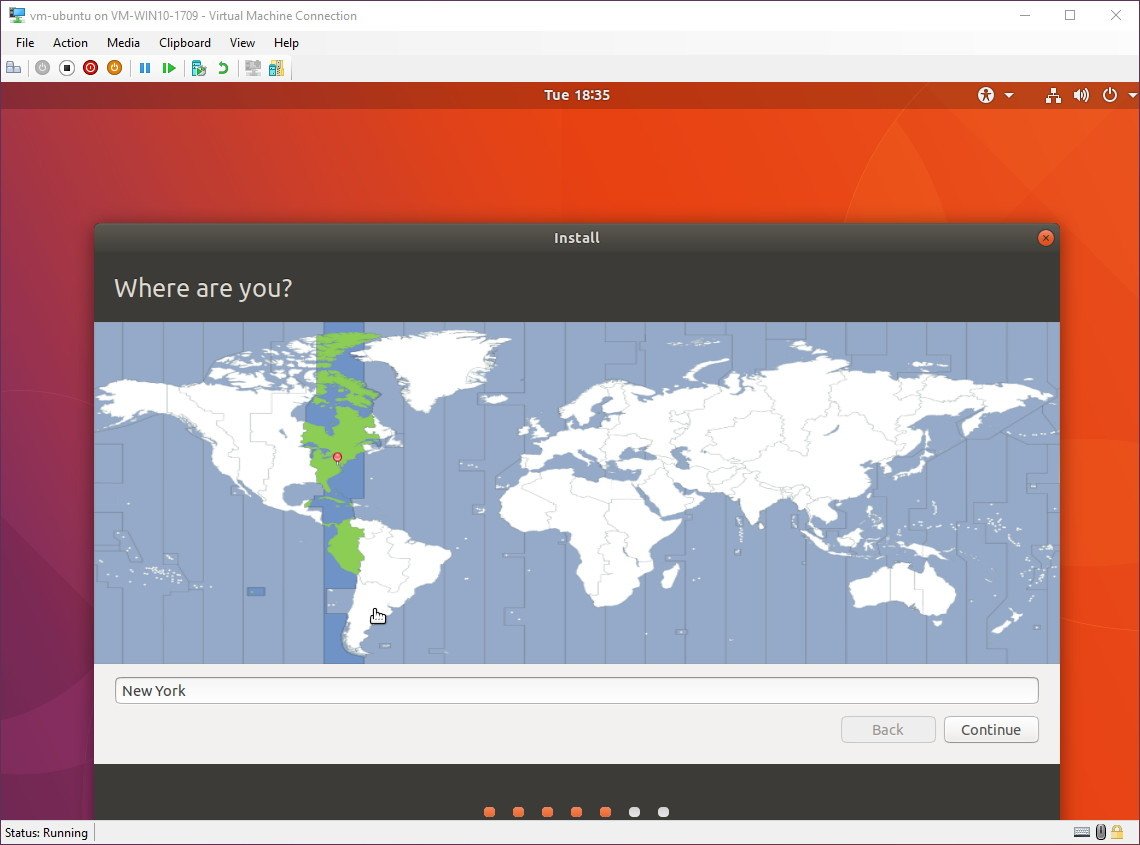
- Select your time zone.
- Click Continue.
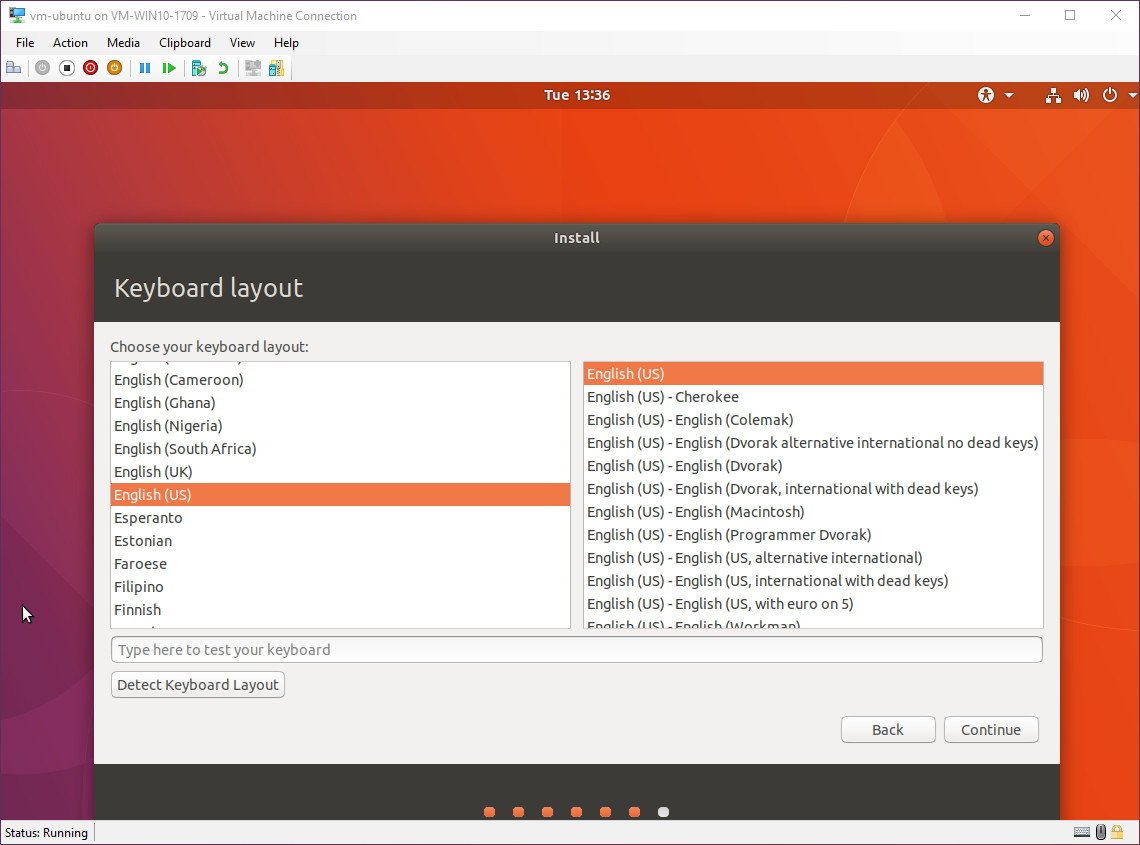
- Select the keyboard layout.
- Click Continue.
- Create a user account with your information.
- Click Continue.
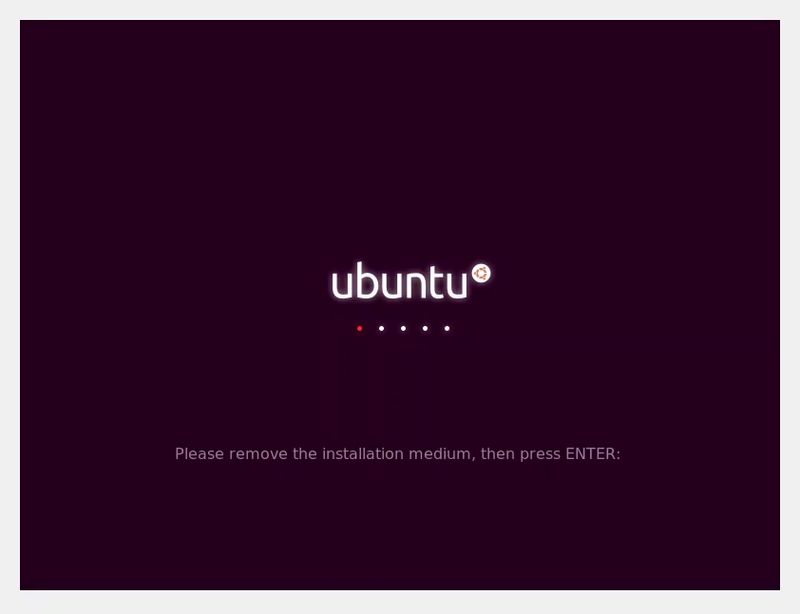
- Restart the virtual machine to finish the setup.Quick Tip: If during the final restart process, you get a message to remove the installation and press Enter, but hitting the key won’t restart the VM, just click the Turn off button and then turn it back on again.
After completing the steps, you can just turn on the VM and start using Ubuntu Linux alongside Windows 10.
While we’re focusing this guide setting up Ubuntu, you can also refer to these instructions to run other distributions of Linux.
More Windows 10 resources
For more helpful articles, coverage, and answers to common questions about Windows 10, visit the following resources:
- Windows 10 on Windows Central – All you need to know
- Windows 10 help, tips, and tricks
- Windows 10 forums on Windows Central
Get the best of Windows Central in in your inbox, every day!
Mauro Huculak is technical writer for WindowsCentral.com. His primary focus is to write comprehensive how-tos to help users get the most out of Windows 10 and its many related technologies. He has an IT background with professional certifications from Microsoft, Cisco, and CompTIA, and he’s a recognized member of the Microsoft MVP community.
There are several ways to install Linux.
- You can clean everything from your system and install Linux.
- You can dual boot Linux with Windows and choose one of the operating systems at the boot time.
- You can even install Linux within Windows from Microsoft Store (though this only provides you with the command line version of Linux).
But if you want to use Linux without making any changes to your Windows system, you can go the virtual machine route.
Basically, you install and use Linux like any regular Windows application. When you just want to try Linux for limited use, virtual machines provide the most comfortable option.
In this tutorial, I’ll show you how to install Linux inside Windows using VirtualBox.
VirtualBox is free and open source virtualization software from Oracle. It enables you to install other operating systems in virtual machines. It is recommended that your system should have at least 4GB of RAM to get decent performance from the virtual operating system.
Requirements
- Good internet connection to download software and Linux ISO. (You can also use some other computer with an internet connection to download these files.)
- Windows system with at least 12 GB of free space.
- Windows system with 4GB of RAM. (It can work with less RAM as well, but your system will start to lag while using Linux in the virtual machine.)
- Make sure to enable virtualization in the BIOS (some system need it)
I am installing Ubuntu 17.10 in this tutorial, but the same steps apply to any other Linux distribution. If you prefer videos, you can watch the one below from our YouTube channel:
Step 1: Download and install VirtualBox
Go to the website of Oracle VirtualBox and get the latest stable version from here:
Installing VirtualBox is not rocket science. Just double-click on the downloaded .exe file and follow the instructions on the screen. It is like installing any regular software on Windows.
Step 2: Download the Linux ISO
Next, you need to download the ISO file of the Linux distribution. You can get this image from the official website of the Linux distribution you are trying to use.
I am using Ubuntu in this example, and you can download ISO images for Ubuntu from the link below:
Step 3: Install Linux using VirtualBox
You have installed VirtualBox and you have downloaded the ISO for Linux. You are now set to install Linux in VirtualBox.
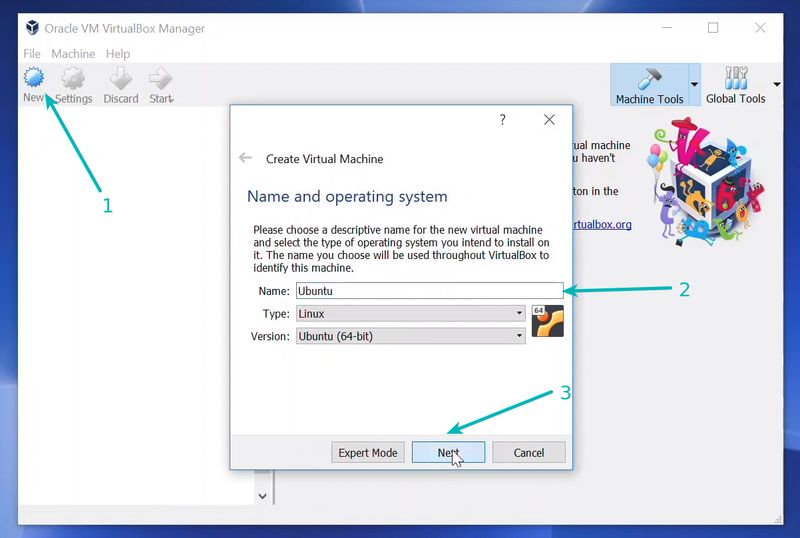
Start VirtualBox, and click on the New symbol. Give the virtual OS a relevant name.
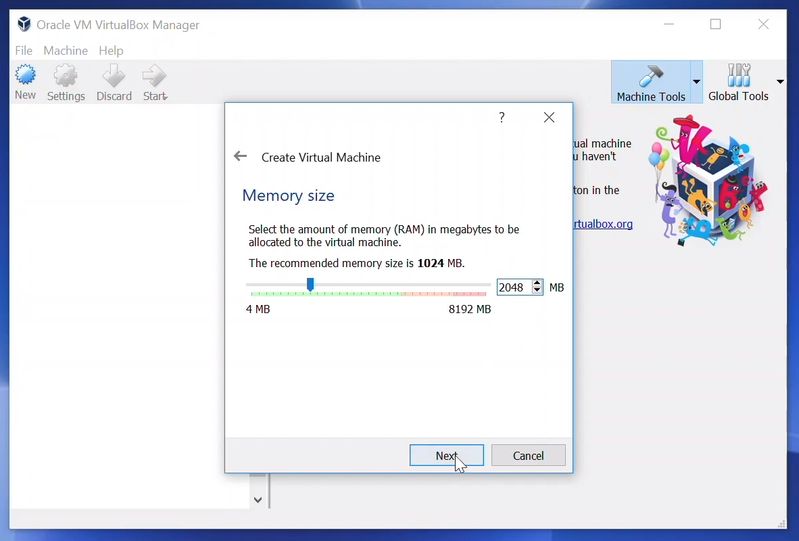
Allocate RAM to the virtual OS. My system has 8GB of RAM and I decided to allocate 2GB of it. You can use more RAM if your system has enough extra.
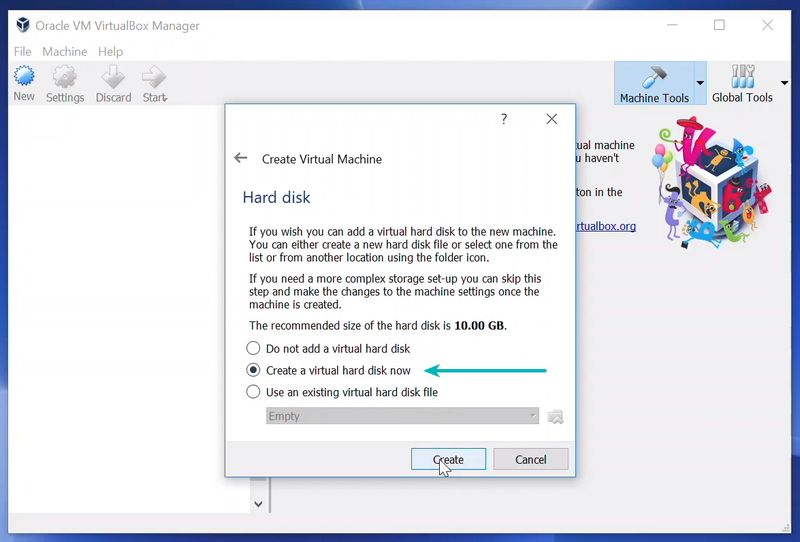
Create a virtual disk. This serves as the hard disk of the virtual Linux system. It is where the virtual system will store its files.
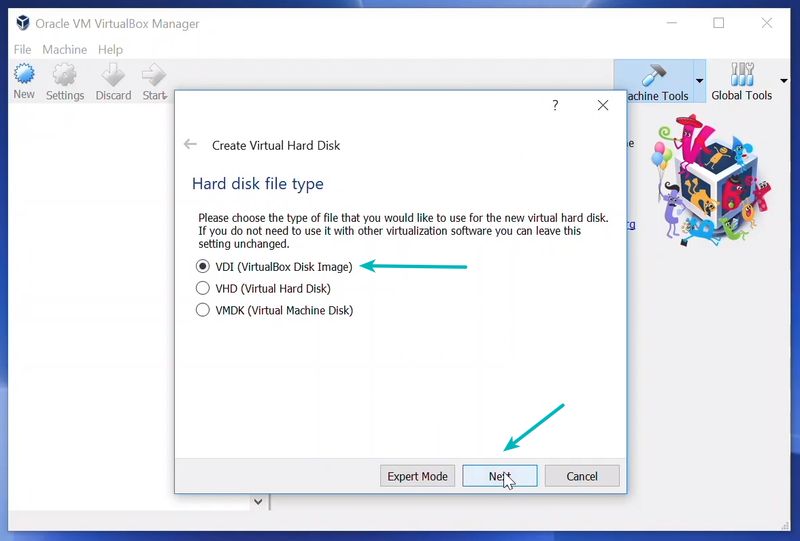
I recommend using the VDI file type here.
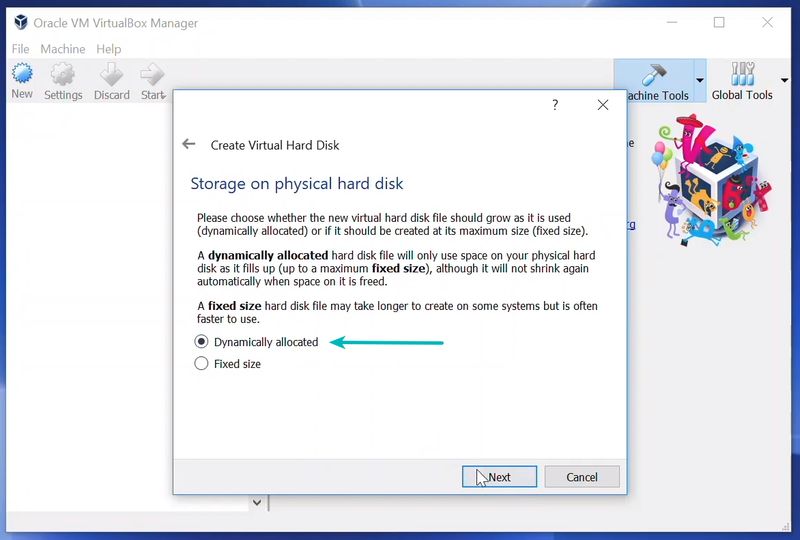
You can choose either the “Dynamically allocated” or the “Fixed size” option for creating the virtual hard disk.
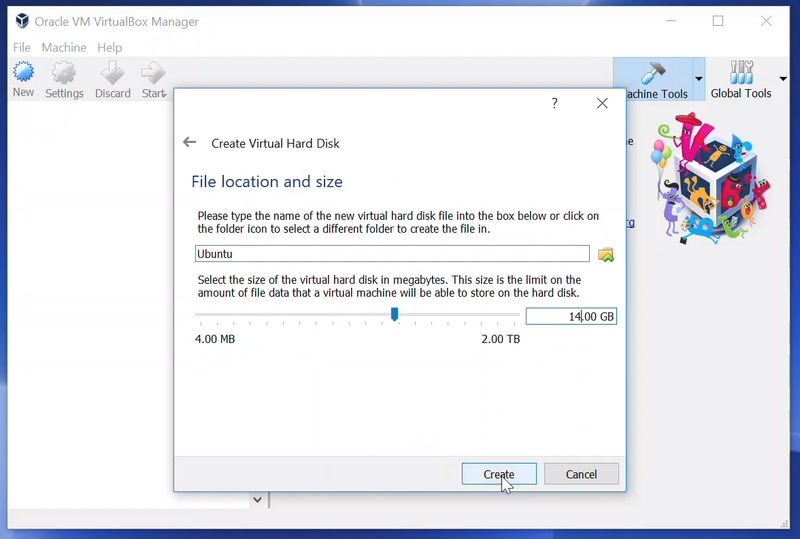
The recommended size is 10 GB. However, I suggest giving it more space if possible. 15-20 GB is preferable.
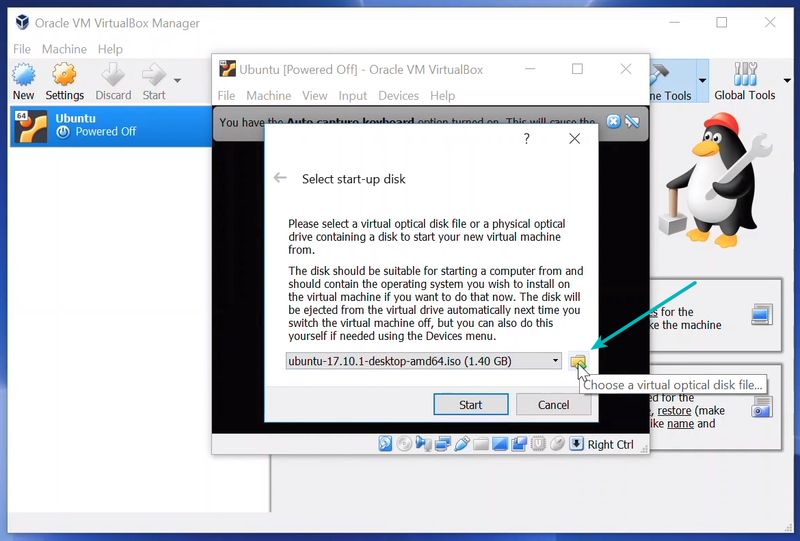
Once everything is in place, it’s time to boot that ISO and install Linux as a virtual operating system.
If VirtualBox doesn’t detect the Linux ISO, browse to its location by clicking the folder icon as shown in the picture below:
Soon you’ll find yourself inside Linux. You should be presented with the option to install it.
Things from here are Ubuntu-specific. Other Linux distributions may have slightly different looking steps, but it won’t be complicated at all.
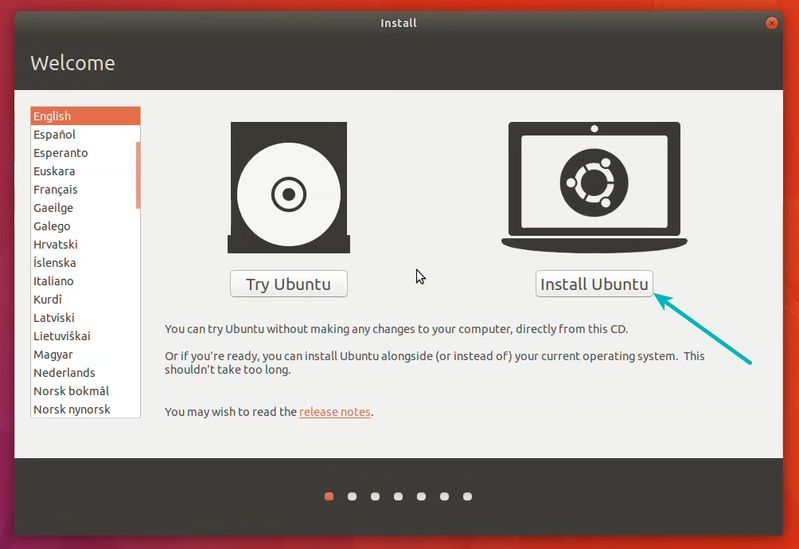
You can skip to Continue.
Select ‘Erase disk and install Ubuntu’. Don’t worry. It won’t delete anything on your Windows operating system. You are using the virtual disk space of 15-20GB that we created in previous steps. It won’t impact the real operating system.
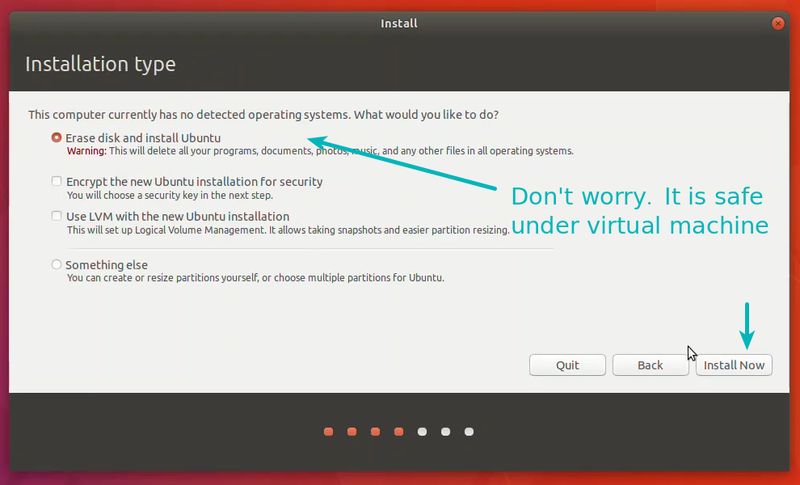
Just click on Continue.
Things are pretty straightforward from here.
Self explanatory.

Try to choose a password that you can remember. You can also reset the password in Ubuntu if you forget it.
You are almost done. It may take 10-15 minutes to complete the installation.
Once the installation finishes, restart the virtual system.
If it gets stuck on the screen below, you may close the VirtualBox.
And that’s all. From now on, just click on the installed Linux virtual machine. You’ll be able to use it directly. The installation is a one time only process. You can even delete the Linux ISO that you downloaded earlier.
I strongly recommend using VirtualBox Guest Additions on Ubuntu for it provides better compatibility and you would be able to use copy-paste and drag-drop between Linux and Windows.
Troubleshooting: AMD-V is disabled in the BIOS
If you face this error while using the virtual machine:
Not in a hypervisor partition (HVP=0) (VERR_NEM_NOT_AVAILABLE).
AMD-V is disabled in the BIOS (or by the host OS) (VERR_SVM_DISABLED).
Result Code:
E_FAIL (0x80004005)
Component:
ConsoleWrap
Interface:
IConsole {872da645-4a9b-1727-bee2-5585105b9eed}
This means that virtualization is blocked on your system. You’ll have to activate it in your BIOS settings first.
Reboot your system and as soon as it powers up, press F2/F10/F12 to access BIOS settings. You have to look for the virtualization option in the BIOS and enable it.
Any questions?
That’s all you need to do to install Linux in VirtualBox on Windows.
If you have any doubts, or if you encounter any issues, please feel free to ask your questions in the comment box below.
Although Windows users could also wish to run Linux software, Linux users frequently desire to run Windows applications on Linux. You can use Linux applications without leaving Windows, whether you’re searching for an improved development environment or strong command-line tools. There are several alternatives to purchasing a new laptop to run the OS for running Linux applications on Windows. Since anybody can set up a virtual machine with a free Linux distribution without the requirement for software licenses, it is simpler than running Windows software on Linux.
There are two popular methods for running Linux software on Windows, they are
- WSL (Windows Subsystem for Linux)
- Virtual Machine
In this article, we’ll discuss how to implement both of these methods briefly.
Note: If you’re using Windows 11, the below steps can be omitted since Windows 11 can run Linux GUI apps out of the box.
Method 1: Windows Subsystem for Linux (WSL)
The WSL is a feature available in Windows that’ll enable one to run the Linux file system, along with Linux command-line tools and GUI applications, directly on Windows. And they can be completely integrated with Windows tools. But the only drawback of WSL is that they are mainly targeted for command-line tools and cannot be used for graphics-intensive programs.
Step 1: Enable the Windows Subsystem for Linux optional feature
Start PowerShell or Command-Prompt with administrator privileges and enter the following command to enable the WSL services on windows, this may be enabled by default in some systems.
Enable-WindowsOptionalFeature -Online -FeatureName -Microsoft-Windows-Subsystem-Linux

Alternatively, you can enable it using the ‘programs and features’ settings.

Step 2: Enable the Virtual Machine platform and Install WSL2
The virtual machine has to be enabled before installing WSL, this can be done using the following command.
dism.exe /online /enable-feature /featurename:Microsoft-Windows-Subsystem-Linux /all /norestart

Once it has been enabled, install WSL by entering the following command in PowerShell or Command-Prompt.
wsl --install
Set the default version of WSL to 2
wsl --set-default-version 2

Step 3: Download and Install a Linux distribution
You can download and install any distro of your choice, for the sake of convenience we’ll be installing ubuntu. Navigate to Microsoft Store and search for ‘ubuntu’ then install the application. Once downloaded open the app and follow through with the installation wizard. Once the installation process is complete you’ll be left with the following terminal. Linux Command-line tools can be executed using this terminal.

Step 4: Download and Install VcXsrv Windows X Server
The X server is a third-party display manager which is a provider of graphics resources and keyboard/mouse events. Download VcXsrv Windows X Server from the link provided – VcXsrv Windows X Server
Once the setup is complete, make sure to disable the access control option to avoid running into errors while running the GUI applications.

Step 5: Setting up the DISPLAY environment variable
Starting the bash terminal, we have to set the DISPLAY environment variable so it uses the windows host IP address since WSL2 and Windows host doesn’t share the network device. Use any of the following commands to set the DISPLAY variable.
export DISPLAY=$(ip route|awk ‘/^default/{print $3}’):0.0
export DISPLAY=”`grep nameserver /etc/resolv.conf | sed ‘s/nameserver //’`:0″

Run the below command to check whether the variable is properly set or not.
echo $DISPLAY

The variable is reset every time a session is restarted so as to avoid running the command each and every time we open the terminal. We can add the command at the end of the /etc/bash.bashrc file. Open the bashrc file using nano or vim and then add the command at the end.
sudo nano /etc/bash.bashrc

Step 6: Create a .xsession file in the user’s home directory
The following command can be used to create a .xsession file in the user’s home directory /home/<user>/.xsession with the content xfce4-session.
echo xfce4-session > ~/.xsession
Now Windows desktop can run Linux GUI apps.

Method 2: Using a Virtual Machine
Using a Virtual Machine is the most efficient and easy way to run Linux apps on Windows, we’ll briefly discuss the installation and setting up a virtual machine with a Linux OS.
Step 1: Download and Install a Virtual Machine
Download a virtual machine of your choice (Oracle or VMware), here we’ll be using a VMware workstation. Download the software from the below link and follow the installation process. Refer to this How to Install VirtualBox on Windows GeeksforGeeks article for setting up a virtual machine using oracle.
Download VMware Workstation.

Step 2: Download a Linux distribution of your choice
You can download any Linux distribution, below are some of the most popular choices along with their links.
- Ubuntu
- Pop! OS
- Linux Mint
- Fedora
Step 3: Installing the OS
Open VMware Workstation, and click on the ‘Create new Virtual Machine’. And then select the installer disc image option and choose the downloaded Linux operating system’s ISO file.

Specify the disk capacity and click on next.

Name the virtual machine and move on to the next step.

Start the virtual machine to boot up the OS and follow the installation steps. Once the installation is complete you can run any Linux GUI apps using the virtual machine.

Step 4: Starting and Running the applications
You can now run any Linux application while within the virtual machines environment, here are some examples.
$ gedit

$ sudo apt install x11-apps -y
$ xcalc

$ xclock

$ xeyes

Installing a Linux virtual machine on Windows 10 has never been easier. With earlier versions of Windows, users only had two options to use Linux.
The first was to go through the struggle of installing a dual-boot operating system if they wanted to toggle between Windows and Linux. That required a USB boot drive and shutting down the Windows OS first.
The other way was to purchase virtual machine software to install the operating system with. Although a more convenient method, the virtualization required a lot of processing power.
On top of that the user needed to download a compatible ISO file to run the operating system.
Now all you need to do to run a Linux VM on Windows 10, is use the Hyper-V capabilities and install Ubuntu inside the Hyper-V manager to launch it at any time with a few clicks.
We also made a video version of this guide on our YouTube channel, if you would rather follow along a video format:
Make sure your PC is capable of running a Linux VM
There are a few requirements to ensure that your PC is able to run the programs necessary. Thankfully it’s a very easy check.
Operating system wise, you need to have either a Pro, Enterprise, or Education version of Windows 10.
In order to check if your machine is capable of running a Linux virtual machine, you first need to open the command prompt.
You can do so by opening the start menu or by pressing the windows key on your keyboard, then typing in ‘cmd‘ and pressing enter.
Type ‘systeminfo‘ into the command prompt and press enter to execute the command. A bunch of information should show up, but you only need to care about the last four lines.

If all of them say Yes, you’re good to go!
Enable Hyper-V on Windows 10
Hyper-V is the key to installing a Linux or Ubuntu VM on Windows 10. It is a built-in alternative to a virtual machine software like VirtualBox.
The Hyper-V takes advantage of a new feature in Windows 10 called Virtual Desktop. If you want to learn more about how to use a Virtual Desktop to toggle between multiple desktops in your work space, check out our article about it.
Virtual Desktop combined with Hyper-V virtualization basically allows you to swap between your normal operating system desktop and a Linux desktop with one press of a button.
This way you can easily toggle between screens, copy text between the systems and much more.
First you need to open your start menu and type in ‘Turn Windows features on or off‘.
Once you see the option, click on it to go to the control panel. You should now see a small window with a bunch of folders with check-boxes next to them.
Look for the folder called ‘Hyper-V‘ and click on the plus next to it to expand its sub-folders.
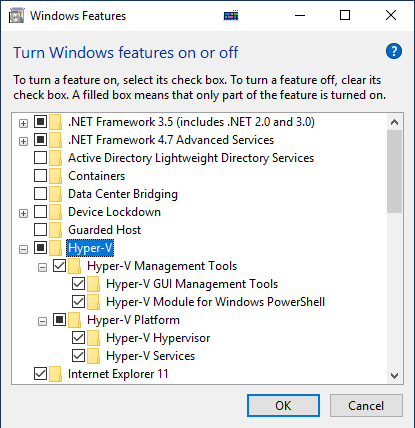
Tick every box under the Hyper-V folder and click OK.
Windows will the install the required package and included features. After this you will be prompted to restart your PC. You need to actually restart your machine for this to work, so we recommend you bookmark this page and come back when you have restarted.
Starting up Hyper-V Quick Create
Now that you’ve enabled Hyper-V and restarted your machine, you’re ready to run the Ubuntu VM on Windows 10.
Again, open up the start menu by pressing the windows key on your keyboard and type ‘Hyper-V’ into the search bar.
You should see an option called Hyper-V Quick Create, go ahead and start it up.
If you found the icon and it launched fine, you can move on the the next section to install Linux.
Can’t see the Hyper-V Quick Create shortcut?
This seems to be a very common occurrence, it even happened to us when trying to make this work for the first time. Thankfully a little research goes a long way and we’ve done it for you.
First, open up the start menu and look for a folder named Windows Administrative Tools. Look for Hyper-V Quick Create there.

If you can’t find it in the above folder either, that means the tools just aren’t installed. This was the case for us as well.
To fix this, you need to download and install free Remote Server Administrator Tools for Windows 10. It is an official toolkit from Microsoft that should be included with every Windows 10 installation since 2018, but for some reason that is not always the case.
Download one of the installers from the above link and run it. You will need to restart your computer after it’s done.
Once you’ve done that, you should be able to find the Quick Create shortcut in the Windows Administrative Tools folder shown above.
If you can’t see it even after all the above steps, leave a comment below and we’ll help you out.
Install Linux on the Virtual Machine
Now that you’ve found the Quick Create shortcut, a window should pop up which allows you to choose which operating system you wish to download.
Although one of the options is a Windows 10 OS, it’s not a free license for Windows, but an evaluation copy that expires in a few days.
Select Ubuntu Linux from the list and click Create Virtual Machine. Windows will now automatically download and install the operating system.
After that’s done, the virtual Linux operating system will show up in a new window and you can continue on to set it up.
That’s all you need to run Ubuntu Linux fast and simple on Windows 10.
How to launch your Ubuntu Linux Virtual Machine faster
If you want to start up the machine faster, you can do so from the Hyper-V Manager.
You can open it up by typing that into the search bar in the start menu or look for it in the Windows Administrative Tools folder.
Once you open it up, you should be able to see your machine name on the left hand side. Choose it and it should show your newly created Ubuntu operating system in the Virtual Machines Box.
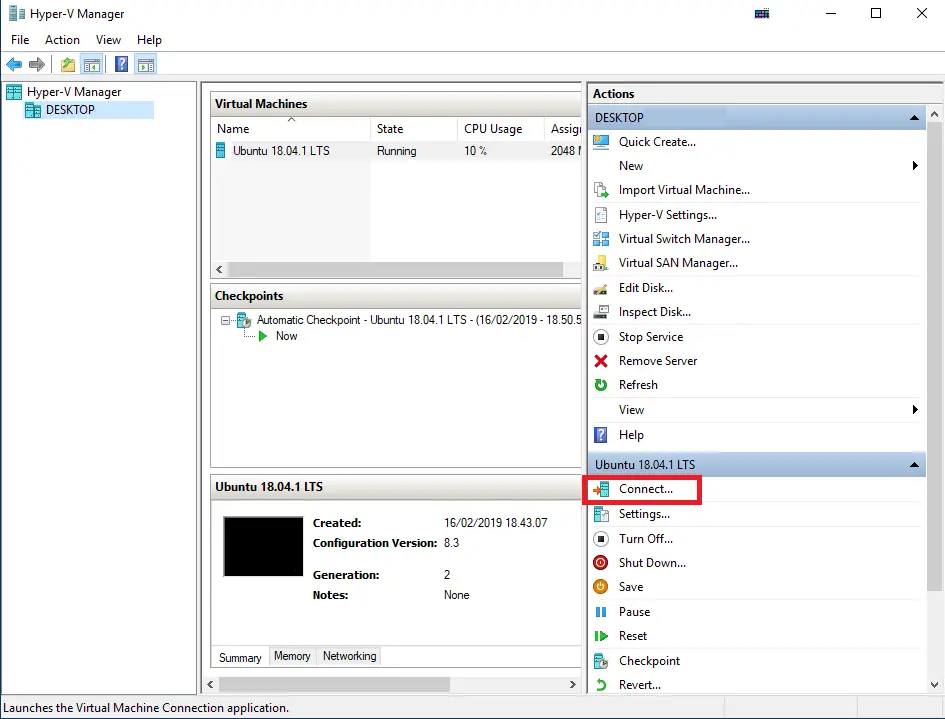
To launch the virtual machine, select it from the list and click on ‘Connect…‘ on the right hand side of the window.
Now your new Ubuntu Linux virtual machine should start up fast and easy.
You can use this same method to install and run any other VM on Windows 10 as well.
If you’re looking for more ways to take advantage of the new Windows 10 features, check out our article on window management on Windows 10.

Hyper-V is a type 1 hypervisor developed by Microsoft that can be enabled on Windows machines or installed as a standalone operating system (Hyper-V Server 2016, for example). Hyper-V can run not only Windows but also Linux virtual machines. You can run an unlimited number of Linux VMs on your Hyper-V Server because the majority of Linux distributions are free and open source. Installing Linux on a Hyper-V VM has some features which compare to installing Windows. Today’s blog post explores how to install Linux on Hyper-V using an example of Ubuntu Linux 18 LTS (Long Term Support) and consists of the following sections:
- Reasons to Run Linux on Hyper-V
- Before you begin
- Creating a new Hyper-V VM
- Setting the static MAC Address
- Installing Ubuntu Linux on the VM
- Configuring Linux
- Checking the network settings
- Changing the network settings manually
- Changing a hostname in Ubuntu
- Configuring the SSH server on Ubuntu Linux
- Transferring files between Linux VM and Windows host machines
- Installing Hyper-V Linux Integration Services
- Tuning Linux Disk Optimizer
Looking for a powerful yet simple and affordable data protection solution?
Download Free Edition of NAKIVO Backup & Replication right now and get to protect virtual, physical, and cloud environments. In under one minute, NAKIVO Backup & Replication can be installed on Windows or Linux or deployed as a pre-configured VMware VA, Nutanix AHV VA, or AWS AMI. What’s more, you can seamlessly upgrade to other editions once your business needs change and your infrastructure grows.
Reasons to Run Linux on Hyper-V
The popularity of Linux is growing and this operating system is time-tested. Let’s have a look at the most common reasons that might force you to install Linux on Hyper-V:
- You need to test a particular Linux distribution in your Hyper-V virtual environment. For example, a new Linux version has recently been released and you want to test this version before installing on physical servers.
- You want to run containers. Linux has excellent container support which may be a reason to install Linux on Hyper-V as a virtual machine.
- Testing multi-platform software or software that provides similar functionality. This is a great option when developers make their applications able to run on multiple operating systems, such as Windows, Linux, and Solaris (for example, Oracle Database). You can install the appropriate software on Linux to test it. If the experiment is successful, you can install Linux and supported software in your production environment.
- Licensing. This point is related to the previous one. You have to pay for Windows while Linux is free. If you don’t have a Datacenter Edition license for your Windows Server, you must pay for each installed on a Hyper-V VM that exceeds the number of Windows licenses included in your edition of the host Windows system.
- Linux requires fewer hardware resources than Windows. Windows is a resource-intensive operating system whereas Linux is light-weight.
- Linux is secure. Users should be aware that Windows systems are vulnerable to a variety of harmful viruses while Linux users may feel safe, especially if their system is configured correctly. Even if you do download a virus, you need to go to great lengths to actually execute the virus on Linux. You need to configure file permissions, for example. Your privacy is respected if you use Linux.
- Linux shell such as bash is essential for automating tasks. You can use regular expressions, scripts and other tricks to manage Linux. You manage Linux, Linux doesn’t manage you. The community of developers is amazing – developers like Linux. If any vulnerabilities are found, they are always fixed quickly.
- You want to learn Linux and migrate from Windows to Linux.
If you want to convert your physical servers to Hyper-V VMs, use converters. Converting a physical Linux machine to a VM in the Hyper-V format can be performed in two steps. Use VMware vCenter Converter for converting a physical machine to a VMware VM, then use Microsoft Virtual Machine Converter for converting a VMware VM to a Hyper-V VM.
Data Protection with NAKIVO Backup & Replication
Keep your data safe and always available with NAKIVO Backup & Replication, one of the leading VMware vSphere and Microsoft Hyper-V backup solutions. Along with comprehensive VM backup, our solution ensures support and protection for other well-known virtual, physical, cloud and SaaS platforms without exceeding your IT budget.
Before You Begin
Installing Ubuntu Linux is considered a focal point of today’s blog post. If you don’t need the GUI (graphical user interface), you can install Ubuntu Server. The installation principle is similar. The number of Linux distributions is high and you can select any distribution you like and install it by using the explained logics. One of the main differences between different Linux families is different package managers you’re required to use. Package managers are intended to install, configure, upgrade and delete programs on Linux systems.
Package managers help to resolve such tasks as:
- Downloading packages. The packages are automatically downloaded from the most suitable software repository when you enter the command to install a particular needed package or application. Packages include metadata such as version of software, architecture the package is built for, checksums, other needed packages to work properly etc.
- Resolving dependencies. When you install software, that software may require its own appropriate packages including libraries. Finding, downloading and installing all this manually consumes a lot of time and efforts. Package managers tell you that there are dependencies and suggest you to install automatically the needed depending packages.
- Quality control. Software packages that are stored in authorized software repositories are tested to provide high quality, stability and the absence of bugs.
- The standard of file locations is respected. Linux contains a high number of files and directories. Sometimes, different Linux distributions use different paths for storing files as well as using different configuration file names. Package managers allow you to follow the standards and store files in the required locations for each Linux distribution.
Before selecting a Linux distribution to install on Hyper-V, you can familiarize yourself with the information about Linux package managers. Some of the most popular Linux distributions and package managers are listed in the table below.
| Linux distributions | Package managers used |
| Debian, Ubuntu, Kubuntu, Xubuntu, Lubuntu, Mint | APT (Advanced Packaging Tool), DPKG (Debian Package Management System) |
| OpenSUSE, SLES (SUSE Linux Enterprise Server) | Zypper, YaST |
| Red Hat, CentOS, Fedora | RPM (Red Hat Package Manager), YUM (Yellowdog Updater Modified) |
| Gentoo | Portage |
As mentioned in the very beginning of this blog post, the installation of Linux on Hyper-V will be demonstrated using an example of Ubuntu Linux. Download the ISO image of Ubuntu 18 LTS from the official site.
Creating a New Hyper-V VM
First, make sure that the Hyper-V role (feature) is enabled on your Windows machine (go to Control Panel > Programs and Features > Turn Windows features on or off and verify whether the check box near the Hyper-V string is ticked). In order to create a new virtual machine, open Hyper-V Manager and click Action > New > Virtual Machine. The New Virtual Machine Wizard should appear.

Before You Begin. There is nothing to configure at this step.
Specify Name and Location. Enter your VM name, for example, Ubuntu18 and select a folder where you will store a new VM. Try to use volumes that are different from your system volume C:. In this case a directory on disk D: is used (D:VirtualHyper-V). You can enter the path manually or select a location by clicking the Browse button.

Specify Generation. Choose the generation of this virtual machine – Generation 1 or Generation 2. Generation 1 is selected in this example due to better compatibility.

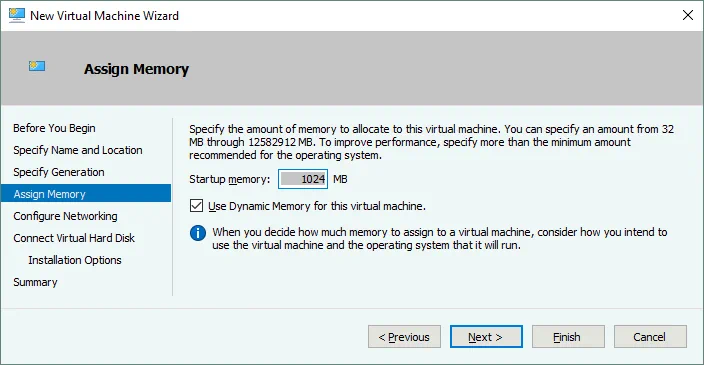
Assign Memory. Specify at least 1 GB of memory for your Ubuntu Linux machine with GUI. You can edit memory settings after VM creation. Tick the Use Dynamic Memory for this virtual machine checkbox to use your hardware memory resources more rationally.
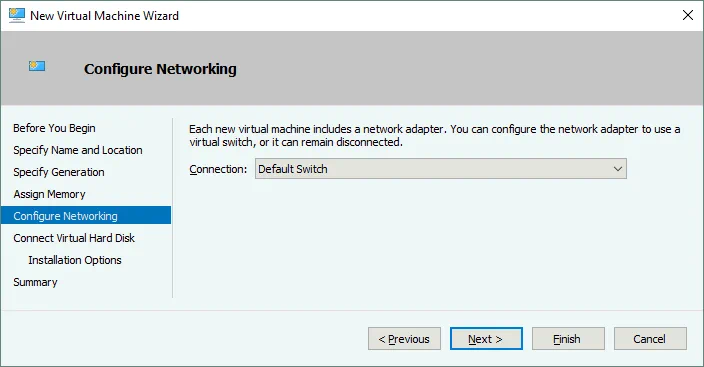
Configure Networking. Select a virtual switch to which the virtual network adapter of your VM will be connected. The Default Switch is used in this case. Later you can create and configure other virtual switches and connect your VM to the appropriate networks.
Connect Virtual Hard Disk. Select the Create a virtual hard disk option. A dynamic VHDX virtual disk is created by default. Enter the virtual disk name (for example, Ubuntu18.vhdx), select the location and set the size of the virtual disk (at least 16 GB).

Installation options. Select the Install an operating system from a bootable CD/DVD-ROM. Select Image file (.iso) and browse the ISO installation image of Ubuntu18 that has been downloaded before.

Summary. Check your settings in the installation summary and click Finish to create a new virtual machine.
Set the Static MAC Address
Now your new empty VM has been created and you can edit the different VM settings, such as MAC address. It is better to use a static MAC address for Linux running on Hyper-V especially if your Linux VM needs to be migrated between Hyper-V hosts. Right click your VM name and click Settings. In the Settings window, select your network adapter, and expand the network adapter options by clicking the + icon. Click Advanced Features and in the right section of the window select a static MAC address. Click OK to save changes.

Installing Ubuntu Linux on the VM
In Hyper-V Manager, select your Ubuntu virtual machine, right click the VM name and in the context menu, select Connect to open VMConnect. As an alternative you can click Action > Connect in the menu bar of the Hyper-V Manager Window after selecting the VM.

In the VMConnect window, click the Start button to power on the VM. The virtual machine should be loaded from the ISO image. Then you can see the graphical user interface of the Ubuntu installer. The installer provides multiple configuration steps in the wizard mode.
Welcome. On this screen, select your desired language (English) and click Install Ubuntu.
Keyboard layout. Select your keyboard layout (for example, English US) and click Continue.
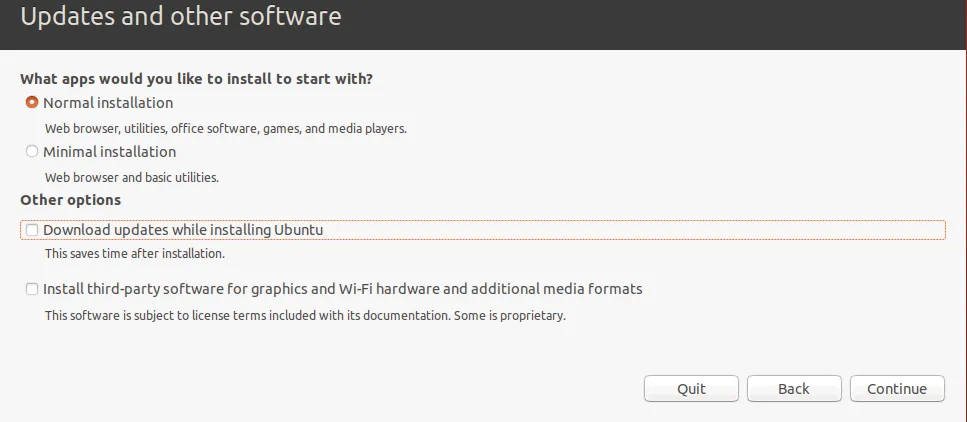
Updates and other software. You can choose between Normal installation and Minimal installation. Normal installation includes a wider set of installed applications.
Other options allow you to download updates while installing Ubuntu as well as installing third-party software for graphics, Wi-Fi hardware and additional media formats.
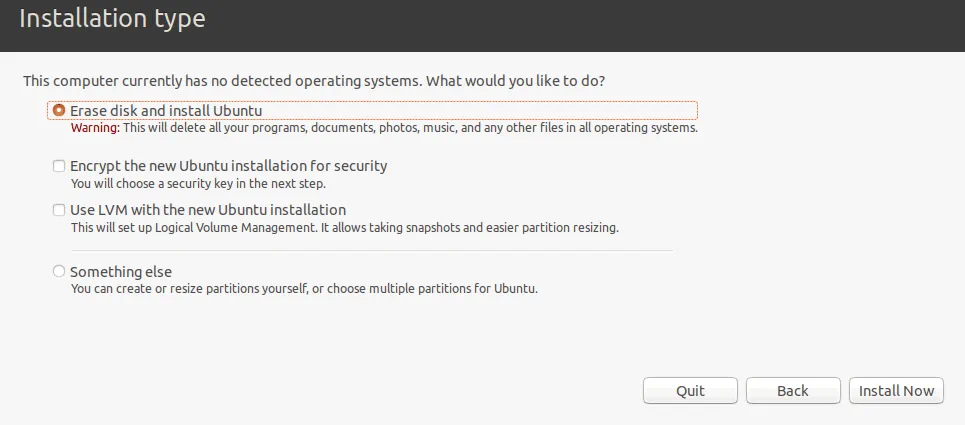
Installation type. Now you should prepare a disk for installing Ubuntu. You should create a new partition scheme and format the partitions.
Erase disk and install Ubuntu. This option can be used for partitioning disks automatically. If you are installing Ubuntu Linux for the first time, you can select this option.
Encrypt the new Ubuntu installation for security. This option will not be enabled in the current example.
Use LVM with the new Ubuntu installation. LVM is the Logical Volume Manager that allows you to use an abstraction layer and create a volume group by using two logical or physical disks (or two virtual disks in the case of running a Linux on Hyper-V as a VM). Moreover, if you have no free space available on your volume, you can add one more disk to the volume group and extend your volume group size. This approach adds much more flexibility that can be useful for file servers, database servers etc. LVM allows you to perform resizing of volume groups and the majority of other operations on the fly without powering off your Linux machine.
Something else. By selecting this option, you can manually create partitions of the necessary size and mount them to the appropriate directories. This option is widely utilized by skilled users.
In Linux, disk partitions are not named as disk letters such as C: or D: as they would be in Windows. In Linux, disks are named as /dev/sda, /dev/sdb, /dev/sdc etc. If the disk is named as /dev/sda and has three partitions, the names of partitions should be /dev/sda1, /dev/sda2 and /dev/sda3.
sda means SATA Disk. A long time ago when IDE (parallel ATA) disks were used, hard disk devices were named /dev/hda, /dev/hdb etc. and partitions were named /dev/hda1, /dev/hda2, /dev/hdb1 accordingly.
Disk partitions are mounted to directories that are called mount points in this case. The main directory of the Linux file system is the root directory that is named by the / symbol. The recommendations for creating the partitioning scheme manually for Linux are displayed in the table. You can use a similar partitions scheme when you install Linux on Hyper-V.
| Mount point | Disk partition | Recommended size | Comment |
| /boot | /dev/sda1 | 500 MB — 1 GB | Contains the boot loader such as GRUB |
| / | /dev/sda2 | at least 12-20 GB | The most important partition that is required |
| /home | /dev/sda3 | Is used to separate user files and system files | |
| swap | /dev/sda4 | 4-8 GB, depending on the amount of RAM | The swap partition is used for the same purpose as the Windows swap file |
| /var/log/ | /dev/sdb1 | Creating a separate partition for storing logs is not necessary, but is recommended for servers. If you have applications that intensively write log files, your disk may become full. The operating system and applications can crash as a result. |
Note that you can create only 4 partitions if the MBR (Master Boot Record) partitioning scheme is used. GPT (GUID Partition Table) allows you to create more than 4 partitions.
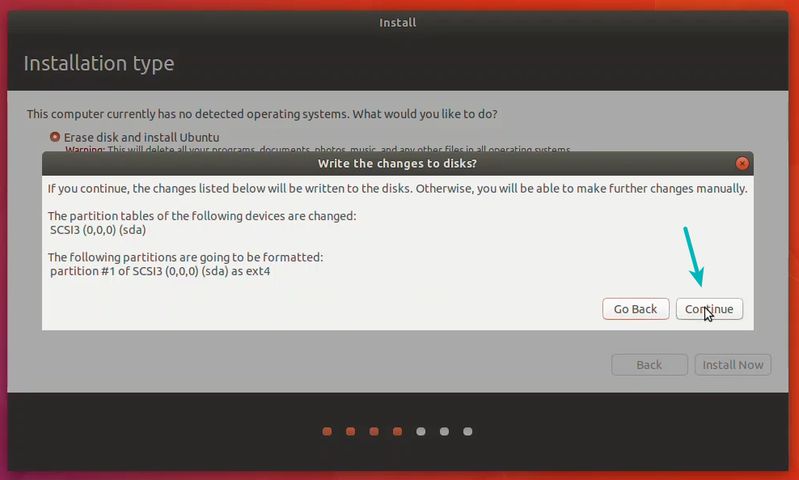
Click Install Now to continue.
Write the changes to disk? A warning message is displayed. Click Continue to apply a new disk partitioning scheme.
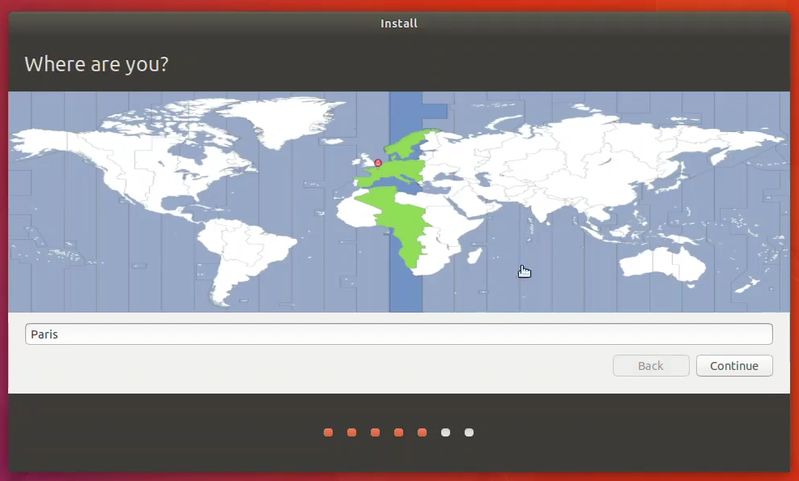
Where are you? Select your geographical location and time zone. Software repositories located in your region should be used for better availability and downloading speed.

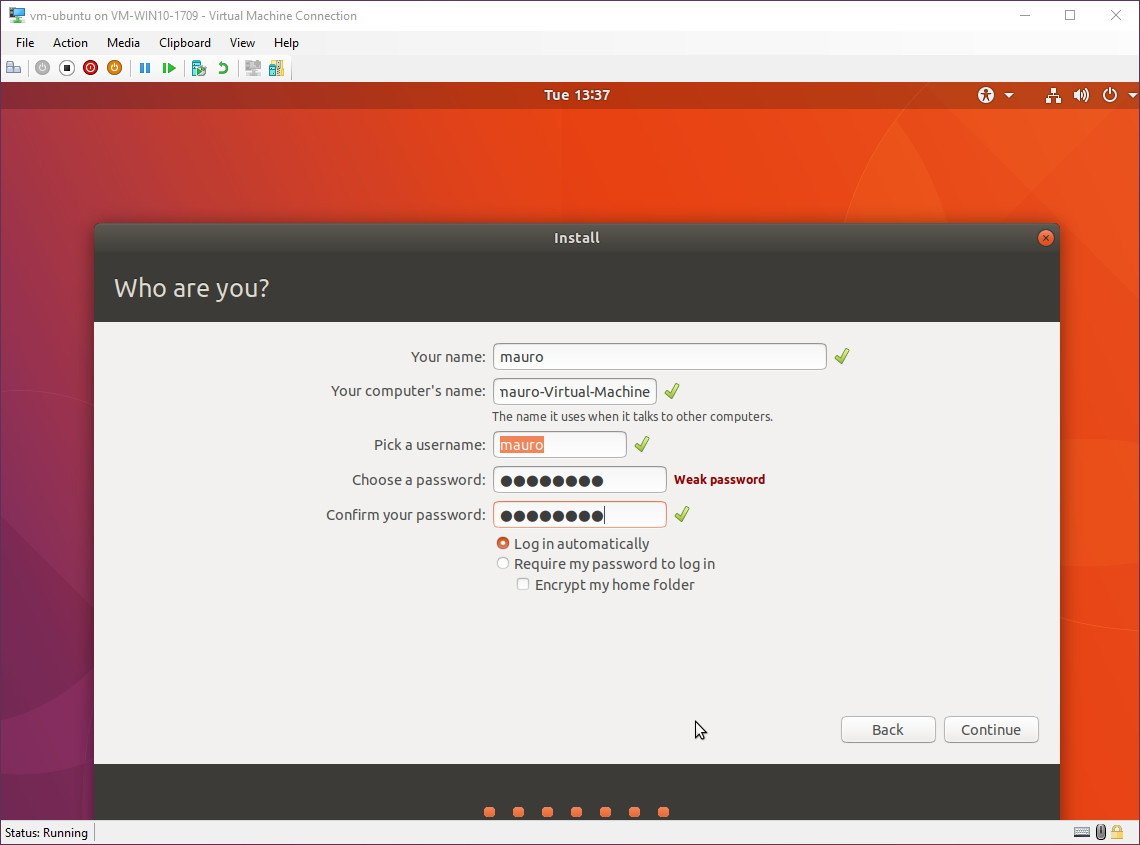
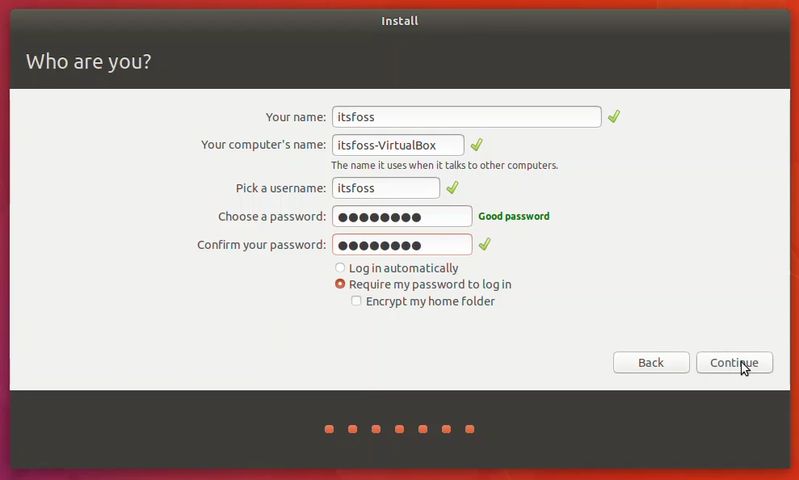
Who are you? Enter your name, your computer’s name (a hostname for your VM in this case), pick a username and define the password. You can select the appropriate option to login automatically if needed. A password is required to log in by default – this is the most secure option, and the one that is recommended. Click Continue to start the installation process and copying files.
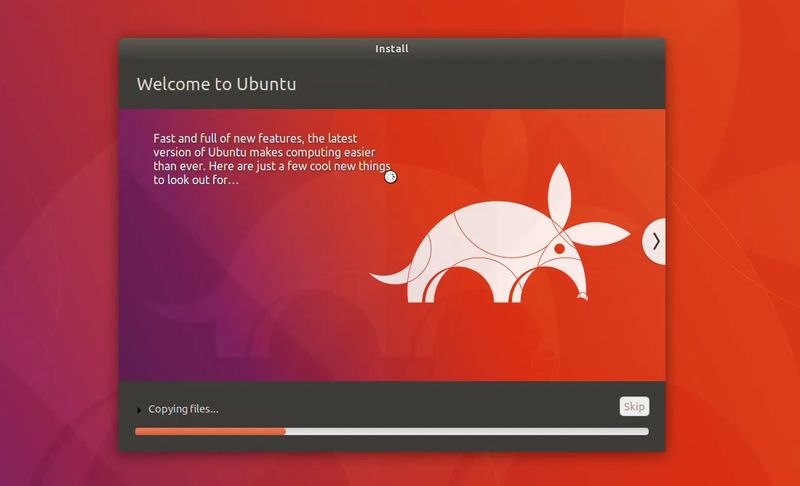
Wait until the installation process is complete. You can read useful tips and OS explanations while files are being copied.
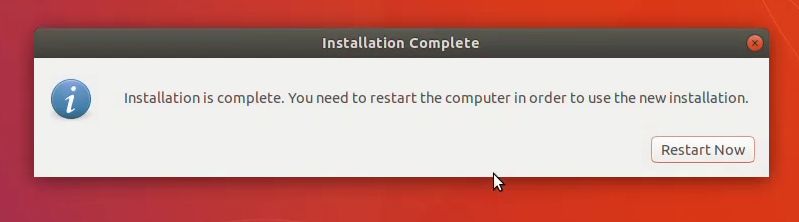
Installation Complete. You need to restart the computer in order to use the new installation. Click Restart Now.
After restarting the Hyper-V Linux virtual machine, you can see the login screen. Select your user name and enter your password to log in. See the window that demonstrates new features of the new version of Ubuntu Linux you have already installed on Hyper-V.
Configuring Linux
You have installed Ubuntu on Hyper-V VM, but Ubuntu, as with any other Linux, must be configured for further comfortable usage. The majority of settings can be configured in the Linux console (Terminal). In order to open a Terminal, click the nine dots in the left bottom corner (Show Applications) and in the menu that appears, click the Terminal icon. Another way to open Terminal is to right click desktop and click Open Terminal in the context menu or pressing the Ctrl+Alt+T hotkey combination.
Now you see an exquisite terminal window of Ubuntu Linux. Be aware that commands and file names in Linux are case sensitive. ReadMe.txt and readme.txt are different file names in Linux while in Windows there is no difference between these file names.

Checking the network settings
Install the net-tools to become able to check network configuration by using the command:
sudo apt-get install net-tools
Where sudo allows you to execute the command as a root user (substitute user do).
Type ifconfig to check the network configuration of your Ubuntu running on a Hyper-V VM.
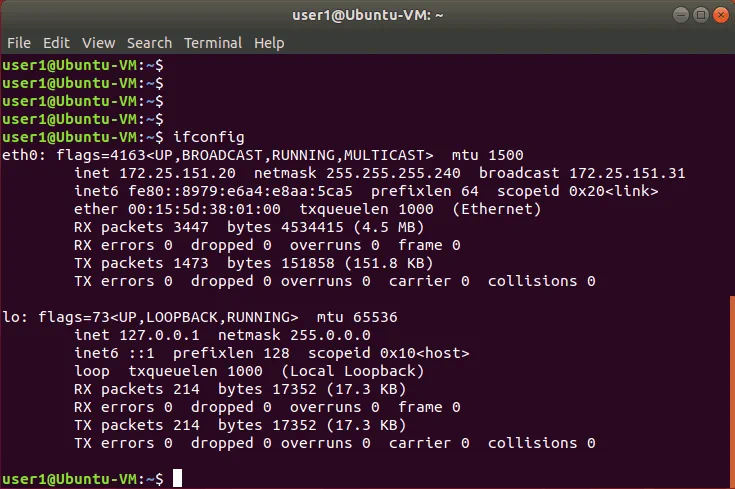
A default virtual DHCP server connected to the default virtual switch has distributed the IP configuration for the virtual network adapter of the current Ubuntu Linux VM running on Hyper-V. The name of the virtual Ethernet adapter in Linux is eth0. The obtained IP address is 172.25.151.20, netmask is 255.255.255.240 and the default gateway is 172.25.151.31 in this case.
Changing the network settings manually
Obtaining your IP address via DHCP is convenient, but if you are planning to use your Linux running on Hyper-V as a server, you should configure network settings manually. Sudo-iMoreover, if you wish to clone your Linux VM used as a server, changing the IP address and machine name is essential. You may also have to change IP addresses on your Linux VM after reconfiguring your Hyper-V virtual switch or after connecting a virtual network adapter to another virtual switch. Let’s find out how to configure network settings for your Linux VM manually.
Changing system settings such as network settings requires root privileges. Type sudo -i to have root rights in the console (you should enter your password) during the session (press Ctrl+D to exit the root mode when needed). You may notice that the $ character is changed to the # character in the command line prompt. Enter a new IP address, then reload the network interface:
ifconfig eth0 172.25.151.21 netmask 255.255.255.240
ifconfig eth0 down
ifconfig eth0 up
The settings are applied until you restart the machine.
For setting up the static IP address permanently, use the netplan configuration that is used to configure networks in Ubuntu Linux since the version 17 of Ubuntu. In earlier versions of Ubuntu and in some other Linux distributions you can edit your IP address configuration by editing the /etc/network/interfaces config file. Let’s edit the .yaml file with vim by using the command:
vim /etc/netplan/01-network-manager-all.yaml
The file contains the following configuration in this case:
version: 2
renderer: NetworkManager

You can change the IP address, net mask, gateway, and DNS servers by editing this file. You should preserve the file structure including the number of space characters.
Note: A network mask can be written as the number of bits.
255.255.255.0 is equal to 11111111.11111111.11111111.00000000 and is a 24bit mask (24 ones in the decimal format, as you can see).
255.255.255.240 is equal to 11111111.11111111.11111111.11110000 and is a 28bit mask (28 ones in the decimal format are present).
An IP address and net mask consist of 4 octets. Each octet (8bits) can be transformed to the decimal format (see the table below).
| 1 | 1 | 1 | 1 | 1 | 1 | 1 | 1 | 1+1+1+1+1+1+1+1=8 |
| 128 | 64 | 32 | 16 | 8 | 4 | 2 | 1 | 128+64+32+16+8+4+2+1=255 |
You can use the table below for converting network masks from one format to another for networks that can be classified as class C networks. The maximum number of hosts that can be connected to the network is shown in the right column.
| Bits | Net mask | Hosts |
| /30 | 255.255.255.252 | 2 |
| /29 | 255.255.255.248 | 6 |
| /28 | 255.255.255.240 | 14 |
| /27 | 255.255.255.224 | 30 |
| /26 | 255.255.255.192 | 62 |
| /25 | 255.255.255.128 | 126 |
| /24 | 255.255.255.0 | 254 |
By using the above explained logics, you can similarly transform any mask from one format to another format manually. If you want to calculate the maximum number of hosts that can be connected to a network, use the formula:
2(32-m) – 2
Where m is the number of bits used for a net mask. For example, you have a /29 network and the maximum number of hosts for this network is:
2(32-29) – 2 = 23 – 2 = 8 – 2 = 6
–2 shows that you must exclude the network address and the broadcast address. (For example, for 192.168.1.0/24 network you must exclude 192.168.1.0 and 192.168.1.255 addresses). Don’t forget that at least one IP address must be used as a default gateway to enable a connection to other networks. You can also divide your network into subnets, but for now, let’s turn back to configuring network for Ubuntu running on a Hyper-V VM.
Change the renderer from NetworkManager to networkd and edit your Ubuntu network configuration similarly as shown below. Be attentive when adding space characters to preserve the configuration format.
version: 2
renderer: networkd
ethernets:
eth0:
dhcp4: no
addresses: [172.25.151.21/24]
gateway4: 192.168.151.17
nameservers:
addresses: [192.168.151.17,8.8.8.8]
Press Esc to exit from the editing mode to the navigation mode in vim. Type :wq and press Enter to write changes and quit the text editor.

Note. If you have more than one network adapter (for example, eth0 and eth1) add the similar eth1: block to your network configuration .yaml file under the eth0: block.
Check whether your configuration file format is correct after editing with the command:
netplan try
If everything is correct, press Enter to keep these settings.

How to change a hostname in Ubuntu?
Let’s check the current hostname before changing it.
hostnamectl
As you can see, on the screenshot below, the current hostname of the Linux machine is Ubuntu-VM. Set the new VM-Ubuntu hostname:
hostnamectl set-hostname VM-Ubuntu

Make sure that the hostname is now changed in the /etc/hostmane file.
less /etc/hostname
You should also edit the hostname in the /etc/hosts file.
vim /etc/hosts
vim is a powerful console text editor that has no analogs in Windows PowerShell. By default, you are in the navigation mode. You can navigate by pressing h (left), L (right), j (down), k (up) or arrow keys. Press a to enter the editing mode to append any characters after a cursor. Press i if you want to insert a character instead of an existing character highlighted by a cursor. Change the Ubuntu-VM to VM-Ubuntu, press Esc to exit from an editing mode to a navigation mode.
Type :wq to write changes to the file and quit.
Use the init 6 command to restart your Linux machine in order to ensure that changes are applied.
Configuring the SSH server on Ubuntu Linux
For greater convenience, you should enable remote access via SSH. The SSH Server is used to access the Linux console remotely via encrypted SSH (secure shell) protocol. For doing this, you should install the SSH server on your Ubuntu VM running on Hyper-V and the SSH client on your Windows machine used as a Hyper-V host.
Open Terminal on your Ubuntu machine and run the command as the root user:
apt-get install -y openssh-server
The configuration of the SSH server is stored in the sshd_config file. Edit this file to enable the SSH connection with needed settings.
vim /etc/ssh/sshd_config
Uncomment this string (delete the # character)
PasswordAuthentication yes
Save the file and exit.
Restart the SSH server daemon (service).
/etc/init.d ssh stop
/etc/init.d ssh start
Download the SSH client (for example, PuTTY) for your Windows machine. Open PuTTY on your Windows machine, enter the IP address of your Ubuntu VM running on Hyper-V and click Open.

Enter your username and password. Now you get the Ubuntu console remotely.
Transferring files between Linux VM and Windows host machines
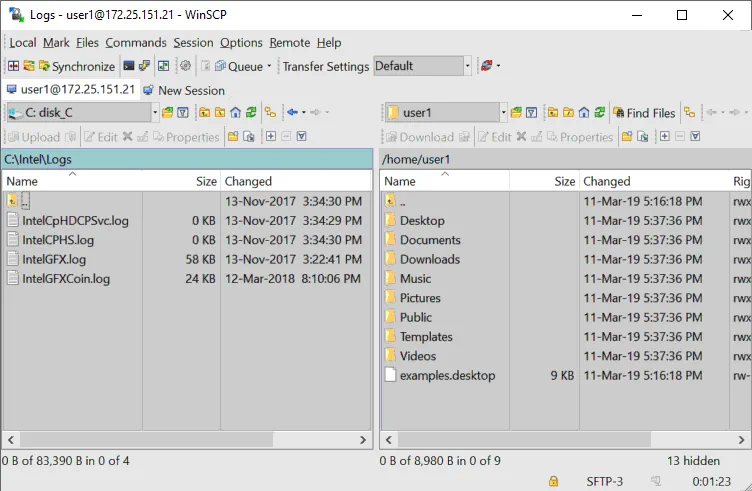
Unlike VMware, you cannot drag and drop files between the Windows host and Linux guest in Hyper-V. As you have configured the SSH server, you can transfer files from your Ubuntu VM to your Hyper-V host and do the inverse by using an SFTP (Secure File Transfer Protocol) client such as WinSCP. WinSCP uses SSH for secure connection and can also use SCP (Secure Copy Protocol) for file transferring.
Run WinSCP on your Windows machine. Select SFTP as a file protocol, enter your host name or IP address, user name and password.

When you have logged in, you can see a window with two panels – the first panel displays files on the Windows machine and the second panel displays files on the Linux machine. Go to the designated directories on source and destination machines, select files and directories. Drag and drop the selected objects between panels to copy them.
How to install Hyper-V Integration Services on Linux?
Hyper-V Linux Integration Services have been built in Ubuntu since version 12.04. If your Linux distribution doesn’t include Hyper-V Integration Services, you can download them from the Microsoft’s site.
You can check which Integration Services are enabled for your Ubuntu VM running on Hyper-V in PowerShell. Type the following command in PowerShell on the Hyper-V host:
get-vmintegrationservice -VMName «Ubuntu18»
You can also select the services you want Hyper-V to offer to this VM in GUI. Open Hyper-V Manager, right click your VM name, and click Settings. In the Settings window, select Integration Services in the left pane and tick the check boxes near the services that are needed (Guest services must be enabled in this example).

Click OK to save changes.
You can now re-check the enabled services in PowerShell (see the screenshot below).
get-vmintegrationservice -VMName «Ubuntu18»

Once Hyper-V Integration services are installed on your Ubuntu Linux, they must become activated. The /etc/initramfs-tools/modules file contains a list of modules that you want to be included in your initramfs.
The initramfs is the initial RAM file system intended to mount the root filesystem (/). As a result, the initial root file system and init daemon (that is the first process that must run in Linux) can reside in kernel memory cache (not on a ramdisk as for initrd filesystem that acts as a block device of a fixed size and consumes more memory for caching). initrd was replaced by initramfs after Linux kernel 2.6 due to its advantages such as flexibility, efficiency and simplicity. The initramfs is a complete set of directories that you can see on your root filesystem and is gzipped into a cpio archive.
Linux kernel can be monolithic and modular. In most cases the module kernel is used. Let’s enable loading of the necessary modules.
vim /etc/initramfs-tools/modules
Edit the file and add these strings to enable loading of the appropriate modules.
hv_storvsc
hv_blkvsc
hv_netvsc
Update initramfs:
update-initramfs -u
Restart your Hyper-V VM running Ubuntu:
init 6
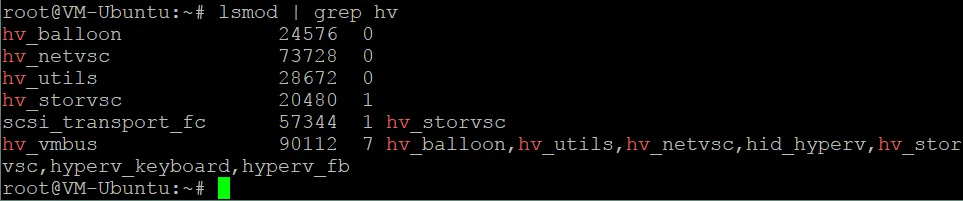
Verify that Hyper-V related modules for your Linux kernel are loaded.
lsmod | grep hv
Tuning Linux Disk Optimizer
Linux has an I/O scheduler mode that helps to optimize disk I/O (input/output) by default that is especially useful for magnetic (spinning) hard disk drives. Hyper-V has its own mechanism for optimizing virtual disks I/O performance. Using two disk optimizers is not necessary and you can disable the built-in Linux disk optimizer. Linux kernel allows you to use different I/O schedulers, each of them using different algorithms. In this case, the NOOP scheduler must be used. NOOP is the simplest I/O scheduler that uses the First In First Out (FIFO) concept for the queue. This is what you need to run Ubuntu on Hyper-V.
In order to edit the I/O scheduler used by Linux kernel, edit the grub configuration file with the command:
vim /etc/default/grub
Find the GRUB_CMDLINE_LINUX_DEFAULT string. In this case this string has the following view:
GRUB_CMDLINE_LINUX_DEFAULT=»quiet splash»
Edit this string to get the following view:
GRUB_CMDLINE_LINUX_DEFAULT=»elevator=noop»
Save changes to this GRUB configuration file.
Update the GRUB bootloader configuration.
update-grub2
Reboot your Ubuntu Hyper-V VM.
init 6
Conclusion
Today’s blog post has explored how to install Ubuntu on Hyper-V. If you have never used Linux, installing Ubuntu on Hyper-V can be the first step to opening the gate to the world of Linux. Creating a new virtual machine is straightforward, but some manual configurations should be made after installation is finished. Running Linux VMs on Hyper-V hosts allows you to clone and migrate VMs easily. Two machines must not have the same host name and IP address, and for this reason, basic network configuration was explained. Hyper-V Linux Integration Services can improve the performance of VMs. While the operating system is running on a VM, both Windows and Windows virtual machines should be backed up to protect precious data. NAKIVO Backup & Replication can back up your Hyper-V VMs in the best way possible.

If you would like to run Linux on Windows and have never used a virtual machine, this tutorial explains how you can do so in a few simple steps.
Linux and Windows are two of the most popular operating systems in the market. One can say that these two OSs have become essentials because of their continuous development and feature enhancements. Many people prefer one over the other. Yet, people who use Linux sometimes need the Windows operating system, and vice versa. For faster development and more security, people prefer to use Linux over Windows. So these people need Linux alongside Windows.
A common solution for this problem is to use a dual boot, which basically installs the entire operating system. However, due to boot loader changes (like UEFI mode), configuring dual boot becomes difficult.
This article is about running Linux on Windows, without using the dual boot technique. There are different ways to do so, one of the most popular being using a virtual machine.
Virtual machines
Virtualisation is fairly old technology now. It was started around 1980 by IBM. So, currently, this technology is pretty stable. We can create Linux virtual machines in Windows using software like Virtual Box, VMware Player, and VMware Workstation.
A virtual machine provides the same functionality as a physical computer, but it is an emulation of a physical computer. The virtual machine can be created or destroyed at any moment and it will not impact the actual operating system, which is the best part about using it.
To install Linux on Windows, we just require two things — the software to create a virtual machine which is Virtual Box (free software) and an ISO file of the operating system.
The installation process is pretty simple, like installing any software in Windows. The steps for installing Ubuntu (a favourite Linux flavour) inside Windows are given below.
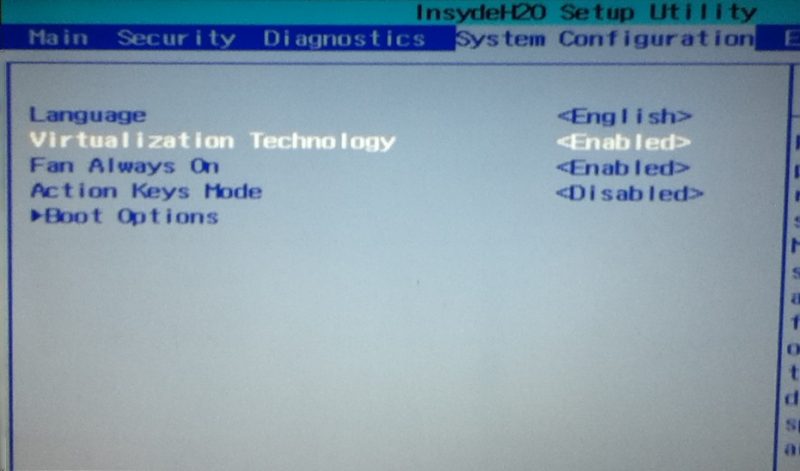
The first step is to enable virtualisation technology in the BIOS. If you have already enabled it, you can skip this step.
You need to power on the system and go to the BIOS setup by pressing F2, Del or the Enter key, depending upon your computer model.
After that, under CPU Configuration -> System Configuration -> Advanced or Security Tab, we need to find Virtualization Technology or Intel Virtualization Technology. If the option is disabled, then it must be enabled. If it’s already enabled, skip this step.
If you get any of the following error messages at any point of time, it means that virtualisation technology is not enabled for you and you need to enable it:
- VT-x/AMD-V hardware acceleration is not available on your system
- This host supports Intel VT-x, but Intel VT-x is disabled
- The processor on this computer is not compatible with Hyper-V
If you have not installed Virtual Box, then you can go to the links https://www.virtualbox.org/wiki/Downloads and http://download.virtualbox.org/virtualbox/5.1.28/VirtualBox-5.1.28-117968-Win.exe, and download and install it. The steps are very straightforward; hence, I am not mentioning them here.


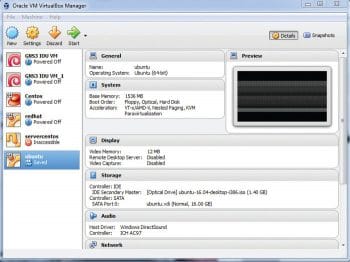
Open the Virtual Box application once it is installed. It will look like what’s shown in the snapshot in Figure 1.
Click on the New button and select the OS category before providing the appropriate name to the virtual machine.
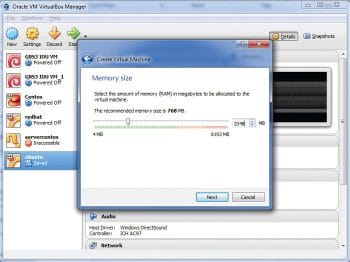
Assign RAM as per your requirements. Ubuntu can run on 512MB, which is the minimum requirement to run Linux smoothly on Windows. Since I have 8GB RAM in my laptop, I have chosen 2048MB (2GB) RAM.
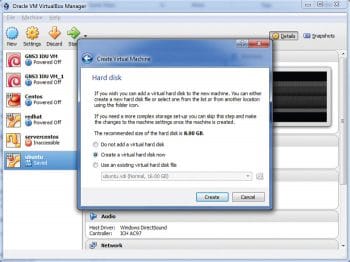
The next option is to select the virtual hard disk. Since we are creating a new virtual machine, we will use the ‘Create virtual hard disk now’ option.
Here we need to select the virtual hard disk type. Since we are using Virtual Box, we will use VDI which is a Virtual Box disk image.
There are two options here — we can either use a fixed size or a dynamic size. It is better to opt for the latter so that the size can be increased if required.
Allocate the disk space as per your requirement.
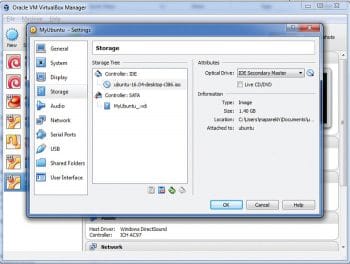
Once it is done, go to the virtual machine that you have created, right-click on it and go to the settings of that machine. Now we must attach the ISO file so that while we run the VM, it should know the location of the Ubuntu ISO file. As shown in the snapshot (Figure 7), click on the DISK button and browse the .ISO file of Ubuntu OS. The ISO file is now attached.
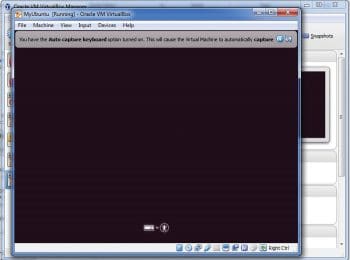
Next, go to the virtual machine, right-click on it and start it.
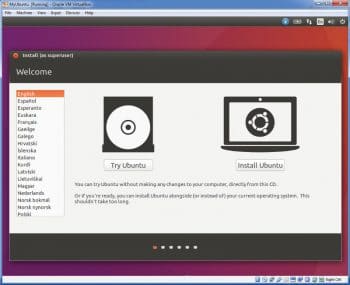
You will get the Ubuntu installation screen, which is similar to installing any operating system that you have chosen. The remaining steps are similar to the installation of any OS.
If you want to close the virtual machine window, you can do one of three things.
1. Save the machine: This is like hibernate. The system will resume from wherever you left off, the next time when you start — it will show you the same task at which you paused.
2. Send the ‘Shutdown’ signal: This is like pressing the power button. It will allow normal shutdown of the virtual machine.
3. Power off the machine: This is like pulling a power cable. It is for a hard shutdown which is required in scenarios where a VM gets hung or is not working properly.
At any time, if you want to destroy the virtual machine you created, right-click and select the Remove option. This will remove all the related files.
In this article, we have seen the basic operations of a virtual machine. We can explore other options in a subsequent one.

Maulik Parekh
The author has an M. Tech degree in cloud computing from VIT University, Chennai. He has rich and varied experience at reputed IT organisations.
There’s something refreshing about installing a new operating system onto a computer. And now, it’s easier than ever to do it without wiping out your existing setup. Whether you want to learn bash scripting, try out a new program, or test hardware compatibility, running a Linux virtual machine (VM) will get you there. Best of all, it takes just a few minutes to do.
The Basics
Before we really get going, there’s an important distinction to make about terminology. When it comes to virtualization, the operating system you already have is the host OS. The one you are installing is the guest. Simple, right? Also, now is a good time to take a moment and decide whether you will create a fixed size or dynamically allocated virtual hard drive for your VM. The difference is pretty straightforward: a fixed-size drive carves out a specific amount of storage space for the guest OS, while a dynamically allocated drive will expand the space as needed. Depending on your use of the VM, you should be able to decide pretty easily if you can predict the physical storage space needed. Although there are ways to resolve issues later (such as increasing a virtual disk’s space limit), it’s much easier to make the right decision from the get-go. All set? Let’s get started.
1. Install VirtualBox
VirtualBox is a free program provided by Oracle. This is the software that powers the entire virtualization process, so go ahead and download it here if you haven’t already and then install it.
2. Download Linux
Next, you’ll need to track down a version of Linux that suits your needs. This is easier said than done. There are a vast number of distributions that you can choose from. You can start with this article for help defining your specific needs and refer to this one for a quick rundown of some popular options. Once you find the version you want to try, download the installation file. You should end up with an ISO file in your Downloads folder.
3. Set Up Your Virtual Machine
Now that you have VirtualBox installed and Linux downloaded, it’s time to get your guest OS set up. Open VirtualBox, click New, and use the following steps as a guide:
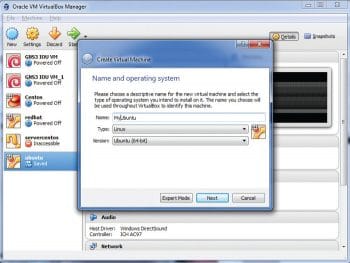
- Name and operating system. Give the VM a name, choose Linux from the Type dropdown, and select the Linux version as indicated. Go with Other Linux if your distribution isn’t listed.
- Memory size. Select the memory size. This will siphon RAM from your system for the VM, so don’t overdo it. This number can be changed easily later under the VM settings menu.
- Hard drive. Since we’re starting fresh, leave it on the default Create a virtual hard drive now.
- Hard drive file type. There are multiple choices here for advanced users. Choose VDI for now unless you know you will need one of the other options.
- Storage on physical hard drive. Based on your decision earlier, select either Dynamically allocated for an expandable drive file or Fixed size for a static drive file. As the description states, please note that a dynamic drive file will expand as needed, but will not shrink again automatically when space on it is freed.
- File location and size. Since you’re making a virtual hard drive within your existing file space, you can give this file a name and choose where it is stored. Adjust the slider or type in a specific number in the box to the right to specify the virtual hard drive size.
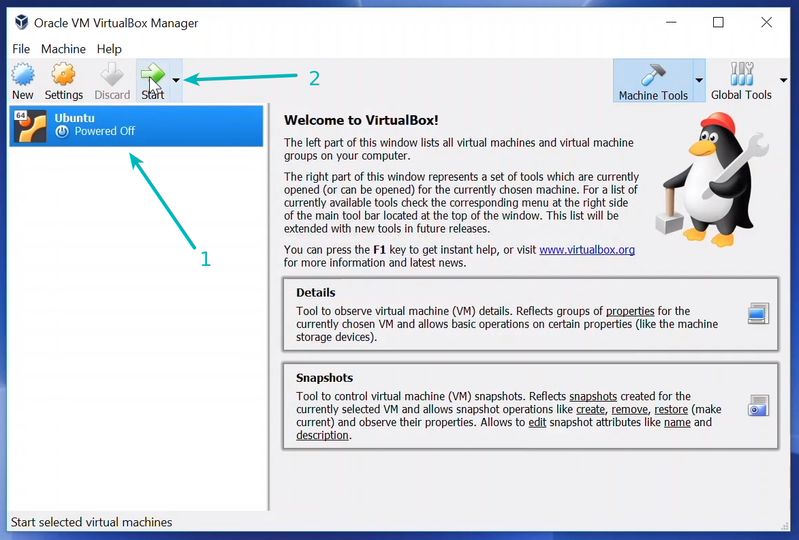
In VirtualBox, you should now see that there is an item on the left-hand side listing your name from step 1 followed by Powered Off. Let’s go ahead and get it powered on.
4. Install the Linux OS
We’ve set the stage for the new guest operating system, but it still needs to be installed. Select your new VM on the left and click Start at the top. The next window will prompt you to select a start-up disk for the VM. Click on the icon next to the dropdown to open a file explorer window, then track down the Linux ISO you downloaded earlier. Once you have selected the file, click Start. This will take you to the boot-up options for the OS, and from here you can simply follow the prompts. Many Linux distributions will give you the option to try the software or outright install it – keep in mind that you have set up a virtual disk drive for this VM and you will not be affecting your files on the host machine by installing the new OS. Once the installation is complete, you’re all set! 
Additional Notes
Guest additions. Some integrations with a Linux virtual machine can be tricky due to display drivers and other hardware dependencies. To resolve some of these issues, VirtualBox comes with a guest additions ISO image. Once you have the Linux OS installed and running, go to the menu items at the top, click on Devices, then click on Insert Guest Additions CD image… to install them. My 64-bit Ubuntu installation insisted on using a fixed screen size and resolution until I installed the guest additions and restarted the VM. Consider going light. Unless you have plenty of processing power to spare, consider going with a lightweight distribution that is easy on your system’s resources. Look for variants of popular distributions such as Ubuntu, Fedora or Mint that include a desktop environment that will be less resource intensive. LXDE and Xfce are popular options and worked well for me in my VMs. Troubleshooting. If you’re having trouble running a particular distribution, you can try wiping the installation and trying again, searching for a solution online, or using another version altogether.