This post demonstrates how to install Windows Server 2012R2 evaluation version onto Oracle VirtualBox.
- First go to Windows Server 2012R2 evaluation downloading website “https://www.microsoft.com/en-in/evalcenter/evaluate-windows-server-2012-r2“
Choose ISO file type
Download ISO image of Windows Server 2012R2 evaluation

2. Start Oracle Virtual Manager, Select NEW.
Name: Windows Server 2012R2
Type: Microsoft Windows
Version: Windows 2012(64-bit)

3. Give 5120M memory size depending on availability.

4. Create an virtual hard disk.

5. Choose “VDI( VirtualBox Disk Image)“.

6. Choose “Dynamically allocated“.

7. Give size 30GB.

8. Also you can choose where the VDI image file located.

9. Click “create” to create “Windows Server 2012R2” virtual machine.

10. Now attach the ISO image to the virtual CD/DVD drive by :
a)Ensure the Windows Server 2012R2 VM is selected and click Settings.
b)Select Storage. Click on Empty under IDE Controller.
c)In the Attributes section, click on “+”sign for adding optimal disk.
d)Select “Choose a disk file”.
e)Browse to the location where you saved the Windows DVD ISO file and select it.
f)Click Open.
g)It should look similar to the following graphic.


11) Now we can install Windows 2012R2 .
a)Select the Windows Server 2012R2 VM in VirtualBox and click Start.
When the Install screen appears, click Next.

b)Click Install Now.

c)Select 2012 evalution Datacenter (Server with a GUI) and click Next. The Server Core installation includes a command prompt but not a graphical user interface (GUI).
d)Review the license terms, select the checkbox to accept the license terms, and click Next.

e) Select Custom: Install Windows only (advanced).

f) The 30 GB drive you created with the VM will be selected as Drive 0 Unallocated Space. Click Next.

g)The installation will begin .

h)When prompted, enter a password for the Administrator account in the Password and Retype password text boxes. Click Finish.

To log on Windows Server 2012R2, press the host key plus the Delete key to simulate the CTRL + ALT + DELETE key combination. The host key is the right-CTRL key by default.

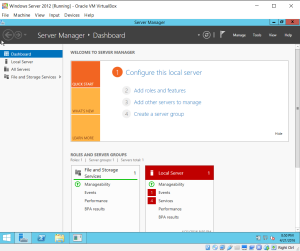
Here we can see, “Windows Server 2012 ISO For Virtualbox”
Installing Windows Server 2012 as Virtual Server
I chose to have fun with the beta version of Windows Server 2012 and required such notes so that you might download and then install it all on your personal computer. These measures will significantly explain how you can put a virtual example of Windows Server 2012 onto a Windows 7 system.
Notice: Windows Server 8 has been renamed to Windows Server 2012 and edited to reflect the shift.
When these measures can allow you to set up and play with Windows Server 2012, they also allow you to play with virtualization; that’s a subject of growing significance for almost virtually any certificates.
Windows Server 2012 is another host operating system, and it is now in the beta phase. Microsoft has a background of server operating systems together using desktop computer systems to use the two qualities. Windows Server 2003 was paired using Windows XP, Windows Server 2008 was paired using Windows Vista, and Windows Server 2008 R2 was paired using Windows 7.
You may expect to visit Windows 8 go live later this season, likely in October. Windows Server 2012 will most likely be published within three weeks of Windows 8.
Virtual Box
Windows Server 2012 is a 64-bit functioning system. Sad to say, the Windows Virtual PC program that’s available as a free upgrade on Windows 7 won’t operate 64-bit functioning systems. An alternate is VirtualBox.
It is possible to find a complimentary copy of all VirtualBox here: https://www.virtualbox.org/wiki/Downloads.
After downloading it, then navigate to where you stored it, and then double-click it to begin the setup. You may take the defaults by clicking through every display.
Download ISO or VHD
You can download the Windows Server 2012 beta: http://technet.microsoft.com/en-us/evalcenter/hh670538.aspx. You will have the option of downloading the 64-bit ISO that’s a DVD picture or even a digital hard disk (VHD) picture. The 64-bit VHD picture will operate as a digital system onto a Windows Server 2008 R2 system utilizing Hyper-V, but it will not run on Windows Virtual PC.
But should you download the ISO DVD image, you may use it to set up the operating system on Virtual Box running inside Windows 7. It is a 3.3 GB file; it might take a while, depending on your relationship’s speed.
Install VirtualBox
Start VirtualBox by clicking Start, All Programs, Oracle VM VirtualBox, also picking Oracle VM VirtualBox. During the setup, you will be prompted many times to put in the device program. This computer program is necessary for various digital apparatus so ought to be set up. All these are signed along with the Publisher is recognized as Oracle Corporation. When the setup finishes, click Finish. VirtualBox will then begin.
Create a VM
It is possible to use these steps to make a virtual machine (VM) utilized for Windows Server 2012.
- Click on the New button in the menu bar. Review the data about the Welcome page and then click on Next.
- Offer your VM a title like Windows Server 2012.
- About the OS Form, make sure Microsoft Windows is picking as the working system. Select Windows 8 (64-bit) since the Version. Click on Next.
- The default memory size is 1536. Change this to 2048 and click on Next.
- Accept the defaults on the Digital Hard Disk site. This makes a brand new 20 GB hard disk which may be employed to boot up (or begin ) that the VM. Click on Next.
- Accept the default option VDI (VirtualBox Disk Picture ) to your new virtual disk and then click on Next.
- Accept the default option of dynamically allocated to the virtual disk drive. Click on Next.
- On the Digital Disk File Location and Size webpage, alter the dimensions to 40 GB. When wanted, you can change the location by clicking on the folder and navigating to another site. Click on Next.
- On the Summary page, then click on Generate.
Following the VM is generated, Virtual Box will seem like the following picture. I’ve got both Windows 8 Consumer Preview and Windows Server 2012 (formerly called Windows Server  installed from the figure.
It is worthwhile saying the clear. Now, this VM is vacant. Though it’s called Windows Server 2012, it does not have Windows Server 2012 installed, however. This is comparable to you making a document in Word and also naming it “My Strategy for Success.” Just specifying the file does not include the contents.
Attach the ISO to the VM
If you were already installing this onto a computer, you would set the DVD into the drive and then boot it into the DVD. You simulate it by minding the ISO image to the digital CD/DVD drive. The following steps show this procedure.
- Make sure the Windows Server 2012 VM (Windows Server 2012 ISO For Virtualbox) is chosen and click on Settings.
- Select Storage. Click Empty under IDE Controller.
- From the Attributes section, click the CD icon on the best of CD/DVD Drive.
- Select Pick a digital CD/DVD.
- Navigate to where you stored your Windows DVD ISO file and then select it. Click on Open.
- The IDE Controller doesn’t more be recorded as Lively but instead has this ISO file title. It should appear like the following picture.
Installing Windows Server 2012
Now, you should have the following:
- VirtualBox installed
- A vacant VM made for Windows Server 2012
- An ISO image file for Windows Server 2012 Connected to the VM
It is possible to use these steps to set up Windows Server 2012.
- Pick the Windows Server 2012 VM (Windows Server 2012 ISO For Virtualbox) from VirtualBox and click on Start.
- Review the information on Vehicle Capture Keyboard along with the server key and click on OK. You will probably find one or more messages that are additional. Review them and click on OK.
- As soon as the Install screen appears, click Next. Click on Install Now.
- Select Server 2012 Beta Datacenter (Server using a GUI) and click on next. The Server Core setup involves a command prompt but not a graphic user interface (GUI).
- Review the permit terms, choose the checkbox to accept the license conditions, and click on Next.
- Select Custom: Install Windows just (sophisticated ).
- The 40 GB push you generated with all the VM will be chosen as Drive 0 Unallocated Space. Click on Next.
- The installation begins, and you will not have to do anything else for a short time. Today might be a fantastic time to have a rest.
- When prompted, enter a password to the Administrator account in the Password and Retype password boxes. As a test system, you might choose to use something you can readily recall, like P@ssw0rd. Click Finish.
To log in, press on the server key and the Delete key to mimic the CTRL + ALT + DELETE key combination. The server key is your right-CTRL key.
Navigation and Shutting Down
The Windows Key (usually found between CTRL and ALT in the left of the spacebar is a significant key for navigation, and also, you’ll be able to use it to toggle between both viewpoints.
Furthermore, there are lots of different Windows key combinations. One that you will want to consider to close off your system is Windows + I. This may create a screen like the following picture, and you can pick the power button to reboot or power down your system.
Windows Server 8 is the next generation Server by Microsoft that is bound to act as the game changer in the server market. It comes with many cloud based enhancements, as well as the new Metro UI introduced by Microsoft for its Windows operating systems, including Windows 8 and Windows Server 2012. In a previous post I showed you How to install Windows 8 on Virtualbox. In this post I will show you the procedure for installing Windows Server 8 on Virtualbox. For those of you who might be unaware of the Virtualbox, it is a VMware like application that enables running operating systems virtually. This helps IT professionals to simulate physical environment features, practice on new software applications and operating systems, as well as to save hardware costs in an enterprise environment.
Step 1: First of all Download Windows Server 8.
Step 2: Download the latest VirtualBox , for Windows, Linux, Mac OS X or Sun Solaris to install Windows Server 8.
Step 3: Now, install Virtualbox and follow the simple instruction given below to install Windows Server 8 on VirtualBox.
Step 4: Once VirtualBox is installed on your computer, open it and select New,to create a new virtual machine and click Next on the new window that pops-up.

Step 5: Select Windows 2008 as the operating system and enter a name for the virtual machine, e.g. “Windows Server 8″. It is quite likely that you may face installation crashes if you select “Windows 2008 64-bit” option. For this reason, select Windows Server 2008 instead.

Step 6: Now allocate RAM for your virtual machine. The minimum RAM requirement for Windows Server 8 is 512 MB, but the virtual machine may not work with the minimum RAM requirement, therefore, allocate at least 1 GB RAM.

Step 7: Leave the default “Create New Hard Disk” option enabled and click Next to continue.

Step 8: Leave the Virtual hard Disk to VDI (VirtualBox Disk image) and click Next to proceed further.

Step 9: Now, choose the “Fixed Size” option to create a virtual hard disk.

Step 10: Allocate desired disk space for your virtual machine, however, make sure that the minimum hardware requirement for 32 GB is met for your Windows Server 8 virtual machine. You can also change the default location of the virtual hard disk from the folder icon, (next to your virtual machine name) and select a different partition to save the virtual disk image file.

Step 11: Click Create to create the virtual disk image.

Step 12: After your virtual hard disk is created, click Settings to configure VM (Virtual Machine) Settings.

Step 13: Now, go to System menu and enable IO APIC from Motherboard sub-tab.

Step 14 (optional): From the Processor tab, allocate at least 2 processors (provided your hardware can support them) for better Virtual Machine performance and to avoid VM installation issues. I am using a Core i3 Laptop so allocating 2 processor still leaves me with 2 additional ones for my physical machine, as Corei3 has 2 physical and 2 virtual cores due to Hyper Threading.

Step 15: Head over to the Storage menu, click Empty, followed by the CD icon to select the Windows Server 8 ISO image. Click OK to continue.

Step 16: Select your Virtual Machine name and click Start from left side of the main interface to begin installation.

The rest of the installation process is not much different form a normal Windows operating system installation. However, you can check out the rest of the process in this post: How To Install Windows Server 8.

You can also check out this video walkthrough for understanding the complete process of creating a Windows Server 8 virtual machine on VirtualBox. This video is also available on our WML Cloud YouTube Channel. How To Install Windows Server 2012 On VirtualBox
Skip to content
Прочитано:
1 626
Запускаю виртуальную машину с развернутой системой Windows Server 2012 R2 Std внутри моего тестового полигона под управлением Virtualbox которую использую на своей основной системе Ubuntu 12.04.5 Desktop amd64 для обкатки нового и тестирования задуманного.
Мне нужно также как и на других виртуальных машинах чтобы работал «Общий буфер» и «Общая папка», для этого внутрь Server 2012 R2 Std нужно поставить утилиты дополнения от Virtualbox
Устройства → Подключить образ диска Дополнений гостевой ОС —
после внутри системы открываем «Мой Компьютер» (This PC) по сочетанию клавиш Win + E → переходим в появившейся под монтированный диск именуемый как: CD Drive (E:) VirtualBox Guest Additions, нажимаем два раза левой кнопкой мыши по исполняемому файлу VboxWindowsAdditions-amd64.exe — Next — Next — Install, после отмечаю галочкой Always trust software from «Oracle Corporation» и нажимаю Install — Finish (Reboot now)
После перезагрузки все что нужно из гостевой системы скопировать в основную происходит на ура, только нужно убедиться что в самих настройках контейнера под данную виртуальную систему проставлены следующие настройки:
Машина — Настроить — Дополнительно:
- Общий буфер обмена: Двунаправленный
- Функция Drag’n’Drop: Двунаправленный
Теперь внутри VM к примеру запускаю консоль командной строки ( Win + X → выбираю Command Prompt) , набираю
C:Windowssystem32>systeminfo
результат выводится на консоль, чтобы его скопировать в основную систему нужно все также находясь в консоль командной строки через правый клик мышью выбрать пункт Mark, после выделить необходимое копируемой и нажать Enter, а после переключившись на основную систему в текстовый редактор LibreOffice вставить все что сейчас находится в буфере обмена:
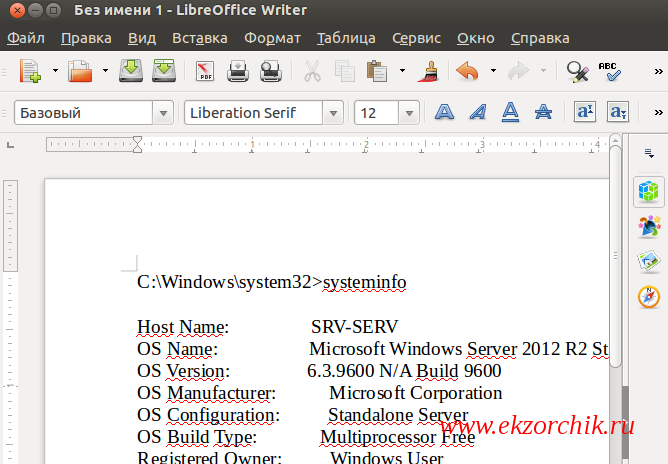
Что собственно мне и требовалось, теперь гостевая система готова чтобы быть тестовой и ее результаты согласно поставленным задачам лягут в основу моих практических заметок для моего блога. На этом я прощаюсь и до новых встреч, с уважением автор блога — ekzorchik.
OS, windows
August 6, 2018August 22, 2018
1 Minute
This blog will show how to download Windows Server 2012R2 180days evaluation and create a VM using Virtualbox VHD.
Reference:
Download Windows Server 2022/2019/2016/2012 R2 VHD for VirtualBox & VMware
- First download the VHD file from Microsoft website. Make sure to select the VHD option:
https://www.microsoft.com/en-us/evalcenter/evaluate-windows-server-2012-r2
NOTE: Once you use this VHD file to create a VM then this file cannot be used again to create another VM. So create a copy of this file so you wont have to download again to create another VM.
2. You must have latest version of VirtualBox. VirtualBox supports Windows 8.1 (2012 R2) from 4.2.16 version only.
3. Create a new virtual machine. Select Windows 2012(64bit) as OS.
Instead of creating new hard disk, select existing virtual hard drive option. Browse and select the downloaded VHD file .
9600.16415.amd64fre.winblue_refresh.130928-2229_server_serverdatacentereval_en-us.vhd
4. Start the VM and choose an Administrator password. Use the Input->insert CTRL-ALT-DEL when asked during login.
You can now use various windows tools like Active Directory, Server Manager in your VM. Enjoy!
Published
August 6, 2018August 22, 2018
Running Windows Server 2012 R2 on VirtualBox
By on October 26, 2013 •
Today I wanted to try out the newest release of Windows Server 2012 R2, primarily because I’m interested in taking a look at the on-prem version of Windows Azure, Windows Azure Pack.
As I’m running Windows 7 Ultimate on my personal development computer, my hypervisor of choice is VirtualBox. Before I started I upgraded VirtualBox to version, 4.2.18 which currently is the newest version.
Unfortunately this version doesn’t offer a Windows Server 2012R2 machine template, but I figured that I could just use the Windows 8.1 (64-bit) template.
I downloaded the Windows Server 2012 R2 VHD from the TechNet Evaluation Center, and tried to mount it in my newly created Windows Server 2012R2 virtual machine (I created the machine without attaching any harddisk). Unfortunately that didn’t work for me at first. After trying a few different things I found a configuration that works, and would let me boot the machine. When it wasn’t working the machine would just reboot instantly, with an unexpected error: 0xc0000225.
The things you have to change from the default configuration to get up and running are:
- The VHD must be mounted as the IDE Primary Master drive.
- Under System > Motherboard, IO APIC must be enabled.
- Under System > Processor, I enabled PAE/NX but I’m not sure this is needed.
- Under Network > Adapter 1, You have to use the Intel PRO/1000 MT Desktop adapter, because the other ones don’t have working drivers.

After setting up my VM like that I was up and running in a few minutes.
Categories: Software
Tagged as: virtual machine virtualbox windows server 2012 r2
