Win98 — PCI System Peripheral and Advanced Power Management
- Reply with quote
Win98 — PCI System Peripheral and Advanced Power Management
Hi,
I was able to install VB on Win2k3 host without any problems, and then installed Win98SE in virtual PC. There were some problems, but I was able to solve all of them, apart from these two:
I have two items in System Manager that I cannot solve, marked with question marks:
1) Other devices — PCI System Peripheral, and
2) System devices — Advanced Power Management support
Thanks in advance
Last edited by BabaLooey on 14. Oct 2011, 05:10, edited 1 time in total.
- BabaLooey
- Posts: 8
- Joined: 11. Oct 2011, 00:00
- Primary OS: MS Windows 2003
- VBox Version: OSE other
- Guest OSses: Windows 98
- Reply with quote
Re: Win98 — PCI periph and Adv power
![]() by mpack » 12. Oct 2011, 13:06
by mpack » 12. Oct 2011, 13:06
The «PCI system peripheral» issue is normal. It’s some device virtualized by VBox which Win98 does not recognize. Win98SE is not a fully supported OS.
As to the APM issue, I doubt that VirtualBox even has APM support — it’s a very old standard, and VBox supports its successor, ACPI. Did you follow the instructions in the «Howtos and Tutorials» forum for installing Win98SE with ACPI support?
- mpack
- Site Moderator
- Posts: 37920
- Joined: 4. Sep 2008, 17:09
- Primary OS: MS Windows 10
- VBox Version: PUEL
- Guest OSses: Mostly XP
- Reply with quote
Re: Win98 — PCI periph and Adv power
![]() by BabaLooey » 13. Oct 2011, 23:41
by BabaLooey » 13. Oct 2011, 23:41
Thanks for reply.
OK on «PCI system peripheral» issue. Will ignore ![]()
Nah, I missed that part about installing ACPI during W98 setup. Any way to fix it now?
- BabaLooey
- Posts: 8
- Joined: 11. Oct 2011, 00:00
- Primary OS: MS Windows 2003
- VBox Version: OSE other
- Guest OSses: Windows 98
- Reply with quote
Re: Win98 — PCI System Peripheral and Advanced Power Managem
![]() by mpack » 14. Oct 2011, 13:16
by mpack » 14. Oct 2011, 13:16
Thank you for that link. That is useful information, if I get time I’ll try to add it to the existing Win98 «howto» thread.
- mpack
- Site Moderator
- Posts: 37920
- Joined: 4. Sep 2008, 17:09
- Primary OS: MS Windows 10
- VBox Version: PUEL
- Guest OSses: Mostly XP
- Reply with quote
Re: Win98 — PCI System Peripheral and Advanced Power Managem
![]() by BabaLooey » 14. Oct 2011, 14:02
by BabaLooey » 14. Oct 2011, 14:02
I’m glad to help, but please be sure to test it by yourself. Although I used to work in PC and LAN setup/repair/maintenance, it was a long time ago, and I forgot a lot.
Also, despite solving my APM/ACPI problem with above links, it now generated a new problem, with a printer port (see separate topic).
There are other advices around www. This one was among the first that popped out after googling for «install acpi support windows 98», and it looked like it should work.
- BabaLooey
- Posts: 8
- Joined: 11. Oct 2011, 00:00
- Primary OS: MS Windows 2003
- VBox Version: OSE other
- Guest OSses: Windows 98
Return to Windows Guests
Who is online
Users browsing this forum: No registered users and 21 guests
Theres the vmx file:
.encoding = «windows-1255»
config.version = «8»
virtualHW.version = «7»
scsi0.present = «TRUE»
memsize = «512»
ide0:0.present = «TRUE»
ide0:0.fileName = «25-games-test-cl2.vmdk»
ide1:0.present = «TRUE»
ide1:0.autodetect = «TRUE»
ide1:0.deviceType = «cdrom-raw»
floppy0.startConnected = «FALSE»
floppy0.fileName = «»
floppy0.autodetect = «TRUE»
ethernet0.present = «TRUE»
ethernet0.connectionType = «bridged»
ethernet0.wakeOnPcktRcv = «FALSE»
ethernet0.addressType = «generated»
usb.present = «TRUE»
mks.enable3d = «TRUE»
serial0.present = «TRUE»
serial0.fileType = «thinprint»
pciBridge0.present = «TRUE»
pciBridge4.present = «TRUE»
pciBridge4.virtualDev = «pcieRootPort»
pciBridge4.functions = «8»
pciBridge5.present = «TRUE»
pciBridge5.virtualDev = «pcieRootPort»
pciBridge5.functions = «8»
pciBridge6.present = «TRUE»
pciBridge6.virtualDev = «pcieRootPort»
pciBridge6.functions = «8»
pciBridge7.present = «TRUE»
pciBridge7.virtualDev = «pcieRootPort»
pciBridge7.functions = «8»
vmci0.present = «TRUE»
usb.vbluetooth.startConnected = «TRUE»
displayName = «Clone of WIN985»
guestOS = «win98»
nvram = «Clone of WIN985.nvram»
virtualHW.productCompatibility = «hosted»
powerType.powerOff = «hard»
powerType.powerOn = «hard»
powerType.suspend = «hard»
powerType.reset = «hard»
extendedConfigFile = «Clone of WIN985.vmxf»
ide1:0.fileName = «auto detect»
ethernet0.generatedAddress = «00:0C:29:7D:84:19»
vmci0.id = «-238461774»
tools.syncTime = «FALSE»
uuid.location = «56 4d e8 f2 aa a7 27 1f-76 49 8f cf 7d 7d 84 19»
uuid.bios = «56 4d e8 f2 aa a7 27 1f-76 49 8f cf 7d 7d 84 19»
cleanShutdown = «TRUE»
replay.supported = «FALSE»
replay.filename = «»
ide0:0.redo = «»
usb.autoConnect.device0 = «»
pciBridge0.pciSlotNumber = «17»
pciBridge4.pciSlotNumber = «21»
pciBridge5.pciSlotNumber = «22»
pciBridge6.pciSlotNumber = «23»
pciBridge7.pciSlotNumber = «24»
scsi0.pciSlotNumber = «16»
usb.pciSlotNumber = «32»
ethernet0.pciSlotNumber = «33»
vmci0.pciSlotNumber = «36»
usb:1.present = «TRUE»
ethernet0.generatedAddressOffset = «0»
ethernet0.virtualDev = «e1000»
tools.remindInstall = «FALSE»
vmotion.checkpointFBSize = «16777216»
usb:1.speed = «2»
usb:1.deviceType = «hub»
usb:1.port = «1»
usb:1.parent = «-1»
tools.upgrade.policy = «manual»
ide1:0.startConnected = «TRUE»
unity.wasCapable = «FALSE»
bios.forceSetupOnce = «FALSE»
checkpoint.vmState = «»
ide0:1.present = «TRUE»
ide0:1.fileName = «25-games-test-0-cl2.vmdk»
ide0:1.redo = «»
checkpoint.vmState.readOnly = «FALSE»
policy.vm.mvmtid = «»
vc.uuid = «»
serial0.startConnected = «FALSE»
sound.present = «TRUE»
sound.fileName = «-1»
sound.pciSlotNumber = «34»
sound.autodetect = «TRUE»
softPowerOff = «FALSE»
usb.generic.allowHID = «TRUE»
mks.keyboardFilter = «allow»
hpet0.present = «FALSE»
ehci.present = «FALSE»
Why do this?
If you feel nostalgic for a bit of Windows 9x action, or you just want to play some old games that are between DOS and Windows XP, you can either build a retro PC gaming rig, or you can test the water with VirtualBox.
Once it’s all done, you too can see how pointless it all is. 🙂
Update March 2019: Due to popularity of this post, I’ve run through this again on OSX with Virtualbox 6. I’ve also added some new content and will continue to do so.
What you will need:
- Windows 98SE ISO (link here, and key – HQ23F-WXWFF-7V3HJ-KCVXT-4FRRM)
- SCITech Display Doctor (this will be the video driver) – https://docs.google.com/file/d/0BycgkMZbeQOzWXE5NUhnWGRycVE/edit?pli=1
- VirtualBox (https://www.virtualbox.org/wiki/Downloads)
- Opera 9.6 (http://www.oldversion.com/windows/opera-9-64)
- Unofficial Windows 98 SE update roll up pack (http://files.platesteel.net/win98/U98SESP3.exe)
- Some other software from http://files.platesteel.net/win98se
Create the VM and Install Windows 98 SE
- Create new VM on Virtualbox

- Type: Microsoft Windows
- Version: Windows 98
- RAM: 512MB
- Create new fixed size HDD – 2GB (VDI is fine)
- Edit the settings of the VM:
- Display -> Video Memory ->
- 128MB
- Enable 2D Acceleration – Yes
- Enable 3D Acceleration – Yes
- Display -> Video Memory ->
- Install Windows 98SE
- Boot with your 98SE ISO mounted (you’ll have to find this yourself)
- Boot with option 2 – Start computer with CD-ROM support
- Run fdisk and accept all the defaults to create an 8GB partition on your virtual drive.
- Restart the virtual machine
- Boot with option 2 – Start computer with CD-ROM support
- Format the virtual drive using format on the Windows CD
- D:win98format c:
- Run: D:setup.exe /ie /im /is /nr
- /ie Disables create a boot disk (causes crashing on VBox and 98SE installer)
- /im Disables checking conventional RAM
- /is Disables scandisk
- /iv Don’t disable billboards
- /nr Disable registry check
- Run through the Windows installer with all the defaults
- After reboot – Boot from Hard Disk
- Enter your name and the CD key for Win98SE (DMWRC-T9XP4-GJ2P8-26G66-V9WBB); install will continue.
- If everything went well, you should see Windows 98 desktop and hear some tragic music. 🙂
- I recommend that you take a snapshot of the VM and call it “BASE INSTALL”


Install Video Driver
- Shutdown Windows (and the VM)
- Edit Settings of the VM -> Storage -> Add another device to the IDE controller (click the CD with the green plus) and mount the scitech-display-doctor-7.iso file you downloaded earlier.
- You should see a CD drive with Sdd7 – double click that then run the scitech-display-doctor-win-7.0 installer – Express installation is fine.
- Register the Sci-Tech Display driver with either the name/serial in the text file on the mounted ISO, or use:
- Name: CSCKnight
- Serial: 0B5E-12B4-A8A4-0B
- Register the Sci-Tech Display driver with either the name/serial in the text file on the mounted ISO, or use:
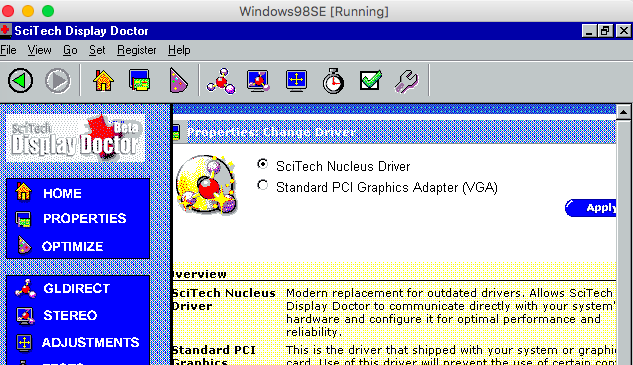
- OS will restart, when it returns, SciTech Display Doctor will load. Either register it or start the 21 day trial.
- On the HOME page, underneath Current Configuration, there is a section called Active Features. Click ‘Disabled’ next to SciTech Display Driver then select SciTech Nucleus Driver and apply.
- OS will reboot again (remember how annoying this used to be?)
- SciTech reloads and you’ll see that VESA VBE 2.0 Oracle VM VirtualBox VBE Adapter is now selected.
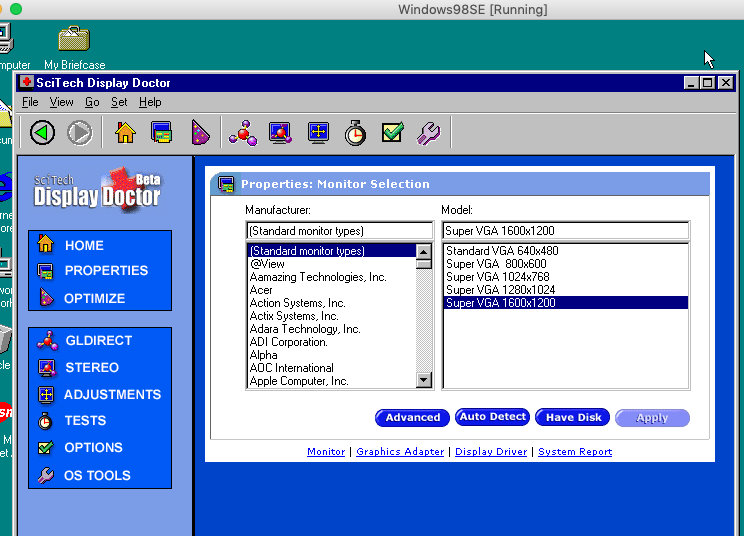
- Once the SciTech window returns; click the ‘Monitor not selected!’ link and choose SuperVGA 1600×1200, then reboot Windows.
- Once back into Windows after the reboot; right click Desktop then Properties then Settings
- Here you should see Default Monitor on SciTech Display Doctor 7.0
- Click the monitor model, and select Super VGA 1600×1200.
(Strangely, I wasn’t able to pick anything higher than 1024×768, so select that, it’ll make you reboot. Once you return, go back into the settings, and you’ll now see 1600×1200 32bit)- I’ve had issues trying to change resolution at the same time.
- I’ve also had issues when the restart didn’t work – if so, restart the VM yourself – no need to go into safe mode, it should boot the second time OK.
- Right click Desktop -> Properties -> Settings; now you can select 1600×1200 32bit True Color no problem.
- Reboot one more time to be sure.
- Hello accelerated Windows desktop!
- Take another VM snapshot and call it something like “Display Driver Installed”


Configure for basic Internet access (NAT)
This will allow you to access the Internet, albeit in a basic and broken way.
- Start -> Settings -> Control Panel -> Internet Options -> Connections -> Setup
- I want to set up my Internet connection manually … or local area network (LAN).
- I connect through a local area network (LAN).
- Accept everything except for setting up a mail account.
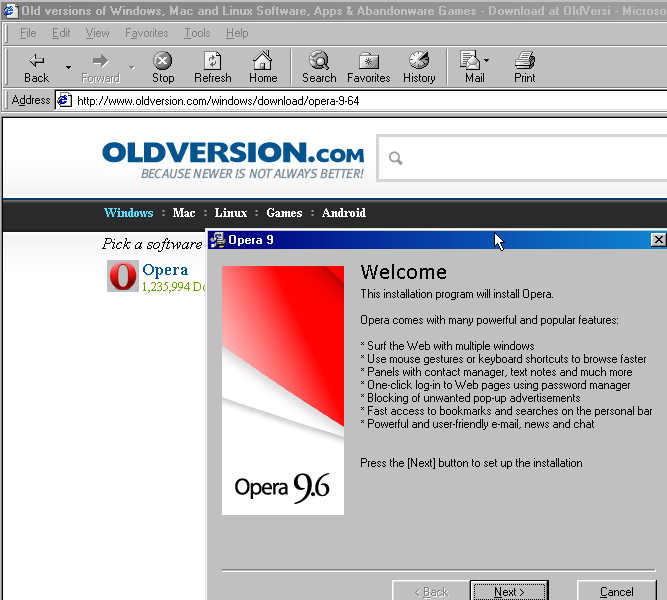
- Internet Explorer 5 will load. I recommend that you download Opera 9.64 (Opera 10 and above doesn’t support Windows 9x) – http://www.oldversion.com/windows/opera-9-64
- It will download it as a IFHDIH.PHP file that’s about 5MB – don’t worry. Just rename this to opera.exe and it *will* run.
- It will complain that Msimg32.dll is missing or too old. Don’t worry, it’ll still work and we’ll come back to fix this later.
Install Mouse Driver
- Not strictly necessary, but I find that the mouse works better with this driver/software installed.
- Download and run Belkin PS2 Mouse Driver 1.0 from http://files.platesteel.net/win98se/F8E850_SW_v1.exe
- Select PS/2 connection type. It will make you reboot again.
- Driver installed will look like:


Install some Essential Applications and Tools
- Install 7zip – http://files.platesteel.net/win98se/7z920.exe
- Download, unzip and install TweakUI – http://files.platesteel.net/win98se/7z920.exe
- Right click the inf file then install; it will ask you for a disk. Just browse to the directory that it was decompressed in, and select the catalog file.
Install Internet Explorer 6
- Not a strict necessity, but it’s better than having IE5.
- Probably a good idea to snapshot here – “Pre-IE6”
- Download, unzip, and install from – http://files.platesteel.net/win98se/ie60sp1.7z

Customizations
- In Explorer/Folder window -> View -> Folder Options -> View
- Show all files
- Display the full path in title bar
- Don’t hide file extensions for known file types
- Show window contents while dragging
- Smooth edges of screen fonts
- Click Apply then Like Current Folder
Install AC97 soundcard
The default VM setting is SoundBlaster 16 compatible. You can use the Windows Midi Synth, but I’ve seen some issues with games. In turn, we can use 9x drivers for AC97. Warning: lots of these drivers don’t work, so use mine.
- Download my Win 95 AC97 driver from http://files.platesteel.net/win98se/0001-VXD_A406.exe but do *NOT* run it.. simply right click and use 7zip to extract it to a directory.
- Shutdown the VM and go into Settings -> Audio, and change the audio hardware to ICH AC97, then boot up the machine.
- It will complain about no driver, select find driver and point it at the 0001-VXD_A406Win95 directory. It will find and install the driver for you without crashing/or no audio, possibly after a reboot. You will also see it installing Realtek SB Emulation.
- Should have audio and wavetable MIDI when it returns.
- You can test this by running C:windowssystemdxdiag.exe again.


Install Unofficial Windows 98SE Update Roll Up Pack (pseudo SP3)
- Download Windows 98SE SP3from http://files.platesteel.net/win98se/
- Instructions aren’t very good, it will pop up a Windows Help file. You can close this, then it’ll show you the install menu.
- Install DirectX 9.0c by itself, it will require a reboot after, then run installer again.
- Install Main Updates/System Core Files by itself. When complete, it will return with “Installation is now complete” and reboot, then run installer again (remember close the help window each time).
- At this point, I install (all at the same time) (with a reboot at the end):
- Adaptec ASPI Layer
- Animated Boot Up and Shutdown Logos
- DMA for all hard disks
- Microsoft Pain Graphic Filters
- Microsoft Word 97 SR-2
- Performance Tweaks
- Remote Desktop Connection
- Time Zone Update
- TrueType Fonts
- Universal Plug-n-PLay
- WinTop
- Snapshot! Call this “Windows 98SE Updated All Drivers and Clean”

Optional: Install 98SE2ME
- 98SE2ME will update over 700 of the system files with the newer versions from Windows ME. I don’t personally install it, at this time, but you can read more about it from the installer. http://www.mdgx.com/9s2m/read1st.php
- You will need a Windows ME ISO to use this.
Optional: Install KernelEx
- KernelEx adds an open source compatibility layer to Windows 98 that will let you run more modern software (like later versions of Opera, Firefox, etc).
I don’t personally have it installed, at this time, but you can read more about it here: http://kernelex.sourceforge.net/
Optional: Install Revolution Pack 9
- Revolution Pack makes the 98SE installation look more like XP/Vista. I don’t personally install it, but you can read more about it here: http://rp9.win98.nl/
Info: Resizing Windows 98SE Partition
If you get into a situation where you don’t have enough disk space. You can solve it by extending the virtual disk within VirtualBox, then grow the fat32 partition with gparted live ISO. The only caveat is that you need to remove all snapshots first.
To resize the VDI:
/Applications/VirtualBox.app/Contents/Resources/VirtualBoxVM.app/Contents/MacOS/VboxManage modifyhd –resize <MEGABYTES> <PATH TO VDI>
Then, boot from the gparted ISO.. you should see the total disk size and utilized. Right click the partition and hit resize, then apply. Once it’s complete, Windows 98 should have the extra space available. I would run scandisk just to be sure everything is OK, too.
Software
Games
The biggest problem with VirtualBox and Windows 9x is the lack of Guest Additions. This prevents any hardware emulation for Direct3D.
N – Does not work
Y – Does work
P – Works, with issues.
- N – C&C Gold 95
- Y – Civilization 2 Ultimate Collection – works perfect (dx5 game)
- N – Star Trek: Birth of the Federation 1.0.2 Software Emulation (video)
Applications
- Y – Visual Studio 6 Enterprise
Содержание
- VirtualBox и Windows 98. Видеодрайвер.
- 1. Немного про видео режимы для Windows 98 в VirtualBox
- 2. Универсальный VESA/VBE Видеодрайвер
- 3. Установка Универсального VESA/VBE Видеодрайвера
- virtualbox.org
- Tutorial: Windows 95/98 guest OSes
- Tutorial: Windows 95/98 guest OSes
- Re: Tutorial: Windows 95/98 guest OSes
- Re: Tutorial: Windows 95/98 guest OSes
- Re: Tutorial: Windows 95/98 guest OSes
- Virtualbox драйвер видеокарты windows 98
VirtualBox и Windows 98. Видеодрайвер.
1. Немного про видео режимы для Windows 98 в VirtualBox
По умолчанию, после инсталляции в VirtualBox, Windows 98 будет запущена с разрешением экрана 640×480 и 16 цветами (4-х битный режим).

Разрешение экрана для Windows 98 в VirtualBox
Видеокарта определяется Стандартный видеоадаптер PCI(VGA):

Видеоадаптер Windows 98 в VirtualBox по умолчанию
VirtualBox не оптимизирован для 16-ти цветовой (4-х битный) эмуляции, в которой запускается Windows 98. Эта эмуляция будет работать очень медленно.
2. Универсальный VESA/VBE Видеодрайвер
Драйвер в формате ISO скачать можно здесь: Vbe9x.iso или здесь: Vbe9x.iso также прикрепляю вложение к этой статье. Можно сразу присоединить, как образ, к оптическому диску и ставить его в Windows 98.
3. Установка Универсального VESA/VBE Видеодрайвера
На окошке Обновление драйверов (Какое действие должна выполнить Windows) выбрать:

Какое действие должна выполнить Windows
Далее на следующем окошке Обновление драйверов ( Выбор местонахождения драйверов ) выбрать путь к драйверу в файле ISO, который на оптическом диске ( в примере это диск D: ) :

Выбор местонахождения драйверов
Windows 98 найдет драйвер на диске и в следующем окне Обновление драйверов (Поиск драйвера Windows для устройства) сообщит :

Поиск драйвера Windows для устройства
По окончанию установки в окошке Обновление драйверов следующее сообщение Завершена установка обновленного драйвера для данного оборудования :

Завершена установка обновленного драйвера
Потребуется перезагрузка Windows 98. После перезагрузки можно установить нужный монитор, нужную глубину цвета и нужное разрешение:

Новое разрешение экрана для Windows 98 в VirtualBox
Теперь видеокарта определяется как VBE Miniport- Standart PCI Grafics Adapter(VGA):

Новый видеоадаптер Windows 98 в VirtualBox
Источник
Источник
virtualbox.org
End user forums for VirtualBox
Tutorial: Windows 95/98 guest OSes
Tutorial: Windows 95/98 guest OSes
by Technologov » 23. Sep 2008, 13:30
Since this is now became a common request by many, I decided to write a tutorial about Windows 9x (95/98/98SE/Me) usage on VirtualBox.
Forenote: Windows 9x is not officially supported by VirtualBox team, which means, that it lacks Guest VM Additions, and it runs slowly, because VirtualBox is not optimized to run Win 9x.
Most CD-ROMs available for Windows 95/98 are not bootable, which means, that you must boot from DOS floppy, install DOS first and only then install Windows 95/98.
*It does require DOS skills*
Official bootable CD media is starting from 98SE. So if you’re newbie, you should use Windows 98 SE bootable CD.
Additionally I strongly suggest to limit system RAM to 512 MB for those OSes. Otherwise it will crash. (There are workarounds, that allow Win 9x run on modern physical systems, but I won’t go into detail here)
In some cases enabling or disabling AMD-V/VT-x can help you install the O.S.
For this tutorial, I presume, that you are able to install the OS.
Installing with ACPI:
(contributed by Richard_S)
Contrary to what you may have read here in some of the other VirtualBox Win98 threads, this is NOT because Win98se is a poorly written piece of antiquated crap that doesn’t even know how to properly handle CPU IDLE.
Back when a lot of todays young Linux geeks were still pooping their dipiys, Win98 was already supporting ACPI functions to create greener PCs and help keep laptops from running down their batteries in 10 minutes (which is exactly what DID happen to me the first time I installed Linux on a laptop that was working FINE in Win98).
So, long story short, there is NOTHING really wrong with Win98, the problem is that VirtualBox’s emulated BIOS doesn’t fully match up with what Win98 expects a real ACPI BIOS to look like, so by default Win98 will not install ACPI support (and unfortunately, the older APM support doesn’t handle CPU IDLE, so we get problems).
The solution is to FORCE ACPI support to be installed, by using the
command line switch when running the setup program that installs Win98.
This means that you can’t just jam the virtual CD into the virtual CD drive and let ‘autorun’ take care of everything.
The best way to handle this is to simply move the Win98 install folder from the Windows 98 SE CD onto your virtual C: drive in VirtualBox, then change directory to that folder in a DOS prompt and run the setup program manually:
This will force ACPI power management (and the associated CPU IDLE functions) to be installed, and your Win98 virtual machine will consume no more system resources when running than a similar XP or Linux virtual machine.
2. Sound /Audio Integration.
In VirtualBox, you must enable Sound, and use «Sound Blaster 16».
It is available since VBox 1.6.0.
The procedure for installation is rather simple:
NOTE: The procedure below is only needed if you switch from AC’97 to SB16.
It is not needed, if you create new VM with SB16, then install Win98 on it.
2.1. Delete your sound card device and all unknown devices from «Device Manager».
2.2 Add New Hardware (from Control Panel).
2.3 Select «no, device is not listed in the list».
Code: Select all Expand viewCollapse view [img]http://img397.imageshack.us/img397/7972/win98soundscreenshot03so7.png[/img]
2.4 Let Windows search for non-plug’n’play devices.
Code: Select all Expand viewCollapse view [img]http://img168.imageshack.us/img168/1111/win98soundscreenshot04gd2.png[/img]
2.5 It will manually detect non-plug-n-play devices. Click on «Details» to show them.
Code: Select all Expand viewCollapse view [img]http://img413.imageshack.us/img413/9726/win98soundscreenshot05yx4.png[/img]
2.6. It will find «Soundblaster 16 or AWE 32 or compatible».
Code: Select all Expand viewCollapse view [img]http://img413.imageshack.us/img413/2001/win98soundscreenshot06me3.png[/img]
3. Video driver integration.
By default Windows 98 will run only in 640×480 resolution, 16-colors.
Performance Note: VirtualBox is not optimized for 16-colors (4-bit) emulation. It works very slow this way.
Having 32-bit True Color driver makes Win98 VMs run on VirtualBox *much* faster.
If you want True color or high resolution, you need to download special drivers.
3.1. bearwindows driver (unstable)
http://bearwindows.zcm.com.au/
NOTE: You must install «Universal version» (2nd link), as the «VirtualBox» version is known to have problems.
WARNING: This driver is buggy, and many Windows fonts do not render correctly with it. Not recommended.
The driver is a high quality commercial grade video driver (even includes some software emulated Open GL 3D support), and it does include an exe installer program.
Despite having an installer, the SciTech Display Doctor is a little tricky to get going. After the program launches, you have to find the little round radio button link to click to ‘enable’ the new driver (otherwise you still have VGA). Even then, you can’t select any higher resolution modes until you ditch the ‘default monitor’ and select one of the ‘Super VGA’ types.
After fiddling around with the above changes and rebooting several times you should be able to select 800×600 or 1024×768 (or higher) resolutions with 32 bit color depth. (setting 32 bit color mode optimizes the interface with Virtualbox and really speeds things up)
4. Network
Easiest thing, is to setup VirtualBox to NAT, and AMD PCnet-II network chip. It will be auto-detected by Win 9x.
5. Mouse
(contributed by stefan.becker)
VirtualBox 4.1 provides for Windows-98-compatible USB tablet device.
Enable USB Tablet: VM->Settings->System->Enable Absolute pointing device
then do: (enable Windows-98 mode)
VBoxManage setextradata «VM name» «VBoxInternal/USB/HidMouse/0/Config/CoordShift» 0
6. Shared Folders
Since VirtualBox shared folders won’t work, there are other ways, such as SMB/Windows File Sharing. Recommended for Windows hosts.
(Tested with VBox 2.1.2.— and was successful with «bridged» network. I had no success with NAT.)
WARNING: I admit that with VirtualBox the network is very unstable, presumably due to very slow performance of Win 9x guests under VBox.
For Unix hosts, WinSCP is recommended.
Another way of read-only file sharing is to create a virtual CD-ROM *.iso file on the host and insert it into the guest VM.
7. Clipboard Host Guest
(contributed by stefan.becker)
Clipboard integrated in VirtualBox only works with the Guest Additions, so not for Windows9x. But there is another solution: Clipboard over TCP/IP.
A Solution tested successfull with Linux Host is ShareClip: http://homepage.mac.com/bnej/shareclip/
-Technologov
Written on 2.9.2008, updated on 18.07.2011.
Please discuss this tutorial here
This topic is only for additions to this tutorial. Do not ask questions about how to get something working. Use a separate topic for that.
by fixedwheel » 23. Sep 2008, 13:58
avoid 100% CPU load
here is a link explaining something about, related to real hardware http://estu.nit.ac.jp/
Re: Tutorial: Windows 95/98 guest OSes
by stefan.becker » 28. Nov 2010, 12:28
There is no automatic installation.
Unzip the driver in the guest. Start system control/display, chosse the settings/advanced/vga-card, change the vga-card and choose option to show drivers in a directory, there choose manually the directory where you unzipped the driver.
Another hint: With the bearwindows drivers you cant start the comamnd line direct on the desktop. So search all «*.PIF» Files in the guest and change the settings to fullscreen (screen/appearence, Bildschirm/Darstellung).
Re: Tutorial: Windows 95/98 guest OSes
by mpack » 23. Mar 2011, 12:28
Universal Mass Storage Drivers for Windows 98.
As you may know, Win98 did not have generic support for USB mass storage devices (thumb drives, external mechanical drives, digital cameras etc). You needed a specific driver for each device, and of course those have become hard to find! However someone has just posted a link to a site offering generic USB mass storage drivers.
The site offers free generic USB mass storage drivers for both Win98 and Win98SE. Drivers for the former require you to install a big service pack first. Drivers for the latter are quite small. I have not yet tried either myself, I just thought it would be good to preserve the links here.
Re: Tutorial: Windows 95/98 guest OSes
by mpack » 31. May 2018, 09:56
Solving Windows 95 «Protection Error» on boot.
The download includes a readme with instructions on a couple of ways to apply the patch.
Thanks to user «pt58» for drawing my attention to this fix.
Источник
Virtualbox драйвер видеокарты windows 98

Junior Member Редактировать | Профиль | Сообщение | Цитировать | Сообщить модератору **** Vbemp NT Project ****
С 2004 года разрабатываю и поддерживаю универсальный видеодрайвер для семейства Windows (9x/NT3.x/NT4.0/2000/XP/2003) основанный на стандартах VESA Bios Extensions VBE 1.x/2.0/3.0.
Текущая актуальная верcия выпущена: January, 01, 2015.
Сайт обновлен: January, 31, 2015.
In English: http://bearwindows.zcm.com.au/vbemp.htm
In Russian: http://bearwindows.zcm.com.au/vbempru.htm
Текущая актуальная верcия выпущена: February, 14, 2014.
Сайт обновлен: February, 14, 2014.
In Russian: http://bearwindows.zcm.com.au/vbe9xru.htm
In English: http://bearwindows.zcm.com.au/vbe9x.htm
Для дальнейшего улучшения кода драйвера нобходимо тестирование его на разнообразных видеокартах. Особенно интересуют результаты тестирования карт с VESA BIOS 3.0, новых карт от AMD-ATI Technologies/nVidia и более редко встречающихся карт вроде VIA/SIS/Matrox и прочих, совместимость которых с VBEMP пока подтверждена не полностью.
27-28.10.2007: На сайте обновились библиотеки framevbe, vgamono для NT4. Добавлены материалы по: ISA/VLB картам, DbgPrint Logger’у (по снятию логов).
05.03.2008: Выпущена обновленная и исправленная версия библиотеки framevbe для NT4.
13.03.2008: Довыпущены версии VBEMP 9x для VMWare, Bochs, VirtualBox.
15-16.03.2008: Наконец-то! Выпущена УНИВЕРСАЛЬНАЯ версия VBEMP 9x.
16-19.04.2008: Выпущена обновленная версия драйвера VBEMP для семейства WinNT. Появиласть долгожданная поддержка видеокарт Intel 810/815 и прочих «banked» VESA 1.x карт (для XP/2003 версии) и поддержка VESA 1.x карт Trident (для всех).
26.04.2008: Появиласть долгожданная поддержка VESA 3.0 refresh rates для видеокарт Intel 810/815 (для XP/2003 версии).
05.05.2008: Обновлена утилита infovbe
05.10.2008: Новая версия VBEMP для семейства WinNT: Поддержка Mode-X (320 строк) в Windows 2000/XP/2003, исправление ошибок. Для Windows 2000/XP/2003 добавлена поддержка Hibernation.
21.10.2008: Выпущена версия драйвера VBEMP для семейства Win9x c поддержкой ASUS EEE PC (800×480, 1024×600) и TSR VBIOS. Для корректной работы этих режимов необходим предварительно загруженный TSR VBIOS. Вариант TSR VBIOS для EEE PC включён в комплект с драйвером.
16.11.2008: Новый beta релиз VBEMP, изменения коснулись в основном расчета refresh rates через формулу VESA GTF, в котором были найдены существенные ошибки при округлении и определении частот нестанадартных interlaced и doublescan ( = 1024×768. Для карт nVidia с подключенным по DVI LCD-дисплеем реализовано управление масштабированием.
01.03.2009: изменена лицензия на использование и рапространение VBEMP
01.11.2009: выпущена «автоотладочная» версия VBEMP 9x (в комплекте с релизом 081021.zip).
01.06.2010: in VBEMP 9x «uni» version VESA functionality in DOS restored
05.07.2010: библиотека framevbe/framebuf теперь раздельно поддерживает 15/16-бит режимы.
31.01.2014: Новый beta релиз VBEMP 9x.
a) добавлены видеорежимы (в основном widescreen)
b) исправлена таблица aspect ratio
c) поддержка добавления ЛЮБЫХ новых режимов для чипов Intel через патч и запуск TSR VESA BIOS
d) выпущены версии, ограниченные по VRAM 32/64/128mb (иногда убирает зависания)
e) PCI/AGP/PCIe адаптер не должен имет фиксированные ресурсы шины!, vbemp.inf исправлен
01.01.2015: Новый beta релиз VBEMP NT.
a) полностью переписан код, некорректно «разбирающий» EDID-блок монитора
b) закомментирован неработающий код переключения банков памяти VESA 1.x (версия для nt/w2k)
с) добавлена чересстрочная частота обновления экрана 50 Hz
d) планируется поддержка прямого подключения к TV с помощью VGA-SCART кабеля, т.е. чересстрочных режимов 25/30 Hz
e) уменьшено, оптимизировано к-во частот обновления экрана (в основном для NT с её ограничениями на размер списка режимов)
f) исправлена утечка памяти в таблицах режимов (все vbe20 версии)
g) убрана «радуга» на экране при загрузке драйвера (w2k/xp/2003)
h) убран код автоматического управления питанием из «legacy» т.е. не-PNP версий
i) альтернативный метод определения монитора используя считывание линий SCL/SDA если считывание EDID неудачно (w2k/xp/2003)
j) синхронизирован разрозненный код между nt/w2k и xp/2003 версиями
k) общий код для архитектур i386, amd64 и IA64 (xp/2003)
l) в диспетчере устройств отображается производитель видеокарты (w2k/xp/2003)
01.01.2015: Новый beta релиз CL54xxMP NT.
a) уменьшено, оптимизировано к-во частот обновления экрана (в основном для NT с её ограничениями на размер списка режимов)
b) добавлено определение монитора через VESA DDC2B используя линии SCL/SDA
c) в диспетчере устройств отображается модель видеокарты (w2k/xp/2003)
P.S. Не гарантируется работоспособность этих драйверов в среде Microsoft Windows Vista/7/Server2008/8/Server2012/8.1/10 и далее. Всего записей: 137 | Зарегистр. 23-05-2007 | Отправлено: 06:12 01-06-2007 | Исправлено: bearwindows, 17:15 07-02-2016
| bearwindows
Junior Member |
Редактировать | Профиль | Сообщение | Цитировать | Сообщить модератору |
| Всего записей: 137 | Зарегистр. 23-05-2007 | Отправлено: 16:11 23-10-2007 | Исправлено: bearwindows, 23:18 19-09-2008 |
| AlexG
Super Member |
Редактировать | Профиль | Сообщение | ICQ | Цитировать | Сообщить модератору bearwindows
Цитата: VBEMP для семейства Win9x Очень интересно. С нетерпением жду первых результатов. |
| Всего записей: 622 | Зарегистр. 24-09-2001 | Отправлено: 23:08 08-12-2007 |

| NeoHunter
Advanced Member |
Редактировать | Профиль | Сообщение | ICQ | Цитировать | Сообщить модератору Попробовал добавить в ХРЕ драйвер версии 04.26.2008 vbemph. До добавления файлов у меня при загрузке и после логина разрешение экрана было 1024×768 16bpp так как при создании ХРЕ прописывал строчки ; Default Screen Resolution 1024×768 16bpp 0x4,»ControlSet001ServicesVgaSaveDevice0″,»DefaultSettings.BitsPerPel»,0x010 0x4,»ControlSet001ServicesVgaSaveDevice0″,»DefaultSettings.XResolution»,0x400 0x4,»ControlSet001ServicesVgaSaveDevice0″,»DefaultSettings.YResolution»,0x300 После добавления файлов vbemp.sys и vbemppnp.inf при загрузке разрешение 1024×768 16bpp, а после логина сбрасывается на 800х600. Пришлось добавить в автозагрузку комманду shellexecute.exe /h qres.exe /x 1024 /y 768 /c:16 /r:75 shell32.dll,141 для возвращения первоначальных параметров. Но это не очень удобно и экран лишний раз моргает. Как сделать чтоб не переключалось в режим 800х600. |
| Всего записей: 1025 | Зарегистр. 10-08-2005 | Отправлено: 04:35 22-07-2008 |
| JekaRus
Advanced Member |
Редактировать | Профиль | Сообщение | ICQ | Цитировать | Сообщить модератору Попробовал сделать по аналогии
[SetupReg.AddReg] Все равно частота и разрешение на выставляются. А при подходе через комманду shellexecute.exe /h qres.exe /x 1024 /y 768 /c:16 /r:75 shell32.dll,141 многие иконки начинают отображаться неправильными значками. На счет аппаратного ускорения тоже непонятно. Рекомендуется выставлять Acceleration.Level 5. Но при этом ускорение отсутствует. Для ускорения нужно выставлять значение 0. |
| Всего записей: 1025 | Зарегистр. 10-08-2005 | Отправлено: 09:27 22-07-2008 |
| q111111
Advanced Member |
Редактировать | Профиль | Сообщение | Цитировать | Сообщить модератору интересует поддержка широкоформатных разрешений. особенно 1440х900. у кого-нибудь с таким разрешением работает? под Windows 2000 sp4. видеокарты GeForce 9400 и ATI Radeon 9600. подключение по D-SUB. может подскажите что и где подправить, что бы работало? |
| Всего записей: 1638 | Зарегистр. 05-03-2008 | Отправлено: 16:20 19-02-2009 | Исправлено: q111111, 16:23 19-02-2009 |
| Nike000
BANNED |
Редактировать | Профиль | Сообщение | Цитировать | Сообщить модератору Виртуальная машина VMware Workstation не обеспечивает поддержку 3D в виртуальной ОС Windows 98, а только в XP и выше. Мастдай просто не понимает, что эмулируемая видеокарта VMware SVGA II имеет 3D и ставит драйвер без 3D. Стоит пробовать универсальный драйвер, чтобы появилось 3D? |
| Всего записей: 7100 | Зарегистр. 29-11-2004 | Отправлено: 23:11 05-11-2010 |

| ctropa
Junior Member |
Редактировать | Профиль | Сообщение | Цитировать | Сообщить модератору Поставил vbemp на ноутбук с картой S3 Mirage, родное разрешение матрицы равно 1280х800, а в свойствах экрана доступно только 1280х768, из-за чего все несколько вытянутое. Возможно ли попросить vbemp поставить нужное разрешение и как? |
| Всего записей: 40 | Зарегистр. 31-10-2005 | Отправлено: 02:53 16-07-2011 |
| MERCURY127
Silver Member |
Редактировать | Профиль | Сообщение | Цитировать | Сообщить модератору Уважаемый Divetoxx! Вы не заметили, что автор покинул эту тему аж 3(!) года назад. Причем, он заходил только для того, чтобы вычистить свой пост годичной давности. Это о чем-то говорит. Последний раз, судя по уликам, он появлялся год назад, обновил шапку последней версией драйвера и свалил for good.
PS: А вообще, мне вот, тоже любопытно, какие есть причины использовать vbemp, если есть тот самый стандартный vga.sys. Я еще не встречал видюхи, сколь бы старой и редкой она ни была, с которой бы vga.sys отказался работать. PPS: Divetoxx, как верно заметил MERCURY127, vbemp использует BIOS видюхи для общения с нею. Родной же драйвер работает с GPU напрямую, не обращаясь к BIOS’у (всякие мелочи, типа чтения из BIOS’а модели видюхи в расчет не берем). Поэтому он и может использовать большие разрешения, кучи конвейеров и Z-буфферов. BIOS же предоставляет лишь самые базовые возможности, описанные в стандерте VESA. Поэтому самое большое разрешение, что можно им выставить 1280×1024. По крайней мере, я больше не встрачал. Да и набор этих разрешений там меньше того, что действительно может дать видюха. Вот вашего 1280×800 там и нет. И никакие утилиты, работающие выше драйвера вам не помогут. VGA не вызывает артефактов на вашей видюхе потому, что не использует (точнее, BIOS не использует) те блоки GPU, которые накрылись медным тазом. Поэтому, ИМХО, для вас не будет никакой разницы между vbemp и старым добрым vga.sys. |
| Всего записей: 2002 | Зарегистр. 02-09-2005 | Отправлено: 17:47 16-07-2011 |

| me1ancho1ic
Junior Member |
Редактировать | Профиль | Сообщение | Цитировать | Сообщить модератору Цитата: А вообще, мне вот, тоже любопытно, какие есть причины использовать vbemp, если есть тот самый стандартный vga.sys.
Platinum Member |
Редактировать | Профиль | Сообщение | Цитировать | Сообщить модератору Divetoxx Ваша шутка какая-то неудачная. Написать драйвер под конкретно Вашу частично исправную Цитата: выйдет на два порядка дороже и на два порядка дольше, чем купить исправную. Есть еще два момента, которые следует учесть: 1) материнку придется выслать разработчику (это заметно увеличит скорость корректировки драйвера); 2) процесс распада гефорса может закончиться раньше финального релиза |
| Всего записей: 10856 | Зарегистр. 11-09-2002 | Отправлено: 15:20 01-06-2012 |

И даже если бы вопрос стоял о написании драйвера, то не под конкретную видеокарту, а под 2d функции видеокарт, которые, полагаю, практически у всех современных видеокарт стандартизированы (то же VESA). 3d ускорение как раз требуется не использовать, потому что эта часть чипа повреждена.

Источник
Adblock
detector
1.
Немного про видео режимы для Windows
98 в VirtualBox
По умолчанию, после инсталляции в VirtualBox,
Windows
98 будет запущена с разрешением экрана 640x480
и 16 цветами (4-х битный режим).
 |
| Разрешение экрана для Windows 98 в VirtualBox |
Видеокарта
определяется Стандартный видеоадаптер PCI(VGA):
 |
| Видеоадаптер Windows 98 в VirtualBox по умолчанию |
VirtualBox
не оптимизирован для 16-ти цветовой (4-х битный) эмуляции, в которой запускается
Windows
98. Эта эмуляция будет работать очень медленно.
Имея
32 битный True
Color
драйвер можно сделать Windows
98 ,запускаемую в VirtualBox,
намного быстрее
Если
вы хотите True
color
или высокое разрешение, вы должны загрузить специальные
драйвера
2.
Универсальный VESA/VBE Видеодрайвер
Драйвер
в формате ISO
скачать можно здесь: Vbe9x.iso или здесь: Vbe9x.iso. Можно сразу присоединить, как образ, к
оптическому диску и ставить его в
Windows
98.
3.
Установка Универсального VESA/VBE Видеодрайвера
Перейти
Экран-Настройка-Дополнительно-Адаптер-Изменить-Далее
На
окошке Обновление драйверов (Какое действие должна выполнить Windows) выбрать:
 |
| Какое действие должна выполнить Windows |
Далее на следующем окошке Обновление драйверов ( Выбор местонахождения драйверов ) выбрать путь к
драйверу в файле ISO, который на оптическом диске ( в примере это диск D: ) :
 |
| Выбор местонахождения драйверов |
Windows 98
найдет драйвер на диске и в следующем окне Обновление драйверов (Поиск драйвера Windows для устройства) сообщит :
 |
| Поиск драйвера Windows для устройства |
По
окончанию установки в окошке Обновление драйверов следующее сообщение Завершена установка обновленного драйвера для данного оборудования :
 |
| Завершена установка обновленного драйвера |
Потребуется
перезагрузка Windows 98. После перезагрузки можно установить нужный монитор, нужную глубину
цвета и нужное разрешение:
 |
| Новое разрешение экрана для Windows 98 в VirtualBox |
Теперь
видеокарта определяется как VBE
Miniport—
Standart
PCI
Grafics
Adapter(VGA):
 |
| Новый видеоадаптер Windows 98 в VirtualBox |
A Mind in Transition. A Heart Open.
Your presence here is welcome.
Thursday, April 14, 2011
Better Windows 98 video driver for VirtualBox
It’s 2011, and . you don’t care. All you want to know is how not to be stuck at 640×480 and 16 colors on Windows 98 guest on VirtualBox and guest additions won’t ever be made on Windows 98 or 95.
How easy is it? go to http://bearwindows.zcm.com.au/vbe9x.htm and download, for instance, 2010.06.01 (click one of the ? on the right).
Now you have a .zip. Extract it.
Make a .iso from that folder with your favorite program.
You now can mount that on your Windows 98 image.
Update the driver from Device manager and point it to the VBE9XUNI folder and let it install. Reboot and you have color!
YRMV, don’t blame me if it doesn’t work, etc. All I can say is it worked well for me.
I suppose you’re also looking for AMD PCnet drivers at the same time. Stop. Don’t panic yourself about it, but stop the vm, go to network, advanced, and change the nic to the one above it — NOT the FAST one. (have your Windows 98 CD available, and . it is installed.)
2015: updated to a different domain.
Heh. 2012 and I STILL don’t care. Worked nicely. Thanks.
I used this for both Win95 and Win98 in my VirtualBox installation (4.1.18 on Win7 x64). Seems to work great for the most part, but unfortunately it hoses the whole screen when I attempt to open a command prompt in either VM. I used 1024x768x32 when I configured my screen. Is there something else I need to do so it gets along with with the command prompt too?
I haven’t played with it for a couple of years. If anything, I’d probably check to make sure the command prompt doesn’t open full screen. You may want to reduce to 800×600 and try that.
2013 and I don’t care either.. Thanks for the info!
Thanks, helped me as well.
J
![]()
It’s 2013, and I just want to play Beasts & Bumpkins.
Источник
VirtualBox и Windows 98. Видеодрайвер.
1. Немного про видео режимы для Windows 98 в VirtualBox
По умолчанию, после инсталляции в VirtualBox, Windows 98 будет запущена с разрешением экрана 640×480 и 16 цветами (4-х битный режим).
Разрешение экрана для Windows 98 в VirtualBox
Видеокарта определяется Стандартный видеоадаптер PCI(VGA):
Видеоадаптер Windows 98 в VirtualBox по умолчанию
VirtualBox не оптимизирован для 16-ти цветовой (4-х битный) эмуляции, в которой запускается Windows 98. Эта эмуляция будет работать очень медленно.
Имея 32 битный True Color драйвер можно сделать Windows 98 ,запускаемую в VirtualBox, намного быстрее
Если вы хотите True color или высокое разрешение, вы должны загрузить специальные драйвера
2. Универсальный VESA/VBE Видеодрайвер
По принципу что-то лучше, чем ничего, в форуме и в ответах технической поддержки для Windows 98, работающей в VirtualBox , предлагается универсальный VESA/VBE Видеодрайвер.
Драйвер в формате ISO скачать можно здесь: Vbe9x.iso или здесь: Vbe9x.iso также прикрепляю вложение к этой статье. Можно сразу присоединить, как образ, к оптическому диску и ставить его в Windows 98.
3. Установка Универсального VESA/VBE Видеодрайвера
На окошке Обновление драйверов (Какое действие должна выполнить Windows) выбрать:
Какое действие должна выполнить Windows
Далее на следующем окошке Обновление драйверов ( Выбор местонахождения драйверов ) выбрать путь к драйверу в файле ISO, который на оптическом диске ( в примере это диск D: ) :
Выбор местонахождения драйверов
Windows 98 найдет драйвер на диске и в следующем окне Обновление драйверов (Поиск драйвера Windows для устройства) сообщит :
Поиск драйвера Windows для устройства
По окончанию установки в окошке Обновление драйверов следующее сообщение Завершена установка обновленного драйвера для данного оборудования :
Завершена установка обновленного драйвера
Потребуется перезагрузка Windows 98. После перезагрузки можно установить нужный монитор, нужную глубину цвета и нужное разрешение:
Новое разрешение экрана для Windows 98 в VirtualBox
Теперь видеокарта определяется как VBE Miniport- Standart PCI Grafics Adapter(VGA):
Новый видеоадаптер Windows 98 в VirtualBox
Источник
Источник
Socket 3
Bits & Bytes on Retro Computing
Install & Configure Windows 98 Using Oracle VirtualBox
Earlier posts on installing Windows 3.1 and 95 with VirtualBox have been consistently popular since I started this blog. This time the focus is on Windows 98, arguably the most popular version of Windows from a retro PC enthusiast prospective, particularly for gaming.

Based on personal observations I feel it comes down to a few reasons such as:
- relative ease of installation;
- generally runs earlier Windows and DOS games and applications without compatibility issues;
- was well supported by game developers into the 2000s;
- less irritable for power users compared to Windows ME (e.g. Windows ME brought further restrictions to DOS);
- people who only experienced PCs with Windows XP or later, generally can use with a minimal learning curve, who desire to run older games.
Unfortunately VirtualBox once again provides limited support for Windows 98, so the Guest Additions isn’t going to be of use. Also if the intent is gaming where DirectX and 3D acceleration is needed, I’d be more inclined to use PCem to emulate hardware from the era. Personally I built a Pentium III 800 MHz PC for Windows 98 gaming, and it’s brilliant for this. Despite all the mention of gaming, VirtualBox is better suited for applications.
Windows 98 saw two releases over its lifetime, the original RTM in June 1998, followed by the Second Edition (SE) in May 1999. Unless it’s out of curiosity, there’s not really a compelling reason to not go with SE. To understand the differences between the two, I’ll briefly go over the changes.
The RTM release brought together several bits and pieces that were made available for Windows 95 over time. Originally available separately or as part of Windows 95 OSR 2.5, Internet Explorer 4.0 and the Windows Desktop Update (e.g. shell enhancements such as the Quick Launch toolbar) were now integrated. Desktop Themes and utilities offered with Microsoft Plus! for Windows 95 were also added, USB support improved, and the introduction of DVD.
ACPI (Advanced Configuration & Power Interface) had also been introduced, though is typically disabled by default upon installation. ACPI provided an open standard that brought about transferring power management across from being dependent on the computer’s BIOS to the operating system itself. Installing Windows 98 with ACPI support is done by entering setup /p j at the DOS Command Prompt, otherwise it requires a registry change after installation.
The Second Edition included Internet Explorer 5.0, and Internet Connection Sharing. Internet Connection Sharing was to allow a small home or office network access the internet via a single PC. Useful at a time when only one PC could be physically connected using a dial-up modem. DirectX was updated from 5.2 to 6.1, introducing the DirectMusic API, whilst Direct3D now took advantage of Intel’s then-new Pentium III processors for 3D tasks. Fonts had also been updated, to accommodate the new Euro currency that came into effect across much of continental Europe. Otherwise the changes were subtle for improving stability and bug fixes.
For this guide you’ll need to have:
- Oracle VirtualBox installed
- Windows 98 Boot Disk (optional) Download
- CD or ISO image of Windows 98
- VBEMP Universal VESA Video Driver Download
Windows 98 also accepts the SciTech Display Doctor video driver that was used in my Windows 95 tutorial with VirtualBox. However, the one used here I prefer out of the two. Developed by Bearwindows and AnaPa Corporation as they call themselves, it’s a stable and no-frills driver, that can also be installed onto Windows 95 and ME. From experience this driver is lighter on resources and allows Windows 98 to shut down correctly. SciTech’s driver tends to cause the virtual machine to freeze up at the “Windows is shutting down” splash screen. The original source location is https://bearwindows.zcm.com.au/vbe9x.htm and is free for personal use. I simply copied the contents of their ZIP file in its entirety into an ISO image for ease of installation.
Here I’m using Oracle VirtualBox 5.2.18, though later upgraded to 5.2.20 on Windows 10.
Setting Up The Virtual Machine
Open up VirtualBox and select New. A Create Virtual Machine dialog box will appear allowing you to select which operating system it will be using for this virtual machine (VM). You may either select the Windows version, or type Windows 98 and the drop-down selection will automatically change. After this, select Next.
The following option now is to choose the amount of RAM. By default as Windows 98 had been selected, the recommended memory size is 64 MB. A historically accurate amount was typically in the range of 16 MB to 128 MB. For this, I went with 128 MB. Select Next.
Having 512 MB or above and Windows 98’s stability becomes flaky with varying results, thanks to memory management (i.e. VCache). This was inherited from Windows 95 and continued with Windows ME. For VirtualBox, I managed to successfully boot with 978 MB without workarounds. Once in gigabyte territory, Windows will simply crash upon start-up claiming there’s insufficient memory.
Now the option is regarding a hard disk for the VM. As we don’t have one yet, we will select the Create a virtual hard disk now option and choose Create. Again as we’ve chosen Windows 98, VirtualBox has suggested the recommended size of the hard disk to be 2 GB. Select VDI (VirtualBox Disk Image) and Dynamically allocated over the following couple of options before choosing the size of the hard disk.
 In 1998, hard disk drives peaked at 15 GB capacity. For a desktop PC, capacities of 4.3, 6.4, and 8.4 GB were most frequently seen.
Attempting to create a virtual hard disk at 6.4 GB, VirtualBox threw me an error about not being aligned on a sector boundary. Another attempt at an even 6 GB and it was fine. This quirk comes about from a misalignment with the sector size of your physical drive, in this case having 512-byte sectors. Alternatively repeating the process set at 6.4 GB on a different physical drive with 4 KiB (4,096-byte) sectors, and it was fine. To see whether my physical hard disks had 512- or 4,096-byte sectors, I went to check via Windows 10’s Command Prompt with administrator access. With the command fsutil fsinfo ntfsinfo d: to check Drive D, followed again by the other hard disks, the value for Bytes per Physical Cluster provided confirmation as to why the outcome was different on different drives. Depending on your setup you may not even see this error at all, but if you do, simply choosing a different size for your virtual hard disk is the way to circumvent this if you have no other hard disks to store your virtual machine.
Remaining settings to adjust for your virtual machine include:
- System > Acceleration tab > Deactivate the VT-x/AMD-V and Nested Paging
- Display > Scale Factor > Default is 100%, useful for enlarging low resolution output on our modern resolution displays if desired
- Audio > Audio Controller > Use Sound Blaster 16
- Network > Adapter 1 > Use Bridged Adapter and ensure it’s a PCNET-Fast III
- USB > Set the USB controller to USB 1.1 (USB 2.0 didn’t gain widespread adoption until Windows XP)
Whilst still in the Settings dialog box of your VM, you may mount the Windows 98 CD or ISO image before running it. Once done, select OK to close the dialog box.

Mounting the Windows 98 CD. Use the Host Drive option for a physical disc.
Windows 98 Setup
Start your VM in VirtualBox, and shortly you should see the CD-ROM Startup Menu. Unlike Windows 95, there’s no need to use a floppy boot disk to begin installation. Either press 2 or use the arrow keys to highlight option 2 to proceed booting from the CD.

A second menu appears whether to proceed with Setup, or to boot into DOS with or without CD-ROM support. The first option is highlighted by default, so press Enter. Shortly you will see Windows 98 Setup.
At the Welcome to Setup screen, press Enter. Setup detects the virtual hard disk as having unallocated disk space, in this case the whole disk. Highlight Configure unallocated disk space (recommended) and press Enter. As the capacity is greater than 512 MB, Setup confirms if you wish to enable large disk support. Highlight Yes, enable large disk support and press Enter. In slightly technical terms, large disk support refers to the FAT32 file system, instead of the older FAT file system that had been in use since the 1980s.
Setup states that it will restart your computer, with mention to have the Windows 98 Boot Disk in your floppy disk drive. This actually isn’t required. Upon restart and choosing to boot from CD-ROM, select either one of the Start computer with/without CD-ROM support to access the DOS prompt. The Windows 98 Boot Disk is handy for reformatting the hard disk as FORMAT.COM is not provided when booting from CD.
At the DOS prompt appearing as A:>, type fdisk and press Enter. The FDISK utility should load, and at first ask to enable large disk support as occurred in Setup. Press Y then Enter to proceed to the main menu. FDISK alerts you at the bottom of the screen that no partitions are set active. Press 2 then Enter to select Set active partition.
At the Set Active Partition screen, you’ll like see only one partition listed for this virtual machine – shown as C: 1. FDISK prompts to enter the partition’s designated number you wish to be active. Press 1 then Enter. The Status column updates to display the letter A to reflect this change. Press Esc repeatedly until you reach the DOS prompt again, then restart the VM.
Run through the startup menus to load Windows 98 Setup again. Now that there’s an active primary partition, Setup will commence formatting as needed for installation. When formatted has completed, press Enter to continue with performing a “routine check”, which is simply ScanDisk checking for any errors on the hard disk.
ScanDisk will complete, and Setup changes from text mode to the GUI portion of Setup. Here’s a series of screenshots through the steps up until this point.

Setting up for Windows 98 installation.
This stage of Setup is intuitive and easy to follow. Unlike Windows 95 Setup, hardware detection is left towards the end. At first, you’ll be prompted to confirm the location to install Windows. Click Next to install to the default, C:WINDOWS.
Setup begins checking if a previous version of Windows exists, and the available disk space. A possible error to come up here is by using the inappropriate Windows 98 CD (i.e. using the retail Upgrade version on a blank hard disk, when it’s expecting to find either a previous Windows 3.1 or 95 installation).
You will now be greeted with four options on the installation type to proceed with. These options and their outcomes are virtually the same as what was on offer with Windows 95.
The four options are:
- Typical – As it’s named, this was the most common installation pathway that would have Windows 98 installed with many of its bells and whistles. We will go for this option.
- Portable – Similar to a Typical installation, though with some relatively minor changes that includes functionality concerning laptops, i.e. relating to power and battery settings.
- Compact – When disk space was tight, this option could be selected bypassing all the optional components such as games, accessories, etc. that may be installed with a Typical or Portable installation.
- Custom – Allows much greater tweaking of installation and configuration of Windows 98.
With Typical selected, click Next. Select Install the most common components (Recommended), and click Next. Otherwise feel free to customise (e.g. you may wish to include Desktop Themes). I personally tend to remove Online Services and Outlook Express.
Setup proceeds with confirming your computer’s name and the workgroup to be associated to for a server-less network. Enter a more descriptive name if desired, to replace the random alphanumeric characters. WORKGROUP is the default name for a workgroup, so only change this if your workgroup has a different name. Click Next.
You’ll be asked to confirm your location. Based on the country chosen, this would influence Windows 98’s Channel Guide that could appear floating on your Windows desktop. Select your country and click Next. As Setup is now ready to begin file transfer, click Next once more.
As files begin transferring over, a rundown of what’s in store with Windows 98 commences. Now is an opportunity to make yourself a coffee as it takes a few moments. After completion, Setup will display a countdown that it will restart your computer in 15 seconds, unless you hit the Restart Now button. When the VM restarts, you may also leave it alone and wait for the countdown to complete on the default option to boot from the hard disk.
The final stages of the Windows 98 Setup Wizard will appear, requesting your name, to accept the license agreement, and to enter your product key. Hardware detection follows, with yet another restart just as before. This time Setup will only prompt to confirm the date and time, but otherwise finishes off installation. Windows starts up and you’ll be prompted for a network password, due to having the VM set up to include a compatible network card. At this time, you may simply select Cancel. The network passwords here were only intended for accessing resources over your workgroup network, not to be confused with securing your user account. Windows begins to complete the Plug and Play process, by installing drivers for hardware components detected during Setup.
Setup is now complete and directs you to the Windows desktop, displaying the Welcome to Windows 98 window. Below is a continuation of screenshots up until this point. Remember to unmount the Windows 98 CD/ISO also.
Now it’s ready for some optimisations.

Windows 98 Setup to the desktop.
Configuring Video
By default, Windows 98 will appear at a low 640 x 480 resolution with 16 colours, using the basic VGA video driver. Installing the following video driver will allow up to 32-bit colour at a maximum 1,600 x 1,200 resolution – a lot easier on the eyes.
At the Windows desktop, right-click on My Computer and select Properties, to bring up the System Properties dialog box. Select the Device Manager tab to see a list of system components. Hit the plus sign beside Display adapters to expand, now showing Standard PCI Graphics Adapter (VGA). Select on this VGA video adapter, then click Properties to bring up the Properties dialog box. In the Standard PCI Graphics Adapter (VGA) Properties dialog box, select the Driver tab, then click Update Drivers. The Update Device Driver Wizard will appear.
With the wizard appearing, it states that it will search for an updated driver. Click Next. You’ll be asked to search or display a list of drivers to choose from. Select to display a list, and click Next. This option was typically for more advanced users who knew exactly what hardware they were installing.

Update Device Driver Wizard.
You’ll be asked to select the manufacturer and model of your hardware device. Click Have Disk. The Install From Disk dialog box will appear. Now is the time to mount the ISO image of the VBEMP drivers. Once mounted, click Browse, select the CD drive, and direct yourself to the 032mb folder. Select VBEMP.INF and click OK to close this dialog box. The path to copy the files from has then updated. Click OK.
Based on the INF file selected, the Select Device dialog box shows the models of compatible hardware to choose from. However only VGA is an option. Select the radio button for Show all devices to expand the list. From this list, select the XGA model as shown below. Click OK.

Viewing all options from the VBEMP drivers.
Windows will warn you that the driver chosen wasn’t specifically for your piece of hardware, and therefore may not work correctly. Click Yes to proceed, then Next to begin installation. Click Finish once done, followed by Yes to restart the computer (VM).
Once restarted and back to the Windows desktop, the new display settings whilst still at 640 x 480 have now somewhat improved to 256-colour depth. Under the Display Properties within the Settings tab, you’ll know be able to significantly increase colour depth and resolution. Personally I set it to 32-bit colour with an oddball resolution of 1,152 x 864 as it comfortably fits within my 1080p monitor. Once you’ve made your selection, press OK. Windows will note that it will now resize your desktop. Click OK, then click Yes to keep the changes.
You should also find that the performance of the VM will be more responsive after this.

Windows 98 in glorious 32-bit colour.
Sound & Networking
As with Windows 95, Windows 98 detects the Sound Blaster 16 and PCNET-Fast III adapters for sound and networking respectively, out of the box so to speak. Unlike Windows 95 though the TCP/IP protocol is installed by default, so there’s no longer a need to change over from IPX/SPX. Internet connectivity should simply work. When the operating system was new, protocols such as IPX/SPX used on Novell networks, and Banyan Vines were losing prevalence.
Источник
-
Привет! Подскажите пожалуйста, реально ли установить 98SE в Windows 98 в VirtualBox на Ryzen 5 2600 БЕЗ ошибок и чтобы потом тоже все работало без ошибок? Гугл говорит, что нет. Хочу убедится, что это действительно так.
Или это глючное 98ое г..но не нужно и трогать? Помню сколько было с ней проблем во времена 90х когда она была актуальна.
Дело в том, что
https://www.old-games.ru/forum/thre…unknow-djadjushka-risjoch.44155/#post-1795095Вложения:
-
Ogr 2
лол

Хелпер
Переводчик- Регистрация:
- 25 мар 2008
- Сообщения:
- 6.142
-
Последнее редактирование: 25 апр 2022
-
12sunflowers нравится это.
-
@Tigoro, Спасибо за отклик!
Хотелось не кое как и на виртуалку
Да, хороший вариант
но не играбельноХР не интересует так как есть установленная 7
Последнее редактирование: 25 апр 2022
-
Ogr 2
лол
Хелпер
Переводчик- Регистрация:
- 25 мар 2008
- Сообщения:
- 6.142
как бе Еще есть вмваре, И в случае с виндс 7 виртуал пк. а так же различные эмуляторы, такие как доз бокс (на твоем процессоре должен эмулировать в районе Пенсиум 400 мгц) и ПКем (В районе р160 мгц).
-
*пожал плечами…
Если при установке старой ОС в виртуалке возникают ошибки — это без вариантов косяк этой самой виртуальной машины.
Eraser и Ogr 2 нравится это.
-
Если время значения не имеет, тогда пробовать и перебирать варианты установок. Плюс разные версии Virtualbox попробовать.
Однозначно нужно не старше 5.х ветки, а возможно даже 3.х-4.х (если заработают).
«Совет: Версии VirtualBox для windows после 4.3.12.93733 имеют защиту от встраивания сторонних DLL. Что может приводить к критическим ошибкам при запуске виртуальной машины (и ещё) при использовании ПО типа антивирусов (Avira? Решение), отладчиков, кастомных тем, электронных словарей… Перед тем, как жаловаться на работоспособность «свежих» билдов, попробуйте версию 4.3.12.93733. Понять, что не так с более новыми бидлами Вы можете прочитав последние страницы этого топика»
У меня по-моему winme нормально ставится, а win98 как у всех, падает ) -
На VMware тоже самое. Дело в проце слишком новом для такого софта.
— добавлено 27 апр 2022, предыдущее сообщение размещено: 27 апр 2022 —
Дело в проце слишком новом для такого софта.
-
Ogr 2
лол
Хелпер
Переводчик- Регистрация:
- 25 мар 2008
- Сообщения:
- 6.142
Последнее редактирование: 27 апр 2022
-
Ogr 2
лол
Хелпер
Переводчик- Регистрация:
- 25 мар 2008
- Сообщения:
- 6.142
-
Искал по оригинальному имени, не заметил. К тому же я ссылку дал.
Ещё вариант: Emulator of retro x86-based machines

") но не играбельно
но не играбельно
Страницы: [1] 2 3 4 5 … 26 Далее Вниз

Тема: Виртуальные машины (Прочитано 125252 раз)
0 Пользователей и 1 Гость просматривают эту тему.
Открою данную, весьма интересную, тему.
Установил в VirtualBox, Windows 98 SE, теперь пытаюсь настроить, возникли две проблемы — со звуковой картой, пишет, драйвер не установлен, звука, соответственно, нет. И с видеокартой — определяется как «Стандартный видеоадаптер PCI», в итоге, дико медленно работает операционка и всего шестнадцать цветов.
Guest Additions упорно не хочет ставиться на ’98 ось.
Как и что тут настраивать надо, может кто знает?

Аддишены ты и не поставишь. Увы. В интернетах уже это давно обсуждается, а мне позиция разработчиков кажется совсем непонятной на этот счёт.
Тем не менее, раз уж установил. Звук лечится очень просто, кликни на пункт Аудио и замени то что стоит на обыкновенный Саундбластер:

Ну а драйверок для видео счас приаттачу. Монтировать надо как образ флоппи-диска. Только 3D всё равно не появится. И ставь драйвер не из папочки virtualbox а uni — как ни странно, он гораздо лучше подходит. В общем получается примерно так:

Хотя ходят в некоторых кругах упорные слухи что можно как-то и 3D к Win9x в VirtualBox прикрутить…
ходят в некоторых кругах упорные слухи что можно как-то и 3D к Win9x в VirtualBox прикрутить…
Wine D3D разве что попробовать, он для этого и сделан, правда сработает ли на Win98…
Morphium, спешу тебя обрадовать что Virtual Box официально НЕ держит win 98. Нужен 98 — ставь его в vmware
а вррьще почитай их оф форум, там рассказывается как поставить 98. Хотя Yaranga в принципе и так уже обьснил 
ALEX_230_VOLT,
Тут уже написали что держит. Да и потом, я сам ставил без звука и видео он работал. В принципе, работа ОС обеспечена, зачит держит, не?
ALEX_230_VOLT,
Тут уже написали что держит. Да и потом, я сам ставил без звука и видео он работал. В принципе, работа ОС обеспечена, зачит держит, не?
га оф форуме написанно что не держит. Хотя хз, может в последней версии добавили.?
Нужен 98 — ставь его в vmware
Ага, сам-то пробовал? Я пробовал — ничем не лучше ситуация и аддишены тоже не ставятся. Если только древние версии машины тискать — там-то точно были аддишены.
Wine D3D разве что попробовать, он для этого и сделан, правда сработает ли на Win98…
Да это ж несколько другое… Wine по-большому счёту не эмулятор и не виртуальная машина, впрочем ты и сам это знаешь.
Yaranga, знаю, это подстава. Это не тот вайн, что ты думаешь.  Враппер своего рода и предназначен как раз для ВМ, не поддерживающих D3D на гостевых. На варьке он у меня стоит, а вот насчет бокса не в курсе.
Yaranga, спасибо, с видео теперь проблем нет, а вот с аудио ничего не получается, если выбрать «ICH AC97», то Win9x сообщает, мол, есть неизвестное PCI аудиоустройство, а вот ставя «Саундбластер», Win9x вообще никакого устройства не видит.
А, ну значит я его сам ручками ставил, просто забыл.
Добавлено позже:
Заставь поверить свою виртуальную Вин9х что у тебя есть саундбластер, то есть в установке оборудования в панели управления выбери установку нового устройства несмотря на то что у тебя его нет. Он типа как-бы не плюг-н-плей. Но если бы ты его назначил перед установкой системы, всё скорей всего уже стояло на своих местах.
Добавлено позже:
Yaranga, знаю, это подстава. Это не тот вайн, что ты думаешь.
А, пробил… Но несколько сомневаюсь что это будет работать в вин98 так как врапперу для эмуляции D3D нужна поддержка OpenGL а её-то как раз и не наблюдается. Я всё правильно понял?
Заставь поверить свою виртуальную Вин9х что у тебя есть саундбластер, то есть в установке оборудования в панели управления выбери установку нового устройства несмотря на то что у тебя его нет. Он типа как-бы не плюг-н-плей. Но если бы ты его назначил перед установкой системы, всё скорей всего уже стояло на своих местах.
Точно. Появился звук
Yaranga, в целом да. Вот и я не знаю, сработает ли.
Хм, товарищи, а что за чудо, под названием «SciTech Display Doctor»
Настройка видеокарты вроде бы. Тебя наверное интересует UniVBE, универсальный VESA-драйвер? Приходилось его юзать, правда, под реальным DOS (и в XP), было полезно в плане совместимости на современном железе, чтобы получить нормальное VGA-разрешение.
Поговаривают, он в Виртуалбоксе таки нормально работает. Правда это всё равно ничего не даст при установленном драйвере что я недавно приаттачил. Ну или всего лишь будет его дублировать. Я его в староглинянные времена использовал чтоб первый Квак запускать в высоких разрешениях когда он не видел оных в установленной видюшке.
Вот и я думаю, попробовать сейчас это чудо воткнуть, авось Direct3D будет работать.
Вот и я думаю, попробовать сейчас это чудо воткнуть, авось Direct3D будет работать.
Да не, не будет. Это чудо раньше родилось и не для Direct3D было предназначено.
Такс, поставил, хоть и написано, что ускорение Direct3D отсутствует, а проверку все равно проходит

Ну дык заинсталируй какую-нибудь старую Direct3D-игрушку и отпишись. Заодно отпиши как тебе это удалось. Без внимания не оставим.
Взял первую попавшуюся старенькую игру, требующую DirectX — «Knights & Merchants». Вроде бы пошла нормально.

« Последнее редактирование: 23 Февраль 2010, 17:10:42 от Morphium »
Уже хорошо. А возьмём Pandemonium? В комментах зобачь.
Если не считать небольших косяков со звуком, то нормально.


D3D работает, причем на штатном DirectX6 кнопочка проверки активна, как было описано выше, а на DirectX8.1 нет (видимо проверку добавили).
Если не считать небольших косяков со звуком, то нормально.
А, так она походу у тебя в софтверном режиме работает… Хардверыч притянул за уши ещё одну виртуальную машину, чтож. Она ещё проще в настройке и видюшка там фиксированная s3 trio а не своё собственное непоймичто.
Впрочем, судя по тестам самого доктора, 3D имеется и не самое худшее.

VirtualPC обновился уже до 6 версии. Понятно, что и глайд и Д3Д работают в нем на софтварной эмуляции, при этом производительность примерно такая-же как у оригинальной S3 Trio64.


PS И да, он бесплатен.
« Последнее редактирование: 24 Февраль 2010, 09:55:54 от HardWareMan »
А как вообще 3D приложения под виртуальной машиной идут, тормозят не сильно? А то хочу попробовать омикрон запустить, но не хочется зря копаться.
На Virtual PC я простенькие 3d игрушки запускал с сильными тормозами, с другими вирт. машинами вообще не получилось, так как они видеокарты почему-то не видят(
Abelus, если почитать предыдущую страницу, можно обнаружить как сделать чтоб видели. А именно — установить драйвер идущий в комплекте со SciTech Display Doctor и немного покопаться в настройках утилиты.

HardWareMan, VirtualBox тоже абсолютно бесплатная.
Yaranga, я несколько далёк от этого вопроса, по сему спрошу, виртуальная машина что работает в хардварном режиме видео? Ведь дров новых (и не очень новых) видео карт на 98 да и 2000. Или же сам бокс связывает всё в кучу?
Виртуальная машина эмулирует видеокарту.
Добавлено позже:
Yaranga, если надо, вот серийник к SciTech Display Doctor 7.0 Beta
« Последнее редактирование: 26 Декабрь 2011, 17:56:39 от Yaranga »
Страницы: [1] 2 3 4 5 … 26 Далее Вверх