Виртуальные среды (окружения) используются в Python 3 контроля версионности пакетов. Кроме контроля версий среды используют для использования разных интерпретаторов. Самих пакетов, которые создают виртуальные окружения много. В этой статье речь пойдет про venv, virtualenv и virtualenvwrapper.
Для чего нужно виртуальные среды?
При создании скрипта или программы вы часто используете сторонние модули (пакеты). Если в последующем потребуется перенос программы на другой компьютер, то вы можете столкнуться с двумя проблемами:
- Нужные пакеты отсутствуют на новом компьютере и придется проверять каждый файл программы для их поиска. Либо получить список установленных пакетов через «pip list» на старом компьютере, который выведет множество лишних модулей.
- Даже если количество пакетов или файлов программ маленькое, или вы его создали отдельно, то вы все равно можете столкнуться с проблемами в версиях. Пакеты могли быть обновлены, а методы и классы изменены.
Использование виртуальных сред избавляет вас от этих проблем. В таком виртуальной среде находится свой интерпретатор, свой pip и все пакеты относятся только к нему. Так же, весь проект, можно перенести как папку на другой компьютер без ошибок.
Кроме этого вы можете запускать разные версии Python в разных виртуальных средах, что сильно упрощает работу.
Установка и создания окружения с virtualenv
Самый популярный пакет, который используется для создания виртуальных сред в Python, это virtualenv. Для его установки на Windows выполните:
pip install virtualenvДля установки на Linux системах, для Python 3, понадобится выполнить такую команду:
sudo pip3 install virtualenvЕсли вы не будете использовать sudo, то в зависимости от версии ОС у вас появятся разные ошибки. В CentOS установка не выполнится вовсе, а в Ubuntu не будет добавлен путь в переменную окружения:
- PermissionError: [Errno 13] Permission denied: ‘/usr/local/lib/python3.6’
- Command ‘virtualenv’ not found, but can be installed with: sudo apt install virtualenv
Далее, вне зависимости от того используете ли вы Linux или Windows, вы можете выполнить команду получения справки:
virtualenv --help
Я использую Python 3.6, и так я создам окружение в папке projectname/venv:
virtualenv -p python3.6 project/venvСпособ выше устанавливает окружение относительно текущего пути. Если нужно установить на другом диске или каталоге, то можно использовать абсолютный путь. Так же не обязательно указывать параметр «-p» если вы используете одну версию Python. Вариант как это может быть сделано на Windows:
virtualenv D:projectvenvСамо расположение виртуального окружения рекомендуется создавать в одной папке вместе разрабатываемым приложением. Такую структуру будет легче сопровождать. Я обычно придерживаюсь такой структуры:
-projectname # Каталог проекта
--venv # Окружение
--app # Каталог с приложением
Активация и выход из окружения
Для того что бы виртуальное окружения начало работать его нужно активировать. В разных ОС это делается по-разному.
В случаях с Linux указываем полный путь до venv/bin/activate:
source project/venv/bin/activateДля активации в Windows, в папке venvScripts есть несколько файлов:
- activate.ps1 — для активации через Powershell;
- activate.bat — для активации через CMD.
Для активации просто укажите полный путь до файла. Например:
D:projectnamevenvScriptsactivate.ps1О том что вы находитесь в виртуальном окружении свидетельствуют следующие надписи:

Вы так же можете сравнить количество установленных пакетов внутри виртуального окружения с тем, что установлено вне:
pip list
Теперь вы можете устанавливать пакеты, которые будут работать только в этой среде.
Для выхода из окружения, за исключением запуска с помощью CMD, используйте команду:
deactivateДля CMD нужно указать путь до файла «venvScriptsdeactivate.bat».
Управление средами через virtualenvwrapper
Если вы создаете множество виртуальных сред, например для тестирования в разных версиях Python, вы можете использовать virtualenvwrapper. Этот пакет представляет собой надстройку для virtualenv для более удобной работы и устанавливается отдельно.
Благодаря этому пакету мы сможем запускать ваши окружения так:
workon project_name
# вместо
source project_name/venv/bin/activate
Для Windows нужно установить следующий пакет:
pip install virtualenvwrapper-winДля Linux нужно так же использовать sudo:
sudo pip3 install virtualenvwrapperНастройки для Linux
Virtualenvwrapper хранит все окружения в одном месте. Это место определяется через переменную WORKON_HOME в Linux и по умолчанию равно директории ‘/home/пользователь/.virtualenvs’. Если вы хотите изменить это расположение — выполните команду экспорта с нужным путем:
export WORKON_HOME = /var/envs/

# Создание директории
source ~/.bashrc
mkdir -p $WORKON_HOME
Следующая команда добавит скрипты в домашний каталог для удобной работы:
source /usr/local/bin/virtualenvwrapper.sh
# Если путь отличается, то файл virtualenvwrapper.sh можно найти так
which virtualenvwrapper.sh
При выполнении предыдущей команды у меня появилась ошибка:
virtualenvwrapper.sh: There was a problem running the initialization hooks. If Python could not import the module virtualenvwrapper.hook_loader
Она исправилась добавлением переменной в env с путем до нужного интерпретатора:
export VIRTUALENVWRAPPER_PYTHON=/usr/bin/python3Настройки для Windows
Все виртуальные среды, которые будут созданы, по умолчанию будут располагаться по пути «C:Users%USERNAME%Envs». Если вам нужно изменить расположение, то создайте переменную WORKON_HOME с нужной директорией:

Важный момент, в случае с Windows, команды virtualenvwrapper не будут выполняться Powershell. Команды работают только через CMD.
Основные команды
Далее мы можем использовать следующие команды (основные):
- mkvirtualenv — создание окружения;
- lsvirtualenv — отображение списка окружений;
- rmvirtualenv — удаление;
- workon — переключение между виртуальными средами;
- deactivate — выход из текущего окружения.
Так мы создадим виртуальную среду:
mkvirtualenv project_name
Так выйдем из созданной среды:
deactivateАктивация окружения:
workon django3.0
Если нужно использовать другую версию Python:
mkvirtualenv -p python2.7 project_name/venvПолучение справки:
mkvirtualenv -hСоздание виртуальных сред со встроенным пакетом Python venv
Ранее, до версии Python >= 3.6 базовая установка интерпретатора шла вместе с пакетом pyenv, но на данный момент он считается устаревшим и более не поддерживается. На его смену пришел venv. В некоторых версиях ОС (Ubuntu/Debian) может потребоваться его отдельная установка:
sudo apt install python3-venvПроверить, то что пакет venv установлен, можно так:
python -m venv
# или
python3 -m venv
Следующая команда создаст виртуальную среду:
python -m venv C:project_nameproject_venv
# или
python3 -m venv /var/project_name/project_venv
Выбранная версия Python и стандартные библиотеки будут скопированы в указанную папку.
Активация окружения выполняется следующим образом:
# CMD
C:project_nameproject_venvScriptsactivate.bat
# Powershell
C:project_nameproject_venvScriptsActivate.ps1
# Bash
project_name/project_venv/bin/activate
Для выхода из окружения:
# CMD
C:project_nameproject_venvScriptsdeactivate.bat
# Powershell и bash
deactivate
Создание виртуального окружения в Pycharm
В некоторых IDE, например Pycharm, консоль встроенная и по умолчанию у вас будет запускаться интерпретатор выбранный в настройках. В Pycharm вы можете создать или изменить проект привязав его к определенному интерпретатору.
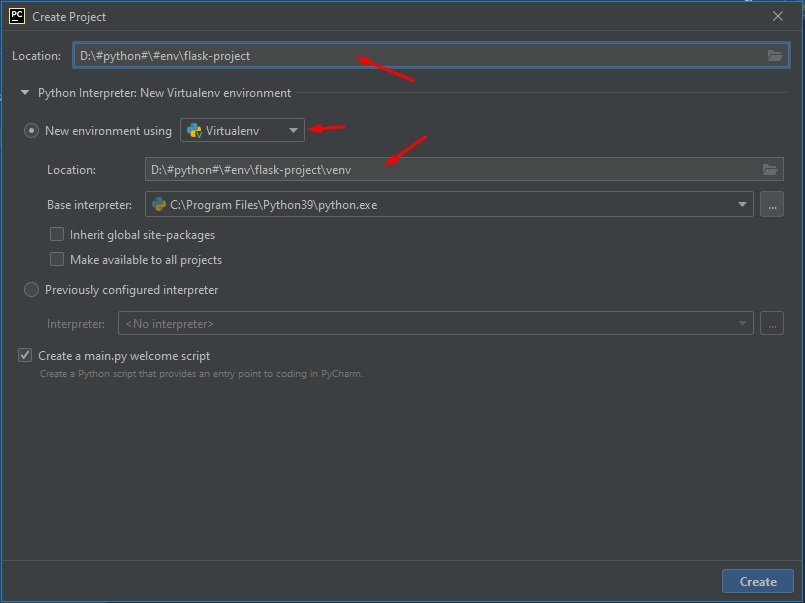
Виртуальную среду можно создать при создании нового проекта. Для этого нужно зайти по следующему пути:

В новом окне выбрать название проекта, место для копирования, интерпретатор и нажать кнопку создания окружения:

Для настройки окружения для старых проектов нужно зайти в настройки:

Во вкладе «Python Interpreter» будет выбор из существующих интерпретаторов (1). Либо можно создать новый (2):

Создание списка установленных пакетов Requirements.txt
Используя виртуальные окружения можно легко создавать файл, в котором будут собраны все названия и версии пакетов для определенного проекта. Этот подход используется для удобства работы, так как одной программой мы сразу установим нужные пакеты.
Так мы получим список пакетов, установленных в виртуальном окружении, в формате читаемом pip:
pip freeze
Следующим способом мы экспортируем этот список в файл Requirements.txt (способ подходит для Bash/CMD/Powershell):
pip freeze > Requirements.txtНа другом компьютере/среде мы можем этот список быстро проверить и установить отсутствующие пакеты следующей командой:
pip install -r Requirements.txt
…
Теги:
#python
#virtualenv
#venv
Язык программирования Python считается достаточно простым. На нем легче и быстрее пишутся программы, по сравнению с компилируемыми языками программирования. Для Python существует множество библиотек, позволяющих решать практически любые задачи. Есть, конечно, и минусы и другие нюансы, но это отдельная тема.
Довольно часто я вижу, как мои знакомые и друзья начинают изучать Python и сталкиваются с проблемой установки и использования сторонних библиотек. Они могут несколько часов потратить на установку библиотеки, и даже, могут не справиться с этим и забить на неё. В то время как, в большинстве случаев, это можно было сделать за несколько минут.
Статья начинается с базовых вещей: с установки Python 3, инструментов разработки Pip и Virtualenv и среды разработки PyCharm в Windows и в Ubuntu. Для многих это не представляет трудностей и возможно, что уже всё установлено.
После чего будет то, ради чего задумывалась статья, я покажу как в PyCharm создавать и использовать виртуальные окружения и устанавливать в них библиотеки с помощью Pip.
Установка Python и Pip
Pip является менеджером пакетов для Python. Именно с помощью него обычно устанавливаются модули/библиотеки для разработки в виде пакетов. В Windows Pip можно установить через стандартный установщик Python. В Ubuntu Pip ставится отдельно.
Установка Python и Pip в Windows
Для windows заходим на официальную страницу загрузки, где затем переходим на страницу загрузки определенной версии Python. У меня используется Python 3.6.8, из-за того, что LLVM 9 требует установленного Python 3.6.
Далее в таблице с файлами выбираем «Windows x86-64 executable installer» для 64-битной системы или «Windows x86 executable installer» для 32-битной. И запускаем скачанный установщик, например, для версии Python 3.8.1 он называется python-3.8.1-amd64.exe.
Во время установки ставим галочку возле Add Python 3.x to PATH и нажимаем Install Now:

Установка Python и Pip в Ubuntu
В Ubuntu установить Python 3 можно через терминал. Запускаем его и вводим команду установки. Вторая команда выводит версию Python.
sudo apt install python3-minimal
python3 -V
Далее устанавливаем Pip и обновляем его. После обновления необходимо перезапустить текущую сессию (или перезагрузить компьютер), иначе возникнет ошибка во время вызова Pip.
sudo apt install python3-pip
pip3 install --user --upgrade pip
Основные команды Pip
Рассмотрим основные команды при работе с Pip в командой строке Windows и в терминале Ubuntu.
Если виртуальные окружения не используются, то во время установки пакета(ов) полезно использовать дополнительно ключ --user, устанавливая пакет(ы) локально только для текущего пользователя.
Установка VirtualEnv и VirtualEnvWrapper
VirtualEnv используется для создания виртуальных окружений для Python программ. Это необходимо для избежания конфликтов, позволяя установить одну версию библиотеки для одной программы, и другу для второй. Всё удобство использования VirtualEnv постигается на практике.
Установка VirtualEnv и VirtualEnvWrapper в Windows
В командной строке выполняем команды:
pip install virtualenv
pip install virtualenvwrapper-win
Установка VirtualEnv и VirtualEnvWrapper в Ubuntu
Для Ubuntu команда установки будет следующей:
pip3 install --user virtualenv virtualenvwrapperПосле которой в конец ~/.bashrc добавляем:
export VIRTUALENVWRAPPER_PYTHON=/usr/bin/python3
source ~/.local/bin/virtualenvwrapper.sh
При новом запуске терминала должны будут появиться сообщения, начинающиеся на virtualenvwrapper.user_scripts creating, что говорит об успешном завершении установки.
Работа с виртуальным окружением VirtualEnv
Рассмотрим основные команды при работе с VirtualEnv в командой строке Windows и в терминале Ubuntu.
Находясь в одном из окружений, можно ставить пакеты через Pip, как обычно и нет необходимости добавлять ключ --user:
pip3 install markdownДля Windows можно указать в переменных среды WORKON_HOME для переопределения пути, где хранятся виртуальные окружения. По умолчанию, используется путь %USERPROFILE%Envs.
Установка PyCharm
PyCharm — интегрированная среда разработки для языка программирования Python. Обладает всеми базовыми вещами необходимых для разработки. В нашем случае огромное значение имеет хорошее взаимодействие PyCharm с VirtualEnv и Pip, чем мы и будем пользоваться.
Установка PyCharm в Windows
Скачиваем установщик PyCharm Community для Windows с официального сайта JetBrains. Если умеете проверять контрольные суммы у скаченных файлов, то не забываем это сделать.
В самой установке ничего особенного нету. По сути только нажимаем на кнопки next, и в завершение на кнопку Install. Единственно, можно убрать версию из имени папки установки, т.к. PyCharm постоянно обновляется и указанная версия в будущем станет не правильной.
Установка PyCharm в Ubuntu
Скачиваем установщик PyCharm Community для Linux с официального сайта JetBrains. Очень хорошей практикой является проверка контрольных сумм, так что если умеете, не ленитесь с проверкой.
Распаковываем архив с PyCharm и переименовываем папку с программой в pycharm-community, убрав версию из названия.
Теперь в директории ~/.local (Ctrl + H — Показ скрытый файлов), создаем папку opt, куда и перемещаем pycharm-community. В результате по пути /.local/opt/pycharm-community должны размещаться папки bin, help и т.д. Таким образом PyCharm будет находится в своём скромном месте и никому не будет мешать.
Далее выполняем команды в терминале:
cd /home/maksim/.local/opt/pycharm-community/bin
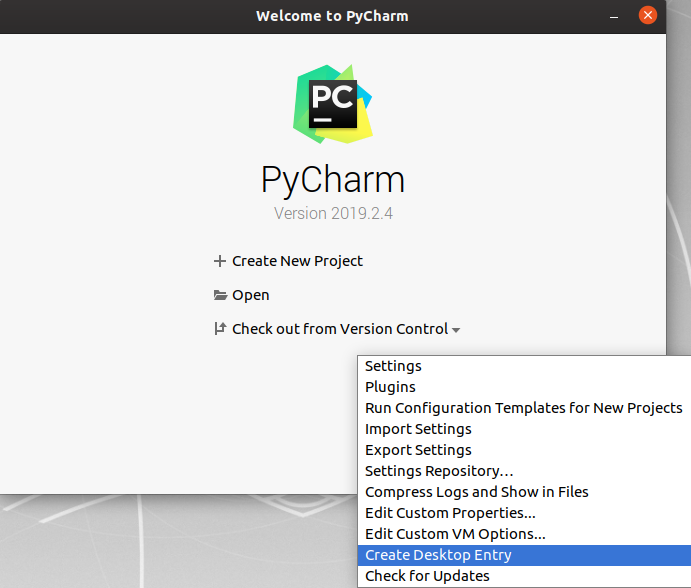
sh ./pycharm.shПроизводим установку. И очень важно в конце не забыть создать desktop файл для запуска PyCharm. Для этого в Окне приветствия в нижнем правом углу нажимаем на Configure → Create Desktop Entry.
Установка PyCharm в Ubuntu из snap-пакета
PyCharm теперь можно устанавливать из snap-пакета. Если вы используете Ubuntu 16.04 или более позднюю версию, можете установить PyCharm из командной строки.
sudo snap install pycharm-community --classicИспользование VirtualEnv и Pip в PyCharm
Поддержка Pip и Virtualenv в PyCharm появилась уже довольно давно. Иногда конечно возникают проблемы, но взаимодействие работает в основном стабильно.
Рассмотрим два варианта работы с виртуальными окружениями:
- Создаём проект со своим собственным виртуальным окружением, куда затем будут устанавливаться необходимые библиотеки;
- Предварительно создаём виртуальное окружение, куда установим нужные библиотеки. И затем при создании проекта в PyCharm можно будет его выбирать, т.е. использовать для нескольких проектов.
Первый пример: использование собственного виртуального окружения для проекта
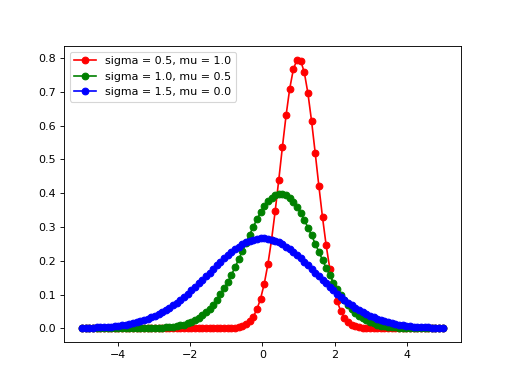
Создадим программу, генерирующую изображение с тремя графиками нормального распределения Гаусса Для этого будут использоваться библиотеки matplotlib и numpy, которые будут установлены в специальное созданное виртуальное окружение для программы.
Запускаем PyCharm и окне приветствия выбираем Create New Project.
В мастере создания проекта, указываем в поле Location путь расположения создаваемого проекта. Имя конечной директории также является именем проекта. В примере директория называется ‘first_program’.
Далее разворачиваем параметры окружения, щелкая по Project Interpreter. И выбираем New environment using Virtualenv. Путь расположения окружения генерируется автоматически. В Windows можно поменять в пути папку venv на Envs, чтобы команда workon находила создаваемые в PyCharm окружения. Ставить дополнительно галочки — нет необходимости. И нажимаем на Create.

Теперь установим библиотеки, которые будем использовать в программе. С помощью главного меню переходим в настройки File → Settings. Где переходим в Project: project_name → Project Interpreter.
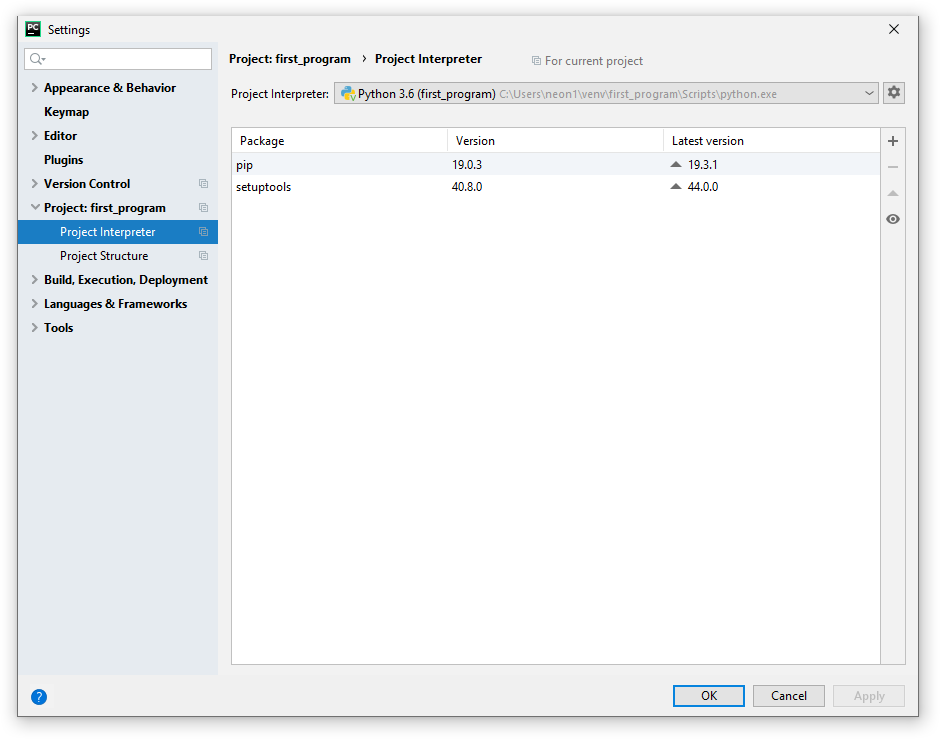
Здесь мы видим таблицу со списком установленных пакетов. В начале установлено только два пакета: pip и setuptools.
Справа от таблицы имеется панель управления с четырьмя кнопками:
- Кнопка с плюсом добавляет пакет в окружение;
- Кнопка с минусом удаляет пакет из окружения;
- Кнопка с треугольником обновляет пакет;
- Кнопка с глазом включает отображение ранних релизов для пакетов.
Для добавления (установки) библиотеки в окружение нажимаем на плюс. В поле поиска вводим название библиотеки. В данном примере будем устанавливать matplotlib. Дополнительно, через Specify version можно указать версию устанавливаемого пакета и через Options указать параметры. Сейчас для matplotlib нет необходимости в дополнительных параметрах. Для установки нажимаем Install Package.

После установки закрываем окно добавления пакетов в проект и видим, что в окружение проекта добавился пакет matplotlib с его зависимостями. В том, числе был установлен пакет с библиотекой numpy. Выходим из настроек.
Теперь мы можем создать файл с кодом в проекте, например, first.py. Код программы имеет следующий вид:
import matplotlib.pyplot as plt
import numpy as np

x = np.linspace(-5, 5, 100)

def gauss(sigma, mu):
    return 1/(sigma * (2*np.pi)**.5) * np.e ** (-(x-mu)**2/(2 * sigma**2))

dpi = 80
fig = plt.figure(dpi=dpi, figsize=(512 / dpi, 384 / dpi))

plt.plot(x, gauss(0.5, 1.0), 'ro-')
plt.plot(x, gauss(1.0, 0.5), 'go-')
plt.plot(x, gauss(1.5, 0.0), 'bo-')

plt.legend(['sigma = 0.5, mu = 1.0',
            'sigma = 1.0, mu = 0.5',
            'sigma = 1.5, mu = 0.0'], loc='upper left')

fig.savefig('gauss.png')
Для запуска программы, необходимо создать профиль с конфигурацией. Для этого в верхнем правом углу нажимаем на кнопку Add Configuration…. Откроется окно Run/Debug Configurations, где нажимаем на кнопку с плюсом (Add New Configuration) в правом верхнем углу и выбираем Python.
Далее указываем в поле Name имя конфигурации и в поле Script path расположение Python файла с кодом программы. Остальные параметры не трогаем. В завершение нажимаем на Apply, затем на OK.

Теперь можно выполнить программу и в директории с программой появится файл gauss.png:
Второй пример: использование предварительно созданного виртуального окружения
Данный пример можно использовать во время изучения работы с библиотекой. Например, изучаем PySide2 и нам придется создать множество проектов. Создание для каждого проекта отдельного окружения довольно накладно. Это нужно каждый раз скачивать пакеты, также свободное место на локальных дисках ограничено.
Более практично заранее подготовить окружение с установленными нужными библиотеками. И во время создания проектов использовать это окружение.
В этом примере мы создадим виртуальное окружения PySide2, куда установим данную библиотеку. Затем создадим программу, использующую библиотеку PySide2 из предварительно созданного виртуального окружения. Программа будет показывать метку, отображающую версию установленной библиотеки PySide2.
Начнем с экран приветствия PyCharm. Для этого нужно выйти из текущего проекта. На экране приветствия в нижнем правом углу через Configure → Settings переходим в настройки. Затем переходим в раздел Project Interpreter. В верхнем правом углу есть кнопка с шестерёнкой, нажимаем на неё и выбираем Add…, создавая новое окружение. И указываем расположение для нового окружения. Имя конечной директории будет также именем самого окружения, в данном примере — pyside2. В Windows можно поменять в пути папку venv на Envs, чтобы команда workon находила создаваемые в PyCharm окружения. Нажимаем на ОК.

Далее в созданном окружении устанавливаем пакет с библиотекой PySide2, также как мы устанавливали matplotlib. И выходим из настроек.
Теперь мы можем создавать новый проект использующий библиотеку PySide2. В окне приветствия выбираем Create New Project.
В мастере создания проекта, указываем имя расположения проекта в поле Location. Разворачиваем параметры окружения, щелкая по Project Interpreter, где выбираем Existing interpreter и указываем нужное нам окружение pyside2.

Для проверки работы библиотеки создаем файл second.py со следующий кодом:
import sys

from PySide2.QtWidgets import QApplication, QLabel
from PySide2 import QtCore

if __name__ == "__main__":
    app = QApplication(sys.argv)

    label = QLabel(QtCore.qVersion())
    label.show()

    QtCore.qVersion()

    sys.exit(app.exec_())
Далее создаем конфигурацию запуска программы, также как создавали для первого примера. После чего можно выполнить программу.
Заключение
У меня нет богатого опыта программирования на Python. И я не знаком с другими IDE для Python. Поэтому, возможно, данные IDE также умеют работать с Pip и Virtualenv. Использовать Pip и Virtualenv можно в командой строке или в терминале. Установка библиотеки через Pip может завершиться ошибкой. Есть способы установки библиотек без Pip. Также создавать виртуальные окружения можно не только с помощью Virtualenv.
В общем, я лишь поделился небольшой частью опыта из данной области. Но, если не вдаваться в глубокие дебри, то этого вполне достаточно знать, чтобы писать простые программы на Python с использованием сторонних библиотек.
В данной статье мы рассмотрим, как использовать виртуальную среду для создания и управлять ими отдельно в ваших проектах Python, используя разные версии Python для выполнения, а также рассмотрим, как хранятся и разрешаются зависимости Python.
Зачем нужна виртуальная среда?
Python, как и большая часть других современных языков программирования, имеет собственный, уникальный способ загрузки, хранения и разрешения пакетов (или модулей). Это имеет свои преимущества, однако были принятые некоторые интересные решения, на счет хранения и разрешения пакетов, которые привели к определенным проблемам, а именно: как и где эти пакеты хранятся?
Содержание
- Зачем нужна виртуальная среда?
- Что такое виртуальная среда?
- Использование виртуальной среды
- Как работает виртуальная среда?
- Управление виртуальной средой при помощи virtualenvwrapper
- Использование разных версий Python
- Вывод
Существует несколько разных расположений, в которых хранятся пакеты, которые можно установить в вашей системе. Например, большая часть системных пакетов хранятся в дочернем каталоге пути, который, в свою очередь, хранится в sys.prefix.
Есть вопросы по Python?
На нашем форуме вы можете задать любой вопрос и получить ответ от всего нашего сообщества!
Telegram Чат & Канал
Вступите в наш дружный чат по Python и начните общение с единомышленниками! Станьте частью большого сообщества!
Паблик VK
Одно из самых больших сообществ по Python в социальной сети ВК. Видео уроки и книги для вас!
На Mac OS X, вы можете легко найти, где именно sys.prefix указывает на использование оболочки Python:
|
import sys print(sys.prefix) # ‘/System/Library/Frameworks/Python.framework/Versions/3.5’ |
К нашей статье в большей мере относятся сторонние пакеты, установленные при помощи easy_install или pip, обычно располагаются в одном из каталогов, на которую указывает site.getsitepackages:
|
import site data = site.getsitepackages() print(data) |
Результат:
|
[ ‘/System/Library/Frameworks/Python.framework/Versions/3.5/Extras/lib/python’, ‘/Library/Python/3.5/site-packages’ ] |
Зачем нам все эти детали?
Очень важно иметь представление об этом, так как по умолчанию, каждый объект вашей системы будет использовать одинаковые каталоги для хранения и разрешения пакетов (сторонних библиотек. На первый взгляд это не выглядит чем-то значительным. Это так, но только в отношении системных пакетов, являющихся частью стандартной библиотеки Python – но сторонние пакеты – это другое дело.
Представим следующий сценарий, где у вас есть два проекта: проект А и проект Б, которые оба имеют зависимость от одной и той же библиотеки – проект В. Проблема становится явной, когда мы начинаем запрашивать разные версии проекта В. Может быть так, что проект А запрашивает версию 1.0.0, в то время как проект Б запрашивает более новую версию 2.0.0, к примеру.
Это большая проблема Python, поскольку он не может различать версии в каталоге «site-packages». Так что обе версии 1.0.0 и 2.0.0 будут находиться с тем же именем в одном каталоге:
|
/System/Library/Frameworks/Python.framework/Versions/3.5/Extras/lib/python/ProjectC |
И так как проекты хранятся в соответствии с их названиями, то нет различий между версиями. Таким образом, проекты А и Б должны будут использовать одну и ту же версию, что во многих случаях неприемлемо.
Тут-то и вступает в игру виртуальная среда (вместе с инструментами virtualenv/ven)
Что такое виртуальная среда?
В корне своем, главная задача виртуальной среды Python – создание изолированной среды для проектов Python.
Это значит, что:
Каждый проект может иметь свои собственные зависимости, вне зависимости от того, какие зависимости у другого проекта.
И так, в нашем небольшом примере вверху, нам просто нужно создать раздельную виртуальную среду для проектов А и Б. Каждая среда, в свою очередь, сможет зависеть от любой версии проекта В, независимо друг от друга.
Это хорошо тем, что у нас нет ограничений на то, в скольких экземплярах будет наша виртуальная среда, так как они являются обычными каталогами, в которых содержится несколько скриптов. Плюс, их очень легко создать при помощи инструментов командной строки virtualenv или pyenv.
Использование виртуальной среды
Перед тем, как начать: если вы не пользуетесь Python 3, вам нужно будет установить инструмент virtualenv при помощи pip:
Если вы используете Python 3, у вас уже должен быть модуль venv, установленный в стандартной библиотеке.
Предположим, что вы пользуетесь последней версией инструмента venv, так как между ним и virtualenv существует несколько различий в отношении команд. По большому счету, это два весьма разных инструмента.
Начнем с создания нового каталога, с которым мы будем работать:
|
mkdir python—virtual—environments && cd python—virtual—environments |
Создание новой виртуальной среды внутри каталога:
|
# Python 2: $ virtualenv env # Python 3 $ python3 —m venv env |
По умолчанию, это не включает в себя ни один из существующих сторонних пакетов.
Подход venv в Python 3 обладает преимуществом, которое вынуждает вас использовать определенную версию интерпретатора Python 3, который будет использован для создания виртуальной среды. Таким образом, вы избегаете недоразумений при выяснении, какая инсталляция Python базируется в новой виртуальной среде.
Начиная с Python 3.3 и 3.4, рекомендуемый способ создания виртуального пространства – это использование инструмента командной строки pyvenv, который также включен в инсталляцию вашего Python 3 по умолчанию. Однако, в версии 3.6 и выше, вам нужен python3 -m venv.
В примере выше, эта команда создает каталог под названием «env», структура каталога которого схожа со следующей:
|
1 2 3 4 5 6 7 8 9 10 11 12 13 14 15 16 17 |
├── bin │ ├── activate │ ├── activate.csh │ ├── activate.fish │ ├── easy_install │ ├── easy_install—3.5 │ ├── pip │ ├── pip3 │ ├── pip3.5 │ ├── python -> python3.5 │ ├── python3 -> python3.5 │ └── python3.5 -> /Library/Frameworks/Python.framework/Versions/3.5/bin/python3.5 ├── include ├── lib │ └── python3.5 │ └── site—packages └── pyvenv.cfg |
Что находится в этих папках?
- bin – файлы, которые взаимодействуют с виртуальной средой;
- include – С-заголовки, компилирующие пакеты Python;
- lib – копия версии Python вместе с папкой «site-packages», в которой установлена каждая зависимость.
Далее, у нас есть копии или символические ссылки нескольких различных инструментов Python. Эти файлы используются для обеспечения того, чтобы команды и код Python выполнялись в контексте нынешней среды, таким образом, достигается изоляция от глобальной среды. Мы рассмотрим это детальнее в следующем разделе.
Более интересные сейчас – скрипты activate в папке bin. Эти скрипты используются для настройки вашей оболочки для использования исполняемого файла среды Python и его сайтовых пакетов по умолчанию.
Чтобы использовать эти пакеты (или ресурсы) среды в изоляции, вам нужно «активировать» их. Чтобы сделать это, просто запустите:
Обратите внимание на то, что ваше приглашение командной строки теперь носит префикс вашей среды (в нашем случае – env). Это индикатор того, что env в данный момент активен, что в свою очередь говорит о том, что выполнимые файлы Python используют пакеты и настройки только этой среды.
Чтобы показать изолированный пакет в действии, мы можем использовать модуль bcrypt в качестве примера. Скажем, что модуль bcrypt установлен где-нибудь в системе, но не в нашей виртуальной среде.
Перед тем как проверить это, нам нужно вернуться назад в контекст «system» , выполнив команду deactivate:
Теперь ваш сеанс оболочки вернулся в норму, а команда python ссылается на общую установку Python. Помните: это можно делать когда угодно, после закрытия определенной виртуальной среды.
Теперь установим bcrypt и используем его для хеширования пароля:
|
$ pip —q install bcrypt $ python —c «import bcrypt; print(bcrypt.hashpw(‘password’.encode(‘utf-8’), bcrypt.gensalt()))» $2b$12$vWa/VSvxxyQ9d.WGgVTdrell515Ctux36LCga8nM5QTW0.4w8TXXi |
Что произойдет, если мы попробуем ту же команду, когда виртуальная среда активна?
|
$ source env/bin/activate (env) $ python —c «import bcrypt; print(bcrypt.hashpw(‘password’.encode(‘utf-8’), bcrypt.gensalt()))» Traceback (most recent call last): File «<string>», line 1, in <module> ImportError: No module named ‘bcrypt’ |
Как мы видим, поведение команды the python -c «import bcrypt…» меняется после вызова источника env/bin/activate.
В одном примере, у нас есть доступный нам bcrypt, а в другом его нет. Это тот тип разделения, который мы ищем для виртуальной среды, и мы к нему пришли.
Как работает виртуальная среда?
Что именно имеется ввиду под «активировать» среду? Понимание того, что именно происходит под капотом, может быть очень важно для разработчика, особенно когда вам нужно понять выполнение виртуальной среды, разрешение зависимостей, и так далее.
Чтобы объяснить, как это работает, для начала проверим расположения разных исполняемых файлов python. С «деактивированной» средой запускаем:
|
$ which python /usr/bin/python |
Теперь активируем и снова запустим команду:
|
$ source env/bin/activate (env) $ which python /Users/michaelherman/python—virtual—environments/env/bin/python |
Активировав среду, мы теперь получаем другой путь к исполнимому файлу python, так как в активной среде, переменная среды $PATH несколько отличается.
Обратите внимание на разницу между первым путем в $PATH до и после активации:
|
$ echo $PATH /usr/local/bin:/usr/bin:/bin:/usr/sbin:/sbin: $ source env/bin/activate (env) $ echo $PATH /Users/michaelherman/python—virtual—environments/env/bin:/usr/local/bin:/usr/bin:/bin:/usr/sbin:/sbin: |
В последнем примере, каталог bin нашей виртуальной среды теперь находится в начале пути. Это значит, что это первый каталог в поиске, когда мы запускаем исполняемый файл в командной строке. Таким образом, оболочка использует экземпляр нашей виртуальной среды в Python, а не в системной версии.
Другие пакеты, связывающие Python, такие как Anaconda, также могут выполнять манипуляции с вашим путем, если вы активируете их. Просто имейте это ввиду на случай, если вы столкнетесь с проблемами, связанными с другими виртуальными средами. Проблема может возникнуть при активации нескольких сред одновременно.
Это наталкивает на вопросы:
- В чем разница между этими исполняемыми файлами?
- Каким образом виртуальная среда исполняемого файлаPython может использовать что-либо, кроме системных сайт-пакетов?
Это можно объяснить тем, как Python запускается и где он расположен в системе. Нет разницы между двумя исполняемыми файлами Python. Суть заключается в расположении каталога
Когда Python запускается, он ищет путь своего двоичного файла (в виртуальной среде он является копией или символической ссылке системного бинарного файла Python). Далее, он устанавливает расположение sys.prefix и sys.exec_prefix согласно с этим расположением, опуская часть bin в пути.
Путь, находящийся в sys.prefix далее используется для поиска каталога site-packages, путем поиска по связанного с ним пути lib/pythonX.X/site-packages/, где Х.Х – это версия используемого вами Python.
В нашем примере, бинарный файл расположен в /Users/michaelherman/python-virtual-environments/env/bin, это значит, что sys.prefix может быть /Users/michaelherman/python-virtual-environments/env, следовательно, используемый каталог site-packages может быть /Users/michaelherman/python-virtual-environments/env/lib/pythonX.X/site-packages. Наконец, этот путь наложен в массиве sys.path, который содержит все расположения, которые пакет может использовать.
Управление виртуальной средой при помощи virtualenvwrapper
Несмотря на то, что виртуальная среда определенно решает ряд проблем с управлением пакетами, она не идеальна. После создания нескольких виртуальных сред, вы обнаружите, что они создают некоторые проблемы сами по себе, большая часть которых вращается вокруг управления самими виртуальными средами. Чтобы помочь с этим, был создан инструмент virtualenvwrapper, который представляет собой набор оберточных скриптов вокруг основного инструмента virtualenv.
Самые полезные функции virtualenvwrapper:
- Организация каждой виртуальной среды в одном расположении;
- Предоставляются методы, которые помогут вам легко создавать, удалять и копировать виртуальную среду, а также,
- Предоставляет одну команду для переключения между средами
Некоторые функции могут показаться узкими, или незначительными, вы быстро поймете, что они – это отличные инструменты для вашего рабочего ритма.
Перед началом, вы можете скачать обёртку при помощи pip:
|
$ pip install virtualenvwrapper |
Для Windows нужно использовать virtualenvwrapper-win
После завершения установки, нам нужно активировать его функции оболочки. Это можно сделать, запустив источник установленного скрипта virtualenvwrapper.sh. Кода вы в первый раз устанавливаете его при помощи pip, выдача установки укажет вам точное расположение virtualenvwrapper.sh. Впрочем, вы можете просто запустить команду:
|
$ which virtualenvwrapper.sh /usr/local/bin/virtualenvwrapper.sh |
Используя данный путь, добавьте следующие три строки в стартовый файл вшей оболочки. Если оболочку Bash, вы можете разместить эти строки и в файле ~/.bashrc file or ~/.profile. Для других оболочек, таких как zsh, csh или fish, вам может понадобиться определенные файлы запуска для этой оболочки. Главное, чтобы эти команды выполнялись при открытии новой оболочки или входе в неё.
|
export WORKON_HOME=$HOME/.virtualenvs # optional export PROJECT_HOME=$HOME/projects # optional source /usr/local/bin/virtualenvwrapper.sh |
От нас не требуется определять переменные виртуальной среды WORKON_HOME и PROJECT_HOME. В virtualenvwrapper имеются установленные по умолчанию переменные для них, но вы можете перезаписать их, указав значения.
Наконец, перезагружаем файл запуска:
Теперь здесь должен быть каталог, расположенный в $WORKON_HOME, который содержит все данные и файлы virtualenvwrapper:
|
$ echo $WORKON_HOME /Users/michaelherman/.virtualenvs |
Кроме этого, у вас теперь в распоряжении имеются доступные команды оболочки, которые помогут в управлении виртуальной средой. Вот несколько из них:
- workon
- deactivate
- mkvirtualenv
- cdvirtualenv
- rmvirtualenv
Для дополнительной информации о командах, установке и настройке virtualenvwrapper, вы можете ознакомиться с их документацией.
Теперь, когда бы вы не начинали новый проект, все что вам нужно, это:
|
$ mkvirtualenv my—new—project (my—new—project) $ |
Это создаст и активирует новую виртуальную среду в каталоге, расположенном в $WORKON_HOME, где хранятся все среды virtualenvwrapper.
Чтобы прекратить использование этой среды, вам всего лишь нужно её деактивировать, как мы делали это раньше:
|
(my—new—project) $ deactivate $ |
Если у вас есть широкий выбор виртуальных сред, вы можете отсортировать их по списку при помощи функции workon:
|
$ workon my—new—project my—django—project web—scraper |
И, наконец, активировать:
|
$ workon web—scraper (web—scraper) $ |
Если вы хотите иметь один инструмент и переключаться между версиями Python, virtualenv позволит вам это сделать. Virtualenv содержит параметр -р, который позволяет вам выбрать, какую версию Python использовать. Совместите это с командой which, и мы можем быстро выбрать предпочитаемую версию Python. К примеру, скажем, что мы хотим выбрать Python 3 в качестве нашей основной версии:
|
$ virtualenv —p $(which python3) blog_virtualenv |
Это создаст новую среду python3.
Так как же это работает? Команда which используется для поиска переданной команды в вашей переменной $PATH и возвращает полный путь к этой команде. Так, полный путь к Python3 вернулся параметру -р , который в свою очередь принимает PYTHON_EXE. Это также можно практиковать и в Python2. Просто замените python3 на python2 (или python, если вы используете python2 по умолчанию).
Теперь вам не нужно помнить где вы установили вашу виртуальную среду. Вы можете просто удалить или копировать ее как хотите, разгрузив ваш проектный каталог.
В отличие от старого virtualenv, pyvenv не поддерживает создание виртуальной среды в произвольных версиях Python. Это значит, что вам придется использовать установленный Python 3 по умолчанию для каждой создаваемой вами виртуальной среды. Хотя вы можете обновить среду до последней системной версии Python (через опцию –upgrade) если она поменялась, вы все еще не можете указывать конкретную версию.
Существует предостаточно способов установить Python, но только некоторые из них достаточно простые или гибкие, чтобы повторно удалять и переустанавливать разные бинарные версии файлов.
Здесь и вступает в игру pyenv.
Несмотря на схожесть в названиях (pyvenv и pyenv), pyenv отличается тем, что он направлен на то, чтобы помочь переключаться между версиями Python на как на системном уровне, так и на проектном. Другими словами, задача pyvenv разделять модули, задача pyenv – разделять версии Python.
Вы можете начать с установки pyenv как при помощи Homebrew (на OS X), или при помощи проекта pyenv-installer:
Homebrew
pyenv-installer
|
$ curl —L https://raw.githubusercontent.com/yyuu/pyenv—installer/master/bin/pyenv—installer | bash |
К сожалению, pyenv не поддерживается Windows. Вы можете воспользоваться альтернативами в виде pywin и anyenv.
После установки pyenv в вашей системе, есть несколько базовых команд, которые вас могут заинтересовать:
КОД # Install new version установка новой версии
КОД # Внесение установленных версий в список
КОД # Выполнение «python-V» с использованием версии pyenv
|
$ pyenv install 3.5.0 # Установка новой версии $ pyenv versions # Внесение установленных версий в список $ pyenv exec python —V # Выполнение «python-V» с использованием версии pyenv |
Этими тремя строками мы устанавливаем версию Python 3.5.0, просим pyenv показать все доступные нам версии, после чего выполнить команду python –V, используя определенную pyenv версию.
Чтобы дать вам больше контроля, вы можете использовать любую доступную версию как для «глобального», так и «локального». Использование pyenv с локальными командами настраивает версию Python на определенный проект или директорию, сортируя версию в локальном файле .python-version. Мы можем настроить «локальную» версию следующим образом:
Это создает файл .python-version в нашем текущем каталоге, как вы можете видеть здесь:
|
$ ls —la total 16 drwxr—xr—x 4 michaelherman staff 136 Feb 22 10:57 . drwxr—xr—x 9 michaelherman staff 306 Jan 27 20:55 .. —rw—r—r— 1 michaelherman staff 7 Feb 22 10:57 .python—version —rw—r—r— 1 michaelherman staff 52 Jan 28 17:20 main.py |
Этот файл содержит только «2.7.11». Теперь, когда вы запускаете скрипт при помощи pyenv, он загрузит этот файл, и использует определенную версию, предполагая, что он действителен и существует в вашей системе.
Двигаясь дальше с нашим примером, предположим, что у нас есть простой скрипт, под названием main.py в нашем проектном каталоге, который выглядит следующим образом:
|
import sys print(‘Using version:’, sys.version[:5]) |
Все что он делает, это выводит номер версии используемого выполняемого файла Python. При помощи pyenv и команды exec, мы можем запустить скрипт с любой другой установленной версией Python.
|
$ python main.py Using version: 2.7.5 $ pyenv global 3.5.0 $ pyenv exec python main.py Using version: 3.5.0 $ pyenv local 2.7.11 $ pyenv exec python main.py Using version: 2.7.11 |
Обратите внимание на то, как pyenv exec python main.py использует нашу «глобальную» версию Python по умолчанию, но затем он использует «локальную» версию после ее установки в текущий каталог.
Это может быть мощным орудием для разработчиков, работающих со множеством проектов с различными требованиями к версии. Вы можете не только изменить версию по умолчанию для всех проектов (через global), но также переопределять ее для указания особых случаев.
Вывод
В данной статье вы узнали больше о том, как хранятся и разрешаются зависимости Python, как использовать различные инструменты для помощи в обходе различных проблем, связанных с пакетами и версиями.
Как вы видите, благодаря огромному сообществу Python, в вашем распоряжении имеется обширное количество инструментов для помощи с решением этих проблем. С вашим ростом в качестве разработчика, убедитесь, что вы уделили время тому, как использовать эти инструменты в своих интересах. Вы даже можете найти особенное использование для них, или применять схожие концепции в других языках программирования, которые вы используете.

Являюсь администратором нескольких порталов по обучению языков программирования Python, Golang и Kotlin. В составе небольшой команды единомышленников, мы занимаемся популяризацией языков программирования на русскоязычную аудиторию. Большая часть статей была адаптирована нами на русский язык и распространяется бесплатно.
E-mail: vasile.buldumac@ati.utm.md
Образование
Universitatea Tehnică a Moldovei (utm.md)
- 2014 — 2018 Технический Университет Молдовы, ИТ-Инженер. Тема дипломной работы «Автоматизация покупки и продажи криптовалюты используя технический анализ»
- 2018 — 2020 Технический Университет Молдовы, Магистр, Магистерская диссертация «Идентификация человека в киберпространстве по фотографии лица»
Продолжаем серию “Python.Уроки”. На этот раз мы изучим, что такое виртуальные окружения в Python, зачем они нужны и как их использовать. Познакомимся с инструментами virtualenv и venv для создания виртуальных окружений.
- Что такое виртуальное окружение и зачем оно нужно?
- ПО позволяющее создавать виртуальное окружение в Python
- virtualenv
- Установка virtualenv
- Создание виртуального окружения
- Активация виртуального окружения
- Деактивация виртуального окружения
- venv
- Создание виртуального окружения
- Активация виртуального окружения
- Деактивация виртуального окружения
- Полезные ссылки
Что такое виртуальное окружение и зачем оно нужно?
При разработке Python-приложений или использовании решений на Python, созданных другими разработчиками, может возникнуть ряд проблем, связанных с использованием библиотек различных версий. Рассмотрим их более подробно.
Во-первых: различные приложения могут использовать одну и туже библиотеку, но при этом требуемые версии могут отличаться.
Во-вторых: может возникнуть необходимость в том, чтобы запретить вносить изменения в приложение на уровне библиотек, т.е. вы установили приложение и хотите, чтобы оно работало независимо от того обновляются у вас библиотеки или нет. Как вы понимаете, если оно будет использовать библиотеки из глобального хранилища (/usr/lib/pythonXX/site-packages), то, со временем, могут возникнуть проблемы.
В-третьих: у вас просто может не быть доступа к каталогу /usr/lib/pythonXX/site-packages.
Для решения данных вопросов используется подход, основанный на построении виртуальных окружений – своего рода песочниц, в рамках которых запускается приложение со своими библиотеками, обновление и изменение которых не затронет другие приложение, использующие те же библиотеки.
Программное обеспечение, которое позволяет создавать виртуальные окружения в Python можно разделить на те, что входят в стандартную библиотеку Python и не входят в нее. Сделаем краткий обзор доступных инструментов (хороший пост на эту тем есть на stackoverflow).
Начнем с инструментов, которые входят в PyPI. Если кто не знает PyPI – это Python Package Index (PyPI) – репозиторий пакетов Python, доступный для любого разработчика и пользователя Python ().
virtualenv
Это, наверное, одни из самых популярных инструментов, позволяющих создавать виртуальные окружения. Он прост в установке и использовании. В сети довольно много руководств по virtualenv, самые интересные, на наш взгляд, будут собраны в конце урока в разделе “Полезные ссылки”. В общем, этот инструмент нужно обязательно освоить, как минимум, потому что описание развертывания и использования многих систем, созданных с использованием Python, включает в себя процесс создания виртуального окружения с помощью virtualenv.
pyenv
Инструмент для изоляции версий Python. Чаще всего применяется, когда на одной машине вам нужно иметь несколько версий интерпретатора для тестирования на них разрабатываемого вами ПО.
virtualenvwrapper
Virtualenvwrapper – это обертка для virtualenv позволяющая хранить все изолированные окружения в одном месте, создавать их, копировать и удалять. Предоставляет удобный способ переключения между окружениями и возможность расширять функционал за счет plug-in’ов.
Существуют ещё инструменты и plug-in’ы, выполняющие работу по изоляции частей системы Python, но мы их не будем рассматривать.
Инструменты, входящие в стандартную библиотеку Python.
venv
Этот модуль появился в Python3 и не может быть использован для решения задачи изоляции в Python2. По своему функционалу очень похож на virtualenv. Если вы работаете с третьим Python, то можете смело использовать данный инструмент.
virtualenv
Будем рассматривать работу с virtualenv в рамках операционной системы Linux. Для Windows все будет очень похоже, за исключением моментов, связанных со спецификой этой ОС: названия и расположение каталогов, запуск скриптов оболочки и т.п.
Установка virtualenv
Virtualenv можно установить с использованием менеджера pip (ссылка на статью), либо скачать исходные коды проекта и установить приложение вручную.
Установка с использованием pip.
Для установки virtualenv откройте консоль и введите следующую команду:
> pip install virtualenv
Установка из исходного кода проекта.
В этом случае, вам нужно будет выполнить чуть большее количество действий.
Введите в консоли следующий набор команд:
> curl -O https://pypi.python.org/packages/source/v/virtualenv/virtualenv-X.X.tar.gz
> tar xvfz virtualenv-X.X.tar.gz
> cd virtualenv-X.X
>  [sudo] python setup.py install
X.X – это версия приложения, ее вам нужно знать заранее.
Если использовать ключевое слово sudo, инструмент будет установлен глобально, в противном случае – локально.
Мы рекомендуем вам использовать pip для установки virtualenv.
Создание виртуального окружения
Виртуальное окружение создается следующей командой:
> virtualenv PRG1
PRG1 в данном случае – это имя окружения.
После выполнения данной команды, в текущем каталоге будет создан новый каталог с именем PRG1. Разберем более подробно его содержимое.
RPG1/bin/ – содержит скрипты для активации/деактивации окружения, интерпретатор Python, используемый в рамках данного окружения, менеджер pip и ещё несколько инструментов, обеспечивающих работу с пакетами Python. В Windows, это каталог PRG1Scripts
PRG1/include/ и PRG1/lib/ – каталоги, содержащие библиотечные файлы окружения. Новые пакеты будут установлены в каталог PRG1/lib/pythonX.X/site-packages/.
Активация виртуального окружения
Для активации виртуального окружения воспользуйтесь командой (для Linux):
> source PRG1/bin/activate
для Windows команда будет выглядеть так:
> PRG1Scriptsactivate.bat
Команда source выполняет bash-скрипт без запуска второго bash-процесса.
Если команда выполнилась успешно, то вы увидите, что перед приглашением в командной строке появилась дополнительная надпись, совпадающая с именем виртуального окружения.

При этом в переменную окружения PATH, в самое начало, будет добавлен путь до директории bin, созданного каталога RPG1.
Если вы создадите виртуальное окружение с ключем –system-site-packages:
> virtualenv --system-site-packages PRG1
то в рамках окружения PRG1 вы будите иметь доступ к глобальному хранилищу пакетов:
-
- в Linux: /usr/lib/pythonX.X/site-packages
- в Windows: PythonXXLibsite-packages
Деактивация виртуального окружения
Для деактивации виртуального окружения (выхода из него), введите команду deactivate для Linux или deactivate.bat, если вы работаете в Windows.
> deactivate

venv
Устанавливать venv не нужно, т.к. он входит в стандартную библиотеку Python. Т.е. если вы установили себе Python, то venv у вас уже есть. Помните, что venv работает только в Python3!
Создание виртуального окружения
Для создания виртуального окружения с именем PRG2 с помощью venv выполните следующую команду:
> python -m venv PRG2
В результате будет создан каталог PRG2 со структурой похожей на ту, что была описана для virtualenv. Функциональное назначение каталогов тоже самое.
Активация виртуального окружения
Активация виртуального окружения в Linux выполняется командой:
>source PRG2/bin/activate
в Windows:
>PRG2Scriptsactivate.bat
Деактивация виртуального окружения
Деактивация выполняется командой deactivate (работает как в Windows, так и в Linux)
>deactivate
Полезные ссылки
Ниже приведен список полезных ссылок, для того, чтобы более глубоко изучить тему создания виртуальных окружений в Python.
Официальная документация
Документация по virtualenv
Документация по virtualenvwrapper
Документация по venv
Статьи
Python. Строим виртуальное окружение с помощью virtualenv
Памятка по virtualenv и изолированным проектам на Python
P.S.
Если вам интересна тема анализа данных, то мы рекомендуем ознакомиться с библиотекой Pandas. На нашем сайте вы можете найти вводные уроки по этой теме. Все уроки по библиотеке Pandas собраны в книге “Pandas. Работа с данными”.

<<< Python. Урок 16. Установка пакетов в Python Python. Урок 18. Аннотация типов в Python>>>
virtualenv — это инструмент для создания изолированной среды Python. У такой среды есть отдельна установка python, при ее использовании загруженные библиотеки недоступны другим. Можно сделать так, чтобы у этой среды не было доступа к глобальным библиотекам.
Virtualenv — простой и рекомендованный способ настройки среды Python.
Отличия virtualenv и venv
Venv — это пакет, который идет по умолчанию с Python 3.3+. В версии Python 2 его нет.
Virtualenv — более продвинутая библиотека. По ссылке можно ознакомиться с основными отличиями.
Виртуальную среду можно создать и с помощью venv, но все-таки рекомендуется установить и использовать virtualenv для полноценной работы.
Для установки virtualenv с Python нужно использовать pip. Желательно предварительно обновить этот инструмент.
python -m pip install --upgrade pipИли используйте python3, если python ссылается на 2 версию.
После обновления можно установить и virtualenv:
pip install virtualenv # или pip3Создание виртуальной среды
1. Перейдите в директорию, в которой вы хотите создать виртуальную среду(например папка проекта).
~$ cd test
~/test$
2. Создайте виртуальную среду, при необходимости указав конкретную версию Python. Следующая команда создает virtualenv с именем venv_name и использует флаг -p, чтобы указать полный путь к версии Python:
virtualenv -p /usr/bin/python venv_name
# или
virtualenv venv_name
Назвать среду можно как угодно
После выполнения команды вы увидите логи:
Running virtualenv with interpreter /usr/bin/python
Already using interpreter /usr/bin/python
Using base prefix '/usr'
New python executable in /home/username/test/venv_name/bin/python
Installing setuptools, pip, wheel...
done.
Эта команда создает локальную копию среды. Работая с ней, важно не забывать об активации, чтобы использовались нужные версии конкретных инструментов и пакетов.
Если при установке возникла ошибка setuptools pip failed with error code 1` error, используйте следующую команду, чтобы решить проблему:
pip install --upgrade setuptools # или pip33. Для активации новой виртуальной среды используйте команду:
source venv_name/bin/activateПосле этого название текущей среды отобразится слева от символа ввода: (venv_name) username@desctop:~/test$
Теперь при установке любого пакета с помощью pip он будет размещаться в папках этой среды, изолированно от глобальной установки.
Деактивации virtualenv
После завершения работы деактивировать виртуальную среду можно с помощью команды deactivate.
Введите ее и приставка venv_name пропадет. Вы вернетесь к использованию глобально версии python.
Удаление виртуальной среды
Для удаления виртуальной среды достаточно просто удалить папку проекта. Для этого используется следующая команда:
rm -rf venv_nameРешение популярных ошибок
Ошибки при создании virtualenv. При попытке создать virtualenv с Python 3.7 могут возникнуть следующие ошибки.
AttributeError: module 'importlib._bootstrap' has no attribute 'SourceFileLoader'

OSError: Command /home/username/venv/bin/python3 -c "import sys, pip; sys...d"] + sys.argv[1:]))" setuptools pip failed with error code 1
Для их исправления нужно добавить следующую строку в .bash_profile.
export LC_ALL="en_US.UTF-8"Использование полного пути к виртуальной среде. Может быть такое, что при использовании команды virtualenv будет использована не та версия. Для решения проблемы нужно лишь задать полные пути как к virtualenv, так и к Python в системе.
А получить их можно с помощью этой команды:
/home/username/opt/python-3.8.0/bin/virtualenv -p /home/username/opt/python-3.8.0/bin/python3 venvЕсли вы работали с несколькими проектами, в которых использовался Python, то наверняка вы встречались с проблемой поломки одного из проекта, потому что обновленная версия библиотеки для другого проекта, не применима для текущего. Т.е. если вы работаете с Python и не используете miniconda или anaconda, то установка и обновление библиотек python постоянно ломает ваши проекты. Эта проблема называется «Ад зависимостей».
Поэтому лучшим подходом будет создавать для каждого отдельного проекта свою среду. В этой статье будет рассмотрена библиотека venv для настройки Virtual Environment для Windows.
Виртуальная среда — это способ Python для разделения зависимостей между проектами.
Создание виртуальной среды — venv в Windows
venv -это пакет, поставляемый с Python 3.
venv (для Python 3) позволяет управлять отдельными установками пакетов для разных проектов. По сути, venv позволяет вам создавать «виртуальную» изолированную установку Python и устанавливать пакеты в эту виртуальную установку. При переключении проектов вы можете просто создать новую виртуальную среду и не беспокоиться о нарушении работы пакетов, установленных в других средах. При разработке приложений Python всегда рекомендуется использовать виртуальную среду.
Чтобы создать виртуальную среду, перейдите в каталог вашего проекта и запустите venv.
python3 -m venv venv
или
python -m venv venv
venv создаст виртуальную установку Python в директории venv.

Примечание: Вы должны исключить каталог виртуальной среды из своей системы управления версиями с помощью
.gitignore.
Активация и деактивация виртуальной среды Python
Далее необходимо активировать виртуальную среду.
Для этого необходимо в консоли cmd запустить .venvScriptsactivate или файл .venvScriptsactivate.bat, или .venvScriptsActivate.ps1.
Префикс вашего рабочего каталога изменится (выделил желтым — venv)
Пока ваша виртуальная среда активирована, pip будет устанавливать пакеты в эту конкретную среду, и вы сможете импортировать и использовать пакеты в своем приложении Python.
Установка пакетов в виртуальную среду
Пример:
pip install requests
pip позволяет вам указать, какую версию пакета установить, используя спецификаторы версии. Например, чтобы установить определенную версию requests:
pip install requests==2.18.4
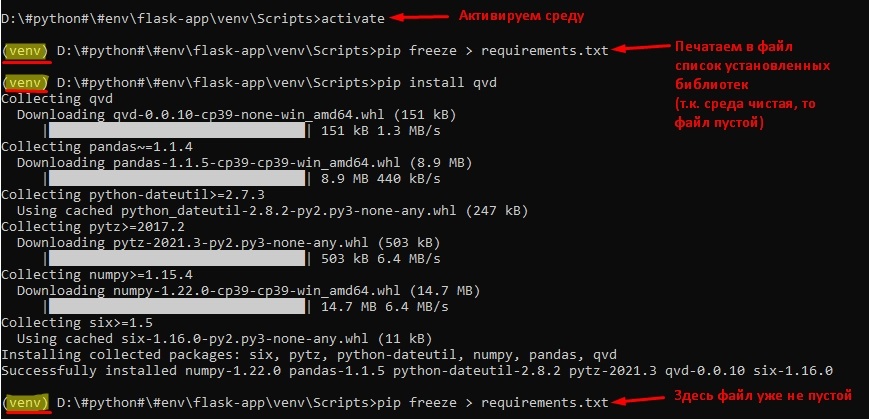
Как сохранить пакеты в файл requirements.txt
Pip может экспортировать список всех установленных пакетов и их версий с помощью freeze команды: pip freeze > requirements.txt.
Будет выведен список спецификаторов пакетов, таких как:
backports.entry-points-selectable==1.1.0
certifi==2021.5.30
charset-normalizer==2.0.3
distlib==0.3.2
filelock==3.0.12
idna==3.2
platformdirs==2.0.2
requests==2.26.0
six==1.16.0
urllib3==1.26.6
virtualenv==20.6.0
Имейте в виду, что в этом случае в файле requirements.txt будут перечислены все пакеты, которые были установлены в виртуальной среде, независимо от того, откуда они пришли.
Установить пакеты из файла requirements.txt
pip install -r requirements.txt
Как запустить скрипт Python в виртуальной среде. Пример автоматизации с помощью cmd
Для того, чтобы запустить скрипт, достаточно внутри директории с проектом (со средой) запустить команду:
"D:#python##envflask-appvenvScriptspython.exe" "D:#python##envflask-appapp.py"
Либо создать файл cmd с содержимым и запустить его:
@echo off
For /f "tokens=1-4 delims=/ " %%a in ('date /t') do (set mydate=%%c-%%a-%%b)
For /f "tokens=1-2 delims=/:" %%a in ('time /t') do (set mytime=%%a%%b)
rem %mydate%_%mytime%

"D:#python##envflask-appvenvScriptspython.exe" "D:#python##envflask-appapp.py" 2>"D:#python##envflask-applog_get_data_log_%mydate%_%mytime%.log"
Создание виртуальной среды с помощью PyCharm
Для более легкой работы с виртуальными средами на Windows рекомендую установить PyCharm (Community Edition бесплатная). При создании проекта он сам создаст виртуальную среду и будет запускать файл в этой виртуальной среде:
Новую виртуальную среду можно создать с помощью разных инструментов в Pycharm:
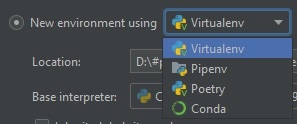
- Virtualenv
- Pipenv
- Poetry
- Conda
Создание виртуальной среды в Ubuntu 20.14
С помощью пакета venv
# Создаем директорию проекта
mkdir flask-app

# Переходим внутрь директории
cd flask-app
# Создаем среду myenv
python3 -m venv myenv

# Активируем среду
source myenv/bin/activate

Watch Now This tutorial has a related video course created by the Real Python team. Watch it together with the written tutorial to deepen your understanding: Working With Python Virtual Environments
In this tutorial, you’ll learn how to work with Python’s venv module to create and manage separate virtual environments for your Python projects. Each environment can use different versions of package dependencies and Python. After you’ve learned to work with virtual environments, you’ll know how to help other programmers reproduce your development setup, and you’ll make sure that your projects never cause dependency conflicts for one another.
By the end of this tutorial, you’ll know how to:
- Create and activate a Python virtual environment
- Explain why you want to isolate external dependencies
- Visualize what Python does when you create a virtual environment
- Customize your virtual environments using optional arguments to
venv - Deactivate and remove virtual environments
- Choose additional tools for managing your Python versions and virtual environments
Virtual environments are a common and effective technique used in Python development. Gaining a better understanding of how they work, why you need them, and what you can do with them will help you master your Python programming workflow.
Throughout the tutorial, you can select code examples for either Windows, Ubuntu Linux, or macOS. Pick your platform at the top right of the relevant code blocks to get the commands that you need, and feel free to switch between your options if you want to learn how to work with Python virtual environments on other operating systems.
How Can You Work With a Python Virtual Environment?
If you just need to get a Python virtual environment up and running to continue working on your favorite project,
then this section is the right place for you.
The instructions in this tutorial use Python’s venv module to create virtual environments.
This module is part of Python’s standard library, and it’s the officially recommended way to create virtual environments since Python 3.5.
For basic usage, venv is an excellent choice because it already comes packaged with your Python installation. With that in mind, you’re ready to create your first virtual environment in this tutorial.
Create It
Any time you’re working on a Python project that uses external dependencies that you’re installing with pip,
it’s best to first create a virtual environment:
- Windows
- Linux
- macOS
If you’re using Python on Windows
and you haven’t configured the PATH and PATHEXT variables,
then you might need to provide the full path to your Python executable:
PS> C:UsersNameAppDataLocalProgramsPythonPython310python -m venv venv
The system path shown above assumes that you installed Python 3.10 using the Windows installer provided by the Python downloads page. The path to the Python executable on your system might be different. Working with PowerShell, you can find the path using the where.exe python command.
Many Linux operating systems ship with a version of Python 3.
If python3 doesn’t work, then you’ll have to first install Python, and you may need to use the specific name of the executable version that you installed, for example python3.10 for Python 3.10.x. If that’s the case for you, remember to replace mentions of python3 in the code blocks with your specific version number.
Older versions of macOS come with a system installation of Python 2.7.x that you should never use to run your scripts. If you’re working on macOS < 12.3 and invoke the Python interpreter with python instead of python3, then
you might accidentally start up the outdated system Python interpreter.
If running python3 doesn’t work, then you’ll have to first install a modern version of Python.
Activate It
Great! Now your project has its own virtual environment. Generally, before you start using it, you’ll first activate the environment by executing a script that comes with the installation:
- Windows
- Linux + macOS
PS> venvScriptsactivate
(venv) PS>
$ source venv/bin/activate
(venv) $
Before you run this command, make sure that you’re in the folder that contains the virtual environment you just created.
Once you can see the name of your virtual environment—in this case (venv)—in your command prompt, then you know that your virtual environment is active. You’re all set and ready to install your external packages!
Install Packages Into It
After creating and activating your virtual environment, you can now install any external dependencies that you need for your project:
- Windows
- Linux + macOS
(venv) PS> python -m pip install <package-name>
(venv) $ python -m pip install <package-name>
This command is the default command that you should use to install external Python packages with pip. Because you first created and activated the virtual environment, pip will install the packages in an isolated location.
Congratulations, you can now install your packages to your virtual environment. To get to this point, you began by creating a Python virtual environment named venv and then activated it in your current shell session.
As long as you don’t close your terminal, every Python package that you’ll install will end up in this isolated environment instead of your global Python site-packages. That means you can now work on your Python project without worrying about dependency conflicts.
Deactivate It
Once you’re done working with this virtual environment, you can deactivate it:
- Windows
- Linux + macOS
(venv) PS> deactivate
PS>
After executing the deactivate command, your command prompt returns to normal.
This change means that you’ve exited your virtual environment. If you interact with Python or pip now, you’ll interact with your globally configured Python environment.
If you want to go back into a virtual environment that you’ve created before, you again need to run the activate script of that virtual environment.
At this point, you’ve covered the essentials of working with Python virtual environments.
If that’s all you need, then happy trails as you continue creating!
However, if you want to know what exactly just happened,
why so many tutorials ask you to create a virtual environment in the first place,
and what a Python virtual environment really is,
then keep on reading! You’re about to go deep!
Why Do You Need Virtual Environments?
Nearly everyone in the Python community suggests that you use virtual environments for all your projects.
But why?
If you want to find out why you need to set up a Python virtual environment in the first place,
then this is the right section for you.
The short answer is that Python isn’t great at dependency management.
If you’re not specific,
then pip will place all the external packages that you install in a folder called site-packages/ in your base Python installation.
Technically, Python comes with two site-packages folders:
purelib/should contain only modules written in pure Python code.platlib/should contain binaries that aren’t written in pure Python, for example.dll,.so, or.pydistfiles.
You can find these folders in different locations if you’re working on Fedora or RedHat Linux distributions.
However, most operating systems implement Python’s site-packages setting so that both locations point to the same path, effectively creating a single site-packages folder.
You can check the paths using sysconfig:
- Windows
- Linux
- macOS
>>>
>>> import sysconfig
>>> sysconfig.get_path("purelib")
'C:\Users\Name\AppData\Local\Programs\Python\Python310\Lib\site-packages'
>>> sysconfig.get_path("platlib")
'C:\Users\Name\AppData\Local\Programs\Python\Python310\Lib\site-packages'
>>>
>>> import sysconfig
>>> sysconfig.get_path("purelib")
'/home/name/path/to/venv/lib/python3.10/site-packages'
>>> sysconfig.get_path("platlib")
'/home/name/path/to/venv/lib/python3.10/site-packages'
>>>
>>> import sysconfig
>>> sysconfig.get_path("purelib")
'/Users/name/path/to/venv/lib/python3.10/site-packages'
>>> sysconfig.get_path("platlib")
'/Users/name/path/to/venv/lib/python3.10/site-packages'
Most likely, both outputs will show you the same path. If both outputs are the same, then your operating system doesn’t put purelib modules into a different folder than platlib modules. If two different paths show up, then your operating system makes this distinction.
Even if your operating system distinguishes between the two, dependency conflicts will still arise because all purelib modules will go into a single location for purelib modules, and the same will happen with the platlib modules.
To work with virtual environments, you don’t need to worry about the implementation detail of a single site-packages folder or two separate ones. In fact, you probably won’t ever need to think about it again. If you want to, however, you can keep in mind that when someone mentions Python’s site-packages directory, they could be talking about two different directories.
Several issues can come up if all of your external packages land in the same folder. In this section, you’ll learn more about them, as well as other problems that virtual environments mitigate.
Avoid System Pollution
Linux and macOS come preinstalled with a version of Python that the operating system uses for internal tasks.
If you install packages to your operating system’s global Python, these packages will mix with the system-relevant packages. This mix-up could have unexpected side effects on tasks crucial to your operating system’s normal behavior.
Additionally, if you update your operating system, then the packages you installed might get overwritten and lost. You don’t want either of those headaches to happen!
Sidestep Dependency Conflicts
One of your projects might require a different version of an external library than another one. If you have only one place to install packages, then you can’t work with two different versions of the same library. This is one of the most common reasons for the recommendation to use a Python virtual environment.
To better understand why this is so important, imagine you’re building Django websites for two different clients. One client is comfortable with their existing web app, which you initially built using Django 2.2.26, and that client refuses to update their project to a modern Django version. Another client wants you to include async functionality in their website, which is only available starting from Django 4.0.
If you installed Django globally, you could only have one of the two versions installed:
- Windows
- Linux + macOS
PS> python -m pip install django==2.2.26
PS> python -m pip list
Package    Version
---------- -------
Django     2.2.26
pip        22.0.4
pytz       2022.1
setuptools 58.1.0
sqlparse   0.4.2

PS> python -m pip install django==4.0.3
PS> python -m pip list
Package    Version
---------- -------
asgiref    3.5.0
Django     4.0.3
pip        22.0.4
pytz       2022.1
setuptools 58.1.0
sqlparse   0.4.2
tzdata     2022.1
$ python3 -m pip install django==2.2.26
$ python3 -m pip list
Package    Version
---------- -------
Django     2.2.26
pip        22.0.4
pytz       2022.1
setuptools 58.1.0
sqlparse   0.4.2

$ python3 -m pip install django==4.0.3
$ python3 -m pip list
Package    Version
---------- -------
asgiref    3.5.0
Django     4.0.3
pip        22.0.4
pytz       2022.1
setuptools 58.1.0
sqlparse   0.4.2
If you install two different versions of the same package into your global Python environment, the second installation overwrites the first one. For the same reason, having a single virtual environment for both clients won’t work either. You can’t have two different versions of the same package in a single Python environment.
Looks like you won’t be able to work on one of the two projects with this setup! However, if you create a virtual environment for each of your clients’ projects, then you can install a different version of Django into each of them:
- Windows
- Linux + macOS
PS> mkdir client-old
PS> cd client-old
PS> python -m venv venv --prompt="client-old"
PS> venvScriptsactivate
(client-old) PS> python -m pip install django==2.2.26
(client-old) PS> python -m pip list
Package    Version
---------- -------
Django     2.2.26
pip        22.0.4
pytz       2022.1
setuptools 58.1.0
sqlparse   0.4.2
(client-old) PS> deactivate

PS> cd ..
PS> mkdir client-new
PS> cd client-new
PS> python -m venv venv --prompt="client-new"
PS> venvScriptsactivate
(client-new) PS> python -m pip install django==4.0.3
(client-new) PS> python -m pip list
Package    Version
---------- -------
asgiref    3.5.0
Django     4.0.3
pip        22.0.4
setuptools 58.1.0
sqlparse   0.4.2
tzdata     2022.1
(client-new) PS> deactivate
$ mkdir client-old
$ cd client-old
$ python3 -m venv venv --prompt="client-old"
$ source venv/bin/activate
(client-old) $ python -m pip install django==2.2.26
(client-old) $ python -m pip list
Package    Version
---------- -------
Django     2.2.26
pip        22.0.4
pytz       2022.1
setuptools 58.1.0
sqlparse   0.4.2
(client-old) $ deactivate

$ cd ..
$ mkdir client-new
$ cd client-new
$ python3 -m venv venv --prompt="client-new"
$ source venv/bin/activate
(client-new) $ python -m pip install django==4.0.3
(client-new) $ python -m pip list
Package    Version
---------- -------
asgiref    3.5.0
Django     4.0.3
pip        22.0.4
setuptools 58.1.0
sqlparse   0.4.2
(client-new) $ deactivate
If you now activate either of the two virtual environments, then you’ll notice that it still holds its own specific version of Django. The two environments also have different dependencies, and each only contains the dependencies necessary for that version of Django.
With this setup, you can activate one environment when you work on one project and another when you work on another. Now you can keep any number of clients happy at the same time!
Minimize Reproducibility Issues
If all your packages live in one location, then it’ll be difficult to only pin dependencies that are relevant for a single project.
If you’ve worked with Python for a while, then your global Python environment might already include all sorts of third-party packages. If that’s not the case, then pat yourself on the back! You’ve probably installed a new version of Python recently, or you already know how to handle virtual environments to avoid system pollution.
To clarify what reproducibility issues you can encounter when sharing a Python environment across multiple projects, you’ll look into an example situation next. Imagine you’ve worked on two independent projects over the past month:
- A web scraping project with Beautiful Soup
- A Flask application
Unaware of virtual environments, you installed all necessary packages into your global Python environment:
- Windows
- Linux + macOS
PS> python -m pip install beautifulsoup4 requests
PS> python -m pip install flask
$ python3 -m pip install beautifulsoup4 requests
$ python3 -m pip install flask
Your Flask app has turned out to be quite helpful, so other developers want to work on it as well. They need to reproduce the environment that you used for working on it. You want to go ahead and pin your dependencies so that you can share your project online:
- Windows
- Linux + macOS
PS> python -m pip freeze
beautifulsoup4==4.10.0
certifi==2021.10.8
charset-normalizer==2.0.12
click==8.0.4
colorama==0.4.4
Flask==2.0.3
idna==3.3
itsdangerous==2.1.1
Jinja2==3.0.3
MarkupSafe==2.1.1
requests==2.27.1
soupsieve==2.3.1
urllib3==1.26.9
Werkzeug==2.0.3
$ python3 -m pip freeze
beautifulsoup4==4.10.0
certifi==2021.10.8
charset-normalizer==2.0.12
click==8.0.4
Flask==2.0.3
idna==3.3
itsdangerous==2.1.1
Jinja2==3.0.3
MarkupSafe==2.1.1
requests==2.27.1
soupsieve==2.3.1
urllib3==1.26.9
Werkzeug==2.0.3
Which of these packages are relevant for your Flask app, and which ones are here because of your web scraping project? It’s hard to tell when all external dependencies live in a single bucket.
With a single environment like this one, you’d have to manually go through the dependencies and know which are necessary for your project and which aren’t. At best, this approach is tedious, but more likely, it’s error prone.
If you use a separate virtual environment for each of your projects, then it’ll be more straightforward to read the project requirements from your pinned dependencies. That means you can share your success when you develop a great app, making it possible for others to collaborate with you!
Dodge Installation Privilege Lockouts
Finally, you may need administrator privileges on a computer to install packages into the host Python’s site-packages directory. In a corporate work environment, you most likely won’t have that level of access to the machine that you’re working on.
If you use virtual environments, then you create a new installation location within the scope of your user privileges, which allows you to install and work with external packages.
Whether you’re coding as a hobby on your own machine, developing websites for clients, or working in a corporate environment, using a virtual environment will save you lots of grief in the long run.
What Is a Python Virtual Environment?
At this point, you’re convinced that you want to work with virtual environments.
Great, but what are you working with when you use a virtual environment?
If you want to understand what Python virtual environments are, then this is the right section for you.
The short answer is that a Python virtual environment is a folder structure
that gives you everything you need to run a lightweight yet isolated Python environment.
A Folder Structure
When you create a new virtual environment using the venv module, Python creates a self-contained folder structure and copies or symlinks the Python executable files into that folder structure.
You don’t need to dig deeply into this folder structure to learn more about what virtual environments are made of. In just a bit, you’ll carefully scrape off the topsoil and investigate the high-level structures that you uncover.
However, if you’ve already got your shovel ready and you’re itching to dig, then open the collapsible section below:
Welcome, brave one. You’ve accepted the challenge to venture deeper into your virtual environment’s folder structure! In this collapsible section, you’ll find instructions on how to take a look into that dark abyss.
On your command line, navigate to the folder that contains your virtual environment. Take a deep breath and brace yourself, then execute the tree command to display all the contents of the directory:
- Windows
- Linux
- macOS
You may need to first install tree, for example with sudo apt install tree.
The tree command displays the content of your venv directory in a very long tree structure.
However you end up displaying all the contents of the venv/ folder, you might be surprised what you find. Many developers experience a slight shock when they first take a peek. There are a lot of files in there!
If this was your first time and you felt that way, then welcome to the group of people who have taken a look and gotten overwhelmed.
A virtual environment folder contains a lot of files and folders, but you might notice that most of what makes this tree structure so long rests inside the site-packages/ folder. If you trim down the subfolders and files in there, you end up with a tree structure that isn’t too overwhelming:
- Windows
- Linux
- macOS
venv
│
├── Include
│
├── Lib
│   │
│   └── site-packages
│       │
│       ├── _distutils_hack
│       │
│       ├── pip
│       │
│       ├── pip-22.0.4.dist-info
│       │
│       ├── pkg_resources
│       │
│       ├── setuptools
│       │
│       ├── setuptools-58.1.0.dist-info
│       │
│       └── distutils-precedence.pth
│
│
├── Scripts
│   ├── Activate.ps1
│   ├── activate
│   ├── activate.bat
│   ├── deactivate.bat
│   ├── pip.exe
│   ├── pip3.10.exe
│   ├── pip3.exe
│   ├── python.exe
│   └── pythonw.exe
│
└── pyvenv.cfg
venv/
│
├── bin/
│   ├── Activate.ps1
│   ├── activate
│   ├── activate.csh
│   ├── activate.fish
│   ├── pip
│   ├── pip3
│   ├── pip3.10
│   ├── python
│   ├── python3
│   └── python3.10
│
├── include/
│
├── lib/
│   │
│   └── python3.10/
│       │
│       └── site-packages/
│           │
│           ├── _distutils_hack/
│           │
│           ├── pip/
│           │
│           ├── pip-22.0.4.dist-info/
│           │
│           ├── pkg_resources/
│           │
│           ├── setuptools/
│           │
│           ├── setuptools-58.1.0.dist-info/
│           │
│           └── distutils-precedence.pth
│
├── lib64/
│   │
│   └── python3.10/
│       │
│       └── site-packages/
│           │
│           ├── _distutils_hack/
│           │
│           ├── pip/
│           │
│           ├── pip-22.0.4.dist-info/
│           │
│           ├── pkg_resources/
│           │
│           ├── setuptools/
│           │
│           ├── setuptools-58.1.0.dist-info/
│           │
│           └── distutils-precedence.pth
│
└── pyvenv.cfg
venv/
│
├── bin/
│   ├── Activate.ps1
│   ├── activate
│   ├── activate.csh
│   ├── activate.fish
│   ├── pip
│   ├── pip3
│   ├── pip3.10
│   ├── python
│   ├── python3
│   └── python3.10
│
├── include/
│
├── lib/
│   │
│   └── python3.10/
│       │
│       └── site-packages/
│           │
│           ├── _distutils_hack/
│           │
│           ├── pip/
│           │
│           ├── pip-22.0.4.dist-ino/
│           │
│           ├── pkg_resources/
│           │
│           ├── setuptools/
│           │
│           ├── setuptools-58.1.0.dist-info/
│           │
│           └── distutils-precedence.pth
│
└── pyvenv.cfg
This reduced tree structure gives you a better overview of what’s going on in your virtual environment folder:
- Windows
- Linux
- macOS
-
Includeis an initially empty folder that Python uses to include C header files for packages you might install that depend on C extensions. -
Libcontains thesite-packagesfolder, which is one of the main reasons for creating your virtual environment. This folder is where you’ll install external packages that you want to use within your virtual environment. By default, your virtual environment comes preinstalled with two dependencies,pipand setuptools. You’ll learn more about them in a bit. -
Scriptscontains the executable files of your virtual environment. Most notable are the Python interpreter (python.exe), thepipexecutable (pip.exe), and the activation script for your virtual environment, which comes in a couple of different flavors to allow you to work with different shells. In this tutorial, you’ve usedactivate, which handles the activation of your virtual environment for Windows across most shells. -
pyvenv.cfgis a crucial file for your virtual environment. It contains only a couple of key-value pairs that Python uses to set variables in thesysmodule that determine which Python interpreter and which site-packages directory the current Python session will use. You’ll learn more about the settings in this file when you read about how a virtual environment works.
-
bin/contains the executable files of your virtual environment. Most notable are the Python interpreter (python) and thepipexecutable (pip), as well as their respective symlinks (python3,python3.10,pip3,pip3.10). The folder also contains activation scripts for your virtual environment. Your specific activation script depends on what shell you use. For example, in this tutorial, you ranactivate, which works for the Bash and Zsh shells. -
include/is an initially empty folder that Python uses to include C header files for packages you might install that depend on C extensions. -
lib/contains thesite-packages/directory nested in a folder that designates the Python version (python3.10/).site-packages/is one of the main reasons for creating your virtual environment. This folder is where you’ll install external packages that you want to use within your virtual environment. By default, your virtual environment comes preinstalled with two dependencies,pipand setuptools. You’ll learn more about them in a bit. -
lib64/in many Linux systems comes as a symlink tolib/for compatibility reasons. Some Linux systems may use the distinction betweenlib/andlib64/to install different versions of libraries depending on their architecture. -
pyvenv.cfgis a crucial file for your virtual environment. It contains only a couple of key-value pairs that Python uses to set variables in thesysmodule that determine which Python interpreter and which site-packages directory the current Python session will use. You’ll learn more about the settings in this file when you read about how a virtual environment works.
-
bin/contains the executable files of your virtual environment. Most notable are the Python interpreter (python) and thepipexecutable (pip), as well as their respective symlinks (python3,python3.10,pip3,pip3.10). The folder also contains activation scripts for your virtual environment. Your specific activation script depends on what shell you use. For example, in this tutorial, you ranactivate, which works for the Bash and Zsh shells. -
include/is an initially empty folder that Python uses to include C header files for packages you might install that depend on C extensions. -
lib/contains thesite-packages/directory nested in a folder that designates the Python version (python3.10/).site-packages/is one of the main reasons for creating your virtual environment. This folder is where you’ll install external packages that you want to use within your virtual environment. By default, your virtual environment comes preinstalled with two dependencies,pipand setuptools. You’ll learn more about them in a bit. -
pyvenv.cfgis a crucial file for your virtual environment. It contains only a couple of key-value pairs that Python uses to set variables in thesysmodule that determine which Python interpreter and which site-packages directory the current Python session will use. You’ll learn more about the settings in this file when you read about how a virtual environment works.
From this bird’s-eye view of the contents of your virtual environment folder, you can zoom out even further to discover that there are three essential parts of a Python virtual environment:
- A copy or a symlink of the Python binary
- A
pyvenv.cfgfile - A site-packages directory
The installed packages inside site-packages/ are optional but come as a reasonable default. However, your virtual environment would still be a valid virtual environment if this directory were empty, and there are ways to create it without installing any dependencies.
With the default settings, venv will install both pip and setuptools. Using pip is the recommended way to install packages in Python, and setuptools is a dependency for pip. Because installing other packages is the most common use case for Python virtual environments, you’ll want to have access to pip.
You can double-check that Python installed both pip and setuptools into your virtual environment by using pip list:
- Windows
- Linux + macOS
(venv) PS> python -m pip list
Package    Version
---------- -------
pip        22.0.4
setuptools 58.1.0
(venv) $ python -m pip list
Package    Version
---------- -------
pip        22.0.4
setuptools 58.1.0
Your version numbers may differ, but this output confirms that Python installed both packages when you created the virtual environment with its default settings.
These two installed packages make up most of the content of your new virtual environment. However, you’ll notice that there are also a couple of other folders in the site-packages/ directory:
-
The
_distutils_hack/module, in a manner true to its name, ensures that when performing package installations, Python picks the local._distutilssubmodule of setuptools over the standard library’sdistutilsmodule. -
The
pkg_resources/module helps applications discover plugins automatically and allows Python packages to access their resource files. It’s distributed together withsetuptools. -
The
{name}-{version}.dist-info/directories forpipand setuptools contain package distribution information that exists to record information about installed packages.
Finally, there’s also a file named distutils-precedence.pth. This file helps set the path precedence for distutils imports and works together with _distutils_hack to ensure that Python prefers the version of distutils that comes bundled with setuptools over the built-in one.
At this point, you’ve seen all the files and folders that make up a Python virtual environment if you’ve installed it using the built-in venv module.
Keep in mind that your virtual environment is just a folder structure, which means that you can delete and re-create it anytime you want to. But why this specific folder structure, and what does it make possible?
An Isolated Python Installation
Python virtual environments aim to provide a lightweight, isolated Python environment that you can quickly create and then discard when you don’t need it anymore. The folder structure that you’ve seen above makes that possible by providing three key pieces:
- A copy or a symlink of the Python binary
- A
pyvenv.cfgfile - A site-packages directory
You want to achieve an isolated environment so that any external packages you install won’t conflict with global site-packages. What venv does to make this possible is to reproduce the folder structure that a standard Python installation creates.
This structure accounts for the location of the copy or symlink of the Python binary and the site-packages directory, where Python installs external packages.
In addition to the Python binary and the site-packages directory, you get the pyvenv.cfg file. It’s a small file that contains only a couple of key-value pairs. However, these settings are crucial for making your virtual environment work:
- Windows
- Linux
- macOS
home = C:UsersNameAppDataLocalProgramsPythonPython310
include-system-site-packages = false
version = 3.10.3
home = /usr/local/bin
include-system-site-packages = false
version = 3.10.3
home = /Library/Frameworks/Python.framework/Versions/3.10/bin
include-system-site-packages = false
version = 3.10.3
You’ll learn more about this file in a later section when reading about how a virtual environment works.
Suppose you closely inspect your newly minted virtual environment’s folder structure. In that case, you might notice that this lightweight installation doesn’t contain any of the trusted standard library modules. Some might say that Python without its standard library is like a toy car without batteries!
However, if you start the Python interpreter from within your virtual environment, then you can still access all the goodies from the standard library:
>>>
>>> import urllib
>>> from pprint import pp
>>> pp(dir(urllib))
['__builtins__',
 '__cached__',
 '__doc__',
 '__file__',
 '__loader__',
 '__name__',
 '__package__',
 '__path__',
 '__spec__']
In the example code snippet above, you’ve successfully imported both the urllib module and the pp() shortcut from the pretty print module. Then you used dir() to inspect the urllib module.
Both modules are part of the standard library, so how come you have access to them even though they’re not in the folder structure of your Python virtual environment?
You can access Python’s standard library modules because your virtual environment reuses Python’s built-ins and the standard library modules from the Python installation from which you created your virtual environment. In a later section, you’ll learn how the virtual environment achieves linking to your base Python’s standard library.
In addition to the standard library modules, you can optionally give your virtual environment access to the base installation’s site-packages through an argument when creating the environment:
- Windows
- Linux + macOS
PS C:> python -m venv venv --system-site-packages
$ python3 -m venv venv --system-site-packages
If you add --system-site-packages when you call venv, Python will set the value to include-system-site-packages in pyvenv.cfg to true. This setting means that you can use any external packages that you installed to your base Python as if you’d installed them into your virtual environment.
This connection works in only one direction. Even if you give your virtual environment access to the source Python’s site-packages folder, any new packages you install into your virtual environment won’t mingle with the packages there. Python will respect the isolated nature of installations to your virtual environment and place them into the separate site-packages directory within the virtual environment.
You know that a Python virtual environment is just a folder structure with a settings file. It might or might not come with pip preinstalled, and it has access to the source Python’s site-packages directory while remaining isolated. But you might wonder how all of this works.
How Does a Virtual Environment Work?
If you know what a Python virtual environment is but wonder how it manages to create the lightweight isolation it provides, then you’re in the right section. Here you’ll learn how the folder structure and the settings in your pyvenv.cfg file interact with Python to provide a reproducible and isolated space for installing external dependencies.
It Copies Structure and Files
When you create a virtual environment using venv, the module re-creates the file and folder structure of a standard Python installation on your operating system. Python also copies or symlinks into that folder structure the Python executable with which you’ve called venv:
- Windows
- Linux
- macOS
venv
│
├── Include
│
├── Lib
│   │
│   └── site-packages
│
├── Scripts
│   ├── Activate.ps1
│   ├── activate
│   ├── activate.bat
│   ├── deactivate.bat
│   ├── pip.exe
│   ├── pip3.10.exe
│   ├── pip3.exe
│   ├── python.exe
│   └── pythonw.exe
│
└── pyvenv.cfg
venv/
│
├── bin/
│   ├── Activate.ps1
│   ├── activate
│   ├── activate.csh
│   ├── activate.fish
│   ├── pip
│   ├── pip3
│   ├── pip3.10
│   ├── python
│   ├── python3
│   └── python3.10
│
├── include/
│
├── lib/
│   │
│   └── python3.10/
│       │
│       └── site-packages/
│
├── lib64/
│   │
│   └── python3.10/
│       │
│       └── site-packages/
│
└── pyvenv.cfg
venv/
│
├── bin/
│   ├── Activate.ps1
│   ├── activate
│   ├── activate.csh
│   ├── activate.fish
│   ├── pip
│   ├── pip3
│   ├── pip3.10
│   ├── python
│   ├── python3
│   └── python3.10
│
├── include/
│
├── lib/
│   │
│   └── python3.10/
│       │
│       └── site-packages/
│
└── pyvenv.cfg
If you locate your system-wide Python installation on your operating system and inspect the folder structure there, then you’ll see that your virtual environment resembles that structure.
You can find the base Python installation that your virtual environment is based on by navigating to the path you can find under the home key in pyvenv.cfg.
While you might find some additional files and folders in your base Python installation, you’ll notice that the standard folder structure is the same as in your virtual environment. venv creates this folder structure to assure that Python will work as expected in isolation, without the need to apply many additional changes.
It Adapts the Prefix-Finding Process
With the standard folder structure in place, the Python interpreter in your virtual environment can understand where all relevant files are located. It does this with only minor adaptations to its prefix-finding process according to the venv specification.
Instead of looking for the os module to determine the location of the standard library, the Python interpreter first looks for a pyvenv.cfg file. If the interpreter finds this file and it contains a home key, then the interpreter will use that key to set the value for two variables:
sys.base_prefixwill hold the path to the Python executable used to create this virtual environment, which you can find at the path defined under thehomekey inpyvenv.cfg.sys.prefixwill point to the directory containingpyvenv.cfg.
If the interpreter doesn’t find a pyvenv.cfg file, then it determines that it’s not running within a virtual environment, and both sys.base_prefix and sys.prefix will then point to the same path.
You can confirm that this works as described. Spin up a Python interpreter within an active virtual environment and inspect both variables:
- Windows
- Linux
- macOS
>>>
>>> import sys
>>> sys.prefix
'C:\Users\Name\path\to\venv'
>>> sys.base_prefix
'C:\Users\Name\AppData\Local\Programs\Python\Python310'
>>>
>>> import sys
>>> sys.prefix
'/home/name/path/to/venv'
>>> sys.base_prefix
'/usr/local'
>>>
>>> import sys
>>> sys.prefix
'/Users/name/path/to/venv'
>>> sys.base_prefix
'/Library/Frameworks/Python.framework/Versions/3.10'
You can see that the variables point to different locations on your system.
Now go ahead and deactivate the virtual environment, enter a new interpreter session, and rerun the same code:
- Windows
- Linux
- macOS
>>>
>>> import sys
>>> sys.prefix
'C:\Users\Name\AppData\Local\Programs\Python\Python310'
>>> sys.base_prefix
'C:\Users\Name\AppData\Local\Programs\Python\Python310'
>>>
>>> import sys
>>> sys.prefix
'/usr/local'
>>> sys.base_prefix
'/usr/local'
>>>
>>> import sys
>>> sys.prefix
'/Library/Frameworks/Python.framework/Versions/3.10'
>>> sys.base_prefix
'/Library/Frameworks/Python.framework/Versions/3.10'
You should see that both sys.prefix and sys.base_prefix now point to the same path.
If these two variables have different values, then Python adapts where it’ll look for modules:
The
siteandsysconfigstandard-library modules are modified such that the standard library and header files are found relative tosys.base_prefix[…], while site-package directories […] are still found relative tosys.prefix[…]. (Source)
This change effectively allows the Python interpreter in your virtual environment to use the standard library modules from your base Python installation while pointing to its internal site-packages directory to install and access external packages.
It Links Back to Your Standard Library
Python virtual environments aim to be a lightweight way to provide you with an isolated Python environment that you can quickly create and then delete when you don’t need it anymore. To make this possible, venv copies only the minimally necessary files:
[A] Python virtual environment in its simplest form would consist of nothing more than a copy or symlink of the Python binary accompanied by a
pyvenv.cfgfile and a site-packages directory. (Source)
The Python executable in your virtual environment has access to the standard library modules of the Python installation on which you based the environment. Python makes this possible by pointing to the file path of the base Python executable in the home setting in pyvenv.cfg:
- Windows
- Linux
- macOS
home = C:UsersNameAppDataLocalProgramsPythonPython310
include-system-site-packages = false
version = 3.10.3
home = /usr/local/bin
include-system-site-packages = false
version = 3.10.3
home = /Library/Frameworks/Python.framework/Versions/3.10/bin
include-system-site-packages = false
version = 3.10.3
If you navigate to the path value of the highlighted line in pyvenv.cfg and list the contents of the folder, then you find the base Python executable that you used to create your virtual environment. From there, you can navigate to find the folder that contains your standard library modules:
- Windows
- Linux
- macOS
PS> ls C:UsersNameAppDataLocalProgramsPythonPython310

 Directory: C:UsersNameAppDataLocalProgramsPythonPython310

Mode              LastWriteTime      Length Name
----              -------------      ------ ----
d-----     12/19/2021   5:09 PM             DLLs
d-----     12/19/2021   5:09 PM             Doc
d-----     12/19/2021   5:09 PM             include
d-----     12/19/2021   5:09 PM             Lib
d-----     12/19/2021   5:09 PM             libs
d-----     12/21/2021   2:04 PM             Scripts
d-----     12/19/2021   5:09 PM             tcl
d-----     12/19/2021   5:09 PM             Tools
-a----      12/7/2021   4:28 AM       32762 LICENSE.txt
-a----      12/7/2021   4:29 AM     1225432 NEWS.txt
-a----      12/7/2021   4:28 AM       98544 python.exe
-a----      12/7/2021   4:28 AM       61680 python3.dll
-a----      12/7/2021   4:28 AM     4471024 python310.dll
-a----      12/7/2021   4:28 AM       97008 pythonw.exe
-a----      12/7/2021   4:29 AM       97168 vcruntime140.dll
-a----      12/7/2021   4:29 AM       37240 vcruntime140_1.dll

PS> ls C:UsersNameAppDataLocalProgramsPythonPython310Lib

 Directory: C:UsersNameAppDataLocalProgramsPythonPython310Lib

Mode              LastWriteTime      Length Name
----              -------------      ------ ----
d-----     12/19/2021   5:09 PM             asyncio
d-----     12/19/2021   5:09 PM             collections

# ...

-a----      12/7/2021   4:27 AM        5302 __future__.py
-a----      12/7/2021   4:27 AM          65 __phello__.foo.py
$ ls /usr/local/bin

2to3-3.10         pip3.10           python3.10
idle3.10          pydoc3.10         python3.10-config

$ ls /usr/local/lib/python3.10

$ ls
abc.py                   hmac.py            shelve.py
aifc.py                  html               shlex.py
_aix_support.py          http               shutil.py
antigravity.py           idlelib            signal.py

# ...

graphlib.py              runpy.py           zipimport.py
gzip.py                  sched.py           zoneinfo
hashlib.py               secrets.py
heapq.py                 selectors.py
$ ls /Library/Frameworks/Python.framework/Versions/3.10/bin

2to3               pip3.10            python3-intel64
2to3-3.10          pydoc3             python3.10
idle3              pydoc3.10          python3.10-config
idle3.10           python3            python3.10-intel64
pip3               python3-config

$ ls /Library/Frameworks/Python.framework/Versions/3.10/lib/python3.10/

LICENSE.txt              fnmatch.py             rlcompleter.py
__future__.py            fractions.py           runpy.py
__phello__.foo.py        ftplib.py              sched.py
__pycache__              functools.py           secrets.py

# ...

ensurepip                quopri.py              zipimport.py
enum.py                  random.py              zoneinfo
filecmp.py               re.py
fileinput.py             reprlib.py
Python is set up to find these modules by adding the relevant path to sys.path. During initialization, Python automatically imports the site module, which sets the defaults for this argument.
The paths that your Python session has access to in sys.path determine which locations Python can import modules from.
If you activate your virtual environment and enter a Python interpreter, then you can confirm that the path to the standard library folder of your base Python installation is available:
- Windows
- Linux
- macOS
>>>
>>> import sys
>>> from pprint import pp
>>> pp(sys.path)
['',
 'C:\Users\Name\AppData\Local\Programs\Python\Python310\python310.zip',
 'C:\Users\Name\AppData\Local\Programs\Python\Python310\DLLs',
 'C:\Users\Name\AppData\Local\Programs\Python\Python310\lib',
 'C:\Users\Name\AppData\Local\Programs\Python\Python310',
 'C:\Users\Name\path\to\venv',
 'C:\Users\Name\path\to\venv\lib\site-packages']
>>>
>>> import sys
>>> from pprint import pp
>>> pp(sys.path)
['',
 '/usr/local/lib/python310.zip',
 '/usr/local/lib/python3.10',
 '/usr/local/lib/python3.10/lib-dynload',
 '/home/name/path/to/venv/lib/python3.10/site-packages']
>>>
>>> import sys
>>> from pprint import pp
>>> pp(sys.path)
['',
 '/Library/Frameworks/Python.framework/Versions/3.10/lib/python310.zip',
 '/Library/Frameworks/Python.framework/Versions/3.10/lib/python3.10',
 '/Library/Frameworks/Python.framework/Versions/3.10/lib/python3.10/lib-dynload',
 '/Users/name/path/to/venv/lib/python3.10/site-packages']
Because the path to the directory that contains your standard library modules is available in sys.path, you’ll be able to import any of them when you work with Python from within your virtual environment.
It Modifies Your PYTHONPATH
To assure that the scripts you want to run use the Python interpreter within your virtual environment, venv modifies the PYTHONPATH environment variable that you can access using sys.path.
If you inspect that variable without an active virtual environment, you’ll see the default path locations for your default Python installation:
- Windows
- Linux
- macOS
>>>
>>> import sys
>>> from pprint import pp
>>> pp(sys.path)
['',
 'C:\Users\Name\AppData\Local\Programs\Python\Python310\python310.zip',
 'C:\Users\Name\AppData\Local\Programs\Python\Python310\DLLs',
 'C:\Users\Name\AppData\Local\Programs\Python\Python310\lib',
 'C:\Users\Name\AppData\Local\Programs\Python\Python310',
 'C:\Users\Name\AppData\Roaming\Python\Python310\site-packages',
 'C:\Users\Name\AppData\Local\Programs\Python\Python310\lib\site-packages']
>>>
>>> import sys
>>> from pprint import pp
>>> pp(sys.path)
['',
 '/usr/local/lib/python310.zip',
 '/usr/local/lib/python3.10',
 '/usr/local/lib/python3.10/lib-dynload',
 '/usr/local/lib/python3.10/site-packages']
>>>
>>> import sys
>>> from pprint import pp
>>> pp(sys.path)
['',
 '/Library/Frameworks/Python.framework/Versions/3.10/lib/python310.zip',
 '/Library/Frameworks/Python.framework/Versions/3.10/lib/python3.10',
 '/Library/Frameworks/Python.framework/Versions/3.10/lib/python3.10/lib-dynload',
 '/Library/Frameworks/Python.framework/Versions/3.10/lib/python3.10/site-packages']
Note the highlighted lines, which represent the path to the site-packages directory. This folder contains external modules that you’d install, for example, using pip. Without an activated virtual environment, this directory is nested within the same folder structure as the Python executable.
However, if you activate your virtual environment before starting another interpreter session and rerun the same commands, then you’ll get different output:
- Windows
- Linux
- macOS
>>>
>>> import sys
>>> from pprint import pp
>>> pp(sys.path)
['',
 'C:\Users\Name\AppData\Local\Programs\Python\Python310\python310.zip',
 'C:\Users\Name\AppData\Local\Programs\Python\Python310\DLLs',
 'C:\Users\Name\AppData\Local\Programs\Python\Python310\lib',
 'C:\Users\Name\AppData\Local\Programs\Python\Python310',
 'C:\Users\Name\path\to\venv',
 'C:\Users\Name\path\to\venv\lib\site-packages']
>>>
>>> import sys
>>> from pprint import pp
>>> pp(sys.path)
['',
 '/usr/local/lib/python310.zip',
 '/usr/local/lib/python3.10',
 '/usr/local/lib/python3.10/lib-dynload',
 '/home/name/path/to/venv/lib/python3.10/site-packages']
>>>
>>> import sys
>>> from pprint import pp
>>> pp(sys.path)
['',
 '/Library/Frameworks/Python.framework/Versions/3.10/lib/python310.zip',
 '/Library/Frameworks/Python.framework/Versions/3.10/lib/python3.10',
 '/Library/Frameworks/Python.framework/Versions/3.10/lib/python3.10/lib-dynload',
 '/Users/name/path/to/venv/lib/python3.10/site-packages']
Python replaced the default site-packages directory path with the one that lives inside your virtual environment. This change means that Python will load any external packages installed in your virtual environment. Conversely, because the path to your base Python’s site-packages directory isn’t in this list anymore, Python won’t load modules from there.
This change in Python’s path settings effectively creates the isolation of external packages in your virtual environment.
Optionally, you can get read-only access to the system site-packages directory of your base Python installation by passing an argument when creating the virtual environment.
It Changes Your Shell PATH Variable on Activation
For convenience, you’ll usually activate your virtual environment before working in it, even though you don’t have to.
To activate your virtual environment, you need to execute an activation script:
- Windows
- Linux + macOS
PS> venvScriptsactivate
(venv) PS>
$ source venv/bin/activate
(venv) $
Which activation script you’ll have to run depends on your operating system and the shell that you’re using.
If you dig into your virtual environment’s folder structure, then you’ll find a few different activation scripts that it ships with:
- Windows
- Linux
- macOS
venv
│
├── Include
│
├── Lib
│
├── Scripts
│   ├── Activate.ps1
│   ├── activate
│   ├── activate.bat
│   ├── deactivate.bat
│   ├── pip.exe
│   ├── pip3.10.exe
│   ├── pip3.exe
│   ├── python.exe
│   └── pythonw.exe
│
└── pyvenv.cfg
venv/
│
├── bin/
│   ├── Activate.ps1
│   ├── activate
│   ├── activate.csh
│   ├── activate.fish
│   ├── pip
│   ├── pip3
│   ├── pip3.10
│   ├── python
│   ├── python3
│   └── python3.10
│
├── include/
│
├── lib/
│
├── lib64/
│
└── pyvenv.cfg
venv/
│
├── bin/
│   ├── Activate.ps1
│   ├── activate
│   ├── activate.csh
│   ├── activate.fish
│   ├── pip
│   ├── pip3
│   ├── pip3.10
│   ├── python
│   ├── python3
│   └── python3.10
│
├── include/
│
├── lib/
│
└── pyvenv.cfg
These activation scripts all have the same purpose. However, they need to provide different ways of achieving it because of the various operating systems and shells that users are working with.
Two critical actions happen in the activation script:
- Path: It sets the
VIRTUAL_ENVvariable to the root folder path of your virtual environment and prepends the relative location of its Python executable to yourPATH. - Command prompt: It changes the command prompt to the name that you passed when creating the virtual environment. It takes that name and puts it into parentheses, for example
(venv).
These changes put the convenience of virtual environments into effect within your shell:
- Path: Because the path to all the executables in your virtual environment now lives at the front of your
PATH, your shell will invoke the internal versions ofpipor Python when you just typepiporpython. - Command prompt: Because the script changed your command prompt, you’ll quickly know whether or not your virtual environment is activated.
Both of these changes are minor adaptations that exist purely for your convenience. They aren’t strictly necessary, but they make working with Python virtual environments more enjoyable.
You can inspect your PATH variable before and after activation of your virtual environment. If you’ve activated your virtual environment, then you’ll see the path to the folder containing your internal executables at the beginning of PATH:
- Windows
- Linux
- macOS
PS> $Env:Path
C:UsersNamepathtovenvScripts;C:Windowssystem32;C:Windows;C:WindowsSystem32Wbem;C:UsersNameAppDataLocalProgramsPythonPython310Scripts;C:UsersNameAppDataLocalProgramsPythonPython310;c:usersname.localbin;c:usersnameappdataroamingpythonpython310scripts
$ echo $PATH
/home/name/path/to/venv/bin:/usr/local/sbin:/usr/local/bin:/usr/sbin:/usr/bin:/sbin:/bin:/home/name/.local/bin
$ echo $PATH
/Users/name/path/to/venv/bin:/Library/Frameworks/Python.framework/Versions/3.10/bin:/usr/local/bin:/usr/bin:/bin:/usr/sbin:/sbin:/Users/name/.local/bin
Keep in mind that the output of printing your PATH variable will most likely look quite different. The important point is that the activation script has added the path to your virtual environment at the beginning of the PATH variable.
When you deactivate your virtual environment using deactivate, your shell reverses these changes and puts PATH and your command prompt back to the way they were before.
Give it a try and inspect the changes. This small change to your PATH variable gives you the convenience of running executables in your virtual environment without the need to provide the full path.
It Runs From Anywhere With Absolute Paths
You don’t need to activate your virtual environment to use it. You can work with your virtual environment without activating it, even though activating it is a common action that you’ll often see recommended.
If you provide only the name of an executable to your shell, it’ll look through the location recorded in PATH for an executable file sporting that name. It’ll then pick and run the first one that matches that criterion.
The activation script changes your PATH variable so that the binaries folder of your virtual environment is the first place your shell looks for executables. This change allows you to type only pip or python to run the respective programs situated inside your virtual environment.
If you don’t activate your virtual environment, then you can instead pass the absolute path of the Python executable inside your virtual environment to run any script from within your virtual environment:
- Windows
- Linux
- macOS
PS> C:UsersNamepathtovenvScriptspython.exe
$ /home/name/path/to/venv/bin/python
$ /Users/name/path/to/venv/bin/python
This command will start the Python interpreter within your virtual environment precisely the same way it would if you first activated the virtual environment and then called it with python.
How can you confirm that using the absolute path without activating the virtual environment starts the same interpreter as when you activate the virtual environment and run python?
Take some notes of possible ways to check, then try out some of the solutions mentioned in the Solution block below.
As described in previous sections of this tutorial, you could:
- Print
sys.pathand confirm that the site-packages directory within your virtual environment is listed - Confirm that
sys.prefixhas changed and now points to a folder in your virtual environment folder structure - Activate the virtual environment, then inspect the
PATHshell variable to find the path to your virtual environment’s binary executables listed in the first place
If you’re unsure why any of these approaches could confirm that this works as described, follow the links to the relevant sections in this tutorial to refresh your memory.
Alternatively, you could confirm which Python executable you’re using by starting the interpreter and running import sys; sys.executable. These commands will return the absolute path to your current Python interpreter. Does the path lead into your virtual environment folder structure?
You’ll often activate your virtual environment before working with it and deactivate it after you’re done. However, there is an everyday use case where using the absolute paths is a helpful approach.
Embedding the activation of your virtual environment in your script is a fussy exercise that goes wrong more often than it doesn’t. Instead, equipped with the knowledge that you’ve gained in this tutorial, you can use the absolute path to the Python interpreter in your virtual environment when running your script.
You could use this, for example, if you were setting up an hourly CRON job on your remote Linux server that checks for site connectivity asynchronously using the external aiohttp package that you installed in a virtual environment:
0 * * * *
    /home/name/Documents/connectivity-checker/venv/bin/python
    -m rpchecker
    -u google.com twitter.com
    -a
You don’t need to fiddle with activating your virtual environment to use the right Python interpreter that has access to the dependencies that you’ve installed inside the virtual environment. Instead, you just pass the absolute path to the binary of that interpreter. Python takes care of the rest for you during initialization.
As long as you provide the path to your Python executable, you don’t need to activate your virtual environment to enjoy the benefits of using one.
How Can You Customize a Virtual Environment?
If you’re confident about what a Python virtual environment is and you want to customize it for a specific use case, then you’re in the right place. In this section, you’ll learn about the optional arguments that you can pass when creating a virtual environment with venv, and how these customizations can help you get precisely the virtual environment you need.
Change the Command Prompt
You can change the folder name that contains your virtual environment when you create it by passing a name other than venv. In fact, you’ll often see different names in different projects. Some of them are commonly used:
venvenv.venv
You could name the folder that you create for your virtual environment anything you want.
Whatever name you choose will show up in your command prompt after you activate the virtual environment:
- Windows
- Linux + macOS
PS> python -m venv your-fancy-name
PS> your-fancy-nameScriptsactivate
(your-fancy-name) PS>
$ python3 -m venv your-fancy-name
$ source your-fancy-name/bin/activate
(your-fancy-name) $
If you give your virtual environment folder an alternate name, you’ll also need to consider that name when you want to run your activation script, as shown in the code example above.
If you want the convenience of seeing a different command prompt, but you want to keep the folder name descriptive so that you’ll know it contains a virtual environment, then you can pass your desired command prompt name to --prompt:
- Windows
- Linux + macOS
PS> python -m venv venv --prompt="dev-env"
PS> venvScriptsactivate
(dev-env) PS>
$ python3 -m venv venv --prompt="dev-env"
$ source venv/bin/activate
(dev-env) $
Using the optional --prompt argument, you can set the command prompt that’ll show up when your virtual environment is active to a descriptive string without changing the name of your virtual environment’s folder.
In the code snippet above, you can see that you’re still calling the folder venv, which means that you’ll be able to access the activate script with the familiar path. At the same time, the command prompt that shows up after activation will be whatever you passed to --prompt.
Overwrite Existing Environments
You might want to delete and re-create one of your virtual environments at any given time. If you do that often, then you might be glad to know that you can add the --clear argument to delete the contents of an existing environment before Python creates the new one.
Before you try that out, it’s helpful to see that running the command to create a new virtual environment without this argument won’t overwrite an existing virtual environment with the same name:
- Windows
- Linux + macOS
PS> python -m venv venv
PS> venvScriptspip.exe install requests
PS> venvScriptspip.exe list
Package            Version
------------------ ---------
certifi            2021.10.8
charset-normalizer 2.0.12
idna               3.3
pip                22.0.4
requests           2.27.1
setuptools         58.1.0
urllib3            1.26.9

PS> python -m venv venv
PS> venvScriptspip.exe list
Package            Version
------------------ ---------
certifi            2021.10.8
charset-normalizer 2.0.12
idna               3.3
pip                22.0.4
requests           2.27.1
setuptools         58.1.0
urllib3            1.26.9
$ python3 -m venv venv
$ venv/bin/pip install requests
$ venv/bin/pip list
Package            Version
------------------ ---------
certifi            2021.10.8
charset-normalizer 2.0.12
idna               3.3
pip                22.0.4
requests           2.27.1
setuptools         58.1.0
urllib3            1.26.9

$ python3 -m venv venv
$ venv/bin/pip list
Package            Version
------------------ ---------
certifi            2021.10.8
charset-normalizer 2.0.12
idna               3.3
pip                22.0.4
requests           2.27.1
setuptools         58.1.0
urllib3            1.26.9
In this code example, you first created a virtual environment called venv, then used the environment-internal pip executable to install requests into the site-packages directory of your virtual environment. You then used pip list to confirm that it had been installed, together with its dependencies.
In the highlighted line, you attempted to create another virtual environment using the same name, venv.
You might expect venv to notify you that there’s an existing virtual environment on the same path, but it doesn’t. You might expect venv to automatically delete the existing virtual environment with the same name and replace it with a new one, but it doesn’t do that either. Instead, when venv finds an existing virtual environment of the same name on the path you provided, it doesn’t do anything—and again, it doesn’t communicate this to you.
If you list the installed packages after running the virtual environment creation command a second time, then you’ll notice that requests and its dependencies still show up. This might not be what you want to achieve.
Rather than navigating to your virtual environment folder and deleting it first, you can explicitly overwrite an existing virtual environment using --clear:
- Windows
- Linux + macOS
PS> python -m venv venv
PS> venvScriptspip.exe install requests
PS> venvScriptspip.exe list
Package            Version
------------------ ---------
certifi            2021.10.8
charset-normalizer 2.0.12
idna               3.3
pip                22.0.4
requests           2.27.1
setuptools         58.1.0
urllib3            1.26.9

PS> python -m venv venv --clear
PS> venvScriptspip.exe list
Package    Version
---------- -------
pip        22.0.4
setuptools 58.1.0
$ python3 -m venv venv
$ venv/bin/pip install requests
$ venv/bin/pip list
Package            Version
------------------ ---------
certifi            2021.10.8
charset-normalizer 2.0.12
idna               3.3
pip                22.0.4
requests           2.27.1
setuptools         58.1.0
urllib3            1.26.9

$ python3 -m venv venv --clear
$ venv/bin/pip list
Package    Version
---------- -------
pip        22.0.4
setuptools 58.1.0
Using the same example as before, you added the optional --clear argument when running the creation command the second time.
You then confirmed that Python automatically discarded the existing virtual environment with the same name and created a new default virtual environment without the previously installed packages.
Create Multiple Virtual Environments at Once
If one virtual environment isn’t enough, you can create multiple separate virtual environments in one go by passing more than one path to the command:
- Windows
- Linux
- macOS
PS> python -m venv venv C:UsersNameDocumentsvirtualenvsvenv-copy
$ python3 -m venv venv /home/name/virtualenvs/venv-copy
$ python3 -m venv venv /Users/name/virtualenvs/venv-copy
Running this command creates two separate virtual environments in two different locations. These two folders are independent virtual environment folders. Passing more than one path therefore just saves you the effort of typing the creation command more than once.
In the example shown above, you might notice that the first argument, venv, represents a relative path. Conversely, the second argument uses an absolute path to point to a new folder location. Either option works when creating a virtual environment. You can even mix and match, as you did here.
You’re also not limited to creating two virtual environments at once. You can pass as many valid paths as you want, separated by a whitespace character. Python will diligently set up a virtual environment at each location, even creating any missing folders on the way.
Update the Core Dependencies
When you’ve created a Python virtual environment using venv and its default settings and then installed an external package using pip, you’ve most likely encountered a message telling you that your installation of pip is outdated:
- Windows
- Linux + macOS
WARNING: You are using pip version 21.2.4; however, version 22.0.4 is available.
You should consider upgrading via the
'C:UsersNamepathtovenvScriptspython.exe -m pip install --upgrade pip' command.
WARNING: You are using pip version 21.2.4; however, version 22.0.4 is available.
You should consider upgrading via the
'/path/to/venv/python -m pip install --upgrade pip' command.
It can be frustrating to create something new just to see that it’s already outdated! Why does this happen?
The installation of pip that you’ll receive when creating a virtual environment with the default configuration of venv is likely outdated because venv uses ensurepip to bootstrap pip into your virtual environment.
ensurepip intentionally doesn’t connect to the Internet, but instead uses a pip wheel that comes bundled with each new CPython release. Therefore, the bundled pip has a different update cycle than the independent pip project.
Once you install an external package using pip, the program connects to PyPI and also identifies if pip itself is outdated. If pip is outdated, then you’ll receive the warning shown above.
While using the bootstrapped version of pip can be helpful in some cases, you might want to have the latest pip to avoid potential security issues or bugs that might still be around in an older version. For an existing virtual environment, you can follow the instructions that pip prints to your terminal and use pip to upgrade itself.
If you want to save the effort of doing this manually, you can specify that you want pip to contact PyPI and update itself right after installation by passing the --upgrade-deps argument:
- Windows
- Linux + macOS
PS> python -m venv venv --upgrade-deps
PS> venvScriptsactivate
(venv) PS> python -m pip install --upgrade pip
Requirement already satisfied: pip in c:usersnamepathtovenvlibsite-packages (22.0.4)
$ python3 -m venv venv --upgrade-deps
$ source venv/bin/activate
(venv) $ python -m pip install --upgrade pip
Requirement already satisfied: pip in ./venv/lib/python3.10/site-packages (22.0.4)
Suppose you use the optional --upgrade-deps argument when creating your virtual environment. In that case, it’ll automatically poll PyPI for the newest versions of pip and setuptools and install them if the local wheel isn’t up-to-date.
Gone is that pesky warning message, and you can rest assured that you’re using the most recent version of pip.
Avoid Installing pip
You might wonder why it takes a while to set up a Python virtual environment when all it does is create a folder structure. The reason for the time delay is mainly the installation of pip. pip and its dependencies are large and blow up the size of your virtual environment from a few kilobytes to many megabytes!
In most use cases, you’ll want to have pip installed in your virtual environment because you’ll probably use it to install external packages from PyPI. However, if you don’t need pip for whatever reason, then you can use --without-pip to create a virtual environment without it:
- Windows
- Linux
- macOS
PS> python -m venv venv --without-pip
PS> Get-ChildItem venv | Measure-Object -Property length -Sum

Count    : 1
Average  :
Sum      : 120
Maximum  :
Minimum  :
Property : Length
$ python3 -m venv venv --without-pip
$ du -hs venv
52K venv
$ python3 -m venv venv --without-pip
$ du -hs venv
28K venv
Your virtual environment still does everything that qualifies it as a virtual environment by providing lightweight isolation with a separate Python executable.
To work with a virtual environment that doesn’t have pip installed, you can manually install packages into your site-packages directory or place your ZIP files in there then import them using Python ZIP imports.
Include the System Site-Packages
In some situations, you might want to keep access to your base Python’s site-packages directory instead of severing that tie. For example, you might have already set up a package that’s compiled during installation, such as Bokeh, in your global Python environment.
Bokeh happens to be your data exploration library of choice, and you use it for all your projects. You still want to keep your clients’ projects in separate environments, but installing Bokeh into each of these can take a couple of minutes each. For quick iteration, you instead want to have access to the existing Bokeh installation without needing to redo it for every virtual environment you create.
You can access all modules you’ve installed to your base Python’s site-packages directory by adding the --system-site-packages flag when creating your virtual environment.
Create a new virtual environment while passing this argument. You’ll see that in addition to your local site-packages directory, the path to your base Python’s site-packages directory will stick around in sys.path.
To test this, you can create and activate a new virtual environment using the --system-site-packages argument:
- Windows
- Linux + macOS
PS> python -m venv venv --system-site-packages
PS> venvScriptsactivate
(venv) PS>
$ python3 -m venv venv --system-site-packages
$ source venv/bin/activate
(venv) $
Once again, you’ve created a new virtual environment named venv, but this time you passed the --system-site-packages argument. Adding this optional argument resulted in a different setting in your pyvenv.cfg file:
- Windows
- Linux
- macOS
home = C:UsersNameAppDataLocalProgramsPythonPython310
include-system-site-packages = true
version = 3.10.3
home = /usr/local/bin
include-system-site-packages = true
version = 3.10.3
home = /Library/Frameworks/Python.framework/Versions/3.10/bin
include-system-site-packages = true
version = 3.10.3
Instead of sporting the default value of false, the include-system-site-packages configuration is now set to true.
This change means that you’ll see an additional entry to sys.path, which allows the Python interpreter in your virtual environment to also access the system site-packages directory. Make sure your virtual environment is active, then start the Python interpreter to check the path variables:
- Windows
- Linux
- macOS
>>>
>>> import sys
>>> from pprint import pp
>>> pp(sys.path)
['',
 'C:\Users\Name\AppData\Local\Programs\Python\Python310\python310.zip',
 'C:\Users\Name\AppData\Local\Programs\Python\Python310\DLLs',
 'C:\Users\Name\AppData\Local\Programs\Python\Python310\lib',
 'C:\Users\Name\AppData\Local\Programs\Python\Python310',
 'C:\Users\Name\path\to\venv',
 'C:\Users\Name\path\to\venv\lib\site-packages',
 'C:\Users\Name\AppData\Roaming\Python\Python310\site-packages',
 'C:\Users\Name\AppData\Local\Programs\Python\Python310\lib\site-packages']
>>>
>>> import sys
>>> from pprint import pp
>>> pp(sys.path)
['',
 '/usr/local/lib/python310.zip',
 '/usr/local/lib/python3.10',
 '/usr/local/lib/python3.10/lib-dynload',
 '/home/name/path/to/venv/lib/python3.10/site-packages',
 '/home/name/.local/lib/python3.10/site-packages',
 '/usr/local/lib/python3.10/site-packages']
>>>
>>> import sys
>>> from pprint import pp
>>> pp(sys.path)
['',
 '/Library/Frameworks/Python.framework/Versions/3.10/lib/python310.zip',
 '/Library/Frameworks/Python.framework/Versions/3.10/lib/python3.10',
 '/Library/Frameworks/Python.framework/Versions/3.10/lib/python3.10/lib-dynload',
 '/Users/name/path/to/venv/lib/python3.10/site-packages',
 '/Library/Frameworks/Python.framework/Versions/3.10/lib/python3.10/site-packages']
The highlighted lines show the additional paths present in a virtual environment when you’ve created it using --system-site-packages. They point to the site-packages directories of your base Python installation and give the interpreter inside your virtual environment access to these packages.
Copy or Link Your Executables
Whether you receive a copy or a symlink of your Python binaries depends on the operating system that you’re working with:
- Windows may create either a symlink or a copy, but some versions don’t support symlinks. Creating symlinks might require you to have administrator privileges.
- Linux distributions may create either a symlink or a copy and often opt for symlinks over copies.
- macOS always creates a copy of the binaries.
PEP 405 mentions the advantages of creating symlinks:
Symlinking is preferable where possible because, in the case of an upgrade to the underlying Python installation, a Python executable copied in a venv might become out-of-sync with the installed standard library and require manual upgrade. (Source)
While it can be helpful to symlink the executables so that they’ll automatically stay in sync even if you upgrade your base Python installation, the added flimsiness of this approach may outweigh its benefit. For example, when you double-click python.exe in Windows, the operating system will eagerly resolve the symlink and ignore your virtual environment.
Most likely, you won’t ever have to touch these arguments, but if you have a good reason for attempting to force either symlinks or copies over your operating system’s default, then you can do so:
--symlinkswill attempt to create symlinks instead of copies. This option won’t have any effect on macOS builds.--copieswill attempt to create copies of your Python binaries instead of linking them to the base Python installation’s executables.
You can pass either one of these optional arguments when creating your virtual environment.
Upgrade Your Python to Match the System Python
If you’ve built your virtual environment using copies rather than symlinks and later updated your base Python version on your operating system, you might run into a version mismatch with standard library modules.
The venv module offers a solution to this. The optional --upgrade argument keeps your site-packages directory intact while updating the binary files to the new versions on your system:
- Windows
- Linux + macOS
PS> python -m venv venv --upgrade
$ python3 -m venv venv --upgrade
If you run this command and you’ve updated your Python version since initially creating the virtual environment, then you’ll keep your installed libraries, but venv will update the executables for pip and Python.
In this section, you’ve learned that you can apply a lot of customization to the virtual environments that you build with the venv module. These adaptations can be pure convenience updates, such as naming your command prompt differently from your environment folder, overwriting existing environments, or creating multiple environments with a single command. Other customizations create different functionality in your virtual environments by, for example, skipping the installation of pip and its dependencies, or linking back to the base Python’s site-packages folder.
But what if you want to do even more than that? In the next section, you’ll explore alternatives to the built-in venv module.
What Other Popular Options Exist, Aside From venv?
The venv module is a great way to work with Python virtual environments. One of its main advantages is that venv comes preinstalled with Python starting from version 3.3. But it isn’t the only option you have. You can use other tools to create and handle virtual environments in Python.
In this section, you’ll learn about two popular tools. They have different scopes but are both also commonly used for the same purpose as the venv module:
- Virtualenv is a superset of
venvand provides the basis for its implementation. It’s a powerful, extendable tool for creating isolated Python environments. - Conda offers package, dependency, and environment management for Python and other languages.
They have some advantages over venv, but they don’t come with your standard Python installation, so you’ll have to install them separately.
The Virtualenv Project
Virtualenv is a tool that was specifically made for creating isolated Python environments. It’s been a long-time favorite within the Python community and precedes the built-in venv module.
The package is a superset of venv, which allows you to do everything that you can do using venv, and more. Virtualenv allows you to:
- Create virtual environments more quickly
- Discover installed versions of Python without needing to provide the absolute path
- Upgrade the tool using
pip - Extend the functionality of the tool yourself
Any of these additional functionalities can come in handy when you’re working on your Python projects. You might even want to save a blueprint of your virtualenv in code together with your project to aid reproducibility. Virtualenv has a rich programmatic API that allows you to describe virtual environments without creating them.
After installing virtualenv on your system, you can create and activate a new virtual environment similarly to how you do it using venv:
- Windows
- Linux
- macOS
PS> virtualenv venv
created virtual environment CPython3.10.3.final.0-64 in 312ms
  creator CPython3Windows(dest=C:UsersNamepathtovenv, clear=False, no_vcs_ignore=False, global=False)
  seeder FromAppData(download=False, pip=bundle, setuptools=bundle, wheel=bundle, via=copy, app_data_dir=C:UsersNameAppDataLocalpypavirtualenv)
    added seed packages: pip==22.0.4, setuptools==60.10.0, wheel==0.37.1
  activators BashActivator,BatchActivator,FishActivator,NushellActivator,PowerShellActivator,PythonActivator
PS> Set-ExecutionPolicy Unrestricted -Scope Process
PS> venvScriptsactivate
(venv) PS>
$ virtualenv venv
created virtual environment CPython3.10.3.final.0-64 in 214ms
  creator CPython3Posix(dest=/home/name/path/to/venv, clear=False, no_vcs_ignore=False, global=False)
  seeder FromAppData(download=False, pip=bundle, setuptools=bundle, wheel=bundle, via=copy, app_data_dir=/home/name/.local/share/virtualenv)
    added seed packages: pip==22.0.4, setuptools==60.10.0, wheel==0.37.1
  activators BashActivator,CShellActivator,FishActivator,NushellActivator,PowerShellActivator,PythonActivator
$ source venv/bin/activate
(venv) $
$ virtualenv venv
created virtual environment CPython3.10.3.final.0-64 in 389ms
  creator CPython3Posix(dest=/Users/name/path/to/venv, clear=False, no_vcs_ignore=False, global=False)
  seeder FromAppData(download=False, pip=bundle, setuptools=bundle, wheel=bundle, via=copy, app_data_dir=/Users/name/Library/Application Support/virtualenv)
    added seed packages: pip==22.0.4, setuptools==60.10.0, wheel==0.37.1
  activators BashActivator,CShellActivator,FishActivator,NushellActivator,PowerShellActivator,PythonActivator
$ source venv/bin/activate
(venv) $
Like with venv, you can pass a relative or an absolute path and name your virtual environment. Before working in your virtualenv, you’ll usually activate it using one of the provided scripts.
There are two main user advantages with virtualenv over venv:
- Speed: Virtualenv creates environments much more quickly.
- Updates: Thanks to virtualenv’s embedded wheels, you’ll receive up-to-date
pipand setuptools without needing to connect to the Internet right when you first set up the virtual environment.
If you need to work with legacy versions of Python 2.x, then virtualenv can also be helpful for that. It supports building Python virtual environments using Python 2 executables, which isn’t possible using venv.
If you’re just getting started with virtual environments in Python, then you may want to stick with the built-in venv module. However, if you’ve used it for a while and you’re bumping into the tool’s limitations, then it’s a great idea to get started using virtualenv.
The Conda Package and Environment Manager
Conda gives you an alternative package and environment management approach. While the tool is primarily associated with the data science community and the Anaconda Python distribution, its potential use cases extend beyond that community and beyond just installing Python packages:
Package, dependency and environment management for any language—Python, R, Ruby, Lua, Scala, Java, JavaScript, C/ C++, FORTRAN, and more. (Source)
While you can also use conda to set up an isolated environment to install Python packages, this is only one feature of the tool:
pip installs python packages within an environment; conda installs any package within conda environments. (Source)
As you may gather from this quote, conda accomplishes this isolation differently from the venv module and virtualenv project.
Conda is its own project that’s unrelated to pip. You can set it up on your system using the Miniconda installer, which brings along the minimal requirements for running conda on your system.
In its default configuration, conda get its packages from repo.anaconda.com instead of PyPI. This alternative package index is maintained by the Anaconda project and is similar PyPI, but not identical.
Because conda isn’t limited to Python packages, you’ll find other, usually data-science-related packages on conda’s package index written in different languages. Conversely, there are Python packages available on PyPI that you can’t install using conda because they aren’t present in that package repository. If you need such a package in your conda environment, then you can instead install it there using pip.
If you’re working in the data science space and with Python alongside other data science projects, then conda is an excellent choice that works across platforms and languages.
After installing Anaconda or Miniconda, you can create a conda environment:
- Windows
- Linux
- macOS
PS> conda create -n <venv-name>
Collecting package metadata (current_repodata.json): done
Solving environment: done

## Package Plan ##

  environment location: C:UsersNameminiconda3envs<venv-name>

Proceed ([y]/n)? y

Preparing transaction: done
Verifying transaction: done
Executing transaction: done
#
# To activate this environment, use
#
#     $ conda activate <venv-name>
#
# To deactivate an active environment, use
#
#     $ conda deactivate
Suppose your standard PowerShell session doesn’t recognize the conda command after successfully installing Anaconda. In that case, you can look for the Anaconda PowerShell Prompt in your programs and work with that one instead.
$ conda create -n <venv-name>
Collecting package metadata (current_repodata.json): done
Solving environment: done

## Package Plan ##

  environment location: /home/name/anaconda3/envs/<venv-name>

Proceed ([y]/n)? y

Preparing transaction: done
Verifying transaction: done
Executing transaction: done
#
# To activate this environment, use
#
#     $ conda activate <venv-name>
#
# To deactivate an active environment, use
#
#     $ conda deactivate
$ conda create -n <venv-name>
Collecting package metadata (current_repodata.json): done
Solving environment: done

## Package Plan ##

  environment location: /Users/name/opt/anaconda3/envs/<venv-name>

Proceed ([y]/n)? y

Preparing transaction: done
Verifying transaction: done
Executing transaction: done
#
# To activate this environment, use
#
#     $ conda activate <venv-name>
#
# To deactivate an active environment, use
#
#     $ conda deactivate
This command creates a new conda environment in a central location on your computer.
To work within your new conda environment, you’ll need to activate it:
- Windows
- Linux + macOS
PS> conda activate <venv-name>
(<venv-name>) PS>
$ conda activate <venv-name>
(<venv-name>) $
After activating the environment, you can install packages from conda’s package repository into that environment:
- Windows
- Linux + macOS
(<venv-name>) PS> conda install numpy
(<venv-name>) $ conda install numpy
The install command installs a third-party package from conda’s package repository into your active conda environment.
When you’re done working in the environment, you’ll have to deactivate it:
- Windows
- Linux + macOS
(<venv-name>) PS> conda deactivate
PS>
(<venv-name>) $ conda deactivate
$
You might notice that the general idea is similar to working with Python virtual environments that you’ve created using venv. The commands differ slightly, but you’ll receive the same benefits of working within an isolated environment that you can delete and re-create when necessary.
If you primarily work on data science projects and already work with Anaconda, then you might never have to work with venv. In that case, you can read more about conda environments and how to work with them effectively on your machine.
If you only have pure-Python dependencies and you haven’t worked with Anaconda before, then you’re better off using the more lightweight venv module directly or giving virtualenv a try.
How Can You Manage Your Virtual Environments?
If you’ve absorbed all the information from the previous sections, but you’re unsure how to handle the multitude of environment folders that have started agglomerating on your system, keep reading here.
In this section, you’ll learn how to extract the essential information of your virtual environment into a single file so that you can quickly delete and re-create your virtual environment folder at any time and on any computer.
You’ll also learn about two different ways of organizing where to keep your virtual environment folders and about some popular third-party tools that can help you manage your virtual environments.
Decide Where to Create Your Environment Folders
A Python virtual environment is just a folder structure. You can place it anywhere on your system. However, a consistent structure can help, and there are two prominent opinions on where to create your virtual environment folders:
- Inside each individual project folder
- In a single location, for example in a subfolder of your home directory
Both of these have merits and disadvantages, and your preference will ultimately depend on your workflow.
In the project-folder approach approach, you create a new virtual environment in the root folder of the project that’ll use this virtual environment for:
project_name/
│
├── venv/
│
└── src/
The virtual environment folder then lives side by side with any code that you’ll write for that project.
This structure has the advantage that you’ll know which virtual environment belongs to which project, and you can activate your virtual environment using a short relative path once you’ve navigated into the project folder.
In the single-folder approach, you keep all your virtual environments in a single folder, for example in a subfolder of your home directory:
- Windows
- Linux
- macOS
C:USERSUSERNAME
│
├── .local
│
├── Contacts
│
├── Desktop
│
├── Documents
│   │
│   └── Projects
│       │
│       ├── django-project
│       │
│       ├── flask-project
│       │
│       └── pandas-project
│
├── Downloads
│
├── Favorites
│
├── Links
│
├── Music
│
├── OneDrive
│
├── Pictures
│
├── Searches
│
├── venvs
│   │
│   ├── django-venv
│   │
│   ├── flask-venv
│   │
│   └── pandas-venv
│
└── Videos
name/
│
├── Desktop/
│
├── Documents/
│   │
│   └── projects/
│       │
│       ├── django-project/
│       │
│       ├── flask-project/
│       │
│       └── pandas-project/
│
├── Downloads/
│
├── Music/
│
├── Pictures/
│
├── Public/
│
├── Templates/
│
├── venvs
│   │
│   ├── django-venv/
│   │
│   ├── flask-venv/
│   │
│   └── pandas-venv/
│
└── Videos/
name/
│
├── Applications/
│
├── Desktop/
│
├── Documents/
│   │
│   └── projects/
│       │
│       ├── django-project/
│       │
│       ├── flask-project/
│       │
│       └── pandas-project/
│
├── Downloads/
│
├── Library/
│
├── Movies/
│
├── Music/
│
├── Pictures/
│
├── Public/
│
├── opt/
│
└── venvs
    │
    ├── django-venv/
    │
    ├── flask-venv/
    │
    └── pandas-venv/
If you use this approach, it could be less effort to keep track of which virtual environments you’ve created. You can go to a single location on your operating system to inspect all virtual environments and decide which ones to keep and which ones to delete.
On the other hand, you won’t be able to activate your virtual environment quickly using a relative path when you’ve already navigated to your project folder. Instead, it’s best to activate it using the absolute path to the activate script in the respective virtual environment folder.
A third option is to leave this decision to your integrated development environment (IDE). Many of these programs include options to automatically create a virtual environment for you when you start a new project.
To learn more about how your favorite IDE handles virtual environments, check out its online documentation on the topic. For example, VS Code and PyCharm have their own approaches to creating virtual environments.
Treat Them as Disposables
Virtual environments are disposable folder structures that you should be able to safely delete and re-create at any time without losing information about your code project.
This means that you generally don’t put any additional code or information into your virtual environment manually. Anything that goes in there should be handled by your package manager, which will usually be pip or conda.
You also shouldn’t commit your virtual environment to version control, and you shouldn’t ship it with your project.
Because virtual environments aren’t entirely self-sufficient Python installations but rely on the base Python’s standard library, you won’t create a portable application by distributing your virtual environment together with your code.
Virtual environments are meant to be lightweight, disposable, and isolated environments to develop your projects in.
However, you should be able to re-create your Python environment on a different computer so that you can run your program or continue developing it there. How can you make that happen when you treat your virtual environment as disposable and won’t commit it to version control?
Pin Your Dependencies
To make your virtual environment reproducible, you need a way to describe its contents. The most common way to do this is by creating a requirements.txt file while your virtual environment is active:
- Windows
- Linux + macOS
(venv) PS> python -m pip freeze > requirements.txt
(venv) $ python -m pip freeze > requirements.txt
This command pipes the output of pip freeze into a new file called requirements.txt. If you open the file, then you’ll notice that it contains a list of the external dependencies currently installed in your virtual environment.
This list is a recipe for pip to know which version of which package to install. As long as you keep this requirements.txt file up to date, you can always re-create the virtual environment that you’re working in, even after deleting the venv/ folder or moving to a different computer altogether:
- Windows
- Linux + macOS
(venv) PS> deactivate
PS> python -m venv new-venv
PS> new-venvScriptsactivate
(new-venv) PS> python -m pip install -r requirements.txt
(venv) $ deactivate
$ python3 -m venv new-venv
$ source new-venv/bin/activate
(new-venv) $ python -m pip install -r requirements.txt
In the example code snippet above, you created a new virtual environment called new-venv, activated it, and installed all external dependencies that you previously recorded in your requirements.txt file.
If you use pip list to inspect the currently installed dependencies, then you’ll see that both virtual environments, venv and new-venv, now contain the same external packages.
Keep in mind that while this is a widespread way to ship dependency information with a code project in Python, it isn’t deterministic:
- Python Version: This requirements file doesn’t include information about which version of Python you used as your base Python interpreter when creating the virtual environment.
- Sub-Dependencies: Depending on how you create your requirements file, it may not include version information about sub-dependencies of your dependencies. This means that someone could get a different version of a subpackage if that package was silently updated after you created your requirements file.
You can’t easily solve either of these issues with requirements.txt alone, but many third-party dependency management tools attempt to address them to guarantee deterministic builds:
requirements.txtusingpip-toolsPipfile.lockusing Pipenvpoetry.lockusing Poetry
Projects that integrate the virtual environment workflow into their features but go beyond that will also often include ways to create lock files that allow deterministic builds of your environments.
Avoid Virtual Environments in Production
You might wonder how to include and activate your virtual environment when deploying a project to production. In most cases, you don’t want to include your virtual environment folder in remote online locations:
- GitHub: Don’t push the
venv/folder to GitHub. - CI/CD Pipelines: Don’t include your virtual environment folder in your continuous integration or continuous delivery pipelines.
- Server Deployments: Don’t set up a virtual environment on your deployment server unless you manage that server yourself and run multiple separate projects on it.
You still want isolated environments and reproducibility for your code projects. You’ll achieve that by pinning your dependencies instead of including the virtual environment folder that you’ve worked with locally.
Most remote hosting providers, including CI/CD pipeline tools and Platform-as-a-Service (PaaS) providers, such as Heroku or Google App Engine (GAE), will automatically create that isolation for you.
When you push your code project to one of these hosted services, the service will often allocate a virtual fraction of a server to your application. Such virtualized servers are isolated environments by design, which means that your code will run in its separate environment by default.
In most hosted solutions, you won’t have to deal with creating the isolation, but you’ll still need to provide the information about what to install in the remote environment. For this, you’ll often use the pinned dependencies in your requirements.txt file.
Most hosted platform providers will also ask you to create a settings file specific to the tool that you’re working with. This file will include information that isn’t recorded in requirements.txt but that the platform needs to set up a functioning environment for your code. You’ll need to read up on these specific files in the documentation of the hosting service that you’re planning to use.
A popular option that takes virtualization to the next level and still allows you to create a lot of the setup yourself is Docker.
Use Third-Party Tools
The Python community has created many additional tools that use virtual environments as one of their features and allow you to manage multiple virtual environments in a user-friendly manner.
Because many tools come up in online discussions and tutorials, you might wonder what each of them is about and how they can help you manage your virtual environments.
While discussing each of them is out of the scope of this tutorial, you’ll get an overview of which popular projects exist, what they do, and where you can learn more:
-
virtualenvwrapper is an extension to the virtualenv project that makes creating, deleting, and otherwise managing virtual environments lower effort. It keeps all your virtual environments in one place, introduces user-friendly CLI commands for managing and switching between virtualenvs, and is also configurable and extensible.
virtualenvwrapper-winis a Windows port of this project. -
Poetry is a tool for Python dependency management and packaging. With Poetry, you can declare packages that your project depends on, similar to
requirements.txtbut deterministic. Poetry will then install these dependencies in an auto-generated virtual environment and help you manage your virtual environment. -
Pipenv aims to improve packaging in Python. It creates and manages virtual environments for your projects using
virtualenvin the back. Like Poetry, Pipenv aims to improve dependency management to allow for deterministic builds. It’s a relatively slow, high-level tool that has been supported by the Python Packaging Authority (PyPA). -
pipx allows you to install Python packages that you’d habitually run as stand-alone applications in isolated environments. It creates a virtual environment for each tool and makes it globally accessible. Aside from helping with code quality tools such as black, isort, flake8, pylint, and mypy, it’s also useful for installing alternative Python interpreters, such as bpython, ptpython, or ipython.
-
pipx-in-pipx is a wrapper you can use for installing pipx that takes the recursive acronym for
pipto the next level by allowing you to install and manage pipx using pipx itself. -
pyenv isn’t inherently related to virtual environments, even though it’s often mentioned in relation to this concept. You can manage multiple Python versions with pyenv, which allows you to switch between a new release and an older Python version that you need for a project you’re working on. pyenv also has a Windows port called pyenv-win.
-
pyenv-virtualenv is a plugin for pyenv that combines pyenv with virtualenv, allowing you to create virtual environments for the pyenv-managed Python versions on UNIX systems. There’s even a plugin to mix pyenv with virtualenvwrapper, called pyenv-virtualenvwrapper.
The Python community built a whole host of third-party projects that can help you manage your Python virtual environments in a user-friendly manner.
Remember that these projects are meant to make the process more convenient for you and aren’t necessary for working with virtual environments in Python.
Conclusion
Congratulations on making it through this tutorial on Python virtual environments. Throughout the tutorial, you built a thorough understanding of what virtual environments are, why you need them, how they function internally, and how you can manage them on your system.
In this tutorial, you learned how to:
- Create and activate a Python virtual environment
- Explain why you want to isolate external dependencies
- Visualize what Python does when you create a virtual environment
- Customize your virtual environments using optional arguments to
venv - Deactivate and remove virtual environments
- Choose additional tools for managing your Python versions and virtual environments
Next time a tutorial tells you to create and activate a virtual environment, you’ll better understand why that’s a good suggestion and what Python does for you behind the scenes.
Watch Now This tutorial has a related video course created by the Real Python team. Watch it together with the written tutorial to deepen your understanding: Working With Python Virtual Environments