Я сегодня подготовил для вас тяжёлый, большой, но очень полезный материал! Я собрал и настроил готовый образ виртуальной машины windows XP на базе Vmware Player.
Бывает ещё виртуальная среда Oracle VM VirtualBox, и вы также можете скачать данный образ на нашем сайте и для VirtualBox, и другие среды, но принципиальной разницы между ними нет.
В этой публикации вы сможете скачать по сути готовую виртуальную машину windows XP SP3, со встроенными, уже установленными в неё некоторыми программами. Там даже работает звук и интернет! Я делал упор на то, чтобы пользователь смог скачать Vmware Player 6, (это сама программа запуска образов виртуальных машин), и сам готовый образ (архив, если быть точным). После чего ему будет достаточно в 1 клик запустить и пользоваться виртуальной машиной:

Вот так будет выглядеть давно забытая windows XP, когда запустите её в Vmware Player 6.
Для чего нужны виртуальные машины?
Виртуальная машина — это целый симулятор компьютера, завёрнутый в окно программы Vmware Player/Virtual box. Т.е. под управлением одного компьютера, в 1 клик запускается ещё один, с совершенно другой операционной системой. Это даёт невероятные и безопасные возможности для тестирования, запуска каких-то скриптов, старых программ, даёт возможность в рамках одного единственного ПК содержать целый парк других ПК, различных по своим параметрам.
Как вы понимаете, чтобы осуществить запуск «компьютера в компьютере» нужны приличные ресурсы. Т.е. слабый компьютер может не потянуть запуск сразу двух компьютеров. Попросту не хватит ресурсов. Но… что касается именно виртуальной Windows XP, то тут как раз исключение из правил, и ресурсов вашей host-машины должно по любому хватить. 🙂 А вот если бы вы захотели запускать виртуальную машину Windows 10 или не дай Бог Windows 11, то это потребовало значительных ресурсов вашего ПК (хост — машины). И не на каждом железе такое возможно было бы осуществить.
Скачать Vmware Player 6
Как вы уже догадались, для того чтобы иметь возможность запускать образы любых виртуальных машин, вы должны скачать и установить так называемую утилиту, программу управления виртуальными машинами, в данном случае, это Vmware Player 6. Почему именно Vmware Player 6, когда на официальном сайте vmware.com есть уже 16-ая версия??
Отвечу. Во-первых, для указанной задачи хватит и Vmware Player 6, которая весит всего 83 Мб. В то время как Vmware Player 16 только один дистрибутив весит более 580 Мб.! В установленном виде намного больше. Кроме того, 16-ая версия куда прожорливее с точки зрения системных ресурсов. Она будет запускаться в 2-3 раза медленнее, и на не очень сильных машинах, таких как intel core i3, будет банально тормозить.
Кроме того, образ самой виртуальной машины в 16-ой версии Vmware Player тут же потребует обновлений и донастроек! Оно вам надо? Впрочем, любители «скачать только самое свежее» всегда есть, и выбор в любом случае за вами. Убедил я вас?) Тогда вот:
Скачать Vmware Player 6
Для тех, у кого по какой-то причине не видна/не работает кнопка, вот прямая ссылка на скачивание: ⏩Скачать vmware Player
Итак, первое действие — это скачивание и установка Vmware Player — программы управления виртуальными машинами на ПК. И оно выполнено! Теперь перейдём с скачиванию самого образа виртуальной машины.
Образ — громко сказано, конечно. 🙂 Это архив .rar, содержащий подготовленные и настроенные файлы, необходимые для запуска и работы виртуальной машины Windows XP. Его необходимо скачать, распаковать в какую-либо папку на вашем ПК, и затем с помощью Vmware Player указать на эту папку один раз, и в дальнейшем программа уже будет «помнить» параметры и пути, и вам останется только пользоваться, впрочем, обо всём по порядку! Поехали:
Скачать готовый образ WindowsXP [4GB]
Зеркало
Скачиваем, распаковываем, не торопимся. Если кнопочка не видна, а такое бывает, то даю прямую ссылку: ⏩ СКАЧАТЬ
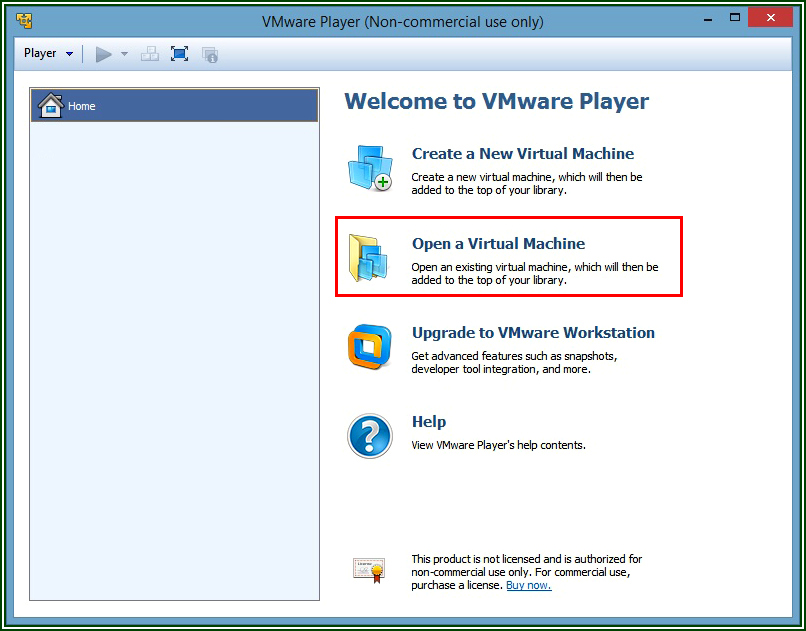
После этого запускаем Vmware Player, и там нажимаем на кпоночку «Open a Virtual Machine». Что можно перевести как «открыть существующую виртуальную машину». Пусть вас не смущает английский интерфейс, букв в принципе в программе не много:
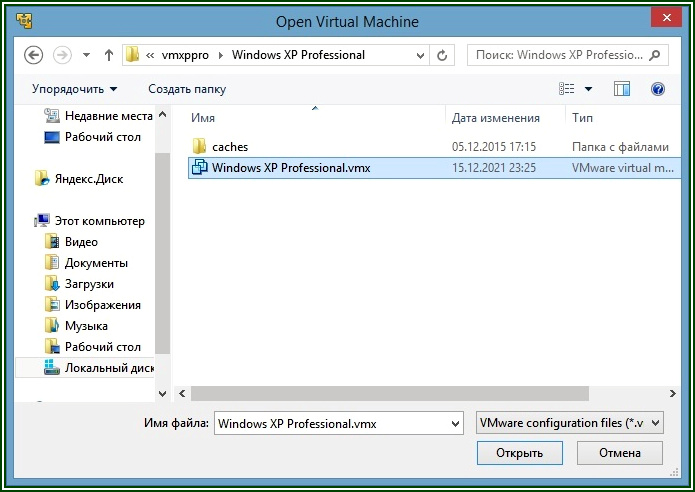
Откроется окно, в котором вы должны будете указать путь до конфигурационного файла скачанной виртуальной машины, смотрим иллюстрацию:
В результате чего в окне Vmware Player тут же появится скачанная вами, подготовленная мной виртуальная машина Windows XP Professional:
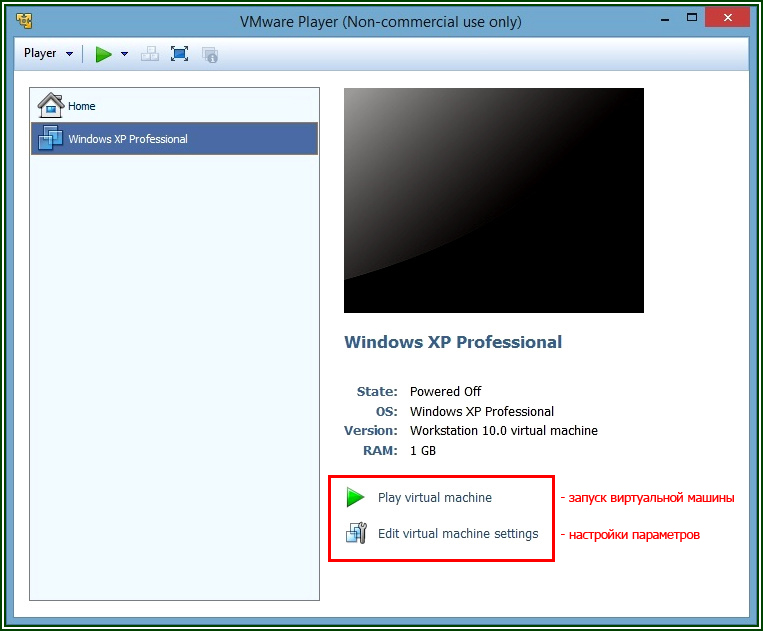
Как видите, всё довольно просто! Теперь Вы можете сделать первый запуск образа, он должен загрузиться довольно быстро. Или же, нажав на «edit virtual machine settings», донастроить под свои нужды параметры данного образа:

Я подчеркнул красным слово NAT на этом скрине не с проста. Это настройка поведения сетевого адаптера внутри образа windows XP. Который подразумевает, что если на машине подключен интернет, то и виртуальная машина сразу же получит доступ в интернет. Впрочем, любые настройки вы можете на этой закладке изменять. Короче, пора поговорить о «начинке» этого образа. 🙂
Настройки образа моей виртуальной машины windows XP SP3
1) Настройка железа:
- Количество оперативной памяти 1 Гб — вполне хватает для работы windows XP;
- Размер дискового пространства 10 Гб;
- CD/DVD — ДА;
- Сетевой адаптер включен в режиме NAT;
- Звуковая карта — авто настройка;
- Принтер — поддерживается;
- Разрешение экрана 1024х768, легко меняется внутри гостевой машины.
2) Установленное в образ программное обеспечение:
- Winrar;
- Microsoft office 2003 + File Format converter, позволяющий открывать .docx;
- Faststone image viewer — для просмотра изображений;
- Notepad ++
- Mozilla firefox ESR.
Обратите внимание, что копировать файлы в гостевую машину можно простым перетаскиванием мышки!
Надеюсь, этот материал кому-то, да пригодится! Удачи!
winxpimage
Windows XP OVA virtual image file to be used on Virtual Box, VmWare.
This image was created for students that are learning pentesting in order to follow many penetratin testing books like «Penetration Testing: A Hands-On Introduction to Hacking». Today is very hard to find Windows XP images or even ISO’s so I had created this to help you out. This is a clean installation. I had created the OVA file right after the Windows XP instalation from the ISO file and this can save you some time.
Disclaimer!
Be careful using this machine as Windwows XP is not support by Microsoft for a long time ago and it’s full of vulnerabilities! Use it with care!
Download Link
Google Drive — https://drive.google.com/file/d/1GrMcl90R36AoQXvJkiTp_npzxV0UESnW/view?usp=sharing
Credentials
There are no credentials. I turned off the guest user and the only existing user is the Administrator. No password.
Windows XP Screenshot

Notes
For any feedback feel free to create an issue here or reach out to me over Twitter — @lucianoferrari
Скачать образ виртуальной машины Windows XP
Специально подготовленный образ для того, чтобы вы имели возможность быстро осуществить свои замыслы. Ибо подготовка образа виртуальной машины занимает некоторое время, и требует кое-каких знаний в области IT.
Так вот, сходу, не каждый человек способен сам изготовить виртуальную машину Windows, не говоря уже про Unix-системы и Mac OS.
Пардон, мы отвлеклись, к делу!

Образ виртуальной машины
Что такое виртуальная машина?
Виртуальная машина – это программная среда, позволяющая в известных рамках эмулировать, имитировать виртуальный компьютер.
Т.е. запуская образ виртуальной машины через определённый софт, мы получаем «компьютер в компьютере».
Например, таким образом можно создать систему, сеть, состоящую из:
- Вашего реального компьютера
- Одного или нескольких виртуальных компьютеров, и решать, например, задачи сетевой игры или тестовые мероприятия.
А теперь представьте, что компьютер у Вас один, а Вы скачали вещи или персонажа для Диабло-2, но «перебросить» их возможно только через сетевую игру. Вот тут – то Вы и вспомните про виртуальную машину!
Но в принципе, как Вы уже догадались, виртуальная машина может понадобиться для решения самых разнообразных задач. От игр до построения сложных систем в рамках ОДНОГО комплекта железа.
Качаем образ Windows XP для Vmware
Параметры предлагаемого НАМИ образа:
— диск HDD около 5 гигов (можно донастроить гибко под себя);
— Vmware tools установлены и настроены, в отличие от кишащих в инете Virtual—box образов, которые голые как стены в недостроенном доме!
— установлены программы, такие как Word, Excel, Winrar, Acrobat, кодеки, Direct—X.
— Скопирована игра Диабло-2 «The Grapes Of Wrath» — можете играть сразу!
Как всегда, мы предлагаем два способа скачивания:
- Скачать по красивой кнопочке:
Скачать образ Windows XP с игрой Diablo-2
- Скачать по прямой ссылке:
>>Прямая ссылка для скачивания
Не забудьте скачать так же Vmware Player! Ибо без неё этот образ просто ничто!
>>Скачать Vmware Player
Само собой разумеется, что с начала скачиваем и устанавливаем себе Vmware Player, а затем из этой программы указываем на скачанный так же образ (образ после распаковки — это папка с файлами по сути) виртуальной машины Windows XP.
Файлы залиты на собственное облачное хранилище, а ни какой-нибудь там file Share, Deposit file или Яндекс-диск, так что проблем со скоростью или доступностью не будет.
К стати, о железе…
Системные требования к компьютеру для VMWARE
Vmware – Эта программная среда, в которой я готовил для Вас образы виртуальной машины Windows XP SP3.
Существуют, конечно, и другие подобные программные среды, но эту я считаю более мощной и профессиональной.
Но запуская у себя по сути «компьютер в компьютере», необходимо учесть, что ресурсов главной машины должно хватать для боле-менее комфортной работы сразу двух (а то и более!) компьютеров в случае использования Vmware.
Тут нет конкретных ограничений, кроме одного: операционная система, в т.ч. разрядность, основного Вашего компьютера должна ПРЕВЫШАТЬ параметры ОС виртуальной машины.
Пример:
Ваш компьютер работает под управлением Windows 7 (32 разрядной версии). А образ виртуальной машины, который Вы пытаетесь запустить – Windows 7 (x64 — разрядной).
В этом случае, запустить образ 64-разрядной машины под управлением 32-разрядной системы не получится никак по техническим причинам.
Второй пример:
У Вас ноутбук, или компьютер, на котором 1 Гбайт оперативной памяти. И система Windows 7 (x64).
Она итак «еле ворочается», а Вы ещё Vmware захотели запустить. В таком случае, работа будет или не возможной, или на столько медленной, что смысл работы теряется ка таковой.
Можно приводить и другие примеры. Но ограничимся этими. Это я к чему?? К тому, что Windows XP наименее требовательна к ресурсам из семейства современных ОС Windows и запустится даже на машинах с относительно слабыми конфигурациями.
Да и большинство игр Windows XP всё ещё держит…
Во всяком случае, в Диабло-2 гарантированно позволит играть)
Теперь вы понимаете почему я остановился над выбором именно Windows XP (х32) когда готовил образ для скачивания.
Всё для вас! И ради вас! Удачи вам всем!
Комментарии времено закрыты..
Table of contents
- Introduction
- Video
- Download Links
- Setting up a Windows XP Virtual Machine
- Extracting the Virtual Hard Disc File
- Adding the Virtual Hard Drive to your Virtual Machine
- Installing Windows XP Mode (Keyboard Only)
- Uninstalling Virtual PC Integration Components
- Installing VMware Tools
- Microsoft Product Activation
- Enabling XP Mode in the Virtual Machines Configuration File
- «30 Day» Trial
- Nested VM
- Windows 10 Host Download
- Windows 7 Guest Download
- Windows 7 Host Download
- Windows XP Guest Download
- Windows 10 Host Download
- Telephone Activation
- Change Key
- Enabling XP Mode in the Virtual Machines Configuration File
Introduction
XP Mode was a free Windows XP Virtual Machine available for Windows 7 Pro, Windows 7 Ultimate and Windows Enterprise Licenses. Unfortunately it required Windows Virtual PC which is far inferior to VMware Workstation Player. This guide will look at downloading the XP Mode Installer from Microsoft and creating a XP Mode Virtual Machine within VMware Workstation Player.
Note this by default will give a virtual machine that lasts for only 30 Days if carried out on Windows 8.1 Pro or Windows 10 Pro. If carried out on Windows 7 Pro, Windows 7 Ultimate or Windows Enterprise there is an official line of code that can be added to the Virtual machines Configuration File to allow Product Activation.
Video
Download Links
Setting up a Windows XP Virtual Machine
Launch VMware Workstation Player:

Select Player → File → New Virtual Machine…

Select I will install the Operating System Later:

Select Microsoft Windows:

You can use the default names given but take a note of the Location as we will need to access it later:

This screen doesn’t matter as we will replace this Virtual Hard Drive with the one from XP Mode. Select Next:

By default VMware will give very poor default hardware. To amend this select Customise Hardware. This guide assumes you are running a modern (5 years old) Windows 10 PC or one of the last PCs that supported Windows 7 (i.e. a 6th Generation Skylake i5/i7 Processor with at least 8 GB of RAM) with Windows 7 Pro.

Change the RAM to 4 GB. Windows XP Mode is a 32 Bit OS and can use up to a maximum of 4 GB.

Change the number of Cores to 2 otherwise the VM will run very slowly:

Most Modern PCs don’t have optical drives so uncheck Connect at Power On:

It is ill advised to connect a >6 Years End of Life OS to the internet. So under Network Adaptor, uncheck Connect at Power On:

There is only support for USB 2.0 on Windows XP:

Leave the Sound Card as default:

Leave the Printer as Default:

Up the Display to 1 GB:

When done select Close:

Select Finish:

Do not Start your Virtual Machine yet:

Install 7-zip and right click the XP Mode Application. Select Open Archive:

Double click the Sources Folder:

Double click the XPM folder:

Single click the VirtualXPVHD and select Extract:

Select OK:


By default the dot is missing in the file name. So right click it and select rename:

Add the . before the VHD file extensionL:

In Windows 10 an icon will appear (this won’t appear in Windows 7 as Windows 7 doesn’t natively recognise VHD files)

Open up your Virtual Machine’s folder and copy this Virtual Hard Drive to it:

Adding the Virtual Hard Drive to your Virtual Machine
Now select Edit Virtual Machine Settings:

Highlight the HardDisk and then select Remove:

Now select Add…

Select Hard Disk and then select Next:

Select IDE and then Next:

Select Use an Existing Virtual Hard Drive and then select Next:

Select Browse:

Change the File Extension to the bottom right to All Files. Then Load your VirtualXP.VHD file:

Select Finish:

Select Convert:

Installing Windows XP Mode (Keyboard Only)
Unfortunately the Virtual Machine has a mouse driver prebundled which doesn’t play with the mouse. As a result you can click into the Virtual Machine but the mouse doesn’t move. The keyboard is however functional. We will need to complete the XP setup using the keyboard only.
The tab [↹], arrows [↓], [↑], enter [↵] and [Esc] keys are your best friends here. You will also need the keyboard combination [+] + [a] to select the license agreement. The keyboard combination [Ctrl] + [Alt] can be used to escape the VM.
The setup will hang with a black screen in couple of cases and you will need to restart the Virtual Machine.
Select the play button.


The Windows XP setup will begin:

Click into the VM. Your mouse will now be stuck:

Press [↹] as you do you will see what you have highlighted is enclosed in a black dotted box:

To accept the License Agreement press [+] + [a]:

Then highlight Next and press [↵]:

By default the VM will be setup for English US. Again press the [↹] to highlight Customise and then select [↵]:

Use the [↑] and [↓] to select your standards and formats:

in this case I will change it to English (United Kingdom):

Press the [↹] to get to the Location and once again use the [↑] or [↓] to go through the options:

When done, use the [↹] to get to OK and press [↵]:

Use the [↹] to get to Details and [↵] to enter the setting:

Once again use the [↓] and [↑] to select your desired option:

Use the [↹] to highlight Ok and press [↵]:

Use the [↹] to highlight Next and press [↵]:

Use the [↹] to highlight the Computer Name and input your Computers name:

Use the [↹] to highlight Next and press [↵]:

Use the [↹] to highlight Time Zone:

Once again use the [↓] and [↑] to select your desired option:

Use the [↹] to highlight Next and press [↵]:

The setup will hang on a black screen. Press [Ctrl] + [Alt] to escape the VM:

Select Player → Power → Restart Guest:

Select Yes:

The setup will continue:

Select [Esc] multiple times to ignore the Found New Hardware Wizards:

Select [Esc] to ignore Automatic Updates:

The setup will complete:

You will be taken to the Windows XP Desktop:

Uninstalling Virtual PC Integration Components
The Virtual PC Integration Components are to blame for the mouse problem and the setup freezing at a black screen. We need to uninstall these.
Press the Windows [⊞] and [r] key to open run. Then type in:
appwiz.cpl
Then press [↵].

To launch Add or remove programs.

Press the [↓] key to highlight Virtual PC Integration Components:

Now press [↹] until Remove is highlighted. Then press [↵]:

Press [↵] to confirm the removal:


Press [↵] to restart the VM:

You will get stuck at a black screen. Press [Ctrl] + [Alt] to escape the VM:

Then select Player → Power → Restart Guest:

Select Yes:

You should be able to use the Mouse in the VM. The default password is left empty:

Close the Found New Hardware Wizard:

To the bottom of the VM select Update Tools (if this yellow balloon at the bottom of the VM does not show select Player → Manage → Install VMware Tools):

The VMware Tools wizard should display. (If not go to the Windows XP VM Computer and launch the setup from the CD). Select Next:

Select Typical and the Next:

Select Install:


To restart select Finish:

Select Yes:

Once the VM has restarted, you should be able to resize it and copy and paste files from the Host PC.


Microsoft Product Activation
Enabling XP Mode in the Virtual Machines Configuration File
It is possible to activate the XP Mode VM if you are running a Windows 7 Pro, Windows 7 Ultimate or Windows 7 Enterprise Host PC. Ensure the Virtual Machine is shut down. Then open up the folder of your Virtual Machine and right click the Virtual Machine’s configuration file and select Edit with Notepad++:

To the bottom add the line:
xpmode.enabled = "TRUE"

Then save the file. Launch the VM as normal and it should be activated (you will get no activation nags and it will work past 30 days).
When the VM is powered down it is recommended to create a copy of the VirtualXP.VHD. Performing an in place update with the copy will allow you to revert to a clean install. You should also considering creating copies of the VirtualXP.VHD once you have installed additional software installed to have a backup in that state. (Copy the entire folder if you are going to move the VM to another Host PC).
Unfortunately this activation mechanism will not work on a Windows 10 Pro Host. Instead you will get this error message:
This system is not allowed to run «Windows XP Mode». The virtual machine will now power off.

«30 Day» Trial
The VM will therefore expire after 30 Days. If Windows XP is Booted and the system clock is past 30 days from the date of initial install. You will be harassed by the following error message:

As a workaround you can create a copy of the VirtualXP.VHD file and create a text file with the date of installation. Then in the Virtual Machine’s configuration file add the line:
bios.bootdelay = 20000
This will allow you to access the VM’s Virtual BIOS Setup when you launch the VM by pressing [F2]:

Then you can change the VM’s system clock to your date of installation:

If the current installation still doesn’t work after the system clock has changed. Then power off your VM and delete the VirtualXP.VHD and replace it with a copy of your copy. This copy will never have experienced the system clock exceeding its upper bound and will remain activated.
Nested VM
It is possible to get around this on powerful hardware with a Windows 10 Pro OEM License by created a Nested VM. Essentially using Windows 10 Pro OEM to invoke downgrades to Windows 7 Pro OEM in a VM and then using the Windows 7 Pro VM to invoke downgrade rights to a Windows XP Mode VM.

Windows 10 Host Download
Windows 7 Guest Download
This VM requires at least 8 GB of RAM, 120 GB Free Space from a SSD, 4 Processor Cores and all Processor Virtualisation options.

The SLIC 2.1 has to be ported to the VM by modifying the VMware configuration file. See my Windows 7 VM Guide for more details:
Windows 7 Host Download
Windows XP Guest Download
The VM can be accessed by using XP Mode Activation as it has a Windows 7 Pro Host.
Telephone Activation
By default the Product won’t be activated leading to a 30 Day Trial. You will see the Windows Wizard for Activation Prompts.

You can select Yes I want to telephone a Customer Service Representative to Activate Windows:

You can then select the region to get the automated phone number:

You can then use the automated phone service to input your Installation ID. Unfortunately it isn’t accepted automatically and you will need to speak to a Microsoft Customer Service Representative. It is at their discretion to allow or decline the Product Activation.

Change Key
Note it is possible to change the Product Key on the Phone Activation Screen. However the XP Mode Installation Media is OEM which means it will reject Retail keys (which are under the correct license agreement to run in a VM).
It will only accept OEM keys for example an old COA from an aging XP Computer. Technically according to the License Agreement you are not allowed to transfer OEM Product Keys however Microsoft may be a bit more lax about activating Windows XP these days in a Virtual environment especially if it moves away from ancient physical hardware and prevents the continued use of the End of Life Windows 7 Pro OS as a Host OS opposed to Windows 10 Pro. As mentioned earlier Product Activation is at Microsoft’s discretion. You will need to contact a Microsoft Customer Service Representative however having a valid XP Product Key may help you to convince them to allow you to activate.
In this article, we will examine how to set up and run Windows XP on a new virtual machine using the VMware Workstation 17 Pro virtualization software on the Windows 10 operating system.

How to Set Up Windows XP Professional 64 Bit SP1 on Windows 10 using VMware Workstation 17
As you know, Windows XP was a popular operating system at the time. Microsoft ended its support for XP completely in 2014. Therefore, it would be a logical choice to use an up-to-date operating system such as Windows 10 on your host computer.
However, since automation machines used in some institutions or organizations were produced in an old date, they need Windows XP or an older operating system to be managed. In case of such need, it is recommended to run systems such as XP on desktop or laptop computers with old hardware.
If you do not have an old computer, of course, you can use old operating systems on virtual machines by using virtualization software such as VMware on your current computer.
Or if you still want to use Windows XP even though it is an old system, as we mentioned, after installing a virtualization program such as VMware, VirtualBox, or Hyper-V on your Windows 10 computer, you can build this system on the virtual machine.
How to Create a New Virtual Machine for Windows XP
Before proceeding with the installation steps, you need to install the VMware virtualization program on your computer. After installation, download the XP ISO file to your host computer by clicking the button below and create a new VM by following the steps below.
Windows XP Pro x86/x64 SP1 ISO + SP2 Installer
Step 1
After installing VMware Workstation 17 Pro on your computer, run the program and click Create a New Virtual Machine on the homepage to set up a new virtual machine, and when the VM wizard opens, tick Custom (Advanced) and click the Next button.

Step 2
In the Choose the Virtual Machine Hardware Compatibility window, select the latest version of the Workstation program you are using. In this window, you will see the version of Workstation Pro currently installed on your computer.
If you are installing on an older version, you will not be able to select 17.x, so update Workstation Pro. Next, select Workstation 17.x for VMware virtual machine compatibility, and then click the Next button.

Step 3
Select I will install the operating system later and click Next as it would be better to create a new virtual machine with advanced settings for the operating system in this step.

Step 4
Since you will install XP on the VM in the Select a Guest Operating System window, first select Microsoft Windows, then select Windows XP Professional from the Version section and click Next.

Step 5
In the Name the Virtual Machine section, type the name of the operating system you will install. In the Location section, if you want to store the virtual machine on a USB 3.0 or 3.1 external disks, configure the relevant location.
To change the installation location of the VM, click the Browse button in this window and select the relevant location in the window that opens.

Step 6
In the Processor Configuration window, configure the number of processors and cores for XP depending on the hardware features of your computer.
If you have a fast PC and for faster installation, you can configure 1 processor and 8 core values to the virtual machine.

Step 7
Likewise, you can assign a 4 GB RAM size to the virtual computer or choose the maximum memory size according to the RAM capacity of your physical computer.

Step 8
If you want to connect to the Internet after installing the virtual operating system, select Bridged or NAT in the Network Type window and click Next.

Step 9
Click the Next button to continue with the LSI Logic option selected by default in the I/O Controller window.

Step 10
In the Select a Disk Type window, select which disk controller you want to install the virtual system with. Here you need to select the SCSI disk type that is selected by default. Because Microsoft has ended its support for XP, SATA disk structure is not supported, but some hosts provide SATA type and USB 3.0 support.
You may also see the warning that XP cannot be installed on the NVMe disk. NVMe is supported by current operating systems as it is a new disk controller.

Step 11
In the Select a Disk window, you can add the system disk you installed earlier or create a new virtual disk here. Additionally, you can use a physical disk in the VM.
For a clean system installation, select Create a new virtual disk and click Next.

Step 12
The recommended virtual disk size for Windows XP Professional is 40 GB. However, if you are only going to use the virtual machine for simple purposes or professional work, it is recommended to configure a disk size of 20 GB or 50 GB.
Also, to back up the virtual machine disk file as a single file type, select Store virtual disk as a single file and click Next.

Step 13
You can change the name and location of the WinXP virtual machine disk file in the Specify Disk File window. However, since you will be installing to an external disk, the disk name refers to the name that will be stored in the installation location.

Step 14
At the final stage of the virtual machine setup, click the Customize Hardware button to add the ISO to the VM and enable virtualization.

Step 15
In the Hardware settings window, click Processors and tick all the options in the Virtualization Engine section.
- Virtualize Intel VT-x/EPT or AMD-V/RVI
- Virtualize CPU Performance Counters
- Virtualize IOMMU (IO Memory Management Unit)

Step 16
Click on the CD/DVD device to add the ISO file to the virtual computer, and then select the Use ISO image file option and click the Browse button.
Select the Windows XP SP1 ISO file you downloaded to your computer and click the Open button.

Step 17
Select USB 2.0 compatibility from the USB Controller device settings.

Step 18
After clicking on the Display device, enable 3D graphics acceleration and configure the Graphics Memory size to a value that your host can support.

Step 19
After completing the necessary preparations, click the Close button to close the hardware settings of the virtual computer.

Step 20
You can now click the Power on this virtual machine button to begin the installation of the virtual XP system.

How to Install Windows XP
After creating and preparing a new VM for Windows XP, the setup wizard will start when you run the VM. You can also install it on a physical computer by following these steps.
Step 1
If you do not have an ISO file with SATA drivers integrated when the Windows Setup wizard opens, you can press the F6 key to install the relevant drivers in this step.
If you have a computer with Windows XP installed, you can Repair your system on this screen. Otherwise, press Enter to install from scratch.

Step 2
After reading the license agreement of the Windows XP Professional system, press the F8 key to accept it.

Step 3
Press the C key to partition the virtual disk. Here you can start the installation directly by pressing the ENTER key.

Step 4
Press Enter to create the entire HDD size you have assigned for the Virtual PC.

Step 5
Press Enter to install XP on the C Partition you created.

Step 6
Format the virtual disk using the NTFS file format. For example, if your physical computer has a hard disk that you have used for a long time, you will extend the health of your disk by doing the formatting process as normal.

Step 7
Wait while Setup formats the virtual disk.

Step 8
Wait while Setup is copying the necessary files for the XP system.

Step 9
After the first stage of the installation wizard is completed successfully, press Enter to restart the virtual system or wait for the timer to expire.

Step 10
Setup will continue when Windows XP restarts.

Step 11
Wait while Setup installs and prepares the necessary devices for installation.

Step 12
When the Regional and Language Options window opens, you can configure the country and time zone you live in by clicking the Customize button. You can also choose your keyboard layout after clicking the Details button.

Step 13
In the Personalize Your Software window, type a name for the user account to be created on your system, and if there is an additional organization you are in, type its name and click Next.

Step 14
In the Your Product Key window, enter the installation key for Windows XP Pro 64 Bit Service Pack 1 and continue.

Step 15
In the Computer Name and Administrator Password window, type a name for your virtual computer and if you want to set a password for the admin account, type your password and click Next.

Step 16
In the Data and Time Settings window, configure the relevant time zone and the date of the installation day according to your location and click Next.

Step 17
In the Networking Settings window, if you are not going to use the VM in a domain environment, check the Typical Settings option which is selected by default, and click Next.

Step 18
In the Workgroup or Computer Domain window, if you are not going to use the VM in a domain environment, select Workgroup and click Next.

Step 19
Wait while the setup wizard configures the remaining settings.

Step 20
After the installation is complete, your Windows XP desktop screen is now ready.

How to Install VMware Tools
After installing Windows XP with VMware, you can build the drivers for devices that are not installed in your virtual system by installing VM Tools on the virtual machine. You can also use the Shared Folder feature, transfer files between the host and the VM, and use the screen resolution as full screen.
Step 1
First, right-click on My Computer, then click Manage, then click Device Manager as in the image below and check the drivers that are not installed in the right section.

Step 2
Click VM / Install VMware Tools from the tool menu to install the drivers for the virtual PC.

Step 3
Wait while VMware Tools prepares for installation on the virtual PC. When the installation wizard opens, click Next to go to the next step.

Step 4
In the Choose Setup Type window, if you want to use the virtual machine on other VMware products later, select Complete and click Next.

Step 5
Click the Install button to start installing all the features of the virtual machine utility.

Step 6
Wait while the video and other hardware drivers of your virtual system are installed.

Step 7
Click Yes to restart your virtual computer and check if the drivers are installed. When you view the Device Manager again, you can now see that drivers such as VMware SVGA II are installed in your virtual system.

Step 8
Click View / Full Screen from the Workstation tool menu and check that your virtual PC is adapted to full screen mode.

Step 9
Create a new text document on your host and when you try to copy it to the virtual machine with drag and drop, you can see that the file transfer was successful.
Also, open the Internet Explorer browser and visit Google, and you can see that the Internet connection is working fine.

How to Configure Shared Folder
The biggest advantage of creating a Shared Folder in virtual machines is to facilitate file transfer between the host and the VM. When you copy a file with the Drag and Drop method, this process may take some time, but the process will be faster when you copy a file of the same size using the Shared Folder feature.
Step 1
Click VM / Settings from the menu of Workstation Pro to open the properties of the virtual machine you have installed.
When the Virtual Machine Settings window opens, click the Options tab and then click Shared Folders. In the Folder Sharing section, check Always Enabled to enable this feature, and also select “Map as a network drive in Windows Guests” to configure it as a network drive, and then click the Add button.
When the Shared Folder Wizard opens, click Next directly.

Step 2
In this window, select the folder you want to share, type a name and click Next.

Step 3
In order to make the folder you added available for sharing in the folder properties window, enable sharing by ticking “Enable this share” and click Finish.
After editing the path of the shared folder, close the VM settings.

Step 4
When you check the Shared Folder on my computer, check that it is active in the Network Drives section.

Step 5
When you open the folder added as a network drive, you can see that you can access the related files.
Additionally, click Add a network place from the options under Network Tasks to add the shared folder to My Network Places. Click Next when the add network location wizard opens.
Double-click on Choose another network location or click Next when the relevant option is selected. Open the vmware-host content by clicking the Browse button in the Internet or Network Address section, select Shared Folders and click OK.
To access Shared Folders over the network, click Next after selecting the location and click Finish to close The Add Network Place Wizard.
Click My Network Places and check the location you added in the Local Network window. You can see that you can access the files when you view the Shared Folder content over the network.

How to Use USB Flash Memory
Instead of using the Shared Folder feature to transfer files, a faster solution is the use of USB flash memory.
Step 1
Insert a flash memory into one of the free USB ports of your host computer and create a folder named Backup, for example.

Step 2
To connect the USB disk to the virtual machine, click VM / Removable Devices / Name of your USB / Connect from the tool menu.

Step 3
When USB drivers are automatically installed in your virtual system, you can access your USB and see the folders and files you have created in it.

How to Install Windows XP SP2 Software Package (Upgrade SP1 to SP2)
To upgrade Windows XP 64 Bit SP1 to SP2, you can both install from scratch with an ISO file with SP2 files integrated, and install only the SP2 software package.
Step 1
To add the Windows XP SP2 ISO image to the virtual machine, right-click on the DVD device and click Settings. With the CD/DVD device selected, click the Browse button to add the SP2 ISO location to the Use ISO Image File section.
Select the Windows XP SP2 Installer.iso file and click the Open button. To enable the DVD device, check the Device Status option and click the OK button to close the window.
")
Step 2
When the Service Pack 2 ISO image is automatically mounted to the system, you will automatically see the Readme page. Close the Readme.HTM webpage and open My Computer. To view the contents of the ISO image mounted in the Removable Storage section, click the right button and then click Open.
Right-click / Open the SRSP2 file in the CD/DVD media to start the installation.

Step 3
Click Next in the Windows x64 Service Pack 2 wizard.

Step 4
Check “I Agree” to accept the Service Pack 2 license agreement and click Next.

Step 5
Click Next in the Select Options window without changing the Uninstall Folder location.

Step 6
Wait while Windows XP Service Pack 2 is being installed. The system update period may take some time, so do not do anything on your system.
After installing Service Pack 2, restart your virtual system by clicking the Finish button.

Step 7
After right-clicking on my computer, click System Properties and you can check the Service Pack version in the System: section of the window that opens.

How to Delete the Virtual Machine
If you decide not to use the guest machines that you have prepared with VMware on your physical computer, we recommend that you completely delete the VM files from your host disk.
Right-click on your guest system from the left panel of Workstation Pro, then click Manage / Delete From Disk, and as soon as you click Yes in the warning window that opens, all VM files will be completely deleted from your host disk.

Video
Installing Old Versions
You can easily install and use Windows XP operating system on 12, 14, 15, or 16 versions of Workstation Pro.
Workstation Pro
YouTube Video
Slide
Related Articles
♦ How to Install Windows 7 with VMware
♦ How to Install Windows 10 with VMware
♦ How to Install Windows 8 with VMware
♦ How to Install Windows Vista with VMware
♦ How to Install Windows 98 with VMware
Microsoft уже несколько лет раздаёт бесплатные виртуальные машины с Windows XP, Vista и 7 для тестирования веб-сайтов на старых версиях браузера Internet Explorer.
Все образы укомплектованы соответствующей версией IE и апдейтами безопасности. Для XP установлены апдейты до октября 2012 года, для остальных — до марта 2011 года. В остальном — это чистая свежая инсталляция Windows без особенных модификаций. Образы в формате VHD можно загрузить в Microsoft Virtual PC или другой пакет виртуализации. Самораспаковывающиеся архивы RAR для удобства скачивания разбиты на части по 700 МБ.
Windows_XP+ IE6: 415,5 МБ
Windows Vista + IE7: часть 1, часть 2, часть 3, часть 4, часть 5, часть 6
Windows 7 + IE8: часть 1, часть 2, часть 3, часть 4
Windows 7 + IE9: часть 1, часть 2, часть 3, часть 4, часть 5, часть 6, часть 7
Пароль для авторизации во все системы одинаковый: Password1.
Сразу после запуска Windows 7 или Windows Vista они попросит ввести ключ активации. В соответствии с инструкцией Microsoft, можно дважды продлевать пробный период на 30 дней с помощью команды slmgr –rearm, или просто закрыть виртуальную машину без сохранения и запустить заново. В этом случае, технически, вы каждый раз загружаете основной образ с неограниченным сроком действия лицензии, хотя любые сохранения придётся аннулировать максимум через 90 дней.
Дополнительно: инструкция по загрузке этих виртуальных машин в VirtualBox под OSX или Linux.
Автор: Unix от 25-09-2012, 20:26, Посмотрело: 13 497, Обсуждения: 0

Стадия разработки : Release
Год/Дата Выпуска: 2012
Версия: Embedded 2009
prog_build: SP3
Разработчик: [email protected] aleks200059
Разрядность: 32bit
Язык интерфейса: Английский + Русский
Таблэтка: Вылечено
Системные требования: Стандартные требования для установки Windows XP загрузочный USB порт VirtualBox VMWare виртуальные машины на любой операционной системе (линукс виндовс и т.д.)
Описание: Сборка в минимально возможном размере и комплектации назначением постановки на внешние устройства через USB 2.0 (usb-hdd флешка и т.д) а также обычная установка на компьютеры в режиме IDE
Возможна установка на AHCI режимы при постановке образа с применением возможности restore в acronis
Система обновлена имеет в своем составе фремворки по 3.5 SP1 включительно директх firefox vlc 2.0.1
Раздача на основе Win 7 PE имеющим в своем составе acronis для разворачивания образа системы.
Размер системы после установки 1.1 гб
(возможно уменьшение до 1гб убрав комплект поставленных драйверов.
MD5: 9c3a1a624ae8a37f988c9b44456aeda5
Скриншоты:


©Torrent-Soft.Pro


Загрузил: Unix (25 сентября 2012 20:26)
Взяли: 3031 | Размер: 1,18 Gb
Последняя активность: 21 марта 2016 15:42
![]() ALeks200059 Windows XP Micro.iso (1,18 Gb)
ALeks200059 Windows XP Micro.iso (1,18 Gb)
- 40
- 1
- 2
- 3
- 4
- 5
Категория: OC / Windows XP
Уважаемый посетитель, Вы зашли на сайт как незарегистрированный пользователь.
Мы рекомендуем Вам зарегистрироваться либо войти на сайт под своим именем.
Стремительное развитие программных продуктов зачастую становится причиной несовместимости устанавливаемых компонентов с операционной системой. Новая «операционка» вряд ли захочет работать в паре, скажем, с устаревшей игрой, для которой максимальные системные требования останавливаются на Windows XP. Подобная ситуация возникает не только с игровым софтом, но и с программным. Обновленные версии программ, конечно же, будут дорабатываться до последней операционной системы, но как быть с ПО, чья разработка уже завершилась, а пользователю просто необходимо его установить?
К счастью, решение подобной проблемы не требует кардинальных изменений, предполагающих перехода на более старую версию Windows. Эмулятор Windows XP — вот, что действительно поможет «обойти» подобную несовместимость. Как им воспользоваться? Расскажем в нашей статье.
Системные требования для эмулятора
Изначально эмулятор Windows ХР был создан исключительно для систем Windows 7 Максимальная , Windows 7 Профессиональная и Windows 7 Корпоративная , однако, пользователи сети подтвердили его совместимость и с 8, и с 10 версиями операционки.
Сама среда XP mode занимает на жестком диске не более 2 ГБ, однако для установки виртуальной машины Windows понадобится еще 15.
Обратите внимание: дальнейшая инструкция актуальна, если персональный компьютер поддерживает технологии AMD-V™, Intel® VT или VIA® VT.
Критерии выбора объема оперативной памяти
На следующем этапе потребуется указать объем оперативной памяти, необходимый для работы. Тут нужно быть осторожным. Например, если потребуется тестировать одну-две не слишком ресурсоемких программы, можно поставить минимум в 192 Мб.

Если же пользователь хочет избежать «притормаживания», лучше использовать либо 512 Мб, либо 1024 Мб. Правда, следует принимать во внимание возможности своей системы, так что особо завышать планку не рекомендуется, а то при включенной виртуальной машине и основная система начнет тормозить.
Подготовительные мероприятия
Для того, чтобы воспользоваться средой, перейдите по ссылке.
В открывшейся вкладке выберите русский язык и нажмите «скачать».
Далее следуйте инструкции:
- сохраните файл WindowsXPMode_ru-ru.exe (размер: 447 МБ), запустите его,
- в открывшемся окне отобразится список файлов устанавливаемой среды, найдите среди них папку «sources»,
- в указанной папке отыщите файл «xpm» и откройте его при помощи архиватора WinRAR или аналога,
- каталог запущенной папки будет включать множество наименований, но понадобится только один — VirtualXPVHD. Перенесите его в любую папку, которая в последствии не будет переименовываться (желательно создать новую) и добавьте в названии файла расширение *.vhd,
- скачайте бесплатную программу VirtualBox по ссылке: https://www.virtualbox.org/. В настоящее время доступна версия 6.1. При установке следуйте указаниям программы.
Microsoft Hyper-V
Диспетчер виртуальных машин Hyper-V — это встроенный компонент операционных систем всех редакций Windows 7-10, за исключением начальной и домашних. Если разобраться, он не хуже и не сложнее, чем два рассмотренных выше, просто некоторые пользователи ничего не знают о его существовании и только поэтому предпочитают сторонний софт.
Чтобы активировать диспетчер Hyper-V, зайдите в раздел приложений панели управления Windows, щелкните «Включение и выключение компонентов Виндовс» и в открывшемся окошке о.

Перезагрузите компьютер, откройте поиск и с его помощью запустите диспетчер Hyper-V.
- Для создания новой ВМ в панели диспетчера «Действия» нажмите «Создать» — «Виртуальная машина».

- Дайте новой виртуальной машине имя.

- Определите ее поколение — 1 (старое, к которому относится Windows XP и все 32-битные системы) или 2 (новое — 64-битные Windows 7, 8.1 или 10).

- Выделите виртуальной машине оперативную память. Флажок «Динамическая» позволит основной ОС использовать часть памяти, которая не задействована гостевой ОС, для своих нужд. Этой полезной возможности, кстати, нет ни в Virtualbox, ни в VMware.

- Настройки сети отложим на потом. Оставим по умолчанию «Нет подключения».

- Далее определим размер, расположение виртуального диска и назначаем ему имя.

- Последний шаг — параметры установки гостевой ОС. Укажем месторасположение носителя с дистрибутивом или файла образа iso. Либо отложим установку Виндовс на другое время. После нажатия кнопки «Готово» виртуальная машина будет создана, а вслед за этим запустится инсталляция операционной системы. Ее ход тоже ничем не отличается от установки ОС на реальный компьютер.

Список всех виртуальных машин Hyper-V отображается в средней части окна диспетчера. Чтобы запустить любую из них, кликните 2 раза по ее имени. В окошке, которое откроется после этого, нажмите кнопку «Пуск».

Чтобы виртуальные машины Hyper-v могли подключаться к Интернету, запустите через панель «Действия» диспетчер виртуальных коммутаторов. Выберите в показанном ниже списке тип сети «Внешняя» и нажмите «Создать виртуальный коммутатор». Сети «Внутренняя» и «Частная» предназначены для соединения виртуальных компьютеров между собой, и большинству пользователей не нужны.

На следующей странице обычно ничего менять не требуется, кроме, если хотите, имени подключения. В выпадающем списке «Внешняя сеть» должен быть указан сетевой адаптер физического компьютера, который соединен с роутером или кабелем интернет-провайдера. Ниже должен стоять флажок «Разрешить управляющей ОС предоставлять общий доступ к адаптеру» (т. е. к Интернету).

Кстати, Hyper-v поддерживает не только операционные системы семейства Windows, но и некоторых конкурентов, в частности, Linux и FreeBSD. Полный список всех совместимых с ним платформ, а также условия их использования в среде Windows, приведены на сайте MSDN.microsoft.
Некоторые опции виртуальных машин Hyper-V
Чтобы сделать снимок состояния запущенной гостевой ОС, Откройте верхнее меню ее окна «Действие» и щелкните «Контрольная точка». Либо нажмите комбинацию Ctrl+N.
Доступ к настройкам отдельной виртуальной машины открывается из ее контекстного меню в списке главного окна диспетчера и скрывается за кнопкой «Параметры».
Прочие возможности программы тоже весьма незамысловаты и осваиваются без особого труда.
Другие статьи сайта
- Чем открыть файл fb2 на компьютере?
- Лучшие программы для автоматического обновления драйверов Windows
- Лучшие бесплатные программы для чистки и оптимизации компьютера
- Программы и онлайн-сервисы для просмотра файлов XML
Перечисленные пункты инструкции были лишь подготовительными, далее начинаем создавать виртуальную машину XP в следующем порядке:
- запускаем VirtualBox,
- кликаем в поле «Новое»,
- заполняем поле Имя (можно вписать любое),
- в разделе тип выбираем Microsoft Windows,
- далее в поле «Версия» ставим XP (32-bit),
- переходим во вкладку «Диск» и там через каталог ищем ранее скачанный и пересохраненный файл с расширением *.vhd,
- нажимаем «создать».
Теперь в программе VirtualBox после всех манипуляций появится виртуальная машина с заданным именем. Для ее запуска необходимо выбрать ее одним кликом мыши, а затем в верхней части эмулятора нажать кнопку «Start». Запуск операционной системы Windows XP начнется сразу же.
Обратите внимание: в некоторых версиях виртуальных машин некорректно распознается мышь персонального компьютера и воспользоваться ею при старте операционки не представится возможным. Таким образом, все начальные настройки системы придется выполнять посредством кнопок навигации на клавиатуре.
Также стоит отметить, что установка и запуск устаревших программ, поддерживаемых исключительно в Windows XP должны происходить исключительно в оболочке VitrualBox.
VMware Workstation Pro
VMware Workstation pro — не менее функциональный продукт, чем Vrtualbox, но рассчитанный на профессиональное применение и интеграцию с другими сервисами производителя. Не бесплатный и довольно дорогостоящий, однако тоже очень популярный у домашних пользователей Windows.
Бесплатная версия VMware для личного использования тоже существует. Это VMware Workstation Player, но малая функциональность, сильно уступающая даже некоммерческому Vrtualbox, отвернула от него любовь наших сограждан.
Полноценный VMware Workstation Pro, с которым мы будем знакомиться сегодня, как и конкурент, поддерживает массу операционных систем, включая мобильные и Mac OS X (кстати, он совместим с большим количеством редакций OS X, нежели Virtualbox), и эмулирует все основные устройства компьютера. Еще он эмулирует интерфейс BIOS, в отличие от Vrtualbox.

Рассмотрим, как проходит процесс создания виртуальной машины и запуск установки Windows 10 на платформе VMware Workstation Pro.
Дизайн основного окна программы (который, кстати, видоизменяется от версии к версии) не позволит запутаться даже начинающему пользователю.
- Чтобы создать новую виртуальную машину, нажмем одноименную кнопку на вкладке «Главная».

- В первом окошке мастера создания ВМ укажем тип конфигурации. Если вам нужен компьютер со стандартными параметрами (которых достаточно в 90% случаев), о.

- Следом укажем тип ОС, которую будем устанавливать на эту виртуальную машину. Программа дает возможность запустить установку сразу после создания ВМ, причем без лишних действий с вашей стороны. Если вы согласны на это, укажите путь к файлу образа или носителя с дистрибутивом системы, если нет, о.

- Чтобы не вводить ключ продукта, имя пользователя и пароль во время установки Windows, введите это данные в следующее окно. Первый пункт можно пропустить.

- Дайте новой виртуальной машине имя и укажите будущее расположение папки с операционной системой.

- Определите размер виртуального диска. По умолчанию VMware отдает Windows 10 целых 60 Гб, но мы можем увеличить или уменьшить этот объем. Следом вам предстоит указать способ сохранения виртуального диска — в одном или нескольких файлах.

- Ниже показаны параметры только что созданного виртуального компьютера. Если вас что-то не устраивает, например, размер оперативной памяти, нажмите «Настройку оборудования».

- Измените нужные характеристики, вернитесь в предыдущее окно и кликните «Готово».

- После этого, наконец, запустится установка операционной системы. Ваше участие понадобится ближе к ее окончанию — для настройки сетевого обнаружения и проверки обновлений.

- После загрузки рабочего стола программа автоматически установит в новую систему VMware Tools — то же, что и дополнения гостевой ОС в Virtualbox. После этого виртуальная машина готова к работе.
Список всех установленных гостевых операционных систем находится на вкладке «Мой компьютер».

Некоторые опции виртуальной машины VMware
До установки VMware Tools окно гостевой системы, как и в Virtualbox, захватывает курсор мыши. Для возврата его в основную ОС нажмите Ctrl+Alt.
Чтобы попасть в интерфейс BIOS виртуальной машины, выделите ее в списке, откройте меню запуска (кнопка «play» на верхней панели) и кликните «При включении (машины) войти в режим BIOS».

( 2 оценки, среднее 4.5 из 5 )