Хотите запустить виртуальную Raspberry Pi на вашем ПК? Вот как использовать эмулятор QEMU или запустить Raspberry Pi Desktop на виртуальной машине.

Перед тем как купить Raspberry Pi, почему бы не попробовать запустить операционную систему этого одноплатного компьютера на вашем обычном компьютере и попробовать свои силы? Она может быть установлена в эмуляторе QEMU, на виртуальной машине или в виде liveCD.
Вот что вам нужно знать.
1. Эмуляция Raspberry Pi на Windows с QEMU
Такие утилиты для создания виртуальных машин, как VMware и VirtualBox, создают виртуализированную аппаратную среду. Однако почти всегда они основаны на 32-битной и 64-битной (x86/x64) архитектуре. Хотя это делает их идеальными для виртуализации большинства операционных систем, с ОС, работающих на ARM-чипах, они работать не будут.
Вот здесь вступает в игру QEMU. Quick EMUlator эмулирует чипсеты ARM, аналогичные тем, что встречаются в Raspberry Pi. Следовательно, его можно использовать для создания виртуализированного Pi на любом ПК.
Можно установить QEMU и настроить ОС Raspberry Pi с нуля, но это займет некоторое время. Для простоты я расскажу вам, как использовать вместо этого пакет QEMU Raspbian от Sourceforge.
Скачать: QEMU Raspbian for Windows (Бесплатно)
После загрузки вам нужно будет настроить пакет.
- Перейдите в папку загрузки.
- Распакуйте QEMU.zip на жесткий диск (используйте C:/QEMU).
- Откройте папку QEMU.
- Дважды щелкните файл bat, чтобы начать работу.
- На экране появится виртуализированный Raspberry Pi с загрузкой Raspbian Wheezy.
- Подождите, пока закончится загрузка… должно получиться так, как показано в этом видео.
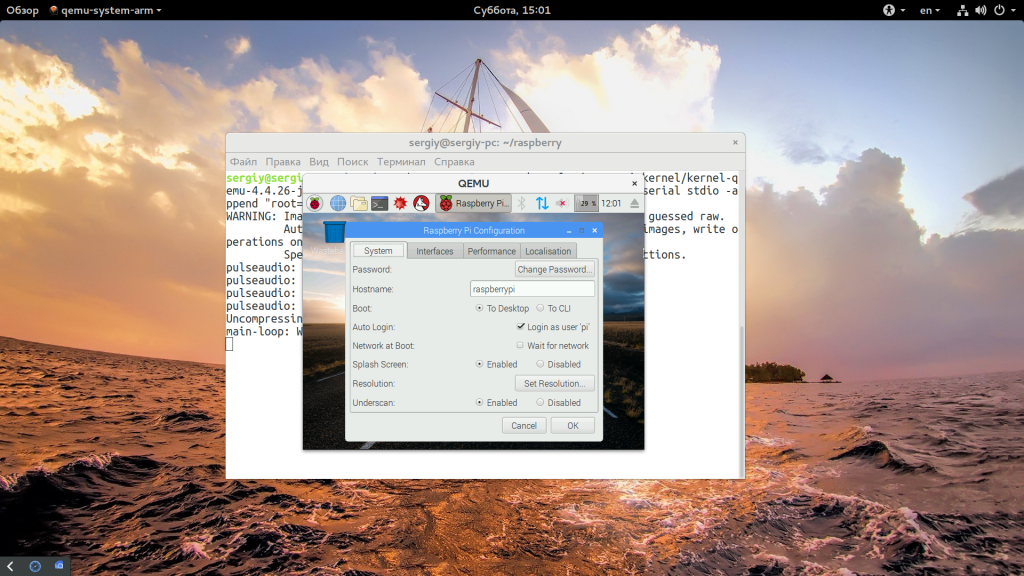
После завершения, Raspbian загрузится прямо в Raspi-config, инструмент для настройки Raspberry Pi. Не рекомендую вносить слишком много изменений, так как это может привести к проблемам со стабильностью. Избегайте использования опции обновления.
Обратите внимание, что этот инструмент настройки может быть перезапущен в любой момент из командной строки с помощью команды:
sudo raspi-configКогда вы закончите, с помощью клавиш со стрелками выберите Finish, затем нажмите Enter.
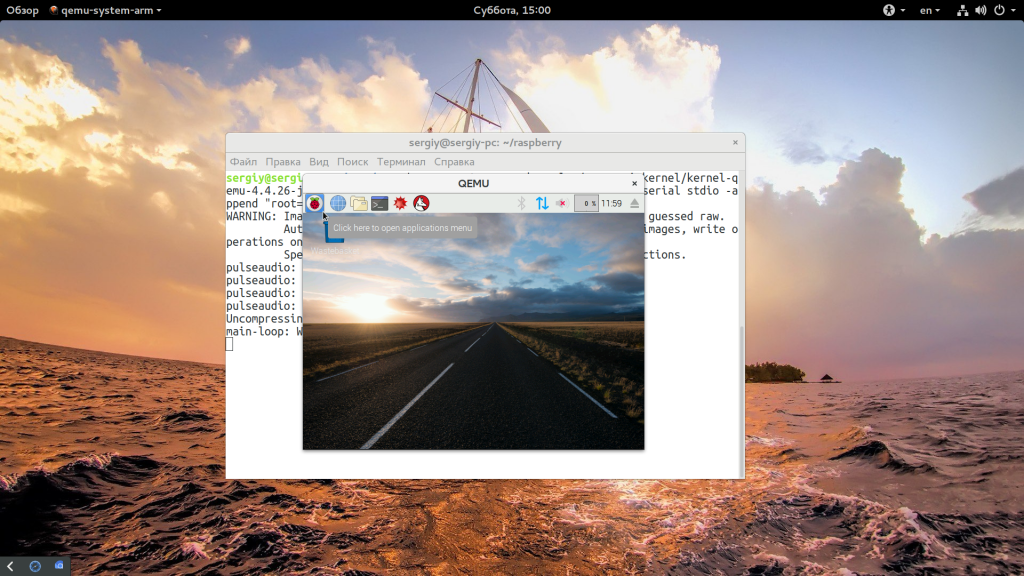
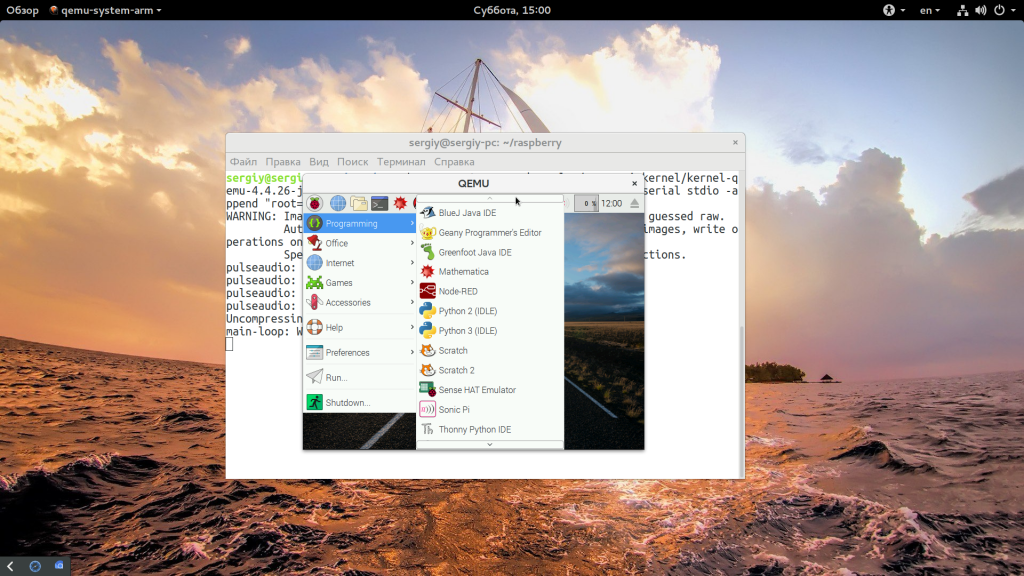
После завершения настройки вы увидите окно командной строки. Вы можете либо попробовать некоторые основные команды Linux, либо написать startx для запуска рабочего стола Raspbian.
Здесь вы познакомитесь с различными предустановленными инструментами, такими как Minecraft-Pi или Scratch.
2. Запустите Raspberry Pi OS с помощью Live CD
Хотя в большинстве случаев QEMU достаточно, у него есть некоторые недостатки. Главным из них является то, что он использует старую версию операционной системы Raspberry Pi.
Raspbian больше не развивается в своей старой форме; теперь он известен как Raspberry Pi OS. Для получения более современного образа среды Pi, Raspberry Pi OS доступна для компьютеров x86/x64 под названием Raspberry Pi Desktop.
Все, что вам нужно сделать, это скачать его, записать на USB-флешку или DVD и загрузить компьютер с носителя. Вы получите возможность загрузиться в Raspberry Pi Desktop, что даст вам хорошее представление о возможностях компьютера Pi.
Скачать: Raspberry Pi Desktop (Бесплатно)
If you find you like Raspberry Pi Desktop, it can be run without the live CD and associated rebooting. All you need is a virtual machine utility such as VirtualBox or VMware Workstation.
Если вам нравится Raspberry Pi Desktop, его можно запустить без Live CD и перезагрузки. Все, что вам нужно, это утилита для виртуальной машины VirtualBox или VMware Workstation.
Общий принцип прост:
- Установить программное обеспечение виртуальной машины.
- Создать виртуальную машину.
- Установить образ ISO-диска Raspberry Pi Desktop
- Загрузить виртуальную машину.
- Установить Raspberry Pi OS
- Enjoy your virtual Raspberry Pi
Спасибо, что читаете! На данный момент большинство моих заметок, статей и подборок выходит в telegram канале «Левашов». Обязательно подписывайтесь, чтобы не пропустить новости мира ИТ, полезные инструкции и нужные сервисы.
Респект за пост! Спасибо за работу!
Хотите больше постов в блоге? Подборок софта и сервисов, а также обзоры на гаджеты? Сейчас, чтобы писать регулярно и радовать вас большими обзорами, мне требуется помощь. Чтобы поддерживать сайт на регулярной основе, вы можете оформить подписку на российском сервисе Boosty. Или воспользоваться ЮMoney (бывшие Яндекс Деньги) для разовой поддержки:
Заранее спасибо! Все собранные средства будут пущены на развитие сайта. Поддержка проекта является подарком владельцу сайта.
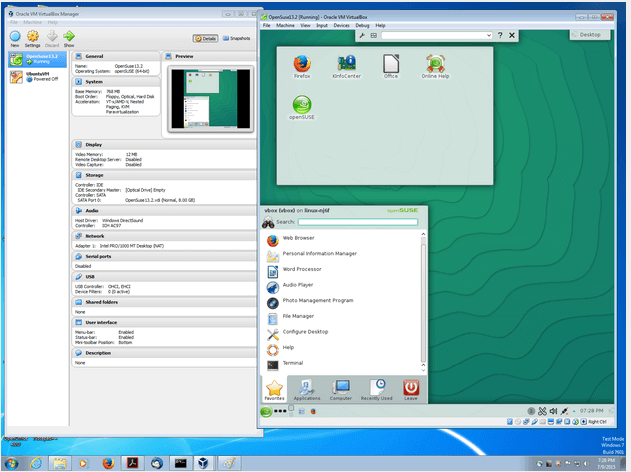
VirtualBox — это известная программа аппаратной виртуализации (и эмуляции), и это один из лучших эмуляторов Raspberry Pi для Windows. На нем размещена виртуальная машина, которая позволяет вам создать виртуальную имитацию любой ОС в вашей компьютерной системе.
В свете этого VirtualBox предлагает вам возможность запустить ОС Raspberry Pi на вашем ПК с Windows. И это особенно идеально для пользователей с небольшим или нулевым знанием кодирования. Он имеет удобный интерфейс, что делает его очень простым в использовании.
Все, что вам нужно сделать, это установить Raspberry Pi на VirtualBox, чтобы создать виртуальную машину. Затем вы можете запустить программу оттуда.
В отличие от QEMU, VirtualBox не поддерживает наборы микросхем ARM (например, Raspbian), хотя настройка эмулируемого Raspberry Pi с VirtualBox менее сложна. Тем не менее, VirtualBox работает в системе Debian, которая является проприетарной системой, на которой построен Raspbian.
Как только виртуальная машина настроена правильно, все остальное так же просто, как установка ОС Raspberry Pi и настройка протоколов, таких как язык, клавиатура и разделы.
VirtualBox можно загрузить бесплатно и он совместим практически со всеми современными компьютерами Windows, включая все версии Windows 10. Однако существуют определенные версии для каждого набора компьютеров. Следовательно, пользователи должны убедиться, что они загружают оригинальную версию в своих системах.
После всего этого процесса вы можете наслаждаться имитацией работы с оборудованием и кодом Raspberry Pi так удобно, как вы этого хотите на своем ПК с Windows.
Скачать VirtualBox
— СВЯЗАННЫЕ: Windows 10 на ARM тестируется на Raspberry Pi 3B [ВИДЕО]
Most of the tutorials on this website are here to help you solve a specific problem on the Raspberry Pi.
But for once, we won’t do anything on the Raspberry Pi directly. Instead, we will learn how to do without: I will show you how to run Raspberry Pi OS in a virtual machine on Windows, macOS or Linux.
VirtualBox, VMWare and QEMU are three solutions to virtualize a Raspberry Pi.
These emulators can run Raspberry Pi OS on a standard PC running Windows, Linux or macOS.
And here we’ll learn how to do it with these three tools, from your favorite operating system.
These software programs can be very useful if you are a developer, you don’t have your Raspberry Pi with you, or you want to test something without breaking your installation on the SD card.
By the way, you can get a complete Raspberry Pi kit for under $30 (this one for example), so make sure the virtual machine solution is really the best one for you.
Download Raspberry Pi OS for PC
I think this is probably the main problem you’ve encountered: where to find an image compatible with the main hypervisors?
The default image offered on the official website, which is an .img format, which can’t work on VirtualBox for example.
Looking for this image, I came across many forums that said it was not possible to emulate a Raspberry Pi on PC because it turns on ARM architecture, unlike a PC …
And finally, I ended up finding the image, directly on the official website, just above the main download.
So you can download the image of Raspberry Pi OS in ISO format before continuing this guide.
I advise you to use a Torrent client to download it, as it’s much faster.
Use VirtualBox to run Raspberry Pi OS on PC
Introduction
VirtualBox is an open-source hypervisor, developed by Oracle.
It is available for most operating systems: Windows, Linux, macOS, Solaris, …
It allows you to create virtual machines on your computer and supports many operating systems to virtualize.
Installation
You can find download links for Windows, Mac, and Linux on this page: https://www.virtualbox.org/wiki/Downloads.
In any case, the installation is straightforward:
- Download the installer corresponding to your environment.
- Launch the installer and keep the default options.
Create the virtual machine
Launch Oracle VirtualBox now on your computer, and we will create the virtual machine:
- Click on New in the top bar.

- Choose a Name.
- Type: Linux.
- Version: Anyone.
- Memory size: 1Gb is enough, but you can set more depending on your computer memory available.
- Hard disk: You can keep the default options (8GB, dynamically allocated).

Our new virtual machine is available, but now you have to tell it to start on the previously downloaded iso file:
- Click on Settings in the top bar.
- Select Storage in the left menu.
- Below the first controller, click on Empty.
- On the right panel, click on the Disc icon to choose the file.

- Select Choose a Disk File.
- Browse to the location of the image and validate.
Ok, you should have something like this:
Download the Pi Glossary!
If you are lost in all these new words and abbreviations, request my free Raspberry Pi glossary here (PDF format)!

Now we can start the virtual machine and install the Raspberry Pi Desktop:
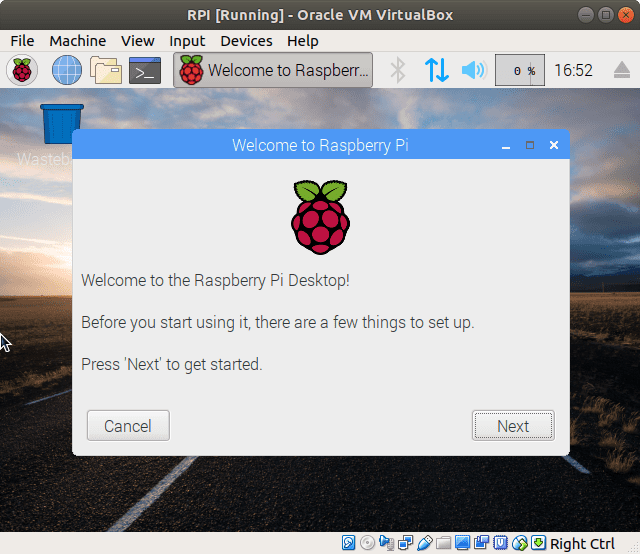
Once the reboot is done, you will come to a first start wizard like this one:
Choose the settings that best suits you.
Change the default password.
Update your system and reboot one last time.
Your Raspberry Pi Desktop virtual machine running in VirtualBox is finally operational!
You can now check out my 27 tips to take a good start on this operating system if you need help configuring it.
Create a virtual machine running RPI OS in QEMU
Introduction
QEMU is another great open-source machine emulator and virtualizer, developed by Fabrice Bellard under GPL.
It can run many guest systems and it also can be used with KVM to increase virtual machines speed.
QEMU is available for Linux, macOS, and Windows.
Installation
The installation isn’t quite the same depending on your operating system, so I’ll briefly explain how to do this.
Linux installation:
For Debian/Ubuntu, QEMU is available in the repository so that you can install it with:
apt-get install qemu
For other distributions, it is usually available as easily via the basic commands:
RedHat/CentOS: yum install qemu-kvm
SUSE: zypper install qemu
Arch: pacman -S qemu
If you need more details, I have a complete guide on how to install QEMU on Ubuntu. And even if you are not using Ubuntu, it’s similar on most distributions, so it should be useful.
Mac OS installation:
QEMU is available via Homebrew or MacPorts.
HomeBrew:brew install qemu
MacPorts:port install qemu
Windows installation:
You can get the last installer version following this link.
Then start the .exe file and follow instructions.
Create the virtual machine
QEMU is a command line tool.
So whatever your system you’ll have to do this :).
I give instructions for Linux; it may need to be slightly adapted if you are on another system.
In Windows, for example, you need to start the command prompt, and go to the QEMU directory (cd “C:Program Filesqemu”).
First, create a folder for your VMs and move the image in it:
sudo mkdir ~/qemu/
mv ~/Downloads/IMAGE.iso ~/qemu/
cd ~/qemu
Now let’s launch the image in QEMU with the following command:
qemu-system-x86_64 -hda IMAGE.iso -m 1024 -net nic -net user
- Choose Install in the first menu.
You can choose “Graphical install”, but it’s just the same thing slower, so there is no need to do this 🙂 - Select your Keyboard layout.
- For partition disks, you can keep the default options (use entire disk > all files in one partition > finish > yes).
- Installation will begin.
- After a few minutes, the installation wizard will resume.
- Confirm the bootloader installation to the master boot record.
- Select /dev/sda.
- Continue to reboot your new operating system.
Once the reboot is done, Raspberry Pi Desktop is starting:

A wizard will start on first boot.
Download the Pi Glossary!
If you are lost in all these new words and abbreviations, request my free Raspberry Pi glossary here (PDF format)!
- Choose the settings that best suits you.
- Change the default password.
- Update your system and reboot one last time.
Your Raspberry Pi Desktop virtual machine running in QEMU is now operational!
You can now install any apps on it, like on a real Raspberry Pi (check my selection of the 17 best apps to install at the beginning here).
Run Raspberry Pi OS on PC with WMWare Workstation
Introduction
VMWare Workstation is a proprietary hypervisor distributed by VMWare, a subsidiary of Dell.
There is a free version, VMWare Workstation Player, for non-commercial use.
Workstation can emulate most operating systems.
VMWare also develops many other professional tools, which can allow you to use virtual machines on a large scale, but this is not the subject of the day :).
Installation
You can download VMWare Workstation Player on the official website.
There is a Linux and Windows version, but I’m not sure about macOS.
On Windows, just run the .exe file to start the setup.
On Linux, you have to start the wizard like this:sudo sh VMware-Player-VERSION.x86_64.bundle
You can keep default options, and no key is needed for the moment.
On the first start, choose that you want to use Workstation Player for non-commercial use, and you are ready :).
(I had problems with Linux at first, I had to take a newer version than the one given on the site because the modules did not install. If this happens to you, now you’ll know what to do)
Create the virtual machine
We will now create our virtual machine:
- Select “Create a New Virtual Machine”.
- Choose “Use ISO image” and browse to your Raspberry Pi OS ISO file.
- On the next screen, select Linux and Debian 64 bits, for example.
- Name your virtual machine and change installation folder if you want.
- For the disk space, you can let 20 GB or decrease it to 10 GB to save disk space on your computer.
- Finally, click on Finish and Close.
Virtual Machine will start directly after the wizard ends:
- Click on Start in the top bar.
- Choose Install in the first menu.
- Select your Keyboard layout.
- For partition disks, you can keep the default options (use entire disk > all files in one partition > finish > yes).

- Installation starts.
- After a few minutes, the installation wizard resumes.
- Confirm the bootloader installation to the master boot record.
- Select /dev/sda.
- Continue to reboot your new operating system.

You can choose to download and install VMWare Tools if you want, but it isn’t mandatory.
A wizard will start on first boot.
- Choose the settings that best suits you.
- Change the default password.
- Update your system and reboot one last time.
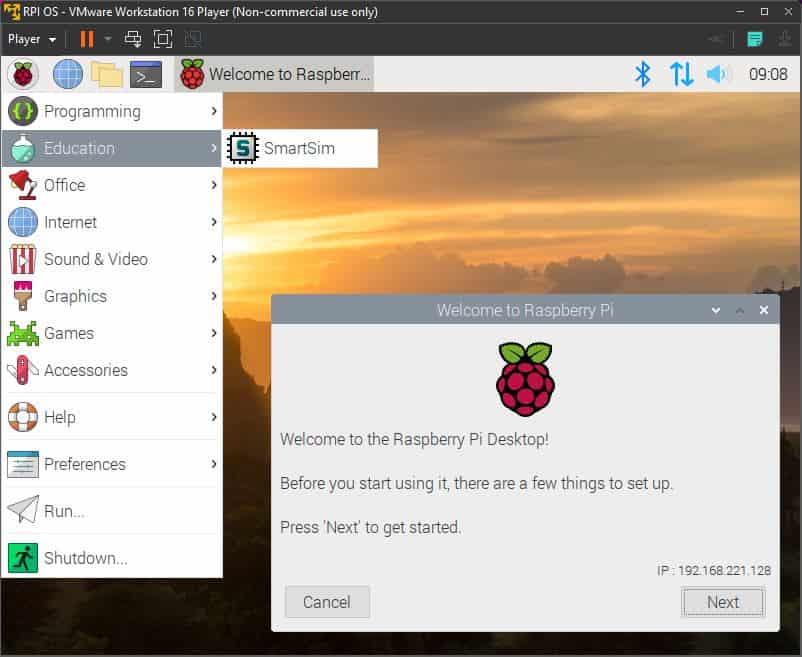
Your Raspberry Pi Desktop virtual machine running in VMWare Workstation is now operational!
What to do next?
Once your virtual machine is installed, and no matter which hypervisor you choose, I invite you to follow the various tutorials on this website to set up the necessary software (ssh, vnc, …), as if you were on a Raspberry Pi.
Here are a few links to help you with this:
- 5 ways to remote desktop on Raspberry Pi
- 17 best Raspberry Pi OS apps you need to try
- How to install a printer on Raspberry Pi OS
There are probably other things that are more dependent on the fact that your Raspberry Pi OS is on a virtual machine:
- Network card: by default, I had network and Internet in these 3 installation cases, but depending on your environment, it might not work on first boot. Or maybe you will need the opposite: isolate the virtual machine of the network.
- File sharing: it can be interesting to have a shared folder between your virtual machine and your computer (especially for developers, to work on your computer, and launch the application on the virtual machine).
- Adjust the hardware: you may have to adjust the screen resolution, disk size or RAM to suit your needs.
I will not go into more details about all of this because it depends on your goals with this system.
But be aware that once Raspberry Pi is virtualized and functional, you can follow any tutorial on the chosen hypervisor to help you, it does not depend on Raspberry Pi OS most of the time.
Why do I need a virtual machine?
The following will depend on why you created this virtual machine, but I can give you some reasons why you might need a virtual machine.
Not (yet) a Raspberry Pi
If you do not have a Raspberry Pi, but you plan to buy one, testing its capabilities on a virtual machine might be a good idea.
This allows you to have a good vision of what you will be able to do. Maybe to test, install, or program the software that you would like to use, so you can make the purchase when you’re sure.
If it’s the only reason, I would consider a cheap Raspberry Pi board to get started quickly (a Zero kit or even the Pi 3B+ are really affordable right now on Amazon). This way, you would have a real overview :).
Moving
You are addicted to Raspberry Pi, but you can’t take it everywhere?
A virtual machine on your usual computer allows you to continue your projects, even without having the Raspberry Pi with you.
More powerful
Whether you’re a tester, developer, or just curious, running your Raspberry Pi desktop on a virtual machine will help you increase power and efficiency by taking advantage of your computer’s resources.
This can save you a lot of time on some applications, even if it’s less true with the new models like the Raspberry Pi 4 8GB.
Snapshots
Obviously, who says virtual machine says you can create snapshots.
A snapshot and a complete image of the virtual machine at a time T.
So it becomes possible to test something, and go back if it does not happen as expected (instead of having to recreate an SD card, reinstall everything needed, etc … if we work directly on the Raspberry Pi).
Video
If you need more help to understand everything here, or if you prefer the video version, here is a demonstration on how to do this wih VirtualBox and VMWare:
You can also subscribe to see all the news videos in your YouTube Feed:
Recommended stuff for taking it to the next level
- Raspberry Pi 4: After your first tests in a virtual machine, you are now ready to switch to a real Raspberry Pi device. It’s really not the same, you won’t regret it!
- Learn everything step by step: If you are afraid to get started for real, I have written a book on the topic, so it’s not that complicated! The promise is to master your first Raspberry Pi in 30 days, and it’s absolutely possible. Try it and let me know.
- Start with the cheapest model: If your problem is the price, you can totally start with a minimal model just to see if it’s for you. If you are mainly doing this for basic things or programming, this model should be perfect.
Get My Commands Cheat Sheet!
Grab your free PDF file with all the commands you need to know on Raspberry Pi!
If you are looking for exclusive tutorials, I post a new course each month, available for premium members only. Join the community to get access to all of them right now!
Conclusion
So, we saw how to create a Raspberry Pi OS virtual machine on three different hypervisors:
– VirtualBox
– QEMU
– VMWare Workstation
We also saw what the benefits of virtualization could be when talking about Raspberry Pi.
It’s up to you now to launch your projects on this, good luck!
By the way, you can now use a Raspberry Pi as a cheap hypervisor, with solutions like VMWare ESXI or by installing Proxmox on your Raspberry Pi.
Get My Commands Cheat Sheet!
Grab your free PDF file with all the commands you need to know on Raspberry Pi!
Additional Resources
Not sure where to start?
Understand everything about the Raspberry Pi, stop searching for help all the time, and finally enjoy completing your projects.
Watch the Raspberry Pi Bootcamp course now.
Master your Raspberry Pi in 30 days
Don’t want the basic stuff only? If you are looking for the best tips to become an expert on Raspberry Pi, this book is for you. Learn useful Linux skills and practice multiple projects with step-by-step guides.
Download the e-book.
VIP Community
If you just want to hang out with me and other Raspberry Pi fans, you can also join the community. I share exclusive tutorials and behind-the-scenes content there. Premium members can also visit the website without ads.
More details here.
Need help building something with Python?
Create, understand and improve any Python script for your Raspberry Pi.
Learn the essentials, step-by-step, without losing time understanding useless concepts.
Get the e-book now.
You can also find all my recommendations for tools and hardware on this page.
Raspberry Pi — это недорогой микрокомпьютер, который можно приобрести всего за 40 долларов. За последнее время он набрал большую популярность среди разработчиков и пользователей, которые хотят создавать различные проекты. Он очень дешевый и в то же время позволяет делать множество вещей, начиная от домашнего медиацентра и до файлового хранилища или управления роботом.
Но перед тем, как вы точно решите что он вам нужен, желательно как-нибудь протестировать его возможности, например, с помощью эмулятора. Вы можете проверить в эмуляторе некоторые свои программы, чтобы понять как они будут работать на Raspberry. В этой статье мы рассмотрим как установить эмулятор Raspberry Pi 3 на свой компьютер под управлением Linux или Windows.
Нам нужно будет сделать три вещи. Во-первых, необходимо раздобыть образ Raspberry Pi 3, во-вторых установить эмулятор Qemu, в котором мы сможем запустить образ, и скачать ядро Raspberry, специально предназначенное для Qemu, потому что с оригинальным ядром ничего не выйдет.
1. Загрузка образа Raspberry
Нам нужен самый обычный образ Raspberry, который используется для установки на реальное устройство. Вы можете использовать Raspbian Stretch самой последней версии. Эта инструкция тестировалась c образом stretch и jessie, хотя все должно заработать и при использовании Noobs версии или более новых версий в будущем. Вы можете скачать нужную версию на официальном сайте:
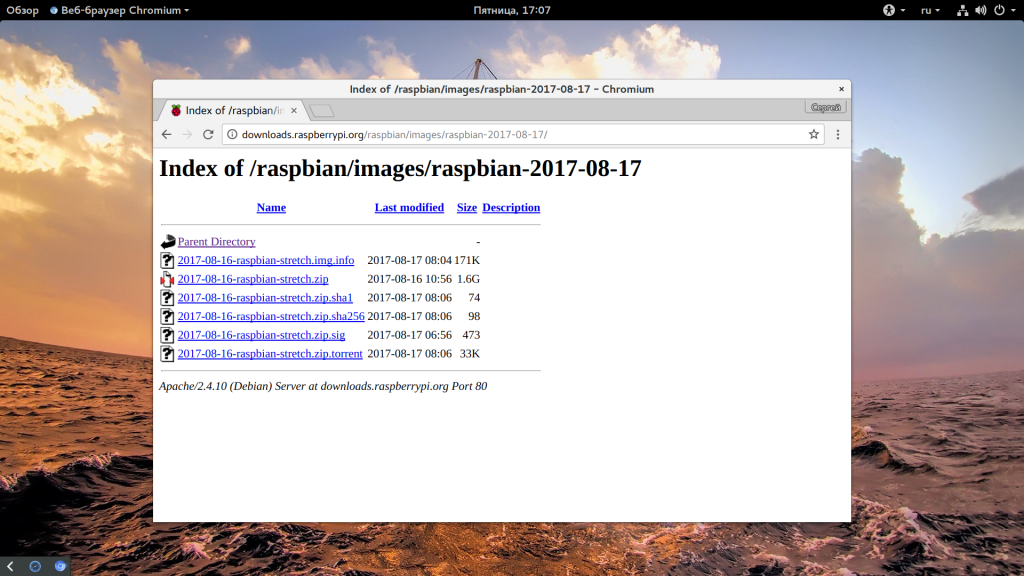
Здесь доступна как торрент версия, так и прямая ссылка на загрузку.
2. Установка Qemu
Qemu — это популярный эмулятор с открытым исходным кодом, который поддерживает огромное количество архитектур, среди которых и ARM процессор Raspberry Pi. Мы могли бы использовать VirtualBox, но там возможна эмуляция только компьютерной архитектуры x86, а это значит, что вы сможете запустить на нем только компьютерный Raspbian и ничего не добьетесь в плане тестирования. Поэтому давайте установим Qemu, установка программы довольно проста, в дистрибутивах Ubuntu выполните такую команду:
sudo apt-get install qemu qemu-kvm
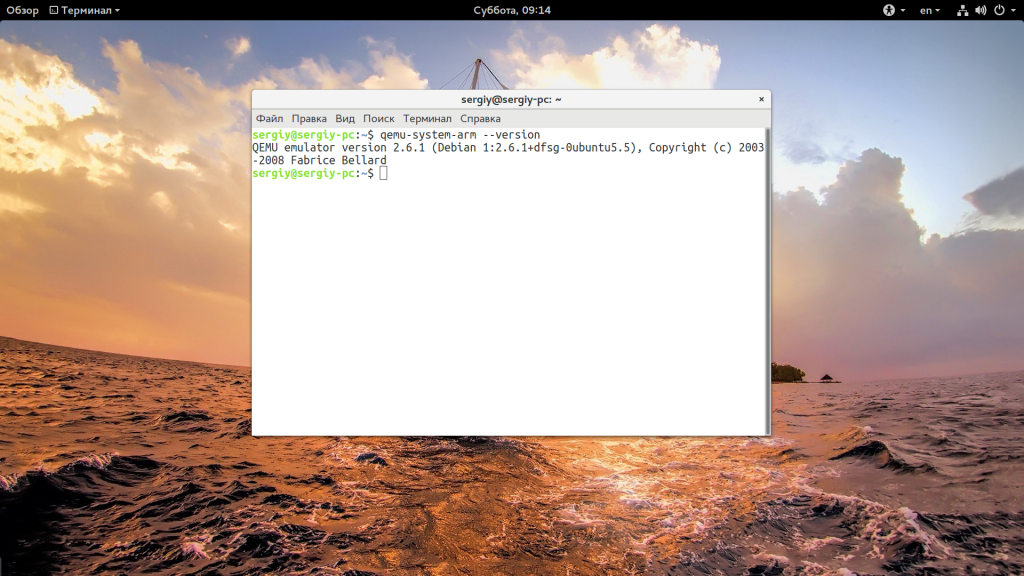
Пакет qemu устанавливает поддержку всех архитектур, а kvm добавляет поддержку модуля ядра аппаратной виртуализации, который очень сильно увеличивает производительность гостевой системы. Мы уже рассматривали как пользоваться qemu. Чтобы посмотреть версию программы выполните:
qemu-system-arm --version
3. Подготовка окружения
Нам понадобится несколько файлов для того, чтобы запустить Raspberry Pi в эмуляторе, поэтому лучше создать одну рабочую папку:
mkdir ~/raspberry
Скопируйте в эту папку ваш образ Raspberry, который предварительно нужно извлечь из архива, если он запакован в zip:
unzip raspbian-stretch.zip
cp raspbian-stretch.img ~/raspberry/
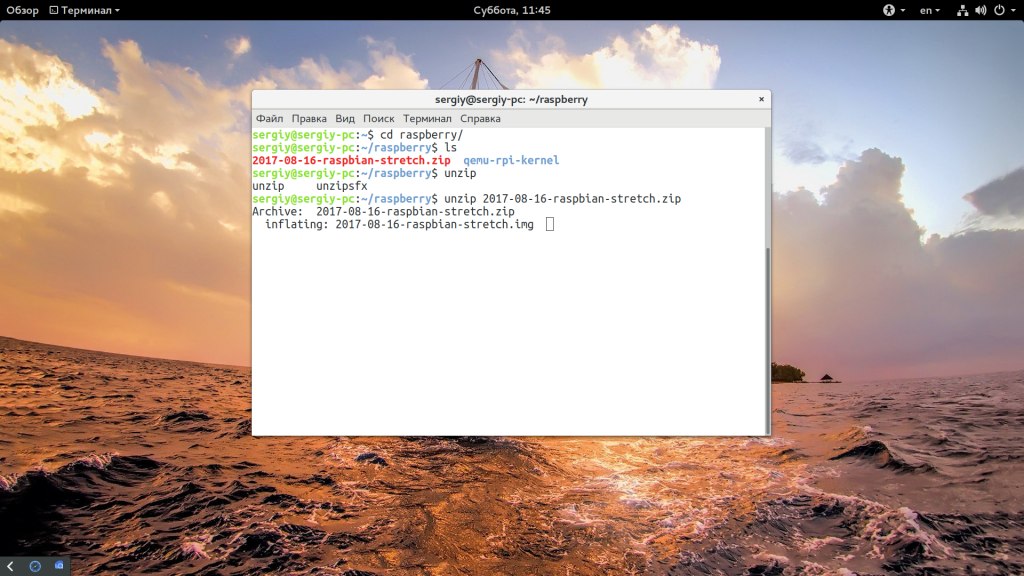
Также можете переименовать этот образ в rpi.img чтобы просто копировать команды из этой инструкции и не вводить имя вручную. Но оригинальный файл оставьте в другой папке, чтобы если потом что-либо сломаете, не пришлось скачивать полтора гигабайта заново.
4. Подготовка образа
Наш образ просто так не загрузиться, и нам нужно его еще немного подправить. Нужно примонтировать корневую файловую систему образа, но это не так просто. Поскольку это образ диска, а не раздела и на нем есть своя файловая система то мы не можем его просто так примонтировать. Откройте файл в gparted:
sudo gparted raspberry-stretch.img
Найдите корневой раздел, размером четыре гигбайта с файловой системой Ext4 и нажмите «Свойства»:
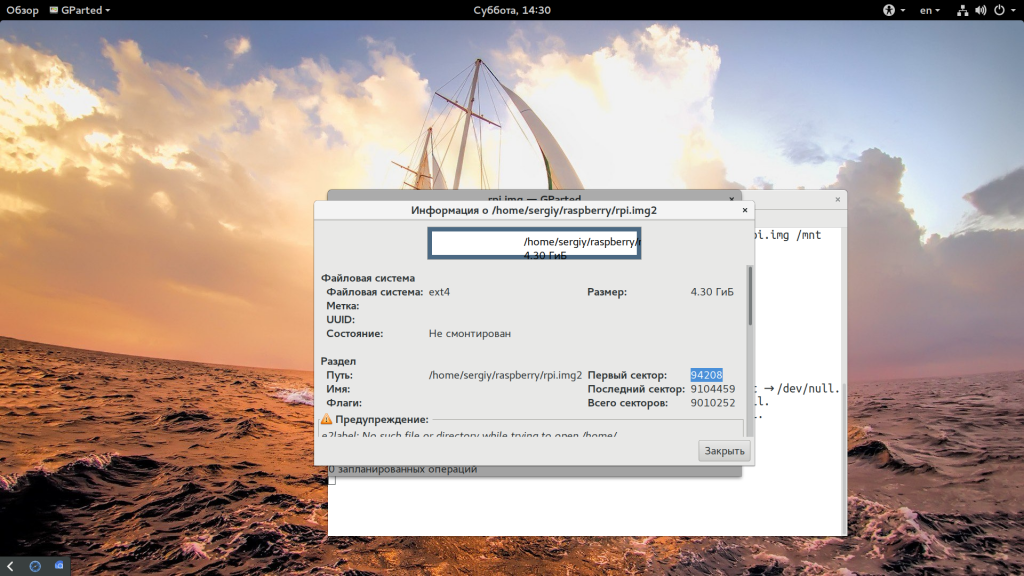 Тут найдите надпись «Первый сектор», полученное число нужно умножить на 512 чтобы узнать по какому адресу нужно монтировать файловую систему, только после этого монтируем:
sudo mount -o loop,offset=48234496 raspberry-jessie.img /mnt
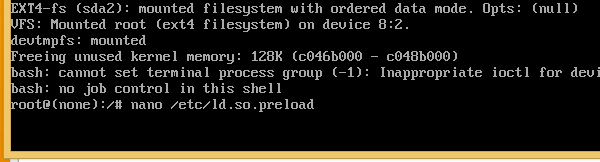
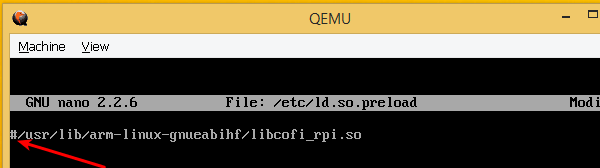
Затем откройте файл /mnt/etc/ld.preload.so и закомметируйте там одну строчку:
nano /mnt/etc/ld.so.preload

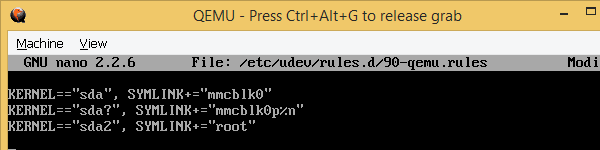
Сохраните изменения и закройте файл. Нужно еще добавить несколько правил udev, чтобы Raspbian правильно определял вашу SD карту. По большому счету программе неважно что это будет жесткий диск, файл или реальная SD карта, вот только она ожидает что это будет устройство /dev/mmcblk. Поэтому создайте файл 90-qemu.rules и добавьте туда такие строки:
nano /etc/udev/rules.d/90-qemu.rules
KERNEL=="sda", SYMLINK+="mmcblk0"

KERNEL=="sda?", SYMLINK+="mmcblk0p%n"

KERNEL=="sda2", SYMLINK+="root"
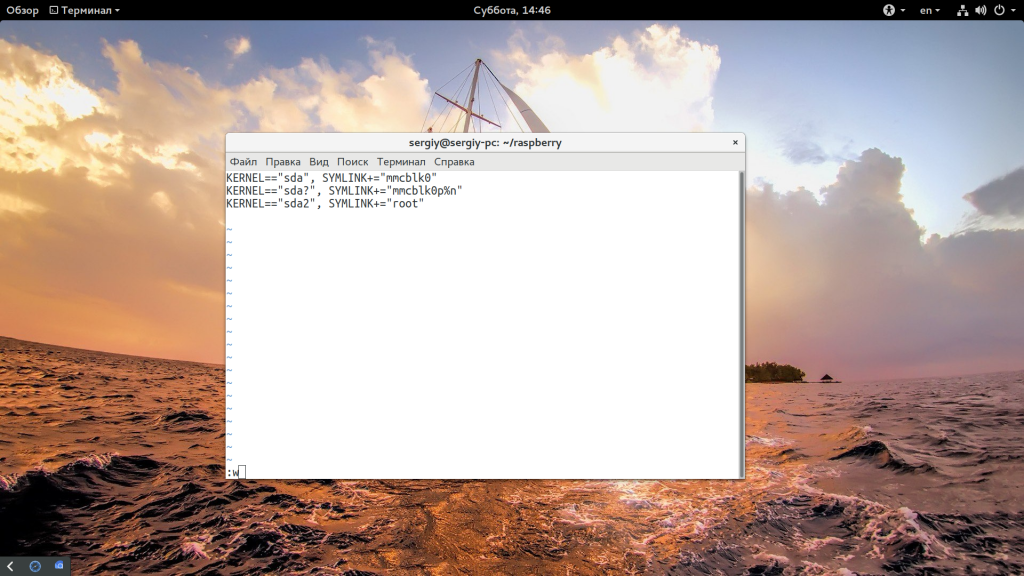
Сохраните изменения и отмонтируйте раздел:
sync
sudo umount /mnt

5. Получение ядра
Вы можете скачать ядро для вашего образа из специального репозитория Github. Или же просто используйте такую команду для загрузки всего репозитория:
git clone https://github.com/dhruvvyas90/qemu-rpi-kernel.git
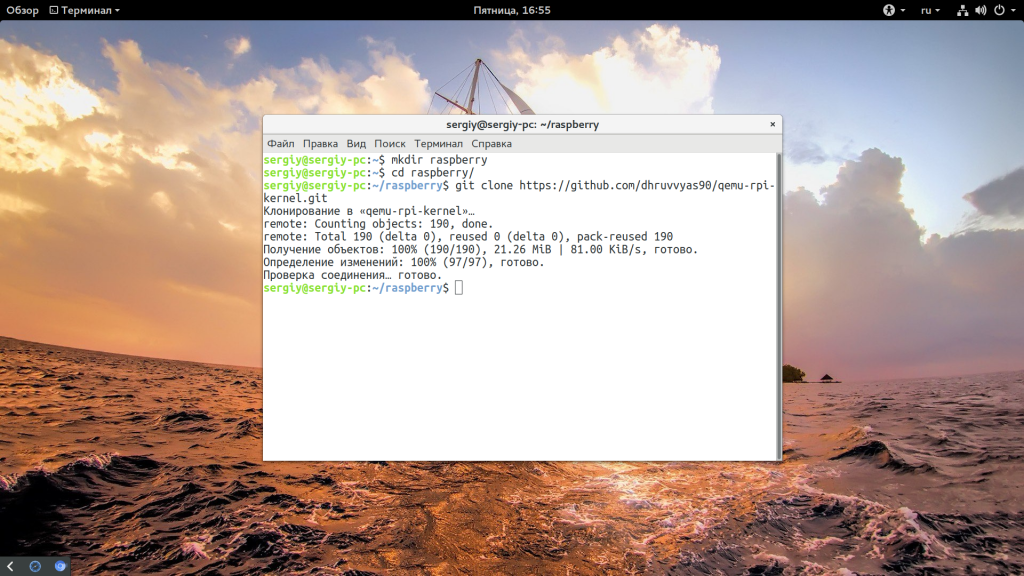
Здесь есть не самые свежие версии ядер, но они вполне работают. Да, мы будем использовать ядро Jessie для Stretch, все будет работать.
6. Запуск эмулятора
Теперь все готово и мы можем запустить эмулятор Raspberry Pi 3. Для запуска эмулятора мы будем использовать вот такую команду:
qemu-system-arm -kernel ./qemu-rpi-kernel/kernel-qemu-4.4.26-jessie -cpu arm1176 -m 1024 -M versatilepb -no-reboot -serial stdio -append "root=/dev/sda2 panic=1 rootfstype=ext4 rw init=/bin/bash" -hda rpi.img
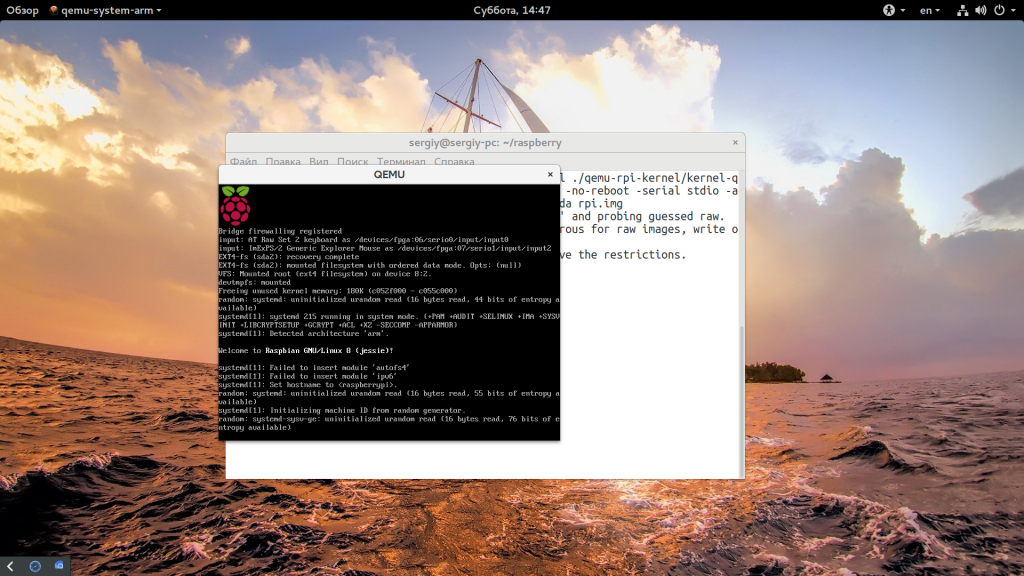
Здесь мы, кроме стандартных опций, qemu указываем параметры ядра root (корневой раздел) на /dev/sda2, нет это не в вашей файловой системе, это в файловой системе образа, указываем тип файловой системы — ext4.
Вы получите полноценную систему Raspbian ARM и сможете протестировать там все, что вам будет необходимо. Здесь можно протестировать запуск нужных вам программ, проверить как работает код и так далее. Что нельзя проверить, так это только работу портов ввода/вывода GPIO, но для этого не нужен эмулятор, есть специальные инструменты на Python. Если для вас не принципиально использовать архитектуру ARM, вы можете установить версию x86 операционной системы Raspbian на компьютер или VirtualBox, там все очень просто.
Эмулятор Raspberry Pi в Windows
Поскольку эту статью могут читать не только пользователи Linux, я не могу не затронуть проблему запуска эмулятора в Windows. Настроить эмулятор Raspberry Pi для Windows. Все работает по тому же принципу, только более автоматизировано. Скачать архив, который уже содержит образ, ядро и эмулятор qemu можно по ссылке.
Затем распакуйте архив и выполните двойной клик по файлу run.bat. Сразу же после этого начнется загрузка Raspbian Wheezy. После загрузки система запустит конфигуратор Raspberry Pi, raspi-config, ничего не рекомендуется менять, иначе рискуете получить проблемы со стабильностью.
Выводы
В этой небольшой статье мы рассмотрели как установить и использовать эмулятор Raspberry Pi 3 на ваш компьютер. Естественно, что реальное устройство будет работать быстрее, но здесь вы можете протестировать практически все, что вам нужно. А вы используете Raspberry Pi? Для каких целей? Напишите в комментариях!

Статья распространяется под лицензией Creative Commons ShareAlike 4.0 при копировании материала ссылка на источник обязательна .
A virtual machine is the best way to test a complete operating system within our OS, without the risk or inconvenience of a dual-boot installation. If, however, we want to try Raspbian, VirtualBox or VMware can’t emulate the ARM processor. Let’s create a Raspberry Pi emulation on Windows with QEMU.
Unblock any international website, browse anonymously, and download movies and Mp3 with complete safety with CyberGhost, just for $2.75 per month:
A Raspberry Pi emulation is a great way to try out the Raspbian environment without buying a Raspberry Pi first.
But, even if we already own the device, with the Raspberry Pi emulation we can test new software in Raspbian without any risk.
Table of Contents
- Install QEMU on Windows
- Get a Linux Kernel and the latest Raspbian
- Resize the Raspbian image
- Create a startup batch file
- Configure the Raspberry Pi emulation for QEMU
- Raspberry Pi emulation: The first run
- Did you have any trouble with the Raspberry Pi emulation?
Install QEMU on Windows
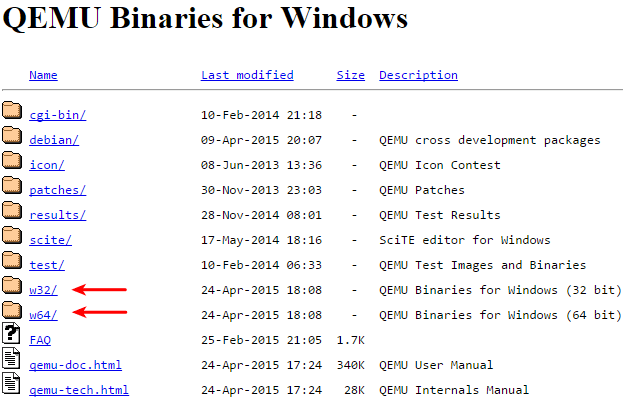
First, we need the Windows version of QEMU (Quick EMUlator). We must select the proper binaries for 32-bit or 64-bit Windows.
We download the 20150424 version. The current latest version 20150503 won’t work.
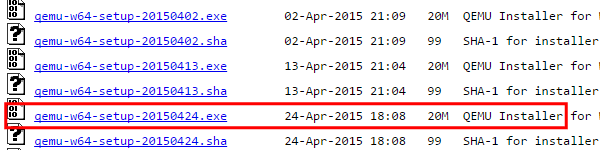
After the installer downloads, we don’t run the application. We use an archiving program, such as 7-zip or WinRAR, to extract all the files it contains.
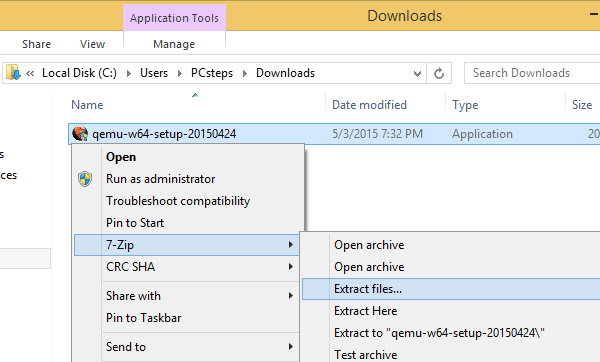
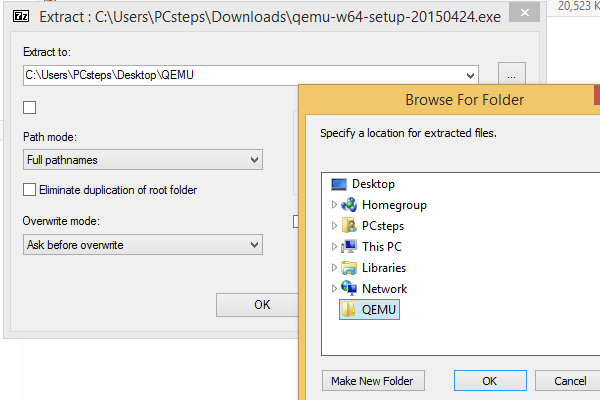
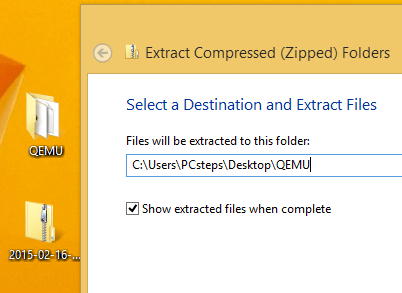
Let’s say we extract the files on a folder QEMU on the desktop.
Get a Linux Kernel and the latest Raspbian
The next thing we need for the Raspberry Pi emulation is to download a Linux Kernel compiled for ARM and the latest version of the Raspbian operating system, currently 2015-02-16.
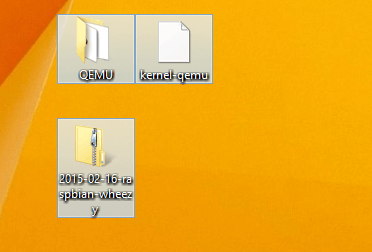
We move the Linux Kernel in the QEMU folder, and extract the contents of the Raspbian .zip inside too.
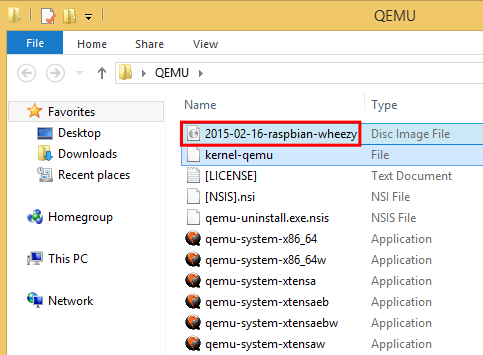
Inside the QEMU folder, it’s important to note the exact filename of the disk Image file.
Resize the Raspbian image
The Raspbian image we downloaded will contain the complete Raspberry Pi emulation, and any programs we will install. So, it’s a good idea to resize the image and give it a couple more Gigabytes.
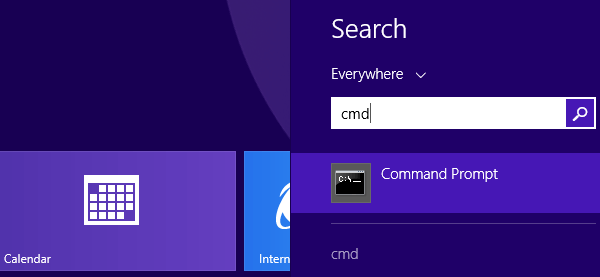
We do a Windows search for cmd and open the command prompt.
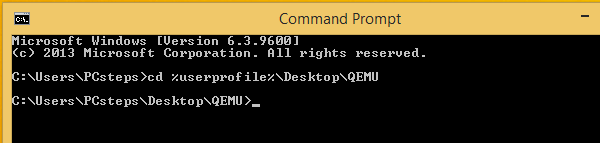
On the command prompt, we navigate to the QEMU folder. If we created it on the desktop, we navigate with:
cd %userprofile%DesktopQEMU
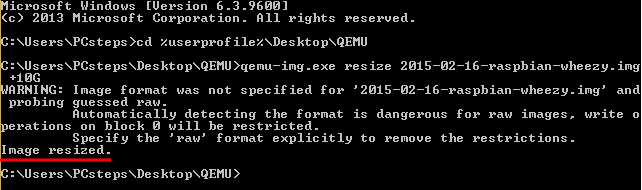
To resize the Raspbian image, we run the command:
qemu-img.exe resize 2015-02-16-raspbian-wheezy.img +10G
Note that we need to use the exact filename of the image file, with the «.img» extension. The +10G parameter will add 10 Gigabytes to the image, which should be more than enough.
Running the command will produce a Warning, but if we get the «Image resized» message, everything went well.
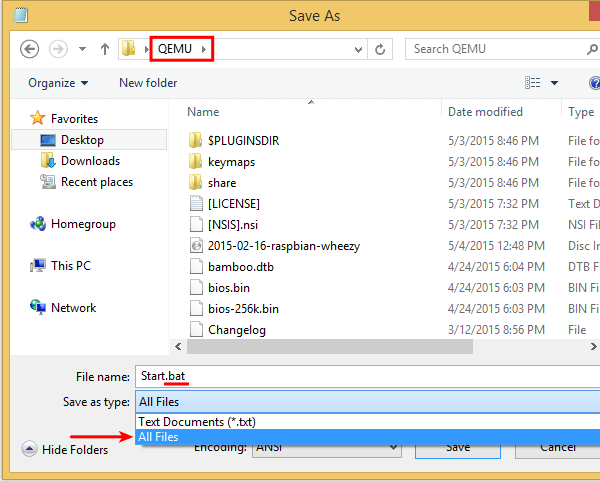
Create a startup batch file
QEMU doesn’t have a sexy user interface like VirtualBox and VMware. We need to type long commands to start it up. And it’s easier if we create a batch file instead.
We open notepad, or any other plain text editor…
…and paste inside the following command. Ignore the text-wrap, it’s all in one line.
qemu-system-arm.exe -kernel kernel-qemu -cpu arm1176 -m 256 -M versatilepb -no-reboot -serial stdio -append "root=/dev/sda2 panic=1 rootfstype=ext4 rw init=/bin/bash" -hda 2015-02-16-raspbian-wheezy.img
You might have noticed that the -m 256 part of the command will allocate 256MB of RAM for the Raspberry Pi emulation. Unfortunately, we can’t allocate more RAM, or the emulation won’t boot at all. This is a bug of QEMU when doing ARM emulation.
We make perfectly sure that the final part of the command is identical to the filename of the Raspbian disk image.

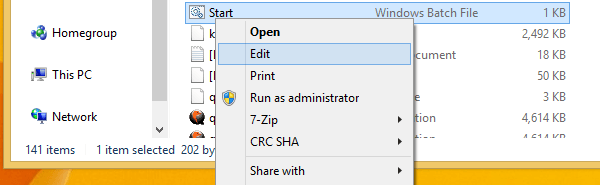
Then, we save the file as .bat. We make sure we save it inside the QEMU folder, with a .bat extension and that we have selected the «All files» option.
If we did it correctly, we will have a Windows Batch File within QEMU.
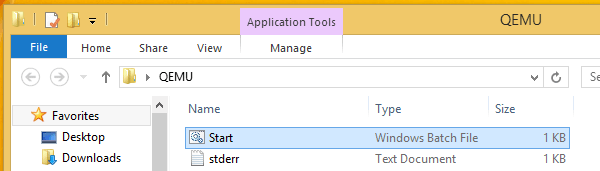
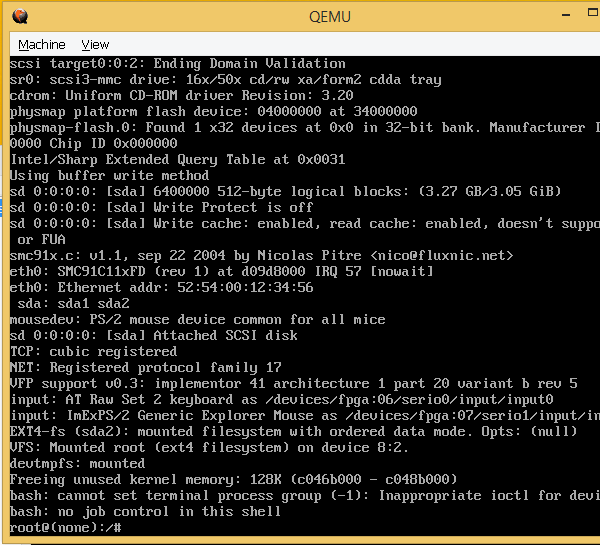
We double-click this file to start the Raspberry Pi emulation.
Configure the Raspberry Pi emulation for QEMU
The emulator will load to a command prompt.
There, we type:
nano /etc/ld.so.preload
This is a Linux command prompt, and as such, it is case-sensitive. Nano or NANO or nAnO won’t work.
The above order will open the ld.so.preload file in the nano text editor. We just need to add a hashtag «#» at the beginning of the single line.
Then we exit nano. We press ctrl+X…

…and then press y for «Yes», to save the changes, and Enter, to overwrite the file.

If we did it correctly, we will get a «Wrote 1 line» message.
Next, we create a new file, with the command:
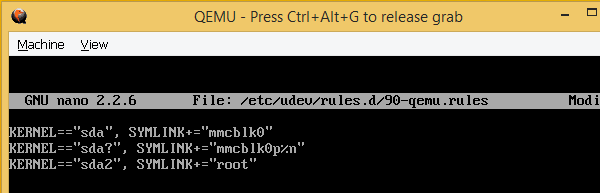
nano /etc/udev/rules.d/90-qemu.rules

Inside, we type exactly the following three lines:
KERNEL=="sda", SYMLINK+="mmcblk0"
KERNEL=="sda?", SYMLINK+="mmcblk0p%n"
KERNEL=="sda2", SYMLINK+="root"
We exit with ctrl+X and make sure to save the file (get the «Wrote 3 lines» message).

Then we exit the Raspberry Pi emulation with «exit».
Raspberry Pi emulation: The first run
Now, we ‘re nearly ready to run the Raspberry Pi emulation for Windows.
Fist, we need to edit the batch file we created earlier…
Inside, the only thing we change is to delete the init=/bin/bash option near the end of the command, including the preceding blank space. Be carefull not to delete the quotes.
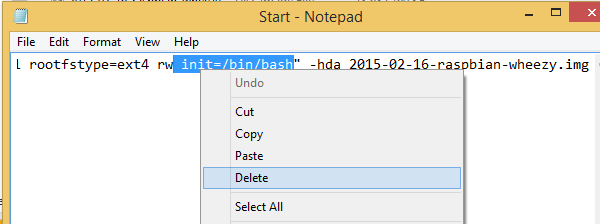
After that, we save the batch file, and double-click to open it.
It will take a while to load, and it will produce some errors. This is to be expected.
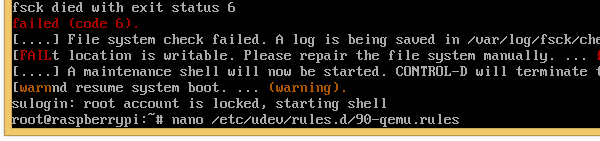
We have to create again the file we previously made, with
nano /etc/udev/rules.d/90-qemu.rules
Again, we type:
KERNEL=="sda", SYMLINK+="mmcblk0"
KERNEL=="sda?", SYMLINK+="mmcblk0p%n"
KERNEL=="sda2", SYMLINK+="root"
This time, however, we write the quotes » with shift+2, because the Raspberry Pi emulation currently has an English UK keyboard layout.
After that, again we exit.

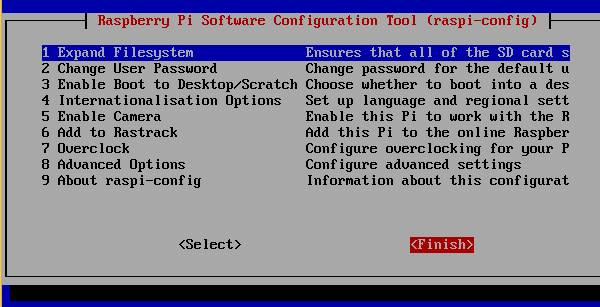
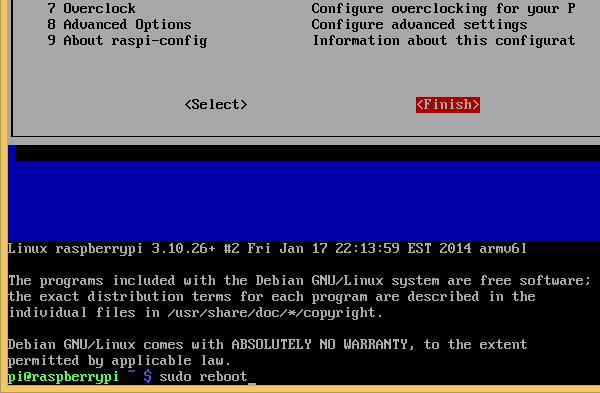
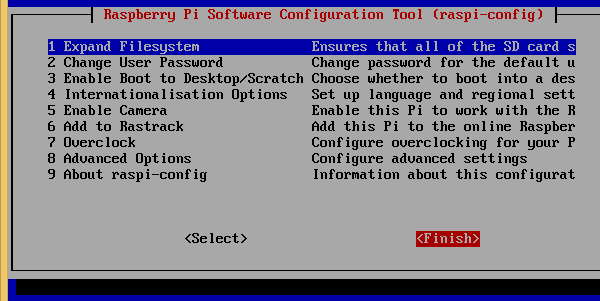
This time, the «exit» command will lead to a reboot, that will get us to the Raspberry Pi Software Configuration Tool. We press «Tab» on the keyboard to select «Finish».
As the pi@raspberrypi user, we type the command:
sudo reboot
This command will close the emulation. We start it again, double-clicking the «Start» batch file.
This time, after the boot sequence, the system will ask us to login.

The default credentials are:
username: pi
password: raspberry
Remember, when we type our password on Linux, nothing will show by default, not stars or dots or anything.
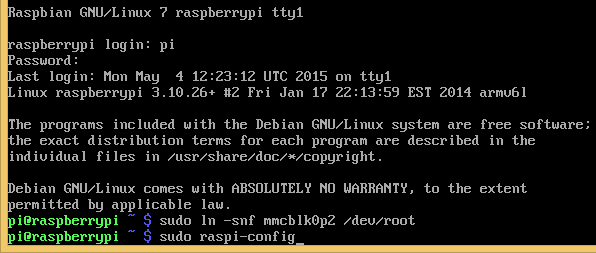
Once inside, we type two consecutive orders:
sudo ln -snf mmcblk0p2 /dev/root
sudo raspi-config
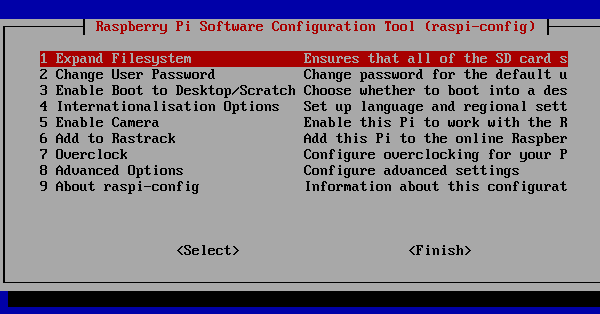
This will get us back to the configuration tool. We select the first option, «Expand Filesystem»…
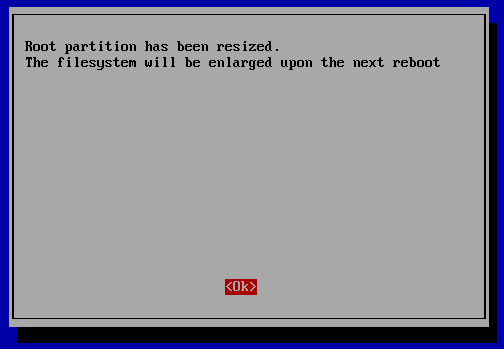
The configuration tool will momentarily close, and in a couple of seconds it will queue up the /root partition to expand and cover all the 10GB of the space on the next reboot.
Again, we press tab to select «Finish»…
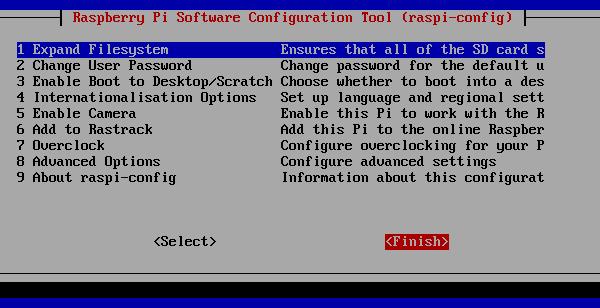
…and this time, we select to reboot.
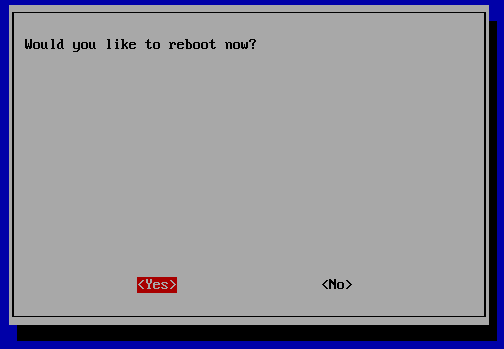
The Raspberry Pi emulation will shutdown again. We start it with the «Start» batch.
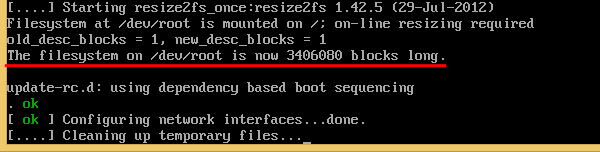
This time, the boot will take longer. It will seem stuck at the message below.
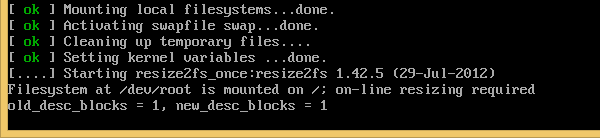
This is the resize command, and it will take some time. Leave it alone, and in a few minutes it will proceed with the boot.
After we log in as the «pi» user, we do a full update with:
sudo apt-get update && sudo apt-get dist-upgrade -y
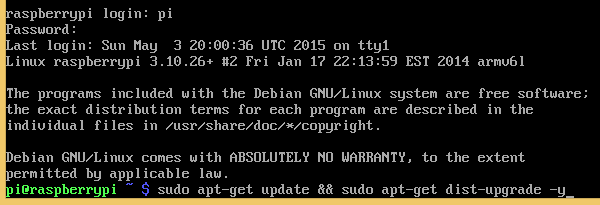
This will also take a while, both to download and to install the updates. When the update is done, we type:
sudo raspi-config
The most important configuration is the «Enable Boot to Desktop/Scratch» option.
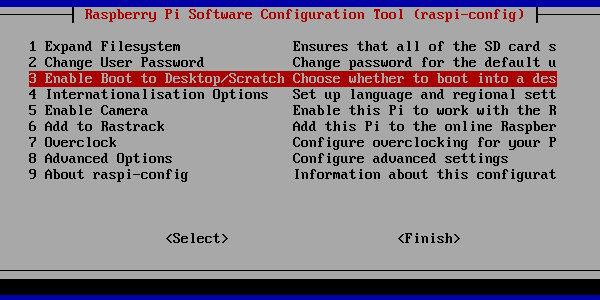
There, we select the «Desktop Log in as user ‘pi’ at the graphical desktop» option.
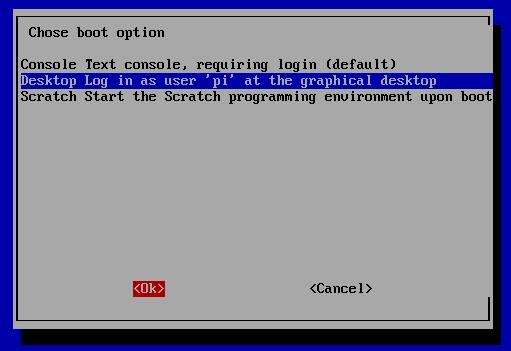
We can also configure other stuff, such as the locales.
Once we are done, we tab to «Finish».
Once again, we select to reboot.
On the next boot, the system will automatically start the graphical user Interface.
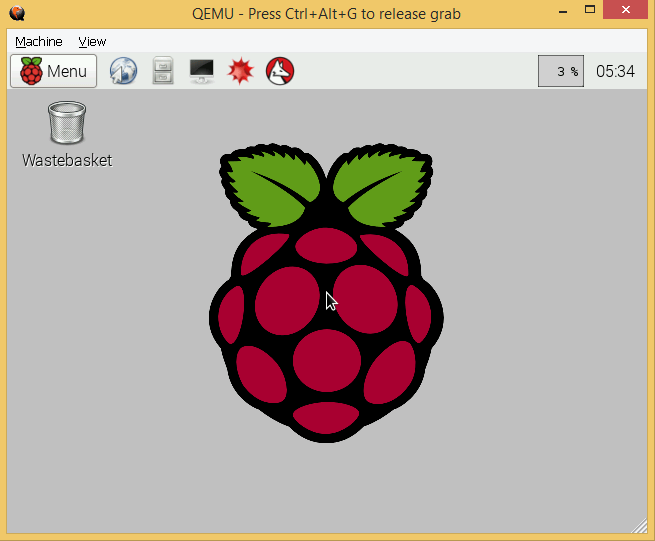
That’s it. The Raspberry Pi emulation for Windows is complete.
Did you have any trouble with the Raspberry Pi emulation?
If any of the above didn’t work as described, and you were unable to create a Raspberry Pi emulation, leave us a comment. If you used a different version of QEMU and/or Raspbian, you should also mention the exact versions.
Support PCsteps
Do you want to support PCsteps, so we can post high quality articles throughout the week?
You can like our Facebook page, share this post with your friends, and select our affiliate links for your purchases on Amazon.com or Newegg.
If you prefer your purchases from China, we are affiliated with the largest international e-shops:
- Banggood
- Geekbuying


In this tutorial I’ll show you how to install Raspberry Pi OS Desktop on a virtual machine, and more specifically on VirtualBox.
As you may know, Raspberry Pi OS is the new name for Raspbian – the official OS for Raspberry Pi boards, derived from Debian.
But… Raspberry Pi OS is not only working on Raspberry Pi boards. You can actually install it on a standard computer. In fact, there is a Raspberry Pi OS Desktop version just for that! And even better, you can install Raspberry Pi OS Desktop directly on a virtual machine. This will allow you to do some experiments and test Raspberry Pi OS, directly from your computer (on Windows, Linux, or Mac).
This tutorial is a step by step guide to help you during the installation process.
Let’s get started!
You are learning how to use Raspberry Pi to build your own projects?
Check out Raspberry Pi For Beginners and learn step by step.
Watch this video as an additional resource to this article:
After watching the video, subscribe to the Robotics Back-End Youtube channel so you don’t miss the next tutorials!
As stated before, for this tutorial I’ll use VirtualBox. You can download the installer from their official wiki page. Take the latest available version, and choose the OS you’re currently using (Windows, Linux, Mac).
Then, after you’ve downloaded it, click on the installer and follow the steps on the screen to install VirtualBox on your computer.
Download Raspberry Pi OS Desktop ISO
Go to the Raspberry Pi download page – Raspberry Pi Desktop section – and click on the “Download” button for a direct download. You can also choose to download by Torrent, in this case make sure you have a Torrent software installed on your computer.
The download part is the longest of the installation process, as the ISO file is more than 2GB.
Create a new virtual machine for Raspberry Pi OS Desktop
Start VirtualBox. On the left you’ll see the list of all virtual machines you’ve already created. If you just installed VirtualBox, this list will be empty. As you can see on the image below, in my case I already have one. Let’s now create a new one for Raspberry Pi OS Desktop. Click on the “New” button.
You will get a setting popup for your new virtual machine.
Virtual Machine Name and type
First select a name which will be easy for you to remember. As you’ll install Raspberry Pi OS Desktop OS, why not simply call it “Raspberry Pi OS Desktop” (or “Raspbian Desktop”) ?
Also, you need to choose what kind of machine you want it to be. In this case, Linux, and more specifically Debian (64-bit).
Click on “Next”.
RAM allocation
Now you’ll have to choose how much RAM you want to allocate for your virtual machine. As you can see the recommended memory size here is 1GB. It’s better to put more if you can, as long as you stay in the green area (so the virtual machine doesn’t eat up the required resources for your host OS). In this example I’ve allocated 4GB.
Virtual Hard Disk
After the RAM, VirtualBox will ask you if you want to create a virtual hard disk for your virtual machine. At this point I recommend you follow the default instruction, which is “Create a virtual hard disk now”. Click on “Create” to go to the next screen.
If VirtualBox asks you to choose which kind of virtual hard disk you want, you can go with “VDI (VirtualBox Disk Image)”, which is the default option.
Then, it will ask you to choose between a dynamically allocated disk, or one with a fixed size. If you have a lot of space on your computer, and if its performance is quite low, choose “Fixed size”. Otherwise, “dynamically allocated” is good. This can use a little bit more resources when running the VM, but nothing to worry about if your computer has descent performances.
VirtualBox will ask you how much space you want to allocate for your VM. It may set 8GB by default, which is quite low. I recommend you put at least 15 to 25GB, so you won’t have to worry about it anymore (unless you plan on using heavy media files inside your VM).
Note: if hard disk space is dynamically allocated, you can put a bigger number, it’s OK since the additional disk space won’t be used at the beginning.
When clicking on “Create”, the virtual hard disk will be created and the popup will shutdown. You will see a new virtual machine on your list!
Allocate CPUs for your VM
There is one additional thing you can do to boost your VM, which is not in the default setup wizard. Select your “Raspberry Pi OS Desktop” (or whichever name you chose) and click on “Settings”. You can also right-click on the VM > “Settings”.
In the “System” tab, “Processor” panel, you can see how many CPUs are allocated for your VM. By default only 1 will be used. If you have 4 or 8 cores in your machine, I recommend you use 2 to 4 cores. This will really speed up things when running your VM.
Associate the Raspberry Pi OS Desktop ISO file to your Virtual Machine
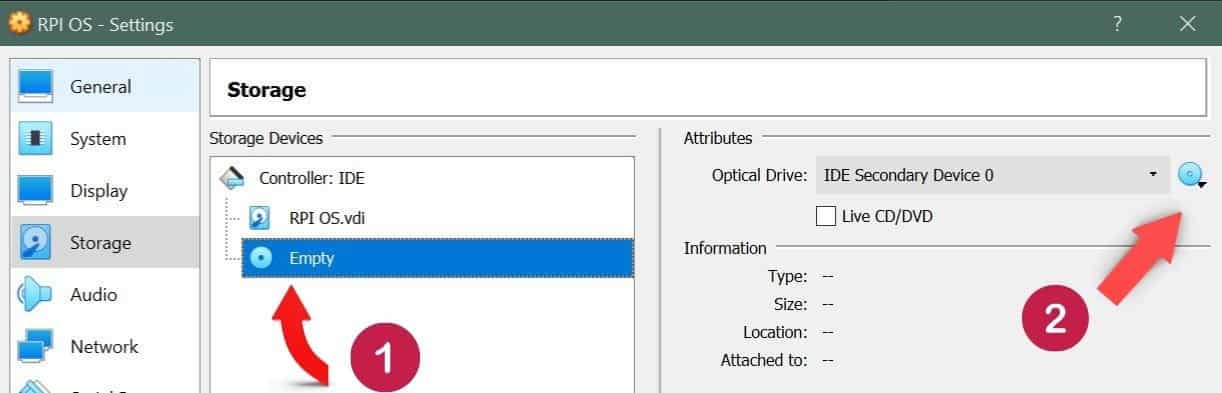
Now, still inside the settings, go into the “Storage” tab. Select the “Empty” disk icon below “Controller: IDE”. On the right, click on the disk icon and select “Choose a disk file”. Now is the time to fetch your downloaded Raspberry Pi OS Desktop ISO.
After you’ve found and selected the correct ISO, you’ll be able to see it like in the following screenshot.
Click on “OK” to save and close the settings window.
Now, you can launch your Raspberry Pi OS Desktop VM by clicking on the “Start” button, which a big green arrow.
VirtualBox may ask you to choose (again) your startup ISO file.
In this case, browse your files and select your ISO, and then click on “Start”.
The first step of the installation is done. You have now successfully created a virtual machine, allocated RAM and CPU, and associated the Raspberry Pi OS Desktop ISO.
Now it’s time to install the Raspberry Pi OS Desktop OS itself.
Install Raspberry Pi OS Desktop on your virtual machine
After you’ve started Raspberry Pi OS Desktop from VirtualBox for the first time, you’ll get a menu asking you to choose between running or installing the OS.
Choose “Graphical install” with your keyboard arrows, and press ENTER. Usually if you don’t do anything for 10 seconds, the first choice will automatically be executed. No worry, in this case you just have to restart your VM (click on the top right cross > Shutdown).
After you’ve selected “Graphical install” you’ll get a series of dialogs to help you correctly install your OS.
Choose language
First, choose your language.
Click on “Continue”. Here you might get a loading bar saying “Loading additional components”. Wait until it’s done.
Partition Disks
In the previous section you have allocated some space to use for the virtual hard disk. Now is the time to create some partitions on this virtual disk.
The next few dialogs you get will let you choose how to partition your disk. If you’re not confident partitioning your disk manually, choose the following options, which are completely fine.
You will be asked if you want to erase all data on your disk. Don’t worry here, the disk we’re talking about is your virtual disk, not the space where all your personal data and Windows (or other) OS is stored. So, yes, you can choose to totally erase the virtual disk, since there’s nothing in it yet.
If you know what you’re doing, you can choose to separate the /home partition from the rest. Otherwise, all files in one partition is fine.
Then you get the summary of what will be created. As you can see 2 partitions will be created on your virtual hard disk:
- ext4: where all files will be stored.
- swap: this additional space will be used when your Raspberry Pi OS consumes too much RAM. This is kind of a “safety feature” to have when installing an OS.
Now, the installation wizard will show you a global summary and ask you to confirm. Click on “Yes” and “Continue”.
You should now see a loading bar stating “Installing the system”. Depending on your computer performance, and the resources that you’ve allocated for your VM, this can take quite a long time (a few minutes).
Install GRUB boot loader
After partitioning your disk, the installation wizard will ask you if you want to install the GRUB boot loader on your newly created hard drive. This is perfectly safe to do, as again, this is a new virtual hard drive, with nothing previously installed on it.
Choose “Yes” and click on “Continue”.
You should see the virtual hard drive created by VirtualBox in the list. Choose the device starting with “/dev/sda”, and click on “Continue”.
Well, this is the end of the Raspberry Pi OS Desktop installation steps! Now you should get an “installation complete” screen, and see this last progress bar.
After that, your Raspberry Pi OS Desktop is installed on your new virtual machine. All you have to do is launch it.
Your Raspberry Pi OS Desktop virtual machine is now ready – First launch
After the last installation step, your virtual machine may automatically reboot and start on your newly installed Raspberry Pi OS Desktop. If not, simply start it from the VirtualBox main window.
You should see this.
This is the GRUB menu, which simply ask which OS you want to start. If you do nothing, after about 5 seconds the first choice will be selected, which is what you want. So, either wait for 5 seconds, or press ENTER to launch Raspberry Pi OS Desktop (seen as “Debian GNU/Linux”).
As it’s the first time you launch your newly installed OS, you’ll see a welcome screen.
Click on “Next” to finish the configuration of your OS. This is optional but I strongly recommend you do it. You will have to:
- Choose a country, language, timezone, keyboard configuration.
- Change the default password (by default, username: “pi”, and password: “raspberry”).
- Update software with latest available versions.
What to do next on your Raspberry Pi OS Desktop?
Well, configuring Raspberry Pi OS Desktop on a virtual machine requires quite a few steps. But now that you’re here, everything should work fine and you can now use your OS without any problem.
Now, the interesting things can begin! You can start many Raspberry Pi projects directly on your computer, without having to have one Raspberry Pi board. Of course you won’t get access to the Raspberry Pi hardware (GPIO headers), but everything else is possible.
Start by configuring your environment, install a text editor (Nano, Vim, Emacs, …), and start developing your first project!
Emulate Raspberry pi on windows
Following files required to emulate raspberry pi on windows
- QEMU Emulator
- Raspberry pi kernel
- Raspberry pi OS image
QEMU emulator
- QEMU is an emulator
- Can be downloaded from the link QEMU
- Download 32 bit the latest version of exe, 64-bit version has some issues
- When it’s executed files will be extracted and available in the same folder
- Rename the folder into qemu (Which ever you like)
Raspberry pi kernel
- QEMU requires kernel to emulate the guest OS
- It will vary between OS and architecture
- Kernel for Raspberry pi can be downloaded from the link Rpi kernel
- Download the latest version of the kernel
- Once downloaded copy the kernel into qemu folder
Raspberry pi OS image
- Raspberry pi OS(Raspbian) can be downloaded from the following URL Rasbian
- Once downloaded extract the img file into qemu folder
Booting Raspbian
- Create a start.bat file under qemu folder
- put following lines into it
qemu-system-arm -kernel kernel-qemu-4.4.34-jessie -cpu arm1176 -m 256 -M versatilepb -no-reboot -serial stdio -append "root=/dev/sda2 panic=1 rootfstype=ext4 rw init=/bin/bash" -drive "file=2017-07-05-raspbian-jessie.img,index=0,media=disk,format=raw" -net nic -net user,hostfwd=tcp::2222-:22
- ‘kernel-qemu-4.4.34-jessie’ is kernel file name
- ‘2017-07-05-raspbian-jessie.img’ is raspberry pi OS
- ‘hostfwd=tcp::2222-:22’ will forward port from guest to host OS. Here we are forwarding port 22 into 2222 .Guest OS can be sshed through 2222 port
- ‘init=/bin/bash’ Will boot the OS and launch bash instead displaying GUI
- Boot the OS by double click on start.bat file
- Once terminal displayed we need to use followng command to add quemu rules
- Create a rule file by typing following command
sudo nano /etc/udev/rules.d/90-qemu.rules
- Once file opened type following in that file
KERNEL=="sda", SYMLINK+="mmcblk0"
KERNEL=="sda?", SYMLINK+="mmcblk0p%n"
KERNEL=="sda2", SYMLINK+="root"
- Save the file by pressing
ctl+x - Shutdown the OS by typing
sudo shutdown nowIf shutdown not working just close the emulator - Now open the
start.batfile and do the following change to boot into GUI- Remove
"init=/bin/bash"text which will be displayed afterrwSave the file and double click to launch Rasbian with GUI
- Remove
Increase the partition size
Disk size of the OS can be increased by using the following command from the host machine, Make sure guest OS turned off before increasing the disk size
qemu-img.exe resize 2017-07-05-raspbian-jessie.img +4G
Above command will add 4 GB storage of the guest OS.
Once successfully increased the disk size we should expand the partition in guest OS, Follow the steps to expanding partition
- Launch the rasbian by double click start.bat
- Once successfully launched open terminal
- Type
sudo fdisk /dev/sda - Delete the partition
- Type
pto display the list of partitions - Note the partition 2 details this will help us to increase the partition, especially
first sectornumber - Delete the partition 2 by typing
dand when its asks for the partition number provide2, this will delete the partition 2
- Type
- Create a new partition
- Now create new partition by typing
n - Choose partition type as primary by providing
p - When position number requested provide
2 - System will ask for the first sector, provide the first sector number which we noted from the deleted 2nd partition and press enter
- When system ask for the last sector just type enter it will calculate the last sector and choose by default
- Once above steps completed type
wto commit the changes
- Now create new partition by typing
- Now reboot the OS, after successful boot launch terminal again and provide the following command
- After that reboot the OS, Now you have expanded the partition
Increase the swap file size
- Type following command in terminal
sudo nano /etc/dphys-swapfileto open swap file - Goto CONF_SWAPSIZE and change that from 100 to 1024
- Stop the swap file and start again by using following command
sudo /etc/init.d/dphys-swapfile stopandsudo /etc/init.d/dphys-swapfile start