Windows Vista – это мощная операционная система, доступная на современном рынке программного обеспечения, но многие люди знают и любят Vista только благодаря потрясающему графическому интерфейсу Aero. К сожалению, этот графический интерфейс Aero отсутствует в Windows Vista Home Basic Edition. Тем не менее, здесь есть учебник о том, как вы можете предоставить вашему Home Basic Edition функцию Aero.
Включить Aero в Windows Vista Home Basic
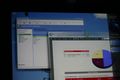
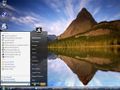
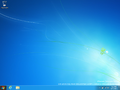
Это внешний вид Vista Basic без эффекта свечения на любой кнопке. Внешний вид Vista Standard сильно отличается от внешнего вида Vista Aero, так как эффект стекла отсутствует, и Flip 3D поставляется с ним.

Если вы хотите активировать Vista Standard Look на своей домашней базовой машине, следуйте этим инструкциям:
ТРЕБОВАНИЯ: Требования к оборудованию для Vista Standard Look:
- Ваша графическая карта должна поддерживать DirectX 9.
- Ваша видеокарта должна поддерживать Pixel Shader 2.0, но большинство новых видеокарт поддерживают.
- Ваша графическая карта должна поддерживать WDDM (модель драйвера дисплея Windows Vista).
- Настройки графики должны быть 32-битными.
- Ваша графическая карта должна иметь 60 МБ графической памяти (128 МБ для Aero).
- Вы также должны иметь память не менее 512 МБ (RAM).
- Если у вас нет поддержки Pixel Shader 2.0 на вашей видеокарте, я также советую вам попробовать эту настройку.
ПРОЦЕДУРА:
- Откройте редактор реестра, нажав Win Key + R и набрав Regedit.exe. Нажмите продолжить на UAC.
- Перейдите к HKEY_CURRENT_USER> Программное обеспечение> Microsoft> Windows> DWM.
- В правой части откройте ключ Composition и измените его на 1. Теперь откройте CompositionPolicy и установите его значение равным 2.
- Теперь создайте значение DWORD с именем Glass и присвойте ему значение 1, а другое значение DWORD с именем ForceSoftwareD3D и присвойте ему значение 0.

5. Теперь нажмите кнопку «Пуск», введите services.msc в поле поиска и нажмите клавишу ввода.
6. Теперь найдите Desktop Manager Windows Session Manager и нажмите кнопку перезагрузки.
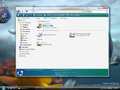
Перезагрузите Windows, и теперь вы сможете увидеть вариант Vista Standard в Windows Color & Appearance.

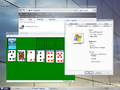
Когда вы применяете стандартный вид, ваша Windows будет выглядеть так:

Для Glass Effect требуется много графической карты и памяти (ОЗУ), поэтому я рекомендую иметь не менее 70 МБ графической карты и 480 МБ памяти.

В первой настройке вы создали DWORD-значение Glass, но этот взлом реестра редко включает Glass в Vista Home Basic, поэтому я предлагаю вам скачать VistaGlazz. Это утилита, которая позволяет пользователю применять сторонние визуальные темы и каким-то образом включает Vista Glass Effect в Maximized Windows.
ПРИМЕЧАНИЕ. Невозможно каким-либо образом включить полный эффект Windows Glass на Windows Vista Home Basic.
Также попробуйте эту настройку реестра, чтобы включить эффект стекла на неподдерживаемых графических картах.
- Откройте редактор реестра, нажав кнопку Пуск + R и набрав Regedit.exe.
- Перейдите к HKEY_LOCAL_MACHINE> Программное обеспечение> Windows> DWM.
- Создайте значение DWORD с именем EnableMachineCheck и присвойте ему значение 0. Также создайте другое значение DWORD с именем Glass и присвойте ему значение 1.
- Перезагрузите Windows
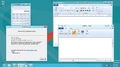
После того, как вы исправите файлы с помощью Vista Glazz, он включит Glass Effect на вашем компьютере Home Basic в Maximized Windows.

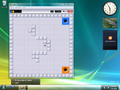
Как видите, эффект «Стекло» включен, но только в развернутой Windows. Вы также заметите, что на панели задач также будет отображаться эффект стекла при развертывании любого окна.
В Vista Home Premium Ultimate Business есть новая функция, известная как Flip 3D . Flip 3D является альтернативой стандартной функции alt + tab. В Vista Home Basic Flip 3D недоступен, и его даже нельзя включить через любой вид настройки реестра. Вы можете попробовать альтернативную бесплатную программу SmartFlip.
Живая панель задач – еще одна интересная функция, доступная только в Vista Home Premium Ultimate Business. Эта функция GUI выдает небольшой предварительный просмотр свернутой Windows или приложения. Как и Flip 3D и Glass, эта функция также не может быть активирована в Vista Home Basic через любой твик реестра. В Vista Home Basic при наведении курсора на любое свернутое окно или приложение просто появляется имя этого окна или приложения. Однако вы можете установить бесплатную Visual ToolTip. Используя Visual ToolTip, вы даже можете контролировать размер предварительного просмотра, который вы хотите просмотреть.
Автор: Абхишек Двиведи
Измените ваш рабочий стол с помощью разработанного скина, позаимствовавшего основной интерфейс у «Windows Vista Aero», наделив открывшиеся окна проводника в полупрозрачную рамку, уникально выделив изменившееся окно на экране компьютера. Стандартные установленные обои в оттенки сине-зеленого цвета полюбятся каждому пользователю, благодаря своей универсальной иллюстрации. В качестве приятного бонуса, скачанная тема предоставит вам гаджеты, которые разместятся по правой области рабочего стола, где вы сможете сосредоточить важную вам информацию для быстрого доступа.
+ Vista Aero
- aero.msstyles
+ Shell
+ NormalColor
+ en-US
- shellstyle.dll.mui
- shellstyle.dll
+ Wallpaper
— img16.jpg
— img17.jpg
— img18.jpg
— img19.jpg
— img20.jpg
— img21.jpg
— img22.jpg
— img23.jpg
— img24.jpg
Windows Vista Basic.theme
Windows Vista Blue.theme
Windows Vista Default.theme
Windows Vista Frost.theme
Windows Vista Graphite.theme
Windows Vista Orange.theme
Windows Vista Pink.theme
Windows Vista Red.theme
Windows Vista Teal.theme
| Microsoft Windows visual style | |

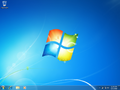
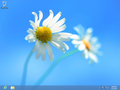
Windows Aero in Windows 7 |
|
| Included in | Windows Vista and later |
|---|---|
| First seen in | Windows Longhorn build 4015 (main) |
Aero is a translucent Windows visual style used from Milestone 5 Longhorn builds to Windows 7 (window transparency was removed in 8). The first known build to reference Aero is Windows Server 2008 build 4028, and the last build with Aero that has functional window transparency is Windows 8 build 8424 (fbl woa drop). In Windows Longhorn, Aero effects relied on the Desktop Compositing Engine (or Desktop Window Manager in newer builds), which only worked in a few builds such as 4038, 4039, 4042, 4066, and 4074.
In Windows Vista and 7, the theme relies on a WDDM driver due to the use of hardware acceleration. If hardware acceleration is not supported, the Windows Basic theme would instead be used. This requirement was dropped since at least Windows 8 build 7880 with the introduction of a software rendering fallback to the Desktop Window Manager. The theme is also available in server editions of Windows from Windows Server 2008 onwards.
Enabling Aero[edit | edit source]
No pre-reset builds of Longhorn contained the Aero theme. There is a very common misconception that Aero can be ‘enabled’ in pre-reset builds of Longhorn by renaming visual style files; renaming the files tricks the OS into assuming that the user has access to the private, unleaked Aero theme, and therefore enables various DCE/DWM effects. For example, renaming plex.msstyles to aero.msstyles in M6 builds (slate.msstyles to aero.msstyles for build 4042 (Lab06_n)) will grant the user the Glass DCE window frame, but will retain much of the Plex (Slate for 4042 (Lab06_n)) style. For M7 builds, the Aero visual style may be re-created using the Jade visual style, although the process is not as simple as renaming jade.msstyles to aero.msstyles.
Windows Longhorn build 4038 to build 4042 (Lab06_n)[edit | edit source]
First, install a compatible Direct3D driver and ensure it works via dxdiag.exe. While you can run sbctl start in C:WINDOWSi386 to enable the borders, they will be opaque. The User Experience Desktop Server checks for the existence of %windir%resourcesthemesaeroaero.msstyles, if found, transparent Glass borders will be used instead of the opaque Metal border. In order to enable transparent borders, you need to go into C:WINDOWSResourcesThemes and copy the «Plex» folder («Slate» for Lab06_n compile of build 4042). Paste back into the Themes folder and the new folder should automatically rename itself to «Plex — Copy» («Slate — Copy» on the aforementioned build). Rename the pasted folder to «Aero» and rename the .msstyles file inside the folder to aero.msstyles. After that, restart the Theming service (either running net stop winux and net start winux, for Lab06 builds or logging off and back on will work). At this point, you can run sbctl start again to enable the glass borders.
Windows Longhorn builds 4074 to 4082[edit | edit source]
- Note: Much of the steps in this guide do not work on 64-bit builds since they only offer basic DWM functionality.
This is a guide on how to enable Aero theme in Longhorn build 4074 to 4082. It does not contain steps for patching system files such as Microsoft.Windows.WCPClient.dll to enable other Aero UI/features.
Video Drivers and Theme Files[edit | edit source]
If using VMware Workstation version 7.1, an appropriate SVGA driver must be installed. To install the driver, go to the Device Manager, and under ‘Graphics’ click ‘Update Driver’ with the mounted or burned driver pack ISO (Device Manager is not fully functional in build 4081 and 4082 because hdwwiz.cpl is missing. It is possible to port hdwwiz.cpl from another build to the WINDOWSSYSTEM32 directory in order to get it to work). Builds 4081 and 4082 require booting into VGA display mode after updating the driver, otherwise it will result in a 0x000000B4 BSOD.
Builds 4081 and 4082 ship with an incomplete copy of DirectX 9, which can cause a black screen when DWM is enabled. The missing components can be obtained from the DirectX 9.0b or 9.0c installer for Windows XP. The installer itself will not work on Longhorn, but this can be bypassed by manually extracting the contents of dxnt.cab and installing all of the .inf files found within from their right-click menus (answer no to all overwrite prompts), and copying any remaining files from dxnt.cab into System32. Verify successful installation by running the Direct3D tests in dxdiag (it may complain about DirectShow not being registered, but the spinning 3D cube animation can still confirm DirectX is functional).
The Aero theme files should then be reconstructed. Aero theme files may be reconstructed based on Jade, and here is a reconstructed aero.msstyles file. Once you have a reconstructed aero.msstyles, you then need to create a folder named Aero in the %WinDir%ResourcesThemes directory, and place aero.msstyles inside the newly created Aero folder. Once that is done, go back to %WinDir%ResourcesThemes, make a copy of jade.theme and name it as aero.theme. The last step is to modify the aero.theme file to load the reconstructed aero.msstyles. Open aero.theme with Notepad and change DisplayName=@themeui.dll,-2013 to DisplayName=Aero, then replace all instances of ‘Jade’ with ‘Aero’ and save it.
The last step is to modify the Registry to allow the Aero theme to be applied. Open Registry Editor, browse to HKLMSoftwareMicrosoftWindowsCurrentVersionThemeManager, create a DWORD called DemoCheckOverride and set its value to 64222 (or 0xFADE in hexadecimal).
Differences between Aero and Jade[edit | edit source]
The public DWM theme, Jade differs from the private Aero theme in a few aspects. This section lists some technical information regarding the differences. If you wish to reconstruct the Aero theme yourself, you must have a good knowledge of the Longhorn theme format.
The private Aero theme turns DWM on automatically, when you apply it or when you log on. To allow the Jade theme to do the same thing, a BOOL named UsesComposition must be patched for its value to be TRUE. The private Aero theme contains a string under the theme documentation class called DemoCheck, which is used by the Theme Manager to make sure that the Aero theme may only be applied on Microsoft’s demo machines. It contains the path name of a file on Microsoft’s network share, which may only be accessed by Microsoft employees. The theme will apply if that file is accessible, otherwise an Access Denied error will be thrown. If the demo check passes, the Animated Preview Pane Aurora will also be enabled, but the demo check is ineffective due to some logical errors in its implementation. It is optional to have DemoCheck added to the Jade theme, but if you would like your reconstruction of the Aero theme to be as close to Microsoft’s private Aero theme as possible, you should add the DemoCheck string \cloak2dropbinenlist.txt to the theme documentation. Needless to say, the private Aero theme contains Aero Glass resources such as transparent Glass window frames, but unfortunately they are currently unavailable. You may wish to replace those Jade (STREAM) resources with modified post-reset Aero Glass resources (it is recommended that you use RealAero resources). If you choose to replace STREAM resources, do not forget to update those hard coded file sizes. The Animated Preview Pane Aurora BAML in the Jade theme is also outdated, which must be updated to the newest format in order for it render. Again, do not forget to change the hard coded file size.
MIL Effects[edit | edit source]
To enable Media Integration Layer (MIL) effects, merge the following entries into the registry:
[HKEY_LOCAL_MACHINESOFTWAREMicrosoftWindowsCurrentVersionExplorer]
"MILExplorer"=dword:00000001
"MILDesktop"=dword:00000000
To enable the animated Aero Stars effects, toggle the MILDesktop DWORD to 1 in HKEY_LOCAL_MACHINESOFTWAREMicrosoftWindowsCurrentVersionExplorer. Apply the Aero theme through the Control Panel to automatically enable DWM, in addition to enabling a translucent taskbar and sidebar interface.
DWM may fail to load if appropriate display drivers are not installed, which can lead to Aero Glass borders and Explorer not rendering properly if MIL effects are enabled.
Windows Longhorn builds 4088 to 4093[edit | edit source]
Builds within this range feature a Managed .NET rewrite of the Desktop Window Manager. This version would be abandoned after the reset, and would be replaced with a new native implementation that is largely different from the one used in builds prior to 4083. Unlike native implementations in both pre-reset and post-reset builds, this version can run even on the «Standard VGA Graphics Adapter» driver.
The new implementation is found in the component package C:buildfilerepositorywindowmanager_a2ea4897, and is called windowmanager.exe. Two XAML files, DwmDsk.xaml and DwmWin.xaml, are not present in the build and must be reconstructed in the same directory as windowmanager.exe. These were likely meant to be eventually included as BAMLs in the aero.msstyles file, had the managed DWM implementation not been ditched due to the development reset. An earlier version of the Jade theme (preferably the one found in build 4074, as some DWM resources that were in STREAM folder got converted to bitmaps in build 4093’s Jade) is required in order to allow DWM to work.
To enable DWM, create the file DwmDsk.xaml in the directory C:buildfilerepositorywindowmanager_a2ea4897 with the following contents:
DwmDsk.xaml:
<?Mapping XmlNamespace="mscorlib_System" ClrNamespace="System" Assembly="mscorlib" ?>
<?Mapping XmlNamespace="windowmanager.WindowLayouts" ClrNamespace="WindowLayouts" Assembly="WindowManager" ?>
<Canvas xmlns="http://schemas.microsoft.com/2003/xaml/" xmlns:wl="windowmanager.WindowLayouts" xmlns:System="mscorlib_System" xmlns:def="Definition" Width="800" Height="600" Background="#80FF0000">
  <Canvas.Resources>
    <Style def:Name="ItemsControlStyle">
      <ItemsControl/>
      <Style.VisualTree>
        <FlowPanel Width="400" Height="600" ItemsControl.IsItemsHost="true" Background="#8000ff00"/>
      </Style.VisualTree>
    </Style>
    <Style def:Name="ItemsControlStyle2">
      <ItemsControl/>
      <Style.VisualTree>
        <wl:CascadePanel ID="myCascadePanel" ItemsControl.IsItemsHost="true"/>
      </Style.VisualTree>
    </Style>
  </Canvas.Resources>
  <wl:CascadeItemsControl ID="DesktopView" Background="#ccffffff" Style="{ItemsControlStyle2}">
    <CollectionContainer Collection="*Bind()"/>
  </wl:CascadeItemsControl>
  <ItemsControl ID="TaskBarIconView" Width="400" Height="600" Background="#40334455">
    <CollectionContainer Collection="*Bind()"/>
  </ItemsControl>
</Canvas>
Create C:buildfilerepositorywindowmanager_a2ea4897DwmWin.xaml with the following content:
DwmWin.xaml:
<?Mapping XmlNamespace="mscorlib_System" ClrNamespace="System" Assembly="mscorlib" ?>
<?Mapping XmlNamespace="windowmanager.WindowLayouts" ClrNamespace="WindowLayouts" Assembly="WindowManager" ?>
<?Mapping XmlNamespace="explorer" ClrNamespace="MS.Internal.Desktop" Assembly="System.Windows.Explorer" ?>
<FlowPanel xmlns="http://schemas.microsoft.com/2003/xaml/" xmlns:wl="windowmanager.WindowLayouts" xmlns:System="mscorlib_System" xmlns:def="Definition" Width="800" Height="600" Background="#80FF0000">
  <FlowPanel.Resources>
    <Style def:Name="NonClientAreaStyleNone">
      <wl:UserWindowChrome Width="*Bind(Path=Width)" Height="*Bind(Path=Height)"/>
      <Style.VisualTree>
        <Canvas ID="Region_WindowTransform">
          <Image ID="ClientArea" Source="*Bind(Path=ClientArea)"/>
        </Canvas>
      </Style.VisualTree>
    </Style>
    <Style def:Name="NonClientAreaStyleBorder">
      <wl:UserWindowChrome Background="#800000ff" Width="*Bind(Path=Width)" Height="*Bind(Path=Height)"/>
      <Style.VisualTree>
        <Canvas ID="Region_WindowTransform" Background="#800000ff">
          <Image ID="ClientArea" Source="*Bind(Path=ClientArea)"/>
          <Text TextContent="*Bind(Path=Title)"/>
        </Canvas>
      </Style.VisualTree>
    </Style>
    <Style def:Name="NonClientAreaStyleFrame">
      <wl:UserWindowChrome Background="#8000ffff" Width="*Bind(Path=Width)" Height="*Bind(Path=Height)"/>
      <Style.VisualTree>
        <DockPanel ID="Region_WindowTransform">
          <DockPanel DockPanel.Dock="Top">
            <Canvas DockPanel.Dock="Right">
              <fullexp:HackImage xmlns:fullexp="explorer" Margin="0,0,0,0" fullexp:HackSource="theme://CompositedWindow,SDB_BACK,SDBTB_NORMAL" fullexp:HackNineGrid="9,105,150,9" Width="100%" Height="100%"/>
              <Grid Width="100%" Margin="0,6,0,0">
                <ColumnDefinition Width="8"/>
                <ColumnDefinition Width="*"/>
                <ColumnDefinition Width="8"/>
                <DockPanel ID="Region_Resize" Grid.Column="1" Background="#00000000">
                  <fullexp:HackImage xmlns:fullexp="explorer" fullexp:HackSource="theme://CompositedWindow,SDB_CLOCKGLASS,SDBTB_NORMAL" Width="20" Height="17" Background="#FFFF0000" DockPanel.Dock="Left"/>
                  <Text TextContent="*Bind(Path=Title)" DockPanel.Dock="Left" Margin="3,3,0,0"/>
                </DockPanel>
              </Grid>
              <DockPanel DockPanel.Dock="Bottom" Margin="0,26,0,0">
                <DockPanel DockPanel.Dock="Left" Margin="8,0,8,8">
                  <Image ID="ClientArea" Source="*Bind(Path=ClientArea)" DockPanel.Dock="Right"/>
                </DockPanel>
              </DockPanel>
              <DockPanel Width="100%">
                <fullexp:HackImage xmlns:fullexp="explorer" ID="FakeCloseButton" fullexp:HackSource="theme://CompositedWindow,SDB_EXPANDO_CLOSED_HORIZ,SDBTB_NORMAL" Width="43" Height="14" DockPanel.Dock="Right" Margin="0,1,6,0" fullexp:HackNineGrid="0,0,14,0"/>
                <fullexp:HackImage xmlns:fullexp="explorer" ID="FakeMaximizeButton" fullexp:HackSource="theme://CompositedWindow,SDB_STARTBUTTON,SDBTB_NORMAL" Width="25" Height="14" DockPanel.Dock="Right" Margin="0,1,0,0" fullexp:HackNineGrid="0,0,14,0"/>
                <fullexp:HackImage xmlns:fullexp="explorer" ID="FakeMinimizeButton" fullexp:HackSource="theme://CompositedWindow,SDB_TASKBACK,SDBTB_NORMAL" Width="27" Height="14" DockPanel.Dock="Right" Margin="0,1,0,0" fullexp:HackNineGrid="0,0,14,0"/>
              </DockPanel>
              <DockPanel Width="100%">
                <Canvas ID="CloseButton" Width="43" Height="14" DockPanel.Dock="Right" Margin="0,1,6,0" Background="#00112233"/>
                <Canvas ID="MaximizeButton" Width="25" Height="14" DockPanel.Dock="Right" Margin="0,1,0,0" Background="#00112233"/>
                <Canvas ID="MinimizeButton" Width="27" Height="14" DockPanel.Dock="Right" Margin="0,1,0,0" Background="#00112233"/>
              </DockPanel>
            </Canvas>
          </DockPanel>
        </DockPanel>
      </Style.VisualTree>
    </Style>
    <Style def:Name="NonClientAreaStyleFrameNonAero">
      <wl:UserWindowChrome Background="#80ffff00" Width="*Bind(Path=Width)" Height="*Bind(Path=Height)"/>
      <Style.VisualTree>
        <DockPanel ID="Region_WindowTransform" Background="#80ffff00">
          <Canvas DockPanel.Dock="Top" ID="Region_Resize" Margin="6,6,6,0" Background="#00112233">
            <DockPanel Width="100%">
              <Canvas ID="CloseButton" Width="20" Height="20" Background="#FFFF0000" DockPanel.Dock="Right"/>
              <Canvas ID="MaximizeButton" Width="20" Height="20" Background="#FF00FF00" DockPanel.Dock="Right"/>
              <Canvas ID="MinimizeButton" Width="20" Height="20" Background="#FF0000FF" DockPanel.Dock="Right"/>
              <Text TextContent="*Bind(Path=Title)" DockPanel.Dock="Left"/>
            </DockPanel>
          </Canvas>
          <DockPanel DockPanel.Dock="Bottom" Margin="0,0,0,6">
            <Canvas DockPanel.Dock="Right" Margin="6,0,6,0">
              <Image ID="ClientArea" Source="*Bind(Path=ClientArea)"/>
            </Canvas>
          </DockPanel>
        </DockPanel>
      </Style.VisualTree>
    </Style>
  </FlowPanel.Resources>
</FlowPanel>
DWM can then be activated by invoking C:buildfilerepositorywindowmanager_a2ea4897WindowManager.exe a (with an arbitrary argument to allow it to run as a regular application rather than a service), or by dragging any file onto WindowManager.exe in Explorer.
The rewrite was originally intended to be run as a Windows service. Due to issues that prevent the service from accessing the theme data, a different DwmWin.xaml file that does not rely on the theming service is instead required:
DwmWin.xaml:
<?Mapping XmlNamespace="mscorlib_System" ClrNamespace="System" Assembly="mscorlib" ?>
<?Mapping XmlNamespace="windowmanager.WindowLayouts" ClrNamespace="WindowLayouts" Assembly="WindowManager" ?>
<FlowPanel xmlns="http://schemas.microsoft.com/2003/xaml/" xmlns:wl="windowmanager.WindowLayouts" xmlns:System="mscorlib_System" xmlns:def="Definition" Width="800" Height="600" Background="#80FF0000">
  <FlowPanel.Resources>
    <Style def:Name="NonClientAreaStyleNone">
      <wl:UserWindowChrome Width="*Bind(Path=Width)" Height="*Bind(Path=Height)"/>
      <Style.VisualTree>
        <Canvas ID="Region_WindowTransform">
          <Image ID="ClientArea" Source="*Bind(Path=ClientArea)"/>
        </Canvas>
      </Style.VisualTree>
    </Style>
    <Style def:Name="NonClientAreaStyleBorder">
      <wl:UserWindowChrome Background="#800000ff" Width="*Bind(Path=Width)" Height="*Bind(Path=Height)"/>
      <Style.VisualTree>
        <Canvas ID="Region_WindowTransform" Background="#800000ff">
          <Image ID="ClientArea" Source="*Bind(Path=ClientArea)"/>
          <Text TextContent="*Bind(Path=Title)"/>
        </Canvas>
      </Style.VisualTree>
    </Style>
    <Style def:Name="NonClientAreaStyleFrame">
      <wl:UserWindowChrome Background="#8000ffff" Width="*Bind(Path=Width)" Height="*Bind(Path=Height)"/>
      <Style.VisualTree>
        <DockPanel ID="Region_WindowTransform" Background="#8000ffff">
          <Canvas DockPanel.Dock="Top" ID="Region_Resize" Margin="6,6,6,0" Background="#00112233">
            <DockPanel Width="100%">
              <Canvas ID="CloseButton" Width="20" Height="20" Background="#FFFF0000" DockPanel.Dock="Right"/>
              <Canvas ID="MaximizeButton" Width="20" Height="20" Background="#FF00FF00" DockPanel.Dock="Right"/>
              <Canvas ID="MinimizeButton" Width="20" Height="20" Background="#FF0000FF" DockPanel.Dock="Right"/>
              <Text TextContent="*Bind(Path=Title)" DockPanel.Dock="Left"/>
            </DockPanel>
          </Canvas>
          <DockPanel DockPanel.Dock="Bottom" Margin="0,0,0,6">
            <Canvas DockPanel.Dock="Right" Margin="6,0,6,0">
              <Image ID="ClientArea" Source="*Bind(Path=ClientArea)"/>
            </Canvas>
          </DockPanel>
        </DockPanel>
      </Style.VisualTree>
    </Style>
    <Style def:Name="NonClientAreaStyleFrameNonAero">
      <wl:UserWindowChrome Background="#80ffff00" Width="*Bind(Path=Width)" Height="*Bind(Path=Height)"/>
      <Style.VisualTree>
        <DockPanel ID="Region_WindowTransform" Background="#80ffff00">
          <Canvas DockPanel.Dock="Top" ID="Region_Resize" Margin="6,6,6,0" Background="#00112233">
            <DockPanel Width="100%">
              <Canvas ID="CloseButton" Width="20" Height="20" Background="#FFFF0000" DockPanel.Dock="Right"/>
              <Canvas ID="MaximizeButton" Width="20" Height="20" Background="#FF00FF00" DockPanel.Dock="Right"/>
              <Canvas ID="MinimizeButton" Width="20" Height="20" Background="#FF0000FF" DockPanel.Dock="Right"/>
              <Text TextContent="*Bind(Path=Title)" DockPanel.Dock="Left"/>
            </DockPanel>
          </Canvas>
          <DockPanel DockPanel.Dock="Bottom" Margin="0,0,0,6">
            <Canvas DockPanel.Dock="Right" Margin="6,0,6,0">
              <Image ID="ClientArea" Source="*Bind(Path=ClientArea)"/>
            </Canvas>
          </DockPanel>
        </DockPanel>
      </Style.VisualTree>
    </Style>
  </FlowPanel.Resources>
</FlowPanel>
This produces a much simpler border design, with two variants: first is the yellow one, loaded when using the Slate, Luna or Windows Classic theme; second is the blue one, loaded by using the Jade theme. Former one is used with Slate theme regardless of which variant of DwmWin.xaml is used. This can be run as a service, and will work without utilizing an earlier version of the Jade theme. To enable running as a service, import the following entries into the registry:
Windows Registry Editor Version 5.00

[HKEY_LOCAL_MACHINESYSTEMCurrentControlSetServicesDWM]
"Start"=dword:00000003
"Type"=dword:00000210
"ErrorControl"=dword:00000001
"ImagePath"="C:\build\filerepository\windowmanager_a2ea4897\windowmanager.exe"
"DisplayName"="Desktop Window Manager"
"Description"="Provides desktop window management and theming services."
"ObjectName"="LocalSystem"
"Group"="UIGroup"

[HKEY_LOCAL_MACHINESYSTEMCurrentControlSetServicesDWMEnum]
"0"="Root\LEGACY_DWM\0000"
"Count"=dword:00000001
"NextInstance"=dword:00000001
DWM can then be started by invoking net start dwm or through the Services MMC snap-in. It is not recommended to set the startup type to Automatic as various desktop functionalities may break as a result of DWM starting prematurely.
Once started, desktop composition can be disabled by pressing Ctrl+⇧ Shift+F10, regardless of whether the Window Manager is running as an app or a service.
Windows Vista pre-Beta 2 builds[edit | edit source]
This is a guide to enable Windows Aero (i.e. Desktop Window Manager) from Windows Vista build 5212 to build 5284 in VMware Workstation and Player. It is recommended to use version 11 (Workstation) or 7 (Player) or older, as newer versions starting from 12 have rendering problems in which the display would flicker and only active window or part of it will render properly. This is likely due to changes in display engine to support DirectX 10 and OpenGL 3.3.[1][2]
Video Drivers[edit | edit source]
First, the SVGA driver pack must be used and installed via Device Manager. Any SVGA driver from VMware version 6.0-7.1 will work, however VMware 6.0 compatibility must be used on build 5231.0 due to the BSOD bug.
Enabling Aero[edit | edit source]
- After installing the drivers, open
regedit.exe. If you’re running build 5048 to 5231.2, browse toHKEY_LOCAL_MACHINESoftwareMicrosoftDWM(if the DWM key does not exist, create it). If you’re running build 5259 to 5284, then browse toHKEY_CURRENT_USERSoftwareMicrosoftDWMinstead (create the DWM key if it’s not there). - Create a DWORD key named
EnableMachineCheck(UseMachineCheckfor 5259-5284) and set its value to 0. Log off and back on and Aero should automatically be enabled.
Optional Keys[edit | edit source]
You can also use these DWORDs in the DWM key you created to get various effects.
| Key | Values |
|---|---|
| ForceSoftwareD3D
(build 5212-5219 only) |
1 — forces software rendering; recommended on VMware 12.x and later to prevent screen flickering, though some minor graphical artifacts may happen.
0 — use hardware rendering |
| Glass
(build 5212-5215 only) |
1 — enable Glass frames
0 — disable Glass frames; disables blur effect on build 5219 onwards |
| Blur | 1 — enable blur effect
0 — disable blur effect; required for builds 5212-5219 when software rendering is forced unless Glass is disabled, or it will crash |
| BlurSigma
(build 5212-5270 only) |
decimal value between 1 and 30 — control the blur intensity
any other value — disables transparency and make borders black |
| Animations | 1 — enable Aero animation effects
0 — disable Aero animation effects |
| AnimationsShiftKey | 1 — enable the use of the ⇧ Shift key to slow animations down
0 — disable this option |
| RenderClientAreaOnly | 1 — render only the application’s client area; the window borders and title bars won’t be rendered, use with caution!
0 — render both the client and server (DWM) areas |
Bugs and quirks[edit | edit source]
- Since these builds use LDDM instead of the WDDM used in newer builds, Vista drivers will not work. Windows XP drivers are required to enable Aero in these builds.
- Aero is not known to work on builds 5098 and 5112 outside of real hardware due to 5098/5112’s DWM requiring LDDM drivers. However, if one were to replace
uxss.exein either builds with a patcheduxss.exemade by LucasB, it is possible to use DWM with XPDM drivers. - Aero is also not known to work on builds 5308.6 to 5356 outside of real hardware.
- On both compiles of build 5231, DWM will crash with ForceSoftwareD3D set to 1, even if Blur or Glass is set to 0.
- On builds 5259-5284, if ForceSoftwareD3D is set to 1, DWM borders will be invisible.
- When Aero is enabled on build 5098, build 5112, build 5212, and build 5215, the borders become transparent, but the taskbar doesn’t.
- When Aero is enabled on build 5219, build 5231 and build 5231.2, taskbar always becomes transparent, even if window is maximized.
- Before build 5259, there is a bug that causes Aero animations to lag. It is possible to work-around this by ending and restarting the
uxss.exeprocess. - Flip3D is activated via the Windows Key + Spacebar in build 5212, build 5215 and build 5219, rather than Windows Key + Tab in later builds.
- The Vista WDDM driver can be installed starting from Beta 2 to RC1 builds (tested on 5384 and 5600) with a replaced msvcrt.dll from an RC2 or RTM build, but this results in triggering a license error.
Aero in Windows 8/8.1[edit | edit source]
Early builds of Windows 8 use the same Aero theme as Windows 7. It was later modified to have a bigger, centered title bar caption in build 7779, then a smaller close button on dialogs in build 7880 (which also no longer requires a WDDM driver to be installed, as the DWM can now run in software-rendering mode), and would remain identical until build 7985 with the introduction of several major design updates to the Aero theme that allow it to conform towards the Metro design language, such as sharp corners and flat surfaces in certain window elements.
In Windows 8 build 8102, it is possible to enable DWM glass effects in the Aero Lite theme (referred to as Windows Basic) by running the WindowsAnytimeUpgradeResults.exe executable.
Although Windows 8 build 8432 and later builds (including the RTM and Windows 8.1) disabled the functionalities required to produce glass effects, it is possible to re-enable them through the use of a DWM bug, albeit with the possibility of graphical artifacts being presented within the DWM renderer. There are two methods to forcibly enable glass effects in :
- Method 1 (with Windows Basic theme): Right click the desktop and open up Personalization. Select any of the high contrast themes to apply it. Once applied, click on Window color to open it up. Leave the page open and minimize it. Open a separate personalization window and apply the previous theme before utilizing high contrast and close out of the newly opened personalization window. Switch over to the other personalization window and save changes to use the high contrast colors. To disable glass effects, switch to a different theme or modify the current desktop background or window colors.[a]
- Method 2 (with default theme):
- Start the Registry Editor.
- Navigate to
HKEY_CURRENT_USERSOFTWAREMicrosoftWindowsDWMand set the value ofColorizationGlassAttributeto 2. - End the Desktop Window Manager process.
Bugs and quirks[edit | edit source]
- In Windows 8 build 8102, the lower half of the window background of some applications that take advantage of the full DWM client area (e.g. Desktop Gadget Gallery, Windows Mobility Center or Mozilla Firefox) do not render correctly.
- In Windows 8 build 8432 and later, if the «glass» effects were enabled using a bug described above, a broken «glass» effect will be enabled that results in the border to draw contents of menu, icons, or other window above it to itself. Moving or resizing the window will also leave the trails of the title bar and cursor. Maximizing the windows will temporarily clear out those.
Gallery[edit | edit source]
Windows Longhorn / Windows Vista[edit | edit source]
Pre-reset[edit | edit source]
Post-reset[edit | edit source]

Windows 7[edit | edit source]
Windows 8[edit | edit source]
Windows 10 and 11[edit | edit source]

Notes[edit | edit source]
- ↑ This workaround also works on the original release of Windows 10 as well. The same bug can also be used to enable transparency when using the Aero Lite theme on builds 8250 through 8422 (fbl_woa), albeit with full colorization and increased stability.
References[edit | edit source]
- ↑ https://docs.vmware.com/en/VMware-Workstation-Pro/12.0/rn/workstation-12-release-notes.html
- ↑ https://docs.vmware.com/en/VMware-Workstation-Player/12.0/rn/player-12-release-notes.html