- Remove From My Forums

Windows CE 5.0 Emulator in vs2008 — Please: give me the step to obtain this.
-
Question
-
Good morning to every body.
I must develope an application on Windows Ce 5.0, because the industrial devise have this SO. I develope with VS2008 and I’havent the emulator. There is emulator for pocket pc 2003, for Mobile 5.0……
I search on Microsoft site, but I have not find the correct way. Please tell me the correct steps for obtain this emulator.
Repeat: the problem is obtain window CE 5.0 Emulator in VS2008.
Tank you, and best regards from Florence (ITALY).
Answers
I need an emulator for Windows CE 5.0 to test an embedded device (not PDA or smartphone) application that I am developing. This is what I have already tried:
-
Visual Studio 2008 Pro includes an emulator. Unfortunately, it does not include a Windows CE image (only Windows Mobile and Smartphone). Yes, there is a difference, see the screenshots here. Windows CE includes a «start button», windows that can be minimized, moved around etc.
-
There is a Windows CE Device Emulator available from Microsoft. Apart from the fact that its license only permits non-commercial use, it does not run in Windows 7 (it requires .net Framework 1.1, which is incompatible with Windows 7) nor in Windows XP mode (error message: «Emulator for Windows CE will not run one virtual machine within another. Please run the virtual machine on the host operating system»).
Is there any option that I have missed?
asked Jun 9, 2010 at 10:13
![]()
HeinziHeinzi
165k54 gold badges357 silver badges510 bronze badges
1
Yes, the option you’ve missed is that you can create your own CE image for the emulator with the emulator BSP. You then generate an image and run it with Device Emulator 3.0.
The reason Microsoft no longer ships a CE emulator image is that there is no such thing as a «standard» Windows CE OS image. Generally speaking you create an image that matches whatever you’ve got on your specific target hardware.
answered Jun 9, 2010 at 13:26
![]()
ctackectacke
66.2k18 gold badges94 silver badges153 bronze badges
1
Have you tried running Microsoft VirtualPC along with the Windows CE6 image or some other image for the version you are using
I have not tried this myself, but it seems to work. (from my google/youtube searches)
answered Jun 9, 2010 at 12:53
![]()
gruntledgruntled
2,63418 silver badges16 bronze badges
4
Introduction
If you are a Windows Mobile Application Developer, you probably have heard or have already used the Device Emulator. This is a priceless tool to test your applications on a variety of different Windows Mobile devices with all kinds of different form factors, without the need to have access to a large range of physical devices.
This article provides information to use the Device Emulator to test your applications, and how to configure the Device Emulator to control the behavior of the tool. This article also provides information on how to make use of the Device Emulator in combination with the Cellular Emulator to allow you to test phone calls and sending and receiving of text messages. Finally, this article also contains a section on how to make use of the Device Emulator Manager programmatically to control different emulators from inside a desktop application.
Different Versions of the Device Emulator
Device Emulator 1.0 shipped with Visual Studio 2005. This emulator allows you to run and test your applications without the need to have access to a real Windows Mobile device. Since Device Emulator is a true ARM emulator, it will run exactly the same executables that also run on real devices. Building upon Device Emulator 1.0, but extending its functionality and performance, Device Emulator 2.0 shipped with the Windows Mobile 6 SDKs. As part of the Windows Mobile 6 SDK installation process, Device Emulator 2.0 automatically replaced Device Emulator 1.0. This means that all of your Windows Mobile Smart Device projects that you developed with Visual Studio 2005 will use Device Emulator 2.0 once it has been installed. Even if you are not targeting Windows Mobile 6 devices and are still using Visual Studio 2005 for device development, it makes sense to install at least one of the Windows Mobile 6 SDKs to take advantage of Device Emulator 2.0. Not only will your code execute faster on Device Emulator 2.0, it also gives you lots of new features like extended configuration options to emulate particular hardware settings, and the possibility to test wireless communication connections.
Device Emulator 3.0 is the latest version of Device Emulator. It ships with Visual Studio 2008, and again automatically replaces any previous versions of Device Emulator that was installed on your development machine as part of the Visual Studio 2008 installation process. Device Emulator 3.0 offers the same performance improvements as Device Emulator 2.0. Using the Device Emulator Manager’s exposed COM Interfaces, it is also possible to control emulators programmatically, for instance, to automate the process of starting and cradling emulators or to programmatically alter emulator configurations.
Using the Device Emulator inside Visual Studio 2008
There are a number of ways to make use of Device Emulator from within Visual Studio 2008. To start working with Device Emulator, you can simply select one of your installed emulator images that match the SDK for which your application was built as the Target Platform inside Visual Studio 2008, and just start debugging your application. Prior to running your application on the selected Device Emulator, the application will be built, and the Device Emulator will be started if it was not already running, and it will connect to Visual Studio 2008. After the application is deployed, optionally, together with the right version of the .NET Compact Framework as well as with the SQL Server CE runtime, it will start automatically on the Device Emulator.

Figure 1 — Windows Mobile application running in Device Emulator
Setting the Device Emulator Properties
In many situations, you probably want to use different hardware settings when testing your Windows Mobile applications. For those scenarios, the Device Emulator allows you to emulate a number of different peripherals. For instance, you can specify a particular battery charge level to test your application under low battery conditions in a very easy way. You can also bind a virtual network adapter to a physical network adapter that is available on your development machine, and you can map virtual COM ports of the Device Emulator to physical COM ports. Another option you have is to share a folder between your development machine and the Device Emulator using the Device Emulator properties. The shared folder will appear as a Storage Card inside the Device Emulator. Making use of folder sharing allows you to transfer files back and forth between the Device Emulator and your development machine.
You can display the Emulator properties dialog box from inside the Device Emulator by clicking Configure on the Device Emulator File menu.
You can display the same dialog from inside Visual Studio 2008 by clicking Options on the Visual Studio 2008 Tools menu, expanding the Device Tools in the Options dialog box, and then clicking on Devices. In the Devices box, you can then select an emulator and click on Properties. The Emulator Properties dialog box can now be activated by clicking on Emulator Options.
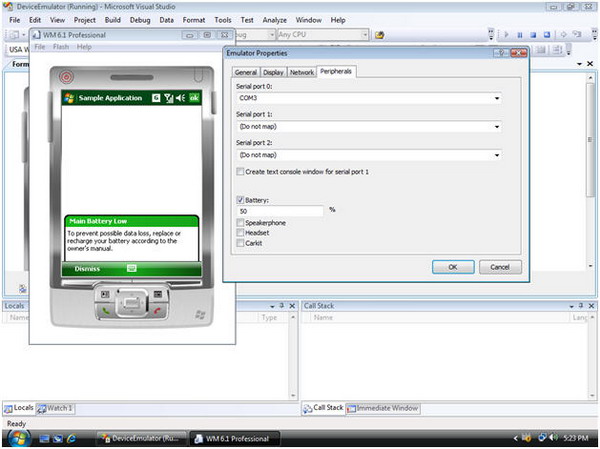
Figure 2 — Configuring Emulator Properties
Using the Device Emulator in combination with the Cellular Emulator
There are many situations where you might want to test cellular connectivity in combination with your own applications. For instance, your application might have functionality to make phone calls, or maybe your application can intercept SMS messages to take some action upon. In scenarios like the one described, the Device Emulator is very useful, because it allows you to test cellular connectivity without the need to have a physical cellular connection. Working together with the Device Emulator, the Cellular Emulator can be used to emulate cellular connections. Cellular Emulator ships with Device Emulator 2.0 and higher. You can start Cellular Emulator by navigating to Start/All Programs / Windows Mobile 6 SDK / Tools / Cellular Emulator in the Start menu.
Before you can use the Device Emulator in combination with the Cellular Emulator, you have to map the Serial port 0 of the Device Emulator to the serial port that is shown in the status bar of the Cellular Emulator. In figure 3, you can see how Serial port 0 is mapped in the Emulator Properties screen to COM3 to establish a connection to the Cellular Emulator. After mapping the serial port, you have to reset the Device Emulator before you can make use of the Cellular Emulator’s functionality.

Figure 3 — Connecting the Cellular Emulator to the Device Emulator
Amongst others, you can:
- Make phone calls from the Device Emulator
- Receive phone calls on the Device Emulator
- Use a GPRS connection inside the Device Emulator to call out to a network
- Send and receive SMS or text messages
- Select between 2G and 3G networks
- Analyze low level modem commands
Setting up a connection through the Cellular Emulator
As soon as the Device Emulator and the Cellular Emulator are connected, you can use the Cellular Emulator to test a lot of functionality regarding cellular connectivity. You can immediately make phone calls to and from the Device Emulator and send SMS messages to and from the Device Emulator. You can also setup a data connection to connect to a network through GPRS. In order to do so, you have to setup and configure the data connection on the Device Emulator. More information about setting up the Device Emulator to make use of a data connection can be found here: http://msdn.microsoft.com/en-us/library/bb158505.aspx.
In figure 4, you can see several data connections being active between the Device Emulator and the Cellular Emulator. In the background on the Device Emulator, you see a running instance of Internet Explorer that displays a particular website. The information is retrieved through a GPRS connection, as is shown in the status bar of the Cellular Emulator, where you can see that the GPRS is connected. The Cellular Emulator simply emulates a GPRS connection by making use of the network connection on the host machine.
In figure 4, you can also see that the Cellular Emulator’s Call Manager is used to make a phone call to the Device Emulator. In the Phone Number edit box, you can simply specify a phone number and click on the Dial button. Immediately, you will see a notification inside the Device Emulator with an incoming phone call. You can see that the phone number inside the Device Emulator corresponds with the phone number that was dialed from inside the Cellular Emulator.

Figure 4 — Device Emulator and Cellular Emulator in action
Sending and receiving SMS messages
An important feature of the Cellular Emulator is the possibility to send SMS messages to the Device Emulator and to receive SMS messages from the Device Emulator. Simply receiving SMS messages on the Device Emulator is not that exciting. Once an SMS message is received, the user will be notified and the SMS message will be stored in the Inbox inside the Device Emulator. However, you can also capture SMS messages inside your own application. This allows for lots of interesting scenarios where you can control an application that is running on a Windows Mobile device remotely. It is up to the application to either intercept SMS messages and use them exclusively, or to intercept SMS messages and afterwards send them on to the Inbox on the device.
Especially in those situations where you are intercepting SMS messages to control your own application, you probably want to do a lot of testing, meaning you need to send many different SMS messages to your device. The combination of the Device Emulator and the Cellular Emulator is priceless for these kinds of test scenarios, since you don’t need a physical network or a costly plan with a telecom operator to test the entire application. Since this article is limited to explaining the Device Emulator itself, we will not go into details on how to intercept SMS messages programmatically. If you want to know more about this topic, you can take a look at the MSDN documentation.
In figure 5, you can see an example of an application that captures SMS messages that start with the string “Control Message”. Each time SMS messages are received on the Device Emulator with a sample application called SMS Capture running, these messages are intercepted by the application. The application shows the body text of the SMS message in a text box, and also sets the Text property of a LinkLabel control to the phone number of the sender of the SMS message, allowing the user to make a phone call to the sender of the message by simply clicking on the displayed phone number.

Figure 5 — Capturing SMS Messages Inside an Application
Controlling the Device Emulator with Device Emulator Manager
Visual Studio 2008 contains a tool called Device Emulator Manager that can be used to control all Device Emulators that are installed on a development machine. You can start the Device Emulator Manager from inside Visual Studio by selecting Device Emulator Manager from the Tools menu. Device Emulator Manager displays a list of all installed Device Emulators in a tree view, and allows you, amongst others, to connect to a Device Emulator, to cradle it, to uncradle it, and to shutdown a Device Emulator. The ability to cradle a Device Emulator is very useful, because it allows the Device Emulator to connect to a development machine through ActiveSync (on Windows XP) or through the Windows Mobile Device Center (on Windows Vista). Once cradled, it allows the Device Emulator to synchronize content, to call out to the Internet, to install applications on the Device Emulator from the development machine using a CAB file, and so on.
Note: You must have ActiveSync or the Windows Mobile Device Center installed to be able to cradle a Device Emulator. You must also make sure that you allow connections through DMA (Direct Memory Access). You can take a look at the MSDN Documentation to learn more about cradling a Device Emulator.

Figure 6 — Device Emulator Manger — Cradling a Device Emulator
In Figure 6, you can see a Windows Mobile 6.1 Professional Emulator with a square screen that was started using the Device Emulator Manager. After starting the emulator, the Device Emulator Manager was also used to cradle it. Controlling emulators from inside the Device Emulator Manager can be done by either right clicking on one of the emulators that are displayed in the tree view that shows all installed emulators, or by selecting an entry from the Actions menu on an already running emulator. Once you cradle the Device Emulator, you will see either ActiveSync or the Windows Mobile Device Center becoming active to establish a partnership with the Device Emulator.
Saving Device Emulator configurations for later use
With the Device Emulator Manager, it is possible to save your own particular configurations for any type of Device Emulator. Using your own configurations, you can, for instance, create an additional Device Emulator that always automatically starts with a battery level of 50% and with a storage card configured which points to a particular folder on your development machine. To begin creating your own emulator configuration, select one of the already installed emulators from inside the Device Emulator Manager, right-click on it, and select Connect. Once the emulator is running, you can change its configuration, after which you can save this particular configuration from inside the Device Emulator Manager by again right-clicking it and selecting Save As. The newly created emulator configuration appears as a brand new emulator inside the Device Emulator Manager. It is displayed in the tree view of the Device Emulator Manager under the My Device Emulators node. Creating a new emulator configuration only means that a new device emulator configuration file is created and stored, since the newly created emulator configuration is already based upon a particular emulator image. Therefore, creating new emulator configurations does not take much storage space on your hard drive.

Figure 7 — Device Emulator Configurations
In figure 7, you see an example of a device emulator configuration with a storage card defined that points to C:UsersPublicDocuments on the development machine and that emulates running on battery power with the battery charged for 50%. Each time this particular Device Emulator is started, it has these initial settings.
Using the Device Emulator to test different security configurations
When you are using Device Emulator to test your Windows Mobile applications, you will typically not have any difficulties deploying and running them, assuming you have a working connection between Visual Studio 2008 and the Device Emulator. The Device Emulator acts like a perfect Windows Mobile device with no security enabled. Depending on the security settings on the physical Windows Mobile target devices, you might have restricted access to the device. Using Visual Studio 2008, you can configure the Device Emulator to work in a particular security configuration. A description of different security configurations that can be implemented for Windows Mobile devices is beyond the scope of this article. If you want to find more information about device security configurations, you can take a look at the MSDN documentation. Setting a particular security configuration on the Device Emulator is fairly simple and straightforward.
Once you have started a particular Device Emulator, you can retrieve its current security setting by going to the Tools menu of Visual Studio 2008 and selecting Device Security Manager. This results in displaying the Device Security Manager inside the working area of Visual Studio 2008. With the Device Security Manager, you can view the current security settings of the running Device Emulator and you can also view the installed certificates.
Note: You can also use the Device Security Manager to interrogate physical Windows Mobile devices.
To deploy a new security configuration to Device Emulator, you should take the following steps:
- Select the Security Configuration tab inside Device Security Manager
- Select a particular configuration from the list titled Security configuration
- Deploy the selected configuration to the Device Emulator by clicking the Deploy to Device tab inside the Device Security Manager

Figure 8 — Device Security Manager in Combination with the Device Emulator
Automating the Device Emulator Manager
The Device Emulator Manager functionality is exposed as a series of COM objects that can be used to create a desktop application to control the Device Emulator Manager programmatically. This means that you can, for instance, write a desktop application in C# that can start and cradle a particular Device Emulator. Take the following steps to create a desktop application that makes use of the Device Emulator functionality:
- Use Visual Studio 2008 to create a Visual C# Windows application
- Add a reference to the Microsoft.DeviceEmulatorManager.Interop.9.0 assembly
Note: Even though you might be running a later version of Device Emulator, the needed assembly will still be found in the Program FilesMicrosoft Device Emulator1.0Microsoft.DeviceEmulatorManager.Interop.9.0.dll folder because each new version of the Device Emulator is an in-place upgrade of a previous version of the Device Emulator.
- To add code to display all data stores containing emulator images on your development machine in a tree view control, you can, for instance, use this code snippet in your main form’s
Loadevent handler to interrogate theIDeviceEmulatorManagerinterface:string categoryName; TreeNode categoryNode; IDeviceEmulatorManager emulatorManager = new DeviceEmulatorManagerClass(); emulatorManager.Reset(); try { while (true) { categoryName = emulatorManager.get_Name(); categoryNode = new TreeNode(categoryName); ListDeviceEmulatorSDKs(emulatorManager, categoryNode); tvEmulators.Nodes.Add(categoryNode); emulatorManager.MoveNext(); } } catch (COMException ex) { if (ex.ErrorCode != END_OF_DATA) throw ex; }
- In a similar way, you can retrieve all installed emulator families (represented by SDKs by creating a similar
whileloop, using theIEnumManagerSDKsinterface. - After retrieving all the emulator families, you can, in yet another similar way, retrieve all particular emulator images belonging to an SDK in another
whileloop, using theIEnumVMIDsinterface. - Once you have access to a particular Device Emulator, you can call methods to control that emulator, for instance, by calling its
Connect,Cradle,Uncradle, andShutdownmethods on theIDeviceEmulatorManagerVMIDinterface.
More information on the automation possibilities of the Device Emulator Manager can be found in this article.
Related Articles in this Series
- Windows Mobile App Development Part 1: Creating your First Application
Correctly install VS2008 and Windows Mobile SDK to create your first mobility app. Part 1 of 7 from www.myrampup.com.
- Windows Mobile App Development Part 3: Basic WinForms App Development for Windows Mobile Devices
Learn the basics of developing Windows Forms based applications for Windows Mobile devices.
- Windows Mobile App Development Part 4: Adding Custom Controls and Making Use of GPS Hardware
Learn to add Custom Controls and make use of GPS hardware in your applications.
- Windows Mobile App Development Part 5: Intro to using SQL Server CE
Learn to access data through
DataSets andSQLCeResultSets in your Mobile apps. - Windows Mobile App Development Part 6: Device Security and Application Deployment
Gain an understanding of device security, testing, and installation of your application on a Windows Mobile device.
- Windows Mobile App Development Part 7: Mobile Web Development
Learn to create web based apps for Mobile Devices with AJAX support enabled using browser controls.
Additional resources and references
- Window Mobile Developer Center
- Device Emulator Reference
- How do I Automate the Setup and Test Environment that uses the Cellular Emulator
- How do I Programmatically Control the Configuration of a Running Device Emulator
- How do I Automate the Setup and Test Environment that uses the Cellular Emulator
Please visit www.myrampup.com for more information.
This member has not yet provided a Biography. Assume it’s interesting and varied, and probably something to do with programming.
Maarten Struys is an experienced software developer. He has been working with all Microsoft Windows Operating Systems for over 20 years both developing native applications and, since 2000, developing managed applications. He is a well known speaker at international conferences like Tech•Ed, MEDC, and Mobile Connections. Maarten created a large number of How-Do-I videos for MSDN around device development. In the past, he frequently presented MSDN Webcasts around application development for Windows Mobile devices. Earlier this year, Maarten created the RampUp program for Windows Mobile Developers. For information about how to use .NET in the embedded world, see Maarten’s Web site at http://www.dotnetfordevices.com.
Часть 8. Средства создания приложений для мобильных устройств
В Visual Studio 2008 входит богатый набор интегрированных средств для создания приложений, выполняющихся на платформах Windows CE и Windows Mobile. Разработчикам предоставляется возможность создания приложений на управляемом коде, выполняемом под управлением .NET Compact Framework, с применением тех же средств редактирования, дизайна и отладки, что и при создании настольных приложений. Для того чтобы начать создание приложений для мобильных устройств, необходимо выбрать шаблон Smart Device Project для поддерживаемых языков программирования — Visual Basic .NET и Visual C# (шаблон находится в ветви Smart Device панели New Project). Помимо шаблонов и средств разработки и дизайна, в состав Visual Studio входят эмуляторы для различных устройств, позволяющие выполнять и отлаживать код на компьютере, а также средства для упаковки приложений и их ресурсов в CAB-файлы для развертывания их на устройствах конечных пользователей.
После выбора шаблона Smart Device Project разработчики попадают в диалоговую панель Add New Smart Device Project, в которой можно выбрать:
- платформу для разработки — возможен выбор следующих платформ:
- Pocket PC 2003,
- Windows CE,
- Windows Mobile 5.0 Pocket PC SDK,
- Windows Mobile 5.0 Smartphone SDK;
- версию .NET Compact Framework — 2.0 или 3.5;
- один из шаблонов приложения (рис. 1):
- Device Application — позволяет создавать приложения на основе .NET Compact Framework Forms для платформы Windows Mobile 5.0 Pocket PC SDK или другой выбранной платформы,
- Class Library — дает возможность создавать библиотеку классов (*.dll) для выбранной платформы,
- Console Application — обеспечивает создание приложений без графического интерфейса для выбранной платформы,
- Control Library — позволяет создавать компоненты для выбранной платформы,
- Empty Project — представляет собой пустой проект для создания приложений для выбранной платформы.
Помимо этого панель Add New Smart Device Project позволяет загружать дополнительные эмуляторы и SDK для различных устройств, не входящие в базовый комплект поставки Visual Studio.
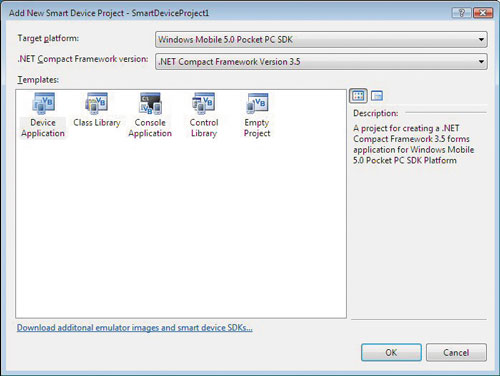
Рис. 1. Панель настроек проекта Smart Device Project
Выбор наиболее распространенного шаблона — Device Application — приводит к появлению среды разработки (показана на рис. 2), состоящей из эмулятора устройства и знакомых разработчикам галереи компонентов, окна установки свойств и окна управления проектом. Работа, как и в случае с Windows Forms, заключается в выборе визуальных компонентов для создания интерфейса, перетаскивании их на форму, установке их свойств и написании кода обработчиков событий (редактор вызывается двойным щелчком мышью по соответствующему компоненту) и логики самого приложения.

Рис. 2. Среда разработки для мобильного устройства
Галерея содержит набор визуальных компонентов, которые можно использовать для создания интерфейсов мобильных приложений. Компоненты расположены в следующих группах:
- Common Controls — содержит наиболее часто применяемые компоненты: CheckBox, Label, ListView, TextBox, WebBrowser и т.п.;
- Device Containers — содержит компонент Panel, используемый для размещения других компонентов на экране;
- Device Menus & Toolbars — содержит средства для создания меню и панелей задач — MainMenu;
- Device Data — содержит средства для работы с данными — BindingSource, DataSet и DataGrid;
- Device Components — содержит дополнительные компоненты: ImageList, MessageQueue, SerialPort и Timer.
Разработка приложений на управляемом коде происходит с использованием платформы .NET Compact Framework версии 3.5, которая представляет собой подмножество .NET Framework, выполняемое на мобильном устройстве под управлением оптимизированной версии Common Language Runtime (CLR) с поддержкой таких технологий, как Windows Communication Foundation (WCF) и Windows Forms. Помимо этого в состав .NET Compact Framework входят классы, специально разработанные для этой платформы и позволяющие управлять различными характеристиками мобильных устройств.
После того как приложение разработано, его можно проверить под одним из доступных в составе Visual Studio (или загруженных дополнительно) эмуляторов. Для этого необходимо выполнить следующие действия:
Выбрать опцию Tools —> Device Emulator Manager для получения списка доступных эмуляторов устройств (рис. 3).
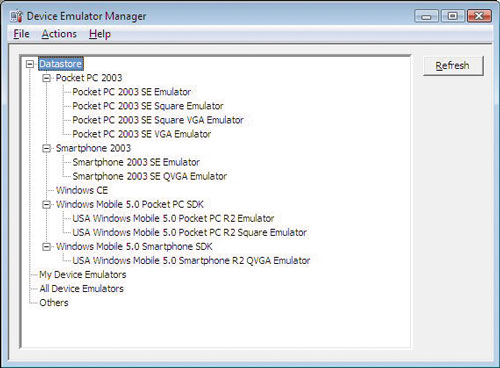
Рис. 3. Device Emulator Manager
Используя команду Actions —> Connect, подключиться к выбранному эмулятору для изучения его возможностей.
Запустить приложение на выбранном эмуляторе для того, чтобы убедиться, что оно работает корректно, — Visual Studio выполнит все необходимые действия по упаковке приложения и требуемых дополнительных компонентов (Compact Framework и т.п.) и загрузке их в устройство.
Протестировать приложение под управлением эмулятора (рис. 4).
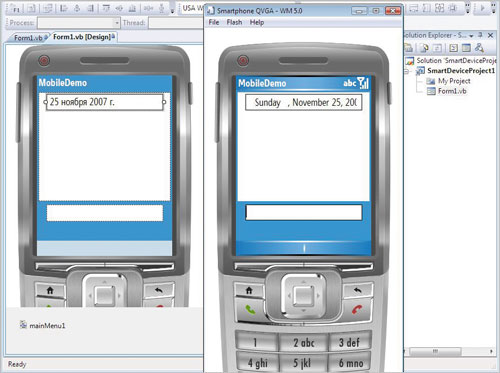
Рис. 4. Выполнение приложения
под управлением эмулятора мобильного устройства
К новинкам для создания приложений для мобильных устройств, появившимся в Visual Studio 2008, относятся:
- средства тестирования для проектов типа Smart Device — к ним относится возможность выполнения модульного тестирования (unit testing) и тестов как на реальных физических устройствах, так и под управлением эмулятора;
- средства программного управления устройствами через Smart Device Connectivity API. Программные интерфейсы, включенные в состав Smart Device Connectivity API, реализованы в пространстве имен Microsoft.SmartDevice.Connectivity и позволяют решать следующие задачи:
- поиск доступных платформ и устройств,
- соединение между локальным компьютером и мобильным устройством,
- развертывание приложений и дополнительных компонентов на мобильном устройстве,
- запуск, остановка и получение информации о процессах, запущенных на мобильном устройстве,
- обмен данными между локальным компьютером и мобильным устройством;
- средства управления безопасностью для Windows Mobile. Данные средства позволяют:
- имитировать различные настройки безопасности на мобильных устройствах,
- применять стандартные настройки безопасности,
- применять расширенные настройки безопасности,
- экспортировать настройки безопасности на локальный компьютер,
- добавлять и удалять сертификаты,
- для управления настройками безопасности используется утилита RapiConfig.exe;
- встроенная поддержка Windows Mobile 5 — в состав Visual Studio 2008 входят эмуляторы, шаблоны проектов и библиотеки для создания приложений под Windows Mobile 5. К ним относятся Windows Mobile 5 Pocket PC SDK и Windows Mobile 5 Smartphone SDK;
- встроенная поддержка .NET Compact Framework 3.5;
- поддержка разработки под Microsoft SQL Server Compact 3.5. Издание Microsoft SQL Server Compact 3.5 заменяет SQL Server Mobile Edition и предоставляет в распоряжение разработчиков новые средства дизайна с поддержкой создания приложений на Visual C# и Visual Basic;
- новые версии эмуляторов устройств — Device Emulator 3.0;
- новая диалоговая панель для управления проектами — Project Dialog, позволяющая выбирать устройства, версии .NET Compact Framework и соответствующие шаблоны.
Помимо новых средств, входящих в состав Visual Studio 2008, ряд новинок появился на уровне .NET Compact Framework 3.5. К ним относятся:
- поддержка Windows Communication Foundation — клиентские приложения, выполняемые под управлением .NET Compact Framework, могут соединяться с веб-сервисами, созданными средствами WCF. Помимо этого поддерживается новый транспортный уровень — Microsoft Exchange Server Mail Transport, доступный как для .NET Compact Framework, так и для приложений, работающих на обычных компьютерах;
- поддержка LINQ — обеспечивает унифицированный доступ к данным, хранящимся в реляционных базах данных, XML-файлах и различных структурах, располагаемых в памяти;
- расширения в Windows Forms — к ним относятся возможность использования графики в компонентах TabPage, Panel, Splitter и PictureBox, поддержка шрифтов ClearType в компонентах на базе класса Control и новые свойства компонента ComboBox — SelectionStart и SelectionLength;
- компонент SoundPlayer для воспроизведения различных звуковых сигналов;
- функции сжатия данных — в пространстве имен System.IO.Compression поддерживаются классы CompressionMode, DeflateStream и GZipStream;
- поддержка делегатов через метод CreateDelegate;
- средства профилирования — .NET Compact Framework CLR Profiler — для просмотра состояния кучи, процессов и работы сборщика мусора. .NET Compact Framework CLR Profiler и документация включены в Power Toys for .NET Compact Framework — набор бесплатных утилит, загружаемых с сайта Microsoft;
- средства конфигурации — позволяют осуществлять ряд административных функций, включая указание версии .NET Compact Framework, под которой должно выполняться приложение. Средства конфигурации входят в Power Toys for .NET Compact Framework — набор бесплатных утилит, загружаемых с сайта Microsoft.
В следующей статье мы ознакомимся с ключевыми ресурсами по основным темам, связанным с использованием .NET Framework 3.5 и Microsoft Visual Studio 2008.
КомпьютерПресс 6’2009
- ПК и комплектующие
- Настольные ПК и моноблоки
- Портативные ПК
- Серверы
- Материнские платы
- Корпуса
- Блоки питания
- Оперативная память
- Процессоры
- Графические адаптеры
- Жесткие диски и SSD
- Оптические приводы и носители
- Звуковые карты
- ТВ-тюнеры
- Контроллеры
- Системы охлаждения ПК
- Моддинг
- Аксессуары для ноутбуков
- Периферия
- Принтеры, сканеры, МФУ
- Мониторы и проекторы
- Устройства ввода
- Внешние накопители
- Акустические системы, гарнитуры, наушники
- ИБП
- Веб-камеры
- KVM-оборудование
- Цифровой дом
- Сетевые медиаплееры
- HTPC и мини-компьютеры
- ТВ и системы домашнего кинотеатра
- Технология DLNA
- Средства управления домашней техникой
- Гаджеты
- Планшеты
- Смартфоны
- Портативные накопители
- Электронные ридеры
- Портативные медиаплееры
- GPS-навигаторы и трекеры
- Носимые гаджеты
- Автомобильные информационно-развлекательные системы
- Зарядные устройства
- Аксессуары для мобильных устройств
- Фото и видео
- Цифровые фотоаппараты и оптика
- Видеокамеры
- Фотоаксессуары
- Обработка фотографий
- Монтаж видео
- Программы и утилиты
- Операционные системы
- Средства разработки
- Офисные программы
- Средства тестирования, мониторинга и диагностики
- Полезные утилиты
- Графические редакторы
- Средства 3D-моделирования
- Мир интернет
- Веб-браузеры
- Поисковые системы
- Социальные сети
- «Облачные» сервисы
- Сервисы для обмена сообщениями и конференц-связи
- Разработка веб-сайтов
- Мобильный интернет
- Полезные инструменты
- Безопасность
- Средства защиты от вредоносного ПО
- Средства управления доступом
- Защита данных
- Сети и телекоммуникации
- Проводные сети
- Беспроводные сети
- Сетевая инфраструктура
- Сотовая связь
- IP-телефония
- NAS-накопители
- Средства управления сетями
- Средства удаленного доступа
- Корпоративные решения
- Системная интеграция
- Проекты в области образования
- Электронный документооборот
- «Облачные» сервисы для бизнеса
- Технологии виртуализации
Архив изданий
- О нас
- Размещение рекламы
- Контакты
Популярные статьи

В настоящем обзоре мы рассмотрим модель моноблока от компании HP, которая является признанным лидером в производстве компьютеров как для домашнего использования, так и для офисов. Моноблок HP 205 G4 22 — модель нового семейства, которая построена на базе процессоров AMD последнего поколения и отличается неплохой производительностью вкупе с привлекательной ценой

Швейцарская компания Logitech G представила беспроводную игровую мышь Logitech G PRO X Superlight. Новинка предназначена для профессиональных киберспортсменов, а слово Superlight в ее названии указывает на малый вес этой модели, который не превышает 63 г. Это почти на четверть меньше по сравнению с анонсированным пару лет тому назад манипулятором Logitech G PRO Wireless

Как показало недавнее исследование Кембриджского университета — количество людей, которые пользуются сегодня криптовалютами, приближается к размеру населения небольшой страны и это только начало, мир меняется. Поэтому компания ASRock разработала и выпустила в продажу весьма необычную материнскую плату — H110 PRO BTC+, которую мы и рассмотрим в этом обзоре

Компания Rapoo анонсировала в Китае беспроводную клавиатуру Ralemo Pre 5 Fabric Edition. Новинка выполнена в формате TKL (без секции цифровых клавиш) и привлекает внимание оригинальным дизайном. Одна из отличительных особенностей этой модели — верхняя панель, обтянутая тканью с меланжевым рисунком

Линейку компьютерных мониторов MSI пополнила модель Optix MAG301 CR2, адресованная любителям игр. Она оборудована ЖК-панелью типа VA со сверхширокоформатным (21:9) экраном изогнутой формы (радиус закругления — 1,5 м). Его размер — 29,5 дюйма по диагонали, разрешение — 2560×1080 пикселов

Каталог продукции компании SilverStone пополнил комплект MS12. Он позволяет создать портативный накопитель на базе стандартного SSD типоразмера M.2 2280 с интерфейсом PCI Express

Компания ADATA Technology анонсировала твердотельные накопители серии XPG Spectrix S20G. Они предназначены для оснащения игровых ПК и, как утверждают их создатели, сочетают высокую производительность и эффектный внешний вид

Линейку видеоадаптеров ASUS на базе графических процессоров NVIDIA пополнила модель GeForce RTX 3070 Turbo (заводской индекс TURBO-RTX3070-8G), предназначенная для оснащения игровых ПК. Одной из особенностей новинки является конструкция системы охлаждения
КомпьютерПресс использует 
If you are a device manufacturer or are in any other way involved in building Windows CE 6.0 kernels, you undoubtedly also have to generate an SDK for your device so that application developers can create applications targeting your device.
Platform Builder for Windows CE 6.0 plugs into Visual Studio 2005, but the latest and greatest version of Visual Studio that supports «smart device» development is Visual Studio 2008 (unfortunately not Visual Studio 2010, yet?!). Most application developers will use Visual Studio 2008 for smart device development, so that’s what your SDK should support in most cases.
You may have noticed that some of your customers are complaining that the SDK installation aborts and rolls back completely. This only happens on systems that do not have Visual Studio 2005 installed:

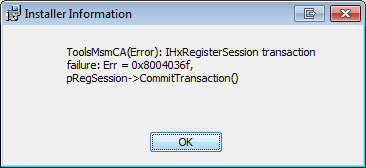


The reason for these «ToolsMsmCA(Error): IHxFilters filter registration failure» and «ToolsMsmCA(Error): IHxRegisterSession transaction failure» errors is that the documentation of the SDK is trying to merge with the Visual Studio namespace «VS.VSIPCC.v80», which is the Visual Studio 2005 namespace. Visual Studio 2008 uses the namespace «VS.VSIPCC.v90», and the namespace «VS.VSIPCC.v80» is not available on systems with only Visual Studio 2008 installed.
The solution is simple:
Open your SDK.sdkcfg file and look for the lines:
<PropertyBag NAME=»Help2″>
<Property NAME=»VS Namespace»>MS.VSIPCC.v80</Property>
If you want the SDK to install into Visual Studio 2005 then leave these lines as it is, but if you want the SDK to install into Visual Studio 2008 then change the «v80» into «v90»:
<PropertyBag NAME=»Help2″>
<Property NAME=»VS Namespace»>MS.VSIPCC.v90</Property>
and regenerate the SDK.
But what if you have an SDK from a 3rd party and you can’t regenerate the SDK? Well, to this problem there are two solutions:
- Do a custom installation of the SDK and de-select the documentation
- Use Orca (or any other msi editor) to change the namespace
Of course «solution» number 1 is not a real solution. What if you really need the documentation of this SDK?
Solution number 2 is of course much better. Orca is in the Microsoft Windows SDK which should be on your machine if you’ve installed Visual Studio. Take a look in your «Program Files» folder and see if there’s a folder «Microsoft SDKs». If there is, you’ll find «Orca.msi» in the «bin» folder (if not, install Visual Studio or download the Microsoft Windows SDK here.
Once you’ve installed Orca you can right click the msi and choose «Edit with Orca». When Orca opens you’ll have to select the «Property» table on the left and scroll to the property «VS_NAMESPACE» on the right. Now double click on the value of that property and change «MS.VSIPCC.v80» into «MS.VSIPCC.v90» if you want the documentation to install correctly into Visual Studio 2008.
Of course it would be nice to be able to build one SDK that will install without any problems in any version of Visual Studio that supports smart device development. Without an update to the SDK roller by Microsoft or some more hacking and editing of the MSI using Orca this isn’t possible at the moment, but the above solutions will at least give you a way to target either VS2005 or VS2008 with your SDK.