Remote Development using SSH
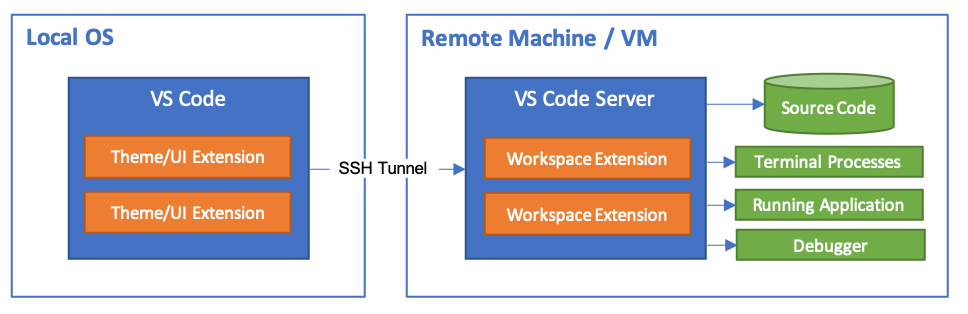
The Visual Studio Code Remote — SSH extension allows you to open a remote folder on any remote machine, virtual machine, or container with a running SSH server and take full advantage of VS Code’s feature set. Once connected to a server, you can interact with files and folders anywhere on the remote filesystem.
No source code needs to be on your local machine to gain these benefits since the extension runs commands and other extensions directly on the remote machine.

This lets VS Code provide a local-quality development experience — including full IntelliSense (completions), code navigation, and debugging — regardless of where your code is hosted.
Getting started
Note: After reviewing this topic, you can get started with the introductory SSH tutorial.
System requirements
Local: A supported OpenSSH compatible SSH client must also be installed.
Remote SSH host: A running SSH server on:
- x86_64 Debian 8+, Ubuntu 16.04+, CentOS / RHEL 7+.
- ARMv7l (AArch32) Raspberry Pi OS (previously called Raspbian) Stretch/9+ (32-bit).
- ARMv8l (AArch64) Ubuntu 18.04+ (64-bit).
- Windows 10 / Server 2016/2019 (1803+) using the official OpenSSH Server.
- macOS 10.14+ (Mojave) SSH hosts with Remote Login enabled.
- 1 GB RAM is required for remote hosts, but at least 2 GB RAM and a 2-core CPU is recommended.
Other glibc based Linux distributions for x86_64, ARMv7l (AArch32), and ARMv8l (AArch64) should work if they have the needed prerequisites. See the Remote Development with Linux article for information prerequisites and tips for getting community supported distributions up and running.
While ARMv7l (AArch32) and ARMv8l (AArch64) support is available, some extensions installed on these devices may not work due to the use of x86 native code in the extension.
Installation
To get started, you need to:
-
Install an OpenSSH compatible SSH client if one is not already present.
-
Install Visual Studio Code or Visual Studio Code Insiders.
-
Install the Remote-SSH extension. If you plan to work with other remote extensions in VS Code, you may choose to install the Remote Development extension pack.
SSH host setup
-
If you do not have an SSH host set up, follow the directions for Linux, Windows 10 / Server (1803+), or macOS SSH host or create a VM on Azure.
-
Optional: If your Linux or macOS SSH host will be accessed by multiple users at the same time, consider enabling Remote.SSH: Remote Server Listen On Socket in VS Code User settings for improved security.
In the Settings editor:

See the Tips and Tricks article for details.
-
Optional: While password-based authentication is supported, we recommend setting up key based authentication for your host. See the Tips and Tricks article for details.

Connect to a remote host
To connect to a remote host for the first time, follow these steps:
-
Verify you can connect to the SSH host by running the following command from a terminal / PowerShell window replacing
user@hostnameas appropriate.ssh user@hostname # Or for Windows when using a domain / AAD account ssh user@domain@hostname -
In VS Code, select Remote-SSH: Connect to Host… from the Command Palette (F1, ⇧⌘P (Windows, Linux Ctrl+Shift+P)) and use the same
user@hostnameas in step 1. -
If VS Code cannot automatically detect the type of server you are connecting to, you will be asked to select the type manually.
Once you select a platform, it will be stored in VS Code settings under the
remote.SSH.remotePlatformproperty so you can change it at any time. -
After a moment, VS Code will connect to the SSH server and set itself up. VS Code will keep you up-to-date using a progress notification and you can see a detailed log in the
Remote - SSHoutput channel.Tip: Connection hanging or failing? See troubleshooting tips for information on resolving common problems.
If you see errors about SSH file permissions, see the section on Fixing SSH file permission errors.
-
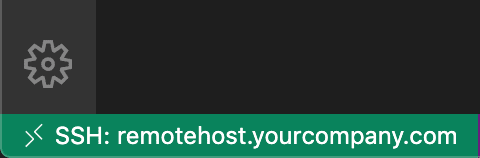
After you are connected, you’ll be in an empty window. You can always refer to the Status bar to see which host you are connected to.
Clicking on the Status bar item will provide a list of remote commands while you are connected.
-
You can then open any folder or workspace on the remote machine using File > Open… or File > Open Workspace… just as you would locally!


From here, install any extensions you want to use when connected to the host and start editing!
Note: On ARMv7l / ARMv8l
glibcSSH hosts, some extensions may not work due to x86 compiled native code inside the extension.
Open a folder on a remote SSH host in a container
If you are using a Linux or macOS SSH host, you can use the Remote — SSH and Dev Containers extensions together to open a folder on your remote host inside of a container. You do not even need to have a Docker client installed locally.
To do so:
- Follow the installation steps for the Dev Containers extension on your remote host.
- Optional: Set up SSH key based authentication to the server so you do not need to enter your password multiple times.
- Follow the quick start for the Remote — SSH extension to connect to a host and open a folder there.
- Use the Dev Containers: Reopen in Container command from the Command Palette (F1, ⇧⌘P (Windows, Linux Ctrl+Shift+P)).
The rest of the Dev Containers quick start applies as-is. You can learn more about the Dev Containers extension in its documentation. You can also see the Develop on a remote Docker host article for other options if this model does not meet your needs.
Disconnect from a remote host
To close the connection when you finish editing files on the remote host, choose File > Close Remote Connection to disconnect from the host. The default configuration does not include a keyboard shortcut for this command. You can also simply exit VS Code to close the remote connection.
Remember hosts and advanced settings
If you have a set of hosts you use frequently or you need to connect to a host using some additional options, you can add them to a local file that follows the SSH config file format.
To make setup easy, the extension can guide you through adding a host without having to hand edit this file.
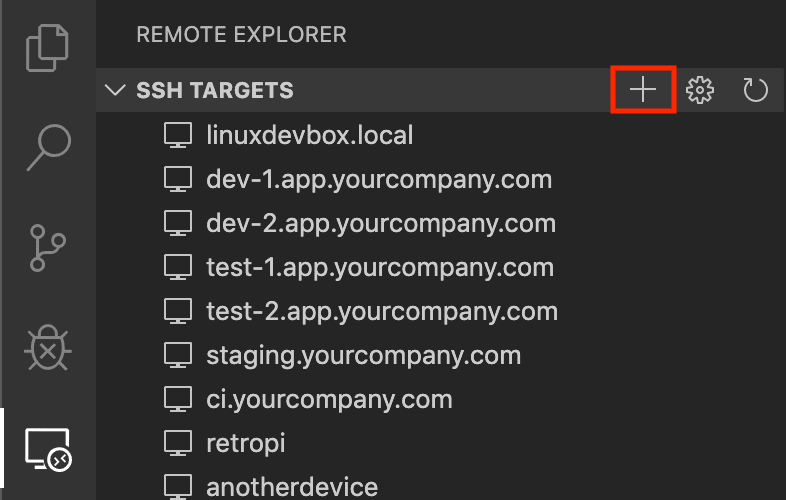
Start by selecting Remote-SSH: Add New SSH Host… from the Command Palette (F1, ⇧⌘P (Windows, Linux Ctrl+Shift+P)) or clicking on the Add New icon in the SSH Remote Explorer in the Activity Bar.
You’ll then be asked to enter the SSH connection information. You can either enter a host name:

Or the full ssh command you would use to connect to the host from the command line:

Finally, you’ll be asked to pick a config file to use. You can also set the "remote.SSH.configFile" property in your User settings.json file if you want to use a different config file than those listed. The extension takes care of the rest!
For example, entering ssh -i ~/.ssh/id_rsa-remote-ssh yourname@remotehost.yourcompany.com in the input box would generate this entry:
Host remotehost.yourcompany.com
    User yourname
    HostName another-host-fqdn-or-ip-goes-here
    IdentityFile ~/.ssh/id_rsa-remote-ssh
See Tips and Tricks for details on generating the key shown here. You can manually edit this file with anything the SSH config file format supports, so this is just one example.
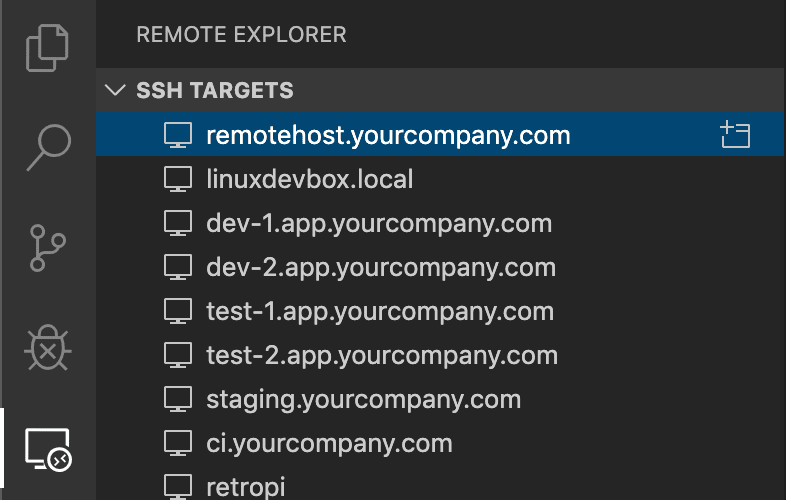
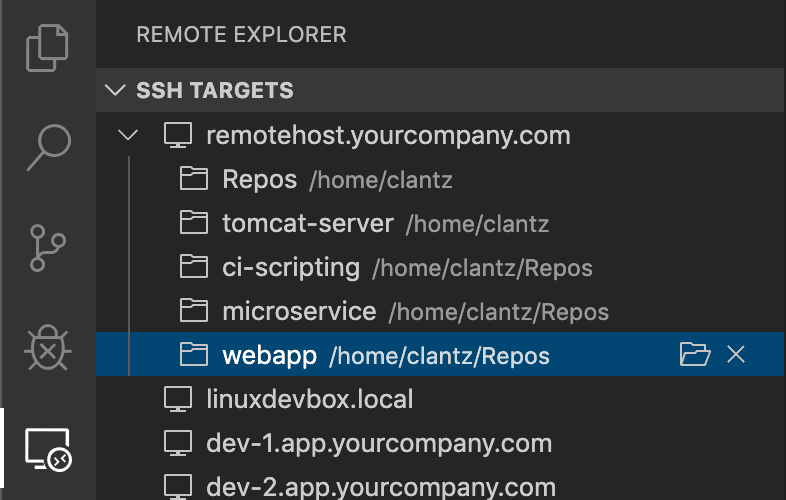
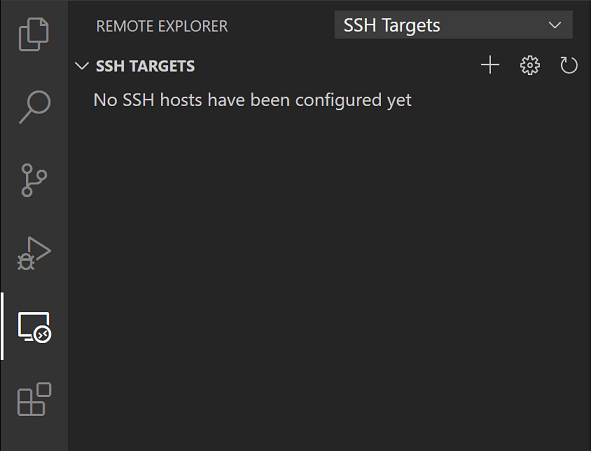
From this point forward, the host will appear in the list of hosts when you select Remote-SSH: Connect to Host… from the Command Palette (F1, ⇧⌘P (Windows, Linux Ctrl+Shift+P)) or in the SSH Targets section of the Remote Explorer.
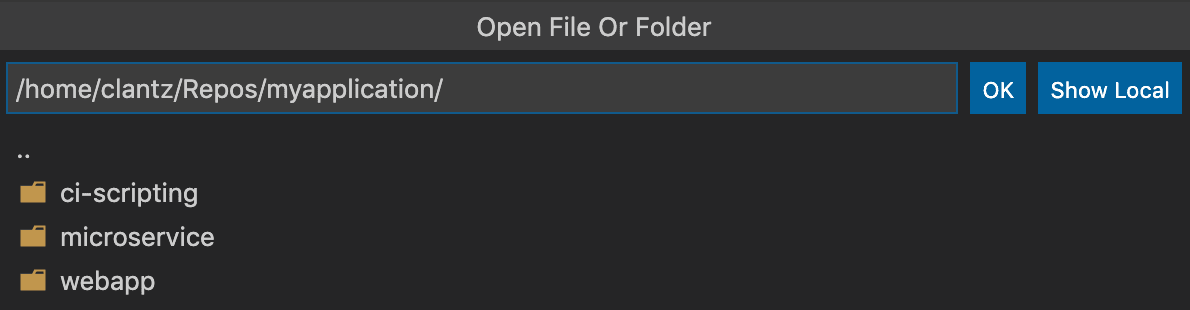
The Remote Explorer allows you to both open a new empty window on the remote host or directly open a folder you previously opened. Expand the host and click on the Open Folder icon next to the folder you want to open on the host.
Managing extensions
VS Code runs extensions in one of two places: locally on the UI / client side, or remotely on the SSH host. While extensions that affect the VS Code UI, like themes and snippets, are installed locally, most extensions will reside on the SSH host. This ensures you have smooth experience and allows you to install any needed extensions for a given workspace on an SSH host from your local machine. This way, you can pick up exactly where you left off, from a different machine complete with your extensions.
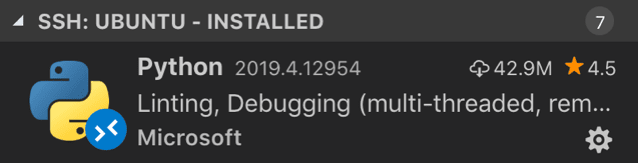
If you install an extension from the Extensions view, it will automatically be installed in the correct location. Once installed, you can tell where an extension is installed based on the category grouping.
There will be a category for your remote SSH host:
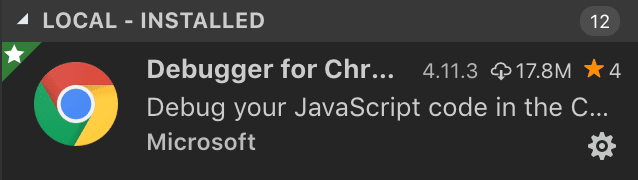
And also a Local — Installed category:
Note: If you are an extension author and find that your extension is not working properly or installs in the wrong place, see Supporting Remote Development for details.
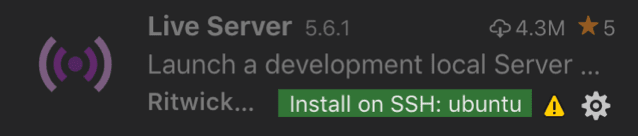
Local extensions that actually need to run remotely will appear dimmed and disabled in the Local — Installed category. Select Install to install an extension on your remote host.
You can also install all locally installed extensions on the SSH host by going to the Extensions view and selecting Install Local Extensions in SSH: {Hostname} using the cloud button at the right of the Local — Installed title bar. This will display a dropdown where you can select which locally installed extensions to install on your SSH host.
«Always installed» extensions
If there are extensions that you would like to always have installed on any SSH host, you can specify which ones using the remote.SSH.defaultExtensions property in settings.json. For example, if you wanted to install the GitLens and Resource Monitor extensions, specify their extension IDs as follows:
"remote.SSH.defaultExtensions": [
    "eamodio.gitlens",
    "mutantdino.resourcemonitor"
]
Advanced: Forcing an extension to run locally / remotely
Extensions are typically designed and tested to either run locally or remotely, not both. However, if an extension supports it, you can force it to run in a particular location in your settings.json file.
For example, the setting below will force the Docker extension to run locally and Remote — SSH: Editing Configuration Files extension to run remotely instead of their defaults:
"remote.extensionKind": {
    "ms-azuretools.vscode-docker": [ "ui" ],
    "ms-vscode-remote.remote-ssh-edit": [ "workspace" ]
}
A value of "ui" instead of "workspace" will force the extension to run on the local UI/client side instead. Typically, this should only be used for testing unless otherwise noted in the extension’s documentation since it can break extensions. See the article on Supporting Remote Development for details.
Forwarding a port / creating SSH tunnel
Sometimes when developing, you may need to access a port on a remote machine that is not publicly exposed. There are two ways to do this using an SSH tunnel that «forwards» the desired remote port to your local machine.
Temporarily forwarding a port
Once you are connected to a host, if you want to temporarily forward a new port for the duration of the session, select Forward a Port from the Command Palette (F1, ⇧⌘P (Windows, Linux Ctrl+Shift+P)) or select the Add Port button in the Ports view. You can see the Ports view in the bottom panel, or by running the command Ports: Focus on Ports View.

You’ll be asked to enter the port you would like to forward and you can give it a name.

A notification will tell you the localhost port you should use to access the remote port. For example, if you forwarded an HTTP server listening on port 3000, the notification may tell you that it was mapped to port 4123 on localhost since 3000 was already in use. You can then connect to this remote HTTP server using http://localhost:4123.
This same information is available in the Forwarded Ports section of the Remote Explorer if you need to access it later.
If you would like VS Code to remember any ports you have forwarded, check Remote: Restore Forwarded Ports in the Settings editor (⌘, (Windows, Linux Ctrl+,)) or set "remote.restoreForwardedPorts": true in settings.json.

Change local port on tunnel
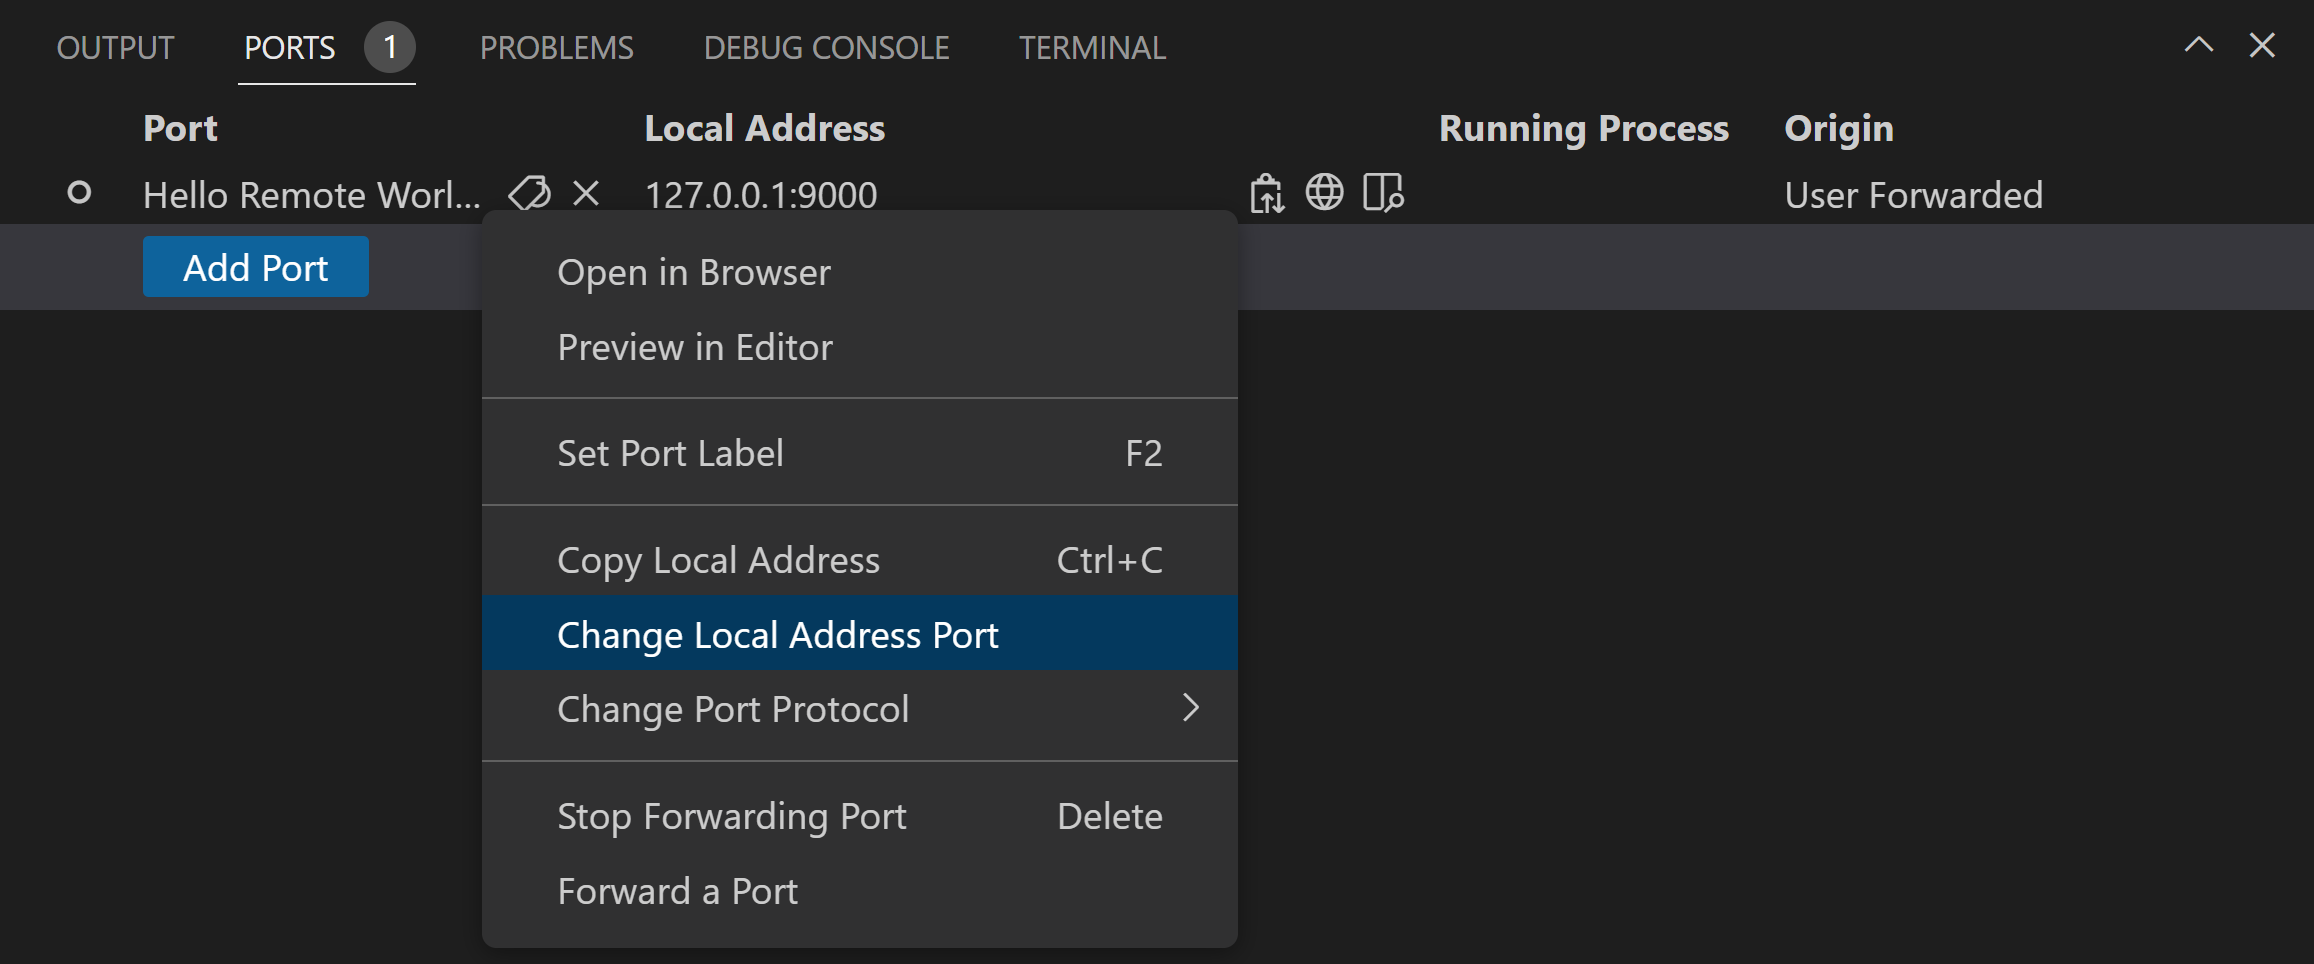
If you would like the local port of the tunnel to be different than the remote server’s, you can change this via the Forwarded Ports panel.
Right-click the tunnel you want to modify, and select Change Local Address Port in the context menu.
Always forwarding a port
If you have ports that you always want to forward, you can use the LocalForward directive in the same SSH config file you use to remember hosts and advanced settings.
For example, if you wanted to forward ports 3000 and 27017, you could update the file as follows:
Host remote-linux-machine
    User myuser
    HostName remote-linux-machine.mydomain
    LocalForward 127.0.0.1:3000 127.0.0.1:3000
    LocalForward 127.0.0.1:27017 127.0.0.1:27017
Opening a terminal on a remote host
Opening a terminal on the remote host from VS Code is simple. Once connected, any terminal window you open in VS Code (Terminal > New Terminal) will automatically run on the remote host rather than locally.
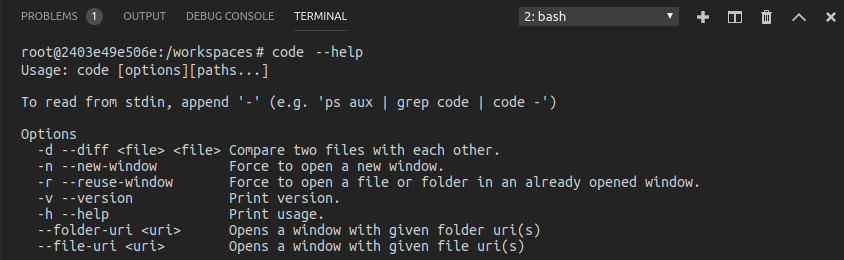
You can also use the code command line from this same terminal window to perform a number of operations such as opening a new file or folder on the remote host. Type code --help to see all the options available from the command line.
Debugging on the SSH host
Once you are connected to a remote host, you can use VS Code’s debugger in the same way you would when running the application locally. For example, if you select a launch configuration in launch.json and start debugging (F5), the application will start on remote host and attach the debugger to it.
See the debugging documentation for details on configuring VS Code’s debugging features in .vscode/launch.json.
SSH host-specific settings
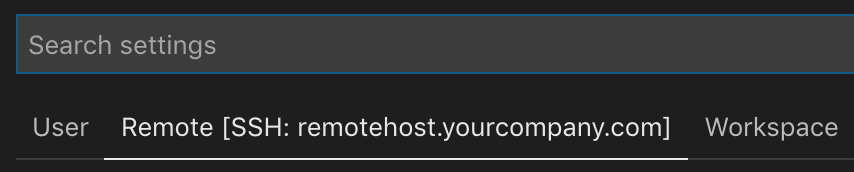
VS Code’s local User settings are also reused when you are connected to an SSH host. While this keeps your user experience consistent, you may want to vary some of these settings between your local machine and each host. Fortunately, once you have connected to a host, you can also set host-specific settings by running the Preferences: Open Remote Settings command from the Command Palette (F1, ⇧⌘P (Windows, Linux Ctrl+Shift+P)) or by selecting on the Remote tab in the Settings editor. These will override any User settings you have in place whenever you connect to the host. And Workspace settings will override Remote and User settings.
The Remote — SSH extension does not provide direct support for sync’ing source code or using local tools with content on a remote host. However, there are two ways to do this using common tools that will work with most Linux hosts. Specifically, you can:
- Mount the remote filesystem using SSHFS.
- Sync files to/from the remote host to your local machine using
rsync.
SSHFS is the most convenient option and does not require any file sync’ing. However, performance will be significantly slower than working through VS Code, so it is best used for single file edits and uploading/downloading content. If you need to use an application that bulk reads/write to many files at once (like a local source control tool), rsync is a better choice.
Known limitations
Remote — SSH limitations
- Using key based authentication is recommended. Passwords and other tokens entered for alternate authentication methods are not saved.
- Alpine Linux and non-glibc based Linux SSH hosts are not supported.
- Older (community supported) Linux distributions require workarounds to install the needed prerequisites.
- PuTTY is not supported on Windows.
- If you clone a Git repository using SSH and your SSH key has a passphrase, VS Code’s pull and sync features may hang when running remotely. Either use an SSH key without a passphrase, clone using HTTPS, or run
git pushfrom the command line to work around the issue. - Local proxy settings are not reused on the remote host, which can prevent extensions from working unless the appropriate proxy information is configured on the remote host (for example global
HTTP_PROXYorHTTPS_PROXYenvironment variables with the appropriate proxy information). - You cannot use Dev Containers from a Remote — SSH connection to a Windows machine.
- See here for a list of active issues related to SSH.
Docker Extension limitations
If you are using the Docker or Kubernetes extension in a Remote — SSH window, you will not be able to use the right-click Attach VS Code to Container option. This will only work if you are using it from your local machine.
Extension limitations
Many extensions will work on remote SSH hosts without modification. However, in some cases, certain features may require changes. If you run into an extension issue, there is a summary of common problems and solutions that you can mention to the extension author when reporting the issue.
In addition, some extensions installed on ARMv7l (AArch32) / ARMv8l (AArch64) devices may not work due to native modules or runtimes in the extension that only support x86_64. In these cases, the extensions would need to opt-in to supporting these platforms by compiling / including binaries for ARMv7l / ARMv8l.
Common questions
How do I set up an SSH client on …?
See Installing a supported SSH client for details.
How do I set up an SSH server on …?
See Installing a supported SSH server for details on setting up an SSH server for your host.
Can I sign in to my SSH server with another/additional authentication mechanism like a password?
Yes, you should be prompted to enter your token or password automatically. However, passwords are not saved, so using key based authentication is typically more convenient.
How do I fix SSH errors about «bad permissions»?
See Fixing SSH file permission errors for details on resolving these types of errors.
What Linux packages / libraries need to be installed on remote SSH hosts?
Most Linux distributions will not require additional dependency installation steps. For SSH, Linux hosts need to have Bash (/bin/bash), tar, and either curl or wget installed and those utilities could be missing from certain stripped down distributions. Remote Development also requires kernel >= 3.10, glibc >=2.17, libstdc++ >= 3.4.18. Only glibc-based distributions are supported currently, so by extension Alpine Linux is not supported.
See Linux Prerequisites for details.
What are the connectivity requirements for the VS Code Server when it is running on a remote machine / VM?
Installation of VS Code Server requires that your local machine has outbound HTTPS (port 443) connectivity to:
update.code.visualstudio.comvscode.blob.core.windows.net*.vo.msecnd.net(Azure CDN)
By default, the Remote — SSH will attempt to download on the remote host, but if you enable remote.SSH.allowLocalServerDownload, the extension will fall back to downloading VS Code Server locally and transferring it remotely once a connection is established.
You can install extensions manually without an internet connection using the Extensions: Install from VSIX… command, but if you use the extension panel to install extensions, your local machine and VS Code Server server will need outbound HTTPS (port 443) access to:
marketplace.visualstudio.com*.vo.msecnd.net(Azure CDN)*.gallerycdn.vsassets.io(Azure CDN)
Finally, some extensions (like C#) download secondary dependencies from download.microsoft.com or download.visualstudio.microsoft.com. Others (like Visual Studio Live Share) may have additional connectivity requirements. Consult the extension’s documentation for details if you run into trouble.
All other communication between the server and the VS Code client is accomplished through the authenticated, secure SSH tunnel.
Can I use local tools on source code sitting on the remote SSH host?
Yes. Typically this is done using SSHFS or by using rsync to get a copy of the files on your local machine. SSHFS mounts the remote filesystem is ideal for scenarios where you need to edit individual files or browse the source tree and requires no sync step to use. However, it is not ideal for using something like a source control tool that bulk manages files. In this case, the rsync approach is better since you get a complete copy of the remote source code on your local machine. See Tips and Tricks for details.
Can I use VS Code when I only have SFTP/FTP filesystem access to my remote host (no shell access)?
Some cloud platforms only provide remote filesystem access for developers rather than direct shell access. VS Code Remote Development was not designed with this use case in mind since it negates the performance and user experience benefits.
However, this use case can typically be handled by combining extensions like SFTP with remote debugging features for Node.js, Python, C#, or others.
The VS Code extension API abstracts away local/remote details so most extensions will work without modification. However, given extensions can use any node module or runtime they want, there are situations where adjustments may need to be made. We recommend you test your extension to be sure that no updates are required. See Supporting Remote Development for details.
Questions or feedback
- See Tips and Tricks or the FAQ.
- Search on Stack Overflow.
- Add a feature request or report a problem.
- Contribute to our documentation or VS Code itself.
- See our CONTRIBUTING guide for details.
2/2/2023
Remote development over SSH
This tutorial walks you through creating and connecting to a virtual machine (VM) on Azure using the Visual Studio Code Remote — SSH extension. You’ll create a Node.js Express web app to show how you can edit and debug on a remote machine with VS Code just like you could if the source code was local.
Note: Your Linux VM can be hosted anywhere — on your local host, on premise, in Azure, or in any other cloud, as long as the chosen Linux distribution meets these prerequisites.
Prerequisites
To get started, you need to have done the following steps:
- Install an OpenSSH compatible SSH client (PuTTY is not supported).
- Install Visual Studio Code.
- Have an Azure subscription (If you don’t have an Azure subscription, create a free account before you begin).
Install the extension
The Remote — SSH extension is used to connect to SSH hosts.
Install the Remote — SSH extension
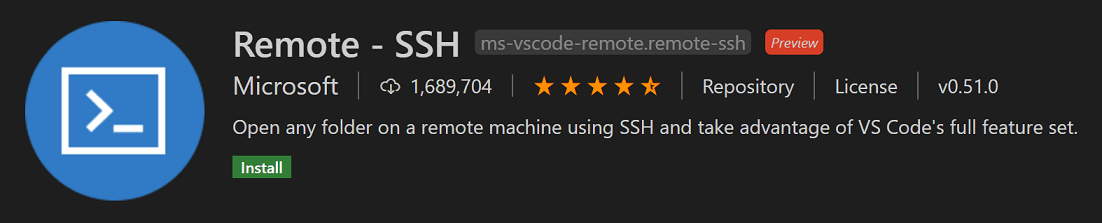
Remote — SSH
With the Remote — SSH extension installed, you will see a new Status bar item at the far left.
The Remote Status bar item can quickly show you in which context VS Code is running (local or remote) and clicking on the item will bring up the Remote — SSH commands.

Create a virtual machine
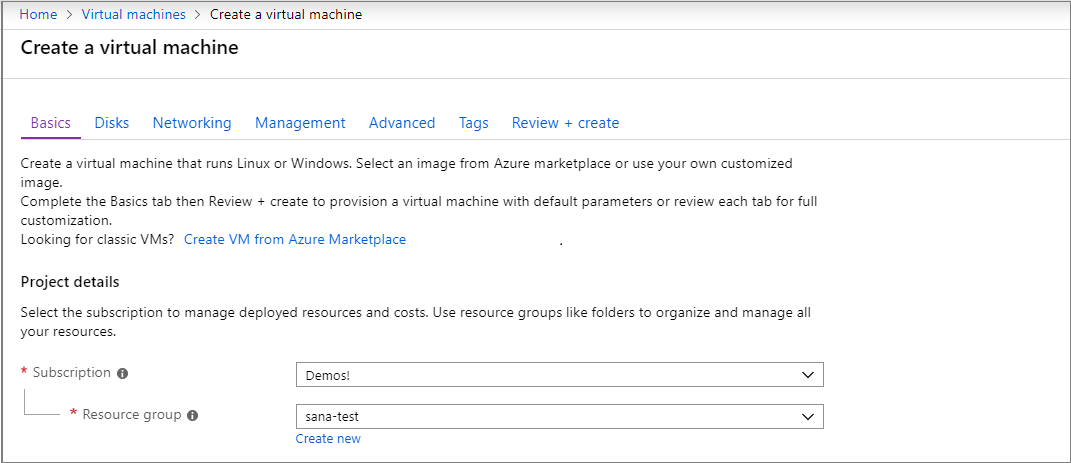
If you don’t have an existing Linux virtual machine, you can create a new VM through the Azure portal. In the Azure portal, search for «Virtual Machines», and choose Add. From there, you can select your Azure subscription and create a new resource group, if you don’t already have one.
Note: In this tutorial, we are using Azure, but your Linux VM can be hosted anywhere, as long as the Linux distribution meets these prerequisites.
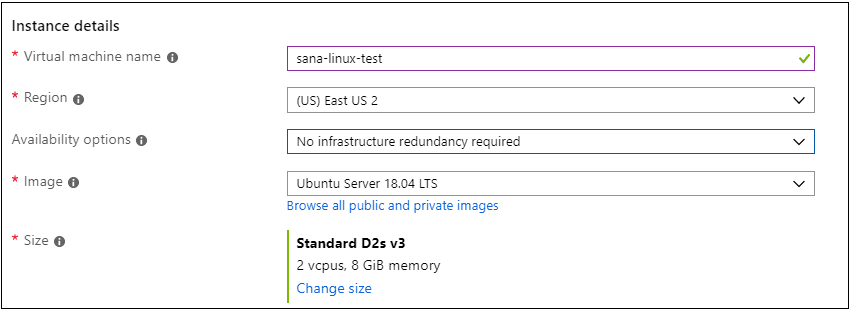
Now you can specify details of your VM, such as the name, the size, and the base image. Choose Ubuntu Server 18.04 LTS for this example, but you can choose recent versions of other Linux distros and look at VS Code’s supported SSH servers.
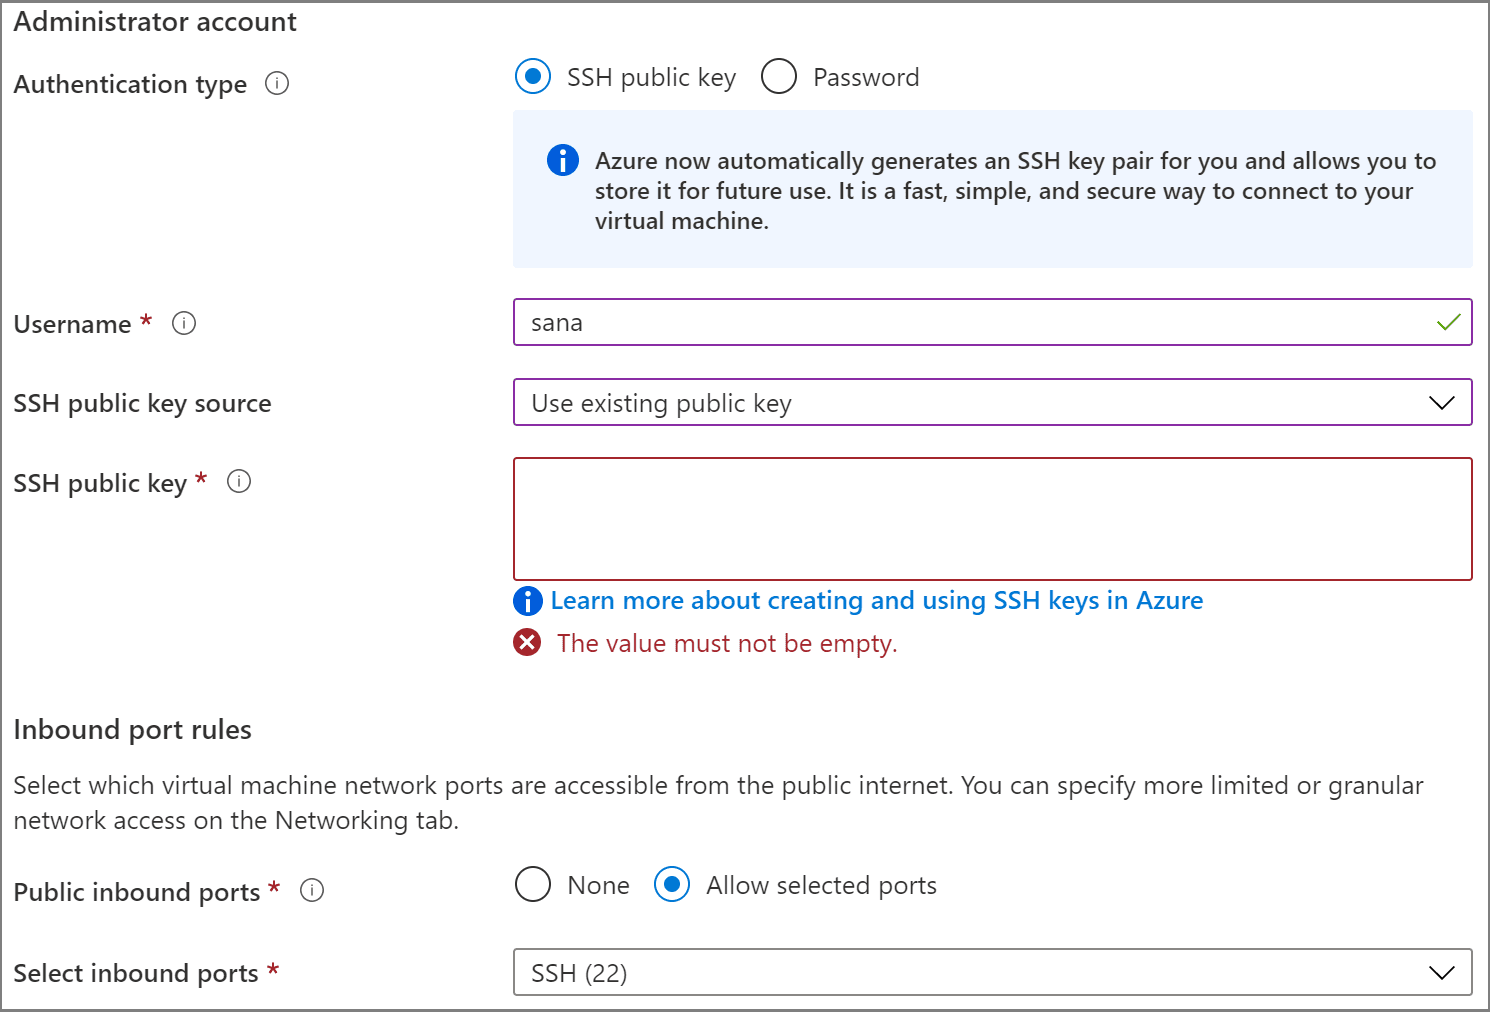
Set up SSH
There are several authentication methods into a VM, including an SSH public/private key pair or a username and password. We recommend using key-based authentication (if you use a username/password, you’ll be prompted to enter your credentials more than once by the extension). If you’re on Windows and have already created keys using PuttyGen, you can reuse them.
Create an SSH key
If you don’t have an SSH key pair, open a bash shell or the command line and type in:
ssh-keygen -t ed25519
This will generate the SSH key. Press Enter at the following prompt to save the key in the default location (under your user directory as a folder named .ssh).

You will then be prompted to enter a secure passphrase, but you can leave that blank. You should now have a id_ed25519.pub file which contains your new public SSH key.
Note: If you are using a legacy system that doesn’t support the Ed25519 algorithm, you can use rsa instead:
ssh-keygen -t rsa -b 4096.
Add SSH key to your VM
In the previous step, you generated an SSH key pair. Select Use existing public key in the dropdown for SSH public key source so that you can use the public key you just generated. Take the public key and paste it into your VM setup, by copying the entire contents of the id_ed25519.pub in the SSH public key. You also want to allow your VM to accept inbound SSH traffic by selecting Allow selected ports and choosing SSH (22) from the Select inbound ports dropdown list.
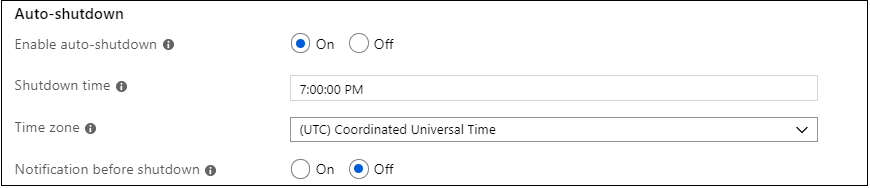
Auto shutdown
A cool feature of using Azure VMs is the ability to enable auto shutdown (because let’s face it, we all forget to turn off our VMs…). If you go to the Management tab, you can set the time you want to shut down the VM daily.
Select Review and Create, then Create, and Azure will deploy your VM for you!
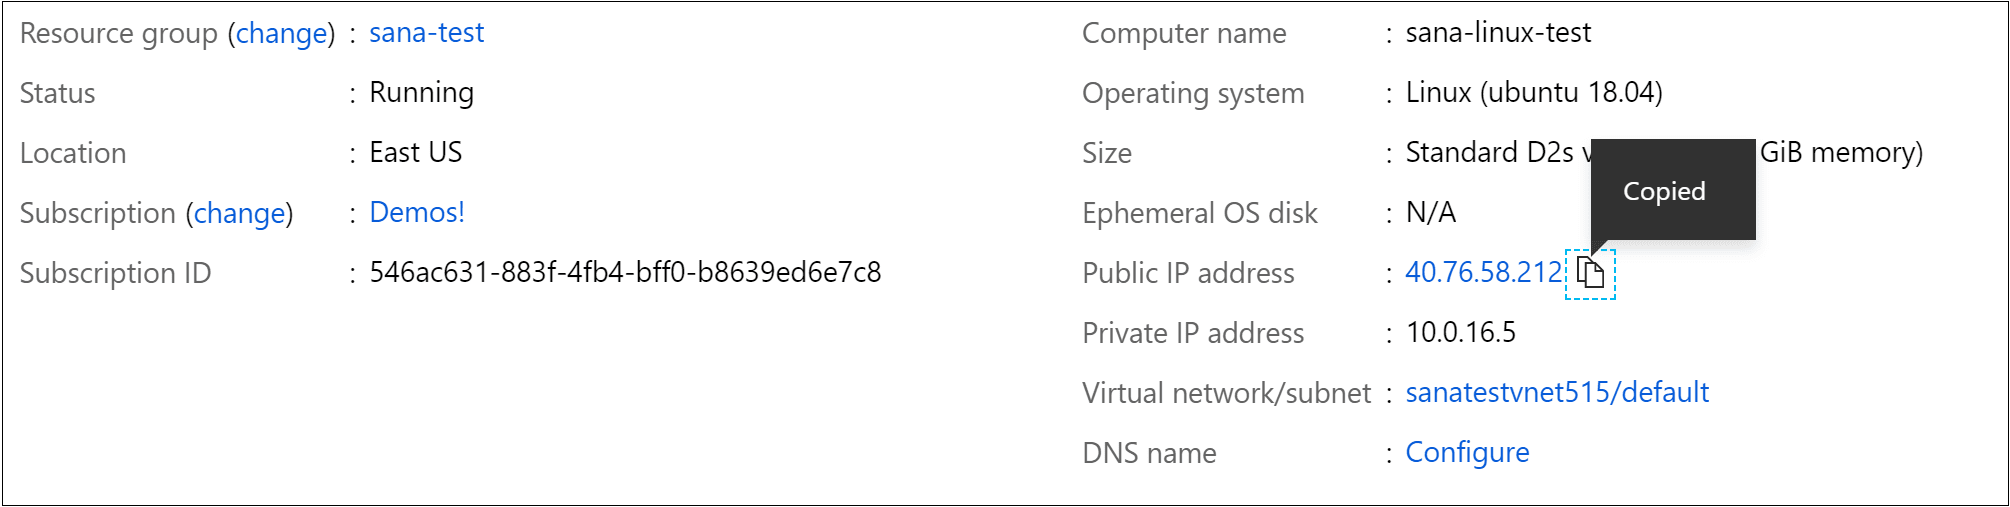
Once the deployment is finished (it may take several minutes), go to the new resource view for your virtual machine.
Connect using SSH
Now that you’ve created an SSH host, let’s connect to it!
You’ll have noticed an indicator on the bottom-left corner of the Status bar. This indicator tells you in which context VS Code is running (local or remote). Click on the indicator to bring up a list of Remote extension commands.

Choose the Connect to Host… command in the Remote-SSH section and connect to the host by entering connection information for your VM in the following format: user@hostname.
The user is the username you set when adding the SSH public key to your VM. For the hostname, go back to the Azure portal and in the Overview pane of the VM you created, copy the Public IP address.
Before connecting in Remote — SSH, you can verify you’re able to connect to your VM via a command prompt using ssh user@hostname.
Note: If you run into an error
ssh: connect to host <host ip> port 22: Connection timed out, you may need to delete NRMS-Rule-106 from the Networking tab of your VM:

Set the user and hostname in the connection information text box.

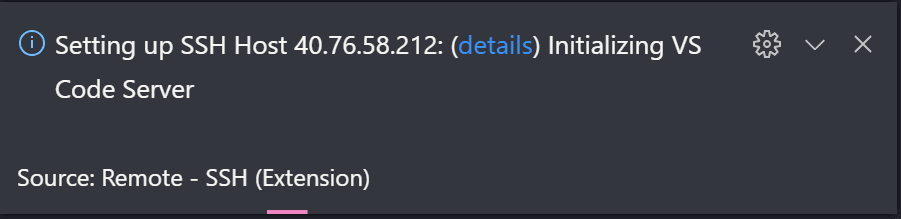
VS Code will now open a new window (instance). You’ll then see a notification that the «VS Code Server» is initializing on the SSH Host. Once the VS Code Server is installed on the remote host, it can run extensions and talk to your local instance of VS Code.
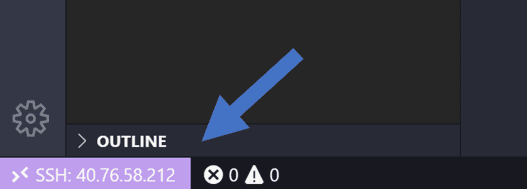
You’ll know you’re connected to your VM by looking at the indicator in the Status bar. It shows the hostname of your VM.
The Remote — SSH extension also contributes a new icon on your Activity bar, and clicking on it will open the Remote explorer. From the dropdown, select SSH Targets, where you can configure your SSH connections. For instance, you can save the hosts you connect to the most and access them from here instead of entering the user and hostname.
Once you’re connected to your SSH host, you can interact with files and open folders on the remote machine. If you open the integrated terminal (⌃` (Windows, Linux Ctrl+`)), you’ll see you’re working inside a bash shell while you’re on Windows.

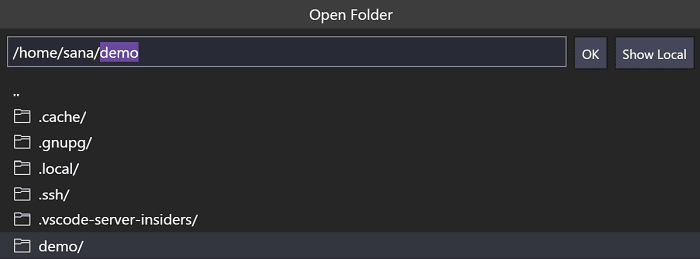
You can use the bash shell to browse the file system on the VM. You can also browse and open folders on the remote home directory with File > Open Folder.
Create your Node.js application
In this step, you will create a simple Node.js application. You will use an application generator to quickly scaffold out the application from a terminal.
Install Node.js and npm
From the integrated terminal (⌃` (Windows, Linux Ctrl+`)), update the packages in your Linux VM, then install Node.js, which includes npm, the Node.js package manager.
sudo apt-get update
curl -sL https://deb.nodesource.com/setup_lts.x | sudo -E bash -
sudo apt-get install -y nodejs
You can verify the installations by running:
node --version
npm --version
Install the Express generator
Express is a popular framework for building and running Node.js applications. You can scaffold (create) a new Express application using the Express Generator tool. The Express Generator is shipped as an npm module and installed by using the npm command-line tool npm.
sudo npm install -g express-generator
The -g switch installs the Express Generator globally on your machine so that you can run it from anywhere.
Create a new application
You can now create a new Express application called myExpressApp by running:
express myExpressApp --view pug
The --view pug parameters tell the generator to use the pug template engine.
To install all of the application’s dependencies, go to the new folder and run npm install.
cd myExpressApp
npm install
Run the application
Last, let’s ensure that the application runs. From the terminal, start the application using the npm start command to start the server.
npm start
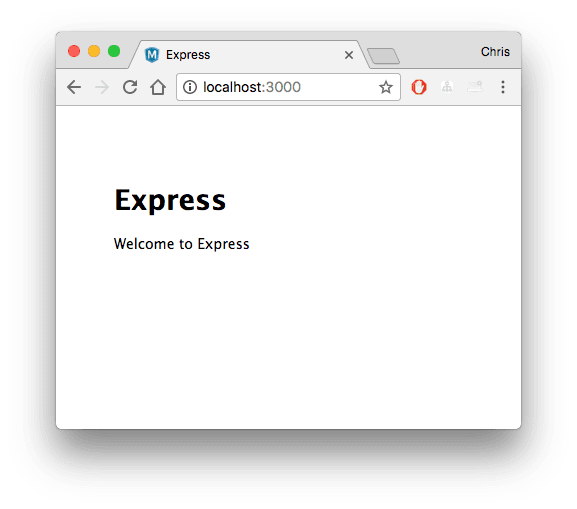
The Express app by default runs on http://localhost:3000. You won’t see anything in your local browser on localhost:3000 because the web app is running on your virtual machine.
Port forwarding
To be able to browse to the web app on your local machine, you can leverage another feature called Port forwarding.
To be able to access a port on the remote machine that may not be publicly exposed, you need to establish a connection or a tunnel between a port on your local machine and the server. With the app still running, open the SSH Explorer and find the Forwarded Ports view. Click on the Forward a port link and indicate that you want to forward port 3000:

Name the connection «browser»:

The server will now forward traffic on port 3000 to your local machine. When you browse to http://localhost:3000, you see the running web app.
Edit and debug
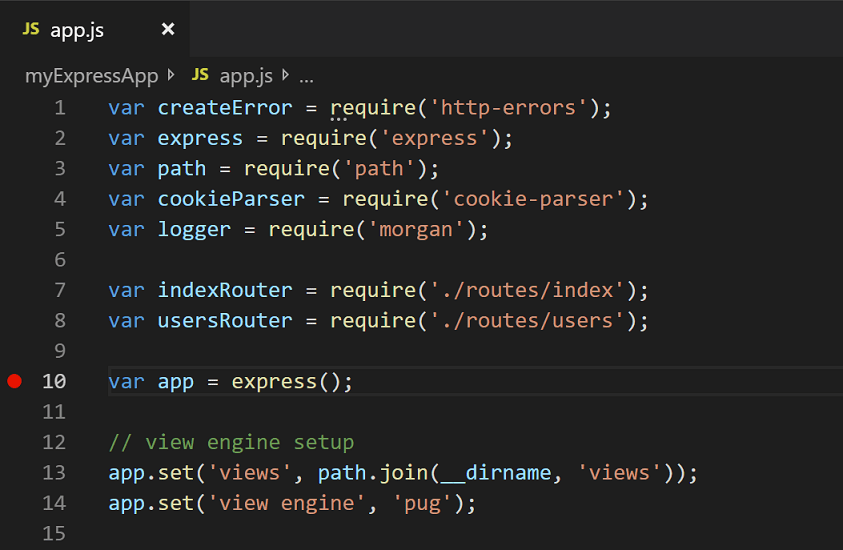
From the Visual Studio Code File Explorer (⇧⌘E (Windows, Linux Ctrl+Shift+E)), navigate to your new myExpressApp folder and double-click the app.js file to open it in the editor.
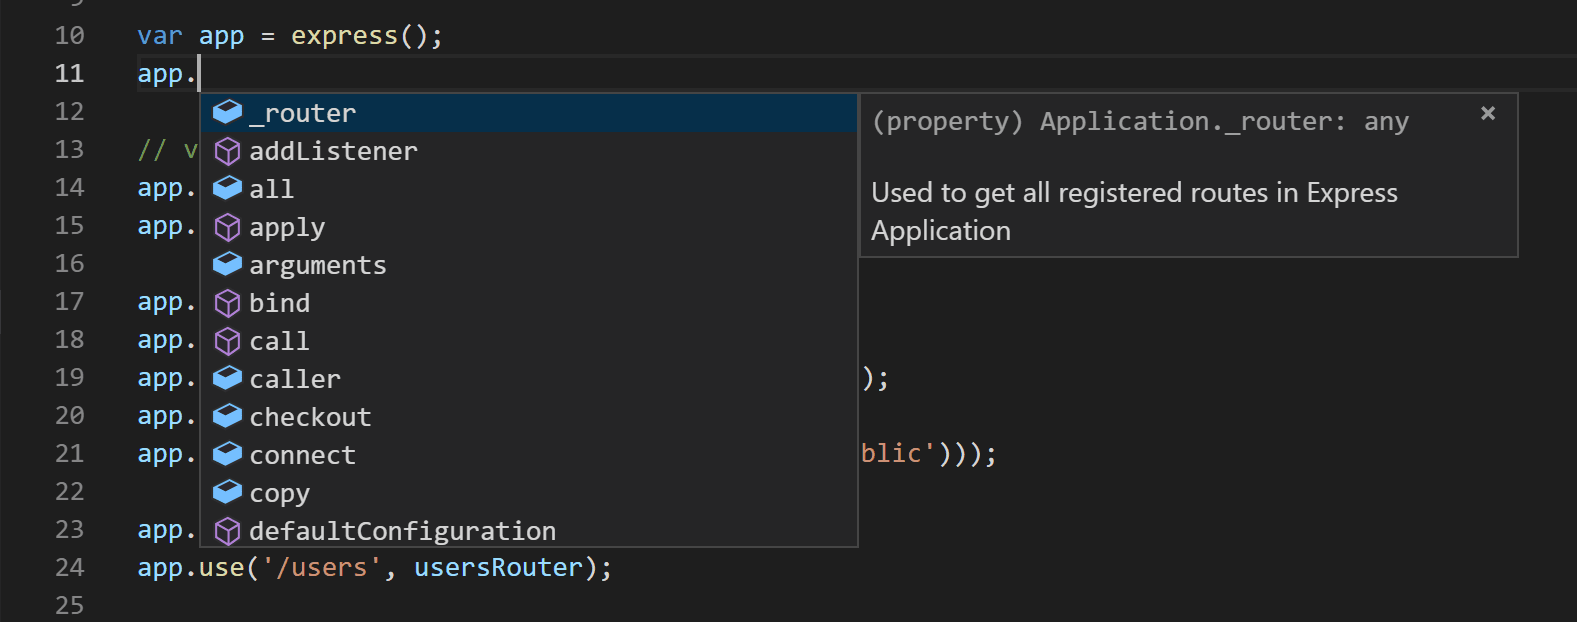
IntelliSense
You have syntax highlighting for the JavaScript file as well as IntelliSense with hovers, just like you would see if the source code was on your local machine.
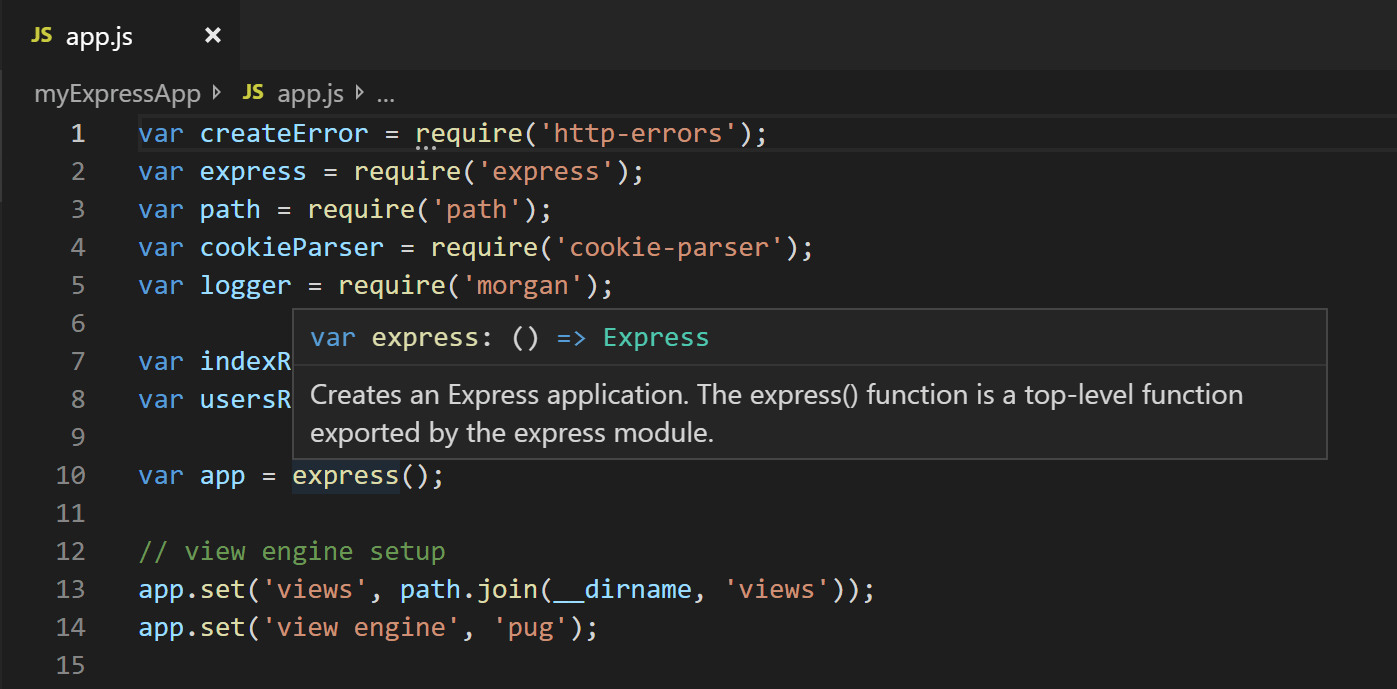
When you start typing, you’ll get smart completions for the object methods and properties.
Debugging
Set a breakpoint on line 10 of app.js by clicking in the gutter to the left of the line number or by putting the cursor on the line and pressing F9. The breakpoint will be displayed as a red circle.
Now, press F5 to run your application. If you are asked how to run the application, choose Node.js.
The app will start, and you’ll hit the breakpoint. You can inspect variables, create watches, and navigate the call stack.
Press F10 to step or F5 again to finish your debugging session.

You get the full development experience of Visual Studio Code connected over SSH.
Ending your SSH connection
You can end your session over SSH and go back to running VS Code locally with File > Close Remote Connection.
Congratulations
Congratulations, you’ve successfully completed this tutorial!
Next, check out the other Remote Development extensions.
- WSL
- Dev Containers
Or get them all by installing the
Remote Development Extension Pack.
2/2/2023
| Order | Area | TOCTitle | PageTitle | ContentId | MetaDescription | DateApproved |
|---|---|---|---|---|---|---|
|
2 |
remote |
SSH |
Developing on Remote Machines using SSH and Visual Studio Code |
42e65445-fb3b-4561-8730-bbd19769a160 |
Developing on Remote Machines or VMs using Visual Studio Code Remote Development and SSH |
2/2/2023 |
Remote Development using SSH
The Visual Studio Code Remote — SSH extension allows you to open a remote folder on any remote machine, virtual machine, or container with a running SSH server and take full advantage of VS Code’s feature set. Once connected to a server, you can interact with files and folders anywhere on the remote filesystem.
No source code needs to be on your local machine to gain these benefits since the extension runs commands and other extensions directly on the remote machine.

This lets VS Code provide a local-quality development experience — including full IntelliSense (completions), code navigation, and debugging — regardless of where your code is hosted.
Getting started
Note: After reviewing this topic, you can get started with the introductory SSH tutorial.
System requirements
Local: A supported OpenSSH compatible SSH client must also be installed.
Remote SSH host: A running SSH server on:
- x86_64 Debian 8+, Ubuntu 16.04+, CentOS / RHEL 7+.
- ARMv7l (AArch32) Raspberry Pi OS (previously called Raspbian) Stretch/9+ (32-bit).
- ARMv8l (AArch64) Ubuntu 18.04+ (64-bit).
- Windows 10 / Server 2016/2019 (1803+) using the official OpenSSH Server.
- macOS 10.14+ (Mojave) SSH hosts with Remote Login enabled.
- 1 GB RAM is required for remote hosts, but at least 2 GB RAM and a 2-core CPU is recommended.
Other glibc based Linux distributions for x86_64, ARMv7l (AArch32), and ARMv8l (AArch64) should work if they have the needed prerequisites. See the Remote Development with Linux article for information prerequisites and tips for getting community supported distributions up and running.
While ARMv7l (AArch32) and ARMv8l (AArch64) support is available, some extensions installed on these devices may not work due to the use of x86 native code in the extension.
Installation
To get started, you need to:
-
Install an OpenSSH compatible SSH client if one is not already present.
-
Install Visual Studio Code or Visual Studio Code Insiders.
-
Install the Remote-SSH extension. If you plan to work with other remote extensions in VS Code, you may choose to install the Remote Development extension pack.
SSH host setup
-
If you do not have an SSH host set up, follow the directions for Linux, Windows 10 / Server (1803+), or macOS SSH host or create a VM on Azure.
-
Optional: If your Linux or macOS SSH host will be accessed by multiple users at the same time, consider enabling Remote.SSH: Remote Server Listen On Socket in VS Code User settings for improved security.
In the Settings editor:
See the Tips and Tricks article for details.
-
Optional: While password-based authentication is supported, we recommend setting up key based authentication for your host. See the Tips and Tricks article for details.

Connect to a remote host
To connect to a remote host for the first time, follow these steps:
-
Verify you can connect to the SSH host by running the following command from a terminal / PowerShell window replacing
user@hostnameas appropriate.ssh user@hostname # Or for Windows when using a domain / AAD account ssh user@domain@hostname -
In VS Code, select Remote-SSH: Connect to Host… from the Command Palette (
kbstyle(F1),kb(workbench.action.showCommands)) and use the sameuser@hostnameas in step 1. -
If VS Code cannot automatically detect the type of server you are connecting to, you will be asked to select the type manually.
Once you select a platform, it will be stored in VS Code settings under the
remote.SSH.remotePlatformproperty so you can change it at any time. -
After a moment, VS Code will connect to the SSH server and set itself up. VS Code will keep you up-to-date using a progress notification and you can see a detailed log in the
Remote - SSHoutput channel.Tip: Connection hanging or failing? See troubleshooting tips for information on resolving common problems.
If you see errors about SSH file permissions, see the section on Fixing SSH file permission errors.
-
After you are connected, you’ll be in an empty window. You can always refer to the Status bar to see which host you are connected to.
Clicking on the Status bar item will provide a list of remote commands while you are connected.
-
You can then open any folder or workspace on the remote machine using File > Open… or File > Open Workspace… just as you would locally!


From here, install any extensions you want to use when connected to the host and start editing!
Note: On ARMv7l / ARMv8l
glibcSSH hosts, some extensions may not work due to x86 compiled native code inside the extension.
Open a folder on a remote SSH host in a container
If you are using a Linux or macOS SSH host, you can use the Remote — SSH and Dev Containers extensions together to open a folder on your remote host inside of a container. You do not even need to have a Docker client installed locally.
To do so:
- Follow the installation steps for the Dev Containers extension on your remote host.
- Optional: Set up SSH key based authentication to the server so you do not need to enter your password multiple times.
- Follow the quick start for the Remote — SSH extension to connect to a host and open a folder there.
- Use the Dev Containers: Reopen in Container command from the Command Palette (
kbstyle(F1),kb(workbench.action.showCommands)).
The rest of the Dev Containers quick start applies as-is. You can learn more about the Dev Containers extension in its documentation. You can also see the Develop on a remote Docker host article for other options if this model does not meet your needs.
Disconnect from a remote host
To close the connection when you finish editing files on the remote host, choose File > Close Remote Connection to disconnect from the host. The default configuration does not include a keyboard shortcut for this command. You can also simply exit VS Code to close the remote connection.
Remember hosts and advanced settings
If you have a set of hosts you use frequently or you need to connect to a host using some additional options, you can add them to a local file that follows the SSH config file format.
To make setup easy, the extension can guide you through adding a host without having to hand edit this file.
Start by selecting Remote-SSH: Add New SSH Host… from the Command Palette (kbstyle(F1), kb(workbench.action.showCommands)) or clicking on the Add New icon in the SSH Remote Explorer in the Activity Bar.

You’ll then be asked to enter the SSH connection information. You can either enter a host name:

Or the full ssh command you would use to connect to the host from the command line:

Finally, you’ll be asked to pick a config file to use. You can also set the "remote.SSH.configFile" property in your User settings.json file if you want to use a different config file than those listed. The extension takes care of the rest!
For example, entering ssh -i ~/.ssh/id_rsa-remote-ssh yourname@remotehost.yourcompany.com in the input box would generate this entry:
Host remotehost.yourcompany.com
    User yourname
    HostName another-host-fqdn-or-ip-goes-here
    IdentityFile ~/.ssh/id_rsa-remote-ssh
See Tips and Tricks for details on generating the key shown here. You can manually edit this file with anything the SSH config file format supports, so this is just one example.
From this point forward, the host will appear in the list of hosts when you select Remote-SSH: Connect to Host… from the Command Palette (kbstyle(F1), kb(workbench.action.showCommands)) or in the SSH Targets section of the Remote Explorer.

The Remote Explorer allows you to both open a new empty window on the remote host or directly open a folder you previously opened. Expand the host and click on the Open Folder icon next to the folder you want to open on the host.

Managing extensions
VS Code runs extensions in one of two places: locally on the UI / client side, or remotely on the SSH host. While extensions that affect the VS Code UI, like themes and snippets, are installed locally, most extensions will reside on the SSH host. This ensures you have smooth experience and allows you to install any needed extensions for a given workspace on an SSH host from your local machine. This way, you can pick up exactly where you left off, from a different machine complete with your extensions.
If you install an extension from the Extensions view, it will automatically be installed in the correct location. Once installed, you can tell where an extension is installed based on the category grouping.
There will be a category for your remote SSH host:

And also a Local — Installed category:

Note: If you are an extension author and find that your extension is not working properly or installs in the wrong place, see Supporting Remote Development for details.
Local extensions that actually need to run remotely will appear dimmed and disabled in the Local — Installed category. Select Install to install an extension on your remote host.

You can also install all locally installed extensions on the SSH host by going to the Extensions view and selecting Install Local Extensions in SSH: {Hostname} using the cloud button at the right of the Local — Installed title bar. This will display a dropdown where you can select which locally installed extensions to install on your SSH host.
«Always installed» extensions
If there are extensions that you would like to always have installed on any SSH host, you can specify which ones using the remote.SSH.defaultExtensions property in settings.json. For example, if you wanted to install the GitLens and Resource Monitor extensions, specify their extension IDs as follows:
"remote.SSH.defaultExtensions": [
    "eamodio.gitlens",
    "mutantdino.resourcemonitor"
]
Advanced: Forcing an extension to run locally / remotely
Extensions are typically designed and tested to either run locally or remotely, not both. However, if an extension supports it, you can force it to run in a particular location in your settings.json file.
For example, the setting below will force the Docker extension to run locally and Remote — SSH: Editing Configuration Files extension to run remotely instead of their defaults:
"remote.extensionKind": {
    "ms-azuretools.vscode-docker": [ "ui" ],
    "ms-vscode-remote.remote-ssh-edit": [ "workspace" ]
}
A value of "ui" instead of "workspace" will force the extension to run on the local UI/client side instead. Typically, this should only be used for testing unless otherwise noted in the extension’s documentation since it can break extensions. See the article on Supporting Remote Development for details.
Forwarding a port / creating SSH tunnel
Sometimes when developing, you may need to access a port on a remote machine that is not publicly exposed. There are two ways to do this using an SSH tunnel that «forwards» the desired remote port to your local machine.
Temporarily forwarding a port
Once you are connected to a host, if you want to temporarily forward a new port for the duration of the session, select Forward a Port from the Command Palette (kbstyle(F1), kb(workbench.action.showCommands)) or select the Add Port button in the Ports view. You can see the Ports view in the bottom panel, or by running the command Ports: Focus on Ports View.

You’ll be asked to enter the port you would like to forward and you can give it a name.

A notification will tell you the localhost port you should use to access the remote port. For example, if you forwarded an HTTP server listening on port 3000, the notification may tell you that it was mapped to port 4123 on localhost since 3000 was already in use. You can then connect to this remote HTTP server using http://localhost:4123.
This same information is available in the Forwarded Ports section of the Remote Explorer if you need to access it later.
If you would like VS Code to remember any ports you have forwarded, check Remote: Restore Forwarded Ports in the Settings editor (kb(workbench.action.openSettings)) or set "remote.restoreForwardedPorts": true in settings.json.

Change local port on tunnel
If you would like the local port of the tunnel to be different than the remote server’s, you can change this via the Forwarded Ports panel.
Right-click the tunnel you want to modify, and select Change Local Address Port in the context menu.

Always forwarding a port
If you have ports that you always want to forward, you can use the LocalForward directive in the same SSH config file you use to remember hosts and advanced settings.
For example, if you wanted to forward ports 3000 and 27017, you could update the file as follows:
Host remote-linux-machine
    User myuser
    HostName remote-linux-machine.mydomain
    LocalForward 127.0.0.1:3000 127.0.0.1:3000
    LocalForward 127.0.0.1:27017 127.0.0.1:27017
Opening a terminal on a remote host
Opening a terminal on the remote host from VS Code is simple. Once connected, any terminal window you open in VS Code (Terminal > New Terminal) will automatically run on the remote host rather than locally.
You can also use the code command line from this same terminal window to perform a number of operations such as opening a new file or folder on the remote host. Type code --help to see all the options available from the command line.

Debugging on the SSH host
Once you are connected to a remote host, you can use VS Code’s debugger in the same way you would when running the application locally. For example, if you select a launch configuration in launch.json and start debugging (kb(workbench.action.debug.start)), the application will start on remote host and attach the debugger to it.
See the debugging documentation for details on configuring VS Code’s debugging features in .vscode/launch.json.
SSH host-specific settings
VS Code’s local User settings are also reused when you are connected to an SSH host. While this keeps your user experience consistent, you may want to vary some of these settings between your local machine and each host. Fortunately, once you have connected to a host, you can also set host-specific settings by running the Preferences: Open Remote Settings command from the Command Palette (kbstyle(F1), kb(workbench.action.showCommands)) or by selecting on the Remote tab in the Settings editor. These will override any User settings you have in place whenever you connect to the host. And Workspace settings will override Remote and User settings.

Working with local tools
The Remote — SSH extension does not provide direct support for sync’ing source code or using local tools with content on a remote host. However, there are two ways to do this using common tools that will work with most Linux hosts. Specifically, you can:
- Mount the remote filesystem using SSHFS.
- Sync files to/from the remote host to your local machine using
rsync.
SSHFS is the most convenient option and does not require any file sync’ing. However, performance will be significantly slower than working through VS Code, so it is best used for single file edits and uploading/downloading content. If you need to use an application that bulk reads/write to many files at once (like a local source control tool), rsync is a better choice.
Known limitations
Remote — SSH limitations
- Using key based authentication is recommended. Passwords and other tokens entered for alternate authentication methods are not saved.
- Alpine Linux and non-glibc based Linux SSH hosts are not supported.
- Older (community supported) Linux distributions require workarounds to install the needed prerequisites.
- PuTTY is not supported on Windows.
- If you clone a Git repository using SSH and your SSH key has a passphrase, VS Code’s pull and sync features may hang when running remotely. Either use an SSH key without a passphrase, clone using HTTPS, or run
git pushfrom the command line to work around the issue. - Local proxy settings are not reused on the remote host, which can prevent extensions from working unless the appropriate proxy information is configured on the remote host (for example global
HTTP_PROXYorHTTPS_PROXYenvironment variables with the appropriate proxy information). - You cannot use Dev Containers from a Remote — SSH connection to a Windows machine.
- See here for a list of active issues related to SSH.
Docker Extension limitations
If you are using the Docker or Kubernetes extension in a Remote — SSH window, you will not be able to use the right-click Attach VS Code to Container option. This will only work if you are using it from your local machine.
Extension limitations
Many extensions will work on remote SSH hosts without modification. However, in some cases, certain features may require changes. If you run into an extension issue, there is a summary of common problems and solutions that you can mention to the extension author when reporting the issue.
In addition, some extensions installed on ARMv7l (AArch32) / ARMv8l (AArch64) devices may not work due to native modules or runtimes in the extension that only support x86_64. In these cases, the extensions would need to opt-in to supporting these platforms by compiling / including binaries for ARMv7l / ARMv8l.
Common questions
How do I set up an SSH client on …?
See Installing a supported SSH client for details.
How do I set up an SSH server on …?
See Installing a supported SSH server for details on setting up an SSH server for your host.
Can I sign in to my SSH server with another/additional authentication mechanism like a password?
Yes, you should be prompted to enter your token or password automatically. However, passwords are not saved, so using key based authentication is typically more convenient.
How do I fix SSH errors about «bad permissions»?
See Fixing SSH file permission errors for details on resolving these types of errors.
What Linux packages / libraries need to be installed on remote SSH hosts?
Most Linux distributions will not require additional dependency installation steps. For SSH, Linux hosts need to have Bash (/bin/bash), tar, and either curl or wget installed and those utilities could be missing from certain stripped down distributions. Remote Development also requires kernel >= 3.10, glibc >=2.17, libstdc++ >= 3.4.18. Only glibc-based distributions are supported currently, so by extension Alpine Linux is not supported.
See Linux Prerequisites for details.
What are the connectivity requirements for the VS Code Server when it is running on a remote machine / VM?
Installation of VS Code Server requires that your local machine has outbound HTTPS (port 443) connectivity to:
update.code.visualstudio.comvscode.blob.core.windows.net*.vo.msecnd.net(Azure CDN)
By default, the Remote — SSH will attempt to download on the remote host, but if you enable remote.SSH.allowLocalServerDownload, the extension will fall back to downloading VS Code Server locally and transferring it remotely once a connection is established.
You can install extensions manually without an internet connection using the Extensions: Install from VSIX… command, but if you use the extension panel to install extensions, your local machine and VS Code Server server will need outbound HTTPS (port 443) access to:
marketplace.visualstudio.com*.vo.msecnd.net(Azure CDN)*.gallerycdn.vsassets.io(Azure CDN)
Finally, some extensions (like C#) download secondary dependencies from download.microsoft.com or download.visualstudio.microsoft.com. Others (like Visual Studio Live Share) may have additional connectivity requirements. Consult the extension’s documentation for details if you run into trouble.
All other communication between the server and the VS Code client is accomplished through the authenticated, secure SSH tunnel.
Can I use local tools on source code sitting on the remote SSH host?
Yes. Typically this is done using SSHFS or by using rsync to get a copy of the files on your local machine. SSHFS mounts the remote filesystem is ideal for scenarios where you need to edit individual files or browse the source tree and requires no sync step to use. However, it is not ideal for using something like a source control tool that bulk manages files. In this case, the rsync approach is better since you get a complete copy of the remote source code on your local machine. See Tips and Tricks for details.
Can I use VS Code when I only have SFTP/FTP filesystem access to my remote host (no shell access)?
Some cloud platforms only provide remote filesystem access for developers rather than direct shell access. VS Code Remote Development was not designed with this use case in mind since it negates the performance and user experience benefits.
However, this use case can typically be handled by combining extensions like SFTP with remote debugging features for Node.js, Python, C#, or others.
As an extension author, what do I need to do?
The VS Code extension API abstracts away local/remote details so most extensions will work without modification. However, given extensions can use any node module or runtime they want, there are situations where adjustments may need to be made. We recommend you test your extension to be sure that no updates are required. See Supporting Remote Development for details.
Questions or feedback
- See Tips and Tricks or the FAQ.
- Search on Stack Overflow.
- Add a feature request or report a problem.
- Contribute to our documentation or VS Code itself.
- See our CONTRIBUTING guide for details.
Visual Studio Code – это очень функциональный и универсальный текстовый редактор, который могут использовать не только разработчкики, но и системные администраторы. Вы можете использовать VS Code для редактирования скриптов (см. как использовать VSCode для разработки скриптов PowerShell), конфигурационных файлов или даже командной оболочки консоли. С помощью расширения Remote SSH вы можете подключаться к удаленным компьютерам по SSH и редактировать любые файлы, скрипты, конфиги или выполнять команды на удаленных Windows или Linux хостах прямо из VS Code, установленного на вашем компьютере.
В этой статье мы покажем, как настроить SSH клиент в Visual Studio Code для подключения к удаленным хостам.
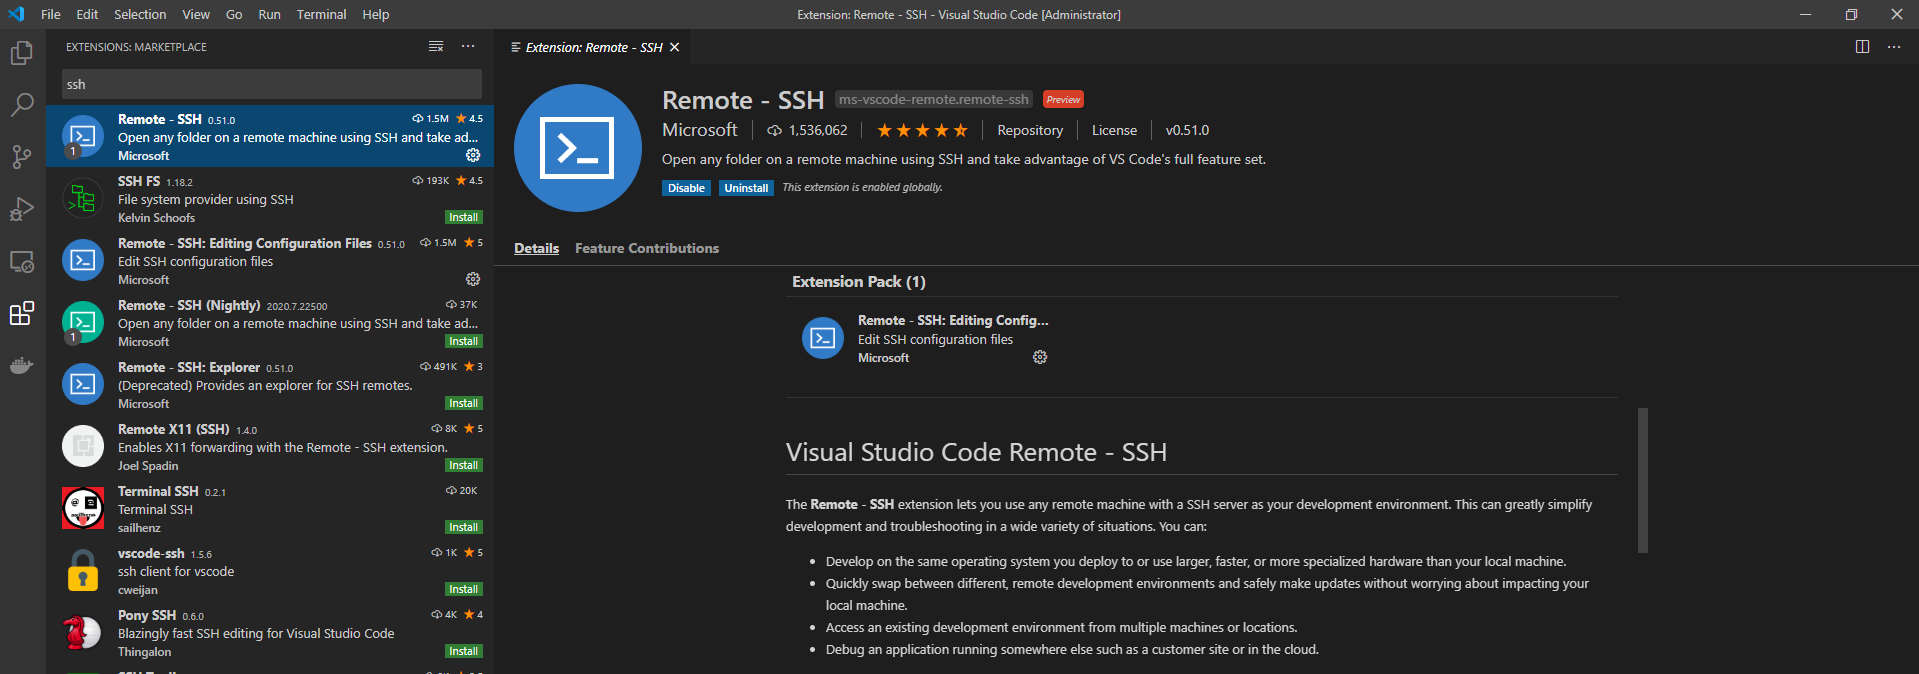
Запустите VS Code, перейдите в раздел Extensions (
Ctrl + Shift + X
), найдите и установите расширение Remote SSH.
При этом автоматически устанавливаются расширения Remote SSH: Editing Configuration Files и Remote Explorer (вкладка Extension Pack).
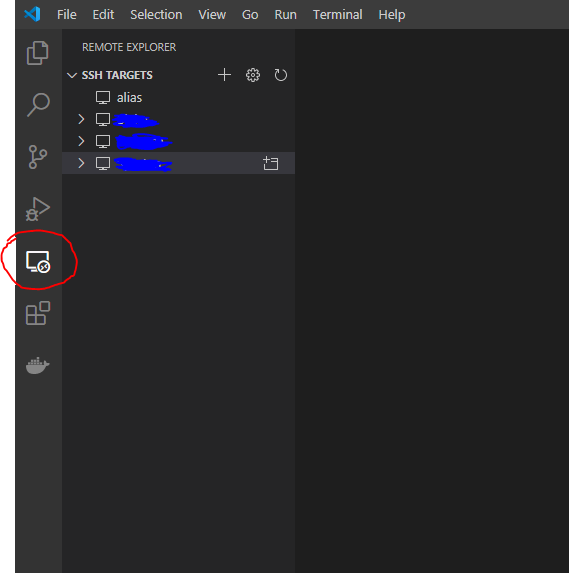
Выберите Remote Explorer в левой панели VS Code и создайте новое SSH подключение. Мастер подключения запросит:
- строку SSH подключения:
[email protected] - путь к конфигурационному файлу, в котором будут храниться настройки этого подключения (по умолчанию
C:Users%username%.sshconfig
.
Чтобы создать новое подключение можно нажать
CTRL + SHIFT + P
и выбрать Remote-SSH: Connect to Host)

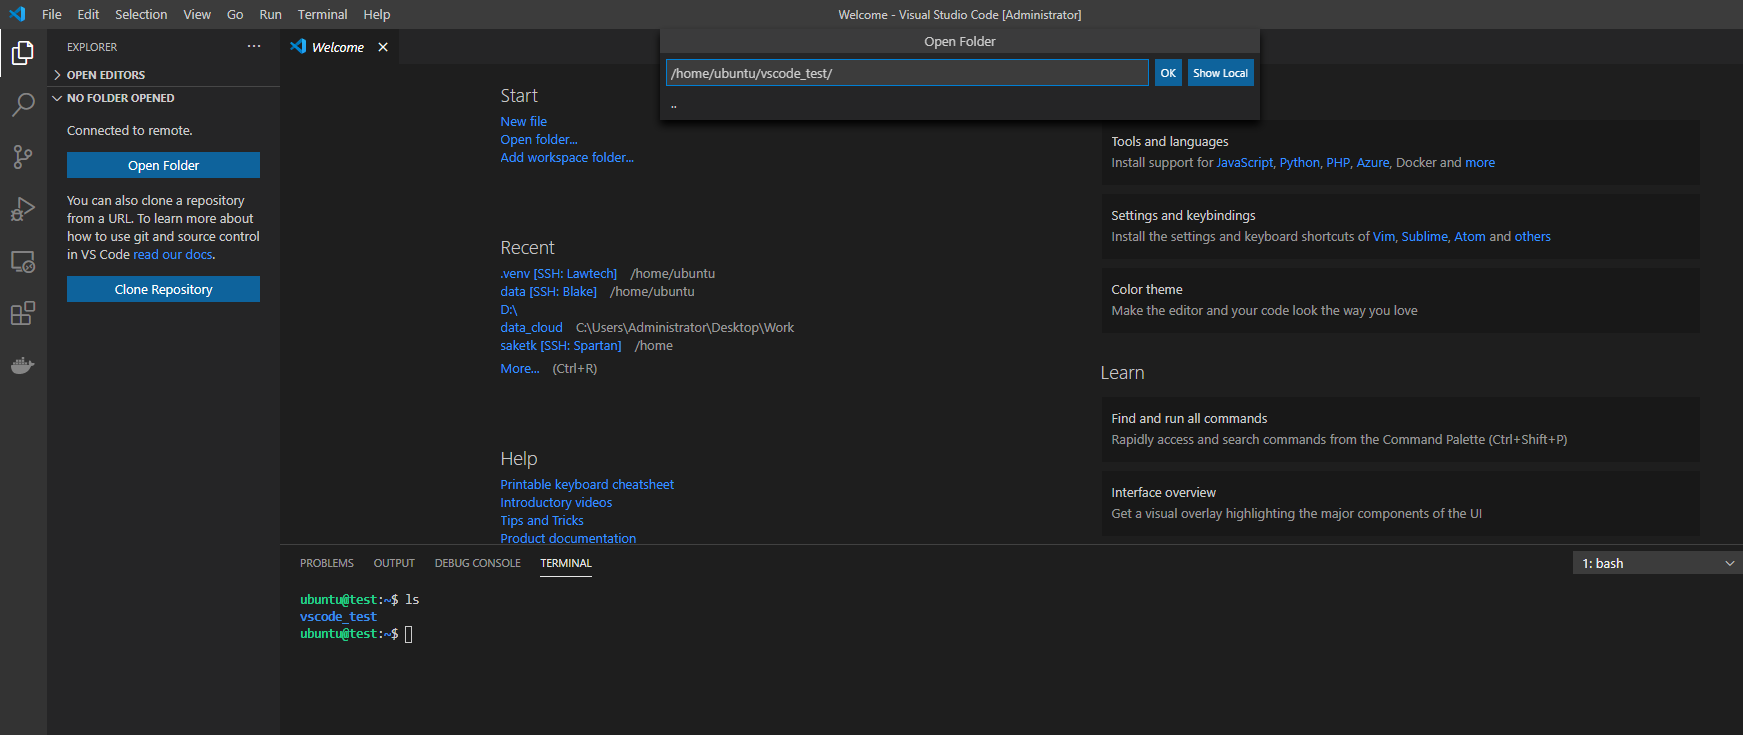
Теперь вы можете подключиться к удаленному хосту по SSH. Выберите нужный хост в списке и выберите Connect.
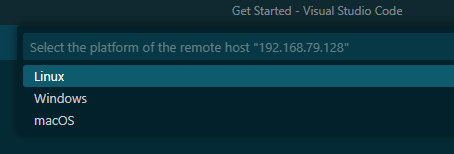
При первом подключении VSCode запрашивает у вас тип платформы на удаленном SSH хосте (Linux/Windows/MacOS) и пароль для подключения:
После подключение к удаленном SSH хосту вы можете прямо из VSCoder редактировать любые текстовые файлы и выполнять команды в Shell как будто вы подключились с помощью ssh-клиента (чтобы отобразить окно терминала, выберите Terminal -> New Terminal),
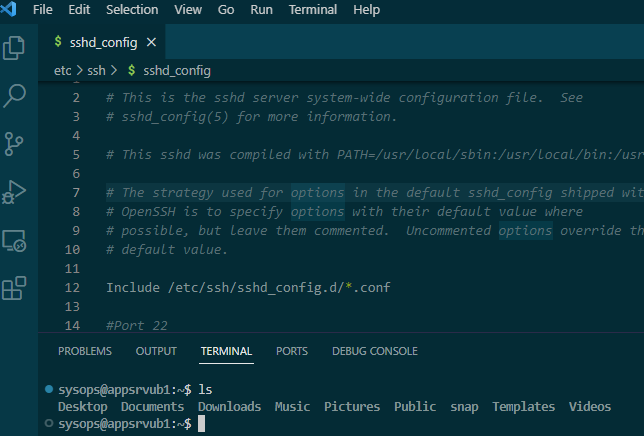
Если вы в VSCode попробуете сохранить файл, которые не доступен для правки пользователю без прав root (без sudo), появиться ошибка:
Failed to save 'sshd_config': Unable to write file 'vscode-remote://ssh-remote+192.168.79.128/etc/ssh/sshd_config' (NoPermissions (FileSystemError): Error: EACCES: permission denied, open '/etc/ssh/sshd_config')
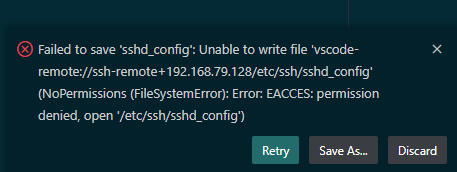
Для решения это проблемы можно использовать расширение VSCode Save as Root in Remote — SSH. После установки этого расширения вы сможете сохранить файл в режим sudo с помощью команды «Save as Root».
В Remote SSH вы можете использовать как парольную аутентификацию, так и аутентификацию по SSH ключам.
Попробуем настроить аутентификацию по SSH ключам на удаленном хосте Windows:
- Сгенерируйте на клиенте пару SSH ключей:
ssh-keygen -t ed25519В этом примере используется Windows 10 со встроенным клиентом OpenSSH.
- Скопируйте файл открытого ключа
C:Users%username%.sshid_ed25519
в файл
C:Usersuser1.sshauthorized_keys
на удаленном хосте (где user1 – имя пользователя, под которым вы будете подключаться); - Проверьте, что в конфигурационном файле OpenSSH сервера в Windows включена опция:
PubkeyAuthentication yes
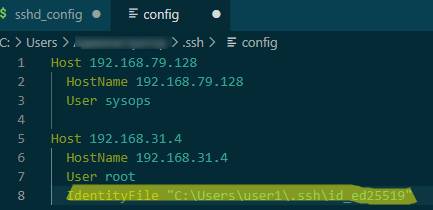
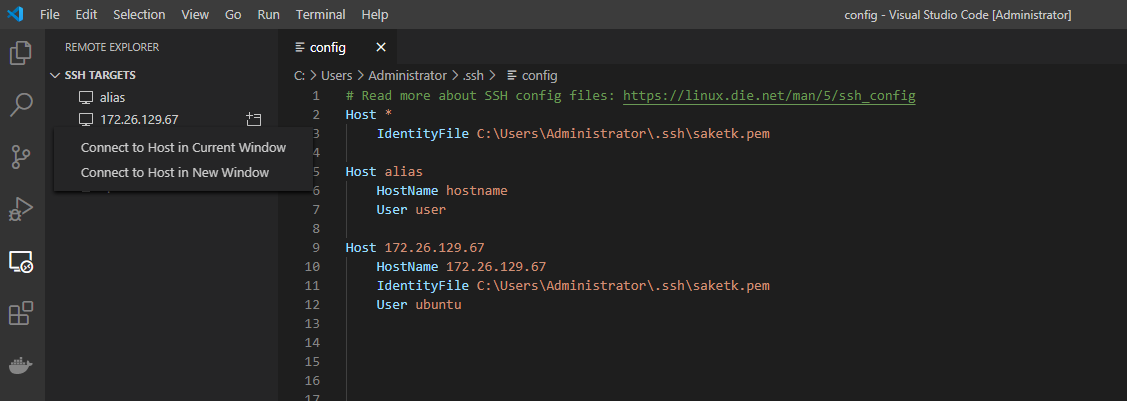
- Теперь откройте файл C:Users%username%.sshconfig в котором хранятся настройки подключения VSCode к хостам SSH. Найдите хост и добавьте параметре IdentityFile с путем к вашему закрытому ключу:
Host 192.168.31.4
  HostName 192.168.31.4
  User root
  IdentityFile "C:Usersuser1.sshid_ed25519"
Чтобы быстро открыть конфиг файл, нажмите F1 -> Remote-SSH: Open SSH Configuration File. 
Теперь при подключении к SSH хосту будет использоваться аутентификацию по ключу (без пароля).
Вы можете использовать директиву LocalForward для организации SSH туннелей и проброса портов. Можно использовать директивы
ForwardAgent
и
ProxyJump
:
Host PublicJumpServer1
  HostName pub.winitpro.ru
  User user1
  ForwardAgent yes

Host PrivateServer1
  HostName private.contoso.com
  User user1
  ProxyJump PublicJumpServer1
В предыдущем посте о Remote SSH мы рассмотрели, как настроить виртуальную машину Linux и подключиться к виртуальной машине с помощью расширения Remote — SSH в Visual Studio Code. В этом посте мы расскажем о некоторых советах и приемах, которые вы можете использовать, чтобы максимально эффективно пользоваться удаленной настройкой.

Подключение с использованием Remote SSH
Расширение Visual Studio Code Remote — SSH позволяет подключаться к удаленной машине или виртуальной машине с использованием SSH, и все изнутри VS Code. Если расширение еще не установлено, можно выполнить поиск «remote ssh» во вкладке «Расширения» (⇧⌘X).

После установки расширения вы увидите индикатор в нижнем левом углу строки состояния. Этот индикатор говорит вам, в каком контексте работает VS Code (локальный или удаленный). Нажмите на индикатор, чтобы вызвать список команд удаленного расширения.

Файл конфигурации SSH
В предыдущем посте об удаленном SSH мы подключались только к одной машине и, когда это было предложено, вводили «user@host». Если вы регулярно подключаетесь к нескольким удаленным серверам или локальным виртуальным машинам, есть лучший способ подключения без необходимости запоминать все имена пользователей, адреса и дополнительные параметры конфигурации.
OpenSSH поддерживает использование файла конфигурации для хранения всех ваших различных SSH-соединений. Чтобы использовать файл конфигурации SSH, нажмите на удаленный индикатор, чтобы вызвать удаленные команды, выберите «Open Configuration File», и выберете файл, который находится в «Users/{yourusername}/.ssh/config».

Вот пример файла конфигурации SSH:
# Читайте подробности о файлах конфигурации SSH: https://linux.die.net/man/5/ssh_config
Host python-linux-vm
    HostName <vm address>
    User sana
    IdentityFile ~/.ssh/id_python_vm

Host node-vm
    HostName <vm address>
    User sana
    Port 5522
    IdentityFile ~/.ssh/id_node_vm
Существует много других параметров конфигурации, которые вы можете указать в формате файла конфигурации SSH. Вы получите дополнения в этом файле, и вы можете нажать (⌃Space) для IntelliSense, чтобы узнать больше о параметрах конфигурации.
Опции, использованные выше:
Вы можете добавить информацию для всех хостов, которые у вас есть. После сохранения файла конфигурации вы сможете увидеть эти узлы в Remote Explorer, а также любые папки, которые вы открыли на этом узле. Вы можете выбрать значок рядом с каждым хостом или папкой, и он запустит новое окно VS Code (экземпляр) и соединит вас с этим хостом. На снимке экрана ниже я подключен к своей удаленной машине «python-linux-vm», и Remote Explorer показывает мне папки, к которым я подключался в прошлом, а также любые перенаправленные порты с удаленной машины.

ProxyCommand
Иногда вам может потребоваться подключиться с вашего настольного компьютера или ноутбука к удаленному компьютеру через интранет вашей компании или за брандмауэром. В этом случае вы можете использовать промежуточный сервер или jump-box. Этот тип настройки полезен, если вы работаете в защищенной системе, которая настроена на прием SSH-соединений только от фиксированного набора хостов.
Чтобы использовать настройку jump-box с расширением Remote — SSH, вы можете использовать параметр конфигурации ProxyCommand. Эта конфигурация откроет фоновое SSH-соединение с jump-box, а затем подключится через частный IP-адрес к цели.
Вы можете установить параметр конфигурации ProxyCommand в файле конфигурации SSH следующим образом:
# Jump box с публичным IP-адресом
Host jump-box
    HostName 52.179.157.97
    User sana
    IdentityFile ~/.ssh/jumpbox

# Целевая машина с приватным IP-адресом
Host target-box
    HostName <IP address of target>
    User sana
    IdentityFile ~/.ssh/target
    ProxyCommand ssh -q -W %h:%p jump-box
ControlMaster
Если вы подключаетесь к удаленному хосту SSH с использованием других методов аутентификации, кроме аутентификации на основе ключей, например двухфакторной, на основе пароля или ключа SSH с парольной фразой, вам может потребоваться вводить необходимую информацию несколько раз.
Вместо того, чтобы открывать несколько соединений SSH, вы можете использовать опцию ControlMaster (только на клиентах macOS/Linux), чтобы повторно использовать существующее соединение и сократить количество раз, когда вы должны вводить вашу фразу-пароль.
Чтобы использовать эту функцию, добавьте следующее в ваш конфигурационный файл SSH:
Host *
    ControlMaster auto
    ControlPath ~/.ssh/sockets/%r@%h-%p
    ControlPersist 600
Автономный удаленный компьютер
Если вы ограничены брандмауэром или ваша компания блокирует ваши виртуальные машины, и они не могут подключиться к Интернету, расширение Remote — SSH не сможет подключиться к вашей виртуальной машине, поскольку VS Code должен загрузить компонент, называемый VS Code Server, на удаленную машину.
Однако теперь вы можете решить эту проблему с помощью нового пользовательского параметра в расширении Remote — SSH. Если вы включите параметр remote.SSH.allowLocalServerDownload, расширение сначала установит VS Code Server на клиент, а затем скопирует его на сервер через SCP.
Примечание. В настоящее время это экспериментальная функция, но она будет включена по умолчанию в следующем выпуске.
Remote — SSH Nightly extension
Если вы хотите протестировать новые обновления и экспериментальные функции, как только они станут доступны, установите расширение Remote — SSH Nightly (сначала удалите стабильное расширение Remote-SSH). Это ночная сборка расширения, где мы экспериментируем с новыми функциями и настройками, прежде чем добавить их в стабильную версию.
Remote-SSH — правим код на сервере не покидая VSCode
В этой статье мы разберемся, как настроить удаленную разработку в VS Code через плагин remote-ssh.
Все последующие действия провожу в операционной системе семейства linux (linux mint 20.1), если вы собираетесь настраивать Remote-SSH в Windows 10, то рекомендуется предварительно настроить WSL, об этом процессе можно прочитать, перейдя по ссылке.
Установка Remote-SSH в редактор VSCode
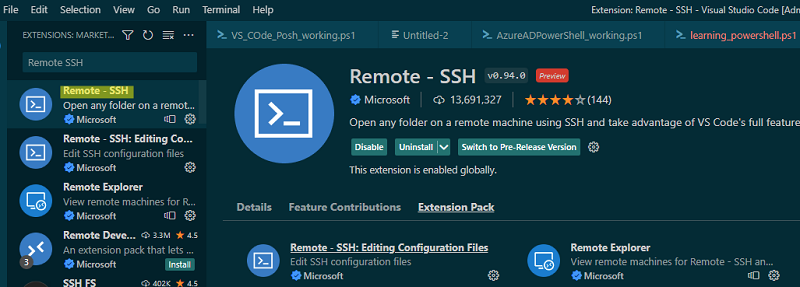
Перейдите в Расширение и в поиске найдите пакет Remote SSH, разработчиком которого указана компания Microsoft. Нажмите на кнопку «Установить», чтобы установить пакет.

Также автоматически будут установлены дополнительные пакеты.
Настройка SSH-соединения в редакторе VSCode
Есть два способа настроить подключение по SSH.
- Аутентификация с вводом пароля.
- Аутентификация через SSH ключи.
Рекомендуется использовать аутентификацию на основе ключей SSH, поскольку она более безопасна и уменьшает время, связанное с постоянным вводом паролей. Нажмите F1 или CTRL + SHIFT + P и введите remote-ssh. Он покажет список доступных команд. Выберите Add New SSH Host.

Теперь вам нужно ввести строку состоящую из команды подключения к ssh соединению, точно также как происходит процесс подключения к ssh серверу через консоль.

На следующем шаге вам будет предложено указать расположение файла конфигурации, в котором вы хотите сохранить информацию о подключении. выберите место, которое вам подходит, и нажмите Enter.
Рекомендуется создать собственный файл конфигурации, выбрав «Настройки» и указав расположение своего файла. Вы также можете добавить параметр remote.SSH.configFile в файл settings.json и обновить расположение пользовательской конфигурации.
{
  "remote.SSH.configFile": "path-to-file"
}
Ниже приведены параметры, сохраненные в файле конфигурации как часть предыдущих шагов. Вы можете сразу же настроить этот файл, а не делать это через vscode.
Host xxx.com
    User USERNAME
    HostName IP
    IdentityFile "SSH KEY LOCATION"
Вот как работает этот файл конфигурации:
- Host: указывает имя вашего хоста. Это позволяет использовать короткое имя или аббревиатуру вместо полного IP-адреса либо имя хоста при подключении к серверу.
- HostName: фактическое имя хоста сервера, которое представляет собой либо IP-адрес, либо полностью квалифицированное доменное имя.
- User: пользователь, от имени которого вы хотите выполнить подключение.
- IdentityFile: путь к вашему закрытому ключу SSH. На системах Mac и Linux вы найдете ее в домашнем каталоге в скрытом каталоге
.ssh, обычноid_rsa. Если вы используете Windows, у вас будет указано местоположение для сохранения этого файла при его создании с помощьюputty-gen.
Подключитесь к удаленному серверу SSH с помощью ввода пароля в VSCode
Теперь давайте подключимся к удаленному хосту, нажав F1 или CTRL + SHIFT + P -> REMOTE-SSH -> CONNECT TO HOST -> CHOOSE HOST IP.
Теперь вам будет предложено проверить fingerprint, поскольку это первое подключение к удаленному компьютеру.
После того как вы нажмете Continue, вам будет предложено ввести пароль. После ввода пароля он успешно подключится к удаленной машине SSH.
Подключитесь к удаленному серверу SSH с помощью ключа авторизации в VSCode
Для активации SSH key-based authentication, сгенерируйте пару публичного и приватного ssh ключей с помощью следующей команды.
ssh-keygen -t rsa -b 4096
И скопируйте публичный ключ на удаленный сервер с помощью следующей команды (заменив username@host на своё значение)
ssh-copy-id -i ~/.ssh/id_rsa.pub username@host
Теперь войдите на хост вручную, чтобы проверить, нормально ли работает аутентификация на основе ключей. Затем, откройте файл конфигурации SSH в VScode и добавьте параметр ниже. Этот параметр направляет на ваш файл с секретным ключом и указывает vscode использовать аутентификацию на основе ключей вместо аутентификации на основе пароля.
IdentityFile ~/ssh/id_rsa
Еще раз подключитесь к вашему хосту, выполнив ту же процедуру, что и на предыдущих шагах. На этот раз вам не будет предложено ввести пароль. Если у вас возникли проблемы с установкой удаленного подключения, вы можете проверить логи.
Чтобы открыть логи, нажмите F1 или CTRL + SHIFT + P –> REMOTE-SSH –> Show Log.
Чтобы закрыть активное соединение, выберите close remote connection, нажав F1 или CTRL + SHIFT + P -> REMOTE-SSH -> Close Remote Connection, или просто закройте vscode, который отключит сеанс.
ProxyCommand
Иногда вам может потребоваться подключиться с вашего настольного компьютера или ноутбука к удаленному компьютеру через интранет вашей компании или за брандмауэром. В этом случае вы можете использовать промежуточный сервер или jump-box. Этот тип настройки полезен, если вы работаете в защищенной системе, которая настроена на прием SSH-соединений только от фиксированного набора хостов.
Чтобы использовать настройку jump-box с расширением Remote-SSH, вы можете использовать параметр конфигурации ProxyCommand. Эта конфигурация откроет фоновое SSH-соединение с jump-box, а затем подключится через частный IP-адрес к цели.
Вы можете установить параметр конфигурации ProxyCommand в файле конфигурации SSH следующим образом:
# Jump box с публичным IP-адресом
Host jump-box
    HostName 52.179.157.97
    User sana
    IdentityFile ~/.ssh/jumpbox

# Целевая машина с приватным IP-адресом
Host target-box
    HostName <IP address of target>
    User sana
    IdentityFile ~/.ssh/target
    ProxyCommand ssh -q -W %h:%p jump-box
ControlMaster
Если вы подключаетесь к удаленному хосту SSH с использованием других методов аутентификации, кроме аутентификации на основе ключей, например двухфакторной, на основе пароля или ключа SSH с парольной фразой, вам может потребоваться вводить необходимую информацию несколько раз.
Вместо того, чтобы открывать несколько соединений SSH, вы можете использовать опцию ControlMaster (только на клиентах macOS/Linux), чтобы повторно использовать существующее соединение и сократить количество раз, когда вы должны вводить вашу фразу-пароль.
Чтобы использовать эту функцию, добавьте следующее в ваш конфигурационный файл SSH:
Host *
    ControlMaster auto
    ControlPath ~/.ssh/sockets/%r@%h-%p
    ControlPersist 600
Автономный удаленный компьютер
! В настоящее время это экспериментальная функция, но она будет включена по умолчанию в следующем выпуске.
Если вы ограничены брандмауэром или ваша компания блокирует ваши виртуальные машины, и они не могут подключиться к Интернету, расширение Remote-SSH не сможет подключиться к вашей виртуальной машине, поскольку VS Code должен загрузить компонент, называемый VS Code Server, на удаленную машину.
Однако теперь вы можете решить эту проблему с помощью нового пользовательского параметра в расширении Remote-SSH. Если вы включите параметр remote.SSH.allowLocalServerDownload, расширение сначала установит VS Code Server на клиент, а затем скопирует его на сервер через SCP.
Настройка Remote-SSH для подключения к хостингу BEGET
Следующая часть статьи рабочая, но устаревшая, более свежий вариант настройки подключения по ssh к хостингу beget вы можете изучить по ссылке.
Если попробовать подключиться через Remote-SSH к хостингу BEGET, то появится ошибка, чтобы её исправить нужно сделать две вещи:
- Настроить авторизацию к докер контейнеру бегет без ввода пароля
- Добавить автоматический вход в докер контейнер при авторизации к ssh
Настройка авторизации к докер контейнеру бегет без ввода пароля
Подключаемся к ssh вашего хостинга бегет, затем вводим команду
ssh-copy-id "-p 222 localhost"
Вводим пароль подключения и нажимаем enter.
Теперь проверим, что всё прошло успешно, пробуем подключится к докер контейнеру
Если подключение прошло без ввода пароля, значит всё работает.
Автоматический вход в докер контейнер beget при авторизации к ssh
! Стоит заметить, что при включении данной функции может происходить ошибка при подключении к серверу через ftp клиент. Как решить данную проблему я не нашел, если у когото есть идеи, напишите мне, добавлю в статью.
Убеждаемся, что находимся в домашней директории (~). Редактируем файл .bashrc.
Добавляем в самый верх следующие строки
if echo $SSH_CLIENT | grep --quiet -v '127.0.0.1'
then
   ssh localhost -p 222
fi
Сохраняем изменения.
Пробуем подключиться через Remote-SSH.
Заключение
Подключившись к удаленному серверу можно изменять файлы не покидая окна редактора кода, а также запускать команды в терминале удаленного сервера не переключаясь к стороннему ssh приложению.
Теперь у вас есть Visual Studio Code, настроенный для разработки на удаленном сервере с помощью SSH. Удаленное исполнение при помощи IDE обеспечивает множество преимуществ, в том числе способность быстро тестировать процесс выполнения вашего кода на различных операционных системах и с различными техническими спецификациями оборудования. Если у вас есть подключение к Интернету, вы можете подключаться к вашему серверу и работать над вашим кодом с любого компьютера, а также можете заниматься разработкой в среде Linux, даже если будете использовать Windows в качестве основной операционной системы.
When working on a development project in the tech field, you often interact with remote servers. I ofen used to face difficulties in moving files and connecting to remote servers on Windows or Mac OS then I came across Visual Studio Code Remote — SSH. In this post I will show you how to connect to a remote server using SSH with Vscode and move files easily between your local computer and the remote server.
Content:
- Connect SSH with Vscode
- Moving files with Vscode between local and remote
From Vscode docs:
The Visual Studio Code Remote — SSH extension allows you to open a remote folder on any remote machine, virtual machine, or container with a running SSH server and take full advantage of VS Code’s feature set. Once connected to a server, you can interact with files and folders anywhere on the remote filesystem.
Source: Vscode docs.
I have created an instance on my univeristy’s (unimelb) cloud platform as illustrated in the figure below. I will be using the test instance for today where we will connect to the instance using vscode remote ssh. I have setup the instance with my public ssh key.
Note:
You can use any cloud platform as the basics would be the same. You would need your public key on the remote server (under authorized keys)

SSH with Vscode
At this stage, I assume you have an instance you want to connect and your public key resides on the server gaining you acess to it. Now using vscode to connect to the server can be done in 3 simple steps as shown below.
Step 1: Install extension
You have to first install the vscode extension for remote-ssh. You can do so by search for ssh in the extensions and installing the extension as shown below.
Step 2: Add host to ssh config
Once the extension has been installed an icon will be pop up on the left side menu where you can establish a new connection to a remote server (host) as shown below.
Now click on add new host and enter the ssh command for connecting to the remote server and pointing to your ssh key. Choose the config file you want to add the host to.

Step 3: Connect to host
The remote server (host) should be added to the list. In order to connect you can right-click and choose from the options based on you preference.
Done! you can now connect your remote server and use its terminal in vscode.
Moving files
One of the great features of this extension is not requiring the use of another tool to move files between the remote server and your local machine.
Uploading files to remote server
Uploading files to remote servers can be easily done by simply dragging files to the vscode ui (under ssh) as shown below.
Downloading files from remote server
Downloading files from remote servers can be easily done too by simply right-clicking and choosing download from the vscode ui as shown below.
via GIPHY
You can check out additional features from the docs (link here).
Happy remote coding!