Перейти к основному контенту

Microsoft


![]()
A small Visual Studio Code extention to run Android and iOS Simulators in a click.
Link to marketplace: https://marketplace.visualstudio.com/items?itemName=DiemasMichiels.emulate
Running iOS simulators only works on Mac with Xcode!
Features
Select and run your emulator from Visual Studio Code.
Open all commands with Cmd-Shift-P and type Emulator or click the Emulator icon in the top right.
Requirements
Android Studio
To run Android emulators you need to have Android studio and already created the Android Virtual Devices.
Add the Android Studio emulator script to your settings in Visual Studio Code:
You can either set the default path or specify a specific path for each operating system. The default path will always be the fallback.
Default: "emulator.emulatorPath": "~/Library/Android/sdk/emulator"
Mac: "emulator.emulatorPathMac": "~/Library/Android/sdk/emulator"
Linux: "emulator.emulatorPathLinux": "~/Android/Sdk/emulator"
Windows: "emulator.emulatorPathWindows":
"<yourAndroidHome>\Sdk\emulator"
or
"C:\Users\<yourUsername>\AppData\Local\Android\Sdk\emulator"
Your visual studio code settings are found here:
File -> Preferences -> Setting -> User Setting -> Extensions -> Emulator Configuration
You now have the option to start Android emulators in cold boot modus. Activate it in your settings in Visual Studio Code:
Android Cold Boot: true
Xcode
To run iOS emulators Xcode is required.
If your Xcode or simulator is not installed in the default location it is possible to set the correct path of the Simulator.app file:
"emulator.simulatorPath": "/Applications/Xcode.app/Contents/Developer/Applications/Simulator.app"
License
MIT License
Copyright (c) 2019 Diemas Michiels
Permission is hereby granted, free of charge, to any person obtaining a copy
of this software and associated documentation files (the «Software»), to deal
in the Software without restriction, including without limitation the rights
to use, copy, modify, merge, publish, distribute, sublicense, and/or sell
copies of the Software, and to permit persons to whom the Software is
furnished to do so, subject to the following conditions:
The above copyright notice and this permission notice shall be included in all
copies or substantial portions of the Software.
THE SOFTWARE IS PROVIDED «AS IS», WITHOUT WARRANTY OF ANY KIND, EXPRESS OR
IMPLIED, INCLUDING BUT NOT LIMITED TO THE WARRANTIES OF MERCHANTABILITY,
FITNESS FOR A PARTICULAR PURPOSE AND NONINFRINGEMENT. IN NO EVENT SHALL THE
AUTHORS OR COPYRIGHT HOLDERS BE LIABLE FOR ANY CLAIM, DAMAGES OR OTHER
LIABILITY, WHETHER IN AN ACTION OF CONTRACT, TORT OR OTHERWISE, ARISING FROM,
OUT OF OR IN CONNECTION WITH THE SOFTWARE OR THE USE OR OTHER DEALINGS IN THE
SOFTWARE.
В последнее время для запуска андроид-приложений в процессе разработки я пользуюсь эмулятором Visual Studio от Microsoft. Он достаточно быстрый, удобный, поддерживает все распространенные версии андроид.
Эмулятор Visual Studio отлично подойдет вам, если у вас на компьютере стоит Windows и процессор семейства AMD. Эта связка не дружит с навороченными образами виртуальных устройств последних версий в Android Studio. А эмулятор Visual Studio прекрасно взаимодействует с Android Studio, поддерживает технологию Instant Run, и может стать полноценной заменой стандартному AVD. Кроме того, он полностью бесплатный.
Для установки Эмулятора Visual Studio идем на сайт visualstudio.com
Нажимаем кнопку «Загрузить».
В процессе установки следуем инструкциям.
После окончания установки запускаем программу.
При запуске открывается окно, где мы видим список виртуальных образов андроид-устройств. Изначально активны только 2 устройства. Это планшет с характеристиками Nexus 7 и с установленной версией Android 4.4, а также смартфон с характеристиками Samsung Galaxy S5 или Sony Xperia Z, и тоже с Android 4.4. Позже мы подключим устройства более поздних версий.
Запустим второе устройство. Первый запуск может происходить достаточно долго, последующие запуски будут быстрее.
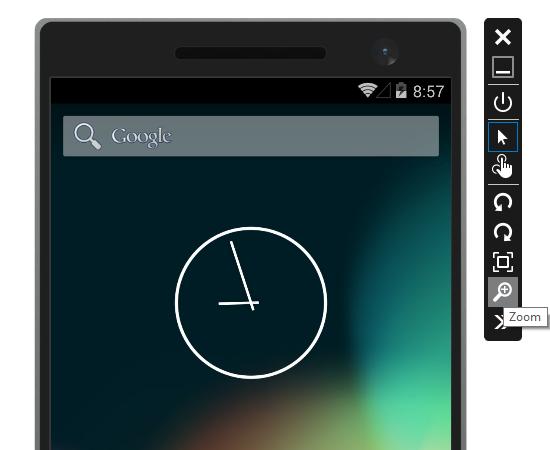
Панель управления устройства содержит кнопки закрытия, свертывания окна эмулятора, кнопку блокировки экрана устройства, режим указателя, режим мультитача, кнопки поворота устройства и масштабирования.
В раскрывающемся окне есть дополнительные настройки. Это работа с акселерометром, возможность указания реального или фиктивного местоположения устройства, имитация заряда батареи, получение снимка экрана, эмуляция камер устройства, работа с SD картой и эмуляция сетевых подключений.
Вернемся к списку устройств. Можно выбрать любое неактивное устройство в списке и загрузить его для дальнейшего использования. При выборе устройства обращайте внимание на его свойство Memory. Это объем оперативной памяти работающего устройства. То есть при запуске эмулятор занимает указанный объем оперативной памяти вашего ПК. Если вашей оперативки недостаточно — виртуальное устройство не запустится.
У разных виртуальных устройств в этом списке, независимо от версии Android, параметр Memory может быть от 1 до 3 GB. Если у вас нет лишней оперативки на ПК, вполне можно выбрать виртуальное устройство любой версии с одним гигабайтом оперативки.
После установки устройство станет активным в списке, и его можно будет запустить. На первый взгляд, оформление интерфейса может быть похожим у разных версий, например, обои рабочего стола, иконки и список приложений. Но элементы управления и поведение соответствуют версии Android виртуального устройства.
Для установки apk-файла приложения достаточно перетащить его в проводнике на экран виртуального устройства. А чтобы запускать приложения в процессе разработки, нужно выбрать предварительно запущенный эмулятор Visual Studio в окне запуска приложения среды разработки Android Studio.
Если Android Studio не видит запущенное виртуальное устройство, придется немного поковыряться в реестре Windows.
Для этого воспользуемся системной утилитой редактирования реестра regedit. Жмем комбинацию клавиш Windows+R и пишем в окошко команду regedit.
Я думаю, вы в курсе, что работать с реестром следует очень внимательно и осторожно, поскольку одно неверное действие может привести к неработоспособности вашей системы Windows.
В редакторе реестра находим ветку HKEY_LOCAL_MACHINE/SOFTWARE/Wow6432Node. Создаем здесь новый раздел Android SDK Tools. Внутри раздела создаем новый параметр Path, в значение которого сохраняем путь к Android SDK. Например, у меня оно расположено на диске D в папке android.
После этого перезапустите виртуальное устройство, и Android Studio его успешно обнаружит.
VSCode is an Advanced source code editor which can be used with a variety of programming languages, including Java, JavaScript, Go, Node.js, Python, and C++. VSCode was developed by Microsoft for Windows to develop GUI, Mobile Applications and also Web Applications, and many more.
To download and set up with VSCode you can follow the VSCode Setup tutorial. An emulator is software or hardware that enables one device to behave like another device. It can be simply defined as the ability of a computer program in an electronic device to emulate (imitate) another program or device.
When we create Mobile Applications using VSCode we need to deploy it somewhere to examine the GUI and working of our application and modify accordingly. But it takes a lot of time to make it into APK and open it in the mobile phone again and again when we need to see our output and modify it. The Android Emulator simulates Android devices on your computer so that you can test your application on a variety of devices and Android API levels without needing to have each physical device.
Here in this article, we are going to see the different ways to Set Up an Emulator for VSCode.
Method 1: Using Genny motion Emulator
Step by step implementation
Step 1: Download Genny motion Emulator along with Virtual box. https://www.genymotion.com/download/
Step 2: Open Genny motion Emulator.
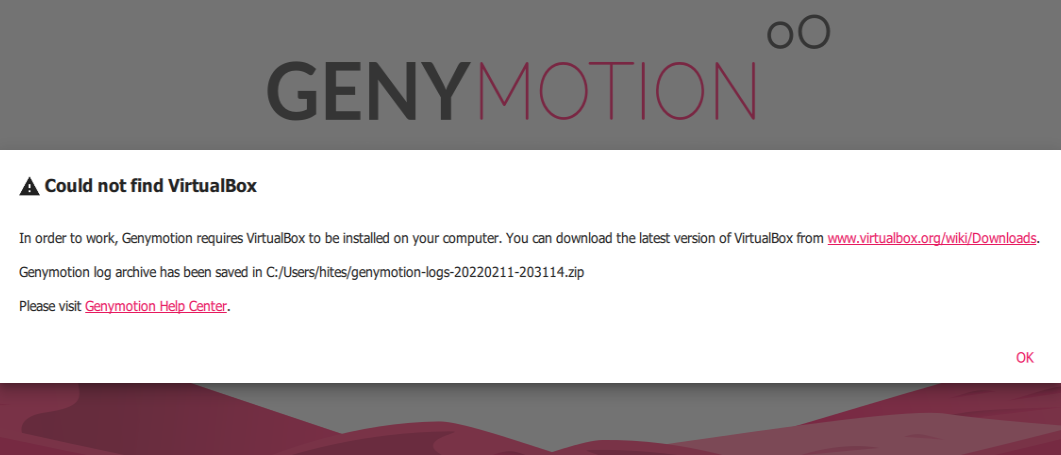
If you don’t have a virtual box installed on your PC then you may encounter this error
Then install the Virtual box from this link, and after installation, you can follow the Genny motion tutorial for the remaining setup of genny motion and the details of how to install the virtual devices and all.
Step 3: Once you install the virtual device Start the Virtual device from Virtual box or Genny Motionx. When you open Genny motion your installed devices would be shown like in the below image and to install new devices you need to click on the plus (“+”) symbol at the top right.

When you click on some device. The device will run and you can see a virtual mobile on your screen.
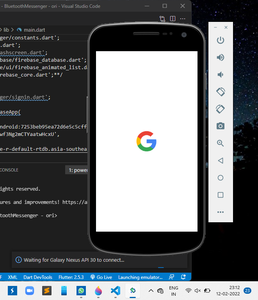
The virtual mobile on the screen
Step 4: That’s it you are sorted out and when you run the code in VSCode it would run directly in the virtual device and you can feel the UI as it is in the mobile phone and examine the UI, make necessary changes in the code if any, and hot reload the device again by clicking CTRL+R to view the updated changes.
Method 2: Using Android iOS Emulator extension in VSCode
Step by step implementation
Step 1: Go to the Extensions button on VSCode and search for Android and iOS Emulator and install it.
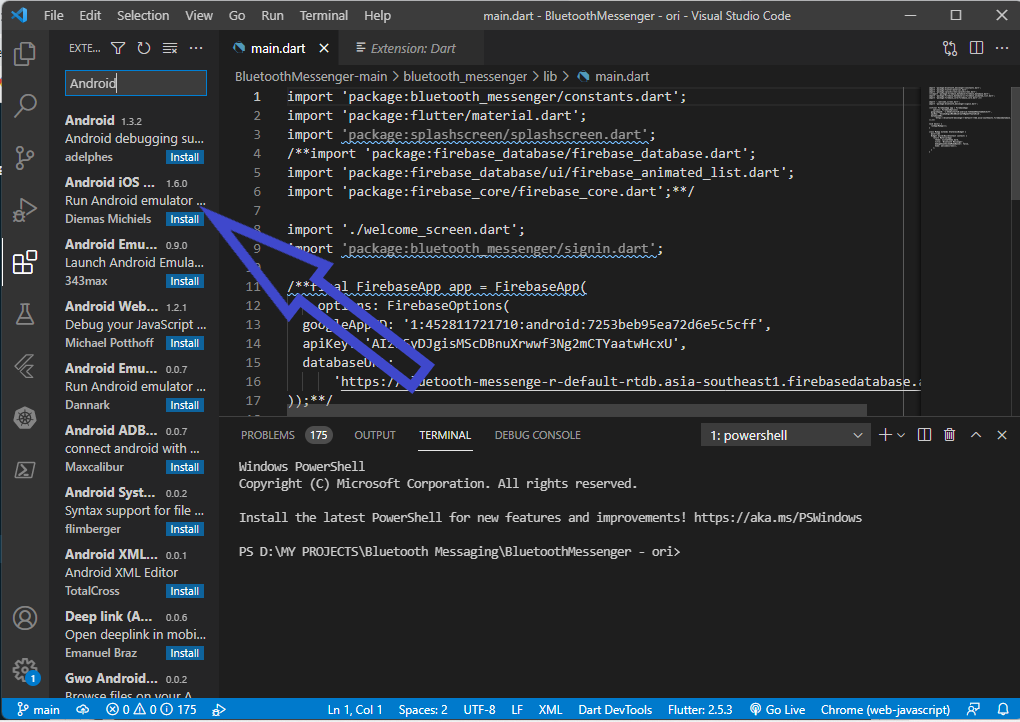
Install that extension
Step 2: Click on the Settings icon>click on the Extension settings button then you see page as below image
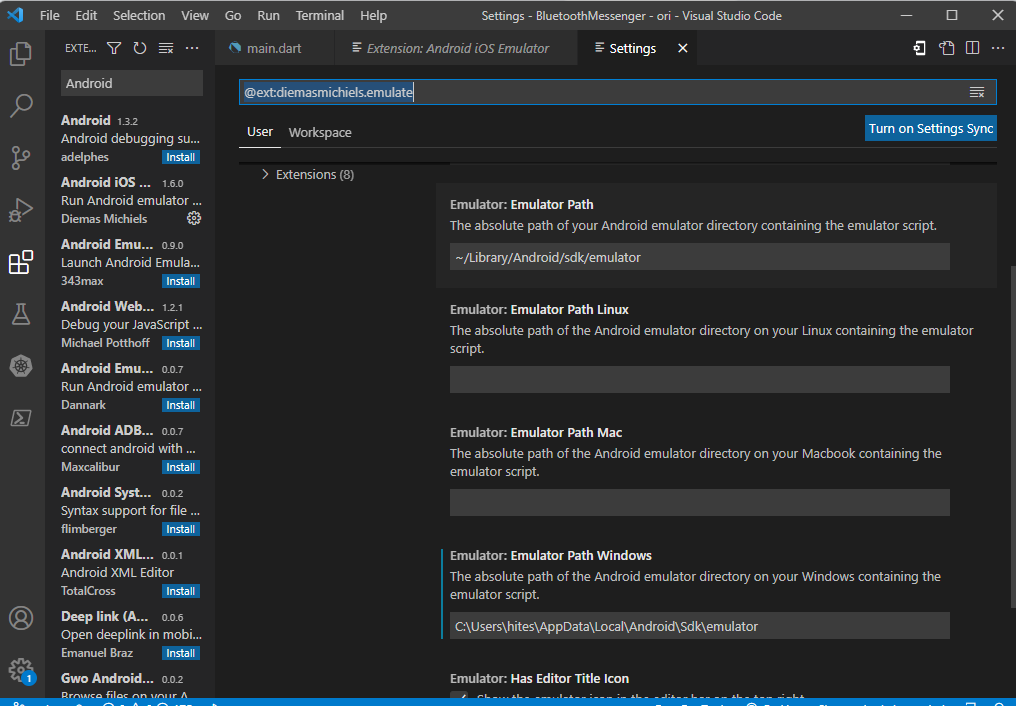
Give Emulator path as same as mentioned in the image
Note: Change the Emulator path windows address based on the location of the emulator file on your PC but make the Emulator path as default it would be given as default by the VSCode.
Step 3: Now you are sorted out and you will get the mobile icon on the top right as you click that icon you will get the list of available virtual devices.

If you click on the device, you want that would open as a virtual mobile device and when you run the code it runs directly into the virtual device and you can feel the UI as it is in the mobile phone and examine the UI, make necessary changes in the code and hot reload the device again by clicking CTRL+R to view the updated changes.
Method 3: Using AVD (Android Virtual Device) manager
Step by step implementation
Step 1: We need to have Android Studio in our System to manage Virtual devices using AVD Manager and for installing AVD Manager in Android Studio you can follow this tutorial.
Step 2: As you install a new virtual device in the AVD Manager that would be reflected in the VSCode.
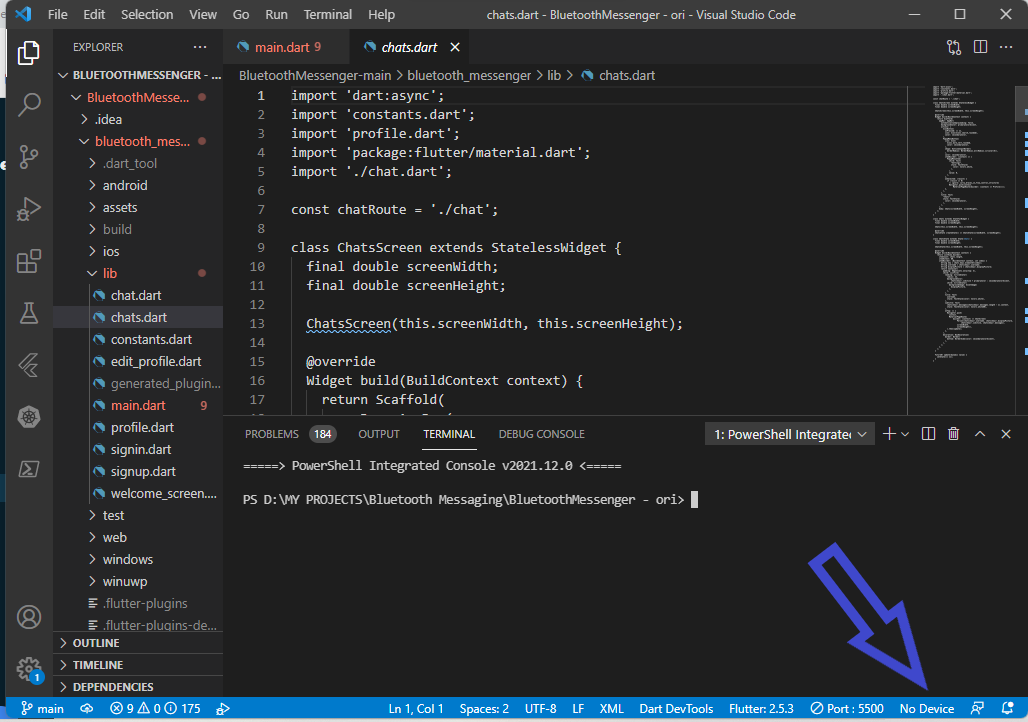
Here you can see No device initially
Step 3: If you click on the No Device you will get a list of devices that you have created an AVD Manager and also browsers

Step 4: If you click on the device, you want that would open as a virtual mobile device and when you run the code it runs directly into the virtual device and you can feel the UI as it is in the mobile phone and examine the UI, make necessary changes in the code and hot reload the device again by clicking CTRL+R to view the updated changes.
At the end of 2014 year, Microsoft has announced a fast and free Hyper-V compatible Android emulator usable to make Android developments in Visual Studio IDE. However, Android Studio and still Eclipse ADT are the primary options used by developers to make Android applications.
Since Visual Studio Emulator for Android is very appreciated by developers thanks to its great performances and to answer to Android developers asks to get the emulator available for their current IDE, Microsoft has decided to make it available for all during summer 2015.
Download and Install the Emulator
To start, you must download the emulator by clicking on the following direct link :
http://aka.ms/blogdownloadvsemu
Once you’ve installed the emulator, you need to activate a free license on your first launch by signing to with your Microsoft Account. To start the emulator, go on the emulator manager windows, and then click on the green “play” button.
Work in Android Studio with the Emulator
By default, Emulator connects to ADB (Android Debug Bridge) as if it were a USB-connected device, but to get a smoother experience during your developments using Android Studio you can follow the following steps. Main goal here is to configure Android Studio to avoid use the slow standard Android SDK emulator and target the Visual Studio Emulator for Android.
1/ In Android Studio, go to Run menu and click Edit Configurations…
2/ Under Defaults / Android Application, set Target Device to Show chooser dialog
3/ Check Use same device for future launches
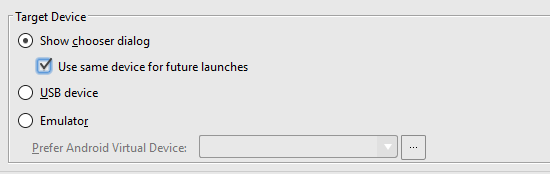
This will prompt you to select and ADB-connected device when you debug your application the first time, and then remember that device for next debugging sessions.
Other approach can be to create a toolbar item for quick-launching the emulator manager in Android Studio or starting particular device profile. To achieve that, follow these steps :
1/ Go to File > Settings > External Tools
2/ Click Add
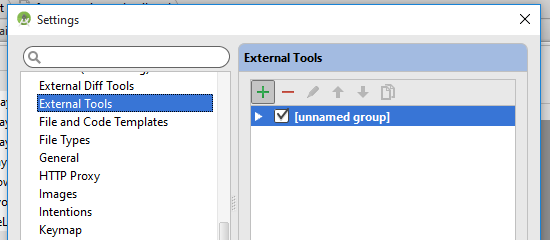
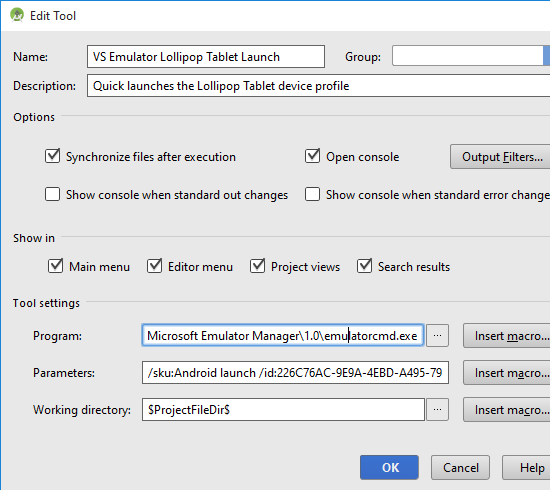
3/ In the Create Tool dialog, enter a name and description for the task, then fill in the Program & Parameters with the following values (depending on the task) :

To get the id of a profile by running emulatorcmd.exe /sku:Android list /type:device
4/ Click OK to finish editing the external tool, and OK again once you’ve added all of your tasks to close the Settings dialog.
5/ Right-click on the Android Studio toolbar and click Customize Menus and Toolbars…

6/ Under Main Toolbar, identify where you want the new toolbar icon to appear, and click Add After…
7/ Pick the external tool you created under External Tools and click OK
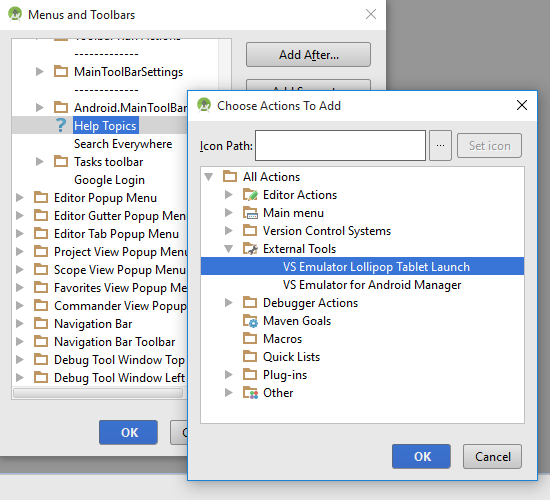
8/ Click OK again to close the Menus and Toolbars dialog
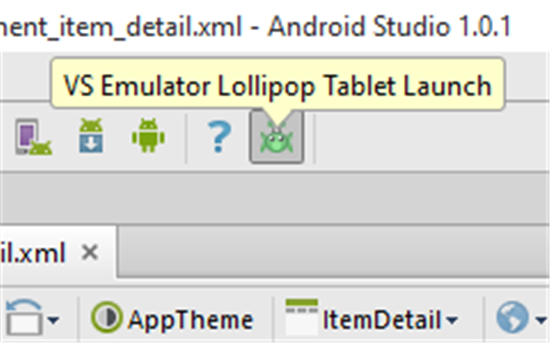
That’s all ! Now, you can use a fast Android Emulator for your developments. Thanks Microsoft !
Can you use Visual Studio for Android Development?
If so how would you set the android SDK instead of .NET framework and are there any special settings or configuration?
![]()
Jere.Jones
9,8055 gold badges35 silver badges38 bronze badges
asked Sep 3, 2009 at 7:38
3
Yes, you can use Visual Studio for Android (native) using «vs-android».
Here are the steps to set it up:
-
Download the Android SDK here.
-
Download the Android NDK here.
-
Download Cygwin here.
-
Download the JDK here.
-
Download Visual Studio 2010, 2012 or 2013 here.
-
Download vs-android here.
-
Download Apache Ant here.
-
Set environment variables:
(Control Panel > System > Advanced > Environment Variables)
ANDROID_HOME = <install_path>android-sdk
ANDROID_NDK_ROOT = <install_path>android-ndk
ANT_HOME  = <install_path>apache-ant
JAVA_HOME = <install_path>jdk
_JAVA_OPTIONS = -Xms256m -Xmx512m
- Download examples from here.
It works like a charm… and best so far to use.
![]()
Anton
4,5542 gold badges36 silver badges60 bronze badges
answered Sep 1, 2012 at 2:32
![]()
user1169079user1169079
3,0535 gold badges42 silver badges71 bronze badges
8
Believe me, I’ve tried so hard to find a decent IDE for Android developement but I failed. I used Visual Studio for many years, and it is so hard for me to get use to the way Eclipse doing things.
However, the new IntelliJ supports for Android development, it’s the closest you can get.
answered Dec 15, 2009 at 20:25
![]()
AlexAlex
6768 silver badges12 bronze badges
1
If you’re interested in producing HTML5 hybrid applications (web apps wrapped in a native container giving access to device functions), the Nomad Visual Studio extension supports building for android devices.
answered Apr 24, 2012 at 7:44
![]()
From the Android documentation:
The recommended way to develop an Android application is to use Eclipse with the ADT plugin… However, if you’d rather develop your application in another IDE, such as IntelliJ, or in a basic editor, such as Emacs, you can do that instead.
Currently, there are plug-ins for IntelliJ IDEA and NetBeans, but you can still use the tools in /tools to build, debug, monitor, measure and start the emulator.
answered Sep 3, 2009 at 8:17
![]()
Dimitar DimitrovDimitar Dimitrov
15.9k5 gold badges51 silver badges54 bronze badges
That depends on what you actually want to achieve.
You want to keep on making normal Java-based Android application, but use Visual Studio for development? Then it’s bad news, as Visual Studio has no built-in java support. Thus, if you use it out-of-the-box, you will lose all Java-specific Eclipse functionality (IntelliSense for Java, Java debugger, wizards, etc) as well as numerous Android plugins (that are Eclipse-specific and won’t work with VS).
On the other hand, you can use Mono for Android to develop apps in C# in VS, but they won’t look as smooth as the native apps (some functionality might be missing, look-and-feel slightly different, etc.). In that case such app could sell less than a «normal» Java app that looks and feels like all other Java apps.
If you are talking about native Android code (in C/C++), such as games, the news are not as bad. As Visual Studio has no problem with C++, there are numerous ways to make it work:
-
If you only want to compile your code, you can use the free vs-android toolset. It’s essentially a set of build rules telling Visual Studio how to launch Android compiler.
-
If you want to compile and debug your native code with Visual Studio, you will need something more advanced, such as VisualGDB for Android. It can build/debug your Native code independently, or together with debugging Java code from Eclipse.
answered Dec 12, 2012 at 13:47
![]()
answered Mar 3, 2013 at 10:43
![]()
free4ridefree4ride
1,6131 gold badge18 silver badges21 bronze badges
Besides, you can use VS for Android development too, because in the end, the IDE is nothing but a fancy text editor with shortcuts to command line tools, so most popular IDE’s can be used.
However, if you want to develop fully native without restrictions, you’ll have all kinds of issues, such as those related to file system case insensitivity and missing libraries on Windows platform..
If you try to build windows mobile apps on Linux platform, you’ll have bigger problems than other way around, but still makes most sense to use Linux with Eclipse for Android OS.
answered Feb 26, 2010 at 0:32
![]()
fipdafipda
471 bronze badge
2
You can use Visual Studio for Android Development. See a nice article on it here
answered Aug 14, 2015 at 20:34
![]()
yogihostingyogihosting
5,1606 gold badges45 silver badges78 bronze badges
I suppose you can open Java files in Visual Studio and just use the command line tools directly. I don’t think you’d get syntax highlighting or autocompletion though.
Eclipse is really not all that different from Visual Studio, and there are a lot of tools that are designed to make Android development more comfortable that work from within Eclipse.
answered Jan 18, 2010 at 2:10
![]()
joemoejoemoe
5,6748 gold badges42 silver badges60 bronze badges
2
You can Build rich native apps using C# and Xamarin with 100% of the native APIs exposed to you. Or push maximum performance using C++ with code that could be reused with iOS or Windows.
To follow along you’ll need a copy of Visual Studio, plus the ‘Mobile development with .NET’ workload. You can either enable this feature from first installation of Visual Studio or access it from the ‘Tools -> Get Tools and Features…’ menu item:
Visual Studio Installer
When testing and running your app you have the choice of doing so with either an Android emulator running on your development machine, or by directly connecting to an existing Android device. There’s no right option here and different developers prefer different form factors. If you choose the former option, you’ll need to ensure once you’ve selected the workload that on the right-hand pane (‘Installation details’) the checkboxes for Intel Hardware Accelerated Execution Manager and Google Android Emulator are selected (as seen above).
This article will help you to do basic android application through visual studio. I’ll put the link here below down.
https://developer.okta.com/blog/2018/12/27/build-a-basic-android-app-with-xamarin-and-visual-studio
answered Mar 5, 2021 at 7:20
![]()
If you want to create an Android application using c# language you can use Xamarin.
they created this great Cross Platform development tool which enables developers to develop iOS and Android apps in C# language.
Xamarin is offered in different licenses from free to enterprise levels but for not I will be using the starter version which is the free version. It includes the Xamarin Studio which is great start for those who want to try out creating their first apps for Android, they also offer a Business license which lets you develop in Visual Studio so you can use that rich experience similar to developing Web Apps or Windows Apps, then they have this Enterprise which contains everything
answered Apr 17, 2015 at 14:49
![]()
AminMAminM
1,6504 gold badges32 silver badges47 bronze badges
I do most of my native app work in MacOS, but when I am working in Windows and need to fire up Android Studio, I’ve always had an issue running the bundled emulator. The emulator complained about Hyper-V and turning it off per the instructions did not resolve the issue. After searching for and trying multiple solutions that did not work, I had really just given up using Android Studio on Windows. Later, through my work with Xamarin and Visual Studio, I was introduced to the Visual Studio Emulator for Android, a full featured Android emulator for Windows that worked with Hyper-V out of the box!!
Getting started was easy, just download the emulator from Microsoft’s Visual Studio.com site
After installation, open the app and download any of the emulator profiles you are interested in testing:
Start the emulator you want and then fire up your Android Studio project. Once in Android Studio, configure it to use your new emulator by navigating to:
Run > Edit Configurations > Defaults > Android App
On the General tab, under Deployment Target Options change the Target option to «Open Select Deployment Target Dialog» and check the «Use same device for future launches» option, so that we can be prompted to select an emulator when we run a project in Android Studio:
Go ahead and run your app. You’ll be prompted with the Select Deployment Target window:
HEY! Where’s our new emulator?!?! It should appear under Connected Devices, but it does not. If it appears for you then you can stop reading and get back to work! For the rest of us, there is one more hurdle we need to get over before we are done.
The issue really boils down to where the new emulator is looking for the Android SDK. In most default installations of Android Studio bundled with the SDK, the SDK is stored under:
C:Users[USER]AppDataLocalAndroidSdk
When the emulator is installed, it assumes by default that the SDK path is:
C:Program Files (x86)Androidandroid-sdk
This mismatch is what is causing the new emulator to not show up in Android Studio. You can double check the SDK location you are using from Android Studio by navigating to:
File > Project Structure > SDK Location
Make note or copy this path as we are going to update the emulator to point to this location. The emulator stores the path in the registry so we will have to make the change there. Right click on the Windows logo on your task bar, select Run and then type «regedit» in the window to launch the registry editor.
Navigate to:
HKEY_LOCAL_MACHINE > SOFTWARE > WOW6432Node > Android SDK Tools
Then change the Path value to the same SDK location mapped in Android Studio. Close regedit, restart the emulator and then try to run the app again in Android Studio.
Voilà!! Your emulator should now appear under the Connected Devices area:
- Подробности
- Категория: Статьи и комментарии
-
Опубликовано: 24 ноября 2017
После обновления старого компьютера с процессором Intel на конфигурацию с процессором AMD A10 7870K стал вопрос об эмуляторе для программ написанных в среде Android Studio, так как типовой эмулятор работать с процессорами AMD отказывается. Беглый поиск в интернете выдал два варианта решения вопроса: эмулятор Genymotion и эмулятор Visual Studio. Первый, по отзывам, очень хорош, но платный, хотя есть trial-версия на 31 день. В итоге выбор пал на Visual Studio Emulator как на совершенно бесплатную альтернативу.
Скачать его можно с официального сайта Visual Studio: https://www.visualstudio.com/ru/vs/msft-android-emulator/
В процессе запуска эмулятора возникли следующие проблемы:
1. Ошибка [Critical] XDE Exit Code: InvalidArguments (3).
Возможно, проблема в вашем случае снимется с отключением OpenGL. Это выполняется редактированием файла xdesku.xml.
Необходимо удалить строчку GuestDisplayProvider=»VsEmulator.OpenGLGuestDisplay» в файле Program Files (или Program Files (x86), если 64-битная система)Microsoft XDE10.0.0.0SKUsAndroidxdesku.xml
2. Ошибка [Critical] XDE Exit Code: CouldntStartVm (10)
Здесь рекомендуется удалить лишние приложения, ибо эмулятору не хватает памяти. Мне этот шаг не помог. В итоге проблема решилась следующим образом:
1. Запускаем в командной строке редактор реестра regedit.exe.
2. Находим подраздел реестра:
HKEY_LOCAL_MACHINESOFTWAREMicrosoftWindows NTCurrentVersionVirtualization
3. Щелкаем правой кнопкой мыши папку «Virtualization», выбираем «Создать», а затем «Параметр DWORD (32 бита)».
4. Вводим наименование MemoryReserve, нажимаем Enter.
5. Дважды щелкаем на созданный MemoryReserve, вводим 2048 в поле «Значение», при этом выбрав параметр «Десятичный» и нажимаем «ОК».
6. Закрываем редактор реестра.
В системах, у которых установлено менее 8 ГБ ОЗУ, рекомендуется значение MemoryReserve 2048 (2 ГБ). Если поставить значение 0, то этот параметр будет игнорироваться.
Чтобы этот параметр реестра вступил в силу, необходимо перезагрузить компьютер.
1. Запускаем в командной строке редактор реестра regedit.exe.
2. Находим подраздел реестра:
HKEY_LOCAL_MACHINE/SOFTWARE/Wow6432Node
3. Создаем здесь новый раздел Android SDK Tools. Внутри раздела создаем новый параметр Path тип «Строковый», в значение которого сохраняем ваш путь к Android SDK.
4. Перезапускаем виртуальное устройство. Теперь Android Studio должна его обнаружить и показать при отладке.