| title | description | author | ms.author | manager | ms.technology | ms.topic | ms.workload | dev_langs | ms.date | ms.custom |
|---|---|---|---|---|---|---|---|---|---|---|
|
Tutorial: Create a Windows Forms app with Visual Basic |
In this tutorial, learn how to create a Windows Forms app in Visual Studio with Visual Basic. |
anandmeg |
meghaanand |
jmartens |
vs-ide-general |
tutorial |
multiple |
VB |
01/07/2022 |
vs-acquisition, get-started |
Tutorial: Create a WinForms app with Visual Basic
[!INCLUDE Visual Studio]
In this tutorial, you’ll create a Visual Basic application that has a Windows Forms user interface.
The Visual Studio integrated development environment (IDE) includes all the tools you need to create a Windows Forms app.
In this tutorial, you learn how to:
[!div class=»checklist»]
- Create a project
- Add a button to the form
- Add a label and code
- Run the application
Prerequisites
::: moniker range=»vs-2019″
You need Visual Studio to complete this tutorial.
Visit the Visual Studio downloads page for a free version.
::: moniker-end
::: moniker range=»>=vs-2022″
You need Visual Studio to complete this tutorial.
Visit the Visual Studio downloads page for a free version.
::: moniker-end
Create a project
Create a Visual Basic application project.
The project type comes with all the template files you’ll need, before you’ve even added anything.
::: moniker range=»vs-2019″
-
Open Visual Studio.
-
On the start window, choose Create a new project.

-
On the Create a new project window, select the Windows Forms App (.NET Framework) template for Visual Basic.
You can refine your search to quickly get to the template you want.
For example, enter Windows Forms App in the search box.
Next, select Visual Basic from the Language list, and then Windows from the Platform list.[!NOTE]
If you don’t see the Windows Forms App (.NET Framework) template, you can install it from the Create a new project window.
In the Not finding what you’re looking for? message, choose the Install more tools and features link.Next, in the Visual Studio Installer, choose the .NET desktop development workload.
After that, select Modify in the Visual Studio Installer. You might be prompted to save your work.
-
In the Configure your new project window, enter HelloWorld as the Project name. Then, select Create.
Visual Studio opens your new project.


::: moniker-end
::: moniker range=»>=vs-2022″
-
Open Visual Studio.
-
On the start window, choose Create a new project.
-
On the Create a new project window, select the Windows Forms App (.NET Framework) template for Visual Basic.
You can refine your search to quickly get to the template you want.
For example, enter Windows Forms App in the search box.
Next, select Visual Basic from the Language list, and then Windows from the Platform list.[!NOTE]
If you don’t see the Windows Forms App (.NET Framework) template, you can install it from the Create a new project window.
In the Not finding what you’re looking for? message, choose the Install more tools and features link.Next, in the Visual Studio Installer, choose the .NET desktop development workload.
After that, select Modify in the Visual Studio Installer. You might be prompted to save your work.
-
In the Configure your new project window, enter HelloWorld as the Project name. Then, select Create.
Visual Studio opens your new project.

::: moniker-end
Add a button to the form
After you select your Visual Basic project template and name your file, Visual Studio opens a form for you.
A form is a Windows user interface.
You’ll create a «Hello World» application by adding controls to the form.
-
On the left side of the Visual Studio IDE, select the Toolbox tab.
If you don’t see it, select View > Toolbox from the menu bar or Ctrl+Alt+X.If you want, select the Pin icon to dock the Toolbox window.
-
Select the Button control and then drag it onto the form.
-
In the Appearance section of the Properties window, for Text, type Click this, and then press Enter.
If you don’t see the Properties window, you can open it from the menu bar. Select View > Properties Window or press F4.
-
In the Design section of the Properties window, change the name from Button1 to btnClickThis, and then press Enter.
[!NOTE]
If you’ve alphabetized the list in the Properties window, Button1 appears in the (DataBindings) section, instead.


Add a label and code
Now that you’ve added a button control to create an action, add a label control to send text to.
-
Select the Label control in the Toolbox window, and then drag it onto the form.
Place it beneath the Click this button. -
In either the Design section or the (DataBindings) section of the Properties window, change the name Label1 to lblHelloWorld, and then press Enter.
-
In the Form1.vb [Design] window, double-click the Click this button to open the Form1.vb window.
Another option is to expand Form1.vb in Solution Explorer, and then select Form1.
-
In the Form1.vb window, between the Private Sub and End Sub lines, enter lblHelloWorld.Text = «Hello World!» as shown in the following screenshot:

Run the application
Your application is ready to build and run.
-
Select Start to run the application.
Several things happen.
In the Visual Studio IDE, the Diagnostics Tools window opens, and an Output window opens.
Outside of the IDE, a Form1 dialog box appears.
It includes your Click this button and text that says Label1. -
Select the Click this button in the Form1 dialog box.
The Label1 text changes to Hello World!.
-
Close the Form1 dialog box to stop running the app.


Next steps
To learn more about Windows Forms, continue with the following tutorial:
[!div class=»nextstepaction»]
Tutorial: Create a picture viewer
See also
- More Visual Basic tutorials
- C# tutorials
- C++ tutorials
Chapter 4. Windows Forms I: Developing Desktop Applications
Windows
Forms is a set of classes that
encapsulates the creation of the graphical user interface (GUI)
portion of a typical desktop application. Previously, each
programming language had its own way of creating windows, text boxes,
buttons, etc. This functionality has all been moved into the .NET
Framework class library—into the types located in the
System.Windows.Forms namespace. Closely
related is the System.Drawing namespace, which
contains several types used in the creation of GUI applications. The
capabilities provided by the types in the System.Drawing namespace
are commonly referred to as
GDI+ (discussed more
fully later in this chapter).
In this chapter, we’ll examine the form (or
window)
as the central component in a classic desktop application.
We’ll look at how forms are programmatically created and how
they’re hooked to events. We’ll also examine how multiple
forms in a single application relate to one another and how you
handle forms in an application that has one or more child forms.
Finally, we’ll discuss two topics, printing and 2-D graphics,
that are relevant to desktop application development.
Creating a Form
The
easiest way to design a form is to use
the Windows Forms Designer in
Visual Studio .NET. The developer can use
visual tools to lay out the form, with the designer translating the
layout into Visual Basic .NET source code. If you don’t have
Visual Studio .NET, you can write the Visual Basic .NET code directly
and not use the designer at all. This section will demonstrate both
methods.
Programmatically, a form is defined by deriving a class from the
Form class
(defined in System.Windows.Forms). The Form class contains the
know-how for displaying an empty form, including its title bar and
other amenities that we expect from a Windows form. Adding members to
the new class and overriding members inherited from the Form class
add visual elements and behavior to the new form.
Creating a Form Using Visual Studio .NET
To create a GUI application in Visual Studio .NET:
-
Select File→New→Project. The New Project dialog box
appears, as shown in Figure 4-1.
Figure 4-1. The New Project dialog box
-
Select Visual Basic Projects in the Project Types pane on the left
side of the dialog box. -
Select Windows Application in the Templates pane on the right side of
the dialog box. -
Enter a name in the Name text box.
-
Click OK. Visual Studio .NET creates a project with a form in it and
displays the form in a designer, as shown in Figure 4-2.

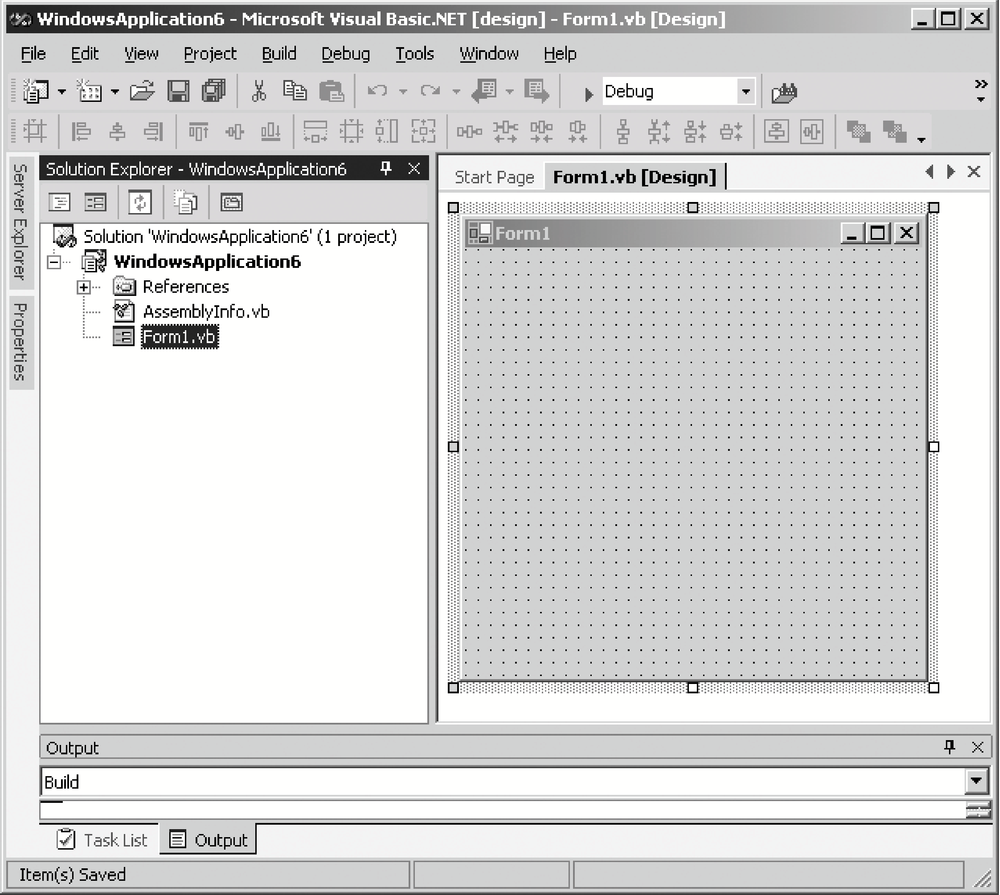
Figure 4-2. The Windows Forms Designer
To see the code created by the form Windows Forms Designer,
right-click on the form, then select View
Code. Doing this for the blank form shown in Figure 4-2 reveals the code shown here:
Public Class Form1
    Inherits System.Windows.Forms.Form

 Windows Form Designer generated code

End Class
This shows the definition of a class
named Form1 that inherits from the Form class. The Windows Forms
Designer also creates a lot of boilerplate code that should not be
modified by the developer. By default, it hides this code from view.
To see the code, click on the “+” symbol that appears to
the left of the line that says “Windows Form Designer generated
code.” Doing so reveals the code shown in Example 4-1.
Example 4-1. The Windows Forms Designer-generated code for a blank form
Public Class Form1
   Inherits System.Windows.Forms.Form

#Region " Windows Form Designer generated code "

   Public Sub New(  )
      MyBase.New(  )

      'This call is required by the Windows Form Designer.
      InitializeComponent(  )

      'Add any initialization after the InitializeComponent(  ) call

   End Sub

   'Form overrides dispose to clean up the component list.
   Protected Overloads Overrides Sub Dispose(ByVal disposing As Boolean)
      If disposing Then
         If Not (components Is Nothing) Then
            components.Dispose(  )
         End If
      End If
      MyBase.Dispose(disposing)
   End Sub

   'Required by the Windows Form Designer
   Private components As System.ComponentModel.Container

   'NOTE: The following procedure is required by the Windows Form Designer
   'It can be modified using the Windows Form Designer.
   'Do not modify it using the code editor.
   <System.Diagnostics.DebuggerStepThrough(  )> Private Sub InitializeComponent(  )
      components = New System.ComponentModel.Container(  )
      Me.Text = "Form1"
   End Sub

#End Region

End Class
The Windows Forms Designer autogenerates the code for four class
members:
- New method (the class constructor)
-
The constructor calls the base class’s constructor and then
invokes the InitializeComponent method. Developer-supplied
initialization code should follow the call to InitializeComponent.
After the constructor is generated, the designer doesn’t touch
it again. - Dispose method
-
The Dispose method is where the object gets rid of any expensive
resources. In this case, it calls the base class’s Dispose
method to give it a chance to release any expensive resources that it
may hold, then it calls the components field’s Dispose method.
(For more on the components field, see the next item.) This in turn
calls the Dispose methods on each individual component in the
collection. If the derived class uses any expensive resources, the
developer should add code here to release them. When a form is no
longer needed, all code that uses the form should call the
form’s Dispose method. After the Dispose method is generated,
the designer doesn’t touch it again. - Components field
-
The components field is an object of type IContainer (defined in the
System.ComponentModel namespace). The designer-generated code uses
the components field to manage finalization of components that may be
added to a form (for example, the Timer component). - InitializeComponent method
-
The code in this method should not be modified or added to by the
developer in any way. The Windows Forms Designer automatically
updates it as needed. When controls are added to the form using the
designer, code is added to this method to instantiate the controls at
runtime and set their initial properties. Note also in Example 4-1 that properties of the form itself (such as
Text and Name) are initialized in this method.
One thing missing from this class definition is a Main method. Recall
from Chapter 2 that .NET applications must expose
a public, shared Main method. This method is called by the CLR when
an application is started. So why doesn’t the
designer-generated form include a
Main method? It’s because the
Visual Basic .NET compiler in Visual Studio .NET automatically
creates one as it compiles the code. In other words, the compiled
code has a Main method in it even though the source code does not.
The Main method in the compiled code is a member of the Form1 class
and is equivalent to this:
<System.STAThreadAttribute(  )> Public Shared Sub Main(  )
   System.Threading.Thread.CurrentThread.ApartmentState = _
      System.Threading.ApartmentState.STA
   System.Windows.Forms.Application.Run(New Form1(  ))
End Sub
Note that the Visual Basic .NET command-line compiler doesn’t
automatically generate the Main method. This method must appear in
the source code if the command-line compiler is to be used.
The next steps in designing the form are to name the
code file something meaningful and to set
some properties on the form, such as the title-bar text. To change
the name of the form’s code file,
right-click on the filename in
the Solution Explorer window and select Rename. If you’re
following along with this example, enter
HelloWindows.vb as the name of the file.
Changing the name of the file doesn’t change the name of the
class.
To change the name of the class, right-click the form in the designer
and choose Properties. In the Properties window, change the value of
the Name property. For this example, change the name to
“HelloWindows”.
To change the form’s caption, set the form’s Text
property to a new value. Set the Text property in this example to
“Programming Visual Basic .NET”.
Next,
controls can be added to the form from the
Visual Studio .NET toolbox. To display the toolbox, select
View→Toolbox from the Visual Studio .NET main menu. For this
example, double-click on the Label control in the toolbox to add a
Label control on the form. Use the
Properties window to change the label’s Text property to
“Hello, Windows!” and its Font property to Arial 24pt.
Next, double-click on the Button control in the toolbox to add a
Button control to the form. Use the
Properties window to change the button’s Name property to
“OkButton” and its Text property to “OK”.
Finally, position the controls as desired, size the Label control and
the form to be appealing, and set the form’s FormBorderStyle
property to “FixedToolWindow”. The resulting form should
look something like the one shown in Figure 4-3.
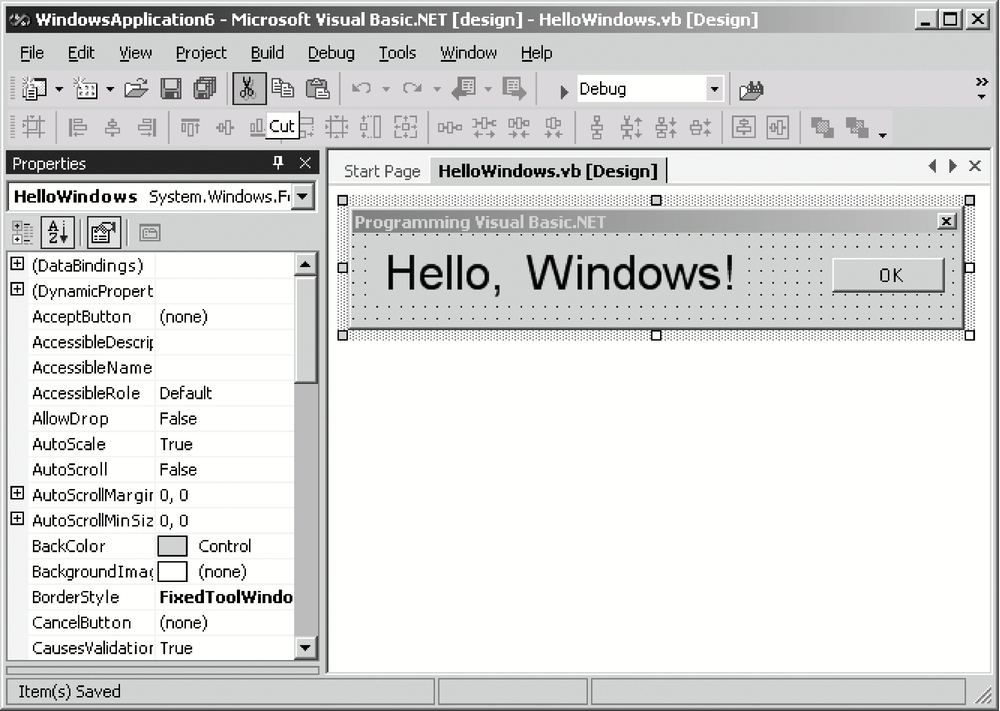
Figure 4-3. A form with controls
Press the F5
key to build and run the program. The result should look something
like Figure 4-4.
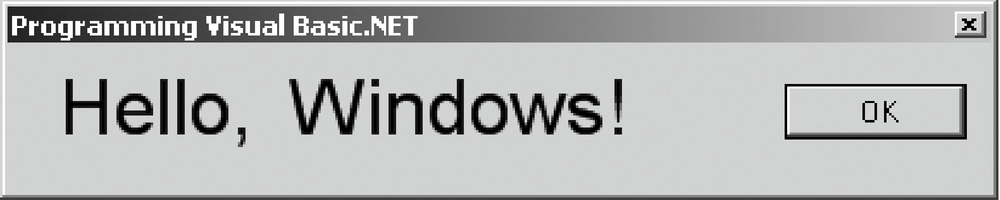
Figure 4-4. Hello, Windows!, as created by the Windows Forms Designer
The code generated by the designer is shown in Example 4-2.
Example 4-2. Hello, Windows! code, as generated by the Windows Forms Designer
Public Class HelloWindows
   Inherits System.Windows.Forms.Form

#Region " Windows Form Designer generated code "

   Public Sub New(  )
      MyBase.New(  )

      'This call is required by the Windows Form Designer.
      InitializeComponent(  )

      'Add any initialization after the InitializeComponent(  ) call

   End Sub

   'Form overrides dispose to clean up the component list.
   Protected Overloads Overrides Sub Dispose(ByVal disposing As Boolean)
      If disposing Then
         If Not (components Is Nothing) Then
            components.Dispose(  )
         End If
      End If
      MyBase.Dispose(disposing)
   End Sub
   Friend WithEvents Label1 As System.Windows.Forms.Label
   Friend WithEvents OkButton As System.Windows.Forms.Button

   'Required by the Windows Form Designer
   Private components As System.ComponentModel.Container

   'NOTE: The following procedure is required by the Windows Form Designer
   'It can be modified using the Windows Form Designer.
   'Do not modify it using the code editor.
   <System.Diagnostics.DebuggerStepThrough(  )> _
   Private Sub InitializeComponent(  )
      Me.Label1 = New System.Windows.Forms.Label(  )
      Me.OkButton = New System.Windows.Forms.Button(  )
      Me.SuspendLayout(  )
      '
      'Label1
      '
      Me.Label1.Font = New System.Drawing.Font("Arial", 24!, _
         System.Drawing.FontStyle.Regular, _
         System.Drawing.GraphicsUnit.Point, CType(0, Byte))
      Me.Label1.Location = New System.Drawing.Point(8, 8)
      Me.Label1.Name = "Label1"
      Me.Label1.Size = New System.Drawing.Size(264, 48)
      Me.Label1.TabIndex = 0
      Me.Label1.Text = "Hello, Windows!"
      '
      'OkButton
      '
      Me.OkButton.Location = New System.Drawing.Point(280, 16)
      Me.OkButton.Name = "OkButton"
      Me.OkButton.TabIndex = 1
      Me.OkButton.Text = "OK"
      '
      'HelloWindows
      '
      Me.AutoScaleBaseSize = New System.Drawing.Size(5, 13)
      Me.ClientSize = New System.Drawing.Size(362, 58)
      Me.Controls.AddRange(New System.Windows.Forms.Control(  ) _
         {Me.OkButton, Me.Label1})
      Me.FormBorderStyle = _
         System.Windows.Forms.FormBorderStyle.FixedToolWindow
      Me.Name = "HelloWindows"
      Me.Text = "Programming Visual Basic .NET"
      Me.ResumeLayout(False)

   End Sub

#End Region

End Class
Note that the designer made the following modifications to the code:
-
Two Friend fields were added to the class, one for each of the
controls that were added to the form:Friend WithEvents Label1 As System.Windows.Forms.Label Friend WithEvents OkButton As System.Windows.Forms.Button
The
Friendkeyword makes the members visible to
other code within the project, but it hides them from code running in
other assemblies.The
WithEventskeyword allows the HelloWindows
class to handle events generated by the controls. In the code shown,
no event handlers have been added yet, but you’ll see how to do
that later in this section.Note that the field names match the control names as shown in the
Properties window. -
Code was added to the InitializeComponent method to instantiate the
two controls and assign their references to the member fields:Me.Label1 = New System.Windows.Forms.Label( ) Me.OkButton = New System.Windows.Forms.Button( )
-
Code was added to the InitializeComponent method to set various
properties of the label, button, and form. Some of these assignments
directly correspond to the settings made in the Properties window,
while others are the implicit result of other actions taken in the
designer (such as sizing the form).
Adding event handlers
The Hello, Windows! application built thus far
has an OK button, but the application doesn’t yet respond to
button clicks. To add a Click
event handler for the OK button,
double-click on the button in the Windows Forms Designer. The
designer responds by switching to the form’s code view and
inserting a subroutine that handles the Click event (i.e., it will be
called when the user of the running application clicks the OK
button). The subroutine the designer creates looks like this (note
that I added the line-continuation character for printing in this
book):
Private Sub OkButton_Click(ByVal sender As System.Object, _
   ByVal e As System.EventArgs) Handles OkButton.Click

End Sub
The body of the subroutine can then be added. This would be a likely
implementation for this event handler:
Private Sub OkButton_Click(ByVal sender As System.Object, _
   ByVal e As System.EventArgs) Handles OkButton.Click
   Me.Close(  )
   Me.Dispose(  )
End Sub
An alternative way to add an event handler is to use the drop-down
lists at the top of the form’s code-view window. In the
lefthand drop-down list, choose the object for which you would like
to add an event handler. Then, in the righthand drop-down list,
choose the desired event. See Figure 4-5.
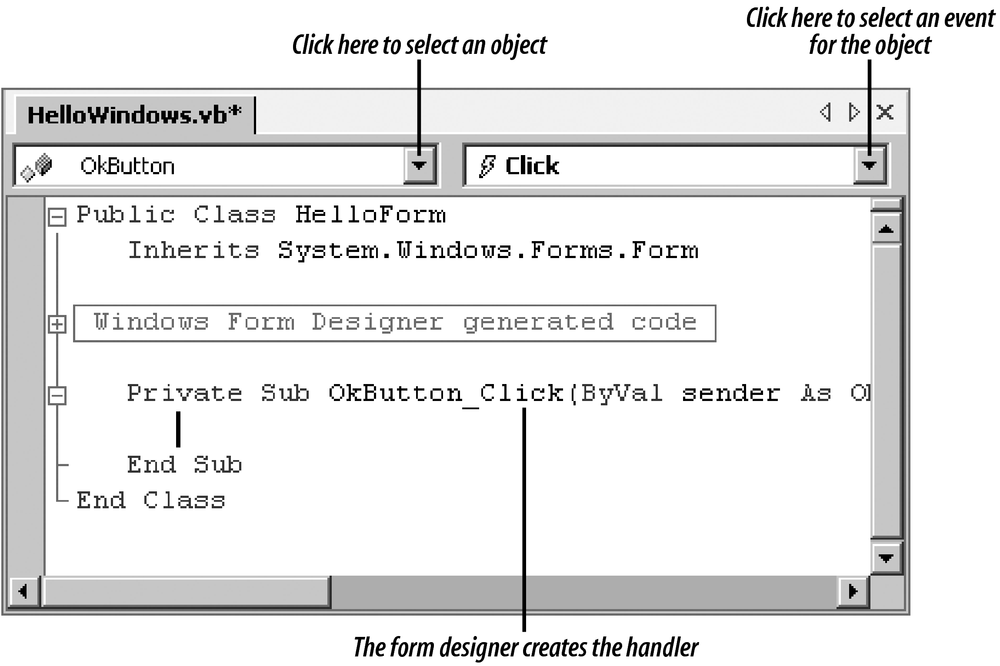
Figure 4-5. Adding an event handler using the code view’s drop-down lists
Event handlers can be typed directly into the form’s code if
you know the correct signature for the handler. Event-handler
signatures are documented in the Microsoft Developer Network
(
MSDN) Library.
Creating a Form in Code
Although form designers
are convenient, it is certainly possible to code a form directly. To
do so, follow these steps:
-
Define a class that is derived from the Form class (defined in the
System.Windows.Forms namespace). If the form is to be the startup
form for an application, include a public, shared Main method. For
example:Imports System.Windows.Forms Public Class HelloWindows Inherits Form ' Include this method only if this is the application's startup form. ' Alternatively, place this method in a separate module in the ' application. If it is placed in a separate module, remove the ' Shared keyword. <System.STAThreadAttribute( )> Public Shared Sub Main( ) System.Threading.Thread.CurrentThread.ApartmentState = _ System.Threading.ApartmentState.STA Application.Run(New HelloWindows( )) End Sub ' Main End Class -
Declare a data member for each control that is to appear on the form.
If you want to handle events from the control, use the
WithEventskeyword in the declaration. For
example:Imports System.Windows.Forms Public Class HelloWindows Inherits Form
Private lblHelloWindows As LabelPrivate WithEvents btnOK As Button<System.STAThreadAttribute( )> Public Shared Sub Main( ) System.Threading.Thread.CurrentThread.ApartmentState = _ System.Threading.ApartmentState.STA Application.Run(New HelloWindows( )) End Sub ' Main End ClassThe visibility (
Private,
Friend,Protected, or
Public) of these data members is a design issue
that depends on the project and on the developer’s preferences.
My own preference is to make all data members private. If code
external to the class needs to modify the data held by these members,
specific accessor methods can be added for the purpose. This prevents
internal design changes from affecting external users of the class. -
Declare a constructor. Perform the following operations in the
constructor:-
Instantiate each control.
-
Set properties for each control and for the form.
-
Add all controls to the form’s Controls collection.
For example:
Imports System.DrawingImports System.Windows.Forms Public Class HelloWindows Inherits Form Private lblHelloWindows As Label Private WithEvents btnOK As ButtonPublic Sub New' Instantiate a label control and set its properties.lblHelloWindows = New Label( )With lblHelloWindows.Font = New Font("Arial", 24).Location = New Point(16, 8).Size = New Size(248, 40).TabIndex = 0.Text = "Hello, Windows!"End With' Instantiate a button control and set its properties.btnOK = New Button( )With btnOK.Location = New Point(320, 16).TabIndex = 1.Text = "OK"End With' Set properties on the form.FormBorderStyle = FormBorderStyle.FixedToolWindowClientSize = New Size(405, 61)Text = "Programming Visual Basic .NET"' Add the controls to the form's Controls collection.Controls.Add(lblHelloWindowsControls.Add(btnOK)End Sub<System.STAThreadAttribute( )> Public Shared Sub Main( ) System.Threading.Thread.CurrentThread.ApartmentState = _ System.Threading.ApartmentState.STA Application.Run(New HelloWindows( )) End Sub ' Main End ClassAn
Importsstatement was added to give access to
types in the System.Drawing namespace, such as Point and Size. -
Adding event handlers
Define event handlers directly in code for any
events that you wish to handle. For example:
Private Sub btnOK_Click(ByVal sender As Object, _
   ByVal e As System.EventArgs) Handles btnOK.Click
   Close(  )
   Dispose(  )
End Sub
The complete code for a standalone Windows Forms application is shown
in Example 4-3. Compile it from the command line
with this command:
vbc HelloWindows.vb /r:System.dll,System.Drawing.dll,System.Windows.Forms.dll /t:winexe
(Note that the command should be typed on a single line.)
Example 4-3. Hello, Windows! code generated outside of Visual Studio
Imports System.Drawing
Imports System.Windows.Forms
Public Class HelloWindows
   Inherits Form
   Private lblHelloWindows As Label
   Private WithEvents btnOK As Button

   Private Sub btnOK_Click(ByVal sender As Object, _
      ByVal e As System.EventArgs) Handles btnOK.Click
      Close()
      Dispose()
   End Sub
   Public Sub New
      ' Instantiate a label control and set its properties.
      lblHelloWindows = New Label ()
      With lblHelloWindows
         .Font = New Font("Arial", 24)
         .Location = New Point(16, 8)
         .Size = New Size(248, 40)
         .TabIndex = 0
         .Text = "Hello, Windows!"
      End With
      ' Instantiate a button control and set its properties.
      btnOK = New Button()
      With btnOK
         .Location = New Point(320, 16)
         .TabIndex = 1
         .Text = "OK"
      End With
      ' Set properties on the form.
      FormBorderStyle = FormBorderStyle.FixedToolWindow
      ClientSize = New Size(405, 61)
      Text = "Programming Visual Basic .NET"
      ' Add the controls to the form's Controls collection.
      Controls.Add(lblHelloWindows)
      Controls.Add(btnOK)
   End Sub

   <System.STAThreadAttribute()> Public Shared Sub Main()
      System.Threading.Thread.CurrentThread.ApartmentState = _
         System.Threading.ApartmentState.STA
      Application.Run(New HelloWindows())
   End Sub ' Main
End Class
Get Programming Visual Basic .NET now with the O’Reilly learning platform.
O’Reilly members experience live online training, plus books, videos, and digital content from nearly 200 publishers.
Содержание
- Шаг 1. Создание проекта приложения Windows Forms
- Откройте Visual Studio 2017.
- Открытие Visual Studio
- Сведения о проекте приложения Windows Forms
- Дальнейшие действия
- Step 1: Create a Windows Forms App project
- Open Visual Studio 2017
- Open Visual Studio
- About the Windows Forms App project
- Next steps
- Предварительные требования
- Создание приложения WinForms
- Важные элементы среды Visual Studio
- Добавление элементов управления на форму
- Обработка событий
- Запустите приложение
- Создание приложения Windows Forms на Visual Basic в Visual Studio
- Создание проекта
- Создание приложения
- Добавление кнопки на форму
- Добавление метки на форму
- Добавление кода на форму
- Запуск приложения
- Следующие шаги
- Создание приложения Windows Forms на C# в Visual Studio
- Создание проекта
- Создание приложения
- Добавление кнопки на форму
- Добавление метки на форму
- Добавление кода на форму
- Запуск приложения
- Следующие шаги
Шаг 1. Создание проекта приложения Windows Forms
Первый шаг в создании программы для просмотра изображений — это создание проекта приложения Windows Forms.
Откройте Visual Studio 2017.
В строке меню выберите Файл > Создать > Проект. Диалоговое окно должно выглядеть так же, как на следующем снимке экрана.

Диалоговое окно _ _»Новый проект»
В левой части диалогового окна Новый проект выберите Visual C# или Visual Basic, а затем — Классическое приложение Windows.
В списке шаблонов проектов выберите Приложение Windows Forms (.NET Framework). Назовите новую форму PictureViewer и нажмите кнопку ОК.

Дополнительные сведения см. в разделе Установка Visual Studio.
Открытие Visual Studio
На начальном экране выберите Создать проект.

В поле поиска окна Создание проекта введите Windows Forms. Затем в списке Тип проекта выберите Рабочий стол.
Применив фильтр Тип проекта, выберите шаблон Приложение Windows Forms (.NET Framework) для C# или Visual Basic и нажмите кнопку Далее.

Если шаблон Приложение Windows Forms (.NET Framework) отсутствует, его можно установить из окна Создание проекта. В сообщении Не нашли то, что искали? выберите ссылку Установка других средств и компонентов.


Затем нажмите кнопку Изменить в Visual Studio Installer. Вам может быть предложено сохранить результаты работы; в таком случае сделайте это. Выберите Продолжить, чтобы установить рабочую нагрузку.
В поле Имя проекта окна Настроить новый проект введите PictureViewer. Затем нажмите Создать.
Visual Studio создает решение для приложения. Решение играет роль контейнера для всех проектов и файлов, необходимых приложению. Более подробно эти термины поясняются далее в этом учебнике.
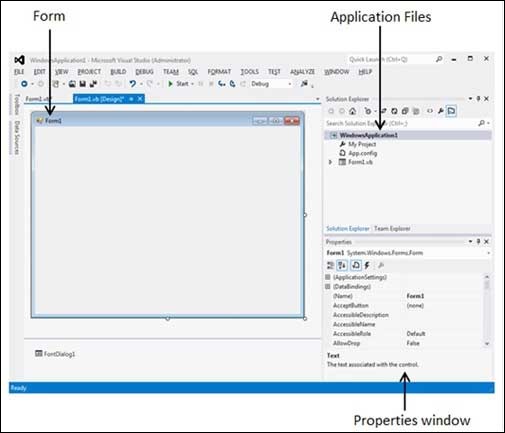
Сведения о проекте приложения Windows Forms
Среда разработки содержит три окна: главное окно, Обозреватель решений и окно Свойства.
Если какое-либо из этих окон отсутствует, можно восстановить макет окон по умолчанию. В строке меню выберите Окно > Сброс макета окна.
Можно также отобразить окна с помощью команд меню. В строке меню выберите Вид > Окно «Свойства» или Обозреватель решений.
Если открыты какие-либо другие окна, закройте их с помощью кнопки Закрыть (x) в верхнем правом углу.
Если выбрать файл, содержимое в окне Свойства изменится. Если открыть файл кода (с расширением .cs в C# и .vb в Visual Basic), откроется сам файл кода или конструктор для него. Конструктор — это визуальная поверхность, на которую можно добавлять элементы управления, такие как кнопки и списки. При работе с формами Visual Studio такая поверхность называется конструктор Windows Forms.
Окно «Свойства». В этом окне производится изменение свойств элементов, выбранных в других окнах. Например, выбрав форму Form1, можно изменить ее название путем задания свойства Text, а также изменить цвет фона путем задания свойства Backcolor.
В верхней строке в обозревателе решений отображается текст Решение «PictureViewer» (1 проект). Это означает, что Visual Studio автоматически создала для вас решение. Решение может содержать несколько проектов, но пока что вы будете работать с решениями, которые содержат только один проект.
В строке меню выберите Файл > Сохранить все.
Другой вариант — нажать кнопку Сохранить все на панели инструментов, как показано на рисунке ниже.
Visual Studio автоматически заполняет имя папки и имя проекта, а затем сохраняет проект в папке проектов.
Дальнейшие действия
Источник
Step 1: Create a Windows Forms App project
When you create a picture viewer, the first step is to create a Windows Forms App project.
Open Visual Studio 2017
On the menu bar, choose File > New > Project. The dialog box should look similar to the following screenshot.

New project dialog box
On the left side of the New Project dialog box, choose either Visual C# or Visual Basic, and then choose Windows Desktop.
In the project templates list, choose Windows Forms App (.NET Framework). Name the new form PictureViewer, and then choose the OK button.
If you don’t see the Windows Forms App (.NET Framework) template, use the Visual Studio Installer to install the .NET desktop development workload.

For more information, see the Install Visual Studio page.
Open Visual Studio
On the start window, choose Create a new project.

On the Create a new project window, enter or type Windows Forms in the search box. Next, choose Desktop from the Project type list.
After you apply the Project type filter, choose the Windows Forms App (.NET Framework) template for either C# or Visual Basic, and then choose Next.

If you don’t see the Windows Forms App (.NET Framework) template, you can install it from the Create a new project window. In the Not finding what you’re looking for? message, choose the Install more tools and features link.

Next, in the Visual Studio Installer, choose the .NET desktop development workload.

After that, choose the Modify button in the Visual Studio Installer. You might be prompted to save your work; if so, do so. Next, choose Continue to install the workload.
In the Configure your new project window, type or enter PictureViewer in the Project name box. Then, choose Create.
Visual Studio creates a solution for your app. A solution acts as a container for all of the projects and files needed by your app. These terms will be explained in more detail later in this tutorial.
About the Windows Forms App project
The development environment contains three windows: a main window, Solution Explorer, and the Properties window.
If any of these windows are missing, you can restore the default window layout. On the menu bar, choose Window > Reset Window Layout.
You can also display windows by using menu commands. On the menu bar, choose View > Properties Window or Solution Explorer.
If any other windows are open, close them by choosing the Close (x) button in their upper-right corners.
If you choose a file, the contents of the Properties window changes. If you open a code file (which ends in .cs in C# and .vb in Visual Basic), the code file or a designer for the code file appears. A designer is a visual surface onto which you can add controls such as buttons and lists. For Visual Studio forms, the designer is called the Windows Forms Designer.
Properties window In this window, you can change the properties of items that you choose in the other windows. For example, if you choose Form1, you can change its title by setting the Text property, and you can change the background color by setting the Backcolor property.
The top line in Solution Explorer shows Solution ‘PictureViewer’ (1 project), which means that Visual Studio created a solution for you. A solution can contain more than one project, but for now, you’ll work with solutions that contain only one project.
On the menu bar, choose File > Save All.
As an alternative, choose the Save All button on the toolbar, which the following image shows.
Visual Studio automatically fills in the folder name and the project name and then saves the project in your projects folder.
Next steps
To go to the next tutorial step, see Step 2: Run your app.
To return to the overview topic, see Tutorial 1: Create a picture viewer.
Источник
Из этого краткого руководства вы узнаете, как создать новое приложение Windows Forms (WinForms) с помощью Visual Studio. После создания первоначального приложения вы научитесь добавлять элементы управления и обрабатывать события. По завершении работы с этим руководством у вас будет простое приложение, добавляющее имена в список.
В этом руководстве описано следующее:
Предварительные требования
Создание приложения WinForms
Первым шагом в создании нового приложения является запуск Visual Studio и создание приложения на основе шаблона.
Запустите Visual Studio.
Выберите Создать новый проект.

В раскрывающемся списке язык кода выберите C# или Visual Basic.
В списке шаблонов выберите Приложение Windows Forms (.NET) и затем щелкните Далее.

В окне Настроить новый проект задайте в качестве имени проекта значение Names и щелкните Создать.
Вы также можете сохранить проект в другую папку, изменив параметр Расположение.

После создания приложения Visual Studio должен открыть панель конструктора для формы по умолчанию Form1. Если конструктор форм не отображается, дважды щелкните форму в области Обозреватель решений, чтобы открыть окно конструктора.
Важные элементы среды Visual Studio
Поддержка WinForms в Visual Studio состоит из четырех важных компонентов, с которыми вы будете взаимодействовать при создании приложения.

Все файлы проекта, код, формы и ресурсы отображаются в этой области.
На этой панели отображаются параметры свойств, которые можно настроить в зависимости от выбранного элемента. Например, если выбрать элемент в Обозревателе решений, отобразятся параметры свойств, связанные с файлом. Если выбрать объект в конструкторе, отобразятся параметры элемента управления или формы.
Это конструктор для формы. Он является интерактивным, и на него можно перетаскивать объекты из панели элементов. Выбирая и перемещая элементы в конструкторе, можно визуально создавать пользовательский интерфейс для приложения.
Панель элементов содержит все элементы управления, которые можно добавить на форму. Чтобы добавить элемент управления на текущую форму, дважды щелкните элемент управления или перетащите его.
Добавление элементов управления на форму
Открыв конструктор форм Form1, используйте панель Область элементов, чтобы добавить на форму следующие элементы управления:
Вы можете расположить и изменить размер элементов управления в соответствии со следующими настройками. Либо визуально перенесите их, чтобы они соответствовали следующему снимку экрана, либо щелкните каждый элемент управления и настройте параметры в области Свойства. Можно также щелкнуть область заголовка формы, чтобы выбрать форму.
| Объект | Параметр | Значение |
|---|---|---|
| Form | Текст | Names |
| Размер | 268, 180 | |
| Label | Расположение | 12, 9 |
| Текст | Names | |
| Listbox | Имя | lstNames |
| Расположение | 12, 27 | |
| Размер | 120, 94 | |
| текстовое поле; | Имя | txtName |
| Расположение | 138, 26 | |
| Размер | 100, 23 | |
| Button | Имя | btnAdd |
| Расположение | 138, 55 | |
| Размер | 100, 23 | |
| Текст | Add Name |
Вы должны получить в конструкторе форму, которая выглядит следующим образом.

Обработка событий
Теперь, когда в форме есть все элементы управления, необходимо обрабатывать события элементов управления, чтобы реагировать на вводимые пользователем данные. Открыв конструктор форм, выполните следующие действия.
Выберите в форме элемент управления «Кнопка».
Найдите событие Click и дважды щелкните его, чтобы создать обработчик событий.
Это действие добавляет следующий код в форму:
Запустите приложение
Теперь, когда у нас есть код события, можно запустить приложение, нажав клавишу F5 или выбрав пункт меню Отладка > Начать отладку. Отобразится форма, и вы можете ввести имя в текстовое поле, а затем добавить его, нажав кнопку.
Источник
Создание приложения Windows Forms на Visual Basic в Visual Studio
В рамках этого краткого знакомства с возможностями интегрированной среды разработки Visual Studio (IDE) вы создадите простое приложение на Visual Basic с пользовательским интерфейсом на основе Windows.
Установите Visual Studio бесплатно со страницы скачиваемых материалов Visual Studio, если еще не сделали этого.
Установите Visual Studio бесплатно со страницы скачиваемых материалов Visual Studio, если еще не сделали этого.
На некоторых снимках экрана в этом учебнике используется темная тема. Если вы не используете темную тему, но хотите переключиться на нее, см. страницу Персонализация интегрированной среды разработки и редактора Visual Studio.
Установите Visual Studio 2022 бесплатно со страницы скачиваемых материалов Visual Studio 2022, если еще не сделали этого.
На некоторых снимках экрана в этом учебнике используется темная тема. Если вы не используете темную тему, но хотите переключиться на нее, см. страницу Персонализация интегрированной среды разработки и редактора Visual Studio.
Создание проекта
Сначала вы создадите проект приложения Visual Basic. Для этого типа проекта уже имеются все нужные файлы шаблонов, что избавляет вас от лишней работы.
Откройте Visual Studio 2017.
В верхней строке меню последовательно выберите Файл > Создать > Проект.
Запустите Visual Studio.
На начальном экране выберите Создать проект.
В окне Создать проект выберите шаблон Приложение Windows Forms (.NET Framework) для Visual Basic.
(При желании вы можете уточнить условия поиска, чтобы быстро перейти к нужному шаблону. Например, введите Приложение Windows Forms в поле поиска. Затем выберите Visual Basic в списке языков и Windows в списке платформ.)

Если шаблон Приложение Windows Forms (.NET Framework) отсутствует, его можно установить из окна Создание проекта. В сообщении Не нашли то, что искали? выберите ссылку Установка других средств и компонентов.
Затем нажмите кнопку Изменить в Visual Studio Installer. Вам может быть предложено сохранить результаты работы; в таком случае сделайте это. Выберите Продолжить, чтобы установить рабочую нагрузку. После этого вернитесь к шагу 2 в процедуре Создание проекта.
В поле Имя проекта окна Настроить новый проект введите HelloWorld. Затем нажмите Создать.

Новый проект открывается в Visual Studio.
Создание приложения
Когда вы выберете шаблон проекта Visual Basic и зададите имя файла, Visual Studio открывает форму. Форма является пользовательским интерфейсом Windows. Мы создадим приложение Hello World, добавив элементы управления на форму, а затем запустим его.
Добавление кнопки на форму
Щелкните Панель элементов, чтобы открыть всплывающее окно «Панель элементов».

(Если параметр для всплывающего окна Панель элементов отсутствует, его можно открыть в строке меню. Для этого выберите Вид > Панель элементов. Либо нажмите клавиши CTRL+ALT+X.)
Щелкните значок Закрепить, чтобы закрепить окно Панель элементов.

Щелкните элемент управления Кнопка и перетащите его на форму.
В разделе Внешний вид (или Шрифты) окна Свойства введите Click this и нажмите клавишу ВВОД.
(Если окно Свойства не отображается, его можно открыть в строке меню.) Для этого щелкните Вид > Окно свойств. Или нажмите клавишу F4.)
Добавление метки на форму
Теперь, когда мы добавили элемент управления »Кнопка» для создания действия, давайте добавим элемент управления «Метка», куда можно отправлять текст.
Выберите элемент управления Метка в окне Панель элементов, а затем перетащите его на форму и расположите под кнопкой Нажмите это.
В разделе Проект или (DataBindings) окна Свойства измените имя Label1 на lblHelloWorld и нажмите клавишу ВВОД.
Добавление кода на форму
В окне Form1.vb [Design] дважды щелкните кнопку Нажмите это, чтобы открыть окно Form1.vb.
(Кроме того, можно развернуть узел Form1.vb в обозревателе решений, а затем выбрать Form1.)

Запуск приложения
Нажмите кнопку Запустить, чтобы запустить приложение.

Будет выполнено несколько операций. В интегрированной среде разработки Visual Studio откроются окна Средства диагностики и Вывод. Кроме того, вне этой среды откроется диалоговое окно Form1. Оно будет содержать вашу кнопку Нажмите это и текст Label1.

Закройте диалоговое окно Form1, чтобы завершить работу приложения.
Следующие шаги
Для получения дополнительных сведений перейдите к следующему руководству:
Источник
Создание приложения Windows Forms на C# в Visual Studio
В рамках этого краткого знакомства с возможностями интегрированной среды разработки Visual Studio (IDE) вы создадите простое приложение на C# с пользовательским интерфейсом на основе Windows.
Установите Visual Studio бесплатно со страницы скачиваемых материалов Visual Studio, если еще не сделали этого.
Установите Visual Studio бесплатно со страницы скачиваемых материалов Visual Studio, если еще не сделали этого.
На некоторых снимках экрана в этом учебнике используется темная тема. Если вы не используете темную тему, но хотите переключиться на нее, см. страницу Персонализация интегрированной среды разработки и редактора Visual Studio.
Установите Visual Studio 2022 бесплатно со страницы скачиваемых материалов Visual Studio 2022, если еще не сделали этого.
На некоторых снимках экрана в этом учебнике используется темная тема. Если вы не используете темную тему, но хотите переключиться на нее, см. страницу Персонализация интегрированной среды разработки и редактора Visual Studio.
Создание проекта
Сначала вы создадите проект приложения на C#. Для этого типа проекта уже имеются все нужные файлы шаблонов, что избавляет вас от лишней работы.
Откройте Visual Studio 2017.
В верхней строке меню последовательно выберите Файл > Создать > Проект.
Запустите Visual Studio.
На начальном экране выберите Создать проект.
В окне Создать проект выберите шаблон Приложение Windows Forms (.NET Framework) для C#.
(При желании вы можете уточнить условия поиска, чтобы быстро перейти к нужному шаблону. Например, введите Приложение Windows Forms в поле поиска. Затем выберите C# в списке языков и Windows в списке платформ.)

Если шаблон Приложение Windows Forms (.NET Framework) отсутствует, его можно установить из окна Создание проекта. В сообщении Не нашли то, что искали? выберите ссылку Установка других средств и компонентов.
Затем нажмите кнопку Изменить в Visual Studio Installer. Вам может быть предложено сохранить результаты работы; в таком случае сделайте это. Выберите Продолжить, чтобы установить рабочую нагрузку. После этого вернитесь к шагу 2 в процедуре Создание проекта.
В поле Имя проекта окна Настроить новый проект введите HelloWorld. Затем нажмите Создать.

Новый проект открывается в Visual Studio.
Создание приложения
Когда вы выберете шаблон проекта C# и зададите имя файла, Visual Studio открывает форму. Форма является пользовательским интерфейсом Windows. Мы создадим приложение Hello World, добавив элементы управления на форму, а затем запустим его.
Добавление кнопки на форму
Щелкните Панель элементов, чтобы открыть всплывающее окно «Панель элементов».

(Если параметр для всплывающего окна Панель элементов отсутствует, его можно открыть в строке меню. Для этого выберите Вид > Панель элементов. Либо нажмите клавиши CTRL+ALT+X.)
Щелкните значок Закрепить, чтобы закрепить окно Панель элементов.
Выберите элемент управления Кнопка и перетащите его на форму.
(Если окно Свойства не отображается, его можно открыть в строке меню.) Для этого выберите Вид > Окно свойств. Или нажмите клавишу F4.)
Добавление метки на форму
Теперь, когда мы добавили элемент управления »Кнопка» для создания действия, давайте добавим элемент управления «Метка», куда можно отправлять текст.
Выберите элемент управления Метка в окне Панель элементов, а затем перетащите его на форму и расположите под кнопкой Нажмите это.
В разделе Проект или (DataBindings) окна Свойства измените имя Label1 на lblHelloWorld и нажмите клавишу ВВОД.
Добавление кода на форму
В окне Form1.cs [Проект] дважды щелкните кнопку Нажмите это, чтобы открыть окно Form1.cs.
(Кроме того, можно развернуть узел Form1.cs в обозревателе решений, а затем выбрать Form1.)

Запуск приложения
Нажмите кнопку Запустить, чтобы запустить приложение.
Будет выполнено несколько операций. В интегрированной среде разработки Visual Studio откроются окна Средства диагностики и Вывод. Кроме того, вне этой среды откроется диалоговое окно Form1. Оно будет содержать вашу кнопку Нажмите это и текст Label1.
Закройте диалоговое окно Form1, чтобы завершить работу приложения.
Следующие шаги
Для получения дополнительных сведений перейдите к следующему руководству:
Источник
Let’s start with creating a Window Forms Application by following the following steps in Microsoft Visual Studio — File → New Project → Windows Forms Applications
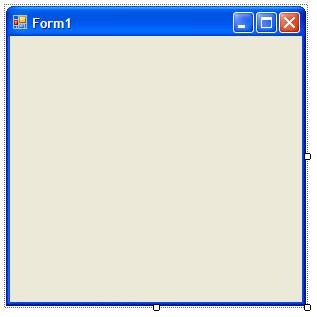
Finally, select OK, Microsoft Visual Studio creates your project and displays following window Form with a name Form1.
Visual Basic Form is the container for all the controls that make up the user interface. Every window you see in a running visual basic application is a form, thus the terms form and window describe the same entity. Visual Studio creates a default form for you when you create a Windows Forms Application.
Every form will have title bar on which the form’s caption is displayed and there will be buttons to close, maximize and minimize the form shown below −
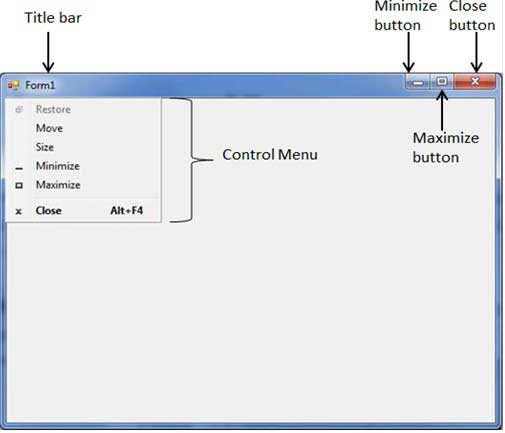
If you click the icon on the top left corner, it opens the control menu, which contains the various commands to control the form like to move control from one place to another place, to maximize or minimize the form or to close the form.
Form Properties
Following table lists down various important properties related to a form. These properties can be set or read during application execution. You can refer to Microsoft documentation for a complete list of properties associated with a Form control −
| S.N | Properties | Description |
|---|---|---|
| 1 |
AcceptButton |
The button that’s automatically activated when you press Enter, no matter which control has the focus at the time. Usually the OK button on a form is set as AcceptButton for a form. |
| 2 |
CancelButton |
The button that’s automatically activated when you hit the Esc key. Usually, the Cancel button on a form is set as CancelButton for a form. |
| 3 |
AutoScale |
This Boolean property determines whether the controls you place on the form are automatically scaled to the height of the current font. The default value of this property is True. This is a property of the form, but it affects the controls on the form. |
| 4 |
AutoScroll |
This Boolean property indicates whether scroll bars will be automatically attached to the form if it is resized to a point that not all its controls are visible. |
| 5 |
AutoScrollMinSize |
This property lets you specify the minimum size of the form, before the scroll bars are attached. |
| 6 |
AutoScrollPosition |
The AutoScrollPosition is the number of pixels by which the two scroll bars were displaced from their initial locations. |
| 7 |
BackColor |
Sets the form background color. |
| 8 |
BorderStyle |
The BorderStyle property determines the style of the form’s border and the appearance of the form −
|
| 9 |
ControlBox |
By default, this property is True and you can set it to False to hide the icon and disable the Control menu. |
| 10 |
Enabled |
If True, allows the form to respond to mouse and keyboard events; if False, disables form. |
| 11 |
Font |
This property specify font type, style, size |
| 12 |
HelpButton |
Determines whether a Help button should be displayed in the caption box of the form. |
| 13 |
Height |
This is the height of the Form in pixels. |
| 14 |
MinimizeBox |
By default, this property is True and you can set it to False to hide the Minimize button on the title bar. |
| 15 |
MaximizeBox |
By default, this property is True and you can set it to False to hide the Maximize button on the title bar. |
| 16 |
MinimumSize |
This specifies the minimum height and width of the window you can minimize. |
| 17 |
MaximumSize |
This specifies the maximum height and width of the window you maximize. |
| 18 |
Name |
This is the actual name of the form. |
| 19 |
StartPosition |
This property determines the initial position of the form when it’s first displayed. It will have any of the following values −
|
| 20 |
Text |
The text, which will appear at the title bar of the form. |
| 21 |
Top, Left |
These two properties set or return the coordinates of the form’s top-left corner in pixels. |
| 22 |
TopMost |
This property is a True/False value that lets you specify whether the form will remain on top of all other forms in your application. Its default property is False. |
| 23 |
Width |
This is the width of the form in pixel. |
Form Methods
The following are some of the commonly used methods of the Form class. You can refer to Microsoft documentation for a complete list of methods associated with forms control −
| Sr.No. | Method Name & Description |
|---|---|
| 1 |
Activate Activates the form and gives it focus. |
| 2 |
ActivateMdiChild Activates the MDI child of a form. |
| 3 |
AddOwnedForm Adds an owned form to this form. |
| 4 |
BringToFront Brings the control to the front of the z-order. |
| 5 |
CenterToParent Centers the position of the form within the bounds of the parent form. |
| 6 |
CenterToScreen Centers the form on the current screen. |
| 7 |
Close Closes the form. |
| 8 |
Contains Retrieves a value indicating whether the specified control is a child of the control. |
| 9 |
Focus Sets input focus to the control. |
| 10 |
Hide Conceals the control from the user. |
| 11 |
Refresh Forces the control to invalidate its client area and immediately redraw itself and any child controls. |
| 12 |
Scale(SizeF) Scales the control and all child controls by the specified scaling factor. |
| 13 |
ScaleControl Scales the location, size, padding, and margin of a control. |
| 14 |
ScaleCore Performs scaling of the form. |
| 15 |
Select Activates the control. |
| 16 |
SendToBack Sends the control to the back of the z-order. |
| 17 |
SetAutoScrollMargin Sets the size of the auto-scroll margins. |
| 18 |
SetDesktopBounds Sets the bounds of the form in desktop coordinates. |
| 19 |
SetDesktopLocation Sets the location of the form in desktop coordinates. |
| 20 |
SetDisplayRectLocation Positions the display window to the specified value. |
| 21 |
Show Displays the control to the user. |
| 22 |
ShowDialog Shows the form as a modal dialog box. |
Form Events
Following table lists down various important events related to a form. You can refer to Microsoft documentation for a complete list of events associated with forms control −
| Sr.No. | Event | Description |
|---|---|---|
| 1 |
Activated |
Occurs when the form is activated in code or by the user. |
| 2 |
Click |
Occurs when the form is clicked. |
| 3 |
Closed |
Occurs before the form is closed. |
| 4 |
Closing |
Occurs when the form is closing. |
| 5 |
DoubleClick |
Occurs when the form control is double-clicked. |
| 6 |
DragDrop |
Occurs when a drag-and-drop operation is completed. |
| 7 |
Enter |
Occurs when the form is entered. |
| 8 |
GotFocus |
Occurs when the form control receives focus. |
| 9 |
HelpButtonClicked |
Occurs when the Help button is clicked. |
| 10 |
KeyDown |
Occurs when a key is pressed while the form has focus. |
| 11 |
KeyPress |
Occurs when a key is pressed while the form has focus. |
| 12 |
KeyUp |
Occurs when a key is released while the form has focus. |
| 13 |
Load |
Occurs before a form is displayed for the first time. |
| 14 |
LostFocus |
Occurs when the form loses focus. |
| 15 |
MouseDown |
Occurs when the mouse pointer is over the form and a mouse button is pressed. |
| 16 |
MouseEnter |
Occurs when the mouse pointer enters the form. |
| 17 |
MouseHover |
Occurs when the mouse pointer rests on the form. |
| 18 |
MouseLeave |
Occurs when the mouse pointer leaves the form. |
| 19 |
MouseMove |
Occurs when the mouse pointer is moved over the form. |
| 20 |
MouseUp |
Occurs when the mouse pointer is over the form and a mouse button is released. |
| 21 |
MouseWheel |
Occurs when the mouse wheel moves while the control has focus. |
| 22 |
Move |
Occurs when the form is moved. |
| 23 |
Resize |
Occurs when the control is resized. |
| 24 |
Scroll |
Occurs when the user or code scrolls through the client area. |
| 25 |
Shown |
Occurs whenever the form is first displayed. |
| 26 |
VisibleChanged |
Occurs when the Visible property value changes. |
Example
Following is an example, which shows how we create two buttons at the time of form load event and different properties are being set at the same time.
Because Form1 is being referenced within its own event handler, so it will be written as Me instead of using its name, but if we access the same form inside any other control’s event handler, then it will be accessed using its name Form1.
Let’s double click on the Form and put the follow code in the opened window.
Public Class Form1
Private Sub Form1_Load(sender As Object, e As EventArgs) Handles MyBase.Load
' Create two buttons to use as the accept and cancel buttons.
Dim button1 As New Button()
Dim button2 As New Button()
' Set the text of button1 to "OK".
button1.Text = "OK"
' Set the position of the button on the form.
button1.Location = New Point(10, 10)
' Set the text of button2 to "Cancel".
button2.Text = "Cancel"
' Set the position of the button based on the location of button1.
button2.Location = _
New Point(button1.Left, button1.Height + button1.Top + 10)
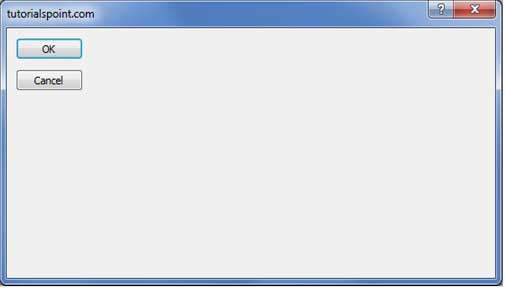
' Set the caption bar text of the form.
Me.Text = "tutorialspoint.com"
' Display a help button on the form.
Me.HelpButton = True
' Define the border style of the form to a dialog box.
Me.FormBorderStyle = FormBorderStyle.FixedDialog
' Set the MaximizeBox to false to remove the maximize box.
Me.MaximizeBox = False
' Set the MinimizeBox to false to remove the minimize box.
Me.MinimizeBox = False
' Set the accept button of the form to button1.
Me.AcceptButton = button1
' Set the cancel button of the form to button2.
Me.CancelButton = button2
' Set the start position of the form to the center of the screen.
Me.StartPosition = FormStartPosition.CenterScreen
' Set window width and height
Me.Height = 300
Me.Width = 560
' Add button1 to the form.
Me.Controls.Add(button1)
' Add button2 to the form.
Me.Controls.Add(button2)
End Sub
End Class
When the above code is executed and run using Start button available at the Microsoft Visual Studio tool bar, it will show the following window −
vb.net_basic_controls.htm
На чтение 7 мин Просмотров 2.8к. Опубликовано 07.04.2022
Освойте Microsoft Visual Studio и разрабатывайте собственные приложения с помощью Windows Forms практически без написания кода.
Windows Forms — это платформа, доступная в Visual Studio, которая позволяет создавать настольные приложения с помощью графического пользовательского интерфейса. Это позволяет вам щелкать и перетаскивать виджеты, такие как кнопки или метки, прямо на холст и управлять свойствами каждого виджета, такими как размер шрифта, цвет или граница.
В этой статье простой конвертер градусов Цельсия в градусы Фаренгейта будет использоваться в качестве примера для изучения основ настройки приложения Windows Form. В этом руководстве используется Visual Studio 2019 Community Edition.
Содержание
- Как создать проект Windows Forms в Visual Studio
- Как добавить элементы на холст проекта
- Как обрабатывать события и писать код в коде программной части
- Как запускать и отлаживать программу Windows Forms
- Отладка программы Windows Forms
- Запуск программы с помощью исполняемого файла
- Добавление дополнительных элементов в форму Windows
Как создать проект Windows Forms в Visual Studio
Сначала создайте проект в Visual Studio.
- Откройте Visual Studio и выберите Создать новый проект.
- Visual Studio предоставит вам список шаблонов проектов, из которых вы можете выбрать.
- Чтобы создать приложение Windows Forms, найдите приложение Windows Formи выберите его из списка шаблонов. Как только это будет выбрано, нажмите » Далее».

- Добавьте имя и местоположение для проекта и нажмите » Далее». Расположение — это каталог, в котором будут храниться файлы кода.
- На следующем экране сохраните выбор по умолчанию.NET Core 3.1.
- Щелкните Создать.
- Когда Visual Studio завершит создание проекта, он откроется.


Как добавить элементы на холст проекта
Холст — это белая область, расположенная в верхнем левом углу экрана. Нажмите и перетащите точки в нижней, правой или нижней правой части холста, чтобы изменить его размер, если это необходимо.
Чтобы создать пользовательский интерфейс приложения, добавьте на холст такие виджеты, как кнопки или текстовые поля.
- Откройте вкладку «Вид» в верхней части окна и выберите » Панель инструментов «.

- Это добавит панель инструментов в левую часть приложения. Выберите значок булавкив правом верхнем углу панели инструментов, чтобы закрепить его там навсегда.
- Здесь вы можете перетащить любой виджет из панели инструментов на холст. Выделите кнопку на панели инструментов и перетащите ее на холст.

- Перетащите на холст еще два текстовых поля вместе с тремя метками (две метки для каждого текстового поля и одна метка для заголовка в верхней части приложения).

- Каждый виджет на холсте имеет связанные с ним свойства. Выделите виджет, чтобы отобразить окно свойствв правом нижнем углу Visual Studio, в котором перечислены все свойства этого виджета. Эти свойства могут включать текст, имя, размер шрифта, границу или выравнивание выделенного виджета.
- На данный момент текст этих виджетов по-прежнему говорит label1, label2или button1. Выберите виджет label1и отредактируйте свойство Text в окне свойств, указав «Цельсий в Фаренгейт». Измените размер шрифта на 22pt.

- Аналогичным образом отредактируйте свойства других виджетов на холсте, чтобы они были следующими:


|
Виджет |
Имущество |
Новое значение |
| метка2 | Текст | Цельсия |
| этикетка3 | Текст | по Фаренгейту |
| кнопка | Текст | Рассчитать |
| Текстовое поле Фаренгейта | Только для чтения | Истинный |
Как обрабатывать события и писать код в коде программной части
Виджеты на холсте можно привязывать к событиям. События могут включать в себя такие вещи, как нажатие кнопки, изменение текста внутри текстового поля или выбор определенного переключателя. Когда происходят эти события, это может привести к срабатыванию части кода в программном коде.
C# — это язык, используемый при создании Windows Forms. Если вы еще не использовали C#, есть много практических причин для изучения программирования на C#.
Для этого конкретного приложения добавьте событие к кнопке » Рассчитать «, чтобы инициировать выполнение части кода при нажатии этой кнопки.
1. Дважды щелкните кнопку » Рассчитать«, чтобы автоматически открыть Form1.cs с новым методом Event:
private void calculateButton_Click(object sender, EventArgs e)
2. Здесь вы добавите код, который будет выполнять расчет градусов Цельсия по Фаренгейту и отображать результат в текстовом поле Фаренгейта. Для этого вам нужно иметь возможность прочитать значение из текстового поля Цельсия и изменить текстовое поле Фаренгейта, чтобы отобразить результат.
3. Вернитесь на холст и повторно отредактируйте свойства, как показано ранее. На этот раз отредактируйте свойство Nameдля текстовых полей Цельсия и Фаренгейта. Эти имена можно использовать для ссылки на текстовые поля в коде.
| Виджет | Имущество | Новое значение |
| Текстовое поле Цельсия | Имя | ЦельсияTextBox |
| Текстовое поле Фаренгейта | Имя | по ФаренгейтуTextBox |
4. Вернитесь к функции calculateButton_Click в Form1.cs.
5. Теперь на текстовое поле Celsius можно ссылаться в коде, используя имя «celsiusTextBox». Введенное пользователем значение Цельсия сохраняется в его свойстве Text. Однако, поскольку это строка, разберите ее на двойную, чтобы включить ее в будущие расчеты по Фаренгейту.
private void calculateButton_Click(object sender, EventArgs e)
{
// Get the value that the user entered in the Celsius Text Box
double celsiusValue = Double.Parse(celsiusTextBox.Text);
}
6. Переменная celsiusValue теперь хранит значение, введенное пользователем в текстовом поле Celsius. Формула для преобразования градусов Цельсия в градусы Фаренгейта: (celsiusValue * 9 / 5) + 32.Таким образом, результат теперь можно рассчитать и сохранить в текстовом поле Фаренгейта.
private void calculateButton_Click(object sender, EventArgs e)
{
// Get the value that the user entered in the Celsius Text Box
double celsiusValue = Double.Parse(celsiusTextBox.Text);
// Apply the calculation
double result = (celsiusValue * 9 / 5) + 32;
// Store the result in the Fahrenheit Textbox
fahrenheitTextBox.Text = result.ToString();
}
Как запускать и отлаживать программу Windows Forms
Запуск программы Windows Forms в Visual Studio
Теперь, когда пользовательский интерфейс и логика кода настроены, запустите программу, чтобы увидеть, как она работает.
1. Чтобы запустить программу, выберите зеленую стрелку вверху панели инструментов в Visual Studio. 
2. После загрузки проекта добавьте значение в текстовое поле Цельсия и нажмите кнопку » Рассчитать». Это добавит результат в текстовое поле по Фаренгейту. 
3 Если программа размыта во время выполнения, вероятно, ваше приложение не поддерживает DPI. Это может вызвать проблемы с масштабированием и разрешением, поэтому его необходимо включить.
4. Щелкните правой кнопкой мыши проект TemperatureConverterв обозревателе решений. Выберите Добавить, затем выберите Новый элемент.
5. Найдите файл манифеста приложения и нажмите » Добавить «. 
6. Скопируйте следующий код в новый файл app.manifest как дочерний элемент тега сборки (если код уже сгенерирован, просто раскомментируйте его).
<application xmlns=»urn:schemas-microsoft-com:asm.v3″>
<windowsSettings>
<dpiAware xmlns=»http://schemas.microsoft.com/SMI/2005/WindowsSettings«>true</dpiAware>
<longPathAware xmlns=»http://schemas.microsoft.com/SMI/2016/WindowsSettings«>true</longPathAware>
</windowsSettings>
</application>
7. Чтобы это изменение вступило в силу, перезапустите программу. Нажмите красную кнопку остановки в верхней части панели инструментов, затем снова нажмите зеленую кнопку воспроизведения.
Отладка программы Windows Forms
Вы можете отладить программу, если логика вашего приложения Windows Forms не работает должным образом.
- Вернитесь к функции calculateButton_Click в Form1.cs и щелкните в любом месте серой полосы в крайнем левом углу экрана. Это добавит точку останова, которая обозначена красным кружком.
- Нажмите кнопку «Рассчитать» еще раз, чтобы запустить этот метод. Программа приостановится, когда достигнет точки останова, чтобы показать все значения, хранящиеся в переменных в этой точке.
- Чтобы продолжить работу программы, нажмите зеленую стрелку » Продолжить» в верхней части панели инструментов.

Запуск программы с помощью исполняемого файла
Если вы не хотите запускать свою программу через Visual Studio, используйте автономный исполняемый файл для программы. Это автоматически генерируется.
Перейдите к исполняемому файлу, который можно найти здесь:
<your-project-folder>/bin/Debug/netcoreapp3.1/TemperatureConverter.exe
Нажмите на исполняемый файл, чтобы запустить программу напрямую.
Добавление дополнительных элементов в форму Windows
Надеюсь, теперь у вас есть общее представление об основной структуре приложения Windows Form. Вы можете продолжить изучение дополнительных функций Windows Forms, поэкспериментировав с новыми виджетами и углубившись в другие различные события, которые можно обрабатывать.
Как только вы лучше познакомитесь с Windows Forms, вы сможете приступить к созданию более сложных приложений. Вы также можете изучить многие другие способы создания приложений на рабочем столе Windows.
| Purchase and download the fully updated Visual Basic 2010 edition of this eBook in PDF and ePub for only $9.99
|

The primary purpose of Visual Basic is the development of graphical Windows applications. Given this fact, it is not surprising that an important part of developing with Visual Basic involves the design of Windows Forms. In this chapter of Visual Basic Essentials, we will cover in great detail the design of Forms using Visual Studio.
Contents
Contents
|
||
Visual Basic Forms and Controls
The form object is essentially a container for holding the controls that allow the user to interact with an application. Controls are individual objects such as Buttons and TextBoxes. In Visual Basic and Forms we looked at the many options for configuring a Windows Form. We have also looked briefly at adding controls to a form in earlier chapters. In this chapter, however, we will take a much closer look at the steps involved in laying out controls on a Form in Visual Studio.
When a new Windows Application project is created in Visual Studio the first object you will see is a form. Typically it will appear in the design area as follows:
Controls are added to the form using the Toolbox. The Toolbox is usually accessed by clicking on the Toolbox tab to the left of the Visual Studio main window. The Toolbox can be pinned in place so that it no longer auto-hides by clicking on the push pin in the title bar. It can also be detached and allowed to float anywhere on the desktop by clicking and dragging on the title bar after applying the push pin. When detached, the Toolbox appears as follows:
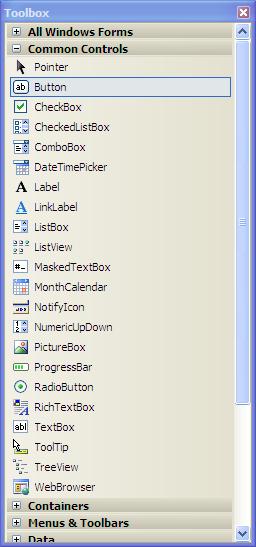
Visual Studio provides three methods for adding new controls to a form. In this chapter we will cover each of these different approaches.

Double Clicking the Control in the Toolbox
The Toolbox contains all of the controls available to be added to a form. One way to add a control to a form is to simply double click on the control in the Toolbox. The control is then automatically added to the current form. The advantage of this approach is that it is very quick to add multiple controls to a form. The downside is that Visual Studio does not know where you want the control positioned in the form and consequently positions the controls near to the top left hand corner of the form. Once the control is added to the form you will need to click and drag it to the desired location.
Dragging a Dropping Controls onto the Form
Another approach to adding controls to a form is to click on the control in the Toolbox and drag it onto the form. When the control is in the required location, release the mouse button to drop the control into place. The position of the control can subsequently be refined using the mouse or arrow keys to move the location of the control.
Drawing a Control on the Form
The most precise mechanism for adding a control to a form is to draw it. This is achieved by first selecting the desired control in the Toolbox. Once the control is highlighted, move the mouse pointer to the location on the form where you would like the top left hand corner of the new control to appear. Click and hold down the left hand mouse button and drag the pointer. A box will be drawn as you drag the pointer. When the box reaches the required size for the new control, release the mouse button. The new control will appear positioned and sized according to the size and location of the box.
Positioning and Sizing Controls Using the Grid
When adding controls to a form it is possible to configure how controls are positioned and sized by activating a grid. When the grid is active, controls «snap» to the nearest grid position when added to a form.
There are a number of ways to configure the granularity and behavior of the Visual Studio grid. These settings are global in that once defined, they apply to all forms and projects, not just to the current form or project. Note also that for some reason, changes to the grid do not immediately take effect in forms in which you are already working.
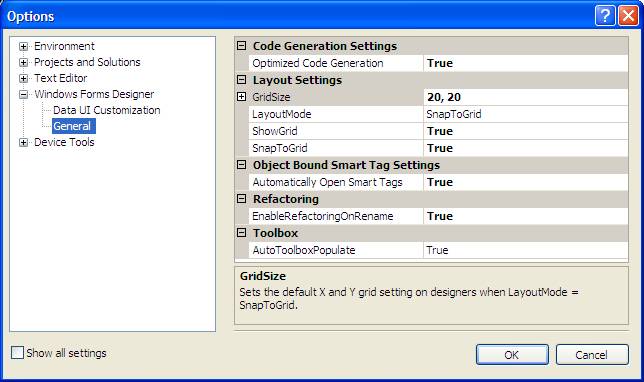
Grid settings are changed using the Visual Studio Options screen. To access this screen, select Options… from the Tools menu. When the dialog appears, click on Windows Forms Designer in the left hand tree. Once selected the dialog should appear as follows:
The settings available here require some explanation:
- GridSize — This setting controls the vertical and horizontal distances between the grid points on the form. This essentially controls the granularity of the grid. The smaller the gaps between grid points, the greater control over control size and position.
- ShowGrid — Controls whether the grid dots are visible in the form. Note that this setting controls only whether the grid is visible, not whether controls snap to the grid locations. Snapping is controlled by the SnapToGrid setting.
- SnapToGrid — This setting determines whether the grid is used when controls are added. When set to True new controls will «snap» to the nearest grid location when added. When set to False the grid is ignored and controls will appear where they are dropped or drawn.
- LayoutMode — Controls whether controls are laid out by snapping to a grid location, or are aligned with other controls in the form. Aligning with other controls is achieved using «Snap Lines» which are covered in detail in the next section of this chapter.
Spend some time changing the settings and adding new controls or move existing form controls. In particular, try different GridSize and SnapToGrid settings.
Positioning Controls Using Snap Lines
One of the key objectives in designing esthetically pleasing forms is getting controls aligned. One way to make the task of aligning controls easier involves the use of «Snap Lines» in Visual Studio. When activated, the Snap Lines feature causes a line to be drawn between an edge of the control you are currently moving and the corresponding edge of the closest control on the form when the edges are in alignment.
To active Snap Lines select Options… from the Tools menu, click on Windows Form Designer in the tree to the left of the Options dialog and configure the following settings:
- Layout Mode: SnapLines
- SnapToGrid: False
- ShowGrid: False
Once the settings are applied add a Button control to a form. Next, click on the ListBox control in the ToolBox and drag it over to the form. As you move the ListBox below the Button a line will appear between the controls at any point that edges align. For example the following figures show a line appearing at the point the left and right hand edges of the controls align:
Selecting Multiple Controls
It is often useful to be able to select multiple controls in a form. Normally when you click on one control in a form, the currently selected control is deselected. There are two ways to select multiple controls. One method is to hold down the Shift key while selecting controls. With the Shift key pressed any currently selected controls will remain selected while other controls are clicked.
Another method is to rubber band the controls. To do this click on any empty area of the form to the top left of the group of controls you wish to select. With the mouse button depressed drag to draw a box around the controls. When you release the mouse button all the controls within the box area will be selected.
To de-select individual controls from a group of selected controls, simply hold down the Shift key and click with the left hand mouse button on the control to de-select.
Once a group of controls are selected you can move all the controls at once, maintaining their positions relative to each other, simply by clicking and dragging the entire group.
Now that we have covered selecting groups of controls we can now look at some other tasks that can be performed on groups in Visual Studio.
Aligning and Sizing Groups of Controls
Visual Studio provides a number of tools to assist in aligning groups and sizing groups of controls in a form. These features are accessed using the layout toolbar. To display the layout toolbar right click on any part of the standard Visual Studio Toolbar and select Layout from the drop down menu. The resulting toolbar will appear as follows:
![]()
Select a group of components and click on the various buttons in the toolbar to see the effect. For example, all the controls can be left or right aligned and resized to the same size, width or height. It is also possible to equally space the controls, and then increase or decrease the spacing used to separate the controls. It is also possible place controls on top of one another and change which control appears on top of the stack (this can also be done in Visual Basic code using the BringToFront() and SendToBack() methods of the respective controls).
All together, the selection of controls allows just about any uniform layout to be achieved from a group of controls in a form.
Setting Properties on a Group of Controls
In addition to changing the size and layout of a group of controls it is also possible to set properties simultaneously on the group. When multiple controls are selected as a group the Visual Studio Properties panel changes to list only the properties which are common to all the control types comprising the group. Changing a property value in the properties panel applies that change to all selected controls.
Anchoring and Autosizing Form Controls
All the controls we have worked with so far have been a fixed size. They have also remained that same size, even if the form in which they reside is resized. It is often useful to have a control resize when the form is resized. This is achieved using the Anchor property. To use this property, select a control in a form and click on the down arrow in the value field of the Anchor property in the Properties panel. A graphic will be displayed indicating the anchors currently set (typically the top and left edges of the control). Activate the anchors on the right and bottom edges of the control to anchor those sides:
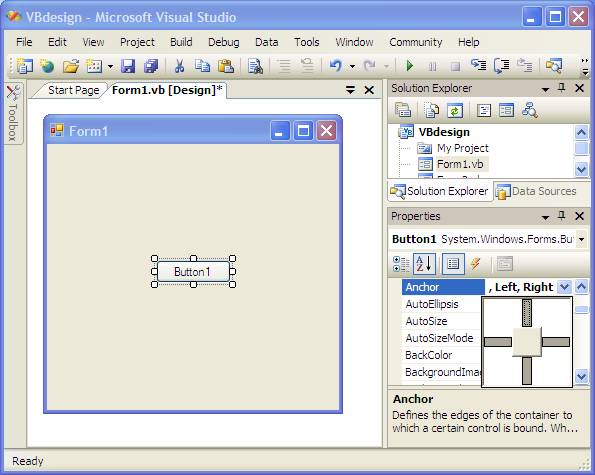
Once the anchors are in place, press F5 to compile und run the application. When the form is displayed and resized, the control with the anchors will grow in proportion to the size of the form.
Setting Tab Order in a Form
Despite the advent of the graphical user interface and the mouse, it is still common for users to navigate forms using the keyboard. The standard keyboard navigation technique involves the use of the Tab key to move from one control to the next in form. For this reason it is vital that the Tab Order be configured to implement a sensible sequence of moves between controls.
To view and change the current tab order for a form, display the Layout toolbar (if this is not already visible, right click on the standard Visual Studio toolbar and select Layout). On the Layout toolbar click the Tab order button (usually the last button on the right). The form will be displayed with a number next to each control:
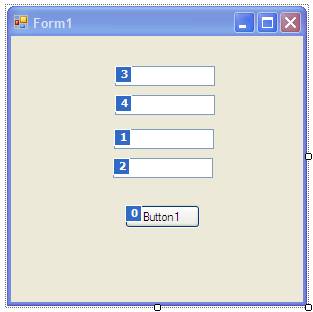
To change the order, simply click on each control in the order you wish for them to be navigated by the Tab key. As you click on each control the number will change, starting at 0 until all the controls have been sequenced. The tab order is now set.
| Purchase and download the fully updated Visual Basic 2010 edition of this eBook in PDF and ePub for only $9.99
|