
On this page, we have managed to share the official USB driver of the Vivo Y91C Device. If you were already searching for the USB driver of the device, then this page will help you out.
There are 2 USB drivers available for the device, i.e., Mediatek Driver and ADB Driver. The Mediatek Driver is compatible with all the Mediatek Flash Tool, and the ADB Driver can be useful for establishing a connection between the mobile and the computer.
Vivo Y91C Mediatek Driver
The Mediatek Driver is compatible with the SP Flash Tool, MTK Flash Tool, SP MDT Tool, and the SN Write Tool and can be helpful if you are trying to install firmware (ROM) on the device.
Driver Name: Mediatek Driver
Package Name: Mediatek_Driver_Auto_Installer_v1.1352.zip
Driver Size: 9.56 MB
How to Install: Follow Guidelines
Get Driver
Vivo Y91C ADB Driver
You can use the ADB Driver to connect the mobile (powered by android) to the computer and transfer data between the mobile and the computer.
Driver Name: Android ADB Driver
Package Name: usb_driver_r13-windows.zip
Driver Size: 8.27 MB
How to Install: Follow Guidelines
Get Driver
How to Install any USB Driver Manually
- Download and extract the USB driver on the computer.
- Open Device Manager (devmgmt.msc) and Click on the Computer Name > Action Menu > Add Legacy Hardware.
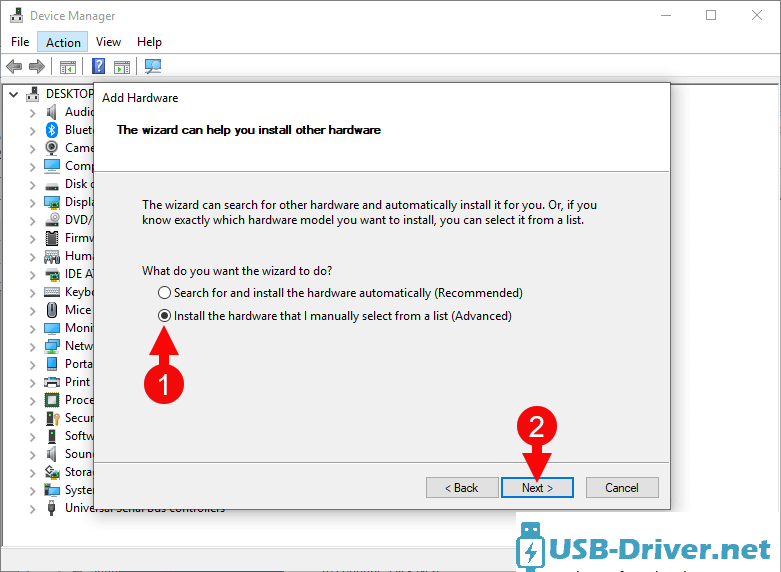
- Click on the Next button.
- Select the Install the hardware that I manually Select from a list checkbox and Click on the Next button.
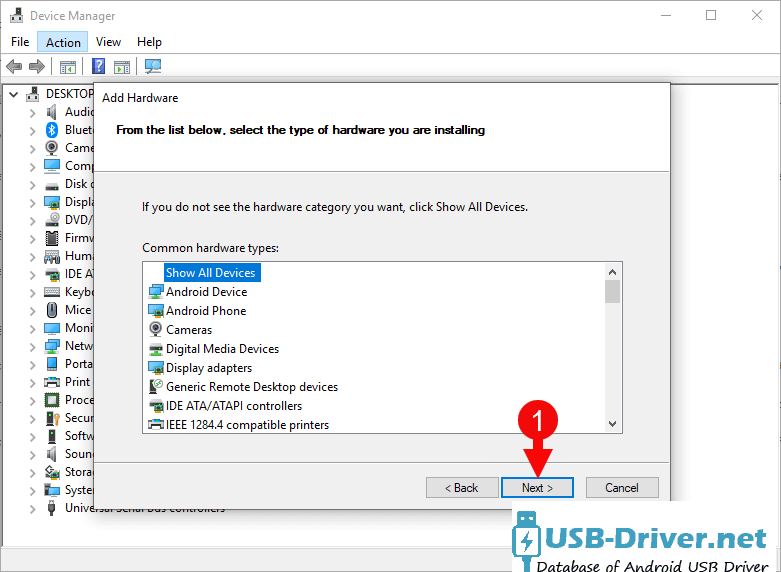
- Again, Click on the Next button.
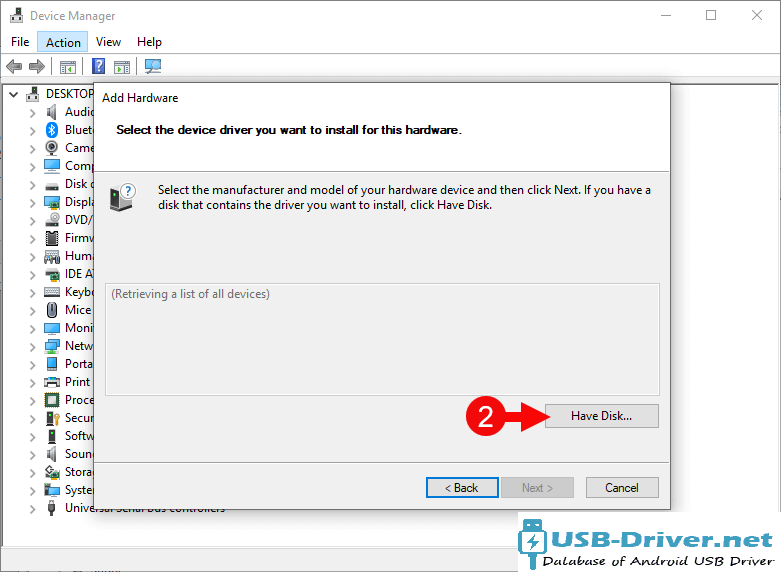
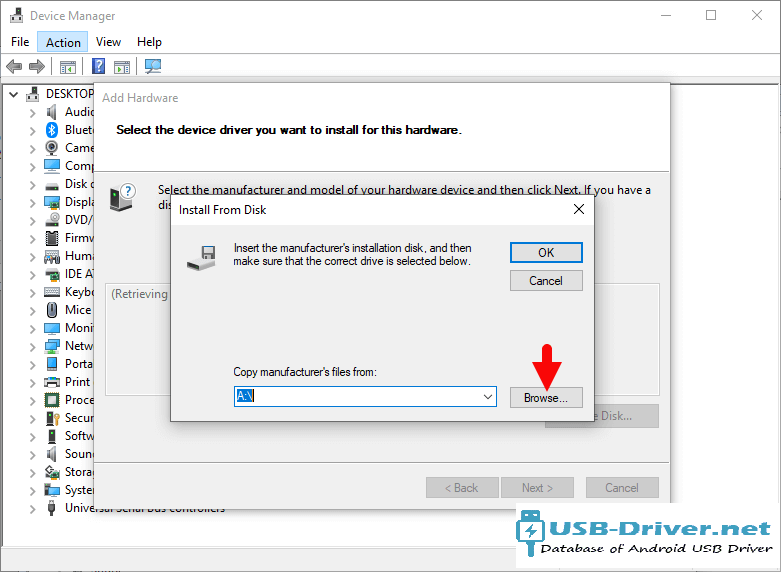
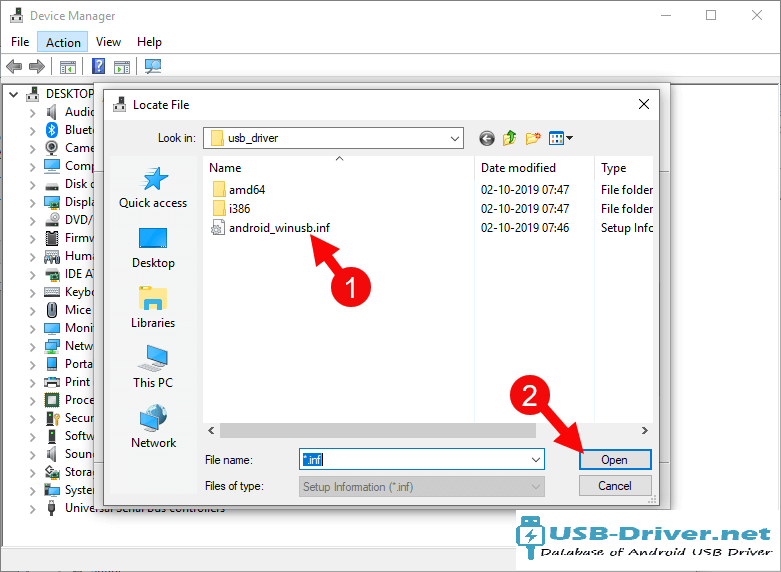
- Click on the Have Disk > Browse > Locate the .inf file (found in the extracted driver folder) and Click on Open Button.
- Click on the Finish button to complete the installation.
Follow Complete Guidelines
Readme Once:
[*] Driver Signature Error: If you are facing Driver Signature Error while installing the USB Driver, then head over to How to Fix Driver Signature Error page.
[*] Driver Easy: We recommend you to use Driver Easy application to update all the computer drivers in a Single Click.
[*] Vivo Y91C Stock Firmware: If you are looking for the Vivo Y91C Stock Firmware, then head over to the Vivo Firmware page.
Windows computer not recognizing Vivo Y91C Phone? Or Vivo Y91C android phone won’t connect to the PC? It can be the result of missing Vivo Y91C USB drivers or bad or corrupted drivers. To fix Vivo Y91C Android phone not showing up on PC, download the Vivo Y91C USB driver and install it on your computer.
Vivo USB drivers are essential to efficiently connect Vivo Y91C to Computer and Laptop using a USB cable. On this page, we have managed to share the official Vivo Y91C USB driver for Windows 11, Windows 10, Windows 7, Windows 8.1, and Windows 8. Apart from the official USB Driver for Vivo Y91C, we have also shared Vivo Y91C ADB interface drivers and Fastboot drivers.
The Vivo Y91C Android USB driver allows you to connect your phone as an MTP USB device (Media Transfer Protocol) to the computer so that you can transfer images, videos, documents, and other files between the phone and computer. Thus it will fix the android file transfer not working issue.
The Vivo Y91C ADB driver and Fastboot driver allow you to pass ADB and Fastboot commands from the PC to perform certain operations on your phone.
Table of Contents
- 1 Download Vivo Y91C USB Driver
- 1.1 Vivo Y91C CDC Driver for Flashing Firmware
- 1.2 Vivo Y91C VCOM Driver for Flashing Firmware
- 1.3 Vivo Y91C USB Driver for normal connecting to PC
- 1.4 Vivo Y91C ADB and Fastboot Drivers
- 2 How to Install Vivo Y91C CDC Drivers
- 3 How to Install Vivo Y91C VCOM Drivers
- 4 How to Install Vivo Y91C USB Drivers Manually
- 5 How to Install Vivo Y91C ADB and Fastboot Drivers
The Vivo mobile drivers offered here can be used to flash stock firmware, stock recovery, TWRP recovery, CWM Recovery, Unlocking Bootloader, etc. It can also be used for general purposes like transferring media and files to and from mobile to PC.
Vivo Y91C CDC Driver for Flashing Firmware
Download Now
How to install: Follow Tutorial
Vivo Y91C VCOM Driver for Flashing Firmware
Download Now
How to install: Follow Tutorial
Vivo Y91C USB Driver for normal connecting to PC
Download Now
How to install: Follow Tutorial
The Vivo Y91C Fastboot and ADB drivers can be downloaded below.
Vivo Y91C ADB and Fastboot Drivers
Download Now
How to install: Follow Tutorial
[!] Note: If you face Driver Signature Error while installing the USB Driver, then watch this video to fix the problem.
Also Download: Vivo V15 USB Drivers
How to Install Vivo Y91C CDC Drivers
- Download and extract the android-cdc-driver.zip to Desktop on your computer.

- Open the Device Manager on your computer by searching device manager (devmgmt.msc) from Windows Start Menu.

- When the Device Manager window opens, click on your Computer name.

- Now click on Action and then click on Add legacy hardware.

- Now Add Hardware Wizard window should open. Click on Next to continue.

- Now select Install the hardware that I manually select from a list (Advanced) option and click on Next.
- Now click on Show All Devices from the list and click on Next.
- Now click on Have Disk… to open the Install From Disk window.
- In the Install From Disk window, click on Browse… and navigate to the folder where you have extracted the drivers in Step #1.

- Now select Android_Gadget_CDC_driver.inf driver file and click on Open and then on OK.

- Now select the Android Gadget VCOM Driver from the list and click on Next.
- In the next screen, confirm the Hardware driver to install and click on Next to begin the installation process.
- Once installed, click on Finish.
- Follow Steps #3 to #13 again and install the Gadget Serial, MediaTek PreLoader USB VCOM (Android), and MediaTek USB Port drivers.
- Once all the listed drivers are installed, reboot your computer.


How to Install Vivo Y91C VCOM Drivers
- Download the android-vcom-driver.zip file on your computer and extract it on Desktop.

- Open the Device Manager on your computer by searching device manager from Windows Start Menu.
- Now click on your Computer name in the Device Manager window.
- Now click on Action and then select Add legacy hardware.
- Add Hardware Wizard window should open, click on Next to continue.
- Now select Install the hardware that I manually select from a list (Advanced) option and click on Next.
- Select Show All Devices from the list and click on Next.
- On the next screen, click on Have Disk… to open the Install From Disk window.
- Click on Browse… and navigate to the folder where you have extracted the drivers in Step #1.
- Now open Win 7 folder and select usb2ser_Win764.inf driver file if you have the 64-bit version of Windows, otherwise choose usb2ser_Win7.inf file if you have the 32-bit version of Windows. When selected, click on Open and then on OK.
- Select the MediaTek DA USB VCOM Port driver from the list and click on Next.
- Confirm the Hardware driver to install and click on Next to begin the installation process.
- Once installed, click on Finish.
- Follow Steps #3 to #13 again and install the MediaTek PreLoader USB VCOM Port, MTK USB Debug Port, MTK USB Modem Port, and MTK USB Port drivers.
- Once all the listed drivers are installed, restart your computer.


How to Install Vivo Y91C USB Drivers Manually
- Download and extract the latest Google Android USB Driver (latest_usb_driver_windows.zip) on your computer.

- Launch Device Manager on your computer by right-clicking Windows Start Button and selecting Device Manager.

- Once the Device Manager window loads, click on your Computer name.
- Now click on Action and then select Add legacy hardware.
- Now Add Hardware Wizard window should open. Click on Next to continue.
- Select Install the hardware that I manually select from a list (Advanced) option and click on Next.
- Now select Show All Devices and click on Next.
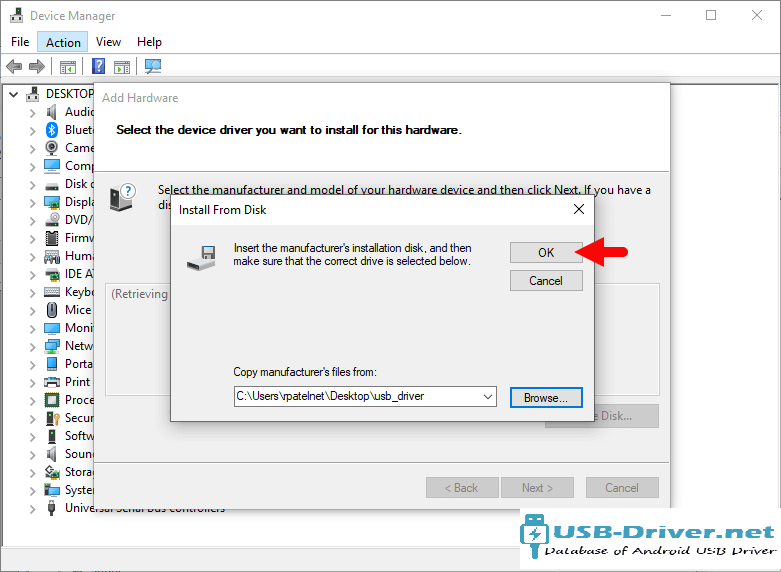
- Now click on Have Disk… to launch the Install From Disk window.
- Now click on Browse… from the Install From Disk window and navigate to the folder where you have extracted the drivers in Step #1.
- Now select android_winusb.inf driver file and click on Open and then on OK.
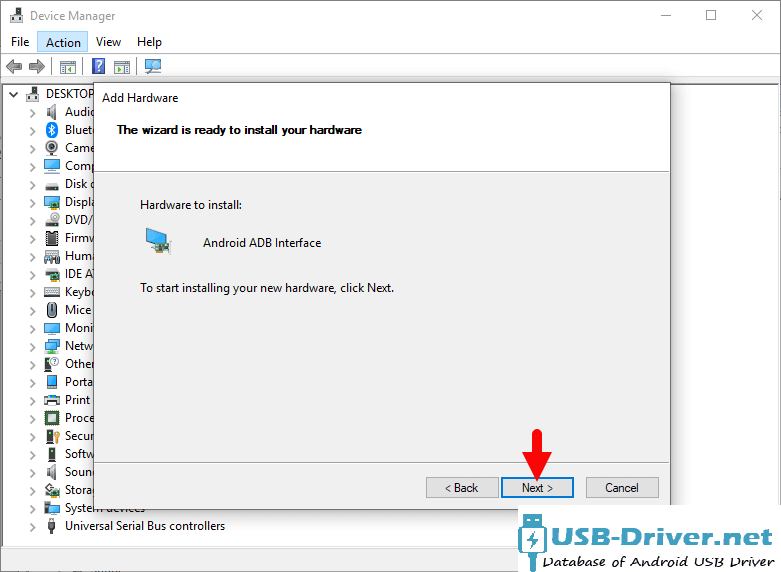
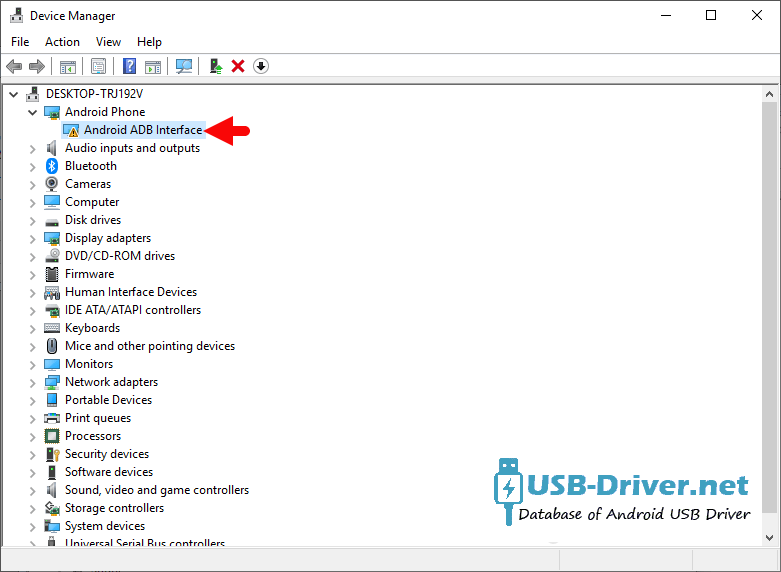
- Select the Android ADB Interface driver from the list and click on Next.
- Confirm the Hardware driver to install and click on Next to begin the installation process.
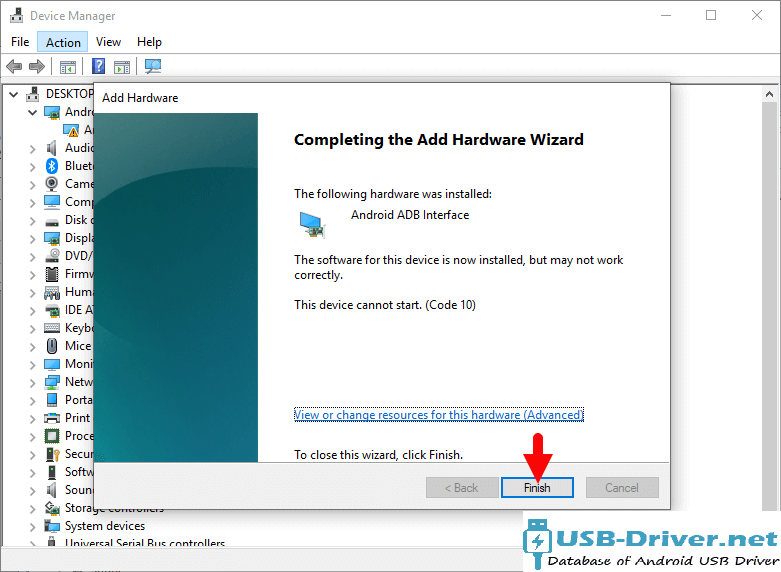
- Once installed, click on Finish.
- Follow Steps #3 to #13 again and install the Android Bootloader Interface driver and Android Composite ADB Interface driver.
- Once all the listed drivers are installed, restart your computer.


How to Install Vivo Y91C ADB and Fastboot Drivers
- Download the 15 Seconds ADB installer on your computer. Once downloaded, extract the zip file to obtain the ADB installer setup file.
- Now, right-click on the ADB driver installer setup file and select Run as administrator.

- Now a command prompt window should load on your computer.

- It should ask whether you want to install ADB and Fastboot driver on your computer. Press the Y key and then press Enter.
- Now, it should ask whether you want to install the ADB driver system-wide. Press the Y key again and hit Enter.
- Now, the ADB and Fastboot driver installation process should start.
- When the installation is completed, it will ask whether you want to install device drivers. Press the Y key and then press Enter.
- Now the «Device Driver Installation Wizard» window should pop-up.
- Click on Next to install the Google USB Drivers (WinUSB).

- Once the installation process is completed, click on Finish and reboot your computer.


Important Notes:
[*] Driver Signature Error: If you got Driver Signature Error While installing the Driver then See this Video to fix this problem.
[*] Broken link: Report here.
[*] Have we missed any device model? Let us know by contacting us via Contact Us page.
Reader Interactions
Vivo Y91C USB Driver for Windows Computer
Vivo Y91C USB Driver helps you to connect your Vivo Device to the Windows Computer and transfer data between the device and the computer. It also allows you to Flash Vivo Y91C Stock Firmware on your Vivo Device using the preloader drivers. Here on this page, we have managed to share the official Vivo Y91C USB Driver.
It is very necessary to have Vivo Y91C USB drivers whenever you have to connect Vivo Y91C to the Pc for the purpose of transferring data or important files. Also, when it comes to updating your Vivo Y91C manually, it’s necessary to have them on your PC. While you are installing or flashing Fastboot firmware on the device, then Vivo USB Drivers are required. Check out the download links given in this post to simply keep up the pace in this matter.

Vivo Y91C Mediatek Driver for Windows (11,10,8,7,XP)
Driver Package Name : Mediatek Driver for windows
Package File Name: Mediatek_Driver_Auto_Installer_v1.1352_(USB-Driver.NET).zip
Driver File Size: 9.56 MB
Download Driver File Now
How to install Vivo Y91C Mediatek Driver official on Windows
Vivo Y91C Mediatek Driver is compatible with the SP Flash Tool, MTK Flash Tool, SP MDT Tool, and the SN Write Tool and can be useful if you are trying to install firmware (ROM) on the Vivo Y91C.
Step 1 : Download and extract Vivo Y91C Mediatek Driver Auto Installer package on the Computer. If in case, you have already downloaded and extracted the driver package, then SKIP this step.

Step 2 : Once you have extracted the driver package, you will be able to see the following files:
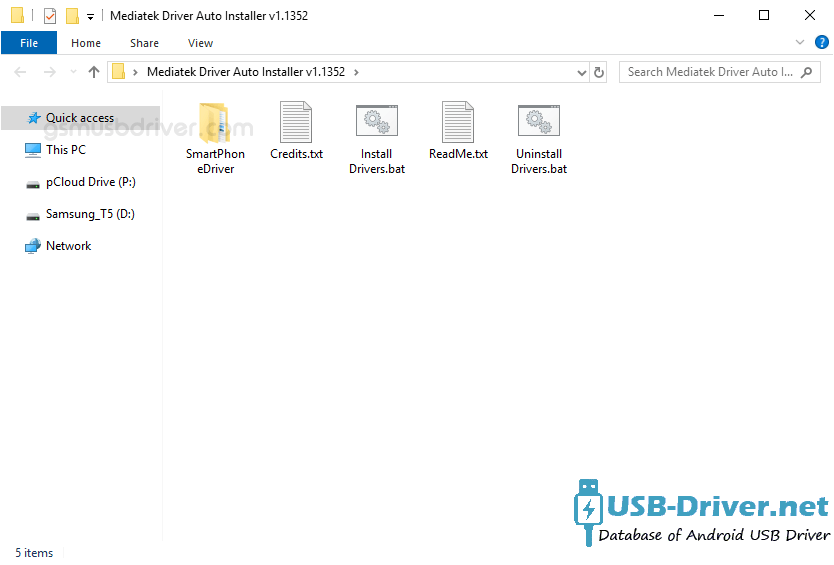
Step 3 : Open Install Drivers.bat to Launch the Setup Dialog Box:
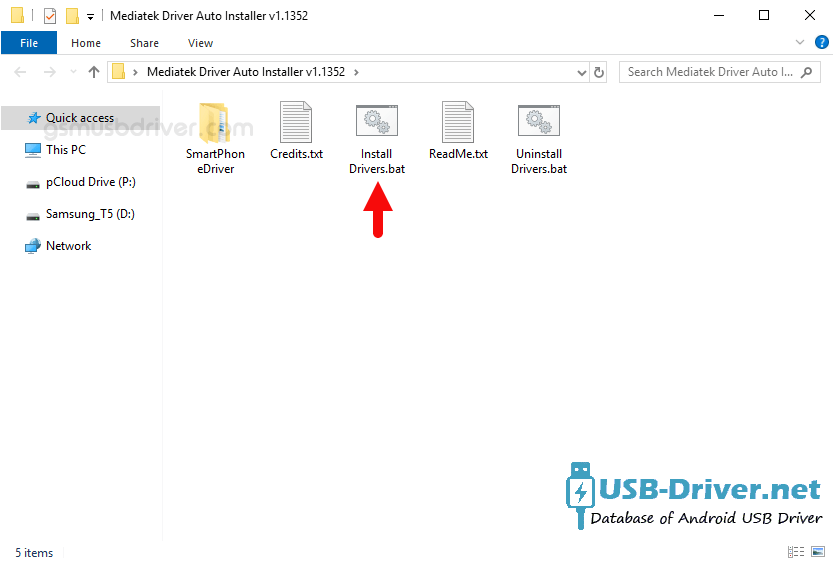
Step 4 : Once the Driver Setup Dialog Box is Launched, you will be able to see the following window:
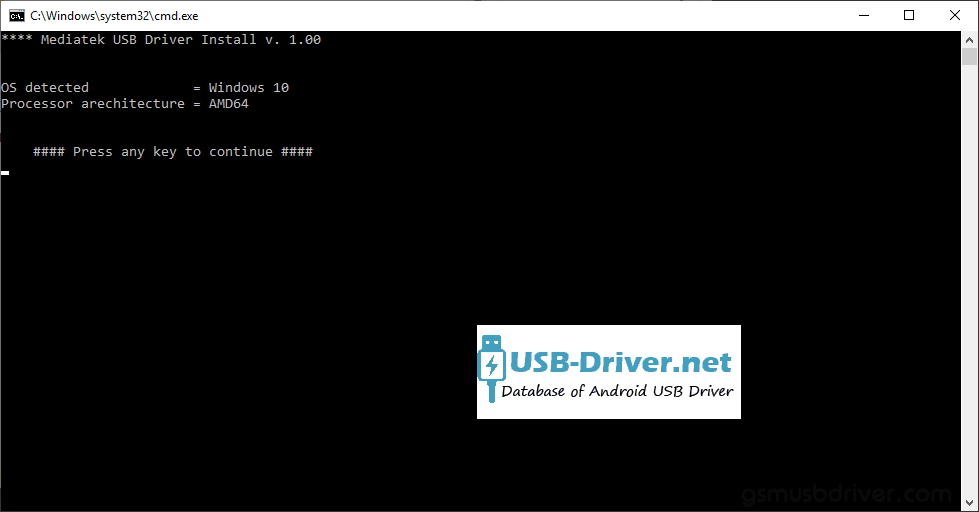
Step 5 : Now, Press any Key (from keyboard) to begin the installation process.
Step 6 : Once the installation process is completed, you will be able to see the Driver installation Completed Message:
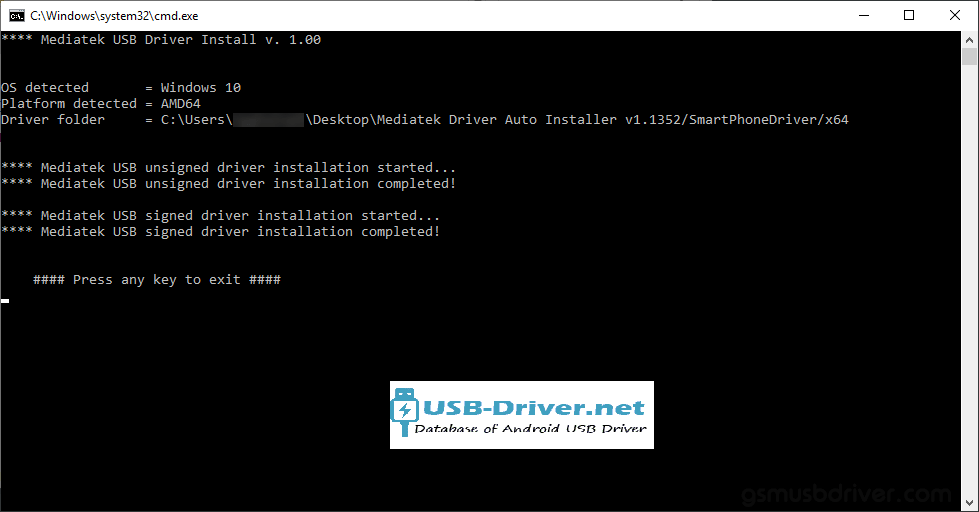
Step 7 : Now, Press any Key (from keyboard) to exit the Setup Window.
Step 8 : Restart your Computer:
Step 9 : Once the Computer is restarted, you can easily connect your Vivo Y91C MediaTek the computer without facing any issue.
Vivo Y91C ADB Driver for Windows (11,10,8,7,XP)
Driver Package Name : Android ADB Driver for windows
Package File Name: usb_driver_r13-windows_(USB-Driver.NET).zip
Driver File Size: 8.27 MB
Download Driver File Now
[•] Download Vivo Y91C Stock Firmware: If you are looking for the Vivo Y91C Stock Firmware, then head over to the Vivo Firmware page.
How4 to install Vivo Y91C USB drivers
The Vivo Y91C USB driver makes almost every task that needs to be performed by connecting the device to PC easier. All the files can be transferred in no time without worrying about anything. Also, there are certain benefits to having it. Before you proceed to download, it is suggested to you to remove the previously installed Vivo Y91C from your PC in case you have installed it. Once you are done, click the below link to download Vivo USB Drivers on your PC.
How to install Vivo Y91C ADB Driver on Windows
Vivo ADB Driver can be used to connect the Vivo to the computer and transfer data between the mobile and the computer.
Step 1 : Download and extract Vivo Y91C ADB Driver (.inf based) (The link is above) on the Computer. If in case, you have already downloaded and extracted the driver, then SKIP this step.
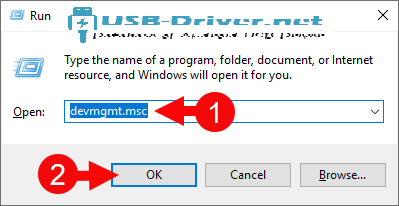
Step 2 : Open Device Manager on the Computer. Press Win + R key from the keyboard and type devmgmt.msc and Click on OK Button:
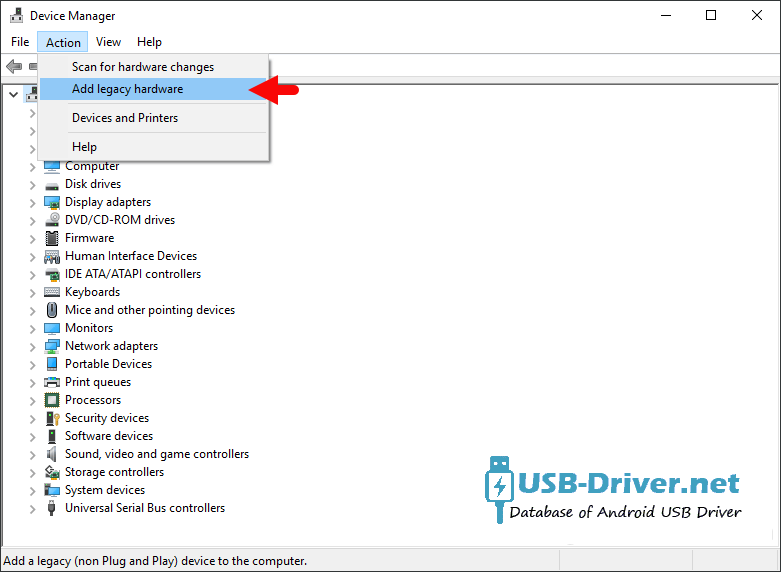
Step 3 : Once the Device Manager is Launched, Click on the Computer Name (name can vary from the image below):

Step 4 : Click on the Action Menu and Select Add Legacy Hardware option:
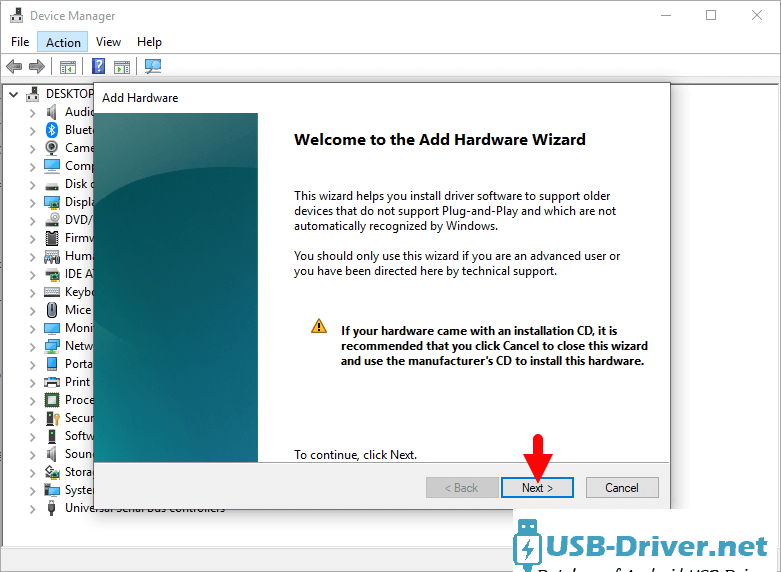
Step 5 : Under Add hardware Dialog Box, Click on the Next Button:
Step 6 : Tick on the Install the hardware that I manually select from a list checkbox and Click on the Next Button:
Step 7 : Click on the Next Button:
Step 8 : Then Click on the Have Disk Button:
Step 9 : Click on the Browse Button:
Step 10 : Locate the .inf file from the computer (this file can be found in the extracted driver folder).
Step 11 : Click on the OK Button:
Step 12 : Click on the Next button:
Step 13 : Again Click on the Next button:
Step 14 : Click on the Finish button to complete the installation process (ignore Code 10; it will be gone post restarting the computer).
Step 15 : Your Vivo Y91C driver is listed in the Device Manager.
Step 16 : Now, Restart the Computer. Once the computer is restarted, you can easily connect your Vivo Y91C device to the computer.
[•] Driver Signature Error: If you got Driver Signature Error While installing the Vivo Y91C Driver then See this Video to fix this problem.
[•] Request Vivo Driver: If you are looking for any specific Vivo drivers that is not listed above, then you can request it through the comment box below (do not request driver from the contact page, or else it will be ignored).
Vivo Y91C USB Driver, PC Manager & User Guide Download
Is your Vivo Y91C not connecting to the PC or is it failing to get recognized by your PC? Well, this is a common problem that we see often on connecting the device to a PC via the USB cable for the first time. It usually happens because of missing or corrupted USB drivers. You’ll need to download and install the Vivo Y91C USB drivers on your computer so that it can easily recognize the device.
Vivo USB Driver is a part of Vivo connectivities over the PC Windows. If you have recently purchased an Vivo mobile phone, and still not finding a way to communicate with the mobile phone via a personal computer. Then you need to download the Vivo USB driver setup from the site link below.
Install it on your computer to see all the stuff on your mobile phone or computer and communicate with your mobile phone in a better way.
To download the USB driver, you have to click on the link below, and enable the USB debugging before connecting the mobile phone to PC.
What is a Vivo Y91C USB Driver?
USB drivers are the most important and useful drivers to communicate the mobile phone, you can share the data by connecting your phone to the PC. Can manage all the data available on your mobile phone, and can arrange to rearrange all the stuff out there.
Though you can connect the PC to mobile phones via third-party software, the use and benefits of using the official tools will be extraordinary.
In this case, if you want to communicate your Vivo with PC using simple connectivity. While you have a problem then this Vivo USB driver is the best solution for you.
IMPORTANT NOTICE: Downloading the Vivo Y91C latest Driver releases helps resolve Driver conflicts and improve your computer’s stability and performance. Updates are recommended for all Windows XP, Vista, Windows 7, Windows 8, Windows 10, and Windows 11 users.

Features Of Vivo Y91C USB Driver:
-
- Connect Vivo devices to Computer
- No extra software is required
- Vivo Tablets support
- Drivers are free and always available
- Enables you to flash the firmware on Vivo smartphones
- All windows compatible
You even can share the same internet connection on both sides of the data cable. You even can send the messages from the computer, using your SMS package and using your contacts.
Download Vivo Y91C USB Driver for Windows
In this guide, we’ve given the download links for the Vivo Y91C USB driver which can be installed on Windows 11, Windows 10, Windows 8.1, Windows 8, and Windows 7 PC. In case you are not familiar with how to install a USB driver, we’ve got you covered here. In this guide, you will also find the steps to install Vivo Y91C USB drivers.
Download Vivo Y91C Mediatek Driver
Vivo Y91C Mediatek Driver is compatible with the SP Flash Tool, MTK Flash Tool, SP MDT Tool, and the SN Write Tool and can be helpful if you are trying to install Vivo Y91C firmware (ROM).
Package Driver Name: Mediatek Driver
Driver File Name: Android_Mediatek_Driver_Auto_Installer_v1.1352_(usb-file.com).zip
Driver File Size: 9.56 MB
How-to (Install): Follow Guidelines
Download Driver Now
Download Vivo Y91C ADB Driver
Package Driver Name: Android ADB Driver
Driver File Name: Android_usb_driver_R13-windows_(usb-file.com).zip
Driver File Size: 8.27 MB
How-to (Install): Follow Guidelines
Download Driver Now
- Connect your Vivo Y91C to the USB cable of your computer.

- In the left pane of the Computer Management menu, select Device Manager.


- In the right panel of Device Manager, locate and expand portable devices or other devices, depending on what you see.

- Right-click on the name of the connected device and select Update Driver.

- Search my computer for the driver software in the Hardware Update Wizard and then click Next.
- Click Browse and navigate to the ADB driver folder. For example, the Google ADB driver is in android_sdk extras google usb_driver .
- Click Next to install the F11 CPH2407 driver.
-
- Connect the Vivo Y91C to the USB port of the computer.
- Right-click on the computer on the desktop or in Windows Explorer and select Manage.
- Select Device Manager in the left pane of the Device Management window.
- Find and expand the Vivo phone in the right panel.
- Right-click on the ADB Android Composite interface and select Update Driver. This will start the Hardware Update Wizard.
- Select Install in a list or a specific location and then click Next.
- Select Search for the best driver in these locations; uncheck Search removable media, and check to Include this site in the survey.
- Click Browse and navigate to the ADB driver folder. (The Google ADB driver is in android_sdk extras google usb_driver .)
- Click Next to update the driver.
How to install Vivo Y91C ADB USB Driver VIDEO :
How to slove Vivo Y91C USB Driver Signature Error?
[#] Stock ROM : If you are looking for the Vivo Y91C Stock Firmware, then head over to the Vivo Firmware page.
[#] Request Vivo Driver: If you are looking for any specific Vivo driver that is not listed above, then you can request it through the comment box below (do not request driver from the contact page, or else it will be ignored).
[#] The above Vivo Y91C USB Drivers are officially provided by Vivo Inc. If any of the above drivers did not work for you, then you can complain to Vivo Y91C Mobile Inc Officially or report to us using the comment box below.
FREQUENTLY ASKED QUESTIONS
Is Vivo Y91C USB Driver Free?
Yes. The Vivo Y91C USB Driver is 100% free since the Vivo community officially releases it for Vivo Mobile users.
Is Vivo Y91C USB Driver Safe?
Yes. The Vivo Y91C USB Driver is 100% safe for the computer, laptop, and Vivo device. Furthermore, since the Vivo community officially releases the driver, it’s 100% safe & secure to use on the computer.
Where Can I find Vivo Y91C Plus Firmware?
If you are looking for the original Vivo Y91C Firmware (Stock ROM), then head over to the Vivo Firmware page.
That’s all the tutorial on how to install the Vivo Y91C USB driver for the Windows procedure, If there is a problem or an error, you can keep in touch with us through the Contact menu at the bottom of this page, Support us and share it with anyone who needs it so we can continue to support you.
Download Vivo Y91C Stock Firmware: If you are looking for the Vivo Y91C Stock Firmware, then head over to the Vivo Firmware page.
How to Install Vivo Y91C USB Driver Manually
Installing Vivo Y91C ADB Drivers for Windows 10/11.
Requirements: You need to have the Windows Computer and the Vivo Y91C Android ADB Driver (.inf based) to follow the below guidelines.
Step 1: Download Vivo Y91C ADB driver to your computer. Once download, extract the download zip file a folder on your computer.

Step 2: Next, go to Control panel and open up the Device Manager window. Now click on “Action” tab and select “Add Legacy Hardware“.

Step 3: You will see the “Add Hardware Wizard” welcome window. Click on “Next“

Step 4:Install the hard that I manually select from a list” option and click “Next“.
Step 5: Now, you will be asked to select the type of hardware you are installing. Select “Show all devices“, click “Next” and choose the Vivo Y91C ADB driver folder on your computer (Step 1)

Step 6: In the next window, you will see “Hardware to install: Android ADB Interface“. Once you see this message, click “Next“.

Step 7: Now, a Windows security prompt window will open up. Click on “Install” to start the Vivo Y91C ADB driver installation process.

Step 8: It will take a minute or two for the installation process to get completed and once it does, you will see the “Completing the Add Hardware Wizard” window. Click on “Finish“.

That’s it. Now you have successfully finished installing ADB driver on your Windows computer. From now on, you will be able to connect your with the computer successfully.
Installing Vivo Y91C ADB Drivers for Windows 7/8/8.1.
To install the Vivo Y91C ADB Drivers in Windows 10 , and 11 for the first time, do the following:


Or, to update an existing Vivo Y91C ADB Drivers in Windows 7 and higher with the new driver:
Download and Install Android USB Driver
In this article, you will find out the Vivo USB Drivers? Don’t worry about it, we are here to give you the latest officially released drivers for your Vivo Y91C smartphone or tablet and check for the USB driver for your device? If yes are you checking out an easy way to connect your device to a PC or Laptop? You’ve come to the right place! Here we’ve provided free download Vivo Y91C USB drivers for all models supported their model numbers, just check below.
Additionally, Vivo Mobile doesn’t offer computer suite application, connecting your device to a PC while not downloading and installing the USB driver given here is a not possible task. Therefore, download Vivo USB drivers from here, install it on your PC and connect Vivo smartphone/tablet to PC or Laptop with successfully.
Here, we have provided 2 USB drivers for your Vivo Y91C Android device on this page.
| USB Driver Type | ADB Driver |
| USB Driver Purpose | Secure your device to a computer |
| File Size | 8.3 MB |
| USB Driver link | Click here to Download |
Download Vivo Y91C Qualcomm Driver
| USB Driver Type | Qualcomm Driver |
| USB Driver Purpose | Flashing stock firmware on your device |
| File Size | 11.00 MB |
| Qualcomm Driver link | Click here to Download |
Watch video tutorial about ADB USB Drivers
If you don’t like this video tutorial or if you would like to get more command, then continue reading.
How to Install Android USB Drivers for Windows?
- Let’s get started, download the USB driver and extract it on your desktop.
- Currently, open Device Manager > Action > Add legacy hardware.

- Click “Next” in the Add legacy hardware wizard.

- NOW, select“Install the hardware that I manually select from the list (Proceed)” and click “Next“.

- When done choose “Show all devices“, click “Next” and select the extracted file manually from your PC.

- Now to start installing your new hardware, click “Next” once again.

- Click “Install” in the Windows security prompt window.

- Click “Finish” to complete the installation.

You May Also Like:
Samsung USB Drivers
Huawei USB Drivers
Nokia USB Drivers
Motorola USB Drivers
LG USB Drivers
Oppo USB Drivers
Meizu USB Drivers
Xiaomi USB Drivers
Lenovo USB Drivers
Vivo USB Drivers
ZTE USB Drivers
Supported Operating Systems 32-bit / 64-bit
Need USB driver to download for Windows 10, Windows 8.1, Windows 7? Just in case you are having problems at the part of your USB is not operating, see the article below to settle your USB problems.
How to Install Android USB Drivers on Windows 10
Installation the Android USB driver on Windows 10 for the first time, some awesome steps guide below:
- Connect your Android device to your computer’s USB port.
- From Windows Explorer, open “Computer Management”.
- In the “Computer Management” left pane, select Device Manager.
- In the “Device Manager” right pane, locate and expand Portable Devices > Other Devices, depending on which one you see.
- Right-click the name of the device you connected, and then select “Update Driver Software”.
- In the “Hardware Update Wizard“, select Browse my computer for driver software and click “Next”.
- Click Browse and then locate the USB driver folder. For example, the Google USB Driver is located in.
android_sdkextrasgoogleusb_driver - Click “Next” to install the driver.
How to Install Android USB Drivers on Windows 8.1
Installation the Android USB driver on Windows 8.1 for the first time, some awesome steps guide below:
- Connect your Android device to your computer’s USB port.
- Access search, as follows: Touch screen: On your computer, swipe in from the right edge of the screen and tap “Search”.Using a mouse: Point to the lower-right corner of the screen, move the mouse pointer up, and then click “Search”.
- In the search box, type into and then click “Device Manager”.
- Double-click the device category, and then double-click the device you want.
- Click the “Driver” tab, click Update Driver, and follow the instructions.
How to Install Android USB Drivers on Windows 7
Installation the Android USB driver on Windows 7 for the first time, some awesome steps guide below:
- Connect your Android device to your computer’s USB port.
- Right-click on “Computer” from your desktop or Windows Explorer, and select “Manage”.
- Select “Devices” in the left pane.
- Locate and expand “Another device” in the right pane.
- Right-click the device name (such as Nexus S) and select “Update Driver Software”. This will launch the Hardware Update Wizard.
- Select Browse my computer for driver software and click “Next”.
- Click “Browse” and locate the USB driver folder. (The Google USB Driver is located in
android_sdkextrasgoogleusb_driver.) - Click “Next” to install the driver.
Or, to upgrade an existing Android USB driver on Windows 7 and higher with the new driver:
- Connect your Android device to your computer’s USB port.
- Right-click on “Computer” from your desktop or Windows Explorer, and select “Manage”.
- Select “Device Manager” in the left pane of the Computer Management window.
- Locate and expand “Android Phone” in the right pane.
- Right-click on “Android Composite ADB Interface” and select “Update Driver”. This will launch the Hardware Update Wizard.
- Select “Install from a list or specific location” and click “Next”.
- Select “Search for the best driver in these locations” uncheck “Search removable media”, and check to Include this location in the search.
- Click “Browse” and locate the USB driver folder. (The Google USB Driver is located in
android_sdkextrasgoogleusb_driver.) - Click “Next” to upgrade the driver.
That’s it. Now you have successfully finished installing Android ADB Driver on your Windows computer. From now on, you will be able to connect your Android smartphone or tablet with the PC successfully.
In the event that you might want to connect with us for many reasons, utilize the contact page.
Vivo Y91 USB Driver allows you to connect your Smartphone to the Windows Computer. The USB Driver can be beneficial if you’re trying to connect your Smartphone to Sync Data between the Mobile and the Computer, flashing/installing Stock Firmware (OS) on the device, or fixing Software related issues on the mobile.
Vivo Y91 Driver for Windows
Vivo USB Driver helps you connect your Vivo Smartphone to the Windows Computer and transfer data between the Smartphone and the computer. It also allows you to Sync the Smartphone Data with the computer, take a backup of existing data, flash or install the Stock Firmware on the device.
There are several scenarios when you might need to install the Vivo driver to connect the device to the computer. They are:
- Transfer data from the Vivo Smartphone to the Computer or from the computer to the Smartphone.
- To free up the device space.
- To install the Stock Firmware (OS) on the device.
- To Write/Flash IMEI on the Device.
Download Vivo Y91 Driver
Driver Name: Vivo_USB_Driver_v1.1.0.zip
Driver Version: v1.1.0
Driver Size: 13.36 MB
How to Install: Follow Guidelines
Compatible with: Windows Computer
Download
Frequently Asked Questions
What is Vivo Y91 USB Driver?
The Vivo Y91 USB Driver is a free software primarily used to install the Vivo Drivers on the Windows computer with a few clicks.
How do I install the Vivo Y91 USB Driver?
You can install the Vivo Y91 USB Driver by downloading the .exe file and installing the driver on the Computer. The installation process is quite similar to the standard Windows Application. You can follow the How to install the Vivo Driver page to install the drivers correctly.
Is Vivo Y91 USB Driver Free?
Yes. The Vivo Y91 USB Driver is 100% free since the Vivo community officially releases it for Vivo Smartphone users.
Is Vivo Y91 USB Driver Safe?
Yes. The Vivo Y91 USB Driver is 100% safe for the Computer, laptop, and Vivo mobile. Furthermore, since the Vivo community officially releases the driver, it’s 100% safe & secure to use on the computer.
Where Can I find Vivo Y91 Firmware?
If you are looking for the original Vivo Y91 Firmware (Stock ROM), then head over to the Vivo Y91 Firmware page.
Home » Vivo » Vivo Y91C USB Driver
If you are an owner of Vivo Y91C and looking out for usb drivers to connect your Android device with the Windows computer, then you have landed in the right place. Download Vivo Y91C USB driver from here, install it in your computer and connect your device with PC or Laptop successfully.
Here, we have provided two usb drivers for your Vivo Y91C Android device.

Download Vivo Y91C USB Driver
USB Driver Type: Mediatek Driver
USB Driver Purpose: For flashing Stock firmware on your device.
File Size: 10 MB
Download Now
USB Driver Type: ADB Driver
USB Driver Purpose: For connecting your device to a computer.
File Size: 8.3 MB
Download Now
Steps To Install Vivo Y91C Mediatek Driver In Computer
Video Tutorial
If you don’t like this video tutorial or if you would like to get more instructions, then continue reading.
Step 1: To get started, download MediaTek driver and extract it on your desktop.

Step 2: Now, open the driver folder and click “Install Drivers” to initiate the installation process.

Step 3: In the Setup Command Prompt Window, press any key from the keyboard to start the installation process.

Step 4: You will see the Driver Installation Completed message, after successful installation of the MediaTek Driver on your Windows computer.
Step 5: Now, press any key from the keyboard to exit the Setup Window.

Step 6: To finish, restart your computer.
That’s it. You have successfully installed the MediaTek Driver on your Windows computer.
Steps To Install Vivo Y91C ADB Driver In Computer
Video Tutorial
If you don’t like this video tutorial or if you would like to get more instructions, then continue reading.
Step 1: To get started, download ADB driver and extract it on your desktop.

Step 2: Now, open Device Manager > Action > Add legacy hardware.

Step 3: Next, click “Next” in the Add legacy hardware wizard.

Step 4: Now choose “Install the hardware that I manually select from the list (Advanced)” and click “Next“.

Step 5: Once done, choose “Show all devices“, click “Next” and select the extracted file manually from your computer.

Step 6: Now to start installing your new hardware, click “Next” again.

Step 7: Click “Install” in the Windows security prompt window.

Step 8: Next, click “Finish” to complete installation.

That’s it. Now you have successfully finished installing ADB driver on your computer. If you encounter any issues while following this tutorial, do let me know via comments.
Note: If you have corrupted or bricked your Vivo Y91C, download Vivo Y91C stock firmware and flash it on your device using an Android flash tool.

Boopathy Sundaramoorthy is a tech and Android enthusiast working for AllUSBDrivers.com from 2018. He loves helping Android users to find the right USB drivers for their devices so that they can connect their smartphone or tablet to a computer.