Vinchin Blog
How to Download and Install VMware Remote Console on Windows, Linux, and Mac?
Table of contents
- What Is VMware Remote Console?
- How to Download VMware Remote Console?
- How to Install VMRC on Windows?
- How to Install VMRC on Linux?
- How to Install VMRC on Mac?
- VMware Backup in the Round
- Conclusion

Google Chrome deprecates Netscape Plug-in API support, an application programming interface to extend server software, leading to the malfunction of the vSphere Client Integration Plugin.
VMware releases VMware Remote Console (VMRC) instead to work with vSphere Web Client in Windows and Mac OS as a standalone application.
What Is VMware Remote Console?
VMware Remote Console (VMRC) is a standalone application that enables remote access and operations to virtual machines on VMware hosts in Windows, Linux, and macOS.
VMRC is launched only inside the web client and used for guest management. Although you must install the tool manually, you don’t have to purchase a license for it.
VMRC Features
-
Insert ISO images into CD/DVD.
-
Manage network adapters.
-
Install VMware Tools on the VMs.
-
Adjust to a guest OS screen resolution.
-
Connect a removable USB to a remote VM.
-
Increase hardware devices of the VM.
-
Install OS on VMs using a local CD/DVD ISO image.
-
Turn on, turn off, reset, suspend, and rename the VMs.
-
Modify current hardware settings like processor, memory, virtual disks, etc.
How to Download VMware Remote Console?
1. Visit customerconnect.vmware.com and log in to the account, establish one if you don’t have one.
2. Download VMRC 12.0.1 or 12.0.2 from VMware Downloads, or download it from the Windows software management automation tool Chocolatey if you don’t want to download the installer.
3. Click Download Now for Windows (a ZIP archive includes an EXE file) or Linux (a .bundle file), while Mac users go to App Store to download.
4. Save File and hit OK in the pop-up window.

How to Install VMRC on Windows?
Install VMRC with Setup Wizard
1. Right-click the VMRC zip file and choose Extra All.
2. Input a temporary location to Extract the files.
3. Double-click the setup file to launch the wizard.
4. Click Next on the welcome page, then accept the End User License Agreement, and click Next.
5. On the Custom Setup page, leave the default path or click Change for a different location, and click Next.
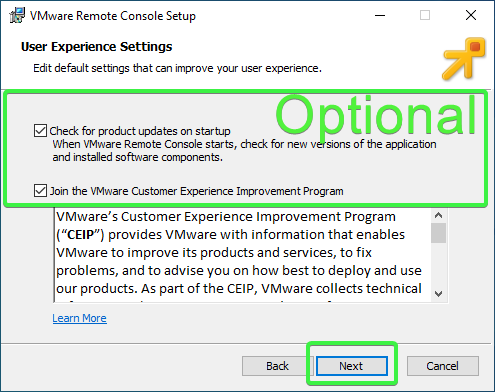
6. On the User Experience Settings page, check or ignore optional settings for automatic VMRC updates and customer experience programs. Click Next.
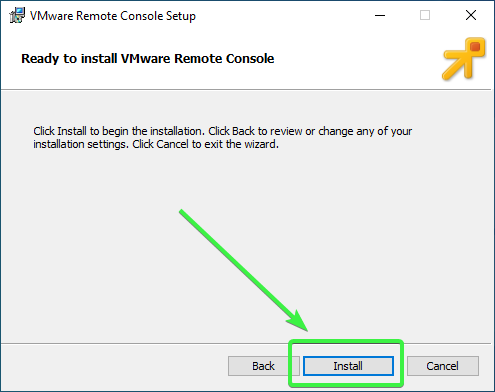
7. Click Install on the ready to install page. Then click Finish. Choose to restart the OS now Yes or No.
Install VMRC with PowerShell
1. Open PowerShell as admin and modify the working directory to the setup file location of VMRC.
2. Run the following commands.
.VMware-VMRC-12.0.2-xxxxxxxx.exe /s /v «/qn EULAS_AGREED=1 AUTOSOFTWAREUPDATE=1 DATACOLLECTION=0»
/s – keeps the installation window hidden.
/v –conceals the installation window.
/qn – instructs the installer to run a silent installation.
EULAS_AGREED=1 – to consent to the license agreement. When the value is changed to 0, the license agreement is rejected and the setup is terminated.
AUTOSOFTWAREUPDATE=1 – to activate the automatic software update feature of VMRC. If you want to stop automatic updates, set the value to 0.
DATACOLLECTION=0 – do not join the customer experience improvement program (CEIP). Change the value to 1 to join the program.
Install VMRC with Chocolatey
1. Install Chocolatey if you don’t have one.
https://community.chocolatey.org/install.ps1
2. Open PowerShell as admin and run the commands to install the package.
cinst vmrc -y
cinst-install a package
vmrc-package name
-y-confirm all prompts
3. Or install VMRC from Windows software repositories. Press Y (yes) or A (yes to all) when required to continue.
choco install vmrc —version=12.0.2.xxxxxxxx
Connect to a VM
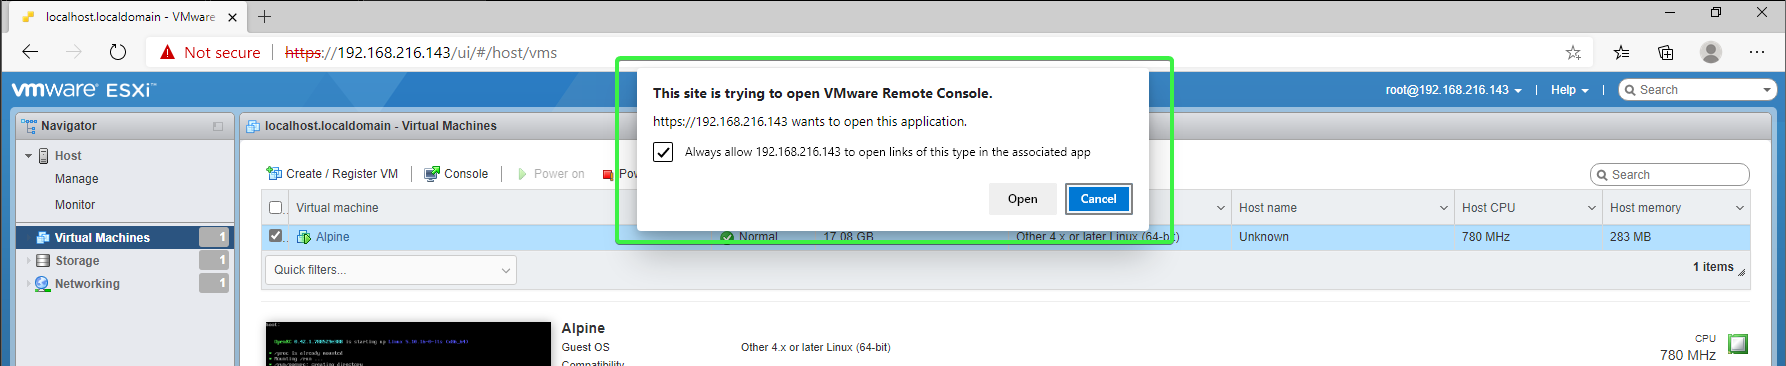
1. On the vSphere or ESXi web client, go to the Virtual Machines page> right-click the target VM> click Console> Launch remote console.
2. Check Always allow to open links of this type in the associated app box and click Open.
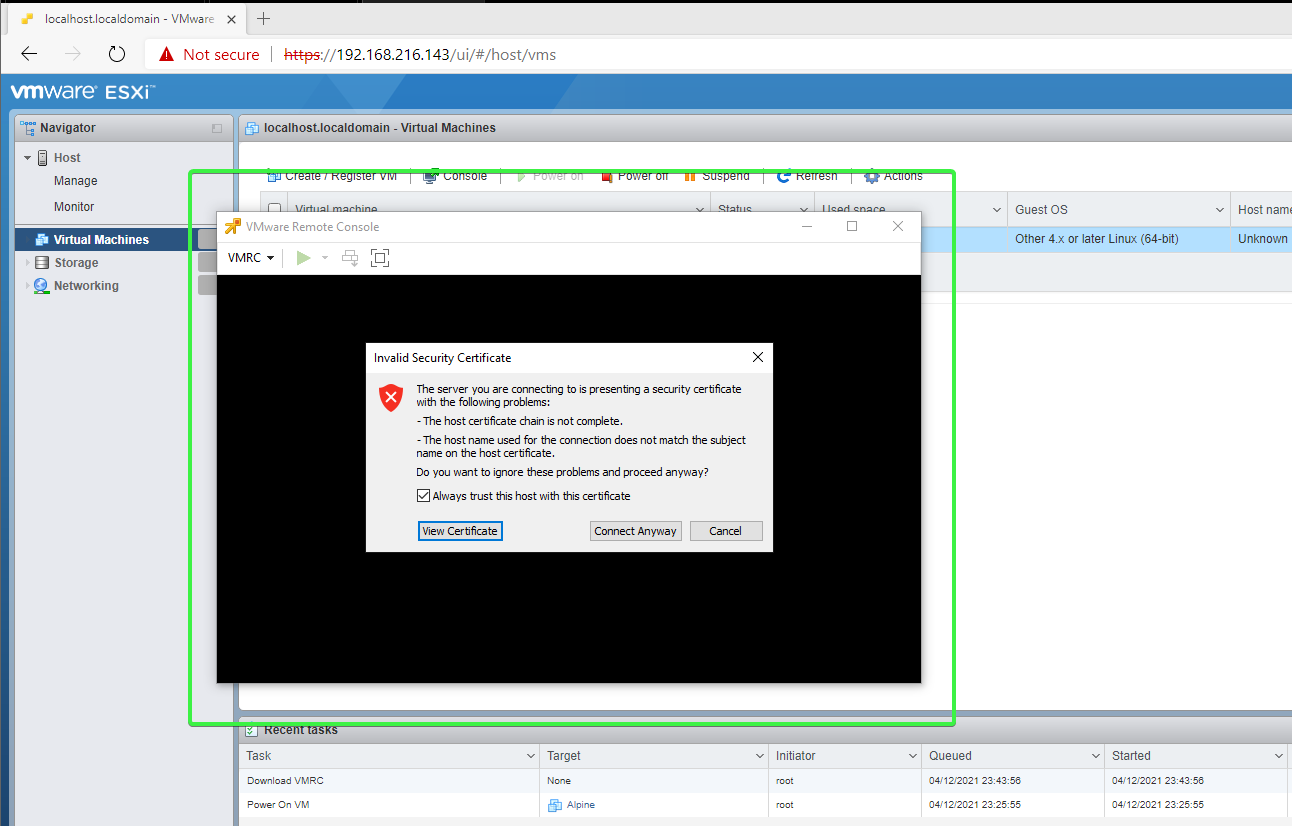
3. Check the Always trust this host with this certificate box and click Connect Anyway after you receive a certificate message.
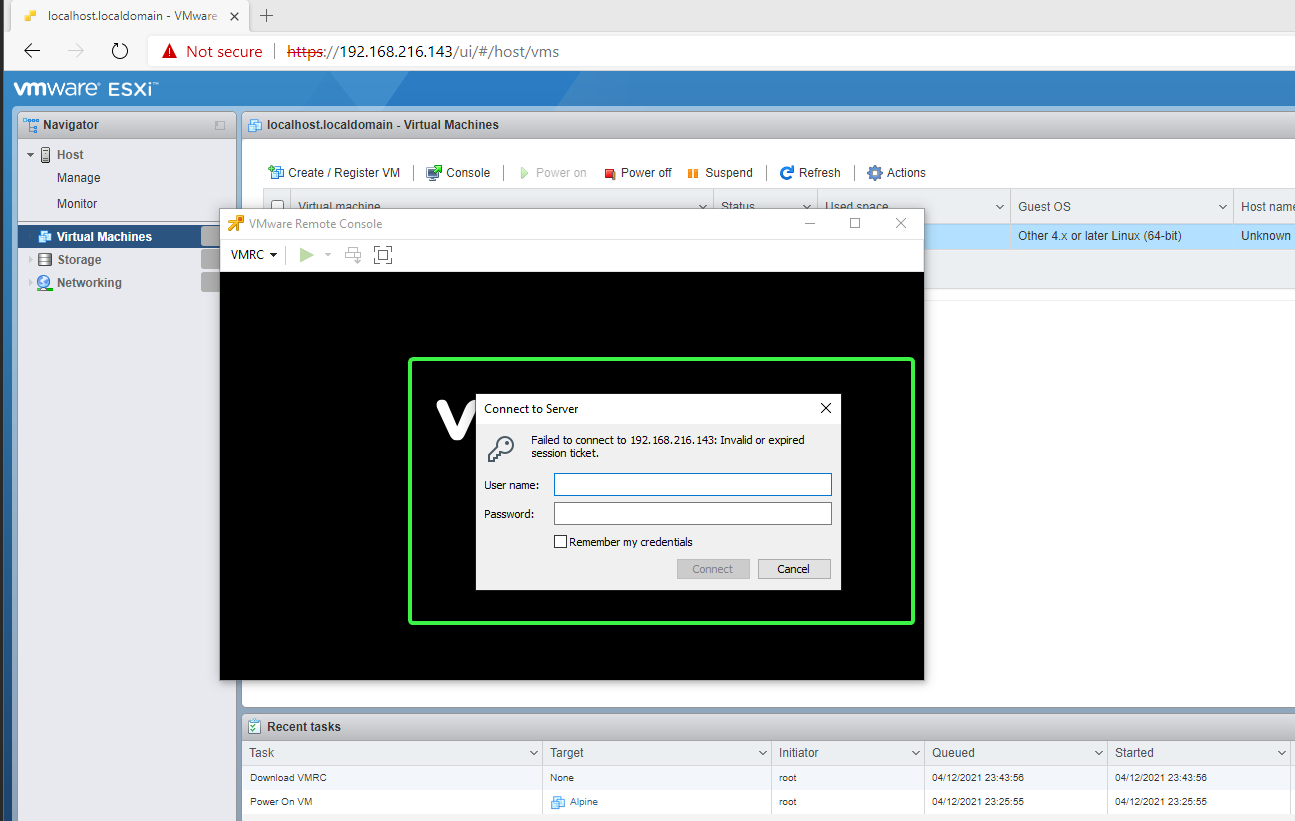
4. Enter the host VM root account or vSphere user account that can access the guest.
How to Install VMRC on Linux?
Launch VMRC in VMware Host Client
1. Type the ESXi host IP address on the web to access the VMware Host Client.
2. On the Navigator page, click Virtual Machines and choose one needed.
Note: choose the professional ESXi backup solution for fast and frequent VMware backup.
3. Click the first computer Monitor icon to open the options.
4. Choose Launch remote console.
5. Click Choose Application to open the VMRC link, you can select the box always allow the ESXi host to open VMRC in this IP address.
Note: VMware Workstation and VMware Remote Console cannot be installed on the same Linux machine because they overlap operations.
6. Choose VMware Remote Console and click Open Link.
7. Click Connect Anyway on the certificate page, and check Always trust this host with this certificate.
Install VMRC with Bash
Bash is a Unix shell as a free alternative to the Bourne shell.
1. Open the Bash terminal with root privilege.
sudo su –
2. Set the VMRC package execution bit.
chmod +x /home/bkindle/Downloads/VMware-VMRC-12.0.2-xxxxxxxx.x86_64.bundle
3. Run the installation package.
/home/bkindle/Downloads/VMware-VMRC-12.0.2-xxxxxxxx.x86_64.bundle
4. Press q to skip the license agreement, then type y to accept the agreement.
Connect to a VM
Use Bash.
vmrc vmrc://remote_host/?moid=VM-ID
How to Install VMRC on Mac?
1. Open App Store and look for VMware Remote Console.
2. Click Get> Install App.
Or you could download it manually from vSphere Client or VMware Host Client as above.
VMware Backup in the Round
Vinchin Backup & Recovery is a multi-functional backup solution for 10+ virtualization including VMware, KVM, Xen, and more, and 4 databases (Oracle DB, MySQL, SQL Server, PostgreSQL).

Automatic backup: make backup more accessible and faster with multiple scheduled backup strategies (like CBT incremental backup) via HotAdd/SAN transmission and reduce data size by up to 50% with Vinchin technologies.
Instant recovery: bring a crashed VM back in 15s directly from local backups for shorter RTO.
Offsite backup copy: send another backup copy to a remote location as a standby.
Anti-ransomware protection: protect data and backup server from malware attacks with backup storage protection, double data encryption, data archiving to public clouds, etc.
Cross-platform V2V migration: transfer VMware to another 10+ hosts and vice versa for worry-free V2V migration without needing any tools.
Vinchin Backup & Recovery offers a single console to manage a multi-hypervisor environment in clear view, and an intuitive data visualization interface is also available for a broader perspective.
Take an interest in the solution? Download a 60-day free trial of the Enterprise version below to try.
Conclusion
VMware Remote Console is a helpful utility to manage VMware virtual machines and guest operating systems in Windows, Linux, and Mac.
In this article, details of VMRC download and installation are presented. And do not forget to back up VMware VMs with Vinchin Backup & Recovery at a reasonable price and rich features.
— admin|Опубликовано 14.10.2020
-
Версия
-
Скачать
2821 -
Размер файла
88.33 MB -
Количество файлов
1 -
Дата создания
14.10.2020 -
Последнее обновление
14.10.2020
Скачать
Описание
Version
11.2.0
Notes
VMware Remote Console provides console access and client device connection to VMs on a remote host. You will need to download this installer before you can launch the external VMRC application directly from a VMware vSphere or vRealize Automation web client.
Documentation
Release Notes
VMware Remote Console Guide for VMware vSphere
VMware Remote Console for vRealize Automation and vCloud Director
Release Date
2020-07-09
Type
Drivers & Tools
Вам также может понравиться

Опубликовано 01.10.2017
RFC 8093 PDF
Deprecation of BGP Path Attribute Values 30, 31, 129, 241, 242, and 243 Читать на русском языке RFC 8093 | Устаревание значений атрибутов […]
Опубликовано 20.12.2017
RFC 6415 PDF
Web Host Metadata
Опубликовано 03.02.2019
RFC 489 PDF
Comment on Resynchronization of Connection Status Proposal
Опубликовано 19.12.2017
RFC 6181 PDF
Threat Analysis for TCP Extensions for Multipath Operation with Multiple Addresses

Join the Chocolatey Team on our regular monthly stream where we discuss all things Community, what we do, how you can get involved and answer your Chocolatey questions.

Join the Chocolatey Team on our regular monthly stream where we put a spotlight on the most recent Chocolatey product releases. You’ll have a chance to have your questions answered in a live Ask Me Anything format.

Livestream from
Thursday, 06 October 2022
We recently released our largest update to Chocolatey Central Management so far. Join Gary and Steph to find out more about Chocolatey Central Management and the new features and fixes we’ve added to this release.
Watch On-Demand

Webinar Replay from
Wednesday, 30 March 2022
At Chocolatey Software we strive for simple, and teaching others. Let us teach you just how simple it could be to keep your 3rd party applications updated across your devices, all with Intune!
Watch On-Demand

Livestream from
Thursday, 9 June 2022
Join James and Josh to show you how you can get the Chocolatey For Business recommended infrastructure and workflow, created, in Azure, in around 20 minutes.
Watch On-Demand

Livestream from
Thursday, 04 August 2022
Join Paul and Gary to hear more about the plans for the Chocolatey CLI in the not so distant future. We’ll talk about some cool new features, long term asks from Customers and Community and how you can get involved!
Watch On-Demand

Livestreams from
October 2022
For Hacktoberfest, Chocolatey ran a livestream every Tuesday! Re-watch Cory, James, Gary, and Rain as they share knowledge on how to contribute to open-source projects such as Chocolatey CLI.
Watch On-Demand

Livestream from
Thursday, 03 November 2022
Join Paul and Gary for this months Chocolatey product livestream where we look at the latest release of Chocolatey 1.2.0, Chocolatey Licensed Extension 5.0.0 and shine a spotlight on the new hook scripts functionality. This opens up so many possibilities for Chocolatey CLI users!
Watch On-Demand

Livestream from
Tuesday, 29 November 2022
Join Josh as he adds the ability to manage Chocolatey GUI config and features with the Chocolatey Ansible Collection.
Watch On-Demand

Webinar from
Tuesday, 13 December 2022
Join Gary, Paul, and Maurice as they introduce and demonstrate how to use Chocolatey! Questions will be answered live in an Ask Me Anything format.
Watch On-Demand
VMware ESXi and vCenter have a flash-based web UI, which may no longer work on the latest web browsers. VMware Workstation can connect to ESXi and vCenter servers but getting it is not cheap. What other option is there to manage virtual machines? VMware Remote Console (VMRC) is the answer!
In this tutorial, you’ll learn about what VMRC is, how to install it on supported platforms, and ultimately how to use it to connect and manage virtual machines on remote hosts.
Prerequisites
Have or need VMware ESXi hosts? Check out the VMware vSphere virtualization suite integrated with VMware vCenter for comprehensive management and advanced features. Need more localized VM capabilities? Check out VMware Workstation PRO & Player!
If you plan on following along with the examples below, here’s what you will need:
- A modern web browser such as Edge, Chrome, and Firefox. The examples in this article will use Microsoft Edge.
- An ESXi or vCenter server. This article uses ESXi 7.0.
- A computer running on Windows 10 or Linux. There will be examples in this article for VMRC in Windows and Linux.
- Download the VMRC setup file for your computer’s operating system (Windows and/or Linux). As of this writing, the latest VMRC version is 12.0, which this tutorial will use.
Downloading from VMWare requires you to log in with a VMWare Customer Connect account. If you don’t have an account, you can register for free.
- Install the Chocolatey package manager on your computer only if you plan to install VMRC on Windows without downloading the installer from VMware.
What is the VMRC?
The VMRC is a standalone application that provides access to virtual machines on remote VMware virtual machine hosts.
Accessing remote consoles with VMRC allows you to modify VM settings directly, such as allocated vCPU’s, RAM, and disk. Performing tasks such as restarting, suspending, or resuming a virtual machine are also possible through VMRC.
What’s more, you can upgrade VMware Tools or modify boot configurations. Need to attach a USB device to a VM? VMRC can do that too!
Installing and Using VMware Remote Console on Windows
Before connecting to a VM on a remote host, you have to first install VMRC on your computer. And on Windows, there are a few ways you can install VMRC. Whether using the GUI or command-line, VMRC got you covered.
Installing VMRC using the Setup Wizard
One way to install VMRC is by downloading the installer and running the VMRC setup wizard. To do so, follow these steps:
1. On your computer, locate the VMRC setup file you downloaded.
2. Right-click on the VMRC installer zip file and click Extract All.
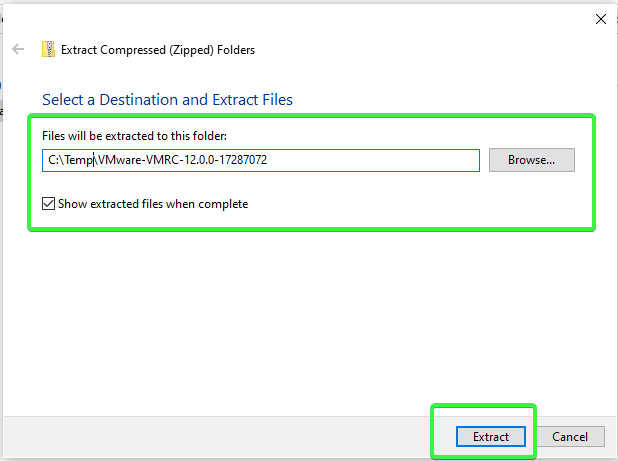
3. When asked to select a destination, enter the temporary location to extract the files and click Extract. In this example, the destination is in C:Temp.
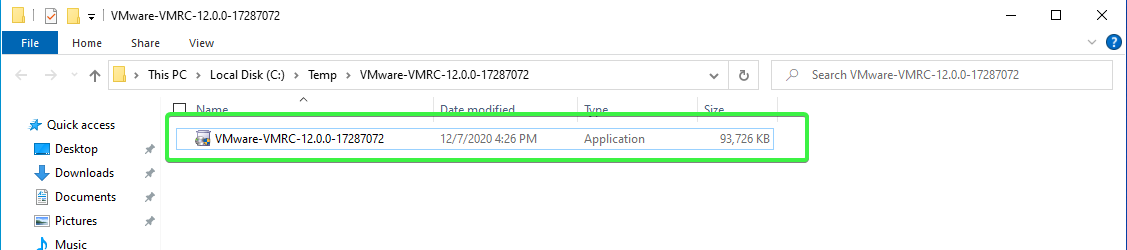
4. After extracting the zip file, double-click the VMRC setup file to launch the installation wizard. In this example, the setup filename is VMware-VMRC-12.0.0-17287072.
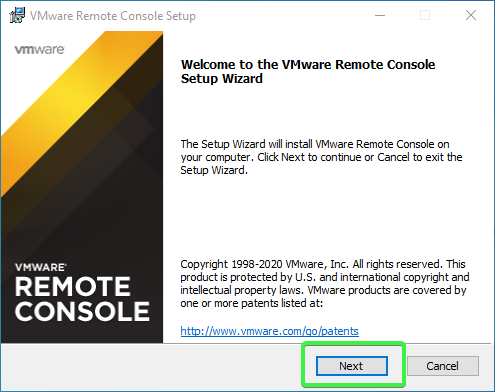
5. On the Welcome to the VMWare Remote Console Setup Wizard page, click Next.
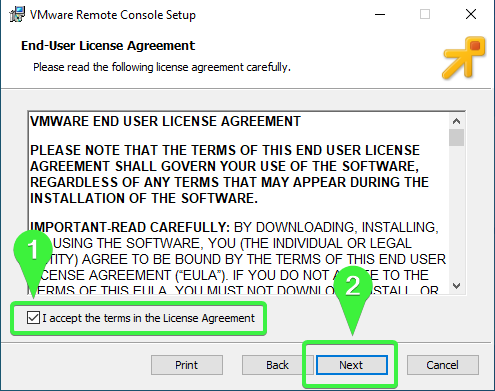
6. Read through the End User License Agreement if you wish. Otherwise, accept the terms of the agreement and click Next.
7. On the Custom Setup page, leave the default installation path and click Next.

8. On the User Experience Settings page, check or uncheck the settings to:
- Check for product updates on startup – this setting enables or disables the VMRC automatic software updates.
- Join the VMware Customer Experience Improvement Program (CEIP) – this setting enables or disables VMRC technical data collection.
Note that you can change these settings anytime within VMRC after installing.
After you’ve made your selection, click Next to continue the installation.
9. Next, on the Ready to install VMware Remote Console page, click Install.
10. Lastly, after completing the VMRC, click Finish to close the setup wizard.
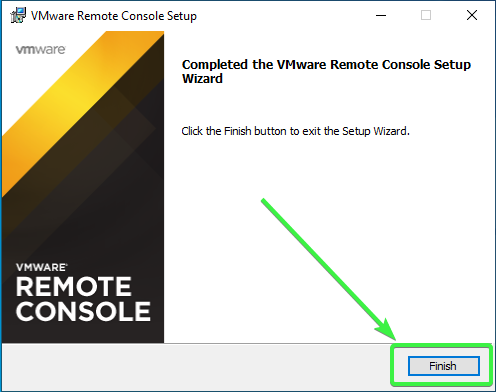
Congratulations! You’ve successfully installed VMRC for Windows.
Installing VMRC using the Command-Line (Silent Install)
Apart from installing using the setup wizard, VMRC has a command-line setup, too. The VMRC command-line setup method is ideal when performing a silent installation manually, via Group Policy, or as part of a software deployment script.
To perform a silent installation of VMRC on your Windows computer, open PowerShell as admin and change the working directory to the VMRC setup file’s location.
Next, copy the command below and run it in PowerShell. You’ll notice there are switches and parameters following the setup filename. Below is a breakdown of the options.
/s– hides the installation window./v– passes parameters to the installer./qn– parameter that tells the installer to perform a silent installation.EULAS_AGREED=1– parameter to accept the license agreement. Changing the value to0means rejecting the license agreement, and the setup will not continue.
You will not see the license agreement during the silent installation. To read the license agreement, perform a standard installation instead.
AUTOSOFTWAREUPDATE=1– parameter to enable VMRC’s automatic software update. Change the value to0to disable automatic updates.DATACOLLECTION=0– parameter to disable joining the customer experience improvement program (CEIP). Change the value to1to enable joining the CEIP.
.VMware-VMRC-12.0.0-17287072.exe /s /v "/qn EULAS_AGREED=1 AUTOSOFTWAREUPDATE=1 DATACOLLECTION=0"Installing VMRC using Chocolatey
Chocolatey brings the convenience of installing software (packages) in Windows from online repositories. If you don’t want to download the VMRC installer manually, VMRC is also available as a Chocolatey package.
To install VMRC using Chocolatey, open PowerShell as admin and copy the code below and it in PowerShell. cinst is the command to install a package, followed by the package name vmrc. The -y option confirms all prompts, which, in this example, accepts the license agreement.
You have now installed the latest VMRC client.
Now that you’ve installed VMRC, your next step is to test that it works. And what better way to test VMRC than connecting to a VM. There are two methods to connect to a VM with VMRC. Let’s explore those methods next.
Connecting to a VM using a Web Browser
One way to use VMRC is by launching it from the vSphere or ESXi web clients. To do so:
1. On your web client, navigate to the Virtual Machines view.
2. Right click the virtual machine you want to connect to and click on Console —> Launch remote console.
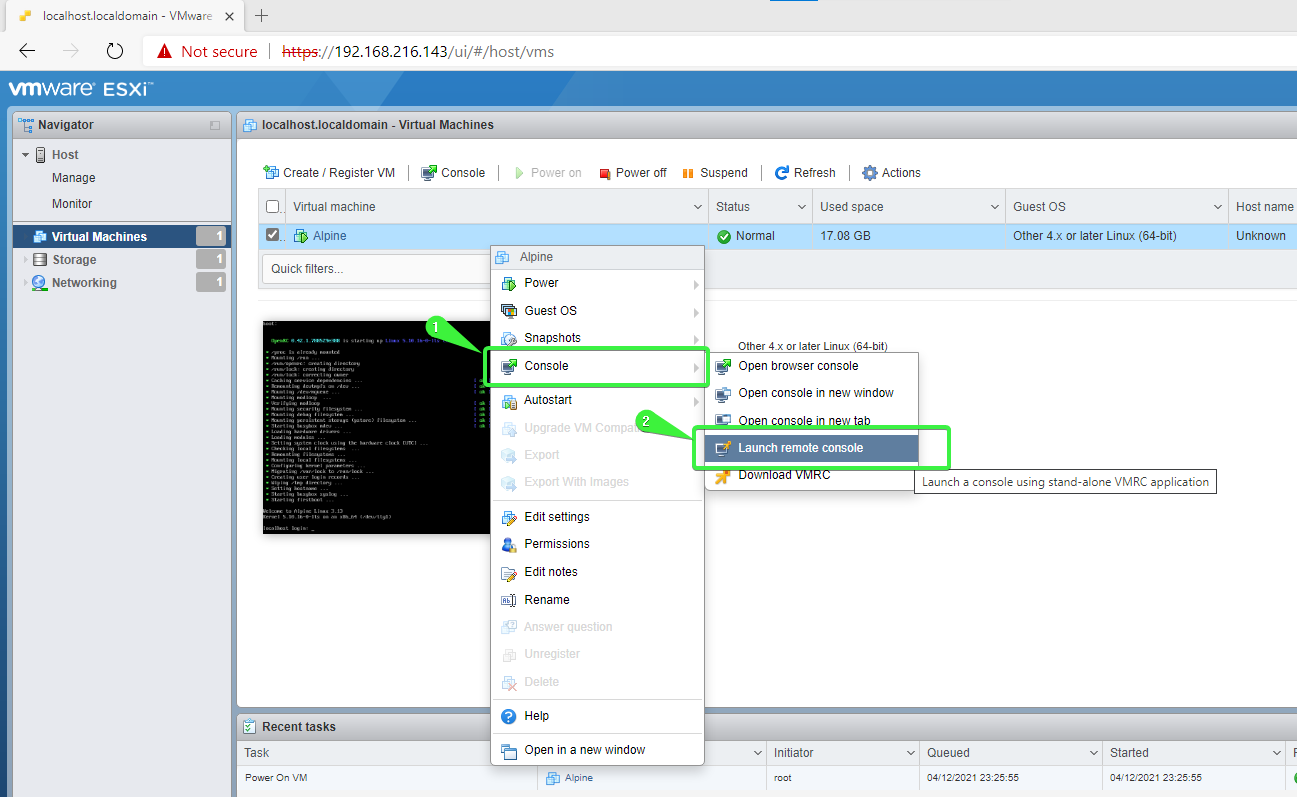
3. On the pop-up box saying This site is trying to open VMware Remote Console, put a check on the Always allow to open links of this type in the associated app box. Click Open.
4. Next, the VMRC application will launch using the connection settings for the virtual machine you. If you receive a certificate message, check the Always trust this host with this certificate box and click Connect Anyway.
5. When prompted for login credentials, enter your virtual machine host root account or your vSphere user account with access rights to the virtual machine guest.
You have successfully connected to the remote virtual machine console.
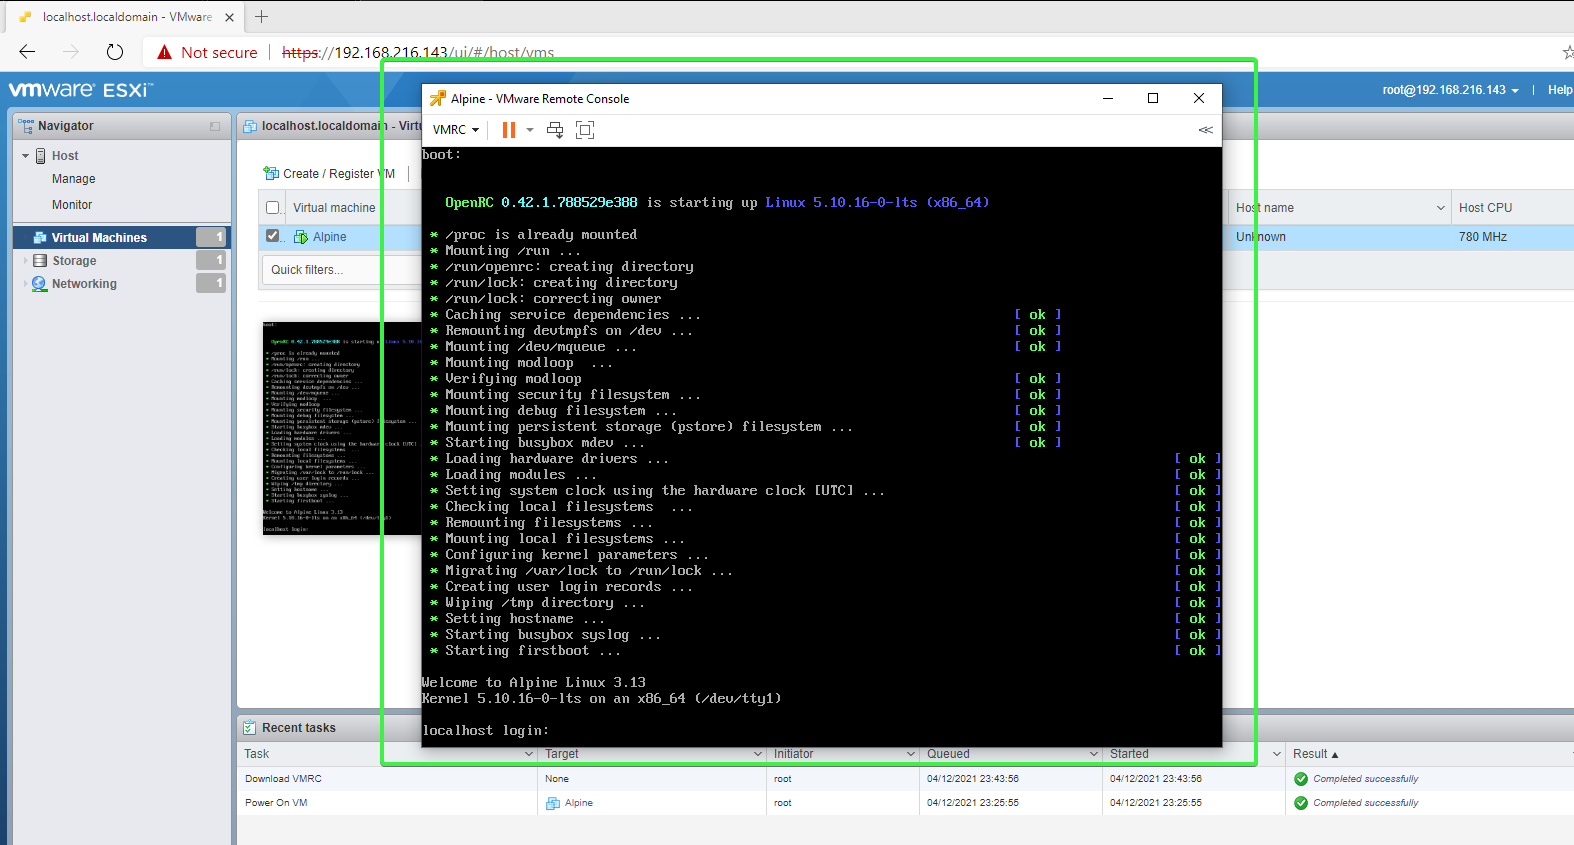
At this point, you can close the browser. The VMRC will stay open, and you can continue working on the virtual machine.
Connecting to a VM using PowerShell
To run VMRC in PowerShell, you’ll need to execute the vmrc.exe command. The command’s syntax is as shown below. remote_host is the address of the remote host, and VM-ID is the virtual machine ID.
.vmrc.exe vmrc://remote_host/?moid=VM-IDFor example, to connect to a remote VM with an ID of 1 on host 192.168.216.143, run this command in PowerShell.
# To make the commands shorter, push the current directory onto the stack
Push-Location 'C:Program Files (x86)VMwareVMware Remote Console'

# Now run VMRC using a URI
.vmrc.exe vmrc://192.168.216.143/?moid=1
Installing and Using VMware Remote Console on Linux
Installing VMRC on Linux involves entering a few commands into the terminal and responding to prompts. And afterward, connecting to a VM would require invoking VMRC using the terminal as well.
Installing VMRC using Bash
Follow the steps below to install VMRC on a Linux computer.
1. Open a Bash terminal.
If you are using Gnome-shell, press the Super key (Windows logo on most keyboards) and type “Terminal” in the search bar.
2. Switch to the root user.
3. Set the execution bit for the VMRC installation package that you downloaded. To do so, copy the command below and run it in the terminal. Make sure to change the installation package path if needed.
chmod +x /home/bkindle/Downloads/VMware-VMRC-12.0.0-17287072.x86_64.bundle4. Next, run the installation package by typing the installation package filename and press Enter.
/home/bkindle/Downloads/VMware-VMRC-12.0.0-17287072.x86_64.bundle5. The installation displays the license agreement on the screen—press q to skip to the end.
6. At the next prompt, type yes or y to accept the agreement.
7. Finally, to let VMRC check product updates, type yes or y.
The installation begins and only takes a few moments to complete.
Connecting to a VM Using Bash
The syntax to run VMRC on Linux is similar to the command in Windows. The only difference is, in Linux, the vmrc command does not have the .exe extension.
vmrc vmrc://remote_host/?moid=VM-IDFor example, to connect to a remote VM with an ID of 1 on host 192.168.216.143, run this command in the terminal.
vmrc vmrc://192.168.216.143/?moid=1 Configuring VMRC Preferences
When you install VMRC, there are default settings that might not be to your liking. You can configure these settings from VMRC’s Preferences windows. To access the Preferences, on the VMRC window, click on the VMRC dropdown menu —> Preferences.
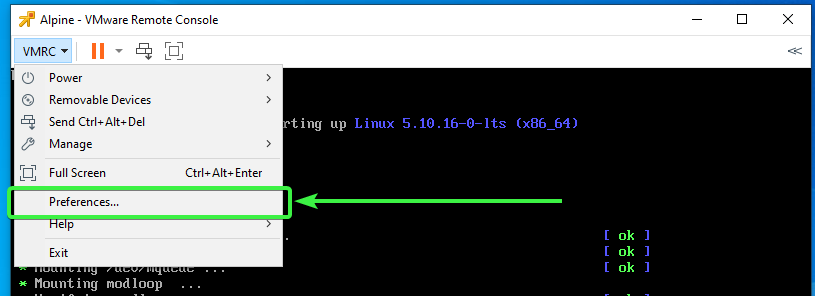
Once you’re in the Preferences window, here are the settings that you can change according to your preference.
- Check for product updates on startup – Enables or disables automatic updates check.
- Enable connection proxy for remote virtual machine – Enables or disables connection proxy.
- VM Window Resize – Let’s you choose the remote console’s display resolution. Options are:
- Resize the virtual machine and the window – The VM’s display resolution will automatically resize to fit the VMRC window.
- Stretch the virtual machine in the window – The VM’s display will stretch to fill the VMRC window without changing the resolution.
- Hardware acceleration – Enables or disables hardware acceleration. Enabling this setting can improve performance and reduce power consumption.
- Join the VMware Customer Experience Program – Join or opt-out of the CEIP. This option is the same that you see while you are installing VMRC.
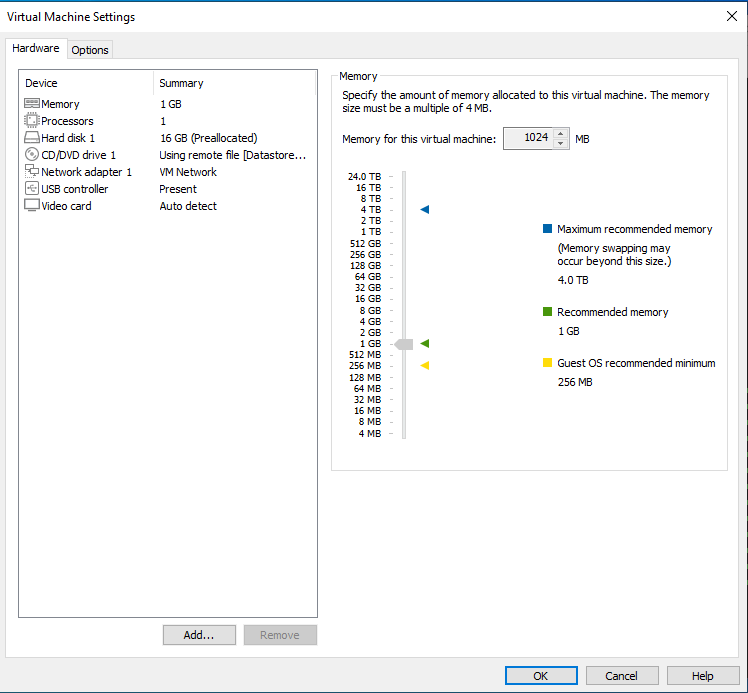
Managing Virtual Machine Settings in VMRC
Suppose you need to adjust a few settings for a virtual machine guest, but you don’t want to connect to ESXi or vSphere. Instead, you connect to a single virtual machine using VMRC and manage the VM settings from there.
To access the virtual machine settings in VMRC, click the VMRC dropdown menu —> Manage — Virtual Machine Settings. Or, while on the VMRC window, press CTRL+D. Either method opens the Virtual Machine Settings window.
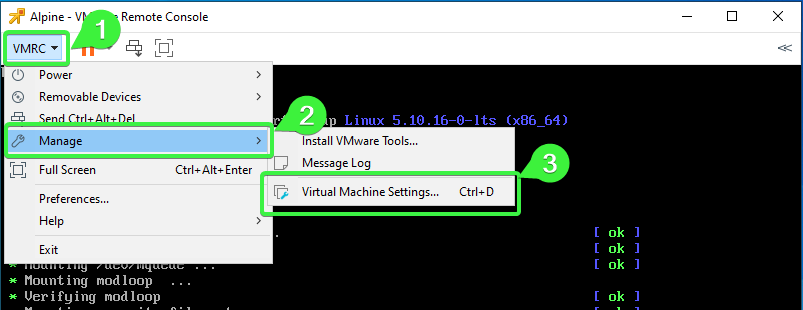
The Virtual Machine Settings window should be familiar if you’ve managed virtual machines in the web UI before. Here you can change the memory, processors, add additional hard disks, optical drives, network adapters, USB controllers, video cards, and more.
Conclusion
Have or need VMware ESXi hosts? Check out the VMware vSphere virtualization suite integrated with VMware vCenter for comprehensive management and advanced features. Need more localized VM capabilities? Check out VMware Workstation PRO & Player!
In this article, you learned about what VMware Remote Console (VMRC) is—a free tool for accessing and managing virtual machines in a standalone interface. You’ve learned how to download and install VMRC on both Linux and Windows machines using different methods.
Additionally, you’ve learned the different ways to use VMRC to connect to virtual machines on remote hosts. Now that you know how to install and connect to VMs with the VMRC, would you consider using VMRC in your daily management tasks?
How to install VMware Remote Console on Windows and Linux
VMware provides several ways to manage virtual machines and guest operating systems running on the VMs. In modern vSphere versions, you can use a web interface with VMware Web Console (starting from vSphere 5.1) or install a standalone VMware Remote Console application. This blog post explains what VMware Remote Console is and how to launch VMware Remote Console to configure VM options as well as manage guest operating systems in vSphere.
Table of Contents
- What Is VMware Console?
- VMware Web Console
- What Is VMware Remote Console
- VMRC features
- How to Download VMware Remote Console
- Installing VMRC on Linux
- How to Launch VMware Remote Console in Linux
- Installing VMRC in Windows
- Installing VMRC with Chocolatey
- How to Use VMware Remote Console in Windows
- VMRC Interface and Options
- Options in the VMRC menu
- The Manage menu
- The Preferences window
- Other VMRC Configuration Parameters
- How to Exit VMware Remote Console
- How to Uninstall VMware Remote Console
Before we start
VMware vSphere is a reliable virtualization platform with tools for conveniently managing virtual infrastructure. However, data loss and downtime remain a risk in virtualization environments. By using a data protection solution that is fast, reliable, and provides a convenient user interface, you can restore your VMs faster. Download the white paper about VMware disaster recovery to learn more about data protection methods.
What Is VMware Console?
Users of earlier vSphere versions such as vSphere 4.x and vSphere 5.x are familiar with the standalone VMware vSphere Client application (written on C#) that is used to manage ESXi hosts and VMs. The C# vSphere Client for Windows had an option to manage a guest operating system (OS) in the client window. Now, in vSphere 6.x and vSphere 7.0, users should use the HTML 5 vSphere Client and VMware Host Client, which provide a web interface for managing vSphere resources including guest operating systems on VMs. The default option is using VMware Web Console. Another option is installing VMware Remote Console on your computer.
Don’t confuse VMware console, which is a tool to manage guests in the GUI, with the command line (console) interfaces such as ESXCLI and Power CLI. VMware console displays the user interface of a guest OS similarly to how you see the interface of the host OS on a physical monitor connected to your computer. I will cover VMware Web Console in brief before going to the detailed explanation of VMware Remote Console.
VMware Web Console
The HTML5 versions of VMware vSphere Client and VMware Host Client allow you to open VMware Web Console in a web interface to manage a guest OS of a running VM without installing additional applications (see the screenshot below). In VMware Host Client, you can open Web Console as a window in the same tab or open Web Console in a new tab.

In VMware vSphere Client, VMware Web Console always opens in a new tab in the web browser. On the screenshot below, you can see the interface of the NAKIVO Backup & Replication virtual appliance (the Transporter appliance based on Linux) in the VMware Web Console opened from VMware vSphere Client in a new tab in the web browser. The NAKIVO Backup & Replication virtual appliance is a preconfigured VMware vSphere VM with selected installed components (you can select a virtual appliance with the needed components on the website when downloading the solution).

What Is VMware Remote Console
VMware Remote Console is a standalone application that you can install on computers running Linux, Windows, and macOS to manage VMware vSphere VMs and guest operating systems running on these VMs. VMware Remote Console (VMRC) is the alternative to VMware Web Console for guest management and provides better performance and stability. You can use VMware Workstation (or VMware Fusion Pro on macOS) as a replacement for VMware Remote Console, but the advantage of VMware Remote Console is that you don’t need to buy a license. VMware Remote Console is not pre-installed and must be installed manually.
VMRC features
VMRC provides remote access to a guest OS and VM devices and allows you to edit VM settings. You can add virtual processors, memory, virtual disks, virtual floppy drives, CD/DVD drives, insert ISO images into CD/DVD drives, manage virtual network adapters, etc. You can change existing settings and change a virtual machine’s name.
You can connect a removable USB device such as a USB flash drive or a USB HDD attached to your local machine to a remote VM running on an ESXi host by using VMware Remote Console. This functionality is available via the USB passthrough feature.
Other VMRC features include:
- VMware Remote Console supports proxy in a network configuration for connecting to an ESXi host and VMs.
- You can initiate installing VMware Tools from VMware Remote Console.
- VMRC can fit the screen resolution of a guest OS when you change the resolution of the VMware Remote Console Window.
- VMRC is a free application.
How to Download VMware Remote Console
You can download VMware Remote Console from the official VMware website by using this link:
https://customerconnect.vmware.com/en/downloads/details?downloadGroup=VMRC1201&productId=876
You need to log in with a VMware account to open VMRC download links.
Once logged in, locate the version for the needed platform and hit Download Now. Save the file to a custom location on your machine.

The VMware Remote Console installer for Windows is provided as a ZIP archive that contains the EXE file. VMRC for Linux is provided as a .bundle installation file. In my example, I download the installer files of VMRC version 12. This blog post is focused on installing and configuring VMRC on Linux and Windows; macOS users should visit the Apple Store to get the VMware Remote Console.
Installing VMRC on Linux
Let’s go over how to install VMware Remote Console on Ubuntu Linux. The VMRC application depends on the libaio1 package on Ubuntu. If the required package is missing, you can install libaio1 with the following command (you need root privileges):
sudo apt-get install libaio1
Go to the directory to which you saved the downloaded bundle file of the VMware Remote Console installer.
Edit the permissions to allow executing the bundle file. The operations explained in this tutorial require root privileges.
sudo chmod +x ./VMware-Remote-Console-12.0.0-17287072.x86_64.bundle
Note: VMRC is not available in Linux software repositories. For this reason, you need to install VMRC by using the downloaded installation bundle.
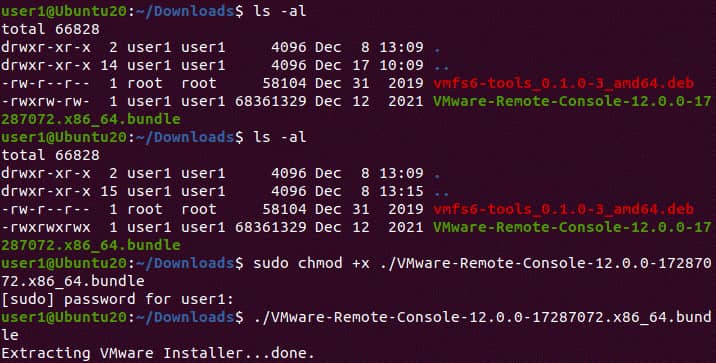
After setting the permissions run the VMRC installer:
sudo ./VMware-Remote-Console-12.0.0-17287072.x86_64.bundle
The graphical user interface of VMware Remote Console Installer opens in a new window. You should see a user-friendly installation wizard.
1. On the Welcome to the VMware Remote Console installer screen, select I accept the terms in the license agreement. Click Next on each screen to continue.

2. Determine whether you would like to check product updates on startup.
Hit Yes or No depending on your needs. I select No because I don’t want to install updates automatically.
3. Select whether you want to join the VMware Customer Experience Improvement Program (CEIP) and send statistics to VMware.
Click Yes or No depending on your needs. I select No in this walkthrough.
4. The product is ready to be installed. Click Install.
Wait until the installation process is finished.
5. If you see Installation was successful, you can close the window of the VMRC installer.
How to Launch VMware Remote Console in Linux
Even though you can find the VMware Remote Console item in the search panel after clicking the Start button in the Ubuntu GUI, you cannot launch VMware Remote Console directly. You need to click the link in VMware vSphere Client or VMware Host Client and open this link in VMware Remote Console.
Let’s go over how to launch VMRC in Linux to manage a VM running on an ESXi host. In this example, I use VMware Host Client to access the ESXi host.
1. Enter the IP address of an ESXi host in a web browser and log in to VMware Host Client.
2. In the Navigator pane, click Virtual Machines and select the needed VM.
Tip: Use dedicated ESXi backup software to perform regular backups of your VMs residing on ESXi hosts.

3. Click the Monitor icon to open the menu with the VMware Console options to manage this VM’s guest operating system. A menu with multiple VMware Console options appears.
- The first three options are used to open VMware Web Console in the web browser.
- The Launch remote console option is used to open the interface of a guest OS in the VMware Remote Console Application you have previously installed on your computer.
- Download VMRC. This option is used to get the VMRC download link and install VMware Remote Console.
4. Click Launch remote console.

Once you have clicked Launch remote console, the pop-up pane is displayed under the address bar in the web browser. You need to select an application to open the VMRC link.
5. Click Choose Application. You can select the checkbox to always allow your ESXi host to open VMRC links for this IP address.

6. Choose an application to open the VMRC link. If you have installed only VMware Remote Console on your computer, this application is selected by default. If you have VMware Workstation on your computer, VMware Workstation is selected by default. You can click Choose and select the needed application. You cannot install VMware Remote Console and VMware Workstation on the same Linux machine because they share certain components required for their operation.
7. After selecting VMware Remote Console, click Open Link.

8. A certificate warning is displayed. Click Connect Anyway to continue. Select the Always trust this host with this certificate checkbox to skip this message in the future when connecting to VMs on this ESXi host.

9. Now you are connected to the user interface of the guest OS of the selected VM running on the ESXi host.

You can connect to multiple VMs and launch multiple instances of VMware Remote Console.
Installing VMRC in Windows
In this example, I am going to install VMware Remote Console 12.0 0 for Windows. Installing VMware Remote Console for Windows is not difficult. Essentially, I unpack a ZIP archive downloaded before and extract the installer EXE file. In my case, the file name is VMware-VMRC-12.0.0-17287072.exe and I launch EXE file.

The VMware Remote Console setup wizard is started in a new window. Installing VMRC in Windows by using this wizard is straightforward.
1. The first step of the wizard is the welcome screen. There is nothing to configure on this screen. Click Next at each step to continue.

2. Read and accept the End-User License Agreement.
3. Select the installation destination and any additional features.
Click Change and select a directory to install the application if you don’t want to use the default installation path.

4. Select User Experience settings. You can deselect the checkboxes if you don’t want to enable automatic updates and send additional information to VMware:
- Check for product updates at startup
- Join the VMware Customer Experience Improvement Program
I select No for both these options.
5. Ready to install. Hit Install to begin the installation.
Wait until the wizard installs VMware Remote Console on your computer.
6. Once installation is completed, click Finish to close the installer window.
7. You must restart your operating system. Click Yes to restart now or click No if you want to manually restart later.

After system reboot you can launch VMware Remote Console.
Installing VMRC with Chocolatey
There is an alternative method for installing VMware Remote Console on new Windows versions like Windows 10, Windows Server 2016, and Windows Server 2019. You can use Chocolatey, which is a software management automation tool in Windows. Chocolatey is used in PowerShell to install applications from online software repositories for Windows. The advantage of this method of installing VMware Remote Console is that you don’t need to register on the VMware website to download the VMRC installer.
Install Chocolatey if this software manager for Windows is not installed on your machine. Download and run this PowerShell script to install Chocolatey:
https://community.chocolatey.org/install.ps1
If the script doesn’t run, set the execution policy by running this command:
Set-ExecutionPolicy Bypass -Scope Process -Force; [System.Net.ServicePointManager]::SecurityProtocol = [System.Net.ServicePointManager]::SecurityProtocol -bor 3072; iex ((New-Object System.Net.WebClient).DownloadString(‘https://community.chocolatey.org/install.ps1’))
Run the command to install VMware Remote Console 12.0 0 for Windows from software repositories with Chocolatey:
choco install vmrc —version=12.0.0.17287072
This command downloads and installs the needed software packages.
Press Y (yes) or A (Yes to all) when the confirmation to install a package is required to continue.

If you see a failure related to the VMRC package, try to run the command once again.
choco install vmrc —version=12.0.0.17287072

When the command execution is finished, the number of installed packages is displayed in PowerShell. If you see The install of vmrc was successful, you can close this PowerShell console window and use VMware Remote Console.
How to Use VMware Remote Console in Windows
Let’s go over how to use VMware Remote Console in Windows if you connect to vCenter in VMware vSphere Client for vSphere management.
1. Open the IP address of your vCenter Server in a web browser, open VMware vSphere Client, and log in. Go to Host and Clusters and select the needed virtual machine in the inventory.
2. When the VM is selected, you can see the preview screen of the guest OS user interface. Under this preview screen, you should see two links. Click Launch Remote Console for connecting to the VM in VMware Remote Console installed in your Windows system.
Note: If you haven’t installed VMRC yet, you can click a link to the download page of the VMware website or use Web Console in a web browser. If you have not configured VMware backup yet, it is recommended that you back up VMs managed by vCenter.

3. The Allow this site to open the vmrc link? dialog pane appears under the address bar in your web browser. Click Choose Application.

4. If the path to VMware Remote Console is displayed, then VMRC is selected. If VMRC is not selected, click Choose other Application and select the VMRC EXE file manually.
5. Click Open Link.

VMRC should open and connect to the VM now.
You can set VMware Remote Console to be used by default in VMware vSphere Client. Click your account name in the top right corner of the web interface and hit My Preferences.

Click the Default Console tab and select VMware Remote Console (VMRC). Click Save to save settings and close this dialog.

VMRC Interface and Options
After you launch VMware Remote Console by using the VMRC link, a new VMRC window opens, and you should see the guest OS user interface in this window.
In the top left corner, you can see the VMRC menu, the shortcut menu to change the VM state (Power On, Shut Down Guest, Suspend Guest, and Restart Guest), the button to send the Ctrl+Alt+Del combination to the guest OS, and the button to enable the full-screen mode. These additional menus and buttons duplicate some options of the VMRC menu.
In the top right corner of the VMRC window, you can expand a panel and see icons of virtual devices such as virtual hard disks, CD/DVD-ROM drives, and network adapters. Right-click the device icon to open device settings in the VM settings window.
You can change the VMRC window size, and the size of the guest OS GUI can adjust to the changed VMRC window size (VMware Tools must be installed in the guest OS).

Options in the VMRC menu
Removable devices. You can use this submenu for fast connect/disconnect of virtual devices including virtual CD/DVD drives, network adapters, and USB devices attached to your local machine on which VMware Remote Console is installed. In order to connect a removable device, go to VMRC > Removable Devices > Device_Name > Connect. In order to disconnect the device, go to the same menu and click Disconnect.
Send Ctrl+Alt+Del. If you press Ctrl+Alt+Del on your local machine, your host operating system on the local machine reacts to this combination. This menu entry allows you to send the Ctrl+Alt+Del combination directly to the guest OS without any impact on the host OS. As an alternative to this menu entry, you can press the Ctrl+Alt+Insert combination.
Manage. See a detailed description of this entry below.
Full Screen. Opens VMware Remote Console in the full-screen mode.
Preferences. Opens the Preferences window, which is covered below.
Help. Displays the help information.
Exit. Can be used to close the VMRC window and provides the same result as if you have clicked the x button in the top right corner of the window.

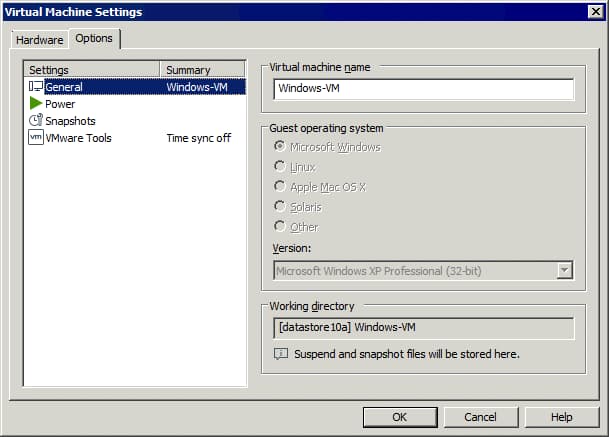
The Manage menu

The Virtual machine settings window of VMRC is similar to the VM settings window of VMware Workstation. The window contains two tabs: Hardware and Settings.

If you upgrade the guest OS, you can change the guest operating system in the Options tab to optimize VM performance. A VM must be powered off to change the guest OS in VM settings. Once you change the guest operating system in VM settings, the changes are written to the VM’s VMX file.
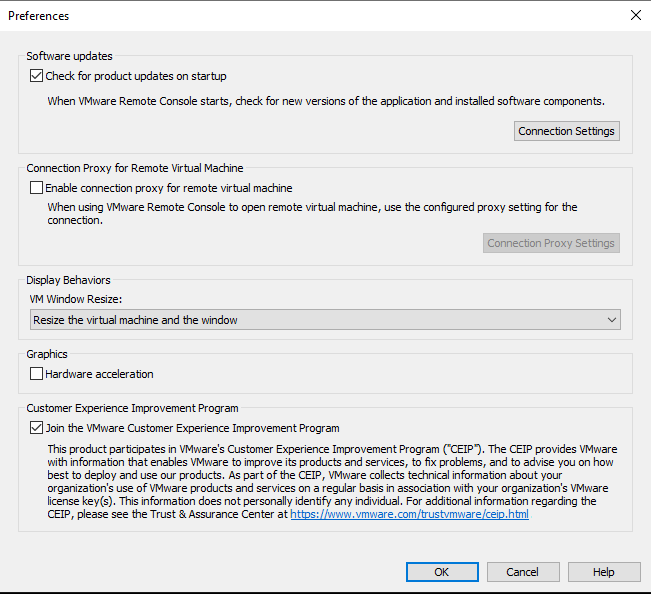
The Preferences window
The Preferences option in the VMRC menu opens the Preferences window that contains the main settings of the VMware Remote Console. You can also open the Preferences window by going to vmrc://settings in your web browser on the local machine where VMRC is installed.
Software Updates. You can change automatic update settings and configure connection settings by selecting a proxy server for an internet connection.
Display behaviors. There are two options of how the guest OS interface reacts to changing the VMRC window size:
- Resize the virtual machine and the window. The resolution of the VM display is resized to fit the window.
- Stretch the virtual machine in the window. The VM display resolution is not changed and the VM display is stretched to fit the window.
Connection Proxy for Remote Virtual Machine. You can enter the settings of the proxy server if the proxy server is required in your network.
Graphics. Hardware acceleration can improve performance but is disabled by default to avoid issues if an unstable graphic card is used.
Customer Experience Improvement Program. If you need to change CEIP settings during VMRC installation, you can do it here by selecting/deselecting the checkbox.

Other VMRC Configuration Parameters
Log file location. VMRC logs in Windows are located in the %LOCALAPPDATA%tempvmware-%USERNAME% folder.
VMRC logs in Linux are stored in %TEMP%/vmware-%USERNAME%/
The USB Arbitrator log is stored in /tmp/vmware-root/
Using VMware Workstation and VMRC in Windows. If you install VMware Workstation on your host Windows OS after installing VMware Remote Console, VMware Workstation can be set as the default application to open VMRC links when opening them from a web browser. If you need to use VMware Remote Console by default, check the registry values. You can do this operation in PowerShell:
Get-Item «HKLM:SOFTWAREClassesvmrcDefaultIcon»
Get-Item «HKLM:SOFTWAREClassesvmrcshellopencommand»
In order to change settings and use VMRC by default, write these values to the registry:
Set-Item HKLM:SOFTWAREClassesvmrcDefaultIcon -Value ‘»C:Program Files (x86)VMwareVMware Remote Consolevmrc.exe»,0’
Set-Item HKLM:SOFTWAREClassesvmrcshellopencommand -Value ‘»C:Program Files (x86)VMwareVMware Remote Consolevmrc.exe» «%1″‘
How to Exit VMware Remote Console
Press Ctrl+Alt to leave the guest screen of the console window. Pressing Ctrl+Alt transfers mouse and keyboard input from the VM to the local machine. This combination is extremely useful if VMware Tools is not installed on the guest OS during the boot process of the guest OS (when VMware Tools have not been loaded yet) and if the guest OS doesn’t have a graphical user interface. If you close the VMRC window, the VM is not shut down.
How to Uninstall VMware Remote Console
Finally, let’s explore how to uninstall VMRC from Linux and Windows.
Uninstalling VMRC in Linux
If you need to uninstall VMware Remote Console (for example, you want to install VMware Workstation), you can do this in the Linux terminal. Display the list of all VMware applications installed on the Linux machine:
vmware-installer -l
The command to uninstall VMRC is:
vmware-installer —uninstall-product vmware-vmrc
If you have issues when trying to uninstall VMRC, you can perform the following actions. Open the /etc/vmware-installer/database file in DB Explorer for SQLite. Locate the component_dependencies table. Delete the row that contains vmware-usbarbitrator>=17.1.1.
Uninstalling VMRC in Windows
Go to Control Panel > Programs and features, select VMware Remote Console in the list of installed applications and click Uninstall.
If you used Chocolatey to install VMRC, use this command to uninstall this application:
choco uninstall vmrc
Conclusion
VMware Remote Console is a useful application to manage virtual machines and guest operating systems in VMware vSphere. This blog post has explained how to install VMware Remote Console 12.0 0 for Windows and Linux and how to use VMware Remote Console as well as covered VMRC configuration. VMware VMRC is a free lightweight multi-platform tool that is not difficult to use. Download VMware VCP Study Guide to learn more about VMware vSphere features.